1
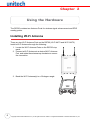
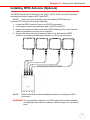
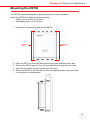
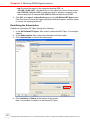
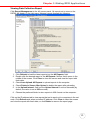
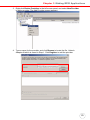
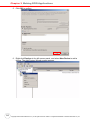
RS700 Smart RFID Fixed Reader
User’s Manual
400682G Version 2.0
Preface
About This Manual
This manual explains how to install, operate and maintain the RS700 Smart RFID
Fixed Reader.
No part of this publication may be reproduced or used in any form, or by any electrical
or mechanical means, without permission in writing from the manufacturer, which
includes but is not limited to photocopying, recording, or information storage and
retrieval systems. The material in this manual is subject to change without notice.
© Copyright 2009 Unitech Electronics Co., Ltd. All rights reserved.
Unitech America Web site: http:\\www.unitech-adc.com
Unitech is a member of the Windows Embedded Partner
Program.
Unitech is a member of the Oracle Embedded Software
Licensing Program.
Unitech RFID readers support Microsoft BizTalk
Server for data collection.
All product and company names are trademarks, service marks or registered trademarks of their respective owners.
i
Regulatory Compliance Statements
Federal Communication Commission Interference Statement
This equipment has been tested and found to comply with the limits for a Class B digital device, pursuant to Part 15 of the FCC Rules. These limits are designed to provide
reasonable protection against harmful interference in a residential installation. This
equipment generates, uses and can radiate radio frequency energy and, if not
installed and used in accordance with the instructions, may cause harmful interference to radio communications. However, there is no guarantee that interference will
not occur in a particular installation. If this equipment does cause harmful interference
to radio or television reception, which can be determined by turning the equipment off
and on, the user is encouraged to try to correct the interference by one of the following
measures:
•
•
•
•
Relocate the receiving antenna.
Increase the separation between the equipment and receiver.
Connect the equipment into an outlet on a circuit that is different from the connected receiver.
Consult the dealer or an experienced radio/television technician for help.
FCC Caution:
Any changes or modifications not expressly approved by the party responsible for
compliance could void the user’s authority to operate this equipment.
This device complies with Part 15 of the FCC Rules. Operation is subject to the following two conditions: (1) This device may not cause harmful interference, and (2) this
device must accept any interference received, including interference that may cause
undesired operation.
This device and its antenna(s) must not be cohabited or operate in conjunction with
any other antenna(s) or transmitter(s).
FCC Radiation Exposure Statement
This equipment complies with FCC radiation exposure limits set forth for an uncontrolled environment. End users must follow the specific operating instructions for satisfying RF exposure compliance. Please follow the operation instructions in this manual
to main compliant with FCC RF exposure compliance requirements. This fixed RFID
Terminal meets FCC RF exposure guidelines when used in fixed RFID operation.
RoHS Statement
This device conforms to RoHS (Reduction Of Hazardous Substances) European Union regulations that set maximum concentration limits on hazardous materials used in electrical and
electronic equipment.
ii
About This Manual
Battery Notices
The RS700 is equipped with a Lithium-Ion battery pack. However, the RS700 may not
start without an external power source due to battery discharge after extended storage periods. To charge the battery to full capacity, connect the RS700 with the AC
Adapter and charge the RS700 for at least 20 hours. To prevent data loss, do not
leave the battery uncharged for an extended period.
NOTE:
Press the RS700 Backup Battery Switch before initially using the device.
NOTE:
Rechargeable batteries are advised to replace every year or when 500
charge/discharge cycles achieved to guarantee optimal performance. It
is normal that the battery balloons or expands beyond one year or the
maximum of 500 cycles. Although it does not cause harm, it can not be
used again and must be disposed of according to the location's safe battery disposal procedures.
If the performance decrease of greater than 20% in a Lithium-Ion battery, the battery is at the end of its life cycle. Do not continue to use, and
ensure the battery is disposed of properly.
The length of time that a battery power lasts depends on the battery type and how the
device is used. Conserve the battery life through the following:
•
•
•
Avoid frequent full discharges because this places additional strain on the battery. Several partial discharges with frequent recharges are better than a deep
one. Recharging a partially charged lithium-Ion battery does not cause harm
because there is no memory.
Keep the lithium-Ion battery cool. Avoid a hot room. For prolonged storage,
keep the battery at a 40% charge level.
Do not leave the lithium-Ion battery discharged and unused for an extended
period because the battery will wear out and the longevity of the battery will be
at least shorter than half of the one with frequent recharges.
Battery Charge Notice
It is important to consider the environmental temperature whenever the Lithium-Ion
battery pack is charged. Charging is most efficient at room temperature or in a slightly
cooler environment. It is essential that batteries are charged within the temperature
range of 0°C to 50°C (23°F to 122°F). Charging batteries outside of this specified temperature range could damage the batteries and shorten their charging life cycle.
CAUTION! Do not charge batteries at a temperature lower than 0°C, which will
increase the internal resistance to cause heat and make the batteries
unstable and unsafe. Please use a battery temperature detecting
device for a charger to ensure a safe charging temperature range.
Storage and Safety Notice
Although charged Lithium-Ion batteries may be left unused for several months, their
capacity may be depleted due to build up of internal resistance. If this happens they
will require recharging prior to use. Lithium-Ion batteries may be stored at temperatures between -20°C to 60°C, however they may deplete more rapidly at the higher
temperature ranges. It is recommended to store batteries within normal room temperature ranges.
iii
Warranty
Unitech limited Warranty covers the following items:
• RS700 Smart RFID Fixed Reader - 1-year limited warranty.
• Please contact a regional Unitech office for further information regarding
Unitech’s extended warranty package.
iv
Table of Contents
Preface
About This Manual
i
Regulatory Compliance Statements ............................................................................. ii
Federal Communication Commission Interference Statement ................................................
FCC Caution: ...........................................................................................................................
FCC Radiation Exposure Statement........................................................................................
RoHS Statement......................................................................................................................
ii
ii
ii
ii
Battery Notices ..................................................................................................................... iii
Battery Charge Notice ............................................................................................................ iii
Storage and Safety Notice...................................................................................................... iii
Warranty .................................................................................................................................. iv
Chapter 1
Getting Started
1
Introducing the RS700 .......................................................................................................
Features ...................................................................................................................................
Package Contents ...............................................................................................................
A Tour of the RS700............................................................................................................
1
1
2
3
Front Panel ............................................................................................................................. 3
Top Panel ............................................................................................................................... 4
Bottom Panel .......................................................................................................................... 4
Connect Power ..................................................................................................................... 5
Chapter 2
Using the Hardware
6
Installing Wi-Fi Antenna.................................................................................................... 6
Installing RFID Antenna (Optional)............................................................................... 7
Using the GPIO Interface .................................................................................................. 8
GPIO Pin Assignment............................................................................................................. 8
Mounting the RS700 ........................................................................................................... 9
Performing a Hardware Reset ...................................................................................... 10
Chapter 3
Making RFID Applications
11
Using Smart-Reader Server ........................................................................................... 11
Opening Smart-Reader Server ............................................................................................. 11
Controlling Smart-Reader Server Remotely ........................................................... 12
Installing Microsoft .NET Framework....................................................................................
Installing the SRSRC Program .............................................................................................
Using the Smart-Reader Server Remote Control .................................................................
Configuring Antenna Port .....................................................................................................
12
12
13
14
v
Defining Smart Reader Behavior ..........................................................................................
Creating a New EC Spec.................................................................................................
Specifying Report Criteria................................................................................................
Setting up Filter Rules .....................................................................................................
Defining the EC Spec ...........................................................................................................
Subscribing the EC Spec......................................................................................................
Redefining the Subscription..................................................................................................
Viewing Data Collection Report ............................................................................................
Viewing Server Log...............................................................................................................
15
16
17
18
18
19
20
21
22
Using the Application Programming Interface ...................................................... 22
Connecting to BizTalk Server ....................................................................................... 22
Connecting to Oracle Sensor Edge Server ............................................................. 30
Chapter 4
Advanced Settings
35
Connecting to a LAN Network ...................................................................................... 35
Obtaining an IP Address....................................................................................................... 35
Setting the System Time....................................................................................................... 36
Setting up Ethernet connection............................................................................................. 37
Connecting to a WLAN Network .................................................................................. 38
Managing your Wireless Profiles .......................................................................................... 41
Establishing Terminal-PC Connection...................................................................... 44
Installing Microsoft ActiveSync .............................................................................................
Additional Capabilities ..........................................................................................................
Connecting the terminal to Your Computer ..........................................................................
Using Microsoft ActiveSync to Exchange Files.....................................................................
44
44
45
46
Using Remote Control ..................................................................................................... 47
vi
Chapter 5
Troubleshooting
48
Appendix A
System Specification
49
Appendix B
Support
50
Chapter 1
Getting Star ted
Introducing the RS700
Thanks for purchasing the RS700 Smart RFID Fixed Reader. The RS700 is designed
for inventory visibility in the warehouse.
The RS700 is a compact, Windows CE 5.0 based stationary data collection terminal
with built-in Unitech RFID middleware that provides a Windows-based environment
for remote reader control and data filtering functions.
Features
Powerful System
• Microsoft Windows CE 5.0 Operating System.
• 520Mhz Intel PXA270 CE CPU.
System Memory
• 64 MB SDRAM.
• 64 MB Flash ROM.
Power Supply
• External Power: 12V DC, 3A.
• 3800mAh Rechargeable LithiumIon Battery.
• Power-over-Ethernet.
RFID UHF Reader
• EPCglobal Class1 Gen2 Compliant.
• UHF Frequency: 860 - 960Mhz.
• Built-in RFID Middleware.
• Four Antenna Ports (TNC Connector) and Eight Channels.
• Supports Dense Reader Mode
(DRM).
Communication
• USB 1.1 Client.
• Serial RS232.
• Ethernet 10/100Base-T.
• IEEE 802.11b/g Wireless LAN,
CCX Compatible.
• Relay Outputs (2): Control for
Siren and Stacked Lamp.
Mounting System
• IP65 Environmental Sealing.
• Operation Temperature: -20ºC 50ºC (-4ºF - 122ºF).
• Storage Temperature: -30ºC - 70ºC
(-22ºF - 158ºF).
• Uses Din Rail for Wall Mount
Installation.
1
Chapter 1 Getting Started
Package Contents
Please make sure the following contents are in the RS700 box. If anything appears
missing or damaged, please contact a Unitech representative.
Main Unit.
AC Adapter.
Power Cord.
Ethernet Cable.
Power/RS232 Cable.
USB Cable.
GPIO Cable.
Two AS103-M-3
Wi-Fi Antennas.
Unitech CD-ROM
(User Manual,
Unitech
Software
Development
Kit
(Optional).
GPX026XTPR8-763
RFID Antenna
(Optional).
CFD200-NL
Antenna Cable
(Optional).
Quick Reference Guide).
2
Copyright 2009 Unitech Electronics Co., Ltd. All rights reserved. Unitech is a registered trademark of Unitech Electronics Co., Ltd.
Chapter 1 Getting Started
A Tour of the RS700
The following sections describe the main components of the RS700:
Front Panel
1
No.
1.
Component
Status Indicators.
Description
Indicates the RS700’s terminal operation status (left to right):
DATA - Red LED status indicator for data collection.
RFID - Yellow LED status indicator for the SmartReader Server during normal operation.
PWR - Green LED status indicator for receiving
external power. (Also dim green LED for receiving
Backup Battery power.)
3
Chapter 1 Getting Started
Top Panel
2
2
3
No.
2.
Component
Wi-Fi Antenna Ports.
Description
3.
RFID Antenna Ports.
ANT1, ANT2, ANT3 and ANT4 (left to right)
connects the RS700 to RFID Antennas for
reading data stored on RFID tags.
Wi-Fi ANT1, Wi-Fi ANT2 (left to right),
connects the RS700 to Wi-Fi Antennas for
wireless signal enhancement.
Bottom Panel
5
4
No.
4.
5.
Component
Backup Battery Switch.
GPIO Port.
6.
USB Port.
7.
Ethernet Port.
8.
DC Input Power Port
RS232 Port.
9.
Reset Button.
8
6
7
9
Description
Press this switch to engage the Backup Battery.
Use the GPIO Cable to connect the RS700 to
external controls such as LED indicator lamp, LCD
or motion sensor.
Use the USB Cable to connect the RS700 to a
host computer and perform Microsoft ActiveSync.
Use the Ethernet Cable to connect the RS700 to a
wired Ethernet network.
Use the Power/RS232 Cable to connect the
RS700 to an external power supply or to a
computer to perform configuration updates.
Use a stylus to press the button and reset the
RS700.
CAUTION! Pressing the Reset Button erases current configuration settings and
reboots the RS700.
4
Copyright 2009 Unitech Electronics Co., Ltd. All rights reserved. Unitech is a registered trademark of Unitech Electronics Co., Ltd.
Chapter 1 Getting Started
Connect Power
An internal backup battery helps prevent data loss when the RS700 disconnects from
an external power source. The backup battery stores all data and system settings for
up to seven days. Connect power to the RS700 through the following:
NOTE:
To adequately charge the backup battery, connect the RS700 to an
external power source and press the Backup Battery Switch. Charge the
RS700 for at least 20 hours. The backup battery begins charging as
soon as the RS700 connects to a power source.
1. Connect the Power/RS232 Cable to the PWR + RS232 Port, and rotate the
cable cap clockwise to secure the connection.
2. Insert the AC Adapter into the power jack of the Power/RS232 Cable.
3. Insert the Power Cord into the AC Adapter.
4. Plug the other end of the Power Cord into an electrical outlet.
DATA
RFID
Z
PWR
Y
PWR+RS232
GP I/0
BACKUP
SW
[
RESET
X
NOTE:
The PWR LED on the RS700’s front panel lights up green when the
RS700 connects to a power source.
Once the RS700 connects to an external power source the device is ready for initial
setup to make connections and read RFID tags.
5
Chapter 2
Using the Hardware
The RS700 contains two Antenna Ports for wireless signal enhancement and RFID
reading points.
Installing Wi-Fi Antenna
There are two Wi-Fi Antenna Ports on the RS700 (Wi-Fi ANT1 and Wi-Fi ANT2).
Install a Wi-Fi Antenna through the following:
1. Locate the Wi-Fi Antenna Ports on the RS700’s top
panel.
2. Connect a Wi-Fi Antenna to a desired Wi-Fi Antenna
Port, and rotate the antenna cap clockwise to secure
the connection.
3. Bend the Wi-Fi Antenna(s) to a 90-degree angle.
DATA
GP I/0
BACKUP
SW
6
RFID
PWR
PWR+RS232
RESET
Copyright 2009 Unitech Electronics Co., Ltd. All rights reserved. Unitech is a registered trademark of Unitech Electronics Co., Ltd.
Chapter 2 Using the Hardware
Installing RFID Antenna (Optional)
The RS700 has four RFID Antenna Ports (ANT1, ANT2, ANT3, and ANT4) and two
removable protection caps on ANT2 and ANT3.
NOTE:
Only remove the protective caps for installing RFID Antennas.
Install an RFID Antenna through the following:
1. Locate the RFID Antenna Ports on the RS700’s top panel.
2. If necessary, remove the protection caps on ANT2 and ANT3.
3. Connect the Antenna Cable to the desired RFID Antenna Port, and rotate the
cable cap clockwise to secure the connection.
4. Connect the other end of the Antenna Cable to the wall mounted RFID
Antenna, and rotate the cable cap clockwise to secure the connection.
NOTE:
Refer to the RFID Antenna Installation guide for mounting the RFID
Antenna(s).
WARNING! To avoid radiation exposure, the RFID Antennas should be installed
and operated with minimum distance 1000mm away from the human
body.
7
Chapter 2 Using the Hardware
Using the GPIO Interface
Use the GPIO Cable to connect the RS700 to several external controls such as an
LED indicator lamp, LCD or motion sensor.
GPIO Pin Assignment
Connect two relay output and digital input signals with the 10-pin GPIO cable. Connect external devices through the following:
Pin1 . . . . . . . . . 10
Pin
Name
10.
DI1-1.
9.
DI1-2.
8.
DI2-1.
7.
DI2-2.
Description
DIX: Digital Input (X=1; 2).
DIX-1
DIX-2
DIX-1: Input Voltage (3.3V - 12V).
DIX-2: Ground.
8
6.
RL1C.
5.
RL1NC.
4.
RL1NO.
3.
RL2C.
2.
RL2NC.
1.
RL2NO.
RLX: Relay (X=1; 2).
RLXC
RLXNC
RLXNO
C: Common.
NC: Normal Close.
NO: Normal Open.
Copyright 2009 Unitech Electronics Co., Ltd. All rights reserved. Unitech is a registered trademark of Unitech Electronics Co., Ltd.
Chapter 2 Using the Hardware
Mounting the RS700
The RS700 comes standard with a wall mounting kit for easy installation.
Mount the RS700 to a wall through the following:
•
•
Plastic conical anchor (4) 3x25mm.
Self-tapping screw (4) 3.5x19mm.
1. Locate the four mounting holes on the RS700.
Mounting
Holes
2.
3.
4.
5.
Mounting
Holes
Place the RS700 on the wall. Mark the mounting hole locations with a pen.
Remove the RS700 and drill four 1/4-inch wide holes at least one inch deep.
Insert the four plastic conical anchors into the holes.
Secure the RS700 to the wall with the four self-tapping screws, and insert them
into the plastic conical anchors.
9
Chapter 2 Using the Hardware
Performing a Hardware Reset
Perform a reset if the RS700 freezes (i.e., no longer responds).
Resetting the RS700 erases all installed records, entries and programs; returning the
RS700 to default status. (Not even the date and time settings remain.) All settings
return to default mode. However, data stored in the flash storage or in an SD Card Slot
will remain intact. Use the remote control to access the SD folder on the RS700. See
Using Remote Control on page 47.
NOTE:
During the next Microsoft ActiveSync operation, lost data can be
restored that was previously synchronized on the computer, or data can
be restored from a storage card.
Reset the RS700 through one of the following:
1. Use a stylus to press the reset button on the RS700’s bottom panel.
2. Reconnect the power supply, and reset the Backup Battery Switch to the on
position.
CAUTION! Pressing the Reset Button erases current configuration settings and
reboots the RS700. The RS700 returns to default mode. All registry
settings and all files (including hidden files) are returned to their original factory defaults.
10
Copyright 2009 Unitech Electronics Co., Ltd. All rights reserved. Unitech is a registered trademark of Unitech Electronics Co., Ltd.
Chapter 3
Making RFID Applications
The Unitech RS700 Smart RFID Fixed Reader can do more than just read, store or
forward data. The built-in Unitech RFID middleware helps filter data, execute commands and perform rich functions at the front end.
The Smart-Reader Server is designed to control and collect data from RFID tags
through a wired or Wi-Fi network. Enhancing the data precision is possible by creating
accurate reports, reducing server load and even customizing RFID applications on the
RS700.
Using Smart-Reader Server
Opening Smart-Reader Server
The RS700 automatically starts once it connects to an external power source. Follow
the instructions below to check which programs are currently active (If necessary, activate the Smart-Reader Server on the RS700).
1. Install the remote control program. See Using Remote Control on page 47.
2. On the remote control window, double click My Device → Windows → SRS →
SmartReader Server. The SRS window appears with an assigned IP address.
11
Chapter 3 Making RFID Applications
NOTE:
The yellow RFID LED on the RS700’s front panel indicates the SmartReader Server status. On means SRS is running. On and flashing
means TCP server in SRS is running and waiting for request from
SRSRC. On and fast flashing means TCP server is processing requests
from SRSRC. Off means SRS is not running. On and not flashing means
TCP server in SRS is not running so SRSRC cannot connect to it.
Controlling Smart-Reader Server Remotely
It is necessary to install the Smart-Reader Server Remote Control (SRSRC) Program,
to control the built-in RS700 Smart-Reader Server remotely. Please contact a Unitech
representative to acquire the program.
SRSRC
Remote Control
SRS
Computer
RS700
Installing Microsoft .NET Framework
To execute the SRSRC, Microsoft .NET Framework 3.5 must be installed on the computer. Download the software from the Microsoft Download Center at:
http://www.microsoft.com/downloads/details.aspx?FamilyID=333325fd-ae52-4e35b531-508d977d32a6&DisplayLang=en.
NOTE:
Uninstall any previous versions of Microsoft .NET Framework before
installing Microsoft .NET Framework 3.5.
Installing the SRSRC Program
Install the SRSRC program and acquire an IP address for the RS700 through the following:
1. Connect the computer to a DHCP enabled network.
2. Connect the Ethernet Cable to the Ethernet Port on the RS700’s bottom panel,
and rotate the cable cap clockwise to secure the connection.
3. Connect the RS700 to the same network via DHCP. The DHCP server will
assign an IP address to the RS700.
4. Install SRSRC.msi on the computer.
5. Follow the onscreen instructions to complete the SRSRC installation.
6. Click Start → Programs → Smart-Reader Server Remote Control → Reader
Discovery.
12
Copyright 2009 Unitech Electronics Co., Ltd. All rights reserved. Unitech is a registered trademark of Unitech Electronics Co., Ltd.
Chapter 3 Making RFID Applications
7. Click Discovery to lookup the DHCP client in the same subnet.
8. Refer to the MAC address label attached on the RS700’s bottom panel, and discover the RS700’s IP address from the list box.
Using the Smart-Reader Server Remote Control
Start using the SRSRC through the following:
1. Click Start → Programs → Smart-Reader Server Remote Control → SmartReader Server Remote Control.
2. Enter the assigned IP address in the Server Address field. To login, enter the
default user name and password as unitech. Click OK.
13
Chapter 3 Making RFID Applications
NOTE:
Do not change the default port number from 11126, and ensure that the
port is not occupied by any other service.
3. The SRS Remote Control window appears. The SRSRC menu resides in the
left pane, while the reader status is in the right pane.
At the bottom right corner of the screen, the login info displays the user name
and the login time duration. Click Stop to end the connection between the
RS700 and the R1000 Reader.
NOTE:
A dialog box appears informing User account expired! (when the
screen is idle for three minutes). Login (again) and continue with the settings.
Configuring Antenna Port
To enable or disable antennas connected to antenna ports, click Device Status in the
left screen panel. Configure the Antenna Port settings through the following:
1. In the Antennas: field, check the antenna port number to enable the antenna.
Antenna port number (1 is checked by default). If more than one antenna is
enabled, the antennas switch in numerical order (i.e., 1 → 2 → 3 → 4 → 1).
2. In the Antenna Switch Time (ms): field, input the Antenna Switch Time for
each reading period (300ms by default).
14
Copyright 2009 Unitech Electronics Co., Ltd. All rights reserved. Unitech is a registered trademark of Unitech Electronics Co., Ltd.
Chapter 3 Making RFID Applications
3. In the Inventory Times: field, input the Inventory Times for reading times within
the reading period (0ms by default). A setting of 0 or 8192ms is recommended,
but it depends on the local environment.
NOTE:
The Antenna Switch Time and the Inventory Times cannot both be
simultaneously set at 0.
4. Click Apply to save the settings.
Antenna ports switch when the Antenna Switch Time or Inventory Times run out. If
installed properly, the Tags screen will display any data collected from the antennas.
Click Clear at the bottom of the screen to view the fresh data. See Installing RFID
Antenna (Optional) on page 7.
NOTE:
The red DATA LED on the RS700’s front panel indicates data collection
status. While off is normal, flashing means received tag data from the
RFID reader.
Defining Smart Reader Behavior
In the left pane, click Event Management. In the right panel, define the event cycle
specifications, specify the report criteria and the setup filter rules.
15
Chapter 3 Making RFID Applications
Creating a New EC Spec
In the All Defined EC Specs field, *specTest1 is defined and subscribed as the
default. Create a new event cycle specification through the following:
1. Click New EC Spec. An InputBox screen appears.
2. Input a unique EC Spec name or accept the default at spec1. Click OK, and
spec1 appears in the All Defined EC Specs field.
3. In the All Defined EC Specs: field, check Repeat, Period: for the automatic
reading mode, and set the following values in milliseconds.
– Repeat, Period: field - Cycle time (5000ms by default).
– Duration: field - Duration for reading data within the cycle time (4500ms by
default).
16
Copyright 2009 Unitech Electronics Co., Ltd. All rights reserved. Unitech is a registered trademark of Unitech Electronics Co., Ltd.
Chapter 3 Making RFID Applications
– Stable Set Interval: field - Interval time between cycles (0ms by default).
4. Check Trigger, Start: to activate the trigger manually. Specify the trigger start/
stop name for the event cycle. Add // before the name string. For example,
input the following in each field:
– Start: //spec1_start_trigger.
– Stop: //spec1_stop_trigger.
5. Check Include Spec In Reports to include the EC-Spec info in the report.
Specifying Report Criteria
In the Report Specs field, set report1 as the default. Modify or create reports through
the following:
1. Click New Spec and Yes to create a new report. The report2 appears in the
Report Specs field.
Click Delete to delete a selected report.
2. In the Set: drop down menu, select the occasion for the report:
– CURRENT: Produces report when tag reading occurs.
– ADDITIONS: Produces report when tag seen in this cycle, but not in the previous cycle.
– DELETIONS: Produces report when tags not seen in this cycle, but seen in
the previous cycle.
17
Chapter 3 Making RFID Applications
3. Definitions of the options in the Output Includes field:
– EPC: Displays EPC encoding method.
– Tag: Displays tag ID.
– Raw Hex: Displays hexadecimal data.
– Raw Dec: Displays decimal data.
– Count: Displays tag count.
Setting up Filter Rules
Use a filter to sort data in the Report Specs field. Setup the filter rules through the following:
1. To add a filter, select a desired report from the Report Specs drop down menu.
For example, report1.
2. To add a new inclusive pattern, click + next to the Include Patterns field. An
InputBox screen appears with some predefined patterns for reference.
To create a GID-96 encoding, input any of the following:
– urn:epc:pat:gid-96:20.100.5000 to match the EPC for Unitech serial number
5000.
– urn:epc:pat:gid-96:20.100.* to match any ABC’s EPC (regardless of serial
number).
– urn:epc:pat:gid-96:20.*.[5000-9999] to match any XYZ Corporation product
whose serial number is between 5000 and 9999 (inclusive).
– urn:epc:pat:gid-96:*.*.* to match any GID-96 tag.
3. Click OK to confirm.
To modify an inclusive pattern, select the pattern and click -.
To delete an inclusive pattern, select the pattern and click x.
4. Follow similar steps to exclude or group patterns.
Defining the EC Spec
After defining the event cycle and its report specifications, save this EC Spec through
the following:
1. Select a desired EC Spec, for example, spec1.
2. Click Define. The #spec1, defined appears in the All Defined EC Specs field.
18
Copyright 2009 Unitech Electronics Co., Ltd. All rights reserved. Unitech is a registered trademark of Unitech Electronics Co., Ltd.
Chapter 3 Making RFID Applications
Subscribing the EC Spec
In order to implement the event cycle, make a subscription to the EC Spec through the
following:
1. Select a defined EC Spec in the All Defined EC Specs: field. For example,
#spec1.
2. Click Subscribe. An InputBox screen appears with some predefined formats
for reference.
3. In the Subscribe Notification: field, input any of the following:
– file:// to store data in the folder located in the path My Device/srs/reports on
the RS700.
19
Chapter 3 Making RFID Applications
– tcp:// to send the report to the computer hosting SRS, i.e.,
192.168.110.80:11127, the tab shown on the upper left corner of the screen.
– tcp://192.168.110.114:11126 to send the report to another computer in the
same subnet with IP address 192.168.110.114 and default port 11127.
4. Click OK, and *spec1, subscribed appears in the All Defined EC Specs field.
Click the ! button next to the trigger start/stop fields that appear, and this allows
to control the reading behaviors.
Redefining the Subscription
Redefine a subscribed EC Spec through the following:
1. In the All Defined EC Specs: field, select a subscribed EC Spec. For example,
*spec1.
2. In the Subscription: field, select the subscribe notification path.
3. Click Unsubscribe to cancel the subscription.
4. Click Undefine or Delete at the bottom of the screen.
Now, it is possible to redefine or delete this EC Spec.
20
Copyright 2009 Unitech Electronics Co., Ltd. All rights reserved. Unitech is a registered trademark of Unitech Electronics Co., Ltd.
Chapter 3 Making RFID Applications
Viewing Data Collection Report
Click Report Management in the left screen panel. All reports set to store on the
RS700 will display in the right pane. Manage reports through the following:
1. Click Refresh to load the latest reports into the All Reports: field.
2. Double click the desired report in the All Reports: field so that it opens in the
middle of the screen. Click Clear to clear the screen and view the report with
fresh data.
3. Check Auto Upload All Reports to upload reports to the computer.
4. Check Delete In Server After Upload to delete the report after uploading.
5. In the Upload Interval: field, set the Upload Interval in units of seconds (by
default, the value is set at 300 seconds).
6. Choose the preferred folder to store reports in XML format on the computer.
Click on the IP address tab to view reports that set to send out to computers in the network. Click Refresh and select a desired IP address. Click Clear to clear the screen
and view the report with fresh data, or click Delete to remove the report page.
21
Chapter 3 Making RFID Applications
Viewing Server Log
Click Server Log, and log events on the Smart-Reader Server display in the right
pane. Click Clear to clear the screen and view fresh logs.
Using the Application Programming Interface
Besides using the built-in RS700 Smart-Reader Server and SRSRC, develop or customize RFID applications based on specified requirements. To learn more about the
API, please refer to the Unitech Software Development Kit and Programming Manual.
Connecting to BizTalk Server
RS700 supports Microsoft BizTalk Server for data collection. Connect to the BizTalk
Server through the following:
1. Copy the UnitechAdapter.dll, which is on the Unitech Software Development Kit
CD-ROM, to the BizTalk RFID Manager folder (C:\Program Files\Microsoft BizTalk RFID\bin).
2. Run RFID Manager.
22
Copyright 2009 Unitech Electronics Co., Ltd. All rights reserved. Unitech is a registered trademark of Unitech Electronics Co., Ltd.
Chapter 3 Making RFID Applications
3. Right-click Device Providers in the left screen panel, and select New Provider
to add a provider. The Add Provider screen appears.
4. Type a name for the provider, and click Browse to locate the file, UnitechAdapter.dll which is saved in Step 1. Click Register to add the provider.
23
Chapter 3 Making RFID Applications
5. Click OK to confirm.
6. Right-click Devices in the left screen panel, and select New Device to add a
device. The Add Device Wizard screen appears.
24
Copyright 2009 Unitech Electronics Co., Ltd. All rights reserved. Unitech is a registered trademark of Unitech Electronics Co., Ltd.
Chapter 3 Making RFID Applications
7. Check Add single device. Click Next.
8. Select the newly created provider in Step 4. Click Next.
25
Chapter 3 Making RFID Applications
9. Input the RS700's IP address and port number. Click Next.
10. Click Next.
26
Copyright 2009 Unitech Electronics Co., Ltd. All rights reserved. Unitech is a registered trademark of Unitech Electronics Co., Ltd.
Chapter 3 Making RFID Applications
11. Enter the default user name and password as unitech. Click Next.
12. Type a name for the device. Click Next.
27
Chapter 3 Making RFID Applications
13. Click Finish.
14. Right-click the device, and select View Tags. The View Tags screen appears.
28
Copyright 2009 Unitech Electronics Co., Ltd. All rights reserved. Unitech is a registered trademark of Unitech Electronics Co., Ltd.
Chapter 3 Making RFID Applications
15. Data collected from the RS700 displays in the Tags: field. Setup the interval
from the Refresh interval: drop down menu to update the screen automatically.
Or, click Clear or Refresh to update the screen manually.
29
Chapter 3 Making RFID Applications
Connecting to Oracle Sensor Edge Server
The RS700 supports the Oracle Sensor Edge Server (SES) for data collection. Connect to SES through the following:
1. Stop SES.
2. Copy the three files, SmartReaderAdapter.jar, SmartReaderDevice.jar and
SmartReaderDispatcher.jar, which are on the Unitech Software Development
Kit CD-ROM, to the path C:\Oracle\product\10.1.3.1\AS\j2ee\home\applications\edge\edge\extensions.
3. Restart SES.
4. Open the web browser and type http://127.0.0.1:7777/edge to login to the
server on the local host.
5. Click MyEdgeServer.
6. Click Change dispatcher.
30
Copyright 2009 Unitech Electronics Co., Ltd. All rights reserved. Unitech is a registered trademark of Unitech Electronics Co., Ltd.
Chapter 3 Making RFID Applications
7. Select Smart Reader Dispatcher. Click Select.
8. Set the Log Level to All. Click Save Changes.
9. Click MyEdgeServer → Groups → Default.
31
Chapter 3 Making RFID Applications
10. Click Add new device.
11. Select Smart Reader Device.
12. Type a name for the device. For example, RS700. Click Select.
32
Copyright 2009 Unitech Electronics Co., Ltd. All rights reserved. Unitech is a registered trademark of Unitech Electronics Co., Ltd.
Chapter 3 Making RFID Applications
13. Click MyEdgeServer → Groups → Default → RS700.
14. Input the RS700’s IP address and port number, and the default user name and
password as unitech. Click Save Changes.
15. Restart SES.
16. Click MyEdgeServer → Groups → Default → RS700.
33
Chapter 3 Making RFID Applications
17. Click Start all devices.
The server will log the event in the Monitor Events tab, when the RS700 collects
RFID tags.
34
Copyright 2009 Unitech Electronics Co., Ltd. All rights reserved. Unitech is a registered trademark of Unitech Electronics Co., Ltd.
Chapter 4
Advanced Settings
The RS700 provides a standard interface to setup the terminal, and It is possible
through this to make connections and perform remote control functions.
Connecting to a LAN Network
Obtaining an IP Address
Connect to a network through the following:
1. Connect the computer to a DHCP enabled network.
2. Connect the Ethernet cable to the Ethernet Port on the RS700’s bottom panel,
and rotate the cable cap clockwise to secure the connection.
3. Connect the RS700 to the same network via DHCP. The DHCP server will
assign an IP address to the RS700.
4. On the computer, click Start → Programs → Smart-Reader Server Remote
Control → Reader Discovery.
5. Click Discovery to lookup the DHCP client in the same subnet.
35
Chapter 4 Advanced Settings
6. Refer to the MAC address label attached the RS700’s rear panel, and discover
the RS700’s IP address in the list box. Double-click the IP address to open the
configuration webpage in the default browser.
7. The RS700 WebConfig Server window appears with basic information about
the RS700, such as program version numbers and system memory.
The built-in RS700 WebConfig Server is a web-based interface, which can configure
the RS700 on a remote computer.
Setting the System Time
Synchronize the system time with the remote computer via the RS700 WebConfig
Server. Set the system time through the following:
36
Copyright 2009 Unitech Electronics Co., Ltd. All rights reserved. Unitech is a registered trademark of Unitech Electronics Co., Ltd.
Chapter 4 Advanced Settings
1. Click SystemTime in the left screen panel. The System Time Setup page
appears in the right screen panel with the current settings.
2. Click Reset to clear all the fields.
3. Select the desired time zone, and input the preferred date and time.
4. Click Apply to save the settings. A dialog box appears with the message Set
System Time OK!.
Setting up Ethernet connection
It is possible to configure the Ethernet settings on this page.
1. Click Ethernet in the left screen panel. The Ethernet Setup page appears in the
right screen panel with the current settings.
2. Select the DHCP server to automatically assign an IP address, or manually
specify an IP address.
3. Select Specify an IP address, input the IP address, subnet mask, default gateway and etc.
4. Click Apply to save the settings. A box appears with the message Set Ethernet OK!. While the message Input Error, please check! indicates incomplete
input.
37
Chapter 4 Advanced Settings
Connecting to a WLAN Network
It is possible to send and receive signals to a Wi-Fi network, and synchronize files with
the RS700’s embedded WLAN interface.
NOTE:
Wi-Fi access requires a separate service contract through a wireless
service provider. Contact a wireless service provider for more information.
A wireless network can be added when the network is detected or by manually entering information settings. Determine if authentication information is needed before proceeding through the following steps.
Setup a wireless LAN via RS700 WebConfig Server through the following:
1. Click Profile Setup in the left screen panel. The Wireless Profile page appears
in the right screen panel. Click New to add a new profile.
2. Enter the profile name in the dialog box. Click Ok.
38
Copyright 2009 Unitech Electronics Co., Ltd. All rights reserved. Unitech is a registered trademark of Unitech Electronics Co., Ltd.
Chapter 4 Advanced Settings
3. Enter the SSID for the wireless network. Scroll down the Encryption drop down
menu to select the wireless encryption type. Click WEP keys/PSKs.
4. Enter the WEP keys in the dialog box. Click Ok.
5. In the Wireless Profile page, click Commit to save the profile.
6. Click Basic Setup in the left screen panel. The Wireless Basic page appears in
the right screen panel. Click Reset to clear all fields.
39
Chapter 4 Advanced Settings
7. Select Enable Radio. Scroll down the Active Profile list to select the created
profile.
8. Have the DHCP server automatically assign an IP address, or specify an IP
address manually.
9. Select Specify an IP address, input the IP address, subnet mask, default gateway and etc.
NOTE:
To enhance radio performance install the Wi-Fi Antennas on the
RS700’s top panel. See Installing Wi-Fi Antenna on page 6.
10. Click Apply to save the settings. Check the settings if the message Input
Error, please check! appears.
11. Click Status in the left screen panel. The Wireless Status page appears in the
right screen panel with information containing the active profile, radio status, client attributes, AP attributes, connection channel number, data rate, transmitted
power, signal strength and etc. Click Refresh to refresh the page.
40
Copyright 2009 Unitech Electronics Co., Ltd. All rights reserved. Unitech is a registered trademark of Unitech Electronics Co., Ltd.
Chapter 4 Advanced Settings
12. Click Basic Setup in the left screen panel and select Disable Radio in the
Wireless Basic page to disable the access point.
Managing your Wireless Profiles
Click Profile Setup in the left screen panel to manage wireless profiles in the Wireless
Profile page.
•
Edit Profile: Views a selected profile from the drop down menu on the right.
– New: Creates a new profile.
– Rename: Changes the name of a selected profile. The name should be
unique, not being assigned to another profile. Input another name for this profile if the message Profile name already exit! appears.
– Delete: Deletes a selected profile, which is not the active profile. Otherwise,
the message Active profile can not be deleted! appears.
41
Chapter 4 Advanced Settings
– Scan: A window appears with available APs. Click Refresh to receive the
updated list. Referring to the received signal strength indication (RSSI) and
whether data encryption is required or not, i.e., true or false (Secure), select a
desired SSID from the list and click Connect to create a new profile with this
SSID.
•
Radio: Configures radio settings on the right fields.
– SSID: Enters the service set identifier (SSID) for an access point.
– Client Name: Assigns a client name for the terminal.
– Power Save: Selects a power saving mode when idling. Value CAM stands
for constant awake mode, Maximum for maximum power saving mode and
default Fast for fast power saving mode.
– Tx Power: Selects a transmit power for power saving. While the default is set
to Maximum, lower the transmit power to 50, 30, 20, 10, 5 or 1mW. The
lower power will result in a lower signal strength.
– Bit Rate: Selects a suitable transmission rate to AP. While the default is set to
Auto, set the bit rate to 1, 2, 5.5, 6, 9, 11, 12, 18, 24, 36, 48 or 54 Mbps. The
higher rate will allow a shorter distance between access points.
– Radio Mode: Selects a radio mode to AP. The terminal supports 802.11b/g.
While the default is set to BG optimized, change to B rates only (802.11b
data rates at 1, 2, 5.5 and 11 Mbps), G rates only (802.11g data rates at 6, 9,
12, 18, 24, 36, 48 and 54 Mbps) or BG rates full (All 802.11b/g rates).
– Auth Type: Selects an 802.11 authentication type. While the default is set to
no authentication needed to Open, change to Shared using WEP shared key
or LEAP using LEAP protocol.
•
•
42
Encryption: Selects the type of encryption to protect transmitted data. Available types are Manual WEP, Auto WEP, WPA PSK, WPA TKIP, WPA2 PSK,
WPA2 AES, CCKM TKIP, CKIP Manual and CKIP Auto. While WEP Keys/
PSKs appears; WEP keys or pre-shared keys are required.
EAP Type: Selects an extensible authentication protocol. Available types are
LEAP, EAP-FAST, PEAP-MSCHAP, PEAP-GTC and EAP-TLS. While Credentials appears, authentication credentials are required.
Copyright 2009 Unitech Electronics Co., Ltd. All rights reserved. Unitech is a registered trademark of Unitech Electronics Co., Ltd.
Chapter 4 Advanced Settings
Click Global Setup in the left screen panel to adjust the wireless global settings in the
Wireless Global page. The attributes in the Property field can apply to all profiles.
Click Logout to exit the RS700 WebConfig Server.
43
Chapter 4 Advanced Settings
Establishing Terminal-PC Connection
Installing Microsoft ActiveSync
In order to exchange data between the computer and the RS700, Microsoft ActiveSync must be installed on the computer. Use the USB Cable that comes with the
RS700 to connect the terminal to the computer.
NOTE:
Uninstall previous versions of Microsoft ActiveSync before installing the
latest version.
Additional Capabilities
•
•
•
•
Backup and restore RS700 data.
Copy (rather than synchronize) files between the RS700 and a desktop computer.
Control the synchronization occurrence by selecting a synchronization mode.
For example, synchronize continuously while connecting to a desktop computer
or only when a synchronization command is selected.
Select which information types are synchronized and control how much data is
synchronized. For example, synchronize past appointments during the last six
weeks.
Install Microsoft ActiveSync on the computer through the following:
•
•
Close any open programs, including those that run during startup and disable
any antivirus software.
Download the ActiveSync software from the Microsoft ActiveSync Download
page at:
http://www.microsoft.com/windowsmobile/en-us/help/synchronize/activesync45.mspx.
•
•
44
Browse to the location of the downloaded file, and double-click it. The installation wizard begins.
Follow the instructions onscreen to install Microsoft ActiveSync.
Copyright 2009 Unitech Electronics Co., Ltd. All rights reserved. Unitech is a registered trademark of Unitech Electronics Co., Ltd.
Chapter 4 Advanced Settings
Connecting the terminal to Your Computer
After Microsoft ActiveSync is installed, make a connection through the following:
1. Connect the USB Cable to the USB port on the RS700’s bottom panel, and
rotate the cable cap clockwise to secure the connection.
2. Insert the other end of the USB Cable into a USB Port on the computer.
3. Microsoft ActiveSync starts automatically and configures the USB Port to work
with the RS700. The New Partnership setup wizard will ask to setup a partnership.
NOTE:
If Microsoft ActiveSync doesn’t start automatically, click Start → Programs → Microsoft ActiveSync.
If a message appears indicating that it is unable to detect a connection, click Cancel
and manually configure the communication settings by clicking MAS → File → Connection Settings → Connect.
4. Follow the onscreen instructions. The Microsoft ActiveSync window appears
when the configuration is complete.
5. Synchronization will initiate, and it will synchronize periodically or upon connection.
45
Chapter 4 Advanced Settings
Using Microsoft ActiveSync to Exchange Files
Synchronization options can modify, including when to synchronize and what gets
synchronized. In the Mobile Device window on the computer, click Tools → Sync
Options.
For each type of information, the synchronization process can be hastened by limiting
the amount of synchronized data. To do this, select a service and click Settings. After
enabling a service, close and reopen Microsoft ActiveSync.
Synchronization occurs according to the options chosen while setting up Microsoft
ActiveSync on the computer. If the default (On Connect) synchronization option in the
Microsoft ActiveSync Setup Wizard is selected, simply connect the RS700 to the
desktop computer and synchronization will take place.
If the disabled On Connect feature in Microsoft ActiveSync is selected, start ActiveSync through one of the following:
•
•
On the computer, click My Computer → Mobile Device folder.
Connect the USB cable between the computer and terminal.
Use Microsoft ActiveSync to exchange information from the terminal to the computer
and vice versa. Changes made to the information on one location will not affect the
information on the other. To automatically update information on both the RS700 and
the computer, synchronize the information instead.
NOTE:
Files created on the computer may need to be converted by ActiveSync
so that they can be viewed and edited on the terminal, and vice versa.
Copy two types of information to the device: files and Pocket Access Windows CE
Store information.
The following procedure only applies to copying files. Refer to the Microsoft ActiveSync Help on the computer for instructions on how to copy Pocket Access Windows
CE Store information.
1. In the Microsoft ActiveSync window on the computer, click Explore. Windows
Explorer opens the Mobile Device window for the terminal.
2. Locate a file to copy on the terminal or computer.
3. Do one of the following:
– To copy the file to the terminal, right-click the file and click Copy. Place the
cursor in the desired folder for the terminal, right-click and click Paste.
– To copy the file to the computer, right-click the file and click Copy. Place the
cursor in the desired folder on the computer, right-click and then click Paste.
46
Copyright 2009 Unitech Electronics Co., Ltd. All rights reserved. Unitech is a registered trademark of Unitech Electronics Co., Ltd.
Chapter 4 Advanced Settings
Using Remote Control
Besides configurations through the web-based interface, there are also ways to control the RS700 remotely with the computer via Microsoft Power Toys. It is possible to
setup the system time, establish network connections or do any other settings on the
RS700 Windows platform.
Use the remote control through the following:
1. On the computer, install WindowsMobilePowerToys.msi, which is on the
Unitech CD-ROM.
NOTE:
Download the latest PowerToys software from the Microsoft Download
Center.
2. Connect the USB Cable to USB Port on the RS700’s bottom panel, and rotate
the cable cap clockwise to secure the connection.
3. Insert the other end of the USB Cable into a USB Port on the computer.
4. Microsoft ActiveSync starts automatically and configures the USB Port to work
with the RS700.
5. Click Start → Programs → ActiveSync Remote Display.
NOTE:
Alternatively, execute ASRDisp.exe in the Microsoft ActiveSync Remote
Display folder.
6. A dialog box appears with message The OS or CPU of this device is
unknown to this application. Click OK. The WindowsCE window opens with
applications, such as SRS and WebConfig running on the RS700.
Click Zoom to adjust the zoom level at 1x, 2x or 3x. Click File → Exit to exit the
remote control window.
47
Chapter 5
Troubleshooting
Unitech has a professional support team to answer any questions or technical related
issues. If equipment problems occur please refer to the table below or contact a
regional Unitech representative.
Problem
Solution
1.
Cannot Backup
Data.
•
•
Check if the Backup Battery Switch is on.
Send back to Unitech for RMA.
2.
Cannot Read a
Tag.
•
•
•
Check whether the RFID Antenna is properly connected to the TNC Connector via Antenna Cable.
Check whether the Antenna Port is correct.
Check whether the tag is damaged.
Check the software settings, e.g., reader status,
antenna port and etc.
Reset the RS700.
Send back to Unitech for RMA.
•
•
•
3.
Cannot Charge
the Backup
Battery.
•
•
Check if the Backup Battery Switch is on.
Send back to Unitech for RMA.
4.
The USB
Communication
Fails.
•
•
•
Reconnect the USB Cable.
Reset the RS700.
Send back to Unitech for RMA.
5.
Cannot Reset
the RS700.
•
•
Make sure the Reset Button is pressed in.
Make sure the backup battery switch is turned off
when removing external power.
Send back to Unitech for RMA.
•
48
Copyright 2009 Unitech Electronics Co., Ltd. All rights reserved. Unitech is a registered trademark of Unitech Electronics Co., Ltd.
Appendix A
System Specification
Processor/Memory
CPU
Memory
OS
Indicator
Communication
Microsoft Windows CE 5.0
Data LED, RFID LED and Power LED
USB 1.1 Client
Serial RS232
Ethernet 10/100Base-T
IEEE 802.11b/g Wireless LAN, CCX Compatible
Relay Outputs (2)
Optical Inputs (2)
Reader
R1000
Protocol
EPCglobal Class1 Gen2
Frequency
UHF 860MHz - 960MHz
Output Power
Up to 1W and 4ERP with Antenna
Antenna Number
4-port switch
Channel
8-channel TX/RX
Reading Distance
1 - 10 Meters Depending on Reading
Points and Tags
Tag Type
EPCglobal C1G2, ISO 18000-6C
Built-in 2GB Storage
Main Power
Input: 100-240Vac, 50/60MHz, 0.75A
Output: 12V DC, 3A, 36W Max.
Backup Power
3800mAh Rechargeable Lithium-Ion
Battery
Weight
1750g (3.8 lbs.)
Dimension
252mmL X 57.7mmH X 185.3mmW
(9.9”L X 2.2”H X 7.2”W)
Operating Temperature
-20ºC - 50ºC (-4ºF - 122ºF)
Storage Temperature
-30ºC - 70ºC (-22ºF - 158ºF)
Relative Humidity
0% - 95% (Non-condensed)
Environmental Sealing
IP65 (Indoor and Outdoor Applications)
FCC, CE, NCC, BSMI, CCC, RoHS Compliance and TELEC
GPX-026XTPR8-763 RFID Antenna
CFD200-NL Antenna cable, 24’
RS700 SDK
RFID Middleware SDK
Microsoft BizTalk RFID
Oracle Sensor Edge Sever
IBM WebSphere
RFID Reader
SD Card Slot
Power Source
Enclosure
Environmental
Certification
Accessories
Software
520Mhz Intel PXA270
SDRAM: 128MB
Flash ROM: 64MB
49
Appendix B
Support
50
Region
Web site
Global Operation Center
www.unitech-adc.com
unitech Taiwan
adc-utt.unitech.com.tw
unitech Asia Pacific & Middle
www.unitech-utp.com.tw
unitech China
www.ute.com.cn
unitech Japan
www.unitech-japan.co.jp
unitech America
www.ute.com
unitech Latin America
latin.ute.com
unitech Europe
www.unitech-europe.nl
Copyright 2009 Unitech Electronics Co., Ltd. All rights reserved. Unitech is a registered trademark of Unitech Electronics Co., Ltd.