1
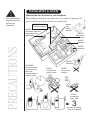
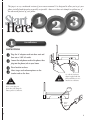
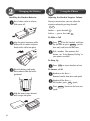
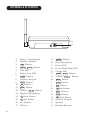
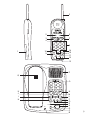
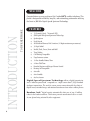
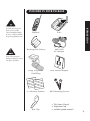
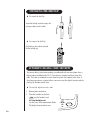
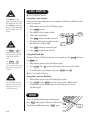
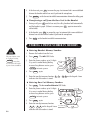
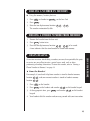
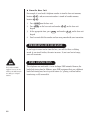
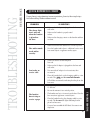
Start
Here!
Quick Start Guide - next page ...
DG72
Digital Spread Spectrum
provides the longest range,
the clearest sound
and the best privacy.
QUICK
START GUIDE
INSTALLATION & SAFETY
This symbol indicates
important operating
and servicing
instructions.
Choosing the best location for your telephone.
When choosing a location for your phone there are a number of appliances the
phone should be not be near, and area’s you should avoid.
Always
fully
extend
antenna
CHOOSE a central location
AVOID Television sets and
other electronic
appliances
AVOID Microwave
ovens
PRECAUTIONS
AVOID Moisture
AVOID Computers
AVOID Moisture
CHARGE the new phone
for 20 hrs and
raise the
antenna before
making a call.
DON’T overload the
power outlet.
AVOID multi power
boards
AVOID connecting
more than
3
phones as ringing
may be impaired
This page is a very condensed version of your owners manual. It is designed to allow you to get your
phone installed and operating as quickly as possible - however it does not attempt to explain any of
the advanced features of your phone.
Start
Here!
Installation
CONNECTIONS
Plug the AC adaptor cord into base unit and
then into a 240V AC outlet.
Connect the telephone cord to the phone, then
plug into the phone jack in your home.
Place handset on base.
Select ringer and volume options on the
handset and on the base.
!
Before connecting your
phone line, fully charge the
battery pack for 15-20 hours.
!
Use only the Uniden AC
adaptor supplied with this
phone and make sure it is
switched on at all times.
TEL LINE
✃
Line in
From
Telephone
Jack
i
Charging the Battery
Press battery cover to release.
Slide cover off.
Adjusting the Handset Earpiece Volume
During a conversation, you can adjust the
earpiece volume by pressing the vol
▼
▼
Louder — press the vol
▼
Installing the Handset Batteries
Using the Phone
Softer — press the vol
▼
To Make a Call
Align the plastic connector of the
battery with it’s socket and press
firmly until it clicks into place.
Press talk (on the handset) and listen
for dial tone or press speaker (on the
base unit) and listen for dial tone.
Dial a number. (For memory dial
feature, see “Using Memory Dialing” in
your owner’s manual.)
To Hang Up
Press talk or return handset to base.
Place the battery pack inside.
Please observe how the lead is
positioned.
To Answer a Call
Handset on the Base —
Remove handset from base and speak.
Handset off the Base —
Lift handset, press talk , speak.
Press speaker button on the base unit,
speak.
Slide the battery cover forward
until it snaps into place.
ii
CONTENTS
Precautions . . . . . . . . . . . . . . . . . . . . . . . Inside Front Cover
Controls And Functions . . . . . . . . . . . . . . . . . . . . . . . . . .2
Introduction
Introduction
Welcome
Features
...................................4
....................................4
OF YOUR OWNERS MANUAL
CONTENTS
Included In Your Package . . . . . . . . . . . . . . . . . . . . . . . . 5
Installing and Adjusting your Phone
Desk/Tabletop Installation . . . . . . . . . . . . . . . . . . . . . . . . 6
Installing and
Adjusting
Installing & Charging the Battery Pack . . . . . . . . . . . . . . . 8
Cleaning the Battery Contacts . . . . . . . . . . . . . . . . . . . . . 9
Adjusting the Volume Controls . . . . . . . . . . . . . . . . . . . . . 9
Adjusting the Ringer Tone . . . . . . . . . . . . . . . . . . . . . . . . 9
Installing the Beltclip . . . . . . . . . . . . . . . . . . . . . . . . . . . 10
Automatic Digital Code Security . . . . . . . . . . . . . . . . . . . 10
Using Your New Phone
Making and Receiving Calls . . . . . . . . . . . . . . . . . . . . . . 11
Using Your
New Phone
Call Waiting . . . . . . . . . . . . . . . . . . . . . . . . . . . . . . . . . 12
Hold . . . . . . . . . . . . . . . . . . . . . . . . . . . . . . . . . . . . . . 12
Mute . . . . . . . . . . . . . . . . . . . . . . . . . . . . . . . . . . . . . . 13
Intercom . . . . . . . . . . . . . . . . . . . . . . . . . . . . . . . . . . . 13
Room Monitor . . . . . . . . . . . . . . . . . . . . . . . . . . . . . . . 13
Call Transfer
. . . . . . . . . . . . . . . . . . . . . . . . . . . . . . . . 13
Storing a Phone Number in Memory . . . . . . . . . . . . . . . . 14
Dialing a Number In Memory . . . . . . . . . . . . . . . . . . . . . 15
Erasing a Stored Number from Memory . . . . . . . . . . . . . . 15
Chain Dialing . . . . . . . . . . . . . . . . . . . . . . . . . . . . . . . . 15
Travelling Out-Of-Range . . . . . . . . . . . . . . . . . . . . . . . . 16
PABX Connection . . . . . . . . . . . . . . . . . . . . . . . . . . . . . 16
Troubleshooting
Quick Reference Chart . . . . . . . . . . . . . . . . . . . . . . . . . . 17
Warranty . . . . . . . . . . . . . . . . . . . . . . . . . . . . . . . . . . . . 16
Troubleshooting
CONTROLS & FUNCTIONS
16
17
▼
2
Battery Compartment
Handset Antenna
talk Button
redial / pause Button
Talk LED
Battery Low LED
c.wait Button
Numeric Keypad
flash Button
int Button
mem Button
▼
Volume
Button
Handset Microphone
Hash Button
Star Button
AC Adaptor
Tel Line
A.
B.
C.
D.
E.
F.
G.
H.
I.
J.
K.
L.
M.
N.
O.
P.
Q.
speaker Button
Base Microphone
Power LED
In use/Hold/Mute LED
Charge LED
redial / pause Button
▼
Volume
Button
flash Button
mute Button
int Button
Star Button
hold Button
mem Button
Hash Button
Numeric Keypad
Speaker
Handset Retainer
▼
1.
2.
3.
4.
5.
6.
7.
8.
9.
10.
11.
12.
13.
14.
15.
16.
17.
2
5
talk
3
4
1
6
batt low
talk
c.wait
7
redial/p
15
9
1
2 abc
3 def
4 ghi
5 jkl
6 mno
7 pqrs
8 tuv
9 wxyz
*
0
flash
#
mem
int
vol
8
14
10
11
12
13
P
Q
K
J
I
1
2 abc
3 def
4 ghi
5 jkl
6 mno
7 pqrs
8 tuv
9 wxyz
*
mute
flash
H
0
int
#
mem
vol
charge
in use/hold/mute
speaker
mic
power
hold
redial/p
O
N
M
L
F
G
E
A
D
C
B
3
WELCOME
4
TO YOUR NEW PHONE
INTRODUCTION
Congratulations on your purchase of the Uniden DG72 cordless telephone. This
phone is designed for reliability, long life, and outstanding performance utilising
the latest in 900 MHz Digital Spread Spectrum Technology.
FEATURES
●
●
●
●
●
●
●
●
●
●
●
●
●
●
●
●
●
15 channels (Aust), 7 channels (NZ)
900 Digital MHz Spread Spectrum Technology
Speakerphone
Dual Keypad
40 Enhanced Memory Dial Locations (16 digits maximum per memory)
32 Digit Redial
Redial, Flash, Pause, Mute and Hold
Tone Dialing
Call Waiting Compatible
Page/Intercom system
14-Day Standby Battery Time
4-Hour Talk Time
Handset Earpiece and Ringer Volume Control
Hearing Aid Compatible
Auto talk
Auto Standby
Any key Answer
Digital Spread Spectrum Technology utilises a digital transmission
and a “wider frequency band” compared to a “single narrow band” 30/39 Standard
Analogue transmission. The result is a more secure conversation with the clarity of
digital sound, extended range, and minimal interference from other cordless phones.
Random CodeTM digital security automatically selects one of over 16 million
codes for the handset and base. This feature prevents unauthorised calls as a result
of your phone being activated by other equipment.
INCLUDED IN YOUR PACKAGE
talk
batt
talk
low
c.wait
redial/
p
1
2 abc
3 def
4 ghi
5 jkl
7 pqrs
9 wxyz
0
flas
h
mem
INTRODUCTION
!
6 mno
8 tuv
*
To get the most from your
phone, please read this
owner’s manual thoroughly.
Be sure to complete and mail
the product registration form.
#
int
vol
Handset
Base
Rechargeable Battery
AAD 900S
AC Adaptor
Long Telephone
Cord/Plug
Wall Mount Adaptor
If any of these items are
missing or damaged, contact
your place of purchase.
memory
memory
2 x Memory Stickers
Wall Mounting Screws
●
●
Belt Clip
●
This Owner’s Manual
Registration Card
and other printed materials
5
WALL INSTALLATION
Be careful not to insert the
mounting screws
into possible electrical
hazards such as cables,
wiring, or pipes.
1. Insert two mounting screws (with their
appropriate anchoring device) into the wall
100mm apart. Allow about 5mm between the
wall and screw heads for mounting the phone.
INSTALLING
AND ADJUSTING YOUR PHONE
2. Snap the desktop/wall mount
adaptor into the bottom of the base
as shown.
6
3. Plug the AC adaptor cord into the
9V DC input jack on the back of
the base.
4. Put the AC adaptor cord inside the wall
mount adaptor. Plug the AC adaptor into
a standard 240V AC wall outlet.
5. Plug one end of the telephone
cord into the TEL LINE jack
on the back of the base. Plug the other
end into a telephone jack.
INSTALLATION & ADJUSTING
6. Align the mounting slots on the
base with the mounting screws on
the wall. Push in and down until
the phone is firmly seated.
7. On the base, pull the handset retainer
out of the slot. Rotate clockwise 180°.
8. Flip the retainer from front to back.
Slide it back into the slot so that the lip
of the retainer is up (arrow on the retainer
clip must be pointing down).
The retainer holds the handset in place.
7
!
The battery connector
will fit together only
one way. Make sure the
connector is properly
aligned. Use only the
Uniden battery pack
(model BT-434)
!
It is recommended to
place the handset on
the base after use if
convenient. However
recharging the battery
is only necessary when
the low battery
indicator is lit.
INSTALLING & CHARGING THE BATTERY PACK
Installing the Battery Pack
The rechargeable battery pack must be fully charged before using your phone for
the first time. Before plugging the phone line into your new phone, you must
charge the battery for approximately 15-20 hours without interruption.
1. Remove the Handset
battery cover.
2. Plug the battery’s cable into the
handset press the plug in firmly
until it clicks into place. Place
the battery pack inside the battery
compartment.
3. Replace the battery cover.
Charging the Battery Pack
▼
Initial battery charging
Before connecting your the phone line for the first time, fully
charge the rechargeable battery pack for 15-20 hours
without interruption.
1. Place the handset on the base
(facing up or down).
2. Make sure that charge LED lights.
If the LED doesn’t light, be sure the AC
adaptor is plugged in and the handset
makes good contact with the base
charging contacts.
▼
charge
Low battery indicator
The low battery indicator shows when the
battery pack is very low and needs to be charged.
If the phone is not in use, the batt low LED
flashes every four seconds. If the phone is in use,
the batt low LED flashes every four seconds
and the handset beeps. Complete your
conversation as quickly as possible and return
the handset to the base for charging.
8
CLEANING THE BATTERY CONTACTS
To maintain a good charge, clean all charging contacts on the handset and base
about once a month. Use a pencil eraser or other contact cleaner. DO NOT use
liquids or solvents; you may damage your phone.
ADJUSTING THE VOLUME CONTROLS
▼
Handset ringer volume
INSTALLATION & ADJUSTING
or ▼ key on the handset
Press the vol
to set the handset ringer volume. There are two
ringer volume settings; high and low.
▼
▼
Handset earpiece volume
There are four volume settings for the handset
earpiece; max., high, low and min. The handset
earpiece volume can be adjusted only
during a call.
To lower the volume, press vol ▼ . To raise the
.
volume, press vol
The volume will remain on the same setting when you hang up.
▼
ADJUSTING RINGER TONE
1. Press flash . button.
2. Press 1 , 2 , 3 or 4 on the keypad to select ringer tone.
Note: The procedure it the same for both the handset and base unit.
9
INSTALLING THE BELTCLIP
▼
To attach the beltclip.
Insert the beltclip into the empty slot
and press down until it clicks.
▼
To remove the beltclip
Pull back on the release tab and
lift the beltclip up.
talk
batt low
talk
c.wait
redial/p
3 def
1
2 abc
4 ghi
5 jkl
6 mno
7 pqrs
8 tuv
9 wxyz
*
flash
0
mem
#
mute
vol
AUTOMATIC DIGITAL CODE SECURITY
To prevent other parties from making unauthorised calls on your phone line, a
digital code was added to the DG72. Your phone’s handset and base share this
code. This code is randomly set each time you place the handset in the base. If
the phone experiences a power failure, you must reset the digital security code by
placing the handset on the base.
▼
To reset the digital security code
1. Restore power to the base.
2. Place the handset on the base.
talk (on the handset) and
in use/hold/mute
(on the base) LEDs momentarily blinks.
The digital security code is reset.
10
charge
in use/hold/mute
speaker
power
MAKING AND RECEIVING CALLS
▼
Basic phone operation
Handset On Base
Handset Off Base
talk
Base Only
batt low
talk
c.wait
redial/p
3 def
1
2 abc
4 ghi
5 jkl
6 mno
7 pqrs
8 tuv
9 wxyz
*
flash
0
mem
#
int
vol
flash
vol
redial/p
charge
To answer
a call
in use/hold/mute
Pick up handset.
speaker
power
Press
talk .
1. Press speaker .
2. Listen for the dial
tone.
3. Dial the number.
YOUR NEW PHONE
USING
To hang up
Press talk , or return the handset to the
base (AutoStandby).
Press speaker .
2. Press talk .
3. Listen for the dial
tone.
4. Dial the number.
1. Pick up the handset.
To redial
2. Press talk .
3. Listen for the dial
tone.
4. Press redial .
USING YOUR PHONE
1. Press talk .
2. Listen for the dial
tone.
3. Dial the number.
1. Pick up the handset.
To make
a call
Press
speaker .
1. Press speaker .
2. Listen for the dial
tone.
1. Press
talk .
2. Listen for the dial
tone.
3. Press redial .
3. Press redial .
Note:
If any key is pressed before redial , the last telephone number dialed will
not be redialed.
11
!
The c.wait procedure
toggles between the incoming
and original call (vice versa).
The c.wait procedure will
drop the current call and pick
up the incoming call or call
on hold.
!
CALL WAITING
For Australian Version
Using the c.wait feature
Please call your local telephone service provider to check the availability of this
service in your area.
1. While talking you hear the Call Waiting signal.
▼
2. Press c.wait button.
3. The existing call is placed on hold.
4. Talk to the second caller.
5. Press talk button to end the current call.
6. The phone will ring back indicating that
the first caller is still on hold.
c.wait
flash
7. Press talk button to answer this call.
The flash + 2 call
waiting procedure toggles
between the incoming and
original call (and visa
versa).
The flash + 1
procedure will drop the
current call connection and
pick up the incoming call
on hold.
!
In New Zealand you must
subscribe to Telecom’s Call
Waiting Service before you
can use this feature.
8. Press talk button to end the call.
Using the Flash Key
To access Telstra’s Call Waiting Service, you can either use the c.wait button or
the flash key.
1. While talking you hear the Call Waiting signal.
2. Press flash then 2 to switch call and put the current call on hold.
3. To switch back to your original call, press flash then 1 .
For New Zealand Version
Using the c.wait or flash key
1. While talking you hear the Call Waiting beep signal.
▼
2. Press c.wait or the flash key. This feature sends a 600ms timed
“hook-flash” on the telephone line for accessing services such as
Call Waiting etc.
HOLD
To use the hold feature during a conversation,
press hold . Both parties will not be able to hear.
To disable the hold feature, press hold again.
12
hold
MUTE
To use the mute feature during a conversation,
press mute . The other party will not be able to
hear you although you can hear them. To disable
the mute feature, press mute again.
1
2 abc
3 def
4 ghi
5 jkl
6 mno
7 pqrs
8 tuv
9 wxyz
*
mute
flash
INTERCOM
▼
1.
2.
3.
4.
0
int
#
mem
vol
hold
redial/p
h
Intercom from the Base Unit
Press int on the base unit. (If there is no answer press int again to
disconnect).
Press int on the handset to answer the intercom.
Speak into the mouthpiece.
To turn off the intercom, press int on the base unit.
-ORPress int on the handset.
You may use the DG72 handset to monitor activity near the base unit without
anyone present at the base unit.
To turn Room Monitoring on:
1. Press int on the handset.
2. There is a beep sound from the base unit then automatically two-way
communications are now set up between the base unit and the handset.
3. To turn monitoring off, press int on the handset.
CALL TRANSFER
Transferring a call from the Handset to the Base Unit
When a phone call is answered at the handset, you can transfer the call to the
base unit.
▼
1. During a call, press int on the handset, the call is placed on hold automatically
and the base unit is paged. (If there is no answer press int again to return to the
call).
13
USING YOUR PHONE
ROOM MONITOR
2. At the base unit, press int to answer the page. An intercom link is now established
between the handset and the base unit. Speak into the microphone.
3. Press speaker on the base unit to establish communications between the calling party.
▼
Transferring a call from the Base Unit to the Handset
1. During a call, press int on the base unit, the call is placed on hold automatically
and the handset is paged. (If there is no answer press int again to return to the
call on hold).
2. At the handset, press int to answer the page. An intercom link is now established
between base unit the and the handset. Speak into the microphone.
3. Press talk on the handset to establish communications.
STORING A PHONE NUMBER IN MEMORY
!
The pause button count
as one digit. Pressing
redial/p more than
once increases the length
of pause between numbers.
▼ Entering Handset Memory Numbers
1. Remove the handset from the base.
2. Press mem . The talk LED blinks.
3. Enter the phone number, up to 16 digits.
If a pause is needed during dialing
to access long distance service, press
redial/p to insert a pause.
talk
redial/p
mem
4. Press mem again.
5. Enter the two digit memory location 0 1 - 2 0 on the keypad. A tone
indicates that the number is stored.
▼
Entering Base Unit Memory Numbers
1. Press mem . The in use/hold/mute LED blinks.
2. Enter the phone number, up to 16 digits.
If a pause is needed during dialing
to access long distance service, press
redial/p to insert a pause.
3. Press mem again.
mute
int
mem
hold
mem
flash
redial/p
vol
redial/p
charge
in use/hold/mute
speaker
power
4. Enter the two digit memory location
0 1 - 2 0 on the keypad. A tone
indicates that the number is stored.
14
inuse/hold/mute
DIALING A NUMBER IN MEMORY
▼
Using the memory location features
1. Press talk on handset or speaker on the base Unit
2. Press mem .
3. Enter the two digit memory location 0 1 - 2 0 .
The number automatically dials.
ERASING A STORED NUMBER FROM MEMORY
1. Remove the handset from the base unit.
2. Press mem button twice.
3. Press the two digit memory location 0 1 - 2 0 to be erased.
A tone indicates that the stored number is erased from memory.
CHAIN DIALING
From the Handset
For example, if your bank’s telephone number is stored in handset memory
location 0 3 , and your account number is stored in handset memory
location 0 4 :
▼
1. Press talk on the handset.
2. Press mem on the handset and number 0 3 on the handset keypad.
3. At the appropriate time, press mem and number 0 4 on the handset
keypad.
4. Your handset dials the number and you may proceed with your transaction.
15
USING YOUR PHONE
On certain occasions after dialing a number, you may be requested by the party
or service you are calling to enter a special access code, such as when
performing a banking transaction. To store this number, refer to “Storing a
Phone Number in Memory” on page 14.
▼ From the Base Unit
For example, if your bank’s telephone number is stored in base unit memory
location 0 3 , and your account number is stored in handset memory
location 0 4 :
1. Press speaker on the base unit.
2. Press mem on the base unit and number 0 3 on the base unit
keypad.
3. At the appropriate time, press mem and number 0 4 on the base unit
keypad.
4. Your base unit dials the number and you may proceed with your transaction.
TRAVELLING OUT-OF-RANGE
As you begin to move too far from the base, you will first hear a clicking
sound. As you travel further, the noise increases. If you travel out-of-range,
your call terminates.
!
Check with your PABX
supplier if you are not sure
whether your PABX network
uses Analogue or Digital
interface.
16
PABX CONNECTION
This telephone may work with a 2-wire Analogue PABX network. However, the
hook-flash timing fixed at 100msec, some PABX equipment that uses a different
hook flash timing may have its special feature (i.e. placing a call on hold or
transferring a call) inaccessible.
YOUR NEW PHONE
If your phone is not performing to your expectations, please try these simple steps
first before calling Uniden customer service.
PROBLEM
SUGGESTION
●
The charge light
won’t come on
when the handset
is placed on
the base.
●
●
●
The audio sounds
weak and/or
scratchy
●
●
●
Can’t make or
receive calls.
●
●
●
●
The handset
doesn’t ring or
receive a page.
●
●
●
Make sure the AC adaptor is plugged into the base and
wall outlet.
Make sure the handset is properly seated
in base.
Make sure the charging contacts on the handset and base
are clean.
Make sure that the base antenna is in a vertical position.
Move the handset and/or base to a different location away
from metal objects or appliances and try again.
Check both ends of the base telephone
line cord.
Make sure the AC adaptor is plugged into the base and
wall outlet.
Disconnect the AC adaptor for a few minutes, then
reconnect it.
Place the handset back on the charging cradle for a few
seconds. The talk and in use/hold/mute
LEDs blinks momentarily indicating that the phone has
been reset.
The battery pack may be weak. Charge the battery for
15-20 hours.
Be sure the antenna is in a vertical position.
The handset may be too far away from the base. Place the
base away from appliances or metal objects.
Place the handset back on the charging cradle for a few
seconds. The in use LED lights indicating that the
phone has been reset.
You may have exceeded the REN limit. Disconnect some
telephones.
17
TROUBLESHOOTING
TROUBLESHOOTING
QUICK REFERENCE CHART
PROBLEM
SUGGESTION
●
No dial tone.
●
●
Does not ring.
●
No power on
handset unit
●
●
Does not charge
●
●
●
Range is limited
●
●
Calls received
flutters or fades
●
●
Cannot store or
recall phone
numbers from
memory
18
●
●
Check the telephone line cord connectors at both ends
that they are pushed in firmly until they click.
If you had a power failure or had unplugged the base
unit, replace the handset on the base unit for two to five
second to reset the system.
You may have exceeded the Ringer Equivalence Number
(REN) limit of how many phones can be connected to the
same line. The REN total of all devices (printed on the
label on the bottom of each unit) should not exceed three
(3). Disconnect the appropriate units to lower the REN
total.
Check the battery pack connection inside the main battery
compartment on the handset.
The handset rechargeable battery pack may need to be
charged.
Make sure the charging contacts on both the base unit
and the handset are in contact during charging.
The charging contacts may need to be cleaned.
The battery pack may need to be discharged first before a
full charge.
Raise or reposition the antenna on the base or handset.
Move the base unit so that it is centrally located in your
residence or office and make sure that the base unit is not
located near appliances.
The handset rechargeable battery pack may need
charging.
You may be out of normal operating range. Move closer to
the base unit.
When storing phone numbers, make sure that the handset
is in the standby position.
When recalling stored phone numbers, check first for a
dial tone.
Always use two digits when entering/recalling memory
numbers.
WARRANTY
One Year Limited Warranty
Important:
Evidence of original purchase is required for warranty service.
Warrantor:
Uniden Australia Pty Limited ABN 58 001 865 498
Uniden New Zealand Limited
ELEMENT OF WARRANTY: Uniden warrants to the original retail owner for the duration
of this warranty, its DG72(herein after referred to as the Product), to be free from defects in
materials and craftsmanship with only the limitations or exclusions set out below.
WARRANTY DURATION: This warranty to the original retail owner only, shall
terminate and be of no further effect 12 months after the date of original retail sale. This
warranty will be deemed invalid if the product is; (A) Damaged or not maintained as
reasonable and necessary, (B) Modified, altered or used as part of any conversion kits,
subassemblies, or any configurations not sold by Uniden, (C) Improperly installed, (D)
Repaired by someone other than an authorised Uniden Repair Agent for a defect or
malfunction covered by this warranty, (E) Used in conjunction with any equipment or
parts or as part of a system not manufactured by Uniden.
WARRANTY
PARTS COVERED: This warranty covers for one (1) year, the Base/Charging Unit and
Handset only. All accessories (AC Adaptor, Wall mount bracket etc)are covered for 90 days only.
STATEMENT OF REMEDY: In the event that the product does not conform to this
warranty at any time while this warranty is in effect, the warrantor at its discretion, will
repair the defect or replace the product and return it to you without charge for parts or
service. THIS WARRANTY DOES NOT COVER OR PROVIDE FOR THE REIMBURSEMENT
OR PAYMENT OF INCIDENTAL OR CONSEQUENTIAL DAMAGES. THIS GUARANTEE IS IN
ADDITION TO AND DOES NOT IN ANY WAY AFFECT YOUR RIGHTS UNDER THE
CONSUMER GUARANTEE ACT.
PROCEDURE FOR OBTAINING PERFORMANCE OR WARRANTY: In the event that
the product does not conform to this warranty, the Product should be shipped or delivered,
freight pre-paid, with evidence of original purchase (eg. a copy of the sales docket), to the
warrantor at:
UNIDEN AUSTRALIA PTY LIMITED
SERVICE DIVISION
345 Princes Highway,
Rockdale NSW 2216
Ph (02) 9599 3355 Fx (02) 9599 3278
Toll Free 1300 366 895
UNIDEN NEW ZEALAND LIMITED
SERVICE DIVISION
150 Harris Road,
East Tamaki, Auckland
Ph (9) 273 8383 Fx (9) 274 4253
Toll Free 0800 4 UNIDEN
4 864 336
Customers in other States should ship or deliver the Product freight pre-paid to their nearest
Uniden Authorised Repair Centre (Contact Uniden for the nearest Warranty Agent to you)
19
FOR PURCHASING A UNIDEN PHONE!
THANK YOU
© 2002 Uniden Australia Pty Limited
Uniden New Zealand Limited