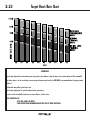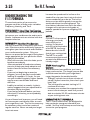
1
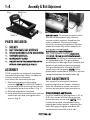
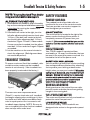
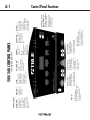
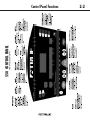
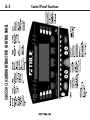
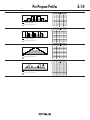
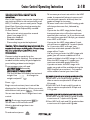
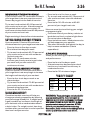
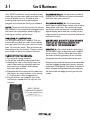
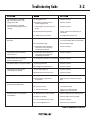
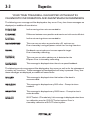
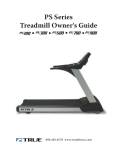
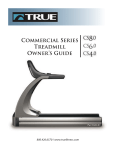
Table Of Contents
1-1
SECTION 1
SAFETY TIPS
1-2
BASICS
1-3
ASSEMBLY
1-4
BELT ADJUSTMENTS
1-4
TREADBELT TENSION
1-5
SAFETY FEATURES
1-5
SECTION 2
500/540 HRC CONTROL PANEL DESCRIPTIONS/FUNCTIONS
2-1
550 HRC CONTROL PANEL DESCRIPTIONS/FUNCTIONS
2-2
540/550 CI (CARDIOINTERACTIVE) CONTROL PANEL DESCRIPTIONS/FUNCTIONS
2-3
S.O.F. T. SELECT AND EXPRESS COMMAND KEYS
2-4
QUICK REFERENCE OPERATING INSTRUCTIONS - 500, 540, 550 MODELS
2-5
QUICK REFERENCE OPERATING INSTRUCTIONS WITH EXPRESS KEYS - 500 HRC, 540 HRC, CI
550 HRC, CI MODELS
2-6
MANUAL PROGRAM OPERATING INSTRUCTIONS - 500, 540, 550 ALL MODELS
2-7
PRE PROGRAM OPERATING INSTRUCTIONS - 500, 540, 550 P, HRC, CI MODELS
2-8
PRE-PROGRAM OPERATING INSTRUCTIONS WITH EXPRESS KEYS - HRC, CI MODELS
2-9
PRE-PROGRAM PROFILES
2-10
USER PROGRAM OPERATING INSTRUCTIONS
2-11
HRC/CI INTRODUCTION
2-12
TRUE HEART RATE CONTROL (HRC) HOW IT WORKS
2-13
CARDIOINTERACTIVE AND HRC TARGET OPERATING INSTRUCTIONS
CRUISE CONTROL OPERATING INSTRUCTIONS - HRC, CI MODELS
HRC/CI INTERVAL OPERATING INSTRUCTIONS - HRC, CI MODELS
2-14, 15, 16, 17
2-18
2-19, 20, 21
HEART RATE CONTROL IMPORTANT POINTS
2-22
TARGET HEART RATE CHART
2-23
THE F. I.T. FORMULA
2-24, 25, 26
SECTION 3
CARE AND MAINTENANCE
3-1
TROUBLESHOOTING GUIDE
3-2
DIAGNOSTICS
3-3
SECTION 4
INDIVIDUAL PERFORMANCE CHART
4-1, 2
1-2
Safety Tips
Congratulations on your purchase of a TRUE residential
treadmill. You have chosen a premium piece of exercise
equipment designed to meet your fitness needs for a
lifetime.
Before using your treadmill, please review this manual to
learn about the unit’s features, functions, maintenance
procedures, and safe operation.
SAFETY TIPS:
1.
2.
3.
4.
5.
6.
7.
8.
9.
Always use the safety key and attach
lanyard to your clothing at about
waist height.
Wear comfortable, good-quality
walking or running shoes.
Warm-up and cool-down periods are
important for a complete workout.
Always straddle the belt and allow it to
start moving before stepping onto it.
Hold the handrail while adjusting the
controls.
Keeping your eyes focused straight
ahead will help you maintain your
balance.
Adjust your own speed and grade.
Never make adjustments for another
person or allow someone else to make
adjustments for you.
Always allow the belt to stop completely
before dismounting. Gradually slowing
down also minimizes the sensation of
feeling like you are still moving after you
stop.
Allow space behind treadmill and sides
in the event you lose your balance.
10. Always inspect your treadmill to
ensure there are no foreign objects
obstructing the moving parts.
11. To avoid any possibility of being struck
by or caught between moving parts,
bystanders should not be within reach
of the treadmill while it is in motion.
12. For safety reasons and to prevent
damage to your treadmill, allow only
ONE person at a time on your machine.
13. Never leave unsupervised children
near your treadmill.
14. Animals should never be allowed on or
near your treadmill.
15. Keep the power cord clear of the
incline system. Allow extra slack for
inclining the machine. Do not run the
power cord under the treadmill.
16. Your treadmill is designed for indoor
use only.
17 . Never use your treadmill around water
or while you are wet. Using the unit
around a pool, hot tub or sauna will
void the warranty.
18 . Do not operate treadmill while using
bottled oxygen.
Learning The Basics
1-3
THE BASICS
Your treadmill is made up of two main sections: the base and
the pedestal. (See figure 1, page 1-4)
The base of the treadmill consists of a metal frame, a
shock-absorbing deck system and a powerful 3.0 horsepower
continuous-duty DC motor. The motor powers a pulley system
which moves the running belt over the deck.
The pedestal mounts on the top of the frame. It places the
displays, information readout and touch keys within easy sight
and reach.
SETTING UP
YOUR TREADMILL
Place your treadmill on a clean, level surface.
Make sure the electrical cord easily reaches a
grounded three-pronged outlet and has
enough slack to allow the deck to incline
unhindered by the cord. Do not allow the
treadmill assembly to rest on the cord.
Although your treadmill is designed to operate on most carpeted surfaces, some deeply
padded or heavy shag carpets can cause
damage to the unit. To prevent damage to
your treadmill or carpet, have someone stand
on the deck and make sure the treadmill belt
doesn’t touch the carpet at any point.
Your TRUE treadmill is designed for indoor
use only.
IMPORTANT
ELECTRICAL
REQUIREMENTS
Your True treadmill requires a dedicated
110 VAC 15 amp grounded outlet circuit.
WARNING: Do not use an extension cord or
an ungrounded outlet. The ground helps
prevent electrical damage to your treadmill
and enhances your safety by preventing
shock.
A GROUNDED OUTLET IS CRITICAL
FOR THE HRC SYSTEM TO FUNCTION
PROPERLY.
1-4
Assembly & Belt Adjustment
Fig. 1
PEDESTAL
BASE
PARTS INCLUDED:
1 - HEX KEY
6 - BUTTON HEAD CAP SCREWS
6 - STAR WASHERS (LOCK WASHERS)
1 - OWNERS MANUAL
1 - WARRANTY CARD
1 - HEART RATE TRANSMITTER WITH
STRAP (HRC MODELS ONLY)
ASSEMBLY
TRUE treadmills are shipped in two pieces:
the pedestal assembly (which includes the
control console) and the base.
Instructions for assembling the unit:
1. Remove the protective packaging
materials. NOTE: Do not lift the treadmill
by the motor when removing from carton!
2. Lay pedestal on deck as shown. (Fig. 1)
3. Raise top of pedestal into place.
4. Install three of the enclosed screws with lock
washers on each side, then tighten all six
screws. (Fig. 3)
Fig. 2
Fig. 3
IMPORTANT: Do not operate unless all six
screws are fastened securely. Be sure
screws and lock washers thread into the
holes in pedestal. Reverse procedure
whenever removing the pedestal. Remove
pedestal console only while treadmill is at
zero grade and unplugged.
ELECTRICAL REQUIREMENT:
Your TRUE treadmill requires a dedicated
110 VAC 15 amp grounded outlet circuit.
WARNING: Do not use an extension cord or
an ungrounded outlet. The ground helps
prevent electrical damage to your treadmill and
enhances your safety by preventing shock.
This grounded outlet is critical for the HRC
system to function properly. NOTE: Units
produced for use outside of the U.S.A. will have
voltage indicated on the identification tag.
BELT ADJUSTMENTS
Your treadmill’s running belt has been
properly aligned at the factory. However,
when the treadmill is used on an uneven
surface, please follow these instructions:
PREFERRED METHOD
Level the treadmill by placing shims 1/8” to
3/8” thick under the front wheel and rear
shock absorber on one side. NOTE: This
method will provide extended belt life by
keeping both rollers parallel. Adjusting the
belt tracking by using the roller bolts will
cause the belt to stretch on one side.
Treadbelt Tension & Safety Features
NOTE: Your authorized True dealer
may provide additional support.
ALTERNATIVE METHOD
1. Stand beside the treadmill, attach the safety
key on the control panel and follow operating
instructions for running the treadmill at 3
mph. (Section 2.5)
2. If the belt is off-center to the right, turn the
left roller adjustment bolt counter clock-wise
1/4 turn. If the belt is off-center to the left,
turn the left roller adjustment bolt 1/4 turn
clockwise. (Figure 1 Detail 1) Observe belt:
if more correction is needed, turn the adjustment bolt 1/4 turn and check again. Repeat
as needed.
3. Let the machine run for several minutes to
check the alignment. (Belt alignment does
not need to be perfect).
TREADBELT TENSION:
To assure maximum life of the treadbelt, roller
and drive motor, make sure the treadbelt
tension is set correctly. (Your treadbelt has
been properly tensioned at the factory.)
Figure 1
Turn both rear roller adjustment bolts
(Detail 1) counter-clockwise until treadbelt
just begins slipping when walking on it, then
turn both rear roller adjustment bolts clockwise in equal quarter turn increments until
treadbelt stops slipping. NOTE: Be sure to
run on treadbelt to ensure that the treadbelt
does not slip while under load.
1-5
SAFETY FEATURES
PADDED HAND RAIL
The padded hand rail and side rails are
mounted to the rear of the control console.
The bars provide a convenient support to
use throughout your workout.
ON/OFF SWITCH
The on/off switch is located to the right of the
power cord on the front of the machine. It
completely removes AC power from your
treadmill. [ It is recommended that you use this
switch to turn the machine off after each workout.]
CIRCUIT BREAKER
Your TRUE treadmill is protected from
overload by a 15 amp circuit breaker that can
be reset in the event of a power overload. It is
located to the left of the power cord.
SAFETY KEY AND LANYARD
You can protect yourself from injuries resulting
from unexpected loss of balance by attaching
the lanyard to your clothing at about waist
height when you use your treadmill. When the
safety key is detached, your treadmill will not
operate. Storing the safety key in a secured
location while your treadmill is not in use will
prevent children and other unauthorized
users from operating your treadmill.
REAR ROLLER SHIELDS
Steel guards over the ends of the rear roller
prevent towels and other items from getting
caught in the running belt.
FULLY ENCLOSED MOTOR
The motor and flywheel are fully enclosed in a
protective metal compartment.
LOW PROFILE FRAME
To enhance safety, TRUE treadmills are
designed to be as low to the ground as possible.
Indicates incline
in percent
of grade in .5%
increments
Indicates miles traveled in .01 mile increments up to 9.99, and .1 mile
increments past 10 miles. Can also be set to countdown
(See countdown on page 2-7)
Stops the treadmill
at any point in your
workout. Information
will be retained unless
the safety key is removed or key is held for 5 seconds (Resets to 0)
Adjusts the grade at
any time during your
workout. Sets distance to countdown. Also used
to scroll through programs
1. Instructs during
setup.
2. Provides updated
information on progress
during workout.
DOT MATRIX
STOP/PAUSE:
Indicates elasped
time after pressing
start (0-99minutes and 59 seconds).
Can also be set to
countdown, (See
countdown page 2-7)
TIME:
Indicates estimated
calories burned.
Based on weight,
speed, grade and
time
CALORIES:
Access your favorite
workouts.Choose fr
target HRC workout
pre-programs and custom programs.
EXPRESS KEY
(Not available o
500, 540P mod
Access your favorite
workouts.Choose from target HRC workout, pre-programs and custom programs.
EXPRESS KEYS:
(Not available on
500, 540P models)
One MET is the amount of energy
your body uses at
rest. If a physical
activity has an equivalent of six METS,
its energy demands
are six times that of your resting state
METS:
Used to enter your weight.
Also for viewing dual function
windows of speed/pace
and calories/metabolic rate
SELECT/enter:
Used to adjust speed
in .1 mph increments, to
enter weight, other
workout parameters, and to set time to countdown
SLOW/FAST:
Indicates amount of
time required to
complete 1 mile at
that current speed
PACE:
Indicates mph in .1
increments
SPEED:
HRC MODEL SHOWN
UP/DOWN:
Starts the treadbelt in motion. Also resets distance, time, calories when held for 3 seconds.
START/reset:
KEYS
GRADE:
DISTANCE:
WINDOWS
500/540 CONTROL PANEL
2-1
Control Panel Functions
HRC MODEL SHOWN
550 CONTROL PANEL
Control Panel Functions
2-2
540/550 CI (CARDIOINTERACTIVE) CONTROL PANEL
2-3
Control Panel Functions
S.O.F.T. Select and Express Command Keys
THE TRUE S.O.F.T. SYSTEM IS A
DIFFERENCE YOU CAN FEEL.
True’s unique S.O.F. T. System is the most
advanced shock-absorbing system available.
It cushions the initial impact and then
transitions to a firm, secure surface for
push-off providing lateral stability throughout,
eliminating deck shift from side to side. The
benefit is less stress on the ankles, knees,
hips and back.
ADJUST THE FEEL WITH
S.O.F.T. SELECT.
All True S.O.F.T. Select series treadmills (540,
550 models) take the user to a new level of
comfort. Now you can “personalize” the
treadbelt surface to suit your walking or running needs, from soft to firm or anywhere in
between.
2-4
• Adjustment of S.O.F.T. Select: Press and
hold either
or
.
SOFTER
FIRMER
• To review your S.O.F.T. Select Setting:
Quickly press either
or
.
SOFTER
FIRMER
NOTE: Movement of S.O.F.T. Select motor
does not occur until
is pressed.
MESSAGE CENTER
ACCESS YOUR FAVORITE WORKOUT
WITH EXPRESS KEYS ON HRC MODELS.
This True feature is ideal for users of differing
weights or those with special physical needs.
MANUAL ADJUSTMENT
It’s simple for the user to choose from 12
manually adjustable settings on the right side
of the treadmill base.
NOTE:500 model does not include
interval HRC.
Simply slide the S.O.F. T. Select control knob
to the desired setting.
ELECTRONIC ADJUSTMENT (550 CI)
You electronically adjust the settings on the
550 CI models on the control panel. The
display will indicate the level from 1-12. With
1 being the softest and 12 being the firmest.
This special feature makes it even quicker
and easier to meet your changing workout
needs.
True HRC models feature Express Keys
which allow simple access to HRC workouts
and pre-programs. 550 Pre-programmed
models also offer one touch Express Keys to
access pre-programs.
550P MODEL
2-5
Quick Reference Operating Instructions
The following is a quick overview of the basic operating
features of your True treadmill.
While more detailed operating instructions are on the
following pages, these quick references will familiarize
you with the basic operating procedures needed to get
started.
BASICS:
TO END WORKOUT:
• Straddle Treadbelt
• Place Safety Key onto the keyboard,
attach lanyard to clothing
Slow Machine To Below 2 mph
Using
Key
QUICK START:
(Manual Workout Only)
Press
Adjust Speed Using
Adjust Grade Using
Keys
Keys
PROGRAMS: (IF AVAILABLE)
Set Your Weight Using
Press
Scroll To Desired Program
Using
Keys
Set Program Level Using
(Pre Programs Only)
Press
Set Time Using
(15:00-99:00 Minutes)
Press
Keys
Keys
Keys
Press
Key
Quick Reference Operating Instructions
2-6
With Express Command Keys
The following is a quick overview of the basic operating features of your
True treadmill. While more detailed operating instructions are on the
following pages, these quick references will familiarize you with the
basic operating procedures needed to get started.
BASICS:
• Straddle Treadbelt
• Place Safety Key onto the keyboard,
attach lanyard to clothing
HEART RATE CONTROL:
Set Weight Using
Keys
Press
Press
to access HR workout.
Scroll through workouts using same
HRC Key used to access workouts
Press
Edit HR Using
Keys
Press
Edit Max. Speed Using
Keys
Press
Edit Time Using
Keys
TARGET HRC
CRUISE
CONTROL
(For Interval HRC There Will Be Several Time
Variables To Edit. Total Time, Work Time,
Rest Time.)
Press
Edit Max. Grade Using
Press
Keys
CRUISE CONTROL:
Enter Manual Workout While Wearing Heart
Rate Transmitter. (Heart Rate Will Be
Displayed In Heart Rate Window.)
When You Reach Desired Heart Rate
Press
TARGET HRC
CRUISE
CONTROL
QUICK START:
(Manual Workout Only)
Press
Adjust Speed Using
Adjust Grade Using
Keys
Keys
PROGRAMS:
HRC MODELS:
Set Your Weight Using
Keys
Press
Press
key to access programs
PROGRAMS
Scroll To Desired Program
Using
Key
Set Program Level Using
Keys
(Pre Programs Only) Press
Set Time Using
Keys
(15:00-99:00 Minutes)
Press
PROGRAMS
550 MODELS:
Set Your Weight Using
Keys
Press
Press Desired Program Key
Set Program Level Using
Keys
Press
Set Time Using
Keys
(15:00-99:00 Minutes)
Press
TO END WORKOUT:
Slow Machine To Below 2 mph
Using
Key
Press
Key
2-7
Manual Program Operating Instructions
BASICS
• Straddle Treadbelt
• Place Safety Key onto the keyboard,
attach lanyard to clothing
QUICK START
(Manual Workout Only)
Press
Adjust Speed Using
Adjust Grade Using
Keys
Keys
BASIC START-UP
• Plug machine into a grounded 110
VAC outlet.
• Turn on the power switch.
• Step onto the treadmill.
• Straddle the treadbelt.
• Place safety key onto the keyboard.
• Connect safety lanyard clip to the waist
band of your clothing. Do not operate
treadmill without safety lanyard clipped to
your clothing at about waist height.
Caution: When the safety key is placed on the
keyboard, the treadmill will return to 0% grade.
Please keep the area under the treadmill free
from obstructions.
The message will read
WGT FAST/SLOW followed by
PRESS SELECT
PRESS START
The time window will display last entered
weight. Use
to change the
weight and press
.
MANUAL MODE
• Message now reads
NEXT UP/DN followed by
PRESS START
Press
to get tread belt moving.
• Hold the grab bar and carefully step onto
the treadbelt and begin walking. It is
important to start at a safe speed. It is not
recommended to exceed 2.0 mph when
starting the treadmill.
• Speed and grade may be adjusted any time
during your workout by pressing
for speed and
for grade.
• To stop or pause your workout: Slow
machine to below 2 mph by pressing
Press
. This will stop the treadbelt
and retain all workout information. To restart
your workout, press
, enter speed and
step back onto treadbelt. To shut off the
control panel, remove the safety key and
turn off the on/off switch. (Located by the
power cord.)
• To reset distance, time, and calories:
(During workout) Press and hold
until
zeros appear in the time, distance, calorie
windows. If not in use, press and hold
.
Countdown Feature: (Time and distance)
500, 540-Enter weight press
(twice) or
until the lights in the time and distance windows
flash. Press
to set distance
and
to set time. When you press
, time and distance will begin counting
down.
550-Enter weight press
Press
again and ADJ TIME will appear in
message center. Set time using
key or 10-key pad. Message reads: PRESS
again and ADJ DISTANCE
ENTER. Press
using
keys. Message reads:PRESS
START. Press
.
NOTE: These functions will give you an audible signal
and begin counting up when the time or distance has
reached zero. The treadbelt will continue to move.
2-8
Pre Program Operating Instructions
BASIC START-UP
• Plug machine into a grounded 110 VAC
outlet.
• Turn on the power switch.
• Step onto the treadmill.
• Straddle the treadbelt.
• Place safety key onto the keyboard, attach
lanyard to clothing.
Caution: When the safety key is inserted, the
treadmill will return to 0% grade. Please keep
the area under the treadmill free from
obstructions.
• Connect safety lanyard clip to the waist
band of your clothing. Do not operate
treadmill without safety lanyard clipped to
your clothing at about waist height.The
message will read ADJ WGT FAST/SLOW
followed by PRESS SELECT .
The time window will display last entered
weight. Use
to change the
weight and press
.
PROGRAM MODE 500/540
• NEXT UP/DN message appears, followed
by EDIT SELECT. Press
or
to
access the programs
• Press
and the message will read
HILL INTRVL followed by ADJ LVL FAST/SLOW
followed by PRESS START. Scroll to desired
program using
keys.
Select a level using
Press
After program and level have been
selected, set time using
keys
(15:00-99:00 minutes)
Press
to begin
• Carefully step onto treadbelt.
• To Stop or pause your workout: slow
machine to below 2 mph by pressing
Press
. This will stop the program
and save all valuable information. To restart
a program, press
. To end workout,
press
and remove the safety key.
• To reset distance, time, and calories:
(During workout) Press and hold
until
zeros appear in the time, distance, calorie
windows. If not in use, press and hold
.
• To change level during workout: press and
hold
. L - will appear in speed window,
press
keys to select new level.
After new level is entered press
.
• Recall of accumulated data (at end of work
out): obtained by pressing the
.
550Z P MODEL:
Set Your Weight Using
Press
Press Desired Program Key
Set Program Level Using
Press
Set Time Using
Minutes)
Press
Keys
Keys
Keys (15:00-99:00
NOTE: All workouts (programs) are able to be set from
15:00 - 99:00 minutes. Default value (if no time entered)
is 30:00 minutes. When timer reaches 0:00 it will beep
and begin counting up. You must press
to end
workout!
NOTE: When in run mode user may switch from one
workout to the next selected, joining the workout in
process at the same time as the prevous workout.
EXAMPLE: Working out in weight loss at the 15:00
mark user pressed CV Workout, computer and readout
reflects move to CV Workout and continues countdown
at 15:00.
2-9
Pre-Program Operating Instructions With Express Keys
500 HRC, 540 HRC/CI, 550 HRC/CI
BASIC START-UP
• Plug machine into a grounded 110 VAC
outlet.
• Turn on the power switch.
• Step onto the treadmill.
• Straddle the treadbelt.
• Place safety key onto the keyboard.
• Connect safety lanyard clip to the waist
band of your clothing. Do not operate
treadmill without safety lanyard clipped
to your clothing at about waist height.
Caution: When the safety key is inserted, the
treadmill will return to 0% grade. Please keep
the area under the treadmill free from
obstructions.
The message will read:
WGT FAST/SLOW followed by
PRESS SELECT
The time window will display last entered
weight. Use
to change the
weight and press
.
PROGRAM MODE
• NEXT UP/DN message appears,
followed by EDIT SELECT. Press
to access the programs, or , on 550Z,
press desired program key.
• Select a level using
Press
After program and level have been
selected, set time using
keys (15:00-99:00 minutes)
Press
to begin
• Carefully step onto treadbelt.
PROGRAMS
• To Stop or pause your workout: slow
machine to below 2 mph by pressing
Press
. This will stop the program
and save all valuable information. To restart
a program, press
. To end workout,
press
and remove the safety key.
• To reset distance, time, and calories:
(During workout) Press and hold
until
zeros appear in the time, distance, calorie
windows. If not in use, press and hold
.
• To change level during workout: press and
hold
. Press
keys to select
new level. After new level is entered press
.
• Recall of accumulated data: obtained by
pressing the
.
USER PROGRAM
A total of 50 changes can be made to speed
and/or grade in a user program. One speed
and grade change per 30 second time block
ie: (0-:30, :30-1:00, 1:00-1:30) can be made.
NOTE: If you wish the program to end at
zero speed, your last :30 entry should be
zero speed when you stop the treadmill.
• Complete a manually-controlled workout.
• Press
.
• Press and hold
until SAVE USER 1
appears.
• Press
until USER 1, 2 OR 3 message
appears. When you have selected
which user file you want to save to, press
and hold the
until SAVE USER 1,
USER 2 OR USER 3 message appears.
• Your user program is now saved.
• Remove the safety key.
HILL INTERVAL WORKOUT
LEVEL
Pre-Program Profiles
solid line is the grade
screened area is the speed
solid line is the grade
LEVEL
screened area is the speed
CARDIOVASCULAR WORKOUT
solid line is the grade
solid line is the speed
screened area is the grade
LEVEL
screened area is the speed
SPEED INTERVAL WORKOUT
SPEED (MPH)
MIN
MAX
GRADE (%)
MIN
MAX
1
2.0
2.4
1.0
4.0
2
2.2
2.8
1.5
5.0
3
2.6
3.2
2.0
6.0
4
3.0
3.6
3.0
7.0
5
3.4
4.2
4.0
8.0
6
3.8
4.6
5.0
9.0
7
4.0
5.0
6.0
10.0
8
4.4
5.4
7.0
11.0
9
4.8
6.0
8.0
12.0
SPEED (MPH)
LEVEL
WEIGHT LOSS WORKOUT
2-10
MIN
MAX
GRADE (%)
MIN
MAX
1
1.4
2.6
0.0
2.0
2
1.6
2.8
0.5
3.0
3
1.8
3.0
0.5
4.0
4
2.0
3.2
1.0
5.0
5
2.2
3.4
1.5
6.0
6
2.4
3.6
2.0
7.0
7
2.6
3.8
2.5
8.0
8
2.8
4.0
3.0
9
3.0
4.2
3.5
SPEED (MPH)
MIN
MAX
9.0
10.0
GRADE (%)
MIN
MAX
1
2.0
2.4
0.5
4.0
2
2.2
2.8
0.5
5.0
3
2.6
3.2
0.5
6.0
4
3.0
3.6
1.0
7.0
5
3.4
4.2
1.0
8.0
6
3.8
4.6
1.0
9.0
7
4.0
5.0
1.0
10.0
8
4.4
5.4
1.0
11.0
9
4.8
6.0
1.5
12.0
SPEED (MPH)
MIN
MAX
GRADE (%)
MIN
MAX
1
2.0
2.4
2.0
4.0
2
2.2
2.8
3.0
5.0
3
2.6
3.2
4.0
6.0
4
3.0
3.6
5.0
7.0
5
3.4
4.2
6.0
8.0
6
3.8
4.6
7.0
9.0
7
4.0
5.0
8.0
10.0
8
4.4
5.4
9.0
11.0
9
4.8
6.0
10.0
12.0
2-11
User Program
Creating and Using User Programs
During a manually-controlled workout, your treadmill always “records” the changes you make
in speed or incline. This recording can be saved as a User Program that you can “play back”
to use as custom-designed workouts.
Up to 50 changes in speed or incline can be recorded. Each speed/incline pair of changes
must be separated by at least 30 seconds.
To save a manual workout, press
as you normally would to end your workout. Now press
and hold
until the display shows Save User 1.
You can save your workout in User 1, or press
to select User 2 or User 3. Press and hold
to save your workout in the User Program you have selected.
To use a User Program that you have saved, simply select it from the list of programs as
described in “Programmed Workouts” in the previous section.
HRC / CI Introduction
2-12
HRC AND CI MODELS ONLY
INTRODUCTION
You are now the owner of the most sophisticated
Heart Rate Control treadmill available. The TRUE
HRC is unique and patented. It accommodates
users from rehabilitation to world class athletes, and
all those in between. The TRUE HRC treadmill
allows you to do a completely hands free heart rate
controlled workout using speed, grade or both.
By training at a specific target heart rate, you can
exercise at a more efficient cardiovascular level.
The TRUE HRC system is unique because it
allows you to key parameters of your workout;
target heart rate, maximum speed, maximum grade,
and time, prior to beginning your HRC workout. As
you approach your target heart rate, the treadmill’s
computer takes over and changes the speed and/or
grade automatically to keep you near your target
heart rate. This gives you a completely “hands free”
workout.
RECOMMENDATIONS
Before selecting a target heart rate control workout, it
is important to use the treadmill for several workouts
in the manual mode while monitoring your heart rate.
You can monitor your heart rate during workouts by
wearing the heart rate transmitter included with your
treadmill.
After you have spent some time learning how your
heart responds to different levels of speed and grade,
you will have a better understanding of how to select
the maximum speed and maximum grade required to
reach your target heart rate.
CONSULT YOUR PHYSICIAN TO DETERMINE
YOUR TARGET HEART RATE.
WORKOUT GUIDELINES
1. Target Heart Rate Training
(Heart Rate Workouts 1-5):
Preset your target heart rate, maximum speed,
maximum grade, and time of workout. These are
time-based workouts. The distance traveled will
vary depending on speed.
2. 2 Mile, 4 Mile, 5K, and 10K Target Heart Rate
Training (540 CI, 550 CI,and 550 HRC only)
For these workouts you preset target heart rate,
maximum speed, and maximum grade. These
are distance-based workouts. The duration of the
workout will depend on your speed.
3.
Interval Heart Rate Training
(Model 540 HRC/540 CI/550 Only)
Interval heart rate training takes your workout to
an even higher level. Interval training allows you to
program periods of rest between periods of work.
For each workout, you enter target heart rate,
maximum speed, maximum grade, duration of
workout, and duration of work and rest intervals.
These are time-based workouts. The distance
traveled will depend on your speed.
4. Cruise Control (see 2-16)
Manual workout with heart rate transmitter. When
you reach desired heart rate, press cruise control
key and it’s hands-free.
5. Manual Workout:
This is a completely user controlled workout. You
control the speed and the grade throughout your work
out. Your heart rate may be monitored during this
workout, but it is not heart rate controlled.
6. Programs:
There are four preprogrammed workouts:
• Hill Interval workout
• Weight Loss workout
• Cardiovascular workout
• Speed Interval workout
Each workout has nine levels of intensity. The
treadmill controls both the speed and grade.
These are not heart rate controlled, but will
monitor heart rate.
User determines duration of programs are 15:00
to 99:00 minutes.
7. User Program:
A total of 50 changes can be made to speed
and/or grade in a user program. One change per
30 second time block, IE: (0-:30, :30-1:00,1:001:30) can be made.
8. Method Used To Increase Heart Rate:
To raise your heart rate in the HRC mode, speed
will always increase until maximum speed is
attained, followed by grade (if grade is used
in the workout).
9. Method Used To Decrease Heart Rate:
To lower heart rate in the HRC mode, grade will
always decrease until zero grade is reached,
followed by speed (if grade is used in the workout).
10. Speed Change:
Each change in speed is in .1 mph increments.
11. Grade Change:
Each change in grade is in .5% grade increments.
NOTE: The heart rate control workouts are files which store workout parameters once you have completed an
HRC program. You do not need to enter all parameters each time you use the same workout. Just insert the safety
key, select which file or workout you want, and press start.
2-13
True Target Heart Rate Control: How It Works
This unique, simple, and safe system is
easy to use and understand.
The user first sets their personal
maximums for both speed and grade. This
allows the user to customize and create a
variety of workouts. By setting personal
maximums for speed and grade, the user is
provided safe workouts that fit their capabilities. Once this data is entered, along with
target heart rate and workout time, the user
is ready to start their Heart Rate Control
workout.
The initial stage of the Heart Rate Control
workout is the warm-up stage and allows the
user the flexibility to adjust their speed or
grade at anytime. The warm-up stage is not
predetermined by the amount of time input
prior to workout, and the user may take as
much time as they wish to approach their
target heart rate. The warm-up stage ends
when the user’s heart rate is 10 beats below
the pre-set target heart rate.
At this point, the user enters the Heart Rate
Control stage, and the treadmill’s computer
takes control of both the speed and grade
(hands free).
The treadmill software gradually increases
the user’s heart rate to within 10 beats of the
target heart rate.
In the situation where workload needs to be
increased in order to elevate the heart rate,
the speed will be increased first in 1/10 mph
increments.
If needed, the speed will continue to
increase up to the pre-set maximum. If the
user still requires additional workload to raise
the heart rate, the grade will be raised in .5%
increments up to the maximum pre-set grade
(unless zero grade was entered as parameter).
Conversely, whenever the workload needs
to be reduced in order to lower the heart rate,
the grade will always be reduced first. The
grade will be reduced to zero (if required),
before speed is reduced.
EXAMPLES OF HOW HRC CAN WORK
FOR YOU:
Example #1:
A user who physically cannot walk over
2.5 mph can safely use heart rate
control by entering maximum speed of
2.5 mph in a Heart Rate Control workout.
Example #2:
A runner can run up to a speed of 10 mph,
without hills, by entering a maximum
speed of 10 mph and a maximum grade
of 0%.
Example #3:
A walker enters a maximum speed of
4.0 mph and a maximum grade of 6%.
The walker is limited to a maximum
speed of 4.0 mph and grade will be
used if required to elevate the heart
rate up to a maximum of 6%.
Cardiointeractive & HRC Target Operating Instructions
2-14
HRC AND CI MODELS ONLY
OPERATING INSTRUCTIONS
500/540/550 HEART RATE
CONTROL
Before beginning operation in
Heart Rate Control, you must
first attach the heart rate
transmitter around your
chest. The radio frequency transmitter strap
should be worn directly
against your skin, 1-2 inches
below the pectoral muscles/
breast line. Women should be careful to place
the transmitter below their bra line. Initially, the
transmission signal for heart rate may be erratic
or non-existent. Perspiration on your skin is
necessary for proper transmission. In most
cases, by the end of your warm up, transmission
becomes consistent and accurate. If not, saline
solution should be used to moisten the sensors
on the back of the strap.
The Heart ( ) LED will flash, showing that the
heart rate signal is received.
BASIC START-UP
MODEL 500Z AND 540Z
• Plug machine into a grounded 110
VAC outlet.
• Turn on the power switch.
• Step onto treadmill.
• Straddle treadbelt.
• Place safety key onto the keyboard, attach
lanyard to clothing.
Caution: When the safety key is inserted, the
treadmill will return to 0% grade. Please keep
the area under the treadmill free from
obstructions.
• Connect safety lanyard clip to the
waistband of your clothing. Do not operate
treadmill without safety lanyard clipped to
your clothing at about waist height.The
message will read:
WGT FAST/SLOW followed by
PRESS SELECT/PRESS START
NOTE: 550 CI model only, soft select position shows briefly in message center.
The time window will display last entered
weight. Use
to change the
weight and press
ALL TRUE HEART RATE CONTROL
WORKOUTS CONSIST OF THREE
STAGES:
1. Warm -up Stage
2. Target Heart Rate Control Stage
3. Cool Down Stage
TO USE TARGET HRC WORKOUTS
Press the
TARGET HRC
CRUISE
CONTROL
Message Reads
EDIT/SELECT
NEXT UP/DN
PRESS START-only when ready to begin the
workout.
NOTE: Check the target heart rate each time
you use target heart rate training workouts.
Press
TARGET HRC
CRUISE
CONTROL
to scroll to desired workout.
2-15
Cardiointeractive & HRC Target Operating Instructions
Press
(In the window labeled heart rate
the last edited heart rate will appear.)
The message will read:
ADJ TARGET + NEXT-SELECT
PRESS START.
Using
, edit heart rate.
Press
.
The message will read:
ADJ MAX SPEED + NEXT-SELECT
PRESS START.
Using
, enter your desired
maximum speed.
Press
.
The message will read:
ADJ TIME + NEXT-SELECT
PRESS START.
Using
, enter your desired time at
target heart rate.
Press
.
The message will read:
ADJ MX GRD + NEXT-SELECT
PRESS START.
Using
, enter your desired
maximum grade.
NOTE: Time is not entered for 2 mile, 4 mile,
5K, and 10K workouts. These are distance
based workouts. (Refers to 540/550 Model
only.)
Press
to begin your workout.
NOTE: If you accidentally press
again,
the HEART RATE window will flash.
Press
to begin your workout.
The message will read:
STARTING 3
STARTING 2
STARTING 1
ADJ SPEED + ADJ GRADE + WARM UP
TARGET XXX
WARM UP STAGE
The treadmill will operate as if in the manual
mode during the warm-up stage. You control
both speed and grade. You may only increase
speed and grade to the preset maximum
values entered. It is important that you start at
a low level of perceived exertion and gradually
increase your work load over several minutes
until you approach your target heart rate. This
allows your body to adapt to your workout.
Increasing work load gradually will allow you
to enter the heart rate control stage without
overshooting your target.
NOTE: Warming up too fast may cause you
to overshoot your target. If this occurs it may
take several minutes before the computer
software can control your heart rate. You may
overshoot and undershoot your target for
several minutes until control is achieved.
Wear the heart rate transmitter, provided
with your treadmill, directly against your skin,
1-2 inches below the pectoral muscles/breast
line. Initially the transmission signal for heart
rate may be erratic or non existent.
Perspiration on your skin is necessary for
proper transmission. The Heart ( ) LED will
flash, showing that the heart rate signal is
received.
Warm-up Stage Instructions: Using
,
gradually increase speed to a comfortable
walk. If you have entered a maximum grade in
your workout, you may increase grade gradually by using
.. Remember, warm up
slowly! Continue increasing speed and/or
grade to gradually increase your heart rate.
You may only increase speed and grade to
the preset maximum values entered.
2-16
Cardiointeractive & HRC Target Operating Instructions
When your heart rate is within 15 beats from
the target, the message will read
APPROACHING TARGET XXX
NOTE: If while you are warming up you feel
that your selected target is too high or too
low, you can edit your target heart to a new
value as follows:
Press
Using
, edit heart rate (a maximum
of 5 beat changes are permitted when editing
target heart rate down). Do this only while
display is flashing or the software may exit
you from heart rate control.
TARGET HRC
CRUISE
CONTROL
NOTE: Do not touch
or
.
Touching any key before pressing
or
first will immediately exit you from heart
rate control and begin your cool down stage.
TARGET HRC
As your heart rate increases or decreases from
your target, the treadmill will automatically
make adjustments to speed and/or grade to
keep your heart rate near your selected target.
If your speed or grade reaches your preset
maximums, MAX SPEED or MAX GRADE will be
displayed.
NOTE: To edit your target heart rate to a
new value while in heart rate control stage:
Press
or select/enter. (The target
value will be displayed, TARGET XXX, ADJ
TARGET +-).
TARGET HRC
Press
or select/enter to set new heart
rate target or wait 5 seconds and new target
will be recognized. Continue to warm up.
TARGET HRC
CRUISE
CONTROL
HEART RATE CONTROL STAGE
Heart Rate Control Stage Instructions: When
your heart rate is 10 beats away from your
target, the message will read:
BEGINNING
TARGET HRC
HANDS FREE
The computer software takes control of the
treadmill at this point, allowing “HANDS FREE”
operation. The time window will reset and
begin descending from the time you originally
entered in the setup of the workout parameters.
The treadmill’s computer now controls all
speed and grade changes. The treadmill will
gradually continue to increase your workload
until you reach your selected target heart rate.
When your heart rate is at plus or minus 2
beats, the message center will read:
AT TARGET
CRUISE
CONTROL
CRUISE
CONTROL
Using
edit heart rate. (a maximum
of 5 beat changes are permitted when editing target heart rate). Do this only while the
display is flashing or the software may exit
you from heart rate control.
Press
to set new target heart rate or
wait 5 seconds and new target will be recognizd. The treadmill will now adjust the work
load to bring you to your new target. To end
your workout before the time you previously
selected, press
.
TARGET HRC
CRUISE
CONTROL
2-17
Cardiointeractive & HRC Target Operating Instructions
COOL DOWN STAGE
Cool Down Stage Instructions: When time is
elapsed or distance has reached zero and
the HRC stage is completed, there will be an
immediate 50% MET reduction in your work
load. The message will read:
COOL DOWN followed by audible signal
AVG HEART RATE XXX
DIST XXX
CALS XXXX
TIME XX:XX
COOL DOWN
NOTE: Your accumulated average heart rate,
distance, calories, and time are summarized.
COOL DOWN will remain in the message to
remind you that you are in the cool down
stage.
The treadmill will now operate in the manual
mode. The time will reset to 00:00 and begin
to ascend. You will be in complete control of all
speed and grade changes. It is recommended
that you spend an equal amount of time in the
cool down stage as you did in the warm up
stage, or a minimum of at least two minutes.
Press
when you are finished!
NOTE: Workout totals of average heart rate,
time, distance and calories will appear in
message at the end of your workout. If you
prematurely press speed or grade to end your
workout during the HRC stage, you will enter
the cool down stage and your workload will
remain constant. You may then manually
adjust speed and grade.
NOTE: Accumulated data of average heart
rate, distance, calories, and time is displayed
each time
is pressed.
Cruise Control Operating Instruction
CRUISE CONTROL HEART RATE
CONTROL
Here’s the simplest way to enter target heart
rate training. While in manual workout on all
HRC, CI models, you can easily enter Target
Heart Rate Control by simply pressing the
Target Heart Rate Express Key marked
Cruise Control.
• Secure heart rate transmitter around
chest. (see page 2-12.)
• Step onto treadmill.
• Straddle treadbelt.
• Place safety key onto the keyboard.
Caution: When the safety key is inserted, the
treadmill will return to 0% grade. Please keep
the area under the treadmill free from
obstructions.
Connect safety lanyard clip to the
waistband of your clothing. Do not operate
treadmill without safety lanyard clipped to
your clothing at about waist height.
The message center will read
WGT FAST/SLOW followed by
PRESS SELECT/PRESS START
The time window will display last entered
weight. Use
to change the
weight and press
Press
.
Begin manual workout, heart rate will be
displayed as it is picked up. When you reach
desired heart rate press
(cruise control).
You are now hands-free in target heart rate
control.
TARGET HRC
CRUISE
CONTROL
NOTE: To change target press
You are now in full manual control.
Work to desired target heart rate
press
.
TARGET HRC
TARGET HRC
CRUISE
CONTROL
To end workout press
.
CRUISE
CONTROL
.
2-18
• To increase your heart rate while in the HRC
mode, the speed will always increase until
the maximum speed is attained, then the
grade will begin to increase.
• To lower heart rate in the HRC mode, grade
will always decrease first, followed by
speed.
• If you enter the HRC stage, below 5mph,
the speed you enter will be the maximum
speed of your workout. i.e.: If you like to walk
at a maximum speed of 3.8 mph, you should
enter HRC at 3.8 mph.
• If you enter the HRC stage above 5 mph,
you will have an additional 1 mph of speed.
i.e.: If you enter HRC at 6 mph, your
maximum attainable speed in the HRC
stage will be 7 mph.
• If at any time you enter the HRC stage with
grade, you will have an additional 4% of
grade available in the HRC stage. i.e.: If you
enter the HRC stage at 1% grade your
maximum attainable grade will be 5%.
• If you do not enter the HRC stage with
grade, no grade will be available during the
HRC stage of your workout. Only speed
will be used to control your heart rate.
EXAMPLES OF WALKING WORKOUTS:
1.Enter HRC at 3.5 mph and 4% grade to
allow a maximum speed of 3.5 mph and
8% grade.
2.Enter HRC at 4.2 mph and 6% grade to
allow a maximum speed of 4.2 mph and
10% grade.
EXAMPLES OF RUNNING WORKOUTS:
1.Enter HRC at 6 mph and 0% grade to allow
a maximum of 7 mph and 0% grade.
2.Enter HRC at 5 mph and 2% grade to allow
a maximum of 6 mph and 6% grade.
2-19
Cardiointeractive HRC Interval Operating Instructions
ALL TRUE HEART RATE CONTROL
WORKOUTS CONSIST OF THREE
STAGES:
1. Warm -up Stage
2. Target Heart Rate Control Stage
3. Cool Down Stage
TO USE HRC INTERVAL WORKOUTS
Interval Workouts offer variety and help you
attain higher levels of conditioning in a shorter
period of time.
It is recommended that you do not do an
interval workout until you have used this
treadmill on a regular basis and have a
working knowledge of your target heart rate
and fitness level.
BASIC START-UP 500ZCI, 550Z HRC/CI
Models
• Plug machine into grounded 110 VAC
outlet.
• Turn on the power switch
• Step onto the treadmill
• Straddle the treadbelt.
• Place safety key onto the keyboard.
Caution: When the safety key is inserted, the
treadmill will return to 0% grade. Please keep
the area under the treadmill free from
obstructions.
• Connect safety lanyard clip to the
waistband of your clothing. Do not operate
treadmill without safety lanyard clipped to
your clothing at about waist height.
Message will read
WGT FAST/SLOW followed by
PRESS SELECT
PRESS START
Last entered weight will be displayed. Use
to change the weight and press
.
Press
Scroll to desired workout using
INTERVAL
HRC
INTERVAL
HRC
Press
(In the window labeled heart
rate the last edited heart rate will appear.)
ADJ TARGET+- will appear in the
message followed by
NEXT-SELECT
PRESS START
Press
heart rate.
Press
to change your target
. The message will read:
ADJ MX SPD + NEXT-SELECT
PRESS START
Press
to enter your desired
maximum speed.
Press
. The message will read:
ADJ TIME +-
NEXT-SELECT
PRESS START
Press
Press
to enter your desired time.
. The message will read:
ADJ WORK +-
NEXT-SELECT
PRESS START
Press
to enter your desired work
interval time. You may adjust work interval
from :30 seconds to 9 minutes in :05 second
segments. Press
. The message will
read:
ADJ REST+-
NEXT-SELECT
PRESS START
Press
to enter your desired rest
interval time. You may adjust rest interval from
:30 seconds to 9 minutes in :05 second segments. Press
. The message will read:
ADJ MX GRD+-
NEXT-SELECT
PRESS START
Press
to enter your desired
maximum grade.
Press
to begin workout.
NOTE: If you accidentally press
again,
the HEART RATE window will flash.
Press
to begin your workout.
Cardiointeractive HRC INTERVAL Operating Instructions
The message will read:
STARTING 3
STARTING 2
STARTING 1
ADJ SPEED +ADJ GRADE +WARM UP
TARGET XXX
WARM-UP STAGE
Warm-up Stage Instructions: The treadmill
will operate as if in the manual mode during
the warm up stage so you can control both
speed and grade. It is important that you
start at a low level of perceived exertion and
gradually increase your work load over
several minutes until you approach your
target heart rate. This allows your body to
adapt to your workout. Increasing work load
gradually will allow you to enter the heart rate
control stage without overshooting your target.
NOTE: Warming up too fast may cause you
to overshoot your target. If this occurs it may
take several minutes before the computer
software can control your heart rate. You may
overshoot and undershoot your target for
several minutes until control is achieved. Wear
the heart rate transmitter provided with your
treadmill directly against the skin 1-2 inches
below the pectoral muscles/breast line.
Initially the transmission signal for heart rate
may be erratic or non existent. Perspiration on
your skin is necessary for proper
transmission. The Heart ( ) LED will flash,
showing that the heart rate signal is received.
NOTE: If while you are warming up you feel
that your selected target is too high or too
low, you can edit your target to a new value as
follows:
Press
(The target value message will
appear, TARGET XXX ). Using
, edit
heart rate (only 5 beat changes are permitted
when editing target). Do this only while display is flashing or the software may exit you
INTERVAL
HRC
2-20
from heart rate control.
Press
to set new heart rate target.
Continue to warm up.
Warm-Up Stage Instructions: Using
gradually increase speed to a comfortable
walk. If you have entered a maximum grade in
your workout, you may increase grade
gradually by using
. Remember, warm
up slowly! Continue increasing speed and/or
grade to gradually increase your heart rate.
You may only increase speed and grade to
the preset maximum values entered.
When your heart rate is within 15 beats from
the target, the message center will read:
INTERVAL
HRC
APPROACHING TARGET XXX
INTERVAL HEART RATE CONTROL
Heart Rate Control Stage Instructions: When
your heart rate is 10 beats away from your
selected target heart rate, the message
center will read:
BEGINNING
INTERVAL HRC
HANDS FREE.
The computer software will take control of
the speed and grade at this point to allow
HANDS FREE operation. By taking control
before you actually reach your target heart
rate, the computer reduces the chances of
overshooting your target heart rate.
NOTE: Do not touch
. Touching any key before pressing
, or
first will immediately exit
you from heart rate control and begin your
cool down stage.
INTERVAL
HRC
The treadmill will now control all speed and
grade changes. The treadmill will gradually
continue to increase your workload until your
heart rate reaches your selected target.
When your heart rate is at the selected
target, the message will read:
AT TARGET
2-21 Cardiointeractive HRC Interval Operating Instructions
The message will then read WORK INT XX:XX . The
time will decrease from the work interval time you
entered. When you reach zero, the The message will
will read REST INT XX:XX . The time will decrease
from the rest interval time you entered.
INT HRC NOTE: additional displayed data include:
HR REMAIN XX:XX (total time remaining at target
heart rate), this message follows both the work
interval and rest interval display.
XX:XXW (displayed in time window) time remaining
in work interval. XX:XXR (displayed in time window)
time remaining in rest interval.
Using
, change your target heart rate.
Only 5 beat changes are permitted when editing
target while in Interval Workouts.
Press
to set new heart rate target. The
treadmill will now adjust the work load to bring
you to your new target. Do this only while the
display is flashing or the software may exit you
from Heart Rate Control. In Interval Training it may
take a few work intervals to bring you to your new
selected target heart rate.
INTERVAL
HRC
To end your workout press
NOTE: Mets and pace is displayed briefly in message center after target message.
As your heart rate increases or decreases from
your target, (while you are in the work interval,) the
treadmill will automatically make the adjustments to
speed and/or grade to keep your heart rate near
your selected target.
Interval Training is one of the fastest ways to
increase cardiovascular fitness. The treadmill will
monitor your heart rate and adjust the speed
and/or grade while in the work interval. When you
enter the rest interval, there will be a 50% MET
reduction. Your work level will remain the same
throughout the rest period to allow your heart rate
to decrease. Your heart rate will be monitored
during this time, but there will be no adjustment to
speed or grade in the rest interval.
When you return to the work interval, your speed
will return to a calculated average of the speeds
and/or grades which were used in the previous
work intervals. Your speed and/or grade may
increase or decrease while you are in your work
interval. This averaging of speed and/or grade
enables you to return to a work level which will
bring you near your selected target heart rate.
NOTE: If you feel that your selected target is too
high or too low, you can change your
target heart rate as follows, when you are in Heart
Rate Control.
Press
. The target value message will
appear:
INTERVAL
HRC
TARGET XXX
ADJ TARGET +-
.
COOL DOWN STAGE
Cool Down Stage Instructions: When the time is
elapsed and the HRC stage of your workout is
finished, there will be an immediate 50% MET
reduction in your workload.
The message center will read:
COOL DOWN followed by audible signal
DIST XXX
CALS XXXX
TIME XX:XX
COOL DOWN.
COOL DOWN will remain in the message center to
remind you that you are in the cool down stage.
The treadmill will now operate in the manual
mode. The time will reset to 0 and begin to
ascend. You will be in complete control of all
speed and grade changes. It is recommended
that you spend an equal amount of time in the cool
down stage as you did in the warm up stage or, a
minimum of at least 2 minutes. Press
when you are finished!
NOTE: Workout totals of average heart rate, distance, calories will be displayed at the end of your
workout. If while in the HRC stage you prematurely end your workout, you will enter the cool
down stage and your work load will remain
constant. You may then manually adjust speed
and grade.
NOTE: Accumulated data of average heart rate,
distance, calories, and time is displayed each time
is pressed.
Heart Rate Control Important Points
• The Heart Rate Monitor strap provided with
your treadmill should be worn directly against
your skin, 1-2 inches below the pectoral
muscles/breast line. Initially the transmission
signal for your heart rate may be erratic or
nonexistent. Perspiration on your skin is
necessary for proper transmission. In most
cases, by the end of your warm-up,
transmission becomes consistent and
accurate. If not, saline solution should be used
to moisten the sensors on the back of the
strap. Women should be careful to place the
transmitter below their bra line. If the
transmitter strap is adjusted or moved while
exercising, communication may be temporarily
affected.
• If communication is lost for 30 seconds, the
treadmill will automatically shut off. It is
important to keep the transmitter adjusted
properly.
• The transmitter emits a fairly weak signal to
the receiver, so interference from more
powerful airwaves (everything from other
exercising equipment to airplanes) is not
uncommon. The good news is that
interference is usually quite brief. If you
continue to have intermittent heart rate
display problems, consult your local service
technician. The problem may be with the
transmitter batteries.
• Oxygen intake directly affects your heart
rate. To prevent your heart rate from spiking
up, maintain a constant rate of oxygen intake.
Maintaining a fluid motion while walking or
running and refraining from talking helps to
keep your heart rate from spiking.
Note: Talking while in the HRC stage can
cause your heart rate to rise independent
of your workload and cause the software to
make necessary changes. This will cause
inappropriate speed and/or grade changes,
and affect the efficiency of your HRC workout.
• A grounded outlet is critical for the HRC
system to function properly.
• If erroneous heart readings are displayed
above the target selected, you can pull the
transmitter portion away from your chest for
several seconds. This will keep you from
exiting HRC.
2-22
• Two users wearing the same kind of transmitter
at the same time, in close proximity, may cause
false heart rate display readings.
• Use only the transmitter provided with your
TRUE HRC Treadmill, or a Polar standard
transmitter.
• Use dedicated 110 VAC, grounded outlet to
help prevent interference.
Your TRUE HRC Treadmill is designed to meet
the needs of both walkers and runners by
adjusting speed and grade accordingly:
• To raise your heart rate in the HRC mode,
speed will always increase first, until you reach
your maximum speed, followed by grade (if
grade is used in the workout).
• To lower your heart rate in the HRC mode,
grade will always decrease first, until you reach
0% grade, followed by speed (if
grade is used in the workout).
• Each change of speed is .1 MPH increments.
• Each change of grade is .5% grade increments.
• For examples of workout maximum speed
and maximum grade, refer to program charts
on page 2-9.
HEART RATE SAFETY PARAMETERS
Your TRUE HRC Treadmill computer software is
programmed with the following safety parameters:
• If your heart rate exceeds your target by 12
beats, there will be a 30% MET reduction in
workload to reduce your heart rate.
• If your heart rate exceeds your target by 20
beats, the unit will automatically shut off as a
precautionary measure. (Be cautious when
selecting your target heart rate so the 20
beat variance will not exceed your maximum
heart rate as determined by your physician).
Heart Rate Control Patent 5,462,504
2-23
Target Heart Rate Chart
AGE
WARNING!
Consult your physician to determine your target heart rate before using the heart rate control mode of this treadmill!
The above chart is to be used only as an average reference point and is in NO WAY a recommendation of your personal
abilities!
Medications may affect your heart rate.
Consult your physician for specific advice before exercising.
Do not use this treadmill if you have an acute illness, cold or fever.
STOP EXERCISING IF:
- YOU FEEL FAINT OR DIZZY.
- YOU EXCEED YOUR MAXIMUM HEART RATE SET BY YOUR PHYSICIAN.
The F.I.T. Formula
THE F.I.T. FORMULA
(Frequency, Intensity,Time)
YOUR FITNESS PROGRAM
You can get valuable fitness benefits from your
TRUE Treadmill. Using the treadmill regularly
may increase the ability of your heart and
lungs to supply oxygen and nutrients to
exercising muscles over an extended period of
time. The treadmill will also help you develop
added muscle endurance and balanced
strength throughout your body.
DETERMINING YOUR NEEDS
Calculate your maximum heart rate as a first
step in developing your fitness program. The
formula to calculate average maximum heart
rate for one minute is 220 beats per minute
minus your age. To find your pulse, locate a
vein on your neck or inside your wrist, then
count beats for ten seconds, then multiply by
six. (Refer to chart on page 2-22.)
It’s also important to know your target
training zone or target heart rate. The
American Heart Association (AHA) defines
target heart rate as 60-75 percent of your
maximum heart rate. This is high enough to
condition, but well within safe limits. The
AHA recommends that you aim for the lower
part of the target zone (60 percent) during
the first few months of your exercise program.
As you gradually progress you can increase
your target to 75 percent.According to the
AHA, “Exercise above 75 percent of the
maximum heart rate may be too strenuous
unless you are in excellent physical condition.
Exercise below 60 percent gives your heart
and lungs little conditioning.”
In addition to monitoring your heart rate as
you exercise, be certain of how quickly your
heart rate recovers. If your heart rate is over
120 beats per minute five minutes after
exercising, or is higher than normal the
morning after exercising, your exertion may
be too strenuous for your current level of
2-24
fitness. Reducing the intensity of your workout
is recommended.
The age-adjusted target heart rates indicated
in the previous chart reflect averages. A
variety of factors (including medication,
emotional state, temperature, and other
conditions) can affect the exercise heart rate
appropriate for you.
WARNING: Consult your doctor to establish
the exercise intensity (target heart rate zone)
appropriate for your age and condition before
beginning any exercise program.
BEGINNING YOUR EXERCISE
PROGRAM
WARM-UP: Slow and Deliberate Exercise
You are not warmed up until you begin to
perspire lightly and breath more deeply.
Warming up prepares your heart and other
muscles for more intense exercise and helps
you avoid premature exhaustion. Begin each
workout by walking even if you plan to run.
Start slowly, exploring different speeds until
you can comfortably sustain your speed, a
suggested minimum of three minutes.
Perspiration on your brow is a good indicator
of a thorough warm-up. The older you are,
the longer your warm-up period should be.
WORKOUT: Brisk and Rhythmic Exercise
The workout trains and conditions your heart,
lungs, and muscles to operate more efficiently.
Increase exercise in response to your heart
rate to train and strengthen your cardiovascular
system. Concentrate on moving your arms and
legs smoothly. Walk naturally and avoid
jerking motions that can cause pulled
muscles, sprained joints, and loss of balance.
COOL DOWN: Slow and Relaxed Exercise
Cooling down relaxes your muscles and gradually
lowers your heart rate. Slowly reduce your
workload until your heart rate is below 60 percent
of your maximum heart rate. The cool down
should last at least five minutes, followed by
some light stretching to enhance your flexibility.
2-25
The F.I.T. Formula
UNDERSTANDING THE
F.I.T.FORMULA
The workout portion of your exercise
program consists of three major variables:
Frequency, Intensity, and Time.
FREQUENCY: How Often You Exercise
You should exercise three to five times a week
to improve your cardiovascular and muscle
fitness. Improvements are minimal with less
frequent exercise.
INTENSITY: How Hard You Exercise
Intensity of exercise is reflected in your heart
rate. Exercise must be sufficiently rigorous to
strengthen your heart muscle and condition
your cardiovascular system. Only your
doctor can prescribe the target training heart
range appropriate for your particular needs
and physical condition.
• Start with exercise that stimulates you to
breathe more deeply.
• Alternate periods of moderate and easy
exercise to help your body adapt to new
levels of exertion without unnecessary
strain.
• If you are just beginning an exercise
program, you may be most comfortable
walking at a speed of 1-2 mph. As you
use your treadmill regularly, higher speeds
may be more comfortable and more
effective.
• Inability to maintain a smooth, rhythmic
motion suggests that your speed and/or
elevation may be too great.
• If you feel out of breath before you have
exercised 12 minutes, you are probably
overdoing it.
As your fitness level improves, you will need
to increase your workload in order to reach
your target heart rate. The first increase may
be necessary after two to four weeks of
regular exercise. Never exceed your target
heart rate zone.
Increase the speed and/or incline on the
treadmill to raise your heart rate to the level
recommended by your doctor. The incline
feature can be used to greatly increase the
workload without increasing speed. The
chart below indicates how much the effort
changes with each percent of grade at
popular speeds for a person weighing 155
pounds.
METS
One MET is the amount
of energy your body
uses when you’re
resting. If a physical
activity has an equivalent
of six METS, its energy
demands are six times
that of your resting state.
The MET is a useful
measurement, because it
accounts for differences
in body weight.
MPH 2.0
Minutes 30
per mile
2.5
24
3.0
20
3.5
17
4.0
15
METS METS METS METS METS
Grade %
0
1
2
3
4
5
6
7
8
9
10
11
12
13
14
15
16
2.5
2.8
3.1
3.4
3.7
3.9
4.2
4.5
4.7
5.0
5.3
5.6
5.9
6.1
6.4
6.7
7.0
2.9
3.3
3.6
3.9
4.3
4.7
5.0
5.3
5.7
6.0
6.4
6.7
7.1
7.4
7.7
8.1
8.4
3.3
3.7
4.1
4.5
5.0
5.4
5.8
6.2
6.6
7.1
7.5
7.9
8.3
8.7
9.1
9.5
10.0
3.7
4.2
4.7
5.1
5.6
6.1
6.6
7.1
7.6
8.0
8.5
9.0
9.5
10.0
10.5
10.9
11.4
4.1
4.6
5.2
5.7
6.3
6.8
7.4
7.9
8.5
9.0
9.6
10.1
10.7
11.2
11.8
12.3
12.9
TIME: How Long You
Exercise
Sustained exercise conditions your heart,
lungs, and muscles. The longer you are able
to sustain exercise within your target heart
range, the greater the aerobic benefits.
• To begin, maintain two to three minutes of
steady, rhythmic exercise, then check your
heart rate.
• The initial goal for aerobic training is 12
continuous minutes.
• Increase your workout time approximately
one or two minutes per week until you are
able to maintain 20-30 continuous minutes
at your training heart rate.
USING THE F.I.T. FORMULA
The F.I.T. formula and chart are designed to
help you begin a program tailored to your
needs. You may wish to keep an exercise log
to monitor your progress.
The F.I.T. Formula
BEGINNING FITNESS PROGRAM
If you cannot sustain 12 continuous minutes in
your target heart rate zone, exercise several
times a day to get into the habit of exercise.
Try to reach and maintain 60-65 percent of
your maximum heart rate. Alternate exercise
with periods of rest until you can sustain 12
continuous minutes of exercise at 60-65 percent
of your maximum heart rate.
Begin exercising in three to five minute sessions.
ESTABLISHING AEROBIC FITNESS
If you can sustain 12 but not 20 continuous
minutes of exercise in your target heart rate zone:
• Exercise three to five days a week.
Rest at least two days per week.
• Try to reach and maintain 60-75 percent of
your maximum heart rate with moderate
rhythmic exercise.
• Begin with 12 continuous minutes.
Increase your time by one to two minutes
per week until you can sustain 20
continuous minutes.
MAINTAINING AEROBIC FITNESS
If you can sustain 20 continuous minutes in
your target heart rate zone, begin to increase
the length and intensity of your workout:
• Exercise four to six days a week or on
alternate days.
• Try to reach and maintain 70-85 percent of
your maximum heart rate with moderate to
somewhat hard exercise.
• Exercise for 20-30 minutes.
2-26
• Exercise four to five times a week.
• Try to reach and maintain 60-75 percent of
your maximum heart rate with moderate
exercise.
• Exercise for 30-45 minutes at 60-65
percent of your target heart rate.
Here are some tips to achieving your weight
management goal:
• Consume most of your dietary calories at
breakfast and lunch, and eat a light dinner.
Do not eat close to bedtime.
• Exercise before meals. Moderate exercise
will help suppress your appetite.
• Take exercise breaks throughout the day to
help increase metabolism (calorie
expenditure).
ATHLETIC TRAINING
When you are training to improve strength
and performance:
• Exercise four to five days a week.
• Alternate exercise days and intervals of
hard to very hard exercise with easy to
moderate exercise.
• Exercise for 30 minutes or longer.
THE F.I.T. CHART
FREQUENCY
BEGINNING
EXERCISE
PROGRAM
ESTABLISHING
AEROBIC
FITNESS
MAINTAINING
AEROBIC
FITNESS
INTENSITY
TIME
2-3 times/week 60-65% of MHR*
3-5 minutes
3-4 days/week 60-75% of MHR*
12-20 minutes
4-6 days/week 70-85% of MHR*
20-30 minutes
*MHR = maximum heart rate
MANAGING WEIGHT
Consistent aerobic exercise will help you
change your body composition by lowering
your percentage of body fat. If weight loss is
a goal, combine an increase in the length of
your workouts with a moderate decrease in
caloric intake. For weight control, how long
and how often you exercise is more important
than how hard you exercise.
WARNING: These strategies are intended for
average healthy adults. If you have pain or
tightness in your chest, an irregular heartbeat,
shortness of breath or if you feel faint or have
any discomfort when you exercise- STOP!
Consult your physician before continuing.
Remember, every workout should begin with a
warm-up and finish with a cool-down.
3-1
Care & Maintenance
Your TRUE treadmill is constructed of quality
materials and manufactured to provide many
years of faithful service. Simple routine
cleaning and a preventive maintenance
program will extend the life of your treadmill.
NOTE: To prevent electrical shock, be certain
the treadmill is turned off and unplugged from
the electrical outlet before performing any
cleaning or routine maintenance.
TREADBELT LUBRICATION
For average use of your treadmill, True recommends you lubricate under the treadbelt
once per year. For heavy use, which is more
than 10 hours per week, True recommends
lubricating every six months. Please contact
your dealer to obtain the proper lubricant.
LUBRICATION PROCEDURE:
1. Turn off and unplug treadmill.
2. Cut off the end of the tube of lubricant.
3. Holding the tube in one hand, insert the
tube underneath the treadbelt halfway
between front and back and halfway
between right and left.
4. Squeeze the full contents of the tube onto
the deck in a circular pattern in the center
1/3 of the deck. (See image below.)
5. Plug in and turn on treadmill, then walk
normally on treadmill at 0.5 mph for five
minutes.
CLEANING DAILY: Perspiration should be
wiped from the control console and treadmill
surfaces after your workout.
CLEANING WEEKLY: You should wipe
down your treadmill once a week with a water
dampened, soft cloth. Be careful not to get
excessive moisture between the edge of the
digital display panel and the console, as this
might create an electrical hazard or cause the
electronics to fail.
IMPORTANT: DO NOT CLEAN OR WIPE
THE TOP OF THE DECK UNDER THE
CENTER OF THE RUNNING BELT.
MONTHLY: Clean dust and dirt that might
accumulate under and behind your treadmill
once a month. Small rubber particles from
the soles of walking shoes will accumulate
alongside the belt and also behind the unit.
Expert service and maintenance at a reasonable
cost are available through your factory-trained,
authorized TRUE dealer. The dealer maintains a
stock of repair and replacement parts and has
the technical knowledge to meet your service
needs.
Troubleshooting Guide
3-2
SYMPTOM
CAUSE
SOLUTION
Circuit breaker on treadmill
trips when the power cord is
plugged into wall
A. Damaged motor
Service required
B. Damage of defective motor
power supply board
Service required
C. Damaged motor control circuit
board
Service required
D. Restricted belt or flywheel
Check and remove obstruction or
call dealer
E. Treadbelt over tensioned
See Adjustments Page 1-5
A. No power to treadmill
Restore power at electrical outlet
or reset circuit breaker if in off position
B. Circuit breaker trip
Reset Circuit breaker
C. Pedestal to frame electrical
connector not connected or
completely connected
Service required
Incline Motor and tread motor
will not turn on*
A. Pedestal to frame electrical
connector not connected or
completely connected
Service required
Incline motor does not operate
but the treadbelt moves*
A. Incomplete wire harness connection
Service required
Scrambled digits on computer LED’s
A. Damaged E-Prom
Service required
B. Damaged computer board
Service required
A. Poly V-belt slipping
Service required
B. Motor brush noise excessive
Service required
A. Uneven floor
Move treadmill to even surface
B. Rear roller not adjusted for
sloped floor
Refer to Owner’s Manual to adjust
belt
A. Defective breaker
Replace breaker
B. Circuit too small
Use 20 amp circuit
C. Circuit over-loaded
Remove the other electrical
appliances on same circuit
A. Object between belt and deck
Remove object between belt and deck
B. Object under belt
Remove object from under belt
C. Loose tread motor drive-belt
Service required
D. loose treadbelt tension
Refer to Owner’s Manual
Circuit breaker on treadmill
trips when inputting speed and
starting
Computer display LED’s do not
illuminate
Squeaking noise from motor
while using the treadmill
Treadbelt tracks left to right
Treadmill trips household or
institutional circuit breaker
Treadbelt feels unsmooth, jerks
intermittently
* Computer LED Displays are illuminated
3-3
Diagnostics
YOUR TRUE TREADMILL IS EQUIPPED WITH BUILT IN
DIAGNOSTIC INFORMATION AND MAINTENANCE REMINDERS
The following error messages will be displayed as they occur. Every time these messages are
displayed, an audible will sound twice.
E1:INCLINE
Incline moving when not commanded to.
E1:RANGE
Difference between zero position and maximum incline not sufficient.
E1:STALL
Incline not moving when commanded to.
E2:OVERSPEED
This error occurs when an acceleration >2.1 mph occurs.
Error cleared by turning off power switch then turning it back on.
E2:CAL
Feedback cannot reduce or increase speed to target.
Error cleared by calibrating.
E2:RECAL
This error occurs when a data error is detected on the
EEprom. Error is cleared by calibrating.
E5:SENSOR
This message is displayed when there is no speed feedback.
The following service messages will be displayed as they occur, as well as for the subsequent
six safety key insertions. These messages will be displayed until a key is pressed. Every time
these messages are displayed, an audible will sound twice.
S1:LUBE
This message is displayed when lubrication of the deck is
recommended.
S2:CLEAN
This message is displayed every 500 miles. - Prompt to clean
treadmill.
S3:MOTOR
This message is displayed every 2500 hours. - Prompt to check
motor brushes.
S7:SLCT
S.O.F.T. select-(CI model only) this message is displayed when there
is a calibration error for CI S.O.F.T. select system. Error is
cleared by calibration of S.O.F.T. select system.
Performance Chart
INDIVIDUAL PERFORMANCE CHART
1
2
3
4
5
6
7
8
9
10
11
12
13
14
TRUE FITNESS TECHNOLOGY, INC. P.O. BOX 8803, 865 HOFF ROAD, O’FALLON, MO 63366
TAR
GE
RAT T HEA
E
RT
GO
AL
PRO
G
LEV RAM
EL
AVE
R
SP AGE
EED
NC
E
DIS
TA
WO
TIM RKOU
T
E
NA
ME
___
DAT
___
E
Photocopy this chart for repeated use and keep a weekly record of your performance progress.
4-1
Performance Chart
4-2
INDIVIDUAL PERFORMANCE CHART
1
2
3
4
5
6
7
8
9
10
11
12
13
14
TRUE FITNESS TECHNOLOGY, INC. P.O. BOX 8803, 865 HOFF ROAD, O’FALLON, MO 63366
TAR
GE
RAT T HEA
E
RT
GO
AL
PRO
G
LEV RAM
EL
AVE
R
SP AGE
EED
NC
E
DIS
TA
WO
TIM RKOU
T
E
NA
ME
___
DAT
___
E
Photocopy this chart for repeated use and keep a weekly record of your performance progress.