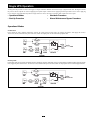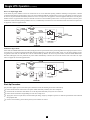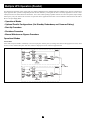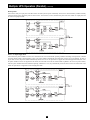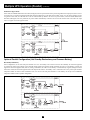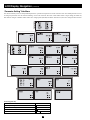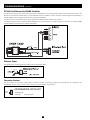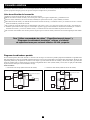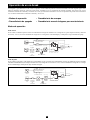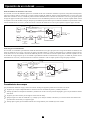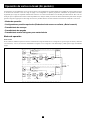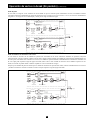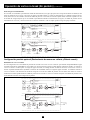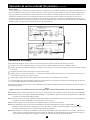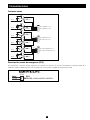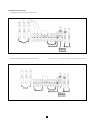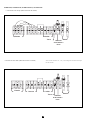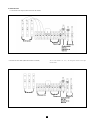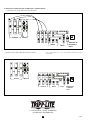
1
Owner’s Manual
SmartOnline™ 3-Phase (50kVA & Above)
Intelligent True On-Line UPS Systems
Input/Output:
3Ø, 4 Wire (plus ground), wye
• “PM” models: 277/480V AC
• “INTPM” models: 220/380V, 230/400V or 240/415V AC (user-selectable)*
**
* See “Parameter Setting” Sub-Menu on page 16 to set the inverter output voltage. ** CE certification applies to “INTPM” models only.
Not suitable for mobile applications.
There are two separate UPS system modules: a power module and a battery module. The power module is described in this
manual and the 3-Phase UPS Specifications Addendum—50kVA & Above. The battery module is described in a separate manual.
Important Safety Warnings
2
Power Module Features
3
Installation
5
Electrical Connection
6
Single UPS Operation
7
Multiple UPS Operation (Parallel)
10
LCD Display Navigation
15
Communications
19
Service
22
Warranty
22
Español
23
1111 W. 35th Street • Chicago, IL 60609 USA
(773) 869-1234 • www.tripplite.com
Copyright © 2007 Tripp Lite. All rights reserved. SmartOnline™ is a trademark of Tripp Lite.
Important Safety Warnings
SAVE THESE INSTRUCTIONS. This manual contains important instructions and warnings that should be followed during the installation and
maintenance of all Tripp Lite SmartOnline 3-Phase UPS Systems (50kVA and above) and their batteries. All UPS connection and maintenance must
be performed by qualified service personnel. The UPS should only be installed in accordance with the requirements of IEC 60364-4-48. (The UPS
complies with EN 50091-1-1, EN 50091-2, IEC 61000-4-2 Level 4, IEC 61000-4-3 Level 3, IEC 61000-4-4 Level 4, IEC 61000-4-5 Level 4 and
IEC 61000-4-6.)
Service personnel should familiarize themselves with symbols marked on the UPS:
This symbol indicates a protective grounding terminal (a terminal which must be connected to earth ground prior to making any other
connection to the equipment).
This symbol indicates a terminal to which or from which a direct current or voltage may be applied or supplied.
This symbol indicates the word phase.
UPS Location Warnings
• Install the UPS indoors, away from heat, direct sunlight, dust, and excess moisture or other conductive contaminants.
• Install the UPS away from flammable liquids and gases. Do not let the unit come in contact with water or other liquids.
• Install the UPS in a structurally sound area. Your UPS is extremely heavy. Flooring must be able to support the weight of all UPS modules.
Take care when moving and lifting the unit.
• Only operate the UPS at indoor temperatures between 32° F and 104° F (between 0° C and 40° C) with humidity within a range of 0 to 95%
(non-condensing). For best results, keep indoor temperatures between 62° F and 84° F (between 17° C and 29° C).
• Leave adequate space around all sides of the UPS for proper ventilation: at least 40 inches (100 cm) from front panel and 20 inches (50 cm) from
top, rear and side panels. Do not cover ventilation openings on the unit.
• Do not install the UPS near magnetic storage media, as this may result in data corruption.
UPS Connection Warnings
• The power supply for this unit must be three-phase rated in accordance with the equipment nameplate. It also must be suitably grounded
according to all applicable local electrical wiring regulations.
• The UPS must be isolated prior to any connection or maintenance. A readily-accessible disconnect device must be incorporated into the wiring
following all local electrical codes. The disconnect device must be four-pole and must be able to disconnect all line conductors and the neutral
conductor.
• Due to high leakage current, a ground connection is essential.
Equipment Connection Warnings
• Do not use Tripp Lite UPS Systems in life support applications in which a malfunction or failure of a Tripp Lite UPS System could cause
failure or significantly alter the performance of a life support device.
• The UPS is designed to power computer equipment. Do not use the UPS with purely inductive or capacitive loads.
• The UPS System includes its own energy source (external battery). The output terminals may be live even when the UPS is not connected to an
AC supply.
Battery Warnings
• The UPS does not require routine maintenance. Do not open the UPS for any reason. There are no user-serviceable parts inside.
• Risk of electrocution is possible when battery module is connected to the power module. Qualified service personnel must disconnect the
batteries prior to maintenance.
• Because the batteries present a risk of electrical shock and burn from high short-circuit current, batteries should be changed only by trained
service personnel observing proper precautions. Consult your battery module manual before proceeding. Remove watches, rings, and other metal
objects. Use tools with insulated handles. Wear rubber gloves and boots. Do not lay tools or metal parts on top of the batteries. Do not short or
bridge the battery terminals with any object. Disconnect the charging source prior to connecting or disconnecting battery terminals. Determine
if the batteries are inadvertently grounded. If inadvertently grounded, remove the source of the ground. Contact with any part of a grounded
battery can result in electrical shock. The likelihood of such shock will be reduced if such grounds are removed during installation and maintenance.
• Do not dispose of the batteries in a fire. The UPS batteries are recyclable. Refer to local codes for disposal requirements.
Safety Warnings
(continued)
2
Important
Important Safety Warnings (continued)
• Connect only Tripp Lite battery modules to the UPS's external battery hardware terminals.
• Do not operate the UPS without batteries.
• Fuses should be replaced only by factory authorized personnel. Blown fuses should be replaced only with fuses of the same number and type.
• Potentially lethal voltages exist within the UPS as long as the battery supply is connected. Service and repair should be done only by trained
personnel. During any service work, the UPS should be turned off or put into manual bypass and fuses removed from all connected battery modules.
• Do not connect or disconnect the battery modules while the UPS is operating from the battery supply or when the unit is not in bypass mode.
Power Module Features
There are two separate UPS system modules: a power module and a battery module. Familiarize yourself with the location and function
of the features on each module before installing and operating the UPS system. The power module is described below. The battery
module is described in a separate manual.
Control Panel
1
LCD Display: This backlit display indicates a wide range of UPS operating conditions and diagnostic data. It will illuminate after the
UPS has been properly installed and started up.
2
MAINTENANCE BYPASS LED: This red LED will illuminate when the UPS is providing filtered mains power without engaging its
converter or inverter. Connected equipment will not receive battery power in the event of a blackout when this light is illuminated.
3
RESERVE POWER LED: This green LED will illuminate to indicate the presence of a reserve power breaker and reserve power source
connected to the UPS.
4
RECTIFIER LED: This green LED will illuminate to indicate the UPS rectifier is operating.
5
BATTERY LED: This orange LED will illuminate when the UPS is discharging the battery to provide connected equipment with AC power.
6
INVERTER LED: This green LED will illuminate constantly to indicate the UPS inverter is activated.
7
RESERVE POWER STATIC SWITCH LED: This green LED will illuminate when the UPS is powering connected equipment through a
reserve power source connected to the UPS.
8
INVERTER MC LED: This green LED will illuminate to indicate connected equipment is supplied with power through the UPS inverter.
9
AC OUTPUT LED: This green LED will illuminate constantly to indicate your UPS is supplying AC power to connected equipment.
10
EMERGENCY POWER OFF Button: In case of emergency, press this button to turn off the UPS rectifier, inverter and output. After
pressing the button, it will remain down until reset. To reset the UPS system and restore output, press the EMERGENCY POWER OFF
button until it pops back up.
11
ON Button: This button, when used
with the button, turns the UPS
inverter on. To turn the UPS inverter
on, simultaneously press the
ON and buttons and hold for 3
seconds before releasing.
7
3
12 OFF Button: This button, when used
with the button, turns the UPS
inverter off. To turn the inverter off,
simultaneously press the OFF
and buttons and hold for 3 seconds
before releasing.
13
1
8
2
4
9
5
6
, and Buttons: These buttons
control the LCD Display and setting
parameters.
10
11
12
CONTROL PANEL
3
13
Power Module Features
(continued)
Breakers, Switches and Fuses
14 Rectifier Input Breaker: This breaker controls input power to the
UPS during normal operation.
15 Reserve Input Breaker: This breaker controls input power to the
UPS when operating from reserve power.
16 Manual Bypass Breaker: This breaker controls input power to the
UPS during bypass operation.
17 UPS Output Breaker: This breaker controls UPS output to
connected equipment.
18 Fan Fuse: This fuse protects the fan's circuit.
19 Power Fuse: This fuse disconnects the battery and auxiliary power
circuits during maintenance. It also protects the auxiliary power
circuit.
20
21
18
19
20 Accessory Slot: Remove the small cover panel and use optional
accessories.
14
15
16
17
Contact Tripp Lite Customer Support at (773) 869-1234 for more
information and a list of available SNMP, network management
and connectivity products.
21 Battery Start-Up Switch: Use this switch to “cold-start” the UPS
See Communication Interface
in the absence of utility power. (To cold-start UPS, close the fuse
isolator in the battery cabinet, then press the battery start-up
switch and press the ON and buttons simultaneously.
Connected loads will be powered from battery. If battery power
is drained and utility power is absent, the UPS will shut down
and power to connected loads will be interrupted.)
50kVA-120kVA POWER MODULE
Front Panel, Door Open
160kVA-200kVA POWER MODULE
Front Panel, Door Open
20 15
14
16
21
17
18
19
See Communication Interface
4
Power Module Features
(continued)
Communication Interface
22
Dry Contacts: #1 (UPS Normal); #2 (Load On Reserve); #3 (Load On Battery); #4 (Battery Low Voltage);
#5 (Reserve Abnormal); #6 (Battery Test Fail). See “Communications” for details.
23
Remote “Emergency Power OFF” (EPO) Connector: This modular jack allows remote emergency
shutdown. See “Communications” for details.
24
“Smart” RS-232 Interface Port: This female DB9 port connects the UPS to a workstation or server. It
uses RS-232 communications to report UPS and power conditions. It is used with Tripp Lite software and
cabling. See “Communications” for details.
25
26
Ethernet Port & Ethernet Power: The Ethernet Port is an RS-232 port that accepts an optional RS-232/RJ45
Ethernet Adapter (sold separately). The Ethernet Power connection provides 12VDC power to the
optional adapter. See “Communications” for details.
Generator Contact: This port connects to an auxiliary power generator. When the generator is operating
to support the equipment load, the UPS System will automatically reduce its charge current by 50% in order
to prevent overloading of the generator. See “Communications” for details.
27
RS-485 Ports: These ports allow multiple UPS power modules to be connected in a parallel configuration.
See “Communications” for details.
28
UPS Parallel Communication Ports: These ports allow multiple UPS power modules to communicate
while in a parallel configuration. See “Communications” for details.
22
23
24
25
26
27
28
Installation
Follow all warnings listed in the Safety section prior to installation. The following checklist provides a general guide rather than a complete outline
of procedures.
Installation Checklist
K
The floor area where the UPS will be installed has enough supporting strength. See Floor Weight Loading Table on the 3-Phase
UPS Specifications Addendum—50kVA & Above.
K
The entrances and hallways to the facility provide enough room for UPS transportation.
K
The room where the UPS will be installed has enough clearance around the UPS modules to allow adequate ventilation and access for operation
and maintenance.
K
The facility's air conditioning can maintain ideal temperature and humidity levels.
K
Noise abating devices are installed (if desired).
K
Electrical wiring is clearly marked (for polarity and phase) and checked for compliance with local electrical codes.
K
The input power source has been switched off prior to hardwire connection.
K
The room where the UPS will be installed includes floor, ceiling and walls made of flameproof materials. The room includes a fire
extinguisher. The room is secure from access by unauthorized personnel.
K
All personnel are sufficiently trained for normal and emergency operations.
K
During installation, the UPS input neutral is solidly connected to the utility power neutral.
5
Electrical Connection
Follow all warnings listed in the Safety section prior to hardwire terminal connection. The following checklist provides a general guide rather
than a complete outline of procedures.
Connection Checklist
K
Turn off input power prior to electrical connection.
K
Check the input, output and battery cables for proper amplitude, phase and polarization.
K
Connect ground wire(s) between UPS power module(s) and battery module(s).
K
If the input and output power of the UPS is a Y connection, then note that the Neutral wire and Ground wire are not connected within the UPS
power module.
K
If the input power system has a floating voltage between Neutral and Ground, and if 0 volts is desired between Neutral and Ground within the
UPS power module, Tripp Lite recommends the following: add a user-supplied isolation transformer to the input of the UPS, and connect the
Neutral wire and Ground wire inside the UPS power module.
K
If installing multiple UPS modules in parallel, ensure input and output cables are the same length for each module.
For Recommended Cable Sizes, Torque Specifications and Terminal Wiring Diagrams,
refer to the 3-Phase UPS Specifications Addendum—50kVA & Above.
Parallel Wiring Diagrams
In a parallel connection, up to eight UPS Systems are connected to a single load. A parallel connection provides fail-safe redundancy, assuring that the
load is constantly supported even if one or more UPS Systems fail or are taken off-line for maintenance. Within a parallel architecture, there is a “single
loop” connection option (where only one input source is used) and a “double loop” connection option (where two input sources are used). Note: in both
connection options the total length of all cables (input, output and reserve) must be the same for each UPS Power Module to prevent load inequality.
All Models
• Single Loop Connection (one input source used)
• Double Loop Connection (two input sources used)
LOAD
6
Single UPS Operation
The diagrams and procedures in this section apply to a single UPS Power Module connected to a single equipment load. Note: all diagrams assume
the presence of two separate AC sources supplying two separate inputs: a mains source supplying rectifier input and a reserve source supplying
reserve input. If your application only allows a single mains AC source, this source will supply both rectifier and reserve input.
• Operational Modes
•
Shutdown Procedure
• Start-Up Procedure
•
Manual Maintenance Bypass Procedure
Operational Modes
Normal Mode
In this mode, the power module continuously converts AC input power into DC power (to recharge the batteries and supply the inverter).
The inverter, in turn, transforms DC power into clean, stable AC output power for the connected equipment load.
Back-Up Mode
In this mode, utility AC input power has failed. Since the UPS System operates continuously on-line, connected battery modules instantly (with zero transfer
time) supply DC power to the inverter. The inverter, in turn, transforms DC power into clean, stable AC output power for the connected equipment load.
7
7
Single UPS Operation
(continued)
Reserve AC Input Supply Mode
In this mode, the power module's inverter has encountered one of several abnormal operating conditions including overtemperature, continual
overload, shorted output or depleted battery power. The power module automatically shuts down the inverter to prevent damage. In order to bypass
the inverter, the power module automatically transfers to a reserve AC input source to support the connected equipment load. (Note: since the power
module's inverter is bypassed in this mode, the UPS will not be able to switch to Back-Up Mode in the event of a power failure.) After the power
module detects that abnormal operating conditions are over, it automatically reactivates the inverter and switches back to the mains AC input source
to support the connected equipment load.
Maintenance Bypass Mode
In this mode, the Manual Maintenance Procedure (On Bypass) has been performed in order to pass-through filtered AC input power (from a reserve
AC input source) to connected equipment loads while allowing maintenance on the UPS power module. (Note: since the power module's inverter
is bypassed in this mode, the UPS will not be able to switch to Back-Up Mode in the event of a power failure.) After the Manual Maintenance
Procedure (Off Bypass) has been performed, the power module automatically reactivates the inverter and switches back to the mains AC input
source to support the connected equipment load.
Start-Up Procedure
This procedure supplies power to and starts up the UPS. Please check the following items before UPS start-up:
K
Ensure that all electrical connections to the power module and battery module(s) have been completed.
K
Check that all circuit breakers and isolators are in the off position and battery fuse(s) have been removed.
K
Ensure that the neutral line and grounding are at the same voltage level.
K
Apply power to the AC input cables, and check that input voltage, frequency and phase sequence are within the specifications of the UPS and
the equipment load.
K
Check to ensure auxiliary power and fan power (N) fuse isolators are closed.
8
8
Single UPS Operation
(continued)
After following all warnings listed in the Safety section and precautions listed above, start-up UPS according to the following procedure:
Step 1. Turn on (close) the “RESERVE INPUT” Breaker. The LCD Screen will display “Bypass Mode”.
Step 2. Turn on (close) the “RECTIFIER INPUT” Breaker and wait about 30 seconds. The DC BUS voltage will be built up to about 393V DC.
Step 3. Locate the external fuse block(s) on the battery module(s) and turn on (close) the fuses.
Step 4. Simultaneously press the “ON” and “ ” Buttons and hold for 3 seconds. The inverter will turn on and voltage will build for about 30
seconds. The load will be transferred to the inverter. The LCD Screen will display “Normal Mode”.
Step 5. Measure the voltage on the UPS Output Breaker to determine if it is normal or abnormal. If the output voltage is normal, close the Output
Breaker to supply the load. After approximately 30 seconds, the UPS will automatically execute a battery test.
Shutdown Procedure
This procedure removes power from and shuts down the UPS.
Step 1. Turn off (open) the “UPS OUTPUT” Breaker.
Step 2. Simultaneously press the “OFF” and “ ” Buttons and hold for 3 seconds. When the reserve power has returned to normal (where its
voltage and frequency are within the set range), the power module's inverter will turn off immediately. Support of the equipment load will
be transferred to reserve power. The LCD Screen will display “Bypass Mode”.
Step 3. Locate the external fuse block(s) on the battery module(s) and turn off (open) the fuses.
Step 4. Turn off (open) the “RECTIFIER INPUT” Breaker.
Step 5. Wait approximately 5 minutes for the DC capacity to discharge. Press the “ON” and “OFF” Buttons to test the inverter for adequate
discharge of DC capacity, and then simultaneously press the “OFF” and “ ” Buttons to turn off the inverter. Confirm that BUS voltage is safe.
Step 6. Turn off (open) the “RESERVE INPUT” Breaker.
Manual Maintenance Bypass Procedure
This procedure allows for routine maintenance by qualified service personnel. Tripp Lite recommends a routine maintenance inspection every six
months. Note: since the power module's inverter is bypassed during this procedure, the UPS will not be able to switch to Back-Up Mode and support
connected equipment in the event of a power failure.
Manual Maintenance Procedure (ON Bypass)
Step 1. Simultaneously press the “OFF” and “ ” Buttons and hold for 3 seconds. When the reserve power has returned to normal (where its voltage
and frequency are within the set range), the power module's inverter will turn off immediately. Support of the equipment load will be
transferred to reserve power. The LCD Screen will display “Bypass Mode”.
Step 2. Locate the external fuse block(s) on the battery module(s) and turn off (open) the fuses.
Step 3. Turn off (open) the “RECTIFIER INPUT” Breaker.
Step 4. Wait approximately 5 minutes for the DC capacity to discharge. Press the “ON” and “OFF” Buttons to test the inverter for adequate
discharge of DC capacity, and then simultaneously press the “OFF” and “ ” Buttons to turn off the inverter. Confirm that BUS voltage is safe.
Step 5. Turn on (close) the “MANUAL BYPASS” Breaker. Support of the equipment load will transfer to manual bypass. The LCD Screen will
display “Manual Bypass”.
Step 6. Turn off (open) the “UPS OUTPUT” Breaker, the “RESERVE INPUT” Breaker and the auxiliary power (+) and fan power (N) fuse
isolators. The LCD Screen will go dark.
Note: When the UPS is in Maintenance Bypass Mode, no high voltages will be present within the UPS power module except at the terminals and the “MANUAL BYPASS”Breaker.
Manual Maintenance Procedure (OFF Bypass):
Step 1. Turn on (close) the “UPS OUTPUT” Breaker, the “RESERVE INPUT” Breaker and the auxiliary power (+) and fan power (N) fuse
isolators. Support of the equipment load will transfer to manual bypass. The LCD Screen will display “Manual Bypass”.
Step 2. Turn off (open) the “MANUAL BYPASS” Breaker. Support of the equipment load will transfer to reserve power. The LCD Screen will
display “Bypass Mode”.
Step 3. Turn on (close) the “RECTIFIER INPUT” breaker and wait approximately 30 seconds. The DC BUS voltage will be built up to about
393V DC.
Step 4. Locate the external fuse block(s) on the battery module(s) and turn on (close) the fuses.
Step 5. Simultaneously press the “ON” and “ ” Buttons and hold for 3 seconds. The inverter will turn on and voltage will build for about 30
seconds. The load will be transferred to the inverter. The LCD Screen will display “Normal Mode”.
9
Multiple UPS Operation (Parallel)
The diagrams and procedures in this section apply to a parallel configuration where multiple UPS Power Modules (up to eight) are connected to a
single equipment load. A parallel configuration provides fail-safe redundancy, assuring that the load is constantly supported even if one or more
UPS Systems fail or are taken off-line for maintenance. Two or more UPSs operating in parallel must have the same VA capacities, output voltage
and frequency. They also must be able to assume an equal share of the equipment load in order to not overload the UPSs and switch all UPSs to
Reserve AC Input Supply Mode.
• Operational Modes
• Optional Parallel Configurations (Hot Standby Redundancy and Common Battery)
• Start-Up Procedure
• Shutdown Procedure
• Manual Maintenance Bypass Procedure
Operational Modes
Normal Mode
In this mode, the power modules continuously convert AC input power into DC power (to recharge their batteries and supply their inverters). Their
inverters, in turn, transform DC power into clean, stable AC output power for the connected equipment load.
10
Multiple UPS Operation (Parallel)
(continued)
Back-Up Mode
In this mode, utility AC input power has failed. Since the UPS Systems operate continuously on-line, their connected battery modules instantly
(with zero transfer time) supply DC power to their inverters. Their inverters, in turn, transform DC power into clean, stable AC output power for
the connected equipment load.
Reserve AC Input Supply Mode
In this mode, the power modules' inverters have encountered one of several abnormal operating conditions including overtemperature, continual
overload, shorted output or depleted battery power. The power modules automatically shut down their inverters to prevent damage. In order to
bypass their inverters, the power modules automatically transfer to a reserve AC input source to support the connected equipment load. (Note: since
the power modules' inverters are bypassed in this mode, the UPSs will not be able to switch to Back-Up Mode in the event of a power failure.)
After the power modules detect that abnormal operating conditions are over, they automatically reactivate their inverters and switch back to the
mains AC input source to support the connected equipment load.
11
Multiple UPS Operation (Parallel)
(continued)
Maintenance Bypass Mode
In this mode, the Manual Maintenance Procedure (On Bypass) has been performed in order to pass-through filtered AC input power (from a reserve
AC input source) to connected equipment loads while allowing maintenance on the UPS power module. (Note: since the power module's inverter
is bypassed in this mode, the UPS will not be able to switch to Back-Up Mode in the event of a power failure.) After the Manual Maintenance
Procedure (Off Bypass) has been performed, the power module automatically reactivates the inverter and switches back to the mains AC input
source to support connected equipment loads.
Optional Parallel Configuration (Hot Standby Redundancy and Common Battery)
Hot Standby Redundancy
In this configuration, one or more UPS power modules serve in a “hot standby” role in order to increase the availability of connected equipment
by reducing the chances that a failure of one UPS will impact output power. During normal conditions, the UPS in a “hot standby” role does not
support the connected equipment load; however, during a UPS failure, the UPS in a “hot standby” role automatically supports (through activation
of the static switch) the connected equipment load. The output of the UPS in a “hot standby” role is connected to the reserve power input of another
UPS power module. In order to reduce installation costs, users can use one UPS power module in a “hot standby” role for up to seven additional
UPS power modules within a parallel configuration.
12
Multiple UPS Operation (Parallel)
(continued)
Common Battery
In this configuration, a single bank of battery modules is shared by multiple UPS power modules. This not only reduces installation costs, but saves
floor space. Note: when using the LCD Screen to set battery charging, divide the charging task equally among all UPS power modules. For example:
two UPS power modules are connected to a single bank of battery modules with a 100 amp-hour capacity. To charge the battery bank at a 12 amp
charge current rate, select a 6 amp “Battery Charge Current” setting and a 50 amp-hour “Battery Capacity AH” setting individually on each of the
LCD Screens of the two UPS power modules. Also note: in a Common Battery configuration, you will not be able to execute a battery test from
the LCD Screen.
Start-Up Procedure
This procedure supplies power to and starts up the UPSs. Please check the following items before UPS start-up:
K
Ensure that all electrical connections to all power modules and battery modules have been completed.
K
Check that all circuit breakers and isolators are in the off position and battery fuse(s) have been removed.
K
Ensure that the neutral line and grounding are at the same voltage level.
K
Apply power to the AC input cables, and check that input voltage, frequency and phase sequence are within the specifications of the UPS and
the equipment load.
K
Check to ensure auxiliary power and fan power (N) fuse isolators are closed.
K
Using the LCD Display Screen on each UPS power module within the parallel configuration, set the UPS ID. Set a different ID for each power
module.
After following all warnings listed in the Safety section and precautions listed above, start-up UPSs according to the following procedure:
NOTE!
Apply each step to each UPS power module within the parallel configuration before moving on to the next step.
Step 1: Install external parallel communication cables between the parallel ports on the UPS power modules to a computer.
Step 2. Turn on (close) the “RESERVE INPUT” Breaker of each UPS power module. The LCD Screen on each UPS power module will display
“Bypass Mode”.
Step 3. Turn on (close) the “RECTIFIER INPUT” Breaker of each UPS power module and wait about 30 seconds. The DC BUS voltage will be
built up to about 393V DC.
Step 4. Locate the external fuse block(s) on the battery module(s) and turn on (close) the fuses.
Step 5. For each UPS power module individually, simultaneously press the “ON” and “ ” Buttons and hold for 3 seconds. The inverter will turn
on and voltage will build for about 30 seconds. The load will be transferred to the inverter. The LCD Screen will display “Normal Mode”.
Step 6. Measure the voltage on the UPS “OUTPUT” Breaker of each power module to determine if it is normal or abnormal. If the output voltage
is normal, turn on (close) the “OUTPUT” Breakers of each power module to supply power to the load. After approximately 30 seconds,
the UPS will automatically execute a battery test
13
Multiple UPS Operation (Parallel)
(continued)
Shutdown Procedure
This procedure removes power from and shuts down the UPS power modules.
WARNING!
When shutting down individual UPS power modules in a parallel configuration, the user must ensure that the UPS power modules
within the configuration that remain ON can collectively power the equipment load. If they cannot, the UPS power modules within the
parallel configuration will be overloaded and will shut down and cease powering the equipment load.
NOTE!
Apply each step to each UPS power module within the parallel configuration before moving on to the next step.
Step 1. For each UPS power module in the parallel configuration which will be shut down, simultaneously press the “OFF” and “ ” Buttons and
hold for 3 seconds. The power module's inverter will turn off; its LCD Screen will display “Output Close” and support of the equipment
load will be transferred and shared equally among the other UPS power modules in the parallel configuration that have not yet been shut
down. As each consecutive power module's inverter is turned off, however, a point will be reached where the power modules which have
not yet been shut down will not be able to share the combined load. At this point, the remaining power modules will automatically shut
down their inverters, transfer the load to reserve power and display “Bypass Mode” on their LCD Screens.
Step 2. Locate the external fuse block(s) on the battery module(s) and turn off (open) the fuses.
Step 3. Turn off (open) the “RECTIFIER INPUT” Breaker and “UPS OUTPUT” Breaker of each UPS power module.
Step 4. Wait approximately 5 minutes for the DC capacity to discharge. Press the “ON” and “OFF” Buttons of each UPS power module to test the
inverter for adequate discharge of DC capacity. Then, for each UPS power module in turn, simultaneously press the “OFF” and “ ”
Buttons to turn off their inverter. Confirm that BUS voltage is safe.
Step 5. Turn off (open) the “RESERVE INPUT” Breaker of each UPS power module.
Manual Maintenance Bypass Procedure
This procedure allows for routine maintenance by qualified service personnel. Tripp Lite recommends a routine maintenance inspection every six
months. Note: since the power modules' inverters are bypassed during this procedure, the UPSs will not be able to switch to Back-Up Mode and
support connected equipment in the event of a power failure.
Manual Maintenance Procedure (ON Bypass)
Step 1. For each UPS power module in the parallel configuration which will be placed on bypass, simultaneously press the “OFF” and “ ” Buttons
and hold for 3 seconds. The power module's inverter will turn off; its LCD Screen will display “Output Close” and support of the equipment
load will be transferred and shared equally among the other UPS power modules in the parallel configuration that have not yet been
placed on bypass. As each consecutive power module's inverter is turned off, however, a point will be reached where the power modules
which have not yet been placed on bypass will not be able to share the combined load. At this point, the remaining power modules will
automatically shut down their inverters, transfer the load to reserve power and display “Bypass Mode” on their LCD Screens.
Step 2. Locate the external fuse block(s) on the battery module(s) and turn off (open) the fuses.
Step 3. Turn off (open) the “RECTIFIER INPUT” Breaker of each UPS power module.
Step 4. Wait approximately 5 minutes for the DC capacity to discharge. Press the “ON” and “OFF” Buttons of each UPS power module to test the
inverter for adequate discharge of DC capacity. Then, for each UPS power module in turn, simultaneously press the “OFF” and “ ” Buttons
to turn off their inverter. Confirm that BUS voltage is safe.
Step 5. Turn on (close) the “MANUAL BYPASS” Breaker of each UPS power module. Support of the equipment load will transfer to manual
bypass. The LCD Screen of each UPS power module will display “Manual Bypass”.
Step 6. Turn off (open) the “UPS OUTPUT” Breaker, the “RESERVE INPUT” Breaker and the auxiliary power (+) and fan power (N) fuse
isolators of each UPS power module. The LCD Screens will go dark.
Note: When the UPSs are in Maintenance Bypass Mode, no high voltages will be present within the UPS power modules except at the terminals and the “MANUAL BYPASS” Breakers.
Manual Maintenance Procedure (OFF Bypass):
Step 1. Turn on (close) the “UPS OUTPUT” Breaker, the “RESERVE INPUT” Breaker and the auxiliary power (+) and fan power (N) fuse
isolators of each UPS power module. Support of the equipment load will transfer to manual bypass. The LCD Screens will display “Manual Bypass”.
Step 2. Turn off (open) the “MANUAL BYPASS” Breaker of each UPS power module. Support of the equipment load will transfer to reserve
power. The LCD Screens will display “Bypass Mode”.
Step 3. Turn on (close) the “RECTIFIER INPUT” breaker of each UPS power module and wait approximately 30 seconds.
Step 4. Locate the external fuse block(s) on the battery module(s) and turn on (close) the fuses.
Step 5. For each UPS power module to be taken off bypass, simultaneously press the “ON” and “ ” Buttons and hold for 3 seconds. The inverter
will turn on and voltage will build for about 30 seconds. The load will be transferred to the inverter. The LCD Screens will display “Normal Mode”.
Step 6. Measure the voltage on the UPS “OUTPUT” Breaker of each power module to determine if it is normal or abnormal. If the output voltage
is normal, turn on (close) the “OUTPUT” Breakers of each power module to supply power to the load. After approximately 30 seconds,
the UPS will automatically execute a battery test.
14
LCD Display Navigation
The LCD Screen displays a wide variety of operational conditions as well as
provides managers with the ability to set operational parameters and view event
logs. The LCD Screen will display a block diagram of the current operating mode.
The Normal Mode is provided as an example.
PASSWORD NOTE: navigating select screens within the LCD Display submenus will require a password. The default password is 0 0 0 0. To change the
password, select the “Password Setting” screen in the “Parameter Setting”
sub-menu.
To navigate the display in order to view detailed operational conditions or change operational parameters, familiarize yourself with the navigation
button functions:
LCD Navigation Key
Action
Scroll Up Through Menu
Scroll Down Through Menu
Enter or Select a Menu Choice
Exit Current Menu and Return to Previous Menu
Buttons to Push
and
simultaneously
Main Menu
Press the “ ” Button to enter the main menu. Sub-menus are as follows:
• Measure Page
• Event Log
• Parameter Setting
• Other Information
• System Control
“Measure Page” Sub-Menu
This sub-menu allows you to monitor the present status and parameters of the UPS.
15
LCD Display Navigation
(continued)
“Parameter Setting” Sub-Menu
This sub-menu allows you to set UPS operational parameters. A password is required to access this sub-menu. Note: The default password is 0 0 0 0.
To change the password, select the “Password Setting” screen in this sub-menu. Also Note: “PM” models feature a single voltage (277/480V AC)
that cannot be changed. “INTPM” models feature three voltage options (220/380, 230/400 or 240/415V AC) that can be changed in this sub-menu.
A
B
C
D
A
B
C
1
6
2
7
3
8
4
9
5
10
7
E
F
G
H
1
2
3
4
5
6
8
9
10
D
E
F
G
H
LCD Navigation Key
Action
Scroll Up Through Menu
Scroll Down Through Menu
Enter or Select a Menu Choice
Exit Current Menu and Return to Previous Menu
Buttons to Push
and
simultaneously
16
LCD Display Navigation
(continued)
“System Control” Sub-Menu
This sub-menu allows you to directly control UPS operation. A password is required to access this sub-menu. Note: The default password is 0 0 0 0.
To change the password, select the “Password Setting” screen in the “Parameter Setting” sub-menu.
A
B
E
F
C
D
B
A
Choose “ON” to turn inverter on. Choose “OFF” to turn inverter off.
Choose “ON” to allow alarm to sound if the UPS detects a warning or
fault status. Choose “OFF” to suppress this alarm.
C
D
Choose “AUTO ON” to manually boost the battery charge. Choose
“MANUAL” to set a time delay for charge boosting. Choose “AUTO
OFF” if you do not want to manually boost the battery charge.
Choose “ON” to maintain output. Choose “OFF” to turn off output.
E
F
Choose “ON” to initiate a battery self-test. The self test results will be
displayed. Choose “OFF” if you do not want to initiate a battery selftest.
Choose “ON” to manually transfer the load to reserve power. Choose
“OFF” if you do not want to manually transfer the load.
“Event Log” Sub-Menu
This sub-menu allows managers to view up to 500 operational events, listed in order of occurrence.
LCD Navigation Key
Action
Scroll Up Through Menu
Scroll Down Through Menu
Enter or Select a Menu Choice
Exit Current Menu and Return to Previous Menu
Buttons to Push
and
simultaneously
17
LCD Display Navigation
(continued)
“Other Information” Sub-Menu
This sub-menu allows managers to view a variety of additional UPS
System information.
Note: a UPS Status Code is displayed in the upper-right corner of the
screen in the following display. Use the chart below to determine what
the UPS Status Code indicates.
UPS
Status
Code
Code
Displayed
0
2
10
18
20
22
24
26
28
30, 58
32
34
36
38
40, 42
44
46
50
52, 54, 56
60, 62, 64
66
68, 70
72
LCD Navigation Key
Action
Scroll Up Through Menu
Scroll Down Through Menu
Enter or Select a Menu Choice
Exit Current Menu and Return to Previous Menu
Buttons to Push
and
simultaneously
18
UPS Status
Bypass Output Inhibited
Load on Reserve
Rectifier AC Soft-Start
Performing Inverter Test
Load on Inverter
Load on Inverter at Backup Mode
Low Battery
Low Battery Shutdown
Short-Circuit Shutdown
Manual Bypass On
Parallel Communication Cable Abnormal
Inverter Fault Shutdown
Inverter Overload Shutdown
Overload Under Parallel (N-1)
Inverter Output Voltage Abnormal
Inverter IGBT Driver Protection (Output Voltage Abnormal)
EPO Event Shutdown
DC BUS Overvoltage Protection Shutdown
Inverter Fuse Open (R/S/T Phase)
Inverter Over-temperature Shutdown (R/S/T Phase)
Output Transformer Over-temperature Shutdown
Auxiliary Power Abnormal (PCB-C/A)
Feedback Protection
Communications
Dry-Contacts
Remote Emergency Power Off (EPO)
This feature is only for those applications that require connection to a facility's Emergency Power Off (EPO) circuit. When the power module is
connected to this circuit, it enables emergency shutdown of the output.
19
Communications
(continued)
RS-232 Port/Ethernet Port/SNMP Card Slot
The RS-232 port connects your UPS via an RS-232 cable to a workstation or server equipped with Tripp Lite power management software. The
RS-232 port uses RS-232 communications to report UPS status and power conditions. Contact Tripp Lite Customer Support for information on
available SNMP, network management and connectivity software and products.
The Ethernet Port is an RS-232 port that accepts an optional RS-232/RJ45 Ethernet Adapter (sold separately).
The SNMP Card Slot accepts an optional internal SNMP/Web card. Contact Tripp Lite Customer Support for information on available SNMP,
network management and connectivity software and products.
Ethernet Power
The Ethernet Power connection provides 12VDC power to the optional adapter.
Generator Contact
This port connects to an auxiliary power generator. When the generator is operating to support the equipment load, the UPS System will
automatically reduce its charge current by 50% in order to prevent overloading of the generator.
GENERATOR CONTACT
G-ON'
GND
GENERATOR
CONTACT
(Normally Open)
20
Communications
(continued)
RS-485 Ports
These ports connect multiple UPS power modules in a parallel connection.
RS-485 Port
TX485+
TX485RX485+
RX485-
TERMINAL RESISTOR FOR RS-485
Normally Closed
When using RS-485 for more than two units,
SWQ1 must be "ON" in at least one
and "OFF" in the other.
RS-485 Port
PIN1: RS-485 Transmit+
PIN2: RS-485 TransmitPIN3: RS-485 Receive+
PIN4: RS-485 Receive-
UPS Parallel Communication Ports
These ports allow multiple UPS power modules to communicate while in a parallel configuration.
UPS Parallel Communication Port
Sync Bus
BP ON
P UPS
Data
PARALLEL
Reserve
MBs_ON
UPS Parallel Communication Port
PARALLEL
21
Service
Your SmartOnline 3-Phase UPS System is covered by the limited warranty described below. Extended warranty (2-, 3- and 4-year) and start-up
service programs are available. For more information, call Tripp Lite Customer Service at (773) 869-1234.
Warranty
LIMITED WARRANTY
Seller warrants this product, if used in accordance with all applicable instructions, to be free from original defects in material and workmanship for a period of 2 years (except
U.S., Canada and Mexico: 1 year) from the date of initial purchase. If the product should prove defective in material or workmanship within that period, Seller will repair or
replace the product, in its sole discretion. Service under this Warranty includes parts and Tripp Lite service center labor. Onsite service plans are available from Tripp Lite
through authorized service partners (in most areas). Contact Tripp Lite Customer Service at (773) 869-1234 for details. International customers should contact Tripp Lite
support at [email protected]
THIS WARRANTY DOES NOT APPLY TO NORMAL WEAR OR TO DAMAGE RESULTING FROM ACCIDENT, MISUSE, ABUSE OR NEGLECT. SELLER MAKES NO
EXPRESS WARRANTIES OTHER THAN THE WARRANTY EXPRESSLY SET FORTH HEREIN. EXCEPT TO THE EXTENT PROHIBITED BY APPLICABLE LAW, ALL
IMPLIED WARRANTIES, INCLUDING ALL WARRANTIES OF MERCHANTABILITY OR FITNESS, ARE LIMITED IN DURATION TO THE WARRANTY PERIOD SET
FORTH ABOVE; AND THIS WARRANTY EXPRESSLY EXCLUDES ALL INCIDENTAL AND CONSEQUENTIAL DAMAGES. (Some states do not allow limitations on how
long an implied warranty lasts, and some states do not allow the exclusion or limitation of incidental or consequential damages, so the above limitations or exclusions may
not apply to you. This Warranty gives you specific legal rights, and you may have other rights which vary from jurisdiction to jurisdiction).
Tripp Lite; 1111 W. 35th Street; Chicago IL 60609; USA
WARNING: The individual user should take care to determine prior to use whether this device is suitable, adequate or safe for the use intended. Since individual applications
are subject to great variation, the manufacturer makes no representation or warranty as to the suitability or fitness of these devices for any specific application. The policy
of Tripp Lite is one of continuous improvement. Specifications are subject to change without notice.
Regulatory Compliance Identification Numbers
For the purpose of regulatory compliance certifications and identification, your Tripp Lite product has been assigned a unique series number. The series number can be found on the product
nameplate label, along with all required approval markings and information. When requesting compliance information for this product, always refer to the series number. The series number
should not be confused with the marking name or model number of the product.
22
Manual del propietario
No-break inteligente trifásico realmente en
línea SmartOnline (50 kVA y superior)
™
Entrada/Salida
Trifásico, 4 hilos (más tierra), conexión en estrella
• Modelos “PM”: 277/480 VCA
• Modelos “INTPM”: 220/380, 230/400 o 240/415 VCA (seleccionable por el usuario)*
* Consulte el submenú “Configuración de parámetros” de la página 38 para establecer el voltaje de salida del inversor. ** La certificación CE sólo es aplicable a los modelos
“INTPM” solamente. No conveniente para los usos móviles.
**
Hay dos módulos diferentes en el no-break: Un módulo de potencia y un módulo de batería. El módulo del poder se describe en
este manual y la Adición de especificaciones para no-break trifásico—50 kVA y superior. El módulo de batería se describe en su
manual del propietario, impreso por separado.
Advertencias de seguridad importantes
24
Características del módulo de potencia
25
Instalación
27
Conexión eléctrica
28
Operación de un no-break
29
Operación de varios no-break (En paralelo)
32
Navegación en pantalla LCD
37
Comunicaciones
41
Servicio
44
Garantía
44
English
1
1111 W. 35th Street • Chicago, IL 60609 USA
(773) 869-1234 • www.tripplite.com
Copyright © 2007 Tripp Lite. Todos los derechos reservados. SmartOnline™ es una marca comercial de Tripp Lite.
Advertencias de seguridad importantes
GUARDE ESTAS INSTRUCCIONES. Este manual contiene importantes instrucciones y advertencias que debe seguir durante la instalación y
el mantenimiento de todos los no-break SmartOnline trifásicos de Tripp Lite (50 kVA o más) y sus baterías. Todas las conexiones y el
mantenimiento del no-break deben ser realizados por personal calificado. El no-break solo debe ser instalado de acuerdo con los requisitos
establecidos en la norma IEC 60364-4-48. (El no-break cumple con las normas EN 50091-1-1, EN 50091-2, IEC 61000-4-2 Nivel 4, IEC 610004-3 Nivel 3, IEC 61000-4-4 Nivel 4, IEC 61000-4-5 Nivel 4 e IEC 61000-4-6.)
El personal de mantenimiento debe familiarizarse con los símbolos grabados en el no-break:
Este símbolo indica un terminal de protección a tierra (un terminal que debe estar conectado a tierra antes de hacer cualquier otra conexión
al equipo).
Este símbolo indica un terminal al cual se puede aplicar, o del cual se puede suministrar, una corriente o un voltaje continuos.
Este símbolo indica la palabra “fase”.
Advertencias sobre la ubicación del no-break
• Instale su no-break bajo techo, lejos del calor, la luz solar directa, el polvo, la humedad y cualquier otro contaminante conductor.
• Instale su no-break lejos de líquidos y gases inflamables. No permita que la unidad entre en contacto con agua u otros líquidos.
• Instale su no-break en un área estructuralmente sólida. Su no-break es muy pesado. El piso debe poder sostener el peso de todos los módulos del
no-break.Tenga cuidado al mover y levantar la unidad.
• Sólo opere su no-break a temperaturas en interiores entre 0 °C y 40 °C (32 °F y 104 °F) con una humedad entre 0 y 95% (sin-condensación).
Para obtener mejores resultados, mantenga las temperaturas bajo techo entre 62° F y 84° F (17° C y 29° C)
• Deje un espacio adecuado alrededor de los lados del no-break para ventilación: al menos 40 pulgadas (100 cm) del panel frontal y 20 pulgadas
(50 cm) de los paneles superior, posterior y laterales. No cubra las aberturas de ventilación en la unidad.
• No instale el no-break cerca de medios de almacenamiento magnético porque podría dañar los datos.
Advertencias sobre la conexión del no-break
• El suministro eléctrico para esta unidad debe ser trifásico y estar de acuerdo con la placa del equipo. También debe estar puesto a tierra
adecuadamente, de acuerdo con todos los reglamentos eléctricos locales aplicables.
• El no-break debe estar aislado antes de realizar cualquier conexión o servicio de mantenimiento. Debe incorporarse un dispositivo de desconexión
de fácil acceso en la instalación, cumpliendo todos los códigos eléctricos locales. El dispositivo de desconexión debe ser de cuatro polos y debe
poder desconectar todos los conductores de línea y el conductor neutro.
• Debido a la alta corriente de fuga, es indispensable una conexión a tierra.
Advertencias sobre la conexión de equipos
• No utilice un no-break de Tripp Lite para aplicaciones de soporte de vida en las que un funcionamiento defectuoso o una anomalía pudieran
causar una falla o una alteración importante en el funcionamiento de algún dispositivo de soporte de vida.
• El no-break está diseñado para alimentar equipos de cómputo. No utilice el no-break con cargas puramente inductivas o capacitivas.
• El no-break contiene su propia fuente de energía (batería externa) Los terminales de salida pueden estar con energía incluso cuando el no-breakno
está conectado a un suministro de corriente alterna.
Advertencias sobre la batería
• Su no-break no requiere ningún mantenimiento de rutina. No lo abra por ningún motivo. No hay partes en su interior que requieran
mantenimiento por parte del usuario.
• Existe riesgo de electrocución cuando el módulo de batería está conectado al módulo de potencia. Las baterías deben ser desconectadas antes de
su mantenimiento por personal de servicio calificado.
• Debido a que las baterías presentan un riesgo de choque eléctrico y quemaduras por a las altas corrientes de cortocircuito, deben ser cambiadas
sólo por personal de servicio entrenado que observe las precauciones adecuadas. Consulte el manual de su módulo de batería antes de proceder.
Quítese los relojes, anillos y otros objetos metálicos. Use herramientas con mangos aislados. Use guantes y botas de caucho. No deje
herramientas ni partes metálicas encima de las baterías. No ponga los terminales de la batería en cortocircuito o en puente con ningún objeto.
Desconecte la fuente de carga antes de conectar o desconectar los terminales de la batería. Determine si las baterías están puestas a tierra en forma
inadvertida. Si lo están, desconecte la fuente de la tierra. El contacto con cualquier parte de una batería puesta a tierra puede producir un choque
eléctrico. La probabilidad de tal choque eléctrico se reducirá si se retiran las conexiones a tierra durante la instalación y el mantenimiento.
• No deseche las baterías en un incinerador. Las baterías del no-break son reciclables. Consulte la reglamentación local para conocer los requisitos
de disposición de desechos.
24
Advertencias de seguridad importantes
(continúa)
• Solo conecte módulos de batería Tripp Lite a los terminales de baterías externas del no-break.
• No opere el no-break sin baterías.
• Los fusibles deben ser reemplazados sólo por personal autorizado por la fábrica. Los fusibles quemados sólo deben reemplazarse con fusibles
del mismo número y tipo.
• Hay voltajes potencialmente fatales dentro de esta unidad mientras está conectada la alimentación a la batería. Sólo personal entrenado debe
realizar los trabajos de servicio y reparación. Durante cualquier trabajo de mantenimiento, el no-break debe estar apagado o en modo de bypass
manual, con los fusibles retirados de todos los módulos de baterías conectados.
• No conecte ni desconecte los módulos de baterías mientras el no-break está en operación con alimentación de baterías, o cuando la unidad no
esté en el modo bypass.
Características del módulo de potencia
Hay dos módulos de no-break separados: Un módulo de potencia y un módulo de batería. Familiarícese con la ubicación y función de cada módulo
antes de instalar y operar su no-break. El módulo de potencia se describe a continuación. El módulo de batería se describe en su manual del
propietario, impreso por separado.
Panel de Control
1
2
3
4
5
6
7
8
9
10
11
12
13
Pantalla LCD: Esta pantalla de matriz de puntos retroiluminada indica una amplia gama de condiciones de operación e información de
diagnóstico del no-break. Se iluminará después que usted haya completado la instalación correctamente y puesto en marcha la unidad.
LED “BYPASS DE MANTENIMIENTO”: Esta luz roja se encenderá cuando el no-break esté proporcionando energía filtrada desde la red sin
emplear su convertidor o inversor. El equipo conectado no recibirá energía de baterías en el caso de una falla del servicio eléctrico.
LED “ENERGÍA DE RESERVA”: Esta luz verde se encenderá para indicar la presencia de un interruptor automático de reserva y una fuente
de energía de reserva conectados al UPD.
LED “RECTIFICADOR”: Esta luz verde se encenderá para indicar que el rectificador del no-break está funcionando.
LED “BATERÍA”: Esta luz naranja se encenderá cuando el no-break esté descargando la batería para proporcionar energía de corriente alterna
al equipo conectado.
LED “INVERSOR”: Esta luz verde se encenderá permanentemente para indicar que el inversor de corriente continua a corriente alterna del
no-break está activado.
LED “CONMUTADOR ESTÁTICO DE ENERGÍA DE RESERVA”: Esta luz verde se encenderá cuando el no-break esté alimentando a
equipo conectado mediante una fuente de energía de reserva conectada al no-break.
LED “INVERSOR MC”: Esta luz verde se encenderá para indicar que el equipo conectado está alimentado con energía a través del inversor
del no-break.
LED “SALIDA CA”: Esta luz verde se encenderá permanentemente para indicar que su no-break está suministrando energía de corriente
alterna al equipo conectado.
Botón de “DESCONEXIÓN DE
EMERGENCIA”: Este botón apaga el
7
rectificador, el inversor y la salida del no1
8
break en una emergencia. Después de
2
presionar el botón, seguirá presionado
hasta que sea restablecido. Para restablecer
3
el no-break y restaurar la salida, presione el
4
botón “Desconexión de emergencia” hasta
9
que regrese a su posición original.
Botón “ENCENDIDO” Este botón, cuando
5
se usa con el botón “ ”enciende el inversor
del no-break. Para encender el inversor del
6
no-break, presione simultáneamente el botón
“ENCENDIDO” y el botón “ ” y
10
manténgalos presionados 3 segundos antes
de liberarlos.
Botón “APAGADO”: Este botón, cuando
11
12
13
se usa con el botón “ ” apaga el inversor del
no-break. Para apagar el inversor del no-break,
presione simultáneamente el botón
“APAGADO” y el botón “ ” manteniéndolos
presionados 3 segundos antes de soltarlos.
Botones “ ”, “ ” y “ ”: Estos botones
controlan la pantalla LCD y los parámetros
PANEL DE CONTROL
de configuración.
25
Características del módulo de potencia
(continuación)
Interruptores automáticos, interruptores y fusibles
14 Interruptor automático de entrada del rectificador: Este
interruptor automático controla la energía de entrada al no-break
durante la operación normal.
15
Interruptor automático de entrada de reserva: Este interruptor
automático controla la energía de entrada al no-break durante la
operación con energía de reserva.
16
Interruptor automático de derivación manual: Este interruptor
automático controla la energía de entrada al no-break durante la
operación en derivación (bypass).
17
Interruptor automático de salida del no-break: Este interruptor
controla la salida del no-break al equipo conectado.
18 Fusible del ventilador: Este fusible protege el circuito
del ventilador.
20
19 Fusible de potencia: Este fusible desconecta la batería y los circuitos
21
18
de potencia auxiliar durante los trabajos de mantenimiento. También
protege el circuito auxiliar de potencia.
19
20 Ranura auxiliar (vea la ubicación en la página anterior): Retire
14
el pequeño panel de cubierta y utilice accesorios opcionales.
Contacte con el Soporte al cliente de Tripp Lite para obtener más
información y una lista de los productos disponibles para SNMP,
administración de red y conectividad.
15
16
17
21 Interruptor de Arranque de la Batería: En ausencia de energía
Consulte el apartado Interfaz
de comunicación
eléctrica del servicio público use este Interruptor para arrancar en
frío el UPS. (Para arrancar en frío el UPS, cierre el aislador del
fusible del compartimiento de la batería y a continuación presione
simultáneamente los botones ON (Encender) y . Las cargas
conectadas serán alimentadas por la batería. Si la carga de la
batería se ha agotado y no hay energía eléctrica disponible del
servicio público, se apagará el UPS y la alimentación de energía
eléctrica a los equipos conectadas se interrumpirá.)
MODULO DE ENERGIA DE 50kVA-120kVA
PANEL FRONTAL, PUERTA ABIERTA
MODULO DE ENERGIA DE 160kVA-200kVA
PANEL FRONTAL, PUERTA ABIERTA
20 15
14
16
21
17
18
19
Consulte el apartado Interfaz
de comunicación
26
Características del módulo de potencia
(continuación)
Interfaz de comunicación
22 Contactos secos: #1 (no-break Normal); #2 (Carga con reserva); #3 (Carga con batería); #4 (Voltaje bajo de
21
batería);#5 (Reserva anormal); #6 (Falla de prueba de batería). Vea el apartado “Comunicaciones” para
más detalles.
22.
23 Conector para Desconexión remota de emergencia (EPO):Este conector modular permite el apagado
remoto de emergencia. Vea el apartado “Comunicaciones” para más detalles.
24
Puerto inteligente RS-232: Este puerto DB9 hembra conecta su no-break con una estación de trabajo o un
servidor. Usa comunicaciones RS-232 para informar las condiciones de energía y del no-break. Se utiliza con
software y cables de Tripp Lite. Vea el apartado “Comunicaciones” para más detalles.
Contactos secos #1
Contactos secos #2
Contactos secos #3
22
Contactos secos #4
Contactos secos #5
Contactos secos #6
25 Puerto Ethernet y alimentación Ethernet: El puerto Ethernet es un puerto RS-232 que acepta un adaptador
24.
Ethernet opcional RS-232/RJ45 (vendido por separado). La conexión de alimentación Ethernet proporciona
energía de 12 VCC al adaptador opcional. Vea el apartado “Comunicaciones” para más detalles.
26 Contacto del generador: este puerto conecta a un generador auxiliar de energía. Cuando el generador está
25.
funcionando para soportar la carga del equipo, el no-break reducirá automáticamente su corriente de carga en
50% para evitar sobrecargar al generador. Vea el apartado “Comunicaciones” para más detalles.
27 Puertos RS-485: Estos puertos permiten conectar varios módulos de potencia del no-break en una
26.
configuración paralelo. Vea el apartado “Comunicaciones” para más detalles.
Conector para
Desconexión remota
de emergencia (EPO)
RS-232
23
24
Adaptador Ethernet
25
-12V
GND
Contacto del
Generador
26
RS-485
28
Puertos paralelos de comunicación del no-break: Estos puertos permiten que varios módulos de potencia
del no-break se comuniquen con una configuración paralelo. Vea el apartado “Comunicaciones” para más
detalles.
27
RS-485
Paralelo
28
Paralelo
Instalación
Siga todas las advertencias indicadas en la sección Seguridad antes de la instalación. La lista de verificación siguiente proporciona una guía general,
más que una descripción completa de los procedimientos.
Lista de verificación de la instalación
K
El área del piso donde se instalará el no-break tiene la suficiente resistencia de apoyo. Consulte “Tabla de carga de peso del piso” en la
Adición de especificaciones para no-break trifásico—50 kVA y superior.
K
Las entradas y los pasillos al local tienen suficiente espacio para transportar el no-break.
K
La habitación donde se instalará el no-break tiene suficiente espacio libre alrededor de los módulos del no-break para permitir una adecuada
ventilación y acceso para la operación y el mantenimiento.
K
El aire acondicionado de la planta puede mantener los niveles ideales de temperatura y humedad.
K
Los dispositivos de disminución de ruido están instalados (si se desea).
K
El cableado eléctrico está claramente marcado (por polaridad y fase) y se ha verificado que cumple con los códigos eléctricos locales.
K
La fuente de energía de entrada ha sido desconectada antes de realizar el cableado.
K
La habitación donde se instalará el no-break tiene el piso, el techo y las paredes construidos con materiales a prueba de incendios. La habitación
incluye un extintor de incendios. La habitación tiene seguridad contra el acceso de personal no autorizado.
K
Todo el personal tiene el entrenamiento adecuado para las operaciones normales y de emergencia.
K
Durante la instalación, el neutro de la entrada del no-break está conectado sólidamente al neutro de la red.
27
Conexión eléctrica
Siga todas las advertencias indicadas en la sección Seguridad antes de realizar una conexión permanente de los terminales. La lista de verificación
siguiente proporciona una guía general, más que una descripción completa de los procedimientos.
Lista de verificación de la conexión
K
K
K
K
Apague la energía de entrada antes de realizar la conexión eléctrica.
Revise los cables de entrada, de salida y de la batería para verificar que tengan la amplitud, fase y polaridad correctas.
Conecte el(los) conductor(es) de tierra entre el(los) módulo(s) de potencia del no-break y el(los) módulo(s) de batería.
Si la alimentación de entrada y de salida del no-break tienen conexión estrella (Y), el conductor de tierra y el conductor neutro no se conectan
dentro del módulo de potencia del no-break.
K Si el sistema de energía de entrada tiene un voltaje flotante entre neutro y tierra, y si se desea tener 0 voltios entre neutro y tierra dentro del
módulo de potencia del no-break, Tripp Lite recomienda lo siguiente: agregar un transformador de aislamiento suministrado por el usuario a
lacentrada del no-break, y conectar el conductor neutro y el conductor de tierra dentro del módulo de potencia del no-break.
K Si se instalan varios módulos de no-break en paralelo, asegúrese que los cables de entrada y salida sean de la misma longitud para cada módulo.
Para “Calibre recomendado de cables”, “Especificaciones de torque” y
“Diagramas de cableado de terminales”, refieren a la Adición
de especificaciones para no-break trifásico—50 kVA y superior.
Diagrama de cableado en paralelo
En una conexión paralela, hasta ocho no-break se conectan a una sola carga. Una conexión en paralelo proporciona redundancia de seguridad contra
falla, asegurando que la carga esté soportada constantemente incluso si uno o más no-break fallan o son retirados para mantenimiento. Dentro de cada
arquitectura paralela, hay una opción de conexión de “bucle simple” (que solo utiliza una fuente de entrada) y otra de”bucle doble” (que utiliza dos
fuentes de entrada). Nota: En ambas opciones de conexión, la longitud total de los cables (entrada, salida y reserva) debe ser igual para cada módulo
de potencia del no-break para evitar un desbalance de carga.
Todos los modelos
• Conexión de bucle simple (utiliza una fuente de entrada)
• Conexión de bucle doble (utiliza dos fuentes de entrada)
ENTRADA 1
ENTRADA 1
Entrada Salida
Entrada Salida
Reserva
Línea de comunicación en paralelo
Línea de comunicación en paralelo
ENTRADA 2
Entrada Salida
ENTRADA
ENTRADA
SALIDA 1
SALIDA 2
Entrada Salida
SALIDA 2
LOAD
CARGA
Reserva
SALIDA 8
ENTRADA 8
SALIDA 1
ENTRADA 2
CARGA
SALIDA 8
RESERVA
Entrada Salida
ENTRADA 8 Entrada Salida
Reserva
28
Operación de un no-break
Los diagramas y procedimientos en esta sección se aplican a un solo módulo de potencia de no-break conectado a una sola carga del equipo. Nota:
Todos los diagramas asumen la existencia de dos fuentes separadas de CA que suministran dos entradas separadas: Una fuente de la red que
suministra la entrada del rectificador y una fuente de reserva que suministra la entrada de reserva. Si su aplicación sólo permite una sola fuente de
CA, esta fuente suministrará la entrada al rectificador y a la reserva.
• Modos de operación
• Procedimiento de apagado
• Procedimiento de arranque
• Procedimiento manual de bypass para mantenimiento
Modos de operación
Modo normal
En este modo, el módulo de potencia convierte continuamente la energía de entrada de CA en energía de CC (para recargar las baterías y alimentar
al inversor). A su vez, el inversor transforma la energía de CC en energía de CA de salida limpia y estable para la carga conectada del equipo.
Interruptor automático de
derivación manual
Entrada de
reserva
Interruptor automático
de entrada de reserva
Flujo de energía
Flujo de energía
Flujo de energía
Flujo de energía
Carga
Interruptor
automático de
salida
Entrada de
red
Interruptor
automático
de entrada
del
rectificador
Rectificador
Inversor
Conmutador estático
Banco de baterías
Modo Respaldo
En este modo, la energía de CA de entrada de la red ha fallado. Ya que el no-break opera continuamente en línea, los módulos de baterías conectados
suministran instantáneamente (con tiempo de transferencia cero) la energía de CC al inversor. A su vez, el inversor transforma la energía de CC en energía
de CA de salida limpia y estable para la carga conectada del equipo.
Interruptor automático de
derivación manual
Entrada de
reserva
Interruptor automático
de entrada de reserva
Flujo de energía
Flujo de energía
Flujo de energía
Carga
Interruptor
automático de
salida
Entrada de
red
Interruptor
automático
de entrada
del
rectificador
Rectificador
Inversor
Banco de baterías
29
Conmutador estático
Operación de un no-break
(continuación)
Modo de suministro de entrada de CA de reserva
En este modo, el inversor del módulo de potencia ha encontrado una de varias condiciones anormales de operación, incluyendo sobretemperatura,
sobrecarga continua, salida en cortocircuito o energía de batería agotada. El módulo de potencia apaga automáticamente el inversor para evitar
daños. Para no utilizar el inversor, el módulo de potencia transfiere automáticamente a una fuente de entrada de CA de reserva para poder soportar
la carga del equipo conectado. (Nota: Como se está evitando el inversor del módulo de potencia en este modo, el no-break no podrá cambiar a modo
de respaldo en el caso de una falla de energía.) Después que el módulo de potencia detecta que las condiciones anormales de operación han cesado,
reactiva automáticamente el inversor y cambia nuevamente a la fuente de entrada de CA de la red para soportar la carga del equipo conectado.
Flujo de energía
Interruptor automático de
derivación manual Flujo de energía
Entrada de
reserva
Flujo de energía
Interruptor automático
de entrada de reserva
Flujo de energía
Carga
Interruptor
automático de
salida
Entrada de
red
Interruptor
automático
de entrada
del
rectificador
Rectificador
Inversor
Conmutador estático
Banco de baterías
Modo de bypass de mantenimiento
En este modo, se ha realizado el procedimiento manual de mantenimiento (con bypass) para pasar de la energía de entrada de CA filtrada (de una
fuente de entrada de CA de reserva) a las cargas de equipos conectados mientras se permite el mantenimiento en el módulo de potencia del nobreak. (Nota: Como se está evitando el inversor del módulo de potencia en este modo, el no-break no podrá cambiar a modo de respaldo en el caso
de una falla de energía.) Después que se ha realizado el procedimiento manual de mantenimiento (sin bypass), el módulo de potencia reactiva
automáticamente el inversor y cambia nuevamente a la fuente de entrada de CA de la red para soportar la carga del equipo conectado.
Flujo de energía
Flujo de energía
Interruptor automático de
derivación manual
Entrada de
reserva
Interruptor automático
de entrada de reserva
Flujo de energía
Carga
Interruptor
automático de
salida
Entrada de
red
Interruptor
automático
de entrada
del
rectificador
Rectificador
Inversor
Conmutador estático
Banco de baterías
Procedimiento de arranque
Este procedimiento suministra energía y arranca el no-break. Verifique los siguientes puntos antes de arrancar el no-break:
K
Asegúrese que se hayan completado todas las conexiones eléctricas al módulo de potencia y módulo(s) de batería.
K
Verifique que todos los interruptores automáticos y aisladores de circuito estén en la posición de apagado y que se hayan retirado los fusibles
de la batería.
K
Asegúrese que la línea neutral y tierra tengan el mismo nivel del voltaje.
K
Aplique energía a los cables de entrada de CA y verifique que el voltaje de entrada, la frecuencia y la secuencia de fase estén dentro de las
especificaciones del no-break y la carga del equipo.
K
Verifique para asegurar que los aisladores fusibles de la energía auxiliar y del ventilador (N) estén cerrados.
30
Operación de un no-break
(continuación)
Después de seguir todas las advertencias de la sección Seguridad y las precauciones indicadas anteriormente, arranque el no-break de acuerdo con
el procedimiento siguiente:
Paso 1. Encienda (cierre) el interruptor “ENTRADA DE RESERVA”. La pantalla LCD indicará “Bypass Mode”.
Paso 2. Encienda (cierre) el interruptor “ENTRADA DEL RECTIFICADOR” y espere 30 segundos aproximadamente. El voltaje de la
BARRA CC aumentará hasta cerca de 393 VCC.
Paso 3. Ubique los bloques externos de fusibles en los módulos de batería y conecte (cierre) los fusibles.
Paso 4. Simultáneamente, presione los botones “ENCENDIDO” y “ ” y manténgalos presionados durante 3 segundos. El inversor se encenderá
y el voltaje se incrementará durante cerca de 30 segundos. La carga será transferida al inversor. La pantalla LCD indicará “Normal Mode”.
Paso 5. Mida el voltaje en el interruptor de salida del no-break para determinar si es normal o anormal. Si el voltaje de salida es normal, cierre
el interruptor de salida para alimentar la carga. Después de aproximadamente 30 segundos, el no-break ejecutará automáticamente una
prueba de batería.
Procedimiento de apagado
Este procedimiento retira la alimentación y apaga el no-break.
Paso 1. Apague (abra) el interruptor “SALIDA DE NO-BREAK”.
Paso 2. Simultáneamente, presione los botones ‘APAGADO” y “ ” y manténgalos presionados durante 3 segundos. Cuando la energía de
Paso 3.
Paso 4.
Paso 5.
Paso 6.
reserva ha vuelto a su nivel normal (en que su voltaje y frecuencia están dentro de un rango establecido), el inversor del módulo de
potencia se apagará inmediatamente. El soporte de la carga del equipo se transferirá a la energía de reserva. La pantalla LCD indicará
“Bypass Mode”.
Ubique los bloques externos de fusibles en los módulos de batería y desconecte (abra) los fusibles.
Apague (abra) el interruptor “ENTRADA DE RECTIFICADOR”.
Espere aproximadamente 5 minutos para que la capacidad de CC se descargue. Presione los botones “ENCENDIDO” y “APAGADO”
para probar la adecuada descarga de la capacidad de CC del inversor, y luego presione simultáneamente los botones “APAGADO”
y “ ” para apagar el inversor. Confirme que el voltaje de la BARRA sea seguro.
Apague (abra) el interruptor “ENTRADA DE RESERVA”.
Procedimiento manual de bypass para mantenimiento
Este procedimiento permite el mantenimiento de rutina a cargo del personal calificado de servicio. Tripp Lite recomienda una inspección rutinaria
de mantenimiento cada seis meses. Nota: Como se está evitando el inversor del módulo de potencia durante este procedimiento, el no-break no
podrá cambiar a modo de respaldo y soportar el equipo conectado en el caso de una falla de energía.
Procedimiento manual de mantenimiento (Con bypass)
Paso 1. Simultáneamente, presione los botones “APAGADO’ y “ ” y manténgalos presionados durante 3 segundos. Cuando la energía de reserva
ha vuelto a su nivel normal (en que su voltaje y frecuencia están dentro de un rango establecido), el inversor del módulo de potencia se
apagará inmediatamente. El soporte de la carga del equipo se transferirá a la energía de reserva. La pantalla LCD indicará “Bypass Mode”.
Paso 2. Ubique los bloques externos de fusibles en los módulos de batería y desconecte (abra) los fusibles.
Paso 3. Apague (abra) el interruptor “ENTRADA de rectificador”.
Paso 4. Espere aproximadamente 5 minutos para que la capacidad de CC se descargue. Presione los botones “ENCENDIDO” y “APAGADO”
para probar la adecuada descarga de la capacidad de CC del inversor, y luego presione simultáneamente los botones “APAGADO”
y “ ” para apagar el inversor. Confirme que el voltaje de la BARRA sea seguro.
Paso 5. Encienda (cierre) el interruptor “BYPASS MANUAL”. El soporte de la carga del equipo se transferirá a bypass manual. La pantalla LCD
indicará “Manual Bypass”.
Paso 6. Apague (abra) el interruptor “SALIDA DE NO-BREAK”, el interruptor de “ENTRADA DE RESERVA” y los aisladores fusibles de
energía auxiliar (+) y del ventilador (N). La pantalla LCD se apagará.
Nota: Cuando el no-break esté en modo de bypass de mantenimiento, no habrá altos voltajes dentro de su módulo de potencia, excepto en los terminales y en el interruptor
“BYPASS MANUAL”.
Procedimiento manual de mantenimiento (Sin bypass)
Paso 1. Encienda (cierre) el interruptor “SALIDA DE NO-BREAK”, el interruptor de “ENTRADA DE RESERVA” y los aisladores fusibles de
energía auxiliar (+) y del ventilador (N). El soporte de la carga del equipo se transferirá a bypass manual. La pantalla LCD indicará
“Manual Bypass”.
Paso 2. Apague (abra) el interruptor “BYPASS MANUAL”. El soporte de la carga del equipo se transferirá a la energía de reserva. La pantalla
LCD indicará “Bypass Mode”.
Paso 3. Encienda (cierre) el interruptor “ENTRADA DEL RECTIFICADOR” y espere 30 segundos aproximadamente. El voltaje de la BARRA
CC aumentará hasta cerca de 393 VCC.
Paso 4. Ubique los bloques externos de fusibles en los módulos de batería y conecte (cierre) los fusibles.
Paso 5. Simultáneamente, presione los botones “ENCENDIDO” y “ ” y manténgalos presionados durante 3 segundos. El inversor se encenderá
y el voltaje se incrementará durante cerca de 30 segundos. La carga será transferida al inversor. La pantalla LCD indicará “Normal Mode’.
31
Operación de varios no-break (En paralelo)
Los diagramas y los procedimientos en esta sección se aplican a una configuración en paralelo donde varios módulos de potencia (hasta ocho) de
un no-break son conectados a una sola carga del equipo. Una configuración en paralelo proporciona redundancia de seguridad contra falla,
asegurando que la carga esté soportada constantemente incluso si uno o más no-break fallan o son retirados para mantenimiento. Dos o más nobreak que operen en paralelo deben tener la misma capacidad de VA, voltaje de salida y frecuencia de salida. También deben poder asumir una parte
igual de la carga del equipo para no sobrecargar los no-break y cambiar todos los no-break al modo de suministro de entrada de CA de reserva.
• Modos de operación
• Configuraciones paralelas opcionales (Redundancia de reserva en caliente y Batería común)
• Procedimiento de arranque
• Procedimiento de apagado
• Procedimiento manual de bypass para mantenimiento
Modos de operación
Modo normal
En este modo, los módulos de potencia convierten continuamente energía de entrada de CA en energía de CC (para recargar sus baterías y alimentar
a sus inversores). A su vez, los inversores transforman la energía de CC en energía de CA de salida limpia y estable para la carga conectada del
equipo.
Interruptor automático de
derivación manual
Entrada de
reserva
Flujo de energía
Interruptor automático
de entrada de reserva
Flujo de energía
Flujo de energía
Flujo de energía
Entrada de
red
Interruptor
automático
de entrada
del
rectificador
Rectificador
Inversor
Conmutador
estático
Interruptor
automático de
salida
Banco de baterías
Flujo de energía
Carga
Interruptor automático de
derivación manual
Entrada de
reserva
Flujo de energía
Interruptor automático
de entrada de reserva
Flujo de energía
Flujo de energía
Flujo de energía
Entrada de
red
Interruptor
automático
de entrada
del
rectificador
Rectificador
Inversor
Banco de baterías
32
Conmutador
estático
Interruptor
automático de
salida
Operación de varios no-break (En paralelo)
(continuación)
Modo Respaldo
En este modo, la energía de CA de entrada de la red ha fallado. Ya que los no-break operan continuamente en línea, sus módulos de batería
conectados suministran instantáneamente (tiempo de transferencia cero) energía de CC a sus inversores. A su vez, los inversores transforman la
energía de CC en energía de CA de salida limpia y estable para la carga conectada del equipo.
Interruptor automático de
derivación manual
Entrada de
reserva
Interruptor automático
de entrada de reserva
Flujo de energía
Flujo de energía
Flujo de energía
Entrada de
red
Interruptor
automático
de entrada
del
rectificador
Rectificador
Inversor
Conmutador
estático
Interruptor
automático de
salida
Banco de baterías
Flujo de energía
Carga
Interruptor automático de
derivación manual
Entrada de
reserva
Interruptor automático
de entrada de reserva
Flujo de energía
Flujo de energía
Flujo de energía
Entrada de
red
Interruptor
automático
de entrada
del
rectificador
Rectificador
Inversor
Conmutador
estático
Interruptor
automático de
salida
Banco de baterías
Modo de suministro de entrada de CA de reserva
En este modo, los inversores de los módulos de potencia han encontrado una de varias condiciones anormales de operación, incluyendo
sobretemperatura, sobrecarga continua, salida en cortocircuito o energía de batería agotada. Los módulos de potencia apagan automáticamente sus
inversores para evitar daños. Para no utilizar sus inversores, los módulos de potencia transfieren automáticamente a una fuente de entrada de CA
de reserva para poder soportar la carga del equipo conectado. (Nota: Como se están evitando los inversores de los módulos de potencia en este
modo, los no-break no podrán cambiar a modo de respaldo en el caso de una falla de energía.)
Después que los módulos de potencia detectan que las condiciones anormales de operación han cesado, reactivan automáticamente sus inversores
y cambian nuevamente a la fuente de entrada de CA de la red para soportar la carga del equipo conectado.
Flujo de energía
Entrada de
reserva
Interruptor automático de
derivación manual Flujo de energía
Interruptor automático
de entrada de reserva
Flujo de energía
Flujo de energía
Entrada de
red
Interruptor
automático
de entrada
del
rectificador
Rectificador
Inversor
Conmutador
estático
Interruptor
automático de
salida
Banco de baterías
Flujo de energía
Carga
Flujo de energía
Entrada de
reserva
Interruptor automático de
derivación manual Flujo de energía
Interruptor automático
de entrada de reserva
Flujo de energía
Flujo de energía
Entrada de
red
Interruptor
automático
de entrada
del
rectificador
Rectificador
Inversor
Banco de baterías
33
Conmutador
estático
Interruptor
automático de
salida
Operación de varios no-break (En paralelo)
(continuación)
Modo de bypass de mantenimiento
En este modo, se ha realizado el procedimiento manual de mantenimiento (con bypass) para pasar de la energía de entrada de CA filtrada (de una
fuente de entrada de CA de reserva) a las cargas de equipos conectados mientras se permite el mantenimiento en el módulo de potencia del nobreak. (Nota: Como se está evitando el inversor del módulo de potencia en este modo, el no-break no podrá cambiar a modo de respaldo en el caso
de una falla de energía.) Después que se ha realizado el procedimiento manual de mantenimiento (sin bypass), el módulo de potencia reactiva
automáticamente el inversor y cambia nuevamente a la fuente de entrada de CA de la red para soportar la carga del equipo conectado.
Flujo de energía
Flujo de energía
Entrada de
reserva
Interruptor automático de
derivación manual
Interruptor automático
de entrada de reserva
Flujo de energía
Interruptor
automático
de entrada
del
rectificador
Entrada de
red
Rectificador
Inversor
Conmutador
estático
Interruptor
automático de
salida
Banco de baterías
Flujo de energía
Carga
Flujo de energía
Flujo de energía
Entrada de
reserva
Interruptor automático de
derivación manual
Interruptor automático
de entrada de reserva
Flujo de energía
Entrada de
red
Interruptor
automático
de entrada
del
rectificador
Rectificador
Conmutador
estático
Inversor
Interruptor
automático de
salida
Banco de baterías
Configuración paralela opcional (Redundancia de reserva en caliente y Batería común)
Redundancia de reserva en caliente
En esta configuración, uno o más módulos de potencia del no-break sirven como “reserva en caliente” para aumentar la disponibilidad del equipo
conectado reduciendo las posibilidades de que la falla de un no-break afectará el poder de salida. Durante condiciones normales, el no-break en
“reserva en caliente” no dará soporte a la carga del equipo conectado; sin embargo, durante una falla del no-break, el no-break en "reserva en
caliente" soportará automáticamente (mediante la activación del conmutador estático) la carga del equipo conectado. La salida del no-break en
“reserva en caliente” está conectada a la entrada de energía de reserva de otro módulo de potencia de un no-break. Para reducir los costos de
instalación, los usuarios pueden utilizar un módulo de potencia de un no-break en “reserva en caliente” hasta para siete módulos de potencia de nobreak adicionales dentro de una configuración en paralelo.
Interruptor automático de
derivación manual
Entrada de
reserva
Entrada de
red
Flujo de energía
Interruptor
automático
de entrada
del
rectificador
Entrada de
reserva
Flujo de energía
Entrada de
red
Interruptor automático
de entrada de reserva
Rectificador
Flujo de energía
Flujo de energía
Inversor
Conmutador
estático
Flujo de energía
Salida no-break 1
Flujo de energía
Salida no-break 2
Carga
Interruptor
automático de
salida
Banco de baterías
Interruptor automático de
derivación manual
Interruptor automático
de entrada de reserva
Interruptor
automático
de entrada
del
rectificador
Rectificador
Flujo de energía
Flujo de energía
Inversor
Banco de baterías
34
Conmutador
estático
Interruptor
automático de
salida
Operación de varios no-break (En paralelo)
(continuación)
Batería común
En esta configuración, un solo banco de módulos de batería es compartido por varios módulos de potencia de no-break. Esto no sólo reduce los
costos de la instalación, sino que salva la superficie útil. Nota: Al usar la pantalla LCD para establecer la carga de la batería, divida la tarea de
carga por igual entre todos los módulos de potencia del no-break. Por ejemplo: Dos módulos de potencia de no-break están conectados a un
solo banco de módulos de batería con una capacidad de 100 amp-hora. Para cargar el banco de batería a un régimen de 12 amperios de
corriente de carga, seleccione un ajuste de “Corriente de carga de batería’ de 6 amperios y un ajuste de “Capacidad de batería en AH” de 50
amp-hora individualmente en cada una de las pantallas LCD de los dos módulos de potencia de no-break. Nota adicional: En una configuración
de Batería común, no podrá ejecutar una prueba de batería desde la pantalla LCD.
Interruptor automático de
derivación manual
Entrada
de reserva
Flujo de energía
Interruptor automático
de entrada de reserva
Flujo de energía
Flujo de energía
Interruptor
Entrada automático Rectificador
de red de entrada
del
rectificador
Inversor
Interruptor
Conmutador automático de
salida
estático
Flujo de energía
Banco de baterías
Carga
Interruptor automático
de entrada de reserva
Entrada
de reserva
Flujo de
energía
Interruptor automático de
derivación manual
Interruptor
Entrada automático Rectificador
de red de entrada
del
rectificador
Flujo de energía
Inversor
Conmutador
estático
Flujo de
energía
Interruptor
automático de
salida
Procedimiento de arranque
Este procedimiento suministra energía y arranca los no-break. Verifique los siguientes puntos antes de arrancar el no-break:
K
Asegúrese que se hayan completado todas las conexiones eléctricas a todos los módulos de potencia y módulos de batería.
K
Verifique que todos los interruptores automáticos y aisladores de circuito estén en la posición de apagado y que se hayan retirado los fusibles
de la batería.
K
Asegúrese que la línea neutral y tierra tengan el mismo nivel del voltaje.
K
Aplique energía a los cables de entrada de CA y verifique que el voltaje de entrada, la frecuencia y la secuencia de fase estén dentro de las
especificaciones del no-break y la carga del equipo.
K
Verifique para asegurar que los aisladores fusibles de la energía auxiliar y del ventilador (N) estén cerrados.
K
Usando la pantalla LCD de cada módulo de potencia de no-break dentro de la configuración en paralelo, fije la identificación del no-break.
Fije una identificación diferente para cada módulo de potencia.
Después de seguir todas las advertencias de la sección Seguridad y las precauciones indicadas anteriormente, arranque los no-break de acuerdo con
el procedimiento siguiente:
¡NOTA!
Aplique cada paso a cada módulo de potencia de no-break dentro de la configuración en paralelo antes de avanzar al siguiente paso.
Paso 1: Instale cables de comunicación paralela externos entre los puertos paralelo en los módulos de potencia del no-break a una computadora.
Paso 2. Encienda (cierre) el interruptor “ENTRADA DE RESERVA” de cada módulo de potencia de no-break. La pantalla LCD en cada módulo
de potencia de no-break mostrará “Bypass Mode”.
Paso 3. Encienda (cierre) el interruptor “ENTRADA DE RECTIFICADOR” de cada módulo de potencia de no-break y espere aproximadamente
30 segundos. El voltaje de la BARRA CC aumentará hasta cerca de 393 VCC.
Paso 4. Ubique los bloques externos de fusibles en los módulos de batería y conecte (cierre) los fusibles.
Paso 5. Para cada módulo de potencia de no-break individualmente, presione simultáneamente los botones “ENCENDIDO” y “ ” y
manténgalos presionados durante 3 segundos. El inversor se encenderá y el voltaje se incrementará durante cerca de 30 segundos.
La carga será transferida al inversor. La pantalla LCD indicará “Normal Mode”.
Paso 6. Mida el voltaje en el interruptor de “SALIDA” del no-break de cada módulo de potencia para determinar si es normal o anormal. Si el
voltaje de salida es normal, encienda (cierre) los interruptores de “SALIDA” de cada módulo de potencia para suministrar energía a la
carga. Después de aproximadamente 30 segundos, el no-break ejecutará automáticamente una prueba de batería.
35
Operación de varios no-break (En paralelo)
(continuación)
Procedimiento de apagado
Este procedimiento retira la alimentación y apaga los módulos de potencia del no-break.
¡ADVERTENCIA!
Al apagar módulos de potencia de no-break individuales en una configuración paralela, el usuario debe asegurarse que los módulos de
potencia del no-break dentro de la configuración que permanezcan ENCENDIDOS puedan alimentar colectivamente la carga del
equipo. Si no pueden hacerlo, los módulos de potencia del no-break dentro de la configuración paralela se sobrecargarán y se apagarán,
dejando de alimentar la carga del equipo.
¡NOTA!
Aplique cada paso a cada módulo de potencia de no-break en la configuración en paralelo antes de avanzar al siguiente paso.
Paso 1. Para cada módulo de potencia de no-break en la configuración paralela que se apagará, presione simultáneamente los botones
“APAGADO” y “ ” y manténgalos presionados durante 3 segundos. El inversor del módulo de potencia se apagará; su pantalla LCD
mostrará "Output Close" y el soporte de la carga del equipo se transferirá y será compartido por igual entre los otros módulos de
potencia de no-break en la configuración paralela que no hayan sido apagados todavía. A medida que cada inversor consecutivo de
módulo de poder se apaga, se alcanzará un punto en que los módulos de potencia que aún no han sido apagados no podrán compartir la
carga combinada. En este punto, los módulos de potencia restantes apagarán automáticamente sus inversores, transferirán la carga a la
energía de reserva y mostrarán “Bypass Mode” en sus pantallas LCD.
Paso 2. Ubique los bloques externos de fusibles en los módulos de batería y desconecte (abra) los fusibles.
Paso 3. Apague (abra) los interruptores “ENTRADA DE RECTIFICADOR” y “SALIDA DE NO-BREAK” de cada módulo de potencia de no-break.
Paso 4. Espere aproximadamente 5 minutos para que la capacidad de CC se descargue. Presione los botones "ENCENDIDO" y "APAGADO" de
cada módulo de potencia de no-break para probar la adecuada descarga de la capacidad de CC del inversor. Luego, para cada módulo de
potencia de no-break, presione simultáneamente los botones "APAGADO" y “ ” para apagar sus inversores. Confirme que el voltaje
de la BARRA sea seguro.
Paso 5. Apague (abra) el interruptor "ENTRADA DE RESERVA" de cada módulo de potencia de no-break.
Procedimiento manual de bypass para mantenimiento
Este procedimiento permite el mantenimiento de rutina a cargo del personal calificado de servicio. Tripp Lite recomienda una inspección rutinaria
de mantenimiento cada seis meses. Nota: Como se está evitando los inversores de los módulos de potencia durante este procedimiento, los no-break
no podrán cambiar a modo de respaldo y soportar el equipo conectado en el caso de una falla de energía.
Procedimiento manual de mantenimiento (Con bypass)
Paso 1. Para cada módulo de potencia de no-break en la configuración paralela que será colocado en bypass, presione simultáneamente los
botones "APAGADO" y “ ”y manténgalos presionados durante 3 segundos. El inversor del módulo de potencia se apagará; su pantalla
LCD mostrará "Output Close" y el soporte de la carga del equipo se transferirá y será compartido por igual entre los otros módulos de
potencia de no-break en la configuración paralela que no hayan colocado en bypass todavía. A medida que cada inversor consecutivo de
módulo de poder se apaga, se alcanzará un punto en que los módulos de potencia que aún no han sido colocados en bypass no podrán
compartir la carga combinada. En este punto, los módulos de potencia restantes apagarán automáticamente sus inversores, transferirán la
carga a la energía de reserva y mostrarán “Bypass Mode” en sus pantallas LCD.
Paso 2. Ubique los bloques externos de fusibles en los módulos de batería y desconecte (abra) los fusibles.
Paso 3. Apague (abra) el interruptor “ENTRADA DE RECTIFICADOR” de cada módulo de potencia de no-break.
Paso 4. Espere aproximadamente 5 minutos para que la capacidad de CC se descargue. Presione los botones “ENCENDIDO” y “APAGADO” de
cada módulo de potencia de no-break para probar la adecuada descarga de la capacidad de CC del inversor. Luego, para cada módulo de
potencia de no-break, presione simultáneamente los botones “APAGADO” y “ ” para apagar sus inversores. Confirme que el voltaje de
la BARRA sea seguro.
Paso 5. Encienda (cierre) el interruptor “BYPASS MANUAL” de cada módulo de potencia de no-break. El soporte de la carga del equipo se
transferirá a bypass manual. La pantalla LCD en cada módulo de potencia de no-break mostrará "Manual Bypass".
Paso 6. Apague (abra) el interruptor “SALIDA DE NO-BREAK”, el interruptor de “ENTRADA DE RESERVA” y los aisladores fusibles de
energía auxiliar (+) y del ventilador (N) de cada módulo de potencia de no-break. Las pantallas LCD se apagarán.
Nota: Cuando los no-break estén en modo de bypass de mantenimiento, no habrá altos voltajes dentro de los módulos de potencia, excepto en los terminales y en los interruptores
“BYPASS MANUAL”.
Procedimiento manual de mantenimiento (Sin bypass)
Paso 1. Encienda (cierre) el interruptor “SALIDA DE NO-BREAK”, el interruptor de “ENTRADA DE RESERVA” y los aisladores fusibles de
energía auxiliar (+) y del ventilador (N) de cada módulo de potencia de no-break. El soporte de la carga del equipo se transferirá a
bypass manual. Las pantallas LCD indicarán “Manual Bypass”.
Paso 2. Apague (abra) el interruptor “BYPASS MANUAL” de cada módulo de potencia de no-break. El soporte de la carga del equipo se
transferirá a la energía de reserva. Las pantallas LCD indicarán “Bypass Mode”.
Paso 3. Encienda (cierre) el interruptor "ENTRADA DE RECTIFICADOR" de cada módulo de potencia de no-break y espere aproximadamente
30 segundos.
Paso 4. Ubique los bloques externos de fusibles en los módulos de batería y conecte (cierre) los fusibles.
Paso 5. Para cada módulo de potencia de no-break que saldrá del modo bypass, presione simultáneamente los botones “ENCENDIDO’ y “ ” y
manténgalos presionados durante 3 segundos. El inversor se encenderá y el voltaje se incrementará durante cerca de 30 segundos. La
carga será transferida al inversor. La pantalla LCD indicará “Normal Mode”.
Paso 6. Mida el voltaje en el interruptor de “SALIDA” del no-break de cada módulo de potencia para determinar si es normal o anormal. Si el
voltaje de salida es normal, encienda (cierre) los interruptores de “SALIDA” de cada módulo de potencia para suministrar energía a la
carga. Después de aproximadamente 30 segundos, el no-break ejecutará automáticamente una prueba de batería.
36
Navegación en pantalla LCD
La pantalla LCD muestra una gran variedad de condiciones de operación,
además de proporcionar a la administración la capacidad de fijar los parámetros
de operación y ver registros de eventos. La pantalla LCD mostrará un diagrama
de bloque del modo actual de operación.
El Modo normal se proporciona como ejemplo.
MODO NORMAL
BYPASS
RED
NOTA DE CONTRASEÑA: Para navegar dentro de los submenús de la
pantalla LCD se requiere una contraseña. La contraseña predeterminada es
0 0 0 0. Para cambiar la contraseña, escoja la pantalla "Password Setting"
(Configuración de contraseña) en el submenú “Configuración de parámetros’.
Para desplazarse en la pantalla y ver las condiciones de operación en detalle o cambiar los parámetros de operación, familiarícese con las funciones
del botón de navegación:
Clave de navegación LCD
Acción
Desplazarse hacia arriba en menú
Desplazarse hacia abajo en menú
Ingresar o seleccionar una opción de menú
Salir de menú actual y regresar al menú anterior
Botones que debe presionar
y
simultáneamente
Menú principal
Presione el botón “ ” para ingresar al menú principal. Los submenús son los siguientes:
• Página de medición
• Configuración de parámetros
• Control del sistema
• Registro de eventos
• Otra información
Submenú "Página de medición"
Este submenú le permite controlar el estado actual y los parámetros del no-break.
ENTRADA DE RECTIFICADOR
VOLTAJE CORRIENTE
TEMPERATURA DEL RECTIFICADOR
TEMPERATURA DEL INVERSOR
TEMPERATURA DEL NO-BREAK
TEMPERATURA DEL TRANSFORMADOR
FRECUENCIA DEL RECTIFICADOR
NORMAL
ENTRADA DE BYPASS
VOLTAJE
VOLTAJE DE BATERÍA
CORRIENTE DE BATERÍA
ESTADO DE BATERÍA
CAPACIDAD DE BATERÍA
FRECUENCIA DE BYPASS
CARGA RÁPIDA
CARGA DE SALIDA DE NO-BREAK
SALIDA DEL INVERSOR
VOLTAJE
FACTOR DE POTENCIA
FRECUENCIA DEL INVERSOR
CARGA DE SALIDA DE NO-BREAK
VOLTAJE DE SALIDA DEL NO-BREAK
FRECUENCIA DE SALIDA DEL NO-BREAK
FRECUENCIA DE SALIDA DEL
NO-BREAK
37
Navegación en pantalla LCD
(continuación)
Submenú “Configuración de parámetros”
Este submenú le permite establecer parámetros de operación del no-break. Para acceder a este submenú se requiere una contraseña. Nota: La contraseña
predeterminada es 0 0 0 0. Para cambiar la contraseña, escoja la pantalla “Password Setting” (Configuración de contraseña) en este submenú. Nota adicional:
Los modelos “PM” cuentan un solo voltaje (277/480 VCA) que no puede modificarse. Los modelos “INTPM” cuentan con tres opciones de voltaje
(220/380,230/400 o 240/415 VCA) que pueden ser modificadas en este submenú.
SALIDA DEL INVERSOR
ENTRADA DE BYPASS
CONFIGURACIÓN DE BATERÍA
HORA Y FECHA
A
B
C
D
A
CONFIGURACIÓN DE PANTALLA
CONFIGURACIÓN DE IDIOMA
RANGO DE
VOLTAJE DE
ENTRADA DEL
BYPASS
C
6
2
7
3
8
4
9
5
10
VOLTAJE DE
PRUEBA
TIEMPO DE
PRUEBA
BATERÍA
COMÚN
FECHA DE
INSTALACIÓN
RECORDATORIO
DE REEMPLAZO
7
CAPACIDAD
DE BATERÍA
EN AH
3
VOLTAJE DE
CARGA
RÁPIDA DE
BATERÍA
VOLTAJE DE
FLOTACIÓN DE
BATERÍA
5
4
VOLTAJE DE
PARADA DE
BATERÍA
6
VOLTAJE DE
CARGA DE
BATERÍA
8
TIEMPO DE
PRUEBA DE
BATERÍA
RANGO DE
FRECUENCIA
DE ENTRADA
DEL BYPASS
2
1
1
VOLTAJE DE
PRUEBA DE
BATERÍA
9
10
ADVERTENCIA
RECORDATORIA
DE REEMPLAZO
DE BATERÍA
2 AÑOS 10 MESES
BATERÍA COMÚN
AÑO 03
MES 04
DÍA 14
SÍ
D
AÑO
MES
DÍA
HORA
MIN
CONFIGURACIÓN DE ID. DE NO-BREAK
B
VOLTAJE DE
SALIDA DEL
INVERSOR
CAPACIDAD AH
VOLTAJE DE
CARGA
RÁPIDA
VOLTAJE DE
FLOTACIÓN
VOLTAJE DE
PARADA
VOLTAJE DE
CARGA
CONFIGURACIÓN DE CONTRASEÑA
E
F
G
H
E
03
04
14
14
00
F
SEG 60
CONFIGURACIÓN
DE CONTRASEÑA
G
CONFIGURACI
ÓN DE ID. DE
NO-BREAK
H
CONTRASTE
DE BRILLO
SALVA
PANTALLAS
Clave de navegación LCD
Acción
Desplazarse hacia arriba en menú
Desplazarse hacia abajo en menú
Ingresar o seleccionar una opción de menú
Salir de menú actual y regresar al menú anterior
Botones que debe presionar
y
simultáneamente
38
Navegación en pantalla LCD
(continuación)
Submenú “Control del sistema”
Este submenú le permite controlar directamente la operación del no-break.. Para acceder a este submenú se requiere una contraseña. Nota: La contraseña
predeterminada es 0 0 0 0. Para cambiar la contraseña, escoja la pantalla "Password Setting" (Configuración de contraseña) en el submenú "Parameter
Setting" (Configuración de parámetros).
INVERSOR ENCENDIDO/APAGADO
ZUMBADOR ENCENDIDO/APAGADO
CARGA RÁPIDA
SALIDA DE NO-BREAK ENCENDIDA/APAGADA
SALIDA DEL
INVERSOR
A
B
E
F
PRUEBA DE BATERÍA
FORZAR BYPASS
C
D
B
A
ESTADO DEL
ZUMBADOR
ENCENDIDO
ENCENDIDO
Seleccione "ENCENDIDO" para encender el inversor. Seleccione
"APAGADO" para apagar el inversor.
CARGA RÁPIDA DE
BATERÍA
Seleccione "ENCENDIDO" para permitir que la alarma suene si el nobreak detecta un estado de advertencia o de falla. Seleccione
"APAGADO" para suprimir esta alarma.
C
SALIDA DEL
NO-BREAK
D
AUTO ENCENDIDO
ENCENDIDO
Seleccione “AUTO ENCENDIDO” para aumentar manualmente la
carga de la batería. Seleccione "MANUAL" para fijar un retardo de
tiempo para el aumento de carga. Seleccione “AUTO APAGADO” si
no desea aumentar manualmente la carga de la batería.
PRUEBA MANUAL DE
BATERÍA
Seleccione “ENCENDIDO” para mantener la salida. Seleccione
“APAGADO” para apagar la salida.
E
F
FORZAR BYPASS DE
NO-BREAK
ENCENDIDO
ENCENDIDO
Seleccione “ENCENDIDO” para iniciar una auto-prueba de batería. Se
mostrarán los resultados de la auto-prueba. Seleccione “APAGADO’si
no desea iniciar una auto-prueba de batería.
Seleccione “ENCENDIDO” para transferir la carga manualmente a la
energía de reserva. Seleccione “APAGADO” si no desea transferir la
carga manualmente.
Submenú “Registro de eventos”
Este submenú permite a la administración ver hasta 500 eventos operativos, listados en orden de ocurrencia.
CARGA CON INVERSOR
SOBRECARGA DE
INVERSOR
VOLTAJE DE ENTRADA
ANORMAL
Clave de navegación LCD
Acción
Desplazarse hacia arriba en menú
Desplazarse hacia abajo en menú
Ingresar o seleccionar una opción de menú
Salir de menú actual y regresar al menú anterior
Botones que debe presionar
y
simultáneamente
39
Navegación en pantalla LCD
(continuación)
Submenú “Otra información”
Este submenú permite que la administración vea una variedad de información adicional del no-break.
RESULTADO DE PRUEBA
DE BATERÍA
NÚMERO DE SERIE
NORMAL
FECHA DE PRUEBA DE BATERÍA
03 AÑO 05 MES 21 DÍA
FECHA DE INSTALACIÓN
DE BATERÍA
02 AÑO 02 MES 21 DÍA
VERSIÓN
TIEMPO DEL SISTEMA
REGISTRO NO-BREAK
20
VECES DESCARGADA
148
03 AÑO 04 MES 11 DÍA
VECES EN BYPASS
121
03 HORA 30 MIN 30 SEG
VECES EN OPERACIÓN
0 AÑO 305 DÍA 13 HORA 5 MIN
CONTACTO SECO
CONTACTO SECO NO-BREAK
NORMAL
CERRADO
CARGA CON BYPASS
CERRADO
CARGA CON BATERÍA
CERRADO
Código
mostrado
Nota: En la siguiente visualización se muestra un código de estado del
no-break en la esquina superior derecha de la pantalla. Utilice el cuadro
siguiente para determinar lo que indica el código de estado del no-break.
REGISTRO
NO-BREAK
Código
de estado
no-break
VECES
DESCARGADA
VECES EN
BYPASS
0
0 AÑO
5 DÍA
13 HORA
5 MIN
Clave de navegación LCD
Acción
Desplazarse hacia arriba en menú
Desplazarse hacia abajo en menú
Ingresar o seleccionar una opción de menú
Salir de menú actual y regresar al menú anterior
simultáneamente
FALLA DE PRUEBA
DE BATERÍA
CERRADO
ESTADO DE NO-BREAK
Salida de Bypass inhibida
Carga con reserva
Arranque suave de CA de rectificador
18
Realizando prueba de inversor
20
Carga con inversor
22
Carga con inversor en modo de respaldo
24
Batería baja
26
Apagado por batería baja
28
Apagado por cortocircuito
Bypass manual activado
32
Cable de la comunicación
paralela es anormal
34
Apagado por falla del inversor
36
Apagado por sobrecarga del inversor
38
Sobrecarga bajo paralelo (N-1)
40, 42,
Voltaje de salida del inversor anormal
44
Protección del conductor de IGBT del
inversor (voltaje de salida anormal)
46
Apagado por EPO (Desconexión remota
de emergencia)
50
Apagado por protección de sobrevoltaje
de BARRA CC
52, 54, 56
Fusible del inversor abierto (fase de R/S/T)
60, 62, 64
Apagado por sobretemperatura
del inversor (fase de R/S/T)
66
68, 70
72
40
CERRADO
2
Botones que debe presionar
y
CERRADO
BYPASS ANORMAL
10
30, 58
VECES EN
OPERACIÓN
BATERÍA BAJA
Apagado por sobretemperatura del
transformador de la salida
La potencia auxiliar es anormal (PCB-C/A)
Protección contra la regeneración
Comunicaciones
Contactos secos
SECO 1
SECO 2
RELÉ-SPDT
RELÉ-SPDT
SECO1
SECO1
SECO2
SECO2
SECO 1 NORMAL : P1-2 NA
SECO 2 RESERVA : P3-4 NA
RELÉ-SPDT
SECO 3
SECO 4
SECO 3 RESPALDO 1-2 NA
SECO5
SECO5
SECO6
SECO6
SECO 5 FALLA RED RES P1-2 NA
SECO 4 BAT_BAJA 3-4 NA
RELÉ-SPDT
RELÉ-SPDT
SECO 5
SECO 6
SECO3
SECO3
SECO4
SECO4
SECO 6 FALLA PRUEBA BAT P3-4 NA
RELÉ-SPDT
Desconexión remota de emergencia (EPO)
Esta característica es sólo para aquellas aplicaciones que requieran una conexión a un circuito de desconexión de emergencia (EPO) de la
instalación. Cuando el módulo de potencia está conectado a este circuito, permite el apagado de emergencia de la salida.
EPO
REMOTO (NORMALMENTE ABIERTO)
41
Comunicaciones
(continuación)
Ranura de tarjeta de Puerto RS-232/Puerto Ethernet/SNMP
Este puerto RS-232 conecta su no-break mediante un cable RS-232 con una estación de trabajo o con un servidor que cuente con el software de
administración de energía de Tripp Lite. El puerto RS-232 usa comunicaciones RS-232 para informar el estado y las condiciones de energía del nobreak. Contacte con el Soporte al cliente de Tripp Lite para obtener información sobre productos disponibles para SNMP, administración de redes
y software de conectividad.
El puerto Ethernet es un puerto RS-232 que acepta un adaptador Ethernet opcional RS-232/RJ45 (vendido por separado).
La ranura de la tarjeta SNMP acepta una tarjeta interna opcional SNMP/Web. Contacte con el Soporte al cliente de Tripp Lite para obtener
información sobre productos disponibles para SNMP, administración de redes y software de conectividad.
TARJETA SNMP
PUERTO
ETHERNET
AUTO SELECCIÓN (SNMP O RS232) NO-BREAK_RX
ADAPTADOR
ETHERNET
Alimentación Ethernet
La conexión de alimentación Ethernet proporciona energía de 12 VCC al adaptador opcional.
ALIMENTACIÓN
ETHERNET
Contacto del generador
Este puerto conecta a un generador auxiliar de energía. Cuando el generador está funcionando para soportar la carga del equipo, el no-break reducirá
automáticamente su corriente de carga en 50% para evitar sobrecargar al generador.
G-ON'
GND
CONTACTO DEL GENERADOR
CONTACTO DEL
(Normalmente abierto)
GENERADOR
42
Comunicaciones
(continuación)
Puertos RS-485
Estos puertos conectan varios módulos de potencia del no-break en paralelo.
Puerto RS-485
TX485+
TX485RX485+
RX485-
RESISTOR TERMINAL PARA RS-485
Puerto RS-485
Normalmente cerrado
Al usar RS-485 para más de dos unidades,
SWQ1 debe estar "CONECTADO" al menos
en uno y "DESCONECTADO" en el otro.
PIN1: RS-485 Transmisor+
PIN2: RS-485 TransmisorPIN3: RS-485 Receptor+
PIN4: RS-485 Receptor-
Puertos paralelos de comunicación del no-break:
Estos puertos permiten que varios módulos de potencia del no-break se comuniquen con una configuración paralelo.
Barra de sincr.
BP ON
P NO-BREAK
Datos
Puerto paralelo de comunicaciones
del no-break
PARALELO
Reserva
MBs_ON
Puerto paralelo de comunicaciones
del no-break
PARALELO
43
Servicio
Su no-break trifásico SmartOnline está cubierto con la garantía limitada descrita más adelante. Hay disponibles programas de garantía extendida
(2, 3 y 4 años) y servicio de arranque. Para mayor información, llame al Servicio al cliente de Tripp Lite al (773) 869-1234.
Garantía
GARANTÍA LIMITADA
El vendedor garantiza que este producto, si se emplea de acuerdo con las todas las instrucciones aplicables, no tendrá defectos en materiales ni mano de obra por un
período de 2 años (excepto EE.UU., Canadá y México: 1 año) a partir de la fecha de compra. Si se verifica que el producto tiene defectos en los materiales o en la mano
de obra dentro de dicho período, el vendedor reparará o reemplazará el producto, a su sola discreción. El servicio bajo esta garantía incluye las partes y la mano de obra
del centro de reparaciones de Tripp Lite. Tripp Lite tiene planes de servicio en el lugar disponibles través de sus socios autorizados de servicio (en la mayoría de áreas).
Pida más detalles al Servicio al cliente de Tripp Lite llamando al (773) 869-1234. Los clientes internacionales deben contactar con Tripp Lite en [email protected]
ESTA GARANTÍA NO SE APLICA AL DESGASTE NORMAL O A DAÑOS RESULTANTES DE UN ACCIDENTE, USO INADECUADO, MALTRATO O NEGLIGENCIA. EL
VENDEDOR NO EXPRESA NINGUNA OTRA GARANTÍA DISTINTA DE LA ESTABLECIDA EN ESTE DOCUMENTO EN FORMA EXPLÍCITA. EXCEPTO HASTA EL
GRADO PROHIBIDO POR LAS LEYES APLICABLES, TODAS LAS GARANTÍAS IMPLÍCITAS, INCLUYENDO TODAS LAS GARANTÍAS DE COMERCIABILIDAD O
IDONEIDAD, ESTÁN LIMITADAS EN DURACIÓN AL PERÍODO DE GARANTÍA ESTABLECIDO ANTERIORMENTE; ESTA GARANTÍA EXCLUYE EXPRESAMENTE
TODOS LOS DAÑOS INCIDENTALES Y CONSECUENTES. (Algunos estados no permiten limitaciones sobre la duración de una garantía implícita, y algunos estados no
permiten la exclusión o limitación de daños incidentales o consecuentes, de modo que las limitaciones o exclusiones mencionadas pueden no aplicarse a usted. Esta
garantía le da derechos legales específicos, pero usted puede tener otros derechos que varían de jurisdicción a jurisdicción.)
Tripp Lite; 1111 W. 35th Street; Chicago IL 60609; USA
ADVERTENCIA: El usuario individual debe encargarse de determinar antes de usarlo, si este dispositivo es apropiado, adecuado o seguro para el uso proyectado. Ya que
las aplicaciones individuales están sujetas a gran variación, el fabricante no declara ni garantiza la idoneidad o aptitud de estos dispositivos para ninguna aplicación
específica. Tripp Lite tiene una política de mejoramiento continuo. Las especificaciones están sujetas a cambio sin previo aviso.
Cumplimiento de las normas de los números de identificación
Para fines de identificación y certificación del cumplimiento de las normas, su producto Tripp Lite tiene asignado un número de serie único. Puede encontrar el número de serie en la etiqueta
de la placa de identificación del producto, junto con los símbolos de aprobación e información requeridos. Al solicitar información sobre el cumplimiento de las normas para este producto,
siempre mencione el número de serie. El número de serie no debe ser confundido con el nombre de identificación ni con el número de modelo del producto.
LEA SU INSTRUCTIVO
CONSULTE SUS CONDICIONES DE GARANTÍA POR PRODUCTO
PÓLIZA DE GARANTÍA
Este equipo marca Tripp Lite, modelo _______________ está garantizado por TRIPP LITE, que tiene su domicilio en la calle de Sierra Candela No.111-107, Col Lomas de Chapultepec, CP
11000, México, DF, y puede hacer efectiva su garantía así como obtener partes, componentes, consumibles y accesorios en el Centro de Servicio Q PLUS ubicado en Av Coyoacan 931, Col.
Del Valle, C.P. 03120 México. D.F., tel. 50 00 27 00 contra cualquier defecto de fabricación y funcionamiento, imperfecciones de materiales, piezas, componentes y mano de obra al
consumidor acorde a la siguiente tabla:
Producto
Modelo
Vigencia
Sistema de Energía Ininterrumpible (UPS)
Familia: BC, OMNI, SMART, SMARTONLINE MONOFASICOS
Sistema de Energía Ininterrumpible (UPS)
Familia: SMARTONLINE 3PH
2 Años
1 Año
Regulador y Acondicionador de Tensión
Familia: LS, LC
2 Años
Inversores
Familia: APS, PV
2 Años
Multiplexor y Conmutador
Familia: KVM
5 Años
Conmutador
Modelo: B020-016
6 Meses
Supresor de Picos de Tensión
Familia: PROTECT IT, ISOBAR
25 Años
CONDICIONES
1. Para hacer válida su garantía no podrán exigirse mayores requisitos que la presentación de esta póliza debidamente llenada y sellada por el establecimiento que lo vendió junto con el
producto en el lugar donde fue adquirido.
2. TRIPP LITE, se compromete a reparar, y en caso de que a su juicio no sea posible la reparación, a cambiar el equipo, así como las piezas y componentes defectuosos del mismo sin cargo
alguno para el propietario durante el periodo de garantía, así como los gastos de transportación razonablemente erogados del producto que deriven de su cumplimiento, dentro de su red de
servicio.
3. El tiempo de reparación en ningún caso será mayor de 30 días contados a partir de la fecha de recepción del producto en el Centro Autorizado de Servicio, en donde también podrán
adquirir refacciones y partes.
4. En caso de que la presente póliza de garantía se extraviara, el consumidor puede recurrir a su proveedor para que expida un duplicado de la póliza de garantía, previa presentación de
la nota de compra o factura correspondiente.
EXCLUSIONES
Esta garantía no es válida en los siguientes casos:
a) Cuando el producto se hubiese utilizado en condiciones distintas a la normales.
b) Cuando el producto no hubiese sido operado de acuerdo con el instructivo de uso que se le acompaña.
c) Cuando el producto hubiese sido alterado o reparado por personas no autorizadas por el fabricante nacional, importador
o comercializador responsable respectivo.
Este equipo fue vendido por: _____________________________________
con domicilio en ________________________________________________
el día _____ de ___________ de ________, fecha a partir de la que inicia la presente garantía.
44
1111 W. 35th Street • Chicago, IL 60609 USA
(773) 869-1234 • www.tripplite.com
200603010 93-2534
3-Phase UPS Specifications
Addendum—50kVA & Above
Español
7
Floor Weight Loading Table
UPS Power Module
SU50K SU80K
Model
3/3PM
UPS System Capacity (kVA)
Weight (lb)
Weight (kg)
SU100K SU120K
3/3PM
3/3PM
3/3PM
SU160K
SU200K
3/3PM
3/3PM
SU50K
SU80K
3/3INTPM 3/3INTPM
SU100K SU120K
SU160K SU200K
3/3INTPM 3/3INTPM
3/3INTPM 3/3INTPM
50
80
100
120
160
200
50
80
100
120
160
200
1276
1540
2040
2280
2550
2760
1012
1155
1543
1642
2315
2392
580
700
1020
1140
1275
1380
460
525
700
745
1050
1085
Weight Loading (lb/in2)
1.716
1.495
1.32
1.48
1.65
1.79
1.361
1.554
1.50
1.60
1.50
1.55
2
1208
1054
1024
1145
1280
1386
958
1094
1054
1122
1054
1089
Weight Loading (kg/m )
See Battery Module Owner's Manual or Contact Tripp Lite for Battery Module Weight Loading Information.
Recommended Cable Sizes
UPS Power Module
SU50K SU80K SU100K
Model
3/3PM
UPS System Capacity (kVA) 50
Input Circuit Breaker (A)
100
Input Cable (AWG)
2
2
Input Cable (mm )
22
Reserve Input Circuit Breaker (A) 75
Reserve Input Cable (AWG)
6
Reserve Input Cable (mm2)
10
Output Circuit Breaker (A)
75
Output Cable (AWG)
6
Output Cable (mm2)
10
SU120K SU160K SU200K SU50K
3/3PM
3/3PM
3/3PM
80
150
1/0
50
125
2
25
125
2
25
100
175
3/0
70
150
1
35
150
1
35
120
225
4/0
95
175
1/0
50
175
1/0
50
3/3PM
3/3PM
160
200
300
350
250Kcmil* 400Kcmil*
120
185
250
300
3/0 250Kcmil*
70
120
250
300
3/0 250Kcmil*
70
120
SU80K
SU100K
SU120K SU160K SU200K
3/3INTPM
3/3INTPM
3/3INTPM
3/3INTPM 3/3INTPM 3/3INTPM
50
125
1
38
100
4
22
100
4
22
80
200
3/0
70
150
1
38
150
1
38
100
225
3/0
125
200
3/0
80
200
3/0
80
See Battery Module Owner's Manual or Contact Tripp Lite for Battery Module Cable Size Information.
120
300
4/0
125
225
4/0
100
225
4/0
100
160
350
250Kcmil*
185
300
250Kcmil*
38 x 2
300
250Kcmil*
38 x 2
200
500
500Kcmil*
80 x 2
400
500Kcmil*
80 x 2
400
500Kcmil*
80 x 2
*Kcmil=MCM
Torque Specifications
SU50K3/3PM, SU50K3/3INTPM:
• 150A Terminal Blocks: 61 kgf-cm (4.4 ft-lb)
• 200A Terminal Blocks: 102 kgf-cm (7.4 ft-lb)
SU120K3/3INTPM:
• Bus Bar (w/M8 screw): 110 kgf-cm (8.0 ft-lb)
SU80K3/3PM, SU80K3/3INTPM, SU100K3/3PM,
SU100K3/3INTPM, SU120K3/3PM:
• 200A Terminal Blocks: 102 kgf-cm (7.4 ft-lb)
• Bus Bar (w/M8 screw): 110 kgf-cm (8.0 ft-lb)
SU160K3/3PM, SU160K3/3INTPM, SU200K3/3PM,
SU200K3/3INTPM:
• Bus Bar (w/M8 screw): 110 kgf-cm (8.0 ft-lb)
• 200A Terminal Blocks (w/M10 screw): 102 kgf-cm (7.4 ft-lb)
1111 W. 35th Street
Chicago, IL 60609 USA
(773) 869-1234 • www.tripplite.com
Copyright © 2007 Tripp Lite. All rights reserved. The policy of Tripp Lite is one of continuous improvement. Specifications and diagrams are subject to change without notice.
1
Terminal Wiring Diagrams
The following wiring diagrams are organized according to model. Within each model grouping, there is a “single loop” connection
option (where only one input source is used) and a “double loop” connection option (where two input sources are used).
SU50K3/3PM & SU50K3/3INTPM Models
• Single Loop Connection (one input source used)
Output
Input
•
Double Loop Connection (two input sources used)
Input
Reserve
Battery+
Ground
Battery-
Battery
Cabinet
Ground
Note: cables labeled “1B”, “2B” and “3B’ from the Single Loop Connection
diagram are removed.
Output
Battery+
Ground
Battery-
2
Battery
Cabinet
Ground
SU80K3/3INTPM Model Only
• Single Loop Connection (one input source used)
Rectifier
Breaker
Input
Reserve
Breaker
Output
Battery+
Ground
Battery-
•
Double Loop Connection (two input sources used)
Rectifier
Breaker
Input
Battery
Cabinet
Ground
Note: cables labeled “1C”, “2C” and ‘3C” from the Single Loop Connection diagram
are removed and connected to the terminal under the "Reserve Breaker".
Reserve
Breaker
Output
Battery+
Ground
Battery-
3
Battery
Cabinet
Ground
.
SU80K3/3PM, SU100K3/3PM, SU100K3/3INTPM and SU120K3/3PM Models
• Single Loop Connection (one input source used)
Input
Output
Battery
Ground
Battery
Cabinet Ground
•
Double Loop Connection (two input sources used)
Input
Note: cables labeled “1B”, “2B” and “3B” from the Single Loop Connection diagram
are removed.
Output
Reserve
Ground
Battery
Battery
Cabinet Ground
4
SU120K3/3INTPM Model Only
• Single Loop Connection (one input source used)
•
Double Loop Connection (two input sources used)
Note: cables labeled “1B”, “2B” and “3B” from the Single Loop Connection diagram are removed.
5
SU160K3/3PM, SU160K3/3INTPM, SU200K3/3PM and SU200K3/3INTPM Models
• Single Loop Connection (one input source used)
Input
Battery
Output
•
Double Loop Connection (two input sources used)
Input
Ground
Battery
Cabinet
Ground
Note: cables labeled “1B”, “2B” and “3B” from the Single Loop Connection diagram are removed.
Battery
Reserve
Output
Ground
Battery
Cabinet
Ground
6
Adición de especificaciones para
no-break trifásico—50 kVA y superior
English
1
Tabla de carga de peso del piso
Módulo de potencia del no-break
SU50K SU80K SU100K
Modelo
3/3PM
Capacidad del no-break (kVA) 50
3/3PM
3/3PM
SU120K SU160K SU200K SU50K
3/3PM
3/3PM
3/3PM
3/3INTPM
SU80K
SU100K
SU120K SU160K SU200K
3/3INTPM
3/3INTPM
3/3INTPM 3/3INTPM 3/3INTPM
80
100
120
160
200
50
80
100
120
160
200
1276
1540
2040
2280
2550
2760
1012
1155
1543
1642
2315
2392
580
700
1020
1140
1275
1380
460
525
700
745
1050
1085
Carga de peso (lb/pulgada )
1.716
1.495
1.32
1.48
1.65
1.79
1.361
1.554
1.50
1.60
1.50
1.55
Carga de peso (kg/m2)
1208
1054
1024
1145
1280
1386
958
1094
1054
1122
1054
1089
Peso (lb)
Peso (kg)
2
Consulte el Manual del propietario del módulo de batería o contacte con Tripp Lite para obtener información sobre la carga de peso del módulo de batería.
Calibre recomendado de cables
Módulo de potencia del no-break
SU50K SU80K SU100K
Modelo
3/3PM
Capacidad del no-break (kVA)
50
Interruptor automático de entrada(A) 100
Cable de entrada (AWG)
2
2
Input Cable (mm )
22
Interruptor automático de
entrada de reserva (A)
75
Cable de entrada de reserva (AWG) 6
Cable de entrada de reserva (mm2) 10
Interruptor automático de salida (A) 75
Cable de salida (AWG)
6
Cable de salida (mm2)
10
SU120K SU160K SU200K SU50K
3/3PM
3/3PM
3/3PM
3/3PM
3/3PM
3/3INTPM
SU80K
SU100K
SU120K SU160K SU200K
3/3INTPM
3/3INTPM
3/3INTPM 3/3INTPM 3/3INTPM
80
100
120
160
200
50
80
100
120
160
200
150
175
225
300
350
125
200
225
300
350
500
1/0
3/0
4/0
1
3/0
3/0
4/0
50
70
95
120
185
38
70
125
125
125
150
175
250
300
100
150
200
225
2
1
1/0
3/0
250Kcmil*
4
1
3/0
4/0
250Kcmil* 400Kcmil*
250Kcmil* 500Kcmil*
185
80 x 2
300
400
250Kcmil* 500Kcmil*
25
35
50
70
120
22
38
80
100
38 x 2
80 x 2
125
150
175
250
300
100
150
200
225
300
400
2
1
1/0
3/0
250Kcmil*
4
1
3/0
4/0
25
35
50
70
120
22
38
80
100
Consulte el Manual del propietario del módulo de batería o contacte con Tripp Lite para obtener información sobre calibres de cable del módulo de batería.
250Kcmil* 500Kcmil*
38 x 2
80 x 2
*Kcmil=MCM
Especificaciones de torque
SU50K3/3PM, SU50K3/3INTPM:
• Bloque de terminales 150A: 61 kgf-cm (4.4 pie-lb)
• Bloque de terminales 200A: 102 kgf-cm (7.4 pie-lb)
SU120K3/3INTPM:
• Barra de distribución (con M8 tornillo): 110 kgf-cm (8.0 pie-lb)
• Bloque de terminales 200A (con M10 tornillo): 102 kgf-cm (7.4 pie-lb)
SU80K3/3PM, SU80K3/3INTPM, SU100K3/3PM,
SU100K3/3INTPM, SU120K3/3PM:
• Bloque de terminales 200A: 102 kgf-cm (7.4 pie-lb)
• Barra de distribución (con M8 tornillo): 110 kgf-cm (8.0 pie-lb)
SU160K3/3PM, SU160K3/3INTPM, SU200K3/3PM,
SU200K3/3INTPM:
• Barra de distribución (con M8 tornillo): 110 kgf-cm (8.0 pie-lb)
1111 W. 35th Street
Chicago, IL 60609 USA
(773) 869-1234 • www.tripplite.com
Copyright © 2007 Tripp Lite. Todos los derechos reservados. Tripp Lite tiene una política de mejoramiento continuo. Las especificaciones y los procedimientos de operación están sujetos
a modificaciones sin previo aviso.
7
Diagramas de cableado de terminales
Los siguientes diagramas de cableado son organizados por modelo. Dentro de cada grupo modelo, hay una opción de conexión de “bucle simple”
(que solo utiliza una fuente de entrada) y otra de “bucle doble” (que utiliza dos fuentes de entrada).
SU50K3/3PM y SU50K3/3INTPM
• Conexión de bucle simple (utiliza una fuente de entrada)
Salida
Entrada
• Conexión de bucle doble (utiliza dos fuentes de entrada)
Entrada
Reserva
Batería+
Tierra
Batería-
Gabinete
de la
batería a
tierra
Nota: Los cables rotulados “1B”, “2B” y “3B” del diagrama Conexión
de bucle simple han sido retirados.
Salida
Batería+
Tierra
Batería-
8
Gabinete
de la
batería a
tierra
SU80K3/3INTPM
• Conexión de bucle simple (utiliza una fuente de entrada)
Interruptor
del
rectificador
Entrada
Interruptor
de reserva
Salida
Batería+
Tierra
Batería-
• Conexión de bucle doble (utiliza dos fuentes de entrada)
Interruptor
del
rectificador
Entrada
Gabinete de
la batería a
tierra
Nota: Los cables rotulados “1C”, “2C” y “3C” del diagrama de Conexión de bucle
simple han sido retirados y conectados al terminal debajo del "Interruptor de reserva".
Interruptor
de reserva
Salida
Batería+
Tierra
Batería-
9
Gabinete de
la batería a
tierra
SU80K3/3PM, SU100K3/3PM, SU100K3/3INTPM y SU120K3/3PM
• Conexión de bucle simple (utiliza una fuente de entrada)
Salida
Entrada
Tierra
• Conexión de bucle doble (utiliza dos fuentes de entrada)
Entrada
Batería
Gabinete
de la batería a
tierra
Nota: Los cables rotulados “1B”, “2B” y “3B” del diagrama Conexión de bucle simple
han sido retirados.
Salida
Reserva
Tierra
10
Batería
Gabinete
de la batería a
tierra
Conexión eléctrica
SU120K3/3INTPM
(continúa)
• Conexión de bucle simple (utiliza una fuente de entrada)
• Conexión de bucle doble (utiliza dos fuentes de entrada)
Nota: Los cables rotulados “1B”, “2B” y “3B” del diagrama Conexión de bucle simple
han sido retirados.
11
SU160K3/3PM, SU160K3/3INTPM, SU200K3/3PM y SU200K3/3INTPM
• Conexión de bucle simple (utiliza una fuente de entrada)
Entrada
Bateria
Salida
• Conexión de bucle doble (utiliza dos fuentes de entrada)
Entrada
Tierra
Gabinete de
la bateria a
tierra
Nota: Los cables rotulados “1B”, “2B” y “3B” del diagrama Conexión de bucle simple
han sido retirados.
Bateria
Reserva
Salida
Tierra
Gabinete de
la bateria a
tierra
1111 W. 35th Street • Chicago, IL 60609 USA
(773) 869-1234 • www.tripplite.com
12
200611150
93-2643