1
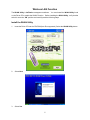
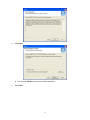
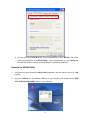
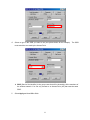
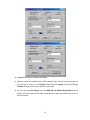
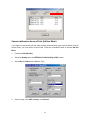
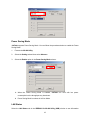
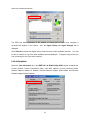
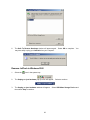
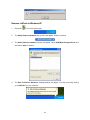
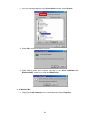
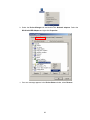
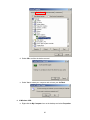
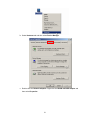
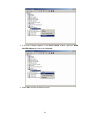
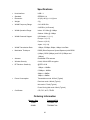
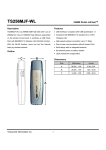
USB 128MB-256MB JetFlash™ User’s Manual P/N TS128/256MJF-WL Table of Contents Introduction Package Contents ................................................................................................................1 Features ................................................................................................................................1 System Requirements .........................................................................................................1 Product Overview Switch....................................................................................................................................2 LED Lights ............................................................................................................................2 Data Storage Function Driver Installation for Windows 98SE ................................................................................3 Driver Installation for Windows Me, 2000, and XP ...........................................................4 Warning .................................................................................................................................4 Wireless LAN Function Install the WLAN Utility .......................................................................................................5 Execute the WLAN Utility ....................................................................................................9 Connect to an Access Point (Infrastructure Mode)........................................................10 Connect without an Access Point (Ad Hoc Mode) .........................................................13 Enable Encryption .............................................................................................................15 Setting the Transmission Rate .........................................................................................17 Power Saving Mode ...........................................................................................................18 LAN Status ..........................................................................................................................18 Link Information.................................................................................................................19 Diagnostic...........................................................................................................................20 About Version.....................................................................................................................20 Safely Remove Your JetFlash Remove JetFlash in Windows 98SE ................................................................................21 Remove JetFlash in Windows Me ....................................................................................21 Remove JetFlash in Windows 2000 .................................................................................22 Remove JetFlash in Windows XP ....................................................................................24 Uninstall WLAN Utility ..........................................................................................25 Troubleshooting .......................................................................................................27 Specifications.............................................................................................................36 Ordering Information .............................................................................................36 JetFlash Limited Warranty Introduction Thank you very much for purchasing Transcend’s Wireless LAN JetFlash™. This small device is more than a USB Flash Drive. It combines a USB Flash Drive with an IEEE802.11b Wireless LAN (WLAN) function. Via a USB connection, it can expedite exchanging huge amounts of data between desktop or laptop computers. With the WLAN function, you can surf the Internet freely from a wireless network. In addition, JetFlash’s mobility, strong data retention ability, and impressive appearance will provide you with a brand-new data storage experience. Package Contents Your JetFlash package includes the following items: • JetFlash • Neck Strap • Driver CD • USB Adapter • USB Extension Cable • Quick Installation Guide Features • Compliant with USB specification 1.1, True Plug and Play • Compliant with IEEE802.11b standard for 2.4 GHz Wireless LAN • High-speed wireless connection up to 11 Mbps • Peer-to-peer communication without an Access Point • Solid design with an integrated internal antenna • No external power or battery needed • LED lights indicate the usage status of JetFlash System Requirements • Hardware: Desktop or notebook computer with a USB port • Operating System: Windows® 98SE, Windows® Me, Windows® 2000 or Windows® XP • IEEE802.11b compliant systems constructed by Access Points 1 Product Overview Switch When the switch is set to the “ON” position, you can write/read data to/from your JetFlash and simultaneously use it for wireless applications. When the switch is set to the “OFF” position, you can write/read data to/from your JetFlash, but the wireless function is disabled. Please set the switch to the “ON” position before using the Wireless LAN function of your JetFlash. LED Lights WLAN LED (Blue) DATA LED (Green) Off Off Off Blinking Blinking Off JetFlash is searching for an Access Point to connect to a wireless network Blinking Blinking JetFlash is searching for an Access Point to connect to a wireless network and there is data transferring to and from the JetFlash Solid Off Solid Blinking Status Standby Data transfer Wireless connection is established Wireless connection is established and there is data transferring to and from the JetFlash 2 Data Storage Function Driver Installation for Windows 98SE 1. Drivers are required for Windows 98SE. Drivers will also be required for the WLAN function. (see Wireless LAN Function section). Insert the Driver CD into the CD-ROM (Auto-Run supported). Select the Win98 Driver button. 2. Select 98 Driver Install to continue. 3. After the drivers are installed, the “DRVSETUP2” dialogue window will appear. Select OK to continue. 4. Plug your JetFlash into an available USB port. new device. Your computer will automatically detect the Two new Removable Disk drives with newly assigned drive letters will appear in the My Computer window. 3 Driver Installation for Windows Me, 2000, and XP No drivers are required. These Windows operating systems have built-in drivers to support the data portion of your JetFlash. Function section). Drivers will be required for the WLAN function (see Wireless LAN Simply plug your JetFlash into an available USB port, and Windows will install the files needed to use it as an external hard drive. Two new Removable Disk drives with newly assigned drive letters will appear in the My Computer window. □ Warning To prevent loss of data and/or damage to your JetFlash, NEVER remove JetFlash from a device while the DATA LED is blinking. 4 Wireless LAN Function The WLAN Utility is JetFlash’s management software. on the Driver CD to enable the WLAN Function. You must install the WLAN Utility found Before installing the WLAN Utility, verify that the switch is set to the “ON” position and carefully read the following steps. Install the WLAN Utility 1. Insert the Driver CD into the CD-ROM (Auto-Run supported). Select the WLAN Utility button. 2. Select Next. 3. Select Yes. 5 4. Select Next. You can select Browse to choose the folder destination. 5. Select Next. 6 You can rename the program folder name. 6. The Question window will appear. Select Yes to add a program shortcut on your desktop (recommended). 7. Select Finish to complete the installation. (In Windows XP, you must complete steps 8-10 and disable the Windows XP Zero-Configuration.) The Operating system may request you to insert the original Windows CD, add necessary protocols, or edit networking settings. Follow the on-screen instructions or ask your IT 7 personnel to assist you to complete the installation. 8. From the Start Menu, go to Settings and select Network Connections. 9. Right-click Wireless Network Connection (this will be your JetFlash), and select Properties. 10. Select the Wireless Networks tab, and verify the check box “Use Windows to configure my wireless network settings” is clear, and then Select OK. 8 You can also use the KU8-M zip file in the second partition of your JetFlash. This zip file is the compressed files of the WLAN Utility. After uncompressing it, run the Setup.exe file inside and follow the above-mentioned steps to complete the installation. Execute the WLAN Utility 1. Verify that you have installed the WLAN Utility application and the switch is set to the “ON” position. 2. Plug your JetFlash into an available USB port on your computer and double-click the IEEE 802.11b WLAN Utility (USB) shortcut on your desktop. 9 3. The IEEE 802.11b WLAN Utility (USB) window will appear. One of following signal icons will appear in the system tray (bottom right corner) after the WLAN Utility has executed. • (Green): Connected • (Yellow): Low Quality • (Red): Disconnected You can right-click the signal icon, and select Exit to close the IEEE 802.11b WLAN Utility (USB) window, or select radio off to disable the Wireless LAN function. Connect to an Access Point (Infrastructure Mode) Follow the procedures below to connect with an Access Point: 1. Execute the WLAN Utility. 2. Select the Setting tab in the IEEE 802.11b WLAN Utility (USB) window. 3. Select Infrastructure as the Network Type. 10 4. Select or type in the SSID you want to use (see picture below for an example). The SSID must match the one used by the Access Point. SSID (Service Set Identifier) is the group name that will be shared by all the members of the wireless network. You can only connect to an Access Point (AP) that uses the same SSID. 5. Select Apply and then OK to finish. 11 Channel is not active in Infrastructure Mode. After the values of Computer Name, SSID, Network Type, Channel and Country are set, you can type in a name in the Profiles column and select Apply to save the settings. Profiles will allow you to store a maximum of five sets. You can select the Site Survey tab in the IEEE 802.11b WLAN Utility (USB) window to display all of the Access Points within communication range and double-click on one of them to connect. 12 Connect without an Access Point (Ad Hoc Mode) If you want to communicate with the other wireless devices directly (peer to peer) without using an Access Point, you must select Ad Hoc mode. Follow the procedures below to activate Ad Hoc Mode: 1. Execute the WLAN Utility. 2. Select the Setting tab in the IEEE 802.11b WLAN Utility (USB) window. 3. Select 802.11 Ad Hoc as the Network Type. 4. Select or type in the SSID, Country, and Channel. 13 Every member of the peer-to-peer network must select the same SSID and channel. 5. Select Apply. 6. Select OK to activate 802.11 Ad Hoc Mode. 14 Enable Encryption You can enhance the security of network by enabling the encryption. Follow the procedures below to activate encryption. 1. Execute the WLAN Utility. 2. Select the Setting tab and then select Advance. 3. From the WEP Required Mode drop-down menu box, choose either 64 bits (ASCII), 128 bits (ASCII), 64 bits, or 128 bits, then type in the WEP keys. You must type in the exact same WEP Key(s) that the network or access point uses. a. If Manual 64 bits (ASCII) is selected, enter the 5-digit WEP Key(s). 15 b. If Manual 128 bits (ASCII) is selected, enter the 13-digit WEP Key(s). c. If Manual 64 bits is selected, enter the 10-digit WEP Key(s). d. If Manual 128 bits is selected, enter a 26-digit WEP Key. 16 4. Select Apply to finish. Setting the Transmission Rate JetFlash supports four kinds of transmission rates. You can follow the procedures below to set the transmission rate. 1. Execute the WLAN Utility. 2. Select the Setting tab and then select Advance. 3. Select one of following transmission rates and then select Apply to set the transmission rate. • Fully Auto (Default) • Fixed 11Mbps • Fixed 5.5Mbps • Auto 1 or 2Mbps 17 Power Saving Mode JetFlash supports Power Saving Mode. You can follow the procedures below to enable the Power Saving Mode. 1. Execute the WLAN Utility. 2. Select the Setting tab and then select Advance. 3. Select the Enable option in the Power Saving Mode column. When the Power Saving Mode is enabled, JetFlash can work with low power consumption but the throughput may slow down. Power Saving Mode is useless in Ad Hoc Mode. LAN Status Select the LAN Status tab in the IEEE802.11b WLAN Utility (USB) window to see information 18 about your wireless connection. The SSID and MAC information of the network or access point to which your computer is connected will appear on the screen. Also, the Signal Quality and Signal Strength will be displayed. Select Rescan to refresh the display and to detect if there are other available networks. be able to connect to any of the other available networks displayed. You may Encryption may prevent you from connecting to one of the other networks. Link Information Select the Link Information tab in the IEEE 802.11b WLAN Utility (USB) window to display the Current Channel, Current Transmission Rate, Own MAC Address, Current Connection State, Wireless Network Adapter IP Address, Wireless Network Adapter Subnet Mask, and Wireless Network Adapter Default Gateway. 19 Diagnostic To view any errors in the hardware, firmware, or software of your JetFlash, select the Diagnostic tab in the IEEE 802.11b WLAN Utility (USB) window and select Start Diagnostic. If any error occurs, you can select View Error Details to view the detailed information. About Version You can select the About tab in the IEEE 802.11b WLAN Utility(USB) window to see the version of the Firmware, Driver and Utility. 20 Safely Remove JetFlash Remove JetFlash in Windows 98SE Unplug JetFlash from your system directly when data is not transferring. Remove JetFlash in Windows Me 1. Select the icon in the system tray. 2. The Unplug or Eject Hardware pop-up menu will appear. 3. The Unplug or Eject Hardware window will appear. Select to continue. Select USB Disk and then select Stop to continue. 4. The Safe To Remove Hardware window will appear. 5. Select USB Disk and then select Stop to continue. 21 Select OK to continue. 6. The Safe To Remove Hardware window will appear again. Select OK to complete. You may now safely unplug your JetFlash from your computer. Remove JetFlash in Windows 2000 1. Select the icon in the system tray. 2. The Unplug or eject hardware pop-up menu will appear. 3. The Unplug or eject hardware window will appear. then select Stop to continue. 22 Select to continue. Select USB Mass Storage Device and 4. The Safe To Remove Hardware window will appear. 5. Select WLAN miniUSB Adapter and select Stop to continue. 6. The Safe To Remove Hardware window will appear. Select OK to complete. safely unplug your JetFlash from your computer. 23 Select OK to continue. You may now Remove JetFlash in Windows XP 1. Select the icon in the system tray. 2. The Safely Remove Hardware pop-up menu will appear. Select to continue. 3. The Safely Remove Hardware window will appear. Select USB Mass Storage Device and then select Stop to continue. 4. The Safe To Remove Hardware message balloon will appear. You may now safely unplug your JetFlash from your computer. 24 Uninstall WLAN Utility 1. Safely remove your JetFlash (see previous section). 2. Select the button on the Task Bar, go to Settings and then select Control Panel. 3. Double-click the Add or Remove Programs icon. 4. Select the IEEE802.11b WLAN Utility and select Change or Remove Programs to continue. 25 5. Follow the InstallShield Wizard and select Remove to complete the un-installation. 6. Select Finish when the un-installation has completed. 26 Troubleshooting Q1: Why doesn’t the driver CD Auto-Run after it is inserted into the CD-ROM drive in Windows? A1: This problem usually occurs because the Auto-Insert function of the CD-ROM drive is disabled. Please enter the Device Manager in Control Panel and enable the Auto-Insert function of the CD-ROM drive. Alternatively, you can execute the JetFlash.EXE in the driver CD manually. Q2: Why isn’t my operating system detecting JetFlash after I’ve plugged it into the USB port of my computer? A2: Please check following: 1. Is JetFlash properly connected to the USB port? If not, unplug it and plug it in again. 2. Is the USB port enabled? If not, refer the user’s manual of your computer (or motherboard) to enable it. 3. Follow the procedures below to verify if the Driver is installed properly. In Windows 98SE: a. Right-click the My Computer icon on the desktop and the select Properties. b. Select Device Manager tab and double-click Network adapters. WLAN miniUSB Adapter and then select Properties. 27 Select the c. If an error message appears in the Device Status window, select Remove. d. Select OK to confirm the device removal. e. Select Yes to restart your computer and refer to the “Driver Installation for Windows 98SE” section to re-install the Win98 Driver. In Windows Me: a. Right-click the My Computer icon on the desktop and select Properties. 28 b. Select the Device Manager tab and double-click Network adapters. Select the WLAN miniUSB Adapter and right-click Properties. c. If an error message appears in the Device Status window, select Remove. 29 d. Select OK to confirm the device removal. e. Select Yes to restart your computer and re-insert your JetFlash. In Windows 2000: a. Right-click the My Computer icon on the desktop and select Properties. 30 b. Select Hardware tab and then select Device Manager. c. Double-click the Network adapters. Right-click the WLAN miniUSB Adapter and then select Properties. 31 d. If an error message appears in the Device Status window, right-click WLAN miniUSB Adapter and then select Uninstall. e. Select OK to confirm the device removal. 32 f. Restart your computer and re-insert your JetFlash. In Windows XP: a. Select the button on the Task Bar, go to Settings and then select Control Panel. b. Double-click the System icon. 33 c. Select Hardware tab and then select Device Manager. d. Double-click the Network adapters. Right-click WLAN miniUSB Adapter and then select Properties. 34 e. If an error message appears in the Device Status window, right-click WLAN miniUSB Adapter and select Uninstall. f. Restart your computer and re-insert your JetFlash. 35 Specifications • Host Interface: USB 1.1 • Standard: IEEE802.11b • Dimension: 26 (W) x 86 (L) x 14 (H) mm • Weight: 27g • WLAN Frequency Range: 2.4-2.4835 GHz 2.497GHz (14 Channel) • WLAN Operation Range: Indoor: 35-100m @ 11Mbps Outdoor: 300m @ 11Mbps • WLAN Channels Support: US/Canada: 11 (1-11) Europe: 13 (1-13) France: 4 (10-13) Japan: 14 (1-14) • WLAN Transmission Rate: 11Mbps, 5.5Mbps, 2Mbps, 1Mbps, Auto-Rate • Modulation Technique: DSSS (Direct Sequence Spread Spectrum) with BPSK (1Mbps), QPSK (2Mbps), and CCK (5.5Mbps and 11Mbps) • Antenna: Embedded PIFA antenna • Wireless Security: 64-bit, 128-bit WEP encryption • RF Receiver Sensitivity: @PER < 0.08 11Mbps < -82dBm 5.5Mbps < -86dBm 2Mbps < -88dBm 1Mbps < -90dBm • Power Consumption: Transmission mode: 205mA (Typical) Receives mode: 190mA (Typical) Idle mode: 173mA (Typical) Power Saving Idle mode: 30mA (Typical) • Certificates: CE, FCC, Wi-Fi, TELEC Ordering Information Memory Size Transcend P/N 128MB TS128MJF-WL 256MB TS256MJF-WL 36 JetFlash Limited Warranty “Above and beyond” is the standard we set ourselves for customer service at Transcend. We consistently position ourselves to be significantly above the industry norm. It’s all part of our commitment to Customer Satisfaction. All Transcend Information, Inc. (Transcend) products are warranted and tested to be free from defects in material and workmanship and to conform to the published specifications. Should your Transcend JetFlash malfunction during normal use in its recommended environment due to improper workmanship or materials within the warranty period, Transcend will repair or replace your product with a comparable product. This warranty is subject to the conditions and limitations set forth herein. Duration of Warranty: Transcend JetFlash are covered by this warranty for a period of two (2) years from the date of purchase. Transcend will inspect the product and make the determination as to whether the product is eligible for repair or replacement. The decision by Transcend regarding eligibility of the product for repair or replacement will be final and binding. Transcend reserves the right to provide a functionally equivalent refurbished replacement product. Limitations: This warranty does not apply to products that fail due to accident, abuse, mishandling, improper installation, alteration, and acts of nature, improper usage, or problems with electrical power. Transcend JetFlash must be used with devices that conform to the recommended industry standards. Transcend will not be liable for damages resulting from a third party device that causes the Transcend product to fail. Transcend shall in no event be liable for any consequential, indirect, or incidental damages, lost profits, lost business investments, lost goodwill, or interference with business relationships as a result of lost data. Transcend is also not responsible for damage or failure of any third party equipment, even if Transcend has been advised of the possibility. This limitation does not apply to the extent that it is illegal or unenforceable under applicable law. Disclaimer: The foregoing limited warranty is exclusive, with no other warranties, implied or statutory, including, but not limited to any implied warranty of merchantability or fitness for a particular purpose. This warranty is not affected in any part by Transcend providing technical support or advice. Online Registration: To expedite warranty service, please register your Transcend Product within 30 days of purchase. Register online at http://www.transcendusa.com/registration Transcend Information, Inc. www.transcendusa.com The Transcend logo is a registered trademark of Transcend Information, Inc. *All logos and marks are trademarks of their respective companies.