1
Introduction
Preparations
PORTABLE DVD PLAYER
Playback
SD-P91SKY
OWNER’S MANUAL
DIGITAL VIDEO
Function Settings
Connections
Others
T
01_SD-P91SKY_Eng_01-54.indd 1
PX1D00004330
2008/06/05 15:25:40
Introduction
SAFETY PRECAUTIONS
WARNING: TO REDUCE THE RISK OF FIRE OR ELECTRIC SHOCK, DO NOT EXPOSE THIS APPLIANCE TO
RAIN OR MOISTURE. DANGEROUS HIGH VOLTAGES ARE PRESENT INSIDE THE ENCLOSURE.
DO NOT OPEN THE CABINET. REFER SERVICING TO QUALIFIED PERSONNEL ONLY.
CAUTION: This equipment employs a Laser System.
To ensure proper use of this product, please read this owner’s manual carefully and retain for future
reference. Should the unit require maintenance, contact an authorised service location - see service
procedure.
Use of controls or adjustments or performance of procedures other than those specified herein may
result in hazardous radiation exposure.
To prevent direct exposure to laser beam, do not try to open the enclosure.
Visible and invisible laser radiation when open and interlocks defeated.
DO NOT STARE INTO BEAM.
CLASS 1 LASER PRODUCT
2
01_SD-P91SKY_Eng_01-54.indd 2
2008/06/05 15:25:40
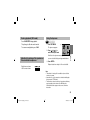
Model No.
Serial No.
Retain this information for future reference.
Introduction
In the spaces provided below, record the Model and Serial No. located on the bottom of your DVD player.
About disposal
The cold cathode fluorescent lamp in the LCD panel contains a small amount of mercury.
Please follow local ordinances or regulations when you dispose of the product.
3
01_SD-P91SKY_Eng_01-54.indd 3
2008/06/05 15:25:40
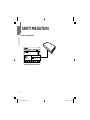
SAFETY PRECAUTIONS
Introduction
Location of the required label
4
01_SD-P91SKY_Eng_01-54.indd 4
2008/06/05 15:25:40
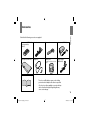
IMPORTANT SAFETY INSTRUCTIONS
This unit is fully transistorized and does not contain any parts that can be repaired by the user.
DO NOT REMOVE THE CABINET COVER, OR YOU MAY BE EXPOSED TO DANGEROUS VOLTAGE. REFER
SERVICING TO QUALIFIED SERVICE PERSONNEL ONLY.
1. Read these instructions.
2. Keep these instructions.
3. Heed all warnings.
4. Follow all instructions.
5. Do not use this apparatus near water.
6. Clean only with dry cloth.
7. Do not install near any heat sources such as
radiators, heat registers, stoves, or other apparatus
(including amplifiers) that produce heat.
8. Protect the power cord from being walked on
or pinched particularly at plugs, convenience
receptacles, and the point where they exit from the
apparatus.
Introduction
CAUTION: PLEASE READ AND OBSERVE ALL WARNINGS AND INSTRUCTIONS GIVEN IN THIS OWNER’S
MANUAL AND THOSE MARKED ON THE UNIT. RETAIN THIS BOOKLET FOR FUTURE
REFERENCE.
9. Only use attachments/accessories specified by the
manufacturer.
10. Unplug this apparatus during lightning storms or
when unused for long periods of time.
However, while it is thundering or lightning, do not
touch the apparatus and any connected cable and/
or equipment. This will prevent you from receiving
the electric shock by an electric surge.
11. Refer all servicing to qualified service personnel.
Servicing is required when the apparatus has been
damaged in any way, such as power-supply cord or
plug is damaged, liquid has been spilled or objects
have fallen into the apparatus, the apparatus has
been exposed to rain or moisture, does not operate
normally, or has been dropped.
5
01_SD-P91SKY_Eng_01-54.indd 5
2008/06/05 15:25:40
Introduction
IMPORTANT SAFETY INSTRUCTIONS
ADDITIONAL SAFETY INSTRUCTIONS
12. When you use headphones, keep the volume
at a moderate level. If you use the headphones
continuously with high volume sound, it may cause
hearing damaged.
18. Do not touch a spinning disc. When you open the
disc holder, the disc may have not stopped spinning.
Touching a spinning disc may cause personal injury
or damage to the product.
13. Do not overload wall outlets; extension cords, or
integral convenience receptacles as this can result
in a risk of fire or electric shock.
19. Do not rest the product on your lap or other parts of
body. The product may become warm during use.
Even low temperatures may cause personal injury
when exposed to your skin for prolonged periods.
14. Apparatus shall not be exposed to dripping or
splashing and no objects filled with liquids, such
as vases, shall be placed on the apparatus and/or
around it.
15. Be careful not to catch your fingers in the disc
holder when closing the lid. It may cause personal
injury.
16. Do not put a vessel containing liquid such as a vase,
or a metal object on the apparatus. If liquid or a
foreign metal object is let into the apparatus, it may
cause fires or electric shock.
20. Use the supplied AC adapter to operate the product.
Substitute devices not specified by the manufacturer
may result in fire or product malfunction. Do not
cover the AC adapter with a blanket or place it near
heating or on electric carpet when it is in use.
21. When you use this product in an airplane, follow the
instructions of the airline. Disregarding them may
cause harmful interference to radio communication.
22. Do not stare at the pick-up lens or look at the laser
beam. Doing so may cause damage to eyesight.
17. Do not use a cracked, deformed, or repaired disc.
These discs are easily broken and may cause
serious personal injury and apparatus malfunction.
6
01_SD-P91SKY_Eng_01-54.indd 6
2008/06/05 15:25:40
24. CAUTION: If the DVD player is dropped and the
cabinet or enclosure surface has been damaged or
the DVD player does not operate normally, take the
following precautions:
• ALWAYS turn off the DVD player and unplug the
power cord to avoid possible electric shock or
fire.
• NEVER allow your body to come in contact with
any broken glass or liquid from the damaged
DVD player. The LCD panel inside the DVD
player contains glass and a toxic liquid. If the
liquid comes in contact with your mouth or eyes,
or your skin is cut by broken glass, rinse the
affected area thoroughly with water and consult
your doctor.
• ALWAYS contact a service technician to inspect
the DVD player any time it has been damaged or
dropped.
25. Use the player in a location that facilitates the
immediate removal of the plug if there is a
malfunction or failure.
26. Battery Pack (Lithium ion battery pack)
a) WARNING: Do not use a battery pack other than the
one specified as it can result in a fire or damage to
the unit.
b) Never throw the battery pack into a fire, as that
could cause the battery pack to explode.
Never heat the battery pack, as that could cause
leakage of alkaline solution or other electrolytic
substance.
c) Never disassemble the battery pack, as that
could cause leakage of alkaline solution or other
electrolytic substance.
d) Never short-circuit the battery pack by either
accidentally or intentionally bringing the terminals in
contact with another metal object. This could cause
personal injury or a fire, and could also damage the
battery pack.
e) Never drive a nail into the battery pack.
Never strike the battery pack with a hammer.
Never step or tread on the battery pack.
f) If you ever smell an unusual odor, excessive heat,
discoloration, or deformation of the battery pack,
remove it from the player after confirming safety and
discontinue use of it. Take the battery pack to an
authorized Toshiba service provider.
g) Keep the battery pack away from heat or fire.
01_SD-P91SKY_Eng_01-54.indd 7
Introduction
23. Do not use this product while walking or driving.
Neglecting this may cause a traffic accident.
7
2008/06/05 15:25:40
Introduction
IMPORTANT SAFETY INSTRUCTIONS
h) Never dispose of used battery packs with other
ordinary solid wastes, since they contain toxic
substances. Always dispose of used battery packs
in accordance with community regulations that
apply to the disposal of batteries. Cover the metal
terminals with insulating tape, in order to prevent
accidental short-circuiting.
i)
j)
Always confirm that the battery pack is compatible
with your player, before attaching the battery pack to
the player.
Never expose the terminals of the battery pack to
any other metal object. Wrap the battery or place it
in a protective plastic bag, whenever transporting it.
k) Always confirm that the temperature is between
5 and 35°C (41°F and 95°F) before you charge the
battery. Leakage, excessive heat, or deterioration
of the battery pack may occur if this caution is not
heeded.
l)
Never immerse the battery pack in any liquid.
m) Never expose the battery pack to direct sunlight.
Never store or use the battery pack in a locked
and unventilated vehicle. (where excessive internal
temperatures may be encountered.)
n) Always keep the battery pack out of reach of infants
or small children.
o) Never shock the battery pack by dropping or
throwing it.
p) If the liquid contained within the battery pack leaks,
use a large amount of water and immediately
wash off any liquid which may accidentally contact
any part of the body. Remove any liquid that has
contacted your clothing by washing it immediately
with a detergent.
q) Always confirm that a “click” sound has resulted,
when attaching the battery pack to the player. This
sound confirms that the battery pack has been
properly attached.
27. Coin-shaped Battery
a) Keep coin-shaped batteries out of children’s reach.
Be careful not to ingest internally, especially by
children, as doing so may cause poisoning.
b) Do not load a battery into the remote control with the
wrong side out.
c) Do not charge, heat, open, or short-circuit the
batteries. Do not throw the batteries into a fire.
d) Do not leave a dead or exhausted battery in the
remote control.
e) If you do not use the remote control for a long
period of time, remove the battery to avoid possible
damage from battery corrosion.
8
01_SD-P91SKY_Eng_01-54.indd 8
2008/06/05 15:25:40
29. To reduce the risk of fire or electric shock, do not
expose this apparatus to rain or moisture.
30. Following mark means “CAUTION - RISK OF
ELECTRIC SHOCK - DO NOT OPEN”.
31. Vehicle adapter and operation in a car
a) NEVER operate the apparatus or view a DVD Video
while operating an automobile or other vehicle.
Note: doing so is illegal in many jurisdictions.
NEVER place an apparatus within the eyesight of a
driver while he/she is driving an automobile/vehicle.
Note: an apparatus located in the front seating
section of a vehicle is illegal in many jurisdictions.
Failure to observe the above instructions could
result in the driver’s inattention to and/or distraction
from road hazards.
b) NEVER place an apparatus in a location where it
could interfere with the proper deployment and/or
performance of an air bag.
Failure to observe this instruction could result in the
prevention of an air bag to properly and/or effectively
deploy.
Introduction
28. After unpacking coin-shaped batteries, store them in
poly bags, etc. separately one by one when unused.
If you leave them unwrapped, they may be shortcircuited by contact with metal objects, resulting in
battery leakage, heat or bursting. This may cause
burns or injury.
The batteries must be completely discharged when
they are deposited in collection containers for old
batteries. If a charge remains, countermeasures to
prevent short circuits must be taken.
c) Do not use a vehicle adapter other than the model
supplied, to power the apparatus. Do not use the
supplied vehicle adapter to power an apparatus
other than this apparatus. Neglecting these may
cause smoke, fire or electrical shock to human body.
d) This adapter is intended for exclusive use in
automobiles/vehicles with a DC 12V negative ground
electrical system.
NEVER use this adapter with a DC 24V configured
or a DC 12V positive ground electrical system
automobile/vehicle.
Consult your vehicle owner’s manual before using
this adapter.
9
01_SD-P91SKY_Eng_01-54.indd 9
2008/06/05 15:25:40
Introduction
IMPORTANT SAFETY INSTRUCTIONS
e) When handling, using or storing the adapter power
cord NEVER:
- Place or locate near any apparatus that produces
heat.
- Disassemble, splice or extend the cord.
- Pull, force or place any heavy objects on the cord.
- Bend, twist or bind the cord.
k) Some cars may not have a compatible socket.
NEVER modify this adapter to fit an incompatible
cigarette lighter socket and/or power port. NEVER
modify an incompatible cigarette lighter socket and/
or power port to accept this adapter.
Failure to observe the above warnings could cause
smoke, fire, burns and/or electric shock.
f) Keep away from the driving device (such as brake
pedal, etc.) and the moving equipment (such as a
seat rail, car windows, door, etc.).
l)
g) NEVER disassemble or alter this adapter in any
manner.
ALWAYS locate the apparatus on a level and secure
surface. If placed on an uneven, shaky, unsecured
or unstable surface, apparatus may fall.
Failure to observe the above caution could result in
the apparatus striking a person.
h) ALWAYS use caution when touching the adapter,
cigarette lighter socket or power port. The adapter,
lighter socket and power port may become heated
after prolonged use.
m) When using the adapter, insert the plug of the
adapter into the cigarette lighter socket or power port
fully.
The incomplete insertion will cause smoke or fire.
i)
ALWAYS remove the adapter from the cigarette
lighter socket or power port when not in use.
n) Do not touch the adapter with wet hands. Do not
expose the adapter to water of liquid.
j)
Do not charge the battery pack which is attached
to the apparatus by the adapter. Doing so may
cause smoke, fire or electrical shock to human body.
Whenever you use the adapter, be sure to remove
the battery pack from the apparatus to prevent it
from being charged by the adapter.
10
01_SD-P91SKY_Eng_01-54.indd 10
2008/06/05 15:25:40
Precautions
Notes on use in a vehicle
Do not shock the LCD monitor. It may cause unit
damage and malfunction.
Do not use this product while driving. Neglecting this
may cause a traffic accident.
Do not use the player in a place subject to vibration.
Neglecting this may cause malfunction of the player
or damage to the disc.
Never operate the player in a moving vehicle.
Vibration may prevent proper playback of the player
or cause damage to the disc.
When transporting the player, the original shipping
carton and packing materials come in handy. For
maximum protection, repack the unit as it was
originally packaged at the factory.
Do not leave the player in a vehicle. Rise or drop in
temperature may result in malfunction of the player.
Do not use volatile liquids, such as insect spray,
near the player. Do not leave rubber or plastic
products in contact with the player for a long time.
They will leave marks on the finish.
The player may become warm after a long period of
use. This is not a malfunction.
When the player is not in use, be sure to remove the
disc and turn off the power.
If you do not use the player for a long period, the
unit may not function properly in the future. Turn on
and use the player occasionally.
Notes on locating
When you place this player near a TV, radio, or
VTR, the playback picture may become poor and
the sound may be distorted. In this case, move the
player away from the TV, radio, or VTR.
Notes on cleaning
Use a soft, dry cloth for cleaning.
Do not use any type of solvent, such as thinner and
benzine, as they may damage the surface of the
player.
When cleaning the LCD monitor, use a soft, dry
cloth.
01_SD-P91SKY_Eng_01-54.indd 11
Introduction
Notes on handling
11
2008/06/05 15:25:40
Introduction
Precautions (continued)
Notes on moisture condensation
Moisture condensation damages the player. Please
read the following carefully.
Moisture condensation occurs, for example, when you
pour a cold drink into a glass on a warm day. Drops
of water form on the outside of the glass. In the same
way, moisture may condense on the optical pick-up lens
inside this unit, one of the most crucial internal parts of
the player.
Moisture condensation occurs during the
following cases.
When you transport the player directly from a cold
place to a warm place.
When you use the player in a room where you just
turned on the heater, or a place where the cold air
from the air conditioner directly hits the unit.
In summer, when you use the player in a hot and
humid place just after you move the unit from an air
conditioned room.
When you use the player in a humid place.
Do not use the player when moisture
condensation may occur.
If you use the player in such a situation, it may
damage discs and internal parts. Remove the
disc, connect the AC adapter, turn on the player,
and leave it for two or three hours. After two or
three hours, the player will have warmed up and
evaporated any moisture.
Notes on products incorporated laser system
This product incorporates laser system. For proper
and safety use of this product, read this owner’s
manual carefully, and keep near at hand for future
reference.
When you need any repair of this product, consult
your dealer where you purchased this product.
Never disassemble or modify this product. Changes
or modifications may result in exposure to laser
radiation.
12
01_SD-P91SKY_Eng_01-54.indd 12
2008/06/05 15:25:41
This owner’s manual explains the basic instructions of
this player. Some DVD video discs are produced in a
manner that allows specific or limited operation during
playback. As such, the player may not respond to all
operating commands. This is not a defect in the player.
Refer to instruction notes of discs.
Notes on region numbers
The region number of this player is 4. Region numbers,
corresponding to specific geographical playback area,
are printed on your DVD video disc. If you do not find
4 or ALL , disc playback will not be allowed by the
player. (In this case, the player will display a message
on-screen.)
Introduction
About this owner’s manual
“ ” may appear on the screen during operation.
A “ ” means that the operation is not permitted by the
player or the disc.
13
01_SD-P91SKY_Eng_01-54.indd 13
2008/06/05 15:25:41
Introduction
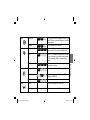
Table of contents
Introduction
Playing a disc...................................................... 34
SAFETY PRECAUTIONS...................................... 2
IMPORTANT SAFETY INSTRUCTIONS............... 5
Precautions ......................................................... 11
Identification of Controls .................................. 16
Accessories ....................................................... 19
Notes and Information....................................... 20
Playable discs .......................................................20
Preparations
Preparation of the remote control ..................... 24
Power connection .............................................. 25
Using the battery pack ...................................... 26
Powering on/off .................................................. 29
Changing the mode ........................................... 30
Playback
14
Connecting to headphones ............................... 33
Loading a disc .................................................... 32
01_SD-P91SKY_Eng_01-54.indd 14
Pausing playback (Still mode) ...............................35
Adjusting the volume of the speakers or the
connected headphones ........................................35
Using the top menu ...............................................35
Changing a playback speed .............................. 37
Playing in fast reverse or fast forward ...................37
Playing frame by frame .........................................37
Playing in slow-motion ..........................................37
Playing a desired scene ..................................... 38
Skipping chapters or tracks................................. . 38
Locating by entering numbers........................... ... 38
Marking the desired position to locate
(Bookmark function)..............................................39
Playing in random order .................................... 40
Playing repeatedly ............................................. 40
Repeating a specific segment ...............................40
Repeating a title, chapter or track .........................41
Playing in a favorite order .................................. 42
Zooming a picture............................................... 43
2008/06/05 15:25:41
Selecting subtitles .............................................. 44
Selecting a playback sound............................... 45
Connecting to an audio system equipped with
analog audio inputs...............................................67
Playing audio/video/picture files ....................... 46
Using the automobile/vehicle adapter or
power port ........................................................... 68
Selecting the sound enhancement ................... 50
To turn the LCD monitor .................................... 71
Adjusting the picture .......................................... 50
Introduction
Changing the camera angle............................... 44
Others
On-screen Display mode.................................... 51
Playing the files stored on a USB flash drive ... 52
Output sound conversion table ......................... 74
Before calling service personnel ...................... 75
Function Settings
Specifications ..................................................... 77
Customizing the function settings .................... 56
Connections
Viewing on a connected TV ............................... 64
Viewing pictures from connected
video equipment ................................................. 65
Connecting to audio equipment ........................ 66
Connecting to an AV amplifier
(via digital audio input) ..........................................66
01_SD-P91SKY_Eng_01-54.indd 15
15
2008/06/05 15:25:41
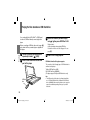
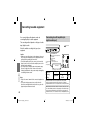
Identification of Controls
Introduction
Instructions and actual buttons
Most instructions are based on remote control operation, unless otherwise
noted. You can use the buttons on the remote control and those on the
main unit as well when they have the same function. Some functions are
available only from the remote control.
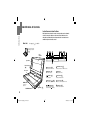
Main Unit
See page in
for details.
LCD monitor swivels
180 degrees around.
71
1
2 3
4
6 7 8
9 10
LCD
monitor
Speakers
5
Remote sensor
24
Disc cover
1 Remote sensor 24
Point the remote control here
6 TOP MENU button 35
To display a top menu of DVD video disc
2 MODE button 30
To select the mode
7 MENU button
To display a disc menu
3 STOP button
To stop playback
OPEN button
To open the
disc cover
POWER indicator
Right side 17
34
8 SETUP button 56
To display the setup menu
4 SKIP buttons (
/ ) 38
To locate a title, chapter or track
9 Direction button 35
To select a content or position to enter
PLAY/PAUSE button
5
To switch between playback
and pause (PLAY
PAUSE)
10 ENTER button 35
To enter a selected content
16
01_SD-P91SKY_Eng_01-54.indd 16
2008/06/05 15:25:41
Right side
Headphone jacks (× 2) 33
To connect headphones
AV IN jack 65
Connect to AV output terminal of your video equipment
BITSTREAM/PCM jack 66
Connect to Digital Out jack of your amplifier
AV OUT jack 64
Connect to AV input terminal of your TV
Introduction
DC IN 12V jack 25
To connect the AC
adapter (supplied)
Volume control 35
To adjust the volume
Left side
USB port 52
POWER switch 29
To connect a
To turn on and off the player
USB flash drive
Front
POWER indicator 29
To display the condition of
the power (on/off/charge)
Important
• Magnets are incorporated inside the player to lock the LCD when closed. To avoid troubles, keep magnetized objects
(e.g. watches, magnetic cards) away from the player.
01_SD-P91SKY_Eng_01-54.indd 17
17
2008/06/05 15:25:41
Identification of Controls (continued)
Remote control
See page in
14 E.A.M. button 50
Introduction
1 MENU button
2 MODE/DISPLAY button 30 51
15 SETUP button 56
16 PICTURE button 50
3 TOP MENU button 35
4 SUBTITLE button 44
5 AUDIO button 45
6 PAUSE/STEP button 35 37
7 STOP button 34
17 ANGLE button 44
18 ZOOM button 43
19 RETURN button
CLEAR button 39
20 PLAY button 34
21 FWD button 37
SLOW button 37
22 ENTER button 35
8 REV button 37
SLOW button 37
9 Direction buttons 35
10 SKIP buttons 38
11 Number buttons 38
23
24
25
26
27
12 SHIFT button
13 +10 button
MENU button
Use the MENU button to display the menu
included on many DVD video discs. To operate
a menu, follow the instructions in “Using the top
menu” 35 .
Function
1 MENU
2 MODE
2 DISPLAY
3
4
5
6
18
7
To display a disc menu
To select an AV mode
To display operation
information
TOP MENU To display a top menu
SUBTITLE To select subtitles
AUDIO
To select the sound
PAUSE/STEP To pause playback
STOP
To stop playback
01_SD-P91SKY_Eng_01-54.indd 18
Function
for details.
T button 39
MEMORY button 42
REPEAT button 41
A-B RPT button 40
RANDOM button 40
14 E.A.M.
15 SETUP
16 PICTURE
17 ANGLE
18 ZOOM
19 RETURN
19 CLEAR
20 PLAY
21 FWD
21 SLOW
22 ENTER
Function
8 REV
8 SLOW
9 Direction
Fast reverse playback
Slow motion playback
To select a content
buttons
or position to enter
10 SKIP
To locate a title,
chapter or track
11 Number buttons To enter numbers
12 SHIFT
To change functions
13 +10 button To enter numbers for
ten places
23 T
24 MEMORY
25 REPEAT
26 A-B RPT
27 RANDOM
To select the sound
enhancement
To display the setup menu
To adjust a picture
quality or size
To select a camera
angle
To zoom a picture
Return to previous
screen
To clear entered
information
To start playback
Fast forward
playback
Slow motion
playback
To enter a selected
content
To display a
preferred scene
To play in a favorite
order
Repeat play
Repeat play a
specific segment
To play in random
order
: Operate these buttons while simultaneously
pressing the SHIFT button.
2008/06/05 15:25:41
Accessories
Remote control (MEDR16UX)
Coin-shaped battery
(CR2025)
Audio/video cable
Power cord*
AC adapter* (ADPV16A)
Battery pack* (SD-PBP91E)
Headphones
Carrying case
Vehicle adapter*
(MEDC01AX)
Use this for carrying, etc. of the
player.
Introduction
Check that the following accessories are supplied.
Owner’s manual
*
Do not use an AC adapter, a power cord, a battery
pack and a vehicle adapter other than one specified.
Also, do not use these supplied accessories with any
device other than this player. Neglecting this may
cause serious danger.
19
01_SD-P91SKY_Eng_01-54.indd 19
2008/06/05 15:25:41
Introduction
Notes and Information
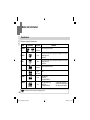
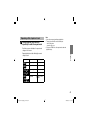
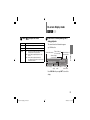
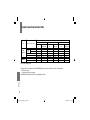
Playable discs
This player can play the following discs.
Disc
Disc Mark
DVD Video
disc
Disc Size
DNDN
Contents
r7JEFPNPWJOHQJDUVSFT
"VEJP
DVD-RW
DN
r7JEFP"VEJP%7%73GPSNBUDPNQBUJCMFXJUI$13.
%7%WJEFPGPSNBU
*
'JOBMJ[FEEJTDTPOMZ
r.PWJF%JW9
DVD-R
DN
r7JEFP"VEJP%7%73GPSNBUDPNQBUJCMFXJUI$13.
%7%WJEFPGPSNBU
*
'JOBMJ[FEEJTDTPOMZ
r.PWJF%JW9
VIDEO CDs
DNDN
r7JEFPNPWJOHQJDUVSFT
"VEJP
DIGITAL VIDEO
Audio CDs
r"VEJP
DN
DN$%TJOHMF
CD-ROM
CD-R/RW
Re Wri t a bl e
DN
r"VEJP.1GJMFT
r.PWJF%JW9
r1IPUPHSBQI+1&(GJMFT
DN
r"VEJP$%%".1GJMFT
r.PWJF%JW9
r1IPUPHSBQI+1&(GJMFT
$%338EJTDTPG7*%&0$%
GPSNBUDBOBMTPCFQMBZFE4PNFPG
UIFTFEJTDTNBZCFJODPNQBUJCMF
is a trademark of DVD Format/Logo Licensing Corporation.
20
01_SD-P91SKY_Eng_01-54.indd 20
2008/06/05 15:25:41
On VIDEO CDs
This player supports VIDEO CDs equipped with the
PBC (Version 2.0) function. (PBC is an abbreviation for
Playback Control.)
You can enjoy two playback variations depending on
types of discs.
Introduction
Notes
• You cannot play discs other than those listed left.
• You cannot play discs of DVD-RAM or non-standardized
discs, etc., even if they may be labeled as left.
• This player uses the PAL/NTSC colour system, and cannot
play DVD video discs recorded in any other colour system
(SECAM, etc.).
• Depending on the data recording method or the disc status,
playback on this player may not be possible, even if the disc
is labeled as left. Toshiba cannot assure that all discs bearing
the DVD or CD logos will operate as expected.
• Because of problems and errors that can occur during the
creation of DVD and CD software and/or the manufacture of
DVD and CD discs, Toshiba cannot assure that this player
will successfully play every disc bearing the DVD and CD
logos. If you happen to experience any difficulty playing a
DVD and/or CD disc on this player, please contact Toshiba
Customer Service.
• VIDEO CD not equipped with PBC function
(Version 1.1)
Sound and movie can be played on this player in the same
way as an audio CD.
• VIDEO CD equipped with PBC function
(Version 2.0)
In addition to operation of a VIDEO CD not equipped with the
PBC function, you can enjoy playback of interactive software
with search function by using the menu displayed on the
screen (Menu Playback). Some functions described in this
owner’s manual may not work with all discs.
21
01_SD-P91SKY_Eng_01-54.indd 21
2008/06/05 15:25:42
Introduction
Notes and Information (continued)
On handling discs
Store discs vertically in a case. Stacking or placing
objects on discs outside of their case may cause
warping.
Do not touch the playback side
of the disc.
Do not attach paper or tape to discs.
Playback
side
On cleaning discs
Fingerprints and dust on the disc may cause picture
and sound deterioration. Wipe the disc from the
center outwards with a soft cloth. Always keep the
disc clean.
Do not use any type of solvent such as thinner,
benzine, commercially available cleaners or antistatic
spray for vinyl LPs. It may damage the disc.
On storing discs
Do not store discs in a place subject to direct sunlight
or near heat sources.
Do not store discs in places subject to moisture and
dust such as a bathroom or near a humidifier.
Notes on copyright
The unauthorized recording, use, distribution, or
revision of copyrighted materials including, without
limitation, television programs, videotapes, and DVDs,
is prohibited under the Copyright Laws of the United
States and other countries, and may subject you to civil
and criminal liability.
This product incorporates copyright protection
technology that is protected by method claims of certain
U.S. patents and other intellectual property rights
owned by Macrovision Corporation and other rights
owners.
Use of this copyright protection technology must be
authorized by Macrovision Corporation, and is intended
for home and other limited viewing uses only unless
otherwise authorized by Macrovision Corporation.
Reverse engineering or disassembly is prohibited.
22
01_SD-P91SKY_Eng_01-54.indd 22
2008/06/05 15:25:42
Preparations
Preparations before using.
Preparation of the remote control
Power connection
Using the battery pack
Powering on/off
Changing the mode
01_SD-P91SKY_Eng_01-54.indd 23
2008/06/05 15:25:42
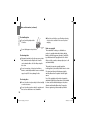
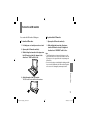
Preparation of the remote control
Preparations
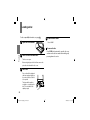
Insert the specified battery to the remote control. See
page 8 , 9 for safety use of coin-shaped batteries.
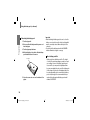
Point the remote control at the remote sensor and press
the buttons.
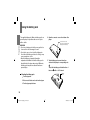
1 Gently insert a fingernail in groove
and pull out the holder in direction
Operating with the remote control
.
Backside
1
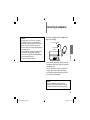
Within about 3 m (9.9 feet)
2
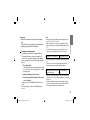
Take care not to break your fingernail.
battery (CR2025) with the
side up on the holder.
C
R
2
3V 02
5
2 Place a coin-shaped
Keep the holder horizontal so that
the battery does not fall through.
CAUTION: Danger of explosion if battery is
incorrectly replaced. Replace only with the same or
equivalent type.
3 Insert the holder into the remote control.
The remote control battery contains Perchlorate
Material - special handling may apply.
24
01_SD-P91SKY_Eng_01-54.indd 24
Distance: About 3 m (9.9 feet) from the front of the remote
sensor
Angle:
About 30° in each direction of the front of the
remote sensor
Do not expose the remote sensor of the player to a strong light
source such as direct sunlight or other illumination. If you do
so, you may not be able to operate the player via the remote
control.
Aim the remote control at the remote sensor of the player.
Do not drop or give the remote control a shock.
Do not leave the remote control near an extremely hot or humid place.
Do not spill water or put anything wet on the remote control.
Do not disassemble the remote control.
If the remote control does not function correctly or if the operating
range becomes reduced, replace the battery with new one.
• Inserting a battery other than the specified one or an object may
damage the remote control.
•
•
•
•
•
•
2008/06/05 15:25:42
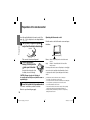
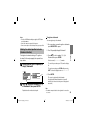
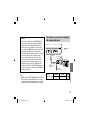
Power connection
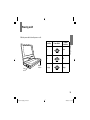
Connect the supplied AC adapter to wall outlet as below.
Follow steps 1 to 3 to connect.
When disconnecting, reverse this order.
2
Preparations
To the DC IN
12V jack
CAUTION
• Do not connect the power plug to a power outlet other
than that indicated on the label, as this can result in a
risk of fire or electric shock.
• Do not connect or disconnect the power plug with wet
hands. Doing so may cause electric shock.
• Do not use an AC adapter other than one specified, as it
can cause a fire or damage to the player.
• When the AC adapter is in use, its temperature may
increase. However, it is not a malfunction. Make sure
that the power cord is disconnected and the temperature
decreases before carrying it.
1
AC adapter
3
Connect the supplied AC adapter
and the power cord firmly.
To wall
outlet
Power cord
Note
• Do not use the supplied AC adapter with any device other
than this player.
25
01_SD-P91SKY_Eng_01-54.indd 25
2008/06/05 15:25:42
Using the battery pack
Preparations
The supplied battery pack (lithium ion battery pack) can
power the player for operation outdoors or in a place
with no outlets.
WARNING
• Do not use a battery pack other than one specified as
it can result in a fire or damage to the unit.
• Do not heat, open, or short-circuit the battery pack.
Do not throw the battery pack into a fire. Doing so may
cause an explosion or a fire.
• Attach the battery pack properly following the
explanation below. Make sure that the battery pack is
attached firmly to the player when using it. Otherwise,
the battery pack may become detached and cause
personal injury.
Attaching the battery pack
4 Open the connector cover on the bottom of the
player.
Open the connector cover
(Be sure to close it whenever the
battery pack is not attached.)
5 Turn the battery pack over and insert four
catches into the player’s corresponding holes
.
Then, slide the battery pack in the direction of
until a “click” is heard.
the arrow
Battery
pack
1 Turn the player off.
2 Disconnect all cables and cords from the player.
3 Turn the player upside down.
26
01_SD-P91SKY_Eng_01-54.indd 26
2008/06/05 15:25:42
Charging the battxery pack
The battery pack needs to be charged before use.
(The battery indicator is shown in the upper left
corner of the screen when the power in the battery
pack is running low.) Perform a full charge before the
first use.
1 Turn off the player.
2
The battery pack cannot be charged when the player
is on. Be sure to turn off the player before charging
the battery pack.
Attach the battery pack to the player.
3 Connect the supplied AC adapter and the power
cord to the player.
Charging starts, and the POWER indicator illuminates in
orange.
When the charging is completed, the POWER indicator
turns off.
Notes
• Charge the battery pack with a surrounding temperature of
+10°C to +30°C (+50°F to +86°F).
• While the charge is in progress, do not disconnect the AC
adapter and the power cord until the POWER indicator turns
off.
• The attached battery pack may get warm when you are
charging it or operating the player. This is not a defect.
Charging time of a battery pack
Preparations
Important
• Detach the battery pack from the player after being
used.
It is possible to leave the battery pack attached while
powering the player with the AC adapter.
Approximately 4.5 hours
• The battery pack can be charged when the player is turned
off.
• This value is for reference only. Charging time may vary
depending on battery pack status and environment.
Continuous playback time while
using the battery pack
Up to approximately 5
hours
• This value is for reference purpose only, it is not guaranteed.
(Conditions: 25°C, output from the headphones, new battery
pack in use.)
• Continuous playback time may vary depending on battery
pack status, operational status and environment conditions.
• Low temperature will shorten the playback time.
27
01_SD-P91SKY_Eng_01-54.indd 27
2008/06/05 15:25:42
Using the battery pack (continued)
Detaching the battery pack
Preparations
1 Turn the player off.
2 Disconnect the AC adapter and the power cord
from the player.
3 Turn the player upside down.
Important
• After detaching the battery pack, be sure to close the
battery cover in order to avoid a short-circuiting which
may be caused by contact with metal objects to the
connector.
• Do not detach the battery pack while the POWER
indicator illuminates in green or orange.
4 While holding the lock switch, slide the battery
pack in the direction of the arrow.
Lock switch
5 Close the connector cover on the bottom of the
player.
About battery pack life
Battery pack has a limited service life. The length
of service life varies depending on product use and
user settings. If you use the battery pack beyond
its service life, you may notice that playback time
becomes remarkably shorter, even if the battery pack
is fully charged. If you notice that playback time has
become remarkably shorter, even when the battery
pack is fully charged, it is recommended that you
replace the battery pack with battery pack model
number SD-PBP91E.
28
01_SD-P91SKY_Eng_01-54.indd 28
2008/06/05 15:25:42
Powering on/off
Slide the power switch to turn the power on or off.
Condition
POWER
indicator
On
Green
Off
Off
Charging
Orange
Preparations
Power
switch
POWER
indicator
Power Switch
29
01_SD-P91SKY_Eng_01-54.indd 29
2008/06/05 15:25:42
Changing the mode
Preparations
You can enjoy various contents of discs, USB flash drives and other external equipments by changing the mode.
Change it depending on your needs.
Press MODE repeatedly to select the mode.
Each time you press MODE, the mode changes on the screen as below.
Select when you want to play a disc on the LCD monitor of this player.
(Normal)
• Make sure that
(Normal) is selected when you play a disc. Cannot be played any discs
other than normal mode.
Select when you want to play the files stored on a USB flash drive.
(USB)
(AV input)
(Back to
Select when you want to view the picture played using a VTR or other external
equipment on the LCD monitor of this player.
(Normal))
30
01_SD-P91SKY_Eng_01-54.indd 30
2008/06/05 15:25:42
Playback
Play your favorite disc.
Loading a disc
Changing the camera angle
Connecting to headphones
Selecting subtitles
Playing a disc
Selecting a playback sound
Changing a playback speed
Playing audio/video/picture files
Playing a desired scene
Selecting the sound
enhancement
Playing in random order
Playing repeatedly
Playing in a favorite order
Zooming a picture
01_SD-P91SKY_Eng_01-54.indd 31
Adjusting the picture
On-screen Display mode
Playing the files stored on a
USB flash drive
2008/06/05 15:25:42
Loading a disc
For disc compatibility information, see page 20 .
1 Open the LCD monitor.
4 Close the disc cover.
Press CLOSE.
Playback
To remove the disc
2 Press OPEN on the main unit.
Press OPEN on the main unit to open the disc cover
and remove the disc from under the rim while gently
pressing down on its center.
The disc cover opens.
Before using the player for the first time, remove the
protective sheet beneath the disc cover.
3 Set a disc.
Place a disc with the playback
side down, and push gently on
the center of the disc to affix it
to the spindle.
The player will be unable to
recognize or correctly play the
disc if it is not affixed to the
spindle properly.
32
01_SD-P91SKY_Eng_01-54.indd 32
2008/06/05 15:35:20
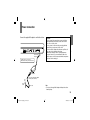
Connecting to headphones
You can connect headphones to the headphone jack
using a stereo mini plug.
Stereo mini plug (
3.5mm)
Connect either of
these jacks.
Playback
CAUTION
• Keep your fingers clear of the disc as it is spinning.
Neglecting to may cause serious personal injury.
• Be careful not to catch your fingers in the disc holder.
• Do not use a cracked, deformed, or repaired disc.
• Do not tilt, shake or move the main unit while playing. It
may damage the disc.
• Do not put any discs or any objects in the disc holder
other than those disc types listed on page 20 .
• Do not touch the spindle immediately after prolonged
play, as it may have become hot.
Be careful in loading/removing a disc.
• Before connecting, temporarily turn down the volume with
the headphone volume control. Readjust to your preference
when playback starts.
• Turn off the player before you connect or disconnect the
headphone cable. Possible shakes produced by plug
connecting/disconnecting may cause damage to the disc.
• You can connect up to 2 headphones.
CAUTION
When you use headphones, keep the volume at a
moderate level. If you use the headphones continuously
with high volume sound, it may cause hearing damage.
33
01_SD-P91SKY_Eng_01-54.indd 33
2008/06/05 15:25:42
Playing a disc
DVD-V
VCD
CD
Preparations
•
•
Turn on the power of the player.
Place a disc to the player.
Playback
Caution
Never operate the player in a moving vehicle.
Vibration may prevent proper playback of the player or cause
damage to the disc.
1 Press MODE repeatedly to select
(Normal).
2 Press PLAY.
Playback starts.
•
If you select a DVD video disc that contains a top menu,
or select a PBC (Playback Control)-featured VIDEO CD,
a menu may appear. See “Using the top menu” 35 .
•
You may need to press the TOP MENU or MENU button
to display the disc menu (depending on the actual DVD
video disc.)
•
34
When you play an audio CD, “menu” screen appears.
See “Playing audio/video/picture files” about the operation.
3 Press STOP to stop playback.
01_SD-P91SKY_Eng_01-54.indd 34
Note
• In many instances, a menu screen will appear after playback
of a movie is completed. If you have connected the DVD
player to a television, and depending on the type of television
that you have, prolonged display of an on-screen menu
may result in the on-screen menu becoming permanently
ingrained in the screen. This type of damage is not covered
by your Toshiba Warranty. To avoid this, be sure to press the
STOP button once the movie is completed.
About Resume playback function
The player memorizes the location where playback is stopped
and resumes playback from the location where you stopped.
If you press PLAY after stopping playback, playback
starts from the location where you stopped.
• The player memorizes the information for resume
playback up to 5 discs. The oldest memory is deleted if
6th disc is inserted.
• If you want to return to the beginning of a DVD video
disc, press STOP twice.
Notes
• The player’s memory is cleared when you use a PBCfeatured VIDEO CD while “PBC” is set to “On”. (Refer to
“Function Settings”.)
• There may be a difference in the location where playback
resumes depending on the disc.
2008/06/05 15:25:42
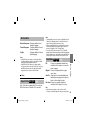
Pausing playback (Still mode)
Press PAUSE/STEP during playback.
The picture gets still and sound is muted.
To resume normal playback, press PLAY.
Using the top menu
DVD-V VCD
CD
1 Press TOP MENU.
1
2
3
4
The top menu appears.
2 Press / / / to
select the title you want.
If the titles in the top menu are assigned a number,
you can select the title by pressing number buttons.
3 Press ENTER.
Playback
Adjusting the volume of the speakers or
the connected headphones
e.g.
Playback starts from chapter 1 of the selected title.
Right: Increase volume.
Left: Decrease volume.
Notes
• This method of locating a title is available only on a disc that
contains a top menu.
• Instruction notes of discs may refer to the button that displays
the top menu as TITLE button.
• The instructions above describe basic procedures which may
vary depending on the contents of the DVD video disc.
If different instructions appear on the screen, follow those
instructions.
35
01_SD-P91SKY_Eng_01-54.indd 35
2008/06/05 15:25:43
Playing a disc (continued)
About the screen saver
Playback
If 20 minutes elapse while the power is on and there
is no disc in the player or while the disc is stopped,
the screen saver is automatically displayed (when
“Screen saver” (refer to “Function Settings”) is set to
“On” ). To turn off the screen saver, press any button
on the main unit or remote control.
Automatic power off function
If the player is stopped or the screen saver is
engaged for approximately 20 minutes, the LCD
power automatically turned off. To turn on the LCD
monitor, slide the power switch to off once and then
turn the power on again.
About the LCD
•
The LCD panel contained in this product is
manufactured using an extremely high level of
precision technology; however, there may be an
occasional pixel (dot of light) that does not operate
properly (does not light, remains constantly lit, etc.).
This is a structural property of LCD technology, is not
a sign of malfunction, and is not covered under your
warranty. Such pixels are not visible when the picture
is viewed from a normal viewing distance.
• The brightness of the LCD monitor differs slightly
depending on the viewing angles. Adjust the LCD
monitor angle to obtain the best viewing. (The
recommended viewing angle is 90 degrees to the
monitor.)
36
01_SD-P91SKY_Eng_01-54.indd 36
2008/06/05 15:25:43
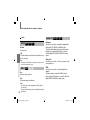
Changing a playback speed
Playing in fast reverse or fast forward
DVD-V
VCD
CD
Press REV or FWD on the remote control during
playback.
: Fast reverse playback
: Fast forward playback
DVD-V
VCD
CD
Press PAUSE/STEP repeatedly during playback.
The sound is muted during frame by frame playback.
Press PLAY to resume normal playback.
Playback
Each time you press the REV or FWD button, the
playback speed changes.
Playing frame by frame
Playing in slow-motion
DVD-V
VCD
CD
Press PLAY to resume normal playback.
• Also,
playback changes to fast reverse or fast forward
when you press and hold SKIP on the main unit.
Notes
• The player mutes sound and omits subtitles during reverse
and forward scan of DVD video discs.
• The playback speed may differ depending on the disc.
• This equipment supports playback of DVD-RW (VR mode)
discs. However, playback or fast-forward/rewind may not
function properly depending how the disc was created, the
status of titles on the disc or the condition of the disc itself.
Press SLOW (
playback.
/
) while pressing SHIFT during
If you press the SLOW (
) during playback, you
can view the picture in reverse slow-motion. (Only
when using a DVD video disc.)
Each time you press the SLOW (
the slow-motion speed changes.
/
) button,
The sound is muted during slow-motion playback.
Press PLAY to resume normal playback.
Note
• The playback speed may differ depending on the disc.
37
01_SD-P91SKY_Eng_01-54.indd 37
2008/06/05 15:25:43
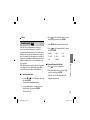
Playing a desired scene
DVD-V
VCD
CD
Skipping chapters or tracks
2 Press
/ to select the category you
want to search.
1 Press SKIP (
/
) repeatedly to locate
the chapter or track you want.
Playback starts from the selected chapter or track.
Playback
: Playback starts from the beginning of the next
chapter or track.
: Playback starts from the beginning of the current
chapter or track.
When you press twice, playback starts from the
beginning of the preceding chapter or track.
Category
To search by specifying:
Title*
Title number
Chapter*
Chapter number
Track
Track number
Time
Elapsed time of the current track
Disc Time
Elapsed time in the entire disc
*: Not available in CD playback.
3 Press the number buttons to enter a
number.
Locating by entering numbers
•
e.g. To enter 25:
2
1 Press T several times to display
“Search”.
•
The display changes each time this button is pressed.
e.g. To enter the time 1 hour 25 minutes 30
seconds:
1
e.g. DVD-V
Search
Title
Chapter
Bookmark 1
Bookmark 2
Bookmark 3
Off
4
5
2
5
3
0
Press PLAY or ENTER.
Time
Playback starts from the selected section.
38
01_SD-P91SKY_Eng_01-54.indd 38
2008/06/05 15:25:43
Notes
• Press the CLEAR button while pressing the SHIFT button
resets the numbers.
• Some discs may not respond to this process.
• Some scenes may not be located precisely as you specified.
Marking the desired position to locate
(Bookmark function)
1 During playback, press T repeatedly to
display “Bookmark”.
You can register up to 3 bookmarks.
1 At a scene where you want to register a bookmark,
press PAUSE/STEP to pause.
2 Press T repeatedly to display “Bookmark”.
3 Press / to select a number (1, 2, 3) of
“Bookmark”, then press ENTER.
Select a vacant (“– – : – – : – –”) number.
Playback
First register a bookmark referring to “To register a
bookmark” of the next paragraph, then operate these
steps below.
To register a bookmark
To cancel the procedure, press T to turn the display
off.
To cancel your entry, press CLEAR while pressing
SHIFT to erase the digits to return to “– – : – – : – –”.
e.g. DVD-V
Search
Title
Chapter
Bookmark 1
Bookmark 2
Bookmark 3
Off
Time
2 Press
/ to select a number (1, 2, 3)
of “Bookmark”, then press ENTER.
Playback starts from the selected point.
01_SD-P91SKY_Eng_01-54.indd 39
4 Press ENTER.
The scene is registered to the bookmark.
(A registered bookmark information is cleared if
another disc is inserted or the power of the player is
turned off.)
Note
• Bookmarks may not be able to be registered for some discs
or scenes.
39
2008/06/05 15:25:43
Playing in random order
Playing repeatedly
DVD-V
DVD-V
VCD
CD
1 During playback, press RANDOM to
Playback
display “Shuffle On” on the screen.
VCD
CD
Repeating a specific segment
1 Press A-B RPT at the beginning of the
Each time you press the button, the random mode
“Shuffle On” and “Shuffle off” alternate.
segment (point A) you want to play
repeatedly.
The mode on the screen will disappear in a few
seconds if not operated.
“Rep A-” appears.
If you display “Shuffle On”, random playback starts
after finishing the current chapter or track.
To resume normal playback
Press RANDOM repeatedly until “Shuffle off”
appears.
Notes
• Some discs may not permit random playback.
• The random mode will be canceled when you:
– turn off the power.
– open the disc cover.
• If you press STOP twice, the random mode ends and
playback stops.
40
01_SD-P91SKY_Eng_01-54.indd 40
2 Press A-B RPT again at the end of the
segment (point B).
“Rep A-B” appears and the player automatically
returns to point A and starts playback of the selected
segment (A-B).
To resume normal playback
Press A-B RPT repeatedly until “RepAB Off” appears.
Notes
• If you press STOP twice, the A-B repeat function ends and
playback stops.
• You can specify a segment only within the current title or track.
• There may be a slight difference between point A and the
location where playback starts actually resumes depending
on the disc.
• Functions other than STOP and A-B RPT may not be
available during A-B repeat playback.
2008/06/05 15:25:43
Repeating a title, chapter or track
1 During playback, press REPEAT
repeatedly to select the repeat mode.
Each time you press the button, the repeat mode
changes on the screen.
Disc
Mode
Repeating range
DVD-V
Repeat Chapter
Current chapter
DVD-V
Repeat Title
Current title
VCD
CD
Repeat single
Current track
VCD
CD
Repeat all
Whole disc
Repeat off
Returns to normal
playback.
DVD-V
VCD
Playback
Repeat playback starts after finishing the current
chapter or track.
Notes
• Some discs may not permit repeat playback.
• The repeat mode will be canceled when you:
– turn off the power.
– open the disc cover.
• If you press STOP twice, the repeat mode ends and
playback stops.
CD
41
01_SD-P91SKY_Eng_01-54.indd 41
2008/06/05 15:25:43
Playing in a favorite order
DVD-V
VCD
CD
1 During stop, press MEMORY.
The programming display appears.
Enter a track number when
using a VIDEO CD.
Program
1
2
Title 1
3
4
Title 2
5
6
Title 3
7
8
Title 4
9
10
11
12
13
14
15
16
Playback
Title 6
Play Program
to select “Play Program” then
press ENTER.
The player starts memory playback.
e.g. DVD-V
Title 5
3 Press
Clear
Clear All
2 Setting the title, chapter or track in the
To cancel the programmed selections
• Select “Clear” on the screen and press ENTER to
clear the programmed selection.
• Select “Clear All” on the screen and press ENTER.
All of the programmed selections are cleared.
order you wish to play.
To stop memory playback
1) Select the number of title you want to set using
/ then press ENTER.
Press STOP twice.
2) Select the number of chapter you want to set using
/ then press ENTER.
3) Setting another memory, select [..] then press
ENTER. After that the programming display
appears.
Follow steps 1 to 2 for the setting.
• Some discs may not exist chapter or track number.
If so chapter or track number cannot be entered.
(The programmed selection is cleared.)
Notes
• Some discs may not permit memory playback operation.
• The programmed selection will be cleared when you:
– turn off the power.
– open the disc cover.
• Memory playback pauses if you press MEMORY while being
executed.
42
01_SD-P91SKY_Eng_01-54.indd 42
2008/06/05 15:25:43
Zooming a picture
DVD-V
VCD
CD
To resume normal playback
1 Press ZOOM during playback.
Press ZOOM repeatedly until “Off” appears.
The zoom icon appears.
This operation is available
also during slow, still, fast
forward or fast reverse
playback.
x2
level.
Playback
2 Select the zoom point and magnification
Notes
• Some discs may not respond to zoom feature.
• Depending on scenes, the buttons may not work as
described.
• Zooming does not work on characters selected on menus.
• Zoom playback will be canceled when you:
– turn off the power.
– open the disc cover.
• Magnification level:
Press ZOOM repeatedly.
The magnification level changes as follows:
“
X2” (Twice the size)
“
X3” (Three times the size)
“
X4” (Four times the size)
“Off” (Normal size)
• Zoom point:
Press / / /
01_SD-P91SKY_Eng_01-54.indd 43
repeatedly.
43
2008/06/05 15:25:43
Changing the camera angle
Selecting subtitles
DVD-V
DVD-V
VCD
CD
1 Press ANGLE while playing a scene
recorded with multiple camera angles.
The angle icon (
) appears on the screen.
Playback
e.g.
CD
1 Press SUBTITLE during playback.
The current subtitle setting is displayed.
2 Press SUBTITLE while the subtitle
setting is displayed on the screen.
Number of angles
Angle icon
Current angle
This display does not appear if the disc includes no
scenes recorded with multiple angles.
If you press ANGLE while playing a scene not
recorded with multiple angles, the angle selection is
not possible.
2 Press ANGLE to select the camera angle.
Each time you press the button, the camera angle changes.
44
VCD
Notes
• After selecting angle, it will take a few moments to change
the camera angle of the scene you are viewing.
• If you pause a picture immediately after changing a camera
angle, the resumed playback picture may not display the new
camera angle.
01_SD-P91SKY_Eng_01-54.indd 44
Each time you press the SUBTITLE button, you can
select a subtitle language from those included on the
DVD video disc.
Notes
• When you select a subtitle language which is not included on
the disc, the player plays a prior language programmed on
the disc.
• Depending on scenes, the subtitles may not appear
immediately after you change the subtitle language.
• Some discs may not include any subtitle languages.
To turn subtitles on or off
Press SUBTITLE several times during playback until
“Off” is displayed.
Notes
• Some discs display subtitles automatically, and you cannot
turn them off even if you set the subtitle function to off.
• Some discs will allow you to make subtitle selections and
turn subtitles on or off only via the disc menu.
2008/06/05 15:25:43
Selecting a playback sound
Good morning!
DVD-V
VCD
Bonjour!
¡Buenos días!
CD
1 Press AUDIO during playback.
The current audio setting is displayed.
Selecting sound channels of VIDEO CDs
During playback, press AUDIO repeatedly to select
the sound channel.
e.g.
1/3
D 2 ch Eng
2 Press AUDIO while the audio setting is
displayed on the screen.
Notes
• Some discs allow you to change audio selections only via
the disc menu. In such a case, press MENU and choose the
appropriate language from the selections on the disc menu.
• If you select a sound track which is not included on the disc,
the player plays a prior sound track programmed on the disc.
Playback
Sound recording Audio language
system
Each time you press the button, you can select a
preferred sound from those included on the DVD
video disc.
45
01_SD-P91SKY_Eng_01-54.indd 45
2008/06/05 15:25:43
Playing audio/video/picture files
DVD-V
VCD
CD
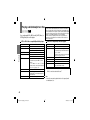
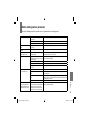
You can play audio CDs, MP3 (audio), DivX® (video) or
JPEG (picture) files on this player.
MP3 or DivX® disc compatibility with this player
Playback
Playable discs
Sampling Frequency
Bit rate
CD physical format
File system
File name
Total number of files
DivX codec version
DivX resolution
CD-ROM, CD-R, CD-RW, DVD-R, DVD-RW
32 kHz, 44.1 kHz, 48 kHz
MP3: 32 kbps - 320 kbps (CBR)
DivX: Less than 8 Mbps
Mode 1
MP3: ISO9660, UDF without interleave
DivX: ISO14496
File names are limited to eight characters or
less and must incorporate “MP3” or “DivX”
extension.
e.g. “********.MP3”, “********.avi”, “********.Divx”
File names cannot contain special characters
such as “?!><+*}{`[@]:;¥ /.,” etc.
Less than 650
3, 4, 5, 6 (Plays all versions of DivX® video
(including DivX® 6) with standard playback of
DivX® media files)
720 × 576 (Less or equal)
This player requires discs/recordings to meet certain technical standards
in order to achieve optimal playback quality. There are many different
types of recordable disc formats (including CD-R containing MP3 files).
Not all recordable discs will operate or produce optimal playback quality.
The technical criteria set forth in this owner’s manual are meant only as
a guide. Use of CD-RW for MP3 files is not recommended.
You must obtain any required permission from copyright owners to
download or use copyrighted content. Toshiba cannot and does not
grant such permission.
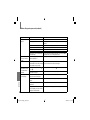
JPEG disc compatibility with this player
Playable discs
File system
File name
Total number of files
File size
File format
Resolution
CD-ROM, CD-R, CD-RW
ISO9660, UDF without interleave
File names are limited to eight characters or
less and must incorporate “JPG” extension.
e.g. “********.JPG”
File names cannot contain special characters
such as “?!><+*}{`[@]:;¥ /.,” etc.
Less than 650
Unrestricted
BASELINE, PROGRESSIVE
Baseline JPG: 5760 x 4320
Progressive JPG 5760 x 4320
DivX, DivX Certified, and associated logos are trademarks
of DivX, Inc. and are used under license.
Note
• Some discs may not be played back due to its capacity and/
or manufacturer, etc.
46
01_SD-P91SKY_Eng_01-54.indd 46
2008/06/05 15:25:43
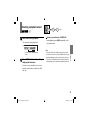
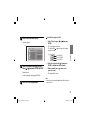
To select the category of file
1 Insert a disc you want to play.
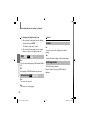
1 Select “Filter” using
ENTER.
The menu appears.
e.g.
1/8
/Track01.CDA
Track01
Filter
Track02
Repeat
: Off
Track03
Mode
: Normal
Track06
Music Playing
Track07
Track08
2 Select the track/file you want to play
using
/
then press ENTER or PLAY.
Playback starts.
/
then press
Audio
Photo
Video
Playback
Track05
/
The screen appears as below.
The check mark ( ) appears next to the category
currently selected.
e.g.
Track04
/
Select MP3 file
Select JPEG file
Select DivX file
2 Select the category using / then press
ENTER to add/remove the check mark.
3 When complete, press
previous screen.
to return to the
The setting will be saved.
A slide show begins when playing JPEG file.
3 Press STOP to stop playback.
Note
• When using a commercially available audio CD, this function
cannot be used.
47
01_SD-P91SKY_Eng_01-54.indd 47
2008/06/05 15:25:43
Playing audio/video/picture files (continued)
Playing repeatedly
Select “Repeat” on the screen using
during playback then press ENTER.
/
/
/
Playback
Each time you press ENTER, the repeat mode
changes.
Note of audio file playback
• The BITSTREAM/PCM jack outputs MP3 or DivX® sounds in
the linear PCM format regardless of the current “Digital Out”
selection. (Refer to “Function Settings”)
Off:
Resumes to normal playback.
Single:
Repeats current track.
All:
Folder:
Repeats all tracks in order. (Audio CD)
Repeats current folder. (MP3)
Playing in Random/Intro order
Select “Mode” on the screen using /
during playback then press ENTER.
/
/
Each time you press ENTER, the playback mode
changes.
Normal:
Notes
• Some discs may not permit repeat, or random playback.
• Some functions such as REPEAT, RANDOM and
SKIP (
) can be operated from the remote control
/
directly.
Rotating a picture (JPEG files)
Press / while a picture is played.
The picture will be rotated toward the designated
direction.
Note
• Rotation does not start immediately after a direction button is
pressed.
Resumes to normal playback.
Shuffle On: Plays in random order.
Music Intro: Plays only music intro in order.
48
01_SD-P91SKY_Eng_01-54.indd 48
2008/06/05 15:25:43
Playing in a favorite order
To display recorded track/file
You can combine your favorite track/file and play in
the order you determine.
Select “Browser view” on the screen then press
ENTER.
1 Select “Edit mode” on the screen using
/ / / then press ENTER.
The track/file list of the disc appears.
To cancel the programmed selections
to the screen
3 Select track/file you want to play using
press ENTER.
The check mark (
track/file.
1 Press STOP twice to stop playback.
/
then
) appears next to the selected
4 Select “Add to program” using
press ENTER.
/
/
/
The player memorizes the selected track/file.
5 Select “Program view” on the screen using
/ / / then press ENTER.
Programmed selections appear.
6 Press PLAY.
then
2 Position the cursor using
displayed track/file.
Playback
2 Position the cursor using
displayed track/file.
to the screen
3 Select track/file you want to cancel then press
ENTER.
The check mark (
track/file.
) appears next to the selected
4 Select “Clear program” using
press ENTER.
/
/
/
then
Program selections are cleared.
Note
• Some discs may not permit this function.
Playback starts in the order you programmed.
49
01_SD-P91SKY_Eng_01-54.indd 49
2008/06/05 15:25:44
Selecting the sound enhancement
Adjusting the picture
DVD-V
DVD-V
VCD
CD
1 Press E.A.M.*
The current sound enhancement setting appears.
* E.A.M. = Enhanced Audio Mode
Playback
2 Press E.A.M. repeatedly.
• [3D Off]
Normal sound.
• [3D On]
To obtain expansive virtual surround sound effects
from just two speakers.
Notes
• Actual effects to sounds may vary depending on the speaker
system. Make the selection to your preference.
• Actual effects to sounds may vary depending on the disc.
VCD
CD
This function operates on the LCD of this player
only. Cannot be effected on the screen of connected
external equipment.
1 Press PICTURE.
The current picture setting appears.
2 Press PICTURE repeatedly to select the
item.
Each time you press the button, the setup items
changes as follows.
Invert
Brightness
08
Color
08
AUTO
Screen
No display
See the list of next page about items and set contents.
50
01_SD-P91SKY_Eng_01-54.indd 50
The setting screen will disappear in a few seconds if
not operated.
2008/06/05 15:25:44
On-screen Display mode
DVD-V
3 Press
/
to adjust the value.
VCD
CD
1 Press DISPLAY while pressing SHIFT
during playback.
Invert
Invert the picture on the screen.
Brightness
0 (Darker) to 16 (Brighter)
Color
0 (Paler) to 16 (Deeper)
Screen
4:3:
e.g.: DVD video disc
Elapsed time of
the current title
Current chapter
or track number
Current title number
DVD Video
Title
Audio
Subtitle
Angle
2/3
1/2
D 3/2.1Ch Eng
2/2 Eng
1/1
Remained time of
the current title
00:00:01
Chapter
1/9
Bitrate
02:12:40
Playback
The picture recorded on the DVD video disc will
be played back in 4:3 picture format.
WIDE: Pictures will be expanded fully into the LCD
screen.
AUTO: Pictures will be adjusted automatically
according to the format (4:3 or 16:9) recorded
on the DVD video disc.
The current instructional information appears.
0.000Mbps
Current language Camera Current playback Current
angle audio
bitrate value
Press DISPLAY while pressing SHIFT to turn off the
display.
51
01_SD-P91SKY_Eng_01-54.indd 51
2008/06/05 15:25:44
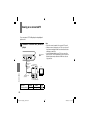
Playing the files stored on a USB flash drive
You can play the files in MP3, DivX® or JPEG format
stored on a USB flash drive by connecting it to this
player.
Playback
Before connecting a USB flash drive, refer to page 46
and confirm the files you want to play are playable on
this player.
1 Turn on this player and press MODE
repeatedly to select “
(USB)”.
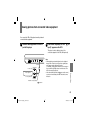
2 Insert a USB flash drive into the USB
port of this player.
3 Select the folder/file you want to play
using
/ , then press ENTER or PLAY.
Playback starts.
A slide show begins when playing JPEG files.
For details on how to select the category of file, see
page 47 .
4 Press STOP to stop playback.
USB flash drives that this player supports
The connection of the following types of USB flash drives is
confirmed on this player.
Toshiba USB Flash Drive (1GB)
PNY USB Flash Drive (2GB/4GB)
(This player supports Full-Speed USB flash drives only.)
USB flash
drive
Note
• The USB operation of this player is confirmed only with the
use of Toshiba USB flash drives (1GB) and PNY USB flash
drives (2GB/4GB). When not using the above, the connection
may not be available depending on the type of your USB
flash drive.
52
01_SD-P91SKY_Eng_01-54.indd 52
2008/06/05 15:25:44
To remove a USB flash drive
1 Press MODE repeatedly to select “
(AV input)”).
(or “
(Normal)”
2 Remove the USB flash drive from the USB port of
this player.
Playback
Notes
• While the contents of the USB flash drive is being accessed
to, or the access lamp of the USB flash drive is blinking, be
careful not to remove the USB flash drive, turn off this player
or change the mode of this player. Neglecting to do so may
cause loss of data. (Depending on the type of USB flash
drives, the access lamp may continue to blink even after
data reading is complete on this player. Wait and confirm the
access lamp of the USB flash drive stopped blinking.)
• Data transfer between this player and USB flash drives is not
available.
• Refer to the instructions of your USB flash drive as well.
53
01_SD-P91SKY_Eng_01-54.indd 53
2008/06/05 15:25:44
01_SD-P91SKY_Eng_01-54.indd 54
2008/06/05 15:25:44
Function Settings
You can change the default settings to customize performance to your preference.
Customizing the function settings
01_SD-P91SKY_Eng_55-80.indd 55
2008/06/05 15:23:45
Customizing the function settings
DVD-V
VCD
CD
You can change the default settings to customize
performance to your preference.
4 Change the selection by
/ or
other buttons, by referring to the
corresponding pages 58 , then press
ENTER.
1 Press SETUP during stop.
The setting menu appears.
To change other settings, press
2 to 4.
2 Press
/ to select the icon of the
setting (listed below) to change, then
press .
5 Press SETUP.
The setting menu disappears, and the procedure
finishes.
Function Settings
3 Press
/ to select the setting you
want to change, then press ENTER.
Icon
Language
Setting
OSD Menu
, then repeat steps
DVD-V
VCD
CD
Subtitle
DVD-V
VCD
CD
Details
To select a preferred language for on-screen
displays.
To select a preferred language for subtitles.
Audio
DVD-V
VCD
CD
To select a preferred language for the sound track.
DVD menu
DVD-V
VCD
CD
To select a preferred language for disc menus.
DivX subtitle
Disc
—
To select the font for subtitles of the DivX file.
56
01_SD-P91SKY_Eng_55-80.indd 56
2008/06/05 15:23:45
Video
Audio
Default
DVD-V
VCD
CD
View Mode
DVD-V
VCD
CD
E.A.M.
DVD-V
VCD
CD
You can easily switch to a preferred audio
enhancement. (E.A.M. = Enhanced Audio Mode)
D.R.C.
DVD-V
VCD
CD
To turn on or off a function that makes faint sounds
easier to hear even if you lower the volume during
late hours playback. (D.R.C. = Dynamic Range
Control)
Digital Out
DVD-V
VCD
CD
To select an output sound format corresponding to
your system connection.
Parental control
DVD-V
VCD
CD
To turn the parental lock function on or off.
PBC
DVD-V
VCD
CD
To use the menu screen when playing a PBCcontrollable VIDEO CD.
Screen saver
DVD-V
VCD
CD
To turn the screen saver on or off.
Default
DivX Registration
—
—
To select a picture size according to the aspect ratio
of your TV, when connected to this player to monitor
playback picture.
To select a picture size of the LCD.
Function Settings
Rating
Aspect Ratio
To restore all settings to the factory set.
To display information about DivX.
57
01_SD-P91SKY_Eng_55-80.indd 57
2008/06/05 15:23:45
Customizing the function settings (continued)
Language
OSD Menu
Audio
DVD-V
VCD
CD
English: To view on-screen displays in English.
Subtitle
DVD-V
VCD
VCD
CD
English: To play sound tracks in English.
Note
• Some DVD video discs may be played in a different language
than you selected. A prior language may be programmed on
the disc.
CD
English: To display subtitles in English.
To display no subtitles.
Off:
Function Settings
DVD-V
Notes
• Some DVD video discs may be set to display subtitles
in a different language than you selected. A prior subtitle
language may be programmed on the disc.
• Some DVD video discs allow you to change subtitle
selections only via the disc menu. If this is the case, press
the MENU button and choose the appropriate subtitle
language from the selection on the disc menu.
DVD Menu
DVD-V
VCD
CD
English: To display disc menus in English.
Note
• Some DVD video discs may not include your preselected
language. In this case, the player automatically displays disc
menus consistent with the disc’s initial language setting.
58
01_SD-P91SKY_Eng_55-80.indd 58
2008/06/05 15:23:45
DivX subtitle
Western European: To display subtitles in west
European language.
Central European: To display subtitles in Central
Cyrillic:
European language.
To display subtitles in Slavonic
Cyrillic language.
Video
Aspect Ratio
DVD-V
VCD
CD
4:3 : Select when a standard 4:3 TV is connected.
16:9 : Select when a 16:9 wide TV is connected.
01_SD-P91SKY_Eng_55-80.indd 59
View Mode
DVD-V
VCD
CD
Fill:
Pictures are expanded horizontally and
vertically to fit the shape of the screen. No
picture cropping.
Original: Pictures are displayed in their original
aspect ratios.
Auto Fit: Aspect ratios are automatically adjusted.
Masking bars may appear on the top and
bottom or left and right of picture.
Pan Scan: Pictures are cropped horizontally or
vertically to fit the shape of the screen.
Note
• Actual views may depends on disc content or the TV.
You may occasionally change the setting to your preference.
Function Settings
Notes
• Some DVD video discs may be set to display subtitles
in a different language than you selected. A prior subtitle
language may be programmed on the disc.
• Some DVD video discs allow you to change subtitle
selections only via the disc menu. If this is the case, press
the MENU button and choose the appropriate subtitle
language from the selection on the disc menu.
Notes
• The displayable picture size is preset on the DVD video disc.
Therefore, the playback picture of some DVD video discs
may not conform to the picture size you select.
• When you play DVD video discs recorded in the 4:3 picture
size only, the playback picture always appears in the 4:3
picture size regardless of the TV shape setting.
• If you select “16:9” and you own a 4:3 TV set, the DVD
playback picture will be horizontally distorted during playback.
Images will appear to be horizontally compressed. Always be
sure that your TV shape conforms to the actual TV in use.
59
2008/06/05 15:23:45
Customizing the function settings (continued)
Digital Out
Audio
E.A.M.
DVD-V
VCD
CD
Normal:
Normal sound.
3D:
Function Settings
To obtain expansive virtual surround sound effects from
just two speakers.
Note
• Pressing the E.A.M. button on the remote control also allows
you to achieve the same setup.
D.R.C.
DVD-V
VCD
CD
On :
Dynamic range is reduced.
Off :
DVD-V
VCD
CD
Bitstream:
Select when connected to an amplifier equipped with a
Dolby Digital, DTS, MPEG1 or MPEG2 decoder.
The player outputs digital audio signal in the bitstream
format when you play a DVD video disc recorded in
the Dolby Digital, DTS, MPEG1 or MPEG2 recording
system.
Analog 2ch:
Select when connected to a TV or stereo system via the
analog audio jacks.
PCM:
Select when connected to a 2 channel digital stereo
amplifier.
The player outputs sounds in the PCM 2ch format
when you play a DVD video disc recorded on the Dolby
Digital, MPEG1 or MPEG2 recording system.
Full dynamic range is maintained.
60
Notes
• This function works only during playback of Dolby Digital
recorded discs.
• The level of Dynamic Range Control may differ depending on
the DVD disc.
01_SD-P91SKY_Eng_55-80.indd 60
2008/06/05 15:23:45
3 Press / to select “Parental control” and enter
the password you set then press ENTER.
Rating
Parental control
DVD-V
VCD
CD
To set the parental level
1 Press / / / to select “Parental control” and
then press ENTER.
The password setting display appears.
5 Press / to select the parental level to set and
then press ENTER.
8 : Adult
7 : NC-17
6:R
5 : PG-R
4 : PG-13
3 : PG
2:G
1 : Kid Safe
To change the parental lock level
1 Press
/
to select “Set password”.
2 Press the number buttons to enter the 5-digit
security code then press ENTER.
Follow the step “To set the parental level” to
change the parental level.
Function Settings
DVD video discs equipped with the parental lock
function are rated according to their content. The
contents allowed by a parental lock level and the way a
DVD video disc can be controlled may vary from disc to
disc. For example, if the disc allowed you could edit out
violent scenes unsuitable for children and replace them
with more suitable scenes, or lock out playback of the
disc altogether.
DVD video discs may or may not respond to the parental
lock settings. This is not a defect in the player. Make
sure this function works with your DVD video discs.
4 Press ENTER while selecting “Parental control”.
2 Press the number buttons to create a personal
5-digit security code then press ENTER.
The password sets.
01_SD-P91SKY_Eng_55-80.indd 61
61
2008/06/05 15:23:45
Customizing the function settings (continued)
To change your 5-digit security code
1 After selecting “Set password”, press the 9 button
five times then press ENTER.
The 5-digit security code is cleared.
2 After selecting “Set password”, press the number
buttons to create a new 5-digit security code.
PBC
DVD-V
VCD
Function Settings
No :
To not restore the function settings to their default
settings.
To restore the function settings to their default settings.
To use the menu when playing a PBC-featured VIDEO
CD.
Off :
When playing a VIDEO CD without using the menu.
DVD-V
Default
Yes :
CD
On :
Screen saver
Default
VCD
DivX Registration
The DivX information appears.
Return to “Default” if you press ENTER while it is
displayed.
CD
On :
The screen saver operates.
Off :
The screen saver is disengaged.
62
01_SD-P91SKY_Eng_55-80.indd 62
2008/06/05 15:23:45
Connections
You can connect the player to a TV or audio system.
Viewing on a connected TV
Viewing pictures from connected video equipment
Connecting to audio equipment
Using the automobile/vehicle adapter or power port
To turn the LCD monitor
01_SD-P91SKY_Eng_55-80.indd 63
2008/06/05 15:23:45
Viewing on a connected TV
You can connect a TV to this player to view playback
picture on it.
1 Connect a TV to the AV OUT jack of this
player.
Signal flow
Connections
To AV OUT
Connection to
To video input
this jack
Yellow (Video) VIDEO IN
disables the
LCD of the
player.
White (Left)
Audio/video cable
(supplied)
Notes
• Refer to the owner’s manual of the connected TV as well.
• When you connect the player to your TV, be sure to turn off
the power and unplug both units from the wall outlet before
making any connections.
• Connect the player directly to your TV. If you connect the
player to a VTR, TV/VTR combination or video selector, the
playback picture may be distorted as DVD video discs are
copy protected.
TV
AUDIO IN
L
R
Red (Right)
To analog audio inputs
Setting
Select:
Make the
following setting. “Digital Out” “Analog 2ch”
Page
60
64
01_SD-P91SKY_Eng_55-80.indd 64
2008/06/05 15:23:45
Viewing pictures from connected video equipment
You can use the LCD of this player to monitor pictures of
connected video equipment.
1 Connect video equipment to the AV IN
jack of this player.
2 Press MODE repeatedly so that “
(AV
input)” appears on the LCD.
The player is ready to display pictures of the
connected equipment on the LCD. (AV input mode)
To AV IN
To video output
Yellow (Video)
Video equipment
White (Left)
To analog audio inputs
Red (Right)
Audio/video cable (supplied)
Signal flow
Connections
Notes
• When supplying non-standard signals such as playback
images from a video deck or images from a game player,
some images may be displayed incorrectly.
For example, shooting games, which shoots at a target on
the screen with a light gun, may not work because of the
LCD Colour monitor properties.
• In the external AV input mode (
appears on the screen),
screen saver function/auto power OFF function becomes
ineffective.
65
01_SD-P91SKY_Eng_55-80.indd 65
2008/06/05 15:23:46
Connecting to audio equipment
You can enjoy high quality dynamic sounds by
connecting the player to audio equipment.
Connecting to an AV amplifier (via
digital audio input)
The connecting method depends on the types of audio
input, digital or audio.
Signal flow
Connections
Select the method according to the type of your
equipment.
Caution
• When you connect the player to other equipment, be sure to
turn off the power and unplug all of the equipment from the
wall outlet before making any connections.
• Turn off the amplifier before you connect or disconnect the
player’s power cord. If you leave the amplifier power on, the
speakers may be damaged.
• The output sound of the player has a wide dynamic range.
Be sure to adjust the receiver’s volume to a moderate
listening level. Otherwise, the speakers may be damaged by
a sudden high volume sound.
Notes
• Refer to the owner’s manual of the connected equipment as
well.
• If you place the player near a tuner or radio, the radio
broadcast sound might be distorted. In this case, place the
player away from the tuner and radio.
66
01_SD-P91SKY_Eng_55-80.indd 66
To BITSTREAM/PCM
Coaxial digital
cable
(not supplied)
The following audio systems are
compatible:
· Dolby Digital
· DTS
· MPEG2 audio
· 2 channel digital stereo
AV amplifier
To digital audio input (coaxial)
Make the
following
setting.
Setting
“Digital Out”
Select:
“Bitstream”
or
“PCM”
Page
60
Manufactured under license from Dolby Laboratories. Dolby and the
double-D symbol are trademarks of Dolby Laboratories. Confidential
Unpublished Works. ©1992-1997 Dolby Laboratories, Inc. All rights reserved.
Manufactured under license under U.S. Patent #: 5,451,942 & other
U.S. and worldwide patents issued & pending. DTS and DTS Digital
Out are registered trademarks and the DTS logos and Symbol are
trademarks of DTS, Inc. © 1996-2007 DTS, Inc. All Rights Reserved.
2008/06/05 15:23:46
CAUTION
• When you are connecting (via the BITSTREAM/PCM
jack) an AV decoder that does not have Dolby Digital,
Digital Theater Systems (DTS) or MPEG2 decoding
function, be sure to set “Digital Out” to “PCM” from the
on-screen displays 60 . Otherwise, high volume sound
may damage your hearing as well as the speakers.
• When playing DTS-encoded discs (audio CDs), excessive
noise may be output from the analog audio output
jacks. To avoid possible damage to the audio system,
you should take proper precautions when the analog
audio output jacks of the player are connected to an
amplification system. To enjoy DTS Digital Surround®
playback, an external 5.1 channel DTS Digital Surround®
decoder system must be connected to the BITSTREAM/
PCM jack of the player.
Signal flow
To AV OUT
To analog audio inputs
Red (Right)
AUDIO IN
R
Audio system
L
White (Left)
Audio/video cable
(supplied)
Yellow (Video)
No need to connect.
Setting
Make the
following setting. “Digital Out”
Select:
Page
“Analog 2ch”
60
Connections
Note
• DO NOT connect the BITSTREAM/PCM jack of the player to
the AC-3 RF input of a Dolby Digital Receiver. This input on
your A/V Receiver is reserved for Laserdisc use only and is
incompatible with the BITSTREAM/PCM jack of the player.
Connecting to an audio system equipped
with analog audio inputs
67
01_SD-P91SKY_Eng_55-80.indd 67
2008/06/05 15:23:46
Using the automobile/vehicle adapter or power port
Connections
For use of the DVD player in a car, this adapter can
power the DVD player from the cigarette lighter socket.
WARNING
• NEVER operate the DVD player or view a DVD Video while
operating an automobile or other vehicle. Note: doing so is
illegal in many jurisdictions.
NEVER place a DVD player within the eyesight of a driver
while he/she is driving an automobile/vehicle. Note: A DVD
player located in the front seating section of a vehicle is
illegal in many jurisdictions.
Failure to observe the above instructions could result in the
driver’s inattention to and/or distraction from road hazards.
• NEVER place a DVD player in a location where it could
interfere with the proper deployment and/or performance of
an air bag.
Failure to observe this instruction could result in the
prevention of an air bag to properly and/or effectively deploy.
• Do not use an adapter other than the model supplied, to
power the player. Do not use the supplied vehicle adapter to
power an apparatus other than this player. Neglecting these
may cause smoke, fire or electrical shock to human body.
• This adapter is intended for exclusive use in automobiles/
vehicles with a DC 12V negative ground electrical system.
NEVER use this adapter with a DC 24V configured or a DC
12V positive ground electrical system automobile/vehicle.
Consult your vehicle owner’s manual before using this
adapter.
• ALWAYS use caution when touching the adapter, cigarette
lighter socket or power port. The adapter, lighter socket and
power port may become heated after prolonged use.
• Do not charge the battery pack which is attached to the
DVD player by the adapter. Doing so may cause smoke, fire
or electrical shock to human body. Whenever you use the
adapter, be sure to remove the battery pack from the DVD
player to prevent it being charged by the adapter.
• Do not touch the adapter with wet hands. Do not get liquid on
the adapter.
1
4
OFF
The LED illuminates
when powered.
3
2
68
01_SD-P91SKY_Eng_55-80.indd 68
2008/06/05 15:23:46
1 Be sure to turn off the DVD player then remove
the battery pack from the player.
(Note: Charging the battery pack with the vehicle adapter
may cause smoke, fi re of electrical shock to human body.
ALWAYS remove the battery back before using the vehicle
adapter.)
2 Turn on the vehicle engine so that the cigarette
lighter socket or power port is powered. In some
vehicles the cigarette lighter socket or power port
is powered even when the vehicle’s engine is not
running. It is important that the vehicle owner’s
manual be consulted.
3 Insert the plug of the adapter into the cigarette
lighter socket or power port fully.
4 Insert the pin plug of the adapter into the DC IN
12V jack of the DVD player.
6 When disconnecting the DVD player, first turn off
the DVD player, then remove the adapter pin plug
from the DVD player and then the power plug
from the cigarette lighter socket or power port.
7 Before turning off the vehicle engine or leaving
the vehicle, be sure to turn off the player then
remove the adapter pin plug from the DVD player.
Operating temperature: 5 ~ 35°C (41 ~ 95°F)
Operating humidity: 30 ~ 80%
Storage temperature: -10 ~ 50°C (14 ~ 122°F)
Storage humidity: 20 ~ 80%
Notes
• Before turning on the vehicle engine, remove the power plug
of the adapter from the cigarette lighter socket or power port.
Neglecting this may cause malfunction of the DVD player.
• If the cigarette lighter socket or power port is dirty, be sure
to clean it before connecting the power plug of the adapter.
Dusts or stains of the cigarette lighter socket or power port
may heat the connected plug while operating, and may
damage the adapter.
• Do not leave the adapter in an unoccupied vehicle to avoid
exposing it to unusually high ambient temperatures.
• Before turning off the vehicle engine, first turn off the DVD
player then remove the plug of the adapter from the cigarette
lighter socket or power port. Turning off the vehicle engine
while the DVD player is powered via the adapter may cause
damage to the DVD player.
• When the DVD player is not in use be sure to remove the
adapter power plug from the cigarette lighter socket or power
port and the pin plug from the DVD player.
(Continued)
Connections
5 Turn on the DVD player.
Specification
69
01_SD-P91SKY_Eng_55-80.indd 69
2008/06/05 15:23:46
Connections
Using the automobile/vehicle adapter or power port (continued)
• Do not force the adapter into an incompatible lighter socket
or power port.
• Avoid dropping the adapter or placing heavy objects on it.
Never use the damaged adapter.
• Do not pull the adapter power cord when removing it from a
socket or power port.
Always grasp and pull the body.
Failure to do so could cause damage to and malfunction of
the adapter.
• Do not operate the DVD player using the adapter for a
prolonged period with the car engine off. The car battery may
be too exhausted to turn the engine on.
• Depending on the vehicle model or the location of the
cigarette lighter socket, this adapter may not be applied.
• In some vehicles the cigarette lighter socket is powered even
when the vehicle’s engine is not running. Using the cigarette
lighter socket for power when the engine is not running will
drain the car’s battery.
• Never add any devices to the cigarette lighter socket or
power port to apply the adapter. These may damage the
DVD player or themselves or may cause fire.
• If noises are heard while operating the car radio, etc, remove
the power plug of the adapter from the cigarette lighter
socket or power port.
• If playback pictures are distorted while operating, move the
DVD player away from the adapter.
70
01_SD-P91SKY_Eng_55-80.indd 70
2008/06/05 15:23:46
To turn the LCD monitor
You can turn the LCD monitor 180 degrees.
To put back the LCD monitor
To turn the LCD monitor
1 Open up the LCD monitor vertically.
1 Put the player on a level place such as a desk.
2 While holding the lower side of the player,
turn the LCD monitor slowly 180 degrees to
the direction of “REVERSE” until it clicks.
2 Open up the LCD monitor vertically.
3 While holding the lower side of the player, turn
the LCD monitor slowly 180 degrees to the
direction of “TURN” until it clicks.
Connections
4 Adjust the angle of the LCD monitor.
The LCD monitor can be laid flat at the maximum.
Notes
• The LCD monitor does not turn over 180 degrees or to the
opposite direction. Do not force the LCD monitor to turn over
180 degrees or to the opposite direction. It may damage the
LCD monitor.
• Do not store the player or attach/detach the battery pack with
the screen side up. Otherwise, the LCD monitor will get dust
on the screen or be damaged by an unexpected shock.
71
01_SD-P91SKY_Eng_55-80.indd 71
2008/06/05 15:23:46
01_SD-P91SKY_Eng_55-80.indd 72
2008/06/05 15:23:46
Others
Useful informations.
Output sound conversion table
Before calling service personnel
Specifications
01_SD-P91SKY_Eng_55-80.indd 73
2008/06/05 15:23:46
Output sound conversion table
Audio selection and outputs
Discs
DVD
video discs
VIDEO CDs
AUDIO CDs
Sound recording system
Dolby Digital
48 kHz
96 kHz
DTS
MPEG1, MPEG2
MPEG1
Linear PCM 44.1 kHz
DTS
Linear
PCM
“Bitstream”
“Analog 2ch”
“PCM”
BITSTREAM/PCM Speakers/AV OUT jack/ BITSTREAM/PCM Speakers/AV OUT jack/ BITSTREAM/PCM Speakers/AV OUT jack/
jack
jack
Headphone jacks
jack
Headphone jacks
Headphone jacks
Bitstream
PCM
PCM*
Bitstream
Bitstream
Bitstream
PCM
Bitstream
Yes
Yes
Yes
No
Yes
Yes
Yes
No
Bitstream
No
No
Bitstream
Bitstream
Bitstream
PCM
Bitstream
Yes
Yes
Yes
No
Yes
Yes
Yes
No
PCM
PCM
PCM*
Bitstream
PCM
PCM
PCM
Bitstream
Yes
Yes
Yes
No
Yes
Yes
Yes
No
*PCM: down sampling PCM
Others
• Signals of 88.2 kHz or higher from the BITSTREAM/PCM jack are down converted to 44.1 kHz or 48 kHz when:
– “3D On” is selected.
– a copyright protected disc is played.
• Quantization will be limited to 16 bits in a copyright protected disc.
74
01_SD-P91SKY_Eng_55-80.indd 74
2008/06/05 15:23:46
Before calling service personnel
Check the following guide for the possible cause of a problem before contacting service.
Symptom
No power.
The LCD turned off by
itself.
No picture on the LCD
monitor.
No picture. (Other than
built-in LCD monitor)
No sound.
The playback picture has
occasional distortion.
Cause
• The AC adapter or power plug is
disconnected.
• The battery pack has been removed.
• Battery empty.
• The automatic LCD off function turned
the LCD off.
• The AV OUT jack is connected.
Correction
• Connect the AC adapter or power plug securely.
• The connected TV is not set to receive
DVD signal output.
• The equipment connected via the
audio/video cable is not set to receive
DVD signal output.
• The volume is too low.
• The audio receiver or TV is turned off.
• The setting of output sound format is
incorrect.
• The disc is dirty.
• Player is in fast forward or fast reverse
mode.
• The player was moved or given a
shock.
• Select the appropriate video input mode on the TV so the picture from
the player appears on the TV screen.
• Select the correct input mode of the audio receiver so you can listen
to the sound from the player.
• When you use the LCD of the player, unplug the AV OUT jack.
• Adjust the volume by turning the volume control.
• Turn on the equipment connected with the audio/video cable.
• Select the proper audio setting.
• Eject the disc and clean it.
• Sometimes a small amount of picture distortion may appear. This is
not a malfunction.
• Vibrating or shaking the player during playback may produce
distortion. This is not a malfunction. If not restored to usual status, stop
playback and start again.
• Remove the disc and set it again.
• Connect the player directly to the TV. Avoid connecting the player to a
VTR or TV/VTR combination.
Others
• The disc is not set firmly.
Brightness is unstable or • The effect of copy protection. If you
noises are present in the
connect the player to a VTR, TV/VTR
playback pictures. (Other
combination or video selector, the
than built-in LCD monitor) playback picture may be distorted as
DVD video discs are copy protected.
• Install the battery pack.
• Re-charge the battery.
• Turn on the player again.
75
01_SD-P91SKY_Eng_55-80.indd 75
2008/06/05 15:23:46
Before calling service personnel (continued)
Symptom
The player does not start
playback.
Playback does not follow
the course of the disc’s
program.
Buttons do not work.
This player does not
display the files stored
on a USB flash drive
connected.
Others
The remote control does
not work properly.
Cause
• No disc is inserted.
• An unplayable disc is inserted.
• The disc is inserted upside down.
• The disc is not inserted securely.
• The disc is dirty.
• The parental lock function is set.
• The player is set to the external input
mode (AV input).
• It is in the repeat playback mode,
memory playback, etc.
• Power supply fluctuations or other
abnormalities such as static electricity
may interrupt correct operation.
”
• The mode of this player is set to “
or “
”.
• This player does not recognize a USB
flash drive connected.
• The remote control is not pointed at
the remote sensor of the player.
• The remote control is too far from the
player.
• The batteries in the remote control are
exhausted.
Correction
• Insert a disc.
• Insert a playable disc. (Check the disc type, colour system and region
number.)
• Insert the disc with the playback side down.
• Insert the disc securely in the disc holder.
• Clean the disc.
• Cancel the parental lock function or change the parental lock level.
• To play a disc with the player, Normal needs to be set. Press MODE
repeatedly so that you can view playback picture.
• These operations may prevent a proper progression of the contents.
• Turn the power on or off with the POWER switch. Or disconnect the
power cord and insert it into the wall outlet again.
• Change the mode of this player to “
”.
• Use a USB flash drive that this player supports.
• Point the remote control at the remote sensor of the player.
• Operate the remote control within about 3 m (9.9 feet).
• Replace the batteries with new ones.
• The player’s remote sensor is exposed • Avoid the player from being exposed to a strong light source.
to a strong light source such as direct
sunlight or other illumination.
76
01_SD-P91SKY_Eng_55-80.indd 76
2008/06/05 15:23:47
Specifications
Player
Power supply
DC 12 V (Rated current : 2 A (Maximum: during battery
pack charging))
100 – 240 V AC, 50/60 Hz (with the supplied AC adapter)
Mass
approximately 1.35 kg
External dimensions
267 × 34 × 167 mm (W/H/D)
Signal system
PAL/3.58NTSC
Laser
Semiconductor laser, wavelength 650 nm / 795 nm
Frequency range
DVD linear sound :
48 kHz sampling 4 Hz to 22 kHz
96 kHz sampling 4 Hz to 44 kHz
Operating conditions
Temperature: 5°C to 35°C (41°F to 95°F)
Operation status: Horizontal
Connectors
AV output (AV OUT)
ø3.5mm mini jack × 1
Video: 1.0 V (p-p), 75Ω, negative sync.,
Audio: 2.0 V (rms), 100Ω
AV input (AV IN)
ø3.5mm mini jack × 1
Video: 1.0 V (p-p), 75Ω, negative sync.,
Audio: 2.0 V (rms), 10kΩ
Audio output (BITSTREAM/PCM)
Coaxial digital terminal (ø3.5mm) × 1
USB interface
USB port × 1
Headphone terminal
ø3.5mm stereo mini jack × 2
Others
77
01_SD-P91SKY_Eng_55-80.indd 77
2008/06/05 15:23:47
Specifications (continued)
Liquid crystal display
Panel size
22.8 cm (9 inches diagonally measured)
Projection system
TN colour transmission
Driving system
Amorphous silicon TFT active matrix
Resolution
640 (H) × 220 (V) pixels (effective pixel rate :
more than 99.99%)
Supplied accessories
Audio/video cable..............................................................1
Remote control (MEDR16UX)..........................................1
Coin-shaped battery (CR2025).......................................1
AC adapter (ADPV16A).....................................................1
Power cord.........................................................................1
Battery pack (SD-PBP91E)................................................1
Vehicle adapter (MEDC01AX)...........................................1
Headphones......................................................................1
Carrying case....................................................................1
Owner’s Manual ................................................................1
• This model complies with the specifications.
• Designs and specifications are subject to change without
notice.
• This model may not be compatible with features and/or
Others
specifications that may be added in the future.
78
01_SD-P91SKY_Eng_55-80.indd 78
2008/06/05 15:23:47
Others
79
01_SD-P91SKY_Eng_55-80.indd 79
2008/06/05 15:23:47
© 2008 Toshiba Corporation
01_SD-P91SKY_Eng_55-80.indd 80
Printed in China
2008/06/05 15:23:47