1
TEC Electronic Cash Register
MA-1595-1 SERIES
Owner's Manual
“This Class A digital apparatus meets all requirements of the Canadian InterferenceCausing Equipment Regulations.”
“Cet appareil numérique de la classe A respecte toutes les exigences du Règlement sur le
matériel brouilleur du Canada.”
FCC Notice
This equipment has been tested and found to comply with the limits for a Class A digital
device, pursuant to Part 15 of the FCC Rules. These limits are designed to provide
reasonable protection against harmful interference when the equipment is operated in a
commercial environment. This equipment generates, uses, and can radiate radio frequency
energy and, if not installed and used in accordance with the instruction manual, may cause
harmful interference to radio communications. Operation of this equipment in a residential
area is likely to cause harmful interference in which case the user will be required to
correct the interference at his own expense.
Changes or modifications not expressly approved by manufacturer for compliance could
void the user’s authority to operate the equipment.
CAUTION!
1. This manual may not be copied in whole or in part without prior written permission of
TOSHIBA TEC.
2. The contents of this manual may be changed without notification.
3. Please refer to your local Authorised Service representative with regard to any queries
you may have in this manual.
Copyright © 2003
by TOSHIBA TEC CORPORATION
All Rights Reserved
570 Ohito, Izunokuni-shi, Shizuoka-ken, JAPAN
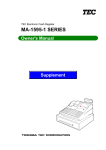
Safety Summary
EO1-11152
Safety Summary
Personal safety in handling or maintaining the equipment is extremely important. Warnings and Cautions
necessary for safe handling are included in this manual. All warnings and cautions contained in this manual
should be read and understood before handling or maintaining the equipment.
Do not attempt to effect repairs or modifications to this equipment. If a fault occurs that cannot be rectified
using the procedures described in this manual, turn off the power, unplug the machine, then contact your
authorized TOSHIBA TEC representative for assistance.
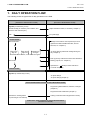
Meanings of Each Symbol
This symbol indicates warning items (including cautions).
Specific warning contents are drawn inside the symbol.
(The symbol on the left indicates a general caution.)
This symbol indicates prohibited actions (prohibited items).
Specific prohibited contents are drawn inside or near the symbol.
(The symbol on the left indicates “no disassembling”.)
This symbol indicates actions which must be performed.
Specific instructions are drawn inside or near the symbol.
(The symbol on the left indicates “disconnect the power cord plug from the outlet”.)
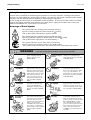
WARNING
Prohibited
Prohibited
Prohibited
Disconnect
the plug.
This indicates that there is the risk of death or serious injury if the
machines are improperly handled contrary to this indication.
Do not plug in or unplug the
power cord plug with wet
hands as this may cause
electric shock.
Any other than the
specified AC voltage is
prohibited.
If the machines share the same
outlet with any other electrical
appliances that consume large
amounts of power, the voltage
will fluctuate widely each time
these appliances operate. Be
sure to provide an exclusive
outlet for the machine as this
may cause fire or electric
shock.
Do not insert or drop metal,
flammable or other foreign
objects into the machines
through the ventilation slits, as
this may cause fire or electric
shock.
Prohibited
Prohibited
If the machines are dropped or
their cabinets damaged, first
turn off the power switches and
disconnect the power cord
plugs from the outlet, and then
contact your authorized
TOSHIBA TEC representative
for assistance. Continued use
of the machine in that condition
may cause fire or electric
shock.
Disconnect
the plug.
(i)
Do not use voltages other than the
voltage (AC) specified on the
rating plate, as this may cause fire
or electric shock.
Do not place metal objects or
water-filled containers such as
flower vases, flower pots or mugs,
etc. on top of the machines. If
metal objects or spilled liquid enter
the machines, this may cause fire
or electric shock.
Do not scratch, damage or modify
the power cords. Also, do not
place heavy objects on, pull on, or
excessively bend the cords, as this
may cause fire or electric shock.
Continued use of the machines in
an abnormal condition such as
when the machines are producing
smoke or strange smells may cause
fire or electric shock. In these
cases, immediately turn off the
power switches and disconnect the
power cord plugs from the outlet.
Then, contact your authorized
TOSHIBA TEC representative for
assistance.
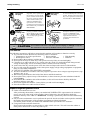
Safety Summary
Disconnect
the plug.
Connect a
grounding wire.
EO1-11152
If foreign objects (metal
fragments, water, liquids) enter
the machines, first turn off the
power switches and disconnect
the power cord plugs from the
outlet, and then contact your
authorized TOSHIBA TEC
representative for assistance.
Continued use of the machine in
that condition may cause fire or
electric shock.
Disconnect
the plug.
Ensure that the equipment is
properly grounded. Extension
cables should also be grounded.
Fire or electric shock could
occur on improperly grounded
equipment.
No
disassembling.
When unplugging the power cords,
be sure to hold and pull on the plug
portion. Pulling on the cord portion
may cut or expose the internal wires
and cause fire or electric shock.
Do not remove covers, repair or
modify the machine by yourself.
You may be injured by high
voltage, very hot parts or sharp
edges inside the machine.
Unauthorized modification is
prohibited.
indicates that there is the risk of personal Injury or damage to objects if
CAUTION This
the machines are improperly handled contrary to this indication.
Precautions
The following precautions will help to ensure that this machine will continue to function correctly.
Try to avoid locations that have the following adverse conditions:
* Temperatures out of the specification
* Direct sunlight
* High humidity
* Shared power source
* Excessive vibration
* Dust/Gas
Do not subject the machine to sudden shocks.
Do not press the keys too hard. Keys will operate correctly if they are touched lightly.
Clean the cover and keyboard, etc. by wiping with a dry cloth or a cloth soaked with detergent and
wrung out thoroughly. Never use thinner or other volatile solvent for cleaning.
At the end of the day, turn the power OFF, then clean and inspect the exterior of the machine.
Try to avoid using this equipment on the same power supply as high voltage equipment or equipment
likely to cause mains interference.
USE ONLY TOSHIBA TEC SPECIFIED consumables.
DO NOT STORE the consumables where they might be exposed to direct sunlight, high temperatures, high
humidity, dust, or gas.
When moving the machine, take hold of the drawer and lift the machine.
Do not place heavy objects on top of the machines, as these items may become unbalanced and fall
causing injury.
Do not block the ventilation slits of the machines, as this will cause heat to build up inside the
machines and may cause fire.
Do not lean against the machine. It may fall on you and could cause injury.
Place the machine on a stable and level surface.
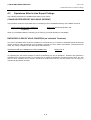
Request Regarding Maintenance
Utilize our maintenance services.
After purchasing the machine, contact your authorized TOSHIBA TEC representative for assistance
once a year to have the inside of the machine cleaned. Otherwise, dust will build up inside the
machines and may cause a fire or a malfunction. Cleaning is particularly effective before humid rainy
seasons.
Our preventive maintenance service performs the periodic checks and other work required to maintain
the quality and performance of the machines, preventing accidents beforehand.
For details, please consult your authorized TOSHIBA TEC representative for assistance.
Using insecticides and other chemicals
Do not expose the machines to insecticides or other volatile solvents. This will cause the cabinet or
other parts to deteriorate or cause the paint to peel.
(ii)
1. STAND-ALONE LEVEL
OPERATOR’S GUIDE
EO1-11152
MA-1595-1 SERIES
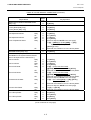
TABLE OF CONTENTS
Page
1. TO OUR CUSTOMERS-------------------------------------------------------------------------------- 1- 1
2. ACCESSORIES------------------------------------------------------------------------------------------ 1- 1
3. APPEARANCE AND NOMENCLATURE--------------------------------------------------------- 3- 1
4. MODE LOCK AND MODE SELECTOR KEYS ------------------------------------------------- 4- 1
4.1
4.2
Mode Lock--------------------------------------------------------------------------------------------------4- 1
Mode Selector Keys--------------------------------------------------------------------------------------4- 1
5. DISPLAY--------------------------------------------------------------------------------------------------- 5- 1
5.1
5.2
5.3
Upper Row (16-digit dot windows) --------------------------------------------------------------------5- 2
Lower Row (10-digit 7-segment Numeric Display) ------------------------------------------------5- 4
Display Indicator ------------------------------------------------------------------------------------------5- 4
6. OUTLINE OF PREPARATION PROCEDURE BEFORE OPERATING THE ECR ---- 6- 1
6.1
Installing/Replacing the Receipt/Journal Roll ------------------------------------------------------6- 2
7. CASHIER SIGNING OR CASHIER KEY OPERATIONS------------------------------------- 7- 1
7.1
7.2
7.3
Cashier Code Entry --------------------------------------------------------------------------------------7- 1
Cashier Key Method ([CLK] Keys) -------------------------------------------------------------------7- 3
Training Mode Start and End --------------------------------------------------------------------------7- 4
8. KEYBOARD LAYOUT --------------------------------------------------------------------------------- 8- 1
9. FUNCTIONS OF EACH KEY------------------------------------------------------------------------- 9- 1
10. REGISTERING PROCEDURE AND PRINT FORMAT-------------------------------------- 10- 1
10.1
10.2
10.3
10.4
10.5
10.6
10.7
10.8
10.9
10.10
10.11
10.12
10.13
10.14
10.15
10.16
10.17
Receipt-Issue/Non-Issue Selection --------------------------------------------------------------- 10- 2
Store Message Display ------------------------------------------------------------------------------ 10- 2
No-Sale-------------------------------------------------------------------------------------------------- 10- 3
Loan------------------------------------------------------------------------------------------------------ 10- 3
Department Entry ------------------------------------------------------------------------------------- 10- 4
Gasoline Entry ----------------------------------------------------------------------------------------- 10- 4
PLU Entry (Manual PLU Code Entry) ------------------------------------------------------------ 10- 5
PLU Entry through Barcode Scanner ------------------------------------------------------------ 10- 5
Cigarette and Alcoholic Beverage Entry
(Entry of Sales Item Restricted by Age Limit) ------------------------------------------------- 10- 5
Repeat Entry ------------------------------------------------------------------------------------------- 10- 6
Quantity Extension (Multiplication) for DEPTs/PLUs ----------------------------------------- 10- 7
Split Package Pricing -------------------------------------------------------------------------------- 10- 7
HI-CONE PLUs --------------------------------------------------------------------------------------------------10- 9
Mix & Match (M & M) Function of Split-Price PLUs ------------------------------------------ 10-11
Price Shift Entry for Split-Price PLUs------------------------------------------------------------ 10-12
Triple Multiplication ---------------------------------------------------------------------------------- 10-14
Single-Item Department or Single-Item PLU Entry------------------------------------------- 10-15
EO1-11152
MA-1595-1 SERIES
Page
10.18
10.19
10.20
10.21
10.22
10.23
10.24
10.25
10.26
10.27
10.28
10.29
10.30
10.31
10.32
10.33
10.34
10.35
10.36
10.37
10.38
10.39
10.40
10.41
10.42
10.43
10.44
10.45
10.46
10.47
10.48
10.49
10.50
10.51
10.52
10.53
10.54
10.55
10.56
10.57
10.58
10.59
10.60
10.61
10.62
10.63
10.64
10.65
10.66
10.67
HASH Department Entry, HASH PLU Entry --------------------------------------------------- 10-15
Sub-Link Department Entry------------------------------------------------------------------------ 10-15
Sub-Link PLU Entry --------------------------------------------------------------------------------- 10-16
Urgent PLU Maintenance -------------------------------------------------------------------------- 10-16
Returned Merchandise ----------------------------------------------------------------------------- 10-17
Bottle Return ------------------------------------------------------------------------------------------ 10-17
Dollar Discount --------------------------------------------------------------------------------------- 10-18
Percent Discount, Percent Charge -------------------------------------------------------------- 10-18
Store Coupon ----------------------------------------------------------------------------------------- 10-18
Vendor Coupon--------------------------------------------------------------------------------------- 10-19
Item Correct ------------------------------------------------------------------------------------------- 10-19
Void ----------------------------------------------------------------------------------------------------- 10-20
All Void ------------------------------------------------------------------------------------------------- 10-20
Non-Add Number Print ----------------------------------------------------------------------------- 10-20
Scale Entry -------------------------------------------------------------------------------------------- 10-21
Listing Capacity Open ------------------------------------------------------------------------------ 10-22
Selective Itemizer (SI) Status Modification----------------------------------------------------- 10-22
Tax Status or Food Stamp Status Modification ----------------------------------------------- 10-23
Manual Tax Entry ------------------------------------------------------------------------------------ 10-23
Subtotal (Sale Total Pre-taxed) Read ----------------------------------------------------------- 10-23
Taxable Total (Sale Total With Taxes) Read-------------------------------------------------- 10-23
Taxable Total Read and Subtotal Print --------------------------------------------------------- 10-23
Selective Itemizer (SI) Total Read --------------------------------------------------------------- 10-24
PLU Preset Price Read----------------------------------------------------------------------------- 10-24
Tax Calculation and Print -------------------------------------------------------------------------- 10-24
Tax Exemption---------------------------------------------------------------------------------------- 10-25
Food Stampable Total Read, Food Stamp Tendering -------------------------------------- 10-25
Sale Finalization by Media Keys ----------------------------------------------------------------- 10-26
Multi-Tendering--------------------------------------------------------------------------------------- 10-27
Split Tendering --------------------------------------------------------------------------------------- 10-27
Sale Finalization by EFT (Electronic Fund Transfer) ---------------------------------------- 10-28
Check Cashing (No-sale cashing of a non-cash media)------------------------------------ 10-54
Sale Paid in Foreign Currencies------------------------------------------------------------------ 10-54
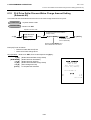
No-Sale Exchange from Foreign Currency to Domestic Currency ----------------------- 10-55
No-Sale Exchange from Domestic Currency to Foreign Currency ----------------------- 10-55
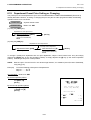
Received-on-Account ------------------------------------------------------------------------------- 10-56
Paid-Out------------------------------------------------------------------------------------------------ 10-56
Salesperson Entry (Salesperson Sign-ON)---------------------------------------------------- 10-57
Hold & Recall ----------------------------------------------------------------------------------------- 10-57
Credit Card No. Check------------------------------------------------------------------------------ 10-58
Receipt Post-Issue----------------------------------------------------------------------------------- 10-58
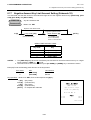
Charge Posting: Previous Balance Manual Entry Type------------------------------------- 10-59
Charge Posting: Customer File Type (Check Track Memory Option) ------------------- 10-61
Function Key Entry ---------------------------------------------------------------------------------- 10-63
Endorsement Print ----------------------------------------------------------------------------------- 10-63
Comment Print---------------------------------------------------------------------------------------- 10-64
Sale Finalization by EBT (Electronic Benefit Transfer)-------------------------------------- 10-65
Validation Print --------------------------------------------------------------------------------------- 10-66
Remote Slip Printer (hardware option) Operation -------------------------------------------- 10-67
When a Power Failure Occurs… ----------------------------------------------------------------- 10-69
EO1-11152
MA-1595-1 SERIES
Page
11. JOURNAL AND RECEIPT PAPER-END DETECTOR-------------------------------------- 11- 1
12. ECR PRINTER MOTOR LOCK DETECTOR -------------------------------------------------- 11- 1
13. REMOTE SLIP PRINTER MOTOR LOCK DETECTOR ------------------------------------ 13- 1
14. PRINTER HEAD OPEN DETECTOR ------------------------------------------------------------ 13- 1
15. GENERAL MAINTENANCE------------------------------------------------------------------------ 15- 1
15.1
15.2
15.3
15.4
15.5
15.6
15.7
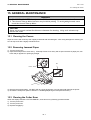
Cleaning the Covers---------------------------------------------------------------------------------- 15- 1
Removing Jammed Paper -------------------------------------------------------------------------- 15- 1
Clearing the Cutter Error ---------------------------------------------------------------------------- 15- 1
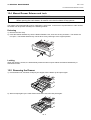
Manual Drawer Release and Lock---------------------------------------------------------------- 15- 2
Removing the Drawer-------------------------------------------------------------------------------- 15- 2
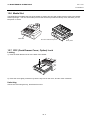
Media Slot ---------------------------------------------------------------------------------------------- 15- 3
CDC (Cash Drawer Cover; Option) Lock-------------------------------------------------------- 15- 3
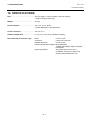
16. SPECIFICATIONS ------------------------------------------------------------------------------------ 16- 1
1. TO OUR CUSTOMERS
EO1-11152
1. TO OUR CUSTOMERS
1. TO OUR CUSTOMERS
Thank you for choosing the TEC electronic cash register MA-1595 series. This instruction manual provides a
description of the functions and handling of this ECR and should be read carefully to ensure optimum
performance. Since every consideration has been given to safety and reliability, there is no danger of damaging
the machine by incorrect operation.
Please refer to this manual whenever you have any questions concerning the machine. This machine has been
manufactured under strict quality control and should give you full satisfaction. However, if the machine is
damaged during transport or there are any unclear points in this manual, please contact your local TOSHIBA
TEC representative.
• The specifications described in this manual may be modified by TOSHIBA TEC, if necessary.
• Be sure to keep this manual for future reference.
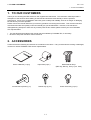
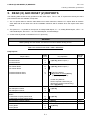
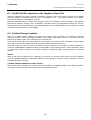
2. ACCESSORIES
Confirm that all the following accessories are contained in the carton. If any accessories are missing or damaged,
contact our nearest TOSHIBA TEC service representative.
REGMA S
Owner’s Manual (1 copy)
Journal Take-up Reel (1 pc.)
Paper Roll (2 pcs.)
Drawer Key (2 pcs.)
1- 1
Mode Selector Keys
(REG key, MA key, S key: 2 pcs. each)
Printer Cover Key (2 pcs.)
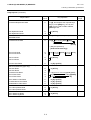
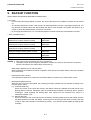
3. APPEARANCE AND NOMENCLATURE
EO1-11152
3. APPEARANCE AND NOMENCLATURE
3. APPEARANCE AND NOMENCLATURE
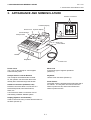
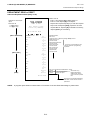
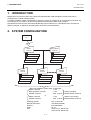
Interface Connectors
Customer Display
Printer Cover Operator Display
Journal Window
COM3 COM2 COM1
Receipt Outlet
Mode Lock
Power Switch
Drawer
Keyboard
Power Cord
Printer Cover
The cover for the Receipt or Journal paper
holder and the printer.
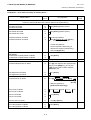
Mode Lock
It selects the type of register operations.
(Section 4)
Receipt Outlet or Journal Window
The receipt for the finalized sale is issued.
Or, the operator can see which items have
already been entered through this window.
Keyboard
Used to enter sale items (Section 8)
Power Switch
The power switch is provided at the right-hand side of
the cabinet. The AC power is turned on when the
switch is pushed to ON, and turned off when the
switch is pushed to OFF.
Interface Connectors (RS-232C, LAN)
RS-232C connectors allow a connection of a
Remote Slip Printer, Bar Code Scanner,
Scale, etc.
LAN connectors allow a connection of a PC
and building of Master-Satellite system.
Display (Operator and Customer)
Used to confirm the entry contents and the status of
the ECR. (Section 5)
3- 1
4. MODE LOCK AND MODE SELECTOR KEYS
EO1-11152
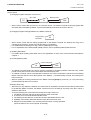
4.1 Mode Lock
4. MODE LOCK AND MODE SELECTOR KEYS
4.1 Mode Lock
X
(POSITION)
MGR
SET
REG
Z
REG
Key
SET
REG
MA
Key
X
MGR
Z
(FUNCTION)
In this position, the ECR will allow programming
operations.
(LOCK position) The register operations are
locked when the Mode Lock is in this position.
Meanwhile, the Display Message and the current
time are displayed.
Normal cash register operations are carried out in
this mode. However, the operations requiring a
Manager Intervention cannot be performed in this
mode.
The sale totals in memory can be read and the
programmed data can be verified in this position.
This position allows to register all normal cash
register operations to be carried out in the “REG”
mode and the operations requiring a Manager
Intervention.
This is the “Negative Mode” which automatically
processes all the entries in the reverse way, i.e.
positive items into negative, and the negative into
positive. It is usually used to return or cancel all
the items once purchased in a sale in the “REG”
or “MGR” mode.
All the resettable totals and their respective
counters in memory will be read and reset in this
position.
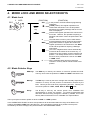
4.2 Mode Selector Keys
The REG Key is used by the cashier or clerk who operates the ECR.
This key can access the positions of LOCK and REG of the Mode Lock.
MA Key:
The MA Key is used by the store manager who will daily supervise the
collection of money and the printout of transactions recorded by the
ECR. This key is also used when programming the ECR. This key can
access the positions of SET, LOCK, REG, X, MGR, - and Z.
S Key:
The S Key is used by the service person from TOSHIBA TEC
representative to access any position. To prevent programmed data
and sales data from being changed or cleared by mistake, do not use
this key without instructions of our TOSHIBA TEC representative.
S
MA
REG
REG Key:
The keys may be inserted or pulled out at the “LOCK” or “REG” position.
In the OPERATOR’S GUIDE, functions and operations will be described within the range of the Mode Lock
positions of LOCK and REG using the REG key. Since operations requiring other positions and keys are
controlled by the store manager, they are described in the MANAGER’S GUIDE.
4- 1
5. DISPLAY
EO1-11152
5. DISPLAY
5. DISPLAY
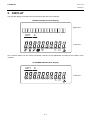
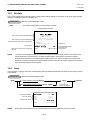
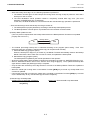
The operator display is located at the top of the ECR just above the keyboard.
OPERATOR DISPLAY (Front Display)
Upper Row
DPT
X
Lower Row
(( ))
TL ST
The customer display can be moved horizontally, and thus is fully adjustable according to the position of the
customer.
CUSTOMER DISPLAY (Rear Display)
DPT
X
Lower Row
TL ST
5- 1
5. DISPLAY
EO1-11152
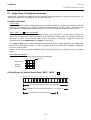
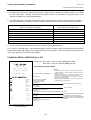
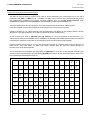
5.1 Upper Row (16-digit dot windows)
5.1 Upper Row (16-digit dot windows)
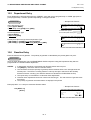
Alphanumeric characters are displayed here as messages, sale item descriptors, prompts for the operator, etc.
depending on the Mode Lock position and the operation sequence.
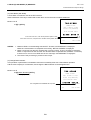
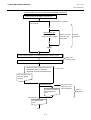
(1) Mode Indications
“LOCK” Mode
If the display store message is preprogrammed, the message is displayed. Whether the message scrolls with
maximum 64 characters or non-scrolls with maximum 16 characters is a program option. At the same time
the current time is displayed in the lowest 5 digits of the Lower Row (example: 14-52 for the time 14:52).
“REG”, “MGR”, or “ - ” Mode Initial Display
The message “LOG” is displayed in the lowest 3 digits of the Upper Row. It means that the cashier has
signed OFF or signed OUT and thus the ECR is not operable for sales entries. (This display indication is
applicable only when the Cashier Code Entry method is selected.) A Sign-ON or Sign-IN is expected to
operate through the [LOG/RECEIPT] (or [LOG]) key in this case.
In the REG or MGR mode, a store message (described as the store message displayed in the LOCK mode
above) can be displayed when there is no key-in operation takes place in 30 seconds. Whether it is displayed
or not is a program option.
Whether or not a store message is displayed during cashier key ON status or cashier sign-ON is a program
option.
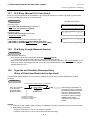
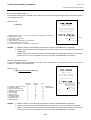
Other Mode Initial Display
The mode symbol of 1 character is displayed in the lowest digit:
4
3
2
1
SET Mode:
P
X Mode:
X
Z Mode:
Z
Digit No.
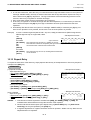
(2) Digit Range for Various Sales Items (“REG”, “MGR”, “ - ”)
16 15 14 13 12 11 10
9
8
7
6
5
4
3
Department/PLU Mane (max. 16 characters)
Customer File Name (Check Track) (max. 16 characters)
Transaction Item Name (max. 12)
5- 2
2
1
5. DISPLAY
EO1-11152
5.1 Upper Row (16-digit dot windows)
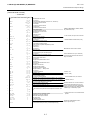
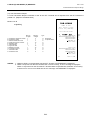
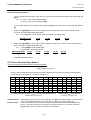
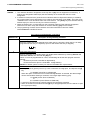
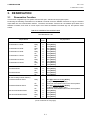
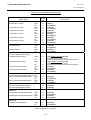
(3) Error Messages (in any mode except “LOCK”)
When an error occurs, an error message (programmable) is displayed, with an error buzzer generated (a long
tone).
16 15 14 13 12 11 10 9 8 7 6 5 4 3 2 1
XX XXXX XX XX XXXX XX
Error Message (max. 16)
Read the Error Message, depress the [C] key to cancel the error status and tone, operate the sequence again
after removing the cause of the error.
The following table shows the cause of the error.
If the error status cannot be cancelled or an error message not listed in the table below is displayed, please
contact your nearest TOSHIBA TEC representative.
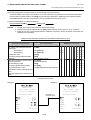
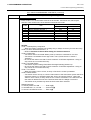
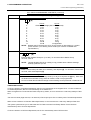
ERROR MESSAGE TABLE
Error Message
(Standard Setting)
OPERATION ERROR
MANAGER REQUIRED
CLOSE DRAWER
COMPULSORY CODE
COMP DEPOSIT
SCALE REQUIRED
SCALE OUT
PC COMM ERROR
CODE ERROR
PROGRAM ERROR
CALL MANAGER
DRAWER LIMIT
LINK PLU ERROR
COMPULSORY SLIP
CDV ERROR
COMP CHECK NO.
X/Z IN PROGRESS
ALREADY RESERVED
UNDER AGE
COMP QUANTITY
PIN ERROR
NO RESPONS
RECEIPT REQUIRED
RESPONS NG
MISC ERROR
PAPER END
HEAD OPEN ERROR
Cause of the Error
Key Sequence or Operation Procedure Error
The operation requires a Manager Intervention.
The drawer must be closed before the operation.
No code has been entered where it is compulsory.
Sub-link Department is compulsory, but not yet entered.
The [SCALE] key has not been depressed where required.
The scale is malfunctioning.
File Receive Error (when a PC is connected).
An undefined code has been entered, or the entered code has already been
defined.
An additional entry of new PLU or new customer file is not acceptable,
because the memory of each table is full.
The card is not acceptable as a result of Negative Card checking.
A media pick up operation is now required.
PLU linkage error such as when a sub-link PLU is not programmed in the LinkPLU Table.
The operation requires a endorsement print.
Check Digit Value Error
Performing the negative card check is necessary before finalizing a sale by a
media key which has the compulsory status of the negative card check.
Read/Reset operation is unavailable during the consolidation of the
communication buffer by PC (or master terminal).
Read/Reset/Reserve operation was attempted when reset data remained in
the communication buffer. (in case of the program option to prohibit rewriting
reset data in the communication buffer)
Underage person has attempted to buy cigarette or alcoholic beverage.
Quantity Entry Compulsion Error (when this compulsion status is programmed
to a PLU item).
EFT Pin Pad Error
Time-out condition on the EFT terminal
Entry of new sale transaction is attempted before issuing the store receipt.
Communication error between the ECR and the EFT terminal.
Other errors
Paper is out.
Print head remains open.
5- 3
5. DISPLAY
EO1-11152
5.2 Lower Row (10-digit 7-segment Numeric Display)
ERROR MESSAGE TABLE (continued)
Error Message
(Standard Setting)
CUTTER ERROR
SLIP OFF LINE
SLIP PAPER OUT
VALIDATION CMP
RETURN PROHIBIT
Cause of the Error
Cutter home position is misaligned.
Slip Printer is in off line status.
No slip paper is set.
The operation requires a Validation Print.
Return entry with the [EBT CASH] or [EBT F/S] key is prohibited by the
system option setting.
It is recommended to prepare a copy of the above table, and place it near the ECR.
5.2 Lower Row (10-digit 7-segment Numeric Display)
(1) Numeric Display
AMOUNT (7 digits)
DPT (2 digits)
X (1 digit)
Displays the numeric data, such as amount, quantity, etc.
When the amount is negative, the symbol “ - ” is displayed as well.
NOTE: When the following codes are being entered, the digits for “RPT” and “DPT”
may be used as well (all 10 digits). On exceeding the 10 digits, the lowest 10
digits are being displayed.
PLU Code (max. 13 digits as option)
Non-add Number (max. 18 digits)
Customer File No. (max. 12 digits)
Displays the Department Code of the department item just entered. The department
name is also displayed in the Upper Row. It stays lit when repeating the same
department item entry.
When a PLU is entered, PLU name is displayed in the Upper Row.
Displays the repeat count of the same Department or PLU item. The count is indicated
from the second entry on, and only the lowest digit of the repeat count will be displayed
even when the count exceeds nine (such as “0” for 10, “1” for 11, etc.)
5.3 Display Indicator
R OFF: Lights up when the Receipt-OFF mode is declared by the [LOG/RECEIPT] (or
[RECEIPT]) key. In this condition, no receipts will be issued for a sale to be entered. It goes out
by depressing the [LOG/RECEIPT] (or [RECEIPT]) key again for Receipt-ON mode.
SIGN ON: This lamp turns lit only when the Cashier Code Entry method is selected. It lights up
when a cashier has signed ON or signed IN. It goes out when the cashier has signed OFF or
signed OUT, and the message “LOG” is displayed in the Upper Row instead.
IN-LINE: It is used when the ECR is used as a terminal in a Master-Satellite system. When the
ECR is used as a stand-alone machine, this lamp is not used.
SLIP: Flickers when the program option “endorsement compulsory” or “slip print compulsory” has
been selected. This lamp does not light up even when a slip is set to the slip printer.
(( ))
ALM: Lights up with the alarm buzzer generated to indicate that the last operation or numeric
entry was an error. To clear the error status, depress the [C] key.
TL
TL: Lights up on a finalizing operation with the total amount displayed when the sale is finalized
without any amount tendered.
ST
ST: Lights up when the [ST] key is depressed, indicating that the displayed amount is subtotal.
The lamp is also illuminated when the [TXBL TL] or [FSTL TEND] key is depressed, indicating
that the displayed amount is the taxable total or food-stampable total. It also lights up when the
amount tendered is less than the sale total with the shortage amount (balance due) is displayed.
CG: When an amount tendering operation is performed, it lights up with the change due
displayed.
5- 4
6. OUTLINE OF PREPARATION PROCEDURE BEFORE OPERATING THE ECR
EO1-11152
6. OUTLINE OF PREPARATION PROCEDURE BEFORE OPERATING THE ECR
6. OUTLINE OF PREPARATION PROCEDURE BEFORE
OPERATING THE ECR
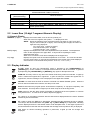
This chapter shows the outline of set-up procedure of the ECR before actually starting the register operation.
WARNING!
Turn the POWER SWITCH to OFF before connecting the power cord.
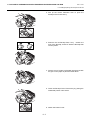
1. Remove the ECR from the carton. And take out all
the parts and accessories.
REGMA S
2. Place the ECR on a stable and level surface, then
remove the tapes and seals for holding parts or
protecting surface of the ECR.
3. Plug the power cord of the ECR into a wall outlet.
Make sure that the outlet voltage matches that of
the power required for the ECR.
REG
X MGR
4. Insert the REG key into the Mode Lock.
Z
SET
REG
X MGR
5. Turn the Mode Lock to the “REG” position with the
power ON.
Z
SET
6- 1
6. OUTLINE OF PREPARATION PROCEDURE BEFORE OPERATING THE ECR
EO1-11152
6.1 Installing/Replacing the Receipt/Journal Roll
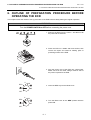
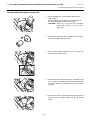
6. Install the Receipt and Journal rolls (referring to the
following section “Installing the Receipt/Journal
Roll”).
6.1 Installing/Replacing the Receipt/Journal Roll
Turn the Mode Lock to the LOCK position using the Mode Selector Key to perform the paper roll installation in
this section.
CAUTION!
Never touch the Cutter Knob. Doing so may cause a CUTTER ERROR.
Cutter Knob
Receipt Printer
NOTE: Paper specification:
Only paper rolled onto a core is acceptable, however, the paper end should not be
pasted to the core.
Installing/Replacing the Receipt Roll
1. To remove the Printer Cover, insert the Printer
Cover Key to the Printer Cover Lock, and then turn it
90° clockwise.
6- 2
6. OUTLINE OF PREPARATION PROCEDURE BEFORE OPERATING THE ECR
EO1-11152
6.1 Installing/Replacing the Receipt/Journal Roll
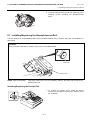
2. Pull up the Printer Release Lever to open the
Receipt Cover Frame Ass’y.
2
1
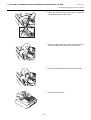
3. Remove the old Receipt Roll, if any. Unstick the
end of the Receipt, and then load the Receipt Roll
into the printer.
4. Pull the end of receipt roll forward until the area with
the glue on the paper is past the Cutter Block.
5. Close the Reciept Cover Frame Ass’y by pusing the
shadowed portion until it clicks.
6. Attach the Printer Cover.
6- 3
6. OUTLINE OF PREPARATION PROCEDURE BEFORE OPERATING THE ECR
EO1-11152
6.1 Installing/Replacing the Receipt/Journal Roll
Installing/Replacing the Journal Roll
1. When installing the Journal Roll for the first time,
skip to Step 3.
When replacing the Journal Roll, cut the paper at
the arrow indicating position in the figure.
CAUTION: Never try to pull out the remaining
paper end by hand. It may cause a
paper jam.
2. Remove the Journal Take-up Reel from the holder,
then pull the paper out of the reel.
3. Pull up the Printer Release Lever to open the
Journal Cover Frame Ass’y.
2
1
4. Remove the old Journal Roll, if any. Unstick the end
of the Journal, and then place the Journal Roll into
the right holder as viewed from the front of the
machine.
5. Pull the end of the Journal Roll until about 8 inches
(about 20 cm) of paper comes out of the journal
outlet.
6- 4
6. OUTLINE OF PREPARATION PROCEDURE BEFORE OPERATING THE ECR
EO1-11152
6.1 Installing/Replacing the Receipt/Journal Roll
6. Close the Journal Cover Frame Ass’y by pushing
the shadowed portion until it clicks.
7. Insert the paper end into the slit of the Take-up Reel
and wind it around the reel twice or three times.
8. Set the Journal Take-up Reel into the Reel Holder.
9. Attach the Printer Cover.
6- 5
7. CASHIER SIGNING OR CASHIER KEY OPERATIONS
EO1-11152
7.1 Cashier Code Entry
7. CASHIER SIGNING OR CASHIER KEY OPERATIONS
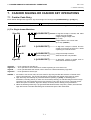
7.1 Cashier Code Entry
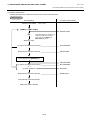
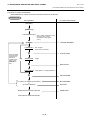
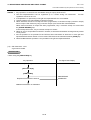
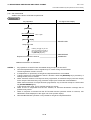
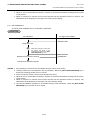
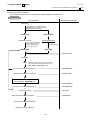
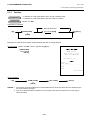
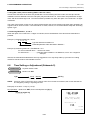
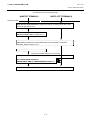
Each cashier will sign-ON, sign-OFF, sign-IN, and sign-OUT through the [LOG/RECEIPT] (or [LOG]) key.
OPERATION: Mode Lock: REG (or, MGR or “ - “ with Manager Intervention)
([LOG/RECEIPT] = [LOG])
(1) For Single-drawer Machines
Sign-ON
Sign-OUT
Sign-IN
[LOG/RECEIPT]
A Sign-ON receipt is issued, and sales
entries are now possible.
2-digit manager-assign code
(01 to 99)
2-digit cashier’s own secret code
(01 to 99) (NOTE 1)
9 [LOG/RECEIPT]
A Sign-OUT receipt is issued, and the
cashier must leave the ECR for a while
expecting to come back soon.
[LOG/RECEIPT]
(same as Sign-ON)
Sign-OFF
0 [LOG/RECEIPT]
A Sign-IN receipt is issued.
Sales entries are now possible.
A Sign-OFF receipt is issued, and no
sales entries will be accepted.
Sign-ON..........to be operated to start the job.
Sign-OUT........to be operated to leave the ECR for a while expecting to come back soon.
Sign-IN............to be operated when the cashier comes back from a break declared by Sign-OUT.
Sign-OFF........to be operated to end the job.
NOTES: 1. As cashier’s own secret code, the code used for Sign-ON just after the issuance of cashier reset
report is programmed. The secret code will be cleared when the cashier reset report is output.
2. Sign-OUT may automatically be performed without operating “9 [LOG]” on finalizing each
transaction, including Check (or other non-cash media) Cashing, No-sale Exchange from/to Foreign
Currencies, No-sale, Received-on-Account, Paid-Out, Loan, Pick Up if so set by a program option.
When this option is selected, Sign-IN is always necessary before starting every transaction.
3. When the finalizing media key is programmed with Endorsement Compulsory status, the automatic
Sign-OUT will be executed after taking the endorsement print of the media data.
7- 1
7. CASHIER SIGNING OR CASHIER KEY OPERATIONS
EO1-11152
7.1 Cashier Code Entry
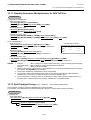
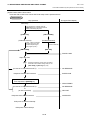
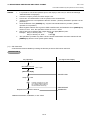
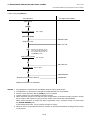
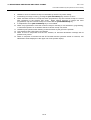
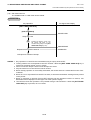
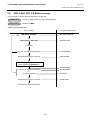
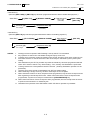
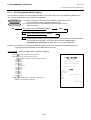
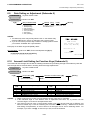
(2) For Multi-drawer Machines
Sign-ON
[@/FOR]
[LOG/RECEIPT]
2-digit manager-assign code (01 to 99)
2-digit cashier’s own secret code (01 to 99)
1 or 2 as Drawer No.
By entering a Drawer No., the designated drawer will open on finalizing each sale by that cashier. It will cause an
error if a Drawer No. already used by another cashier is entered.
Sign-OUT
Sign-IN
Sign-OFF
Same as those for Single-drawer Machines.
NOTES: 1. A maximum of 2 different cashiers may sign-ON on a Multi-drawer Machine at the same time. To
allow more than one cashier’s Sign-ON, the first cashier(s) must sign-OFF before the next cashier
signs ON. Accordingly, only the cashier being signed ON or IN can sign OUT or OFF.
2. When the Drawer No. entry and the [@/FOR] key are skipped in a Sign-ON, the drawers will
automatically be assigned to the cashiers from the smaller No. to the larger.
3. Performing Sign-OFF automatically cancels the designation of the drawer. Therefore, at the next
opportunity to perform Sign-ON, the designation of another drawer is available. Performing SignOUT cannot cancel the designation of the drawer.
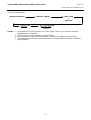
(3) Mode Changes With Signing Operations
When Signed-ON or Signed-IN:
The Mode Lock position changes are allowed within “LOCK”, “REG”, “MGR”, and “ - ”. Changing to any other
position will be an error.
When Signed-OUT:
The Mode Lock may be turned to any position. However, cashier reports of the cashier being signed OUT
cannot be taken in the “X” or “Z” position.
When Signed-OFF:
The Mode Lock may be turned to any position. Therefore, it is best for the cashier (or all the cashiers on a
Multi-drawer Machine) to sign-OFF before the Mode Lock is turned to the “LOCK”, “X”, “Z”, or “SET” position.
7- 2
7. CASHIER SIGNING OR CASHIER KEY OPERATIONS
EO1-11152
7.2 Cashier Key Method ([CLK] Keys)
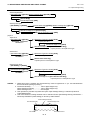
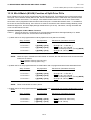
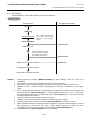
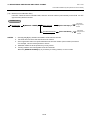
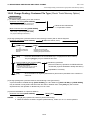
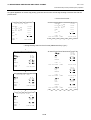
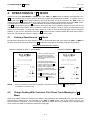
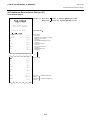
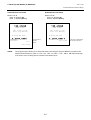
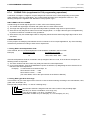
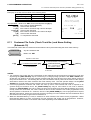
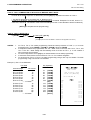
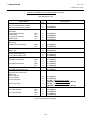
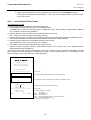
-- SIGNING OPERATION RECEIPT PRINT FORMAT SAMPLES --
TEC STORE
1343 PEACH DRIVE
PHONE: 87-6437
TEC STORE
1343 PEACH DRIVE
PHONE: 87-6437
Open 8:00am to 7:00pm
Closed: every Wednesday
TEC STORE
1343 PEACH DRIVE
PHONE: 87-6437
08-29-2003 FRI #3001
Open 8:00am to 7:00pm
Closed: every Wednesday
TEC STORE
1343 PEACH DRIVE
PHONE: 87-6437
08-29-2003 FRI #3001
∗∗SIGN
Open 8:00am to 7:00pm
ON
∗∗
Closed: every Wednesday
JONES
∗∗SIGN
JONES
0084 15:21TM
08-29-2003 FRI
∗∗SIGN
JONES
Open 8:00am to 7:00pm
OUT
∗∗
Closed: every Wednesday
0085 15:23TM
08-29-2003 FRI
#3001
∗∗SIGN
∗∗
OFF
JONES
0087 15:23TM
IN
#3001
∗∗
0086 15:23TM
NOTE: A program option provides a selection not to print nor issue receipts on any signing operation.
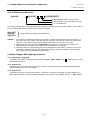
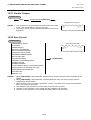
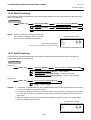
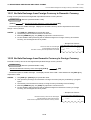
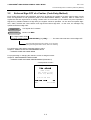
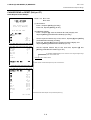
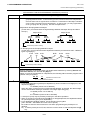
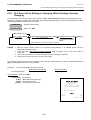
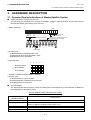
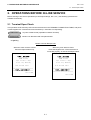
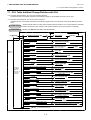
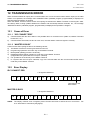
7.2 Cashier Key Method ([CLK] Keys)
When the [LOG/RECEIPT] (or [LOG]) key is not installed, [CLK] keys ([CLK 1] to [CLK 8]; max. 8 keys) may be
provided on the ECR keyboard.
Sale entries will be possible only when one of the [CLK] keys is depressed (in “REG”, “MGR”, or “ - ” mode).
When the same [CLK] key is again depressed, the cashier is in Sign-OFF status.
A program option provides a selection to display or not display the cashier code (1 to 8) of the cashier being
Sign-ON condition at the “DPT” digit on the Lower Row of the Operator Display.
The multi-drawer feature may be taken with the [CLK] keys. In this case, each of the drawers is assigned to the
cashier of the following keys.
Drawer 1 to [CLK 1]
Drawer 2 to [CLK 2] to [CLK 8]
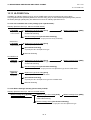
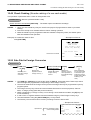
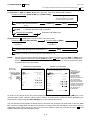
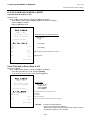
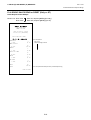
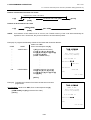
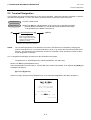
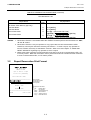
-- Cashier ID Print on Sale Receipts -On every sale receipt (issued in “REG”, “MGR”, or “ - ” mode), the name of the cashier who has operated the
entries of the sale is printed. The cashier name is programmable corresponding to each Cashier Key No. (under
the CASHIER KEY METHOD) or manager-assign cashier code (under the CASHIER CODE ENTRY METHOD).
TEC STORE
1343 PEACH DRIVE
PHONE: 87-6437
Open 8:00am to 7:00pm
Closed: every Wednesday
08-29-2003 FRI
DP01
DP02
CASH
ITEM
JONES
#3001
$3.00
$1.30
$4.30
2
0089 15:25TM
Cashier’s Name
7- 3
7. CASHIER SIGNING OR CASHIER KEY OPERATIONS
EO1-11152
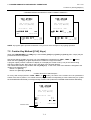
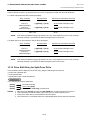
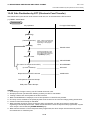
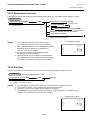
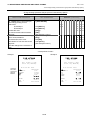
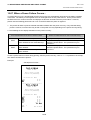
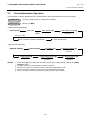
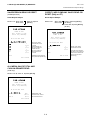
7.3 Training Mode Start and End
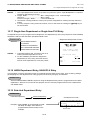
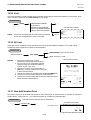
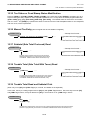
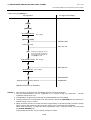
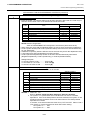
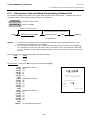
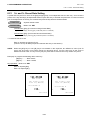
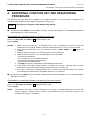
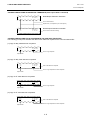
7.3 Training Mode Start and End
When you have newly employed cashiers, you may provide some time for them to train their skills of operating
the ECR. You are to start and end the Training Mode. Once entering the Training Mode, a cashier may operate
just as ordinary sale entry operations in “REG” and “MGR” modes except Sign-ON/OFF entry and check track
operation. The data in the Training Mode are processed into the training cashier memory but not affect any
actual sales data in business.
CONDITION
Outside a sale, and in Cashier Signed-OFF condition for CASHIER CODE ENTRY Method
OPERATION FOR TRAINING MODES START
Cashier Code Entry Method
[LOG/RECEIPT] (or [LOG]) .................................... A training-ON receipt is issued.
2-digit manager-assign code of a cashier with Training status (01 to 99)
2-digit cashier’s secret code (01 to 99)
Cashier Key Method
Case 1: Set the Cashier Key programmed with Training status .... A training-ON receipt is not issued.
Case 2: 99
[LOG/RECEIPT] (or [LOG]) ......................... A training-ON receipt is issued.
(In Cashier Code and Name Setting, cashier
code 99 should be programmed as training
status ON beforehand.)
Fixed to 99 for training purposes.
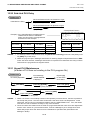
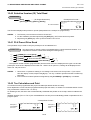
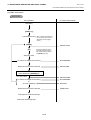
ENTRIES IN TRAINING MODE
Registering operations are allowed by the trainees:
All sale or transaction entry operations are possible in the Training Mode,
except: 1) The drawer will not open.
2) The Consecutive No. on the receipt will not be incremented.
3) When performing an Endorsement print or a Validation print, spaces are printed. (i.e. Printing
operation is performed but nothing is printed.)
4) Print occurs on receipt but not journal.
5) The Remote Slip Printer prints a slip.
OPERATION FOR TRAINING MODE END
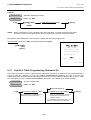
Code Entry Method, and Cashier Key Method Case 2
0
[LOG/RECEIPT] (or [LOG]) .................................... A training-OFF receipt is issued in both
cases.
Cashier Key Method Case 1
Change from the current Cashier Key to another Cashier Key.
Now the ECR is in a Signed-OFF condition. You may turn the Mode Lock to any position for its corresponding
operations. To start sale entries, a Cashier Key to ON status or a cashier’s Sign-ON status is again necessary.
7- 4
7. CASHIER SIGNING OR CASHIER KEY OPERATIONS
EO1-11152
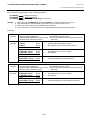
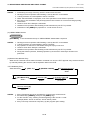
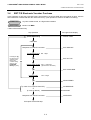
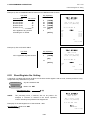
7.3 Training Mode Start and End
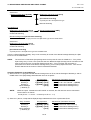
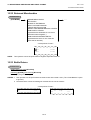
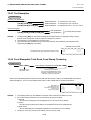
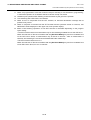
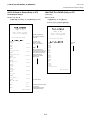
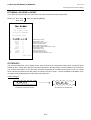
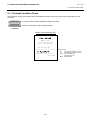
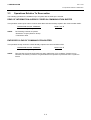
-- Training Mode Receipt Format -Training Start (Training Sign-ON) Receipt
08-29-2003 FRI
Training End (Training Sign-OFF) Receipt
#3001
08-29-2003 FRI
∗∗TRAINING
∗∗ ON
BROWN
∗∗
∗∗
Receipt issued in Training Mode
#3001
∗∗TRAINING
∗∗ OFF
∗∗
∗∗
0109 11:06TM
BROWN
08-29-2003 FRI
Training Mode Header
#3001
∗∗TRAINING
Tomato
VEGETABLE
CASH
∗∗
$1.00TF
$2.30T
$2.30
ITEM
2
∗∗TRAINING
∗∗
BROWN
0109 11:07TM
7- 5
Entry Contents
0109 11:07TM
8. KEYBOARD LAYOUT
EO1-11152
8. KEYBOARD LAYOUT
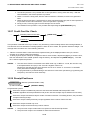
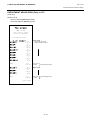
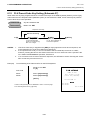
8. KEYBOARD LAYOUT
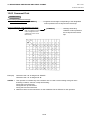
The following are typical keyboard layouts for the MA-1595 series. Since this series is designed to be capable of
programming most of the keys to be placed in the desired place on the keyboard, these are merely examples.
The keyboard of your ECR should have its own layout according to the store’s requirements.
-- Ordinary Keyboard Type (US Standard) -LOG/
RECEIPT
NS
RECEIPT
ISSUE
ALL
VOID
PO
CUR
DOLL
DISC
R/A
RTN
MDSE
%-
EX
VOID
READ
ITEM
CORR
PLU
HOLD/
RECALL
TX1/M
TX2/M
#
RF
C
7
4
1
0
JF
1
6
11
16
21
26
2
7
12
17
22
27
3
8
13
`8
23
28
4
9
14
19
24
29
5
10
15
20
25
30
@/FOR
8
5
2
00
9
6
3
•
ST
AT/TL
CHECK
Chg
CREDIT
1
Other keys not placed in the keyboard above:
Additional Department Keys (31 to 60)
[000] (Triple-zero Key)
[VND CPN]
[STR CPN]
[BTL RTN]
[%+]
[%-] (%III) to [%-] (%VI)
[MISC TEND]
[CREDIT 2]
[PR OPEN]
[LC OPEN]
[OPEN]
PLU Preset-code Keys
[TXBL TL]
[TAX]
[PICK UP BAL] (or [PB+])
[CODE OPEN] (or [PB-])
[TRF]
[SI1/M], [SI2/M]
[SI1/TL] to [SI4/TL]
[AMT]
[RPT]
[SCALE]
[TARE]
[CARD No.]
[FS/M]
[TX3/M], [TX4/M]
[FSTL/TEND]
[CUR 2] to [CUR 5]
[LOG]
[SALES PERSON]
[CHK No.]
[DP#]
[CARD CHK]
[PLU ADD]
[RECEIPT]
[VALIDATE]
[COMMENT]
[CLK 1] to [CLK 8]
[FUNCTION 1] to [FUNCTION 10]
[3rd PRICE]
8- 1
[TARE 2]
[TARE 3]
[PRINT]
[PACK]
[ID]
[DISPLAY 1] to [DISPLAY 6] for
the EBT (Electronic Benefit
Transfer) Spec.
[DEBIT]
[MANUAL CARD#]
[OFFLINE AUTH]
[STORE RECEIPT]
for the EFT
[POST AUTH]
(Electronic
[EBT CASH]
Fund Transfer)
[EBT F/S]
Spec.
[VOUCHER AUTH]
[BALANCE INQUIRY]
[RELOAD]
[GIFT CARD BALANCE]
[GIFT CARD CASH OUT]
8. KEYBOARD LAYOUT
EO1-11152
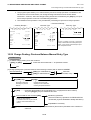
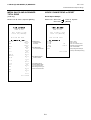
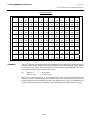
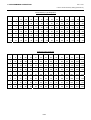
8. KEYBOARD LAYOUT
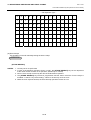
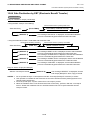
-- Flat Keyboard Type (US Standard) --
1
9
17
25
33
41
49
57
1
9
2
10
18
26
34
42
50
58
2
10
3
11
19
27
35
43
51
59
3
11
4
12
20
28
36
44
52
60
4
12
5
13
21
29
37
45
53
61
5
13
6
14
22
30
38
46
54
62
6
14
7
15
23
31
39
47
55
63
7
15
8
16
24
32
40
48
56
64
8
16
PLU Preset-code keys
LOG/
RECEIPT
RF
JF
NS
EX
RECEIPT
ISSUE
#
DOLL
DISC
%-
TX1/M
ALL
VOID
PO
HOLD/
RECALL
READ
TX2/M
CUR
R/A
C
@/FOR
CREDIT
1
RTN
MDSE
7
8
9
Chg
VOID
4
5
6
CHECK
ITEM
CORR
1
2
3
ST
PLU
0
00
•
AT/TL
Department
keys
Other keys not placed in the keyboard above:
Additional Department Keys (17 to 60)
[000] (Triple-zero Key)
[VND CPN]
[STR CPN]
[BTL RTN]
[%+]
[%-] (%III) to [%-] (%VI)
[MISC TEND]
[CREDIT 2]
[PR OPEN]
[LC OPEN]
[OPEN]
[TXBL TL]
[TAX]
[PICK UP BAL] (or [PB+])
[CODE OPEN] (or [PB-])
[TRF]
[SI1/M], [SI2/M]
[SI1/TL] to [SI4/TL]
[AMT]
[RPT]
[SCALE]
[TARE]
[CARD No.]
[FS/M]
[TX3/M], [TX4/M]
[FSTL/TEND]
[CUR 2] to [CUR 5]
[LOG]
[SALES PERSON]
[CHK No.]
[DP#]
[CARD CHK]
[PLU ADD]
[RECEIPT]
[COMMENT]
[VALIDATE]
[CLK 1] to [CLK 8]
[FUNCTION 1] to [FUNCTION 10]
[3rd PRICE]
[TARE 2]
8- 2
[TARE 3]
[PRINT]
[PACK]
[ID]
[DISPLAY 1] to [DISPLAY 6] for
the EBT (Electronic Benefit
Transfer) Spec.
[DEBIT]
[MANUAL CARD#]
[OFFLINE AUTH]
[STORE RECEIPT]
for the EFT
[POST AUTH]
(Electronic
[EBT CASH]
Fund Transfer)
[EBT F/S]
Spec.
[VOUCHER AUTH]
[BALANCE INQUIRY]
[RELOAD]
[GIFT CARD BALANCE]
[GIFT CARD CASH OUT]
9. FUNCTIONS OF EACH KEY
EO1-11152
9. FUNCTIONS OF EACH KEY
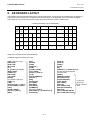
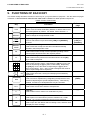
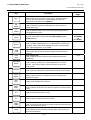
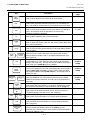
9. FUNCTIONS OF EACH KEY
This section briefly describes functions of each key for your quick reference purposes. See the reference pages
in Section 10: REGISTERING PROCEDURE AND PRINT FORMAT for detail operation sequences.
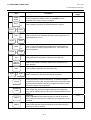
TABLE OF KEY FUNCTIONS
Key
Functions
LOG key
Used in case of Cashier Code Entry Method, to declare start or end
of normal operation by cashier. For details, refer to Section 7.1.
Receipt key
Used to change the receipt-ON/OFF mode.
LOG
RECEIPT
Log/Receipt key
This is a dual-function key that has both [LOG] and [RECEIPT]
functions.
LOG
RECEIPT
RECEIPT
ISSUE
RF
JF
7
4
1
0
1
8
5
2
00
9
6
3
•
to
DP#
PLU
C
#
NS
60
Receipt Post-Issue key
Used to issue the receipt of a sale when the sale has already
finalized in the Receipt-OFF mode.
Receipt Feed key
Used to advance the receipt roll and operated by holding it down
until the paper has advanced to the required position.
Journal Feed key
Used to advance the journal roll in the same fashion as the [RF]
key is used to receipt roll.
Numeric keys
Used to enter numeric values. Depressing the [00] key once is the
same as depressing the [0] key twice consecutively. Depressing
the [000] key once is the same as depressing the [0] key three
times consecutively. The [ . ] key is used to designate the decimal
point of a percentage rate or a quantity.
Department keys
Used to enter each item, serving for classifying merchandise by
department.
Department No. key
Used to access a department by designating the department code,
instead of depressing the specific Department key. With this key
installed, a maximum of 99 departments may be controlled.
PLU (Price Look Up) key
Used to enter a PLU that is linked to a department.
Clear key
Used to clear numeric entries or a declaration key entry.
Non-add Number Print key
Used to print a non-add number (such as Customer No., Credit
Card No., etc.) on the receipt and journal for future reference.
No-sale key
Used to open the cash drawer without relating a sale, and also used
to display the store message.
9- 1
Reference
page
7-1
10-2
See pages for
[LOG] and
[RECEIPT]
10-38
-----
-----
-----
10-4
See pages for
[DEPT]
10-5
-----
10-20
10-2, 3
9. FUNCTIONS OF EACH KEY
EO1-11152
9. FUNCTIONS OF EACH KEY
Key
AMT
PR
OPEN
LC
OPEN
OPEN
@/FOR
VND
CPN
STR
CPN
READ
COMMENT
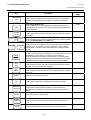
Functions
Amount key
Used to enter a manual amount of PLU item. And also used to
enter an amount or price for an open department when the
department is accessed by the [DP#] key.
Preset Open key
Used to release a preset-price department or PLU items for a
manual price entry.
Listing Capacity Open key
Used to release the high or low amount limit preprogrammed on
each department or PLU.
Preset and Listing Capacity Open key
This is a dual-function key that has both [PR OPEN] and [LC
OPEN] functions.
AT-FOR (Quantity Extension and Split Package Pricing) key
Used to multiply a department, PLU, or Bottle Return item entry by
a quantity. Also used to auto-calculate and enter a split-package
price, triple multiplication, or HI-CONE.
Vendor Coupon key
Used to enter the amount of vendor coupons received from the
customer.
Store Coupon key
Used to subtract a store coupon amount redeemed through a
department.
PLU Price-Read key
Used to read the preset price of the designated PLU from the
memory. Also used to read the amount and the name of the
customer file.
Comment Print key
Used to print the respective programmed comments on the receipt.
Reference
page
10-4, 5
10-4, 5
10-22
See pages for
[PR OPEN]
and
[LC OPEN].
10-7
10-19
10-18
10-24
10-64
Returned Merchandise key
Used to refund money to a customer who has returned items
already purchased.
Bottle Return key
Used to enter a bottle return amount.
10-17
10-18
%+
Dollar Discount key
Used to subtract an amount from the sale such as a discount during
a sale.
Percent Charge key
Used to add a percent rate to a sale.
Percent Discount key
Used to subtract a percent rate from a sale.
10-18
%−
Item Correct key
Used to remove the last item from the bill, printing a line through the
item on the receipt and journal.
Void key
Used to delete an item entered previously (before the last item) in
the current transaction.
10-19
RTN
MDSE
BTL
RTN
DOLL
DISC
ITEM
CORR
VOID
9- 2
10-17
10-18
10-20
9. FUNCTIONS OF EACH KEY
EO1-11152
9. FUNCTIONS OF EACH KEY
Key
Functions
All Void key
Used to cancel all the items entered in the current sale.
ALL
VOID
Received-on-Account key
Used to enter payments received on account, i.e. not relating to a
sale. Also used for change reserve amounts loaned from the store.
Paid-Out key
Used to record amounts paid out of the cash drawer not relating to
a sale. Also used for Pick Up operations, such as money
collections for banking purposes.
Subtotal key
Used to obtain subtotal of the current transaction.
R/A
PO
ST
TXBL
TL
AT/TL
CHK
TND
or
CHECK
TEND
Chg
MISC
TEND
CREDIT
2
CREDIT
1
CARD
No.
CHECK
No.
PB+
or
PB-
TRF
PICK UP
BAL
Taxable Total key
Used to obtain the taxable total (the sale total including taxes due)
of the current transaction.
Cash Amount Tendered/Cash Total key
Used to record all cash paid transactions, and will be able to finalize
a sale operation.
Check key
This is one of non-cash media keys, and used to cash a check
when the ECR is outside a sale, or to finalize the transaction as a
check payment.
Charge key
This is another non-cash media key, and usually programmed as
“Charge Sale Total” key. This key can also be used for payments in
credit cards, if the [CARD No.] key is installed.
Miscellaneous Media key
This is one of additional non-cash media keys that may be installed
besides [CHK TND] and [Chg]. This key has the same functions
and programmabilities as the [CHK TND] key, and usually used as
Tender-only key.
Credit 1 & 2 keys
These are additional non-cash media keys that may be installed
besides those already described, according to the requirements of
each store.
Card No. key
Used to enter the code number (1 to 12) which classifies the credit
card company followed by the sale finalization with the [Chg] key.
Check No. and Endorsement Print key
Used to print the endorsement data with or without a Check No.
print after finalizing a sale with a non-cash media key.
Previous Balance keys
Used to enter a previous balance in a charge posting operation.
Transfer key
Used to transfer the entire balance in a charge posting operation
with no payment.
Pick Up Balance key
This key should be installed in place of the [PB+] key if the
“Customer File” (Check Track) memory option is selected instead of
the “Manual PB Entry” type.
9- 3
Reference
page
10-20
10-3, 56
10-56,
3-1 (MG)
10-23
10-23
10-26
10-26
See pages for
[CHECK
TEND]
See pages for
[CHECK
TEND]
See pages for
[CHECK
TEND]
10-26
10-63, 67
10-59
10-59
10-61
9. FUNCTIONS OF EACH KEY
EO1-11152
9. FUNCTIONS OF EACH KEY
Key
Functions
Customer File Code Open key
This key should be installed in place of the [PB-] key if the
“Customer File” memory option is selected.
SI (Selective Itemizer) Total key
Used to display (and print) the selective itemizer contents.
CODE
OPEN
SI/TL
Reference
page
10-61
10-24
or:
SI1/TL
to
SI4/TL
SI/M
or:
SI1/M
10-22
SI2/M
TX/M
or:
TX1/M to
Tax Modifier key(s)
Used to reverse the taxable/non-taxable status on departments,
PLUs, or other tax-status programmable keys. Also used in Tax
Exempt operations.
10-23, 25
TX4/M
EX
SALES
PERSON
RPT
CUR
1
SI (Selective Itemizer) Modifier key
Used to reverse the SI (Selective Itemizer) status programmed on
each Department or PLU.
to
SCALE
TARE
TARE 2
TARE 3
CUR
5
Tax Exempt key
Used to declare the exemption of the taxes from the sale.
10-25
Salesperson key
Used to record sales contribution data of each salesperson for
report purpose.
Repeat key
Used to repeat a department or PLU item entry.
10-57
Foreign Currency keys
Used in tendering or exchange with foreign currencies.
10-55
Scale key
This key is used for various scaled items. To enable to register
weight data from the scale, only the Departments programmed with
the Scale-Allowed status or the PLUs programmed with the ScaleCompulsory status may be operated.
Tare key
Used to enter the preset tare weight data prior to a scaled item
entry, thus to subtract tare from the gross weight and obtain the net
weight.
Tare 2 key
Used to calculate the net weight using the % rate set in the PLU
table or the input rate when the scaled item (for Department, PLU)
is entered.
Tare 3 key
Used to enter the tare weight manually when the scaled item (for
Department, PLU) is entered.
10-21
9- 4
10-6
10-21
10-21
10-21
9. FUNCTIONS OF EACH KEY
EO1-11152
9. FUNCTIONS OF EACH KEY
Key
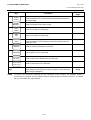
Functions
TAX
FS/M
CARD
CHK
CLK 1
FUNCTION
1
CLK 8
to
to
FUNCTION
10
HOLD
RECALL
PLU
ADD
3rd
PRICE
PACK
ID
VALIDATE
DEBIT
MANUAL
CARD #
OFFLINE
AUTH
Manual Tax key
Used to enter an irregular tax amount that cannot be calculated on
the basis of the programmed tax table, and to add it to the sale
total.
Food Stamp Modifier key
Used to reverse the Food Stampable/Non-stampable status of a
Department, PLU, and other function keys programmable with foodstampable status.
Card Check key
Used to enter the Card No. of the credit card to check if the card is
acceptable.
Cashier 1 to Cashier 8 keys
Used to declare start or end of normal operation by cashier (instead
of using [LOG/RECEIPT] (or [LOG]) key).
Function 1 to Function 10 keys
Used to execute a command of key string preprogrammed on each
of these keys. An operation series of maximum 10 keys can be
programmed on each key, thus eliminating time in daily operation
routines.
HOLD/RECALL key
In case a customer is slow in payment or in endorsement of a check
at finalizing the sale, this key is used to “hold” the sale by
temporarily finalizing the sale, and after wards to “recall” the sale
total of the customer to really finalize it. When the sale is “recalled,”
additional sale items may be entered before the real finalization.
PLU Add key
Used to add a PLU item that has not been programmed in the PLU
table file, to the PLU Additional Table file.
PLU 3rd Price key
Used to perform the dollar discount or the extra charge for a packed
sales item.
Pack key
Used to enter a packed sales item.
Reference
page
10-23
10-23
10-58
7-3
10-63
10-57
10-16
10-12
10-12
ID key
Used to enter a sales item of cigarette or alcoholic beverage.
10-5
Validation key
Used to print a required item or finalize a required sale on a
validation slip. Validation print operation is performed on the slip
printer.
Debit key
This is one of the EFT media keys.
10-66
Manual Card No. key
Used to manually enter a card No. and its expiration date on the
ECR.
Off-line Authority key
Used to finalize the EFT sale transaction on the off-line ECR.
10-30
9- 5
10-29
10-31
9. FUNCTIONS OF EACH KEY
EO1-11152
9. FUNCTIONS OF EACH KEY
Key
POST
AUTH
STORE
RECEIPT
Post Authority key
Used to finalize the EFT sale transaction which was authorized on
the off-line ECR.
Store Receipt key
Used to manually issue a store receipt.
Reference
page
3-3 (MG)
10-32
EBT
CASH
EBT Cash key
This is one of the EFT media keys.
10-33
EBT
F/S
EBT Food Stamp key
This is one of the EFT media keys.
10-35
BALANCE
INQUIRY
Voucher Authority key
Used to finalize the sale transaction on the off-line ECR when the
network is down.
Balance Inquiry key
Used for inquiring the balance to the host.
Reload key
Use to add the fund to a Gift Card.
10-47
RELOAD
GIFT CARD
BALANCE
Gift Card Balance key
Used to inquire the available fund on a Gift Card.
10-50
GIFT CARD
CASH OUT
Gift Card Cash Out key
Used to cash the fund on a Gift Card.
10-51
VOUCHER
AUTH
PLU Preset-code
Keys
NOTE:
Functions
Each of these keys is programmed with a PLU Code. That is,
depressing one of those keys is equal to entering a PLU Code then
depressing the [PLU] key.
3-4 (MG)
3-6 (MG)
See pages for
[PLU]
To perform the operations regarding the EFT (Electronic Fund Transfer), the hardware devise to
connect the EFT terminal and the software setup to realize the EFT function are required. For details,
ask your TOSHIBA TEC representative.
9- 6
10. REGISTERING PROCEDURE AND PRINT FORMAT
EO1-11152
10. REGISTERING PROCEDURE AND PRINT FORMAT
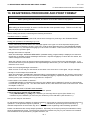
10. REGISTERING PROCEDURE AND PRINT FORMAT
WARNING!
When opening the cash drawer, be careful not to let the drawer hit any person.
CAUTION!
When taking an issued receipt, be sure to confirm that the cutter operation stops. Failure to do this may
cause a paper jam or a printer failure.
Before starting sale entries, read through the following instructions:
TRAINING MODE is available:
If you are a beginner in operating this ECR, ask the store manager for practicing in the TRAINING MODE.
During your operations, the following may occur:
• Errors ...
A tone continuously sounds and an error message appear in the upper row of the Operator Display panel.
The keys on the keyboard are locked. In this case, read the Error Message (refer to the ERROR MESSAGE
TABLE, Section 5.1), and depress the [C] key to cancel the error status. Then remove the cause of the error
and perform the operation again.
• Manager Intervention is required ...
When Error Message “MANAGER REQUIRED” (standard setting; programmable) is displayed, it means that
the last key or operation requires a Manager Intervention. Depress the [C] key to cancel the error status, and
call the manager for intervention.
When the manager comes to intervene with an appropriate key, you may perform the operation again. If you
are informed which keys and operations will require Manager Intervention, you can call the manager in advance
before the error occurs.
• Other errors requiring Manager Intervention ...
When an error occurs and you cannot think of the cause or the same error occurs again, call your manager.
• Receipt or Journal Paper-End is detected ...
When Error Message “PAPER END” (standard setting; programmable) is displayed, the receipt or journal roll is
about to end. In this case, the error cannot be canceled by the [C] key. Replace the paper roll with a new one,
referring to the paper installing/removing operations in Chapter 6.
• Printer Motor-Lock Condition is detected ...
If “PRINTER ERROR” is indicated in the lower row of the display panel (“AMOUNT” portion), the Printer Motor
is locked due to paper jam, etc. Turn the Power Switch to OFF, and remove the cause of the motor-lock. Refer
to Chapters 12 and 13.
CONDITION SETTING TO START SALE ENTRIES
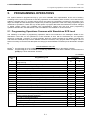
Mode Lock: Insert the “REG” key and set it to the “REG” position.
Cashier Sign-ON or Cashier Key to ON status:
If the [LOG/RECEIPT] (or [LOG]) key is installed, you must sign-ON or sign-IN. (See Section 7.1.)
If Cashier Keys are installed, you must set your cashier key to the ON status. (See Section 7.2.)
Now you are ready for sale entries.
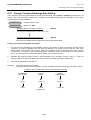
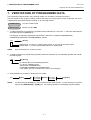
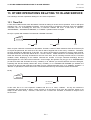
On the following pages are patterns of entering operations, and receipt or journal print format samples due to the
operations. In the operation sequence patterns, “|
|” indicates an input through the numeric keys, “[
]”
indicates a depression of the function key, and “---” indicates other registering and/or finalizing operations.
Please note that these are merely sample operations. Especially, the receipt or journal print indications merely
show the standard print format. The actual print format and contents may vary on your machine in accordance
with the differences in specifications, program selections, etc.
10- 1
10. REGISTERING PROCEDURE AND PRINT FORMAT
EO1-11152
10.1 Receipt-Issue/Non-Issue Selection
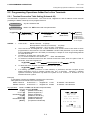
10.1
Receipt-Issue/Non-Issue Selection
Receipts are issued or not issued according to the “R OFF” lamp illuminated/extinguished status on the Operator
Display panel.
“R OFF” (Receipt OFF) Lamp Status Change Operations ([LOG/RECEIPT] = [RECEIPT]).
Mode Lock may be in any position
[LOG/RECEIPT]
Extinguished
[LOG/RECEIPT]
Receipt ON Status
NOTES:
10.2
Illuminated
Receipt OFF Status
1. The “R OFF” lamp status at the starting of a transaction entry decides whether a receipt will be
issued for the transaction or not. Switching the Receipt ON/OFF status during a transaction will
not be effective.
2. If a transaction entered with the “R OFF” lamp illuminated and finalized but a receipt is required,
the [RECEIPT ISSUE] (Post-issue Receipt) key can be operated to issue a receipt.
3. Simply depress the [LOG/RECEIPT] key without a numeric entry. If the key is depressed with a
prior numeric entry in REG mode, it may turn out to be a Sign ON or Sign OFF operation (in case
of Cashier Code Entry Method).
4. Receipt-issue or non-issue cannot be selected after a non-add number print, sales person entry,
comment print, or credit card No. check.
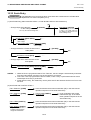
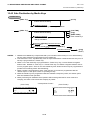
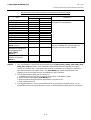
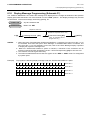
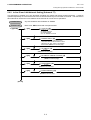
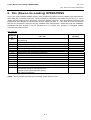
Store Message Display
This operation designates one of the four messages programmed to display in REG or MGR mode when no
entries are under way on the ECR.
OPERATION
(Must be operated outside a sale)
|Display Message Code| [NS]
1 to 4
(corresponding to Line
No.1 to 4 in programming)
NOTE:
This operation is effective when program options “Display Message Method 16 CHARACTERS HELD”
and “Display Message DISPLAY in REG and MGR mode (as well as in LOCK mode)” are both
selected. Display selection in LOCK mode also depends on the line designated in this operation.
10- 2
10. REGISTERING PROCEDURE AND PRINT FORMAT
EO1-11152
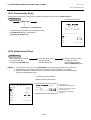
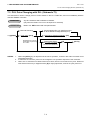
10.3 No-Sale
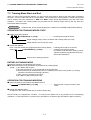
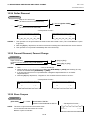
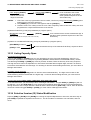
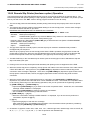
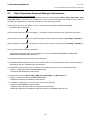
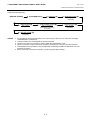
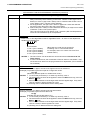
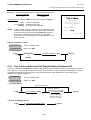
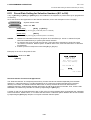
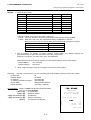
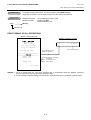
10.3
No-Sale
The no-sale transaction is used to open the cash drawer without relating to any sales, such as for giving change,
testing the receipt/journal print condition, etc.
OPERATION
(Must be operated outside a sale)
[NS] ...................... The drawer opens and a No-sale receipt is issued.
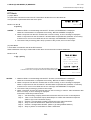
-- Receipt Print Format --
Max.4 lines of Store Name/Message
TEC STORE
1343 PEACH DRIVE
PHONE: 87-6437
Max.3 lines of Commercial Message
Open 8:00am to 7:00pm
Closed: every Wednesday
Date (Month-Day-Year order in this sample)
08-30-2003 SAT
Day-of-Week
Name of the Cashier who is operating
the ECR.
NOTE:
10.4
∗∗NO
#3001
∗∗
SALE
JONES
Register No.
0111 11:26TM
No-sale Receipt Header
Consecutive No.
Current Time
The print format samples in this manual are not copies of actual receipts printed on an ECR but are
merely indications of print formats. In those format samples, the bold-face characters indicate
Double-sized Characters on actual receipts issued by the ECR. Also note that each Double-sized
Character on actual receipts will be printed at the position half-character space rightward more than in
the print format samples in this manual.
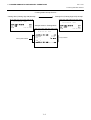
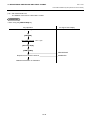
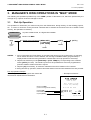
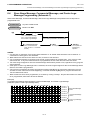
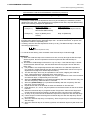
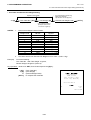
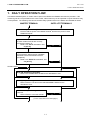
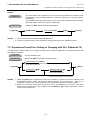
Loan
This operation is used to record the cash amounts and food stamps loaned from the store as the change reserve
in the drawer.
OPERATION
[R/A]
(Must be operated outside a sale)
|Cash Amount Loaned| [AT/TL]
([ST])
|Food Stamp Amount Loaned| [FSTL TEND]
To read the loan
total so far entered.
Repeatable to add up amounts.
Loan Receipt Header
Amounts loaned
Total amount loaned
∗∗LOAN
CASH
CASH
CASH
SUBTL
TOTAL
∗∗
$20.00
$10.00
$35.00
$65.00
$65.00
JONES
NOTE:
0112 11:27TM
During the Loan operation, the Non-add Number print and the Validation print are possible.
10- 3
[AT/TL]
10. REGISTERING PROCEDURE AND PRINT FORMAT
EO1-11152
10.5 Department Entry
10.5
Department Entry
Each department is preprogrammed as the “PRESET” type (with a price programmed) or “OPEN” type (with no
price programmed). Perform operation depending on the type selected.
-- Receipt Print Format --
OPERATION
Open Department Type
• |Price| [Open DEPT]
• |Open-Dept Code| [DP#] |Price| [AMT]
VEGETABLE
$1.00TF
T: Taxable Item Symbol
F: Food Stampable Item Symbol
Preset Department Type
• [Preset DEPT]
• |Dept Code| [DP#]
DP13
$1.40
DP13
$1.00
Preset-price Open through Preset Department Type
• [PR OPEN] (or [OPEN]) |Price| [Preset DEPT]
• [PR OPEN] (or [OPEN]) |Dept Code| [DP#] |Price| [AMT]
10.6
Gasoline Entry
Enter the sale amount of gasoline. The quantity of gasoline is calculated by the preset gallon unit price.
OPERATION
Same as Open Department Type of DEPARTMENT ENTRY sequence using the Department Key which is
programmed as a Gasoline Sales department.
NOTES:
1. A department should be programmed with Gasoline status and unit price.
2. The [DP#] key cannot be used for Gasoline entries.
3. The calculation result (the quantity of gasoline) will be obtained down to the 3rd digit below the
decimal point. The fraction rounding method is ruled by the option selected for the Quantity
Extension fraction rounding. (see NOTE 5 attached to QUANTITY EXTENSION section).
4. The repeat entry is unavailable to a Gasoline Sales department.
5. Gasoline sales department cannot be used as the Preset type. The sale amount of gasoline must
be entered.
6. The quantity of gasoline calculated will be not displayed but printed.
Example) DEPT 10 = Unit price 3.00 with Gasoline status
-- Receipt Print Format -1000 [DEPT 10]
[AT/TL]
3.333 Gal @
Gasoline
TAX
CASH
10- 4
3.000/Gal
$10.00T
$0.60
$10.60
10. REGISTERING PROCEDURE AND PRINT FORMAT
EO1-11152
10.7 PLU Entry (Manual PLU Code Entry)
10.7
PLU Entry (Manual PLU Code Entry)
Each PLU is preprogrammed as the “PRESET” type (with a price preset) or “OPEN” type (with no price preset).
Perform operation depending on the type selected.
OPERATION
-- Receipt Print Format --
Open PLU Type
• |Price| [PLU Preset-Code Key] of Preset-PLU
• |Open-PLU Code| [PLU] |Price| [AMT]
Preset PLU Type
• [PLU Preset-Code Key] of Preset-PLU
• |Preset-PLU Code| [PLU]
Preset-price Open Entry through Preset PLU Type
• [PR OPEN] (or [OPEN]) |Price| [PLU Preset-Code Key]
• [PR OPEN] (or [OPEN]) |Preset-PLU Code| [PLU] |Price| [AMT]
10.8
Drink Small-B
$0.60T
Drink Small-B
$0.60T
Tomato
$0.90TF
PLU Entry through Barcode Scanner
OPERATION
Basic Operation Sequence:
Scan the barcode of the required item (instead of |PLU Code| [PLU])
... A short tone is generated when the barcode is successfully scanned.
When a barcode scanner is connected to the COM port, the operation sequence “|PLU Code| [PLU]” can be
replaced by simply scanning the barcode. It is true in any operation pattern relating to PLU entries (Repeat,
Quantity Extension, etc.).
10.9
Cigarette and Alcoholic Beverage Entry
(Entry of Sales Item Restricted by Age Limit)
This operation checks whether or not a customer satisfies the age limit to purchase cigarette and alcoholic
beverage.
OPERATION
When the entry of “Date of Birth” is unnecessary.
Entry of a cigarette
or an alcoholic
beverage status
Department/PLU
[ID]
|Date of Birth|
MM-DD-YYYY
8 Digits
(NOTE 1 below)
The display message
“CHECK ID” is displayed on
the Operator’s Display.
When the age confirmation is
accepted, the age confirmation
print will be performed, and the
sales item will be processed.
If the age confirmation is not
accepted, the error message
“UNDER AGE” will be
displayed on the Operator’s
Display.
NOTES:
1. When the month of date of birth is January to September, the entry of the preceding zero can be omitted.
2. Initial setting is as follows.
• Customer of the age 18 or more can purchase cigarette.
• Customer of the age 21 or more can purchase alcoholic beverage.
10- 5
10. REGISTERING PROCEDURE AND PRINT FORMAT
EO1-11152
10.10 Repeat Entry
3. In one sale transaction, when the entry of a sales item with the age limit status causes an error (the error
message “UNDER AGE”), the entry of another sales item with the age limit status requires the entry of
date of birth and the [ID] key depression. The age confirmation will be automatically performed in the
second or later entry of cigarette or alcoholic beverage.
4. Entry of the date of birth can be programmed to be compulsory.
5. In the entry of cigarette or alcoholic beverage after the Recall Operation, it is unnecessary to enter the
date of birth and depress the [ID] key if the age confirmation has been performed before the Hold
Operation.
6. Immediately after the ID check error (the error message “UNDER AGE”) is cleared by the [C] key, the
Item Correct Operation is not possible, but the Void or the All Void operation is possible.
Example)
In case a customer aged 20 (date of birth: July 31st, 1983) purchases items (DEPT5=age limit 21,
DEPT6=age limit 18) on August 30th, 2003.
-- Receipt Print Format -100
[DEPT5]
ID CHECK
07/31/1983
Age Confirmation
07311983
[ID CHECK] The customer’s age is under 21, resulting in an error.
This sales item cannot be accepted by the age confirmation,
[C]
the entered value of date of birth will be invalid.
200
[DEPT6]
07311983
[ID CHECK] The customer’s age is over 18, resulting that the sales item
can be entered.
[AT/TL]
10.10 Repeat Entry
To repeat the same item of the last entry, simply depress the last key of the department or PLU entry sequence
or depress the [RPT] key.
OPERATION
(1) Department Repeat
Open Department Type
• |Price| [Open DEPT] [Same DEPT] (or [RPT])
• |Open-Dept Code| [DP#] |Price| [AMT] [AMT] (or [RPT])
-- Receipt Print Format -VEGETABLE
VEGETABLE
$1.20TF
$1.20TF
Preset Department Type
• [Preset DEPT] [Same DEPT] (or [RPT])
• |Preset-Dept Code| [DP#] [DP#] (or [RPT])
Preset-price Open Repeat
• [PR OPEN] (or [OPEN]) |Price| [Preset DEPT] [RPT]
• [PR OPEN] (or [OPEN]) |Preset-Dept Code| [DP#] |Price| [AMT] [RPT]
(2) PLU Repeat
Open PLU Type
• |Open-PLU Code| [PLU] |Price| [AMT] [AMT] (or [RPT])
• |Price| [PLU Preset-Code Key] [Same key] (or [RPT])
NOTES:
-- Receipt Print Format -Tomato
Tomato
$1.00TF
$1.00TF
1. If the first item of those repeated is modified with [SI/M], [LC OPEN], [FS/M], or [TX/M], the
modified status will be effective through the last item of the repeated.
2. Please note that the Preset-price Open Repeat using a [Preset DEPT] key or a [PLU PresetCode Key] can only be repeated by the [RPT] key.
3. A negative Department or negative PLU item cannot be repeated. Neither can any Other Income
Department/PLU be repeated.
10- 6
10. REGISTERING PROCEDURE AND PRINT FORMAT
EO1-11152
10.11 Quantity Extension (Multiplication) for DEPTs/PLUs
10.11 Quantity Extension (Multiplication) for DEPTs/PLUs
OPERATION
(1) Department Multiplication
Open Department Type
• |Quantity| [@/FOR] |Price| [Open DEPT]
• |Quantity| [@/FOR] |Open-Dept Code| [DP#] |Price| [AMT]
Preset Department Type
• |Quantity| [@/FOR] [Preset DEPT]
• |Quantity| [@/FOR] |Preset-Dept Code| [DP#]
Preset-price Open Type
• |Quantity| [@/FOR] [PR OPEN] (or [OPEN]) |Price| [Preset DEPT]
• |Quantity| [@/FOR] [PR OPEN] (or [OPEN]) |Preset-Dept Code| [DP#] |Price| [AMT]
(2) PLU Multiplication
Open PLU Type
• |Open-PLU Code| [PLU] |Quantity| [@/FOR] |Price| [AMT]
• |Quantity| [@/FOR] |Price| [PLU Preset-Code Key] of Open-PLU
Preset PLU Type
• |Quantity| [@/FOR] |Preset-PLU Code| [PLU]
• |Quantity| [@/FOR] [PLU Preset-Code Key] of Preset-PLU
-- Receipt Print Format -5x
DP03
6x
DP04
3.00@
$15.00
0.50@
$3.00
Preset-price Open Type
• [PR OPEN] (or [OPEN]) |Preset-PLU Code| [PLU] |Quantity| [@/FOR] |Price| [AMT]
• |Quantity| [@/FOR] [PR OPEN] (or [OPEN]) |Price| [PLU Preset-Code Key] of Preset-PLU
NOTES:
1. Quantity ................. Max. 3 integral + 3 decimal digits (Use the [ . ] key for entering decimal digits.)
Price (Unit Price) ... Max. 6 digits (or 5 digits with Preset Point feature)
Product .................. Must not exceed 8 digits.
2. When the Quantity is 1-digit integer (1 to 9) followed by a Code-preset Department/PLU key with a
price preset, the [@/FOR] key is omissible.
3. The product obtained by multiplication cannot be repeated.
4. The decimal portion of the Quantity entry itself is processed down to the two digits below the
decimal point. The fraction rounding in this case is fixed to ROUND OFF.
5. You can select the rounding process of the fractions of the product (result of multiplication) by a
program option: ROUND OFF (initial setting), ROUND UP, or ROUND DOWN.
10.12 Split Package Pricing (“Q’ty” = Quantity ... in the patterns listed below)
This operation is used for entering individual item of whole package.
For example, one individual item of whole package ($1.00/3 pcs.) can be entered by this operation.
OPERATION
(1) Department
Open Department
• |Purchased Q’ty| [@/FOR] |Whole Package Q’ty| [@/FOR]
|Whole Package Price| [Open Dept]
|Open-Dept Code| [DP#] |Whole Package Price| [AMT]
10- 7
10. REGISTERING PROCEDURE AND PRINT FORMAT
EO1-11152
10.12 Split Package Pricing
Preset Department
• |Purchased Q’ty| [@/FOR] |Whole Package Q’ty| [@/FOR]
[Preset Dept]
|Preset-Dept Code| [DP#]
Preset-price Open
• [PR OPEN] (or [OPEN])
|Purchased Q’ty| [@/FOR] |Whole Package Q’ty| [@/FOR]
|Whole Package Price| [Preset Dept]
|Preset-Dept Code| [DP#] |Whole Package Price| [AMT]
(2) PLU
Open PLU
• |Purchased Q’ty| [@/FOR]
|Split-Price Type PLU Code| [PLU]
of open-price PLU
NOTE 1 below
|Whole Package Price| [AMT]
|Whole Package Price| [PLU Preset-code Key]
of open-price PLU and Split-Price Type
Preset PLU
• |Purchased Q’ty| [@/FOR]
|Split-Price Type PLU Code| [PLU]
of preset-price PLU
NOTE 1 below
[PLU Preset-code Key]
of preset-price PLU and Split-Price Type
Preset-Price Open
• [PR OPEN] (or [OPEN])
|Purchased Q’ty| [@/FOR]
|Split-Price Type PLU Code| [PLU]
of preset-price PLU
NOTE 1 below
|Whole Package Price| [AMT]
|Whole Package Price| [PLU Preset-code Key]
of preset-price PLU and Split-Price Type
NOTES:
1. When this portion is omitted, the “Purchased Q’ty” value is regarded as “1” (i.e. one individual item
but not the whole package quantity.)
2. Purchased Quantity ....................... max.3 digits integral only
Whole Package Quantity ............... max.3 digits integral only
Whole Package Price .................... max.6 digits
3. This operation is possible only when the option “Split Package Pricing” is selected (instead of
Triple Multiplication).
4. One of two fraction rounding methods can be selected for the Split Package Pricing calculations --Round Up PRODUCT (initial setting) or Round Up UNIT PRICE.
Whole Package Quantity
Purchased Quantity
Whole Package Price
3@
6/1.25
Apple
$0.90TF
Purchased Amount
Item Name
10- 8
10. REGISTERING PROCEDURE AND PRINT FORMAT
EO1-11152
10.13 HI-CONE PLUs
10.13 HI-CONE PLUs
In addition to ordinary Split-Price PLUs, the HI-CONE status can be programmed to each of them.
If so programmed, the operation patterns for one item entry (entry of one individual split-package item) and for
the whole package quantity entry are different from those of ordinary Split-Price PLUs.
To enter one individual item in the package (one unpacked item):
Ordinary Split-Price PLUs (i.e. without HI-CONE status)
Open PLU
(1 [@/FOR])
|Split-Price Type PLU Code| [PLU]
Entry of Quantity
1 can be omitted.
|Whole Package Price| [AMT]
of open-price PLU
or Barcode Scanning
|Whole Package Price| [PLU Preset-code Key]
of open-price PLU Entry of Quantity
Preset PLU
(1 [@/FOR])
|Split-Price Type PLU Code| [PLU]
of preset-price PLU
Entry of Quantity
1 can be omitted.
[PLU Preset-code Key]
of preset-price PLU and Split-Price Type
Barcode Scanning
HI-CONE PLUs
Open PLU
1 [@/FOR]
Entry of Quantity
1 is required.
|Split-Price Type PLU Code| [PLU]
|Whole Package Price| [AMT]
of open-price PLU and Split-Price Type
or Barcode Scanning
|Whole Package Price| [PLU Preset-code Key]
of open-price PLU and Split-Price Type and HI-CONE status
Preset PLU
1 [@/FOR]
Entry of Quantity
1 is required.
|Split-Price Type PLU Code| [PLU]
of preset-price PLU and HI-CONE status
[PLU Preset-code Key]
of preset-price PLU and Split-Price Type and HI-CONE status
Barcode Scanning
To enter Whole Package Quantity (all the items packed):
Ordinary Split-Price PLUs (i.e. without HI-CONE status)
Open PLU
• |Whole Package Q’ty| [@/FOR]
|Split-Price Type PLU Code| [PLU]
Cannot be omitted
|Whole Package Price| [AMT]
of open-price PLU
or Barcode Scanning
|Whole Package Price| [PLU Preset-code Key]
of open-price PLU and Split-Price Type
10- 9
10. REGISTERING PROCEDURE AND PRINT FORMAT
EO1-11152
10.13 HI-CONE PLUs
Preset PLU
• |Whole Package Q’ty| [@/FOR]
|Split-Price Type PLU Code| [PLU]
of preset-price PLU
Cannot be omitted
[PLU Preset-code Key]
of preset-price PLU and Split-Price Type
Barcode Scanning
HI-CONE PLUs
Open PLU
|Split-Price Type PLU Code| [PLU]
|Whole Package Price| [AMT]
of open-price PLU and HI-CONE status
or Barcode Scanning
|Whole Package Price| [PLU Preset-code Key]
of open-price PLU and Split-Price Type and HI-CONE status
Preset PLU
|Split-Price Type PLU Code| [PLU]
of preset-price PLU and HI-CONE status
or Barcode Scanning
[PLU Preset-code Key]
of preset-price PLU and Split-Price Type and HI-CONE status
Thus the “Whole Package Quantity” entry is not necessary for a sale of the Whole Package Quantity of a SplitPrice PLU of HI-CONE status.
NOTE:
The Unit Price of Individual Split-package Item can be preset for each HI-CONE PLU. If it is preset,
Split Pricing entry of such a PLU (with less than the Whole Package Quantity) will be calculated on the
basis of the preset price of Individual Split-package Item. If it is not preset, the calculation is
performed on the basis of the Whole Package Price, just as ordinary Split-Price PLUs. Also see the
NOTES attached to the section of SPLIT PACKAGE PRICING.
Operation Examples of HI-CONE PLUs
1) When PLU No. 1 is programmed with Whole Package Price of $1.00, Whole Package of Quantity 3, and HICONE status. The Split-package Individual Item Price is not preset.
Entry Contents
Quantity 1:
Quantity 2:
Quantity 3:
Whole Package:
(= Quantity 3)
NOTE:
Key Operation
1 [@/FOR] 1 [PLU]
2 [@/FOR] 1 [PLU]
3 [@/FOR] 1 [PLU]
1 [PLU]
Sale Amount (Calculation Process)
$0.34 ($1.00 ÷ 3 = $0.333 ...)
$0.67 ($1.00 x 2/3 = $0.666 ...) (NOTE)
$1.00 (Preset Whole Package Price)
$1.00 (Preset Whole Package Price)
When the option “ROUND UP UNIT PRICE” is selected, the Sale Amount and the Calculation
Process will be as follows:
$0.68 ($1.00 ÷ 3 = 0.333 ... rounded up to $0.34 ... x 2)
2) Same as 1) above, except that the Split-package Individual Item Price is preset with $0.40.
Entry Contents
Quantity 1:
Quantity 2:
Quantity 3:
Whole Package:
(= Quantity 3)
Key Operation
1 [@/FOR] 1 [PLU]
2 [@/FOR] 1 [PLU]
3 [@/FOR] 1 [PLU]
1 [PLU]
10-10
Sale Amount (Calculation Process)
$0.40 (Preset Indiv. Item Price)
$0.80 (Preset Indiv. Item Price x 2)
$1.00 (Preset Whole Package Price)
$1.00 (Preset Whole Package Price)
10. REGISTERING PROCEDURE AND PRINT FORMAT
EO1-11152
10.14 Mix & Match (M & M) Function of Split-Price PLUs
10.14 Mix & Match (M & M) Function of Split-Price PLUs
Each of Split-Price PLUs can be programmed with a M & M Group No. Even different PLUs of the same M & M
Group No. can be entered mixedly within a sale, then an automatic discount is made when the specified number
of those PLU items are entered. For example, if two different bottled drink items cost $1.00 for three bottles,
those items can be programmed with the same M & M Group No. to enable Mix & Match sales. To set different
PLUs into the same M & M Group, each of the PLUs must be set with the same Whole Package Quantity, same
Whole Package Price, and same Split-package Individual Price (if it is set). Otherwise, a wrong calculation will
occur in actual entries in a sale.
Operation Examples of Mix & Match Functions
Cases 1) Two PLUs (PLU No. 1 and PLU No. 2 are programmed with Whole Package Quantity of 3, Whole
Package Price $1.00, and the same M & M Group No.:
1-1) When the PLUs are programmed as ordinary Split-Price PLUs (without HI-CONE):
Entry Contents
(within one sale)
Key Operation
1 x PLU No. 1
1 x PLU No. 2
1 [@/FOR] 1 [PLU]
1 [@/FOR] 2 [PLU]
1 x PLU No. 1
1 [@/FOR] 1 [PLU]
Sale Total
NOTE:
Sale Amount (Calculation Process)
$0.34 ($1.00 ÷ 3 = $0.333 ...)
$0.33 ($1.00 x 2/3 = $0.666 ...
rounded up to $0.67 - $0.34) (NOTE)
$0.33 ($1.00 - $0.67) (NOTE)
$1.00
When the option “ROUND UP UNIT PRICE” is selected, the Sale Amounts on the second and third
entries are as follows:
$0.34 (instead of $0.33) (second entry)
$0.32 (instead of $0.33) (third entry)
1-2) When the PLUs are programmed with HI-CONE status and not programmed with Preset Individual Prices:
Entry Contents
(within one sale)
Key Operation
1 x PLU No. 1
1 x PLU No. 2
1 [@/FOR] 1 [PLU]
1 [@/FOR] 2 [PLU]
1 x PLU No. 1
1 [@/FOR] 1 [PLU]
Sale Total
NOTE:
Sale Amount (Calculation Process)
$0.34 ($1.00 ÷ 3 = $0.333 ...)
$0.33 ($1.00 x 2/3 = $0.666 ...
rounded up to $0.67 - $0.34) (NOTE)
$0.33 ($1.00 - $0.67) (NOTE)
$1.00
Same as the NOTE in Case 1) above
1-3) When the PLUs are programmed with HI-CONE status and programmed with Preset Individual Item Price of
$0.40:
Key Operation
Entry Contents
(within one sale)
1 x PLU No. 1
1 x PLU No. 2
1 x PLU No. 1
(1 [@/FOR]) 1 [PLU]
(1 [@/FOR]) 2 [PLU]
(1 [@/FOR]) 1 [PLU]
Sale Total
Sale Amount (Calculation Process)
$0.40 (Preset Indiv. Item Price)
$0.40 (Preset Indiv. Item Price)
$0.20 ($1.00 - $0.80)
$1.00
10-11
10. REGISTERING PROCEDURE AND PRINT FORMAT
EO1-11152
10.15 Price Shift Entry for Split-Price PLUs
Cases 2) Same as Case 1-3) except that the PLUs are not programmed with the same M &M Group
2-1) When Individual Items are entered separately:
Entry Contents
(within one sale)
PLU No. 1
(Whole package)
PLU No. 2
(Whole package)
Key Operation
(3 [@/FOR]) 1 [PLU]
$1.00 (Whole Package Price)
(3 [@/FOR]) 2 [PLU]
$1.00 (Whole Package Price)
Sale Total
NOTE:
Sale Amount (Calculation Process)
$2.00
Even without M &M Grouping programmed, an entry of any Split-Price PLU in units of Whole
Package Quantity is processed as Whole Package Price for each PLU.
2-2) When the PLUs are entered in units of whole packages:
Entry Contents
(within one sale)
PLU No. 1
(Whole package)
PLU No. 2
(Whole package)
Key Operation
(3 [@/FOR]) 1 [PLU]
$1.00 (Whole Package Price)
(3 [@/FOR]) 2 [PLU]
$1.00 (Whole Package Price)
Sale Total
NOTE:
Sale Amount (Calculation Process)
$2.00
Even without M &M Grouping programmed, an entry of any Split-Price PLU in units of Whole
Package Quantity is processed as Whole Package Price for each PLU.
10.15 Price Shift Entry for Split-Price PLUs
This operation performs Split-price PLU item entry using the following three unit price.
• Cooled one unpacked item
• Cooled packed item
• Packed item under normal temperature
OPERATION
1) For the entry of cooled packed item
[PACK]
[PACK]
[PACK]
NOTES:
Barcode Scanning
|PLU Code| [PLU]
[PLU Preset-Code Key] of Preset-PLU
1.
2.
3.
4.
Depressing the [PACK] key after the [3rd PRICE] key is depressed results in an error.
This transaction can handle neither open price PLU nor scale-compulsory PLU.
Preset-price Open Entry is unavailable for this transaction.
This transaction is unavailable when the Triple Multiplication feature has been selected.
10-12
10. REGISTERING PROCEDURE AND PRINT FORMAT
EO1-11152
10.15 Price Shift Entry for Split-Price PLUs
2) For the entry of packed item under normal temperature
[3rd PRICE]
[3rd PRICE]
[3rd PRICE]
NOTES:
1.
2.
3.
4.
Barcode Scanning
|PLU Code| [PLU]
[PLU Preset-Code Key] of Preset-PLU
Depressing the [3rd PRICE] key after the [PACK] key is depressed results in an error.
This transaction can handle neither open price PLU nor scale-compulsory PLU.
Preset-price Open Entry is unavailable for this transaction.
This transaction is unavailable when the Triple Multiplication feature has been selected.
Example)
Program
Contents
Entry
Contents
Program
Contents
Entry
Contents
• Whole Package Price: $1.00
• HI-CONE Status: None
• Whole Package Quantity: 3
• Mix & Match Function: With
• Split-package Individual Item Price: $0.40 • Amount of Dollar Discount/ Extra Charge: $0.20
• Quantity Entry Compulsory: None
(Discount)
............ Split-package Individual Item Price
1 [PLU]
$0.40
............ Split-package Individual Item Price
1 [PLU]
$0.40
............ Mix & Match $1.00 - $0.40 - $0.40 = $0.20
1 [PLU]
$0.20
Total
$1.00
............ Split-package Individual Item Price
1 [@/FOR] 1 [PLU]
$0.40
............ Mix & Match $1.00 - $0.40 = $0.60
2 [@/FOR] 1 [PLU]
$0.60
............ Mix & Match
3 [@/FOR] 1 [PLU]
$1.00
Total
$2.00
............ Whole Package Price
[PACK] 1 [PLU]
$1.00
............ Whole Package Price -Dollar Discount
[3rd PRICE] 1 [PLU]
$0.80
Total
$1.80
• Whole Package Price: $1.00
• HI-CONE Status: None
• Whole Package Quantity: 3
• Mix & Match Function: With
• Split-package Individual Item Price: $0.40 • Amount of Dollar Discount/ Extra Charge: $0.20
• Quantity Entry Compulsory: With
(Discount)
............ Split-package Individual Item Price
1 [@/FOR] 1 [PLU]
$0.40
............ Mix & Match $1.00 - $0.40 = $0.60
2 [@/FOR] 1 [PLU]
$0.60
............ Mix & Match
3 [@/FOR] 1 [PLU]
$1.00
Total
$2.00
[PACK] 1 [PLU]
$1.00
............ Whole Package Price
[3rd PRICE] 1 [PLU]
$0.80
............ Whole Package Price -Dollar Discount Amount
Total
$1.80
10-13
10. REGISTERING PROCEDURE AND PRINT FORMAT
EO1-11152
10.16 Triple Multiplication
Program
Contents
Entry
Contents
• Whole Package Price: $1.00
• HI-CONE Status: With
• Whole Package Quantity: 3
• Mix & Match Function: With
• Split-package Individual Item Price: $0.40 • Amount of Dollar Discount/ Extra Charge: $0.20
• Quantity Entry Compulsory: None
(Extra Charge)
1 [PLU]
$1.00
............ Whole Package Price
1 [PLU]
$1.00
1 [PLU]
$1.00
Total
$3.00
............ Split-package Individual Item Price
1 [@/FOR] 1 [PLU]
$0.40
2 [@/FOR] 1 [PLU]
$0.60
............ Mix & Match
3 [@/FOR] 1 [PLU]
$1.00
Total
$2.00
............ Whole Package Price
[PACK] 1 [PLU]
$1.00
............ Whole Package Price + Extra Charge Amount
[3rd PRICE] 1 [PLU]
$1.20
Total
$2.20
10.16 Triple Multiplication
(1) Department Triple Multiplication
Open Department
• |Length| [@/FOR] |Width| [@/FOR]
Preset Department
• |Length| [@/FOR] |Width| [@/FOR]
|Unit Price| [Open DEPT]
|Open-Dept Code| [DP#] |Unit Price| [AMT]
[Preset DEPT]
|Preset-Dept Code| [DP#]
Preset-price Open
• [PR OPEN] (or [OPEN])
|Length| [@/FOR] |Width| [@/FOR]
(2) PLU Triple Multiplication
Open PLU
• |Length| [@/FOR] |Width| [@/FOR]
Preset PLU
• |Length| [@/FOR] |Width| [@/FOR]
|Unit Price| [Preset DEPT]
|Preset-Dept Code| [DP#] |Unit Price| [AMT]
|Open-PLU Code| [PLU] |Unit Price| [AMT]
|Unit Price| [PLU Preset-Code Key] of Open-PLU
|Preset-PLU Code| [PLU]
[PLU Preset-Code Key] of Preset-PLU
Preset-price Open
• [PR OPEN] (or [OPEN])
|Length| [@/FOR] |Width| [@/FOR]
|Preset -PLU Code| [PLU] |Unit Price| [AMT]
|Unit Price| [PLU Preset-Code Key] of Preset-PLU
PLU Entry through Barcode Scanner (see NOTE 4 on the next page)
|Length| [@/FOR] |Width|
Scan the Barcode of Preset-price PLU
Scan the Barcode of Open-price PLU
10-14
|Unit Price| [AMT]
10. REGISTERING PROCEDURE AND PRINT FORMAT
EO1-11152
10.17 Single-Item Department or Single-Item PLU Entry
NOTES:
1. The Triple Multiplication entries are possible only when the option “Triple Multiplication” is selected
(instead of Split Package Pricing).
2. Length, Width ................................ Max. 3 integral digits + max. 3 decimal digits
Unit Price ....................................... Max. 6 digits
Product of Length x Width ............. Less than 9999,999
3. The fraction rounding method is ruled by the process designated for ordinary Quantity Extension
entries.
4. In a entry sequence using a barcode scanner, an error will result on entering the [@/FOR] key for
the second time.
10.17 Single-Item Department or Single-Item PLU Entry
If a department (or PLU) is programmed as Single-item, the department (or PLU) entry sequence will immediately
finalizes the sale as cash sale when operated outside a sale.
OPERATION
Same as
NOTES:
-- Single-item Receipt Print Format -DEPARTMENT ENTRY
PLU ENTRY
QUANTITY EXTENSION
SPLIT PACKAGE PRICING
TRIPLE MULTIPLICATION
TEC STORE
1343 PEACH DRIVE
PHONE: 87-6437
Open 8:00am to 7:00pm
Closed: every Wednesday
1. If operated inside a sale, it functions just as an
ordinary itemized department or PLU.
2. For the Validation print after the Single-Item
Department (or PLU) entry, the name and the
amount of the department (or PLU) are printed.
08-30-2003 SAT
DP15
CASH
ITEM
JONES
#3001
$2.10
$2.10
1
0165 12:30TM
10.18 HASH Department Entry, HASH PLU Entry
This operation is used to enter items which do not directly become sales for the store, such as lottery, postage,
gift wrapping fee, size adjustment fee, utility (payment of electricity and gas), and donation.
OPERATION
Same as DEPARTMENT ENTRY sequence using the Department Key which is programmed as an HASH
department. When a PLU is used for this purpose, the PLU must be programmed to link to a department
with HASH status.
10.19 Sub-Link Department Entry
OPERATION
Head-link Dept Entry
Sub-link Dept Entry
---
-- Receipt Print Format --
(compulsory)
Example) Dept.“DRINK” is programmed as Headlink Dept. and Dept. “BTL DEPO” is
programmed as Sub-link Dept. in this
example.
10-15
DRINK
BTL DEPO↑
Sub-link Mark
$3.00TF
$0.10
10. REGISTERING PROCEDURE AND PRINT FORMAT
EO1-11152
10.20 Sub-Link PLU Entry
10.20 Sub-Link PLU Entry
OPERATION
When the Sub-link PLU is of Preset-PLU Type:
Sub-link PLU Code Entry
---
Head-link PLU Entry
(automatically entered)
When the Sub-link PLU is of Open-PLU Type:
--|Price| [AMT]
(compulsory)
-- Receipt Print Format --
Example) PLU “Drink Small-B” is programmed as
Head-link PLU and PLU “Small-Btl
Depo” and “Eco Fees” are programmed
as Sub-link in this example.
Drink Small-B
Small-Btl Depo↑
Eco Fees↑
PLU Table
Link PLU Table
PLU Code
PLU Name
Tax Status
000001
000002
000003
Drink Small-B
Small-Btl Depo
Eco Fees
TAX1
NOTES:
$0.60T
$0.05
$0.02T
Link PLU
Table No.
1
2
Table Code
PLU Code
1
2
000002
000003
TAX1
1. For entering a Price of the Sub-link PLU, the [PLU Preset-code Key] cannot be used (always use
the [AMT] key in this case).
2. When the program option “Manager Intervention for entering Negative Departments/PLUs in REG
mode” has been selected, a Manager Intervention is required for the Head-link PLU entry of which
Sub-link PLU is programmed as negative status.
10.21 Urgent PLU Maintenance
(to enter a PLU item not existing in the PLU program file)
OPERATION
PLU Entry Operation
[PLU ADD]
Error Message
“CODE ERROR”
is displayed.
Depress [C]
to cancel the
error status.
(|Quantity| [@/FOR])
|PLU Code| [PLU]
in case of quantity extension
Or, scan the barcode.
[DEPT]
|Unit Price| [AMT]
|Dept Code| [DP#]
Link Department Designation
NOTES:
---
Max. 6 digits
(0 to 999999)
1. When a PLU item is successfully entered in the operation procedure above, the item is printed on
the receipt and journal. The item name at this time is the name of the Link Department. At the
same time, the PLU item is automatically added to the PLU ADDITIONAL FILE. Thus, the added
PLU item can now be entered normally on any of the terminals.
2. Since PLU items thus added to the PLU file are programmed with the name of the link department
and the “zero” status as a provisional measure, it will be a Manager’s job to change those PLU
tables with proper name and status as a PLU maintenance operation later (described in the
Manager’s Guide).
10-16
10. REGISTERING PROCEDURE AND PRINT FORMAT
EO1-11152
10.22 Returned Merchandise
10.22 Returned Merchandise
OPERATION
[RTN MDSE]
DEPARTMENT ENTRY
PLU ENTRY
QUANTITY EXTENSION
SPLIT PACKAGE PRICING
TRIPLE MULTIPLICATION
SINGLE-ITEM DEPARTMENT/PLU ENTRY
SUB-LINK PLU ENTRY
(Operate before Head-link PLU to return
both items linked together.)
SUB-LINK DEPARTMENT ENTRY
(Operate before each or one of the two
items that is returned.)
---
-- Receipt Print Format -RTN
DP02
RTN
PLU001
NOTE:
-$1.45TF
-$1.00TF
This operation cannot be performed for Negative Departments/PLUs.
10.23 Bottle Return
OPERATION
|Bottle Return Amount| [BTL RTN]
|Quantity| [@/FOR] |Unit Amount| [BTL RTN]
max.3 digits (integral value only)
NOTES: 1. This operation can be performed both inside a sale and outside a sale. (The “Credit Balance” option
is ignored.)
2. The bottle return amount exceeding the subtotal amount can be entered.
-- Receipt Print Format -BTR
-0.05
6x
BTR
10-17
0.05@
-0.30
10. REGISTERING PROCEDURE AND PRINT FORMAT
EO1-11152
10.24 Dollar Discount
10.24 Dollar Discount
OPERATION
---
Dept or PLU item entry
(for discount from an individual item)
|Amount| [DOLL DISC]
---
---
[ST]
(for discount from the sale total)
-- Receipt Print Format -VEGETABLE
DISC
SUBTL
DISC
$1.00TF
-0.05
$21.00
-1.00
NOTES: 1. This operation can be performed both inside a sale and outside a sale. (The “Credit Balance” option
is ignored.)
2. After the [ST] key depression, the discount amount exceeding the subtotal amount can be entered.
3. This operation is not possible immediately after a link-PLU entry.
10.25 Percent Discount, Percent Charge
OPERATION
Dept or PLU entry
Positive Previous Balance entry (credit balance)
[ST]
NOTES:
[%-] (or [%+])
|Rate| [%-] (or [%+])
1. Rate ............................................... 0.001 to 99.999 (%).
2. When the Dept or PLU item entry is modified with [RTN MDSE] or [VOID], the following % entry
will also be modified with [RTN MDSE] or [VOID].
3. A % entry will cause an error if operated after a Negative Department/PLU or an HASH
Department/PLU.
4. After the [ST] key depression, a negative or zero subtotal amount results in an error.
-- Receipt Print Format -DP03
%5%
$3.40TF
SUBTL
%-
-0.17
$6.00
10%
-0.60
10.26 Store Coupon
OPERATION
[STR CPN]
NOTE:
Follow
DEPARTMENT ENTRY
QUANTITY EXTENSION for DEPTs
The store coupon amount to be entered must
not exceed the sale total unless the “Credit
Balance” option is selected.
10-18
-- Receipt Print Format -S.CPN
VEGETABLE
-0.50TF
10. REGISTERING PROCEDURE AND PRINT FORMAT
EO1-11152
10.27 Vendor Coupon
10.27 Vendor Coupon
OPERATION
---
([ST])
|Coupon Amount| [VND CPN]
---- Receipt Print Format --
NOTES: 1. This operation can be performed both inside a sale and outside
a sale. (The “Credit Balance” option is ignored.)
2. The vendor coupon amount exceeding the subtotal amount can
be entered.
SUBTL
V.CPN
$8.00
-4.00
10.28 Item Correct
OPERATION
DEPARTMENT ENTRY
PLU ENTRY
REPEAT ENTRY
QUANTITY EXTENSION
SPLIT PACKAGE PRICING
TRIPLE MULTIPLICATION
RETURNED MERCHANDISE
BOTTLE RETURN
DOLLAR DISCOUNT
PERCENT CHARGE/DISCOUNT
STORE COUPON
VENDOR COUPON
Previous Balance Entry in CHARGE POSTING
(Manual PB Entry or Customer File Type)
RECEIVED-ON-ACCOUNT Item
PAID-OUT Item
MANUAL TAX
-- Journal Print Format -VEGETABLE
CORR ↑
$2.00TF
[ITEM CORR]
NOTES: 1. When [ITEM CORR] is depressed after a Repeat Entry, only the last item of those repeated will be
deleted.
2. When [ITEM CORR] is depressed after a Quantity Extension entry, the entire product (result of
multiplication) will be deleted.
3. When the Item Correct operation is performed, “CORR ↑“ is printed on the journal, but the deleted
item is not printed on the receipt.
4. The Validation Print operation is possible after the Item Correct operation.
5. The Item Correct operation is not possible after the Validation Print operation.
6. The Item Correct operation is not possible immediately after a Link-PLU entry.
10-19
10. REGISTERING PROCEDURE AND PRINT FORMAT
EO1-11152
10.29 Void
10.29 Void
The VOID operation is used to delete an item already entered before the last item within the current sale. Such
items cannot be deleted by the [ITEM CORR] key any longer.
OPERATION
---
[VOID]
DEPARTMENT ENTRY
PLU ENTRY
QUANTITY EXTENSION
SPLIT PACKAGE PRICING|
TRIPLE MULTIPLICATION
---- Receipt Print Format --
voids
NOTE:
An amount exceeding the sale total cannot be entered
unless the “Credit Balance” option is selected.
Void Entry
VEGETABLE
DP02
VOID
VEGETABLE
$1.00TF
$2.00TF
-1.00TF
10.30 All Void
When the current transaction being entered is found to be canceled before finalizing it, ALL VOID can be
operated to delete all the items entered in the transaction.
OPERATION
[ITEM CORR] to execute ALL VOID
Sale Item Entries
[ALL VOID]
[C] to cancel ALL VOID
NOTES:
1. All Void is possible if the current
transaction contains less than 50 items.
2. All Void can also be operated to delete a
charge posting sale of Manual PB Entry
Type or Check Track Type.
3. The All Void cannot be operated after an
[EX] entry or during a Received-on-Account
or Paid-Out transaction.
4. The All Void cannot be operated after the [FS TL/TEND] key.
5. The All Void is not possible during the Hold operation.
6. The All Void is not possible after recalling a sales transaction
which the Hold is performed for.
-- Receipt Print Format --
TEC STORE
1343 PEACH DRIVE
PHONE: 87-6437
Open 8:00am to 7:00pm
Closed: every Wednesday
08-30-2003 SAT
VEGETABLE
DP02
SUBTL
∗∗ALL
JONES
VD
#3001
$3.00TF
$1.30TF
$4.30
∗∗
0209 15:41TM
10.31 Non-Add Number Print
Non-add numbers can be entered and printed for future references, to indicate codes or numbers of customers,
media checks, credit cards, etc. The entered numbers do not affect any sale total data.
OPERATION
(---
(allowed any time during a sale or transaction)
) |Number| [#]
-- Receipt Print Format --
---
Max.18 digits.
Non-add No. Print
10-20
#1234
PO
PO
TOTAL
$6.50
$7.50
$14.00
10. REGISTERING PROCEDURE AND PRINT FORMAT
EO1-11152
10.32 Scale Entry
10.32 Scale Entry
OPERATION
(The department or PLU through which scale items are entered must be a Scale-Allow
department or a Scale-Compulsory PLU)
(1) Auto Scale Entry (without tare/tare 2/tare 3, or with tare/tare 2/tare 3 auto-subtraction)
(M)
• Through Dept: Place the item
on the scale platter.
|Unit Weight| [@/FOR]
[SCALE]
1 to 9 (LB or Kg), 10 for 1/2 LB
or 100g, 11 for 1/4LB (when the
Unit Weight is different from the
General Weight Unit)
For entry with General Weight Unit .....
|Unit Price| [Open DEPT]
---
per Unit Weight
Max. 6 digits
|Open-Dept Code| [DP#] |Unit Price| [AMT]
per Unit Weight
Max. 6 digits
• Through Preset-PLU: Place the item on the
scale platter.
|Preset PLU Code| [PLU]
([SCALE])
(M)
---
• Through Open-PLU: Place the item on the
scale platter.
([SCALE])
(M)
|Open PLU Code| [PLU] |Unit Price| [AMT]
---
per Unit Weight
Max. 6 digits
NOTES:
1. When the PLU is programmed with a Tare Table No., the tare weight is automatically subtracted
from the scaled weight, and thus only the net weight is processed.
2. If the Tare 2 rate is programmed in the PLU table, a Tare 2 entry is performed when the above
Preset/Open PLU entry is performed.
3. At the link-PLU entry, the Scale Entry can be performed for the head-link PLU but not for the sublink PLU.
(2) Auto Scale with Tare/Tare 2/Tare 3
|Tare Table No.| [TARE]
1 to 9
|Tare Table No.| [TARE]
1 to 9
|Tare 2 Rate| [TARE 2]
0 to 99.99 (%)
|Tare Weight| [TARE 3]
Any value other than 0,
however, less than the
weight of scaled item
to be continued to the arrows marked with “(M)” in the above three
operation sequences of the Auto Scale Entry.
|Tare 2 Rate| [TARE 2]
0 to 99.99 (%)
to be continued to the arrows
marked with “(M)” in the above
three operation sequences of the
Auto Scale Entry.
to be continued to the arrows marked with “(M)” in the above three
operation sequences of the Auto Scale Entry.
to be continued to the arrows marked with “(M)” in the above three
operation sequences of the Auto Scale Entry.
10-21
10. REGISTERING PROCEDURE AND PRINT FORMAT
EO1-11152
10.33 Listing Capacity Open
|Tare Weight| [TARE 3]
Any value other than 0,
however, less than the
weight of scaled item
NOTES:
|Tare 2 Rate| [TARE 2]
0 to 99.99 (%)
to be continued to the arrows
marked with “(M)” in the above
three operation sequences of the
Auto Scale Entry.
1. If the Tare 2 rate is programmed in the PLU table, a PLU entry using |Tare 2 Rate| [TARE 2] (third
pattern above) cannot be performed.
2. The [TARE 3] key cannot be used together with the [TARE] key.
3. Omission of the Tare 3 Entry causes an error if the compulsory status of the Tare 3 Entry has been
programmed to a department/PLU item to be entered.
(3) Manual Scale Entry (It may be prohibited by a program option.)
|Net Weight| of the item
to be continued to the arrows marked with “(M)” in
the above three operation sequences of the Auto
Scale Entry.
[SCALE]
1 to 99999
(unit: g or 1/100LB. For example, enter 5 for 0.05 LB.)
(4) Return or Void Manual Scale Entry (It may be prohibited by a program option.)
[RTN MDSE] for Return
to be continued to the top of the “Manual Scale Entry” sequence above.
[VOID] for Void
10.33 Listing Capacity Open
For Departments and PLUs
Depress [LC OPEN] (or [OPEN]) prior to or any time during an entry of an open-department, open-PLU, or
preset-open department or PLU sequence (including REPEAT and QUANTITY EXTENSION entries). Please
note that the [LC OPEN] or [OPEN] key must be pressed, at latest, before the final key of the entry sequence.
The High Amount Limit for the department or PLU will be extended with two higher digits, and the Low Amount
Limit will be extended with one lower digit. For entering an amount still exceeding these limits, you must call for a
Manager Intervention.
For Media Tender Amounts
Depress [LC OPEN] (or [OPEN]) before or after the amount but Media Key. The High Amount Limit for the
media tendering will be extended with one higher digit. In need of still exceeding this limit, you must call for a
Manager Intervention.
For Amounts through [DOLL DISC], [VND CPN], [STR CPN], [BTL RTN]
To exceed their limits, you must always call for a Manager Intervention. The [LC OPEN] or [OPEN] key will not
be effective. As for the [STR CPN] key only, the amount is limited by both High Amount Limit of the department
through which the store coupon amount is entered and the amount limit for [STR CPN]. That is, when an amount
cannot be entered using [LC OPEN] or [OPEN], you must call for a Manager Intervention.
10.34 Selective Itemizer (SI) Status Modification
Depress [SI/M] (or [SI1/M] and/or [SI2/M]) for entering the required Department or PLU item, the same way as
[LC OPEN] is operated for Departments and PLUs. The SI-net status is reversed to non-net status, and vice
versa.
10-22
10. REGISTERING PROCEDURE AND PRINT FORMAT
EO1-11152
10.35 Tax Status or Food Stamp Status Modification
10.35 Tax Status or Food Stamp Status Modification
Depress [TX/M] (or [TX1/M], [TX2/M], [TX3/M], [TX4/M]), in the same way as [LC OPEN] is operated, prior to or
any time during the entry sequence of the required Department, PLU, or any other tax-status-programmable item
([DOLL DISC], [%-], [%+], [STR CPN], [VND CPN], [BTL RTN]). The taxable status is reversed to non-taxable,
and vice versa. The [FS/M] key operates the same to reverse from the Food Stampable status to non-stampable,
and vice versa, of the required item.
10.36 Manual Tax Entry (where irregular tax amount addition is applied)
-- Receipt Print Format --
OPERATION
---
|Irregular Tax Amount to be Added| [TAX]
--TAX5
$0.50
10.37 Subtotal (Sale Total Pre-taxed) Read
OPERATION
---
-- Receipt Print Format -[ST]
--SUBTL
$6.00
The sale total (pre-taxed) of the items so far entered is
displayed (and printed if so programmed), but the sale is
not finalized. Additional item entries are allowed, if any.
10.38 Taxable Total (Sale Total With Taxes) Read
OPERATION
-- Receipt Print Format ----
[TXBL TL]
--TXBL TL
$22.13
The sale total including taxes due of the items so far entered
is displayed (and printed if so programmed), but the sale is
not finalized. Additional item entries are allowed, if any.
10.39 Taxable Total Read and Subtotal Print
(when only one of [ST] and [TXBL TL] keys, not both, is installed on the keyboard)
In this case, the key is usually programmed as [ST] key with [TXBL TL] functions. Since this key has both [ST]
and [TXBL TL] functions, it may be labeled as “[ST]” in some stores or as “[TXBL TL]” in others.
OPERATION
---
[ST]
--(or [TXBL TL])
The sale total including taxes of the items so far entered is displayed (and the sale total pre-taxed is
printed if so programmed), but the sale is not finalized. Additional item entries are allowed, if any.
10-23
10. REGISTERING PROCEDURE AND PRINT FORMAT
EO1-11152
10.40 Selective Itemizer (SI) Total Read
10.40 Selective Itemizer (SI) Total Read
OPERATION
---
-- Receipt Print Format --
[SI/TL]
- - - (for Single-SI Machine)
([SI1/TL], [SI/2/TL], [SI3/TL], [SI4/TL])
SI Total Calculated
VEGETABLE
SI1 TL
TAX
CASH
$10.00TF
-0.70
$0.60
$9.90
The SI total is displayed and printed on journal (and printed on the receipt if so programmed).
NOTES:
1. The fraction process method is fixed to Round OFF.
2. For the Validation print after depressing the [SI/TL] key, the SI total amount is printed.
3. Depressing the [SI/TL] key sums up the memories of SI1 to SI4.
10.41 PLU Preset Price Read
This operation may be used to verify the preset price of an individual PLU.
(Any time inside or outside a sale, but prohibited during a short-tendered condition. It is
impossible to read the customer file during the training entry.)
OPERATION
- - -)
) [READ] |PLU Code| [PLU] (
) [READ] [PLU Preset-Code Key] (
- - -)
) [READ]
Scan the Barcode of the PLU (
) [READ] |Customer File Code| [PICK UP BAL] (
(--(--(--(---
- - -)
- - -)
... The operation header “READ” (programmable) and the name of the PLU displayed in the upper row and the
preset price of the PLU is displayed in the lower row. When it is an open PLU, nothing will be displayed in the
lower row. No print occurs.
NOTES:
1. Other items or operations relating or not relating to the read-out PLU may follow. If you want to
clear the display content, depress the [C] key. It is only a “READ” operation and will not affect any
sales data.
2. PLU Preset Price Read Operation designated by the [3rd PRICE] or [PACK] key is available.
10.42 Tax Calculation and Print
Your ECR has been programmed with proper tax tables (tax breaks and/or tax rates).
Each department or PLU has been programmed with proper tax status, i.e. taxable or non-taxable status of each
Tax (of maximum 4 taxes of Tax 1 to Tax 4).
On finalizing a sale, the taxes due are automatically calculated and printed on the receipt, and thus added to the
sale.
Whether all taxes (Tax 1 to Tax 4) are consolidated into one line print or individually printed in separate lines is a
program option.
-- Receipt Print Format -Example of
Consolidated
Print Line
SUBTL
TAX
CASH
SUBTL
Example of
Separate Print TAX1
TAX2
Lines
$15.00
$0.85
$15.85
CASH
10-24
$15.00
$0.60
$0.25
$15.85
10. REGISTERING PROCEDURE AND PRINT FORMAT
EO1-11152
10.43 Tax Exemption
10.43 Tax Exemption
OPERATION
Selective Tax Exemption
Examples)
[TX1/M] [EX]
[TX1/M] [TX2/M] [EX]
[TX1/M] [TX2/M] [TX3/M] [EX]
Sale Finalization ... to exempt from Tax 1 only
Sale Finalization ... to exempt from Tax 1 & Tax 2
Sale Finalization... to exempt from Tax 1, Tax 2, & Tax 3
All Tax Exemption
[EX]
[TX1/M] [TX2/M] [TX3/M] [TX4/M] [EX]
NOTES:
Sale Finalization
Sale Finalization
to exempt from all taxes
1. On depressing [EX], the sale total including the exempted tax(es) is displayed and pre-taxed
amount of the sale portion subject to the tax exemption is printed.
2. Tax Exemption is unavailable for inclusive taxes.
3. Only when the total validation function has been selected, the Validation print operation after
depressing the [EX] key is possible.
-- Receipt Print Format -Pre-taxed amount of the sale portion subject to Tax1
Pre-taxed amount of the sale portion subject to Tax2
TAX1EX
TAX2EX
$1.50
$6.00
10.44 Food Stampable Total Read, Food Stamp Tendering
OPERATION
---
[FSTL TEND]
|Food Stamp Tendered Amount| [FSTL TEND]
Displays the Food
Stampable Total
Tendering in Food Stamp
(This must be operated first of all the
payments in finalizing the sale if food
stamps are part of the payment.)
---
... When the Food Stamp tendered amount is less than the sale total, the sale is not finalized with the balance
still due displayed. Then it can be finalized with cash or other media total or tendering operations.
Entire Sale Total
Food Stampable Total
Food Stamp Tendered Amount
Change in Cash
Change in Food Stamp
NOTES:
TOTAL
FS/TL
F-STMP
CHANGE
FS CHG
1. Food Stamp feature is unavailable for the area where inclusive tax feature is used.
2. Any of the following features can be selected by the program option.
1) Normal
The amount including the food stampable tax can be paid by Food Stamp.
2) Illinois
Only the amount paid by Food Stamp is exempted from the food stampable tax.
3) New Jersey
All food stampable tax is exempted regardless of the amount of Food Stamp.
3. Change in unit of $ is paid by Food Stamp, and ¢ is paid by cash.
10-25
$12.72
$12.72
$15.00
$0.28
$2.00
10. REGISTERING PROCEDURE AND PRINT FORMAT
EO1-11152
10.45 Sale Finalization by Media Keys
10.45 Sale Finalization by Media Keys
OPERATION
---
([TXBL TL])
[AT/TL]
finalize without tendering
|Tendered Amount|
finalize with tendering and change calculation
---
([TXBL TL])
[CHK TND]
[Chg]
[MISC TEND]
Other media keys
finalize without tendering
|Tendered Amount|
finalize with tendering and
change calculation
|Quantity| [@/FOR] |Tendered Amount|
max. 3 digits
|Code for Credit Card Company| [CARD No.]
1 to 12
(|Tendered Amount|
) [Chg]
(NOTE 6)
NOTES:
1. Whether each Media Key is depressed with a prior tendered amount entry or not is determined by
the key status selections programmed for each media key.
2. If the sale total is zero, any Media Key must be depressed without a tendered amount entry even if
the key is programmed as “Tender” key.
3. When a non-cash media key is programmed as “Tender-only” key, it cannot finalize a negative
balance sale. Whether a “Total-only” or “Tender/Total” key can finalize a negative balance sale or
not is a program option. Each of non-cash media key with Tender function may be programmed to
prohibit Over-tendering and/or Short-tendering.
4. When a media is programmed to allow “Total” function, it can also be programmed with the
“Drawer Open” or “Not Open” status on operating the key.
5. When the media keys are programmed with the validation-compulsory status, the drawer opens
after the Validation Print operation.
6. When performing the Validation Print operation after entering sale total for each credit card
company, the name of the credit card company is printed.
-- Receipt Print Format -(Cash Total)
TAX
CASH
(Cash Tender)
TAX
TOTAL
CATEND
CHANGE
$0.48
$8.48
10-26
$0.48
$8.48
$10.00
$1.52
10. REGISTERING PROCEDURE AND PRINT FORMAT
EO1-11152
10.46 Multi-Tendering
10.46 Multi-Tendering
Short-tendering repeated multiple times by the same media (allowed only when the media key is programmed to
allow short-tendering).
OPERATION
---
([TXBL TL])
(|Quantity| [@/FOR])
|1st Amount Tendered| [MEDIA]
(|Quantity| [@/FOR])
|2nd Amount Tendered| [MEDIA]
Repeat if not yet finalized.
NOTE:
When the media keys are programmed with
the validation-compulsory status, the drawer
opens after the Validation Print operation.
-- Receipt Print Format --
Multi-tendering by [AT/TL] key
Change due, as the result of the 2nd amount tendered
TAX
TOTAL
CATEND
CATEND
CHANGE
$0.48
$8.48
$5.00
$5.00
$1.52
10.47 Split Tendering
Short-tendering repeated multiple times by the different media keys (allowed only when the media keys are
programmed to allow short-tendering).
OPERATION
Example 1)
---
([TXBL TL])
(|Quantity| [@/FOR])
|Check Amount Tendered| [CHK TND]
|Cash Amount Tendered| [AT/TL] ... Check & Cash
|Company Code| [CARD No.] [Chg] ... Check & Credit Card
|Cash Amount Tendered| [AT/TL] [Chg] ... Check, Cash, & Charge
Example 2)
---
([TXBL TL])
|Cash Amount Tendered| [AT/TL]
[Chg] ... Cash & Charge
NOTES:
1. In both MULTI-TENDERING and SPLIT TENDERING operations, the sale is finalized and a receipt
is issued on reaching the sale total amount.
2. If a media key is depressed without an amount tender entry and the key is programmed to function
as “Total” key, the sale is then finalized on that stage processing the balance at that moment into
that media.
3. When the media keys are programmed with the validation-compulsory status, the drawer opens
after the Validation Print operation.
-- Receipt Print Format -TAX
TOTAL
CHECK
CASH
10-27
$0.48
$8.48
$5.00
$3.48
10. REGISTERING PROCEDURE AND PRINT FORMAT
EO1-11152
10.48 Sale Finalization by EFT (Electronic Fund Transfer)
10.48 Sale Finalization by EFT (Electronic Fund Transfer)
Sale transaction by the various cards such as credit card, etc. is executed via the EFT terminal.
(1) CREDIT Authorization
OPERATION
Key Operation
FIU Upper Row Display
Sale Entry
([TXBL TL])
(Tendered Amount)
(Max. 7 digits; Omissible if all
the amount is paid, however
depending on the program
option)
[CREDIT]
SWIPE CARD
([C])
Pressing the [C] key at this
point will restore the ECR to
the condition being ready for
the [CREDIT] key entry
Swipe the Card.
PROCESSING
(in case of no response from EFT)
or
(in case of decline)
NO RESPONS
DECLINE
Response from the EFT terminal
APPROVED
ECR prints a Customer Receipt
ECR prints a Store Receipt
NOTES:
1. At tendering in Foreign Currency, the EFT media cannot be used.
2. Receipt post-Issue operation after finalizing a sale by the EFT is unavailable.
3. Training Cashiers are unacceptable to the EFT terminal.
4. When “PROCESSING” is displayed, none of the operations on the ECR are possible.
5. EFT entry is also available to the partial payment to the received on account and charge posting transactions.
6. Issuance of the Store Receipt is selectable.
7. When automatic issuance of store receipt has been programmed, only the store receipt is issued after
registering in the Receipt OFF mode. When manual issuance of store receipt has been programmed, only the
store receipt is issued with the [STORE RECEIPT] key.
8. When manual issuance of store receipt has been programmed, the store receipt must be issued to perform
next transaction or read/reset jobs.
10-28
10. REGISTERING PROCEDURE AND PRINT FORMAT
EO1-11152
10.48 Sale Finalization by EFT (Electronic Fund Transfer)
(2) DEBIT Authorization
OPERATION
Key Operation
FIU Upper Row Display
Sale Entry
([TXBL TL])
(Tendered Amount) (Max. 7 digits; Omissible if all
the amount is paid, however
depending on the program
option)
[DEBIT]
SWIPE CARD
([C])
Pressing the [C] key at this
point will restore the ECR to
the condition being ready for
the [DEBIT] key entry
Swipe the Card.
(in case of no response from EFT)
NO RESPONS
Response from the EFT terminal
ENTER PIN#
Input the Pin No. from the Pin Pad
Then depress the [ENTER] key
ECR wait condition
PROCESSING
NO RESPONS
(in case of no response from EFT)
or
(in case of decline)
DECLINE
Response from the EFT terminal
APPROVED
ECR prints a Customer Receipt
ECR prints a Store Receipt
10-29
10. REGISTERING PROCEDURE AND PRINT FORMAT
EO1-11152
10.48 Sale Finalization by EFT (Electronic Fund Transfer)
NOTES:
1.
2.
3.
4.
5.
At tendering in Foreign Currency, the EFT media cannot be used.
Receipt post-Issue operation after finalizing a sale by the EFT is unavailable.
Training Cashiers are unacceptable to the EFT terminal.
When “PROCESSING” is displayed, none of the operations on the ECR are possible.
EFT entry is also available to the partial payment to the received on account and charge posting
transactions.
6. Issuance of the Store Receipt is selectable.
7. Validation Print operation after finalizing a sale transaction by the EFT is possible.
8. Finalization of the [DEBIT] key operation in - mode causes an error.
(3) CREDIT/DEBIT Refund
OPERATION
[RTN MDSE]
NOTES:
1.
2.
3.
4.
5.
6.
to be continued to the top of “CREDIT/DEBIT Authorization” sequence
Receipt post-Issue operation after finalizing a sale by the EFT is unavailable.
Training Cashiers are unacceptable to the EFT terminal.
Key operation on the ECR is unavailable during the inquiry to the host.
Issuance of the Store Receipt is selectable.
Validation Print operation after finalizing a sale transaction by the EFT is possible.
During the Refund operation, finalizing operation by several EFT media keys should not be
performed.
(4) Manual Card Number Entry
When the EFT terminal cannot read information contained in a card, the EFT approval entry will be executed
by manually entering the card No. and the expiration date on the ECR.
• EFT Media Key Entry
Sales Item Entry
[TXBL TL]
[MANUAL CARD#]
(|Tendered Amount|)
Max. 7 digits
NOTE 1
[EFT Media Key]
NOTE 2
|Card No.| [#]
|Expiration Date| [#]
Max. 25 digits
NOTE 3
Max 4 digits; MM/YY
(Omissible)
(|Security Code|) [#]
Max 4 digits (Omissible)
NOTE 4
NOTES:
1. Entry of tendering amount is omissible if a customer pays all the amount.
2. EFT Media Key: [CREDIT] (except for the [DEBIT] key)
3. For the Card No. entry, entering 0 at the beginning of the card No. is valid.
Example) When “00123” is entered, “00123” will be printed.
4. Entry of security code will be compulsory by the program option setting.
10-30
10. REGISTERING PROCEDURE AND PRINT FORMAT
EO1-11152
10.48 Sale Finalization by EFT (Electronic Fund Transfer)
(5) Off Line Authorization
When the EFT system is in trouble and down, the EFT can be finalized on the ECR. To obtain the
authorization code of the EFT approval, you tell the customer’s card data and the amount of purchase to the
EFT authorization company on the telephone.
OPERATION
Sales Item Entry
[TXBL TL]
or
[FSTL TEND]
[OFFLINE AUTH]
Max. 7 digits
NOTE 1
(|Authorization Code|) [#]
[EFT Media Key]
Max. 11 characters
(Omissible)
NOTE 2
NOTES:
(|Tendered Amount|)
1. Entry of tendering amount is omissible if a customer pays all the amount.
2. EFT Media Key: [CREDIT], [DEBIT], [EBT CASH], [EBT F/S], [CHECK]
3. Before performing this operation, each EFT Media Key should be programmed with the statuses
both “with EFT process” and “off line authorization is available”. Failure to do this may cause an
error.
4. None of store receipt is issued by the Off Line Authorization operation.
5. In Off Line Authorization operation, the Manual Card No. entry is unavailable.
6. The OFF Line Authorization operation is not possible by cashiers with training status.
7. Values 0 to 9 and A to Z should be used to enter the Authorization Code.
Keyboard layout at the Authorization Code entry
The keyboard layout changes by the [EFT Media Key] depression as shown below.
Accordingly, values 0 to 9 and A to Z can be entered as the Authorization Code.
-- Ordinary Keyboard Type -#
C
E
J
O
T
Y
D
I
N
S
X
7
8
9
C
H
M
R
W
4
5
6
B
G
L
Q
V
1
2
3
A
F
K
P
U
0
10-31
Z
10. REGISTERING PROCEDURE AND PRINT FORMAT
EO1-11152
10.48 Sale Finalization by EFT (Electronic Fund Transfer)
-- Flat Keyboard Type -Q
W
E
R
T
Y
U
I
O
A
S
D
F
G
H
J
K
L
Z
X
C
V
B
N
M
P
#
C
7
8
9
4
5
6
1
2
3
0
(6) Store Receipt
This operation is used for manually issuing the store receipt.
OPERATION
[STORE RECEIPT]
NOTES:
1. Journal print is not performed.
2. In case of the tendering operation (multi- or split-), the [STORE RECEIPT] key can be depressed
at the same number of times as its operation. (Allowed up to 4 times)
3. None of store receipt is issued by the Off Line Authorization operation.
4. The [STORE RECEIPT] key should be programmed with the status “Issuance of store receipt is
available.” in the EFT key status setting. Failure to do this may cause an error.
5. When the host responds decline, the Store Receipt operation causes an error.
10-32
10. REGISTERING PROCEDURE AND PRINT FORMAT
EO1-11152
10.48 Sale Finalization by EFT (Electronic Fund Transfer)
(7) Cashing Authorization
Cashing operation with a Debit card or EBT cash card is performed here.
OPERATION
Key Operation
FIU Upper Row Display
Amount to be cashed
(Max. 7 digits)
[DEBIT] (or [EBT CASH])
SWIPE CARD
([C])
Pressing the [C] key at this point will
restore the ECR to the condition
being ready for the [DEBIT] (or
[EBT CASH]) key entry.
Swipe the Card.
(in case of no response from EFT)
NO RESPONS
Response from the EFT terminal
ENTER PIN#
Input the Pin No. from the Pin Pad
Then depress the [ENTER] key
ECR wait condition
PROCESSING
NO RESPONS
(in case of no response from EFT)
or
(in case of decline)
DECLINE
Response from the EFT terminal
APPROVED
ECR prints a Customer Receipt
ECR prints a Store Receipt
10-33
10. REGISTERING PROCEDURE AND PRINT FORMAT
EO1-11152
10.48 Sale Finalization by EFT (Electronic Fund Transfer)
• Manual Entry (only for [EBT CASH] key)
[MANUAL CARD#]
(|Tendered Amount|)
[EBT CASH]
Max. 7 digits
|Card No.| [#]
8 to19 digits
NOTES:
(|Expiration Date|) [#]
Max 4 digits: MM/YY
1.
(|Security Code|) [#]
Max. 4 digits
Before performing this operation, the [DEBIT] (or [EBT CASH]) key should be programmed with
the status “no-purchase cashing is allowed”. Also each EFT Media Key should be programmed
with the statuses both “with EFT process” and “off line authorization is available”. Failure to do
this may cause an error.
2. When automatic issuance of store receipt has been programmed, only the store receipt is issued
after registering in the Receipt OFF mode. When manual issuance of store receipt has been
programmed, only the store receipt is issued with the [STORE RECEIPT] key.
3. Receipt post-Issue operation after the Cash-only Debit is unavailable.
4. Key operation on the ECR is unavailable during the inquiry to the host.
5. The Endorsement Print can be performed.
6. Training Cashiers are unacceptable to the EFT terminal.
7. Issuance of the Store Receipt is selectable.
8. When manual issuance of store receipt has been programmed, the store receipt must be issued
to perform next transaction or read/reset jobs.
9. EFT Cashing Authorization operation with the [CREDIT], [CHECK], or [EBT F/S] key is not
possible. (This operation in REG or MGR mode works as a no-sale cashing of a non-cash
media.)
10. Entry of security code will be compulsory by the program option setting.
10-34
10. REGISTERING PROCEDURE AND PRINT FORMAT
EO1-11152
10.48 Sale Finalization by EFT (Electronic Fund Transfer)
(8) EBT CASH, EBT F/S Purchase
Purchase with an EBT cash card or EBT food stamp card is performed here.
OPERATION
Key Operation
FIU Upper Row Display
Sale Entry
This operation is possible when the
[EBT F/S] key is programmed with the
status “food stamp payment”.
([TXBL TL])
[FS TL/TEND]
(Tendered Amount)
|Tendered Amount|
(Max. 7 digits; Omissible
if all the amount is paid,
however depending on
the program option.)
[EBT CASH]
Max. 7 digits
(Must be entered)
[EBT F/S]
SWIPE CARD
Swipe the Card.
([C])
Pressing the [C] key at this point will restore
the ECR to the condition being ready for the
[EBT CASH] (or [EBT F/S]) key entry.
(in case of no response from EFT)
NO RESPONS
Response from the EFT terminal
ENTER PIN#
Input the Pin No. from the Pin Pad
then depress the [ENTER] key.
PROCESSING
(in case of no response from EFT)
or
(in case of decline)
NO RESPONS
DECLINE
Response from the EFT terminal
APPROVED
ECR prints a Customer Receipt
ECR prints a Store Receipt
10-35
10. REGISTERING PROCEDURE AND PRINT FORMAT
EO1-11152
10.48 Sale Finalization by EFT (Electronic Fund Transfer)
• Manual Entry
(when the [EBT CASH] or [EBT F/S] key has been programmed with the status “taxable total payment”.)
Sales Entry
([TXBL TL])
[MANUAL CARD#]
(|Sale Amount|)
Max. 7 digits
(Omissible)
|Card No.| [#]
(|Expiration Date|) [#]
8 to 19 digits
Max. 4 digits; MM/YY
(Omissible)
[EBT CASH]
([EBT F/S])
(|Security Code|) [#]
Max. 4 digits
(Omissible)
• Manual Entry
(when the [EBT F/S] key has been programmed with the status “food stamp payment”.)
Sales Entry
([FS TL/TEND])
[MANUAL CARD#]
(|Sale Amount|)
[EBT F/S]
Max. 7 digits
NOTES:
|Card No.| [#]
(|Expiration Date|) [#]
8 to 19 digits
Max. 4 digits; MM/YY
(Omissible)
1.
2.
3.
4.
5.
6.
7.
8.
9.
10.
11.
12.
13.
14.
15.
(|Security Code|) [#]
Max. 4 digits
(Omissible)
Receipt post-Issue operation after finalizing a sale by the EFT is unavailable.
Key operation on the ECR is unavailable during the inquiry to the host.
Contents of the customer receipt are printed on the journal, but those of the store receipt are not.
Automatic issuance or manual issuance of the store receipt is selectable by the system option
setting.
Up to 4 times of Multi-tendering operation or Split-tendering operation is possible when finalizing
a sale transaction by the EFT, however, the 5 times of the operation causes an error. At this time,
the sale finalization operation is possible only when using the [AT/TL] key or the media keys with
the status “without EFT process”.
Sale finalization by the EFT is possible only when the media key has been programmed with the
status “EFT media” in the EFT key status setting. If not, ordinary sale finalization is performed.
Training cashiers are unacceptable to the EFT terminal. (Ordinary finalization operation can be
performed.)
Issuance of the store receipt is selectable by the EFT key status setting.
When tendering in foreign currency, the EFT media keys are not accepted.
When automatic issuance of store receipt has been programmed, only the store receipt is issued
after registering in the Receipt OFF mode. When manual issuance of store receipt has been
programmed, only the store receipt is issued with the [STORE RECEIPT] key.
Multiplication operation for each media with the EFT media keys is not possible.
When manual issuance of store receipt has been programmed, the store receipt must be issued
to perform next transaction or read/reset jobs.
Validation Print operation after finalizing a sale transaction by the EFT is possible.
Negative balance sale causes an error.
Entry of security code will be compulsory by the program option setting.
10-36
10. REGISTERING PROCEDURE AND PRINT FORMAT
EO1-11152
10.48 Sale Finalization by EFT (Electronic Fund Transfer)
(9) Check Authorization
Sale finalization by a check via the EFT terminal is performed.
OPERATION
Key Operation
FIU Upper Row Display
Sale Entry
([TXBL TL])
(Tendered Amount)
(Max. 7 digits; Omissible if all
the amount is paid, however
depending on the program
option)
[CHECK]
SLIDE CHECK
Check Slide
([C])
Pressing the [C] key at this point will
restore the ECR to the condition being
ready for the [CHECK] key entry.
(in case of no response from EFT)
or
(in case of decline)
PROCESSING
NO RESPONS
DECLINE
Response from the EFT terminal
APPROVED
ECR prints a Customer Receipt
10-37
10. REGISTERING PROCEDURE AND PRINT FORMAT
EO1-11152
10.48 Sale Finalization by EFT (Electronic Fund Transfer)
• Manual Entry
Key Operation
FIU Upper Row Display
Sale Entry
([TXBL TL])
[MANUAL CARD#]
MANUAL CD
(Tendered Amount) (Max. 7 digits; Omissible if all the
amount is paid, however
depending on the program
option)
[CHECK]
|Account No.|
ENT ACCT NUMBER
Max. 20 digits
[#]
Pressing the [C]
key at this point
will restore the
ECR to the
condition being
ready for the
[CHECK] key
entry.
|Routing No.|
[C]
ROUTING NO
Max. 20 digits
[#]
CHECK NO
|Check No.| Max. 10 digits
[#]
|State Code|
STATE CODE
2 digits
[#]
PROCESSING
(in case of no response from EFT)
or
(in case of decline)
NO RESPONS
DECLINE
Response from the EFT terminal
APPROVED
ECR prints a Customer Receipt
10-38
10. REGISTERING PROCEDURE AND PRINT FORMAT
EO1-11152
10.48 Sale Finalization by EFT (Electronic Fund Transfer)
NOTES:
1.
2.
3.
4.
5.
6.
It is possible to cancel this operation prior to the inquiry to the host (i.e. before the message
“PROCESSING” is displayed).
Customer receipt is printed, but store receipt is not.
Check No. and Authorization code are printed on the endorsement.
Training cashiers are unacceptable to the EFT terminal. (Ordinary finalization operation can be
performed.) When they depress the [MANUAL CARD#] key at the manual entry, it results in
an error.
As the finalization of the [CHECK] key, only the Check Authorization is possible. (Return
operation is not possible.)
When negative balance sale is given in REG or MGR mode, the finalization of the [CHECK] key
causes an error. Also, this operation causes an error in - mode.
This operation is possible only when “check authorization” has been selected for the [CHECK]
key function in the system option setting.
10-39
10. REGISTERING PROCEDURE AND PRINT FORMAT
EO1-11152
10.48 Sale Finalization by EFT (Electronic Fund Transfer)
(10) Driver’s License Authorization
Sale finalization by a driver’s license via the EFT terminal is performed.
OPERATION
Key Operation
FIU Upper Row Display
Sale Entry
([TXBL TL])
(Tendered Amount) (Max. 7 digits; Omissible if all the
amount is paid, however
depending on the program
option)
[CHECK]
|License No.|
Pressing the [C]
key at this point
will restore the
ECR to the
condition being
ready for the
[CHECK] key
entry.
LICENSE NUMBER
Max. 20 digits
(alphanumeric character)
[#]
[C]
|State Code|
STATE CODE
2 digits
[#]
BIRTHDATE
|Date of Birth| 4 digits (MMYY) or 6 digits (MMDDYY)
[#]
PROCESSING
(in case of no response from EFT)
or
(in case of decline)
NO RESPONS
DECLINE
Response from the EFT terminal
APPROVED
ECR prints a Customer Receipt
10-40
10. REGISTERING PROCEDURE AND PRINT FORMAT
EO1-11152
10.48 Sale Finalization by EFT (Electronic Fund Transfer)
NOTES:
1.
2.
3.
4.
5.
6.
7.
(11)
It is possible to cancel this operation prior to the inquiry to the host (i.e. before the message
“PROCESSING” is displayed).
Customer receipt is printed, but store receipt is not.
License No. and Authorization code are printed on the endorsement.
Training cashiers are unacceptable to the EFT terminal. (Ordinary finalization operation can be
performed.)
As the finalization of the [CHECK] key, only the Check Authorization is possible. (Return
operation is not possible.)
When negative balance sale is given in REG or MGR mode, the finalization of the [CHECK] key
causes an error. Also, this operation causes an error in - mode.
Date of birth can be entered with 3 digits (MYY) or 5 digits (MDDYY) also.
Example: Entry of January 2000 …
100 [#]
Entry of January 15, 2000 …
11500 [#]
This operation is possible only when “driver’s license authorization” has been selected for the
[CHECK] key function in the system option setting.
Gift Card Issue
A Gift Card becomes available by entering the amount put onto a Gift Card on the ECR.
OPERATION
Key Operation
FIU Upper Row Display
(Sale Entry)
|Gift Card Amount| Max. 7 digits
[Gift Card Dept]
SWIPE CARD
Swipe the Card.
([C])
Pressing the [C] key at this
point will restore the ECR to
the condition being ready for
the Gift Card Amount entry.
PROCESSING
Response from the EFT terminal
APPROVED
Additional transaction, finalization, or ALL VOID
10-41
10. REGISTERING PROCEDURE AND PRINT FORMAT
EO1-11152
10.48 Sale Finalization by EFT (Electronic Fund Transfer)
NOTES: 1. Key operations on the ECR are unavailable during an inquiry at the HOST.
2. Gift card department/PLU can be registered up to 4 times during one transaction. The 5th
registration results in an error.
3. A multiplication or repeat entry of the gift card department/PLU is not available.
4. Training cashiers are unacceptable to the EFT terminal.
5. When automatic issuance of receipt has been programmed, an itemized receipt (customer receipt)
and a receipt of Gift Card entry only (customer receipt 2) are issued after sale finalization.
When manual issuance of receipt has been programmed, only a customer receipt 2 is issued with
the [STORE RECEIPT] key.
In the Receipt OFF mode, only a customer receipt 2 is issued.
6. When an error is responded from the EFT terminal, an abnormal termination message will be printed
on the journal.
7. All Void operation is not possible for the Gift Card Issue transaction in which two or more gift card
department/PLU entries remain or for the Void of Gift Card Issue transaction with the [VOID] key.
8. Returned Merchandise operation is not possible for the gift card department/PLU.
(12)
Gift Card Issue - Void
A gift card is voided.
OPERATION
• When using the [ITEM CORR] key
Key Operation
FIU Upper Row Display
(Sale Entry)
[Gift Card Dept]
[ITEM CORR]
PROCESSING
Response from the EFT terminal
APPROVED
Additional transaction or finalization
10-42
10. REGISTERING PROCEDURE AND PRINT FORMAT
EO1-11152
10.48 Sale Finalization by EFT (Electronic Fund Transfer)
• When using the [VOID] key
Key Operation
FIU Upper Row Display
(Sale Entry)
[VOID]
|Gift Card Amount|
Max. 7 digits
[Gift Card Dept]
SWIPE CARD
Swipe the Card.
ENT AUT CD
([C])
Pressing the [C] key at this
point will restore the ECR to
the condition being ready for
the [VOID] key entry.
|Authorization Code| Max. 16 digits
[#]
ENT REF.NO
|Reference No.| Max. 16 digits
[#]
PROCESSING
Response from the EFT terminal
APPROVED
Additional transaction or finalization
NOTES: 1.
2.
3.
4.
5.
Key operations on the ECR are unavailable during an inquiry at the HOST.
A multiplication or repeat entry of the gift card department/PLU is not available.
An item correct operation with the [VOID] key is not available.
Training cashiers are unacceptable to the EFT terminal.
When automatic issuance of receipt has been programmed, an itemized receipt (customer receipt)
and a receipt of Gift Card entry only (customer receipt 2) are issued after sale finalization.
When manual issuance of receipt has been programmed, only a customer receipt 2 is issued with
the [STORE RECEIPT] key.
In the Receipt OFF mode, only a customer receipt 2 is issued.
6. When an error is responded from the EFT terminal, an abnormal termination message will be printed
on the journal.
10-43
10. REGISTERING PROCEDURE AND PRINT FORMAT
EO1-11152
10.48 Sale Finalization by EFT (Electronic Fund Transfer)
(13)
Gift Card Sale
Sale finalization by a Gift Card via the EFT terminal is performed.
OPERATION
Key Operation
FIU Upper Row Display
Sale Entry
([TXBL TL])
|Tendered Amount|
Max. 7 digits; Omissible if all
the amount is paid, however
depending on the program
option.
[Gift Card Media]
SWIPE CARD
Swipe the Card.
([C])
Pressing the [C] key at this
point will restore the ECR to
the condition being ready for
the Tendered Amount entry.
PROCESSING
Response from the EFT terminal
APPROVED
ECR prints a Customer Receipt
ECR prints a Customer Receipt 2
NOTES: 1.
Receipt post-issue operation ([RECEIPT ISSUE] key) after finalizing a sale by a gift card is
unavailable.
2. Key operations on the ECR is unavailable during an inquiry at the HOST.
3. Data of the customer receipt is printed on the journal, but that of the customer receipt 2 is not.
4. Whether to issue a customer receipt 2 automatically or manually is selectable by the program
option.
5. Up to 4 multi-tendering operations or split-tendering operations are possible when finalizing a sale
transaction with the [Gift Card Media] key. The 5th operation will result in an error. At this time,
the sale finalization operation is possible only when using the [AT/TL] key or the media keys with
the status “without EFT process”.
6. Training cashiers are unacceptable to the EFT terminal.
7. Whether to issue a store receipt is selectable by the EFT key status setting.
8. At tendering in Foreign currency, pressing the [Gift Card Media] key results in an error.
9. When automatic issuance of receipt has been programmed, only the customer receipt 2 is issued
after registering in the Receipt OFF mode. When manual issuance of receipt has been
programmed, only the customer receipt 2 is issued with the [STORE RECEIPT] key.
10. A multiplication of the [Gift Card Media] key is not available.
10-44
10. REGISTERING PROCEDURE AND PRINT FORMAT
EO1-11152
10.48 Sale Finalization by EFT (Electronic Fund Transfer)
11. When it is programmed to issue the customer receipt 2 manually, a next transaction, programming,
or read/reset operation is not allowed until the customer receipt 2 is issued.
12. Validation print operation after finalizing a sale transaction by the gift card is possible.
13. Over-tendering with a Gift Card is not allowed.
14. When an error is responded from the EFT terminal, an abnormal termination message will be
printed on the journal.
15. When no response is returned from the EFT terminal and the operation results in a timeout, “NO
RESPONS” will be displayed on the upper row of the operator display.
16. Either of the following operations on the EFT terminal is selectable depending on the program
option setting.
<The EFT terminal returns an authorization only for the remaining available fund on the Gift Card.>
When the sale total of $20.00 is finalized with the [Gift Card Media] key and if the available fund
on the Gift Card is $9.00, an authorization only for $9.00 is returned. After an authorization is
returned, the remaining $11.00 should be finalized with other media keys.
<The EFT terminal returns an error.>
When the sale total of $20.00 is finalized with the [Gift Card Media] key and if the available fund
on the Gift Card is $9.00, an error is returned.
10-45
10. REGISTERING PROCEDURE AND PRINT FORMAT
EO1-11152
10.48 Sale Finalization by EFT (Electronic Fund Transfer)
(14)
Gift Card Sale - Void
Sale finalization by a Gift Card is voided.
OPERATION
Key Operation
FIU Upper Row Display
[RTN MDSE]
Sale Entry
([TXBL TL])
[Gift Card Media]
SWIPE CARD
Swipe the Card.
ENT AUT CD
([C])
Pressing the [C] key at this
point will restore the ECR to
the condition being ready for
the [RTN MDSE] key entry.
|Authorization Code| Max. 16 digits
[#]
ENT REF.NO
|Reference No.| Max. 16 digits
[#]
PROCESSING
Response from the EFT terminal
APPROVED
ECR prints a Customer Receipt
ECR prints a Customer Receipt 2
NOTES: 1.
2.
3.
4.
5.
Receipt post-issue operation ([RECEIPT ISSUE] key) after finalizing a sale by a gift card is
unavailable.
Key operations on the ECR are unavailable during an inquiry at the HOST.
Data of the customer receipt is printed on the journal, but that of the customer receipt 2 is not.
Whether to issue a customer receipt 2 automatically or manually is selectable by the program
option.
Training cashiers are unacceptable to the EFT terminal. (Ordinary finalization operation can be
performed.)
10-46
10. REGISTERING PROCEDURE AND PRINT FORMAT
EO1-11152
10.48 Sale Finalization by EFT (Electronic Fund Transfer)
6.
7.
8.
9.
10.
11.
12.
13.
14.
Whether to issue a customer receipt 2 is selectable by the EFT key status setting.
At tendering in Foreign currency, pressing the [Gift Card Media] key results in an error.
When automatic issuance of receipt has been programmed, only the customer receipt 2 is issued
after registering in the Receipt OFF mode. When manual issuance of receipt has been
programmed, only the customer receipt 2 is issued with the [STORE RECEIPT] key.
A multiplication of the [Gift Card Media] key is not available.
When it is programmed to issue the customer receipt 2 manually, a next transaction, programming,
or read/reset operation is not allowed until the customer receipt 2 is issued.
Validation print operation after finalizing a sale transaction by the gift card is possible.
Over-tendering with a Gift Card is not allowed.
When an error is responded from the EFT terminal, an abnormal termination message will be
printed on the journal.
When no response is returned from the EFT terminal and the operation results in a timeout, “NO
RESPONS” will be displayed on the upper row of the operator display.
10-47
10. REGISTERING PROCEDURE AND PRINT FORMAT
EO1-11152
10.48 Sale Finalization by EFT (Electronic Fund Transfer)
(15)
Gift Card Reload
Addition of the fund to a Gift Card is performed.
OPERATION
Key Operation
FIU Upper Row Display
(Sale Entry)
[RELOAD]
|Gift Card Amount| Max. 7 digits
[Gift Card Dept]
SWIPE CARD
Swipe the Card.
([C])
Pressing the [C] key at this
point will restore the ECR to
the condition being ready for
the [RELOAD] key entry.
PROCESSING
Response from the EFT terminal
APPROVED
Additional transaction or finalization
NOTES: 1.
2.
3.
4.
5.
6.
7.
8.
Key operations on the ECR are unavailable during an inquiry at the HOST.
Gift card department/PLU can be registered up to 4 times during one transaction.
The 5th registration results in an error.
A multiplication or repeat entry of the gift card department/PLU is not available.
Training cashiers are unacceptable to the EFT terminal. When the [RELOAD] key is pressed by a
training cashier, an error results.
When automatic issuance of receipt has been programmed, an itemized receipt (customer receipt)
and a receipt of Gift Card entry only (customer receipt 2) are issued after sale finalization.
When manual issuance of receipt has been programmed, only a customer receipt 2 is issued with
the [STORE RECEIPT] key.
In the Receipt OFF mode, only a customer receipt 2 is issued.
When an error is responded from the EFT terminal, an abnormal termination message will be
printed on the journal.
When no response is returned from the EFT terminal and the operation results in a timeout, “NO
RESPONS” will be displayed on the upper row of the operator display.
Returned Merchandise operation is not possible for the gift card department/PLU.
10-48
10. REGISTERING PROCEDURE AND PRINT FORMAT
EO1-11152
10.48 Sale Finalization by EFT (Electronic Fund Transfer)
(16)
Gift Card Reload-Void
The addition of the fund to a Gift Card is voided.
OPERATION
• When using the [ITEM CORR] key
Key Operation
FIU Upper Row Display
(Sale Entry)
[RELOAD]
|Gift Card Amount| Max. 7 digits
[Gift Card Dept]
[ITEM CORR]
PROCESSING
Response from the EFT terminal
APPROVED
Additional transaction or finalization
10-49
10. REGISTERING PROCEDURE AND PRINT FORMAT
EO1-11152
10.48 Sale Finalization by EFT (Electronic Fund Transfer)
• When using the [VOID] key
Key Operation
FIU Upper Row Display
(Sale Entry)
[VOID]
[RELOAD]
|Gift Card Amount|
Max. 7 digits
[Gift Card Dept]
SWIPE CARD
Swipe the Card.
ENT AUT CD
([C])
Pressing the [C] key at this
point will restore the ECR to
the condition being ready for
the [VOID] key entry.
|Authorization Code| Max. 16 digits
[#]
ENT REF.NO
|Reference No.| Max. 16 digits
[#]
PROCESSING
Response from the EFT terminal
APPROVED
Additional transaction or finalization
NOTES: 1. Key operations on the ECR are unavailable during an inquiry at the HOST.
2. Gift card department/PLU can be registered up to 4 times during one transaction. The 5th
registration results in an error.
3. A multiplication or repeat entry of the gift card department/PLU is not available.
4. Training cashiers are unacceptable to the EFT terminal. When the [RELOAD] key is pressed by a
training cashier, an error results.
5. When automatic issuance of receipt has been programmed, an itemized receipt (customer receipt)
and a receipt of Gift Card entry only (customer receipt 2) are issued after sale finalization.
When manual issuance of receipt has been programmed, only a customer receipt 2 is issued with
the [STORE RECEIPT] key.
In the Receipt OFF mode, only a customer receipt 2 is issued.
10-50
10. REGISTERING PROCEDURE AND PRINT FORMAT
EO1-11152
10.48 Sale Finalization by EFT (Electronic Fund Transfer)
6. When an error is responded from the EFT terminal, an abnormal termination message will be printed
on the journal.
7. When no response is returned from the EFT terminal and the operation results in a timeout, “NO
RESPONS” will be displayed on the upper row of the operator display.
(17)
Gift Card Balance
An inquiry of the available fund on a Gift Card is performed.
OPERATION
Key Operation
FIU Upper Row Display
[GIFT CARD BALANCE]
SWIPE CARD
Swipe the Card.
([C])
Pressing the [C] key at this point
will restore the ECR to the
condition being ready for the [GIFT
CARD BALANCE] key entry.
PROCESSING
Response from the EFT terminal
APPROVED
ECR prints a Customer Receipt
NOTES: 1. Key operations on the ECR are unavailable during an inquiry at the HOST.
2. Training cashiers are unacceptable to the EFT terminal. When the [GIFT CARD BALANCE] key is
pressed by a training cashier, an error results.
3. None of customer receipt is issued in the Receipt OFF mode.
4. When an error is responded from the EFT terminal, an abnormal termination message will be printed
on the journal.
5. When no response is returned from the EFT terminal and the operation results in a timeout, “NO
RESPONS” will be displayed on the upper row of the operator display.
6. The Gift Card Balance operation is not possible during a sale transaction. When the [GIFT CARD
BALANCE] key is pressed, an error results.
10-51
10. REGISTERING PROCEDURE AND PRINT FORMAT
EO1-11152
10.48 Sale Finalization by EFT (Electronic Fund Transfer)
(18)
Gift Card Cash Out
The available fund on a Gift Card can be cashed.
OPERATION
Key Operation
FIU Upper Row Display
[GIFT CARD CASH OUT]
[Gift Card Media]
SWIPE CARD
Swipe the Card.
([C])
Pressing the [C] key at this point
will restore the ECR to the
condition being ready for the [GIFT
CARD CASH OUT] key entry.
PROCESSING
Response from the EFT terminal
APPROVED
ECR prints a Customer Receipt
NOTES: 1. Key operations on the ECR are unavailable during an inquiry at the HOST.
2. Training cashiers are unacceptable to the EFT terminal. When the [GIFT CARD CASH OUT] key is
pressed by a training cashier, an error results.
3. None of customer receipt is issued in the Receipt OFF mode.
4. Only the entire fund on the Gift Card can be cashed.
5. When cashing operation is successfully terminated, the cashed amount is subtracted from the Cashin-Drawer.
6. When an error is responded from the EFT terminal, an abnormal termination message will be printed
on the journal
7. When no response is returned from the EFT terminal and the operation results in a timeout, “NO
RESPONS” will be displayed on the upper row of the operator display.
8. The Gift Card Cash Out operation is not possible during a sale transaction. When the [GIFT CARD
CASH OUT] key is pressed, an error results.
10-52
10. REGISTERING PROCEDURE AND PRINT FORMAT
EO1-11152
10.48 Sale Finalization by EFT (Electronic Fund Transfer)
(19)
Manual Account Number Entry
If the EFT Terminal cannot read Gift Cards, enter the account number (card number) on the ECR. An EFT
approval entry will be executed.
OPERATION
|Account No.|
Max. 24 digits
[MANUAL CARD#]
|Sale amount|
Max. 7 digits
|Tendered amount|
Max. 7 digits
NOTES:
[Gift Card Dept.]
[Gift Card Media]
Authorization
through the EFT
terminal
Authorization
through the EFT
terminal
1. Pressing the [C] key enables cancellation of the manual card No.
2. The ECR does not check the entered account number.
3. Zero suppression will not be performed when the account number (card number) is entered.
For example, “00123” will be printed as “00123”.
4. “MANUAL CARD #” will be printed only on the journal.
5. Training cashiers are unacceptable to the EFT terminal.
When the [MANUAL CARD#] key is pressed by a training cashier, an error results.
10-53
10. REGISTERING PROCEDURE AND PRINT FORMAT
EO1-11152
10.49 Check Cashing (No-sale cashing of a non-cash media)
10.49 Check Cashing (No-sale cashing of a non-cash media)
This operation is performed when a check is changed with cash.
OPERATION
(Must be operated outside a sale)
|Check Amount to be Cashed| [CHK TND] ... The drawer opens to enable the exchange.
NOTES:
1. Other non-cash media keys may be used for this purpose if programmed to allow no-purchase
cashing.
2. Post-issue receipt is not available after the Check Cashing operation.
3. When the media keys are programmed with the validation-compulsory status, the drawer opens
after the Validation Print operation.
Example) To encash the check for $10.
1000 [CHK TND]
-- Receipt Print Format -TEC STORE
1343 PEACH DRIVE
PHONE: 87-6437
Open 8:00am to 7:00pm
Closed: every Wednesday
08-30-2003 SAT
Check Amount Cashed
#3001
CHECK
$10.00
JONES
0291 17:31TM
10.50 Sale Paid in Foreign Currencies
OPERATION
---
[TXBL TL]
(or [ST])
Mandatory for a
sale paid in foreign
currencies.
NOTES:
[CUR1]
Amount Tendered in [CUR1]
Foreign Currency
Displays the
equivalent value in
Foreign Currency 1.
Display the entered
foreign currency
amount.
Displays the
domestic currency
value equivalent to
the tendered foreign
currency.
[AT/TL]
Other media keys
may be used if paid
in that media. (The
media key must be
programmed to allow
tendering in this
case.)
1. The [CUR 2] to [CUR 5] keys operate the same as [CUR 1], except that each of these keys has its
own exchange rate programmed corresponding to each foreign currency.
2. The amount tendered in the foreign currency and its exchange rate may be programmed to print by
program options.
3. The foreign currency keys cannot be used to finalize Received-on-Account payments, Paid-out
items, or charge posting (sale with previous balance).
4. When a tendering by a foreign currency occurs during a short-tendered condition, the [ST] key will
not be mandatory.
5. A sale of zero or negative balance cannot be finalized using any of the foreign currency keys.
6. The sale finalization using the [FS TL/TEND] key is not possible.
7. The fraction process method at the currency exchange is fixed to Round OFF.
-- Receipt Print Format --
Optional Print
Amount Tendered in CUR1
CUR1 Exchange Rate
TAX
TOTAL
CUR1
1.0914∗
CATEND
CHANGE
10-54
$0.48
$8.48
9.50
$8.70
$0.22
10. REGISTERING PROCEDURE AND PRINT FORMAT
EO1-11152
10.51 No-Sale Exchange from Foreign Currency to Domestic Currency
10.51 No-Sale Exchange from Foreign Currency to Domestic Currency
Foreign currency amount is exchanged with equivalent domestic currency amount.
OPERATION
(Must be operated outside a sale)
|Amount of Foreign Currency 1 to be exchanged| [NS]
[CUR 1]
... The drawer opens to enable exchange. Displays the domestic currency amount equivalent to the entered
foreign currency amount.
NOTES:
1.
2.
3.
4.
The [CUR 2] to [CUR 5] keys operate the same.
The fraction process method is fixed to Round OFF.
After the [CARD No.] key, the [CUR] key depression causes an error.
On the validation after performing the No-Sale Exchange from Foreign Currency to Domestic
Currency, the exchanged amount is printed.
-- Receipt Print Format -Amount of CUR1 to be exchanged
Exchange Rate (optional print)
Domestic Currency amount equivalent to the CUR2
CUR1
10.00
1.0914∗
CHANGE
$9.16
10.52 No-Sale Exchange from Domestic Currency to Foreign Currency
Domestic currency amount is exchanged with equivalent foreign currency amount.
OPERATION
(Must be operated outside a sale)
|Amount of Domestic Currency to be exchanged| [CUR 1]
[NS]
... The drawer opens to enable exchange. The display content of the CUR 1 value obtained on the [CUR 1] key
depression is held.
NOTES:
1. The [CUR 2] to [CUR 5] keys operate the same.
2. This operation (exchange from domestic to foreign currencies) may be prohibited by a program
option.
3. The fraction process method is ruled by “Foreign Currency Rounding Process Setting”.
4. After the [CARD No.] key, the [CUR] key depression causes an error.
5. On the validation after performing the No-Sale Exchange from Domestic Currency to Foreign
Currency, the exchanged amount is printed.
-- Receipt Print Format -Domestic Currency amount to be exchanged
Exchange Rate of CUR3 (optional print)
CUR1 amount equivalent to the domestic currency amount
10-55
CATEND
$1.00
1.0914∗
CUR1
1.09
10. REGISTERING PROCEDURE AND PRINT FORMAT
EO1-11152
10.53 Received-on-Account
10.53 Received-on-Account
A received-on-account transaction is used to identify money which is in the drawer but not relating to a sale.
OPERATION
|Amount of Payment| [R/A]
([ST])
|Cash Amount Tendered| [AT/TL]
(if paid in cash)
Repeatable if multiple amounts are received in one
receipt sequence.
(|Quantity| [@/FOR])
|Check Amount Tendered| [CHK TND]
(if paid in check)
[Chg] (if processed into charge account)
Other Media Finalization
This portion is the same as SALE FINALIZATION BY
MEDIA KEYS already described.
NOTES:
1. The media keys used for this operation must be
programmed to allow received-on-account entries.
2. MULTI-TENDERING and SPLIT-TENDERING (already
described) are also applied to the finalization of
received-on-account payments.
3. The All Void operation is not possible during a
Received-on-Account transaction.
4. When the media keys to be used for sale finalization
are programmed with the validation-compulsory status,
the drawer opens after the Validation Print operation.
-- Receipt Print Format -R/A
R/A
SUBTL
CASH
$5.00
$3.00
$8.00
$8.00
JONES
0301 17:46TM
10.54 Paid-Out
A paid-out transaction is used when money is removed from the drawer without totaling to a sale.
OPERATION
(Must be operated outside a sale)
|Amount to be paid out| [PO]
([ST])
[AT/TL]
Repeatable if multiple amounts to be paid out are
recorded in one receipt sequence.
NOTES:
1.
2.
3.
4.
Only [AT/TL] can finalize paid-out amounts (i.e. must always be paid out in cash).
The All Void operation is not possible during a Paid-Out transaction.
Post-issue receipt is not available after the Paid-Out operation.
If the [AT/TL] key is programmed with the validation-compulsory status, the Validation Print
operation is not compulsory at the Paid-Out operation.
-- Receipt Print Format --
10-56
PO
PO
SUBTL
TOTAL
$4.50
$3.20
$7.70
$7.70
JONES
0302 17:46TM
10. REGISTERING PROCEDURE AND PRINT FORMAT
EO1-11152
10.55 Salesperson Entry (Salesperson Sign-ON)
10.55 Salesperson Entry (Salesperson Sign-ON)
This operation is used for performing sales management of each salesperson.
OPERATION
|Salesperson Code| [SALES PERSON]
---
1 to 99
... The name of the person is displayed and printed on both journal and receipt.
Programmable options relating to Salesperson Entries:
• Salesperson’s name non-print on receipt (print on journal only)
• Salesperson Entry compulsory before sale item entries
• Salesperson Entry Prohibited during a sale (i.e. allowed only one person entry at the starting of a sale but
prohibits any other salesperson entry once the sale is started.) When this program option is not selected,
up to five salespersons can sign-ON during one sale.
The salesperson entry status (salesperson Signed-ON condition) will be held until:
• Another salesperson entry is operated, or
• The sale is finalized.
NOTE:
After a Salesperson Entry, the mode change is prohibited.
-- Receipt Print Format -02 Stacy
Salesperson Code
Salesperson’s Name
10.56 Hold & Recall
You can interrupt one customer’s transaction with other customer’s transaction.
OPERATION
Sales item entries
for Customer A
[HOLD/RECALL]
Operate sale item entries and
finalize for Customer B.
Temporary finalization of Customer A Sale (HOLD)
[HOLD/RECALL]
Additional entries if any and real sale finalization for Customer A.
Recalling Customer A Sale (RECALL)
Sale for Customer B
Sale for Customer A (HOLD)
SUBTL
∗∗HOLD
JONES
$7.00
∗∗
0305 17:48TM
DP03
DP03
TAX
CASH
ITEM
JONES
$5.00TF
$2.00TF
$0.35
$7.35
2
0306 17:49TM
Sale for Customer A (RECALL)
0305
∗∗RECALL
TAX
CASH
ITEM
JONES
2
The same Receipt Consecutive No.
NOTES:
1. The All Void operation is not possible during a Hold transaction.
2. After a Hold operation, the mode change, Sign-OUT, and Sign-OFF are not possible.
10-57
∗∗
$0.42
$7.42
0305 17:49TM
10. REGISTERING PROCEDURE AND PRINT FORMAT
EO1-11152
10.57 Credit Card No. Check
3. The Recall operation is not possible after a Hold operation or during sales item entry. After the
sales finalization, the Recall operation is possible.
4. When a customer is being held, after the sales transaction is finalized, a buzzer tone generates
twice.
5. When the Recall operation is performed for a sales transaction being held, the All Void operation is
not possible for this sales transaction. (The Void operation is possible.)
6. During a Hold, Total-only type Post-issue Receipt can be issued.
7. The Validation Print operation is not possible after depressing the [HOLD/RECALL] key.
10.57 Credit Card No. Check
---
|Number printed on the card|
[CARD CHK]
---
Max. 19 digits
|Check No.|
Max 15 digits
This operation is allowed at the top of a sale or any time during a sale including while a sale is being finalized, or
a received-on-account transaction is being operated. When an error results, the operator calls the manager. The
manager then can select one of the following solutions:
1. Tells the customer that the card cannot be accepted referring to the displayed status code. (Or, lets the
operator do so without calling the manager.)
2. To allow payment by this card as an exceptional case for some reason, depress the [C] key to clear the error,
then turn the Mode Lock to “MGR” position using the MA key, and depress the [CARD CHK] key. The card
No. is then accepted and printed.
NOTES:
1. The card check function is activated in the REG mode only; in MGR or - mode, the card No. entry
is accepted without an inquiry to the “Card No. Negative Check List”.
Please also note that the card check function can be set to “active” or “non-active” in the MGR
mode (described in Manager’s Guide.)
2. It is programmable to prohibit finalizing a sale before the card check operation by programming the
compulsory card check to each media key.
10.58 Receipt Post-Issue
OPERATION
(Must be operated outside a sale)
(A sale is finalized)
[RECEIPT ISSUE]
Programmable options:
• Post-issue receipt is available only when the sale has been finalized with Receipt-OFF mode.
• Available regardless of Receipt-ON/OFF mode (in this case two receipts may be obtained for one sale.)
• Post-issue receipt is itemized receipt for a sale of maximum 50 lines. Exceeding 50 lines, the post-issue
receipt is total-only receipt.
• Post-issue receipt is always total-only receipt regardless of the number of lines of a sale.
• Post-issue receipt is issued only once.
• Post-issue receipt can be issued any number of times.
NOTES:
1. The post-issue receipt content will not be printed on the Remote Slip Printer.
2. The post-issue receipt is not available for Paid-Out transactions.
10-58
10. REGISTERING PROCEDURE AND PRINT FORMAT
EO1-11152
10.59 Charge Posting: Previous Balance Manual Entry Type
3. The program option allows you to select that the post-issue receipt operation is available for the
Received-on-Account transaction, the Charge Posting transaction and the Hold & Recall
transaction. However, when the Charge Posting transaction is finalized by the [PO] key, the postissue receipt operation cannot be unconditionally performed.
4. The Validation Print operation is not possible after performing the post-issue receipt operation.
-- Ordinary Receipt -08-30-2003 SAT
VEGETABLE
2x
Tomato
SUBTL
TAX
TOTAL
CATEND
CHANGE
ITEM
JONES
Itemized Type
08-30-2003 SAT
#3001
$8.00TF
1.00@
$2.00TF
$10.00
$0.60
$10.60
$11.00
$0.40
∗∗COPY
VEGETABLE
2x
1.00@
Tomato
SUBTL
TAX
TOTAL
CATEND
CHANGE
-- Post-issue Receipt -Total-only Type
#3001
08-30-2003 SAT
∗∗
$8.00TF
$2.00TF
$10.00
$0.60
$10.60
$11.00
$0.40
3
0316 17:58TM
ITEM
JONES
3
0316 17:58TM
#3001
TOTAL
$10.60
JONES
0316 17:58TM
This line is printed only when a post-issue
receipt is issued after the Ordinary Receipt is
issued, or the second and subsequent postissue receipts are issued.
10.59 Charge Posting: Previous Balance Manual Entry Type
OPERATION
(1) To initiate charge posting for a new customer
0 [PB+] (or [PB-])
Follow the line marked with “*” in Operation 2 below.
zero
(2) Charge posting with a previous balance first entered (pre-select) with or without PAYMENT
[PB+] (for credit balance)
*
Sale item
|Previous Balance|
[PB-] (for debit balance)
entries, if any.
([TXBL TL])
Displays the sale total
excluding the previous
balance.
[Chg]
Finalizes the current sale,
displays the entire sale total
including the previous balance.
[TRF] ......... to transfer all the balance as a new balance (i.e. no payment for this occasion).
The prior [Chg] key may be omitted in this case.
|Amount Paid for this occasion| [R/A]
Media Key operations
(Same as media key operations for RECEIVED-ON
-ACCOUNT payment finalization already described.)
(The amount to be paid, partially or
entirely, for this occasion.
An excessive amount may be entered,
in which case a debit balance will
result.)
Repeatable if necessary.
[PO] ........... when the balance is negative (debit balance) and must be paid back to the customer in
cash now.
10-59
10. REGISTERING PROCEDURE AND PRINT FORMAT
EO1-11152
10.59 Charge Posting: Previous Balance Manual Entry Type
(3) Charge posting with a previous balance entered during a sale (post-select)
A previous balance (including a zero balance for a new customer) may be entered not only before sale items
but also after or between them if the [Chg] key has not been depressed. Multiple previous balance entries
are possible within a sale (for the purpose to sum up multiple accounts into one, etc.).
(4) Percent rate addition to a previous balance
(|Rate|) [%+]
|Previous Balance| [PB+]
NOTES:
---
1. The [%-] key operates the same for percent discounting.
2. The previous balance entered through [PB-] (debit balance) will not allow %+ or %- operation.
3. When the last key is programmed with the validation-compulsory status, the drawer opens after the
Validation Print operation.
Charge Posting Operation Sample (Previous Balance Manual Entry Type)
OPERATION CONTENTS
KEY OPERATION
To open a new customer account:
Sale Items:
$3,50 Dept.1
$2,40 Dept.3
Finalize this sale.
To transfer all the balance without
payment.
The above customer comes to the
store for payment.
All his balance is read.
He will pay all the balance today.
He tenders $7,00 in cash.
The balance of the customer is now
zero.
Give the change to the customer in
cash.
DISPLAY (Lower Row)
0 [PB+]
350 [DEPT 1]
240 [DEPT 3]
([Chg])
[TRF]
(See Receipt 1 below.)
623 [PB+]
(previous balance)
[Chg]
623 [R/A]
700 [AT/TL] (See Receipt 2 below.)
0
0
1
3
0.
0
0
3.
2.
6.
6.
5
4
2
2
0
0
3
3
6.
2
3
6.
6.
0.
2
2
7
3
3
7
-- Receipt Print Format -Receipt 1
Receipt 2
TEC STORE
1343 PEACH DRIVE
PHONE: 87-6437
TEC STORE
1343 PEACH DRIVE
PHONE: 87-6437
Open 8:00am to 7:00pm
Closed: every Wednesday
Open 8:00am to 7:00pm
Closed: every Wednesday
08-30-2003 SAT
#3001
New Balance is
transferred as PB.
08-30-2003 SAT
#3001
PB+
VEGETABLE
DP03
TAX
Chg
$0.00
$3.50TF
$2.40TF
$0.33
$6.23
PB+
Chg
R/A
CATEND
CHANGE
$6.23
$6.23
$6.23
$7.00
$0.77
NEW BAL
$6.23
NEW BAL
$0.00
ITEM
JONES
2
ITEM
JONES
0338 18:26TM
10-60
0
0339 18:27TM
10. REGISTERING PROCEDURE AND PRINT FORMAT
EO1-11152
10.60 Charge Posting: Customer File Type (Check Track Memory Option)
10.60 Charge Posting: Customer File Type (Check Track Memory Option)
OPERATION
(1) To initiate charge posting for a new customer
|Customer File Code| [PICK UP BAL]
(Must be one of those already opened in the
“SET” mode and its balance must be zero.)
Follow the line marked with
“*” in Operation 2 below.
|New Customer File Code| [CODE OPEN]
(any 1 to 12-digit code not yet opened in the
“SET” mode) ... (The use of [CODE OPEN]
may require a Manager Intervention.)
(2) Charge posting with a previous balance first entered (pre-select) with or without Payment
*
Sale item entries, if any.
|Customer File Code| [PICK UP BAL]
([TXBL TL])
Displays the sale total
excluding the previous
balance.
[Chg]
Finalizes the current sale,
displays the entire sale total
including the previous balance.
[TRF] ......... to transfer all the balance as a new balance (i.e. no payment for this occasion).
The prior [Chg] key may be omitted in this case.
|Amount Paid for this occasion| [R/A]
Media Key operations
(Same as media key operations for RECEIVED-ON
-ACCOUNT payment finalization already described.)
(The amount to be paid, partially or
entirely, for this occasion.
An excessive amount may be entered,
in which case a debit balance will
result.)
Repeatable if necessary.
[PO] ........... when the balance is negative (debit balance) and must be paid back to the customer in
cash now.
(3) Charge posting with a previous balance entered during a sale (post-select)
A previous balance recalled through [PICK UP BAL] (or a zero balance by [PICK UP BAL] or [CODE OPEN])
may be entered not only before sale items but also after or between them if the [CRT] key has not been
depressed. But, this operation is allowed only once in a sale.
(4) Percent rate addition to a previous balance
|Customer File Code| [PICK UP BAL]
NOTES:
(|Rate|) [%+]
---
1. The [%-] key operates the same for percent discounting.
2. When the balance recalled is negative (debit balance), neither %+ nor %- can be operated.
10-61
10. REGISTERING PROCEDURE AND PRINT FORMAT
EO1-11152
10.60 Charge Posting: Customer File Type (Check Track Memory Option)
Charge Posting Operation Sample (Check Track Memory Option)
OPERATION CONTENTS
KEY OPERATION
Mr. JAMES HAILY comes and you
start charge posting for him.
Sale Items:
$1,20 Dept.1
$3,50 Dept.3
Finalize this sale.
To transfer all the balance without
payment.
Mr. JAMES HAILY now comes to pay
all his account balance.
He tenders $10,00 in cash.
The balance is now zero due to the
payment.
Give the change to the customer in
cash.
DISPLAY (Lower Row)
1 [PICK UP BAL]
0
0
120 [DEPT 1]
350 [DEPT 3]
([Chg])
[TRF]
(See Receipt 1 below.)
1 [PICK UP BAL]
[Chg]
488 [R/A]
1000 [AT/TL]
(See Receipt 2 below.)
1
3
0.
0
0
1.
3.
4.
4.
2
5
8
8
0
0
8
8
4.
4.
4.
5.
8
8
8
1
8
8
8
2
-- Receipt Print Format -Receipt 1
Receipt 2
TEC STORE
1343 PEACH DRIVE
PHONE: 87-6437
TEC STORE
1343 PEACH DRIVE
PHONE: 87-6437
Open 8:00am to 7:00pm
Closed: every Wednesday
Open 8:00am to 7:00pm
Closed: every Wednesday
08-30-2003 SAT
Customer
File Code
Customer’s
Name &
Balance
PB+
JAMES HAILY
VEGETABLE
DP03
TAX
Chg
NEW BAL
ITEM
JONES
08-30-2003 SAT
#3001
000000000001
$0.00
$1.20TF
$3.50TF
$0.18
$4.88
PB+
JAMES HAILY
Chg
R/A
CATEND
CHANGE
NEW BAL
$4.88
ITEM
JONES
2
0326 18:05TM
10-62
#3001
000000000001
$0.00
$4.88
$4.88
$10.00
$5.12
$0.00
0
0327 18:10TM
10. REGISTERING PROCEDURE AND PRINT FORMAT
EO1-11152
10.61 Function Key Entry
10.61 Function Key Entry
This operation will execute a string of key operations preprogrammed on each [FUNCTION] key.
OPERATION
---
-- Receipt Print Format -[FUNCTION] (
--- )
TEC STORE
1343 PEACH DRIVE
PHONE: 87-6437
[FUNCTION 1] to [FUNCTION 10]
•
The following key operations are preprogrammed on
the [FUNCTION 1] key in this example.
[1] [00] [DP1] [ST] [AT/TL]
Open 8:00am to 7:00pm
Closed: every Wednesday
08-30-2003 SAT
#3001
DP01
SUBTL
CASH
ITEM
JONES
$1.00TF
$1.00
$1.00
1
0340 18:29TM
10.62 Endorsement Print
OPERATION
After operating the required
non-cash media key
(usually the [CHK TND] key)
Insert the check or the
required slip into
Remote Slip Printer
Enter the check No. (Max.
15 digits) (if so the
programmed), and then
depress [CHECK NO.] key.
NOTES: 1. The Check No. entry prior to the [CHECK NO.] key may be programmed to be compulsory.
2. Endorsement print performed after the received-on-account transaction is available.
3. When the validation-compulsory status is activated, the Endorsement print is possible after
performing the Validation Print.
-- Endorsement Print Sample -Printed on Remote Slip Printer:
08-30-2003 SAT
VEGETABLE
DP02
DP03
SUBTL
TXBL TL
TAX
TOTAL
CHECK
CHANGE
ITEM
JONES
#3001
$1.20TF
$6.50TF
$6.00TF
$13.70
$14.46
$0.76
$14.46
$15.00
$0.54
TEC STORE
1343 PEACH DRIVE, LIVERPOOL,
ENGLAND
TOTAL
$14.46
#3001 CHECK
$15.00
1CL 0350 08-30-2003
18:36TM
3
0350 18:36TM
10-63
Check No. Line
Endorsement Message Lines
Total Line (may not be printed)
Check Amount Line
Cashier ID, Consecutive No.,
Date, Time
10. REGISTERING PROCEDURE AND PRINT FORMAT
EO1-11152
10.63 Comment Print
10.63 Comment Print
OPERATION
Print of the programmed message
|Comment Message Code| [COMMENT] .............. Programmed message corresponding to the designated
1 to 10
code is printed on the receipt and the remote slip.
Print of a message using character code entry
[COMMENT]
Character Code Entry
[COMMENT] .................. Message entered by
character code is printed on
the receipt and the remote
slip.
(Max. 32 characters; 2-digit
code is assigned to each
character as shown on the
table below.)
Example)
Character code “00” is assigned to “SPACE”.
Character code “34” is assigned to “B”.
NOTES: 1. This operation is available any time outside a sale or inside a sale including during the short
tendering condition, however except the following.
During the Loan transaction
During the Pick Up transaction
During the Paid Out transaction
2. Neither the Item Correct transaction nor the Validation Print is effective for this operation.
10-64
10. REGISTERING PROCEDURE AND PRINT FORMAT
EO1-11152
10.64 Sale Finalization by EBT (Electronic Benefit Transfer)
10.64 Sale Finalization by EBT (Electronic Benefit Transfer)
OPERATION
Entry for customer’s receipt (1st Receipt)
• Using the EBT Card (for Food Stamp)
When all the amount is paid by EBT Card
Sales Item Entry
[FS TL/TEND]
[DISPLAY 1]
(|Food Stamp Tendered Amount|)
The message “EBT AUTH” is displayed, and the sale finalization
process is automatically performed as the EBT Card sale.
• Using the Debit Card, Check, Credit Card and Cash EBT Card
During short tendering condition
Sales Item Entry
When all the amount is paid by one media
[TXBL TL]
[DISPLAY 2]
[DISPLAY 3]
[DISPLAY 4]
[DISPLAY 5]
(|Media Tendered Amount|)
The message “DEBIT AUTH” is displayed, and the sale finalization
process is automatically performed as the Debit Card sale.
The message “CHECK AUTH” is displayed, and the sale finalization
process is automatically performed as the Check sale.
The message “CREDIT AUTH” is displayed, and the sale finalization
process is automatically performed as the Credit Card sale.
The message “CASH EBT” is displayed, and the sale finalization
process is automatically performed as the Cash EBT Card sale.
Entry for store’s receipt (2nd Receipt)
After the 1st receipt is issued
[DISPLAY 6]
The message “RECEIPT” is displayed, and the
2nd receipt (Receipt for store; Copy) is issued.
NOTES: 1. Do not operate the keys on the keyboard until the 1st receipt (Receipt for customer) is issued.
2. This operation is available for the Received-on-Account transaction and the partial payment on the
Charge Posting transaction.
3. As for the journal print, only the content of the 1st receipt is printed.
4. When the Validation Print or the Endorsement Print is necessary, perform it after the 1st receipt is
issued. Neither the Validation Print nor the Endorsement Print can be performed after the 2nd
receipt is issued.
10-65
10. REGISTERING PROCEDURE AND PRINT FORMAT
EO1-11152
10.65 Validation Print
10.65 Validation Print
After performing each registering operation, insert a validation slip into the validation slot of the slip printer,
confirm the PAPER OUT lamp on the slip printer is off, then depress the [VALIDATE] key to perform a validation
print.
OPERATION
After entering the required
item through a transaction
key or media key.
NOTES: 1.
2.
3.
4.
5.
6.
7.
8.
9.
10.
11.
12.
13.
Insert a validation slip
into the validation slot.
[VALIDATE]
The following options are selectable.
1) Print/Non-print selection
Date print/non-print, consecutive No. print/non-print, cashier No. print/non-print, terminal No.
print/non-print, and time print/non-print are selectable.
2) Multi-validation function
3) Total validation function
When depressing the declaration key, numeric key, or point key, the Validation Print causes an
error.
The Validation Print is possible after performing the Non-Add Number Print or the No-sale
operation.
The validation compulsory status is programmable on each key by the key status setting.
When the validation compulsory status after the issuance of the long receipt is activated, the
Validation Print is performed then the drawer opens.
When the total validation function is not selected, the Validation Print after the [EX] key depression
causes an error.
The subtotal amount is printed on the validation after performing the All Void operation.
The Validation Print operation is not possible by cashiers with training status.
The tendered amount is printed on the validation after tendering food stamps.
When the taxable total display by the [ST] key depression has been programmed, not the taxable
total amount but the subtotal amount is printed.
While the entered data is printed by the slip printer, if you want to perform a validation print, press
the RELEASE key of the slip printer to replace the slip with the validation slip, then depress the
[VALIDATE] key.
Characters of character codes 1007, 1206, 1207, 1211, 1500 through 1503, 1506 through 1514
such as Ë, Œ, œ, ∅, →, ←, ↓, ↑, ¹, , kg, lb, No, ×, ∇, ∆ are not printed on the validation slip.
The name and amount of the head-link PLU are printed on the validation slip after performing the
link PLU entry.
10-66
10. REGISTERING PROCEDURE AND PRINT FORMAT
EO1-11152
10.66 Remote Slip Printer (hardware option) Operation
10.66 Remote Slip Printer (hardware option) Operation
The Remote Slip Printer TM-U295 (EPSON printer) may be connected to the ECR as an optional device. The
Remote Slip Printer will operate printing if a slip is properly inserted, regardless of the Mode Lock position (except
that no print will occur in the “SET” mode or during program verification in the “X” mode).
1. The remote slip printer will automatically activate printing when the slip has properly been set to the printer
table.
2. The following are selective status programmable relating to the remote slip printer. Ask the store manager
and mark the status selected for your store.
PROGRAM OPTIONS RELATING TO REMOTE SLIP CONTROL
• Remote Slip Print compulsory for any Previous Balance entry in “REG” or “MGR” mode:
Standard: FREE (Not compulsory)
Option:
COMPULSORY (applies to any Previous Balance entry whether it is the Manual PB Entry type
or the Customer File (Check Track) Memory type.
• Code No. (Check No.) Entry Before [CHECK NO.] key at Endorsement Print (Refer to ENDORSEMENT
PRINT operation already stated.)
Standard: FREE (Not compulsory)
Option:
COMPULSORY
3. The gap of the slip inlet is usually opened, and the slip may be inserted or withdrawn freely outside a
receipt/journal print sequence.
When a slip is properly set to the remote slip printer and the ECR is operated, the gap will be closed and
printing will be performed. When the sale is finalized and the receipt is issued, the gap of the Remote Slip
Printer will be opened to allow the slip withdrawal. (The gap keeps closed during sale item entries.)
4. The RELEASE key on the TM-U295 may be used to open the closed gap in order to withdraw the slip and
skip unnecessary item print.
5. Printing on the remote slip will be performed alternately with printing on the receipt/journal of the ECR.
6. When the remote slip print is compulsory, the slip printer OFF status or the disconnection of the cable causes
a SLIP OFFLINE error. During the error, the [ITEM CORR] key depression results in that the slip printer
connection check message is displayed. At this time, the [ITEM CORR] key depression again results in that
the slip printer is disconnected, however, the [C] key depression results in that the slip printer remains
connected.
7. When the remote slip print (or endorsement print) is compulsory, the [VALIDATE] or [CHECK NO.] key
depression may cause a SLIP OFFLINE error or SLIP PAPER OUT error. At this time, the compulsion status
is canceled by performing one of the following operations, and you can proceed to the registering operation.
(a) [ITEM CORR] key → [ITEM CORR] key
• Depress the [ITEM CORR] key if you want to cancel the compulsion status. At this time, the confirmation
message “COMP CANCEL?” is displayed.
• Depress the [ITEM CORR] key again to perform the cancellation.
• The cancellation continues during a sale transaction.
(b) [ITEM CORR] key → [C] key
• When the confirmation message “COMP CANCEL?” is displayed, if you do not want to perform the
cancellation, depress the [C] key.
(c) [C] key
• Depress the [C] key to clear the error message.
After clearing the error, the Validation Print operation or the Endorsement Print operation is possible by
depressing the [VALIDATE] or [CHECK NO.] key.
8. Characters of character codes 1007, 1206, 1207, 1211, 1500 through 1503, 1506 through 1514 such as Ë, Œ,
œ, ∅, →, ←, ↓, ↑, ¹, , kg, lb, No, ×, ∇, ∆ are not printed on the validation slip.
10-67
10. REGISTERING PROCEDURE AND PRINT FORMAT
EO1-11152
10.66 Remote Slip Printer (hardware option) Operation
As typical application of remote slip printing, print formats of invoice and Charge Posting Customer Sale File are
placed below.
-- Invoice Print Format --
08-30-2003 SAT
VEGETABLE
6x
0.60@
Drink Small-B
6x
0.05@
Small-Btl Depo↑
SUBTL
%10%
CASH
ITEM
JONES
VEGETABLE
6
0.60@
Drink Small-B
6
0.05@
Small-Btl Depo
SUBTL
%10%
CASH
#3001
$1.30TF
$3.60T
$0.30
$5.20
-0.52
$4.68
ITEM
13
08-30-2003 #3001 JONES
$1.30TF
$3.60T
$0.30
$5.20
-0.52
$4.68
0352 18:47TM
13
0352 18:47TM
-- Charge Posting Sale File Print Format (PB Manual Entry Type) -1
08-30-2003 SAT
#3001
PB+
VEGETABLE
DP02
TAX
Chg
$0.00
$3.50TF
$2.40TF
$0.35
$6.25
NEW BAL
$6.25
ITEM
JONES
NEW BAL
$6.25
08-30-2003 #3001
2
0353 18:50TM
08-30-2003 SAT
$6.25
$1.00TF
$7.25
NEW BAL
$7.25
1
0354 18:51TM
08-30-2003 SAT
#3001
PB+
Chg
R/A
CASH
$7.25
$7.25
$7.25
$7.25
NEW BAL
$0.00
0
0355 18:52TM
10-68
JONES
0353 18:50TM
$6.25
$1.00TF
$7.25
NEW BAL
$7.25
1
JONES
0354 18:51TM
PB+
Chg
R/A
CASH
$7.25
$7.25
$7.25
$7.25
NEW BAL
$0.00
ITEM
08-30-2003 #3001
3
2
PB+
Tomato
Chg
ITEM
08-30-2003 #3001
#3001
PB+
Tomato
Chg
ITEM
JONES
$0.00
$3.50TF
$2.40TF
$0.35
$6.25
ITEM
2
ITEM
JONES
PB+
VEGETABLE
DP02
TAX
Chg
0
JONES
0355 18:52TM
10. REGISTERING PROCEDURE AND PRINT FORMAT
EO1-11152
10.67 When a Power Failure Occurs...
10.67 When a Power Failure Occurs...
If a power failure occurs, all sales data stored in the memory are automatically protected by the battery installed
in the ECR. The battery is rechargeable and it is recharged when the AC power returns. As the power returns,
the ECR revives to continue the work and displays the last item entered before the power failure. However,
please note the following phenomena to occur on the ECR when the power is regained:
1. The printer will work to print the entered data without failure after the power recovery, if any data was being
printed. However, one extra line may be fed on the power recovery depending on the power-recovery timing.
2. The following are the display indications on the power recovery:
ECR CONDITION at the time of Power Failure
DISPLAY INDICATION on the Power Recovery
OUTSIDE A
SALE
No key-in has been operated.
Numeric or Declaration keys have
been entered but not motorized keys.
DURING A
SALE
No Numeric or Declaration keys have
been entered.
Numeric or Declaration keys have
been entered.
Displays zero. Operations may go on.
Regains the display content that was obtained just
before the power failure. The operations may be
continued.
Regains the display content that was obtained just
before the power failure. The operations may be
continued.
In case a power failure occurred during printing, after the power recovery, a line of “*****” is printed on the receipt,
then whole contents will be printed.
Example:
-- Receipt Print Format --
TEC STORE
1343 PEACH DRIVE
PHONE: 87-6437
Open 8:00am to 7:00pm
Closed: every Wednesday
08-30-2003 SAT
#3001
DP01
DP01
$1.00
$1.00
********************************
TEC STORE
1343 PEACH DRIVE
PHONE: 87-6437
Open 8:00am to 7:00pm
Closed: every Wednesday
08-30-2003 SAT
DP01
DP01
DP01
DP01
DP01
CASH
ITEM
JONES
#3001
$1.00
$1.00
$1.00
$1.00
$1.00
$5.00
5
0357 18:55TM
10-69
11. JOURNAL AND RECEIPT PAPER-END DETECTOR
EO1-11152
11. JOURNAL AND RECEIPT PAPER-END DETECTOR
11. JOURNAL AND RECEIPT PAPER-END DETECTOR
(1) This detects when either the journal or receipt paper is coming near the end. It is provided in order to prompt
the operator to replace the old paper roll with a new one.
(2) When the paper roll is out (or the paper has not been set properly), no key operation will be accepted and the
front display will indicate “PAPER END”.
(3) When a new paper roll is set, only the [C] key is allowed to operate. Next, when the [C] key is depressed, the
error message “PAPER END” will be cleared and normal key-in operations will be accepted. If any printing
was suspended, it will continue printing.
(4) If this detector senses a paper-end condition during printing, the printing will stop after the current line printing
is completed.
(5) If the [C] key is depressed in the paper-end condition, it will be ignored. The [C] key depression will be
effective to clear the error message only after the new paper roll is set.
(For further details, refer to Chapter 6.)
12. ECR PRINTER MOTOR LOCK DETECTOR
(1) This detects the printer motor lock condition caused by some trouble.
(2) When such a condition is detected, the front display indicates “PRINTER ERROR” and none of the keys
(including [RF] and [JF]) will be accepted.
(3) To regain the normal condition, turn the power of the ECR to OFF, remove the cause of the motor lock, and
then turn the power to ON again.
11- 1
13. REMOTE SLIP PRINTER MOTOR LOCK DETECTOR
EO1-11152
13. REMOTE SLIP PRINTER MOTOR LOCK DETECTOR
13. REMOTE SLIP PRINTER MOTOR LOCK DETECTOR
(1) This detects the remote slip printer motor lock condition caused by some trouble.
(2) When such a condition is detected, the front display indicates “SLIP OFF LINE” and none of the keys
(including [RF] and [JF]) will be accepted.
(3) To regain the normal condition, turn the powers of the ECR and the remote slip printer to OFF, remove the
cause of the motor lock, and then turn the powers to ON again.
*
If the cause cannot be found in the remote slip printer and only the ECR may be required to work temporarily
without the remote slip printer, remove the remote printer cable from the ECR, and turn the power of the ECR
to ON.
14. PRINTER HEAD OPEN DETECTOR
(1) This detects the printer head open condition.
(2) When such a condition is detected, the front display indicates “Error” and none of the keys (including [RF] and
[JF]) will be accepted.
(3) To regain the normal condition, turn the power of the ECR to OFF, close the printer guide, and then turn the
power to ON again.
13- 1
15. GENERAL MAINTENANCE
EO1-11152
15.1 Cleaning the Covers
15. GENERAL MAINTENANCE
WARNING!
1. DO NOT POUR WATER directly onto the ECR, as this may cause electric shock or fire.
2. The Journal Take-up Motor becomes very hot while printing. To avoid getting burned, never
touch the Journal Take-up Motor.
CAUTION!
Never use an organic solvent like thinners or benzene for cleaning. Using such solvents may
discolor the cover.
15.1 Cleaning the Covers
Wipe the covers with a soft dry cloth slightly moistened with mild detergent. After using detergent for cleaning, be
sure to wipe it off with a slightly moistened cloth.
15.2 Removing Jammed Paper
1) Turn the power OFF.
2) Open the Receipt Frame Cover Ass’y. If Receipt Frame Cover Ass’y will not open because of paper jam, turn
knob until pin appears in opening by triangle.
Pin
Knob
3) Remove the jammed paper. DO NOT USE any sharp implement or tool as these will damage the printer.
4) Re-load the receipt roll. (Refer to Section 6.1 Installing/Replacing the Receipt/Journal Roll.)
15.3 Clearing the Cutter Error
When the display indicates “CUTTER ERROR”, clear this error by following procedure below.
1) Turn the power OFF.
2) Turn the power ON.
3) Depress the [C] key.
15- 1
15. GENERAL MAINTENANCE
EO1-11152
15.4 Manual Drawer Release and Lock
15.4 Manual Drawer Release and Lock
WARNING!
When opening the cash drawer, be careful not to let the drawer hit any person.
The drawer opens automatically when a registration is performed. In the event of a power failure or other trouble,
the drawer can be opened manually in the following manner:
Releasing
1) Remove the CDC Cap.
2) Insert the Drawer Release Key into the Drawer Release Lock, then turn the key clockwise. The drawer will
now open. The Drawer Release Key can be taken out by returning it to the original position.
Locking
When the drawer is closed, it is automatically locked and will not open without the Drawer Release Key or
transaction entries.
15.5 Removing the Drawer
1) Pull the drawer out, and when it stops by the stopper, lift the drawer up and pull it again.
2) When it stops again by the roller fixed in the drawer case, lift it and pull it again.
15- 2
15. MAINTENANCE OPERATIONS
EO1-11152
15.6 Media Slot
15.6 Media Slot
The Media Slot provided at the front of the drawer is used to put non-cash media such as check in the drawer
without opening it. The non-cash media put from this slot are kept under the Money Case, therefore you can
keep them in secret.
Media Slot
Non-cash media are kept here.
Money Case
15.7 CDC (Cash Drawer Cover; Option) Lock
Locking
1) Push the Cash Drawer Cover to the back of the drawer.
2) Press the cover lightly, insert the key into the key hole on the cover, and turn it 90° clockwise.
Unlocking
Unlock the cover using the key, and lift the front end.
15- 3
16. SPECIFICATIONS
EO1-11152
16. SPECIFICATIONS
16. SPECIFICATIONS
Size ........................................................ 460 mm (width) x 430 mm (depth) x 350 mm (height)
(height including rubber feet)
Weight ................................................... 15.0 kg
Power Required .................................... AC 117 V ±10 %; 60 Hz
(varies depending on the destination)
Power Consumed ................................. 0.6 A at 117 V
Ambient Temperature .......................... 0 °C to 40 °C, 10% to 90% Relative Humidity
Size of Receipt and Journal Tape ...... Width:
Thickness:
Outside dimension:
Recommended thermal paper:
Paper specification:
16- 1
57.5 ± 0.5 mm
0.06 mm to 0.075 mm
83 mm or less
KF50 (KANZAN)
TF50KS-E2C (Nippon Paper Industries)
P350 (KSP)
Only paper rolled onto a core is
acceptable, however, the paper end
should not be pasted to the core.
2. STAND-ALONE LEVEL
MANAGER’S GUIDE
EO1-11152
MA-1595-1 SERIES
TABLE OF CONTENTS
Page
1. DAILY OPERATION FLOW -------------------------------------------------------------------------- 1- 1
2. MANAGER INTERVENTION------------------------------------------------------------------------- 2- 1
2.1
2.2
Items Programmed to Require Manager Interventions ------------------------------------------2- 1
Other Operations Required Manager Interventions ----------------------------------------------2- 3
3. MANAGER’S OWN OPERATIONS IN “MGR” MODE --------------------------------------- 3- 1
3.1
3.2
3.3
3.4
3.5
Pick Up Operation ----------------------------------------------------------------------------------------3- 1
Enforced Sign-OFF of a Cashier (Code Entry Method)------------------------------------------3- 2
Post Authorization Operation --------------------------------------------------------------------------3- 3
EBT F/S Electronic Voucher Purchase --------------------------------------------------------------3- 4
EBT CASH, EBT F/S Balance Inquiry ---------------------------------------------------------------3- 6
4. OPERATIONS IN “ - ” MODE ----------------------------------------------------------------------- 4- 1
4.1
4.2
4.3
4.4
4.5
4.6
Ordinary Operations In “ - ” Mode --------------------------------------------------------------------4- 1
Charge Posting With Customer File (Check Track Memory) In “ - ” Mode ------------------4- 1
Scale Item Entry In “ - ” Mode -------------------------------------------------------------------------4- 3
Electronic Fund Transfer (EFT) Operation In “ - “ Mode ----------------------------------------4- 3
Prohibitive Operations In “ - ” Mode ------------------------------------------------------------------4- 7
Manager Intervention Required Status or Amount Limit In “ - ” Mode------------------------4- 7
5. READ (X) AND RESET (Z) REPORTS------------------------------------------------------------ 5- 1
5.1
5.2
Combination Reports ------------------------------------------------------------------------------------5- 4
General Notes On Report Takings--------------------------------------------------------------------5- 4
6. PROGRAMMING OPERATIONS ------------------------------------------------------------------- 6- 1
6.1
6.2
6.3
6.4
6.5
6.6
6.7
6.8
6.9
6.10
6.11
6.12
6.13
6.14
6.15
6.16
6.17
6.18
6.19
6.20
6.21
Basic Key Functions and Keyboard Variations in Programming Operations ---------------6- 2
Character Entries -----------------------------------------------------------------------------------------6- 4
Condition Required for Programming Operations-------------------------------------------------6- 8
Store Name Message, Commercial Message, and Footer Logo Message
Programming (Submode 1)----------------------------------------------------------------------------6- 9
Cashier Code and Name Programming (Submode 2) ------------------------------------------ 6-11
Department Table Programming (Submode 3) --------------------------------------------------- 6-13
PLU Table Programming (Submode 4)------------------------------------------------------------- 6-21
Time Setting or Adjustment (Submode 5)---------------------------------------------------------- 6-32
Date Setting or Adjustment (Submode 6) ---------------------------------------------------------- 6-33
Amount Limit Setting for Function Keys (Submode 8) ------------------------------------------ 6-33
Customer File Code (Check Track No.) and Name Setting (Submode 15) ---------------- 6-34
Salesperson Code and Name Programming (Submode 20) ---------------------------------- 6-36
Link-PLU Table Programming (Submode 25)----------------------------------------------------- 6-37
Tare Table and General Unit Weight Setting (Submode 26) ---------------------------------- 6-38
PLU Preset-Code Key Setting (Submode 27)----------------------------------------------------- 6-40
Display Message Programming (Submode 31)--------------------------------------------------- 6-43
Negative Amount Key Limit Amount Setting (Submode 35) ----------------------------------- 6-45
PLU Price Dollar Discount/Extra Charge Amount Setting (Submode 40) ------------------ 6-46
Department Preset Price Setting or Changing ---------------------------------------------------- 6-47
PLU Preset Price Setting or Changing, Whole Package Quantity Changing -------------- 6-48
%+ and %- Preset Rate Setting ---------------------------------------------------------------------- 6-49
EO1-11152
MA-1595-1 SERIES
Page
6.22
6.23
6.24
6.25
Preset Rate Setting for Selective Itemizers (SI1 to SI4) ---------------------------------------- 6-50
Foreign Currency Exchange Rate Setting --------------------------------------------------------- 6-52
TAX Table Setting --------------------------------------------------------------------------------------- 6-53
Store/Register No. Setting ----------------------------------------------------------------------------- 6-55
7. VERIFICATION OF PROGRAMMED DATA----------------------------------------------------- 7- 1
7.1
Tax Calculation Test -------------------------------------------------------------------------------------7- 2
8. BAR CODE SYSTEM FOR EACH MODEL ------------------------------------------------------ 8- 1
1. DAILY OPERATION FLOW
EO1-11152
1. DAILY OPERATION FLOW
1. DAILY OPERATION FLOW
The following shows the typical flow of daily operations on the ECR.
CASHIER’S OPERATIONS
(described in OPERATOR’S GUIDE)
MANAGER’S OPERATIONS OR ASSISTANCE
(described in MANAGER’S GUIDE)
Sign-ON (or Cashier Key to ON)
No-sale Receipt (to check the print condition, and
check the date and time print)
(Adjust the date and time, if necessary, Chapter 6.)
Loan
(or by Manager)
STORE OPEN
Sale entries start.
Manager Interventions when requested (for such
operations as Returned Merchandise, Amount
Discount, etc. Chapter 2)
Sign-OUT
Sign-OFF
Cashier Key
Sign-IN
Sign-ON
Changes
.... for breaks of the cashier, or for cashier changes
“X” report takings (sales data readings during the
day. Chapter 5)
Pick Up (money collections from the ECR drawer for
banking purpose, etc. Chapter 3)
Sale entries.
Operations in “ - ” Mode (for entire-sale return
or cancel. Chapter 4)
STORE CLOSE
Sign-OFF (or Cashier Key to OFF)
“X” report takings
“Z” report takings (Chapter 5)
OTHER OPERATIONS OUTSIDE STORE’S BUSINESS HOURS
Programming Data Additions, Deletions, Changes
(Chapter 6)
Programmed Data Verification (Chapter 7)
Training mode Start and End (Operator’s Guide)
Operations in Training Mode
(for practicing of new cashiers)
PAPER ROLL REPLACEMENT OR OTHER MAINTENANCE
(OPERATOR’S GUIDE)
1- 1
2. MANAGER INTERVENTION
EO1-11152
2.1 Items Programmed to Require Manager Interventions
2. MANAGER INTERVENTION
2.1
Items Programmed to Require Manager Interventions
During daily sale entry operations, the cashier may call for Manager Interventions. The following is the operation
flow of a Manager Intervention.
1) During operations, the cashier comes across an item that requires a Manager Intervention. The cashier,
already informed of it, may immediately call for a Manager Intervention. Or the cashier, without knowing of it,
attempts the operation, and error results with Error Message “MANAGER REQUIRED” (programmable)
displayed, clears the error by the [C] key, and then calls for a Manager Intervention.
2) The manager goes to the cashier counter with the MA key.
3) The cashier explains what kind of operation is attempted, and removes the REG key from the Mode Lock at
the “REG” position.
4) The manager inserts the MA key and turns it to the “MGR” position.
5) The cashier operates the required item.
6) The manager returns the MA key to the “REG” position and pulls it out.
7) The cashier sets the REG key to the “REG” position again and continues registering operations.
The following is the table of the keys and operations that are programmable with Manager Intervention. Fill in the
table by marking in the “Not Required” or “Required” column of each item, referring to the documents, etc. listed
in the table.
2- 1
2. MANAGER INTERVENTION
EO1-11152
2.1 Items Programmed to Require Manager Interventions
KEYS/OPERATIONS AND MANAGER INTERVENTION STATUS TABLE
KEY
Manager Intervention
Not required
Required
[DOLL DISC]
[VND CPN]
[STR CPN]
[BTL RTN]
[%-] (or [% II])
[RTN MDSE]
[VOID]
[PO]
[PB-] or [CODE OPEN]
[EX]
[NS]
[ALL VOID]
Credit Balance
(NOTE 1 below)
Negative-balance Sale
Finalization by Media Keys
except [AT/TL] and
[FSTL TEND]
(NOTE 2)
Negative Department or
negative PLU Entries
(NOTE 3)
PLU Price Read
NOTES:
Reference
As for changing the key status, ask your
TOSHIBA TEC representative.
These are program options for each store.
Ask your TOSHIBA TEC representative for
information and these status changes.
1. The “Credit Balance” means that amount entries through [DOLL DISC], [VOID], [VND CPN], [STR
CPN], [BTL RTN] will result in over-subtraction of the subtotal amount at the time of the entry
through any of those keys. If the status “Not required” is selected, over-subtraction using these
keys will be allowed in the “REG” mode. The [RTN MDSE] key, negative departments, and
negative PLUs are not subject to this “Credit Balance” status selection.
2. The “Negative-balance Sale” may be caused by:
1. Credit Balance if “Not required” is selected as the above Credit Balance status.
2. Amounts entered through the [RTN MDSE] key.
3. Amounts entered through negative departments or negative PLUs.
4. Other negative amounts.
3. The “Negative DEPTs or PLUs” are the DEPTs/PLUs programmed as negative status, but not
normal DEPTs/PLUs through which Store Coupon or Returned Merchandise amounts are entered.
2- 2
2. MANAGER INTERVENTION
EO1-11152
2.2 Other Operations Required Manager Interventions
2.2
Other Operations Required Manager Interventions
Listing Capacity or Amount Limit Release
Amount Limits may be programmed on Departments/PLUs, Tender Medias, [DOLL DISC], [VND CPN], [STR
CPN], [BTL RTN]. These limits are programmed to check an excessively high or low amount entry by cashier’s
mistake at the earliest stage. Guide your cashiers as in the following procedure:
(1) During sale entries by the cashier, an error occurs with Error Message “OPERATION ERROR”
(programmable) is displayed.
(2) The cashier clears the error by the [C] key. The cashier confirms the amount and operates the item again.
(3) If the same error occurs again, the cashier attempts to enter the amount using the [LC OPEN] or [OPEN] key.
(4)If the operation results in an error again, the Amount Limit cannot be solved by the [LC OPEN] or [OPEN] key.
(5) The cashier calls for Manager Intervention.
The procedure thereafter is the same as Steps 2) to 7) for the ITEMS PROGRAMMED TO REQUIRE
MANAGER INTERVENTIONS (Section 2.1).
In need of information of Amount Limits, see the following:
1) Individual Department High and Low Amount Limits (each PLU is restricted by the Amount Limits of its linked
department): Ask your TOSHIBA TEC representative.
2) Departments Common High and Low Amount Limits, and High Amount Limits of Tender Media keys:
Chapter 7: VERIFICATION OF PROGRAMMED DATA
• FUNCTION KEYS AMOUNT LIMIT READ
3) High Amount Limits for [DOLL DISC], [VND CPN], [STR CPN], and [BTL RTN] keys:
Chapter 7: VERIFICATION OF PROGRAMMED DATA
• NEGATIVE AMOUNT KEY AMOUNT LIMIT READ
4) For setting or changing the current Amount Limits, see the following:
Chapter 6: PROGRAMMING OPERATIONS
• AMOUNT LIMIT SETTING FOR FUNCTION KEYS (Submode 8)
• NEGATIVE AMOUNT KEY AMOUNT LIMIT SETTING or CHANGING (Submode 35)
2- 3
3. MANAGER’S OWN OPERATIONS IN “MGR” MODE
EO1-11152
3.1 Pick Up Operation
3. MANAGER’S OWN OPERATIONS IN “MGR” MODE
The following are operations possible only in the “MGR” position of the Mode Lock, which are performed by the
manager or by a person under the manager’s control.
3.1
Pick Up Operation
This operation is used when you collect money from the ECR drawer, during the day, for the banking purpose,
etc. In order to record the money amounts collected and to subtract the amounts from the In-drawer Totals
memory, this operation is necessary.
CONDITION
Any time outside a sale, in a Signed-ON condition.
OPERATION
Mode Lock: MGR
[PO]
|Media Amount Collected| [MEDIA KEY]
(or [VND CPN],
[FSTL TEND])
Drawer
opens.
([ST])
[AT/TL]
NOTE 3
NOTE 1
Repeat until all the collected media amounts are recorded.
NOTES:
1. As for each media and Food Stamp, its in-drawer limit amount can be programmed. On reaching
this in-drawer limit when a sale is finalized, the message “DRAWER LIMIT” (programmable) is
displayed with an alarm buzzer generated to indicate that a Pick Up operation is necessary.
2. Depress the media keys or the [VND CPN] or [FSTL TEND] key corresponding to the collected
media ([AT/TL] for cash). The media keys that can be operated here are those programmed to
print their media-in-drawer amounts in reports.
3. Depress [ST], if necessary, to obtain the subtotal amount of the medias so far collected.
4. During the Pick Up operation, both the Non-Add Number Print and the Validation Print are possible.
Pick Up Operation Sample:
The manager comes to the register and collects the
cash amount of $300.00 from the drawer:
-- Receipt Print Format -TEC STORE
1343 PEACH DRIVE
PHONE: 87-6437
Open 8:00am to 7:00pm
Closed: every Wednesday
Mode Lock: MGR
(must be in a signed-ON condition)
Depress [PO].
Enter 30000, depress [AT/TL].
Depress [AT/TL].
08-31-2003 SUN
∗∗PICK
CASH
TOTAL
JONES
3- 1
#3001
∗∗
$300.00
$300.00
UP
0369 08:42TM
3. MANAGER’S OWN OPERATIONS IN “MGR” MODE
EO1-11152
3.2 Enforced Sign-OFF of a Cashier (Code Entry Method)
3.2
Enforced Sign-OFF of a Cashier (Code Entry Method)
Each cashier signs-ON to start operations, signs-OUT for leaving the register for a while, signs-IN when comes
back, and signs-OFF to end operations (refer to the OPERATOR’S GUIDE). However, when a cashier once
signed-ON and then signed-OUT for taking a break does not come back (or the cashier may have operated a
Sign-OUT by mistake instead of a Sign-OFF), the register cannot be operated. No one else can operate SignOFF, either, because the same cashier must sign-IN first before Sign-OFF. In this case, the manager may
operate an Enforced Sign-OFF.
CONDITION
In a Signed-OUT condition
OPERATION
Mode Lock: MGR
The 2-digit Cashier Code
(manager-assign portion) [LOG/RECEIPT] (or [LOG]) ........... The same will result as the normal Sign-OFF.
01 to 99
The 2-digit code assigned to each cashier. As for the code
opening and assigned cashier names, refer to the following:
For verifying the code and the assigned cashier’s name:
Chapter 7: VERIFICATION OF PROGRAMMED DATA
• CASHIER CODE AND NAME READ
For programming or changing the cashier’s names or assigned codes:
Chapter 6: PROGRAMMING OPERATIONS
• CASHIER CODE AND NAME PROGRAMMING (Submode 2)
-- Receipt Print Format --
TEC STORE
1343 PEACH DRIVE
PHONE: 87-6437
Open 8:00am to 7:00pm
Closed: every Wednesday
08-31-2003 SUN
∗∗SIGN
#3001
OFF
JONES
∗∗
0370 08:45TM
3- 2
3. MANAGER’S OWN OPERATIONS IN “MGR” MODE
EO1-11152
3.3 Post Authorization Operation
3.3
Post Authorization Operation
This operation is used for finalizing the EFT sale transaction which was authorized on the off-line ECR.
CONDITION
Any time outside a sale, In a Signed-ON condition
OPERATION
Mode Lock: MGR
• Without Card Number Entry
[POST AUTH]
|Sale Amount| [#]
Card Slide
|Authorization Code| [#]
Max. 7 digits
Max. 11 characters
(Omissible)
NOTE 1
ECR wait condition
EFT terminal responds “APPROVAL”
Store Receipt Print
• With Card Number Entry
[MANUAL CARD#]
[POST AUTH]
|Card No.| [#]
Max. 25 digits
|Sale Amount| [#]
Max. 7 digits
NOTES:
(|Authorization Code|) [#]
Max. 11 characters
(Omissible)
(|Expiration Date|) [#]
Max. 4 digits; MM/YY
(Omissible)
(|Security Code|) [#]
Max. 4 digits
(Omissible)
1. Pressing the [C] key at this point will restore the ECR to condition being ready for the [POST
AUTH] key entry.
2. Training cashiers are unacceptable to the EFT terminal.
3. Values 0 to 9 and A to Z should be used to enter the Authorization Code.
4. None of customer receipt is issued by the Post Authorization operation.
5. Entry of security code will be compulsory by the program option setting.
3- 3
3. MANAGER’S OWN OPERATIONS IN “MGR” MODE
EO1-11152
3.4 EBT F/S Electronic Voucher Purchase
3.4
EBT F/S Electronic Voucher Purchase
In this operation, a sale entry with EBT card is performed on the off-line ECR when the network is down, then the
sale transaction is authorized after the network recovery. (This operation is used for the EBT food stamp.)
CONDITION
Any time outside a sale, In a Signed-ON condition
OPERATION
Mode Lock: MGR
• Without Card Number Entry
Key Operation
FIU Upper Row Display
[VOUCHER AUTH]
SWIPE CARD
Card Slide
Response from the EFT terminal
ENT AMOUNT
|Tendered Amount| Max. 7 digits
Pressing the [C]
key at this point
will restore the
ECR to the
condition being
ready for the
[VOUCHER
AUTH] key entry.
[#]
ENT AUT CD
[C]
|Authorization Code| Max. 11 characters
(alphanumeric characters)
[#]
|Voucher No.|
ENT VOUCHER#
Max. 10 digits
[#]
PROCESSING
(in case of no response from EFT)
or
(in case of decline)
NO RESPONS
Response from the EFT terminal
ECR prints a Store Receipt
3- 4
DECLINE
APPROVED
3. MANAGER’S OWN OPERATIONS IN “MGR” MODE
EO1-11152
3.4 EBT F/S Electronic Voucher Purchase
• With Card Number Entry
[MANUAL CARD#]
[VOUCHER AUTH]
|Card No.| [#]
8 to19 digits
|Sale Amount| [#]
Max. 7 digits
(|Authorization Code|) [#]
Max. 11 characters
(alphanumeric characters);
(Omissible)
(|Expiration Date|) [#]
Max. 4 digits; MM/YY
(Omissible)
(|Voucher No.|) [#]
Max. 10 digits;
(Omissible)
(|Security Code|) [#]
Max. 4 digits
(Omissible)
NOTES:
1. It is possible to cancel this operation prior to the inquiry to the host (i.e. before the message
“PROCESSING” is displayed).
2. Training cashiers are unacceptable to the EFT terminal.
3. Values 0 to 9 and A to Z should be used to enter the Authorization Code.
4. None of customer receipt is issued by the EBT F/S Electronic Voucher Purchase operation.
5. The Validation Print operation is not possible after performing the EBT F/S Electronic Voucher
Purchase operation.
6. Entry of security code will be compulsory by the program option setting.
3- 5
3. MANAGER’S OWN OPERATIONS IN “MGR” MODE
EO1-11152
3.5 EBT CASH, EBT F/S Balance Inquiry
3.5
EBT CASH, EBT F/S Balance Inquiry
This operation is used for inquiring the balance to the host.
CONDITION
Any time outside a sale, In a Signed-ON condition
OPERATION
Mode Lock: MGR
• Without Card Number Entry
Key Operation
FIU Upper Row Display
[BALANCE INQUIRY]
BALANCE INQUIRY
[EBT CASH] or [EBT F/S]
SWIPE CARD
Card Slide
(in case of no response from EFT)
NO RESPONS
Response from the EFT terminal
ENTER PIN#
Input the Pin No. from the Pin Pad
Then depress the [ENTER] key
PROCESSING
NO RESPONS
(in case of no response from EFT)
or
(in case of decline)
DECLINE
Response from the EFT terminal
APPROVED
ECR prints a Customer Receipt
3- 6
3. MANAGER’S OWN OPERATIONS IN “MGR” MODE
EO1-11152
3.5 EBT CASH, EBT F/S Balance Inquiry
• With Card Number Entry
[BALANCE INQUIRY]
|Card No.| [#]
8 to19 digits
NOTES:
[MANUAL CARD#]
[EBT CASH]
or
[EBT F/S]
(|Expiration Date|) [#]
Max. 4 digits; MM/YY
(omissible)
1. It is possible to cancel this operation prior to the inquiry to the host (i.e. before the message
“PROCESSING” is displayed).
2. Training cashiers are unacceptable to the EFT terminal.
3. None of customer receipt is issued by the EBT CASH, EBT F/S Balance Inquiry operation.
4. The Validation Print operation is not possible after performing the EBT CASH, EBT F/S Balance
Inquiry operation.
3- 7
4. OPERATIONS IN “ - ” MODE
EO1-11152
4.1 Ordinary Operations In “ - “ Mode
4. OPERATIONS IN “ - ” MODE
Instead of using the [RTN MDSE] or [VOID] key in the “REG” or “MGR” mode for deleting individual items, the
“ - ” mode automatically processes positive items into negative and negative into positive. To operate, turn the
Mode Lock to the “ - ” position using the MA key, and enter the items, one by one, just as in the “REG” mode, as
reading the sale receipt (issued at the time of the purchase) or tracing the returned items as if in the “REG” mode.
A positive balance resulted in the “ - ” mode indicates the amount to be paid back to the customer.
The “ - ” mode operation may occur from time to time during day, on the cashier’s request, just as in the case of
ordinary Manager Interventions, when a customer comes to the cashier counter to return or cancel all the items
that he once purchased. In using this mode, please be certain to read the following three cases of operation
patterns. If you only turn the Mode Lock to the “ - ” position and let the cashier operate the actual item entries in
this mode, you should also inform the cashier of these three cases.
4.1
Ordinary Operations In “ - ” Mode
Except those described in the next sections 4.2 to 4.4, all the sale items that were entered in “REG” or “MGR” at
the time of purchase may be entered in the “ - ” mode in the same way as operated at the time of purchase.
OPERATION AND RECEIPT SAMPLE
RECEIPT ISSUED IN “REG” or “MGR” MODE
TEC STORE
1343 PEACH DRIVE
PHONE: 87-6437
Open 8:00am to 7:00pm
Closed: every Wednesday
08-31-2003 SUN
VEGETABLE
DP02
%5%
SUBTL
CASH
ITEM
JONES
NOTE:
4.2
#3001
$2.50TF
$2.50TF
-0.13
$4.87
$4.87
2
0375 08:47TM
RECEIPT ISSUED IN “ - ” MODE
These two receipts contain the
same sale items and media
finalization. The operations are
also the same except the Mode
Lock position.
The cashier merely follows the
purchase receipt (on the left) and
enters the same items in the
position, finalizing with the same
media in case a customer has
returned or canceled the entire
sale after the cashier had finalized
that sale.
The - mode header ( * REG- * in
this example ) is printed at the top
and the bottom of the sale
contents in the - mode receipt.
TEC STORE
1343 PEACH DRIVE
PHONE: 87-6437
Open 8:00am to 7:00pm
Closed: every Wednesday
08-31-2003 SUN
#3001
∗∗REGVEGETABLE
DP02
%5%
TXBL TL
CASH
∗∗
$2.50TF
$2.50TF
-0.13
$4.87
$4.87
ITEM
2
∗∗REGJONES
∗∗
0376 08:49TM
When you handle a sales item of cigarette or alcoholic beverage in the “ - ” mode, the age
confirmation is unnecessary.
Charge Posting With Customer File (Check Track Memory) In “ - ”
Mode
When your register adopts the Customer File Memory type (instead of the PB Manual Entry type), the previous
balance entry is different from that operated in the “REG” or “MGR” mode. Due to the memory process, this
special operation is required. In case a customer cancels the entire sale once purchased in the charge posting
mode, please be certain to operate as instructed on next page.
4- 1
4. OPERATIONS IN “ - ” MODE
EO1-11152
4.2 Charge Posting With Customer File (Check Track Memory) In “ - “ Mode
(1) Operation in “REG” or “MGR” mode (at the purchase; refer to the OPERATOR’S GUIDE.)
|Customer File Code*| [PICK UP BAL] (or [CODE OPEN])
**
The previous balance is recalled
from the customer’s file memory.
Entries of the purchased items***
([TXBL TL])
[Chg]
(if any)
[TRF] ......... to transfer all balance with no payment
****
|Payment Amount| [R/A]
Finalization with Media Keys
(2) Operation in “ - ” mode (at the cancel or return of the above sale)
|Customer File Code| [PICK UP BAL]
|Previous Balance| [AMT]
Equivalent to *
Equivalent to **
Entries of the returned items (equivalent to ***)
[Chg]
Balance Transfer or Payment operation (equivalent to ****)
NOTE:
Only the previous balance that was automatically recalled from memory in the “REG” or “MGR” mode
must be entered manually through the [AMT] key in the “ - ” mode. Other operations are identical to
those operated in the “REG” or “MGR” mode. (Such items as %+ and %- are also operated the same
as entered at the time of purchase.)
RECEIPT AT PURCHASE
Mode Lock:
REG or MGR
3 (Cus. File Code)
[PICK UP BAL]
600 [DEPT 1]
10 [%-]
(A)
[Chg]
[TRF]
08-31-2003 SUN
PB+
KAREN WALTERS
VEGETABLE
%10%
TAX
Chg
NEW BAL
ITEM
JONES
RECEIPT AT RETURN
#3001
000000000003
$6.36
$6.00TF
-0.60
$0.36
$12.12
08-31-2003 SUN
#3001
∗∗REG∗∗
PB+
000000000003
KAREN WALTERS
$6.36
VEGETABLE
$6.00TF
%10%
-0.60
TAX
$0.36
Chg
$12.12
$12.12
NEW BAL
$12.12
NEW BAL
-5.76
1
0404 18:10TM
ITEM
1
∗∗REGJONES
Mode Lock: 3 (Cus.File Code)
[PICK UP BAL]
636 [AMT]
Operated exactly
the same as the
sequence marked with
“(A)” at purchase.
The final new balance
after correction in this
operation (which should
be equal to the balance
called at the starting of
the RECEIPT AT
PURCHASE).
∗∗
0405 18:12TM
As shown in the sample above, the previous balance $6.36 is entered manually through the [AMT] key on the
right-hand side receipt, while the same previous balance is automatically recalled by merely designating the
Customer File Code through the [PICK UP BAL] key on the left-hand side receipt.
The print formats in both receipts are designed to be the same from Customer File Code down to the first “NEW
BAL” amount (resulting balance at the time of purchase.), except that the final new balance at the time of return is
additionally printed (which will be the same amount of the balance before the purchase) and the “ - ” mode
header is printed on the right-hand side receipt.
4- 2
4. OPERATIONS IN “ - ” MODE
EO1-11152
4.3 Scale Item Entry In “ - “ Mode
4.3
Scale Item Entry In “ - ” Mode
Any scale item entered in the “REG” or “MGR” mode at the time of purchase must be entered manually (Manual
Scale Entry but not Auto Scale) in the “ - ” mode at the time of return or cancel.
That is, for entering a scale item (once purchased) in the “ - ” mode, you must read the written net weight on the
item (if any) or read the net weight in the scale display panel by placing it on the scale platter, then enter the net
weight value, manually in the procedure described as MANUAL SCALE ENTRY operation in the OPERATOR’S
GUIDE.
NOTE:
At the link-PLU entry, the Scale Entry can be performed for the head-link PLU but not for the sub-link
PLU.
4.4
Electronic Fund Transfer (EFT) Operation In “ - “ Mode
(1) Void Credit Sale
This operation is performed for canceling credit sale transactions.
OPERATION
Sales Item Entry
([TXBL TL])
(|Tendered Amount|) [CREDIT]
Card Slide
Max. 7 digits
(|Authorization Code|) [#]
Max. 11 characters
Customer Receipt Print
(|Reference No.|) [#]
EFT terminal responds “APPROVAL”
Max. 16 digits
Store Receipt Print
(2) Void Credit Refund
This operation is performed for canceling credit refund transactions.
[RTN MDSE]
NOTES:
to be continued to the top of “Void Credit Sale” sequence
1.
2.
3.
4.
5.
Receipt post-Issue operation after finalizing a sale by the EFT is unavailable.
Key operation on the ECR is unavailable during the inquiry to the host.
Values 0 to 9 and A to Z should be used to enter the Authorization Code.
Issuance of the Store Receipt is selectable.
When automatic issuance of store receipt has been programmed, only the store receipt is issued
after registering in the Receipt OFF mode. When manual issuance of store receipt has been
programmed, only the store receipt is issued with the [STORE RECEIPT] key.
6. The Validation Print operation is not possible after performing the Void Credit Sale or the Void
Credit Refund operation.
4- 3
4. OPERATIONS IN “ - ” MODE
EO1-11152
4.4 Electronic Fund Transfer (EFT) Operation In “ - “ Mode
(3) Cashing Debit Refund
This operation is performed for canceling debit cashing transactions.
OPERATION
| Amount to be cashed |
Max. 7 digits
[DEBIT]
or
[EBT CASH]
EFT terminal responds “APPROVAL”.
NOTES:
Card Slide
Input the Pin No. from the
Pin Pad. Then depress the
[ENTER] key.
Customer Receipt Print
1.
Store Receipt Print
Before performing this operation, the [DEBIT] (or [EBT CASH]) key should be programmed with
the status “no-purchase cashing is allowed”. Also each EFT Media Key should be programmed
with the statuses both “with EFT process” and “off line authorization is available”. Failure to do
this may cause an error.
2. When automatic issuance of store receipt has been programmed, only the store receipt is issued
after registering in the Receipt OFF mode. When manual issuance of store receipt has been
programmed, only the store receipt is issued with the [STORE RECEIPT] key.
3. Receipt post-Issue operation after the Cashing Debit Refund is unavailable.
4. Key operation on the ECR is unavailable during the inquiry to the host.
5. The Endorsement Print can be performed.
6. Training Cashiers are unacceptable to the EFT terminal.
7. Issuance of the Store Receipt is selectable.
8. When manual issuance of store receipt has been programmed, the store receipt must be issued
to perform next transaction or read/reset jobs.
9. The Validation Print operation is not possible.
10. EFT cashing operation with the [CREDIT], [CHECK], and [EBT F/S] keys is not possible.
4- 4
4. OPERATIONS IN “ - ” MODE
EO1-11152
4.4 Electronic Fund Transfer (EFT) Operation In “ - “ Mode
(4) EBT CASH, EBT F/S Return
This operation is performed for canceling EBT CASH and EBT F/S transactions.
OPERATION
Key Operation
FIU Upper Row Display
Sale Entry
This operation is possible when the
[EBT F/S] key is programmed with the
status “food stamp payment”.
([TXBL TL])
[FS TL/TEND]
(Tendered Amount)
|Tendered Amount|
(Max. 7 digits; Omissible
if all the amount is paid,
however depending on
the program option.)
[EBT CASH]
Max. 7 digits
(Must be entered)
[EBT F/S]
SWIPE CARD
Card Slide
([C])
Pressing the [C] key at this point will restore
the ECR to the condition being ready for the
[EBT CASH] (or [EBT F/S]) key entry.
(in case of no response from EFT)
NO RESPONS
Response from the EFT terminal
ENTER PIN#
Input the Pin No. from the Pin Pad
then depress the [ENTER] key.
PROCESSING
(in case of no response from EFT)
or
(in case of decline)
NO RESPONS
DECLINE
Response from the EFT terminal
APPROVED
ECR prints a Customer Receipt
ECR prints a Store Receipt
4- 5
4. OPERATIONS IN “ - ” MODE
EO1-11152
4.4 Electronic Fund Transfer (EFT) Operation In “ - “ Mode
• Manual Entry
(when the [EBT CASH] or [EBT F/S] key has been programmed with the status “taxable total payment”.)
Sales Entry
([TXBL TL])
[MANUAL CARD#]
(|Sale Amount|)
Max. 7 digits
(Omissible)
|Card No.| [#]
(|Expiration Date|) [#]
8 to 19 digits
Max. 4 digits; MM/YY
(Omissible)
[EBT CASH]
([EBT F/S])
• Manual Entry
(when the [EBT F/S] key has been programmed with the status “food stamp payment”.)
Sales Entry
([FS TL/TEND])
[MANUAL CARD#]
|Sale Amount|
[EBT F/S]
Max. 7 digits
NOTES:
|Card No.| [#]
(|Expiration Date|) [#]
8 to 19 digits
Max. 4 digits; MM/YY
(Omissible)
1.
2.
3.
4.
Receipt post-Issue operation after finalizing a sale by the EFT is unavailable.
Key operation on the ECR is unavailable during the inquiry to the host.
Contents of the customer receipt are printed on the journal, but those of the store receipt are not.
Automatic issuance or manual issuance of the store receipt is selectable by the system option
setting.
5. Sale finalization by the EFT is possible only when the media key has been programmed with the
status “EFT media” in the EFT key status setting. If not, ordinary sale finalization is performed.
6. Training cashiers are unacceptable to the EFT terminal. (Ordinary finalization operation can be
performed.)
7. Issuance of the store receipt is selectable by the EFT key status setting.
8. When tendering in foreign currency, the EFT media keys are not accepted.
9. When automatic issuance of store receipt has been programmed, only the store receipt is issued
after registering in the Receipt OFF mode. When manual issuance of store receipt has been
programmed, only the store receipt is issued with the [STORE RECEIPT] key.
10. When manual issuance of store receipt has been programmed, the store receipt must be issued
to perform next transaction or read/reset jobs.
11. Validation Print operation at the EBT CASH or EBT F/S Return operation is prohibited.
4- 6
4. OPERATIONS IN “ - ” MODE
EO1-11152
4.4 Electronic Fund Transfer (EFT) Operation In “ - “ Mode
(5) Gift Card Refund
This operation is performed for canceling a transaction by a Gift Card.
OPERATION
Sales Item Entry
([TXBL TL])
(|Tendered Amount|) [Gift Card Media]
Swipe the Card.
Max. 7 digits
(Omissible when the
whole amount is
refunded.)
([C])
EFT Terminal responds “APPROVED”
Customer Receipt Print
(When cancelled with the [C]
key, the ECR returns to the
status where just after the
[TXBL TL] key is pressed.
Customer Receipt 2 Print
NOTES: 1.
2.
3.
4.
5.
6.
7.
8.
9.
10.
11.
12.
13.
14.
15.
Receipt post-issue operation ([RECEIPT ISSUE] key) after finalizing a sale by a gift card is
unavailable.
Key operations on the ECR is unavailable during an inquiry at the HOST.
Data of the customer receipt is printed on the journal, but that of the customer receipt 2 is not.
Whether to issue a customer receipt 2 automatically or manually is selectable by the program
option.
An Endorsement Print can be performed.
Up to 4 multi-tendering operations or split-tendering operations are possible when finalizing a sale
transaction with the [Gift Card Media] key. The 5th operation will result in an error. At this time,
the sale finalization operation is possible only when using the [AT/TL] key or the media keys with
the status “without FET process”.
Whether to issue a store receipt is selectable by the EFT key status setting.
At tendering in Foreign currency, pressing the [Gift Card Media] key results in an error.
When automatic issuance of receipt has been programmed, only the customer receipt 2 is issued
after registering in the Receipt OFF mode. When manual issuance of receipt has been
programmed, only the customer receipt 2 is issued with the [STORE RECEIPT] key.
A multiplication of the [Gift Card Media] key is not available.
When it is programmed to issue the customer receipt 2 manually, a next transaction, programming,
or read/reset operation is not allowed until the customer receipt 2 is issued.
Validation print operation after finalizing a sale transaction by the gift card is possible.
Over-tendering with a Gift Card is not allowed.
When an error is responded from the EFT terminal, an abnormal termination message will be
printed on the journal.
When no response is returned from the EFT terminal and the operation results in a timeout, “NO
RESPONS” will be displayed on the upper row of the operator display.
4- 7
4. OPERATIONS IN “ - ” MODE
EO1-11152
4.5 Prohibitive Operations In “ - “ Mode
4.5
Prohibitive Operations In “ - ” Mode
• NO-SALE ([NS])
• AUTO-SCALE (described in 4.3.)
• NO-SALE CASHING OF CHEQUE OR OTHER NON-CASH MEDIAS
• NO-SALE EXCHANGE from Foreign Currency to Domestic Currency, or vice versa
• LOAN
• PICK UP
• TRAINING MODE START/END
• ENDORSEMENT PRINT
• RECEIPT POST-ISSUE ([RECEIPT ISSUE])
4.6
Manager Intervention Required Status or Amount Limit In “ - ” Mode
Since operations in the “ - ” mode are performed under the manager’s control, the status requiring a Manager
Intervention, and Amount Limits (described in Chapter 2) will all be released, i.e., the same handling as in the
“MGR” mode.
4- 8
5. READ (X) AND RESET (Z) REPORTS
EO1-11152
5. READ (X) AND RESET (Z) REPORTS
5. READ (X) AND RESET (Z) REPORTS
The following table shows the key operation to take each report. The “X” and “Z” reports have exactly the same
print content if both are available, except that:
1. The “X” reports allow to read the sales data but not clear memories, while the “Z” reports allow to read the
sales data and at the same time all the resettable memories will be cleared when the reports have been
issued.
2. The symbol “X...” is printed on the top line of a Daily Read Report, “Z...” on a Daily Reset Report, “GTX...” on
a GT Read Report, and “GTZ...” on a GT Reset Report, as initial settings.
3. A reset count is printed on the bottom of a “Z” report only.
WARNING!
When opening the cash drawer, be careful not to let the drawer hit any person.
TABLE OF OPERATIONS FOR X AND Z REPORTS
Daily Reports
Report Name
FINANCIAL READ AND RESET
• Financial Read
• Financial Reset
CASHIER READ AND RESET
• All Cashier Read
• All Cashier Reset
• Individual Cashier Read
• Individual Cashier Reset
Mode
Lock
Key Operation
X
Z
3 [AT/TL] (Drawer opens.)
X
Z
4 [AT/TL] (Drawer opens.)
X
Z
Code Entry Method:
4 [#] |Cashier ID Code| [AT/TL]
Sample
Page
5-5
5-7
(2-digit manager-assign code)
Cashier Key Method:
Set the required Cashier Key (or
depress the required Cashier Key),
then 4 [#] [AT/TL]
SALESPERSON READ AND RESET
• All Salesperson Read
• All Salesperson Reset
CREDIT CARD COMPANY SALES READ AND
RESET
• Credit Card Company Sales Read
• Credit Card Company Sales Reset
DEPARTMENT GROUP READ
MEDIA SALES AND IN-DRWER TOTAL READ
HOURLY RANGE READ AND RESET
• Hourly Read
• Hourly Reset
5-8
X
Z
5 [AT/TL]
5-8
X
Z
X
X
X
Z
5- 1
6 [AT/TL]
8 [AT/TL]
9 [AT/TL] (Drawer opens.)
10 [AT/TL]
5-9
5-10
5-10
5. READ (X) AND RESET (Z) REPORTS
EO1-11152
5. READ (X) AND RESET (Z) REPORTS
Daily Reports (Continued)
Report Name
DEPARTMENT READ AND RESET
• Individual Department Read
• All department Read
• All department Reset
ALL MEDIA SALES TOTAL AND CASH-INDRAWER READ
PLU READ AND RESET
• Individual PLU Read
Mode
Lock
X
X
Z
X
X
Sample
Page
5-11
Key Operation
11 [#], then depress the required Dept.
Keys (or use [DP#] key), one by one,
[ST] may be used to obtain subtotal,
[AT/TL] to end.
11 [AT/TL]
12 [AT/TL] (Drawer opens.)
5-8
*
13 [#] |PLU Code| [PLU] ([ST])
Repeatable
5-13
[AT/TL]
* (May be replaced by
[PLU Preset-code Key])
• Zone PLU Read
• Zone PLU Reset
X
Z
• All PLU Read
• All PLU Reset
X
Z
13 [AT/TL]
• Inactive PLU Read
CUSTOMER FILE READ AND RESET (for
Check Track Memory type only)
• All Files Read
• All Files Reset
• Individual File Read
• Zone Files Read
• Zone Files Reset
X
13 [#] 0 [AT/TL]
• Zero-balance Files Read
• Credit-balance Files Read
• Debit-balance Files Read
PLU GROUP SALES READ AND RESET
• PLU Group Sales Read
• PLU Group Sales Reset
EFT MEDIA LOG READ AND RESET
• EFT Media Log Read
• EFT Media Log Reset
13 [#] Zone-start [@/FOR] Zone-end
PLU Code
[AT/TL]
PLU Code
5-15
X
Z
X
X
Z
15 [AT/TL]
X
X
X
15 [#] 0 [AT/TL]
15 [#] 1 [AT/TL]
15 [#] 2 [AT/TL]
15 [#] |Customer File Code| [@/FOR] [AT/TL]
15 [#] |Zone-start File Code| [@/FOR]
→ |Zone-end File Code| [AT/TL]
5-17
X
Z
24 [AT/TL]
5-18
X
Z
5- 2
45 [AT/TL]
5. READ (X) AND RESET (Z) REPORTS
EO1-11152
5. READ (X) AND RESET (Z) REPORTS
GT Reports -- to be taken on weekly or monthly basis -Mode
Key Operation
Lock
(The Mode Lock position is the same as the corresponding Daily report.
However, always add 200 to the numeric value for the report taking.)
FINANCIAL GT READ AND RESET
• Financial GT Read
X
203 [AT/TL] (Drawer opens.)
• Financial GT Reset
Z
CASHIER GT READ AND RESET
• All Cashier GT Read
X
204 [AT/TL] (Drawer opens.)
• All Cashier GT Reset
Z
Sample
Page
Report Name
• Individual Cashier GT Read
• Individual Cashier GT Reset
X
Z
5-18
5-18
Code Entry Method:
204 [#] |Cashier ID Code| [AT/TL]
(2-digit manager-assign code)
Cashier Key Method:
Set the required Cashier Key (or
depress the required Cashier Key),
then 204 [#] [AT/TL]
CREDIT CARD COMPANY SALES GT READ
AND RESET
• Credit Card Company Sales GT Read
• Credit Card Company Sales GT Reset
DEPARTMENT GROUP GT READ
DEPARTMENT GT READ AND RESET
• Individual Department GT Read
• All Department GT Read
• All Department GT Reset
PLU READ AND RESET
• Individual PLU GT Read
5-18
X
Z
X
X
X
Z
X
206 [AT/TL]
208 [AT/TL]
5-18
5-18
211 [#], then depress the required Dept.
Keys (or use [DP#] key), one by one,
[ST] may be used to obtain subtotal,
[AT/TL] to end.
211 [AT/TL]
*
213 [#] |PLU Code| [PLU] ([ST])
Repeatable
5-18
[AT/TL]
* (May be replaced by
[PLU Preset-code Key])
• Zone PLU GT Read
• Zone PLU GT Reset
X
Z
• All PLU GT Read
• All PLU GT Reset
X
Z
213 [AT/TL]
• Inactive PLU GT Read
PLU GROUP SALES GT READ AND RESET
• PLU Group Sales GT Read
• PLU Group Sales GT Reset
X
213 [#] 0 [AT/TL]
X
Z
224 [AT/TL]
213 [#] Zone-start
[@/FOR]
PLU Code
Zone-end
[AT/TL]
PLU Code
5-18
5- 3
5. READ (X) AND RESET (Z) REPORTS
EO1-11152
5. READ (X) AND RESET (Z) REPORTS
EFT (Batch) Operation
Report Name
OPEN BATCH
CLOSE BATCH
CLOSE BATCH (WITH DEBIT)
CHANGE BATCH NUMBER
LOCAL BATCH STATUS REPORT
LOCAL TRANSACTION INQUIRY
LOCAL TRANSACTION REPORT
Mode
Lock
X or Z
Z
Z
Z
X
X
X
5- 4
Key Operation
30 [AT/TL]
31 [#] 1 [AT/TL]
31 [#] 2 [AT/TL]
32 [#] |Batch Number| [AT/TL]
33 [AT/TL]
34 [#] |Sequence Number| [AT/TL]
34 [AT/TL]
Sample
Page
5-20
5-20
5-21
5-21
5-22
5-22
5-23
5. READ (X) AND RESET (Z) REPORTS
EO1-11152
5.1 Combination Reports
5.1
Combination Reports
Multiple reports can be programmed to be issued in one operation sequence. The following are reports
programmable for combinations (max. 5 reports in one table, max. 3 tables). Ask your TOSHIBA TEC
representative for information of the contents of your Combination Report Tables or for changes.
REPORT NAME
Financial Report
All Cashier Report
All Salesperson Report
Credit Company Sales Report
Department Group Report
Media Sales and In-drawer Report
Hourly Range Report
All Department Report
All Media Sales & Cash-in-drawer Report
All PLU Report
All Customer Files Report
PLU Group Sales Report
KEY OPERATION: Mode Lock:
X
X
X
X
X
X
X
X
X
X
X
X
X for Read
Z for Reset
|
AVAILABLE REPORTS
Z
GTX
GTZ
Z
GTX
GTZ
Z
Z
GTX
GTZ
GTX
Z
Z
GTX
GTZ
Z
GTX
GTZ
Z
GTX
GTZ
| [AT/TL]
Enter the Report Combination-ID No.:
None (simply depress [AT/TL]): Daily Combination Report Table No.1
200: GT Combination Report Table No.1
1:
Daily Combination Report Table No.2
201: GT Combination Report Table No.2
2:
Daily Combination Report Table No.3
202: GT Combination Report Table No.3
NOTES:
5.2
1. When the mode set for taking combination reports does not match the mode of a report contained
in the table, that report will be skipped.
2. If no combination reports data have been programmed, Combination Report Table No. 1 (which is
issued by depressing the [AT/TL] key alone for Daily Reports and depressing 200 [AT/TL] for GT
Reports) is auto-preset with All Department Report and Financial Report. It will be active as Table
No. 1 content unless no data are programmed for Table No. 1.
3. The report output order is determined by the order programmed in each table.
4. The drawer will open when a contained report is ruled to open the drawer.
General Notes On Report Takings
1. The cashier signed-OFF or signed-OUT condition is required for taking any Z reports in the Code Entry
Method. (Otherwise, an error will result when the Mode Lock is turned to the “X” or “Z” position.) However, in
case of a standalone system with PC connected and CVS spec. selected, X/Z reports can be taken during
Sign-ON and sales entries.
2. Reset reports will be printed on the receipt roll as well as on journal, and issued, regardless of the current
Receipt-ON/OFF status.
3. The [ITEM CORR] (or [VOID]) key may be depressed halfway during printing a report, for the purpose to
abort the receipt issuance (except for some short reports). When a report-abort has been operated for a reset
report, the memory of the report data will not be cleared.
5- 5
5. READ (X) AND RESET (Z) REPORTS
EO1-11152
5.2 General Notes On Report Takings
4. The drawer will open at the starting of printing the reports which are stated with “(Drawer opens)” in the Daily
and GT report table. However, the drawer may remain closed if so selected by a program option. This
selection is applied only to the Financial Report.
5. The sales data of the following read reports will be cleared when the relevant reset reports are cleared. If
those read reports are necessary, please be certain to take them before the relevant reset reports are taken:
READ REPORT
(with no reset reports provided)
Department Group Read
Media Sales and In-drawer Total Read
All Media Sales Total and Cash-in-drawer Read
Customer File Read ... non-resettable
Inactive PLU Read
Department Group GT Read
Inactive PLU GT Read
RELEVANT RESET REPORT
that clears the read report data
All Department Reset
Financial Reset
Financial Reset
PLU Reset
All Department GT Reset
PLU GT Reset
6. The PLU with the Delete Status set in each PLU report is not printed/searched.
As you notice, “Financial Reset”, “All Department Reset”, and “PLU Reset” reports should be taken after all other
reports (particularly read reports) on the respective levels of daily and GT, so that the required read reports data
may not be cleared by those reset report takings.
FINANCIAL READ or RESET (Daily or GT)
TEC STORE
1343 PEACH DRIVE
PHONE: 87-6437
Mode Lock: X for read
Z for reset
Reset Report Format Sample
Open 8:00am to 7:00pm
Closed: every Wednesday
08-31-2003 SUN
Date, Day-of Week, Store/Register No.
#3001
X_FINANCIAL
Report Name
GT
NET GT
GS
NS
TAX1
TAX5
NS
HASH DP
%V.CPN
DISC
$346.77
$309.09
125
$346.77
112
$300.48
$17.20
$0.50
112
$318.18
1
$1.40
4
$2.34
1
$4.00
1
$1.00
Enter 3, depress [AT/TL] (for Daily)
Enter 203, depress [AT/TL] (for GT)
NOTES:
1. The numeric values placed in reports in this manual are
merely examples to show the print format and may not
balance correctly.
2. The items attached with “*” outside the receipt frame are
printed only on Daily Reports but not on GT Reports.
3. The print or non-print status of each item on Financial
Reports can be programmed.
4. Non-printing of items with zero sales (i.e.,zero skip) can be
programmed by a program option.
Grand Total (non-resettable)
Net GT (non-resettable)
Gross Sale Item Count
& Amount
Percent Charge I, II Count & Amount
Net Sale Without Tax Item Count
& Amount
Tax 1 Amount
Tax 2 to 4 Amount
Manual Tax Amount
Net Sale With Tax Item Count
& Amount
Total of Positive Departments programmed as HASH Dept., Item Count
& Amount
Total of Negative Departments programmed
Percent Discount (on Subtotal) Count
as HASH Dept., Item Count & Amount
& Amount
Percent Discount II to VI (on Subtotal) Count
Vendor Coupon Count
& Amount if the Percent Discount keys are
& Amount
installed.
Dollar Discount (on Subtotal) Count
& Amount
-- To be continued --
5- 6
5. READ (X) AND RESET (Z) REPORTS
EO1-11152
5.2 General Notes On Report Takings
(Financial Read or Reset)
-- Continued -BTR
TOTAL
CASH
CHECK
FS TL
R/A
PO
∗
CASH ID
CHECK ID
∗
FS ID
∗
FS CG
CORR
VOID
ALL VD
%DISC
S. CPN
-DP TL
RTN
-TAX
-SALE
REGTRF TL
TRF-GT
TRFPB TL
TXBL1
TXBL2
SI1 TL
∗
TAX EX
TAX1 EX
CUR 1
∗
CUR 2
∗
CUR 3
∗
CUR RND
ITEM/CUS
NS/CUS
NO SALE
VALI CTR
HOLD CTR
0001Z
6
$0.35
71CU
$310.49
71CU
$292.77
0CU
$5.00
1CU
$12.72
2
$8.00
8
$37.10
$95.02
2
$15.00
1
$13.00
$0.28
1
$1.00
1
$1.00
2
$8.60
11
$2.02
4
$2.00
2
$1.00
1
$1.00
4
$3.80
$0.22
4CU
$5.37
2
$7.95
$0.03
$0.03
$0.03
1CU
$0.00
$284.98
$58.20
2
$1.40
1CU
$10.00
3
150.00
1
5.68
1
1.45
18.00
1.58
$4.23
3
3
1
Bottle Return Item Count
& Amount
All-media Sales (including CASH, FS TL, and PB TL)
Customer Count & Amount
Cash Sales
Customer Count & Amount
Check Sales
Customer Count & Amount
Food Stamp Sales
Customer Count & Amount
Received-on-Account Count
& Amount
Paid-Out Count
& Amount
Cash-in-drawer Amount
Check-in-drawer Count
& Amount
Food Stamp-in-drawer Count
& Amount
Food Stamp Change Amount
Item Correct (on positive Depts/PLUs) Count
& Amount
Void Count
& Amount
All Void Count
& Amount
Percent Discount (on Line Items) Count
& Amount
Dollar Discount (on Line Items) Count
& Amount
Store Coupon Item Count
& Amount
Negative Departments Item Count
& Amount
Returned Merchandise Item Count
& Amount
Negative Tax Amount
Negative-balance Sales
Customer Count & Amount
Negative Mode (“ - “ Mode) Count
& Amount
Transfer GT Balance
Transfer - GT
Transfer - Daily
Previous Balance Sales
Customer Count & Amount
Taxable Total 1 (Sale Amount Portion subject to Tax 1 taxation)
Taxable Total 2 (Sale Amount Portion subject to Tax 2 taxation)
Selective Itemizer 1 Count
& Amount calculated out or processed
Tax Exempted Customer Count
Sale Portion Exempted from Tax 1
The amounts are expressed in the respective currencies’ unit
Foreign Currency Rounding Amount
Sales Item Count per Customer
Net Sale Amount per Customer
No-sale Count
Validation Count
HOLD Operation Count
Financial Reset Report Count (on Reset Reports only)
5- 7
Additional Media (MISC, CREDIT, DEBIT,
etc.) Sales data, if any
∗ Loan Amount, Pick Up Count & Amount
∗ Additional Media-in-drawer data, if any
Miscellaneous Void Count & Amount
Percent Discount II to VI (on Line Items)
Count & Amount if the Percent Discount
keys are installed.
Transfer + GT
Transfer + Daily
Previous Balance R/A, PO Amount
Taxable Total 3, 4
Selective Itemizer 2 to 4 Count & Amount
Sales Portion Exempted from Tax 2 to 4
FS EX1 to FS EX4 for Taxes exempted by
tendering food stamps if ILLINOIS or NEW
JERSEY type of food stamp system
∗ Foreign Currencies 4 & 5-in-drawer data if
opened.
Off-line EFT Authorization Count &
Amount (for EFT spec.)
5. READ (X) AND RESET (Z) REPORTS
EO1-11152
5.2 General Notes On Report Takings
CASHIER READ or RESET (Daily or GT)
Reset Report Format Sample
Mode Lock: X for read
Z for reset
TEC STORE
1343 PEACH DRIVE
PHONE: 87-6437
(1) All Cashiers:
Enter 4, depress [AT/TL] (for Daily).
Enter 204, depress [AT/TL] (for GT).
Open 8:00am to 7:00pm
Closed: every Wednesday
08-31-2003 SUN
#3001
(2) Individual Cashier:
Enter 4, depress [#], enter the Cashier ID Code (2 digits), and
depress [AT/TL] (CODE ENTRY Method) (for Daily)
Z_CLERK
GT
01 JONES
GS
125
$346.77
112
$300.48
NS
ITEM/CUS
NS /CUS
NO SALE
VALI CTR
HOLD CTR
1.56
$4.17
2
3
1
0001Z
02 SMITH
∗∗
∗∗TRAINING
04 BROWN
GS
∗∗
TAX1
NS
TOTAL
CASH
CASH ID
TXBL1
ITEM/CUS
NS /CUS
Set the required Cashier Key to ON, enter 204, depress [#] and
[AT/TL] (CASHIER KEY Method) (for GT)
In CASHIER SIGNING Method, the ID code here is the 2-digit manager-assign
portion of the Cashier Code
Cashier ID Code & Cashier’s Name
∗∗TRAINING
03 MEHL
NS
Set the required Cashier Key to ON, enter 4, depress [#] and [AT/TL]
(CASHIER KEY Method) (for Daily)
Enter 204, depress [#], enter the Cashier ID Code (2 digits), and
depress [AT/TL] (CODE ENTRY Method) (for GT)
Same contents as Financial Reports except for GT and NET GT
9
$22.80
9
$21.50
$1.30
9
$22.80
5CU
$22.80
$22.80
$22.80
$21.50
1.80
$4.30
Individual Cashier Reset Report Count (on Reset Reports only)
0001Z
0261 18:58TM
5- 8
5. READ (X) AND RESET (Z) REPORTS
EO1-11152
5.2 General Notes On Report Takings
SALESPERSON READ OR RESET
(all Salespersons)
CREDIT CARD COMPANY SALES READ OR
RESET (Daily or GT)
Reset Report Sample
Reset Report Sample
Mode Lock: X for read
Z for reset
Enter 5, depress
[AT/TL]
Mode Lock:
TEC STORE
1343 PEACH DRIVE
PHONE: 87-6437
Open 8:00am to 7:00pm
Closed: every Wednesday
#3001
Z_SLSPERSON
02 Stacy
GS
2
$2.65
NS
2
$2.50
NS
2
$2.65
RTN
0
$0.00
08-31-2003 SUN
Person Code, Name
Gross Sale Item Count
& Amount
Net Sale Without Tax
Item Count & Amount
Net Sale With Tax
Item Count & Amount
Returned Item Count
& Amount
TOTAL
ALL MEDIA SALES TOTAL AND
CASH-IN-DRAWER READ
(read only)
Mode Lock: X, enter 12, depress [AT/TL]
TEC STORE
1343 PEACH DRIVE
PHONE: 87-6437
Open 8:00am to 7:00pm
Closed: every Wednesday
CASH ID
#3001
26CU
$252.23
$20.02
1
$5.30
1
$5.30
0001Z
0267 19:00TM
X_MEDIA
TOTAL
#3001
Z_CREDIT
01 ABC
All Salesperson Reset Report
Count (on Reset Reports only)
0001Z
08-31-2003 SUN
Enter 6, depress [AT/TL]
(for Daily)
Enter 206, depress [AT/TL]
(for GT)
TEC STORE
1343 PEACH DRIVE
PHONE: 87-6437
Open 8:00am to 7:00pm
Closed: every Wednesday
08-31-2003 SUN
X for read
Z for reset
All Media Sales Total
Customer Count, Amount
Cash-in-drawer Amount
0269 19:01TM
5- 9
0268 19:00TM
Company Code, Name,
Count & Sales Amount
Total of all card Companies’
sales (Item Count & Amount)
Credit Card Co.Sales Reset
Report Count (on Reset
Reports only)
5. READ (X) AND RESET (Z) REPORTS
EO1-11152
5.2 General Notes On Report Takings
DEPARTMENT GROUP READ (Daily or GT)
(read only)
Mode Lock: X
Enter 8, depress [AT/TL] (for Daily).
Enter 208, depress [AT/TL] (for GT).
TEC STORE
1343 PEACH DRIVE
PHONE: 87-6437
Open 8:00am to 7:00pm
Closed: every Wednesday
08-31-2003 SUN
X DP
VE&FR
46.51%
ME&FI
9.17%
DAIRY
12.41%
BAKERY
15.28%
CA&BT
14.06%
DR&BL
6.59%
SN&SP
6.07%
OTHERS
1.06%
#3001
GROUP
41
$153.20
11
$30.19
20
$40.89
11
$49.24
15
$46.30
14
$21.70
2
$20.00
2
$3.50
Minor Groups:
Group Name, Item Count
Sales Percentage & Amount
TOTAL
125
$329.38
Item Count
Amount
FRESH
72.22%
MANUF
26.72%
OTHER
1.06%
83
$237.88
40
$88.00
2
$3.50
Major Groups:
TOTAL
125
$329.38
Item Count
Amount
Total of all Minor Groups
Total of all Major Groups
0270 19:03TM
5- 10
5. READ (X) AND RESET (Z) REPORTS
EO1-11152
5.2 General Notes On Report Takings
MEDIA SALES AND IN-DRAWER
TOTAL READ
HOURLY RANGE READ or RESET
(read only)
Reset Report Sample
Mode Lock: X, enter 9, depress [AT/TL]
Mode Lock: X for read
Z for reset
Enter 10, depress
[AT/TL]
TEC STORE
1343 PEACH DRIVE
PHONE: 87-6437
TEC STORE
1343 PEACH DRIVE
PHONE: 87-6437
Open 8:00am to 7:00pm
Closed: every Wednesday
Open 8:00am to 7:00pm
Closed: every Wednesday
08-31-2003 SUN
#3001
X_MEDIA_ALL
TOTAL
26CU
$252.23
CASH
17CU
$128.57
CHECK
3CU
$23.40
Chg
5CU
$73.36
FS TL
1CU
$12.72
CASH ID
$20.02
CHECK ID
5
$37.00
Chg ID
1
$5.30
FS ID
1
$13.00
FS CG
$0.28
PB TL
1CU
$10.90
CUR1
1
100.00
CUR2
2
110.00
CUR3
1
80.00
08-31-2003 SUN
#3001
Z_HOURLY
08:00TM
12:00TM
15:00TM
26CU
19:00TM
All Media Sales
Customer Count
& Amount
Each Media Sales
Cus, Count & Amount
125
$252.23
0001Z
Hourly Range Reset Report
Count (on Reset Reports only)
0272 19:07TM
Each Media-in-drawer
Count & Amount
Food Stamp Change
Previous Balance Sales
Cus. Count & Amount
Each Foreign Currency-indrawer Count & Amount
0271 19:05TM
5-11
8:01 to 12:00
12:01 to 15:00
15:01 to 19:00 Item Count
Customer Count & Amount
19:01 and thereafter
5. READ (X) AND RESET (Z) REPORTS
EO1-11152
5.2 General Notes On Report Takings
DEPARTMENT READ or RESET
Individual Department Read (Daily or GT)
Operation for this sample
report:
TEC STORE
1343 PEACH DRIVE
PHONE: 87-6437
Mode Lock: X
11 [#] (for Daily)
211 [#] (for GT)
Open 8:00am to 7:00pm
Closed: every Wednesday
08-31-2003 SUN
[DEPT: VEGETABLE]
RTN
S.CPN
CORR
REG-
RTN
S.CPN
CORR
REGSUBTL
TOTAL
[AT/TL]
32
$95.20
1
$0.50
0
$0.00
0
$0.00
1
$1.00
2
$5.00
Department Name,
Item Count
Customer Count (or Sales Percentage: NOTE), Amount
Dollar Discount or %Count & Amount
Return Merchandise Item
Count & Amount
The print or non-print status of each
Store Coupon Item
item is selected in a programming
Count & Amount
operation.
Item Correct/Void
Count & Amount
Negative Mode
Count & Amount
FRUIT
17.68%
DISC
[ST]
#3001
X_DP_INDIV
VEGETABLE
29.03%
DISC
[DEPT: FRUIT]
Mode Lock: X
Enter 11 and depress [#] for Daily Report, or
Enter 211 and depress [#] for GT Report
Depress the required Dept Keys (or enter the required
Dept Code and depress [DP#]), repeat this for other
required DEPTs, depress [ST] if subtotal is necessary,
depress [AT/TL] to end reading.
10
$58.00
0
$0.00
0
$0.00
0
$0.00
0
$0.00
0
$0.00
42
$153.20
42
$153.20
0273 19:07TM
Item Count
Amount
Item Count
Amount
Subtotal of VEGETABLE + FRUIT
Total of all departments
read in this report
When there is any
Negative Department
Subtotal value, its Item
Count & Amount is printed
here.
When there is any Negative Department
Total value, its Item Count & Amount is
printed here.
NOTE:
A program option allows to select which of Customer Count and Sales Percentage is printed here.
5-12
5. READ (X) AND RESET (Z) REPORTS
EO1-11152
5.2 General Notes On Report Takings
All Department Read or Reset (Daily or GT)
Reset Report Sample
Mode Lock: X for read
Z for reset
TEC STORE
1343 PEACH DRIVE
PHONE: 87-6437
Open 8:00am to 7:00pm
Closed: every Wednesday
08-31-2003 SUN
Department Data ↓
#3001
Z_DP_ALL
VEGETABLE
30.30%
DISC
RTN
S.CPN
CORR
REG-
33
$101.20
1
$0.50
0
$0.00
0
$0.00
1
$1.00
2
$5.00
Dept. 15 Data:
DP15
DISC
RTN
S.CPN
CORR
REG-
TOTAL
-TOTAL
Dept. 1 Name
Item Count
Customer Count (or Sales %), Amount
Dollar Disc. or %- Count
& Amount
Returned Merchandise Item Count
& Amount
Store Coupon Count
& Amount
Item Correct/Void Count
& Amount
Negative Mode Count
& Amount
1
$1.00
0
$0.00
0
$0.00
0
$0.00
0
$0.00
0
$0.00
126
$333.98
1
$1.00
Item Count
Amount
Item Count
Amount
of positive departments
of negative departments
5-13
Enter 11, depress [AT/TL] (for Daily).
Enter 211, depress [AT/TL] (for GT).
5. READ (X) AND RESET (Z) REPORTS
EO1-11152
5.2 General Notes On Report Takings
PLU (PLU SALES DATA) READ or RESET
Individual PLU Read (Daily or GT)
Mode Lock: X
Enter 13 [#] for Daily Report, or Enter 213 [#] for GT Report.
Enter the PLU code, depress [PLU]. (Repeat this step if necessary.)
Depress [ST] for subtotal.
Depress [AT/TL] to end.
TEC STORE
1343 PEACH DRIVE
PHONE: 87-6437
Open 8:00am to 7:00pm
Closed: every Wednesday
OPERATION FOR THIS SAMPLE REPORT:
Mode Lock: X
13 [#]
08-31-2003 SUN
#3001
X_PLU_INDIV
020102
Lemon
1
$1.00
020105
Apple
0
$0.00
SUBTL
1
$1.00
TOTAL
1
$1.00
20102 [PLU]
20105 [PLU]
[ST] to obtain subtotal of the above two PLUs.
[AT/TL] to end
0297 19:13TM
Zone PLU Read or Reset (Daily or GT)
Mode Lock: X or Z
Enter 13 [#] for Daily Report, or Enter 213 [#] for GT Report.
Enter the zone-start PLU code, depress [@/FOR].
Then enter the zone-end PLU code, depress [AT/TL].
TEC STORE
1343 PEACH DRIVE
PHONE: 87-6437
For this sample
Open 8:00am to 7:00pm
Closed: every Wednesday
08-31-2003 SUN
#3001
X_PLU_ZONE
100000->199999
101301
Small-Btl Depo
4
TOTAL
Mode Lock: X or Z
13 [#] (for Daily)
100000 [@/FOR]
199999 [AT/TL]
Zone-start PLU Code -> Zone-end PLU Code
$0.20
4
$0.20
PLU Code
PLU Name
Item Count, Amount
Item Count, Amount of Total of all PLUs read in this report
0298 19:15TM
NOTES:
In Zone PLU Read Reports:
• PLUs of zero sale will be skipped.
• PLUs not existing in the PLU Program File memory will not
be printed in reports (in any reports).
5-14
5. READ (X) AND RESET (Z) REPORTS
EO1-11152
5.2 General Notes On Report Takings
All PLU Read or Reset (Daily or GT)
INACTIVE PLU READ (Daily or GT)
Reset Report Sample
(read only)
Mode Lock: X or Z
13 [AT/TL] (for Daily), or 213 [AT/TL] (for GT)
Mode Lock: X
13 [#] (Daily), or 213 [#] (GT).
Enter 0 (zero), depress [AT/TL].
TEC STORE
1343 PEACH DRIVE
PHONE: 87-6437
TEC STORE
1343 PEACH DRIVE
PHONE: 87-6437
Open 8:00am to 7:00pm
Closed: every Wednesday
08-31-2003 SUN
Open 8:00am to 7:00pm
Closed: every Wednesday
Print data in order from
lower to larger numbered
PLU Code.
#3001
08-31-2003 SUN
Z_PLU_ALL
010101
Tomato
3
020102
Lemon
1
050301
Milk-Large Pack
1
050321
Cheese-Half Pck
13
050322
Egg-6 Pack
1
060404
Half Rolls-4
1
070501
Tuna Can
12
070502
Soup Can
4
080502
Kiwi Jam
1
090601
Drink Small-A
2
010130
Small-Btl Depo
4
TOTAL
$0.50
$1.00
$1.30
$32.50
PLU Code 10101
Name “Tomato”
Item Count, Amount
NOTE:
When a scaled item is
entered, the item count “1” is
processed into the Total Item
Count of all the PLUs to be
printed at the bottom,
regardless of its actual
weight volume.
$1.50
$0.80
$4.20
#3001
Z_PLU_ZERO
010102
Potato
020101
Orange
020105
Apple
030301
Beef
030302
Pork
030303
Mutton
040201
Salmon
040202
Cod
040203
Shrimp
050302
Milk-Small Pack
0302 19:19TM
$1.20
$2.20
$1.20
PLU Code 101301
$0.20
43
$46.60
0001Z
Total Item Count and Amount
of all the PLUs
PLU Reset Report Count
(on Reset Reports only)
0301 19:17TM
5-15
PLU Code
Name
5. READ (X) AND RESET (Z) REPORTS
EO1-11152
5.2 General Notes On Report Takings
CUSTOMER FILE READ or RESET
Zone Files Read or Reset
(for Check Track Memory Type only)
Mode Lock: X or Z
Enter 15, depress [#].
Enter the zone-start File Code, depress [@/FOR].
Then enter the zone-end File Code, depress [AT/TL].
All Files (with balance remaining) Read or Reset
Mode Lock: X or Z
Enter 15, depress [AT/TL]
TEC STORE
1343 PEACH DRIVE
PHONE: 87-6437
TEC STORE
1343 PEACH DRIVE
PHONE: 87-6437
Open 8:00am to 7:00pm
Closed: every Wednesday
Open 8:00am to 7:00pm
Closed: every Wednesday
08-31-2003 SUN
08-31-2003 SUN
#3001
X_CUST_ALL
JAMES HAILY
#000000000001
$4.70
0425 11:46TM
Customer’s Name
File Code
Balance
(In this case, this is the only
file with any balance
remaining.)
#3001
X_CUST_ZONE
000000000001->000000000005
JAMES HAILY
#000000000001
$4.70
0427 11:48TM
Individual Files Read
Zero-balance Files Read
Mode Lock: X
Enter 15, depress [#].
Enter the required File Code, depress [@/FOR].
Depress [AT/TL] to end.
Mode Lock: X
Enter 15, depress [#].
Enter 0 (zero), depress [AT/TL].
TEC STORE
1343 PEACH DRIVE
PHONE: 87-6437
TEC STORE
1343 PEACH DRIVE
PHONE: 87-6437
Open 8:00am to 7:00pm
Closed: every Wednesday
Open 8:00am to 7:00pm
Closed: every Wednesday
08-31-2003 SUN
#3001
X_CUST_INDIV
HELEN REED
#000000000105
$0.00
08-31-2003 SUN
#3001
X_CUST_ZERO
HELEN REED
#000000000105
Customer’s Name
File Code
Balance
0428 11:49TM
0426 11:47TM
5-16
Zone-start File Code->
Zone-end File Code
Customer’s Name
File Code
Balance
(In this case, there is only
one file with a balance in
the designated zone.)
Customer’s Name
File Code
5. READ (X) AND RESET (Z) REPORTS
EO1-11152
5.2 General Notes On Report Takings
Credit-balance Files Read
Debit-balance Files Read
Mode Lock: X
Enter 15, depress [#].
Enter 1, depress [AT/TL].
Mode Lock: X
Enter 15, depress [#].
Enter 2, depress [AT/TL].
TEC STORE
1343 PEACH DRIVE
PHONE: 87-6437
TEC STORE
1343 PEACH DRIVE
PHONE: 87-6437
Open 8:00am to 7:00pm
Closed: every Wednesday
Open 8:00am to 7:00pm
Closed: every Wednesday
08-31-2003 SUN
#3001
X_CUST_CRED
JAMES HAILY
#000000000001
$4.70
08-31-2003 SUN
#3001
X_CUST_DEBIT
Customer’s Name
File Code
Balance
0430 11:53TM
In this case no debit-balance
files are found at present.
0429 11:51TM
NOTE:
The program option allows you to select that data concerning the Previous Balance provided to the
daily/GT financial memory (TRF TL, TRF + GT, TRF - GT, TRF +, TRF -, PB TL, PB R/A and PB PO)
is all reset to zero on taking the All Customer Files Reset report.
5-17
5. READ (X) AND RESET (Z) REPORTS
EO1-11152
5.2 General Notes On Report Takings
PLU GROUP SALES READ or RESET (Daily or GT)
Reset Report Format Sample
Mode Lock: X for read
Z for reset
Enter 24, depress [AT/TL] (for Daily)
Enter 224, depress [AT/TL] (for GT)
TEC STORE
1343 PEACH DRIVE
PHONE: 87-6437
Open 8:00am to 7:00pm
Closed: every Wednesday
08-31-2003 SUN
#3001
Z_PLU_GROUP
VEGETABLE
3.22%
MEAD & DAIRY
75.75%
BAKERY
1.72%
CAN & BTL FOOD
16.31%
DRINK
2.58%
BTL DEPO
0.43%
TOTAL
4
$1.50
PLU Group Name
Item Count
Sales Percentage, Amount
15
$35.30
1
$0.80
17
$7.60
2
$1.20
4
$0.20
43
$46.60
PLU Group Sales Reset Report Count (on Reset Reports only)
0001Z
0390 09:18TM
5-18
5. READ (X) AND RESET (Z) REPORTS
EO1-11152
5.2 General Notes On Report Takings
EFT MEDIA LOG READ or RESET
This report can be taken when the connection of the EFT terminal has been programmed.
Mode Lock: X for read
Z for reset
Enter 45, depress [AT/TL]
TEC STORE
1343 PEACH DRIVE
PHONE: 87-6437
Open 8:00am to 7:00pm
Closed: every Wednesday
08-31-2003 SUN
2
3
4
5
6
7
8
9
10
11
99
#3001
X_MEDIA_LOG
$252.23
3
$62.00
2
$74.62
2
$0.00
0
$0.00
0
$0.00
0
$0.00
0
$102.60
6
$24.12
3
$82.56
5
$598.13
21
AMEX (Amount, Count)
VISA (Amount, Count)
Master Card (Amount, Count)
Discover (Amount, Count)
Private Label (Amount, Count)
Diner’s Club or Carte Blanche (Amount, Count)
JCB (Amount, Count)
Debit (Amount, Count)
EBT F/S (Amount, Count)
EBT CASH (Amount, Count)
Total for all card types (Amount, Count)
0393 19:42TM
GT REPORTS
The print form and items of a GT report are the same as those of its corresponding daily report, except the report
header portion. Please also note that some items provided in the daily report are not provided in its GT reports.
The counters and totals in a GT report are records accumulated for a certain period (week, month, etc.) while
those counters and totals in the daily report are usually records for a day. The accumulated record data in each
GT report will be renewed when its GTZ report has been taken.
Header Example
Z_DP_ALL
GTX_DP_ALL
All Department Read Report (Daily)
All Department GT Read Report
5-19
5. READ (X) AND RESET (Z) REPORTS
EO1-11152
5.2 General Notes On Report Takings
EFT Batch
(1) Open Batch
An open batch command is sent to the EFT terminal to declare the use of the batch file.
This operation is performed before the store opens.
OPEN
BATCH
OK
9999 17:35TM
Mode Lock: X or Z
30 [AT/TL]
NOTES:
1. While the ECR is communicating with the EFT Terminal, “PROCESSING” is displayed.
When the communication is completed successfully, ”BATCH OPENED” is displayed.
2. When a response from the EFT terminal was not sent correctly, an error message is displayed.
When no response was sent from the EFT terminal within a specified time (standard: 30 seconds),
a timeout error occurs on the ECR and an error message “NO RESPONS” is displayed.
3. The result of the processing (OK or NG) is printed on the journal, but not on the receipt.
(2) Close Batch
A close batch command is sent to the EFT terminal.
Sales transaction of the day is ended and a batch file is sent to the host to make a settlement.
Mode Lock: Z
TEC STORE
1343 PEACH DRIVE
PHONE: 87-6437
31 [#] 1 [AT/TL]
Open 8:00am to 7:00pm
Closed: every Wednesday
08-31-2003 SUN
CLOSE
In the case of an error, “NG” will be printed in place of “OK”.
In the case of an error, a response from the EFT will be printed, also.
BATCH
OK
XXXXXXXXXXXXXXXXXXXXXXXXXXXXX
1CL
NOTES:
#3001
9999 17:35TM
1. While the ECR is communicating with the EFT Terminal, “PROCESSING” is displayed.
When the communication is completed successfully, ”BATCH CLOSED” is displayed.
2. When a response from the EFT terminal was not sent correctly, an error message is displayed.
When no response was sent from the EFT terminal within a specified time (standard: 10 minutes),
a timeout error occurs on the ECR and an error message “NO RESPONS” is displayed.
3. The result of the processing is printed on the receipt.
4. When a response from the EFT terminal was not sent correctly (i.e. when a sales transaction data
was not correct), an error message is displayed.
At this time, follow the procedure below.
Step 1: Ask the hosting company which sales transaction was not correct on the telephone.
Step 2: Take a Local Transaction Inquiry Read Report to confirm the transaction sequence.
(Refer to (6) Local Transaction Inquiry.)
Step 3: Perform a void operation to delete a target item in the sales transaction.
Step 4: Retry to enter the deleted item. (Manual card number entry)
Step 5: Perform a Change Batch Number. (Refer to (4) Change Batch Number.)
Step 6: Retry to perform a Close Batch to make a settlement.
5-20
5. READ (X) AND RESET (Z) REPORTS
EO1-11152
5.2 General Notes On Report Takings
(3) Close Batch (with Debit)
A close batch command is sent to the EFT terminal.
Sales transaction of the day is ended and a batch file is sent to the host to make a settlement.
Mode Lock: Z
TEC STORE
1343 PEACH DRIVE
PHONE: 87-6437
31 [#] 2 [AT/TL]
Open 8:00am to 7:00pm
Closed: every Wednesday
08-31-2003 SUN
CLOSE
In the case of an error, “NG” will be printed in place of “OK”.
In the case of an error, a response from the EFT will be printed, also.
BACH
D
OK
XXXXXXXXXXXXXXXXXXXXXXXXXXXXX
1CL
NOTES:
#3001
9999 17:35TM
1. While the ECR is communicating with the EFT Terminal, “PROCESSING” is displayed.
When the communication is completed successfully, ”BATCH OPENED” is displayed.
2. When a response from the EFT terminal was not sent correctly, an error message is displayed.
When no response was sent from the EFT terminal within a specified time (standard: 10 minutes),
a timeout error occurs on the ECR and an error message “NO RESPONS” is displayed.
3. The result of the processing is printed on the receipt.
(4) Change Batch Number
This operation is performed if a finalization cannot be successfully done with a Close Batch operation.
Call the host company for confirmation, and change the Batch Number to the designated one.
Mode Lock: Z
TEC STORE
1343 PEACH DRIVE
PHONE: 87-6437
32 [#] |Batch Number| [AT/TL]
Max. 4 digits (0 to 9999)
Open 8:00am to 7:00pm
Closed: every Wednesday
08-31-2003 SUN
CHANGE
BATCH
ZZZ9
1CL
9999 17:35TM
The changed BATCH NUMBER will be printed.
5-21
#3001
5. READ (X) AND RESET (Z) REPORTS
EO1-11152
5.2 General Notes On Report Takings
(5) Local Batch Status Report
A local batch status report command is sent to the EFT terminal and a response from the EFT terminal is printed
out. (condition check)
Mode Lock: X
TEC STORE
1343 PEACH DRIVE
PHONE: 87-6437
33 [AT/TL]
Open 8:00am to 7:00pm
Closed: every Wednesday
08-31-2003 SUN
A: Batch status (0 = Open, C = Closed, P = Pended, X = Incomplete): one character
B: Batch Number: 4 digits
C: Transaction count: 5 digits
D: Item count: 5 digits
E: Batch balance: 7-digit integer + 2-digit decimal
F: Forward transaction count: 5 digits
G: Forward batch balance: 7-digit integer + 2-digit decimal
NOTES:
#3001
BATCH STATUS
X 9999 ZZZZ9 ZZZZ9
ZZZZZZ9.99
ZZZZ9 ZZZZZZ9.99
1CL
9999 17:35TM
ABCD
E
FG
1. While the ECR is communicating with the EFT Terminal, “PROCESSING” is displayed.
2. When a response from the EFT terminal was not sent correctly, an error message “RESPONS NG”
is displayed.
When no response was sent from the EFT terminal within a specified time (standard: 30 seconds),
a timeout error occurs on the ECR and an error message “NO RESPONS” is displayed.
(6) Local Transaction Inquiry
A Local Transaction Inquiry command is sent to the EFT Terminal and a response from the EFT terminal is
printed out. (Report of one transaction)
Mode Lock: X
TEC STORE
1343 PEACH DRIVE
PHONE: 87-6437
34 [#] |Sequence Number| [AT/TL]
Max. 5 digits (1 to 99999)
Open 8:00am to 7:00pm
Closed: every Wednesday
08-31-2003 SUN
L
Min. No.
of digits
A: Transaction sequence number
1
B: Transaction status
1
C: Network transaction code
1
D: Credit card account number
1
E: Expiration date
4
F: Card read flag
1
G: Approval code
1
H: Reference number
1
I: Transaction amount
3
J: Transaction date
6
K: Transaction time
6
NOTES:
Max. No.
of digits
5
1
3
19
4
1
16
16
11
6
6
Type
N
A
A
A
N
A
A
A
N
A
A
N=Numeric
A=Alphanumeric
#3001
INQ.
ZZZZ9 X XXX
ZZZZZZZZZZZZZZZZZZX 9999 X
ZZZZZZZZZZZZZZZX
ZZZZZZZZZZZZZZZX
ZZZZZZZZ9.99
999999 999999
1CL
TRAN
ABC
DEF
G
H
I
JK
9999 17:35TM
1. While the ECR is communicating with the EFT Terminal, “PROCESSING” is displayed.
2. When a response from the EFT terminal was not sent correctly, an error message is displayed.
When no response was sent from the EFT terminal within a specified time (standard: 30 seconds),
a timeout error occurs on the ECR and an error message “NO RESPONS” is displayed.
5-22
5. READ (X) AND RESET (Z) REPORTS
EO1-11152
5.2 General Notes On Report Takings
(7) Local Transaction Report
A Local Transaction Report command is sent to the EFT Terminal and a response from the EFT terminal is
printed out. (Report of all transactions)
Mode Lock: X
TEC STORE
1343 PEACH DRIVE
PHONE: 87-6437
34 [AT/TL]
Open 8:00am to 7:00pm
Closed: every Wednesday
08-31-2003 SUN
L
Min. No.
of digits
A: Transaction sequence number
1
B: Transaction status
1
C: Network transaction code
1
D: Credit card account number
1
E: Expiration date
4
F: Card read flag
1
G: Approval code
1
H: Reference number
1
I: Transaction amount
3
J: Transaction date
6
K: Transaction time
6
Max. No.
of digits
5
1
3
19
4
1
16
16
11
6
6
Type
N
A
A
A
N
A
A
A
N
A
A
N=Numeric
A=Alphanumeric
ALL
ZZZZ9 X XXX
ZZZZZZZZZZZZZZZZZZX 9999 X
ZZZZZZZZZZZZZZZX
ZZZZZZZZZZZZZZZX
ZZZZZZZZ9.99
999999 999999
TRAN
ABC
DEF
G
H
I
JK
:
:
ZZZZ9 X XXX
ZZZZZZZZZZZZZZZZZZX 9999 X
ZZZZZZZZZZZZZZZX
ZZZZZZZZZZZZZZZX
ZZZZZZZZ9.99
999999 999999
1CL
NOTES:
#3001
9999 17:35TM
1. While the ECR is communicating with the EFT Terminal, “PROCESSING” is displayed.
2. When a response from the EFT terminal was not sent correctly, an error message is displayed.
When no response was sent from the EFT terminal within a specified time (standard: 30 seconds),
a timeout error occurs on the ECR and an error message “NO RESPONS” is displayed.
5-23
6. PROGRAMMING OPERATIONS
EO1-11152
6. PROGRAMMING OPERATIONS
6. PROGRAMMING OPERATIONS
This chapter is provided for the store programmer or the store manager who may have to change the
programmed data of the ECR on the daily, weekly, or monthly basis. Usually, all the basic program data required
for your store should be set before delivering the product by your local TOSHIBA TEC representative. However,
in need of changing or adding program data, please refer to this chapter. It is also recommended to read the
OPERATOR’S GUIDE as well as other chapters of the MANAGER’S GUIDE in order to thoroughly understand
the descriptions in this chapter. If there are any unclear points or program data other than listed here must be
changed or added, please contact your TOSHIBA TEC representative.
TABLE OF PROGRAMMING OPERATIONS
(Page)
Basic Key Functions and Keyboard Variations in Programming Operations ..................................................... 6- 2
Character Entries ................................................................................................................................................ 6- 4
Condition Required for Programming Operations .............................................................................................. 6- 8
Submode No. 1:
Store Name Message, Commercial Message, and Footer Logo Message Programming .. 6- 9
Submode No. 2:
Cashier Code and Name Programming .............................................................................. 6-11
Submode No. 3:
Department Table Programming.......................................................................................... 6-13
Submode No. 4:
PLU Table Programming .................................................................................................... 6-21
Submode No. 5:
Time Setting or Adjustment ................................................................................................. 6-32
Submode No. 6:
Date Setting or Adjustment ................................................................................................. 6-33
Submode No. 8:
Amount Limit Setting for Function Keys .............................................................................. 6-33
Submode No. 15: Customer File Code (Check Track No.) and Name Setting ................................................ 6-34
Submode No. 20: Salesperson Code and Name Programming ...................................................................... 6-36
Submode No. 25: Link-PLU Table Programming ............................................................................................. 6-37
Submode No. 26: Tare Table and General Unit Weight Setting ...................................................................... 6-38
Submode No. 27: PLU Preset-Code Key Setting ............................................................................................ 6-40
Submode No. 31: Display Message Programming .......................................................................................... 6-43
Submode No. 35: Negative Amount Key Limit Amount Setting ....................................................................... 6-45
Submode No. 40: PLU Price Dollar Discount/Extra Charge Amount Setting .................................................. 6-46
No Submode No.: Department Preset Price Setting or Changing ....................................................................
PLU Preset Price Setting or Changing, Whole Package Quantity Changing .....................
%+ and %- Preset Rate Setting ..........................................................................................
Preset Rate Setting for Selective Itemizers (SI1 to SI4) .....................................................
Foreign Currency Exchange Rate Setting ..........................................................................
TAX Table Setting ...............................................................................................................
Store/Register No. Setting ..................................................................................................
6- 1
6-47
6-48
6-49
6-50
6-52
6-53
6-55
6. PROGRAMMING OPERATIONS
EO1-11152
6.1 Basic Key Functions and Keyboard Variations in Programming Operations
6.1
Basic Key Functions and Keyboard Variations in Programming
Operations
6.1.1 Basic Key Functions
1.
The following are main keys and their functions to be used in programming operations:
[@/FOR] (or [X]) ------------------------- Used to enter the program Submode No. (NOTE below)
[ST] or [NS] ------------------------------- Used to enter the Address No. or Item Code. Also used to
end the item data entry.
[#] -------------------------------------------- Used to enter data for the address or item. Each character
also entered through this key.
[ITEM CORR] ----------------------------- When you enter incorrect settings, depressing this key can
return the display to the previous item setting.
[AT/TL] ------------------------------------- Used to end the entire program Submode sequence.
NOTE: Regarding programming operations in this chapter, the [X] key instead of the [@/FOR] key is shown.
2.
Function of the [C] key:
٠
When an entered program data is already printed, the [C] key cannot clear if any longer.
To correct the data, re-enter it.
٠
Before the entered data is printed, the data may be cleared by the [C] key (except in the
SFKC Programming Operation).
3.
To clarify the operation flow, definitions of keys of the ECR keyboard are as shown below.
|
| --------- Selective numeric value which is entered through the Numeric keys.
[
]---------- Depression of the function key.
xxxx ------------ Fixed numeric value which is entered through the Numeric keys.
Fixed
6.1.2 Keyboard Variations in Programming Operations
This ECR provides several keyboards for programming operations. Depending on which keyboard is used, the
key layout and the character entry method will vary.
Case 1: When the ECR Keyboard is Ordinary Type (Stroke-key Type)
1-1
When the Ordinary keyboard alone is used for programming, follow the instructions as they are
described in this manual. For character settings, use the CHARACTER CODE TABLE (later stated).
None of the DIRECT CHARACTER ENTRY methods are possible.
1-2
When the PLU Keyboard PK-2 (hardware option) is connected:
1) Character Keys provided on the PK-2 Character Setting Sheet may be used to directly enter the
characters (DIRECT CHARACTER ENTRY method). Any characters not provided there (and those
provided as well) may be entered, in the CHARACTER CODE ENTRY method, through the Numeric
Keys and the [#] key on the ECR keyboard.
6- 2
6. PROGRAMMING OPERATIONS
EO1-11152
6.1 Basic Key Functions and Keyboard Variations in Programming Operations
2) All Function keys ([C], [@/FOR], [ST], [AT/TL], [DP#], etc.) must be operated on the ECR keyboard.
3) In the following operations, however, the Character Setting Sheet should be removed and the keys on
the PK-2 are used as PLU Preset-code Keys:
• PLU PRESET-CODE KEY SETTING (Submode 27 in this chapter)
Case 2: When the ECR Keyboard is Flat Keyboard Type:
The Flat Keyboard will be set with the “Setting Mode Key Layout” in the programming operations including
character entries. On this keyboard, functions and locations of keys required in various programming
operations are fixed. Characters on the key sheet can be entered directly through this keyboard. The
Character Code Entry method is also allowed.
NOTE:
If an option keyboard (PK-2) is connected, the DIRECT CHARACTER ENTRY method is allowed
through both the ECR keyboard and the option keyboard.
6- 3
6. PROGRAMMING OPERATIONS
EO1-11152
6.2 Character Entries
6.2
Character Entries
As already stated, there are two methods of operations for character settings for names or messages:
CHARACTER CODE ENTRY Method and DIRECT CHARACTER ENTRY Method.
CHARACTER CODE ENTRY Method
This method is to set a character by entering a Character Code and depressing the [#] key. This method is
allowed in either of Case 1 and Case 2, but is operated only on the ECR keyboard (Ordinary Type or Flat
Type).
DIRECT CHARACTER ENTRY Method
This method is to set a character by directly depressing the Character Key on any of the following keyboard:
•
Flat Keyboard (ECR Keyboard Flat Type) with “Setting Mode Key Layout” sheet
(refer to Case 2)
•
PK-2 Keyboard (PLU Keyboard; hardware option)
By using those character keys, the characters are directly entered. In this manual, sample operations are
attached to most of the programming operations. And at name or message programming portions, characters
are entered by the CHARACTER CODE ENTRY method. Instead of this, you may depress the Character
Keys. For example, instead of entering 401 [#] (to enter character “A”), you may simply depress Character
Key “A” on any of the above three keyboards.
On the following pages, Character Code Tables under the CHARACTER CODE ENTRY Method and three
different keyboards under the DIRECT CHARACTER ENTRY Method are shown. These pages are to be
referred to, every time the “Character Entries” sequence is contained in various programming operations in
this manual.
Read through these pages at least once first, so that you may know the appropriate method of character
entries using the ECR keyboard and/or option keyboards.
6- 4
6. PROGRAMMING OPERATIONS
EO1-11152
6.2 Character Entries
6.2.1 Character Code Entry Method
Character Code Table 1: Standard Characters
Column Code
2
3
4
5
6
7
9
10
11
12
13
SP
0
@
P
`
p
€
á
Å
\
!
1
A
Q
a
q
◦
é
å
←
"
2
B
R
b
r
⎡
í
Ø
↓
03
#
3
C
S
c
s
⎦
ó
ø
↑
04
$
4
D
T
d
t
,
ú
Æ
½
05
%
5
E
U
e
u
•
â
æ
¼
06
&
6
F
V
f
v
Ä
ê
Œ
Ì
07
'
7
G
W
g
w
Ë
î
œ
08
(
8
H
X
h
x
Ö
ô
β
Kg
09
)
9
I
Y
i
y
Ü
û
¢
lb
10
*
:
J
Z
j
z
É
à
£
No
11
+
;
K
[
k
{
ä
è
Φ
X
12
,
<
L
¥
l
|
ë
ì
∑
V
13
-
=
M
]
m
}
ï
ç
÷
U
14
.
>
N
^
n
¯
ö
Ñ
─
15
/
?
O
_
o
ü
ñ
00
01
Row
Code
NOTE:
02
8
14
15
→
Characters of those character codes 1007, 1206, 1207, 1211, 1500 through 1503, and 1506 through
1514 cannot be printed on the slip printer.
6- 5
6. PROGRAMMING OPERATIONS
EO1-11152
6.2 Character Entries
Character Setting Operations
•
To set a regular-sized character, enter the COL (column) code and then the ROW code, followed by the
[#] key.
ex.) To set “%”, enter 205 and depress [#].
To set “kg” enter 1508, and depress [#].
•
To set a blank instead of a character, simply depress [#] without a prior entry, or enter 200 and depress
[#].
•
Depress the [@/FOR] key once prior to regular-sized character entry, and it will be a double-sized
character (a blank will also be double-sized).
ex.) To set “GROUP”, “G” in double-sized, and “ROUP” in regular-sized:
[@/FOR] 407 [#]
G
•
502 [#]
R
515 [#]
O
505 [#]
U
500 [#]
P
Depress the [@/FOR] key twice prior to the first character code entry to set the entire message line or
enter name will all double-sized characters.
ex.) To set “GROUP” all in double-sized:
To set “Drink”, all in double-sized;
407 [#]
G
[@/FOR] [@/FOR]
502 [#]
R
415 [#]
O
505 [#]
U
500 [#]
P
All Double-sized Declaration
6.2.2 Direct Character Entry Method
Using Flat Keyboard (installed as the ECR Main Keyboard):
-- Setting Mode Key Layout -(Use the special template for this purpose and insert it between the film layers covering the flat keyboard.
This key layout is applicable to only certain submodes.)
Q
A
Z
q
a
z
!
1
W
S
X
w
s
x
@
2
E
D
C
e
d
c
#
3
R
F
V
r
f
v
$
4
T
G
B
t
g
b
%
5
Y
H
N
y
h
n
&
6
U
J
M
u
j
m
:
7
I
K
,
i
k
(
8
Character Key in Programming
O
L
.
o
l
?
)
9
P
;
/
p
*
–
SP
0
RF
#
JF
NS
C
8
5
2
00
@/FOR
ALL
VOID
ITEM
CORR
PLU
7
4
1
0
9
6
3
•
DP#
ST
AT/TL
Function key in programming
Character Keys: Simply depress the key to enter the character. (The [#] key should not follow.) Then numerics
1 to 0 are entered as characters 1 to 0 but not as codes for PLU Item Codes, etc.
Function Keys: These are function keys to be used in programming operations with the Setting Mode Key
Layout. The numeric Keys here are used to enter PLU Codes, etc. or numeric values as
program data, but not to enter the numerics as characters.
6- 6
6. PROGRAMMING OPERATIONS
EO1-11152
6.2 Character Entries
Using PK-2 (PLU Keyboard; hardware option)
The PK-2 is used to enter a required PLU code by simply depressing the code-preset key on the PK-2
keyboard in the “REG” or “MGR” mode. In addition, the PK-2 can be used to enter characters directly during
the programming operations that require character settings, such as STORE NAME/MESSAGE AND
COMMERCIAL MESSAGE PROGRAMMING, DEPARTMENT TABLE PROGRAMMING, etc.
The figure below shows the key indications of the PK-2 keyboard for the character setting purpose.
Insert the template for this purpose between the film layers that cover the PK-2 keyboard.
Instead of entering a 3 or 4 digit character code and depressing the [#] key on the ECR keyboard, a simple
depression of the appropriate key on the PK-2 keyboard will be the character entry.
All the function keys, such as [@/FOR], [ST], [#]. [AT/TL], etc. must be operated on the ECR side. Any
characters not listed on the template may be entered by the CHARACTER CODE ENTRY method on the ECR
keyboard (the characters even listed on the template may be entered as well by that method).
Please note also that the keys “0” to “9” in the figure below function as character keys but do not function for
code entries. Any code entries, for Menu Item Codes, Address Nos, etc. must be entered through the
Numeric Keys on the ECR keyboard.
The One Double-size Declaration (by depressing the [@/FOR] key once prior to the required character) and
the All Double-sized Declaration (by depressing [@/FOR] twice before all the characters) are the same as in
the CHARACTER CODE ENTRY method.
7
8
9
4
5
6
1
2
3
!
@
#
$
%
¢
&
*
(
)
q
w
e
r
t
y
u
i
o
P
~
^
a
s
d
f
g
h
j
k
l
"
_
+
z
x
c
v
b
n
m
'
-
=
Q
W
E
R
T
Y
U
I
O
P
[
]
A
S
D
F
G
H
J
K
L
;
:
,
Z
X
C
V
B
N
M
space
.
/
?
6- 7
0
6. PROGRAMMING OPERATIONS
EO1-11152
6.3 Condition Required for Programming Operations
6.3
Condition Required for Programming Operations
“CONDITION” is given at the top of each programming operation. The ECR must satisfy this condition to perform
programming operations.
There are two types of conditions:
“Any time outside a sale”
It means that the programming operation is allowed when a sale is finalized before going into any other sale entry.
“After------ reset”
It means that the designated reset report must be taken before entering the programming operation.
And an error will result if the operation is attempted without taking the report. However, the words “After ...
Reset” do not necessarily mean “immediately after ...”.
When the designated reset report has already been taken and then some operations are performed in the SET, X,
or Z mode, the condition “After ... Reset” is still satisfied and the programming operation is still allowed.
On the contrary, when the designated reset report has been taken but then some sales data relating to that
report’s output data are entered in the REG, MGR, or - mode, the programming operation will no longer be
allowed and the same reset report must be taken.
Thus the condition “After ... Reset” indicates that all the sales data relating to the report data must be zero
(except non-resettable memory data). Because of this “CONDITION” requirement, the report data will be
protected from any inconsistencies of sales data entered in the period from a resetting of the report to another
resetting of the same report next time.
6- 8
6. PROGRAMMING OPERATIONS
EO1-11153
6.4 Store Name Message, Commercial Message, and Footer Logo Message Programming (Submode 1)
6.4
Store Name Message, Commercial Message, and Footer Logo
Message Programming (Submode 1)
Store Name Message, Commercial Message, and Footer Logo Message to be printed on the receipt can be
programmed here.
CONDITION
Any time outside a sale
OPERATION
Mode Lock: SET
Repeat for another line.
|Line No.| [ST]
1 [X]
1 digit (1 to 9)
1 to 4: Store Name Message
5 to 7: Commercial Message
8 to 9: Footer Logo Message
(For sequentially programming lines, the
line number specification can be skipped.)
Character Entries
[ST]
Max. 32 characters/line
(See Section 6.2 Character
Entries.)
[AT/TL]
To complete this line.
To complete this
programming
operation.
NOTES:
1. For each line, a maximum of 32 regular-sized characters or 16 double-sized characters can be entered. A
combination of both types is also available.
2. When blanks are entered for the whole one line, it results in one line feed.
3. If no commercial message is required on the receipt, program blanks for all three lines. As a result no extra
lines will be fed. If any one of the three lines is programmed, the two other lines will cause line feeds.
4. The 4-line range assigned for the store name/message will be either printed or fed, regardless of any program
option selection.
5. If the option “Footer Logo Message Print” is selected, the 2-line range assigned for the Footer Message will be
fed even if no data is programmed.
6. If any incorrect characters have been programmed, depress the [C] key to clear all the characters on a line
and then re-enter characters from the beginning, or end the line with an [ST] and re-program the entire line.
The new data will be active.
7. When all the lines have been programmed, do a check by issuing a receipt. Only the lines with errors need to
be re-programmed; other lines will not be affected.
Example)
To program the following Store Message, Commercial Message, and Footer Logo Message
(under the option “Footer Logo Message Print”)
T
E
C
1 3 4 3
S
T
P E A C H
P H O N E :
O
R
E
D R I V E
8 7 - 6 4 3 7
Line No. 1
Line No. 2
Line No. 3
Store Name/Message
portion
Line No. 4
O p e n
C l o s e d :
8 : 0 0 a m
e v e r y
t o
7 : 0 0 p m
Line No. 5
W e d n e s d a y
Line No. 6
Commercial Message
portion
Line No. 7
T h a n k
y o u
Line No. 8
C a l
l
a g a i n
6- 9
Line No. 9
Footer Logo Message
portion
6. PROGRAMMING OPERATIONS
EO1-11153
6.4 Store Name Message, Commercial Message, and Footer Logo Message Programming (Submode 1)
Key Operation: Mode Lock: SET, Enter 1 and depress the [X] key.
1 [ST] (Line No. 1)
[#] (Space)
[#] (Space)
[#] (Space)
[#] (Space)
[#] (Space)
[#] (Space)
[#] (Space)
[X] [5] [0] [4] [#] (T)
[X] [4] [0] [5] [#] (E)
[X] [4] [0] [3] [#] (C)
[X] [#] (Space)
[X] [5] [0] [3] [#] (S)
[X] [5] [0] [4] [#] (T)
[X] [4] [1] [5] [#] (O)
[X] [5] [0] [2] [#] (R)
[X] [4] [0] [5] [#] (E)
[ST] (to complete Line 1)
2 [ST] (Line No. 2)
[#] (Space)
[#] (Space)
[#] (Space)
[#] (Space)
[#] (Space)
[#] (Space)
[#] (Space)
[#] (Space)
[3] [0] [1] [#] (1)
[3] [0] [3] [#] (3)
[3] [0] [4] [#] (4)
[3] [0] [3] [#] (3)
[#] (Space)
[5] [0] [0] [#] (P)
[4] [0] [5] [#] (E)
[4] [0] [1] [#] (A)
[4] [0] [3] [#] (C)
[4] [0] [8] [#] (H)
[#] (Space)
[4] [0] [4] [#] (D)
[5] [0] [2] [#] (R)
[4] [0] [9] [#] (I)
[5] [0] [6] [#] (V)
[4] [0] [5] [#] (E)
[ST] (to complete Line 2)
3 [ST] (Line No. 3)
[#] (Space)
[#] (Space)
[#] (Space)
[#] (Space)
[#] (Space)
[#] (Space)
[#] (Space)
[#] (Space)
[#] (Space)
[5] [0] [0] [#] (P)
[4] [0] [8] [#] (H)
[4] [1] [5] [#] (O)
[4] [1] [4] [#] (N)
[4] [0] [5] [#] (E)
[3] [1] [0] [#] (:)
[#] (Space)
[3] [0] [8] [#] (8)
[3] [0] [7] [#] (7)
[2] [1] [3] [#] (-)
[3] [0] [6] [#] (6)
[3] [0] [4] [#] (4)
[3] [0] [3] [#] (3)
[3] [0] [7] [#] (7)
[ST] (to complete Line 3)
5 [ST] (Line No. 5)
[#] (Space)
[#] (Space)
[#] (Space)
[#] (Space)
[#] (Space)
[4] [1] [5] [#] (O)
[7] [0] [0] [#] (p)
[6] [0] [5] [#] (e)
[6] [1] [4] [#] (n)
[#] (Space)
[#] (Space)
[3] [0] [8] [#] (8)
[3] [1] [0] [#] (:)
[3] [0] [0] [#] (0)
[3] [0] [0] [#] (0)
[6] [0] [1] [#] (a)
[6] [1] [3] [#] (m)
[#] (Space)
[7] [0] [4] [#] (t)
[6] [1] [5] [#] (o)
[#] (Space)
[3] [0] [7] [#] (7)
[3] [1] [0] [#] (:)
[3] [0] [0] [#] (0)
[3] [0] [0] [#] (0)
[7] [0] [0] [#] (p)
[6] [1] [3] [#] (m)
[ST] (to complete Line 5)
6 [ST] (Line No. 6)
[#] (Space)
[#] (Space)
[#] (Space)
[#] (Space)
[4] [0] [3] [#] (C)
[6] [1] [2] [#] (l)
[6] [1] [5] [#] (o)
[7] [0] [3] [#] (s)
[6] [0] [5] [#] (e)
[6] [0] [4] [#] (d)
[3] [1] [0] [#] (:)
[#] (Space)
[6] [0] [5] [#] (e)
[7] [0] [6] [#] (v)
[6] [0] [5] [#] (e)
[7] [0] [2] [#] (r)
[7] [0] [9] [#] (y)
[#] (Space)
[5] [0] [7] [#] (W)
[6] [0] [5] [#] (e)
[6] [0] [4] [#] (d)
[6] [1] [4] [#] (n)
[6] [0] [5] [#] (e)
[7] [0] [3] [#] (s)
[6] [0] [4] [#] (d)
[6] [0] [1] [#] (a)
[7] [0] [9] [#] (y)
[ST] (to complete Line 6)
8 [ST] (Line No. 8)
[#] (Space)
[#] (Space)
[#] (Space)
[#] (Space)
[#] (Space)
[#] (Space)
[5] [0] [4] [#] (T)
[6] [0] [8] [#] (h)
[6] [0] [1] [#] (a)
6-10
[6] [1] [4] [#]
[6] [1] [1] [#]
[#]
[7] [0] [9] [#]
[6] [1] [5] [#]
[7] [0] [5] [#]
[ST]
(n)
(k)
(Space)
(y)
(o)
(u)
(to complete Line 8)
9 [ST] (Line No. 9)
[#] (Space)
[#] (Space)
[#] (Space)
[#] (Space)
[#] (Space)
[#] (Space)
[#] (Space)
[#] (Space)
[#] (Space)
[#] (Space)
[#] (Space)
[#] (Space)
[#] (Space)
[#] (Space)
[#] (Space)
[#] (Space)
[4] [0] [3] [#] (C)
[6] [0] [1] [#] (a
[6] [1] [2] [#] (l)
[6] [1] [2] [#] (l)
[#] (Space)
[6] [0] [1] [#] (a)
[6] [0] [7] [#] (g)
[6] [0] [1] [#] (a)
[6] [0] [9] [#] (i)
[6] [1] [4] [#] (n)
[ST] (to complete Line 9)
[AT/TL] (to complete this submode)
08-22-2003 FRI
#0
P01
1
TEC
STORE
2
1343 PEACH DRIVE
3
PHONE: 87-6437
5
Open
8:00am to 7:00pm
6
Closed: every Wednesday
8
Thank you
9
Call again
0022 14:21TM
6. PROGRAMMING OPERATIONS
EO1-11152
6.5 Cashier Code and Name Programming (Submode 2)
6.5
Cashier Code and Name Programming (Submode 2)
Cashier Code and Name, and Cashier Status for each cashier can be programmed here.
6.5.1 Programming
CONDITION
Any time outside a sale
OPERATION
Mode Lock: SET
2 [X]
|Cashier Code| [NS]
(See NOTE 1 below.)
Address 1: Cashier Name
1 [ST]
Character entries
[ST]
Max. 12 characters
(See NOTE 2 below.)
Address 2: Cashier Status
For sequentially programming the address,
the Address number specification can be skipped.
2 [ST]
|Cashier Status| [#]
0: Cashier for sale entries
1: Cashier for training entries (NOTE 3)
Repeat for another
cashier.
[AT/TL]
NOTES:
(To complete this submode.)
1. The following table shows the Cashier Codes that can be entered (the capacity is determined by
the RAM Allocation Setting).
Code entry type
Cashier key type
[CLK] key
*
2.
3.
4.
5.
Standard memory
Expansion memory
1 to 15
1 to 99
1 to 8, 99*
---
The Cashier Code 99 for the Cashier Key Type is fixed as a code of a cashier for Training
Entries.
For the name of each cashier, a maximum of 12 regular-sized or 6 double-sized characters can
be entered. A combination of both types is also available.
Training entry status is available for every cashier.
When the center file is used, this programming cannot be performed on the Satellite Terminal.
Prior to the change of cashier status (Normal cashier → Training cashier, or Training cashier →
Normal cashier), daily reports and GT reports of this cashier should be taken.
6-11
6. PROGRAMMING OPERATIONS
EO1-11152
6.5 Cashier Code and Name Programming (Submode 2)
Example) To program the following cashier data
Cashier Code 1:
Name JONES, Status 0 (for Sale Entries)
Cashier Code 2:
Name SMITH, Status 0 (for Sale Entries)
Cashier Code 3:
Name MEHL, Status 1 (for Training Entries)
Cashier Code 4:
Name BROWN, Status 1 (for Training Entries)
Key Operation: Mode Lock: SET, Enter 2 and depress the [X] key.
1 [NS] (Cashier Code)
1 [ST] (Address 1: Cashier Name)
410 [#] (J)
415 [#] (O)
414 [#] (N)
405 [#] (E)
503 [#] (S)
[ST] (to end Cashier Name
setting)
(2 [ST]) (Address 2: Cashier Status)
0 [#] (for Sales Entries)
2 [NS] (Cashier Code)
1 [ST] (Address 1: Cashier Name)
503 [#] (S)
3 [NS] (Cashier Code)
1 [ST] (Address 1: Cashier Name)
413 [#] (M)
412 [#]
[ST]
(2 [ST])
1 [#]
(L)
(to end Cashier Name setting)
(Address 2: Cashier Status)
(for Training Entries)
4 [NS] (Cashier Code)
1 [ST] (Address 1: Cashier Name)
402 [#] (B)
414 [#]
[ST]
(2 [ST])
1 [#]
408 [#] (H)
[ST] (to end Cashier Name
setting)
(2 [ST]) (Address 2: Cashier Status)
0 [#] (for Sales Entries)
TEC STORE
1343 PEACH DRIVE
PHONE: 87-6437
(N)
(to end Cashier Name setting)
(Address 2: Cashier Status)
(for Training Entries)
Open 8:00am to 7:00pm
Closed: every Wednesday
08-22-2003 FRI
#0
P02
01
#01
#02
JONES
0
00004
0027 14:37TM
[AT/TL] (to end this submode.)
6.5.2 Deletion
CONDITION
After the Daily and GT Cashier’s Resets, (and his/her Sign OFF for Code Entry Type)
OPERATION
Mode Lock: SET
Repeatable for another cashier to be deleted.
2 [X]
NOTES:
[ITEM CORR]
or
[VOID]
|Cashier Code| [NS]
[AT/TL]
1. The Cashier Reset Report Count of the deleted cashier will be
cleared.
2. The cashier key or cashier code of the deleted cashier cannot
be used or signed-ON for sale entries.
Example)
To delete Cashier Code 1 with name “JONES” that has been programmed in
the preceding page:
Key Operation: Mode Lock: SET, Enter 2 and depress the [X] key.
[ITEM CORR] (for declaration of deletion)
1 [NS] (Cashier Code)
[AT/TL] (to end this program.)
TEC STORE
1343 PEACH DRIVE
PHONE: 87-6437
Open 8:00am to 7:00pm
Closed: every Wednesday
08-22-2003 FRI
#0
P02
01 JONES
-------------------------------00003
0028 14:39TM
6-12
6. PROGRAMMING OPERATIONS
EO1-11152
6.6 PLU Table Programming (Submode 4)
6.6
Department Table Programming (Submode 3)
For each department, memory opening, department name and various statuses settings are performed here.
6.6.1
Programming
CONDITION
OPERATION
To change the positive/negative status:
After Department and PLU Daily and GT Resets
To change any other programmed data or to newly program departments:
Any time outside a sale
Mode Lock: SET
(See NOTE 2.)
As for details of each Address, refer to the
following pages.
3 [X]
[DEPT]
|Address Numbers| [#]
|Department Code|
[DP#]
(See NOTE 1.)
for sequential-coded Dept. only
Address 1: Link Group
|Major GP| |Minor GP| [#]
1 [ST]
(01 to 10)
(01 to 30)
Address 2: Department Name
2 [ST]
Character Entries
[ST]
Max. 16 characters
Address 3: Preset Price
|Price| [#]
3 [ST]
(Max. 6 digits)
Repeat for
any
address
within the
same
dept. by
re-entry
for
correction.
(NOTE 3)
Repeat for
other
departments.
Address 4: Status Code 1
|Status Codes to ON| [#]
4 [ST]
Address 5: Status Code 2
5 [ST]
|Status Codes to ON| [#]
Address 6: Tax Status
|Status Codes| [#]
6 [ST]
(Max. 4 digits)
Address 7: High Amount Limit
|High Amount to be locked out| [#]
7 [ST]
(Max.7 digits)
Address 8: Low Amount Limit
8 [ST]
|Low Amount to be locked out| [#]
(Max.7 digits)
Address 9: Sub-link Dept. Code
9 [ST]
|Sub-link Dept. Code| [#]
(1 to 99)
[AT/TL] (To complete this submode.)
6-13
6. PROGRAMMING OPERATIONS
EO1-11152
6.6 PLU Table Programming (Submode 4)
NOTES:
1. The “Address Numbers” designation at the top after “3 [X]” can be skipped if not necessary. If
entered, the designated Address(es) will automatically be accessed after the department
designation. For example, if you enter |0204| [#] here (designate each address by entering a twodigit code; 01 for Address 1, 02 for Address 2, etc.), you will then enter:
[DEPT] key, or Dept Code + [DP#] key,
Character Entries [ST] (“2 [ST]” can be skipped), then
Status Codes [#] (“4 [ST]” can be skipped), then
may go on to another department setting for the same address designations.
But still in this case, you can go to other addresses by first entering the Address No. and
depressing [ST]. The Address Designation feature may be useful when you want to program or
change contents of only one or two specific Addresses of multiple departments. (For example,
when you want to change only the names, but not any other programmed contents, of 15
departments.)
2. The “[DEPT]” key here means each of the individual department keys of Dept Preset-code type.
For example, if you have [DEPT 1] (Department No.1) key, you can depress it, or you may enter 1
then depress [DP#] to start Department No.1 programming procedure. You can only enter the
Dept Code and then depress [DP#] to start any other department than those installed as Dept
Preset-code Keys. When you use a Flat Keyboard and the Setting Mode Key Layout sheet is
inserted, any department may be accessed by using the [DP#] key in the SET mode operations.
Up to 99 departments can be programmed. The [DP#] key should be used to program
departments 61 to 99. (In SFKC programming, up to 60 departments can be programmed.)
3. When the Address No. is sequential from the preceding address (and when the Address
Designation feature has not been used), the Address No. and [ST] may be omitted.
4. The programming contents of each address are further described in the DEPARTMENT TABLE
PROGRAMMING CONTENTS below.
DEPARTMENT TABLE PROGRAMMING CONTENTS
Address No.
1
Description of Programming Contents
Linked Group Code
Enter a 4-digit code, composed of a 2-digit Major Group Code and a 2-digit Minor Group
Code.
[#]
Minor Group Code (01 to 30)
Major Group Code (01 to 10)
ex.) To link Major Group No. 1 and Minor Group No. 1:
Enter: (0)
1
0
1
Major Group
Code
Minor Group
Code
Enter 00 when the department is not
linked to any Minor Group.
Enter 0 (or 00) when the department is
not linked to any Major Group.
Enter 0 for linking neither Major nor Minor Groups (the preceding zeros may be omitted).
6-14
6. PROGRAMMING OPERATIONS
EO1-11152
6.6 PLU Table Programming (Submode 4)
DEPARTMENT TABLE PROGRAMMING CONTENTS (continued)
Address No.
(1)
Description of Programming Contents
NOTE: The “Major Group” and “Minor Group” here are merely namings for those two
grouping total memories. In the memory process, those two totals are independent
from the other and no logical check is made for a combination of the Major and Minor
group codes to be linked to each department. In other words, you may regard them
as “A” grouping and “B” grouping. See the examples below:
Major-Minor Grouping Method Example:
(In this case, you should check the logical linkage between the Major Groups and Minor
Groups.)
Major GP 01
Major GP 02
Minor
GP 01
DP01
0101
DP02
0101
Minor
GP 02
Minor
GP 03
DP04
0102
DP06
0103
DP07
0103
Minor
GP 04
DP10
0204
DP11
0204
Minor
GP 05
DP14
0205
DP16
0205
Linked Group Code in setting
“A” Grouping and “B” Grouping Method Example:
(In this case, you may think that each department data are processed into max. 2 different
types of groupings.)
A-GP A-GP A-GP
B-GP
B-GP
B-GP
01
02
03
01
02
03
DP01
0100
DP02
0100
DP04
0201
DP06
0301
DP07
0300
DP10
0302
DP11
0002
DP14
0003
DP16
0003
DP17
0002
Linked Group Code in setting
2
Department Name (Descriptor)
Enter a maximum of 16 regular-sized or 8 double-sized characters by referring Section 6.2
Character Entries, then end with the [ST] key.
When no name is programmed for a department, the following will be the auto-program name
(default value) for printing:
D P
xx
Department Code 01 to 99
Double-sized characters
3
Preset Price
• For a preset department (preset-price department), enter a maximum of 6-digit price, and
depress the [#] key.
1 to 999999 (result: 0.01 to 9999.99)
When the option “Preset Point for one decimal digit allowed” is selected, the decimal digit
can be entered after entering a maximum of 5 integer digits and [.] key.
1 to 99999 (result: 0.01 to 999.99)
or
0.1 to 99999.9 (result: 0.001 to 999.999)
• A zero-price (0.00) may be preset by entering 0 in the above operation.
• When no numerics are entered and the [#] key is simply depressed, the department will be
an open department (open-price department).
• For a department handling gasoline, set the preset price per gallon
(max. 999.999 = 999 dollars 99.9 cents can be preset).
Be certain to enter the amount less than cent when programming the preset price of
gasoline.
ex.) To set the preset price of $1.25, enter the numeric value of 1250 and depress the [#]
key.
6-15
6. PROGRAMMING OPERATIONS
EO1-11152
6.6 PLU Table Programming (Submode 4)
DEPARTMENT TABLE PROGRAMMING CONTENTS (continued)
Address No.
4
Description of Programming Contents
Status Code 1 Selection
• Enter the Codes 1 to 8 whose status must be set to ON side. More than one code may be
entered. Enter 0 when none of the statuses should be set to ON.
Code
1
2
3
4
5
6
7
8
•
•
•
•
•
Item
Single-item or Itemized Receipt
HASH or Ordinary Department
Positive or Negative Department
Food Stamp Status
Scale Entry
Department for Gasoline Sales
Validation Compulsory
Gift Card Department
Selective Status
ON
OFF
Single-item
Itemized
HASH
Ordinary
Negative
Positive
Yes
No
Optional
Prohibited
Yes
No
Compulsory
Optional
Gift Card
Ordinary
NOTE: Itemized, Single-item:
Refer to DEPARTMENT KEY description in this manual (stand-alone level).
When Code 6 is set to ON (for Gasoline Sales), be sure to set a preset price in Address 3.
Code 5 (Scale Allowed) and Code 6 (Gasoline Sales) cannot be set to ON simultaneously
for one department.
Validation Compulsory status is effective not for the PLU entry but for the department entry.
A PLU linked to a Gift Card department is Gift Card PLU.
Code 8 (Gift Card Department) should not be set to ON simultaneously with Code 3
(Negative Department), Code 5 (Scale Entry), or Code 6 (Gasoline Sales).
Setting Examples:
To set only Code 2 to ON .............. Enter 2 [#]
To set Codes 2, 3, 5 to ON .…....... Enter 235 [#]
To set none of codes to ON .…...... Enter 0 [#]
5
Status Code 2 Selection (US model only)
• Enter Codes 1 to 8 whose status must be set to ON side.
Code
1
2
3
4
5
6
7
8
Item
Net to Selective Itemizer 1
Net to Selective Itemizer 2
Tare 3 Entry
Net to Selective Itemzer 4
Tax Symbol “F” Print
Canada Non-taxable Quantity
Age Limit 2 Status (alcohol)
Age Limit 1 Status (cigarette)
Net to Selective Itemizer 3
Selective Status
ON
OFF
Yes
No
Yes
No
Compulsory
Optional
Yes
No
Print
Non-print
Objective
Not objective
Necessary Unnecessary
Necessary Unnecessary
Yes
No
NOTES: 1. “Net to S.I. 1, 2”
Refer to Section 6.22 Preset Rate Setting for Selective Itemizers.
2. Tax symbol “F” is printed when this code has been set “ON” to a taxable
department. If the Food Stamp feature has been selected, this symbol “F” will
be always printed regardless of this code status when a food stamp taxable
department is entered.
In Canada, some area handles two kinds of tax; GST and PST. Status Code 4
(Tax Symbol “F” Print) should be set at the GST status setting.
Tax Symbol “T” ...... PST
Tax Symbol “F” ...... GST
6-16
6. PROGRAMMING OPERATIONS
EO1-11152
6.6 PLU Table Programming (Submode 4)
DEPARTMENT TABLE PROGRAMMING CONTENTS (continued)
Address No.
Description of Programming Contents
3. When the Age Limit 1 or Age Limit 2 Status is set to ON, the age confirmation is
always necessary before entering a sales item. Neither Code 6 (Age Limit 2
Status) nor Code 7 (Age Limit 1 Status) can be combined with Codes 5 and 8
on the Status Code 1 selection (Scale Allowed).
4. On the application, the Age Limit 1 Status is applied to a sales item with the
age limit younger than that of the Age Limit 2 Status.
5. Code 3 item (Tare 3 Entry or Net to Selective Itemizer 4) is subject to the status
of Address 7, Bit 5 of the system option.
This code and Code 8 on the Status Code 1 selection (Gift Card Department)
cannot be set simultaneously for a department.
(5)
6
Tax Status
• Enter a one- to four-digit Status Code for applicable Taxes. Or enter 0 if the department
handles non-taxable items.
[#]
0: Non-taxable
1: Tax 1 (Tax 1 taxable)
2: Tax 2 (Tax 2 taxable)
3: Tax 3 (Tax 3 taxable)
4: Tax 4 (Tax 4 taxable)
(More than one code can be entered for
combining Tax1 to Tax4 taxable status.
For example, enter 12 to select Tax1 and Tax2
taxable status.)
NOTES: 1. The rate of each Tax will be later be set and described in Section 6.24 Tax
Table Setting.
2. In case of inclusive tax, the combination of the tax status is unavailable. Only
one inclusive tax status can be programmed for a department. (Tax 3 taxable or
Tax 4 taxable)
7
High Amount Limit
Enter a maximum of 7 digits to be set as the high amount to be locked out.
Example) To prohibit any amount equal to or larger than 40.00:
4000 [#]
(Allows any amount equal to or smaller than 39.99.)
NOTES: 1. To cancel the preset limit (i.e. to allow any amount), enter 0.
2. The limit amount set here will be applied to entries in REG mode only, but not in
MGR or - mode.
3. Zeros must be entered as all the digits other than the highest digit. If any other
value is entered, it will be regarded as a zero.
ex.) Entering 4001 to 4999 will all result in setting 4000.
8
Low Amount Limit
Enter a maximum of 7 digits to be set as the low amount limit.
Example) To prohibit any amount less than 4.00:
400 [#]
(Prohibits any amount less than 4.00.)
NOTES: 1. To cancel the preset limit (i.e. to allow any amount), enter 0.
2. The limit amount set here will be applied to entries in REG mode only, but not in
MGR or - mode.
3. Zeros must be entered as all the digits other than the highest digit. If any other
value is entered, it will be regarded as a zero.
ex.) Entering 401 to 499 will all result in setting 400.
6-17
6. PROGRAMMING OPERATIONS
EO1-11152
6.6 PLU Table Programming (Submode 4)
DEPARTMENT TABLE PROGRAMMING CONTENTS (continued)
Address No.
9
Description of Programming Contents
Sub-link Department Code
• This entry is useful when the department item entry should always be followed by another
department’s item sale. If the department is not applied to this case, skip this address entry.
Refer to the following examples of applications.
Example 1)
Example 2)
HEAD-LINK DEPT.
Dept. 1 (for Bottle Drink
Net Content Sales entries)
SUB-LINK DEPT.
Dept. 2 (for Bottle Deposit entries)
Dept. 14 (Battery drive
Clocks)
Dept. 27 (Batteries)
As shown in the examples, this feature prevents the cashier from forgetting to enter the Sublink Dept. item attached to the Head-link Dept. item. And at the same time, in reports, two
Department Totals are separately read.
• In setting, enter the Sub-link Department Code (1 to 99). (The Main-link Dept. is the dept.
now being programmed.)
[#]
1 to 99 (Sub-link Department Code)
• To cancel the sub-linking, enter 0 instead of the Sub-link Dept. Code before [#].
REMARKS:
1) When the Head-link Dept. item is entered in a sale, an entry through the Sub-link Dept.
will be required. No other operations will be accepted until the Sub-link Dept. is
operated.
2) The HEAD-to-SUB linkage is effective for only one step. If the Sub-link Dept. is further
set with another Sub-link Dept., the first HEAD item will only require its own Sub-link
Dept. entry.
3) It is possible to set multiple departments are Head-link to one Sub-link Department.
(For example, multiple departments are assigned for bottled drink entries but only one
department is assigned for bottled-deposit entries.)
4) The Sub-link Dept. alone may be operated for sale entries, skipping the Head-link
Dept., without affecting the Head-link Dept. sales memory.
5) Various declaration keys, multiplications, etc. may be operated on each of the Head-link
and Sub-link depts., independently from the other.
6) When the [ITEM CORR] key is operated immediately after the Head-link item entry, the
Sub-link compulsory status will also be canceled.
7) When the [ITEM CORR] key is operated immediately after the compulsory Sub-link
item entry, an error will result.
8) Repeat entries will not be allowed on either the Head-link or Sub-link item.
9) Dollar Discount, %+, and %- may be operated on the Sub-link item as well as the Headlink item.
10) When the Head-link dept. is programmed with “Single-item” status and a Single-item
receipt has been issued accordingly, the Sub-link dept. entry will not be compulsory.
11) An entry of any PLU linked to the Head-link dept will not require the Sub-link dept entry.
12) If Store Coupon is entered through the Head-link dept, the Sub-link dept entry will not
be compulsory.
13) When the Sub-link dept entry is compulsory, Store Coupon may be entered through the
Sub-link dept.
14) When the Sub-link dept is not memory-opened, the Head-link dept entry will result in an
error.
6-18
6. PROGRAMMING OPERATIONS
EO1-11152
6.6 PLU Table Programming (Submode 4)
Example) To program the following status and name for each department:
DEPT
CODE
1
2
3
4
5
6
7
8
9
10
11
12
13
14
15
Address
1
Address
2
Address
3
Address
4
Address
5
Address
6
Address
7
Address
8
Address
9
Linked GP
Major,
Minor
Dept.
Name
Preset
Price
Status ONCodes 1
Status ONCodes 2
Tax Status
High
Amount
Limit
Low
Amount
Limit
Sub-link
Dept. Code
open
open
open
open
open
open
open
open
open
open
open
open
open
open
open
5
5
5
5
0
0
0
0
0
0
0
0
2
1
3
01 01
01 01
01 02
01 02
01 03
01 04
02 05
02 05
02 06
02 06
02 07
02 07
03 08
03 08
0
VEGETABLE
FRUIT
MEAT
FISH
DAIRY
BAKERY
CAN FOOD
BTL FOOD
DRINK
BTL DEPO
SNACK
SPICE
(DP13)
(DP14)
(DP15)
0
0
0
0
1
1
1
1
1
0
1
1
0
0
0
1
1
1
1
1
1
1
1
1
0
1
1
0
0
0
10000
10000
0
0
0
0
0
0
0
100
0
0
0
0
0
10
50
100
0
0
0
0
0
0
10
0
0
0
0
0
0
0
0
0
0
0
0
0
10
0
0
0
0
0
0
0: Non-linked to
any GP
DEPTs 13 to 15 will not
have names programmed.
(Standard-program names
such as “DP 13” will be
set in this case.)
0: Non-taxable
1: Tax 1
2: Tax 2
3: Tax 3
4: Tax 4
0: No ON-statuses
1: Single-item Dept.
2: HASH Dept.
3: Negative Dept.
4: Food stamp
5: Scale-allowed
6: Gasoline sales
7: Validation compulsory
8: Gift Card Dept.
0: No limit setting;
The limit is ruled by
the Common Dept
Limit Amount later
described.
0: Non-linked to any
Department
0: No ON-statuses
1: Selective Itemizer 1 status
2: Selective Itemizer 2 status
3: Tare 3 entry compulsion or Selective Itemizer 4 status
4: Tax symbol “F” print
5: Canada non-taxable quantity
6: Age limit 2 status
7: Age limit 1 status
8: Selective Itemizer 3 status
-- Refer to the Key Operation on the next page for programming the above contents. --
6-19
6. PROGRAMMING OPERATIONS
EO1-11152
6.6 PLU Table Programming (Submode 4)
Key Operation: Mode Lock: SET, Enter 3 and depress the [X] key.
1 [DP#] (Department 1)
1 [ST] (Address 1: Link Group)
0101 [#] (Major Group: 01,
Minor Group: 01)
2 [ST] (Address 2: Dept. Name)
506 [#] (V)
405 [#] (E)
407 [#] (G)
405 [#] (E)
504 [#] (T)
401 [#] (A)
402 [#] (B)
412 [#] (L)
405 [#] (E)
[ST] (to end Dept. Name setting)
3 [ST] (Address 3: Preset Price)
[#] (Open-price department)
4 [ST] (Address 4: Status Code 1)
5 [#] (Scale-allowed status)
5 [ST] (Address 5: Status Code 2)
0 [#] (No ON-status)
6 [ST] (Address 6: TaxStatus)
1 [#] (Tax 1)
7 [ST] (Address 7: High Amount
Limit)
10000 [#] (100.00)
NOTES:
8 [ST]
10 [#]
9 [ST]
0 [#]
(Address 8: Low Amount Limit)
(0.10)
(Address 9: Sub-link Dept. Code)
(No Sub-link Dept.)
15 [DP#] (Department 15)
1 [ST] (Address 1: Link Group)
0 [#] (No linked group)
3 [ST] (Address 3: Preset Price)
[#] (Open-price department)
4 [ST] (Address 4: Status Code 1)
3 [#] (Negative Dept. status)
5 [ST] (Address 5: Status Code 2)
0 [#] (No ON-status)
6 [ST] (Address 6: Tax Status)
0 [#] (Non-taxable)
7 [ST] (Address 7: High Amount Limit)
0 [#] (No limit)
8 [ST] (Address 8: Low Amount Limit)
0 [#] (No limit)
9 [ST] (Address 9: Sub-link Dept. Code)
0 [#] (No Sub-link Dept.)
TEC STORE
1343 PEACH DRIVE
PHONE: 87-6437
Open 8:00am to 7:00pm
Closed: every Wednesday
08-22-2003 FRI
#0
P03
01 DP01
#01
#02
#03
#04
#05
#06
#07
#08
#09
0101
VEGETABLE
5
0
1
100.00
0.10
00
[AT/TL] (to complete this submode)
1. In this example, the Address Designation feature is not used.
2. In this example, the Dept. Code is entered through the [DP#]
key; however, it can be replaced by depressing the actual
Dept Code-preset key instead, if that Department Key exists
on the keyboard (which is applicable to the Ordinary Keyboard
Type). Only to open the memory of a department:
15 DP15
#01
#03
#04
#05
#06
#07
#08
#09
0000
3
0
1
0.00
0.00
00
0028 14:39TM
3 [X]
|Department Code| [DP#]
[AT/TL]
3. If the Dept. Code is sequential from the previous one, the Dept. Code before the [DP#] can be
omitted.
4. If the Address No. is sequential from the previous one, the Address No. + [ST] may be omitted.
(In the above example, all address entries are not omitted for an easy understanding of the sample
operation.)
5. For the name setting (Address 2), the CHARACTER CODE ENTRY method has been used. But
the DIRECT CHARACTER ENTRY method is also possible if you have any of FLAT KEYBOARD
and PLU KEYBOARD (PK-2). Refer to Section 6.2 Character Entries.
6.6.2
Deletion
CONDITION
After Department and PLU Daily and GT Resets
OPERATION
Mode Lock: SET
Individual Department Deletion
[DEPT]
3 [X]
[ITEM CORR]
or
[VOID]
[AT/TL]
|Department Code| [DP#]
Repeatable for other departments to be deleted.
All Department Deletion
3 [X]
[ITEM CORR]
or
[VOID]
[ALL VOID]
6-20
[AT/TL]
6. PROGRAMMING OPERATIONS
EO1-11152
6.7 PLU Table Programming (Submode 4)
6.7
PLU Table Programming (Submode 4)
This submode can be operated when new PLU items are to be added, PLU program data is to be changed, or
PLUs are to be deleted.
6.7.1
Programming or Changing
CONDITION
Any time outside a sale
OPERATION
Mode Lock: SET
(See NOTE 2.)
As for details of each Address,
refer to the following pages.
4 [X]
Barcode Scanning
|Address Numbers| [#]
|PLU Code|
[PLU]
(See NOTE 1.)
for sequential-coded item only
Address 1: Link Department
|Department Code| [#]
1 [ST]
(1 to 99)
Address 2: PLU Name
2 [ST]
Character Entries
[ST]
Max. 16 characters
Address 3: Preset Price
3 [ST]
|Price| [#]
(Max. 6 digits)
Address 4: Status Code 1
4 [ST]
|Status Codes to ON| [#]
Address 5: Status Code 2
5 [ST]
|Status Codes to ON| [#]
Address 6: Tax Status
6 [ST]
|Status Codes| [#]
(Max. 4 digits)
Repeat for
other PLUs.
Repeat for
any address
within the
same PLU by
re-entry for
correction.
(NOTE 3)
Address 7: Unit Price of Individual Split Package
7 [ST]
|Unit Price| [#]
(Max. 6 digits)
Address 8: Whole Package Quantity
8 [ST]
|Whole Package Quantity| [#]
(Max. 2 digits)
Address 9: PLU Group No.
9 [ST]
|PLU Group No.| [#]
(1 to 99; 0 to reset)
Address 10: Link-PLU Table No.
10 [ST]
|Link-PLU Table No.| [#]
(1 to 99; 0 to reset)
Address 11: Tare Table No.
11 [ST]
|Tare Table No.| [#]
(1 to 9; 0 to reset)
Address 12: Unit Weight Code
12 [ST]
|Unit Weight Code| [#]
(1 to 11; 0 to reset)
Address 13: Mix & Match Group No.
13 [ST]
|Mix & Match Group No.| [#]
(1 to 255; 0 to reset)
Address 14: Tare 2 Rate
14 [ST]
|Tare 2 Rate| [#]
(0.01 to 99.99%; 0 to reset)
Address 15: Dollar Discount/Extra Charge Code
15 [ST]
|Dollar Discount/Extra Charge Code| [#]
(1 to 99; 0 to reset)
[AT/TL]
(To complete this submode.)
6-21
6. PROGRAMMING OPERATIONS
EO1-11152
6.7 PLU Table Programming (Submode 4)
NOTES:
1. The “Address Numbers” designation at the top after “4 [X]” can be skipped if not necessary. If
entered, the designated Address(es) will automatically be accessed after the PLU Code
designation.
2. A maximum of 65,000 PLUs (5,000 PLUs as standard when the Expansion Memory is installed)
are programmable (varies depending on the capacity and allocation of the RAM). Also refer to the
“CODING PLUs” to be described at the end of this section. The “[PLU]” key here indicates the key
labeled simply as “PLU” but not any PLU Preset-code Keys.
3. When the Address No. is sequential from the preceding address (if the Address Designation
feature has not been used), the Address No. and the following [ST] can be omitted.
4. The programming contents of each address are further described in the PLU TABLE
PROGRAMMING CONTENTS below.
PLU TABLE PROGRAMMING CONTENTS
Address No.
1
Description of Programming Contents
Linked Department Code
Enter the 2-digit code of the department to which the PLU is linked. When the PLU is newly
programmed, this entry is compulsory (an error will result if this entry is skipped.)
[#]
1 to 99
2
PLU Name (Descriptor)
Enter a maximum of 16 regular-sized or 8 double-sized characters by referring Section 6.2
Character Entries, then end with the [ST] key.
When no name is programmed for a PLU, the following will be the auto-program name for
printing:
PLUxxxxxx (for PLU Code Max. 6-digit feature)
PLUxxxxxxxxxxxxx (for PLU Code Max. 13-digit feature)
NOTE: For details, please contact your nearest TOSHIBA TEC representative.
3
Preset Price
• For a preset PLU (preset-price PLU), enter a maximum of 6-digit price, and depress the [#]
key.
1 to 999999 (result: $0.01 to $9999.99)
When the option “Preset Point for one decimal digit allowed” is selected, the decimal digit
can be entered after entering a maximum of 5 integer digits and the [.] key.
1 to 99999 (result: $0.01 to $999.99)
or
0.1 to 99999.9 (result: $0.001 to $999.999)
• A zero-price ($0.00) may be preset by entering 0 in the above operation.
• When no numerics are entered and the [#] key is simply depressed, the PLU will be an open
PLU (open-price PLU).
6-22
6. PROGRAMMING OPERATIONS
EO1-11152
6.7 PLU Table Programming (Submode 4)
PLU TABLE PROGRAMMING CONTENTS (continued)
Address No.
4
Description of Programming Contents
Status Code 1 Selection
• Enter Codes 1 to 7 whose status must be set to ON side. More than one code may be
entered. Enter 0 when none of the statuses should be set to ON.
Code
1
2
3
4
5
6
7
8
Item
Quantity Entry
Net to Selective Itemizer 1
Net to Selective Itemizer 2
Food Stamp Status
Scale Entry
HI-CONE Status
Lock or Unlock Status
Delete Status
Selective Status
ON
OFF
Compulsory
Optional
Yes
No
Yes
No
Yes
No
Compulsory
Prohibited
Yes
No
Lock (not in use) Unlock (in use)
Yes
No
NOTES:
Code 1: Quantity Entry Compulsion
• When this status is selected, the quantity entry is always necessary for PLU item entry.
Code 2,3: Net to Selective Itemizer 1, 2
• Refer to Section 6.22 Preset Rate Setting for Selective Itemizers.
Code 5: Scale Entry
• This status and the HI-CONE Status (Code 6) cannot be combined for one PLU.
• This status is unavailable for the Age Limit 1 and 2 (Codes 6 and 7 in status 2
selection).
• Do not set this status code ON if a PLU is linked to a Gift Card department. Doing so
may cause an error at the item entry.
Code 6: HI-CONE Status
• This status requires setting of the Whole Package Quantity (Address 8).
• Do not set this status code ON if a PLU is linked to a Gift Card department. Doing so
may cause an error at the item entry.
Code 7: Lock Status
• When this status is set to a PLU, an entry of the PLU in a sale is prohibited.
Code 8: Delete Status
• This status can be set only to a PLU of sales data 0 in the stand-alone system with PLU
expansion memory or the M/S system with “PLU to be inquired” feature. When this
status is set to a PLU, an entry of the PLU in a sale is not allowed. PLU which has the
this status is deleted from the PLU Table File when the PLU Merge is executed.
• This status set is possible only when the PLU center file is selected.
Setting Examples:
To set only Status 2 to ON …........... Enter 2 [#]
To set Statuses 2, 3, 5 to ON …....... Enter 235 [#]
To set none of statuses to ON …..... Enter 0 [#]
6-23
6. PROGRAMMING OPERATIONS
EO1-11152
6.7 PLU Table Programming (Submode 4)
PLU TABLE PROGRAMMING CONTENTS (continued)
Address No.
5
Description of Programming Contents
Status Code 2 Selection
• Enter Codes 2 to 7 (Code 3 is vacant.) whose status must be set to ON side. More than one
code may be entered. Enter 0 when none of the statuses should be set to ON.
Code
1
Item
Price Print
Tare 3 Entry
Net to Selective Itemizer 4
Net to Selective Itemizer 3
Tax Symbol “F” Print
Canada Non-taxable Quantity
Age Limit 2 Status (alcohol)
Age Limit 1 Status (cigarette)
2
3
4
5
6
7
Selective Status
ON
OFF
Non-print
Print
Compulsory
Optional
Yes
No
Yes
No
Print
Non-print
Objective
Not objective
Necessary
Unnecessary
Necessary
Unnecessary
NOTES:
Code 1: Price Print
• When this status is set to ON (Non-print), PLU price will not be printed. However, when
the Quantity Extension transaction is performed for the PLU, its price will be always
printed regardless of this status selection. Do not set this status code ON.
Code 2: Tare 3 Entry or Net to Selective Itemizer 4
• The status settings are selected by the system option.
• Do not set the Tare 3 Entry status ON (Compulsory) if a PLU is linked to a Gift Card
department. Doing so may cause an error at the item entry.
Code 4: Tax Symbol “F” Print
• Tax symbol “F” is printed when this status code has been set “ON” to a taxable PLU.
• If the Food Stamp feature has been selected, this symbol “F” will be always printed
regardless of this code status when a food stamp taxable department is entered.
* In Canada, some area handles two kinds of tax; GST and PST. Status Code 4 (Tax
Symbol “F” Print) should be set at the GST status setting.
Tax Symbol “T” ...... PST
Tax Symbol “F” ...... GST
Status Code 6,7: Age Limit Status 2, 1
• When the Age Limit 1 or Age Limit 2 Status is set to ON, the age confirmation is always
necessary before entering a sales item.
• The Age Limit 2 or Age Limit 1 Status (Code 6 or 7) is unavailable for the Scale Entry
Compulsory PLU (Code 5 in Status 1 Selection).
6
Tax Status
• Enter one- to four-digit Status Codes for applicable Taxes.
[#]
0: Non-taxable
1: Tax 1 (Tax 1 taxable)
2: Tax 2 (Tax 2 taxable)
3: Tax 3 (Tax 3 taxable)
4: Tax 4 (Tax 4 taxable)
(More than one code can be entered for
combining Tax1 to Tax4 taxable status.
For example, enter 12 to select Tax1 and Tax2
taxable status.)
NOTES: 1. The rate of each Tax will be later be set and described in Section 6.24 Tax
Table Setting.
2. In case of inclusive tax, the combination of the tax status is unavailable. Only
one inclusive tax status can be programmed for a PLU. (Tax 3 taxable or Tax 4
taxable)
6-24
6. PROGRAMMING OPERATIONS
EO1-11152
6.7 PLU Table Programming (Submode 4)
PLU TABLE PROGRAMMING CONTENTS (continued)
Address No.
7
Description of Programming Contents
Unit Price of Individual Split Package
• The unit price of individual split package can be programmed regardless of the HI-CONE
status.
• For preset the unit price of individual split package, enter a maximum of 6-digit price, and
depress [#].
• To cancel the unit price of individual split package, enter 0 and depress [#].
(When the unit price of individual split package is not preset (or 0), whole package price
(Address 3 setting) will be used in the registration.
• When HI-CONE PLU is entered as an open-price PLU, use the unit price of whole package
instead of that of individual split package.
8
Whole Package Quantity (for Split Package Pricing PLUs)
[#]
Enter the whole package quantity in max. 2 digits (1 to 99), or enter 0 to cancel the
Split Package Pricing status. Be sure to set a whole package quantity here for PLUs
with HI-CONE Status (Address 4 - Code 6) or Mix & Match Group No. (Address 13).
NOTES: 1. This setting is not allowed for PLUs with the Scale-compulsory status.
2. When the option “Preset Point for one decimal digit” is selected, this setting is
not allowed to any PLUs. (For details, please contact your nearest TOSHIBA
TEC representative.)
9
PLU Group No. (for purposes of reports)
• Enter a 2-digit code (1 to 99) as a PLU Group No. to which the PLU belongs, and depress
[#]. To cancel the Group No. once set, enter 0 and depress [#].
• For HASH PLU, the PLU Group No. setting is available.
10
Link-PLU Table No. (for PLU-to-PLU linking requirement only)
• This entry is useful, similar to the “Sub-link Dept.” feature in the Department Table
Programming operation, when the PLU item entry should always be followed by another
PLU item sale. If the PLU is not applied to this case, skip this address entry. Refer to the
following examples of applications:
Example 1)
Example 2)
HEAD-LINK PLU
PLU 1 (Drink Small
Bottle Net Content at $0.45
SUB-LINK PLU
PLU 2 (Bottle Deposit for the
small bottle at $0.05
PLU 101 (Battery-drive
Clock at $20.00)
PLU 202 (Battery-drive Pack
at $1.50)
As shown in the examples, this feature prevents the cashier from forgetting to enter the Sublink PLU item attached to the Head-link PLU item. And at the same time, in reports, two
PLU Totals are separately read.
• In setting, enter the Link-PLU Table No. (1 to 99) and then depress [#].
[#]
1 to 99 (Link-PLU Table No. The Sub-link PLU which link to the Link-PLU Table will be
programmed in a separate programming operation later.)
• To cancel the sub-linking, enter 0 instead of the Link-PLU Table No. before [#].
6-25
6. PROGRAMMING OPERATIONS
EO1-11152
6.7 PLU Table Programming (Submode 4)
PLU TABLE PROGRAMMING CONTENTS (continued)
Address No.
Description of Programming Contents
(10)
REMARKS:
1) When the Head-link PLU is entered in a sale, the Sub-link PLU will automatically be
entered. When the Sub-link PLU is an open-price PLU, the price entry and the [AMT]
key depression should follow manually on the main keyboard. This manual operation
sequence cannot be replaced by a PLU Preset-code Key on the main keyboard or on
the PK-2 keyboard.
2) The PLU-to-PLU linkage is effective even when the Head-link PLU is an open-price
PLU.
3) The linkage of the Sub-link PLU is as shown below.
• Head-link PLU (one PLU) + Sub-link PLU (Max. seven PLUs)
The linkage of the Sub-link PLU is effective so that up to seven Sub-link PLUs can be
entered. If eight or more Sub-link PLUs are programmed, they will be ignored at the
item entry.
4) It is possible to set multiple PLUs as Head-link to one Sub-link PLU. (In Example 1
described above, it may be extended to have more Head-link PLUs of similar items such
as Drink Large, which also link to the Bottle Deposit of the same amount.)
5) Repeat, Item Correct, Dollar Discount, Vendor Coupon, Bottle Return, %+, or %operations are not accepted for PLU-to-PLU link entries. But Return Merchandise or
Void operation is possible for the Head-link (and the Sub-link PLU will be processed as
returned or voided item automatically, in this case).
6) The Sub-link PLU may be operated for sales entries, skipping the Head-link PLU,
without affecting the Head-link PLU sales memory.
7) Multiplication is possible on the Head-link PLU, and then the Sub-link PLU will
automatically be multiplied with the same quantity.
8) Modifier Keys (such as [SI/M]) will be effective for the Head-link PLU item only, and the
modification will be disregarded for the Sub-link PLU.
9) When an error occurs at the Sub-link PLU, only the Head-link PLU is entered but not the
Sub-link PLU. (Errors such as Multiplication Product Over-limit Error, the Sub-link PLU
has not been opened, the sale subtotal will turn into negative, etc.)
10) When the Sub-link is a negative PLU, a Return Merchandise or Void entry through the
Head-link PLU is not possible.
11) None of Scale-Compulsory PLUs should be linked as Sub-link to another PLU of Headlink. An error will result on the Head-link item entry attempt in this case.
12) When a price-change entry is made (using the [PR OPEN] or [OPEN] key) through the
Head-link PLU, the Sub-link PLU will always require a manual amount entry (through
[AMT]) even when the Sub-link is a preset-price PLU.
13) PLU with the Age Limit Status or with the Quantity Entry Compulsion Status
programmed cannot be used for Link-PLU.
11
Tare Table No. (for Scale-compulsory PLUs only)
[#]
Enter the Tare Table No. (1 to 9). The content of each Tare Table is set later in a separate
operation (Submode 26). In a scale item entry of a PLU with a Tare Table No. set, the tare
weight preset in the Tare Table will automatically be subtracted from the total weight read
from the scale. Enter 0 to cancel a Tare Table No. once set. Or skip this address setting for
PLUs not needing any tare weight calculations.
6-26
6. PROGRAMMING OPERATIONS
EO1-11152
6.7 PLU Table Programming (Submode 4)
PLU TABLE PROGRAMMING CONTENTS (continued)
Address No.
12
Description of Programming Contents
Individual PLU Unit Weight Table Code (for Scale-compulsory PLUs only)
[#]
LB unit
Kg unit
0:
General Unit Weight (Set in Submode 26)
1:
1 LB
1 Kg
2:
2 LB
2 Kg
3:
3 LB
3 Kg
4:
4 LB
4 Kg
5:
5 LB
5 Kg
6:
6 LB
6 Kg
7:
7 LB
7 Kg
8:
8 LB
8 Kg
9:
9 LB
9 Kg
10:
1/2 LB
100 g
11:
1/4 LB
not applicable
NOTE: Whether the ECR adopts the LB or Kg unit system is determined by a system
option selection. (For details, please contact your nearest TOSHIBA TEC
representative.)
13
Mix & Match Group No.
[#]
Enter the Mix & Match Group No. (1 to 255). To cancel the Mix & Match Group
once set, enter 0.
NOTE:
14
This Mix & Match Group No. setting is only possible when a Whole Package
Quantity (Address 8) is set.
Tare 2 Rate
• Enter a Tare 2 Rate (0 to 9999; 0% to 99.99%), and depress [#]. To cancel the Tare 2 Rate
once set, enter 0 and depress [#].
15
Dollar Discount/Extra Charge Code
• Enter the Dollar Discount/Extra Charge Code (1 to 99), then depress the [#] key. Enter 0 as
the Dollar Discount/Extra Charge Code to reset the code once programmed.
PLU Price Dollar Discount/Extra Charge Amount Setting can be performed in Submode 40.
ADDITIONAL NOTES
If a PLU is linked to a negative Department, the PLU is automatically set as negative PLU. If a PLU is linked to
an HASH Department, the PLU is automatically set as HASH PLU.
When a negative PLU is set with the Scale-Compulsory status, an error will result in a sale entry attempt of that
PLU.
The Amount Limits (High Amount, Low Amount) of each open-price PLU is ruled by that of its linked department.
When a PLU is linked to a Gasoline Sales Department, an error will result in a sale entry attempt of that PLU.
The system option allows you to select that the Tax Status and the Food Stamp Status of each PLU are
determined by those of its link department.
If a PLU is linked to a Gift Card Department, the PLU is automatically set as Gift Card PLU.
6-27
6. PROGRAMMING OPERATIONS
EO1-11152
6.7 PLU Table Programming (Submode 4)
Example) To program the following PLU data:
PLU Code
Link Department (Address 1)
PLU Name (Address 2)
Preset Price (Address 3)
Status Code 1 (Address 4)
Status Code 2 (Address 5)
Tax Status (Address 6)
Unit Price of Individual Split Package (Address 7)
Whole Package Quantity (Address 8)
PLU Group No. (Address 9)
Link-PLU Table No. (Address 10)
Tare Table No. (Address 11)
Unit Weight Code (Address 12)
Mix & Match Group No. (Address 13)
Tare 2 Rate (Address 14)
Dollar Discount/Extra Charge Code (Address 15)
10101
Dept. 1
Tomato
$1.00
4 (Food Stamp Status)
4 (Tax Symbol “F” print)
1 (Tax 1 taxable)
None
None
1
None
None
None
None
None
None
Key Operation: Mode Lock: SET, Enter 4 and depress the [X] key.
01020304050609 [#] Address Skip Information
(Addresses 7,8,10 to 15 are skipped.)
10101 [PLU] PLU Code
(1 [ST]) (Address 1) 1 [#] (Linked Dept. No.)
(2 [ST]) (Address 2) 504 [#] 615 [#] 613 [#]
601 [#] 704 [#] 615 [#]
[ST] (Name: Tomato)
(3 [ST]) (Address 3) 100 [#] (Preset Price)
(4 [ST]) (Address 4) 4 [#] (Status Code 1)
(5 [ST]) (Address 5) 4 [#] (Status Code 2)
(6 [ST]) (Address 6) 1 [#] (Tax Status)
(9 [ST]) (Address 9) 1 [#] (PLU Group No.)
[AT/TL] (Complete this submode)
TEC STORE
1343 PEACH DRIVE
PHONE: 87-6437
Open 8:00am to 7:00pm
Closed: every Wednesday
08-22-2003 FRI
#0
P04
010101
PLU010101
#01
#02
#03
#04
#05
#06
#09
01
Tomato
1.00@
4
4
1
01
00000
00001
0030 14:43TM
6-28
6. PROGRAMMING OPERATIONS
EO1-11152
6.7 PLU Table Programming (Submode 4)
6.7.2
Deletion
CONDITION
To delete a PLU with sales data of zero: Any time outside a sale
To delete a PLU with sales data of not zero: After PLU Reset
OPERATION
Mode Lock: SET
Individual PLU Deletion
Barcode Scanning
4 [X]
[ITEM CORR]
or
[VOID]
|PLU Code| [DP#]
[AT/TL]
Repeatable for other PLUs to be deleted.
Example) To delete PLU No. 90701 (Drink Small-B) that was once programmed:
Key Operation Mode Lock: SET, enter 4, depress the [X] key.
TEC STORE
1343 PEACH DRIVE
PHONE: 87-6437
[ITEM CORR]
90701 [PLU]
[AT/TL]
Open 8:00am to 7:00pm
Closed: every Wednesday
08-22-2003 FRI
#0
P04
090701
Drink Small-B
-------------------------------00000
00002
0032 14:47TM
All PLU Deletion
4 [X]
[ITEM CORR]
or
[VOID]
[ALL VOID]
[AT/TL]
NOTES: 1. If PLU items have been added to the PLU Additional File, these PLU items are also deleted by the
ALL PLU Deletion operation.
2. Prior to the All PLU Deletion operation, the PLU daily reset report and the PLU GT reset report
should be taken.
6-29
6. PROGRAMMING OPERATIONS
EO1-11152
6.7 PLU Table Programming (Submode 4)
6.7.3
PLU Programmed Data Copying
This operation is used to copy the programmed data of a PLU item and to use it in programming another PLU
item, thus eliminating time in PLU programming operation.
CONDITION
OPERATION
4 [X]
To program new PLUs or to change any programmed contents of PLUs:
Any time outside a sale (except the following case)
To change the PLU of the copy-destination with sales data not zero:
After PLU Reset
|PLU Code of the copy-destination| [PLU]
[NS]
|PLU Code of the copy-source| [PLU]
The programmed data of the copy-source PLU is now copied to the copy-destination
PLU (except the PLU Code). Then follow the procedure in Section 6.7.1
Programming or Changing to change data of any required Addresses.
Example) To program PLU 90701 (Drink Small-B) again that was once programmed and then deleted, by
copying the programmed data of PLU 90601 (Drink Small-A):
Key Operation Mode Lock: SET, enter 4, depress the [X] key.
90701 [PLU]
[NS]
90601 [PLU]
2 [ST]
404 [#]
702 [#]
609 [#]
614 [#]
611 [#]
[#]
503 [#]
613 [#]
601 [#]
612 [#]
612 [#]
213 [#]
402 [#]
[ST]
9 [ST] 7 [#]
[AT/TL]
(PLU Code of the copy-destination)
(PLU Code of the copy-source)
(Address 2, Name changed into: Drink Small-A)
(D)
(r)
(i)
(n)
(k)
(Space)
(S)
(m)
(a)
(l)
(l)
(-)
(B)
090701
Drink Small-A
#00 090601
#02
#00
(Address 9, PLU Group No. changed into: 7)
(to complete this submode)
00000
00003
TEC STORE
1343 PEACH DRIVE
PHONE: 87-6437
Open 8:00am to 7:00pm
Closed: every Wednesday
08-22-2003 FRI
#0
P04
Drink Small-B
07
0033 14:49TM
6-30
6. PROGRAMMING OPERATIONS
EO1-11152
6.7 PLU Table Programming (Submode 4)
6.7.4
CODING PLUs (supplement to PLU programming operations)
A maximum of 6-digit or 13-digit No. may be assigned to each PLU as PLU Code, depending on the system
option selection of the PLU Code digits. Any number within this limit may be assigned to each PLU. The
following description is applied to the “Manual PLU Entry System Type”.
DIGIT LENGTH OF PLU CODES
In determining the actual digit length of PLU codes, refer to the following factors:
1) The smaller the digit length, the easier and quicker the PLU sales entries will be.
2) The larger the digit length, the more precise analysis will be possible using various report functions.
3) Some stores may adopt PLU Codes of more than 2 digits (while 1- or 2-digit codes are given to Departments),
to prevent confusions or mistakes in key operations.
4) Some stores may use smaller-digit codes for frequently sold PLU items while using larger-digit code for slowsale items.
CODING METHODS
For the purpose of classifying merchandise and for convenience of PLU report applications, any of the following
methods may be taken according to each store’s requirement:
1. Coding With Linked Department Code
In this method, the PLU’s linked Department Code should be contained in the PLU Code.
Example)
Department Code
Its Linking PLU Codes
1
100, 101, 102, 103 ... 199
12
1200, 1201, 1202, 1203 ... 1299
If the linked Department Code is contained in the top 2 digits of the PLU code, as in the above examples, the
following merits are expected:
1) The store cashiers and other clerks may easily see each PLU’s link Department.
2) In PLU report takings, “Zone PLU Read/Reset” reports are effective, by designating the zone of all the PLUs
that link to the same Department.
Example) To read all the PLUs linked to Dept. 12:
Zone-start PLU Code ..... 1200
Zone-end PLU Code ...... 1299
(For more details, refer to the report section in the Owner’s Manual.)
2. Coding With Type ID for Each Digit
This method is to give each digit numeric of the PLU code a certain meaning according to the merchandise, color,
grade, size, wholesaler, etc.
Example using 4-digit codes) -- in case of a clothing shop -2 1 3 0
Merchandise serial No. assigned under the same number of the preceding digits.
Size ID (1 for Small, 2 for Medium, 3 for Large, etc.)
Color ID (0 for White, 1 for Gray, 2 for Black, etc.)
Wholesaler or Maker ID (1 for Company “A”, 2 for Company “B”, etc.)
6-31
6. PROGRAMMING OPERATIONS
EO1-11152
6.8 Time Setting or Adjustment (Submode 5)
3. Using Bar codes (source-marking EAN or UPC bar codes)
If most of the sale items in the store are printed with a source-marking UPC bar codes, the code (the humanreadable numerics attached to the bar code print) may be entered as it is. Some items are printed with 13-digit
code, and others with 8-digit code. Thus this method is possible only when the option “PLU Code max. 13 digits”
is selected.
The merit of this system is that you can simply read and enter the source-marked code rather than generating an
original code for each PLU item. If the barcode No. is used, however, it is recommended to adopt the “Scanning
System Type”.
4. Combining Methods 1, 2, and 3
When the option “PLU Code max. 13 digits” is selected, some combinations of the above three methods are
possible.
Example 1) Combining Methods 1 and 2:
x x x x x x
Type IDs described in Method 2
Linked Department Code described in Method 1
Example 2) Combining Methods 3, and Method 1 or 2:
For source-marked items .…use the bar codes.
For other items .……………generate codes in Method 1 or Method 2, in max. 6 or 7 digits for
example.
After all, the methods described above are only suggestions. You may freely make up your own PLU coding
method to suit each store’s merchandise controls.
6.8
Time Setting or Adjustment (Submode 5)
CONDITION
Anytime outside a sale
OPERATION
Mode Lock: SET
5 [X]
|Hour|
|Minute|
[AT/TL]
(00 to 23) (00 to 59)
NOTE:
If an hour value of more than 23 or a minute value of more than 59 is entered, the current data will not
be changed by setting or adjusting the time.
Example) To set time “1:15 p.m. (13:15)”.
Key Operation: Mode Lock: SET, Enter 5 and depress the [X] key.
TEC STORE
1343 PEACH DRIVE
PHONE: 87-6437
[1] [3] [1] [5] [AT/TL]
Open 8:00am to 7:00pm
Closed: every Wednesday
08-22-2003 FRI
#0
P05
13:15TM
0032 13:15TM
6-32
6. PROGRAMMING OPERATIONS
EO1-11152
6.9 Date Setting or Adjustment (Submode 6)
6.9
Date Setting or Adjustment (Submode 6)
CONDITION
Anytime outside a sale
OPERATION
Mode Lock: SET
6 [X]
|Day-of-Week Code|
|Month| |Day|
2 digits
2 digits
(01 to 12) (01 to 31)
See NOTE 1 below
0: SUN (Sunday)
1: MON (Monday)
2: TUE (Tuesday)
3: WED (Wednesday)
4: THU (Thursday)
5: FRI (Friday)
6: SAT (Saturday)
|Year|
[AT/TL]
4 digits
(2003, 2004, etc.)
NOTES:
1. The date entry order may be Day-Month-Year or Year-Month -Day
instead of Month-Day-Year if so selected in the program option.
2. If you do not want to print the Day-of Week on receipt, please contact
your nearest TOSHIBA TEC representative.
TEC STORE
1343 PEACH DRIVE
PHONE: 87-6437
Open 8:00am to 7:00pm
Closed: every Wednesday
Example) To set date “August 25 (MON), 2003”.
08-22-2003 FRI
Key Operation: Mode Lock: SET, Enter 6 and depress the [X] key.
#0
P06
1 08-25-2003
[1] [0] [8] [2] [5] [2] [0] [0] [3] [AT/TL]
0033 13:15TM
6.10
Amount Limit Setting for Function Keys (Submode 8)
This submode sets the high amount limit in finalizing transactions by tendering through each media key and also
sets the high and low amount limits in entering amount through departments.
Any time outside a sale
CONDITION
OPERATION
8 [X]
Mode Lock: SET
| Key Code | [ST]
| Amount Limit Set Value | [#]
Max. 2 digits
(See the table below)
[AT/TL]
Max. 8 digits; 0 to reset
NOTE 1
Repeat for another key.
Key
Code
1
2
3
4
5
6
NOTES:
Key
Code
7
8
9
10
11
12
Item or Key to be applied
[AT/TL] (Cash Tender)
[CHK TEND] (Check Tender)
[Chg] (Charge Tender)
[MISC TEND] (Misc. Tender)
[CREDIT 1] (Credit 1 Tender)
[CREDIT 2] (Credit 2 Tender)
Item or Key to be applied
[DEBIT]
[EBT CASH]
[EBT F/S]
[FSTL/TEND] (Food Stamp Tender)
Common High Limit for all depts.
Common Low Limit for all depts.
1. When continuous key codes are programmed, the key code entry is omissible.
2. If the individual High or Low Amount Limit of department has been set, it prevails over the
Common High or Low Limit for all departments here.
3. The Amount Limit set value of each tender media is the high amount limit and is effective only
when the media key is used for tendering but not when used as total key. Different from amount
limit setting of departments, an exact value on all the digits can be set for tendering media. For
example, if you enter 1234[#], an amount up to $12,34 can be tendered.
6-33
6. PROGRAMMING OPERATIONS
EO1-11152
6.11 Customer File Code (Check Track No.) and Name Setting (Submode 15)
Example) To set the Amount Limits of the following items:
Key Code
Amount Limit
Set Values
2 ([CHK TND])
$ 99.99
9999
11 (Common High)
$ 999.99
100000
12 (Common Low)
$ 0.01
1
Key Operation: Mode Lock: SET, Enter 8 and depress the [X] key.
2 [ST] Item Code for Check Media Key
9999 [#] Amount Limit Set Value
11 [ST] Item Code for Common High Limit for all depts.
100000 [#] Amount Limit Set Value
12 [ST] Item Code for Common Low Limit for all depts.
1 [#] Amount Limit Set Value
[AT/TL] To complete this submode
6.11
TEC STORE
1343 PEACH DRIVE
PHONE: 87-6437
Open 8:00am to 7:00pm
Closed: every Wednesday
08-25-2003 MON
#0
P08
#02 CHECK
#11
#12
99.99
1000.00
0.01
0035 13:16TM
Customer File Code (Check Track No.) and Name Setting
(Submode 15)
This submode creates files for customers whose sales are to be processed using the check track memory.
CONDITION
Any time outside a sale
OPERATION
Mode Lock: SET
Repeat for other codes
*
15 [X]
For sequentially programming codes,
the code specification can be skipped.)
| Customer File Code | [ST]
Character Entries
Max. 12 digits
(1 to 999999999999)
[ST]
[AT/TL]
Max. 16 characters for
the Customer’s Name
When no name is to be programmed
for the code
NOTES:
1. The Customer File codes that are programmed in this submode will be accessed by entering the code and
depressing the [PICK UP BAL] key for a sale entry in a charge posting operation in the REG or MGR mode.
At this time, the balance of the new customer assigned with the code will show zero which will be printed as
the previous balance line. On finalizing the sale, the new balance will be printed at the bottom of the receipt,
which will be stored in the same Customer File Code memory area. Thus the operator always use the [PICK
UP BAL] key for both starting a new customer’s account and at recalling the customer’s balance.
2. If all the programmed Customer File Codes are used up and a new customer file code is required to be
opened during the business hours, the [CODE OPEN] key may be used. When a new code is entered,
followed by [CODE OPEN], the code is printed as the previous balance line item with the balance zero on the
receipt, and at the same time, the code is added to the list of the Customer File Codes programmed in the
above operation of Submode 15. However, the use of the [CODE OPEN] key can be programmed to require
Manager Intervention, which can control the operator’s opening of a new customer file code outside the list of
the Customer File Codes programmed in Submode 15.
3. When the Standard Memory is used, a maximum of 1000 Customer File Codes can be programmed. When
the Expansion Memory is used, a maximum of 3,000 Customer File Codes can be programmed. However,
the actual maximum number of Customer Files varies depending on the RAM allocation.
6-34
6. PROGRAMMING OPERATIONS
EO1-11152
6.11 Customer File Code (Check Track No.) and Name Setting (Submode 15)
Deletion of Individual Customer File Codes
Repeat for other codes to be deleted.
15 [X]
[ITEM CORR]
or
[VOID]
| Customer File Code | [ST]
[AT/TL]
[ALL VOID]
[AT/TL]
Deletion of All Customer File Codes
15 [X]
NOTE:
[ITEM CORR]
or
[VOID]
If the balance of the deleted code is not zero, the Transfer memory of the code will automatically be
adjusted to zero. At that time, the previous balance to be reset will be printed.
Example) To program the following Customer File Codes with Customer Names:
CODE
NAME
1
:
:
:
:
:
:
:
:
:
:
:
105
JAMES HAILY
HELEN REED
Mode Lock: SET
Enter 15 and depress the [X]
1 [ST] (Customer File Code)
410 [#] 401 [#] 413 [#] 405 [#]
503 [#] [#] 408 [#] 401 [#] 409 [#]
412 [#] 509 [#] [ST]
(NAME: JAMES HAILY)
:
:
:
:
:
:
:
105 [ST] (Customer File Code)
408 [#] 405 [#] 412 [#] 405 [#]
414 [#] [#] 502 [#] 405 [#] 405 [#]
404 [#] [ST]
TEC STORE
1343 PEACH DRIVE
PHONE: 87-6437
Open 8:00am to 7:00pm
Closed: every Wednesday
08-25-2003 MON
#0
P15
#000000000001
JAMES HAILY
#000000000105
HELEN REED
00002
0042 13:27TM
[AT/TL]
Example) To delete the Customer File Code 104 that has once been
programmed.
TEC STORE
1343 PEACH DRIVE
PHONE: 87-6437
Key Operation: Mode Lock: SET, Enter 15 and depress the [X].
Open 8:00am to 7:00pm
Closed: every Wednesday
[ITEM CORR] 104 [ST] (Customer File Code)
[AT/TL]
08-25-2003 MON
#0
P15
#000000000104
-------------------------------00002
0043 13:29TM
6-35
6. PROGRAMMING OPERATIONS
EO1-11152
6.12 Salesperson Code and Name Programming (Submode 20)
6.12
Salesperson Code and Name Programming (Submode 20)
By programming Salesperson Codes here, those codes may be used in sales entries. In addition, the name of
each salesperson can be programmed in maximum 12 characters.
CONDITION
Any time outside a sale
OPERATION
Mode Lock: SET
Repeat for other Salespersons
*
20 [X]
| Salesperson Code | [ST]
(For sequentially programming codes, the
code number specification can be skipped.)
Character Entries
[ST]
[AT/TL]
Max. 2 digits (1 to 99)
See NOTE 1 below
NOTES:
1. A maximum of 12 regular-sized or 6 double-sized characters may be programmed for a name.
A combination of both types is also available.
2. Even if no name is programmed (i.e. skipping the Character Entries before the second [ST] key)
for a Salesperson Code, that code can be used in sale entries. Then, auto-preset ID symbol “SP
xx” (xx = Salesperson Code) will be printed instead of a name in this case, for his/her ID in receipt
print, etc.
Example) To program the following salesperson code and name:
Code
Name
1
White
2
Stacy
3
Jansen
Key Operation: Mode Lock: SET, Enter 20 and depress the [X] key.
1 [ST]
507 [#]
608 [#]
609 [#]
704 [#]
605 [#]
[ST]
2 [ST]
503 [#]
704 [#]
601 [#]
603 [#]
709 [#]
[ST]
3 [ST]
410 [#]
601 [#]
614 [#]
703 [#]
605 [#]
614 [#]
[ST]
[AT/TL]
(Salesperson Code 1)
(W)
(h)
(i)
(t)
(e)
TEC STORE
1343 PEACH DRIVE
PHONE: 87-6437
Open 8:00am to 7:00pm
Closed: every Wednesday
(Salesperson Code 2)
(S)
(t)
(a)
(c)
(y)
08-25-2003 MON
#0
P20
01 White
02 Stacy
03 Jansen
0046 13:35TM
(Salesperson Code 3)
(J)
(a)
(n)
(s)
(e)
(n)
(to complete this submode)
6-36
6. PROGRAMMING OPERATIONS
EO1-11152
6.13 Link-PLU Table Programming (Submode 25)
Deletion
CONDITION
After Daily Salesperson Reset
OPERATION
Mode Lock: SET
20 [X]
[ITEM CORR]
or
[VOID]
| Salesperson Code | [ST]
[AT/TL]
Max. 2 digits (1 to 99)
Repeat for other salesperson to be deleted.
NOTE:
When a Salesperson Code is deleted in the above operation, no entries using that code will be
accepted until the code is again opened in the “Programming” operation already described.
Example) To delete Salesperson Code 3 (name: Jansen) that was once programmed:
Key Operation: Mode Lock: SET, Enter 20 and depress the [X] key.
[ITEM CORR]
3 [ST]
[AT/TL]
TEC STORE
1343 PEACH DRIVE
PHONE: 87-6437
Open 8:00am to 7:00pm
Closed: every Wednesday
08-25-2003 MON
#0
P20
03 Jansen
-------------------------------0047 13:37TM
6.13
Link-PLU Table Programming (Submode 25)
This submode programs Link-PLU Tables and their respective Sub-link PLUs. When a PLU is programmed with a
Link-PLU Table No. (Address 10 of the PLU TABLE PROGRAMMING operation), an entry of the PLU will
automatically enter the Sub-link PLU that is programmed in the Link-PLU Table No. Refer to the “Link-PLU Table
No.” description in the PLU TABLE PROGRAMMING, Submode 4, as to details of PLU-to-PLU Iinkage.
CONDITION
Any time outside a sale
OPERATION
Mode Lock: SET
Barcode Scanning
25 [X]
| Link-PLU Table No. | [ST]
| Sub-link PLU Code | [PLU]
1 to 99
(Enter the Table No. programmed in the
Head-link PLU item in Submode 4)
6 or 13 digits
(Enter the code of the PLU to be autoentered when the Head-link PLU is
entered in a sale.)
*
Repeat for other tables.
6-37
(For sequentially programming tables, the
Table No. specification can be skipped.)
[AT/TL]
6. PROGRAMMING OPERATIONS
EO1-11152
6.14 Tare Table and General Unit Weight Setting (Submode 26)
Example)
Toset the following Link-PLU Table and its Sub-link PLU:
Link-PLU Table No.
Sub-link PLU Code
1
101301
TEC STORE
1343 PEACH DRIVE
PHONE: 87-6437
Key Operation: Mode Lock: SET, Enter 25 and depress the [X] key.
1 [ST]
101301 [PLU]
[AT/TL]
(Link-PLU Table No.)
(Sub-link PLU Code)
to complete this submode
Open 8:00am to 7:00pm
Closed: every Wednesday
08-25-2003 MON
NOTE:
In this example, Link-PLU Table No. has already been set in
PLU 90601 (Drink Small-A) and PLU 90701 (Drink Small-B)
as Head-link items in the PLU PROGRAMMING operation,
Submode 4. The Sub-link PLU 101301 here has been
programmed as a bottle-deposit PLU (Small-Btl Depo) in the
same submode.
#0
P25
#01 101301
0052 13:47TM
Deletion of Link-PLU Tables
CONDITION
Any time outside a sale
OPERATION
Mode Lock: SET
25 [X]
| Link-PLU Table No. | [ST]
[ITEM CORR]
or
[VOID]
[AT/TL]
1 to 99
Repeatable for other tables to be deleted.
6.14
Tare Table and General Unit Weight Setting (Submode 26)
In the PLU TABLE PROGRAMMING operation (Submode 4), some of Scale-compulsory PLUs may be set with a
Tare Table No. The actual tare weight is set to each Tare Table here. Also, the General Unit Weight is set here
so that the Unit Weight may be effective to scale items entered through departments or PLUs without any
Individual Unit Weight designation.
CONDITION
Any time outside a sale
OPERATION
Mode Lock: SET
• Tare Table Setting
Repeat for other tables
*
26 [X]
| Tare Table No. | [ST]
(For sequentially programming
tables, the Table No.
specification can be skipped.)
| Tare Weight | [#]
1 digit (1 to 9)
0 to 999
(Unit: 1/00 LB or gram.)
(Example: enter 13 for
0.13 LB or 13 grams.)
• General Unit Weight Setting
26 [X]
| General Unit Weight Code |
1 to 11 (NOTE 1 below)
6-38
[AT/TL]
[AT/TL]
6. PROGRAMMING OPERATIONS
EO1-11152
6.14 Tare Table and General Unit Weight Setting (Submode 26)
• Tare Table and General Unit Weight Setting
Repeat for other tables
*
*
| Tare Table No. | [ST]
26 [X]
1 digit (1 to 9)
NOTES:
1.
2.
Example)
| Tare Weight | [#]
0 to 999
(Unit: 1/00 LB or gram.)
(Example: enter 13 for
0.13 LB or 13 grams.)
General Unit Weight Code as follows.
General Unit
LB Unit
Weight Code
1
1LB
2
2LB
3
3LB
4
4LB
5
5LB
6
6LB
7
7LB
8
8LB
9
9LB
10
1/2LB
11
1/4LB
(For sequentially programming
tables, the Table No.
specification can be skipped.)
| General Unit Weight Code |
[AT/TL]
1 to 11 (NOTE 1 below)
Kg Unit
1Kg
2Kg
3Kg
4Kg
5Kg
6Kg
7Kg
8Kg
9Kg
100g
The initial value for the General Unit Weight is set to Code 1 (1LB or 1Kg).
To set the following:
Tare Table No. 1 with Tare Weight 13 grams,
General Weight 100 grams (Code 10).
Key Operation: Mode Lock: SET, Enter 26 and depress the [X] key.
1 [ST]
13 [#]
10
[AT/TL]
(Tare Table No.)
(Tare Weight)
(General Weight Code)
to complete this submode
TEC STORE
1343 PEACH DRIVE
PHONE: 87-6437
Open 8:00am to 7:00pm
Closed: every Wednesday
08-25-2003 MON
#0
P26
#1
0.13lb
½lb
0053 13:49TM
6-39
6. PROGRAMMING OPERATIONS
EO1-11152
6.15 PLU Preset-Code Key Setting (Submode 27)
6.15
PLU Preset-Code Key Setting (Submode 27)
When there are any keys programmed as PLU Preset-code Keys on the ECR Keyboard (Ordinary or Flat Type),
and/or when the PLU Keyboard PK-2 (hardware option) is connected to the ECR, a PLU code may be preset to
each of those keys in this operation.
CONDITION
Any time outside a sale
OPERATION
Mode Lock: SET
Repeat for other keys.
Barcode Scanning
27 [X]
| PLU Code |
[KEY]
Enter through Numeric Keys
on the ECR Keyboard
(Enter 0 to close the key);
Max. 6 or 13 digits
NOTES:
1.
2.
3.
Example)
[AT/TL]
Depress the required key
on the ECR keyboard or
on the PK-2 keyboard.
If the PLU Code entry is skipped and a [KEY] is simply depressed in the above sequence, the
preprogrammed PLU Code of the KEY will be displayed.
A non-opened PLU Code (i.e. PLU non-existent in the PLU table file) can be set on a KEY;
however, pressing the KEY in sale entries will result in an error unless the code is opened in the
PLU TABLE PROGRAMMING operation, Submode 4.
If “0” is entered as PLU Code in the above sequence, the KEY will be closed. Pressing the closed
KEY in sale entry will cause an error.
To set following PLU Codes to KEYs on the ECR keyboard:
Mode Lock to SET
27 [X]
PLU Code
50321
50322
50321 [required key]
50322 [required key]
[AT/TL]
TEC STORE
1343 PEACH DRIVE
PHONE: 87-6437
Open 8:00am to 7:00pm
Closed: every Wednesday
08-25-2003 MON
#0
P27
Location Code (left side); refer to REMARKS 1 and 2 on the next page.
PLU code assigned to the key (right side)
6-40
#073 050321
#074 050322
0054 13:51TM
6. PROGRAMMING OPERATIONS
EO1-11152
6.15 PLU Preset-Code Key Setting (Submode 27)
PK-2 KEYBOARD
1
11
21
31
41
51
61
71
81
91
101
111
121
2
12
22
32
42
52
62
72
82
92
102
112
122
3
13
23
33
43
53
63
73
83
93
103
113
123
4
14
24
34
44
54
64
74
84
94
104
114
124
5
15
25
35
45
55
65
75
85
95
105
115
125
6
16
26
36
46
56
66
76
86
96
106
116
126
7
17
27
37
47
57
67
77
87
97
107
117
127
8
18
28
38
48
58
68
78
88
98
108
118
128
9
19
29
39
49
59
69
79
89
99
109
119
129
10
20
30
40
50
60
70
80
90
100
110
120
130
REMARKS:
1.
The Nos 1 through 130 marked on the PK-2 Keyboard are the KEY Nos to be printed on the
left side of the program receipt issued in the operation on the preceding page. If each KEY is
not set with a PLU Code, the auto-preset PLU Code identical to the initial KEY No. in the
above figure will be active as its preset PLU Code
ex.)
2.
KEY No.1 ................... PLU Code 1
KEY No.130 ............... PLU Code 130
When a PLU code is assigned to a PLU Preset-code Key on the ECR Keyboard in the
operation on the preceding page, the Hardware Key Code which indicates the absolute
location of the key will be printed to the left of the assigned PLU Code. The Hardware Key
Codes of the ECR keyboards of Ordinary Type and Flat Type are shown on the next page.
6-41
6. PROGRAMMING OPERATIONS
EO1-11152
6.15 PLU Preset-Code Key Setting (Submode 27)
ECR Ordinary Type Keyboard
1
7
13
19
25
31
37
43
49
55
61
67
73
79
85
2
8
14
20
26
32
38
44
50
56
62
68
74
80
86
3
9
15
21
27
33
39
45
51
57
63
69
75
81
87
4
10
16
22
28
34
40
46
52
58
64
70
76
82
88
5
11
17
23
29
35
41
47
53
59
65
71
77
83
89
6
12
18
24
30
36
42
48
54
60
66
72
78
84
90
ECR Flat Type Keyboard
1
9
17
25
33
41
49
57
65
73
81
89
97
105
113
2
10
18
26
34
42
50
58
66
74
82
90
98
106
114
3
11
19
27
35
43
51
59
67
75
83
91
99
107
115
4
12
20
28
36
44
52
60
68
76
84
92
100
108
116
5
13
21
29
37
45
53
61
69
77
85
93
101
109
117
6
14
22
30
38
46
54
62
70
78
86
94
102
110
118
7
15
23
31
39
47
55
63
71
79
87
95
103
111
119
8
16
24
32
40
48
56
64
72
80
88
96
104
112
120
6-42
6. PROGRAMMING OPERATIONS
EO1-11152
6.16 Display Message Programming (Submode 31)
6.16
Display Message Programming (Submode 31)
The “DISPLAY MESSAGE” here means the message to be displayed in the 16-digit dot windows of the Operator
Display panel while the Mode Lock of the terminal is in the “LOCK” position. This display message may be used
as information, commercial message, welcoming greeting, etc.
CONDITION
Any time outside a sale
OPERATION
Mode Lock: SET
Repeat for other lines.
*
31 [X]
Allowed for sequential Line No. only
| Message Line No. | [ST]
Character Entries [ST]
(1 to 4; max. 4 lines)
[AT/TL]
(Max. 16 characters per line.
Regular-size only.)
NOTES:
1. When the option “Store Message SCROLLING DISPLAY” is selected, four lines (Line Nos. 1 to 4)
are available. Even when the option “Store Message 16 CHARACTERS HELD” is selected, four
lines (Line Nos. 1 to 4) are available. In this case, refer to the “Store Message Display” operation
to display the respective message lines.
2. When the “SCROLLING DISPLAY” option is selected, a maximum of 64 characters can be
entered consecutively after designating Line No.1 at first and depressing [ST] for each line end.
3. The character must be regular-sized only.
4. The DISPLAY MESSAGE set here will also appear in the “REG” or “MGR” mode if so designated
by system option.
Example)
To program the following display message under the “SCROLLING DISPLAY” option:
T
H
I
S
C
L
O
S
E
G
O
T
O
H
A
N
K
C
O
D
.
Y
U
N
T
E
R
P
L
E
E
A
N
O
T
H
O
U
.
.
.
6-43
I
S
Line No. 1
A
S
E
Line No. 2
R
,
T
Line No. 3
Line No. 4
6. PROGRAMMING OPERATIONS
EO1-11152
6.16 Display Message Programming (Submode 31)
Key Operation: Mode Lock: SET, Enter 31 and depress the [X] key.
1 [ST]
504 [#]
408 [#]
409 [#]
503 [#]
[#]
403 [#]
415 [#]
505 [#]
414 [#]
504 [#]
405 [#]
502 [#]
[#]
409 [#]
503 [#]
[#]
[ST]
(Line No. 1)
(T)
(H)
(I)
(S)
(Space)
(C)
(O)
(U)
(N)
(T)
(E)
(R)
(Space)
(I)
(S)
(Space)
(to complete Line 1)
(3 [ST])
407 [#]
415 [#]
[#]
504 [#]
415 [#]
[#]
401 [#]
414 [#]
415 [#]
504 [#]
408 [#]
405 [#]
502 [#]
212 [#]
[#]
504 [#]
[ST]
(Line No. 3)
(G)
(O)
(Space)
(T)
(O)
(Space)
(A)
(N)
(O)
(T)
(H)
(E)
(R)
(,)
(Space)
(T)
(to complete Line 3)
(2 [ST])
403 [#]
412 [#]
415 [#]
503 [#]
405 [#]
404 [#]
214 [#]
[#]
[#]
500 [#]
412 [#]
405 [#]
401 [#]
503 [#]
405 [#]
[#]
[ST]
(Line No. 2)
(C)
(L)
(O)
(S)
(E)
(D)
(.)
(Space)
(Space)
(P)
(L)
(E)
(A)
(S)
(E)
(Space)
(to complete Line 2)
(4 [ST])
408 [#]
401 [#]
414 [#]
411 [#]
[#]
509 [#]
415 [#]
505 [#]
214 [#]
214 [#]
214 [#]
[ST]
(Line No. 4)
(H)
(A)
(N)
(K)
(Space)
(Y)
(O)
(U)
(.)
(.)
(.)
(to complete Line 4)
[AT/TL] to complete this submode
6-44
TEC STORE
1343 PEACH DRIVE
PHONE: 87-6437
Open 8:00am to 7:00pm
Closed: every Wednesday
08-25-2003 MON
#0
P31
1
THIS COUNTER IS
2
CLOSED. PLEASE
3
GO TO ANOTHER, T
4
HANK YOU...
0058 13:59TM
6. PROGRAMMING OPERATIONS
EO1-11152
6.17 Negative Amount Key Limit Amount Setting (Submode 35)
6.17
Negative Amount Key Limit Amount Setting (Submode 35)
This submode sets the limit amount to be entered through each of the negative-amount keys [VND CPN], [STR
CPN], [BTL RTN], and [DOLL DISC].
CONDITION
Any time outside a sale
OPERATION
Mode Lock: SET
Repeat for other Media Codes.
*
35 [X]
(Repeatable from here for sequentially
programming Media Codes.)
| Key Code | [ST]
| Limit Amount | [#]
[AT/TL]
Max. 6 digits
(1 to 999999; result:
$0.01 to $9,999.99)
Enter 0 to reset the limit
1 to 4
(See the table below)
MEDIA CODE AND KEY TABLE
NOTES:
Key Code
Key
1
2
3
4
[VND CPN]
[STR CPN]
[BTL RTN]
[DOLL DISC]
1. The [VND CPN] key will not be restricted by the limit amount set here but the amount up to 7 digits
will be entered in “MGR” or “ - “ mode.
2. The limit set here cannot be released by the [LC OPEN] (or [OPEN]) key in transaction entries.
Example) To set the following preset amount on the keys below:
Error Code
1
2
KEY
[VND CPN]
[STR CPN]
Limit Amount
$10.00
$20.00
Key Operation: Mode Lock: SET, Enter 35 and depress the [X] key.
1 [ST]
1000 [#]
2 [ST]
2000 [#]
[AT/TL]
(Key Code)
(Limit Amount)
(Key Code)
(Limit Amount)
to complete this submode
TEC STORE
1343 PEACH DRIVE
PHONE: 87-6437
Open 8:00am to 7:00pm
Closed: every Wednesday
08-25-2003 MON
#0
P35
V.CPN
S.CPN
$10.00
$20.00
0062 14:07TM
6-45
6. PROGRAMMING OPERATIONS
EO1-11152
6.18 PLU Price Dollar Discount/Extra Charge Amount Setting (Submode 40)
6.18
PLU Price Dollar Discount/Extra Charge Amount Setting
(Submode 40)
This submode sets the dollar discount amount or the extra charge amount for PLU price.
CONDITION
Anytime outside a sale
OPERATION
Mode Lock: SET
Repeat for another code.
*
40 [X]
Dollar Discount/
Extra Charge
Code
(Repeatable from here for sequentially
programming Dollar Discount/Extra
Charge Codes.)
[ST]
([RTN MDSE]) | Amount | [#]
[AT/TL]
Max. 6 digits
(1 to 999999; result:
$0.01 to $9999.99)
Max. 2 digits (1 to 99)
Depress the [RTN MDSE] key to
set the Dollar Discount amount.
Example) To set as follows:
• Code 2 for Dollar Discount $1.50
• Code 10 for Extra Charge $2.00
Key Operation: Mode Lock: SET, Enter 40 and depress the [X] key.
2 [ST]
[RTN MDSE]
150 [#]
10 [ST]
200 [#]
[AT/TL]
(Dollar Discount/Extra Charge Code)
(Dollar Discount declaration)
(Dollar Discount Amount)
(Dollar Discount/Extra Charge Code)
(Extra Charge Amount)
to complete this submode
TEC STORE
1343 PEACH DRIVE
PHONE: 87-6437
Open 8:00am to 7:00pm
Closed: every Wednesday
08-25-2003 MON
#0
P40
#02
#10
-1.50
$2.00
0067 14:17TM
6-46
6. PROGRAMMING OPERATIONS
EO1-11152
6.19 Department Preset Price Setting or Changing
6.19
Department Preset Price Setting or Changing
The preset price of each department may be set in the DEPARTMENT TABLE PROGRAMMING (Submode 3)
already described. However, in setting or changing the price only but not other programmed data, the following
operation will be more convenient.
CONDITION
Anytime outside a sale
OPERATION
Mode Lock: SET
(1) Using the [DEPT] key:
Repeatable for other departments.
| New Preset Price | [DEPT]
[AT/TL]
Max. 6 digits; 0 to 999999
(result: $0.00 to $9999.99)
NOTE
(2) Using the [DP#] key:
Repeatable for other departments.
*
| Department Code | [DP#]
Max. 2 digits; 1 to 99
Repeatable from here when
the Dept Code is sequential.
| New Preset Price | [#]
[AT/TL]
Max. 6 digits; 0 to 999999
(result: $0.00 to $9999.99)
NOTE
To change a preset-price department into an open department, skip the “New Preset Price” entry and simply
depress the [DEPT] key (in the first operation pattern) or simply depress the [#] key (in the second operation
pattern). Presetting a zero-price is also possible.
NOTE:
Example)
With the option “Preset Point for one decimal digit allowed”, 0 to 99999.9 (result: $0.000 to $999.999),
using the [.] key.
To set the following preset prices of departments:
Dept.13……….$1.40
Dept.14……….$2.10
Key Operation: Mode Lock: SET
By the first operation pattern:
140 [DEPT 13]
210 [DEPT 14]
[AT/TL]
TEC STORE
1343 PEACH DRIVE
PHONE: 87-6437
By the second operation pattern:
13 [DP#] 140 [#]
14 [DP#] 210 [#]
[AT/TL]
Open 8:00am to 7:00pm
Closed: every Wednesday
08-25-2003 MON
#0
P00
13 DP13
1.40@
14 DP14
2.10@
0081 14:45TM
6-47
6. PROGRAMMING OPERATIONS
EO1-11152
6.20 PLU Preset Price Setting or Changing, Whole Package Quantity Changing
6.20
PLU Preset Price Setting or Changing, Whole Package Quantity
Changing
The preset price of each PLU may be set in the PLU TABLE PROGRAMMING (Submode 4) already described.
However, in setting or changing the price and/or the whole package quantity only but not other programmed data,
the following operation will be more convenient.
CONDITION
Anytime outside a sale
OPERATION
Mode Lock: SET
Barcode Scanning
| PLU Code | [PLU]
| New Whole Package Quantity | [ST]
6 or 13 digits
| New Preset Price | [#]
Max. 2digits; 0 to 99
*
[AT/TL]
Max. 6 digits; 0 to 999999
(result: $0.00 to $9,999.99)
NOTE
Repeatable from here if the PLU code is sequential.
Repeatable for other PLUs
NOTES:
1. With the option “Preset Point for one decimal digit allowed”, 0 to 999999 (result: $0.00 to
$9,999.99), using the [.] key.
2. If the operation |New Whole Package Quantity| [ST] is skipped, only a unit price setting is
performed.
3. Only for the Split Price PLU, Whole Package Quantity Changing is available.
4. Preset price of Open type PLU can also be changed.
To change a preset-price PLU into an open-price PLU, skip the “New Preset Price” entry and simply depress the
[#] key. Presetting a zero-price is also possible.
Example)
To set the following preset prices of PLU:
New Whole Package Q’ty
PLU20105 (Apple)
6
New Preset Price
$1.25
Key Operation: Mode Lock: SET
20105 [PLU]
6 [ST]
125 [#]
[AT/TL]
(PLU Code)
(New Whole Package Q’ty)
(New Preset Price)
to complete this submode
TEC STORE
1343 PEACH DRIVE
PHONE: 87-6437
Open 8:00am to 7:00pm
Closed: every Wednesday
08-25-2003 MON
#0
P00
020105
Apple
/ 6
1.25@
0082 14:47TM
6-48
6. PROGRAMMING OPERATIONS
EO1-11152
6.21 %+ and %- Preset Rate Setting
6.21
%+ and %- Preset Rate Setting
A preset rate may be set on each of the [%+] and [%-] keys, one independent rate for each key. Once a rate is
preset, the % key will simply be depressed without a prior rate entry to activate the preset rate. If a rate is entered
prior to the depression of the key, the entered rate (manual rate) will be activated instead.
CONDITION
Anytime outside a sale
OPERATION
Mode Lock: SET
| Preset Rate | [%+] (For Percent Charge Preset Rate)
(0.001 to 99.999(%); use the [.] key if a decimal portion is contained.)
| Preset Rate | [%-] (For Percent Discount Preset Rate)
(0.001 to 99.999(%); use the [.] key if a decimal portion is contained.)
• To reset the rate once set:
Enter 0, depress the required % key.
(Then the % key will always required a manual rate entry in sale entries.)
NOTE:
When two [%+] keys or two [%-] keys are installed on the keyboard, two different % rates (one for
each) may be preset, in the same manner as described above. The two rates may be the same or
different from the other. Or only one key may be preset with a rate and other may remain non-preset.
Example) To program the following rate to each key.
[%+] key……….Rate: 5.00%
[%-] key………..Rate: 10.00%
Key Operation: Mode Lock: SET
Enter 5, depress [%+]
Enter 10, depress [%-]
TEC STORE
1343 PEACH DRIVE
PHONE: 87-6437
TEC STORE
1343 PEACH DRIVE
PHONE: 87-6437
Open 8:00am to 7:00pm
Closed: every Wednesday
Open 8:00am to 7:00pm
Closed: every Wednesday
08-25-2003 MON
%+
#0
08-25-2003 MON
P00
5%
%-
0084 14:51TM
6-49
#0
P00
10%
0084 14:53TM
6. PROGRAMMING OPERATIONS
EO1-11152
6.22 Preset Rate Setting for Selective Itemizers (SI1 to SI4)
6.22
Preset Rate Setting for Selective Itemizers (SI1 to SI4)
If any of [ST1/TL] (or [SI/TL]) to [SI4/TL] keys are installed on the keyboard, a preset rate may be programmed
on each key.
As for the functions and applications of the Selective Itemizers, refer to the description on the next page.
CONDITION
Anytime outside a sale
OPERATION
Mode Lock: SET
| Preset Rate |
[SI/TL] (or [SI1/TL])
(0.001 to 99.999(%); use the [.] key if a decimal portion is contained.)
| Preset Rate |
[SI2/TL]
(0.001 to 99.999(%); use the [.] key if a decimal portion is contained.)
NOTES:
1. Whether the calculated amount by the preset SI % rate affects (i.e. add to or subtract from) the
sale total is determined by a system option status selection.
2. To reset the rate once set, enter 0 as the rate. (Then the rate is regarded as 100% if the option
“Non-affect” is selected. With the option “SI Affects Sale Total”, some rate other than “0” should be
programmed.)
3. Fraction process corresponds to that of the [%+] or [%-] key.
Example) To set 7% as SI1 preset % rate:
Key Operation: Mode Lock: SET
TEC STORE
1343 PEACH DRIVE
PHONE: 87-6437
7 [SI1/TL]
Open 8:00am to 7:00pm
Closed: every Wednesday
08-25-2003 MON
SI1 TL
#0
P00
7%
0085 14:55TM
Selective Itemizer Functions and Applications
The “Selective Itemizer” is a temporary total memory for each sale and is activated separately from the Main
Itemizer (i.e. sale total memory). If certain Department or PLU items are programmed with the SI (selective
itemizer) “net” status, the Selective Itemizer will function to add up amounts of the SI-net status items in
registering the items, while the Main Itemizer will function to add up all the items in the sale. Thus, near the sale
finalization, the cashier may read the SI content by depressing the [SI/TL] key.
A preset % rate may be programmed for each of SI1 to SI4 (on the preceding page), and whether the calculated
amount will add to, subtract from, or non-affect the sale total is a selective option. Whether the amount resulted
by depressing the [Sl/TL] key will print or non-print is another selective option.
6-50
6. PROGRAMMING OPERATIONS
EO1-11152
6.22 Preset Rate Setting for Selective Itemizers (SI1 to SI4)
The applications of this function may vary from store to store. Some stores may use it for counting the service
stamps to be issued to the customers according to the sale amount of service-stampable items. In this case, the
option “SI Total Non-affects Sale Total” should be selected, and a preset % rate, 1% for example, may be set to
issue one service stamp for every $1.00. Thus the number of stamps to be issued to the customer is displayed
(and printed if so programmed) as a result of calculation with the preset % rate, but the resulted value (the
number of stamps in this case) will not affect the sale total.
Example 1) With option “SI Total Non-affects Sale Total”:
Key Operation in REG Mode
100 [DEPT 1] (SI-net)
150 [DEPT 2] (non-SI)
200 [DEPT 3] (SI-net)
[SI/TL] (1% is preset)
[AT/TL]
Receipt/Journal Print
TEC STORE
1343 PEACH DRIVE
PHONE: 87-6437
Open 8:00am to 7:00pm
Closed: every Wednesday
08-25-2003 MON
DP01
DP02
DP03
SI TL
CASH
#0
$1.00 S
$1.50
$2.00 S
0.03
$4.50
“S” : SI-net Symbol
Number of stamps to be issued
0087 14:57TM
Dept.1 and Dept. 3 are programmed with SI-net-status. On depressing [SI/TL], “0.03” (which is 1 % of total
amount of Dept. 1 “$1.00” + Dept. 3 “$2.00”) is displayed and printed, and 3 stamps are to be issued to the
customer in this case.
The sale total “$4.50” is not affected by the SI calculation.
Other stores may use it for calculating the discount amount for certain sales items during a special discount sales
period by presetting the discount % rate on the SI and programming SI-net status to certain Departments and
PLUs which are subject to the special discount.
Example 2) With option “SI Special Discount”:
Key Operation in REG Mode
100 [DEPT 1] (SI-net)
150 [DEPT 2] (non-SI)
200 [DEPT 3] (SI-net)
[SI/TL] (10% is preset)
[AT/TL]
Receipt/Journal Print
TEC STORE
1343 PEACH DRIVE
PHONE: 87-6437
Open 8:00am to 7:00pm
Closed: every Wednesday
08-25-2003 MON
DP01
DP02
DP03
SI TL
CASH
#0
$1.00 S
$1.50
$2.00 S
-0.30
$4.20
Discount Amount
resulted by SI %
0088 14:59TM
On depressing [SI/TL], “-0.30” (which is 10% discount from the total amount of Dept.1 + Dept. 3 items) is
displayed and printed, and that amount is subtracted from the sale total. ($4.50 - $0.30 = $4.20)
6-51
6. PROGRAMMING OPERATIONS
EO1-11152
6.23 Foreign Currency Exchange Rate Setting
6.23
Foreign Currency Exchange Rate Setting
In this program, the rate of each foreign currencies (corresponding to the [CUR1] to [CUR5] keys) will be set. By
setting a rate on each Foreign Currency Key, reading the sale total and tendering in the foreign currency value
will be possible for sale finalization.
CONDITION
Anytime outside a sale
OPERATION
Mode Lock: SET
| Exchange Rate for Foreign Currency 1 |
[CUR 1]
0.000001 to 9999.999999
(Use the [.] key if decimal portion is contained in the rate.)
| Exchange Rate for Foreign Currency 5 |
[CUR 5]
As for how to calculate the Exchange Rate, see the description below.
Foreign Currency Exchange Rate Calculation
1.
The rate must be calculated in the subsidiary currency unit values for both the domestic and the foreign
currencies. (In case of calculating the rate from the domestic to a foreign currency with the same zerosuppress form, such as from U.S. $ to Euro, it will be no problem even if it is calculated in the main currency
of $ and Euro. However, in case of exchanging from a domestic currency such as $ or Euro to Japanese
yen, or vice versa, this rule must be obeyed; otherwise a wrong rate will result.)
2.
Calculate the required foreign currency value equivalent to the domestic currency value “1”. Then the
obtained value is the Exchange Rate value to be entered in the setting operation stated above.
3.
The result of calculation is rounded up.
Example)
To set two foreign currency rates:
(The rates here are merely examples, and may be different from the actual rates currently in effect.)
Conditions given for Domestic Currency and Foreign Currencies
(DOMESTIC)
U.S. Dollar
(CUR 1)
EURO
(CUR 2)
Japanese Yen
$1.00
€1.0914
¥117.10
1 cent
1.0914
EURO Cent
1.1719 yen
6-52
6. PROGRAMMING OPERATIONS
EO1-11152
6.24 TAX Table Setting
Key Operation: Mode Lock: SET
1 [.] 0914 [CUR 1] (for EURO)
1 [.] 1710 [CUR 2] (for Japanese yen)
TEC STORE
1343 PEACH DRIVE
PHONE: 87-6437
Open 8:00am to 7:00pm
TEC STORE
Closed: every Wednesday
1343 PEACH DRIVE
PHONE: 87-6437
08-25-2003 MON #0
Open 8:00am to 7:00pm
Closed: every Wednesday
P00
CUR2
08-25-2003 MON
#0
1.171∗
0090 15:03TM
P00
CUR1
1.0914∗
0089 15:01TM
Resetting a Foreign Currency Rate Once Set:
Enter “0” in place of the Exchange Rate for the Foreign Currency in the setting operation. Then the rate for that
foreign currency will be reset. The Foreign Currency Key of the rate thus reset cannot be used in sales entries.
6.24
TAX Table Setting
A maximum of four tax tables can be programmed (Tax 1, Tax 2, Tax 3, Tax 4) in accordance with installation of
[TX1/M], [TX2/M], [TX3/M], [TX4/M] keys.
CONDITION
After Financial Daily Reset
OPERATION
Mode Lock: SET
TYPE 1: TAX 1 FULL BREAKS (COMBINATION OF NON-CYCLIC AND CYCLIC BREAKS)
| Max. amount non-taxable | [TX1/M]
| Max. amount for 1 ¢ tax levied | [TX1/M]
| Max. amount for 2 ¢ tax levied | [TX1/M]
Repeat up to the “A” Break
| Max. amount for N¢ tax levied | [TX1/M] .. ... “A” Break (Non-cyclic Break Limit)
[ST] (to indicate the completion of Non-cyclic Breaks)
| Max. amount for N + 1¢ tax levied | [TX1/M] (beginning of Cyclic Breaks)
| Max. amount for N + 2¢ tax levied | [TX1/M]
Repeat up to the “B” Break (“B” Break - “A” Break + Multiple of $1.00; max. $9.00)
[AT/TL] (to complete this tax table programming)
NOTE:
The break amount entry must be a maximum of 4 digits (1 to 9999 resulting in $0.01 to $99.99)
6-53
6. PROGRAMMING OPERATIONS
EO1-11152
6.24 TAX Table Setting
TYPE 2: TAX 1 COMBINATION OF NON-CYCLIC BREAKS AND % RATE
First set all the breaks up to the “A” Break entry and the [ST] key depression as shown in TYPE 1.
| TAX RATE applied when exceeding the “A” Break amount |
(0.0001% to 99.9999%; use the [.] key if a decimal portion is contained. Examples: To set 5%, enter 5. To
set 5.26%, enter 5.26. The fraction of the amount resulting from this % rate calculation will be rounded off.)
[AT/TL] (to complete this tax programming)
TYPE 3: TAX 1 % RATE ONLY
0 [TX1/M]
[ST]
| TAX RATE | [AT/TL]
(The description for the TAX RATE in TYPE 2 is also applied to this case.)
NOTES:
1.
2.
3.
4.
5.
For Tax 2, Tax 3, Tax 4 table programming, follow the same procedure in TYPE 1, 2, or 3 on the
preceding page, using [TX2/M] or [TX3/M] or [TX4/M] instead of [TX1/M].
If multiple tax tables are programmed, the Tax 1 table must be set first, then Tax 2, Tax 3, and
Tax 4. The Tax 1 table setting will automatically reset all of the old Tax 1, 2, 3. and 4 tables if
they have been programmed.
No second depression of the [ST] key is allowed within one tax table programming.
A maximum of 99 breaks can be entered for Tax 1 to Tax 4 tables altogether.
For inclusive tax (Tax 3 or Tax 4), tax table programming using a rate only is available. Tax table
programming using a tax break is unavailable.
Example 1) TAX 1 FULL BREAKS
Tax Table
Tax Levied
Amount Range
$0.00 to $0.10
0¢
$0.11 to $0.22
1¢
$0.23 to $0.39
2¢
$0.40 to $0.56
3¢
$0.57 to $0.73
4¢
$0.74 to $0.90
5¢
$0.91 to $1.08
6¢
---- “A” Break
$1.09 to $1.24
7¢
$1.25 to $1.41
8¢
$1.42 to $1.58
9¢
$1.59 to $1.74
10¢
$1.75 to $1.92
11¢
$1.93 to $2.08
12¢
---- “B” Break
Key Operation
Mode Lock: SET
10
22
39
56
73
90
108
124
141
158
174
192
208
[TX1/M]
[TX1/M]
[TX1/M]
[TX1/M]
[TX1/M]
[TX1/M]
[TX1/M]
[ST]
[TX1/M]
[TX1/M]
[TX1/M]
[TX1/M]
[TX1/M]
[TX1/M]
[AT/TL]
TEC STORE
1343 PEACH DRIVE
PHONE: 87-6437
Open 8:00am to 7:00pm
Closed: every Wednesday
08-25-2003 MON
#0
P00
TAX1
00
01
02
03
04
05
06
∗
07
08
09
10
11
12
∗∗
$0.10
$0.22
$0.39
$0.56
$0.73
$0.90
$1.08
$1.24
$1.41
$1.58
$1.74
$1.92
$2.08
0092 15:07TM
6-54
6. PROGRAMMING OPERATIONS
EO1-11152
6.25 Store/Register No. Setting
Example 2) TAX 2 COMBINATION OF NON-CYCLIC BREAKS AND % RATE
Tax Table
Tax Levied
Amount Range
$0.00 to $0.09
0¢
$0.10 to $0.29
1¢
$0.30 to $0.59
2¢
$0.60 to $0.84
3¢
$0.85 to $1.12
4¢
---- “A” Break
5% is applied to any amount
exceeding the “A” Break.
Key Operation
Mode Lock: SET
9
29
59
84
112
TEC STORE
1343 PEACH DRIVE
PHONE: 87-6437
[TX2/M]
[TX2/M]
[TX2/M]
[TX2/M]
[TX2/M]
[ST]
5
[AT/TL]
Open 8:00am to 7:00pm
Closed: every Wednesday
08-25-2003 MON
#0
P00
TAX2
00
01
02
03
04
∗
$0.09
$0.29
$0.59
$0.84
$1.12
5%
0093 15:09TM
Example 3) TAX 10% RATE ONLY
Tax Table
10% is applied to any sale amount
TEC STORE
1343 PEACH DRIVE
PHONE: 87-6437
Key Operation
Mode Lock: SET
0
Open 8:00am to 7:00pm
Closed: every Wednesday
[TX3/M]
[ST]
08-25-2003 MON
10
[AT/TL]
#0
P00
TAX3
00
∗
$0.00
10%
0094 15:11TM
6.25
Store/Register No. Setting
A maximum of 6 digits may be set as ID No. for the store and/or register. And once set, it will be printed on every
receipt and every transaction on journal.
CONDITION
Any time outside a sale
OPERATION
Mode Lock: SET
| Store/Register No. |
[#]
Max. 6 digits; 0 to 999999
NOTE:
The preceding zeros, if entered, will not be printed. For
example, if “001234” is entered in the above operation,
“#1234” will always be printed as the Register No.
Example) To set the Register No. of this terminal: 3001
TEC STORE
1343 PEACH DRIVE
PHONE: 87-6437
Open 8:00am to 7:00pm
Closed: every Wednesday
08-25-2003 MON
#3001
P00
Key Operation: Mode Lock: SET
3001 [#]
#3001
0095 15:13TM
6-55
7. VERIFICATION OF PROGRAMMED DATA
EO1-11152
7. VERIFICATION OF PROGRAMMED DATA
7. VERIFICATION OF PROGRAMMED DATA
The programmed data entered in the preceding chapter can be read for verification purposes.
The print format of each program reading is almost the same as on the program receipt, except that “PX” and a
3-digit number are printed instead of printing “P” and a 2-digit number.
CONDITION
Any time outside a sale
OPERATION
Mode Lock: X or SET
1. To read out the data of programming operations with a Submode No., first enter “1,” then each Submode No.,
and finally depress the [AT/TL] key.
For example, to read the programmed data entered in Submode 1 (STORE NAME/MESSAGE,
COMMERCIAL MESSAGE, PROGRAMMING), operate:
101
[AT/TL]
Submode No. (In case of a 1-digit number, add a “0” on top to be a 2-digit number.
Always attach “1” to the Program Submode No. for reading data.
NOTE:
Data of Submodes 5, 6 cannot be read.
2. To read out the data of programming operations without a Submode No., the following operation will read all
the data together:
100
[AT/TL]
To read the data of the following operations:
• %+ and %- PRESET RATE
• SELECTIVE ITEMIZER RATE
• FOREIGN CURRENCY EXCHANGE RATE
• TAX TABLE (For tax calculation test, refer to the next page.)
3. Zone destination is possible in reading the PLU TABLE:
104
NOTE:
[ST]
Zone-start [@/FOR] Zone-end
PLU Code
PLU Code
[AT/TL]
On depressing the [AT/TL] key, the programmed data will be printed. To abort printing once started,
depress the [ITEM CORR] or [VOID] key. The reading operation is immediately stopped halfway.
7- 1
7. VERIFICATION OF PROGRAMMED DATA
EO1-11152
7.1 Tax Calculation Test
7.1
Tax Calculation Test
CONDITION
Any time outside a sale
OPERATION
Mode Lock: X or SET
Enter any amount.
Displays the
entered amount.
Depress [TXBL TL]
Displays the tax amount
(Tax 1 + Tax 2 + Tax 3 +
Tax 4) is displayed, issuing
a receipt such as below.
TEC STORE
1343 PEACH DRIVE
PHONE: 87-6437
Open 8:00am to 7:00pm
Closed: every Wednesday
08-25-2003 MON
#3001
PX
$100.00
$6.00
$5.00
$4.00
$3.00
TAX1
TAX2
TAX3
TAX4
Entered Amount
Tax 1 amount calculated
Tax 2 amount calculated
Tax 3 amount calculated
Tax 4 amount calculated
00462
NOTE:
The print or non-print status of each calculated tax amount can be programmed.
7- 2
8. BAR CODE SYSTEM FOR EACH MODEL
EO1-11152
8. BAR CODE SYSTEM FOR EACH MODEL
8. BAR CODE SYSTEM FOR EACH MODEL
Symbols of Bar Code Components (applicable to any of the following tables)
F ................. Flag Code
M ................ Merchandise Maker Code
I .................. Merchandise Item Code
X................. Other type of Item Code or Price Value
P................. Price Value
C/D ............. Check Digit (on the entire code)
C/DP........... Check Digit on Price
Bar Code Type Table
Read
Code
Type
Symbol
Marking
Method
1
UPC
Source
2
UPC
Source
3
EAN
JAN
Source
4
EAN
JAN
Source
5
UPC
Source
6
EAN
JAN
UPC
Source
7
8
JAN
UPC
Version
UPC-A
Standard
UPC-E
Shortened
EAN-13
JAN-13
Standard
EAN-8
JAN-8
Shortened
In-store
Coupon
Standard
Coupon
Standard
Non-PLU
In-store
Non-PLU
PLU
Bar Code Components
F1 F2 M1 M2 M3 M4 M5 I1 I2 I3 I4 I5 C/D
(F1 = 0 fixed, F2 = 0, 1, 3, 6 ~ 9)
F2 X1 X2 X3 X4 X5 X6 C/D
(F2 = 0 fixed, X1 = 0 ~ 9, X1 = 0: Not applicable to the Read Code Type 11)
The method of converting the shortened type into the standard type is
determined by a program option.
F1 F2 M1 M2 M3 M4 M5 I1 I2 I3 I4 I5 C/D
(F1 F2 = 30 ~ 97)
F1 F2 M1 M2 M3 M4 I5 C/D
(F1 F2 = 30 ~ 97)
F1 F2 X1 X2 X3 X4 X5 X6 X7 X8 X9 X10 C/D
(F1 = 0 fixed, F2 = 5, X9 X10 = Coupon Code.)
F1 F2 X1 X2 X3 X4 X5 X6 X7 X8 X9 X10 C/D
(F1 F2 = 98, 99) (X8 X9 X10 is the coupon amount.)
Price 4 dig. C/DP. Item Code 5 dig.:
F1 2 X1 X2 X3 X4 X5 C/DP P1 P2 P3 P4 C/D
Price 5 dig. Item Code 5 dig.:
F1 2 X1 X2 X3 X4 X5 P1 P2 P3 P4 P5 C/D
Price 4 dig. Item Code 6 dig.:
F1 2 X1 X2 X3 X4 X5 X6 P1 P2 P3 P4 C/D
(F1 F2 = 02 fixed)
The processing type (selection of Bar Code Components) is programmable.
Non-PLU Price 4 dig. C/DP. Item Code 5 dig.:
F1 F2 X1 X2 X3 X4 X5 C/DP P1 P2 P3 P4 C/D
Non-PLU Price 5 dig. Item Code 5 dig.
F1 F2 X1 X2 X3 X4 X5 P1 P2 P3 P4 P5 C/D
Non-PLU Price 4 dig. Item Code 6 dig.
F1 F2 X1 X2 X3 X4 X5 X6 P1 P2 P3 P4 C/D
F1 F2 X1 X2 X3 X4 X5 X6 X7 X8 X9 X10 C/D
(F1 F2 = 04, 10 ~ 29)
The processing type (selection of Bar Code Components) is programmable.
9, 10
11
UPC
In-store
LAC
-- reserved -F2 X1 X2 X3 X4 X5 X6 C/D
(F2 X1 = 00 fixed; X2 X3 X4 X5 = 1000 ~ 7999; X6 = 5 ~ 9)
8- 1
3. M/S LEVEL
OPERATOR’S GUIDE
EO1-11152
MA-1595-1 SERIES
TABLE OF CONTENTS
Page
1. INTRODUCTION----------------------------------------------------------------------------------------- 1- 1
2. SYSTEM CONFIGURATION ------------------------------------------------------------------------- 1- 1
3. HARDWARE DESCRIPTION ------------------------------------------------------------------------ 3- 1
3.1
Operator Display Indications of Master-Satellite System----------------------------------------3- 1
4. ADDITIONAL FUNCTION KEY AND REGISTERING PROCEDURE -------------------- 4- 1
1. INTRODUCTION
EO1-11152
1. INTRODUCTION
1. INTRODUCTION
Making the most of the functions of the previously described MA-1595 standalone, the MA-1595 can be
developed into a master-satellite system.
For Master-Satellite, a Batch-consolidation or Scanning system of a maximum of 16 terminals can be built. By
connecting a PC, the system can also be expanded into a transaction data capture system.
Operational functions on each terminal ECR basically stay the same as on a standalone ECR, except those
deleted, changed, or added for this M/S system use which are described later.
2. SYSTEM CONFIGURATION
PC
TCP/IP
Master
Terminal
Backup Master
Terminal
Remote Slip Printer
Remote Slip Printer
Scanner
Scanner
Scale
Scale
EFT
EFT
RS-232C
Satellite
Terminal
RS-232C
UDP
Satellite
Terminal
Remote Slip Printer
Satellite
Terminal
Remote Slip Printer
Remote Slip Printer
Scanner
Scanner
Scanner
Scale
Scale
Scale
EFT
EFT
RS-232C
RS-232C
EFT
RS-232C
Batch-consolidation System: Max. 16 terminals
Master Terminal
... 1 unit
Backup Master Terminal
... 1 unit
Satellite Terminal
... Max. 14 units
or
Master Terminal
... 1 unit
Satellite Terminal
... Max. 14 units
Scanning System:
Remote Slip Printer:
Scanner:
Scale:
EFT:
System including
Backup Master Terminal
System not including
Backup Master Terminal
Max. 4 terminals
TM-U295 (EPSON)
PSC-6000/2500
SL-47
Data Tran-LT DATA CAP
Data Tran-SL DATA CAP
1- 1
3. HARDWARE DESCRIPTION
EO1-11152
3.1 Operator Display Indications of Master-Satellite System
3. HARDWARE DESCRIPTION
3.1 Operator Display Indications of Master-Satellite System
Display Indications during In-line Services
The followings are displayed in the 16-digit dot windows, 10-digit 7-segment window, and IN-LINE Lamp of
the Operator Display panel during in-line services.
< Master Terminal >
Blink
DPT
In-line Job No.
Mode Indication
X
Number of ECRs unserviced
(( ))
ECR No. now serviced at the time
of collecting read/reset data
TL ST
Illuminated
• IN-LINE Lamp
1) Illuminated during RTR declaration “ON”
2) Extinguished during RTR declaration “OFF”
3) Blinking during ULL operations
• Mode Indication
5
4
3
2
1
RTR/SET Mode:
P
RTR/X Mode:
X
RTR/Z Mode:
Z
< Satellite Terminals or Backup Master Terminal >
• IN-LINE Lamp
1) Illuminated during “Hold” condition
2) Extinguished after completing in-line services
3) Blinking during in-line services
Error Messages
The following table shows the Error Codes and Messages to be displayed on in-line terminals, in addition to
those displayed on Standalone ECRs.
IN-LINE ERROR CODE AND MESSAGE TABLE
(to be added to the table for the Standalone Level)
Error Message
(Standard Setting)
FILE BUSY
IRC CONNECT ERR
MASTER IS BUSY
PLEASE BACK UP
TRANS BUFF FULL
Cause of Error
A designated file is already occupied by other terminal.
Transmission cannot be executed due to the connection error (Disconnection of
the line, or Master Terminal’s power is OFF, etc.)
An inquiry file is being used.
RTR Declaration cannot be canceled due to the Backup Error
Satellite Transaction Buffer is full.
3- 1
4. ADDITIONAL FUNCTION KEY AND REGISTERING PROCEDURE
EO1-11152
4. ADDITIONAL FUNCTION KEY AND REGISTERING PROCEDURE
4. ADDITIONAL FUNCTION KEY AND REGISTERING
PROCEDURE
The following is the key that can be installed on the Master Terminal of an in-line system, in addition to the
standalone specifications, and the registering procedure using the key.
RTR
RTR (Register-to-Register) DECLARATION Key ([RTR])
By depressing the [RTR] key on the Master Terminal, various in-line jobs (DLLs, Consolidated Read/Reset
Report takings, etc.) can be performed.
PROCEDURE ON A MASTER TERMINAL FOR RTR DECLARATION
Mode Lock: SET, REG, X, Z, MGR or - /Anytime outside a sale
Depress [RTR]
NOTES:
1. While a PC job is under way ( a command of ULL, DLL, or Read/Reset from the PC), this RTR
Declaration is not possible. Similarly, while this RTR Declaration is on, no PC jobs are possible.
2. While the RTR Declaration is on, no transaction entries in “REG”, “MGR”, or “ - “ mode are
possible.
3. While the RTR Declaration is on, no Backup Data Check is performed.
4. While the RTR Declaration is on, the following are jobs to be allowed:
• Programming Operations
• DLL Operations (DLL to Satellite Terminals)
• Consolidated Read/Reset Report takings
• Manual Copying of Backup Data
5. The [RTR] key can be programmed to require Manager Intervention.
6. If the option “Auto Data Copying feature” is selected for Copying of Backup Data, the RTR
Declaration is not possible while a backup data update process is under way.
7. If the option “Compulsion of Data Sending to PC” is selected, the RTR Declaration is not possible
until sending the reset data (the consolidation data) to PC is completed.
By depressing the [RTR] key on the Master Terminal when the RTR Declaration is on, the RTR Declaration
ON status is canceled.
PROCEDURE ON A MASTER TERMINAL FOR RTR DECLARATION CANCEL
Mode Lock: SET, REG, X, Z, MGR or - / RTR Declaration is ON
Depress [RTR]
NOTE:
If the Backup Error Flag is ON (the standard error message is “PLEASE BACK UP”), it means that
manual copying of Backup Data is required, and therefore the RTR Declaration Cancel is not
accepted until copying is completed.
4- 1
4. M/S LEVEL
MANAGER’S GUIDE
EO1-11152
MA-1595-1 SERIES
TABLE OF CONTENTS
Page
1. DAILY OPERATION FLOW -------------------------------------------------------------------------- 1- 1
2. OPERATIONS BEFORE IN-LINE SERVICE ---------------------------------------------------- 2- 1
2.1
2.2
2.3
Terminal Open Check -----------------------------------------------------------------------------------2- 1
Terminal Designation ------------------------------------------------------------------------------------2- 2
Terminal Condition Check ------------------------------------------------------------------------------2- 3
3. RESERVATION ------------------------------------------------------------------------------------------ 3- 1
3.1
3.2
3.3
Reservation Function ------------------------------------------------------------------------------------3- 1
Report Reservation Print Format----------------------------------------------------------------------3- 3
Operations Relative To Reservation -----------------------------------------------------------------3- 4
4. READ AND RESET REPORTS --------------------------------------------------------------------- 4- 1
4.1
4.2
4.3
Terminal Reports------------------------------------------------------------------------------------------4- 1
In-Line Reports --------------------------------------------------------------------------------------------4- 2
Operations After In-Line Report Takings ------------------------------------------------------------4- 9
5. PROGRAMMING OPERATIONS ------------------------------------------------------------------- 5- 1
5.1
5.2
5.3
Programming Operations Common with Standalone ECR Level------------------------------5- 1
Programming Operations Added for In-line Terminals -------------------------------------------5- 2
Verification of Programmed Data ---------------------------------------------------------------------5- 5
6. DLL (Down-Line-Loading) OPERATIONS ------------------------------------------------------ 6- 1
7. DEPARTMENT AND PLU MAINTENANCE ----------------------------------------------------- 7- 1
7.1
7.2
7.3
PLU Table Addition/Change/Deletion with DLL----------------------------------------------------7- 2
Department Preset Price Setting or Changing with DLL (Submode 72) ---------------------7- 3
PLU Price Changing with DLL (Submode 73)------------------------------------------------------7- 4
8. INQUIRIES ------------------------------------------------------------------------------------------------ 8- 1
8.1
8.2
8.3
8.4
PLU Inquiries ----------------------------------------------------------------------------------------------8- 1
Customer File (Check Track) Inquiries --------------------------------------------------------------8- 1
Credit Card No. Inquiries to the Negative Check File --------------------------------------------8- 2
Cashier Occupy Inquiries -------------------------------------------------------------------------------8- 2
9. BACKUP FUNCTION ---------------------------------------------------------------------------------- 9- 1
10. DATA CAPTURE FUNCTION --------------------------------------------------------------------- 10- 1
11. MASTER AND BACKUP MASTER ALTERNATION---------------------------------------- 11- 1
12. TRANSMISSION ERROR--------------------------------------------------------------------------- 12- 1
12.1 Cause of Error ------------------------------------------------------------------------------------------- 12- 1
12.2 Error Display --------------------------------------------------------------------------------------------- 12- 1
12.3 Error Canceling Process ------------------------------------------------------------------------------ 12- 2
13. OTHER OPERATIONS RELATING TO IN-LINE SERVICE ------------------------------- 13- 1
13.1
13.2
13.3
13.4
13.5
Time Out -------------------------------------------------------------------------------------------------- 13- 1
Suspending----------------------------------------------------------------------------------------------- 13- 2
Retry ------------------------------------------------------------------------------------------------------- 13- 2
Incomplete Ending-------------------------------------------------------------------------------------- 13- 2
Cancel ----------------------------------------------------------------------------------------------------- 13- 3
1. DAILY OPERATION FLOW
EO1-11152
1. DAILY OPERATION FLOW
1. DAILY OPERATION FLOW
In a Master-Satellite System, a certain order of jobs on the Master and Satellite terminals are provided. If the
necessary jobs are not proceeded in the correct order, sale entries may not be operated or report collections may
not be possible. The following chart shows the basic daily operation flow on the Master and Satellite terminals.
MASTER TERMINAL
SATELLITE TERMINALS
Turn ON the power of every ECR in the in-line system.
First turn ON the power of the Master terminal, and then the power of each
Satellite terminals.
Operate TERMINAL OPEN CHECK
to check all the terminals are correctly
connected (Chapter 2):
Mode Lock: X/RTR Declaration: ON
80 [AT/TL]
Operate DATE AND TIME DLL to
synchronize the date and time of Satellite
terminals to that of the Master terminal
(Chapter 6):
Mode Lock: SET/RTR Declaration: ON
505 [AT/TL]
STORE OPEN
Sign-ON, Sale Entries, Sign-OFF
Refer to the OPERATOR’S GUIDE for the Standalone Level.
Read (X) Report Takings on Individual Terminals
Refer to Section 5 in this manual and MANAGER’S GUIDE for the
Standalone Level.
In-line Read Report Takings on Master
Terminal.
Refer to Section 4.2 in this manual.
(To be continued on the next page.)
1- 1
1. DAILY OPERATION FLOW
EO1-11152
1. DAILY OPERATION FLOW
(Continued from the preceding page.)
(MASTER TERMINAL)
(SATELLITE TERMINALS)
STORE CLOSE
Sign OFF on all the terminals (including the Master Terminal) when all the sale
entries for the day are over.
In-line Reset Report Takings on
Master Terminal. (Refer to Section 4.2.)
The HOLD condition of the terminal cannot be released for some reason, an
ENFORCED CLEAR OF HOLD CONDITION can be operated on individual
terminals. (Refer to Section 4.3.)
CONSOLIDATED REPORT DATA READ
If programmed data changes are necessary:
PROGRAMMING OPERATIONS (Chapter 5)
DLL OPERATIONS (Chapter 6)
DEPARTMENT AND PLU MAINTENANCE (Chapter 7)
Turn OFF the power of every terminal to end the business for the day.
1- 2
2. OPERATIONS BEFORE IN-LINE SERVICE
EO1-11152
2.1 Terminal Open Check
2. OPERATIONS BEFORE IN-LINE SERVICE
Before entering in-line service operations (In-line Report takings, DLLs, etc.), the following operations are
available if necessary.
2.1 Terminal Open Check
This operation sends a dummy text to those terminals set in the TERMINAL CONNECTION TABLE, and prints
out the Register Nos. of the disconnected terminals (i.e. terminals not responding).
CONDITION
Any time outside a sale (operable on Master Terminal)
OPERATION
Mode Lock: X and IN-LINE Lamp illuminated
80 [AT/TL]
Master Terminal Receipt Print
When the check result is normal:
Prints the Report Name only.
When any error status is found:
Prints the Register Nos. of the terminals not
connected properly, as well as the Report Name.
TEC STORE
1343 PEACH DRIVE
PHONE: 87-6437
TEC STORE
1343 PEACH DRIVE
PHONE: 87-6437
Open 8:00am to 7:00pm
Closed: every Wednesday
Open 8:00am to 7:00pm
Closed: every Wednesday
08-31-2003 SUN
#3001
08-31-2003 SUN
∗∗∗∗∗∗∗∗∗∗∗∗∗∗∗∗∗∗∗∗∗∗∗∗∗∗∗∗∗∗∗∗
NOT_CONNECT
∗∗∗∗∗∗∗∗∗∗∗∗∗∗∗∗∗∗∗∗∗∗∗∗∗∗∗∗∗∗∗∗
#3001
∗∗∗∗∗∗∗∗∗∗∗∗∗∗∗∗∗∗∗∗∗∗∗∗∗∗∗∗∗∗∗∗
NOT_CONNECT
#333303
∗∗∗∗∗∗∗∗∗∗∗∗∗∗∗∗∗∗∗∗∗∗∗∗∗∗∗∗∗∗∗∗
0013 12:18TM
0016 12:20TM
2- 1
2. OPERATIONS BEFORE IN-LINE SERVICE
EO1-11152
2.2 Terminal Designation
2.2 Terminal Designation
This operation can be performed before any in-line service operation. When this operation is skipped, no specific
terminals are designated, i.e., the in-line service operations will be performed to all the terminals.
CONDITION
Any time outside a sale
OPERATION
Mode Lock: SET, X, or Z (depending on the in-line service operations to follow)
RTR Declaration ON Status (i.e., the IN-LINE Lamp should be illuminated)
To be operated on the Master Terminal only.
[#]
|Store/Register No.| [#]
[AT/TL]
Enter the Store/Register No.
(Max. 6 digits) of the Terminal
subject to the in-line service
operations to follow.
Repeat for other terminals if more are
subject to the in-line service operation.
NOTE:
The Terminal Designation once declared by the above operation will be canceled by changing the
position of the Mode Lock, or by RTR Declaration Cancel, or by turning OFF and ON the power of the
terminal. The designation is automatically canceled on completion of the operation to follow or when
a new designation is operated.
ex.) To designate the following Terminal out of two terminals in the system:
Terminal ID No.3: Store/Register No. 333303 (IP Address: 192.168.0.251)
Mode Lock: SET (if operated before DLLs)
The RTR Declaration must be ON (i.e., the IN-LINE Lamp must be illuminated; if not, depress the [RTR] key
to declare RTR status).
[#] 333303 [#] [AT/TL]
(Issues a receipt, printing the Store/Register Nos. of the terminals designated in the above operation.)
TEC STORE
1343 PEACH DRIVE
PHONE: 87-6437
Open 8:00am to 7:00pm
Closed: every Wednesday
08-31-2003 SUN
#03
#3001
P00
#333303 192.168.
0.251
0017 12:21TM
2- 2
2. OPERATIONS BEFORE IN-LINE SERVICE
EO1-11152
2.3 Terminal Condition Check
2.3 Terminal Condition Check
This operation checks the condition of the designated terminals, and prints out the status responded from the
terminals.
CONDITION
Any time outside a sale (operable on Master Terminal)
OPERATION
Mode Lock: X and IN-LINE Lamp illuminated
81 [AT/TL]
Master Terminal Receipt Print
TEC STORE
1343 PEACH DRIVE
PHONE: 87-6437
Open 8:00am to 7:00pm
Closed: every Wednesday
08-31-2003 SUN
#3001
∗∗∗∗∗∗∗∗∗∗∗∗∗∗∗∗∗∗∗∗∗∗∗∗∗∗∗∗∗∗∗∗
T/M_CHECK
#333303 OK
∗∗∗∗∗∗∗∗∗∗∗∗∗∗∗∗∗∗∗∗∗∗∗∗∗∗∗∗∗∗∗∗
0018 12:22TM
2- 3
Status Symbol
OK:
The terminal condition is normal.
?:
No response (power-OFF, etc.)
BUSY: The terminal is busy
(during a sale, etc.).
Blank: Other statuses
3. RESERVATION
EO1-11152
3.1 Reservation Function
3. RESERVATION
3.1
Reservation Function
This function is applied only to a system with the CVS spec. selected as the program option.
Performing the following reservations on the Master Terminal forces the Satellite Terminals to copy the relevant
report data into the communication buffers. Therefore, the Master Terminal can consolidate report data of the
Satellite Terminals, and issue an in-line report even while the Satellite Terminals sign off, and perform sales
entries.
TABLE OF RESERVATION OPERATIONS
RTR Declaration: ON
Mode
Lock
Report Name
COMBINATION REPORTS
• Combination 1 Read:
Key Operation
Daily
GT
Daily
GT
Daily
GT
Daily
GT
Daily
GT
Daily
GT
X
X
X
X
X
X
Z
Z
Z
Z
Z
Z
600 [AT/TL]
700 [AT/TL]
601 [AT/TL]
701 [AT/TL]
602 [AT/TL]
702 [AT/TL]
600 [AT/TL]
700 [AT/TL]
601 [AT/TL]
701 [AT/TL]
602 [AT/TL]
702 [AT/TL]
Daily
GT
Daily
GT
X
X
Z
Z
603 [AT/TL]
703 [AT/TL]
603 [AT/TL]
703 [AT/TL]
CASHIER REPORTS
(for the Floating Cashier feature)
• Individual Cashier Read:
Daily
X
• Individual Cashier Reset:
GT
Daily
X
Z
GT
Daily
GT
Daily
GT
Z
X
X
Z
Z
604 [#] |Cashier ID Code| [AT/TL]
(2 digit manager-assign code)
Start with 704 instead of 604 in the above pattern.
604 [#] |Cashier ID Code| [AT/TL]
(2 digit manager-assign code)
Start with 704 instead of 604 in the above pattern.
604 [AT/TL]
704 [AT/TL]
604 [AT/TL]
704 [AT/TL]
• Combination 2 Read:
• Combination 3 Read:
• Combination 1 Reset:
• Combination 2 Reset:
• Combination 3 Reset:
FINANCIAL REPORTS
• Financial Read:
• Financial Reset:
• All store All Cashier Read:
• All store All Cashier Reset:
(to be continued on next page)
3- 1
3. RESERVATION
EO1-11152
3.1 Reservation Function
TABLE OF RESERVATION OPERATIONS (continued)
RTR Declaration: ON
Mode
Lock
Report Name
SALESPERSON REPORTS (Daily only)
• All-store All Salesperson Read
• All-store All Salesperson Reset
CREDIT CARD COMPANY SALES
REPORTS
• Credit Card Company
Daily
Sales Read:
GT
• Credit Card Company
Daily
Sales Reset:
GT
DEPARTMENT GROUP REPORTS
(Read only)
• Department Group Read:
Daily
GT
MEDIA SALES AND IN-DRAWER READ
(Daily only)
HOURLY RANGE REPORTS
• Hourly Read (Daily only)
• Hourly Reset (Daily only)
DEPARTMENT REPORTS
• All Department Read:
Daily
GT
• All Department Reset:
Daily
GT
ALL MEDIA SALES TOTAL AND CASH-INDRAWER READ (Daily only)
PLU REPORTS (For the feature “PLU to be
inquired to the Center File.”)
(Daily only)
• All PLU Read
• All PLU Reset
• Zone PLU Read
• Zone PLU Reset
PLU GROUP REPORTS
• PLU Group Read:
• PLU Group Reset:
X
Z
605 [AT/TL]
605 [AT/TL]
X
X
Z
Z
606 [AT/TL]
706 [AT/TL]
606 [AT/TL]
706 [AT/TL]
X
X
608 [AT/TL]
708 [AT/TL]
X
609 [AT/TL]
X
Z
610 [AT/TL]
610 [AT/TL]
X
X
Z
Z
611 [AT/TL]
711 [AT/TL]
611 [AT/TL]
711 [AT/TL]
X
612 [AT/TL]
X
Z
X
613 [AT/TL]
613 [AT/TL]
613 [#] → |Zone-start PLU Code|
[@/FOR] → |Zone-end PLU Code| [AT/TL]
613 [#] → |Zone-start PLU Code|
[@/FOR] → |Zone-end PLU Code| [AT/TL]
Z
Daily
GT
Daily
GT
Key Operation
X
X
Z
Z
624 [AT/TL]
724 [AT/TL]
624 [AT/TL]
724 [AT/TL]
(to be continued on next page)
3- 2
3. RESERVATION
EO1-11152
3.2 Report Reservation Print Format
TABLE OF RESERVATION OPERATIONS (continued)
RTR Declaration: ON
Report Name
Mode
Lock
CUSTOMER FILE REPORTS
(for Check Track Memory type only)
• All Files Read
• All Files Reset
• Zone Files Read
X
Z
X
• Zone Files Reset
Z
NOTES:
3.2
Key Operation
615 [AT/TL]
615 [AT/TL]
615 [#] → |Zone-start File Code|
[@/FOR] → |Zone-end File Code| [AT/TL]
615 [#] → |Zone-start File Code|
[@/FOR] → |Zone-end File Code| [AT/TL]
1. Reservation function is unavailable when the Satellite Terminals perform the transactions in “SET”,
“X” and “Z” modes.
2. Reservation function is only an operation to copy report data into the communication buffer.
Therefore, actual report cannot be issued by this function. To issue a report, key operation to
issue it is further necessary on the Master Terminal. Refer to the next chapter “4. READ AND
RESET REPORTS” regarding key operation to issue a report.
3. When Reservation operation is performed before the data is set in the communication buffer, “DT
R” will be printed. When the reservation reset is performed under the condition that the reset data
is in the communication buffer, “DT Z” will be printed.
Report Reservation Print Format
TEC STORE
1343 PEACH DRIVE
PHONE: 87-6437
Open 8:00am to 7:00pm
Closed: every Wednesday
08-31-2003 SUN
#3001
∗∗∗∗∗∗∗∗∗∗∗∗∗∗∗∗∗∗∗∗∗∗∗∗∗∗∗∗∗∗∗∗
RESERVED
∗∗∗∗∗∗∗∗∗∗∗∗∗∗∗∗∗∗∗∗∗∗∗∗∗∗∗∗∗∗∗∗
#111101 XXXX
#222202 XXXX
#999909 XXXX
∗∗∗∗∗∗∗∗∗∗∗∗∗∗∗∗∗∗∗∗∗∗∗∗∗∗∗∗∗∗∗∗
JONES
0019 12:23TM
RTR Symbol
Reservation Symbol
Report Name
RTR Symbol
Register No. and Status
OK:
Normal status
?:
No response
BUSY: The terminal is busy
Blank: Other statuses
DT_R: Already reserved
DT_Z: Reset data exists
3- 3
3. RESERVATION
EO1-11152
3.3 Operations Relative To Reservation
3.3
Operations Relative To Reservation
The following operations are available only to a system with the CVS spec. selected.
READ OF INFORMATION ALREADY COPIED IN COMMUNICATION BUFFER
This operation issues report names of which sales data have been already copied in the communication buffer.
OPERATION ON ANY TERMINAL:
96 [AT/TL]
NOTE:
Mode Lock: X
The following contents are printed.
• Distinction of report (Read or Reset)
• Transaction name
ENFORCED CLEAR OF COMMUNICATION BUFFER
This operation forcibly clears the content already copied in the communication buffer.
Mode Lock: Z
OPERATION ON ANY TERMINAL:
9998 [AT/TL]
NOTE:
This operation should be performed only when malfunction of PC or Master Terminal occurs.
Therefore, the memory content is not guaranteed if this operation is performed when a system is
normal.
3- 4
4. READ AND RESET REPORTS
EO1-11152
4.1 Terminal Reports
4. READ AND RESET REPORTS
4.1
Terminal Reports
Since most reports are taken as in-line reports on the Master Terminal, some of the reports which are available
on the individual standalone ECR basis cannot be taken on Master or Satellite ECRs of the in-line system. The
following are the reports which are listed in the MANAGER’S GUIDE for the standalone level but cannot be taken
on any ECRs of the in-line system. Other reports not listed below can be taken even in the in-line system.
(Before taking those reports, however, please read the next section 4.2 IN-LINE REPORTS.)
TERMINAL REPORTS that cannot be taken on any ECRs of the in-line system
GT REPORTS
DAILY REPORTS
Report Name
Report Name
CASHIER READ AND RESET REPORTS
(when adopting the Floating Cashier Feature)
• Individual Cashier Read
• Individual Cashier Reset
• All Cashier Read
• All Cashier Reset
PLU READ AND RESET REPORTS
(when programming PLU data in the Center File)
• Individual PLU Read
• Zone PLU Read
• Zone PLU Reset
• All PLU Read
• All PLU Reset
• Inactive PLU Read
CUSTOMER FILE READ REPORTS
(for Check Track Memory type only)
• Individual File Read
• Zone Files Read
• All Files Read
• Zero-balance Files Read
• Debit-balance Files Read
• Credit-balance Files Read
CASHIER GT READ AND RESET REPORTS
(when adopting the Floating Cashier Feature)
• Individual Cashier GT Read
• Individual Cashier GT Reset
• All Cashier GT Read
• All Cashier GT Reset
PLU GT READ AND RESET REPORTS
(when programming PLU data in the Center File)
• Individual PLU GT Read
• Zone PLU GT Read
• Zone PLU GT Reset
• All PLU GT Read
• All PLU GT Reset
• Inactive PLU GT Read
4- 1
4. READ AND RESET REPORTS
EO1-11152
4.2 In-Line Reports
4.2
In-Line Reports
WARNING!
When opening the cash drawer, be careful not to let the drawer hit any person.
4.2.1
In-Line Report Command Executions
Before taking in-line reports, please note the following:
1)
In-line Reset Reports (as well as In-line Read Reports) can be taken on the Master Terminal as long as the
Satellite Terminals are in the idle state (“Signed OFF” condition in case of the cashier code entry type). To
check status of all the terminals connected to the in-line, TERMINAL CONDITION CHECK can be operated
(refer to Chapter 2).
2)
When In-line Reports are taken, the power of each Satellite Terminal must be turned ON but the Mode Lock
can be in any positions.
The operation flow for taking In-line Reports is shown on the next page, and the table of In-line Reports is on the
following pages.
The key operation for each In-line Report is the same as the corresponding terminal report available on the
standalone ECR. However, the key operation can be executed only on the Master Terminal while the [RTR] key
is turned on.
Conditions required on terminals for In-line Report takings:
Read/Reset Reports (Daily or GT)
Master Terminal:
Any time outside a sale
Satellite Terminals: (NOTE below)
Lock Positions Required:
Master Terminal:
Satellite Terminals:
NOTE:
Mode Lock: X/RTR Declaration: ON
Mode Lock: Z/RTR Declaration: ON
Any positions
Conditions required on the Satellite Terminals for in-line report takings depend on the system features.
• Cashier code entry type with the CVS spec. selected ... Satellite Terminal during a Sign-OFF, SignON, and sales entries
• Cashier code entry type without the CVS spec. ... Satellite Terminal during a Sign-OFF, and SignON with no sales entries performed
• Cashier key type with the CVS spec. selected ... Satellite Terminal during idling, and sales entries
• Cashier key type without CVS spec. ... Satellite Terminal during idling
• When the CVS spec. is selected and there is no collected data, “NO-D” will be printed. When the
collected data is not agreed, “NO-A” will be printed.
4- 2
4. READ AND RESET REPORTS
EO1-11152
4.2 In-Line Reports
OPERATION FLOW OF IN-LINE READ OR RESET REPORTS
To be operated on the Master Terminal only
Designating
All Terminals
Designating Some Terminals
[#]
|Store/Register No.|
of the terminal to be
designated (max. 6 digits)
Repeat for all the
terminals to be
designated.
Refer to
Chapter 2.
[#]
[AT/TL]
Report Taking Operation for Each Report (see the following pages)
Refer to the
following pages.
Each Terminal’s Report Data Collection Process
When the option “Individual Terminal
Data Report Issue” is selected.
(applicable to Financial Reports only)
In other cases
Each Terminal’s Data
Print (from Master
Terminal)
Incomplete Ending:
Uncollected Terminal’s
Store/Register No.
Print
Normal Ending
Consolidated Data
Report
End
4- 3
Also refer to Retry,
Suspending, and
Cancel operations.
Refer to
Chapter 13.
4. READ AND RESET REPORTS
EO1-11152
4.2 In-Line Reports
TABLE OF IN-LINE REPORT OPERATIONS
RTR Declaration: ON
Mode
Lock
Report Name
COMBINATION REPORTS
• Combination 1 Read:
Key Operation
Daily
GT
Daily
GT
Daily
GT
Daily
GT
Daily
GT
Daily
GT
X
X
X
X
X
X
Z
Z
Z
Z
Z
Z
[AT/TL]
200 [AT/TL]
1 [AT/TL]
201 [AT/TL]
2 [AT/TL]
202 [AT/TL]
[AT/TL]
200 [AT/TL]
1 [AT/TL]
201 [AT/TL]
2 [AT/TL]
202 [AT/TL]
Daily
GT
Daily
GT
X
X
Z
Z
3 [AT/TL]
203 [AT/TL]
3 [AT/TL]
203 [AT/TL]
CASHIER REPORTS
(for the Floating Cashier feature)
• Individual Cashier Read:
Daily
X
• Individual Cashier Reset:
GT
Daily
X
Z
GT
Daily
GT
Daily
GT
Z
X
X
Z
Z
4 [#] |Cashier ID Code| [AT/TL]
(2-digit manager-assign code)
Start with 204 instead of 4 in the above pattern.
4 [#] |Cashier ID Code| [AT/TL]
(2-digit manager-assign code)
Start with 204 instead of 4 in the above pattern.
4 [AT/TL]
204 [AT/TL]
4 [AT/TL]
204 [AT/TL]
X
X
Z
Z
4 [AT/TL]
204 [AT/TL]
4 [AT/TL]
204 [AT/TL]
X
Z
5 [AT/TL]
5 [AT/TL]
X
X
Z
Z
6 [AT/TL]
206 [AT/TL]
6 [AT/TL]
206 [AT/TL]
X
X
8 [AT/TL]
208 [AT/TL]
• Combination 2 Read:
• Combination 3 Read:
• Combination 1 Reset:
• Combination 2 Reset:
• Combination 3 Reset:
FINANCIAL REPORTS
• Financial Read:
• Financial Reset:
• All store All Cashier Read:
• All store All Cashier Reset:
CASHIER REPORTS
(for the Non-Floating Cashier feature only)
• Indiv. Terminal All Cashier Read:
Daily
GT
• Indiv. Terminal All Cashier Reset:
Daily
GT
SALESPERSON REPORTS (Daily only)
• All-store All Salesperson Read
• All-store All Salesperson Reset
CREDIT CARD COMPANY SALES
REPORTS
• Credit Card Company Sales Read: Daily
GT
• Credit Card Company Sales Reset: Daily
GT
DEPARTMENT GROUP REPORTS
(Read only)
• Department Group Read:
Daily
GT
(to be continued on next page)
4- 4
4. READ AND RESET REPORTS
EO1-11152
4.2 In-Line Reports
TABLE OF IN-LINE REPORT OPERATIONS (continued)
RTR Declaration: ON
Mode
Lock
Report Name
MEDIA SALES AND IN-DRAWER READ
(Daily only)
HOURLY RANGE REPORTS
• Hourly Read (Daily only)
• Hourly Reset (Daily only)
DEPARTMENT REPORTS
• All Department Read:
Daily
GT
• All Department Reset:
Daily
GT
• Indiv. Department Read:
Daily
Key Operation
X
9 [AT/TL]
X
Z
10 [AT/TL]
10 [AT/TL]
X
X
Z
Z
X
11 [AT/TL]
211 [AT/TL]
11 [AT/TL]
211 [AT/TL]
(Process Reports; NOTE on the next page)
11 [#] → [DEPT] (or |Code| [DP#]) → ([ST])
Repeat for required departments.
GT
ALL MEDIA SALES TOTAL AND CASH-INDRAWER READ (Daily only)
PLU REPORTS (Reports marked with “*” are
unavailable for the system with the feature
“PLU to be inquired to the Center File.”)
• All PLU Read:
Daily
GT*
• All PLU Reset:
Daily
GT*
• Zone PLU Read:
Daily
• Zone PLU Reset:
• Individual PLU Read:
X
[AT/TL] (to end)
Start with 211 instead of 11 in the above pattern.
X
12 [AT/TL]
X
X
Z
Z
X
13 [AT/TL]
213 [AT/TL]
13 [AT/TL]
213 [AT/TL]
13 [#] → |Zone-start PLU Code|
[@/FOR] → |Zone-end PLU Code| [AT/TL]
Start with 213 instead of 13 in the above pattern.
13 [#] → |Zone-start PLU Code|
[@/FOR] → |Zone-end PLU Code| [AT/TL]
Start with 213 instead of 13 in the above pattern.
(Process Reports; NOTE on the next page)
13 [#] → |PLU Code| [PLU] → ([ST]) [AT/TL]
GT*
Daily
X
Z
GT*
Z
Daily
X
Repeat for required PLUs.
• Inactive PLU Read:
PLU GROUP REPORTS
• PLU Group Read:
• PLU Group Reset:
GT*
X
Daily
GT*
X
X
Start with 213 instead of 13 in the above pattern.
(Process Reports; NOTE on the next page)
13 [#] → 0 [AT/TL]
Start with 213 instead of 13 in the above pattern.
Daily
GT
Daily
GT
X
X
Z
Z
24 [AT/TL]
224 [AT/TL]
24 [AT/TL]
224 [AT/TL]
(to be continued on next page)
4- 5
4. READ AND RESET REPORTS
EO1-11152
4.2 In-Line Reports
TABLE OF IN-LINE REPORT OPERATIONS (continued)
RTR Declaration: ON
Report Name
CUSTOMER FILE READ
(for Check Track Memory type only)
• All Files Read
• All Files Reset
• Zone Files Read
• Zone Files Reset
• Individual File Read
• Zero-balance Files Read
• Credit-balance Files Read
• Debit-balance Files Read
NOTE:
Mode
Lock
Key Operation
15 [AT/TL]
X
Z
X
Z
X
X
X
X
15 [#] → |Zone-start File Code|
[@/FOR] |Zone-end File Code| [AT/TL]
15 [#] → |File Code| [@/FOR] → [AT/TL]
15 [#] → 0 [AT/TL]
15 [#] → 1 [AT/TL]
15 [#] → 2 [AT/TL]
When the “Process Report” is marked, the report can only be taken after taking another report which
consolidates the corresponding data to be based on. For further details, see the table and descriptions
below.
PROCESS REPORTS AND BASE REPORT DATA
The following table shows which process reports are available after which report data collections.
Reports Collection Required before Process
Report takings
(CONSOLIDATION MEMORY CAPTURE: NOTE 1)
All Department Read Daily
or
All Department Reset Daily
All Department Read GT
or
All Department Reset GT
Any of the following PLU reports (NOTE 2)
All PLU Read Daily
Zone PLU Read Daily
All PLU Reset Daily
Zone PLU Reset Daily
Any of the following PLU reports (NOTE 2)
Process Reports available
Individual Department Read Daily
Individual Department Read GT
Individual PLU Read Daily
Inactive PLU Read Daily
Individual PLU Read GT
Inactive PLU Read GT
All PLU Read GT
Zone PLU Read GT
All PLU Reset GT
Zone PLU Reset GT
NOTES:
1. CONSOLIDATION MEMORY CAPTURE: When an in-line read or reset report is taken on the
Master Terminal, the consolidated data is automatically stored in the Consolidation Memory of the
Master Terminal. The consolidated data stored there is not only used as the data for a Process
Report but also sent to the PC by a command from the PC when a PC is connected.
2. The process reports will be outputted based on the report data previously collected. For example,
when an “Inactive PLU Read” report is taken after a “Zone PLU Read”, only the inactive PLUs in
the designated zone will be printed on the Inactive Read Report. (Only when the PLU is in a local
file, a process report is printed. In this case, collection of data is required beforehand.)
4- 6
4. READ AND RESET REPORTS
EO1-11152
4.2 In-Line Reports
3. When individual department reading (daily/GT) is performed, press the [OPEN] key before
performing all department reading (daily/GT). Then, only the consolidated data is created to output
the process report.
4.2.2
In-Line Report Print Format
IN-LINE REPORT TYPE
An in-line report can be classified into the following five types.
1. Collects data from each terminal to print a consolidation result:
All Salesperson, Credit Card Company Sales, Department Group, Hourly Range, All Department, All/Zone
PLU (Local File), and PLU Group Reports
2. Collects data from each terminal to print a collection result per terminal:
Indiv. Terminal All Cashier Report (Non-floating Cashier)
3. Collects data from each terminal to print a collection result per terminal and then print the consolidation result:
Financial, Media Sales & In-drawer and All Media Sales Total & Cash-in-drawer Reports
4. Creates a process data using consolidated data and prints a report:
Indiv. Department, Indiv. PLU, and Inactive PLU Reports
5. Prints data in the center file possessed by the master terminal:
Indiv./All Cashier (Floating Cashier), All/Zone/Indiv./Inactive PLU (Center File), and All/Indiv./Inactive/
Debit/Credit Customer File Reports
The print format of each report is basically the same as the format of the corresponding standalone terminal
report except that some indications are additionally printed as in-line operation job IDs. The following is print
format example of the in-line report type 1 described above.
TEC STORE
1343 PEACH DRIVE
PHONE: 87-6437
Open 8:00am to 7:00pm
Closed: every Wednesday
08-31-2003 SUN
#3001
∗∗∗∗∗∗∗∗∗∗∗∗∗∗∗∗∗∗∗∗∗∗∗∗∗∗∗∗∗∗∗∗
RTR Symbol
Report Name (When designating a zone, a zone range is printed.)
For print items, refer to the similar report described in the Standalone section.
#111101
#222202
0001Z
0001Z
Register No., Reset Count (on Reset Report only)
#999909 0001Z
∗∗∗∗∗∗∗∗∗∗∗∗∗∗∗∗∗∗∗∗∗∗∗∗∗∗∗∗∗∗∗∗
#555505 XXXX
#666606 XXXX
JONES
0147 19:27TM
RTR Symbol
Un finished register No. and status
?:
No response
BUSY: The terminal is busy
Blank: Other statuses
NO_D: No consolidation data exists.
NO_A: Discord of consolidation data
Consecutive No., Current Time
4- 7
Only for the CVS spec.
4. READ AND RESET REPORTS
EO1-11152
4.2 In-Line Reports
JOURNAL INDICATIONS ON INDIVIDUAL TERMINALS (when report data is collected)
∗ X 03
15:40TM ∗
Read Report Collection Indication
Time of data collection
Report ID No. (X is replaced by Z on reset reports.)
Reset Report Collection Indication
∗ Z 03
= Z 03
15:40TM ∗
15:40TM =
Time of Clear Command receiving
JOURNAL INDICATIONS FOR A SYSTEM WITH THE CVS SPEC. SELECTED
The following journal prints indicate that data in each table has copied into the communication buffer.
(1) Copy of daily read data has completed.
& X 03
15:40TM &
Time of copy completion
Report ID No.
(2) Copy of daily reset data has completed.
& Z 03
! Z 03
15:40TM &
15:40TM !
Clear of the table has completed
Time of copy completion and clear completion
Report ID No.
(3) Copy of GT read data has completed.
& X203
15:40TM &
Time of copy completion
Report ID No.
(4) Copy of GT reset data has completed.
& Z203
! Z203
15:40TM &
15:40TM !
Clear of the table has completed
Time of copy completion and clear completion
Report ID No.
4- 8
4. READ AND RESET REPORTS
EO1-11152
4.3 Operations After In-Line Report Takings
4.3
Operations After In-Line Report Takings
The following operations are available after taking in-line reports.
CONSOLIDATED REPORT DATA READ (REPRINT)
This operation issues the report data which is remaining in the Consolidation Memory of the Master Terminal.
OPERATION ON MASTER TERMINAL:
90 [AT/TL]
Mode Lock: X/RTR Declaration: ON
When no consolidated data are remaining in the memory, this read operation is unavailable.
ENFORCED CLEAR OF HOLD CONDITION (on Individual Terminals)
This can be operated when the HOLD condition on a terminal can by no means be cleared because the terminal
cannot receive a Clear Command from the Master Terminal for some reason (the Master Terminal becomes
down, etc. before completion of the reset report data collection).
OPERATION ON ANY TERMINAL IN HOLD CONDITION:
9999 [AT/TL]
Mode Lock: Z
On operating this, the HOLD condition is cleared, and allowing any key-in operations. However, this operation is
regarded as an emergent measure to cope with such a trouble as the Master Terminal becomes down, etc. and
thus no other solutions can be chosen, because the sales data memory of those reports can no longer be
collected by the Master Terminal.
4- 9
5. PROGRAMMING OPERATIONS
EO1-11152
5.1 Programming Operations Common with Standalone ECR Level
5.
PROGRAMMING OPERATIONS
The system should be programmed fully by your local TOSHIBA TEC representative at the time of delivery
according to the user’s requirements so that daily operations can immediately start. However, some data must be
added or changed daily or in a longer period. Since the volume of programming contents for the system is too
large, this chapter and the following two chapters are provided as guide lines of the user’s daily programming and
maintenance operations. If there are any unclear points or program data other than listed here must be changed
or added, please contact your TOSHIBA TEC representative. Please also note that some programming
operations introduced in the Standalone Level are modified or not available on in-line terminals.
5.1 Programming Operations Common with Standalone ECR Level
The following is the table of programming operations which are introduced in the Manager’s Guide for the
Standalone Level and can be operated on in-line terminals as well, with the Submode No. and operation
sequence unchanged. However, on in-line terminals, these are usually operated on the Master Terminal only
and down-line-loaded (DLLed) to all the Satellite Terminals. Therefore, if any program data is changed, a DLL is
further necessary to load the new data (after the change) to all the Satellite Terminals (to be described in Chapter
6).
PROGRAMMING JOB LIST
*1
Master : Programming job to be available when the [RTR] key is activated on the Master Terminal
*2
Satellite : Programming job to be available on the Backup Master Terminal and the Satellite Terminal when the
[RTR] key is off on the Master Terminal
Submode
No.
1
2
3
4
5
6
8
15
20
25
26
27
31
35
40
No
Submode
Programming Job
Store Name Message, Commercial Message, and Footer Logo Message
Programming
Cashier Code and Name Programming
Department Table Programming
PLU Table Programming
Time Setting or Adjustment
Date Setting or Adjustment
Amount Limit Setting for Function Keys
Customer File Code (Check Track No.) and Name Programming
Salesperson Code and Name Programming
Link PLU Table Programming
Tare Table and General Unit Weight Setting
PLU Preset-code Key Setting
Display Message Programming
Negative Amount Key Limit Amount Setting
PLU Price Dollar Discount/Extra Charge Amount Setting
Department Preset Price Setting or Changing
PLU Preset Price Setting or Changing,
Whole Package Quantity Changing
%+ and %- Preset Rate Setting
Preset Rate Setting for Selective Itemizers
Foreign Currency Exchange Rate Setting
Tax Table Programming
Store/Register No. Setting
5- 1
O: Available
Terminals
*1
*2
Satellite
Master
O
O
O
O
O
O
O
O
O
O
O
O
O
O
O
O
O
O
O
O
O
O
O
O
O
O
O
O
O
O
O
5. PROGRAMMING OPERATIONS
EO1-11152
5.2 Programming Operations Added for In-line Terminals
5.2 Programming Operations Added for In-line Terminals
5.2.1 Terminal Connection Table Setting (Submode 69)
This submode is required for In-line services. The In-line ID No., Register No. and IP Address of each terminal
(including the Master Terminal) can be programmed here.
CONDITION
Any time outside a sale
OPERATION
Mode Lock: SET and IN-LINE Lamp illuminated
69 [@/FOR]
|In-line ID No.| [ST]
2 digits (01 to 16)
(NOTES 1 & 2 below)
|Store/Register No.| [#]
Max. 6 digits
0 to 999999
(NOTE 2 below)
*
|IP Address| [#]
12 digits
(NOTE 3 below)
Repeat for other terminals to be connected, including the Master Terminal itself. (Max. 16 terminals)
NOTES:
1.
2.
3.
4.
6.
* For sequentially
programming Inline ID Nos, the Inline ID specification
can be skipped.
In-line ID No.:
Master Terminal ... 01 (fixed)
Backup Master Terminal (if connected) ... 02 (fixed)
Satellite Terminals ... 03 to 16 (max. 14 terminals)
The In-line ID No. and Register No. of each terminal to be set here must be the same as those
programmed for the terminal in IN-LINE TERMINAL ID SETTING (Submode 77) in this chapter
and STORE/REGISTER NO. SETTING (no submode) in Chapter 6 of the Programming Manual
for stand-alone level.
IP Address: 12 digits (000.. 000 to 255.. 255)
ex) To set the IP Address 192.168.0.252……….Enter 192168000252
To delete an individual terminal from the Terminal Connection Table, enter 0 in place of the Inline ID No., then enter Register No..
69 [@/FOR]
5.
[AT/TL]
0 [ST]
|Store/Register No.| [#]
[AT/TL]
To delete the entire Terminal Connection Table once set, operate:
69 [@/FOR]
0 [AT/TL]
If a deleting operation (individual or entire deletion) is performed, the files occupied by the
deleted terminal(s) (such as Floating Cashier File, etc.) is canceled. Therefore, a deleting
operation should be performed only when the system is to be re-built or a terminal is to be
detached from the system.
Example)
To set Master Terminal and Satellite Terminal in the Connection
Table (total of two terminals in the in-line system):
Master Terminal
In-line ID No. 1
Register No. 111101
Satellite Terminal
In-line ID No. 3
Register No. 333303
IP Address 192.168.0.251
IP Address 192.168.0.253
Key Operation:
Mode Lock SET and IN-LINE Lamp illuminated,
enter 69, depress [@/FOR].
01 [ST]
(Master In-line ID No.)
111101 [#]
(Master Register No.)
192168000251 [#]
(Master IP Address)
03 [ST]
(Satellite In-line ID No.)
333303 [#]
(Satellite Register No.)
192168000253 [#]
(Satellite IP Address)
[AT/TL]
(Complete this Submode)
TEC STORE
1343 PEACH DRIVE
PHONE: 87-6437
Open 8:00am to 7:00pm
Closed: every Wednesday
08-31-2003 SUN
#01
#03
5- 2
#3001
P69
#111101 192.168. 0.251
#333303 192.168. 0.253
0025 19:37TM
5. PROGRAMMING OPERATIONS
EO1-11152
5.2 Programming Operations Added for In-line Terminals
5.2.2 In-line ID and LAN Network Setting (Submode 77)
This submode is available for in-line terminals (including the master and backup master terminals). It must be
operated separately on each terminal since the In-line ID should vary from terminal to terminal. The data sent in
this submode is used as the in-line address of the terminal for in-line service operations.
CONDITION
Any time outside a sale for Master or Satellite
OPERATION
Mode Lock: SET and IN-LINE Lamp illuminated
77 [@/FOR]
1 [ST]
| In-line ID | [#]
Assign No. of 01 to 16
01: Master Terminal
02: Backup Master
03 to 16: Satellite Terminals
2 [ST]
| Network Status | [#]
Enter a maximum of eight-digit number
composed of Bit Nos whose status must be
selected to the “SET” status in the Network
Status Table. (NOTE 1 on the next page)
3 [ST]
| IP Address | [#]
12 digits
(NOTE 2 on the next page)
4 [ST]
| IP Address of Master Terminal | [#]
12 digits
(NOTE 2 on the next page)
5 [ST]
| Subnet Mask | [#]
12 digits
(NOTE 2 on the next page)
6 [ST]
| Default Gateway | [#]
12 digits
(NOTE 2 on the next page)
[AT/TL]
5- 3
5. PROGRAMMING OPERATIONS
EO1-11152
5.2 Programming Operations Added for In-line Terminals
NOTES:
1. Network Status Table
Code
Item
0
No Status
1
2
3
4
5
Default Gateway
6
Subnet Mask auto-setting
7
8
Set
Reset
Used
Ineffective
Not used
Effective
In the above table, only Code 5 and Code 6 can be set.
Code 5: This code should be set before performing Default Gateway setting (6 [ST]).
Code 6: When this code is set, the Subnet Mask setting (5 [ST]) will be effective.
When this code is reset, the Subnet Mask auto-setting will be performed as follows.
IP Address first section value
Subnet Mask
0 to 127
255. 0. 0.0
128 to 191
255.255. 0.0
192 to 223
255.255.255.0
2. Self IP Address, IP Address of Master terminal, Subnet Mask, and Default Gateway are
programmed with 12-digit value (000..000 to 255..254), respectively.
Example) To program “192.168.0.250”, enter 192168000250.
Initial setting values of the Self IP Address and the Default Gateway are as shown below.
Self IP Address:
192.168.0.254
Default Gateway:
192.168.0.1
3. Never assign the same In-line ID to terminals on the same In-line system.
Example) To assign Terminal ID No. 4 to the Terminal used as the Satellite Terminal of the in-line system:
In-line ID No.:
04
Network Status:
No Status
IP Address:
192.168.0.200
IP Address of Master Terminal:
192.168.0.250
Subnet Mask:
255.255.255.0 (Default)
Default Gateway:
192.168.0.1 (Default)
TEC STORE
1343 PEACH DRIVE
PHONE: 87-6437
Mode Lock SET and IN-LINE Lamp illuminated,
enter 77, depress [@/FOR].
1 [ST] 04 [#]
(In-line ID No.)
2 [ST] 0 [#]
(Network Status)
3 [ST] 192168000200 [#]
(IP Address)
4 [ST] 192168000250 [#]
(Master IP Address)
[AT/TL]
(Complete this Submode)
Key Operation:
Open 8:00am to 7:00pm
Closed: every Wednesday
08-31-2003 SUN
#3001
P77
#1
#2
#3
#4
192.168.
192.168.
04
0
0.200
0.250
0026 19:38TM
5- 4
5. PROGRAMMING OPERATIONS
EO1-11152
5.3 Verification of Programmed Data
5.3 Verification of Programmed Data
The programmed data can be read for verification purposes.
CONDITION
Any time outside a sale (Sign OFF required under Cashier Signing Method)
OPERATION
Mode Lock: X or SET with IN-LINE Lamp Illuminated or extinguished.
(Operable on any type of Terminal (Master, Backup Master, Satellites))
1xx
[AT/TL]
Submode No. at programming
69: Terminal Connection Table Setting
77:
In-line ID and LAN Network Setting
NOTE:
Verifications listed in the stand-alone level are also available on all the terminals of the in-line system.
5- 5
6. DLL (Down-Line-Loading) OPERATIONS
EO1-11152
6. DLL (Down-Line-Loading) OPERATIONS
6. DLL (Down-Line-Loading) OPERATIONS
In an in-line system (Master-Satellite system), most programming data are set on the Master Terminal and downline-loaded (DLL) to Satellite Terminals. The DLL operations introduced in this chapter are pure DLLs, i.e. merely
loading the data programmed in the Master Terminal to Satellite Terminals. DLLs automatically performed with
programmed data changes are introduced in the next chapter (Chapter 7). If any other DLLs not introduced in
this and next chapters are required, ask your TOSHIBA TEC representative. Please also note that TERMINAL
DESIGNATION (see Chapter 2) can be operated prior to a specific DLL operation, to designate Satellite
Terminals that receive the DLL.
DLL JOB LIST
Submode
No.
501
502
503
504
505
508
520
525
526
527
531
535
540
569
500
NOTE:
DLL Job
Store Name Message, Commercial Message, and Footer Logo Message
Programming
Cashier Code and Name Programming
Department Table Programming
PLU Table Programming
Time/Date Setting
Amount Limit Setting for Function Keys
Salesperson Code and Name Programming
Link PLU Table Programming
Tare Table and General Unit Weight Setting
PLU Preset-code Key Setting
Display Message Programming
Negative Amount Key Limit Amount Setting
PLU Price Dollar Discount/Extra Charge Amount Setting
Terminal Connection Table Setting
%+ and %- Preset Rate Setting
Preset Rate Setting for Selective Itemizers
Foreign Currency Exchange Rate Setting
Tax Table Programming
DLL is possible only when the non-floating cashier feature is used.
6- 1
Remarks
NOTE below
6. DLL (Down-Line-Loading) OPERATIONS
EO1-11152
6. DLL (Down-Line-Loading) OPERATIONS
CONDITION
Terminals including the Master: Any time outside a sale (NOTE 1 below)
(Sign-OFF condition is not necessary required for the Code Entry Method)
OPERATION
Satellite Terminals:
Master Terminal:
|5XX|
[AT/TL]
Any position if the power is ON
Mode Lock: SET
RTR Declaration: ON
Submode No.
PRINT FORMAT OF DLL OPERATIONS
Master Terminal Receipt
Satellite Terminals Journal
TEC STORE
1343 PEACH DRIVE
PHONE: 87-6437
∗ P5XX
18:02TM ∗
Open 8:00am to 7:00pm
Closed: every Wednesday
Time of receiving the DLL
08-31-2003 SUN
#3001
∗∗∗∗∗∗∗∗∗∗∗∗∗∗∗∗∗∗∗∗∗∗∗∗∗∗∗∗∗∗∗∗
P5XX
∗∗∗∗∗∗∗∗∗∗∗∗∗∗∗∗∗∗∗∗∗∗∗∗∗∗∗∗∗∗∗∗
#111101 XXXX
#222202 XXXX
#999909
XXXX
5xx = Submode No. of the
specific DLL operation
Un finished register No. and status
?:
No response
BUSY: The terminal is busy
Blank: Other statuses
0011 14:16TM
NOTES: 1. As for a system with the CVS spec. selected, DLL is unavailable when the Satellite Terminals
perform sales data copy into the communication buffers.
2. For the Satellite Terminals being received the DLL data, the item entry is prohibited. (HOLD status)
6- 2
7. DEPARTMENT AND PLU MAINTENANCE
EO1-11152
7. DEPARTMENT AND PLU MAINTENANCE
7. DEPARTMENT AND PLU MAINTENANCE
In this chapter, adding, changing, or deleting operations related to Department Table and PLU Table program
data are described. These are operated on the Master Terminal only.
• For a system with the feature “PLU not to be inquired” selected
All of these operations are immediately loaded into Satellite Terminals.
• For a system with the feature “PLU to be inquired” selected
PLU program data are immediately programmed in the center file of the Master Terminal, and Department
Table data are immediately loaded into Satellite Terminals.
TABLE OF DEPARTMENT AND PLU MAINTENANCE OPERATIONS
Mode
Submode page
PLU TABLE ADDITION/CHANGE/DELETION WITH DLL............................... SET/RTR ....... 63 ........... 7-2
DEPARTMENT PRESET PRICE SETTING OR CHANGING WITH DLL........ SET/RTR ....... 72 ........... 7-3
PLU PRICE CHANGE WITH DLL .................................................................... SET/RTR ....... 73 ........... 7-4
7- 1
7. DEPARTMENT AND PLU MAINTENANCE
EO1-11152
7.1 PLU Table Addition/Change/Deletion with DLL
7.1 PLU Table Addition/Change/Deletion with DLL
• For a system with the feature “PLU not to be inquired” selected:
The data entered on the Master Terminal is immediately loaded into the Satellite Terminals, item by item.
• For a system with the feature “PLU to be inquired” selected:
The data entered on the Master Terminal is immediately programmed in the center file owned by the Master Terminal
itself.
All the terminals: After PLU daily and GT Resets (when the feature “PLU not be inquired” is selected)
CONDITION
Master Terminal: Any time outside a sale (when the feature “PLU to be inquired” is selected)
Mode Lock: SET and IN-LINE Lamp Illuminated
OPERATION
Barcode Scanning
|Address Numbers| [#]
63 [@/FOR]
|PLU Code|
[PLU]
for sequential-coded item only
Address 1: Link Department
|Department Code| [#]
1 [ST]
(1 to 99)
Address 2: PLU Name
2 [ST]
Character Entries
[ST]
Max. 16 characters
Address 3: Preset Price
3 [ST]
Repeat for
other PLUs.
|Price| [#]
(Max. 6 digits)
Address 4: Status Code 1
4 [ST]
|Status Codes to ON| [#]
Address 5: Status Code 2
5 [ST]
|Status Codes to ON| [#]
Address 6: Tax Status
6 [ST]
|Status Codes| [#]
(Max. 4 digits)
Repeat for
any address
within the
same PLU by
re-entry for
correction.
Address 7: Unit Price of Individual Split Package
7 [ST]
|Unit Price| [#]
(Max. 6 digits)
Address 8: Whole Package Quantity
8 [ST]
|Whole Package Quantity| [#]
(Max. 2 digits)
Address 9: PLU Group No.
9 [ST]
|PLU Group No.| [#]
(1 to 99; 0 to reset)
Address 10: Link-PLU Table No.
10 [ST]
|Link-PLU Table No.| [#]
(1 to 99; 0 to reset)
Address 11: Tare Table No.
11 [ST]
|Tare Table No.| [#]
(1 to 9; 0 to reset)
Address 12: Unit Weight Code
12 [ST]
|Unit Weight Code| [#]
(1 to 11; 0 to reset)
Address 13: Mix & Match Group No.
13 [ST]
|Mix & Match Group No.| [#]
(1 to 255; 0 to reset)
Address 14: Tare 2 Rate
14 [ST]
|Tare 2 Rate| [#]
(0.01 to 99.99%; 0 to reset)
Address 15: Dollar Discount/Extra Charge Code
15 [ST]
|Dollar Discount/Extra Charge Code| [#]
(1 to 99; 0 to reset)
[AT/TL]
(To complete this submode.)
Operation procedure surrounded by this line is the same as the operation in Submode 4.
7- 2
7. DEPARTMENT AND PLU MAINTENANCE
EO1-11152
7.2 Department Preset Price Setting or Changing with DLL (Submode 72)
Deletion
CONDITION
The sales data of the required PLUs are zero and all terminals are outside a sale,
programming, or report taking operations. (when the feature “PLU not to be inquired”
is selected.)
The sale data of the required PLUs are zero and any time outside a sale for Master.
(when the feature “PLU to be inquired” is selected)
OPERATION
Mode Lock: SET and IN-LINE Lamp illuminated
63 [@/FOR]
[ITEM CORR]
| PLU code | [PLU]
[ST]
[AT/TL]
Repeatable for other PLUs to be deleted.
NOTES:
1. Up to 100 PLUs can be added/changed/deleted once.
2. The DLL is possible while a sales transaction is being performed in the Satellite Terminal.
7.2 Department Preset Price Setting or Changing with DLL (Submode 72)
This submode is used to newly set or change a preset price to required departments, and loads the price data
into Satellite Terminals.
CONDITION
Any time outside a sale
OPERATION
Mode Lock: SET and IN-LINE Lamp illuminated
| New Preset Price | [DEPT]
Max. 6 digits; 0 to 999999 (Department Preset Code Key)
(result: $0.00 to $9999.99)
72 [@/FOR]
[AT/TL]
| Dept. Code | [DP#]
| New Preset Price | [#]
Max. 2 digits; 1 to 99
Max. 6 digits; 0 to 999999
(result: $0.00 to $9999.99)
*
Repeatable for other departments
NOTES:
* For sequentially programming the department,
the Dept Code specification can be skipped.
1. When the [AT/TL] key is depressed in the above operation, it sends a DLL-start command to the
designated terminals, makes the terminals HOLD condition, and executes DLL. After DLL is
completed, it sends a DLL-end command to each terminal and releases the HOLD condition.
2. When zero is entered as the New Preset Price value, the department is set with a zero price.
When the new Preset Price entry is skipped and the [DEPT] or [#] is simply depressed, it will be
an open-price department.
7- 3
7. DEPARTMENT AND PLU MAINTENANCE
EO1-11152
7.3 PLU Price Changing with DLL (Submode 73)
7.3 PLU Price Changing with DLL (Submode 73)
This submode is used to change prices of PLUs existent in the PLU Table files, and into immediately load the
data into Satellite Terminals.
CONDITION
Any time outside a sale for Master or Satellite.
(only when the feature “PLU not to be inquired” is selected)
OPERATION
Mode Lock: SET and IN-LINE Lamp illuminated
73 [@/FOR]
Barcode Scanning
Can be skipped (for non-split Pricing type
or when Whole Package Quantity is 1.)
| PLU code | [PLU]
| New Whole Package Quantity | [ST]
Max. 2 digits; 0 to 99
Repeatable from here for
sequentially programming
PLU codes.
| New Preset Price |
[#]
[AT/TL]
Max. 6 digits; 0 to 999999
(result: $0.00 to $9999.99)
to make open-price PLU
Repeat for other PLUs
NOTES:
1.
2.
3.
When the [AT/TL] key is depressed in the above operation, it sends a DLL-start command to the
designated terminals.
A maximum of 100 PLUs’ prices can be changed in one operation sequence of this submode.
When zero is entered as the New Preset Price value, the PLU is set with a zero price. When the
New Preset Price entry is skipped and the [#] is simply depressed, it will be an open-price PLU.
7- 4
8. INQUIRIES
EO1-11152
8.1 PLU Inquiries
8. INQUIRIES
This chapter describes various inquiries made from each terminal to the Master Terminal and affect data (sales
data updating).
8.1 PLU Inquiries
When the feature “PLUs to be inquired” is selected and a PLU is entered in a sale (entered manually or through a
barcode) on each terminal, the terminal inquires the PLU to the Master Terminal. The inquired Master Terminal
searches the PLU code in the PLU Main Table and the PLU Additional Table.
When the PLU exists, the Master Terminal responds the price, name, and other required data to the inquiring
terminal.
When the applicable PLU code does not exist in the Master Terminal, the message “CODE ERROR” (standard
program; programmable) is displayed on the inquiring terminal.
PLU URGENT MAINTENANCE
When the inquired PLU code does not exist in the Master Terminal, the PLU can be programmed into the Master
Terminal (and the Backup Master Terminal) along with its sale entry on the terminal by entering the linked
Department and the price. The PLU thus entered is temporarily programmed in the PLU Additional Table.
AFFECT
When a PLU entry is determined on a terminal, the terminal sends an AFFECT text to the Master Terminal (and
Backup Master Terminal), and updates the sales data of the Master Terminal (and Backup Master Terminal).
NOTE: When the PLU Urgent Maintenance is not possible resulting from the PLU Additional File is full, the
error message “PROGRAM ERROR” (standard program; programmable) is displayed on the inquiring
terminal.
8.2 Customer File (Check Track) Inquiries
When the feature “Customer File (Check Track)” (instead of PB Manual Entry) is selected and a PICK UP
BALANCE (by [PICK UP BAL]) is entered on a terminal, the terminal inquires the entered Customer File Code to
the Master Terminal. The inquired Master Terminal searches the Customer File Code in the Customer File Table.
When the Customer File Code exists, the Master Terminal responds the name and the previous balance of the
Customer File to the inquiring terminal.
NEW CUSTOMER FILE INQUIRIES
When a NEW CUSTOMER FILE (by [CODE OPEN] key) is entered on a terminal, the terminal inquires the new
Customer File code entered to the Master Terminal. The Master Terminal confirms that the inquired Customer
File code does not exist, then adds it to the Customer File table, and responds to the inquiring terminal that the
code has been additionally set. (If a Backup Master is connected, the code inquiry to and additional setting in the
Backup Master Terminal occur at the same time.)
AFFECT
When a Customer File entry is determined on a terminal, the terminal sends an AFFECT text to the Master
Terminal (and Backup Master Terminal), and updates the sales data of the Master Terminal (and Backup Master
Terminal).
NOTES:
1. When the applicable file code does not exist on a Customer File Code inquiry (by [PICK UP BAL]) or when
the applicable file code exists on a New Customer File Code inquiry (by [CODE OPEN]), the message “CODE
ERROR” (standard program; programmable) is displayed on the inquiring terminal.
2. When the addition of new customer file code is not possible resulting from the Customer File is full, the error
message “PROGRAM ERROR” (standard program; programmable) is displayed on the inquiring terminal.
8- 1
8. INQUIRIES
EO1-11152
8.3 Credit Card No. Inquiries to the Negative Check File
8.3 Credit Card No. Inquiries to the Negative Check File
When the “Negative Card Check” feature is selected by program option, each terminal inquires to the Master
Terminal whether the entered Credit Card No. is acceptable or not. The Master Terminal, thus inquired,
searches the Card No. in the Negative Card File.
When the applicable Card No. exists in the Negative Card File, the Master Terminal responds to the inquiring
terminal the response message “CALL MANAGER” (standard program; programmable) displayed in the Dotdisplay Windows with the Error Status Code (programmable) in the 7-segment Windows on the inquiring terminal
to indicate that the Card No. is not acceptable.
8.4 Cashier Occupy Inquiries
When the “Floating Cashier” feature is selected and a Cashier Code is entered on a terminal, the terminal
inquires the cashier code corresponding to cashier code entered to the Master Terminal. The Master Terminal
searches the Cashier Table of the Cashier No. in the Cashier File.
When the the Cashier No. exists and its table is not occupied by any other terminal, the Master Terminal makes
the cashier in the occupied status and sends the cashier table to the inquiring terminal.
When the Cashier No. does not exist in the Master Terminal’s Cashier File, the Master Terminal responds the
message “CODE ERROR” (standard program; programmable) to the inquiring terminal. When the Cashier Table
is occupied by another terminal, the message “OCCUPY” (standard program; programmable) is responded
instead.
AFFECT
When a sale entry is determined (i.e. finalized) on a terminal, the terminal sends AFFECT text to the Master
Terminal (and Backup Master Terminal) and updates the sales data (in the Cashier Table) of the Master Terminal
(and Backup Master Terminal).
CASHIER CANCEL INQUIRES (OCCUPY CANCEL)
When a Sign-OFF is operated on a terminal, the terminal inquires a CASHIER CANCEL to the Master Terminal.
The Master Terminal cancels the occupied status of the applicable cashier.
8- 2
9. BACKUP FUNCTION
EO1-11152
9. BACKUP FUNCTION
9. BACKUP FUNCTION
(ONLY WHEN THE BACKUP MASTER IS CONNECTED)
(1) Function
• By connecting the Backup Master Terminal, the various files stored in the Master Terminal can be backed
up.
• The terminal assigned to ID No. 2 will function as a Backup Master Terminal. By programming ID No. 2 in
the terminal connection table and downloading this data to each terminal, the system will function as a
system in which the Backup Master Terminal is connected.
• By changing terminal ID from 2 to 1, the Backup Master Terminal will function as the Master Terminal.
< Files to be Backed Up >
PLU Main Table
(When the PLU inquiry function is used)
PLU Additional Table
(When the PLU inquiry function is used)
Link PLU Table
(When the PLU inquiry function is used)
Cashier Table
(When the floating cashier system is used)
Customer File (Check Track) Table
Negative Card Table
Program data
Sales data
Program data
Sales data
Program data
Program data
Sales data
Program data
Sales data
Program data
NOTES: 1. Data capture (DC) transaction files are not backed up.
2. The tables (center files) managed by the Master Terminal and used by each terminal via inquiries
and PC transmission information tables are backed up.
•
Sales data is backed up on a real-time basis.
When sales data of the Master Terminal is updated, sales data of the Backup Master Terminal is updated
at the same time.
•
Backup data check function:
Correspondence between the center files and backup data is checked every certain period of time.
•
Backup data update process:
When an error occurs in backup data, the following processing methods can be selected according to the
program option setting.
(1) Automatic data copy
When the version of the center file stored in the Master Terminal is different from that stored in the
Backup Master Terminal, registration jobs are automatically prohibited, the backup data is properly
exchanged. While updating the backup data, each inquiry from the terminals may result in a
“MASTER IS BUSY” error.
(2) Manual data copy
When the version of the center file stored in the Master Terminal is different from that of data stored in
the Backup Master Terminal, the Master Terminal gives a short beep at the timing of issuing the long
receipt to warn that the data is not backed up properly. The operator should update the backup data
manually.
9- 1
9. BACKUP FUNCTION
EO1-11152
9. BACKUP FUNCTION
(2) Procedure
1) Changing Program Data (DLL from the PC)
DLL Data
PC
Backup Data
M
BM
Response
•
Response
When various center files from the PC are received via DLL, the Master Terminal backs up program data
and sales data of the Backup Master Terminal automatically and sends the result to the PC.
2) Changing Program Data (Operated on the Master Terminal)
Programming
Operation
•
*
*
M
When various center files are being programmed on the Master Terminal, the backup error flag of the
relevant file is turned on. (At this time, backup data is not updated.)
For details about the backup error flag, refer to 5) Backup Error Flag.
For an explanation of the backup data update process, refer to 6) Backup Data Update Process.
3) Updating Sales Data
• For details about updating sales data, refer to the explanation of each of the control functions described in
Chapter 7.
4) Checking Backup Data
Version Request
M
BM
Version Data
•
•
•
The Master Terminal sends the version request command to the Backup Master Terminal every certain
period of time and receives version information about the backup data.
The Master Terminal checks correspondence between the version information received from the Backup
Master Terminal and the center files (stored in the Master). If an abnormality is found, the backup error
flag is turned on.
When a master job is being performed on the Master Terminal ([RTR] key turned on), or a PC job is being
performed backup data is not checked.
5) Backup Error Flag
• When there is any difference between the data stored in the Master Terminal and the backup data stored
in the Backup Master Terminal, the Master Terminal turns on the backup error flag of the file in which a
difference was found.
• There are following five cases when the backup error flag is turned on.
1. The Master Terminal changes the programming of the center files.
2. A version error is found at the backup data check.
3. The backup job fails after the center file has been downloaded from the PC.
4. Updating of the backup data fails after the center files have been reset.
5. Mergence of backup data is not correctly performed by PLU merge operation
(when the feature “PLU to be inquired” is selected).
9- 2
9. BACKUP FUNCTION
EO1-11152
9. BACKUP FUNCTION
•
While the backup error flag is on, the following operation is performed.
1. The Master Terminal gives a short beep at the timing when the long receipt is printed to warn that a
backup error has occurred.
2. The RTR declaration cancel operation results in compulsory manual data copy error. (The error
indication “PLEASE BACK UP” is displayed.)
In this case, the RTR declaration is not canceled until the manual data copy operation is performed.
• There are two timings cases the backup error flag is turned off.
1. The backup data is properly backed up according to the backup data update process.
2. The Backup Master Terminal (ID No. 2) is deleted from the terminal connection table.
6) Backup Data Update Process
(This is a process required when the backup data stored in the Backup Master Terminal is not updated
properly due to an error.)
Backup Data
M
BM
Response
•
*
*
*
*
*
The method processing backup error is selected according to the program option setting. Even if the
automatic data copy operation is selected, data copy can be performed manually.
1. Automatic data copy (program option)
When the backup error flag is on (or turned on), the Master Terminal automatically sends to the Backup
Master Terminal the file in which the error has occurred, and updates the backup data.
2. Manual data copy (program option)
The backup data is updated by the manual operations of the operator.
When the backup data is being updated, inquiries from terminals may result in a “MASTER IS BUSY” error.
When a “MASTER IS BUSY” error occurs, clear the error using the [C] key. Then, update the backup data
again after the master job (backup process) is complete.
Only the files with the backup error flag turned on are sent to the Backup Master Terminal to update the
backup data.
When the master job is being done on the Master Terminal ([RTR] key is turned on), backup data is not
checked or updated.
If the backup error flag is on when the master job is complete on the Master Terminal ([RTR] key is turned
off; the INLINE lamp is off), manual data copy becomes compulsory.
7) Manual Copy of Backup Data
OPERATION ON MASTER TERMINAL:
Mode Lock: Z and IN-LINE Lamp illuminated
900 [AT/TL]
9- 3
10. DATA CAPTURE FUNCTION
EO1-11152
10. DATA CAPTURE FUNCTION
10. DATA CAPTURE FUNCTION
(1) Function
To make it possible to transfer data to the PC, the details of registration jobs performed on each terminal are
pooled in the Master Terminal as transaction data.
(2) Buffering Transaction Data
When a terminal performs the finalize operation, transaction data entered in registrations is sent to the Master
Terminal. The Master Terminal receives the transaction data and pools it in the transaction buffer.
The transaction data is controlled usually in two buffers. One is for buffering transaction data and the other is
for collecting data from the PC. (When one buffer becomes full, or when the collection request is issued from
the PC, the buffer in use is released for the PC, and the other buffer is used for subsequent buffering.)
(3) Collecting Transaction Data
The transaction data stored in the Master Terminal is sent to the PC according to the request from the PC.
If the buffer becomes full when the Master Terminal receives the transaction data request command from the
PC, the transaction data of the full buffer is sent to the PC. If the buffer is not full, the transaction data in the
buffer (the buffer used for buffering) is sent to the PC.
(4) Processing when the Transaction Buffer is Full
When transaction data is received from the terminal (Backup Master, Satellite Terminal), the Master Terminal
checks the vacant area of the transaction buffer. If the received transaction data cannot be stored in the
buffer, the Master Terminal sends to the terminal a response indicating that the buffer is full. The terminal
receiving this response, performs journal printing indicating that the transaction data is missing.
(5) Supplementary
• Only when the transaction data capture function is selected by program option, transaction data can be
sent/received and buffered.
• There is no warning reporting the remaining capacity of the transaction buffer.
• Once the transaction data collection command is issued, data in one buffer is collected. (When data in two
buffers is required, this command should be issued twice.)
10- 1
11. MASTER AND BACKUP MASTER ALTERNATION
EO1-11152
11. MASTER AND BACKUP MASTER ALTERNATION
11. MASTER AND BACKUP MASTER ALTERNATION
The Backup Master Terminal can be changed to be used as the Master Terminal for an accident that the Master
Terminal becomes down, etc. And the Master Terminal can be changed to be used as the Backup Master when
it comes back from repair, etc.
To switch from the Backup Master Terminal function to the Master Terminal function:
1. Disconnect the Master Terminal from the line.
2. When other terminals are in registration operation, finalize and cashier Sign-OFF, or Cashier Key to OFF
operations should be performed.
Since a transmission error occurs at this time, an inquiry job should be completed.
3. Perform the operation below for all the terminals excepting the Backup Master Terminal to be switched.
Mode Lock: SET
9000 [AT/TL]
By this key operation, the new Master Terminal will perform processing below.
• Backup Master Terminal is deleted from the Terminal Connection Table.
• In-line ID No. is changed from 02 to 01 (i.e. from Backup Master to Master).
• Store/Register No. of the old Master Terminal is assigned.
• IP Address of the old Master Terminal is assigned.
4. Assign the [RTR] key to desired key of the new Master Terminal.
5. Download the Terminal Connection Table.
The following files are guaranteed when the recovery process is performed. If a file is used in another terminal
when the Master Terminal goes down, however, data stored in the terminal is not guaranteed.
• Files controlled in the Master Terminal (PLU file, cashier file, etc.)
• PC transmission information
The following files and data are lost when the Master Terminal goes down.
• Transaction file for data capture
• Files controlled locally on the Master Terminal
• Data in the files which are used by other terminals when the Master Terminal goes down.
11- 1
12. TRANSMISSION ERROR
EO1-11152
12.1 Cause of Error
12. TRANSMISSION ERROR
When a terminal makes an inquiry but a communication error occurs for some reason and the inquiry to the other
station is not possible, the message “IRC CONNECT ERR” (standard program; programmable) is displayed on
that terminal and operation is stopped.
When the Master Terminal cannot access the inquiring file because the Master Terminal is receiving DLL data,
the backup data is being updated between the Master and the Backup Master terminals, etc., the message
“MASTER IS BUSY” (standard program; programmable) is displayed and operation is stopped.
12.1
Cause of Error
12.1.1 “IRC CONNECT ERR”
a)
b)
Communication with the other station is not possible due to a connection error (cable cut, Master Terminal’s
Power-OFF, etc.).
Communication was made, but due to a text error, the other station cannot recognize it correctly.
12.1.2 “MASTER IS BUSY”
Cannot access the inquiring file due to the following causes:
a) The Master Terminal is receiving DLL data from the PC.
b) Programming operations are under way on the Master Terminal.
c) Backup data updating process is under way.
d) Read/Reset Report taking operation is under way on the Master Terminal.
(inapplicable to a system with the CVS spec. selected)
e) ULL operations are under way on the Master Terminal.
f)
In a system with the CVS spec. selected, copy of the relevant table into the communication buffer area is
under way on the Master Terminal.
12.2
Error Display
IRC CONNECT ERR
< 16-digit Dot Windows >
I
R
C
C
O
N
N
E
C
T
E
R
0
1
Terminal ID of the
other station
MASTER IS BUSY
< 16-digit Dot Windows >
M
NOTE:
A
S
T
E
R
I
S
B
U
S
Y
The display contents in the 7-segment portion remains the same as before the error occurrence. The
error status will be canceled by the [C] key.
12- 1
12. TRANSMISSION ERROR
EO1-11152
12.3 Error Canceling Process
12.3
Error Canceling Process
There are two error-canceling processes in accordance with the inquiring job contents.
Type 1: Depressing the [C] key will return to the statuses before the inquiry.
Applicable Jobs:
• PLU Inquiry
• PLU Urgent Maintenance
• Customer File (Check Track) Inquiry
• Credit Card No. Inquiry to the Negative Check File
• Cashier Occupy Inquiry
Type 2: Depressing the [C] key will cancel the error status, displays the following message, and waits for
RETRY or CANCEL.
Applicable Jobs:
• PLU Affect
• Customer File Affect
• Cashier Affect
• Cashier Cancel Inquiry
• Transaction Data Send
< 16-digit Dot Windows >
R
E
T
R
Y
?
For Retry ................. [AT/TL] (Performs re-sending to the other station.)
For Cancel .............. [@/FOR] → [ST] (Stops the inquiry, printing on journal “ ** X → ST ** “)
NOTE:
The “Cancel” in Type 2 above is for only the case the other station is in trouble which cannot be
recovered by a Retry operation.
12- 2
13. OTHER OPERATIONS RELATING TO IN-LINE SERVICE
EO1-11152
13.1 Time Out
13. OTHER OPERATIONS RELATING TO IN-LINE SERVICE
The followings are other operations relating to in-line service operations.
13.1 Time Out
A Time-Out condition arises when the Master Terminal is making an in-line service operation, such as X/Z report
collection, DLL, etc. to the Satellite Terminals. The service timer is provided for servicing each of the Satellite
Terminals, thus on exceeding the time limit, a Time-Out condition will occur. In this case, a “RETRY”,
“SUSPENDING”, “INCOMPLETE ENDING”, or “CANCEL” operation will be accepted.
ex. 1) In a system with a Master Terminal and 3 Satellite Terminals:
Master
Terminal
Busy
S1
Busy
S2
S3
When a report collection is executed on the Master Terminal, a series of data collections from each terminal (S1
to S3) will be performed, but services for S1 and S2 will be skipped due to their “busy” conditions. Thereafter,
services will again be attempted to S1 and S2. As a limit of 30 seconds is provided for servicing each terminal,
the total service time in this case will be 30 sec. x 2 units = 60 sec. If data collection is successfully done from S1
within this time limit, servicing S2 follows for the rest of the time, and on reaching the time limit, the Time-Out
condition arises, displaying on the Master Terminal the number of not-yet collected terminal(s) and the
Store/Register No. of the last serviced terminal. On this stage, the operator may only go on to “SUSPENDING”
(to wait for a while until S2 clears the “busy” condition), or to “RETRY” (to execute collection service to S2 again,
expecting that S2 has already cleared the “busy” condition), or to “INCOMPLETE ENDING” (to abandon the
service to S2 and end with collection of the data of so-far collected terminals only), or to “CANCEL” operation. If
“RETRY” is operated, the service time now is 30 seconds because only one terminal remains uncollected.
ex. 2)
Master
Terminal
Busy
S1
No response
(Power OFF)
S2
S3
In this case, S2 is in a “No response” condition and S1 is in a “busy” condition. As only one terminal is
responding with some kind of status, a time out limit of 30 seconds is given (the “No response” status is not
subject to the service timer). However, if S2 turns into a “Power ON” condition, it will also be subject to the
service timer.
13- 1
13. OTHER OPERATIONS RELATING TO IN-LINE SERVICE
EO1-11152
13.2 Suspending
13.2 Suspending
This is to be operated for the purpose of suspending an in-line service being executed, when any terminals
remain unserviced, and of going on to a “RETRY”, “INCOMPLETE ENDING”, or “CANCEL” operation as the next
step.
OPERATION ON MASTER TERMINAL: (Same Lock positions as the in-line job being performed)
Depress [ITEM CORR] until the key-in tone is generated.
DESCRIPTION:
The SUSPENDING operation is allowed any time during an in-line service procedure.
If suspending by the [ITEM CORR] key is accepted, the Master Terminal’s display indicates the number of
unserviced terminals. (SUSPENDING of a service execution of one terminal is not possible). Now a
“RETRY” or “INCOMPLETE ENDING” operation can be selected as the next step. (When no key-in
operations are made in about 10 seconds after a SUSPENDING operation, a RETRY process will
automatically be executed.)
13.3 Retry
This is to be operated for the purpose of re-attempting the in-line service that has been stopped due to “TIME
OUT” or that has just been suspended by “SUSPENDING” operation.
OPERATION ON MASTER TERMINAL: (Same Lock positions as the in-line job being performed)
Depress [AT/TL].
DESCRIPTION:
The in-line service will again be attempted to the unserviced terminals. This operation is possible any
number of times after a “TIME OUT” condition or a “SUSPENDING” operation as long as any terminals
remain unserviced. (When no key-in operations are made in about 10 seconds after a SUSPENDING
operation, a RETRY process will automatically be executed.)
13.4 Incomplete Ending
This is to be operated to abandon services to unserviced terminals, and ends the in-line service with the services
to service-completed terminals only.
OPERATION ON MASTER TERMINAL: (Same Lock positions as the in-line job being performed)
Depress [NS].
DESCRIPTION:
If an in-line service being executed does not seem to end normally due perhaps to some abnormal status of
any Satellite Terminals after “TIME OUT”, “SUSPENDING”, and/or “RETRY” operations, the [NS] key can be
depressed to end the in-line service with only the service-completed terminals serviced and the unserviced
terminals remaining unserviced. In case of In-line X or Z Report Collection sequences, reports of only the
service-completed terminals will be issued.
As part of the print out, the Store/Register No. of the terminal and its status will be printed.
13- 2
13. OTHER OPERATIONS RELATING TO IN-LINE SERVICE
EO1-11152
13.5 Cancel
Status Print Format
No nnnnnn ?
Store/Register No.
Status Symbol
?:
No response (power off, etc.)
BUSY: The terminal is busy (during a sale, etc.)
Blank: Other statuses
13.5 Cancel
This can be operated when a SUSPENDING condition arises due to a TIME OUT or a SUSPENDING operation.
The entire in-line service being performed is cancelled. This operation is effective to in-line read report
operations but not to any in-line reset report operations.
OPERATION ON MASTER TERMINAL: (Mode Lock: X)
Depress [@/FOR].
DESCRIPTION:
The CANCEL symbol is printed as in the following.
CANCEL Print Format
================================
13- 3
E
PRINTED IN MALAYSIA
EO1-11152E
E
PRINTED IN MALAYSIA
EO1-11152E