1
TEC Electronic Cash Register
FS-2600-1 SERIES
Owner’s Manual
S/A Operators Guide
S/A Manager's Guide
M/S Level Operator's Guide
M/S Level Manager's Guide
NOTICE
This equipment has been tested and found to comply with the limits for a Class A digital
device, pursuant to Part 15 of the FCC Rules. These limits are designed to provide reasonable protection against harmful interference when the equipment is operated in a commercial environment. This equipment generates, uses, and can radiate radio frequency energy
and, if not installed and used in accordance with the instruction manual, may cause harmful
interference to radio communications. Operation of this equipment in a residential area is
likely to cause harmful interference in which case the user will be required to correct the
interference at his own expense. Changes or modifications not expressly approved by
manufacturer for compliance could void the user’s authority to operate the equipment.
WARNING
“This Class A digital apparatus meets all requirements of the Canadian Interference-Causing
Equipment Regulations.”
“Cet appareil numénque de la classe A respecte toutes les exigences du Règlement sur le matériel
brouilleur du Canada.”
Copyright © 1999
by TOSHIBA TEC CORPORATION
All Rights Reserved
570 Ohito, Ohito-cho, Tagata-gun, Shizuoka-ken, JAPAN
1. STAND-ALONE LEVEL
OPERATOR’S GUIDE
Table of Contents
TOC 2
EO1-11138
FS-2600-1 SERIES
TABLE OF CONTENTS
Page
1. INTRODUCTION ............................................................................................... 1-1
1.1
1.2
Applicable Model ............................................................................................................. 1-1
Accessories ..................................................................................................................... 1-1
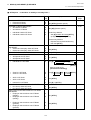
2. SPECIFICATION .............................................................................................. 2-1
2.1
2.2
ECR ................................................................................................................................. 2-1
Hardware Option .............................................................................................................. 2-2
3. APPEARANCE AND NOMENCLATURE ......................................................... 3-1
3.1
3.2
Front View ........................................................................................................................ 3-1
Rear View ........................................................................................................................ 3-2
4. MODE LOCK AND MODE SELECTOR KEYS ................................................ 4-1
4.1
4.2
Mode Lock ....................................................................................................................... 4-1
Mode Selector Keys ......................................................................................................... 4-1
5. DISPLAY ........................................................................................................... 5-1
5.1
5.2
Operator Display .............................................................................................................. 5-1
Customer Display ............................................................................................................ 5-3
6. KEYBOARD ...................................................................................................... 6-1
6.1
6.2
Keyboard Layout .............................................................................................................. 6-1
Functions of Each Key ..................................................................................................... 6-2
7. PROCEDURE BEFORE OPERATION ............................................................. 7-1
8. CASHIER SIGNING OR CASHIER KEY OPERATIONS ................................. 8-1
8.1
8.2
8.3
8.4
Code Entry Method .......................................................................................................... 8-1
Cashier Key Method ([CLK] Keys) .................................................................................. 8-2
Training Mode Start and End ........................................................................................... 8-3
“Cashier Exclusive” Option .............................................................................................. 8-4
9. TRANSACTION ENTRIES ............................................................................... 9-1
9.1
9.2
9.3
9.4
9.5
9.6
9.7
Receipt-Issue/Non-issue Selection .................................................................................. 9-2
Store Message Display .................................................................................................... 9-2
No-sale ............................................................................................................................ 9-2
Loan ................................................................................................................................. 9-3
Check Cashing (No-sale cashing of a non-cash media) .................................................. 9-4
No-sale Exchange from Foreign Currency to Domestic Currency ................................... 9-4
No-sale Exchange from Domestic Currency to Foreign Currency ................................... 9-5
TOC 1
9.8
9.9
9.10
9.11
9.12
9.13
9.14
9.15
9.16
9.17
9.18
9.19
9.20
9.21
9.22
9.23
9.24
9.25
9.26
9.27
9.28
9.29
9.30
9.31
9.32
9.33
9.34
9.35
9.36
9.37
9.38
9.39
9.40
9.41
9.42
9.43
9.44
9.45
9.46
9.47
9.48
9.49
9.50
TOC 3
EO1-11138
FS-2600-1 SERIES
PLU (menu item) Entry through the Keyboard ................................................................. 9-5
PLU (menu item) Entry through the Menu Window ......................................................... 9-6
Repeat Entry .................................................................................................................... 9-7
Quantity Extension (Multiplication) .................................................................................. 9-7
Set Menu Entry ................................................................................................................ 9-8
Modifier Entry ................................................................................................................... 9-9
Other Income PLU Entry .................................................................................................. 9-9
PLU Code Shift Entry ..................................................................................................... 9-10
PLU Price Shift Entry ..................................................................................................... 9-10
Combo (Combination) Sale Entry .................................................................................. 9-11
Scale Entry .................................................................................................................... 9-11
Subtotal Read ................................................................................................................ 9-12
Tray Total Read ............................................................................................................. 9-13
Item Correct ................................................................................................................... 9-14
Void (Designated Line Voiding and Returned Merchandise) ......................................... 9-14
All Void ........................................................................................................................... 9-15
Order Entry Control ........................................................................................................ 9-15
Order Entry Control with Table No. ................................................................................ 9-17
Temporary Release of Order Table No. Entry Compulsion ........................................... 9-18
Guest Check Merge ....................................................................................................... 9-18
Guest Check Transfer .................................................................................................... 9-18
Guest Check Split .......................................................................................................... 9-19
Sale Finalization by Media Keys (Payment of a Sale) ................................................... 9-20
Charge Posting by Check Track .................................................................................... 9-20
Sale Paid in Foreign Currencies .................................................................................... 9-21
Media Transfer ............................................................................................................... 9-21
Tax Status Modification ................................................................................................. 9-22
Automatic Tax Calculation ............................................................................................. 9-22
Manual Tax Entry ........................................................................................................... 9-22
Tax Exemption ............................................................................................................... 9-23
Listing Capacity Open .................................................................................................... 9-23
Selective Itemizer (SI) Status Modification .................................................................... 9-23
Selective Itemizer (SI) Total Read ................................................................................. 9-23
PLU Preset Price Read .................................................................................................. 9-24
PLU Stock Read ............................................................................................................ 9-24
Dollar Discount .............................................................................................................. 9-25
Percent Discount, Percent Charge ................................................................................ 9-25
Non-add Number Print ................................................................................................... 9-26
Number-of-guests Entry ................................................................................................. 9-26
Function Key Entry ........................................................................................................ 9-26
Tip Paid .......................................................................................................................... 9-27
Charge Tip ..................................................................................................................... 9-27
Received-on-Account .................................................................................................... 9-27
TOC 2
9.51
9.52
9.53
9.54
9.55
9.56
9.57
9.58
9.59
Paid-Out ......................................................................................................................... 9-28
Print Mode Invert ........................................................................................................... 9-28
RKP (remote kitchen printer) Receipt Cut ..................................................................... 9-29
RKP (remote kitchen printer) Message Print ................................................................. 9-30
Guest Check Print .......................................................................................................... 9-30
Check Print .................................................................................................................... 9-31
Receipt Post-issue (Receipt Reprint & Guest Check Reprint) ....................................... 9-32
Server Transfer .............................................................................................................. 9-33
Employee Clock-in/Clock-out ......................................................................................... 9-34
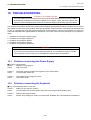
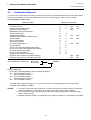
10. Troubleshooting ............................................................................................ 10-1
10.1
10.2
10.3
10.4
10.5
Problems concerning the Power Supply ........................................................................ 10-1
Problems concerning the Keyboard ............................................................................... 10-1
Problems concerning the Drawer .................................................................................. 10-2
Problems concerning the Display .................................................................................. 10-2
Problems during Normal Operations ............................................................................. 10-2
CAUTION:
1. This manual may not be copied in whole or in part without prior written permission of
TOSHIBA TEC.
2. The contents of this manual may be changed without notification.
3. Please refer to your local Authorized Service representative with regard to any queries
you may have in this manual.
EO1-11138
1. TO OUR CUSTOMERS
1. INTRODUCTION
1.
INTRODUCTION
Thank you for choosing the TEC electronic cash register FS-2600-1 series. This owner’s manual provides a description of the functions and handling of this register and should be read carefully to ensure optimum performance. Since every consideration has been given to safety and reliability, there is no danger of damaging the
machine by incorrect operation.
Please refer to this manual whenever you have any questions concerning the machine. This machine has been
manufactured under strict quality control and should give you full satisfaction.
•
Be sure to keep this manual for future reference.
1.1
•
•
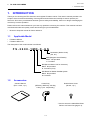
Applicable Model
FS-2600-1MD-US
FS-2600-1MD-C-US
The description of the model number is as follows.
FS-2600-1MD-C-US
Destination (Nation Code)
(US, etc.)
MCR (Magnetic Card Reader)
Blank: Not provided
C: Provided
BIU (Back Indicator Unit for Customer)
Blank: Not provided
D: Provided (1 line)
M/S Board for Master-Satellite System
Blank: Not provided
M: Provided
1.2
Accessories
Owner’s Manual
(EO1-11138; 1 pc.)
Control Key
(REG Key, MGR Key, MA Key,
S Key; 2 pcs. respectively)
Double Sems Screw
(M-3x8; 1pc.)
* Used to secure the Cable Blind Plate
Refer to 3.2 Rear View (page 3-2).
1-1
EO1-11138
2. SPECIFICATION
2.1 ECR
2.
2.1
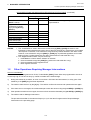
2.1.1
SPECIFICATION
ECR
Software Item
Capacity of Department Memory
Capacity of Group Memory
Capacity of Major Group Memory
Capacity of Cashier Memory
Capacity of Employee Memory
Capacity of Customer File Table
Capacity of PLU Memory
Capacity of PLU Group Memory
Unit Price Programmable
2.2.1
Max. 99 departments
Max. 30 groups
Max. 10 major groups
Max. 8 cashiers for the [CLK] key
Using Standard Memory
Using Expansion Memory
Max. 15 cashiers
Max. 99 cashiers
Max. 200 employees
Max. 200 employees
Max. 5000 tables
Max. 5000 tables
Without the option “Collecting the PLU data by each price level”
Max. 1000 PLUs
Max. 2500 PLUs
With the option “Collecting the PLU data by each price level”
Max. 500 PLUs
Max. 1500 PLUs
Max. 99 PLU groups
Max. 6 digits; 0.00 to 9999.99
Hardware Item
Size
Weight
Power Required
Power Consumed
Ambient Temperature
Relative Humidity
Interface Port
Memory Protection
280 mm (width) x 442 mm (depth) x 235.6 mm (height)
(or 475.5 mm (depth) and 129.5 mm (height) when the operator display
is in its full opened position.)
4.0 kg
117 V, 60 Hz (US)/240V, 50 Hz (AU)
0.3 A (operating; US)/0.14 A (operating; AU)
0 C to 40 C
10% to 90% RH (non-condensing)
COM 1 & 2, PC and M/S
Long-lasting rechargeable lithium battery is provided.
Specifications are subject to change without notice.
2-1
EO1-11138
2. SPECIFICATION
2.2 Hardware Option
2.2
Hardware Option
Option Name
IF-2600RS
KRAM-H-2600
KRAM-1-2600
KRAM-2-2600
KRAM-4-2600
KBD-2600-2
KRD-2600-1
KRD-2600-2
IF-1650C
MD-6
Description
The 3rd printer can be connected to the FS-2600 by
installing this interface board.
Expansion memory of 0.5 MB
Expansion memory of 1 MB
Expansion memory of 2 MB
Expansion memory of 4 MB
2- line back indicator unit
(16-digit dot display and 7-digit 7-segment display)
1-line remote indicator unit (7-digit 7- segment display)
2- line remote indicator unit
(16-digit dot display and 7-digit 7-segment display)
Interface board to connect a scale to the FS-2600
A maximum of 2 remote drawers can be connected to the
FS-2600 to realize the multi-drawer feature. Either the “multidrawer feature controlled by a cashier” or “multi-drawer
feature controlled by a currency” can be selected.
2-2
Source
Contact your TOSHIBA
TEC representative.
EO1-11138
3. APPEARANCE AND NOMENCLATURE
3.1 Front View
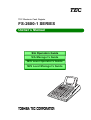
3.
3.1
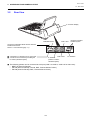
APPEARANCE AND NOMENCLATURE
Front View
Operator Display
Navigation Key
Keyboard
MCR (Magnetic
Card Reader)
AC Cord
Power Switch
■ Power Switch ............ Insure that the power switch is in the OFF position before connecting AC power.
you can adjust the display
to the best viewing angle.
Brightness Control
CAUTION!
1. Do not try to force the display beyond its full opened position.
2. Do not press on or put any pressure on the MCR unit as it may be easily broken.
3-1
EO1-11138
3. APPEARANCE AND NOMENCLATURE
3.2 Rear View
3.2
Rear View
Customer Display
Cable Blind Plate
COM 1 Port
Interface for MasterSatellite System
Secure the Cable Blind Plate with the attached
Double Sems Screw.
Refer to 1.2 Accessories (page 1-1).
■ A maximum of 2 drawers can be connected.
■ A scale can be connected by installing the
IF-1650C (Hardware Option)
COM 2 Port
IF-2600 RS
(COM 3 & COM 4;
Hardware Option)
PC Interface
■ The following printers can be connected to each port (COM 1 to COM 3; COM 4 is for future use).
• BRST-10 (Used for Receipt)
• TM-300 (Used for Receipt, Journal, RKP; Remote Kitchen Printer)
• TM-T88 (Used for Receipt, RKP; Remote Kitchen Printer)
3-2
EO1-11138
4. MODE LOCK AND MODE SELECTOR KEYS
4.1 Mode Lock
4.
4.1
MODE LOCK AND MODE SELECTOR KEYS
Mode Lock
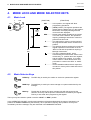
(POSITION)
MGR
X
REG
Z
REG
Key
SET
MGR
Key
MA
Key
SET ........... In this position, the register will allow
programming operations.
............... (LOCK position) The register operations are
locked when the Mode Lock is in this position.
Meanwhile, the Display Message and the
current time are displayed.
REG ........... Normal cash register operations are carried
out in this mode. However, the operations
requiring a Manager Intervention cannot be
performed in this mode.
X .............. The sale totals in memory can be read and
the programmed data can be verified in this
position.
MGR ........... This position allows to register all normal cash
register operations to be carried out in the
“REG” mode and the operations requiring a
Manager Intervention.
- .............. This is the “Negative Mode”, which
automatically processes all the entries in the
reverse way, i.e. positive items into negative,
and the negative into positive. It is usually
used to return or cancel all the items once
purchased in a sale in the “REG” or “MGR”
mode.
Z .............. All the resettable totals and their respective
counters in memory will be read and reset in
this position.
Mode Selector Keys
MA
MGR
REG
4.2
(FUNCTION)
REG Key:
The REG Key is used by the cashier or clerk who operates the register.
MGR Key: The MGR Key is used by the store manager or a person authorized by the
manager.
MA Key:
The MA Key is used by the store manager who will daily supervise the
collection of money and the printout of transactions recorded by the register.
This key is also used when programming the register.
The keys may be inserted or pulled out at the “LOCK” or “REG” position.
In the OPERATOR’S GUIDE, functions and operations will be described within the range of the Mode Lock
positions of LOCK and REG using the REG key. Since operations requiring other positions and keys are
controlled by the store manager, they are described in the MANAGER’S GUIDE.
4-1
EO1-11138
5. DISPLAY
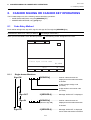
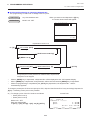
5.1 Operator Display
5.
DISPLAY
The FS-2600 is provided with the LCD operator display and the 7-segment customer display.
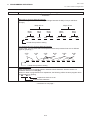
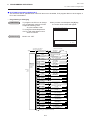
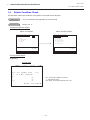
5.1
5.1.1
Operator Display
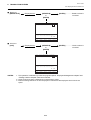
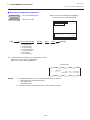
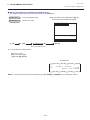
Basic Screen (common to all the mode lock positions)
2
3
4
5
••••*••••10••••*••••20••••*••••30••••*••••40
1
2
3
4
5
6
7
8
9
10
11
12
13
14
15
1
02-06-1999 03:04 Z9 1CLKendi
6
7
A
B
8
9
C
8
9
8
9
8
9
8
1
2
3
4
5
6
7
8
9
10
11
12
13
14
0 15
••••*••••10••••*••••20••••*••••30••••*••••40
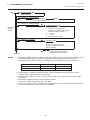
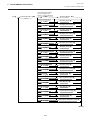
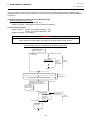
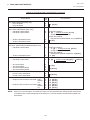
■ Description of each Display Item
Display Item
1 Mode Lock Position
2
3
4
5
6
Date
Time
Cashier Code
Cashier Name
Terminal Status
Indicator
7 Display Area for each
Mode Position
8 Navigation Key
Display Line
1
1
1
1
1
2
2 ~ 14
15
Description
Displays the current mode lock position. (7 digits)
SET:
* SET *
:
REG:
* REG *
X:
*X/GTX*
MGR:
*REG *
-:
*REG- *
Z:
*Z/GTZ*
BLIND:
* SET *
Displays the date. (10 digits)
Displays the time. (5 digits)
Displays the cashier code. (2 digits)
Displays the cashier name. (12 characters)
Displays the indicator which shows the terminal status. For
details, refer to the next section “Description of each Indicator”.
Refer to the display configuration for each mode position.
For details, refer to “Description of each Navigation Key” attached
to the display configuration for each mode position.
5-1
EO1-11138
5. DISPLAY
5.1 Operator Display
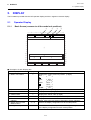
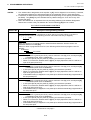
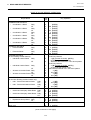
■ Description of each Display Item (continued)
Display Item
9 Printer Error Indicator
Display Line
15
0 Print Data Reception
Indicator
A Sales Item Name
Guidance Message
15
11
B Quantity
12
C Numeric
Sales Total
12
5.1.2
Description
Displays the error indicator “X” to indicate that an error status has
occurred on the printer which is connected to the terminal. From
the left; Port 1, Port 2 and Port 3. The rightmost one will be used
for the future.
Displays the indicator “★” while the print data is being received
from another terminal.
Displays a sales item which has been just entered with a doublewidth sized character. (16 double-width sized characters) Also,
displays an operation guidance message. (Max. 36 characters)
Displays a quantity with a double-width sized numeral.
(max. 3-digit integral portion and 2-digit decimal portion)
Displays a numeric value entered and a sales total with a doublewidth sized numeral.
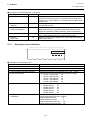
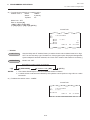
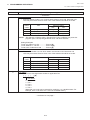
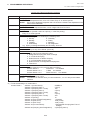
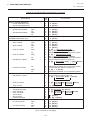
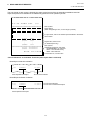
Description of each Indicator
••••*••••10••••*••••20••••*••••30••••*••••40
1
2
1
2
1| || |||||||78
2 3 4 5 6
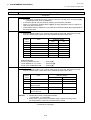
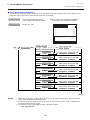
■ Description of each Display Item
1
2
3
4
Display Item
For Future Use
Receipt ON/OFF Indicator
RTR (Register-to-Register) Indicator
Price Level Indicator
5 Menu Shift Level Indicator
6 Caps Lock and Double-width
Designation
Description
For Future Use (1 digit)
Displays OFF while the receipt-issue mode is in “OFF”. (3 digits)
Displays RTR while the RTR declaration is in ON. (3 digits)
Displays the PLU price level currently selected. (2 digits)
• PRICE 1 (1st PRICE):
P1
• PRICE 2 (2nd PRICE):
P2
• PRICE 3 (3rd PRICE):
P3
• PRICE 4 (4th PRICE):
P4
• PRICE 5 (5th PRICE):
P5
Displays the PLU menu shift level currently selected. (2 digits)
• MENU SHIFT 1:
S1
• MENU SHIFT 2:
S2
• MENU SHIFT 3:
S3
• MENU SHIFT 4:
S4
• MENU SHIFT 5:
S5
Displays the following during the programming operation
including the character entries. (2 digits)
Small Letter/Normal Size:
a
Capital Letter/Normal Size:
A
Small Letter/Double-width Size:
a
Capital Letter/Double-width Size: A
5-2
EO1-11138
5. DISPLAY
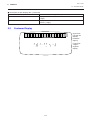
5.2 Customer Display
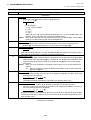
■ Description of each Display Item (continued)
Display Item
7 Previous Screen
8 Continuation Screen
5.2
Description
Displays the indicator “↑” when the menu has previous screens.
(1 digit)
Displays the indicator “↓” when the menu has continuation
screens. (1 digit)
Customer Display
Upper Row
(16-digit dot
display;
Hardware
Option)
AMOUNT
TL
ST
CG
5-3
Lower Row
7-digit 7segment
display
EO1-11138
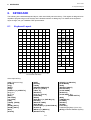
6. KEYBOARD
6.1 Keyboard Layout
6.
KEYBOARD
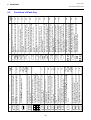
The following is the standard keyboard layout, which was initially set at the factory. This register is designed to be
capable of programming most of the keys at the desired locations or adding keys. For details of the keyboard
layout change, ask your TOSHIBA TEC representative.
6.1
Keyboard Layout
VOID RECEIPT R/A
PO
ISSUE
BREAK BREAK
IN
OUT
IN
OUT
TX1/M TX2/M TAKE EAT
OUT
IN
SERVER CHG
TIP POSITION
#
TRANS. TIP
PAID
CHECK CHECK SPLIT PRINT
MERGE TRANS. CHECK CHECK
ESC
¬
ALL
VOID
¯
ENTER NEXT
®
PAGE
UP
ITEM OPEN PAGE
CORR
DOWN
#
C
NS
START
CHECK
X
7
8
9
4
5
6
SERVER
#
PLU
1
2
3
0
00
RECALL
ST
TOTAL
AT/TL
PLU Preset-code Keys
Other Optional Key:
[000] (Triple-zero Key)
[CHECK]
[Chg]
[MISC]
[CPN]
[CREDIT 1] to [CREDIT 5]
[%+] (%1)
[%-] (%2)
[DISC]
[PR OPEN]
[LC OPEN]
[TAX]
[TX3/M], [TX4/M]
[EX]
[SI1/M], [SI1/TL]
[SI2/M], [SI2/TL]
[RPT]
[STOCK]
[AMT]
[SCALE]
[TARE]
[SERVER #/RECEIPT]
[CUR 1] to [CUR 5]
[TRAY TL]
[RECEIPT]
[CLK 1] to [CLK 8]
[CARD NO.]
[READ]
[RKP Msg 1] to [RKP Msg 10]
[INVERT]
[MANUAL TARE]
[RKP Msg #]
[FUNCTION 1] to [FUNCTION 20]
[GUEST #]
[MENU 1] to [MENU 5]
[RECEIPT CUT]
6-1
[PRICE 1] to [PRICE 5]
[PUB MODE]
[END]
[RECEIPT PRINT]
[PICKUP BAL]
[CODE OPEN]
[DISPLAY]
[CODE SHIFT 1] to
[CODE SHIFT 5]
[RKP]
[TENDER UP]
[COMBO]
[SELECT]
[HOME]
[LCD OFF]
Additional [%-] Keys (%3 to %8)
[RTR] (for Master-Satellite System)
5
2
4
1
6-2
9-2
9-4
9-5
9-5
9-23
See pages
for
[PR OPEN]
and
[LC OPEN].
No-sale key. Used to open the cash drawer without
relating to a sale.
Amount key. Used to enter a manual amount of PLU
item.
Preset Open key. Used to release a preset-price PLU
item for a manual price entry.
Listing Capacity Open key. Used to release the high or
low amount limit preprogrammed on each PLU.
Preset and Listing Capacity Open key. This is a dualfunction key that has both [PR OPEN] and [LC OPEN]
functions.
NS
AMT
PR
OPEN
LC
OPEN
9-25
9-25
Dollar Discount key. Used to subtract an amount from
the sale such as a discount during a sale.
Percent Charge key. Used to add a percent rate to a
sale.
DISC
%+
X
9-7
Quantity Extension (Multiplication) key. Used to
multiply a PLU item entry by a quantity.
OPEN
9-26
Non-add Number Print. Used to print a non-adding
number on the receipt and journal for future reference.
#
9-5
-----
PLU (Price-Look-Up) key. Used to enter a PLU that is
linked to a department.
-----
Numeric keys. Used to enter numeric values.
Depressing the [00] key once is the same as depressing
the [0] key twice consecutively. Depressing the [000] key
once is the same as depressing the [0] key three times
consecutively. The [ . ] key is used to designate the
decimal point of a percentage rate or a quantity.
Clear key. Used to clear numeric entries or a
declaration key entry.
3
6
9
9-32
Receipt Post-issue key. Used to issue the receipt of a
sale when the sale has already been finalized in the
Receipt-OFF mode.
C
PLU
0 00
8
7
RECEIPT
ISSUE
SERVER #
RECEIPT
See pages
for
[SERVER #]
and
[RECEIPT]
9-2
Receipt key. Used to change the receipt-ON/OFF mode.
Server #/Receipt key. This is a dual-function key that
has both [SERVER #] and [RECEIPT] functions.
8-1
Server # key. Used in case of Server/Cashier Code
Entry Method, to declare start or end of normal operation
by cashier.
SERVER
#
9-3
9-27
All Void key. Used to cancel all the items entered in the
current sale.
Received-on-Account key. Used to enter payments
received on account, i. e. not relating to a sale. Also used
for change reserve amounts loaned from the store.
Paid-Out key. Used to record amounts paid out of the
cash drawer not relating to a sale. Also used for Pick Up
operations, such as money collections for banking
purposes.
Subtotal key. Used to obtain the subtotal of the current
transaction.
ALL
VOID
R/A
PO
ST
SI1/TL
to
SI/TL
SI2/TL
or:
CREDIT
5
CARD
NO.
CREDIT
1
MISC
CPN
Chg
CHECK
SI (Selective Itemizer) Total key. Used to display (and
print) the selective itemizer contents.
Card No. key. Used to enter the code number (1 to 12)
which classifies the credit card company followed by the
sale finalization with the [Chg] key.
Credit 1 to Credit 5 keys. These are additional non-cash
media keys that may be installed besides those already
described, according to the requirements of each store.
Miscellaneous Media Key. This is one of additional
non-cash media keys that may be installed besides
[CHECK] and [Chg]. This key has the same functions
and programmabilities as the [CHECK] key,and usually
used as Tender-only key.
Media-Coupon key. This is another non-cash media
key, and usually programmed as “Coupon Tender” key.
Charge key. This is another non-cash media key, and
usually programmed as “Charge Sale Total” key. This key
can also be used for payments in credit cards, if the
[CARD NO.] key is installed.
Check key. This is one of the non-cash media keys, and
used to cash a check when the register is outside a sale,
or to finalize the transaction as a check payment.
Cash Amount Tendered/Cash Total key. Used to
record all cash paid transactions, and will be able to
finalize a sale operation.
9-15
Void key. Used to delete an item entered previously
(before the last item) in the current transaction.
VOID
AT/TL
9-14
Item Correct key. Used to delete the last item from the
bill.
ITEM
CORR
9-23
9-20
9-20
9-20
9-20
9-20
9-20
9-20
9-12
9-28
9-14
9-25
REFERENCE
PAGE
Percent Discount key. Used to subtract a percent rate
from a sale.
FUNCTIONS
%-
KEY
6.2
RECEIPT
REFERENCE
PAGE
FUNCTIONS
KEY
6. KEYBOARD
EO1-11138
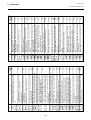
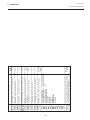
6.2 Functions of Each Key
Functions of Each Key
to
CUR
5
6-3
9-30
9-30
9-15
9-31
9-31
9-15
2-2
(MG)
9-13
RKP Message Print Key. Used to print the respective
programmed messages on an RKP receipt.
Total Key. Used to finalize the order item entries
and transfer the total amount to the new balance.
Receipt Print Key. Used to print the guest check
contents on the receipt roll paper instead of a slip.
Print Check Key. Used to issue a presentation.
Order Table # Key. Used to enter an Order Table No. of
a guest party.
Menu Shift Key. Used to designate the keyboard No.
for [PLU Preset-code key] located on the keyboard.
Tray Total Key. Used to obtain the total of an individual
guest tray in a guest party.
RKP
Msg #
TOTAL
RECEIPT
PRINT
to
RKP
Msg 10
to
MENU
5
TRAY TL
MENU
1
START
CHECK
PRINT
CHECK
RKP
Msg 1
RKP
CUT
INVERT
RKP Message Print key. Used to print the respective
programmed messages on an RKP receipt.
9-26
9-29
Function 1 to Function 20 keys. Used to execute a
command of key string preprogrammed on each of these
keys. An operation series of maximum 10 keys can be
programmed on each key, thus eliminating time in daily
operation routines.
8-2
9-24
Stock key. Used to control stock quantity of the PLU with
the stock-process status. Also used to read the remaining
stock quantity of the designated PLU from the memory.
Cashier 1 to Cashier 8 keys. Used to declare start or
end of normal operation by cashier (instead of using
[SERVER #] (or [SERVER #/RECEIPT]) key).
9-4
9-21
Foreign Currency keys. Used in tendering or exchange
with foreign currencies.
RKP Receipt Cut Key. Used to cut an itemized RKP
receipt.
FUNCTION
20
CLK 8
9-7
Repeat key. Used to repeat a PLU item entry.
9-28
to
to
9-23
9-22
9-23
REFERENCE
PAGE
Tax Exempt key. Used to declare the exemption of the
taxes from the sale.
Tax Modifier key(s). Used to reverse the taxable/nontaxable status on PLUs, or other tax-status
programmable keys.
SI (Selective Itemizer) Modifier key. Used to reverse
the SI (Selective Itemizer) status programmed on each
PLU.
FUNCTIONS
Print Mode Invert Key. Used to temporarily change from
the Single/Double Print Mode to the Itemized Print Mode.
FUNCTION
1
CLK 1
STOCK
CUR
1
RPT
EX
TX4/M
TX1/M
to
SI2/M
or:
SI1/M
SI/M
KEY
9-33
9-24
Guest Check Merge Key. Used to merge two order
tables accounts into one.
Guest Check Transfer Key. Used to change an order
table in use into another table at a guest’s request.
Server Transfer Key. Used to transfer an order table
account to another server/cashier.
PLU Price-Read Key. Used to read the preset price of
the designated PLU from the memory.
CHECK
MERGE
CHECK
TRANS.
SERVER
TRANS.
TAX
,
,
OUT
BREAK
OUT
CHG
TIP
CODE
OPEN
PICKUP
BAL
MANUAL
TARE
TARE
SCALE
BREAK
IN
IN
EAT IN
TAKEOUT
READ
9-19
Guest Check Split Key. Used to split a guest order table
account.
SPLIT
CHECK
9-22
Manual Tax Key. Used to enter an irregular tax amount
that cannot be calculated on the basis of the programmed
tax table.
Charge Tip Key. Used to enter a charge tip amount.
Customer File Code Open Key. Used for the customer
check track entry.
Pickup Balance Key. Used for the customer check track
entry.
Manual Tare Key. Used to manually enter the tare
weight data before a scaled item is entered.
Tare Key. Used to enter the preset tare weight data
before a scaled item is entered.
9-27
9-20
9-20
9-12
9-12
9-11
9-34
9-35
Break-in/Break-out Key. Used to record a cashier
break-in/-out.
Scale Key. Used to enter a scaled item.
9-34
9-35
9-13
Eat-in key. Used to declare an eat-in entry.
IN/OUT key. Used to record a cashier clock-in/-out.
9-13
Takeout key. Used to declare a takeout entry.
9-18
9-18
9-8
9-9
End Key. Used to end the Modifier Entry and the
Open Set Menu Entry.
9-18
9-10
END
Price Shift Key. Used to shift the PLU price.
Pub Mode Key. Used to temporarily release the Order
Table No. entry compulsion.
PRICE
5
PUB
MODE
to
9-17
Position Table No. Key. Used to enter a table position #
of a guest party.
POSITION
#
PRICE
1
9-26
REFERENCE
PAGE
Number-of-Guests Key. Used to enter the number of
guests in a party.
FUNCTIONS
GUEST
#
KEY
6. KEYBOARD
EO1-11138
6.2 Functions of Each Key
RKP
to
CODE
SHIFT 5
6-4
PLU Presetcode Keys
SELECT
PAGE
DOWN
PAGE
UP
NEXT
ENTER
ESC
→
←
↓
↑
RTR
LCD
OFF
COMBO
TENDER
UP
CODE
SHIFT 1
DISPLAY
RECALL
TIP
PAID
KEY
See M/S
System.
RTR Key. Used for the master-satellite system.
Each of these keys is programmed with a PLU Code.
That is, depressing one of those keys is equal to entering
a PLU Code then depressing the [PLU] key.
See pages
for [PLU].
-----
-----
LCD Off Key. Used to turn off the LCD display.
These 10 keys are used
for operations through the
LCD.
9-11
Combo Key. Used for the combo entry.
Cursor (Up Arrow) Key
Cursor (Down Arrow) Key
Cursor (Left Arrow) Key
Cursor (Right Arrow) Key
Escape Key
Enter Key
Next Key
Page Up Key
Page Down Key
Select Key
9-20
9-10
PLU Code Shift Key. Used to shift the PLU code.
Tender Up Key. This is the speed tender key.
9-6
Display Key. Used to display the menu table.
2-3
(MG)
9-16
Recall Key. Used to recall the order table.
RKP Key. Used to temporarily change the RKP
connection.
9-27
REFERENCE
PAGE
Tip Paid Key. Used to enter a cash tip amount.
FUNCTIONS
6. KEYBOARD
EO1-11138
6.2 Functions of Each Key
EO1-11138
7. PROCEDURE BEFORE OPERATION
7. PROCEDURE BEFORE OPERATION
7.
PROCEDURE BEFORE OPERATION
1. Unpack the accessories and the cash register from the carton.
2. Place the cash register at a proper location, referring to the Safety Precautions at the beginning of the
Operator’s Guide.
3. Remove the tapes and seals for holding parts or protecting the cash registers surfaces.
4. Plug the power cord plug into a wall outlet.
5. Insert the REG key into the Control Lock, then turn it to the REG position.
6. Before starting actual transaction entries on the cash register, ask your manager if you need additional setting
or the initial programmed data needs to be changed. For programming, refer to the following chapters in the
Manager’s Guide:
5. PROGRAMMING OPERATION (page 5-1)
6. VERIFICATION OF PROGRAMMED DATA (page 6-1)
7-1
EO1-11138
8. CASHIER SIGNING OR CASHIER KEY OPERATIONS
8.1 Code Entry Method
8.
CASHIER SIGNING OR CASHIER KEY OPERATIONS
The FS-2600 adopts one of the following cashier-identifying operations.
• CODE ENTRY METHOD, using the [SERVER #] key.
• CASHIER KEY METHOD, using [CLK] keys.
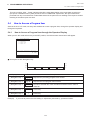
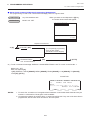
8.1
Code Entry Method
Each cashier will sign-ON, sign-OFF, sign-IN, and sign-OUT through the [SERVER #] key.
OPERATION: Mode Lock: REG (or, MGR or - with Manager Intervention)
When you turn the Mode Lock to the REG (or MGR, - ), the following screen will appear on the LCD.
*REG
* 02-06-1999 03:04
P1S1
Please input cashier code
0.00
DISP1
8.1.1
DISP2
TOTAL
DISP3
DISP4
0.00
DISP5
Single-drawer Machines
Sign-ON
[SERVER #] ................ Cashier code and name are
displayed and the sales transaction
is allowed.
2-digit manager-assign code
(01 to 99)
2-digit cashier’s own secret code
(01 to 99)
Sign-OUT
9 [SERVER #] ............. Message “SIGN OUT” is displayed.
Sign-IN
[SERVER #] ................ Cashier code and name are
(same as Sign-ON)
Sign-OFF
displayed and the sales transaction
is allowed.
0 [SERVER #] ............. Message “SIGN OFF” is displayed
and no sales transaction is allowed.
8-1
EO1-11138
8. CASHIER SIGNING OR CASHIER KEY OPERATIONS
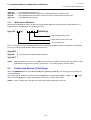
8.2 Cashier Key Method ([CLK] Keys)
Sign-ON .......... to be operated to start the job.
Sign-OUT ........ to be operated to leave the register for a while expecting to come back soon.
Sign-IN............ to be operated when the cashier comes back from a break declared by Sign-OUT.
Sign-OFF ........ to be operated to end the job.
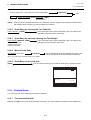
8.1.2
Multi-drawer Machines
Operations are basically the same as those for Single-drawer Machines, except that a one-digit drawer No. is
entered through the [X] key prior to the Sign-ON entry:
Sign-ON
[X]
[SERVER #]
2-digit manager-assign code
2-digit cashier’s own secret code
1 or 2 as Drawer No.
Entry of a drawer No. opens the designated drawer on finalizing the sale transaction. Designation of the drawer
No. which is being used by another cashier causes an error.
Sign-OUT
Sign-IN
Same as those for Single-drawer Machines.
Sign-OFF
NOTE:
When the drawer No. entry and the [X] key depression are skipped in the sign-ON, the drawer 1 will be
automatically assigned to the cashier, if the drawer 1 is not being used by another cashier.
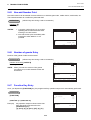
8.2
Cashier Key Method ([CLK] Keys)
When the [SERVER #] key is not installed, [CLK] keys ([CLK 1] to [CLK 8]; max. 8 keys) may be provided on
the ECR keyboard.
Sale entries will be possible only when one of the [CLK] keys is depressed (in “REG”, “MGR”, or “ - ” mode).
When the same [CLK] key is again depressed, the cashier is in Cashier OFF status.
NOTE:
When a cashier key is set ON, the cashier name will be displayed in the LCD.
8-2
EO1-11138
8. CASHIER SIGNING OR CASHIER KEY OPERATIONS
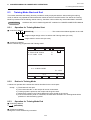
8.3 Training Mode Start and End
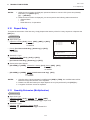
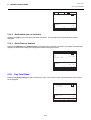
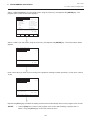
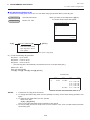
8.3
Training Mode Start and End
This section describes the training function provided for newly employed cashiers. After entering the training
mode, a cashier may operate the same transaction entries as those in the REG mode. The data in the Training
Mode is processed into the training cashier memory, therefore it will not affect any actual sales data in business.
CONDITION
8.3.1
Outside a sale, and in Cashier Signed-OFF condition for CASHIER CODE ENTRY Method
Operation for Training Modes Start
■ Code Entry Method
[SERVER #] ............................................ The screen shown below appears on the LCD.
2-digit manager-assign code of a cashier with Training status (01 to 99)
2-digit cashier’s secret code (01 to 99)
■ Cashier Key Method
Set the Cashier Key programmed with Training status.
*REG
* 02-06-1999 03:04
*TRAINING
*SIGN ON
1 1CLKendi
P1S1
*
*
2CLBROWN
0.00
DISP1
8.3.2
DISP2
TOTAL
DISP3
DISP4
0.00
DISP5
Entries in Training Mode
A trainee can operate all the transaction entries described in the next chapter.
except:
8.3.3
1)
2)
3)
4)
5)
The drawer will not open.
The Consecutive No. on the receipt will not be incremented.
Training symbol is printed on the receipt and the guest check.
Sales items entered in the Training Mode will not be printed on the journal.
If the remote kitchen printer is connected, the sales items entered in the Training Mode will be
printed on it with the training symbol.
Operation for Training Mode End
■ Code Entry Method
0
[SERVER #]
■ Cashier Key Method
Change the current Cashier Key to another.
8-3
EO1-11138
8. CASHIER SIGNING OR CASHIER KEY OPERATIONS
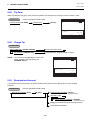
8.4 “Cashier Exclusive” Option
8.4
“Cashier Exclusive” Option
When the program option “Cashier Not exclusive” is selected:
Every Cashier can access the other cashiers’guest order table accounts as well as his/her own.
When the program option “Cashier Exclusive” is selected:
Cashiers with the status “Own Tables only”
The Cashier can only access the guest order tables from which he/she first takes orders or has reserved. An
error results on attempting to access the other cashiers’ tables.
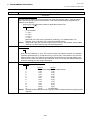
Cashiers with the status “All Tables”
The Cashier can access any order table besides those he/she reserves or takes orders from. In this case, the
same is applied to the cashier as described for the program option “Cashier Not exclusive” selection above.
NOTE:
When the program option “Cashier Exclusive” is selected, even a cashier with the status “All Tables”
cannot handle the order table which a cashier with Training status has opened.
8-4
EO1-11138
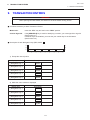
9. TRANSACTION ENTRIES
9. TRANSACTION ENTRIES
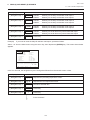
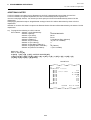
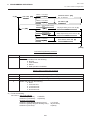
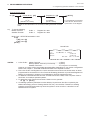
9.
TRANSACTION ENTRIES
WARNING!
When opening the cash drawer, be careful not to let the drawer hit any person.
■ Condition Necessary to Start Transaction Entries
Mode Lock:
Insert the “REG” key and set it to the “REG” position.
Cashier Sign-ON:
If the [SERVER #] key is used for identifying a cashier, you must sign-ON or sign-IN.
(See Section 8.1)
If Cashier Keys are installed, you must set your cashier key to the ON status.
(See Section 8.2)
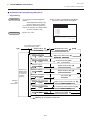
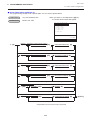
■ Description of each Navigation Key (REG, MGR, - )
13
14
15
1
2
3
4
5
••••*••••10••••*••••20••••*••••30••••*••••40
1) Except the case 2) below
Display Item
Description
1 Navigation Key 1
DISP1
2 Navigation Key 2
DISP2
3 Navigation Key 3
DISP3
4 Navigation Key 4
DISP4
5 Navigation Key 5
DISP5
2) While the menu window is displayed
Display Item
Description
1 Navigation Key 1
↓
2 Navigation Key 2
↑
3 Navigation Key 3
Select
4 Navigation Key 4
Enter
5 Navigation Key 5
Pg dw
9-1
13
14
15
EO1-11138
9. TRANSACTION ENTRIES
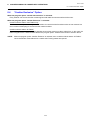
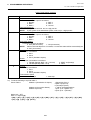
9.1 Receipt-Issue/Non-issue Selection
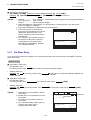
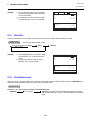
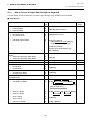
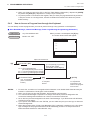
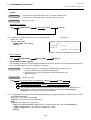
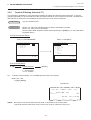
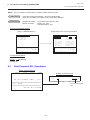
9.1
Receipt-Issue/Non-issue Selection
This operation determines whether or not the receipt is issued.
Mode Lock may be in any position: Pressing the [SERVER #/RECEIPT] key without a prior numeric entry or
pressing the [RECEIPT] key (whichever key is installed on the keyboard) will
change the receipt ON/OFF status. Each time the key is pressed the receipt
ON/OFF status is changed.
NOTES:
9.2
1. The “R OFF” status at the starting of a
transaction entry decides whether a
receipt will be issued for the transaction
or not. Switching the Receipt ON/OFF
status during a transaction will not be
effective.
2. If a transaction entered with the “R OFF”
status and finalized but a receipt is
required, the [RECEIPT ISSUE] (Postissue Receipt) key can be operated to
issue a receipt.
*REG
* 02-06-1999 03:04
OFF
P1S1
Receipt OFF
Indicator
RECEIPT
OFF
0.00
DISP1
DISP2
TOTAL
DISP3
DISP4
0.00
DISP5
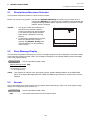
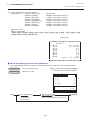
Store Message Display
This operation designates and displays one of the 4 messages programmed to be displayed in the REG or MGR
mode when the register is outside a sale. The message is displayed on the operator display and the dot display
area in the customer display.
OPERATION
(must be operated outside a sale)
|Display Message Code| [NS]
1 to 4
(corresponding to Line No.
1 to 4 in programming)
NOTE:
This operation is effective when the program options “Display Message Method 16 CHARACTERS
HELD” and “Display Message DISPLAY in REG and MGR mode (as well as in LOCK mode)” are both
selected.
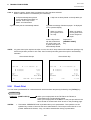
9.3
No-sale
The no-sale transaction is used to open the cash drawer without affecting any sales, such as for giving change,
testing the receipt/journal print condition, etc.
OPERATION
(must be operated outside a sale)
[NS] ...................... The drawer opens and a No-sale receipt is issued.
9-2
EO1-11138
9. TRANSACTION ENTRIES
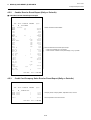
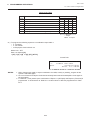
9.4 Loan
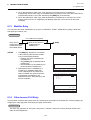
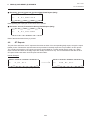
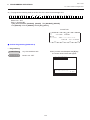
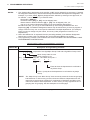
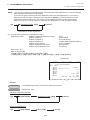
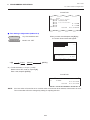
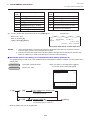
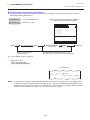
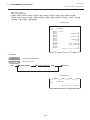
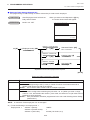
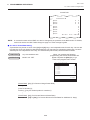
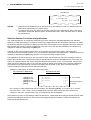
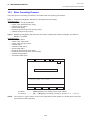
-- Receipt Print Format --
Max. 4 lines of Store
Name/Message
(REMARK 2 below)
RESTAURANTTEC
1343 PEACH DRIVE
PHONE : 87-6437
Open 10:00am to 9:00pm
Closed: every Wednesday
Max. 3 lines of Commercial Message
Date (Month-Day-Year order in
this sample)
Day-of-Week
02-06-1999
* NO
Name of the cashier who is
operating the register.
NOTES:
Register No.
#3001
No-sale Receipt Header
Consecutive No.
Current Time
Max. 2 lines of Footer
Logo Message (REMARK 1 below)
*
0085 15:59TM
Thank you
Call again
1. A no-sale transaction after a non-add
number print can be prohibited by the
program option.
2. A no-sale transaction after an Order
Table No. entry is not possible.
REMARKS:
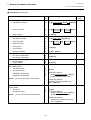
9.4
JONES
SALE
SAT
*REG
1. When the program option “Footer
Logo Message Print” is selected, a
maximum of 2-line Footer Logo
Message will be additionally printed
on the receipt issued for the sales
transaction without the Order Table
No. entry.
2. If your printer is the BRST-10 or the
TM-T88, you can make and print
your own logo on the Store Name/
Message area.
* 02-06-1999 03:04
*NO
SALE
NO
SALE
1 1CLKendi
P1S1
*
0.00
DISP1
DISP2
TOTAL
DISP3
DISP4
0.00
DISP5
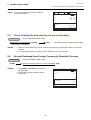
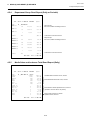
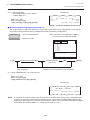
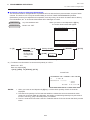
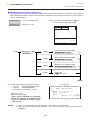
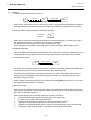
Loan
This operation is used to record the cash amounts loaned from the store as the change reserve in the drawer.
OPERATION
(must be operated outside a sale)
[R/A]
|Cash Amount Loaned| [AT/TL]
([ST])
...
To read the loan
total so far entered.
Repeatable to add up amounts.
9-3
[AT/TL]
EO1-11138
9. TRANSACTION ENTRIES
9.5 Check Cashing (No-sale cashing of a non-cash media)
NOTE:
A loan transaction after an Order Table No.
entry is not possible.
*REG
* 02-06-1999 03:04
*START
CASH
CASH
CASH
TOTAL
BANK
1 1CLKendi
P1S1
*
20.00
30.00
50.00
100.00
TOTAL
100.00
DISP1
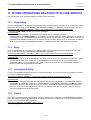
9.5
DISP2
TOTAL
DISP3
100.00
DISP4
DISP5
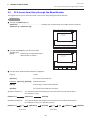
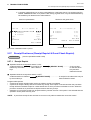
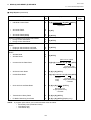
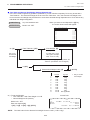
Check Cashing (No-sale cashing of a non-cash media)
OPERATION
(must be operated outside a sale)
|Check Amount to be Cashed| [CHECK]
[NS] ........... The drawer opens to enable the exchange.
Max. 8 digits 1 to 99999999
NOTES:
9.6
1. Other non-cash media keys may be used for this purpose if programmed to allow no-purchase
cashing.
2. A check cashing transaction after an Order Table No. entry is not possible.
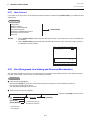
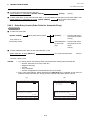
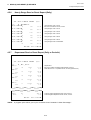
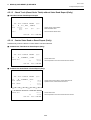
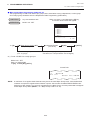
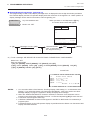
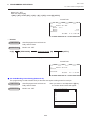
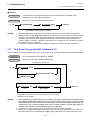
No-sale Exchange from Foreign Currency to Domestic Currency
OPERATION
(must be operated outside a sale)
[CUR1]
|Amount of Foreign Currency 1 to be exchanged| [NS]
Max. 8 digits 1 to 99999999
NOTES:
1. The [CUR 2] to [CUR 5] keys operate in
the same way.
2. The fraction process method is fixed to
Round OFF.
*REG
* 02-06-1999 03:04
CUR1
1 1CLKendi
P1S1
20.00
0.365*
CHANGE
7.30
CHANGE
7.30
DISP1
9-4
DISP2
TOTAL
DISP3
DISP4
0.00
DISP5
EO1-11138
9. TRANSACTION ENTRIES
9.7 No-sale Exchange from Domestic Currency to Foreign Currency
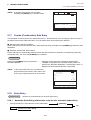
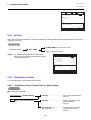
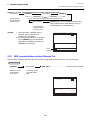
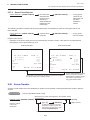
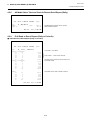
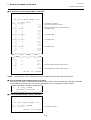
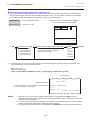
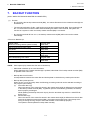
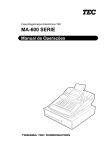
9.7
No-sale Exchange from Domestic Currency to Foreign Currency
OPERATION
(must be operated outside a sale)
|Amount of Domestic Currency to be exchanged| [CUR 1]
NOTES:
[NS]
1. The [CUR 2] to [CUR 5] keys operate in the same way.
2. A program option allows you to prohibit the No-sale Exchange from domestic currency to foreign
currency.
3. The fraction process method is fixed to Round OFF.
*REG
* 02-06-1999 03:04
CATEND
1.214*
CUR2
1 1CLKendi
P1S1
20.00
16.47
CUR2
16.47
DISP1
9.8
DISP2
TOTAL
DISP3
DISP4
0.00
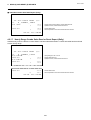
DISP5
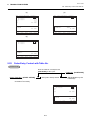
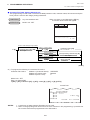
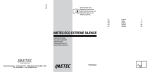
PLU (menu item) Entry through the Keyboard
Each PLU is preprogrammed as the “PRESET” type (with a price preset) or “OPEN” type (with no price preset).
Perform the operation depending on the type selected.
OPERATION
■ Open PLU Type
• |Open-PLU Code| [PLU] |Price| [AMT]
*REG
Max. 7 digits
1 to 9999999
•
* 02-06-1999 03:04
1 1CLKendi
P1S1
1 PLU000001
1.00T
|Price| [PLU Preset-Code Key] of Preset-PLU
Max. 7 digits
1 to 9999999
PLU000001
1.00
■ Preset PLU Type
• |Preset-PLU Code| [PLU]
•
DISP1
[PLU Preset-Code Key] of Preset-PLU
■ Preset-price Open Entry through Preset PLU Type
• [PR OPEN] (or [OPEN]) |Preset-PLU Code| [PLU] |Price| [AMT]
Max. 7 digits
1 to 9999999
•
[PR OPEN] (or [OPEN]) |Price| [PLU Preset-Code Key]
Max. 7 digits
1 to 9999999
9-5
1
DISP2
TOTAL
DISP3
DISP4
1.15
DISP5
T: Taxable
Symbol
EO1-11138
9. TRANSACTION ENTRIES
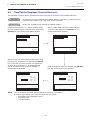
9.9 PLU (menu item) Entry through the Menu Window
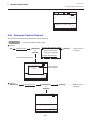
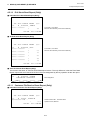
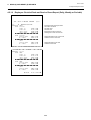
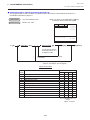
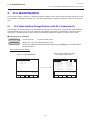
9.9
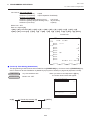
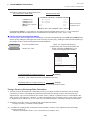
PLU (menu item) Entry through the Menu Window
This register allows you to select and enter a PLU (menu item) through the Menu Window.
OPERATION
■ Through the [DISPLAY] key
[DISPLAY] ......................................................... Displays the corresponding menu table window as follows.
([DISPLAY 1] to [DISPLAY 99])
*REG
* 02-06-1999 03:04
1 1CLKendi
P1S1
PLU000001
PLU000010
PLU000100
0.00
↓
■ Through the [PLU] key with the menu table
programmed
[PLU] .............. Displays the corresponding menu
table window as follows.
*REG
TOTAL
Select
↑
* 02-06-1999 03:04
Enter
0.00
Pg dw
1 1CLKendi
P1S1
1.00T
PLU000001
PLU000010
PLU000100
P
1.00
↓
1
↑
TOTAL
Select
Enter
1.15
Pg dw
■ Function Keys while the Menu Window is displayed
[↑] [↓]:
Cursor
[SELECT]:
PLU (menu item) Selection
|Quantity| [SELECT] ([ENTER]): Quantity Selection
[NEXT]:
Screen Skip or Next Screen Request
[ENTER]:
PLU (menu item) Selection and Entry
Operation Example 1)
You select and enter the following item from the menu window shown above.
PLU 000001 (1 item)
[DISPLAY 1]
([SELECT])
Operation Example 2)
You select and enter the following items from the menu window shown above.
PLU 000010 (1 item), PLU 000100 (3 items)
[DISPLAY 1]
[↓]
([SELECT])
[ENTER]
[ENTER]
[↓]
...
...
Press once.
Press twice.
9-6
[3]
[SELECT]
[ENTER]
EO1-11138
9. TRANSACTION ENTRIES
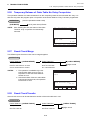
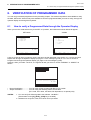
9.10 Repeat Entry
NOTES:
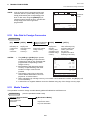
9.10
1. While the menu window is displayed, operate as follows to cancel a PLU (menu item) already
selected by the [SELECT] key.
[0] → [SELECT]
2. While the menu window is displayed, you cannot perform the following sales transactions.
• Subtotal Read
• Void
• Dollar Discount, % Operations
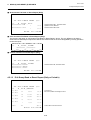
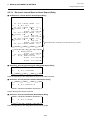
Repeat Entry
To repeat the same item of the last entry, simply depress the last key of the PLU entry sequence or depress the
[RPT] key.
OPERATION
■ Open PLU Type
• |Open-PLU Code| [PLU] |Price| [AMT] [AMT] (or [RPT])
*REG
1 PLU000004
1 PLU000004
1 PLU000004
Max. 7 digits
1 to 9999999
•
1 1CLKendi
P1S1
2.00T
2.00T
2.00T
|Price| [PLU Preset-Code Key] [Same key] (or [RPT])
Max. 7 digits
1 to 9999999
PLU000004
3
■ Preset PLU Type
• |Preset-PLU Code| [PLU] [PLU] (or [RPT])
•
* 02-06-1999 03:04
DISP1
3
DISP2
TOTAL
DISP3
2.00
DISP4
7.32
DISP5
[PLU Preset-Code Key] [Same key] (or [RPT])
■ Preset-price Open Repeat
• [PR OPEN] (or [OPEN]) |Preset-PLU Code| [PLU] |Price| [AMT] [RPT]
Max. 7 digits
1 to 9999999
•
[PR OPEN] (or [OPEN]) |Price| [PLU Preset-Code Key] [RPT]
Max. 7 digits
1 to 9999999
NOTES:
9.11
1. If the first item of those repeated is modified with [SI/M] or [TX/M], the modified status will be
effective through the last item of the repeated.
2. Please note that the Preset-price Open Repeat can only be performed by the [RPT] key.
3. A negative PLU item cannot be repeated.
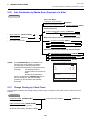
Quantity Extension (Multiplication)
OPERATION
■ Open PLU Type
• |Open-PLU Code| [PLU] |Quantity| [X] |Price| [AMT]
• |Quantity| [X] |Price| [PLU Preset-Code Key] of Open-PLU
■ Preset PLU Type
• |Quantity| [X] |Preset-PLU Code| [PLU]
• |Quantity| [X] [PLU Preset-Code Key] of Preset-PLU
9-7
EO1-11138
9. TRANSACTION ENTRIES
9.12 Set Menu Entry
■ Preset-price Open Repeat
• [PR OPEN] (or [OPEN]) |Preset-PLU Code| [PLU] |Quantity| [X] |Price| [AMT]
• |Quantity| [X] [PR OPEN] (or [OPEN]) |Price| [PLU Preset-Code Key] of Preset-PLU
NOTES:
1. Quantity .................... Max. 3 integral + 3 decimal digits (Use the [ . ] key for entering decimal digits.)
Price (Unit Price) ...... Max. 6 digits
Product ..................... Must not exceed 8 digits.
2. When the Quantity is 1-digit integer (1 to 9) followed by a Code-preset PLU key with a price
preset, the [X] key is omissible.
3. The product obtained by multiplication cannot be repeated.
4. The decimal portion of the Quantity
*REG * 02-06-1999 03:04 1 1CLKendi
P1S1
entry itself is processed down to the two
3 PLU000004
6.00T
digits below the decimal point. The
fraction rounding in this case is fixed to
ROUND OFF.
5. You can select the rounding process of
the fractions of the product (result of
multiplication) by a program option:
PLU000004
3
6.00
ROUND OFF (initial setting), ROUND
UP, or ROUND DOWN.
3
TOTAL
7.32
DISP1
9.12
DISP2
DISP3
DISP4
DISP5
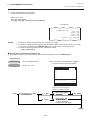
Set Menu Entry
Up to 50 set menu tables are available. You can select two kinds of the set menu table; Preset Menu Type and
Open Menu Type.
OPERATION
■ Preset Menu Table Type
• One Set Menu Entry
PLU Entry of main menu
•
Quantity Extension
|Quantity| [X]
Sub menu PLUs are automatically entered.
PLU Entry of main menu
Sub menu PLUs are automatically multiplied and
entered.
0.001 to 999.999
■ Open Menu Table Type
• One Set Menu Entry
PLU Entry of main menu
•
Quantity Extension
|Quantity| [X]
PLU Entries of sub menus
PLU Entry of main menu
[END]
PLU Entries of sub menus
[END]
0.001 to 999.999
NOTES:
1. Repeat Entry is not possible for the set
menu items.
2. Modifier Entry is not possible for the set
menu items.
3. Void Entry is not possible for the set
menu items.
4. As for the Preset Menu Table Type, up
to seven menu items can be
programmed to each table.
*REG
* 02-06-1999 03:04
1 PLU000005
1 PLU000050
1 PLU000500
9-8
Sub Menus
PLU000005
3
DISP1
3
DISP2
1 1CLKendi
P1S1
10.00T
TOTAL
DISP3
10.00
DISP4
10.70
DISP5
Main Menu
EO1-11138
9. TRANSACTION ENTRIES
9.13 Modifier Entry
5. As for the Open Menu Table Type, if the quantity of sub menu items to be entered is
programmed, the set menu entry is completed when the quantity of sub menu items reaches the
programmed quantity. In this case, depressing the [END] key is unnecessary.
6. As for the Open Menu Table Type, Quantity Extension is available for a sub menu PLU. Even
when a main menu PLU is multiplied by the Quantity Extension, sub menu PLUs will not be
multiplied.
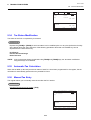
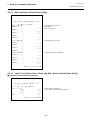
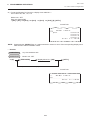
9.13
Modifier Entry
You can select and enter “MODIFIER” PLUs (such as “PEPPER”, “RARE”, “MEDIUM” for grilling a steak item,
and toppings for dishes, etc.).
OPERATION
If no modifier item is required.
Entry of PLU
(menu item) which it
is allowed to enter
the modifier items
Entry of PLU which is
programmed for
modifier use
[END]
Up to 30 modifier PLUs can be entered.
NOTES:
1. The [END] key depression is omissible
in the following cases and the modifier
entry is automatically finalized.
• Ordinary PLU item is entered after
a modifier PLU.
• The [TOTAL] key is operated after a
modifier PLU.
• Sale finalization by the media keys is
performed after a modifier PLU.
2. Quantity Extension is available for a
modifier PLU. Multiplied sales item
count is displayed for a modifier PLU.
When a modifier PLU with preset price
programmed is multiplied by the
Quantity Extension, the preset price will
also be multiplied.
*REG
* 02-06-1999 03:04
RARE
0.00
DISP1
DISP2
TOTAL
DISP3
* REG * 02-06-1999 03:04
1 BEEF STEAK
1 RARE
1 PEPPER
BEEF
3
DISP1
9.14
1 1CLKendi
P1S1
DISP4
0.00
DISP5
1 1CLKendi
P1S1
15.00
STEAK
3
DISP2
15.00
TOTAL
DISP3
DISP4
15.00
DISP5
Other Income PLU Entry
This operation is used to enter items which do not directly become sales for the restaurant, such as postage, gift
wrapping fee, utility (payment of electricity and gas), and donation.
OPERATION
The same key operation as “PLU (menu item) Entry”. However, use the PLU which has been linked to the
Other Income Department.
9-9
EO1-11138
9. TRANSACTION ENTRIES
9.15 PLU Code Shift Entry
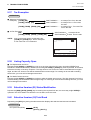
9.15
PLU Code Shift Entry
Depressing the [CODE SHIFT] key designates and enters a PLU item, adding the printed number (1 to 4) to an
entered PLU code.
OPERATION
[CODE SHIFT 1]
[CODE SHIFT 2]
[CODE SHIFT 3]
[CODE SHIFT 4]
PLU Entry ............................ (To enter a PLU item of the entered code plus 1)
PLU Entry ............................ (To enter a PLU item of the entered code plus 2)
PLU Entry ............................ (To enter a PLU item of the entered code plus 3)
PLU Entry ............................ (To enter a PLU item of the entered code plus 4)
Example) When the PLU code 7 is designated after the [CODE SHIFT 2] is depressed, this sales transaction
will result in the sales item entry of the PLU code 9.
NOTES:
1. Depressing the [C] key immediately
after the [CODE SHIFT] key results in
the cancellation of the PLU Code Shift
Entry.
2. You can depress the [CODE SHIFT]
key any number of times before the PLU
Entry. The last depressed [CODE
SHIFT] key becomes effective.
3. Function of the [CODE SHIFT] key is
effective for the next PLU Entry only.
*REG
* 02-06-1999 03:04
CODE
SHIFT2
0.00
DISP1
9.16
1 1CLKendi
P1S1
DISP2
TOTAL
DISP3
DISP4
0.00
DISP5
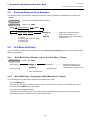
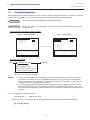
PLU Price Shift Entry
Up to five different unit prices can be programmed for each PLU and you can select either of the following two
features.
9.16.1
Price Shift Entry “Effective only for One PLU Entry” Feature
OPERATION
(PLU entries)
PLU entry ....................... After the PLU Entry, the price
mode automatically returns to
the 1st price mode.
...
...
...
with the 1st price
[PRICE 2]
to
[PRICE 5]
with shifted price
Price shift declaration
9.16.2
Price Shift Entry “Keeping the shifted Price Level” Feature
You can shift the PLU price level to another in the following three cases.
• Using the [PRICE] key
The same key operation as “Effective only for One PLU Entry” Feature. However, the shifted price level is held
until another [PRICE] key is depressed.
• Using the Hourly Range Designation
Hourly range to start shifting each price level can be programmed. If programmed, the price level will be
automatically shifted to another when the hourly range starts.
• Using the Price Level for each Customer
Price level can be programmed to each customer. PLU entry will be performed on the basis of the
programmed information. For details, refer to the section 9.31 Charge Posting by Check Track on page 9-20.
9-10
EO1-11138
9. TRANSACTION ENTRIES
9.17 Combo (Combination) Sale Entry
NOTE:
A program option allows you to prohibit
operating the [PRICE] key in the REG mode.
*REG
* 02-06-1999 03:04
PRICE
1 1CLKendi
P1S1
SHIFT3
0.00
DISP1
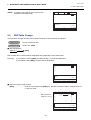
9.17
DISP2
TOTAL
DISP3
DISP4
0.00
DISP5
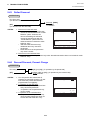
Combo (Combination) Sale Entry
This operation is used to perform the special discount (%-, Dollar Discount, Free of Charge) to the PLU Entry on
the basis of the Combo Table information. You can select either of the following two features.
■ Manual Combo Sale Entry Feature
Combo sale entry becomes effective and is performed only when you depress the [COMBO] key before the sale
finalization.
■ Automatic Combo Sale Entry Feature
Combo sale entry is automatically performed when the sale transaction is finalized. To temporarily prohibit the
combo sale entry, the use of the [COMBO] key is effective.
OPERATION
Depress the [COMBO] key any time before ........... When the combo sale entry is effective, the descriptor
the sale finalization.
“COMBO” is displayed on the operator display. When not
effective, the descriptor disappears. The descriptor “DISC” is
displayed when the special discount is performed.
NOTE:
In the combo sale entry, the 1st preset price
programmed for each PLU is used. Also in this
entry, only the preset-price PLUs can be used.
*REG * 02-06-1999 03:04
COMBO DISC
1 PLU000001
1 PLU000008
SUBTL
COMBO DISC
SUBTL
TAX
CASH
1 1CLKendi
P1S1
1.00T
9.50T
10.50
-4.75
5.75
0.82
6.57
CASH
6.57
DISP1
9.18
•
TOTAL
DISP3
DISP4
6.57
DISP5
Scale Entry
OPERATION
9.18.1
2
DISP2
(Scale entry is allowed only for the scale type PLUs)
Automatic Scale Entry (without tare or by the tare automatic subtraction)
Through Preset-PLU: Place the item on the scale platter.
([SCALE])
(M)
|Preset PLU Code| [PLU]
9-11
EO1-11138
9. TRANSACTION ENTRIES
9.19 Subtotal Read
•
Through Open-PLU: Place the item on the scale platter.
([SCALE])
(M)
|Open-PLU Code| [PLU] |Unit Price| [AMT]
per Unit Weight
NOTE:
9.18.2
When the PLU is programmed with a Tare Table No., the tare weight is automatically subtracted from
the scaled weight, and thus only the net weight is processed.
Scale Entry by entering the Tare Table No.
|Tare Table No.| [TARE]
to be continued to the arrows marked with “(M)” in the above two
operations of the Automatic Scale Entry.
1 to 9
9.18.3
Scale Entry by manually entering the Tare Weight
|Tare Weight| [MANUAL TARE]
to be continued to the arrows marked with “(M)” in the above two
operations of the Automatic Scale Entry.
Any value other than 0,
however, less than the
weight of scaled item
9.18.4
Manual Scale Entry
|Net Weight| of the item
[SCALE]
1 to 99999
(unit: g or 1/100 LB. for example, enter 5 for 0.05LB.)
9.18.5
to be continued to the arrows marked with “(M)” in the
above two operations of the Automatic Scale Entry.
Scale Entry for the Void Item
[VOID]
to be continued to the top of the “Manual Scale Entry” sequence above.
*REG
* 02-06-1999 03:04
1 1CLKendi
P1S1
SCALE
0.999
DISP1
9.19
DISP2
TOTAL
DISP3
DISP4
0.00
DISP5
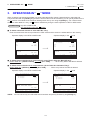
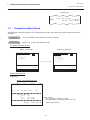
Subtotal Read
You can select one of the following three types of subtotal.
9.19.1
Tax included Subtotal
Depress the [ST] key any time during the sales transaction. The sales subtotal including tax will be displayed.
9-12
EO1-11138
9. TRANSACTION ENTRIES
9.20 Tray Total Read
*REG
* 02-06-1999 03:04
1 1CLKendi
P1S1
1.00T
1 PLU000001
SUBTL
1.10
DISP1
9.19.2
1
DISP2
TOTAL
DISP3
DISP4
1.10
DISP5
Net Subtotal (tax not included)
Depress the [ST] key any time during the sales transaction. The net sales subtotal (excluding tax) will be
displayed.
9.19.3
Eat-in/Takeout Subtotal
Depress the [EAT IN] or the [TAKEOUT] key before the sale transaction is finalized. The register calculates and
displays the subtotal according to the programmed Eat-in/Takeout tax status.
*REG
* 02-06-1999 03:04
1 PLU000015
SUBTL
CASH
*TAKE OUT
1 1CLKendi
P1S1
25.00T
25.00
25.00
*
CASH
25.00
DISP1
9.20
1
DISP2
TOTAL
DISP3
DISP4
25.00
DISP5
Tray Total Read
Depress the [TRAY TOTAL] key after entering PLU items. The contents of the tray total itemizer which include
tax is displayed.
*REG
* 02-06-1999 03:04
1 PLU000001
1 PLU000010
TAX
TRAY TL
TRAY
1 1CLKendi
P1S1
1.00T
1.50
0.25
2.75
TL
2.75
DISP1
9-13
2
DISP2
TOTAL
DISP3
DISP4
2.75
DISP5
EO1-11138
9. TRANSACTION ENTRIES
9.21 Item Correct
9.21
Item Correct
If you make an incorrect entry in the following sales transactions, depress the [ITEM CORR] key to delete the last
entered item.
OPERATION
PLU ENTRY
REPEAT ENTRY
QUANTITY EXTENSION
DOLLAR DISCOUNT
PERCENT CHARGE/DISCOUNT
RECEIVED-ON-ACCOUNT
PAID-OUT
NOTES:
[ITEM CORR]
1. When [ITEM CORR] is depressed after the Repeat Entry, only the last item of those repeated will
be deleted.
2. When [ITEM CORR] is depressed after the Quantity Extension entry, the entire product (result of
multiplication) will be deleted.
*REG
* 02-06-1999 03:04
1 PLU000007
CORR
1
DISP1
9.22
1
DISP2
1 1CLKendi
P1S1
12.00T
12.00
TOTAL
DISP3
DISP4
14.04
DISP5
Void (Designated Line Voiding and Returned Merchandise)
This operation deletes a PLU item (not necessarily the last entered item) already entered in the sales transaction.
It is also used outside a sale to return an item already purchased.
OPERATION
■ Void through the [PLU] key
Depress the [VOID] key prior to or any time during the entry sequence of the following operations:
PLU Entries (except Repeat Entry)
Percent Discount/Charge on a PLU item
■ Void through the Operator Display
Depress the [VOID] key at any point.
(|Quantity|)
[ENTER]
...
[↑]
[↓]
[PAGE UP]
[PAGE DOWN]
...
To delete the items by
the Quantity Extension
Select the item
to be deleted.
9-14
EO1-11138
9. TRANSACTION ENTRIES
9.23 All Void
*REG
* 02-06-1999 03:04
1 PLU000007
1 PLU000008
*VOID
1 PLU000007
1 1CLKendi
P1S1
12.00T
9.50T
*
-12.00T
PLU000007
-12.00
DISP1
9.23
1
DISP2
TOTAL
DISP3
10.17
DISP4
DISP5
All Void
When the current sales transaction now being entered must be canceled before the sale finalization, the All Void
operation is effective.
OPERATION
[ITEM CORR] to execute ALL VOID
Sale Item Entries
[ALL VOID]
[C] to cancel ALL VOID
NOTE:
You cannot perform the All Void if the sales
items of 31 or more have already been entered
in the sales transaction.
*REG
* 02-06-1999 03:04
1 PLU000001
1 PLU000010
1 PLU000100
1 PLU000002
1 PLU000020
SUBTL
*ALL VD
ALL
1 1CLKendi
P1S1
1.00T
1.50T
2.00T
3.00T
3.50T
11.00
*
VD
0.00
DISP1
9.24
DISP2
TOTAL
DISP3
DISP4
0.00
DISP5
Order Entry Control
You can select either of the following two features.
9.24.1
Order Entry Control (Order Table No. Manual Entry)
OPERATION
■ To start new order table:
|Order Table No.| [START CHECK]
1 to 999.9
PLU (menu items) entries
[TOTAL] ................................... only to reserve order table
See (1)
[TOTAL] ................................... to enter order items, with
balance forward
See (2)
Sale finalization by.................... to enter order items, with
the media keys
payment of the check
See (3)
9-15
EO1-11138
9. TRANSACTION ENTRIES
9.24 Order Entry Control
■ To cancel the order table already reserved:
|Order Table No. in reservation| [START CHECK]
[AT/TL]
See (4)
■ To enter order items for the reserved order table, or to enter additional order items for the order table in use:
|Order Table No. in reservation or in use| [START CHECK]
PLU (menu items) entries
See (5)
9.24.2
Order Entry Control (Order Table No. Automatic Entry)
OPERATION
■ To start new order table:
[START CHECK]
PLU (menu items) entries
...
Order Table No. is
automatically created.
[TOTAL] ............... to enter order items,
with balance forward
See (2)
Sale finalization .... to enter order items,
by the media
with payment of the
keys
check
See (3)
■ To enter additional order items for the order table No. in use:
(|Order Table No. in use|) [RECALL]
PLU (menu items) entries
See (5)
...
Omissible; NOTE 2 below
NOTES:
1. You cannot perform the following sales transactions after entering the order table No.
• No-sale, Received-on-Account, Paid Out
• Negative PLU Entry
• All Void
• Tray Total Read
• Percent Charge/Discount and Dollar Discount on PLU item
2. Entry of the order table No. before depressing the [RECALL] key is omissible. In this case, the
oldest-recorded order table No. among all of the opened order tables will be read out.
(1)
*REG * 02-06-1999 03:04
TABLE NO
001
(2)
1 1CLKendi
P1S1
*REG * 02-06-1999 03:04
TABLE NO
001
1 PLU000001
1 PLU000010
RESERVATION001
NEW
0.00
DISP1
DISP2
TOTAL
DISP3
DISP4
0.00
DISP5
DISP1
9-16
1 1CLKendi
P1S1
1.00T
10.00T
BALANCE001
11.90
2
DISP2
TOTAL
DISP3
DISP4
11.90
DISP5
EO1-11138
9. TRANSACTION ENTRIES
9.25 Order Entry Control with Table No.
(3)
*REG * 02-06-1999 03:04
001
TABLE NO
1 PLU000001
1 PLU000010
SUBTL
TAX
CASH
(4)
1 1CLKendi
P1S1
1.00T
10.00T
11.00
0.90
11.90
*REG * 02-06-1999 03:04
001
TABLE NO
CASH
CANCEL
1 1CLKendi
P1S1
001
11.90
DISP1
2
DISP2
TOTAL
DISP3
DISP4
0.00
11.90
DISP5
DISP1
0
DISP2
TOTAL
DISP3
DISP4
0.00
DISP5
(5)
*REG * 02-06-1999 03:04
TABLE NO
001
1 PLU000001
1 PLU000010
1 1CLKendi
P1S1
1.00T
10.00T
SUBTL
11.90
DISP1
9.25
2
DISP2
TOTAL
DISP3
DISP4
11.90
DISP5
Order Entry Control with Table No.
OPERATION
Enter the Table No. and depress the
[POSITION #] at either point.
|Table No.| [POSITION #]
1 to 999.9
(|Order Table No.| [START CHECK])
PLU (menu items) entries
Sale finalization by the
media keys
...
1 to 999.9
Omissible if unnecessary
*REG * 02-06-1999 03:04
2’ nd NO.
005
1 PLU000010
SUBTL
TAX
CASH
1 1CLKendi
P1S1
10.00T
10.00
0.80
10.80
CASH
10.80
DISP1
9-17
1
DISP2
TOTAL
DISP3
DISP4
10.80
DISP5
EO1-11138
9. TRANSACTION ENTRIES
9.26 Temporary Release of Order Table No. Entry Compulsion
9.26
Temporary Release of Order Table No. Entry Compulsion
This operation releases one sales transaction from the compulsory status of the order table No. entry. It is
effective only when the program option “Compulsion of the Order Table No. Entry” has been programmed.
OPERATION
[PUB MODE]
NOTE:
(must be operated outside a sale)
PLU (menu items) Entries
After finalizing the sale, the status of the Order
Table No. entry compulsion is automatically
resumed.
*REG
* 02-06-1999 03:04
Non
1 1CLKendi
P1S1
TAB
0.00
DISP1
9.27
DISP2
TOTAL
DISP3
DISP4
0.00
DISP5
Guest Check Merge
Two different guest check accounts can be merged together.
OPERATION
|Order Table No.| [CHECK MERGE]
|Order Table No.|
...
...
Enter the order table No. of which
account is transferred to another.
NOTES:
[CHECK MERGE]
[C] to cancel
Enter the order table
No. of the destination.
1. This operation is available only to the
opened order table account. Entry of
unopened or reserved order table No.
causes an error.
2. If the item buffers of the two order tables
to be merged exceed 100, this operation
will result in an error.
*REG * 02-06-1999 03:04
TABLE NO
002
MERGE
INTO
NEW
DISP1
9.28
1 1CLKendi
P1S1
1
2
BALANCE002
22.52
4
DISP2
TOTAL
DISP3
DISP4
22.52
DISP5
Guest Check Transfer
Guest check account can be transferred to another of the order table not in use.
OPERATION
|Order Table No.| [CHECK TRANS.]
...
...
Old Order Table No.
|Order Table No.|
New Order Table No.
9-18
[CHECK TRANS.]
[C] to cancel
EO1-11138
9. TRANSACTION ENTRIES
9.29 Guest Check Split
NOTES:
1. As for the old order table, you can use
reserved or opened one. As for the new
order table, you can use reserved or
unopened one.
2. When the register adopts the feature
“Order Entry Control by automatic entry
of the Order Table No.”, you cannot
enter the new order table No. and it will
be automatically designated.
*REG * 02-06-1999 03:04
TABLE NO
002
TRANSFER
INTO
TABLE
DISP1
9.29
1 1CLKendi
P1S1
1
2
TRANS002
43.20
4
DISP2
TOTAL
DISP3
DISP4
43.20
DISP5
Guest Check Split
Guest check account can be partially transferred to another of the order table not in use.
OPERATION
|Order Table No.| [SPLIT CHECK]
|Order Table No.| [SPLIT CHECK]
...
...
PLU (menu item)
Entries (NOTE 1
below)
Enter the order table No. of
which account is partially
transferred to another.
Enter the order table
No. of the destination.
[C] to cancel
[TOTAL]
NOTES:
1. You can only enter the sales items which have been stored in the item buffer of the order table of
which account is transferred.
2. When the register adopts the feature “Order Entry Control by automatic entry of the Order Table
No.”, you cannot enter the order table No. of the destination and it will be automatically
designated.
3. After the PLU entries, you can check the contents of the two order tables using the [←] and [→]
keys.
If a guest wants to pay the check partially or entirely.....
|Order Table No.| [SPLIT CHECK]
PLU (menu item) Entries
[→]
...
Sale finalization by the
media keys
Enter the order table
No. of which account is
partially or entirely paid.
*REG * 02-06-1999 03:04
TABLE NO
001
SPLIT
4 PLU000010
NEW
DISP1
9-19
1 1CLKendi
P1S1
1
2
40.00T
BALANCE002
43.20
4
DISP2
TOTAL
DISP3
DISP4
43.20
DISP5
EO1-11138
9. TRANSACTION ENTRIES
9.30 Sale Finalization by Media Keys (Payment of a Sale)
9.30
Sale Finalization by Media Keys (Payment of a Sale)
OPERATION
Paid in One Media:
Totalling (no change calculation)
[Media]
Tendering (with change calculation)
|Amount Tendered| [Media]
Paid by Credit Card:
|Code for Credit Card Company| [CARD No.]
1 to 12
•
|Order Table No.| [START CHECK]
---
(|Amount Tendered|) [Chg]
•
|Order Table No.| [RECALL]
---
Multi-tender (Short-tender repeated by the same media):
•
PLU (menu item) Entries
|1st Amount Tendered| [Media]
|2nd Amount Tendered| [Same Media]
(|Last Amount Tendered|) [Same Media]
Split-tender (Short-tender repeated by different medias):
|Check Amount Tendered Portion| [CHECK]
|Media-Coupon Amount Tendered Portion| [CPN]
(|Cash Amount Tendered Portion|) [AT/TL]
NOTE:
9.31
If the [TENDER UP] key is installed on the
keyboard, the cash tendering operation
corresponding to the sales total will be
automatically performed by depressing its key.
Example)
The following value is
programmed to the Tender Up
table:
$5.00, $10.00 and $20.00
When you depress the [TENDER UP] key for
the sale total $7.00, the cash tendering
operation by $10.00 will be automatically
performed.
*REG
* 02-06-1999 03:04
1 PLU000010
SUBTL
TOTAL
CATEND
CHANGE
1 1CLKendi
P1S1
7.00T
7.00
7.00
10.00
3.00
CHANGE
3.00
DISP1
1
DISP2
TOTAL
DISP3
DISP4
7.00
DISP5
Charge Posting by Check Track
This operation is used for the charge posting, and the entry of customer code reads out the customer account
balance.
OPERATION
|Customer Code| [PICKUP BAL]
PLU (menu item) Entries
Code already opened
|New Customer Code| [CODE OPEN]
Max. 12 digits Code not yet opened
Customer Card reading through the MCR
9-20
[CREDIT 5]
EO1-11138
9. TRANSACTION ENTRIES
9.32 Sale Paid in Foreign Currencies
NOTE:
If the PLU price level is programmed to each
customer, the PLU (menu item) entry will be
fixedly performed by the corresponding price
level. In this case, using the [PRICE] key to
change the level causes an error, and also the
hourly range price level is ignored if
programmed.
*REG
* 02-06-1999 03:04
1 1CLKendi
P1S1
No999999999999
SMITH
100.00
Customer
Code
SMITH
100.00
DISP1
9.32
DISP2
TOTAL
DISP3
100.00
DISP4
DISP5
Sale Paid in Foreign Currencies
OPERATION
[ST]
[CUR1]
Display the entered
foreign currency
amount.
Displays the
domestic
currency value
equivalent to the
tendered foreign
currency.
[AT/TL]
...
9.33
...
NOTES:
Displays the
equivalent value
in Foreign
Currency 1.
...
...
...
Mandatory for
a sale paid in
foreign
currencies.
Amount Tendered in [CUR1]
Foreign Currency
|
Other media keys may
be used if paid in that
media. (The media
key must be
programmed to allow
tendering in this case.)
1. The [CUR 2] to [CUR 5] keys operate
*REG * 02-06-1999 03:04 1 1CLKendi
P1S1
the same as [CUR 1], except that each
SUBTL
20.00
of these keys has its own exchange rate
TAX
1.60
TOTAL
21.60
programmed corresponding to each
CUR1
100.00
foreign currency.
0.365*
2. Multi-tendering with the same foreign
CATEND
36.50
CHANGE
14.90
currency or Split-tendering with other
medias or foreign currencies are
CHANGE
14.90
possible.
3. The foreign currency keys cannot be
2
TOTAL
21.60
DISP1
DISP2
DISP3
DISP4
DISP5
used to finalize Received-on-Account
payments, or Paid-out items.
4. When a tendering by a foreign currency occurs after a short-tendered condition, the [ST] key will
not be mandatory.
5. A sale of zero or negative balance cannot be finalized using any of the foreign currency keys.
Media Transfer
This operation is used to change a media already paid and finalized into a different one.
OPERATION
(must be operated outside a sale)
|Amount| [Source Media]
[Destination Media]
...
Enter the amount
of the media to be
transferred.
Depress the media
key of the destination.
[C]
9-21
EO1-11138
9. TRANSACTION ENTRIES
9.34 Tax Status Modification
*REG
* 02-06-1999 03:04
*CHANGE
CHANGE
INTO
1 1CLKendi
P1S1
*
CPN
CASH
10.00
CASH
10.00
DISP1
9.34
DISP2
TOTAL
DISP3
DISP4
0.00
DISP5
Tax Status Modification
Tax status of the PLU or required key is reversed:
OPERATION
Depress the [TX1/M] to [TX4/M] of which tax status is to be modified prior to or any time (before the final key
at the latest) during the entry sequence of the following operations. More than one modifier key can be
depressed for the same item entry:
PLU Entries
Percent Discount/Charge
Dollar Discount
NOTE:
If the inclusive-tax feature is selected to the [TX3/M] and [TX4/M] keys, the tax status modification
using those keys is not allowed.
9.35
Automatic Tax Calculation
When the tax table (or tax rate) and the tax status of each PLU have been programmed for the register, the tax
calculation is automatically performed on any taxable PLU item.
9.36
Manual Tax Entry
The register allows you to manually enter the tax after the PLU entries.
OPERATION
|Irregular Tax Amount to be Added| [TAX]
*REG
* 02-06-1999 03:04
1 PLU000001
TAX5
1 1CLKendi
P1S1
1.00T
0.12
TAX5
0.12
DISP1
9-22
1
DISP2
TOTAL
DISP3
DISP4
1.12
DISP5
EO1-11138
9. TRANSACTION ENTRIES
9.37 Tax Exemption
9.37
Tax Exemption
OPERATION
■ Selective Tax Exemption
Examples) [TX1/M] [EX]
[TX1/M] [TX2/M] [EX]
Sale Finalization ........ to exempt Tax 1 from the sale
Sale Finalization ........ to exempt Tax 1 & Tax 2 from
the sale
Sale Finalization ........ to exempt Tax 1, Tax 2 and Tax
3 from the sale
[TX1/M] [TX2/M] [TX3/M] [EX]
■ All Tax Exemption
[EX]
[TX1/M] [TX2/M] [TX3/M] [TX4/M] [EX]
NOTE:
If the inclusive-tax feature is selected to the
[TX3/M] and [TX4/M] keys, the tax exemption
of Tax 3 and Tax 4 is not allowed.
Sale Finalization
Sale Finalization
*REG
* 02-06-1999 03:04
1 PLU000010
TAX2EX
to exempt all the
taxes from the sale
1 1CLKendi
P1S1
10.00T
10.00
TOTAL
10.00
DISP1
9.38
1
DISP2
TOTAL
DISP3
DISP4
10.00
DISP5
Listing Capacity Open
■ For Departments and PLUs
Depress the [LC OPEN] (or [OPEN]) key prior to or any time during the PLU entry (including REPEAT and
QUANTITY EXTENSION entries). Please note that the [LC OPEN] or [OPEN] key must be pressed, at the latest,
before the final key of the entry sequence. The High Amount Limit for the PLU will be extended with two higher
digits, and the Low Amount Limit will be extended with one lower digit. For entering an amount still exceeding
these limits, you must call for Manager Intervention.
■ For Media Tender Amounts
Depress the [LC OPEN] (or [OPEN]) key before or after the tender amount entry. The High Amount Limit for the
media tendering will be extended with one higher digit. For entering an amount still exceeding this limit, you must
call for Manager Intervention.
9.39
Selective Itemizer (SI) Status Modification
Depress the [SI/M] ([SI1/M], [SI2/M]) key for entering the required PLU item, the same way as [LC OPEN] is
operated. The SI-net status is reversed to non-net status, and vice versa.
9.40
Selective Itemizer (SI) Total Read
Depressing the [SI/TL] key during the sales transaction displays the selective itemizer total calculated.
OPERATION
PLU (menu item) Entry
[SI/TL]
([SI1/TL], [SI/2/TL])
9-23
EO1-11138
9. TRANSACTION ENTRIES
9.41 PLU Preset Price Read
NOTE:
Selective Itemizer Total Read after the order
table No. entry is possible.
*REG
* 02-06-1999 03:04
1 PLU000030
SI1 TL
SI1
1 1CLKendi
P1S1
7.50TS
-0.75
S: SI-net
Symbol
TL
-0.75
DISP1
9.41
1
DISP2
TOTAL
DISP3
DISP4
8.10
DISP5
PLU Preset Price Read
You can check the preset price of each PLU.
OPERATION
■ [READ]
(Any time inside or outside a sale, but prohibited during a short-tendered condition.)
([PRICE])
|PLU Code| [PLU]
...
for the shift of price level
■ [READ]
([PRICE])
[PLU Preset-Code Key]
...
*REG
for the shift of
price level
* 02-06-1999 03:04
1 1CLKendi
P1S1
([MENU])
...
for the shift of keyboard phase
READ
DISP1
9.42
DISP2
PLU000030
7.50
TOTAL
DISP3
DISP4
0.00
DISP5
PLU Stock Read
You can check the current stock of each PLU.
OPERATION
(Any time inside or outside a sale, but prohibited during a short-tendered condition.)
■ [STOCK] |PLU Code| [PLU]
■ [STOCK]
([MENU])
*REG
* 02-06-1999 03:04
1 1CLKendi
P1S1
[PLU Preset-Code Key]
...
for the shift of keyboard phase
STOCK
DISP1
9-24
DISP2
PLU000030
120.
TOTAL
DISP3
DISP4
0.00
DISP5
EO1-11138
9. TRANSACTION ENTRIES
9.43 Dollar Discount
9.43
Dollar Discount
OPERATION
PLU item entry
(for discount from an individual item)
|Amount| [DISC]
Max. 7 digits
1 to 9999999
[ST]
(for discount from the sale total)
NOTES:
9.44
1. Discount from the sale total
*REG * 02-06-1999 03:04 1 1CLKendi
P1S1
• An amount exceeding the sale total
1 PLU000010
10.00T
cannot be entered without the “Credit
DISC
-0.10
Balance” option. However, the
amount exceeding the sale total
cannot be entered even with the
“Credit Balance” option when the
sales transaction includes the order
DISC
-0.10
table No. entry.
• After the Dollar Discount entry,
1
TOTAL
10.70
DISP1
DISP2
DISP3
DISP4
DISP5
additional item entry cannot be
performed.
• Dollar Discount can be performed
only once in a sale.
2. Discount from an individual item
• Dollar Discount can be performed only when the sales transaction does not include the order
table No. entry.
Percent Discount, Percent Charge
OPERATION
PLU entry
[%-] (or [%+]) (% operation by the preset rate)
[ST]
|Rate| [%-] (or [%+]) (% operation by the manual rate)
0.001 to 99.999
NOTES:
1. You can perform the manual rate %
operation by manually entering a % rate
even when the preset rate has been
programmed on the [%] key.
2. % operation for the sale total
• After the % operation, additional item
entry cannot be performed.
• % operation can be performed only
once in a sale.
3. % operation for an individual item
• % operation can be performed only
when the sales transaction does not
include the order table No. entry.
9-25
*REG
* 02-06-1999 03:04
1 PLU000010
%-
5%
1 1CLKendi
P1S1
10.00T
-0.50
%-0.50
DISP1
1
DISP2
TOTAL
DISP3
DISP4
10.30
DISP5
EO1-11138
9. TRANSACTION ENTRIES
9.45 Non-add Number Print
9.45
Non-add Number Print
Non-add numbers can be entered for future reference, to indicate guest code, media checks, credit cards, etc.
The entered numbers do not affect any sale total data.
OPERATION
(allowed any time during a sale or transaction)
|Number| [#]
Max. 18 digits
NOTES:
1. A program option allows you to prohibit
operating the No-sale transaction after
entering a non-add number.
2. Non-add number print immediately after
entering the order table No. is not
possible.
*REG
* 02-06-1999 03:04
1 1CLKendi
P1S1
#123000
#
1230.00
DISP1
9.46
DISP2
TOTAL
DISP3
DISP4
0.00
DISP5
Number-of-guests Entry
Number of the guests of sale can be entered.
OPERATION
(allowed any time during a sale or transaction)
|Number of Guests| [GUEST #]
*REG
* 02-06-1999 03:04
Max. 3 digits
1 PLU000010
GUEST
NOTE:
1 1CLKendi
P1S1
10.00T
2CU
When you enter the number of the guests
more than once, the last entered number will
be effective.
GUEST
0.02
DISP1
9.47
1
DISP2
TOTAL
DISP3
DISP4
10.80
DISP5
Function Key Entry
Once you depress the [FUNCTION] key, the programmed key operation sequence is automatically performed.
OPERATION
*REG
* 02-06-1999 03:04
1 PLU000001
1 PLU000020
SUBTL
%-
[FUNCTION]
...
5%
1 1CLKendi
P1S1
1.00T
8.50T
9.50
-0.48
[FUNCTION 1] to [FUNCTION 20]
Example)
Key operation sequence shown below has
been previously programmed on the
[FUNCTION 1] key:
[1] [PLU] [2] [0] [PLU] [ST] [5] [%-]
9-26
SUBTL
10.65
DISP1
2
DISP2
TOTAL
DISP3
DISP4
10.65
DISP5
EO1-11138
9. TRANSACTION ENTRIES
9.48 Tip Paid
9.48
Tip Paid
When a guest pays the tip by credit card, this operation can divide the tip and pay it to each cashier in cash.
OPERATION
(must be operated outside a sale)
|Cashier Code| [TIP PAID]
|Tip Amount|
* REG * 02-06-1999 03:04
2CL
2
TIP PAID
CASH
[AT/TL]
1 1CLKendi
P1S1
10.00
Max. 7 digits
CASH
10.00
DISP1
9.49
DISP2
TOTAL
DISP3
DISP4
0.00
DISP5
Charge Tip
OPERATION
(|Order Table No.| [START CHECK])
PLU (menu item) Entry
|Tip Amount| [CHARGE TIP]
Payment Entry using the media as the tip.
Max. 7 digits
NOTE:
You cannot use the [AT/TL] key for the first
tender operation after depressing the
[CHARGE TIP] key.
* REG * 02-06-1999 03:04
1 PLU000010
CHG TIP
CHG
1 1CLKendi
P1S1
10.00T
0.50
TIP
0.50
DISP1
9.50
1
DISP2
TOTAL
DISP3
DISP4
11.30
DISP5
Received-on-Account
A received-on-account transaction is used to identify money which is in the drawer but not from the daily
business.
OPERATION
(must be operated outside a sale)
|Amount of Payment| [R/A]
([ST])
|Cash Amount Tendered| [AT/TL]
Max. 7 digits
(if paid in cash)
(|Quantity| [X])
Repeatable if multiple amounts are received.
|Check Amount Tendered| [CHECK]
(if paid in check)
[Chg] (if processed into general charge account)
Other Media Finalization
9-27
EO1-11138
9. TRANSACTION ENTRIES
9.51 Paid-Out
NOTES:
1. The media keys used for this operation
must be programmed to allow receivedon-account entries.
2. A received-on-account transaction after
an order table No. entry is not possible.
* REG * 02-06-1999 03:04
R/A
R/A
SUBTL
CASH
1 1CLKendi
P1S1
5.00
10.00
15.00
15.00
CASH
15.00
DISP1
9.51
DISP2
TOTAL
DISP3
DISP4
15.00
DISP5
Paid-Out
A paid-out transaction is used when money is removed from the drawer without totaling to a sale.
OPERATION
(must be operated outside a sale)
|Amount to be paid out| [PO]
([ST])
[AT/TL]
Max. 7 digits
Repeatable if multiple amounts are paid out.
NOTES:
1. Only the [AT/TL] key can finalize a paidout transaction (i.e. must be paid out in
cash).
2. A paid-out transaction after an order
table No. entry is not possible.
* REG * 02-06-1999 03:04
PO
SUBTL
TOTAL
1 1CLKendi
P1S1
10.00
10.00
10.00
TOTAL
10.00
DISP1
9.52
DISP2
TOTAL
DISP3
DISP4
10.00
DISP5
Print Mode Invert
When the option “Single/Double Print” is selected for the RKP (remote kitchen printer) receipt, the [INVERT] key
operation can temporarily change the print mode to “Itemized Print”.
OPERATION
Pattern 1: To enter all the PLU items in the itemized mode
[INVERT]
PLU entries
[TOTAL] (only when the sales transaction has been started
with an order table No. entry) or Sale finalization by the media
keys
9-28
EO1-11138
9. TRANSACTION ENTRIES
9.53 RKP (remote kitchen printer) Receipt Cut
Pattern 2: To enter only the designated PLU items in the itemized mode
PLU entries
[INVERT]
PLU entries
[INVERT]
...
Issues a Single/
Double receipt for
each item entry.
Issues an Itemized receipt for all the items entered here.
(PLU entries)
...
[TOTAL] (only when the sales transaction has
been started with an order table No. entry) or
Sale finalization by the media keys
Issues a Single/
Double receipt for
each item entry.
NOTES:
1. When the option “Itemized Print” is
selected, the Print Mode Invert
operation is not possible.
2. The Itemized Print Mode once declared
by the [INVERT] key is automatically
cancelled by a finalizing operation (by
[TOTAL] or media keys).
* REG * 02-06-1999 03:04
1 1CLKendi
P1S1
0.00
Invert
Indicator
9.53
INV
DISP1
DISP2
TOTAL
DISP3
DISP4
0.00
DISP5
RKP (remote kitchen printer) Receipt Cut
This operation issues an RKP (remote kitchen printer) receipt while the print mode is in the “itemized print”.
OPERATION
([INVERT]
[RKP CUT] ...................................... An RKP receipt is issued.
...
...
Necessary for the
“Single/Double
Print” option
) PLU entries
PLU data is stored
in the RKP printer
buffer.
* REG * 02-06-1999 03:04
1 PLU000001
RKP
1 1CLKendi
P1S1
1.00T
CUT
0.00
DISP1
9-29
1
DISP2
TOTAL
DISP3
DISP4
1.10
DISP5
EO1-11138
9. TRANSACTION ENTRIES
9.54 RKP (remote kitchen printer) Message Print
9.54
RKP (remote kitchen printer) Message Print
This operation prints a message on the RKP.
OPERATION
RKP Print
■ [RKP Msg]
([RKP Msg 1] to [RKP Msg 10])
■ |Message No.| [RKP Msg #]
1 to 20
11-23-1999
TUE
20 RKP MESSAGES
PROGRAMMABLE!
1CL
0209
#0
ARE
16:30TM
This operation is possible during a sales transaction.
ex.)
PLU Entry
NOTES:
[RKP Msg]
PLU Entry
1. A message programmed in the RKP
Message Table is printed on the RKP.
No print occurs on receipt.
2. A message output to the RKP consists
of double-sized characters.
* REG * 02-06-1999 03:04
1 1CLKendi
P1S1
20 RKP MESSAGES ARE
PROGRAMMABLE!
RKP
Msg
0.00
DISP1
9.55
DISP2
TOTAL
DISP3
DISP4
0.00
DISP5
Guest Check Print
A guest check print is required when a sales transaction with an order table No. entry has been finalized by the
media keys (for payment).
OPERATION
Case 1: When the option “Guest check is printed on the receipt roll paper” has been selected:
When a sales transaction is finalized by the media keys (for payment), a guest check will be
automatically issued from the receipt.
9-30
EO1-11138
9. TRANSACTION ENTRIES
9.56 Check Print
Case 2: When the option “Guest check is printed on the slip” has been selected:
When a sale transaction is finalized by the media keys.
A slip has already been placed
on the slip table of the BRST-10
and the “SLIP” lamp on the
BRST-10 is illuminated.
A guest check print is automatically started.
A slip has not been placed on the slip table yet.
A guidance message “Please set paper.” is displayed
on the operator display.
When you want to
print a guest check
on a slip.
Insert a slip into the
slip slot to illuminate
the “SLIP” lamp, and
a guest check print is
automatically started.
NOTE:
When you want to
print a guest check
on the receipt roll
paper.
Depress the
[RECEIPT PRINT]
key.
If a guest check print requires two slips or more, the “SLIP” lamp starts to blink after auto-ejecting a slip
which has just been printed. In this case, insert a new slip and the guest check print is automatically
restarted.
Guest Check Receipt
TABLE NO
1 11-24-1999 WED
1 PLU000010
1 PLU000020
SUBTL
TAX
CASH
1CL
9.56
Guest Check Slip
#0
TABLE NO
10.00T
8.50T
1 PLU000010
1 PLU000020
18.50
2.33
20.83
0276
1 11-24-1999 WED
10.00T
8.50T
SUBTL
TAX
CASH
12:52TM
1CL
#0
18.50
2.33
20.83
0280
12:53TM
Check Print
You can issue a presentation for a sale transaction which has been temporarily finalized by the [TOTAL] key.
OPERATION
|Table No.| [PRINT CHECK]
1 to 999.9
NOTES:
When your receipt printer is the TM-T88 or the TM-300, a
presentation print is automatically started.
When your receipt printer is the BRST-10, the print procedure is the
same as that of “Guest Check Print” shown on the preceding page.
1. The header “PRESENTATION” is printed at the top of a presentation. This operation can be
operated any number of times for the same order table No. The receipt consecutive No. is not
printed. Additional PLU items, if any, can still be entered after issuing a presentation.
9-31
EO1-11138
9. TRANSACTION ENTRIES
9.57 Receipt Post-issue (Receipt Reprint & Guest Check Reprint)
2. A program option allows you to use a presentation as a real guest check. If so programmed, the
header “PRESENTATION” is not printed. After issuing a guest check, only the sale finalization by
the media keys is allowed for the order table No.
Used as a presentation
TABLE NO
3 11-24-1999 WED
* * *PRESENTATION
1 PLU000010
1 PLU000020
SUBTL
TAX
TOTAL
Used as a real guest check
TABLE NO
#0
1 PLU000010
1 PLU000020
***
10.00T
8.50T
SUBTL
TAX
TOTAL
18.50
2.33
20.83
1CL
1CL
10.00T
8.50T
18.50
2.33
20.83
0355
18:23TM
Consecutive No. is printed
Receipt Post-issue (Receipt Reprint & Guest Check Reprint)
OPERATION
9.57.1
#0
18:23TM
The header “PRESENTATION” is printed.
9.57
3 11-24-1999 WED
(must be operated outside a sale)
Receipt Reprint
■ Operated while the receipt-issue status is “ON”.
A sale transaction is
A receipt for the
finalized by the media
sale is issued.
keys.
[RECEIPT ISSUE] .............. A copy receipt
for the sale which
has just been
finalized is issued.
■ Operated while the receipt-issue status is “OFF”.
A sale transaction is finalized
[RECEIPT ISSUE] .................... A receipt for the sale which has just
by the media keys.
been finalized is issued.
Programmable options:
• A post-issue receipt operation after issuing an ordinary receipt is prohibited.
• A post-issue receipt is always issued as a total-only receipt. If this option is not selected then the post-issue
receipt will be an itemized-receipt for a sales transaction of which print lines are below 50 or less. When the
print lines exceeds 50, a post-issue receipt becomes a total-only receipt.
• Operation of a post-issue receipt can be performed any number of times. If this option is not selected then the
operation can be performed only once.
NOTE:
A post-issue receipt for the received-on-account or the paid-out transaction cannot be issued.
9-32
EO1-11138
9. TRANSACTION ENTRIES
9.57 Receipt Post-issue (Receipt Reprint & Guest Check Reprint)
9.57.2
Guest Check Reprint
|Order Table No.| [START CHECK]
PLU items are
entered and a
guest check is
issued by a
sales transaction
finalized by the
media keys.
1 to 999.9
[RECEIPT ISSUE] ............ A copy guest
check for the
sale which has
just been
finalized is
issued.
The following operation is allowed when the program option “Presentation is used as a real guest check” has
been selected.
|Order Table No.| [PRINT CHECK]
A guest check
is issued.
1 to 999.9
[RECEIPT ISSUE] ........... A copy guest
check is issued.
Programmable option:
• Operation of the guest check print can be performed any number of times. If this option is not selected then
the operation can be performed only once.
Ordinary Receipt
11-23-1999
1 PLU000010
1 PLU000020
SUBTL
TAX
CASH
ITEM
1CL
Post-issue Receipt
TUE
#0
11-23-1999
10.00T
8.50T
18.50
2.33
20.83
* COPY
1 PLU000010
1 PLU000020
SUBTL
TAX
CASH
#0
*
10.00T
8.50T
18.50
2.33
20.83
2
0378
11:56TM
ITEM
1CL
2
0378
The receipt consecutive No. printed on a post-issue receipt is
the same as that of an ordinary receipt.
9.58
TUE
11:56TM
A copy receipt header is printed
when a post-issue receipt is
issued after an ordinary receipt.
“INV COPY” is printed as a
copy guest check header.
Server Transfer
Account of order tables which are handled by a cashier can be partially or entirely transferred to another cashier’s
account.
OPERATION
(must be operated outside a sale)
|Cashier Code| [SERVER TRANS.]
...
Enter the cashier
code of the
destination
When all the accounts which appears in the operator display
are transferred.
[↓] or [↑]
[SELECT]
To select an account you want
to transfer, move the cursor to it
using the [↓] or the [↑] key, then
depress the [SELECT] key.
Repeatable if multiple accounts are transferred.
9-33
[AT/TL]
[C] to cancel
EO1-11138
9. TRANSACTION ENTRIES
9.59 Employee Clock-in/Clock-out
* REG * 02-06-1999 03:04
SERVER TRANSFER
2
1
3
TOTAL
ITEM
SERVER
2
DISP1
9.59
DISP2
1 1CLKendi
P1S1
8.50
10.00
18.50
2
TRANSFER
0.00
TOTAL
DISP3
DISP4
0.00
DISP5
Employee Clock-in/Clock-out
This operation records working total hours of each employee.
OPERATION
(must be operated outside a sale)
■ Clock-in
[IN]
|Employee No.|
[SERVER #]
or
[ENTER]
1 to 9999
Through the operator display
Select your job from a
menu window using
the [↓] or the [↑] key.
[ENTER] ....... Clock-in time is
recorded.
Through the keyboard
|Job No.|
A menu window appears.
1 to 10
* REG * 02-06-1999 03:04
CLOCK IN
0001
01
02
03
1 1CLKendi
P1S1
Jobs assigned to
each employee
CASHIER
COOK
SERVER
0.01
Pg up
■ Break-in
[BREAK IN]
Pg dw
TOTAL
Enter
|Employee No.|
↑
0.00
↓
[SERVER #]
or
[ENTER]
* REG * 02-06-1999 03:04
BREAK IN
0001
[ENTER] ................. Break-in time is
recorded.
1 1CLKendi
P1S1
Please verify name and hit Enter.
0.01
DISP1
DISP2
TOTAL
DISP3
9-34
DISP4
0.00
DISP5
EO1-11138
9. TRANSACTION ENTRIES
9.59 Employee Clock-in/Clock-out
■ Break-out
[BREAK OUT]
|Employee No.|
[SERVER #]
or
[ENTER]
* REG * 02-06-1999 03:04
BREAK OUT
0001
[ENTER] ............... Break-out time is
recorded.
1 1CLKendi
P1S1
Please verify name and hit Enter.
0.01
DISP1
■ Clock-out
[OUT]
|Employee No.|
DISP2
TOTAL
DISP3
DISP4
0.00
DISP5
[SERVER #]
or
[ENTER]
* REG * 02-06-1999 03:04
CLOCK OUT
0001
[ENTER] ............... Clock-out time is
recorded.
1 1CLKendi
P1S1
Please verify name and hit Enter.
0.01
DISP1
NOTES:
DISP2
TOTAL
DISP3
DISP4
0.00
DISP5
1. This operation is allowed only when the program options “Employee Management Adopted” and
“Floating Cashier Adopted” have been selected.
2. Clock-in/clock-out entry is allowed up to three times in a day.
3. Data of working total hours of each employee is collected to the employee clock-in/clock-out
report.
9-35
EO1-11138
10. TROUBLESHOOTING
10.1 Problems concerning the Power Supply
10. TROUBLESHOOTING
IN CASE OF A POWER FAILURE
If a power failure occurs during business hours, all the sales data stored in the memory will be
automatically protected by the battery installed in the register. When the power returns, the
register will resume displaying the screen which had been displayed just before the power failure.
The following are possible causes and countermeasures against typical problems. When a problem occurs, refer to
this chapter to find a cause of the problem, then take appropriate countermeasures. If a problem not described here
occurs, or a problem still exists after taking the following countermeasures, ask the store manager to contact your
authorized TOSHIBA TEC representative for assistance. In this case, inform the store manager of your problem in
detail.
1.
2.
3.
4.
5.
Problems concerning the Power Supply
Problems concerning the Keyboard
Problems concerning the Drawer
Problems concerning the Display
Problems during Normal Operations
WARNING!
If you cannot solve a problem with the following solutions, do not attempt to repair it yourself.
Turn the power off, then contact your TOSHIBA TEC representative for assistance.
10.1
Problems concerning the Power Supply
■ Power is not turned ON.
Cause 1:
Register is not plugged in.
Action:
Plug in an outlet.
Cause 2:
Action:
The power switch provided to the register is in the OFF position.
Turn the power switch ON.
Cause 3:
Action:
The outlet does not supply the power.
Use another outlet.
10.2
Problems concerning the Keyboard
■ Key on the keyboard does not function.
Cause 1:
Mode Lock is in the OFF position.
Action:
Turn the Mode Lock to the positions other than OFF using the Mode Selector Key.
Cause 2:
Action:
Failure of the keyboard itself
Ask the store manager to contact your authorized TOSHIBA TEC representative for assistance.
10-1
EO1-11138
10. TROUBLESHOOTING
10.3 Problems concerning the Drawer
10.3
Problems concerning the Drawer
■ Drawer does not open.
Cause 1:
Drawer blocked by foreign substance (coin, etc.).
Action:
Try to open the drawer by removing the foreign substance, using a ruler or something. If you are still
unable to open the drawer ask the store manager to contact your authorized TOSHIBA TEC
representative for assistance.
Cause 2:
Action:
10.4
10.4.1
Failure of the drawer itself
Ask the store manager to contact your authorized TOSHIBA TEC representative for assistance.
Problems concerning the Display
Operator Display
■ Display blank.
Cause 1:
Register is not securely plugged in.
Action:
Securely plug in an outlet.
Cause 2:
Action:
The operator display is in the power-save mode.
Depress any key.
Cause 3:
Action:
The brightness control provided to the operator display is adjusted improperly.
Adjust it properly.
Cause 4:
Action:
Failure of the LCD
Ask the store manager to contact your authorized TOSHIBA TEC representative for assistance.
10.4.2
Customer Display
■ Some segment is not displayed, display shimmers, or illumination of the display is uneven.
Cause 1:
Failure of the display tube
Action:
Ask the store manager to contact your authorized TOSHIBA TEC representative for assistance.
10.5
Problems during Normal Operations
NOTE on changing the Mode Lock position:
Changing the Mode Lock position during sales entries or programming causes an error. To clear the error, return
the Mode Lock to the original position. However, changing the Mode Lock position to the OFF does not cause an
error. Error caused by changing the Mode Lock position cannot be cleared by the [C] key.
■ Normal operations cannot be carried out.
Cause 1:
Mode Lock position does not correspond to the operation you attempted.
Action:
Check whether or not the Mode Lock position corresponds to the operation. (Especially, check
whether or not the operation you attempted requires the MGR position. Ask your manager about the
operations which requires the MGR position.)
10-2
2. STAND-ALONE LEVEL
MANAGER’S GUIDE
Table of Contents
TOC 2
EO1-11138
FS-2600-1 SERIES
TABLE OF CONTENTS
Page
1. MANAGER INTERVENTION ............................................................................ 1-1
1.1
1.2
Items Programmed to Require Manager Intervention ...................................................... 1-1
Other Operations Requiring Manager Interventions ........................................................ 1-2
2. MANAGER’S OWN OPERATIONS IN “MGR” MODE .................................... 2-1
2.1
2.2
2.3
2.4
2.5
Pick Up Operation ............................................................................................................ 2-1
Enforced Sign-off of a Cashier (Code Entry Method) ...................................................... 2-1
Enforced Clock-out of an Employee ................................................................................ 2-2
PLU Menu Shift Entry ...................................................................................................... 2-2
RKP Table Change .......................................................................................................... 2-3
3. OPERATIONS IN “ - ” MODE ........................................................................ 3-1
4. READ (X) AND RESET (Z) REPORTS ............................................................ 4-1
4.1
4.2
4.3
4.4
4.5
How to Access a Report Item .......................................................................................... 4-1
Time Edit for Employee Clock-in/Clock-out ..................................................................... 4-8
Combination Reports ....................................................................................................... 4-9
General Notes on Report Takings ................................................................................. 4-10
Report Sample Format .................................................................................................. 4-10
5. PROGRAMMING OPERATIONS ..................................................................... 5-1
5.1
5.2
5.3
5.4
Before you enter the SET Mode ...................................................................................... 5-1
Character Entries ............................................................................................................. 5-2
Condition Required for Programming Operations ............................................................ 5-4
How to Access a Program Item ....................................................................................... 5-5
■ Store Name/Message, Commercial Message,
Footer Logo Message Programming (Submode 1) .................................................... 5-7
■ Cashier Programming (Submode 2) ........................................................................... 5-8
■ Department Table Programming (Submode 3) ........................................................ 5-11
■ PLU Table Programming (Submode 4) .................................................................... 5-17
■ Time Setting or Adjustment (Submode 5) ................................................................ 5-24
■ Date Setting or Adjustment (Submode 6) ................................................................. 5-25
■ Hourly Range Setting (Submode 7) .......................................................................... 5-26
■ Amount Limit Setting for Function Keys (Submode 8) .............................................. 5-27
■ Non-taxable Amount Limit Setting (for Canada)/
Gratuity Rate Setting (Submode 12) ....................................................................... 5-28
■ Minor Group Name Programming (Submode 13) ..................................................... 5-29
■ Major Group Name Programming (Submode 14) ..................................................... 5-30
■ Customer File Table Setting (Submode 15) ............................................................. 5-31
■ Combination Report Table Programming (Submode 19) ......................................... 5-32
■ PLU Stock Loading or Changing (Submode 24) ...................................................... 5-34
TOC 1
■
■
■
■
■
■
■
■
■
■
■
■
■
■
■
■
■
■
■
■
EO1-11138
FS-2600-1 SERIES
Tare Table and General Unit Weight Setting (Submode 26) .................................... 5-35
PLU Preset-code Key/Display Key Setting (Submode 27) ....................................... 5-36
PLU Group Name Programming (Submode 29) ...................................................... 5-38
RKP Message Programming (Submode 30) ........................................................... 5-39
Display Message Programming (Submode 31) ....................................................... 5-40
Amount Limit Setting for the [DISC] Key (Submode 35) ........................................... 5-41
Set Menu Table Programming (Submode 42) .......................................................... 5-42
Combo Sale Table Programming (Submode 43) ..................................................... 5-43
Guest Check Commercial Message Programming (Submode 45) ........................... 5-47
Day Part Setting (Submode 46) ................................................................................ 5-48
Employee Table Setting (Submode 50) .................................................................... 5-49
Job Code/Working Hours Setting (Submode 51) ..................................................... 5-50
Tender Up Table Setting (Submode 52) ................................................................... 5-52
Display Menu Table Setting (Submode 53) .............................................................. 5-53
PLU Preset Price Setting or Changing (Submode 60) ............................................. 5-55
Printer Table Setting (Submode 71) ......................................................................... 5-56
%+ and %- Preset Rate Setting ................................................................................ 5-58
Preset Rate Setting for Selective Itemizers (SI1 and SI2) ........................................ 5-59
Foreign Currency Exchange Rate Setting ................................................................ 5-61
Store/Register No. Setting ........................................................................................ 5-62
6. Verification of Programmed Data .................................................................. 6-1
6.1
6.2
How to verify a Programmed Data through the Operator Display ................................... 6-1
How to verify a Programmed Data through the Keyboard ............................................... 6-2
EO1-11138
1. MANAGER INTERVENTION
1.1 Items Programmed to Require Manager Intervention
1.
1.1
MANAGER INTERVENTION
Items Programmed to Require Manager Intervention
During daily sale entry operations, a cashier may call for Manager Interventions.
1) During operations, a cashier comes across an item that requires Manager Intervention. The cashier, already
informed of it, may immediately call for Manager Intervention. Or the cashier, without knowing of it, attempts
the operation, and an error results with the Error Message “MANAGER REQUIRED” displayed, clears the
error by the [C] key, and then calls for Manager Intervention.
2) The manager goes to the cashier counter with the MGR or MA key.
3) The cashier explains what kind of operation is attempted, and removes the REG key from the Mode Lock at
the “REG” position.
4) The manager inserts the MGR or MA key and turns it to the “MGR” position.
5) The cashier operates the required item.
6) The manager returns the MGR or MA key to the “REG” position and removes it .
7) The cashier sets the REG key to the “REG” position again and continues registering operations.
The following is the table of the keys and operations that are programmable with Manager Intervention. Fill in the
table by marking in the “Not Required” or “Required” column of each item.
KEYS/OPERATIONS AND MANAGER INTERVENTION STATUS TABLE
KEY
Manager Intervention
Not required
Required
[DISC]
[RECALL]
[TIP PAID]
[CHARGE TIP]
[%] ([% 1] to [% 8])
[VOID]
[PO]
[MENU 1] to [MENU 5]
[PRICE 1] to [PRICE 5]
[EX]
[ALL VOID]
[NS]
[RTR]
Reference
As for the key status change, ask your TOSHIBA
TEC representative.
1-1
EO1-11138
1. MANAGER INTERVENTION
1.2 Other Operations Requiring Manager Interventions
KEYS/OPERATIONS AND MANAGER INTERVENTION STATUS TABLE (continued)
OPERATION
Manager Intervention
Not required
Required
Credit Balance
(NOTE 1 below)
Negative-balance Sale
Finalization by Media
Keys (except [AT/TL])
(NOTE 2)
Negative PLU Entries
Media Transfer
Guest Check Transfer
Guest Check Merge
Guest Check Split
PLU Price Read
PLU Stock Read
NOTES:
1.2
Reference
As for the status change, ask your TOSHIBA TEC
representative.
1. The “Credit Balance” means that amount entries through [DISC], [VOID] will result in oversubtraction of the subtotal amount at the time of the entry through any of those keys. If the status
“Not required” is selected, over-subtraction using these keys will be allowed in the “REG” mode.
However, over-subtraction using the [DISC] or [VOID] key is prohibited regardless of the credit
balance option if a sales transaction has been entered with an order table No. entry.
2. The “Negative-balance Sale” may be caused by:
1. Credit Balance of which status “Allowed” is selected.
2. Amounts entered through the [VOID] key (without an order table No. entry).
3. Amounts entered through negative PLUs.
4. Other negative amounts.
Other Operations Requiring Manager Interventions
Amount Limit Release
Amount Limits may be programmed on PLUs, Tender Media, [DISC]. These limits are programmed to check an
excessively high or low amount entry by cashier’s mistake at the earliest stage.
1)
During sale entries by a cashier, an error occurs when a PLU item has been entered, or a key (one of the
media keys, the [DISC] key) has been depressed.
2)
The cashier clears the error by the [C] key. The cashier confirms the amount and operates the item again.
3)
If the same error occurs again, the cashier attempts to enter the amount using the [LC OPEN] or [OPEN] key.
4)
If the operation results in an error again, the Amount Limit cannot be released by the [LC OPEN] or [OPEN] key.
5)
The cashier calls for Manager Intervention.
The procedure thereafter is the same as Steps 2) to 7) for the Items Programmed to Require Manager
Intervention on the preceding page.
1-2
EO1-11138
1. MANAGER INTERVENTION
1.2 Other Operations Requiring Manager Interventions
Reference:
For reading the high and low amount limits of each PLU:
Chapter 6. VERIFICATION OF PROGRAMMED DATA
Department Status Read
(Amount limit of each PLU is restricted by the amount limit of its linked department.)
For setting the item above:
Chapter 5. PROGRAMMING OPERATION
Department Table Programming (Submode 3)
(Amount limit of each PLU is restricted by the amount limit of its linked department.)
For reading the common high and low amount limits of all the PLUs, and the high amount limit of each tender
media key:
Chapter 6. VERIFICATION OF PROGRAMMED DATA
Function Key Amount Limit Read
For setting the item above:
Chapter 5. PROGRAMMING OPERATION
Amount Limit Setting for Function Keys
(Submode 8)
For reading an amount limit of the [DISC] key:
Chapter 6. VERIFICATION OF PROGRAMMED DATA
For setting the item above:
Chapter 5. PROGRAMMING OPERATION
Dollar Discount Amount Limit Read
Amount Limit Setting for the [DISC] Key
(Submode 35)
1-3
EO1-11138
2. MANAGER’S OWN OPERATIONS IN “MGR” MODE
2.1 Pick Up Operation
2.
MANAGER’S OWN OPERATIONS IN “MGR” MODE
The following are operations possible only in the “MGR” position of the Mode Lock, which are performed by the
manager.
2.1
Pick Up Operation
This operation is used to collect money from a drawer, during the day, for banking purpose, etc.
CONDITION
Any time outside a sale, in a Signed-ON condition.
OPERATION
Mode Lock: MGR
[PO]
|Media Amount Collected| [MEDIA KEY]
...
Max. 8 digits
Drawer
opens.
NOTES:
([ST])
[AT/TL]
NOTE 2
Repeat until all the collected media amounts are recorded.
1. Each media key can be programmed with its in-drawer limit. On reaching this limit in sale entries
(on finalizing a sales transaction), the Error Message “DRAWER LIMIT” is displayed with an
alarm generated to notify a cashier that the Pick Up operation is needed.
2. Depress the media keys corresponding to the collected media ([AT/TL] for cash). The media
keys that can be operated here are those programmed to print their media-in-drawer amounts in
reports.
3. Depress [ST], if necessary, to obtain the subtotal amount of the medias so far collected.
* REG * 02-06-1999 03:04
1 1CLKendi
P1S1
*SERVER
CASH
CPN
TOTAL
*
DROP
300.00
150.00
450.00
TOTAL
450.00
DISP1
2.2
DISP2
TOTAL
DISP3
450.00
DISP4
DISP5
Enforced Sign-off of a Cashier (Code Entry Method)
If a cashier once signed ON, then signed OUT to take a break does not come back, no one can operate the
register. In this case, the manager can perform this operation to forcibly release the cashier signed-OUT
condition.
CONDITION
In a Signed-OUT condition
OPERATION
Mode Lock: MGR
|2-digit manager-assign code| [SERVER #] ............................... Same as a normal sign-OFF
01 to 99
2-1
EO1-11138
2. MANAGER’S OWN OPERATIONS IN “MGR” MODE
2.3 Enforced Clock-out of an Employee
2.3
Enforced Clock-out of an Employee
If an employee who once clocked in forgets to perform the clock-out operation, the manager can perform this
operation.
CONDITION
In a Clock-IN and Signed-OFF condition
OPERATION
Mode Lock: MGR
[OUT]
|Employee No.|
[OUT]
1 to 9999
|Date| |Hour| |Minute|
...
0 to 23 0 to 59
If necessary
Month-Day-Year (Initial Date Order)
Day-Month-Year
Year-Month-Day
2.4
[SERVER #] .................... Same as a normal clock-OUT,
or
however the symbol “**” is
[ENTER]
displayed at the right of an entered
clock-out time.
PLU Menu Shift Entry
Up to five different menus can be programmed for each [PLU Preset-code Key] and you can select either of the
following two features.
2.4.1
Menu Shift Entry “Effective only for One PLU Entry” Feature
OPERATION
(PLU entries)
[MENU 2]
to
[MENU 5]
PLU entry ....................... After the PLU Entry, the
menu mode automatically
returns to the 1st menu mode.
...
...
...
with the 1st menu
Mode Lock: MGR
with shifted menu
Menu shift declaration
2.4.2
Menu Shift Entry “Keeping the shifted Menu Level” Feature
You can shift the PLU menu level to another in the following two cases.
•
Using the [MENU] key
The same key operation as “Effective only for One PLU Entry” Feature. However, the shifted menu level is
held until another [MENU] key is depressed.
•
Using the Hourly Range Designation
Hourly range to start shifting each menu level can be programmed. If programmed, the menu level will be
automatically shifted to another when the hourly range starts.
2-2
EO1-11138
2. MANAGER’S OWN OPERATIONS IN “MGR” MODE
2.5 RKP Table Change
NOTE:
A program option allows you to perform this
operation in the REG mode.
*REG
* 02-06-1999 03:04
1 1CLKendi
P1S1
MENU3
0.00
DISP1
2.5
DISP2
TOTAL
DISP3
DISP4
0.00
DISP5
RKP Table Change
This operation changes an RKP (remote kitchen printer) on which the data is outputted.
CONDITION
Any time outside a sale
OPERATION
Mode Lock: MGR
■ RKP Designation
|RKP No.|
[RKP]
1 to 4
RKP of which No. is entered will be designated as the destination of the data output.
Example)
If you operate 123 then [RKP], the RKPs of Nos. 1 to 3 will be designated.
If you operate 0 then [RKP], no RKPs will be designated.
* REG * 02-06-1999 03:04
RKP1
RKP2
RKP3
RKP4
1 1CLKendi
P1S1
ON
OFF
OFF
OFF
RKP
0.01
DISP1
DISP2
TOTAL
DISP3
DISP4
0.00
DISP5
■ RKP Connection Table Change
[RKP] ........................ Each time you depress the [RKP] key, the RKP connection table is changed from 1 to
2, and vice versa.
* REG * 02-06-1999 03:04
RKP Connection
Table No. (1 or 2)
1
R
RKP1
RKP2
RKP3
RKP4
J
Terminal
ID No.
1 1
1 2
0
0
0
0
1 1CLKendi
P1S1
Port
No.
ON
ON
OFF
OFF
OFF
OFF
RKP
0.00
DISP1
2-3
DISP2
TOTAL
DISP3
DISP4
0.00
DISP5
EO1-11138
3. OPERATIONS IN “ - ” MODE
3. OPERATIONS IN “ - ” MODE
3.
OPERATIONS IN “ - ” MODE
When a cashier has entered some data in a guest order table buffer memory (started with an order table No.
entry and ended with the [TOTAL] key) and then all the entries must be cancelled, you can quickly delete them in
the - position of the Mode Lock instead of deleting items one by one using the[VOID] key. For a sale entered
without an order table No. entry, the - mode is available by doing the same operation in REG or MGR mode.
CONDITION
Any time outside a sale
Turn the Mode Lock to the - position.
■ To delete sale items without an order table No. entry:
Enter the same items that were purchased in “REG” mode and the amount is subtracted from the memory.
Operator display in the REG or MGR mode
*REG
* 02-06-1999 03:04
1 PLU000010
SUBTL
TAX
CASH
Operator display in the - mode
1 1CLKendi
P1S1
10.00T
10.00
0.80
10.80
¾®
CASH
*REG- * 02-06-1999 03:04
1 1CLKendi
P1S1
*REG1 PLU000010
SUBTL
TAX
CASH
*
10.00T
10.00
0.80
10.80
CASH
10.80
DISP1
1
DISP2
TOTAL
DISP3
DISP4
10.80
10.80
DISP5
DISP1
1
DISP2
TOTAL
DISP3
DISP4
10.80
DISP5
■ To delete items ordered with an order table No. entry (Order Table No. Manual Entry):
|Order Table No.| [START CHECK]
[ALL VOID] ............All the entry data of the table is deleted.
■ To delete items ordered with an order table No. (Order Table No. Automatic Entry):
|Order Table No.| [RECALL]
[ALL VOID] ............All the entry data of the table is deleted.
Operator display in the REG or MGR mode
*REG * 02-06-1999 03:04
TABLE NO
001
1 PLU000001
1 PLU000010
Operator display in the - mode
1 1CLKendi
P1S1
1.00T
10.00T
*REG- * 02-06-1999 03:04
TABLE NO
001
*REG1 PLU000001
1 PLU000010
1 1CLKendi
P1S1
*
1.00T
10.00
¾®
NEW
DISP1
NOTE:
BALANCE001
11.90
2
DISP2
TOTAL
DISP3
DISP4
ALL
VD
0.00
11.90
DISP5
DISP1
DISP2
TOTAL
DISP3
DISP4
0.00
DISP5
You can cancel only an order table which has been temporarily finalized by the[TOTAL] key.
3-1
EO1-11138
4. READ (X) AND RESET (Z) REPORTS
4.1 How to Access a Report Item
4.
READ (X) AND RESET (Z) REPORTS
This chapter describes the operation to take each report and its contents.
• A read (X) report allows you to read the totals but not clear the memory. After issuing a read report, only a
header of its report is written into the electronic journal buffer memory.
• A reset (Z) report allows you to read the totals and, at the same time, clear all the resettable totals. After
issuing a reset report, all the data of its report is written into the electronic journal buffer memory.
• A symbol “X” is printed at the top of a read report, while “Z” is printed on a reset report to indicate the type of
report.
• A reset report counter is printed on each reset report only.
• A daily report covers the data obtained during a certain period on that day until the corresponding reset report
is issued, while a periodic report covers the data obtained during a certain period defined by the store.
• When you issue a read report, make sure that the receipt-issue status is in “ON”. If the receipt-issue OFF
message is displayed in the operator display, depress the [SERVER#/RECEIPT] key so that the message
disappears. As for a reset report, it can be issued even while the receipt-issue OFF message is displayed.
WARNING!
When opening the cash drawer, be careful not to let the drawer hit any person.
4.1
How to Access a Report Item
Two ways are available to access a report item you want to issue; through the operator display and through the
keyboard.
4.1.1
How to Access a Report Item through the Operator Display
When you turn the mode selector key to the X or Z position, the initial screens shown below will appear.
X Mode
Z Mode
*X/GTX* 02-06-1999 03:04
*Z/GTZ* 02-06-1999 03:04
1
2
3
4
5
X
GTX
PROGRAM READ
E-JOURNAL
OTHERS
1
2
3
4
Please select operation by Enter key.
0.00
COMB1
COMB2
TOTAL
COMB3
EJ
Z
GTZ
E-JOURNAL
OTHERS
Please select operation by Enter key.
0.00
0.00
↓
COMB1
COMB2
TOTAL
COMB3
■ Description of each Navigation Key (Initial screen in X or Z)
13
14
15
1
2
3
4
5
••••*••••10••••*••••20••••*••••30••••*••••40
4-1
13
14
15
EJ
0.00
↓
EO1-11138
4. READ (X) AND RESET (Z) REPORTS
4.1 How to Access a Report Item
Display Item
Description
1 Navigation Key 1
COMB1
X Mode:
Z Mode:
Start key for the daily combination read report 1
Start key for the daily combination reset report 1
2 Navigation Key 2
COMB2
X Mode:
Z Mode:
Start key for the daily combination read report 2
Start key for the daily combination reset report 2
3 Navigation Key 3
COMB3
X Mode:
Z Mode:
Start key for the daily combination read report 3
Start key for the daily combination reset report 3
4 Navigation Key 4
EJ
X Mode:
Z Mode:
Start key for the all electronic journal data read report
Start key for the all electronic journal data reset report
5 Navigation Key 5
↓
Cursor key
Example)
If you want to issue the daily all cashiers read report, operate as follows.
Select “1 X” from the initial screen using the cursor key, then depress the [ENTER] key. The screen shown below
appears.
*X/GTX* 02-06-1999 03:04
X
0 COMBINATION
10
1 COMBINATION1
11
2 COMBINATION2
12
3 FINANCIAL
13
4 CLERK
14
6 CREDIT
15
8 GROUP
24
9 MEDIA ALL
25
HOURLY
DP
MEDIA
PLU
STOCK
CUSTOMER
PLU GROUP
DAY PART
Please select operation by Enter key.
0.00
Pg up
Pg dw
↑
Enter
↓
In the X or Z mode, the navigation keys are changed as follows from the second screen or later.
Display Item
Description
Pg up
Requests the preceding report item screen.
2 Navigation Key 2
Pg dw
Requests the next report item screen.
3 Navigation Key 3
Enter
Decides a selected item.
4 Navigation Key 4
↑
Cursor Key
5 Navigation Key 5
↓
Cursor key
→
1 Navigation Key 1
To be Continued
4-2
EO1-11138
4. READ (X) AND RESET (Z) REPORTS
→
4.1 How to Access a Report Item
Continued
Select “4 CLERK” from the screen using the cursor key, then depress the [ENTER] key. The screen shown below
appears.
*X/GTX* 02-06-1999 03:04
X
1 ALL
2 INDIVIDUAL
Please select operation by Enter key.
0.00
Pg dw
Enter
↑
↓
→
Pg up
Select “1 ALL” from the screen using the cursor key, then depress the [ENTER] key. The screen shown below
appears.
*X/GTX* 02-06-1999 03:04
X
CLERK
1 PRINT OUT
2 DISPLAY
Please select operation by Enter key.
0.00
Pg dw
Enter
↑
↓
→
Pg up
If you want to print out the report, select “1 PRINT OUT”, then depress the [ENTER] key.
If you only want to verify the report on the display, select “2 DISPLAY”, then depress the [ENTER] key.
NOTES:
1. If you want to cancel a selected item already decided by the [ENTER] key and go back to the
preceding screen, depress the [ESC] key.
2. If you want to interrupt a report print-out or a report display already started by the final [ENTER]
key, depress the [ITEM CORR] or the [VOID] key.
4-3
EO1-11138
4. READ (X) AND RESET (Z) REPORTS
4.1 How to Access a Report Item
4.1.2
How to Access a Report Item through the Keyboard
You can directly access a report item you want to issue through a key operation on the keyboard.
■ Daily Reports
Report Name
FINANCIAL READ AND RESET
• Financial Read
• Financial Reset
CASHIER READ AND RESET
• All Cashier Read
• All Cashier Reset
•
•
Individual Cashier Read
Individual Cashier Reset
Mode
Lock
Key Operation
Sample
Page
4-10
X
Z
3 [AT/TL] (Drawer opens.)
4-12
X
Z
X
Z
4 [ST] (Drawer opens.)
Code Entry Method:
4 [#] |Cashier ID Code| [AT/TL]
(2-digit manager-assign code)
Cashier Key Method:
Depress the required Cashier Key,
then 4 [AT/TL]
CREDIT CARD COMPANY SALES READ AND
RESET
• Credit Card Company Sales Read
• Credit Card Company Sales Reset
DEPARTMENT GROUP READ
MEDIA SALES AND IN-DRAWER TOTAL READ
HOURLY RANGE READ AND RESET
• Hourly Read
• Hourly Reset
DEPARTMENT READ AND RESET
• All department Read
• All department Reset
ALL MEDIA SALES TOTAL AND CASH-INDRAWER READ
PLU READ AND RESET
• Individual PLU Read
4-12
X
Z
X
X
X
Z
6 [AT/TL]
8 [AT/TL]
9 [AT/TL] (Drawer opens.)
4-13
4-13
4-14
10 [AT/TL]
4-14
X
Z
X
X
11 [AT/TL]
12 [AT/TL] (Drawer opens.)
13 [#]
4-15
*
|PLU Code| [PLU] ([ST])
Repeatable
[AT/TL]
* (May be replaced by
[PLU Preset-code Key])
•
•
Zone PLU Read
Zone PLU Reset
X
Z
13 [#] Zone-start [X] Zone-end [AT/TL]
PLU Code |
PLU Code |
•
•
All PLU Read
All PLU Reset
X
Z
13 [AT/TL]
•
Inactive PLU Read
X
13 [#] 0 [AT/TL]
4-4
4-15
EO1-11138
4. READ (X) AND RESET (Z) REPORTS
4.1 How to Access a Report Item
■ Daily Reports (Continued)
Report Name
PLU STOCK READ
• Individual PLU Stock
Mode
Lock
Key Operation
Sample
Page
4-17
X
14 [#]
|PLU Code| [PLU]
[AT/TL]
Repeatable
•
Zone PLU Stock
• All PLU Stock
CUSTOMER FILE READ AND RESET
• Individual File Read
X
14 [#] Zone-start [X] Zone-end [AT/TL]
PLU Code |
PLU Code |
X
14 [AT/TL]
X
15 [#] |File Code| [X] [AT/TL]
4-17
•
•
Zone File Read
Zone File Reset
X
Z
15 [#] Zone-start [X] Zone-end [AT/TL]
File Code |
File Code |
•
•
All File Read
All File Reset
X
Z
15 [AT/TL]
X
15 [#] 0 [AT/TL]
• Inactive File Read
PLU GROUP SALES READ AND RESET
• PLU Group Sales Read
• PLU Group Sales Reset
DAY PART READ AND RESET
• Day Part Read
• Day Part Reset
CHECK TRACK (Guest Order Table) WITH SALES
READ AND RESET
• All Cashier Read
• All Cashier Reset
•
•
Individual Cashier Read
Individual Cashier Reset
NOTE:
24 [AT/TL]
4-19
X
Z
25 [AT/TL]
4-19
X
Z
30 [ST]
X
Z
Code Entry Method:
30 [#] |Cashier ID Code| [AT/TL]
(2-digit manager-assign code)
You can check opened order tables.
CHECK TRACK (Guest Order Table) WITHOUT
SALES READ
• All Cashier
• Individual Cashier
NOTE:
4-18
X
Z
Cashier Key Method:
Depress the required Cashier Key,
then 30 [AT/TL]
4-20
X
X
You can check reserved order tables.
31 [ST]
Code Entry Method:
31 [#] |Cashier ID Code| [AT/TL]
(2-digit manager-assign code)
Cashier Key Method:
Depress the required Cashier Key,
then 31 [AT/TL]
4-5
EO1-11138
4. READ (X) AND RESET (Z) REPORTS
4.1 How to Access a Report Item
■ Daily Reports (Continued)
Report Name
COMBO SALE READ AND RESET
• Individual Combo Read
Mode
Lock
Key Operation
Sample
Page
4-20
X
43 [#] |Combo Code| [#] ([ST])
[AT/TL]
Repeatable
•
•
All Combo Read
All Combo Reset
• All Combo Read (detail)
• All Combo Reset (detail)
HOURLY COMBO SALE READ AND RESET
• Hourly Combo Sale Read
• Hourly Combo Sale Reset
EMPLOYEE CLOCK-IN/CLOCK-OUT READ AND
RESET
• Employee Clock-in/Clock-out Read
• Employee Clock-in/Clock-out Reset
ELECTRONIC JOURNAL DATA READ AND
RESET
• All Data Read
• All Data Reset
X
Z
43 [ST]
X
Z
43 [AT/TL]
4-21
X
Z
44 [AT/TL]
4-22
X
Z
47 [AT/TL]
4-23
X
Z
50 [AT/TL]
Either can be omitted.
•
Consecutive No./Date Read
X
50 [#] 2 [#] |Consecutive No.| [#] |Date| [AT/TL]
Max. 4 digits
Month-Day-Year
8 digits (NOTE below)
•
All Guest Check Read
X
50 [#] 3 [#] [AT/TL]
•
Cashier/Date Read
X
50 [#] 4 [#] |Cashier ID Code| [#] (|Date|) [AT/TL]
(2-digit
managerassign
Code)
•
Clock-in/Clock-out/Date Read
X
Month-Day-Year
8 digits (NOTE below)
* omissible
50 [#] 5 [#] (|Date|) [AT/TL]
Month-Day-Year
8 digits (NOTE below)
* omissible
•
Transmission History Read
X
50 [#] 6 [#] [AT/TL]
•
EJ Buffer Remaining Line Read
X
50 [#] 7 [#] [AT/TL] (Display only)
NOTE:
A program option allows you to select the date order as follows.
• Month-Day-Year (Initial Date Order)
• Day-Month-Year
• Year-Month-Day
4-6
EO1-11138
4. READ (X) AND RESET (Z) REPORTS
4.1 How to Access a Report Item
■ GT Reports -- to be taken on weekly or monthly basis -Report Name
FINANCIAL GT READ AND RESET
• Financial GT Read
• Financial GT Reset
CASHIER GT READ AND RESET
• All Cashier GT Read
• All Cashier GT Reset
•
•
Individual Cashier GT Read
Individual Cashier GT Reset
Mode
Lock
Key Operation
Sample
Page
4-24
X
Z
203 [AT/TL] (Drawer opens.)
4-24
X
Z
X
Z
204 [ST] (Drawer opens.)
Code Entry Method:
204 [#] |Cashier ID Code| [AT/TL]
(2-digit manager-assign code)
Cashier Key Method:
Depress the required Cashier Key,
then 204 [AT/TL]
CREDIT CARD COMPANY SALES GT READ
AND RESET
• Credit Card Company Sales GT Read
• Credit Card Company Sales GT Reset
DEPARTMENT GROUP GT READ
DEPARTMENT GT READ AND RESET
• All Department GT Read
• All Department GT Reset
PLU GT READ AND RESET
• Individual PLU GT Read
4-24
X
Z
X
206 [AT/TL]
208 [AT/TL]
X
Z
211 [AT/TL]
X
213 [#]
4-24
4-24
*
|PLU Code| [PLU] ([ST])
Repeatable
4-24
[AT/TL]
* (May be replaced by
[PLU Preset-code Key])
•
•
Zone PLU GT Read
Zone PLU GT Reset
X
Z
213 [#] Zone-start [X] Zone-end [AT/TL]
PLU Code |
PLU Code |
•
•
All PLU GT Read
All PLU GT Reset
X
Z
213 [AT/TL]
X
213 [#] 0 [AT/TL]
• Inactive PLU GT Read
PLU GROUP SALES GT READ AND RESET
• PLU Group Sales GT Read
• PLU Group Sales GT Reset
EMPLOYEE CLOCK-IN/CLOCK-OUT GT READ
AND RESET
• Employee Clock-in/Clock-out GT Read
(weekly)
• Employee Clock-in/Clock-out GT Reset
(weekly)
•
•
Employee Clock-in/Clock-out GT Read
(periodic)
Employee Clock-in/Clock-out GT Reset
(periodic)
4-24
X
Z
224 [AT/TL]
4-24
X
247 [AT/TL]
Z
X
248 [AT/TL]
Z
4-7
EO1-11138
4. READ (X) AND RESET (Z) REPORTS
4.1 How to Access a Report Item
4.2
Time Edit for Employee Clock-in/Clock-out
This operation is used to edit the recorded time of an employee clock-in/clock-out and total break hours.
CONDITION
An employee of which recorded time is edited must be “Clock OUT”. Furthermore if the
employee has a cashier code, “Sign OFF” is also necessary.
OPERATION
Mode Lock: Z (Allowed only through the operator display)
As described in section 4.1.1, select “47 EMPLOYEE”
from the screen using the cursor key, then depress the
[ENTER] key. The screen shown below appears.
Select “2 EDIT TIME” from the screen using the
cursor key, then depress the [ENTER] key. The
screen shown below appears.
*Z/GTZ* 02-06-1999 03:04
Z
EMPLOYEE
1 ALL
2 EDIT TIME
*Z/GTZ* 02-06-1999 03:04
Z
EMPLOYEE
EMPLOYEE COD
0
→
Please select operation by Enter key.
0.00
Pg dw
Enter
↑
0.00
↓
Pg up
Select an item you want to edit from the screen using
the cursor key, enter time, then depress the [ENTER]
key. In this case, the clock-out time is changed from
17:40 to 18:40. A symbol “**” is displayed at the
right of the edited time and “TOTAL HOURS” is
automatically recalculated.
*Z/GTZ* 02-06-1999 03:04
Z
EMPLOYEE
0001 O001
01 CASHIER
IN
OUT
TOTAL BREAK
TOTAL HOURS
09:30
18:40**
00:10
09:00
Pg dw
Enter
↑
Enter an employee code, then depress the [ENTER]
key. The screen shown below appears.
←
Please input data.
*Z/GTZ* 02-06-1999 03:04
Z
EMPLOYEE
0001 O001
01 CASHIER
IN
OUT
TOTAL BREAK
TOTAL HOURS
09:30
17:40
00:10
08:00
Please input data.
0.00
Pg up
NOTE:
Pg dw
Enter
↓
→
Pg up
Please input Employee code.
↑
0.00
↓
Pg up
Pg dw
You can designate and enter the date before the time entry, if necessary.
A program option allows you to select the date order as follows.
• Month-Day-Year (Initial Date Order)
• Day-Month-Year
• Year-Month-Day
4-8
Enter
↑
↓
EO1-11138
4. READ (X) AND RESET (Z) REPORTS
4.3 Combination Reports
4.3
Combination Reports
You can issue a combination report which consists of a maximum of 5 reports selected from the list shown below,
and you can program your own 3 combination reports. As for the programming, refer to the next chapter
PROGRAMMING OPERATIONS.
REPORT NAME
Financial Report
All Cashier Report
Credit Company Sales Report
Department Group Report
Media Sales and In-drawer Report
Hourly Range Report
All Department Report
All Media Sales & Cash-in-drawer Report
All PLU Report
All PLU Stock Report
All Guest File Report
PLU Group Sales Report
Day Part Report
Check Track with Sales Report (All Cashier)
Check Track without Sales Report (All Cashier)
All Combo Sale Report (detail)
Hourly Combo Sale Report
Employee Clock-in/Clock-out Report
Employee Clock-in/Clock-out Report (weekly)
Employee Clock-in/Clock-out Report (periodic)
KEY OPERATION: Mode Lock:
X
X
X
X
X
X
X
X
X
X
X
X
X
X
X
X
X
X
X for Read
Z for Reset
|
REPORT AVAILABLE
Z
GTX
GTZ
Z
GTX
GTZ
Z
GTX
GTZ
GTX
Z
Z
GTX
GTZ
Z
GTX
GTZ
GTX
GTZ
GTX
GTX
GTZ
GTZ
Z
Z
Z
Z
Z
Z
Z
| [AT/TL]
Enter the Report No.:
None (simply depress [AT/TL]): Daily Combination Report 1
200: GT Combination Report 1
1:
Daily Combination Report 2
201: GT Combination Report 2
2:
Daily Combination Report 3
202: GT Combination Report 3
*
As for the daily combination reports 1 to 3, you can issue them by simply depressing the corresponding
navigation keys COMB1 to COMB3.
NOTES:
1. If a report in which the issue mode does not match the mode lock position to take a combination
report is contained in a combination report table, that report issuance will be skipped.
2. The all department report and the financial report are initially programmed to the combination
report 1 (daily and GT).
3. Whether the drawer opens or not depends on the reports contained in a combination report table.
4-9
EO1-11138
4. READ (X) AND RESET (Z) REPORTS
4.4 General Notes on Report Takings
4.4
General Notes on Report Takings
1. The cashier signed-OFF or signed-OUT condition is required for taking any X or Z reports in the Code Entry
Method. (Otherwise, an error will result when the Mode Lock is turned to the “X” or “Z” position.)
2. The [ITEM CORR] (or [VOID]) key may be depressed anytime during the printing of a report, for the purpose
of aborting the receipt issuance. When a report abort has been operated for a reset report, the memory of the
report data will not be cleared.
3. The drawer opens at the start of printing for those reports which are noted with “(Drawer opens)” in the Daily
and GT report table. However, a program option allows you to take the financial report while the drawer
remains closed.
4.5
Report Sample Format
Shown below are sample formats of the respective reports. In referring to those formats, please note the
following:
•
The data contents are merely examples to show a report format. The numeric data may not balance correctly.
4.5.1
Financial Read or Reset Report (Daily or Periodic)
11-29-1999
See NOTE
on the next
page.
MON
Z03
Z_FINANCIAL
GT
NET GT
GS
161
%+
1
NS
150
TAX1
TAX2
TAX5
NS
150
CHG TIP
1
HASH DP
1
%2
DISC
1
GRATUITY
4
TOTAL
39CU
OPEN TABLE
6CU
CASH
25CU
CHECK
0CU
Chg
7CU
MISC
0CU
CPN
0CU
CRT TL5
2CU
R/A
2
PO
1
LOAN
PICK UP
1
-- To be continued --
#3001
Date, Day-of-Week, Register No.
1177.40
1177.20
1177.40
0.13
990.94
37.35
61.80
4.56
1094.65
2.80
18.00
1.36
0.10
3.21
1117.20
184.06
481.31
60.00
242.59
15.00
1.00
117.45
30.00
5.00
171.37
5.00
Report Symbol, Report Name
Grand Total
Negative Other
Net GT
Income
Gross Sale Item Count, Amount
Percent Charge Operation Count, Amount Department
Net Sale without Tax Item Count, Amount Item Count,
Amount if any
Tax 1 Amount
Tax 2 Amount
Tax 3 & Tax 4 Amount if any
Manual Tax Amount
Net Sale with Tax Item Count, Amount
Charge Tip Operation Count, Amount
Positive Other Income Department Item Count, Amount
Percent Discount on Subtotal Operation Count, Amount
Dollar Discount on Subtotal Operation Count, Amount
Gratuity Operation Count, Amount
All Media Sales Customer Count, Amount
Open Order Table (Unpaid Account) Customer Count, Amount
Cash Sales Customer Count, Amount
Check Sales Customer Count, Amount
Charge Sales Customer Count, Amount
Misc. Media Sales Customer Count, Amount
Coupon Sales Customer Count, Amount
Charge Posting by Check Track Customer Count, Amount
Received-on-Account Operation Count, Amount
Paid Out Operation Count, Amount
Loan Amount
if selected to print by
Pick Up Operation Count, Amount
a program option
Credit 1 to Credit 4
Sales Customer
Count, Amount if any
4-10
Percent Discount 2 to 8
on Subtotal Operation
Count, Amount if any
Combo Sale Discount
Amount if the option “Combo
Sale” has been selected.
EO1-11138
4. READ (X) AND RESET (Z) REPORTS
4.5 Report Sample Format
-- Continued --
See
NOTE
below
CASH ID
CHECK ID
Chg ID
MISC ID
CPN ID
CRT ID5
TIP PAID
CORR
VOID
ALL VD
%-DP TL
-SALE
TXBL1
TXBL2
TAX EX
TAX1EX
GUEST
CUR1
CUR2
ITEM/CUS
NS /CUS
NO SALE
TRAY CTR
4
7
3
1
2
1
2
2
1
1
1
2CU
171.37
160.00
242.59
15.00
1.00
117.45
24.50
11.00
13.00
49.50
0.24
3.00
3.00
391.45
904.40
1CU
5.00
41CU
3
3
315.96
115.00
3.85
25.41
2
35
0001Z
0290
NOTE:
21:54TM
Cash-in-drawer Amount
Operation Count & In-drawer Amount for each non-cash media
Eat-in/Takeout Customer
Count, Amount if the
Tip Paid Operation Count, Amount
option “Eat-in/Takeout”
Item Correct Operation Count, Amount
has been selected.
Void Operation (for PLU item) Count, Amount
All Void Operation Count, Amount
Percent Discount on PLU item Operation Count, Amount
Negative Department Total Item Count, Amount
Negative Balance Sale Customer Count, Amount
Taxable Total 1 (Sale Amount subject to Tax 1 taxation)
Taxable Total 2 (Sale Amount subject to Tax 2 taxation)
Tax Exempted Customer Count
Sale Portion Exempted from Tax 1
Guest Total
Foreign Currency 1 Operation Count, Amount
Foreign Currency 2 Operation Count, Amount
Sales Item Count per Customer
Operation Count &
Net Sale per Customer
Amount for each
No-sale Operation Count
Foreign Currency 3
Tray Total Operation Count
to 5 if any
Financial Reset Report Count
(printed on the reset report only) Sale Portions
Receipt Consecutive No., Time Exempted from
Tax 2 to 4 if any
Taxable Total 3 & 4 if any
Selective Itemizer 1 & 2
Operation Count, Amount if any
Print items surrounded by a dotted line are
printed on a daily report only but not on a
periodic report.
Negative Mode ( - )
Operation Count,
Amount if any
Negative Tax Amount if any
Percent Discount 2 to 8 on PLU item
Operation Count, Amount if any
Dollar Discount on PLU item
Operation Count, Amount if any
Misc. Void Operation (other than
PLU item) Count, Amount if any
4-11
EO1-11138
4. READ (X) AND RESET (Z) REPORTS
4.5 Report Sample Format
4.5.2
Cashier Read or Reset Report (Daily or Periodic)
■ Individual Cashier Read Report Sample
11-29-1999
MON
X04
X_CLERK
02
2CLDYER
GS
50
NS
43
TAX1
TAX2
TAX5
NS
43
CHG TIP
DISC
TOTAL
OPEN TABLE
CASH
Chg
MISC
CPN
CASH ID
Chg ID
MISC ID
CPN ID
TIP PAID
ALL VD
-DP TL
1
-SALE
TXBL1
TXBL2
TAX EX
TAX1EX
GUEST
CUR1
ITEM/CUS
3.91
NS /CUS
TRAY CTR
Cashier Code and Cashier Name
1
1
11CU
3CU
5CU
3CU
0CU
0CU
3
1
1
1
1
1CU
354.90
269.00
9.40
16.64
4.56
299.60
2.80
0.10
302.30
84.40
91.10
114.31
5.00
1.00
1.60
114.31
5.00
1.00
24.50
49.50
3.00
3.00
102.00
245.00
Same contents as the financial report except:
• Data of GT and Net GT is not printed.
• Data of Server Transfer and Tip Percentage, if any, is printed.
1CU
5.00
12CU
1
200.00
25.45
8
0243
4.5.3
#3001
22:33TM
Credit Card Company Sales Read or Reset Report (Daily or Periodic)
11-29-1999
X06
01
02
03
MON
#3001
X_CREDIT
CRT01
1
CRT02
1
CRT03
1
21.97
50.77
28.46
3
101.20
TOTAL
0240
Company Code, Company Name, Operation Count, Amount
Total of Operation Count and Amount
22:29TM
4-12
EO1-11138
4. READ (X) AND RESET (Z) REPORTS
4.5 Report Sample Format
4.5.4
Department Group Read Report (Daily or Periodic)
11-29-1999
X08
GP01
MON
#3001
X_GROUP
93
42.01%
413.05
50
56.47%
555.26
1
1.53%
15.00
Minor Group 1
Item Count, Sales Percentage, Amount
GP02
GP03
TOTAL
144
983.31
MGP01
44
6.81%
66.95
49
35.20%
346.10
34
36.94%
363.26
16
19.53%
192.00
1
1.53%
15.00
Total of Item Count and Amount
Major Group 1
Item Count, Sales Percentage, Amount
MGP02
MGP03
MGP04
MGP05
TOTAL
144
983.31
0239
4.5.5
Total of Item Count and Amount
22:29TM
Media Sales and In-drawer Total Read Report (Daily)
11-29-1999
MON
X09
X_MEDIA_ALL
TOTAL
38CU
CASH
23CU
CHECK
0CU
Chg
7CU
MISC
0CU
CPN
0CU
CRT TL5
2CU
CASH ID
CHECK ID
4
Chg ID
7
MISC ID
3
CPN ID
1
CRT ID5
2
CUR1
3
CUR2
3
0226
#3001
1087.57
451.68
60.00
242.59
15.00
1.00
117.45
141.74
160.00
242.59
15.00
1.00
117.45
315.96
115.00
All Media Sales Customer Count, Amount
Each Media Sale Customer Count, Amount
Each Media-in-drawer Operation Count, Amount
(operation count for cash is not printed)
Each Foreign Currency-in-drawer
Operation Count, Amount
22:18TM
4-13
EO1-11138
4. READ (X) AND RESET (Z) REPORTS
4.5 Report Sample Format
4.5.6
Hourly Range Read or Reset Report (Daily)
11-29-1999
MON
X10
X_HOURLY
10:00TM
8
3CU
12:00TM
24
6CU
14:00TM
44
11CU
16:00TM
19
4CU
18:00TM
5
1CU
20:00TM
24
8CU
22:00TM
19
5CU
0238
4.5.7
#3001
63.64
Hourly Range 10:01 to 12:00
Item Count, Customer Count, Amount
Hourly Range 12:01 to 14:00
160.53
Hourly Range 14:01 to 16:00
326.54
Hourly Range 16:01 to 18:00
174.64
Hourly Range 18:01 to 20:00
32.76
Hourly Range 20:01 to 22:00
143.03
Hourly Range 22:01 and thereafter
167.09
22:28TM
Department Read or Reset Report (Daily or Periodic)
11-29-1999
X11
DP01
28
2.86%
0
27.65
0.00
16
4.06%
0
39.30
0.00
19
9.69%
0
93.80
0.00
30
26.06%
0
252.30
0.00
17
20.94%
1
202.76
0.24
DISC
DP03
DISC
DP04
DISC
DP05
DISC
143
1
968.31
-3.00
0237
NOTE:
#3001
X_DP_ALL
DISC
DP02
TOTAL
-TOTAL
MON
Department 1
Item Count, Sales Percentage (NOTE below), Amount
Dollar Discount or %- Operation Count, Amount (Optional Print)
Total of Positive Departments Item Count, Amount
Total of Negative Departments Item Count, Amount
22:27TM
A program option allows you to print “Customer Count” instead of “Sales Percentage”.
4-14
EO1-11138
4. READ (X) AND RESET (Z) REPORTS
4.5 Report Sample Format
4.5.8
All Media Sales Total and Cash-in-Drawer Read Report (Daily)
11-29-1999
MON
#3001
38CU
1087.57
141.74
X12
X_MEDIA
TOTAL
CASH ID
0227
4.5.9
All Media Sales Customer Count, Amount
Cash-in-drawer Amount
22:19TM
PLU Read or Reset Report (Daily or Periodic)
■ Individual PLU Read Report (Daily or Periodic)
11-29-1999
X13
000001
P1
P2
P3
P4
P5
TL
000002
P1
P2
P3
P4
P5
TL
TOTAL
P1
P2
P3
P4
P5
TL
MON
X_PLU_INDIV
PLU000001
27
0
1
0
0
28
PLU000002
15
0
1
0
0
16
#3001
PLU Code 1, PLU Name
27.00
0.00
0.65
0.00
0.00
27.65
Price Levels 1 ~ 5 Item Count, Amount
Total Item Count, Amount of Price Levels 1 to 5
PLU Code 2 Data
37.50
0.00
1.80
0.00
0.00
39.30
Total Data of PLU Code 1 and PLU Code 2
42
0
2
0
0
44
64.50
0.00
2.45
0.00
0.00
66.95
0230
22:22TM
4-15
EO1-11138
4. READ (X) AND RESET (Z) REPORTS
4.5 Report Sample Format
■ All PLU Read or Reset Report (Daily or Periodic)
11-29-1999
X13
000001
P1
P3
TL
000002
P1
P3
TL
000003
P1
P3
TL
000004
P1
P2
P3
TL
000005
P1
P2
TL
MON
TOTAL
P1
P2
P3
TL
-TOTAL
P1
TL
X_PLU_ALL
PLU000001
27
1
28
PLU000002
15
1
16
PLU000003
18
1
19
PLU000004
27
2
1
30
PLU000005
16
1
17
27.00
0.65
27.65
PLU Code 1, PLU Name
Price Level 1 Item Count, Amount
Total Item Count, Amount of Price Levels 1 to 5
PLU Code 2 Data
37.50
1.80
39.30
PLU Code 3 Data
90.00
3.80
93.80
PLU Code 4 Data
229.50
15.60
7.20
252.30
PLU Code 5 Data
192.00
11.00
203.00
135
4
4
143
920.00
35.10
13.45
968.55
Total of Positive PLUs Item Count, Amount
1
1
-3.00
-3.00
Total of Negative PLUs Item Count, Amount
0232
NOTE:
#3001
22:24TM
All PLU Report can be programmed to not print items and price levels having zero totals.
■ Zone PLU Read or Reset Report (Daily or Periodic)
The format is the same as “All PLU Read or Reset Report” above. The only difference is that the Zone Read
or Reset Report outputs the PLUs in the zone designated by the key operation to take the report.
X13
X_PLU_ZONE
000001-000005
■ Inactive PLU Read Report (Daily or Periodic)
11-29-1999
X13
000015
MON
#3001
X_PLU_ZERO
PLU000015
0233
PLU Code, PLU Name
22:25TM
4-16
EO1-11138
4. READ (X) AND RESET (Z) REPORTS
4.5 Report Sample Format
4.5.10
PLU Stock Read Report (Daily)
■ Individual PLU Stock Read Report (Daily)
11-29-1999
MON
X_STOCK_INDI
PLU000007
0
X14
000007
0234
#3001
348
PLU Code 7, PLU Name
Minimum Stock Quantity, Current Stock Quantity
22:25TM
■ All PLU Stock Read Report (Daily)
11-29-1999
MON
X_STOCK_ALL
PLU000004
0
PLU000005
0
PLU000006
0
PLU000007
0
PLU000008
0
X14
000004
000005
000006
000007
000008
0236
#3001
520
PLU Code 4, PLU Name
Minimum Stock Quantity, Current Stock Quantity
133
433
348
176
22:27TM
■ Zone PLU Stock Read Report (Daily)
The format is the same as “All PLU Stock Read Report” above. The only difference is that the Zone Read
Report outputs the stock data of the PLUs in the zone designated by the key operation to take the report.
X14
4.5.11
X_STOCK_ZONE
000004-000007
Zone designation
Customer File Read or Reset Report (Daily)
■ Individual Customer File Read Report (Daily)
11-29-1999
MON
X15
X_CUST_INDIV
#000000000001 RENO
1
0247
#3001
54.70
Customer File Code 1, Customer Name
Operation Count, Balance
22:36TM
4-17
EO1-11138
4. READ (X) AND RESET (Z) REPORTS
4.5 Report Sample Format
■ All Customer File Read or Reset Report (Daily)
11-29-1999
MON
X15
X_CUST_ALL
#000000000001 RENO
1
#000000000002 SMITH
1
0246
#3001
54.70
Customer File Code 1, Customer Name
Operation Count, Balance
Customer File Code 2 Data
62.75
22:35TM
■ Zone Customer File Read or Reset Report (Daily)
The format is the same as “All Customer File Read or Reset Report” above. The only difference is that the
Zone Read or Reset Report outputs the data of the customer files in the zone designated by the key operation
to take the report.
X15
X_CUST_ZONE
000000000001_000000000010
■ Inactive Customer File Read Report (Daily)
11-29-1999
MON
#3001
X15
X_CUST_ZERO
#000000000003 BECKHAM
#000000000004 JOHNSON
#000000000005 SHEARER
0249
4.5.12
Customer File Code, Customer Name
22:37TM
PLU Group Read or Reset Report (Daily or Periodic)
11-29-1999
MON
X24
X_PLU_GROUP
PLU GP01
44
6.81%
PLU GP02
49
35.19%
PLU GP03
34
36.96%
PLU GP04
16
19.52%
PLU GP05
1
1.53%
TOTAL
144
#3001
66.95
346.10
363.50
192.00
15.00
983.55
0250
PLU Group 1
Item Count, Sales Percentage, Amount
Total of Item Count and Amount
22:37TM
4-18
EO1-11138
4. READ (X) AND RESET (Z) REPORTS
4.5 Report Sample Format
4.5.13
Day Part Read or Reset Report (Daily)
11-29-1999
MON
X25
X_DAY_PART
10:00TM
MGP01
11
MGP02
13
MGP03
4
MGP04
4
MGP05
1
14:00TM
MGP01
16
MGP02
20
MGP03
19
MGP04
8
18:00TM
MGP01
17
MGP02
16
MGP03
11
MGP04
4
0251
4.5.14
#3001
15.50
Hourly Range 10:01 to 14:00
Major Group 1
Item Count, Amount
93.00
45.50
52.00
15.00
Hourly Range 14:01 to 18:00
20.95
145.10
196.00
92.00
Hourly Range 18:01 and thereafter
30.50
108.00
121.76
48.00
22:37TM
Check Track (Guest Order Table) with Sales Read or Reset Report (Daily)
■ Individual Cashier Read Report Sample
11-29-1999
X30
02
TOTAL
MON
X_CT_W_INDI
2CLDYER
#018
#021
#025
3
0253
#3001
43.40
32.50
8.50
Cashier Code, Cashier Name
Order Table No., Amount remaining unpaid
84.40
22:38TM
4-19
EO1-11138
4. READ (X) AND RESET (Z) REPORTS
4.5 Report Sample Format
4.5.15
Check Track (Guest Order Table) without Sales Read Report (Daily)
■ Individual Cashier Read Report Sample
11-29-1999
X31
02
MON
X_CT_WO_INDI
2CLDYER
#003
#004
#005
#015
#3001
TOTAL
Total of reserved Order Table
5
0256
4.5.16
Cashier Code, Cashier Name
Reserved Order Table
#011
22:40TM
Combo Sales Read or Reset Report (Daily)
Available only when the feature “Combo Sales” has been selected.
■ Combo Sales Total Read or Reset Report (Daily)
11-29-1999
MON
X43
X_COMBO_SUM
COMBO TOTAL
100
0121
#3001
1235.12
423.89
Combo Sales Total
Total of Operation Count and Combo Discount Amount
20:30TM
■ Combo Sales Detail Read or Reset Report (Daily)
11-29-1999
X43
01
02
MON
X_COMBO_ALL
COMBO1
9
COMBO2
5
COMBO TOTAL
100
0122
#3001
98.56
21.20
153.41
43.00
1235.12
423.89
Combo Code, Combo Name, Combo Sales Amount
Operation Count, Combo Discount Amount
Combo Sales Total
Total of Operation Count and Combo Discount Amount
20:30TM
4-20
EO1-11138
4. READ (X) AND RESET (Z) REPORTS
■ Individual Combo Sale Read Report (Daily)
11-29-1999
X43
01
MON
X_COMBO_INDI
COMBO1
9
COMBO TOTAL
9
0123
4.5.17
#3001
98.56
21.20
Combo Code, Combo Name, Combo Sales Amount
Operation Count, Combo Discount Amount
98.56
21.20
Combo Sales Total
Total of Operation Count and Combo Discount Amount
20:30TM
Hourly Range Combo Sales Read or Reset Report (Daily)
Available only when the feature “Combo Sales” has been selected and also a combo sale table has been linked
to each hourly range.
11-29-1999
MON
X44
X_COMBO_PERI
10:00TM
COMBO TOTAL
9
11:00TM
COMBO TOTAL
9
COMBO TOTAL
56
0124
#3001
96.24
41.12
Hourly Range 10:01 to 11:00
Combo Sales Amount
Operation Count, Combo Discount Amount
100.62
48.28
324.28
198.22
Combo Sales Total
Total of Operation Count and Combo Discount Amount
20:31TM
4-21
EO1-11138
4. READ (X) AND RESET (Z) REPORTS
4.5 Report Sample Format
4.5.18
Employee Clock-in/Clock-out Read or Reset Report (Daily, Weekly or Periodic)
11-29-1999
MON
#3001
X47
X_EMPLOYEE
0001 JONES
01 CASHIER
CLOCK IN
09:30
CLOCK OUT
22:30
TOTAL BREAK
04:09
TOTAL HOURS
08:51
****************
12*
01 CASHIER
REGULAR HOUR
08:00
O/T HOURS
00:51
****************
12*
TOTAL
REGULAR HOUR
08:00
O/T HOURS
00:51
Employee Code, Employee Name
Job Code, Job Name
Job Start Time
Job End Time
Break Hours Total on each Job
Working Hours Total on each Job
Regular Working Hours on each Job
Overtime Hours on each Job
Regular Working Hours Total
Overtime Hours Total
0005
03
FELDER
COOK
CLOCK IN
09:33
CLOCK OUT
22:12
TOTAL BREAK
00:00
TOTAL HOURS
12:39
****************
12*
03 COOK
08:00
REGULAR HOUR
O/T HOURS
04:39
****************
12*
TOTAL
REGULAR HOUR
08:00
O/T HOURS
04:39
0251
22:37TM
4-22
EO1-11138
4. READ (X) AND RESET (Z) REPORTS
4.5 Report Sample Format
4.5.19
Electronic Journal Read or Reset Report (Daily)
■ All Electronic Journal Read or Reset Report (Daily)
11-29-1999
MON
#3001
X50
X_EJ_ALL
#3001
11-29-1999 MON
* CLOCK IN
*
1
0001
1 09:30
0066 09:30TM
11-29-1999 MON
#3001
* CLOCK IN
*
2
0002
1 09:31
0067 09:31TM
11-29-1999 MON
#3001
* CLOCK IN
*
3
0003
1 09:31
0068 09:31TM
11-29-1999 MON
#3001
All the data stored in the electronic journal buffer memory is printed.
X47
X_EMPLOYEE
0261 22:44TM
11-29-1999 MON
#3001
GTX_EMPLOYEE
X248
0262 22:45TM
0263
22:45TM
■ Electronic Journal (Consecutive No./Date) Read Report (Daily)
X50
X_EJ_CONSNO
Data corresponding to the designated consecutive No./date is printed.
■ Electronic Journal (All Guest Check) Read Report (Daily)
X50
X_EJ_INVOICE
Data of all the guest checks is printed.
■ Electronic Journal (Cashier/Date) Read Report (Daily)
X50
X_EJ_CLERK
Data corresponding to the designated cashier/date is printed.
4-23
EO1-11138
4. READ (X) AND RESET (Z) REPORTS
4.6 GT REPORTS
■ Electronic Journal (Clock-in & Clock-out/Date) Read Report (Daily)
X50
X_EJ_EMPLOYE
Data regarding the employee clock-in/clock-out is printed.
■ Electronic Journal (Transmission History) Read Report (Daily)
X50
X_EJ_HISTORY
Data of the transmission history is printed.
4.6
GT Reports
The print form and items of a GT report are the same as those of its corresponding daily report, except the report
header portion. Please also note that some items provided in the daily report are not provided in its GT reports.
The counters and totals in a GT report are records accumulated for a certain period (week, month, etc.) while
those counters and totals in the daily report are usually records for a day. The accumulated record data in each
GT report will be reset when its GTZ report has been taken.
Header Example
X11
X_DP_ALL
→
Department Read Report (Daily)
X211
GTX_DP_ALL
Department GT Read Report
4-24
EO1-11138
5. PROGRAMMING OPERATIONS
5.1 Before you enter the SET Mode
5.
PROGRAMMING OPERATIONS
This chapter is provided for the store programmer or the store manager who may have to change the programmed
data of the FS-2600 series ECR on the daily, weekly, or monthly basis. Usually, all the basic program data required
for your store should have already been set before delivery of the product by your local TOSHIBA TEC representative.
However, if it becomes necessary to change or add program data, please refer to this chapter. It is also recommended
that you read the OPERATOR’S GUIDE as well as other chapters of the MANAGER’S GUIDE in order to thoroughly
understand the descriptions in this chapter. If there are any unclear points or program data other than listed here that
must be changed or added, please contact your TOSHIBA TEC representative.
WARNING!
Never try to access a program item other than those shown in this chapter. If you access it
and mistakenly change important data, a malfunction may occur on your completed system.
5.1
Before you enter the SET Mode
Please note that you should use the REG Mode Keyboard Sheet or the SET Mode Keyboard Sheet that is proper
for each program item. The SET Mode Keyboard Sheet is printed on the reverse side of the REG Mode
Keyboard Sheet. Refer to the following list.
5.1.1
•
•
•
•
•
•
•
PLU Stock Loading and Changing (Submode 24)
PLU Preset-code Key and Display Key Setting (Submode 27)
PLU Preset Price Setting and Changing (Submode 60)
%+ and %- Rate Setting
Selective Itemizer Rate Setting
Foreign Currency Exchange Rate Setting
Store/Register No. Setting
5.1.2
•
•
•
•
•
•
•
•
•
•
•
•
•
•
•
•
•
•
•
•
•
Program items that require the REG Mode Keyboard Sheet
Program items that require the SET Mode Keyboard Sheet
Store Name/Message, Commercial Message, Footer Logo Message Programming (Submode 1)
Cashier Programming (Submode 2)
Department Table Programming (Submode 3)
PLU Table Setting (Submode 4)
Time Setting and Adjustment (Submode 5)
Date Setting and Adjustment (Submode 6)
Hourly Range Setting (Submode 7)
Amount Limit Setting for Function Keys and Guests (Submode 8)
Non-taxable Limit Amount and Gratuity Rate Setting (Submode 12)
Minor Group Name Programming (Submode 13)
Major Group Name Programming (Submode 14)
Guest File Table Setting (Submode 15)
Combination Report Table Programming (Submode 19)
Tare Table and Scale Unit Weight Programming (Submode 26)
PLU Group Name Programming (Submode 29)
RKP Message Programming (Submode 30)
Display Message Programming (Submode 31)
Amount Limit Setting for the [DISC] Key (Submode 35)
Set Menu Table Programming (Submode 42)
Combo Sale Table Programming (Submode 43)
Guest Check Commercial Message Programming (Submode 45)
5-1
EO1-11138
5. PROGRAMMING OPERATIONS
5.2 Character Entries
•
•
•
•
•
•
Day Part Setting (Submode 46)
Employee Table Setting (Submode 50)
Job Code/Working Hour Setting (Submode 51)
Tender Up Table Setting (Submode 52)
Display Menu Table Setting (Submode 53)
Printer Setting (Submode 71)
5.2
Character Entries
Two ways are available to enter characters for the various names and messages; character code entry method
and direct character entry method.
CHARACTER CODE ENTRY Method
This method is to set a character by entering a Character Code and depressing the [#] key.
DIRECT CHARACTER ENTRY Method
This method is to set a character by directly depressing a character key which has been printed on the SET
mode keyboard sheet.
5.2.1
Character Code Entry Method
■ Character Code Table
Column Code
2
Row
Code
00
3
4
5
0
@
P
6
7
8
9
10
11
12
13
p
\
01
!
1
A
Q
a
q
II
02
"
2
B
R
b
r
III
03
#
3
C
S
c
s
II
04
$
4
D
T
d
t
05
%
5
E
U
e
u
06
&
6
F
V
f
v
7
G
W
g
w
07
,
14
15
®
¬
¯
1/2
D
1/4
★
C
08
(
8
H
X
h
x
09
)
9
I
Y
i
y
¢
lb
10
*
:
J
Z
j
z
£
No
11
+
;
K
[
k
{
F
x
12
,
<
L
l
|
13
-
=
M
]
m
}
14
.
>
N
^
n
~
15
/
?
O
_
o
( )
|
5-2
kg
EO1-11138
5. PROGRAMMING OPERATIONS
5.2 Character Entries
NOTE:
Characters corresponding to the following codes can be used only for display but not for print.
715, 1206, 1207, 1214, 1215, 1301, 1302, 1303, 1304, 1500, 1501, 1502, 1503, 1506, 1507, 1508,
1509, 1510, 1512, 1513, 1514, 1515, 1305 (applicable to the TM-300 only)
■ How to Set a Character
• To set a regular-sized character, enter a column code and then a row code, followed by the [#] key.
ex.) To set “%”, enter 205 and depress [#].
To set “kg”, enter 1508, and depress [#].
•
To set a blank instead of a character, simply depress [#] without a prior code entry, or enter 200 and depress [#].
•
Depress the [X] key once prior to a regular-sized character entry, and it will be a double-sized character (a
blank will also be double-sized) .
ex.) To set “GROUP”, “G” in double-sized, and “ROUP” in regular-sized:
[X] 407 [#] 502 [#]
415 [#]
505 [#]
500 [#]
G
R
O
U
P
•
Depress the [X] key twice prior to the first character code entry to set the entire message line or entered name
with all double-sized characters.
ex.) To set “GROUP” all in double-sized:
[X] [X]
407 [#]
502 [#]
415 [#]
505 [#]
500 [#]
G
R
O
U
P
All Double-sized Declaration
5.2.2
Direct Character Entry Method
■ SET Mode Keyboard Sheet
Detach the keyboard sheet frame from the register, then turn over the REG Mode Keyboard Sheet so that the
SET Mode Keyboard Sheet printed on the reverse side can be used.
1
2
3
4
5
6
7
8
9
0
DOUBLE
DOUBLE
SHIFT
Q
W
E
R
T
Y
U
I
O
P
CAPS
LOCK
SMALL
LOCK
A
S
D
F
G
H
J
K
L
S
D
F
SPACE
Z
X
C
V
B
N
M
,
.
X
ST
!
#
$
%
&
(
)
!
#
$
%
-
=
@
:
+
/
*
8
ESC
C
1/2
1/4
4
5
6
8
¬
¯
Enter NEXT
®
Pg
Up
ALL ITEM OPEN
VOID CORR
£
¢
#
C
Pg
Dw
Ü
NS
4
5
00
4
5
6
7
8
4
7
8
9
4
5
6
4
5
6
7
8
X
4
5
6
1
2
3
4
5
6
7
8
1
1
2
3
4
5
00
4
5
6
7
8
PLU
0
00
4
5
6
4
5
6
7
8
4
5
ST 4
1
2
3
4
5
6
7
8
DP# 2
AT/TL 4
5-3
EO1-11138
5. PROGRAMMING OPERATIONS
5.3 Condition Required for Programming Operations
■ Functions of Keys
[DOUBLE]
Used to enter all the characters of one line in double-size. Depress this key before all
character entries.
[DOUBLE SHIFT]
Depress this key prior to a character entry, and it will be a double-sized character. The
double-size modification using this key is effective for only one character to follow.
[CAPS LOCK]
Used to enter the capital-letter mode, which is held until [SMALL LOCK] is depressed.
[SMALL LOCK]
Used to enter the small-letter mode, which is held until the [CAPS LOCK] is depressed.
[SPACE]
Depress this key to enter a blank instead of a character.
[←] or [ITEM CORR]
Depressing this key once deletes one character just entered. Subsequent depressions
of the key will further delete the characters in the backward direction.
[ESC]
Used to cancel all the characters of one line just entered before the [Enter] key
depression.
Character Keys
Simply depress each key corresponding to the required character. Number Keys [1] to
[0] located on the top line of the keyboard merely function as character keys (i.e
entered numbers are part of print descriptors but not numeric value of Program No.,
Address No., Item Code, etc.).
Numeric Keys [ . ], [00], [0] to [9] (located near the bottom right of the keyboard)
These keys are used to enter codes (Program No., Address No., etc. ) . These key entries will
not be part of descriptors.
NOTE:
You can enter a character not shown on the SET Mode Keyboard Sheet by the character code entry
method.
5.3
Condition Required for Programming Operations
At the top of each programming operation a “CONDITION” is given. Unless the register satisfies this condition,
the programming operations will not be allowed.
There are two types of conditions:
“Any time outside a sale”
It means that the programming operation is allowed when a sale is finalized before going into any other sale
entry.
“After ...Reset”
It means that the designated reset report must be taken before entering the programming operation. And an
error will result if the operation is attempted without taking the report. However, the words “After ... Reset” do
not necessarily mean “immediately after ...”.
When the designated reset report has already been taken and then some operations are performed in the
SET, X, or Z mode, the condition “After ... Reset” is still satisfied and the programming operation is still
allowed.
On the contrary, when the designated reset report has been taken but then some sales data relating to that
report’s output data are entered in the REG, MGR, or - mode, the programming operation will no longer be
allowed and the same reset report must be taken.
5-4
EO1-11138
5. PROGRAMMING OPERATIONS
5.4 How to Access a Program Item
Thus the condition “After ... Reset” indicates that all the sales data relating to the report data must be zero
(except non-resettable memory data). Because of this “CONDITION” requirement, the report data will be
protected from any inconsistencies of sales data entered in the period from a resetting of the report to another
resetting of the same report next time.
5.4
How to Access a Program Item
Same as in the X or Z mode, two ways are available to access a program item; through the operator display and
through the keyboard.
5.4.1
How to Access a Program Item through the Operator Display
When you turn the mode selector key to the SET position, the initial screens shown below will appear.
* SET * 02-06-1999 03:04
1
2
3
PROGRAMMING
PROGRAM READ
PROGRAM DLL
Please select operation by Enter key.
0.00
Pg up
Pg dw
TOTAL
Enter
↑
0.00
↓
■ Description of each Navigation Key
13
14
15
1
2
3
4
5
13
14
15
••••*••••10••••*••••20••••*••••30••••*••••40
Display Item
Description
1 Navigation Key 1
Pg up
Requests the preceding program menu screen.
2 Navigation Key 2
Pg dw
Requests the next program menu screen.
3 Navigation Key 3
Enter
Decides a selected item. Also decides an entered numeric value or
character.
4 Navigation Key 4
↑
Cursor Key
5 Navigation Key 5
↓
Cursor key
Example)
If you want to perform the time setting or adjustment (submode 5), operate as follows.
5-5
EO1-11138
5. PROGRAMMING OPERATIONS
5.4 How to Access a Program Item
Select “1 PROGRAMMING” from the initial screen using the cursor key, then depress the [ENTER] key. The
program menu screen shown below appears.
* SET * 02-06-1999 03:04
PROGRAMMING
0 MISC
8 AMOUNT LIMIT
1 STORE NAME
9 FINANCIAL
2 CASHIER
10 PRINT L NAME
3 DEPARTMENT
11 SYSTEM OP1
4 PLU
12 CA TAX & TIP
5 TIME
13 MINOR GROUP
6 DATE
14 MAJOR
7 HOURLY
15 CUSTOMER
Please select operation by Enter key.
0.00
Pg dw
Enter
↑
↓
→
Pg up
Select “5 TIME” from the screen using the cursor key, then depress the [ENTER] key. The screen shown below
appears.
* SET * 02-06-1999 12:34
PROGRAMMING TIME
01 TIME
12:34
Please input data.
0.00
Pg dw
Enter
↑
↓
→
Pg up
Enter a time value you want to set according to the guidance message “Please input data”. (In this case, 1530 for
15:30)
* SET * 02-06-1999 12:34
PROGRAMMING TIME
01 TIME
12:34
Please input data.
15.30
Pg dw
Enter
↑
↓
→
Pg up
Depress the [AT/TL] key to finalize the setting and the screen automatically returns to the program menu screen.
NOTES:
1. Use the [ESC] key to return to the program menu screen after finalizing a program item “0
MISC”. Using the [AT/TL] key in this case causes an error.
5-6
EO1-11138
5. PROGRAMMING OPERATIONS
5.4 How to Access a Program Item
2. When you obtain an open-price PLU in the PLU Table Setting (Submode 4), depress the [OPEN]
key before the [Enter] key depression in a step to input a PLU price.
3. If a journal printer is connected to the register, data you have just programmed will be printed on
it. No print occurs on a receipt printer, however its data will be stored in the electronic journal
buffer memory.
5.4.2
How to Access a Program Item through the Keyboard
You can directly access a program item you want to perform through a key operation on the keyboard.
■ Store Name/Message, Commercial Message, Footer Logo Message Programming (Submode 1)
CONDITION
Any time outside a sale
OPERATION
Mode Lock: SET
When you enter 1 and depress the [X] key,
the screen shown below will appear.
* SET * 02-06-1999 12:34
PROGRAMMING STORE NAME
1 STORE
↓
2 STORE
3 STORE
4 STORE
Please input item No.
0.00
Pg up
Pg dw
Enter
↑
↓
Repeat for another line.
1 [X]
|Line No.| [ST]
...
(For sequentially programming
lines, the line number
specification can be skipped.)
1 to 4: Store Name/Message
(for Receipt/Receipt Guest Check)
5 to 7: Commercial Message (for Receipt)
8 to 9: Footer Logo Message (for Receipt)
Character Entries
[AT/TL]
...
NOTES:
[ST]
...
max. 40 characters/line
(See 5.2 Character
Entries.)
To complete
this line
To complete the
programming and
return to the program
menu screen.
1. For each line, a maximum of 40 regular-sized characters or 20 double-sized characters may be
entered. A combination of both types is also available.
2. When you fill one print line with all blanks, the line will be one line space.
3. If no commercial message is required on a receipt, fill the three print lines assigned to the
commercial message with all blanks. As a result, no extra lines will be fed.
4. As for the four print lines assigned to the store name/message, if you fill the area with all blanks,
it will be four lines space.
5. If your printer is the BRST-10 or the TM-T88, you can make and print your own logo on the store
name/message area.
6. When the program option “Footer Logo Message Print” is selected, a maximum of a 2-line footer
logo message can be programmed and it will be additionally printed on a receipt issued for a
sales transaction without an order table No. entry.
5-7
EO1-11138
5. PROGRAMMING OPERATIONS
5.4 How to Access a Program Item
ex.) To program the following draft on the first line of the store name/message area.
R E S T A U R A N T
T
E
C
1 3 4 3
P E A C H
D R I V E
Mode Lock: SET
Enter 1, depress [X].
1 [ST] RESTAURANT [DOUBLE] [SPACE] TEC [DOUBLE] [SPACE]
1343 [SPACE] PEACH [SPACE] DRIVE [ST] [AT/TL]
Journal Print
P01
STORE NAME
#01
RESTAURANT TEC 1343 PEACH DRIVE
0409 10:29TM
■ Cashier Programming (Submode 2)
•
Programming
CONDITION
Any time outside a sale
OPERATION
Mode Lock: SET
When you enter 2 and depress the [X] key,
the screen shown below will appear.
* SET * 02-06-1999 12:34
PROGRAMMING CASHIER
Please input cashier code.
0.00
Pg up
5-8
Pg dw
Enter
↑
↓
EO1-11138
5. PROGRAMMING OPERATIONS
5.4 How to Access a Program Item
2 [X]
|Cashier Code| [NS]
(NOTE 1 below)
For Address 1: Cashier Name
1 [ST]
Character Entries
[ST]
(max. 12 characters)
......
For Address 2: Cashier Status
2 [ST]
|Cashier Status| [#]
0: Cashier for Sale Entries
1: Cashier for Training Entries
2: Cashier for All Guest Order Tables
accessible (NOTE 2 below)
3: -- vacant -4: -- vacant -5: Server (NOTE 3 below)
Repeat for
another
cashier.
......
For Address 3: Tip Rate
3 [ST]
|Tip Rate| [#]
0 to 99.99 (%)
(Use the [ . ] key if a decimal
portion is contained in the rate.)
(NOTE 4 below)
....
For sequentially programming the
address, the Address number
specification can be skipped.
[AT/TL]
NOTES:
1. The following table shows the Cashier Codes that can be entered. (The capacity is determined by
the RAM Allocation Setting. ) However, the actual maximum number of the cashiers are
preprogrammed. Therefore, ask your TOSHIBA TEC representative for further information.
Code Entry Type
[CLK] Key Type
Standard Memory
1 to 15
1 to 8
Expansion Memory
1 to 99
---
2. Cashier status 2 (Cashier for All Guest Order Tables accessible) is effective only when the
program option “Cashier Exclusive” is selected.
3. A cashier whose status is “server” can only take an order from a guest, but not finalize a sales
transaction.
4. The following shows the way to calculate the tip amount:
Tip Amount = (Net Sale Without Tax) x (Tip Rate)
5. For a name of each cashier, a maximum of 12 regular-sized or 6 double-sized characters can be
entered. A combination of both types is also available.
5-9
EO1-11138
5. PROGRAMMING OPERATIONS
5.4 How to Access a Program Item
ex.) To program the following to a cashier code 1.
Cashier Code 1:
Name:
JONES
Status:
5 (Server)
Tip Rate:
3%
Mode Lock: SET
Enter 2, depress [X].
1 [NS] 1 [ST] JONES [ST]
(2 [ST]) 5 [#] (3 [ST]) 3 [#] [AT/TL]
Journal Print
P02
01
01
CASHIER
#01
#02
#03
00004
1CLJONES
5
3%
0415
•
11:25TM
Deletion
CONDITION
After the Daily and GT Cashier Reset, (A cashier whose code is deleted must be in “Sign
OFF” for the code entry type. Furthermore, if the program option “Employee Management
System adopted” has been selected, the “Clock OUT” status of that cashier is necessary.)
OPERATION
Mode Lock: SET
Repeatable for another cashier to be deleted.
2 [X]
NOTES:
[ITEM CORR]
|Cashier Code| [NS]
[AT/TL]
1. The Cashier Reset Report Count of the deleted cashier is cleared.
2. A cashier whose code has been deleted by this operation cannot perform a sign-ON nor a sales
transaction.
ex.) To delete the cashier code 1 “JONES”.
Journal Print
P02
CASHIER
01
1CLJONES
---------------------------------------00003
0417 11:54TM
5-10
EO1-11138
5. PROGRAMMING OPERATIONS
5.4 How to Access a Program Item
■ Department Table Programming (Submode 3)
•
Programming
CONDITION
OPERATION
To change the Positive/Negative
Status:
After Department Daily & GT
and PLU Daily & GT Reset
To change any other programmed
data or to program new departments:
Any time outside a sale
Mode Lock: SET
When you enter 3 and depress the [X] key,
the screen shown below will appear.
* SET * 02-06-1999 12:34
PROGRAMMING DEPARTMENT
01 DP01
02 DP02
03 DP03
04 DP04
05 DP05
06 DP06
07 DP07
08 DP08
Please input Department code.
0.00
Pg up
As for details of each Address,
refer to the following pages.
3 [X]
Pg dw
Enter
↑
↓
(NOTE 2 on the next page.)
|Address Nos| [#]
(NOTE 1 on the next page.)
Barcode Scanning
|Department Code|
[DP#]
for sequential-coded Dept. only
Submode No.
Address 1: Link Group
|Major GP| |Minor GP| [#]
(01 to 10) (01 to 30)
1 [ST]
Address 2: Department Name
2 [ST]
Operation
procedure
surrounded
by this line
is the same
Repeat for any
as the
operation in address within
Submode 4. the same dept.
by re-entry for
correction.
(NOTE 2)
Address 3: Status 1
|Status Code to ON| [#]
3 [ST]
Address 4: Status 2
|Status Code to ON| [#]
4 [ST]
Address 5: Tax Status
|Tax Code| [#]
5 [ST]
Address 6: High Amount Limit
Repeat for
other
departments.
Character Entries [ST]
max. 16 characters
6 [ST]
Address 7: Low Amount Limit
7 [ST]
Address 8: Takeout Tax Status
8 [ST]
|High Amount to be locked out| [#]
(max. 7 digits)
|Low Amount to be locked out| [#]
(max. 7 digits)
|Takeout Tax Code| [#]
[ST]
[AT/TL] (to complete this submode)
Executes DLL.
5-11
EO1-11138
5. PROGRAMMING OPERATIONS
5.4 How to Access a Program Item
NOTES:
1. The “Address Nos” designation at the top after “3 [X]” can be skipped if not necessary. If entered,
the designated Address (es) will be automatically accessed after the department designation. For
example, if you enter |0204| [#] here (designate each address by entering a two-digit code; 01
for Address 1, 02 for Address 2, you will then enter:
Dept Code + [DP#] key,
Character Entries [ST] (“2 [ST]” can be skipped), then
Status Code for Status 2 Selection [#] (“4 [ST]” can be skipped), then you
may go on to another department setting for the same address designations.
But still in this case, you can go to other addresses by first entering the Address No. and
depressing [ST]. The Address Designation feature may be useful when you want to program or
change contents of only one or two specific Addresses of multiple departments. (For example,
when you want to change only the names, but not any other programmed contents, of 15
departments.)
2. When the Address No. is sequential from the preceding address (if the Address Designation
feature has not been used), the Address No. and the following [ST] can be omitted.
3. The programming contents of each address are further described in the DEPARTMENT TABLE
PROGRAMMING CONTENTS below.
DEPARTMENT TABLE PROGRAMMING CONTENTS
Address No.
1
Description of Programming Contents
Linked Group Code
Enter a 4-digit code, composed of a 2-digit Major Group Code and 2-digit Minor Group Code.
| | | | [#]
Minor Group Code 01 to 30
Major Group Code 01 to 10
ex.) To link Major Group No. 1 and Minor Group No. 1:
Enter:
(0)
1
0
1
Major Group
Code
Minor Group
Code
Enter 00 when the department is not linked to
any Minor Gruop.
Enter 0 (or 00) when the department is not linked to any Major
Group.
NOTE:
The “Major Group” and “Minor Group” here are merely names for those two grouping
total memories. In the memory process, those two totals are independent from the
other and no logical check is made for a combination of the Major and Minor group
codes to be linked to each department. In other words, you may regard them as “A”
grouping and “B” grouping. See the examples on the next page:
-- Continued on next page --
5-12
EO1-11138
5. PROGRAMMING OPERATIONS
5.4 How to Access a Program Item
Address No.
Description of Programming Contents
-- Continued -Major-Minor Grouping Method Example:
(In this case, you should check the logical linkage between the Major Groups and Minor
Groups.)
Major GP 01
Minor
GP01
DP01
0101
Major GP 02
Minor
GP02
DP02
0101
DP04
0102
Minor
GP03
DP06
0103
Minor
GP04
DP07
0103
DP10
0204
DP11
0204
Minor
GP05
DP14
0205
DP16
0205
Linked Group Code in setting
“A” Grouping and “B” Grouping Method Example:
(In this case, you may think that each department data are processed into max. 2 different
types of groupings.)
A-GP
01
DP01
0100
2
A-GP
02
DP02
0100
DP04
0201
A-GP
03
DP06
0301
DP07
0300
B-GP
01
DP10
0302
DP11
0002
B-GP
02
DP14
0003
B-GP
03
DP16
0003
DP17
0002
Linked Group Code in setting
Department Name
Enter a maximum of 16 regular-sized or 8 double-sized characters. See the section 5.2
Character Entries. End with [ST].
When no name is programmed for a department, the following will be the auto-program name
(initial setting) for printing:
D
P xx
Department Code 01 to 99
double-sized characters
-- Continued on next page --
5-13
EO1-11138
5. PROGRAMMING OPERATIONS
5.4 How to Access a Program Item
Address No.
Description of Programming Contents
-- Continued -3
Status 1 Selection
• Enter the Status Codes 1 to 3 of which status must be set to ON. More than one
code may be entered. Enter 0 when none of the statuses should be set to ON.
Status
Code
1
2
3
NOTE:
4
Receipt Type
Ordinary or Other Income Dept.
Positive or Negative Dept.
Selective Status
OFF
ON
Single
Double
Ordinary
Other Income
Positive
Negative
The selection of Status Code 1 (Receipt Print Type) is effective only when the
program option “Receipt Single/Double Print” has been selected.
Setting Examples:
To set only Status 2 to ON ................ Enter 2 [#]
To set Statuses 1, 2 to ON ................ Enter 12 [#]
To set none of statuses to ON .......... Enter 0 [#]
Status 2 Selection
• Enter Status Codes 5 to 8 of which status must be set to ON. More than one
code may be entered. Enter 0 when none of the statuses should be set to ON.
Status
Code
5
6
7
8
5
Item
Item
Selective Status
OFF
ON
No
Yes
No
Yes
No
Yes
No
Yes
Output to RKP-1?
Output to RKP-2?
Output to RKP-3?
Output to RKP-4?
Tax Status
• Enter one-to four-digit Status Codes for applicable Tax.
| | | | | [#]
Tax Status
0: Non-taxable
1: Tax 1
2: Tax 2
3: Tax 3
4: Tax 4
(More than one code can be entered for combining 1 to 4 taxable status. For
example, enter 12 to select Tax 1 and Tax 2 taxable status.)
-- Continued on next page --
5-14
EO1-11138
5. PROGRAMMING OPERATIONS
5.4 How to Access a Program Item
Address No.
Description of Programming Contents
-- Continued -6
7
8
High Amount Limit
Enter a maximum of 7 digits to be set as the high amount to be locked out.
ex.) To prohibit any amount equal to or larger than $40.00:
4000 [#]
(Allows any amount equal to or smaller than $39.99.)
NOTES:
1.
2.
To cancel the preset limit (i.e. to allow any amount), enter 0.
The limit amount set here will be applied to entries in REG mode only, but not
in MGR or - mode.
3. Zeros must be entered as all the digits other than the highest digit.
If any other value is entered, it will be regarded as a zero.
ex.) Entering 4001 to 4999 will all result in setting 4000.
Low Amount Limit
Enter a maximum of 7 digits to be set as the low amount limit.
ex.) To allow any amount equal to or larger than $4.00:
400 [#]
(Allows any amount equal to or larger than $4.00.)
NOTES:
1.
2.
To cancel the preset limit (i.e. to allow any amount), enter 0.
The limit amount set here will be applied to entries in REG mode only, but not
in MGR or - mode.
3. Zeros must be entered as all the digits other than the highest digit.
If any other value is entered, it will be regarded as a zero.
ex.) Entering 401 to 499 will all result in setting 400.
Takeout Tax Status Setting
This tax status is applied to a takeout transaction when the program option “Takeout feature”
has been selected. (For an eat-in transaction, a tax status which has been programmed in
Address 5 is applied.)
• Enter one-to four-digit Status Codes for applicable Takeout Tax.
| | | | | [#]
0: Non-taxable
1: Tax 1
2: Tax 2
3: Tax 3
4: Tax 4
(More than one code can be entered for combining 1 to 4 taxable status. For
example, enter 12 to select Tax 1 and Tax 2 taxable status.)
5-15
EO1-11138
5. PROGRAMMING OPERATIONS
5.4 How to Access a Program Item
NOTE:
You can use a maximum of 99 departments. The memories of the departments 1 to 30 have already
been opened before delivery of the register.
If you want to open a memory and use a department other than the departments 1 to 30, enter a
department code you want to designate, then depress the [DP#] key in the key sequence of the
Department Table Programming. The memory of the department will be opened automatically.
When you only want to open a memory other than the departments 1 to 30, operate as follows.
3 [X]
|Department Code| [DP#]
[AT/TL]
Repeatable for another department
ex.) To program the following to a department code 1.
Department Code 1:
Address 1 (Major Group/Minor Group):
Address 2 (Name):
Address 3 (Status 1):
Address 4 (Status 2):
Address 5 (Tax Status):
Address 6 (High Amount Limit):
Address 7 (Low Amount Limit):
03/11
VEGETABLE
0 (no ON-status)
7 (Sales data outputted to RKP3)
2 (Tax 2 taxable)
5000 ($50.00)
100 ($1.00)
Mode Lock: SET
Enter 3, depress [X].
1 [DP#] 1 [ST] 0311 [#] (2 [ST]) VEGETABLE [ST]
(3 [ST]) 0 [#] (4 [ST]) 7 [#] (5 [ST]) 2 [#] (6 [ST]) 5000 [#] (7 [ST]) 100 [#] [AT/TL]
Journal Print
P03
01
DEPARTMENT
DP01
#01
0311
#02 DP01VEGETABLE
#03
0
#04
7
#05
2
#06
50.00
#07
1.00
0433 16:35TM
•
Deletion
CONDITION
After Department Daily & GT and PLU Daily and GT Reset
OPERATION
Mode Lock: SET
Individual Department Deletion
3 [X]
[ITEM CORR]
|Department Code| [DP#]
Repeatable for another department to be deleted.
All Department Deletion
3 [X]
[ITEM CORR]
[ALL VOID]
5-16
[AT/TL]
[AT/TL]
EO1-11138
5. PROGRAMMING OPERATIONS
5.4 How to Access a Program Item
■ PLU Table Programming (Submode 4)
This submode can be operated when new PLU items are to be added, PLU program data is to be changed, or
PLUs are to be deleted.
•
Programming or Changing
CONDITION
OPERATION
To program new PLUs or to change
any programmed contents of PLUs
except the following case:
Any time outside a sale
To change the linked Department
of a PLU with sales data not zero:
After PLU Reset
When you enter 4 and depress the [X] key,
the screen shown below will appear.
* SET * 02-06-1999 12:34
PROGRAMMING PLU
Mode Lock: SET
Please input PLU code.
0.00
Pg up
As for details of each Address,
refer to the following pages.
4 [X]
Pg dw
Enter
(NOTE 2 on the next page.)
|Address Nos| [#]
(NOTE 1 on the next page.)
Barcode Scanning
|PLU Code|
[PLU]
for sequential-coded item only
Submode No.
Address 1: Link Department
|Department Code| [#]
(1 to 99)
1 [ST]
Address 2: PLU Name
2 [ST]
Operation
procedure
surrounded
by this line
is the same
Repeat for any
as the
operation in address within
Submode 4. the same PLU
by re-entry for
correction.
(NOTE 3)
Address 3: 1st Preset Price
3 [ST]
Address 4: 2nd Preset Price
4 [ST]
Address 5: 3rd Preset Price
5 [ST]
Address 6: 4th Preset Price
Repeat for
other
PLUs.
6 [ST]
Address 7: 5th Preset Price
7 [ST]
Address 8: PLU Status 1
8 [ST]
Character Entries [ST]
max. 16 characters
|Price| [#]
(max. 6 digits)
|Price| [#]
(max. 6 digits)
|Price| [#]
(max. 6 digits)
|Price| [#]
(max. 6 digits)
|Price| [#]
(max. 6 digits)
|Status Code to ON| [#]
Address 9: PLU Status 2
|Status Code to ON| [#]
9 [ST]
Address 10: Tax Status
10 [ST]
|Tax Code| [#]
Address 11: PLU Group
|PLU Group Code| [#]
(1 to 99)
11 [ST]
Address 12: Set Menu Table
12 [ST]
Address 13: Display Menu Table
13 [ST]
|Set Menu Table No.| [#]
(1 to 50)
|Display Menu Table No.| [#]
(max. 10 digits)
Address 14: Stock Quantity
|Stock Quantity| [#]
(0 to 9999.99)
14 [ST]
Address 15: Minimum Stock Quantity
15 [ST]
|Minimum Stock Quantity| [#]
(0 to 9999.99)
Address 16: Takeout Tax Status
|Tax Code| [#]
(max. 4 digits)
16 [ST]
Address 17: Tare Table
17 [ST]
Address 18: Unit Weight
18 [ST]
|Tare Table No.| [#]
1 to 9
|Unit Weight Table| [#]
1 to 11
[ST]
[AT/TL] (to complete this submode)
Executes DLL.
5-17
↑
↓
EO1-11138
5. PROGRAMMING OPERATIONS
5.4 How to Access a Program Item
NOTES:
1. The “Address Nos” designation at the top after “4 [X]” can be skipped if not necessary. If entered,
the designated Address (es) will automatically be accessed after the PLU Code designation.
2. A maximum of 2500 PLUs are programmable (varies depending on the capacity and allocation of
the RAM) . The “[PLU]” key here indicates the key labeled simply as “PLU” but not any PLU
Preset-code Keys.
3. When the Address No. is sequential from the preceding address (if the Address Designation
feature has not been used), the Address No. and the following [ST] can be omitted.
PLU TABLE PROGRAMMING CONTENTS
Address No.
1
Description of Programming Contents
Linked Department Code
Enter the 2-digit code of the department to which the PLU is linked. When a new PLU is
programmed, this entry is compulsory (an error will result if this entry is skipped.)
| | | [#]
1 to 99
2
3
4
5
6
PLU Name
Enter a maximum of 16 regular-sized or 8 double-sized characters. See the section 5.2
Character Entries. End with [ST].
When no name is programmed for a PLU, the following will be the auto-program name for
printing:
PLUxxxxxx
PLU Code
1st Preset Price
• For a preset PLU (preset-price PLU), enter a maximum of 6-digit price, and depress [#].
1 to 999999 (result: $0.01 to $9999.99)
• A zero-price ($0.00) may be preset by entering 0 in the above operation.
• When no numerics are entered and the [#] key is simply depressed, the PLU will be an
open PLU (open-price PLU).
2nd Preset Price
• For a preset PLU (preset-price PLU), enter a maximum of 6-digit price, and depress [#].
1 to 999999 (result: $0.01 to $9999.99)
• A zero-price ($0.00) may be preset by entering 0 in the above operation.
• When no numerics are entered and the [#] key is simply depressed, the PLU will be an
open PLU (open-price PLU).
• If this address entry is skipped, the 1st preset price will be automatically programmed as
the 2nd preset price.
3rd Preset Price
• For a preset PLU (preset-price PLU), enter a maximum of 6-digit price, and depress [#].
1 to 999999 (result: $0.01 to $9999.99)
• A zero-price ($0.00) may be preset by entering 0 in the above operation.
• When no numerics are entered and the [#] key is simply depressed, the PLU will be an
open PLU (open-price PLU).
• If this address entry is skipped, the 1st preset price will be automatically programmed as
the 3rd preset price.
4th Preset Price
• For a preset PLU (preset-price PLU), enter a maximum of 6-digit price, and depress [#].
1 to 999999 (result: $0.01 to $9999.99)
• A zero-price ($0.00) may be preset by entering 0 in the above operation.
• When no numerics are entered and the [#] key is simply depressed, the PLU will be an
open PLU (open-price PLU).
• If this address entry is skipped, the 1st preset price will be automatically programmed as
the 4th preset price.
-- Continued on next page --
5-18
EO1-11138
5. PROGRAMMING OPERATIONS
5.4 How to Access a Program Item
Address No.
Description of Programming Contents
-- Continued -7
8
5th Preset Price
• For a preset PLU (preset-price PLU), enter a maximum of 6-digit price, and depress [#].
1 to 999999 (result: $0.01 to $9999.99)
• A zero-price ($0.00) may be preset by entering 0 in the above operation.
• When no numerics are entered and the [#] key is simply depressed, the PLU will be an
open PLU (open-price PLU).
• If this address entry is skipped, the 1st preset price will be automatically programmed as
the 5th preset price.
Status 1 Selection
• Enter the Status Codes 1 to 7 of which status must be set to ON. More than one code
may be entered. Enter 0 when none of the statuses should be set to ON.
Status
Code
1
2
3
4
5
6
7
9
Item
Stock Process
Net to S.I. 1?
Net to S.I. 2?
-- vacant -Modifier Entry for this PLU
This PLU is used as:
Lock or Unlock?
Selective Status
OFF
ON
Non-stock
Stock
No
Yes
No
Yes
Prohibited
Allowed
Menu item
Modifier item
Unlock (in use) Lock (not in use)
Setting Examples:
To set only Status 2 to ON ................ Enter 2 [#]
To set Statuses 2, 3, 7 to ON ............ Enter 237 [#]
To set none of statuses to ON .......... Enter 0 [#]
Status 2 Selection
• Enter the Status Codes 1 to 5 of which status must be set to ON. More than one code
may be entered. Enter 0 when none of the statuses should be set to ON.
Status
Code
1
2
3
4
5
NOTES:
Item
Selective Status
Scale Entry
Manual Tare Entry
Canada Tax Symbol Print
(NOTE below)
Combo Exemption Flag
Using the [CODE SHIFT]
key for this PLU
OFF
Prohibited
Optional
Non-print
ON
Compulsory
Compulsory
Print (A symbol “F”)
No
Possible
Exemption
Not possible
1. Canada tax symbol is assigned as follows.
“T” for the PST, “F” for the GST
2. Status Code 1 (Scale Entry) and Status Code 1 (Stock Process) of the
preceding address cannot be combined with one PLU.
-- Continued on next page --
5-19
EO1-11138
5. PROGRAMMING OPERATIONS
5.4 How to Access a Program Item
Address No.
Description of Programming Contents
-- Continued -10
11
12
Tax Status
• Enter one-to four-digit Status Codes for applicable Tax.
| | | | | [#]
0: Non-taxable
1: Tax 1 (Tax 1 taxable)
2: Tax 2
3: Tax 3
4: Tax 4
(More than one code can be entered for combining Tax 1 to Tax 4 taxable status. For
example, enter 12 to select Tax 1 and Tax 2 taxable status.)
NOTE: When a tax status has not been programmed to a PLU in this address, the tax status
of the PLU is determined by that of a linked department.
PLU Group No. (for purposes of reports)
• Enter a 2-digit code (1 to 99) as a PLU Group No. to which the PLU belongs, and
depress [#]. To cancel the Group No. once set, enter 0 and depress [#].
Set Menu Table No.
| | | [#]
1 to 50
13
14
Enter the Set Menu Table No. (1 to 50), and depress [#]. The sub menu PLUs which link to
each table will be set later in a separate operation (Submode 42).
Display Menu Table
• Enter a Display Menu Table No. which is programmed in the Submode 53 (Display Menu
Table Setting), then depress the [#] key. A maximum of 5 display menu table Nos. (max.
10 digit-value) can be entered. Enter 0, then depress the [#] key to cancel the display
menu table.
NOTE: When you enter the display menu tables of which Nos. are 1 to 9, add 0 before the
number.
ex.) When you want to program the display menu tables 1 and 2, enter 0102, then
depress the [#] key.
Stock Quantity (applicable when Status Code 1 has been entered in Address 8)
• Enter the stock quantity of the PLU in max. 6 digits (0 to 9999.99). Use the [ . ] key if any
decimal portion is contained.
| | | | | [ . ] | | | [#]
0 to 9999.99
15
The entered quantity will replace the existing stock quantity value, if any.
Minimum Stock Quantity (applicable when Status Code 1 of Address 8 has been set to ON
and the Stock Quantity of Address 14 has been entered.)
• Enter the minimum stock quantity of the PLU in max. 6 digits (0 to 9999.99; use the [ . ]
key if any decimal portion is contained.)
| | | | | [ . ] | | | [#]
0 to 9999.99
By setting a Minimum Stock Quantity value here, a short tone for warning will be generated
on entering a sale entry of this PLU to turn the stock quantity less than the preset minimum
stock quantity value.
-- Continued on next page --
5-20
EO1-11138
5. PROGRAMMING OPERATIONS
5.4 How to Access a Program Item
Address No.
Description of Programming Contents
-- Continued -16
17
18
Takeout Tax Status Setting
This tax status is applied to a takeout transaction when the program option “Takeout feature”
has been selected. (For an eat-in transaction, a tax status which has been programmed in
Address 10 is applied.)
• Enter one-to four-digit Status Codes for applicable Takeout Tax.
| | | | | [#]
0: Non-taxable
1: Tax 1
2: Tax 2
3: Tax 3
4: Tax 4
(More than one code can be entered for combining 1 to 4 taxable status. For
example, enter 12 to select Tax 1 and Tax 2 taxable status.)
NOTE: When a tax status has not been programmed to a PLU in this address, the tax status
of the PLU is determined by that of a linked department.
Tare Table No. (for Scale-compulsory PLUs only)
| | [#]
Enter the Tare Table No. (1 to 9). The content of each Tare Table is set later in a separate
operation (Submode 26). In a scale item entry of a PLU with a Tare Table No. set, the tare
weight preset in the Tare Table will automatically be subtracted from the total weight read
from the scale. Enter 0 to cancel a Tare Table No. once set. Or skip this address setting for
PLUs not needing any tare weight calculations.
Individual PLU Unit Weight Table Code (for Scale-compulsory PLUs only)
| | | [#]
NOTE:
LB unit
Kg unit
0:
General Unit Weight (set in Submode 26)
1:
1 LB
1 Kg
2:
2 LB
2 Kg
3:
3 LB
3 Kg
4:
4 LB
4 Kg
5:
5 LB
5 Kg
6:
6 LB
6 Kg
7:
7 LB
7 Kg
8:
8 LB
8 Kg
9:
9 LB
9 Kg
10:
1/2 LB
100 g
11:
1/4 LB
not applicable
Whether the ECR adopts the LB or Kg unit system is determined by a program option
selection.
5-21
EO1-11138
5. PROGRAMMING OPERATIONS
5.4 How to Access a Program Item
ADDITIONAL NOTES
If a PLU is linked to an Other Income Department, the PLU is automatically set as Other Income PLU.
If a PLU is linked to a negative Department, the PLU is automatically set as negative PLU.
Amount Limits (High Amount, Low Amount) of each open-price PLU will be determined by those of its link
department.
Receipt type (Itemized receipt or Single/Double receipt) of each PLU will be determined by those of its link
department.
Whether or not each PLU data is output to the Remote Kitchen Printers will be determined by the status of its link
department.
ex.) To program the following to a PLU code 20.
PLU Code 20: Address 1 (Link Department):
Address 2 (Name):
Address 3 (1st Price):
Address 4 (2nd Price):
Address 8 (Status 1):
Address 10 (Tax Status):
Address 11 (PLU Group):
Address 12 (Set Menu Table No.):
Address 13 (Display Menu Table No.):
Address 16 (Takeout Tax Status):
2
CHEESE BURGER
$2.00
$1.80
5 (Condiment Entry Allowed)
12 (Tax 1 & 2 taxable)
3
1
03 (Table 3)
1 (Tax 1 taxable)
Mode Lock: SET
Enter 4, depress [X].
20 [PLU] 1 [ST] 2 [#] (2 [ST]) CHEESE BURGER [ST]
(3 [ST]) 200 [#] (4 [ST]) 180 [#] 8 [ST] 5 [#] 10 [ST] 12 [#] (11 [ST]) 3 [#] (12 [ST]) 1 [#]
(13 [ST]) 03 [#] 16 [ST] 1 [#] [AT/TL]
Journal Print
P04
PLU
000020 PLU000020
#01
02
#02 CHEESE BURGER
#03
2.00@
#04
1.80@
#08
5
#10
12
#11
03
#12
01
#13
03
#16
1
00013
0003 10:17TM
5-22
EO1-11138
5. PROGRAMMING OPERATIONS
5.4 How to Access a Program Item
•
Deletion
CONDITION
To delete a PLU with sales data of zero: Any time outside a sale
To delete a PLU with sales data of not zero: After PLU Reset
OPERATION
Mode Lock: SET
Individual PLU Deletion
4 [X]
[ITEM CORR]
|PLU Code| [PLU]
[AT/TL]
Repeatable for other PLUs to be deleted.
ex.) To delete PLU Code 120001 that was once programmed:
Mode Lock: SET
Enter 4, depress [X].
[ITEM CORR] 120001 [PLU]
[AT/TL]
Journal Print
P04
PLU
120001 PLU120001
---------------------------------------00013
0006 10:24TM
All PLU Deletion
4 [X]
•
[ITEM CORR]
[ALL VOID]
[AT/TL]
PLU Programmed Data Copying
This operation is used to copy the programmed data of a PLU item and to use it in programming another PLU
item, thus eliminating time in PLU programming operation.
CONDITION
To program new PLUs or to change any programmed contents of PLUs:
Any time outside a sale (except the following case)
To change the PLU of the copy-destination with sales data not zero:
After PLU Reset
OPERATION
Mode Lock: SET
4 [X]
|PLU Code of the copy-destination| [PLU]
[NS]
|PLU Code of the copy-source| [PLU]
The programmed data of the copy-source PLU is now copied to the copy-destination PLU
(except the PLU Code). Then follow the procedure on the page of Programming or
Changing to change data of any required Addresses.
ex.) To program the PLU Code 22 (BIG CHEESE BURGER) by copying the programmed data of the PLU Code
20 (CHEESE BURGER).
Mode Lock: SET, enter 4, depress [X]
22 [PLU] (PLU Code of the copy-destination)
[NS]
20 [PLU] (PLU Code of the copy-source)
2 [ST] BIG CHEESEBURGER [ST] (Address 2, Name changed into: BIG CHEESEBURGER)
(3 [ST]) 300 [#] (Address 3, the 1st price changed into: $3.00)
(4 [ST]) 250 [#] (Address 4, the 2nd price changed into: $2.50)
[AT/TL]
5-23
EO1-11138
5. PROGRAMMING OPERATIONS
5.4 How to Access a Program Item
Journal Print
P04
PLU
000022 CHEESE BURGER
#00 000020
#02 BIG CHEESEBURGER
#03
3.00@
#04
2.50@
00002
0011 10:58TM
■ Time Setting or Adjustment (Submode 5)
CONDITION
Any time outside a sale
OPERATION
Mode Lock: SET
When you enter 5 and depress the [X] key,
the screen shown below will appear.
* SET * 02-06-1999 12:34
PROGRAMMING TIME
01 TIME
12:34
Please input data.
0.00
Pg up
5 [X]
|Hour|
|Minute|
(0 to 23)
(00 to 59)
Pg dw
Enter
↑
↓
[AT/TL]
ex.) To set the time to “1:35 p.m. (13:35)”:
Mode Lock to SET, enter 5, depress [X].
Enter 1335, depress [AT/TL].
Journal Print
P05
TIME
0012
NOTE:
13:35TM
13:35TM
If an hour value of more than 23 or a minute value of more than 59 is entered, it will result in an error.
The current date will not be changed by setting or adjusting the time.
5-24
EO1-11138
5. PROGRAMMING OPERATIONS
5.4 How to Access a Program Item
■ Date Setting or Adjustment (Submode 6)
CONDITION
Any time outside a sale
OPERATION
Mode Lock: SET
When you enter 6 and depress the [X] key,
the screen shown below will appear.
* SET * 02-06-1999 12:34
PROGRAMMING DATE
01 DATE
THURSDAY
02-11-1999
Please input data.
0.00
Pg up
6 [X]
|Day-of-Week Code|
0:
1:
2:
3:
4:
5:
6:
|Month|
|Day|
(01 to 12)
(01 to 31) (1999, etc.)
|Year|
Pg dw
Enter
↑
↓
[AT/TL]
SUN (Sunday)
MON (Monday)
TUE (Tuesday)
WED (Wednesday)
THU (Thursday)
FRI (Friday)
SAT (Saturday)
ex.) To set the date to Tuesday, 21st of December, 1999:
Mode Lock: SET, enter 6, depress [X]
Enter 212211999, depress [AT/TL]
Journal Print
P06
NOTES:
DATE
TUESDAY
12-21-1999
0014 13:37TM
1. A program option allows you to select the date order as follows.
• Month-Day-Year (Initial Date Order)
• Day-Month-Year
• Year-Month-Day
2. The Day-of-week is programmable not to be printed on receipts.
5-25
EO1-11138
5. PROGRAMMING OPERATIONS
5.4 How to Access a Program Item
■ Hourly Range Setting (Submode 7)
A maximum of 48 hourly ranges can be set. You can obtain sales data by each hourly range, also you can
designate a price level and a menu level for each day of the week.
CONDITION
After Hourly Range Reset and
Combo Sale Hourly Range Reset
OPERATION
Mode Lock: SET
When you enter 7 and depress the [X] key,
the screen shown below will appear.
* SET * 02-06-1999 12:34
PROGRAMMING HOURLY
01
02
03
04
05
06
07
08
↓
00:00
00:00
00:00
00:00
00:00
00:00
00:00
00:00
Please input item No.
0.00
Pg up
Pg dw
Enter
↑
↓
Address 1: Start Time
7 [X]
|Hourly Range| [NS]
1 [ST]
1 to 48
Submode No.
Address 2: Price Level and Menu
Level for Sunday
2 [ST]
Address 3: Price Level and Menu
Level for Monday
3 [ST]
Address 4: Price Level and Menu
Level for Tuesday
4 [ST]
Address 5: Price Level and Menu
Level for Wednesday
5 [ST]
Address 6: Price Level and Menu
Level for Thursday
6 [ST]
Address 7: Price Level and Menu
Level for Friday
7 [ST]
Address 8: Price Level and Menu
Level for Saturday
8 [ST]
|Hour| |Minute| [#]
0 to 23
00 to 59
|Menu Level| |Price Level| [#]
1 to 5
1 to 5
|Menu Level| |Price Level| [#]
1 to 5
1 to 5
|Menu Level| |Price Level| [#]
1 to 5
1 to 5
|Menu Level| |Price Level| [#]
1 to 5
1 to 5
|Menu Level| |Price Level| [#]
1 to 5
1 to 5
|Menu Level| |Price Level| [#]
1 to 5
1 to 5
|Menu Level| |Price Level| [#]
1 to 5
1 to 5
Repeat until all the hourly ranges you want to set are entered. (max. 48 hourly ranges)
[AT/TL]
NOTES:
1. When you enter only a 1-digit code (1 to 5) for a price & menu level portion, the price level of
which code is entered will be designated.
2. Do not set an hourly range across 24:00, such as “from 23:00 to 1:00”. If set, no data will be
processed into that hourly range.
3. To reset the hourly range table once set, operate as follows.
7 [X] 0 [#] [AT/TL]
5-26
EO1-11138
5. PROGRAMMING OPERATIONS
5.4 How to Access a Program Item
ex.) To set the following to a hourly range 1.
Hourly Range 1:
Address 1 (Start Time):
Address 2 (Sunday):
Address 3 (Monday):
Address 4 (Tuesday):
Address 5 (Wednesday):
Address 6 (Thursday):
Address 7 (Friday):
Address 8 (Saturday):
1000 (10:00)
55 (Menu Level 5/Price Level 5)
11 (Menu Level 1/Price Level 1)
12 (Menu Level 1/Price Level 2)
13 (Menu Level 1/Price Level 3)
23 (Menu Level 2/Price Level 3)
34 (Menu Level 3/Price Level 4)
45 (Menu Level 4/Price Level 5)
Mode Lock: SET
Enter 7, depress [X].
1 [NS] 1 [ST] 1000 [#] (2 [ST]) 55 [#] (3 [ST]) 11 [#] (4 [ST]) 12 [#] (5 [ST]) 13 [#] (6 [ST]) 23 [#]
(7 [ST]) 34 [#] (8 [ST]) 45 [#] [AT/TL]
Journal Print
P07
HOURLY
01#00
#01
#02
#03
#04
#05
#06
#07
#08
0069
10:00TM
10:00TM
55
11
12
13
23
34
45
19:06TM
■ Amount Limit Setting for Function Keys (Submode 8)
This programming is used to set a high or low amount limit for the items shown in the following list.
CONDITION
Any time outside a sale
OPERATION
Mode Lock: SET
When you enter 8 and depress the [X] key,
the screen shown below will appear.
* SET * 02-06-1999 12:34
PROGRAMMING AMOUNT LIMIT
01 AT/TL
02 CHK
03 Chg
04 MISC
05 CPN
06 CREDIT1
07 CREDIT2
08 CREDIT3
↓
0.00
0.00
0.00
0.00
0.00
0.00
0.00
0.00
Please input item No.
0.00
Pg up
8 [X]
|Key Code| [ST]
(See the list on
the next page.)
Pg dw
Enter
|Amount Limit| [#]
Max. 8 digits; 0 to reset
(Max. 7 digits for Key Codes 11 and 12)
Repeat for another key item.
5-27
↑
↓
[AT/TL]
EO1-11138
5. PROGRAMMING OPERATIONS
5.4 How to Access a Program Item
Key
Code
1
2
3
4
5
6
7
Item or Key to be applied
Key
Code
8
9
10
11
12
13
[AT/TL] (Cash Tender)
[CHECK] (Check Tender)
[Chg] (Charge Tender)
[MISC] (Misc. Tender)
[CPN] (Media-Coupon Tender)
[CREDIT 1] (Credit 1 Tender)
[CREDIT 2] (Credit 2 Tender)
Item or Key to be applied
[CREDIT 3] (Credit 3 Tender)
[CREDIT 4] (Credit 4 Tender)
[CREDIT 5] (Credit 5 Tender)
High Amount Limit common to all depts.
Low Amount Limit common to all depts.
Charge Posting Limit Amount
common to all customers
ex.) To set a tender limit amount $100.00 on the [CHECK] key
Mode Lock: SET
Enter 8, depress [X].
2 [ST] 10000 [#] [AT/TL]
Journal Print
P08
#02
AMOUNT
CHECK
LIMIT
100.00
18:04TM
0022
NOTES:
1. If the individual High or Low Amount Limit of a department has been set, it prevails over the
Common High or Low Limit for all departments here.
2. The Amount Limit Set Value of each tender media is the high amount limit and is effective only
when the media key is used for tendering but not when used as total key.
■ Non-taxable Amount Limit Setting (for Canada)/Gratuity Rate Setting (Submode 12)
This programming is used to set a non-taxable amount limit applied to Ontario, Canada. It is also used to set a
gratuity rate.
CONDITION
After Daily Financial Reset
OPERATION
Mode Lock: SET
When you enter 12 and depress the [X] key,
the screen shown below will appear.
* SET * 02-06-1999 12:34
PROGRAMMING CA TAX & TIP
01 CANADA TAX
02 GRATUITY
0.00
0%
Please input data.
0.00
Pg up
12 [X]
1 [ST]
Enter
↑
|Non-taxable Limit Amount| [#]
Max. 4 digits
(1 to 9999; 0 to reset)
*
2 [ST]
|Gratuity Rate| [#]
0.001 to 99.999%; use the [ . ] key
if a decimal portion is contained.
*
Pg dw
When a gratuity rate only is programmed
5-28
[AT/TL]
↓
EO1-11138
5. PROGRAMMING OPERATIONS
5.4 How to Access a Program Item
ex.) To set the following
• Non-taxable Amount Limit: $20.00
• Gratuity Rate: 5%
Journal Print
P12
CA
CANADA TAX
GRATUITY
Mode Lock: SET
Enter 12, depress [X].
1 [ST] 2000 [#] (2 [ST]) 5 [#] [AT/TL]
TAX
&
TIP
20.00
5%
20:10TM
0028
■ Minor Group Name Programming (Submode 13)
This programming is used to set each minor group name. Association among a department, a minor group
and a major group should be set in the Department Table Programming (Submode 3).
CONDITION
Any time outside a sale
OPERATION
Mode Lock: SET
When you enter 13 and depress the [X] key,
the screen shown below will appear.
* SET * 02-06-1999 12:34
PROGRAMMING MINOR GROUP
01 GP01
02 GP02
03 GP03
04 GP04
05 GP05
06 GP06
07 GP07
08 GP08
↓
Please input item No.
0.00
Pg up
13 [X]
|Minor Group Code| [ST]
Character Entries
(1 to 30)
Pg dw
Enter
↑
↓
[ST]
[AT/TL]
(See NOTE)
*
Repeat for other groups
(max. 30 groups)
* (For sequentially programming Group Codes
and Names, the code specification can be skipped.)
ex.) To set “GREENSTUFF” for a minor group1
Mode Lock: SET
Enter 13, depress [X].
1 [ST] GREENSTUFF [ST] [AT/TL]
Journal Print
P13
01
NOTE:
MINOR GROUP
GREENSTUFF
0029 20:29TM
A maximum of 12 regular-sized characters may be set for each Minor Group name. One double-sized
character occupies two regular-sized character’s space. Also see the CHARACTER ENTRIES at the
beginning of this chapter. If no name is programmed for a Minor Gruop, an auto-preset data is assigned
as the Minor Group Name (GPxx; xx = Minor Group Code 01 to 30).
5-29
EO1-11138
5. PROGRAMMING OPERATIONS
5.4 How to Access a Program Item
■ Major Group Name Programming (Submode 14)
This programming is used to set each major group name. Association among a department, a minor group
and a major group should be set in the Department Table Programming (Submode 3).
CONDITION
Any time outside a sale
OPERATION
Mode Lock: SET
When you enter 14 and depress the [X] key,
the screen shown below will appear.
* SET * 02-06-1999 12:34
PROGRAMMING MAJOR
01 MGP01
02 MGP02
03 MGP03
04 MGP04
05 MGP05
06 MGP06
07 MGP07
08 MGP08
↓
Please input item No.
0.00
Pg up
14 [X]
|Major Group Code| [ST]
Character Entries
(1 to 10)
Pg dw
Enter
↑
↓
[ST]
[AT/TL]
(See NOTE)
*
Repeat for other groups
(max. 10 groups)
* (For sequentially programming Group Codes
and Names, the code specification can be skipped.)
ex.) To set “OTHER” for a major group10
Mode Lock: SET
Enter 14, depress [X].
10 [ST] OTHER [ST] [AT/TL]
Journal Print
P14
10
NOTE:
MAJOR
OTHER
0030
20:48TM
A maximum of 12 regular-sized characters may be set for each Major Group name. One double-sized
character occupies two regular-sized character’s space. Also see the CHARACTER ENTRIES at the
beginning of this chapter. If no name is programmed for a Major Group, an auto-preset data is assigned
as the Major Group Name (MGPxx; xx = Major Group Code 01 to 10).
5-30
EO1-11138
5. PROGRAMMING OPERATIONS
5.4 How to Access a Program Item
■ Customer File Table Setting (Submode 15)
This programming is used to set a customer file table(customer code, customer name, limit amount and price
level), which is used for the charge posting transaction.
CONDITION
Any time outside a sale
OPERATION
Mode Lock: SET
When you enter 15 and depress the [X] key,
the screen shown below will appear.
* SET * 02-06-1999 12:34
PROGRAMMING CUSTOMER
Please input customer code.
0.00
Pg up
Pg dw
Enter
↑
↓
Customer Card Reading through the MCR
Address 1: Customer Name
15 [X]
|Customer File Code| [NS]
Character Entries [ST]
1 [ST]
Max. 16 characters
Max. 12 digits
Submode No.
Address 2: Charge Posting Limit
Amount for each Customer
2 [ST]
|Charge Posting Limit Amount| [#]
Max. 8 digits
Address 3: Price Level for each
Customer
3 [ST]
|Price Level| [#]
1 to 5
Repeat for another Customer file.
[AT/TL]
ex.) To program the following to a customer file code 5.
Customer File Code 5:
Address 1 (Customer Name):
Address 2 (Limit Amount):
Address 3 (Price Level):
SHEARER
$500.00
2
Mode Lock: SET
Enter 15, depress [X].
5 [NS] 1 [ST] SHEARER [ST] (2 [ST]) 50000 [#] (3 [ST]) 2 [#] [AT/TL]
Journal Print
P15
CUSTOMER
000000000005
#01 SHEARER
#02
#03
00006
0034
NOTES:
500.00
2
12:56TM
1. A maximum of 5000 customer file tables can be used.
2. When a charge posting limit amount is set for each customer in this programming, it prevails over
the common limit amount programmed in the Submode 8.
5-31
EO1-11138
5. PROGRAMMING OPERATIONS
5.4 How to Access a Program Item
■ Combination Report Table Programming (Submode 19)
This programming is used to make a combination report table which is described in the section 4.3
Combination Reports on page 4-9.
CONDITION
Any time outside a sale
OPERATION
Mode Lock: SET
When you enter 19 and depress the [X] key,
the screen shown below will appear.
* SET * 02-06-1999 12:34
PROGRAMMING COMBI REPORT
01
02
03
1103000000
0000000000
0000000000
Please input item No.
0.00
Pg up
19 [X]
|Table No.| [ST]
Pg dw
|Report Code| [#]
↑
↓
[ST]
[AT/TL]
...
1 to 3
Enter
3 to 48 (See the Report
Code Table below), or 0
to delete the table.
*
Repeat for other tables.
Repeatable for max. five different reports
combination.
* (For sequentially programming Tables, the
Table No. specification can be skipped.)
Report Code Table
Report
Code
3
4
6
8
9
10
11
12
13
14
15
24
Report Name
Financial
All Cashier
Credit Card Company Sales
Department Group
Each Media Sales and In-drawer Total
Hourly Range
All Department
All Media Sales and Cash-in-drawer
All PLU Sales
All PLU Stock
All Customer File
PLU Group
X
*
*
*
*
*
*
*
*
*
*
*
*
Mode for output
Z GTX GTZ
*
*
*
*
*
*
*
*
*
*
*
*
*
*
*
*
*
*
*
*
*
*: output
Blank: no output
5-32
EO1-11138
5. PROGRAMMING OPERATIONS
5.4 How to Access a Program Item
Report Code Table
Report
Code
25
30
31
43
44
47
48
Report Name
Day Part
Check Track with Sales
Check Track without Sales
Combo Sales
Hourly Combo Sales
Employee Clock-in/Clock-out
Employee Clock-in/Clock-out (periodic)
X
*
*
*
*
*
*
Mode for output
Z GTX GTZ
*
*
*
*
*
*
*
*
*
*: output
Blank: no output
ex.) To program the following reports to a combination report table 1.
• 3: Financial
• 4: All Cashier
• 47 Employee Clock-in/Clock-out
Mode Lock: SET
Enter 19, depress [X].
1 [ST] 3 [#] 4 [#] 47 [#] [ST] [AT/TL]
Journal Print
P19
#01
NOTES:
COMBI
REPORT
0304470000
0035 13:38TM
1. When changes are made on report combination in a table, entirely or partially, program all the
reports in that table again.
2. An error will result if a Report Code that has already been entered is attempted to enter again in
the same table.
3. In Table No.1, auto-preset report combination of Report 11 (All Depts) and Report 3 (Financial) is
programmed. It will be active as Table No.1 content unless no data are programmed for Table
No.1.
5-33
EO1-11138
5. PROGRAMMING OPERATIONS
5.4 How to Access a Program Item
■ PLU Stock Loading or Changing (Submode 24)
This submode loads or changes the stock quantities of PLUs with the Stock-process status, as part of stock
controls. The stock of a PLU may be entered initially in the PLU TABLE PROGRAMMING operation
(Submode 4), and may be adjusted in this operation, from day to day, as the stock increases due to delivery
from wholesalers, etc. or as the stock decreases due to damages or losses.
CONDITION
Any time outside a sale
OPERATION
Mode Lock: SET
When you enter 24 and depress the [X] key,
the screen shown below will appear.
* SET * 02-06-1999 12:34
PROGRAMMING STOCK
000001 PLU000001
580
Please input PLU code.
0.00
Pg up
24 [X]
|PLU Code| [PLU]
|Adding Quantity|
Pg dw
Enter
↑
↓
[STOCK]
[AT/TL]
0 to 9999.99
* (Repeatable for
the PLU of the
next sequential
code)
[VOID]
*
Subtracting|
Quantity
|
0 to 9999.99
Repeat for other PLUs for stock change.
ex.) To subtract 150 from 580 of a current stock quantity of a PLU 1.
Mode Lock: SET
Enter 24, depress [X].
1 [PLU] [VOID] 150 [STOCK] [AT/TL]
Journal Print
P24
STOCK
000001 PLU000001
0038
NOTES:
-150
430
14:07TM
1. When you enter 24 and depress the [X] key, a current stock quantity of each PLU will be
displayed.
2. The total stock quantity of a PLU after the addition or subtraction must not exceed the value
range from 0 through 9999.99. Otherwise, the Adding or Subtracting Quantity entry will result in
an error. Use the [ . ] key if decimal portion is contained.
3. The PLU Code here must exist in the PLU Table file and the PLU must be set with Stock-process
status.
5-34
EO1-11138
5. PROGRAMMING OPERATIONS
5.4 How to Access a Program Item
■ Tare Table and General Unit Weight Setting (Submode 26)
In the PLU Table Programming operation (Submode 4), some of Scale-compulsory PLUs may be set with a
Tare Table No. The actual tare weight is set to each Tare Table here. Also, the General Unit Weight is set
here so that the Unit Weight may be effective to scale items entered through departments or PLUs without any
Individual Unit Weight designation.
CONDITION
Any time outside a sale
OPERATION
Mode Lock: SET
When you enter 26 and depress the [X] key,
the screen shown below will appear.
* SET * 02-06-1999 12:34
PROGRAMMING TARE SCALE
01
02
03
04
05
06
07
08
↓
0.001b
0.001b
0.001b
0.001b
0.001b
0.001b
0.001b
0.001b
Please input item No.
0.00
Pg up
26 [X]
|Tare Table No.| [ST]
Enter
↑
↓
|Tare Weight| [#]
...
1 to 9
*
Only to set
the General
Unit Weight
Pg dw
0 to 999 (Unit: 1/100
LB or gram. Example:
enter 13 for 0.13 LB.)
Repeat for other tables.
* (For sequentially programming tables, the
Table No. specification can be skipped.)
10 [ST]
**
|General Unit Weight Code| [#]
[AT/TL]
1 to 11
1:
2
3
4
5
6
7
8
9
10
11
ex.) To set the following.
• Tare Table No. 1 with Tare Weight 0.13 LB
• General Weight 2 LB (Code 2).
Kg Unit
1 Kg
2 Kg
3 Kg
4 Kg
5 Kg
6 Kg
7 Kg
8 Kg
9 Kg
100 g
Not applicable
** Only to set the
Tare Weight
Journal Print
P26
#01
#10
Mode Lock: SET
Enter 26, depress [X].
1 [ST] 13 [#] 10 [ST] 2 [#] [AT/TL]
NOTE:
LB Unit
1 LB
2 LB
3 LB
4 LB
5 LB
6 LB
7 LB
8 LB
9 LB
1/2 LB
1/4 LB
TARE
SCALE
0042
The initial value for the General Unit Weight is set to Code 1 (1LB or 1Kg).
5-35
0.131b
21b
15:26TM
EO1-11138
5. PROGRAMMING OPERATIONS
5.4 How to Access a Program Item
■ PLU Preset-code Key/Display Key Setting (Submode 27)
This programming is used to assign a PLU code to each PLU Preset-code key (SFKC 96), and also used to
assign a display menu table No. to each display key (SFKC 210). You can assign a maximum of 5 different
PLU codes or 5 different display menu table Nos. to one key of the keyboard.
CONDITION
Any time outside a sale
OPERATION
Mode Lock: SET
When you enter 27 and depress the [X] key,
the screen shown below will appear.
* SET * 02-06-1999 12:34
PROGRAMMING PLU KEY
01
02
03
04
05
S1
Please input item No.
0.00
Pg up
27 [X]
Pg dw
↑
Enter
↓
|Keyboard No.| [ST]
|PLU Code or Display Menu Table No.|
[KEY]
1:
2:
3:
4:
5:
Max. 6 digits for PLU Code
1 to 99 for Display Menu Table No.
(Enter 0 to close a key)
Depress
the
required
key on
the ECR
Keyboard.
ECR Keyboard 1
ECR Keyboard 2
ECR Keyboard 3
ECR Keyboard 4
ECR Keyboard 5
[AT/TL]
Repeat for other Keys.
ex.) To assign the PLU code 9 to the required key on the ECR Keyboard 2 and the display menu table No. 2
to the required key on the ECR Keyboard 5.
Mode Lock: SET
Enter 27, depress [X].
2 [ST] 9 [required key of SFKC 96] 5 [ST] 2 [required key of SFKC 210] [AT/TL]
Journal Print
Keyboard Phase No.
Location Code (left); refer to REMARK on the next page.
PLU Code assigned to a key (right)
NOTES:
P27
PLU KEY
2
PLU
#103 000009
5
DISPLAY
#075 02
0046
16:21TM
1. When an entry of PLU code or display menu table No. is skipped and a [KEY] is simply
depressed in the above key operation, the preprogrammed PLU code or display menu table No.
of the KEY will be displayed.
2. If “0” is entered as PLU Code or display menu table No. in the above sequence, the KEY will be
closed. Pressing the closed KEY in sale entry will be ignored.
3. The five phases of the keyboard can be shifted by the [MENU] keys in actual sales transaction.
5-36
EO1-11138
5. PROGRAMMING OPERATIONS
5.4 How to Access a Program Item
REMARK: When a PLU code (display menu No.) is assigned to a PLU Preset-code Key (Display Key) on the
ECR Keyboard in the operation on the preceding page, the Hardware Key Code which indicates the
absolute location of the key will be printed to the left of the assigned PLU Code (display menu No.).
The Hardware Key Codes of the ECR keyboard are shown below.
ECR Keyboard
1
16
31
46
61
76
91
106
121
136
151
166
2
17
32
47
62
77
92
107
122
137
152
167
3
18
33
48
63
78
93
108
123
138
153
168
4
19
34
49
64
79
94
109
124
139
154
169
5
20
35
50
65
80
95
110
125
140
155
170
6
21
36
51
66
81
96
111
126
141
156
171
7
22
37
52
67
82
97
112
127
142
157
172
8
23
38
53
68
83
98
113
128
143
158
173
9
24
39
54
69
84
99
114
129
144
159
174
10
25
40
55
70
85
100
115
130
145
160
175
11
26
41
56
71
86
101
116
131
146
161
176
12
27
42
57
72
87
102
117
132
147
162
177
13
28
43
58
73
88
103
118
133
148
163
178
14
29
44
59
74
89
104
119
134
149
164
179
15
30
45
60
75
90
105
120
135
150
165
180
Navigation Key
181
182
183
184
185
Navigation Key 1
Navigation Key 2
Navigation Key 3
Navigation Key 4
Navigation Key 5
5-37
EO1-11138
5. PROGRAMMING OPERATIONS
5.4 How to Access a Program Item
■ PLU Group Name Programming (Submode 29)
This programming is used to set each PLU group name. Grouping of each PLU should be set in the PLU
Table Programming (Submode 4).
CONDITION
Any time outside a sale
OPERATION
Mode Lock: SET
When you enter 29 and depress the [X] key,
the screen shown below will appear.
* SET * 02-06-1999 12:34
PROGRAMMING PLU GROUP
01 PLU GP01
02 PLU GP02
03 PLU GP03
04 PLU GP04
05 PLU GP05
06 PLU GP06
07 PLU GP07
08 PLU GP08
↓
Please input item No.
0.00
Pg up
29 [X]
|PLU Group Code| [ST]
Pg dw
Character Entries
(1 to 99)
Enter
↑
↓
[ST]
[AT/TL]
(See NOTE)
*
Repeat for other groups
(max. 99 groups)
* (For sequentially programming Group Codes
and Names, the code specification can be skipped.)
ex.) To set “BEER” for a PLU group 2
Mode Lock: SET
Enter 29, depress [X].
2 [ST] BEER [ST] [AT/TL]
Journal Print
P29
02
PLU
BEER
GROUP
0050
NOTE:
16:52TM
A maximum of 16 regular-sized characters may be set for each PLU Group name. One double-sized
character occupies two regular-sized characters’ space. Also see the CHARACTER ENTRIES at the
beginning of this chapter. If no name is programmed for a PLU Group, an auto-preset data is assigned
as the PLU Group Name (PLU GPxx; xx = PLU Group Code 01 to 99).
5-38
EO1-11138
5. PROGRAMMING OPERATIONS
5.4 How to Access a Program Item
■ RKP Message Programming (Submode 30)
This programming is used to set 20 RKP messages (a maximum of 20 characters x 2 lines for each), and also
used to designate an RKP on which each message is outputted. If your printer is the TM-300, you can select a
color for each message.
CONDITION
Any time outside a sale
OPERATION
Mode Lock: SET
When you enter 30 and depress the [X] key,
the screen shown below will appear.
* SET * 02-06-1999 12:34
PROGRAMMING RKP MESSAGE
01
02
03
04
05
06
07
08
↓
Please input item No.
0.00
Pg up
Pg dw
Enter
↑
↓
Guest Card Reading through the MCR
Address 1: Guest Name
30 [X]
|Message No.| [NS]
|1st Line Message Entries| [ST]
1 [ST]
Max. 20 characters
Initial Setting: Blank for all characters
1 to 20
Submode No.
Address 1: Guest Name
|2nd Line Message Entries| [ST]
2 [ST]
Max. 20 characters
Initial Setting: Blank for all characters
Address 1: Guest Name
|RKP No. of the destination| [#]
3 [ST]
Max. 4 digits: Multiple RKPs are selectable.
(NOTE 2 below) Initial Setting: RKP No. 1
Address 1: Guest Name
|Color| [#]
4 [ST]
0: Black (Initial Setting)
1: Red
Repeat for another message.
[AT/TL]
ex.) To set the following to the RKP message 1.
• 1st Line:
20 RKP MESSAGES ARE
• 2nd Line:
PROGRAMMABLE!
• Destination: 13 (RKP Nos. 1 and 3)
Journal Print
P30
01
#01
#02
#03
Mode Lock: SET
Enter 30, depress [X].
1 [NS] 1 [ST] 20 [SPACE] RKP [SPACE]
MESSAGES [SPACE] ARE [SPACE] [ST]
(2 [ST]) PROGRAMMABLE! [ST] (3 [ST])
13 [#] [AT/TL]
NOTES:
RKP
MESSAGE
20 RKP MESSAGES ARE
PROGRAMMABLE!
0051
13
17:01TM
1. When you fill one whole line with all blanks, it will result in a one line space.
2. When you want to designate the RKP Nos. 1 and 3 as the destinations, enter 13, then depress
the [#] key.
5-39
EO1-11138
5. PROGRAMMING OPERATIONS
5.4 How to Access a Program Item
■ Display Message Programming (Submode 31)
This programming is used to set a display message which is displayed in the 16-digit dot window provided to
the customer display and the LCD operator display while the mode lock of the register is in “LOCK” position. A
display message can be used for information, welcome greeting, etc.
CONDITION
Any time outside a sale
OPERATION
Mode Lock: SET
When you enter 31 and depress the [X] key,
the screen shown below will appear.
* SET * 02-06-1999 12:34
PROGRAMMING DISPLAY MSG
01
02
03
04
Please input item No.
0.00
Pg up
31 [X]
Pg dw
|Message Line No.| [ST]
Character Entries
(1 to 4; max. 4 lines)
(Max. 16 characters per
line. Regular-size only.)
*
Repeat for other lines.
Enter
↑
[ST]
↓
[AT/TL]
* Allowed for sequential Line No. only
ex.) To set a message “WE SERVE THE CHOICEST FOOD. PLEASE ENJOY YOUR DINNER.”
Mode Lock: SET
Enter 35, depress [X].
1 [ST] WE [SPACE] SERVE [SPACE] THE [SPACE] CHO [ST]
(2 [ST]) ICEST [SPACE] FOOD. [ST] (3 [ST]) PLEASE [SPACE] ENJOY [SPACE] YOU [ST]
(4 [ST]) R [SPACE] DINNER. [ST] [AT/TL]
Journal Print
P31
#01
#02
#03
#04
NOTES:
DISPLAY MSG
WE SERVE THE CHO
ICEST FOOD.
PLEASE ENJOY YOU
R DINNER.
0052 17:59TM
1. You can select either of two features; “Scrolling Display; initial setting” or “16 Characters Held
Display”. If you select the feature “16 Characters Held Display”, refer to the section 9.2 Store
Message Display on page 9-2 (Operator’s Guide) to display each message.
2. When the “SCROLLING DISPLAY” feature is selected, a maximum of 64 characters can be
entered consecutively after designating Line No. 1 at first and depressing [ST] for each line end.
3. A character must be regular-sized only.
4. A DISPLAY MESSAGE set here will also appear in the REG or MGR mode if so selected by a
program option.
5. A message display on the LCD operator display is possible when the feature “16 Characters Held
Display” has been selected.
5-40
EO1-11138
5. PROGRAMMING OPERATIONS
5.4 How to Access a Program Item
■ Amount Limit Setting for the [DISC] Key (Submode 35)
This programming is used to set an amount limit for the [DISC] key.
CONDITION
Any time outside a sale
OPERATION
Mode Lock: SET
When you enter 35 and depress the [X] key,
the screen shown below will appear.
* SET * 02-06-1999 12:34
PROGRAMMING LIMIT TABLE
01 DISC
0.00
Please input item No.
0.00
Pg up
35 [X]
1 [ST]
|Limit Amount| [#]
Pg dw
Enter
↑
↓
[AT/TL]
Max. 6 digits
Enter 0 to reset the limt.
ex.) To set $5.00 as a limit amount
Mode Lock: SET
Enter 35, depress [X].
1 [ST] 500 [#] [AT/TL]
Journal Print
P35
DISC
LIMIT
TABLE
0067
NOTE:
5.00
18:39TM
The limit set here cannot be released by the [LC OPEN] (or [OPEN]) key in transaction entries.
5-41
EO1-11138
5. PROGRAMMING OPERATIONS
5.4 How to Access a Program Item
■ Set Menu Table Programming (Submode 42)
This programming is used to set a Set Menu Table and their respective Sub Menu PLUs. If a PLU is
programmed with a Set Menu Table No. (Address 12 of the PLU TABLE PROGRAMMING), the PLU will be a
main menu PLU of the Set Menu Table. When the main menu PLU is entered in a sale, the sub menu PLUs
which have been programmed in the Set Menu Table will be automatically entered (Preset Set Menu), or other
PLUs can be manually entered as sub menu items (Open Set Menu).
•
Programming
CONDITION
Any time outside a sale
OPERATION
Mode Lock: SET
When you enter 42 and depress the [X] key,
the screen shown below will appear.
* SET * 02-06-1999 12:34
PROGRAMMING SET MENU
01
02
03
04
05
06
07
08
↓
Please input table No.
0.00
Pg up
Pg dw
Enter
↑
↓
Repeat for another table.
*
42 [X]
|Set Menu Table No.| [NS]
1 [ST]
|Sub Menu PLU Code| [PLU]
[#]
[AT/TL]
1 to 50 (Enter the No.
programmed to the Main
Menu PLU in Submode 4.)
Repeat other sub menu PLUs to be contained
in the same table. (Max. 7 PLUs)
2 [ST]
|Enterable Qty of Sub Menu PLUs| [#]
0 to 30
* (For sequentially programming tables, the Table No. specification can be skipped.)
ex.) To set the following sub menu PLUs to a set menu table No. 1.
Sub Menu PLUs:
30, 40, 50
Mode Lock: SET
Enter 42, depress [X].
1 [NS] 1 [ST] 30 [PLU] 40 [PLU]
50 [PLU] [#] [AT/TL]
P42
01
Journal Print
SET
MENU
#01
0072
NOTES:
000030
000040
000050
19:40TM
1. To make a preset set menu, enter PLUs after the key sequence “1 [ST]” as shown above. If
changing a preset set menu into an open set menu, operate the key sequence “1 [ST] 0 [#]”
after designating the table No.
2. To make an open set menu, depress the [#] key immediately after the key sequence “1 [ST]”.
The setting of the enterable quantity of sub menu PLUs is applied only to an open set menu. If its
quantity is programmed, the set menu entry will be automatically finalized when the quantity of
sub menu PLUs reaches the programmed quantity.
5-42
EO1-11138
5. PROGRAMMING OPERATIONS
5.4 How to Access a Program Item
•
Deletion
CONDITION
Any time outside a sale
OPERATION
Mode Lock: SET
42 [X]
[ITEM CORR]
|Set Menu Table No.| [NS]
[AT/TL]
Repeatable for other tables to be deleted.
Journal Print
P42
SET MENU
02
---------------------------------------0074 19:53TM
■ Combo Sale Table Programming (Submode 43)
This programming is used to set a combo sales table.
•
Programming
CONDITION
Any time outside a sale
OPERATION
Mode Lock: SET
When you enter 43 and depress the [X] key,
the screen shown below will appear.
* SET * 02-06-1999 12:34
PROGRAMMING COMBO
01
02
03
04
05
06
07
08
↓
Please input COMBO code.
0.00
Pg up
5-43
Pg dw
Enter
↑
↓
EO1-11138
5. PROGRAMMING OPERATIONS
5.4 How to Access a Program Item
As for details of each address,
refer to the following page.
As for details of each address,
refer to the following pages.
Address 1: Combo Table Name
43 [X]
|Combo Table No.| [NS]
1 [ST]
1 to 99
Address 2: Grouping Item 1
Submode No.
2 [ST]
Address 3: Grouping Item Code 1
3 [ST]
Address 4: Grouping Item 2
4 [ST]
Address 5: Grouping Item Code 2
5 [ST]
Address 6: Grouping Item 3
6 [ST]
Address 7: Grouping Item Code 3
7 [ST]
Address 8: Grouping Item 4
8 [ST]
Address 9: Grouping Item Code 4
9 [ST]
Address 10: Grouping Item 5
10 [ST]
Address 11: Grouping Item Code 5
11 [ST]
Address 12: Grouping Item 6
12 [ST]
Address 13: Grouping Item Code 6
13 [ST]
Address 14: Priority
14 [ST]
Address 15: Day-of-Week Designation
15 [ST]
Address 16: Start Time
16 [ST]
Address 17: End Time
17 [ST]
Address 18: Process Status
18 [ST]
Address 19: Process Value
19 [ST]
Address 20: Grouping Item Designation
20 [ST]
Character Entries [ST]
Max. 16 characters
|Grouping Item| [#]
|Grouping Item Code| [#]
|Grouping Item| [#]
|Grouping Item Code| [#]
|Grouping Item| [#]
|Grouping Item Code| [#]
|Grouping Item| [#]
|Grouping Item Code| [#]
|Grouping Item| [#]
|Grouping Item Code| [#]
|Grouping Item| [#]
|Grouping Item Code| [#]
|Priority Code| [#]
|Day-of-Week Code| [#]
|Hour/Minute| [#]
|Hour/Minute| [#]
|Process Status Code| [#]
|Process Value| [#]
|Grouping Item Designation Code| [#]
Repeat for another combo table.
[AT/TL]
5-44
EO1-11138
5. PROGRAMMING OPERATIONS
5.4 How to Access a Program Item
Combo Sale Table Programming Contents
Address No.
Description of Programming Contents
2,4,6,8,10,12
Grouping Item
Enter 1 for a department item, 2 for a PLU item. Entry of “0” will be ignored.
NOTE: Do not set a department together with a PLU which is linked to the department in the
same combo sale table.
Grouping Item Code
Enter 1 to 99 for a department item, a max. 6-digit code for a PLU item.
Priority Code
Enter 1 to 99. (Smaller code has a priority; 1 is the first priority.)
Entry of “0” will be ignored.
Day-of-Week Designation
Enter a max. 7-digit value combining the following code.
1: Sunday
5: Thursday
2: Monday
6: Friday
3: Tuesday
7: Saturday
4: Wednesday
0: No designation
ex.) When you designate Monday and Thursday, enter 25.
Start/End Time
Enter “Hour” (0 to 23), then “Minute” (00 to 59).
Process Status
Enter a 1-digit code from the following codes.
1: Designated Grouping Item Free of Charge
2: %- on Whole Grouping
3: Dollar Discount on Whole Grouping
4: %- on Designated Grouping Item
5: Dollar Discount on Designated Grouping Item
0: Fixed Price
Process Value
Effective value depends on the process status as follows.
Process Status 0:
Fixed Price 0 to 999999
Process Status 2 or 4:
% Rate 0 to 99.999
Process Status 3 or 5:
Dollar Discount 0 to 999999
Grouping Designation
Enter a 1-digit value from 1 to 6.
NOTE: This address is effective when you have selected 1, 4 or 5 in the process status
selection.
3,5,7,9,11,13
14
15
16,17
18
19
20
ex.) To set the following to a combo table 1.
Combo Table 1:
Address 1 (Combo Name):
Address 2 (Grouping Item 1):
Address 3 (Grouping Item 1 Code):
Address 4 (Grouping Item 2):
Address 5 (Grouping Item 2 Code):
Address 6 (Grouping Item 3):
Address 7 (Grouping Item 3 Code):
Address 14 (Priority):
Address 15 (Day-of-Week Designation):
Address 16 (Start Time):
Address 17 (End Time):
Address 18 (Process Status):
Address 20 (Grouping Item Designation):
5-45
COMBO A
2 (PLU)
100
2 (PLU)
200
2 (PLU)
300
10
1 (Sunday)
1030 (10:30)
1400 (14:00)
1 (Designated Grouping Item Free of
1 Charge)
2 (Grouping Item 2)
EO1-11138
5. PROGRAMMING OPERATIONS
5.4 How to Access a Program Item
Mode Lock: SET
Enter 43, depress [X].
1 [NS] 1 [ST] COMBO A [ST] (2 [ST]) 2 [#] (3 [ST]) 100 [#] (4 [ST]) 2 [#] (5 [ST]) 200 [#]
(6 [ST]) 2 [#] (7 [ST]) 300 [#] 14 [ST] 10 [#] (15 [ST]) 1 [#] (16 [ST]) 1030 [#] (17 [ST]) 1400 [#]
(18 [ST]) 1 [#] 20 [ST] 2 [#] [AT/TL]
Journal Print
P43
01
COMBO
#01
#02
#03
#04
#05
#06
#07
#14
#15
#16
#17
#18
#20
COMBO A
0078
•
2
000100
2
000200
2
000300
10
1
10:30TM
14:00TM
1
2
22:37TM
Deletion
CONDITION
After Combo Sale Reset
OPERATION
Mode Lock: SET
43 [X]
[ITEM CORR]
|Combo Table No.| [NS]
[AT/TL]
Repeatable for other tables to be deleted.
Journal Print
P43
COMBO
01
---------------------------------------0079 22:50TM
5-46
EO1-11138
5. PROGRAMMING OPERATIONS
5.4 How to Access a Program Item
■ Guest Check Commercial Message Programming (Submode 45)
This programming is used to set a commercial message printed on a guest check.
CONDITION
Any time outside a sale
OPERATION
Mode Lock: SET
When you enter 45 and depress the [X] key,
the screen shown below will appear.
* SET * 02-06-1999 12:34
PROGRAMMING INVO CM MSG
1
2
3
Please input item No.
0.00
Pg up
Pg dw
Enter
↑
↓
Repeat for another line.
45 [X]
|Line No.| [ST]
(For sequentially programming
lines, the line number
specification can be skipped.)
1 to 3
Character Entries
[ST]
[AT/TL]
max. 40 characters/line
ex.) To set a commercial message “SPECIAL LUNCH MENU FROM 11:00 TO 13:00” on the line No. 1.
Mode Lock: SET
Enter 45, depress [X].
1 [ST] SPECIAL LUNCH [SPACE] MENU [SPACE] FROM [SPACE] 11:00 [SPACE] TO [SPACE]
13:00 [ST] [AT/TL]
Journal Print
P45
INVO CM MSG
#01
SPECIAL LUNCH MENU FROM 11:00 TO 13:00
0080 23:06TM
NOTES:
1. For each line, a maximum of 40 regular-sized characters or 20 double-sized characters may be
entered. A combination of both types is also available.
2. If programming blanks for all three lines, no extra lines will be fed. If any one of the three lines is
programmed, the two other lines will result in two lines space.
5-47
EO1-11138
5. PROGRAMMING OPERATIONS
5.4 How to Access a Program Item
■ Day Part Setting (Submode 46)
A maximum of 6 day parts can be set. You can obtain major group sales data by each day part.
CONDITION
After Day Part Reset
OPERATION
Mode Lock: SET
When you enter 46 and depress the [X] key,
the screen shown below will appear.
* SET * 02-06-1999 12:34
PROGRAMMING DAY PART
01
02
03
04
05
06
Please input data.
0.00
Pg up
46 [X]
|Hour| |Minute| [#]
Pg dw
Enter
↑
↓
[AT/TL]
Enter the time that ends
each day part, in the 24hour system.
Repeat until all the day parts are entered. (max. 6 day parts)
ex.) To set the following day part table.
Day Part 1: Up to 10:00*
Day Part 2: 10:01 to 14:00
Day Part 3: 14:01 to 18:00
Day Part 4: 18:01 to 22:00
* (The first day part is automatically continued from 22:01 of the preceding day.)
Mode Lock: SET
Enter 46, depress [X].
1000 [#] 1400 [#] 1800 [#] 2200 [#] [AT/TL]
Journal Print
P46
DAY
PART
0083
NOTES:
10:00TM
14:00TM
18:00TM
22:00TM
10:40TM
1. A maximum of 6 day parts can be set.
2. To change the table of day parts once set, partially or entirely, do the entire setting operation over
again.
2. To reset the day parts table once set, operate:
Mode Lock: SET
46 [X] 0 [#] [AT/TL]
Then no day part sales data will be outputted on the reports.
3. Do not set a day part across 24:00, such as “from 23:00 to 1:00”. If set, no data will be processed
into that day part.
5-48
EO1-11138
5. PROGRAMMING OPERATIONS
5.4 How to Access a Program Item
■ Employee Table Setting (Submode 50)
This programming is used to assign a cashier code and a job code to each employee.
CONDITION
After Employee Clock-in/Clock-out
Daily and GT Reset
OPERATION
Mode Lock: SET
When you enter 50 and depress the [X] key,
the screen shown below will appear.
* SET * 02-06-1999 12:34
PROGRAMMING EMPLOYEE
Please input Employee code.
0.00
Pg up
Pg dw
Enter
↑
↓
Guest Card Reading through the MCR
Address 1: Employee Name
50 [X]
|Employee Code| [NS]
1 [ST]
1 to 9999
Submode No.
*
Character Entries [ST]
Max. 12 characters
Address 2: Cashier Code
2 [ST]
|Cashier Code| [#]
0 to 99
Address 3: Job Code
3 [ST]
|Job Code| [#]
Max. 20 digits
Repeat for another employee.
* Repeatable from here if an employee code is sequential.
[AT/TL]
Employee Table Programming Contents
Address No.
Description of Programming Contents
2
Cashier Code
Enter a manager-assign code (1 to 99). A cashier for which 0 has been entered for a
cashier code cannot sign ON on the register.
NOTE: Do not set the same cashier code for multiple employees.
Job Code
Enter a max. 20-digit value combining the job codes 1 to 10. (When you enter a 1-digit
numeric 1 to 9, add 0 before the numeric.) As a result, a maximum of 10 job codes can be
assigned to each employee.
NOTE: Each job definition should be programmed in the Job Code/ Working Hours Setting
(Submode 51).
3
NOTE:
A maximum of 200 employees can be managed.
ex.) To set the following to an employee No. 1.
Employee No. 1:
Address 1 (Name):
Address 2 (Cashier Code):
Address 3 (Job Code):
JONES
1
010203 (Job Code 1,2,3)
5-49
EO1-11138
5. PROGRAMMING OPERATIONS
5.4 How to Access a Program Item
Mode Lock: SET
Enter 50, depress [X].
1 [NS] 1 [ST] JONES [ST] (2 [ST]) 1 [#] (3 [ST]) 010203 [#] [AT/TL]
Journal Print
P50
EMPLOYEE
0001
#01 JONES
#02
#03
00005
0086
•
01
010203
13:04TM
Deletion
CONDITION
After Employee Clock-in/Clock-out
Daily and GT Reset
OPERATION
Mode Lock: SET
50 [X]
[ITEM CORR]
|Employee Code| [NS]
[AT/TL]
Repeatable for another employee to be deleted.
Journal Print
P50
EMPLOYEE
0002
---------------------------------------00004
0091 15:53TM
■ Job Code/Working Hours Setting (Submode 51)
This programming is used to define each job and also set regular working hours for each job.
CONDITION
After Employee Clock-in/Clock-out
Daily and GT Reset
OPERATION
Mode Lock: SET
When you enter 51 and depress the [X] key,
the screen shown below will appear.
* SET * 02-06-1999 12:34
PROGRAMMING JOB CODE
01
02
03
04
05
06
07
08
↓
Please input item No.
0.00
Pg up
5-50
Pg dw
Enter
↑
↓
EO1-11138
5. PROGRAMMING OPERATIONS
5.4 How to Access a Program Item
Guest Card Reading through the MCR
Address 1: Job Name
51 [X]
|Job Code| [NS]
1 to 10
Character Entries [ST]
1 [ST]
Max. 12 characters
Address 2: Job Status
Submode No.
|Job Status| [#]
2 [ST]
0 to 3
Address 1: Daily Regular Working
Hour
11 [NS]
|Daily Regular Working Hour for each Job| [#]
1 to 24
1 [ST]
Address 2: Weekly Regular
Working Hour
|Weekly Regular Working Hour for each Job| [#]
1 to 99
2 [ST]
Address 3: Time Unit
|Time Unit for each Job| [#]
3 [ST]
0 to 4
Repeat for another job.
[AT/TL]
Job Code Programming Contents
Address No.
2
Description of Programming Contents
Job Status
Select one status from the following.
0: Normal
1: Chief Cashier
2: Server
3: ECR Operation Prohibited
Working Hour Programming Contents
Address No.
1
2
3
Description of Programming Contents
8 hours is initially set as a regular working hours for each job.
40 hours is initially set as a weekly working hours for each job.
Select one unit from the following.
0: None
1: 5 minutes unit
2: 15 minutes unit
3: 30 minutes unit
4: 60 minutes unit
ex.) To set the following.
Job Code 1: Job Code Address
Address 1 (Job Name):
CASHIER
Address 2 (Job Status): 0 (Normal)
Working Hour Address
Address 1 (Daily Regular Working Hour):
Address 2 (Weekly Regular Working Hour):
Address 3 (Time Unit):
5-51
7 (7 Hours)
35 (35 Hours)
0 (None)
EO1-11138
5. PROGRAMMING OPERATIONS
5.4 How to Access a Program Item
Job Code 2: Job Code Address
Address 1 (Job Name):
COOK
Address 2 (Job Status): 3 (ECR Operation Prohibited)
Working Hour Address
Address 1 (Daily Regular Working Hour):
9 (9 Hours)
Address 2 (Weekly Regular Working Hour): 45 (45 Hours)
Address 3 (Time Unit):
0 (None)
Mode Lock: SET
Enter 51, depress [X].
1 [NS] 1 [ST] CASHIER [ST] (2 [ST]) 0 [#] 11 [NS] 1 [ST] 7 [#] (2 [ST]) 35 [#] (3 [ST]) 0 [#]
2 [NS] 1 [ST] COOK [ST] (2 [ST]) 3 [#] 11 [NS] 1 [ST] 9 [#] (2 [ST]) 45 [#] (3 [ST]) 0 [#] [AT/TL]
Journal Print
P51
01
JOB
#01
#02
CODE
CASHIER
0
11
#01
#02
#03
7
35
0
02
#01
#02
COOK
3
11
#01
#02
#03
0089
9
45
0
15:43TM
■ Tender Up Table Setting (Submode 52)
This programming is used to set an amount table for the [TENDER UP] key. On how to use the [TENDER UP] key,
refer to section 9.30 Sale Finalization by Media Keys (Payment of A Sale) on page 9-20 (Operator’s Guide).
CONDITION
Any time outside a sale
OPERATION
Mode Lock: SET
When you enter 52 and depress the [X] key,
the screen shown below will appear.
* SET * 02-06-1999 12:34
PROGRAMMING TENDER UP
01
0.00
Please input data.
0.00
Pg up
52 [X]
|Tender Up Amount| [#]
[AT/TL]
Max. 8 digits
Repeatable for 10 amounts. (NOTE 1 on the next page)
5-52
Pg dw
Enter
↑
↓
EO1-11138
5. PROGRAMMING OPERATIONS
5.4 How to Access a Program Item
ex.) To set the following tender up table.
$50.00, $100.00, $150.00, $200.00
Mode Lock: SET
Enter 52, depress [X].
5000 [#] 10000 [#] 15000 [#] 20000 [#] [AT/TL]
Journal Print
P52
TENDER
UP
0100
NOTES:
50.00
100.00
150.00
200.00
16:48TM
1. A tender up amount should be set from a smaller to a larger.
2. If a tender up table has been programmed as follows, $50.00, $100.00, $150.00, an error will
occur when you depress the [TENDER UP] key for a sales total of more than $150.
3. To reset the tender up table once set, operate as follows.
52 [X] 0 [#] [AT/TL]
■ Display Menu Table Setting (Submode 53)
This programming is used to set a display menu table corresponding to each [DISPLAY] key.
•
Programming
CONDITION
Any time outside a sale
OPERATION
Mode Lock: SET
When you enter 53 and depress the [X] key,
the screen shown below will appear.
* SET * 02-06-1999 12:34
PROGRAMMING MENU TABLE
01
02
03
04
05
06
07
08
↓
Please input table No.
0.00
Pg up
Pg dw
Enter
↑
↓
A maximum of 20 PLU items can be
entered in one display menu table.
Address 1: Guest Name
53 [X]
|Display Menu No.| [NS]
1 [ST]
1 to 99
Submode No.
Address 2: Charge Posting Limit
Amount for each Guest
2 [ST]
|PLU Code| [PLU]
Max. 6 digits
[#]
|Select Status| [#]
0: Select Allowed
1: Select Prohibited
(NOTE on the next page)
Repeat for another display menu table.
[AT/TL]
5-53
EO1-11138
5. PROGRAMMING OPERATIONS
5.4 How to Access a Program Item
ex.) To set the following PLU items in a display menu table No. 1.
PLU Codes 100, 105, 110, 115
Mode Lock: SET
Enter 53, depress [X].
1 [NS] 1 [ST] 100 [PLU] 105 [PLU] 110 [PLU] 115 [PLU] [#] [AT/TL]
Journal Print
P53
01
MENU
TABLE
#01
0102
NOTE:
•
000100
000105
000110
000115
17:26TM
Depressing the [SELECT] key in a sales transaction causes an error if the corresponding display menu
table has the “Select Prohibited” status.
Deletion
CONDITION
Any time outside a sale
OPERATION
Mode Lock: SET
53 [X]
[ITEM CORR]
|Display Menu No.| [NS]
[AT/TL]
Repeatable for another display menu table to be deleted.
Journal Print
P53
MENU TABLE
05
---------------------------------------0103 17:28TM
5-54
EO1-11138
5. PROGRAMMING OPERATIONS
5.4 How to Access a Program Item
■ PLU Preset Price Setting or Changing (Submode 60)
This programming is used to set or change each PLU price.
CONDITION
Any time outside a sale
OPERATION
Mode Lock: SET
When you enter 60 and depress the [X] key,
the screen shown below will appear.
* SET * 02-06-1999 12:34
PROGRAMMING PRICE
S1
Please input PLU code.
0.00
Pg up
Pg dw
Enter
↑
↓
Repeatable for other PLUs
60 [X]
|PLU Code| [PLU]
Max. 6 digits
[PLU Preset-code Key]
[MENU 1 to 5]
|Price Level| [ST]
1 to 5
|New Preset Price| [#]
[AT/TL]
Max. 6 digits
Repeatable for a price change of another price level. When you
change the price of each price level in numerical order, the price level
designation can be skipped.
•
•
•
When a [MENU] key is depressed, a Keyboard No. will be displayed on the LCD operator display.
After a [MENU] key is depressed, a Keyboard No. will be held until another [MENU] key is depressed.
When the programming is completed by the [AT/TL] key depression, the Keyboard No. 1 will be
automatically regained.
To change a preset-price PLU into an open-price PLU, skip the “New Preset Price” entry and simply depress the
[#] key. Presetting a zero-price is also possible.
ex.) To change a price of the PLU Code 21 as follows.
• $5.00 (Price Level 1)
• $2.80 (Price Level 3)
Mode Lock: SET
Enter 60, depress [X].
21 [PLU] 1 [ST] 500 [#] 3 [ST] 280 [#] [AT/TL]
5-55
Journal Print
P60
PRICE
000021 PLU000021
#01
#03
0111
5.00@
2.80@
18:35TM
EO1-11138
5. PROGRAMMING OPERATIONS
5.4 How to Access a Program Item
■ Printer Table Setting (Submode 71)
This programming is used to set a printer table. You can set two printer tables.
CONDITION
Any time outside a sale
OPERATION
Mode Lock: SET
When you enter 71 and depress the [X] key,
the screen shown below will appear.
* SET * 02-06-1999 12:34
PROGRAMMING PRINTER
01 OUTPUT SIDE1
02 SIDE1 STATUS
03 OUTPUT SIDE2
04 SIDE2 STATUS
05 CONNECT PRT
06 BAUD RATE
Please input item No.
0.00
Pg up
Pg dw
Enter
↑
↓
Address 1: Destination of Output (Printer Table 1)
71 [X]
1 [NS]
|Destination of Output| [ST]
|Terminal ID/Port No.| [#]
*
When the multiple destinations are designated
Address 2: Connection Status (Printer Table 1)
2 [NS]
|Destination of Output| [ST]
|Connection Status| [#]
*
When the multiple destinations are designated
Address 3: Destination of Output (Printer Table 2)
3 [NS]
|Destination of Output| [ST]
|Terminal ID/Port No.| [#]
*
When the multiple destinations are designated
Address 4: Connection Status (Printer Table 2)
4 [NS]
|Destination of Output| [ST]
|Connection Status| [#]
*
When the multiple destinations are designated
Address 5: Printer Model
5 [NS]
|Port No.| [ST]
|Printer| [#]
*
When the multiple ports are designated
Address 6: Transmission Speed
6 [NS]
|Port No.| [ST]
|Transmission Speed| [#]
*
When the multiple ports are designated
* Repeatable from here if each code is sequential.
5-56
[AT/TL]
EO1-11138
5. PROGRAMMING OPERATIONS
5.4 How to Access a Program Item
Printer Table Setting Contents
Address No.
Description of Programming Contents
1, 3
Destination of Output
Destination of data output is as follows.
1: Receipt
4: RKP 3
2: RKP 1
5: RKP 4
3: RKP 2
6: Journal
Terminal ID/Port No.
Enter a 2-digit terminal ID No. and a 1-digit port No.
NOTE: If your system is the standalone system, enter only a 1-digit port No.
Destination of Output
Destination of data output is as follows.
1: Receipt
4: RKP 3
2: RKP 1
5: RKP 4
3: RKP 2
6: Journal
Connection Status
Connection status is as follows.
0: OFF (Disconnection)
1: ON (Connection)
NOTE: When a terminal ID/port No. is entered, a connection status will be automatically set
to “ON” (Connection).
Port No.
Port No. is as follows.
1: Port 1
2: Port 2
3: Port 3 (Hardware Option)
Printer
A printer connectable is as follows.
1: TM-300 (Receipt, RKP 1 to 4, Journal)
3: BRST-10 (Receipt)
2: TM-T88 (Receipt, RKP 1 to 4)
0: None
Port No.
Port No. is as follows.
1: Port 1
2: Port 2
3: Port 3 (Hardware Option)
Transmission Speed
0: 19200 bps
1: 9600 bps
2, 4
5
6
ex.) To set the following to a printer table 1.
Printer Table 1
Address 1 (Destination of Output):
Address 2 (Connection Status):
Address 5 (Printer):
1 (Receipt)/1 (Port 1)
2 (RKP 1)/2 (Port 2)
6 (Journal)/2 (Port 2)
1: ON for all the destinations
1 (Port 1) for 3 (BRST-10)
2 (Port 2) for 1 (TM-300)
Mode Lock: SET
Enter 71, depress [X].
1 [NS] 1 [ST] 1 [#] (2 [ST]) 2 [#] 6 [ST] 2 [#] 2 [NS] 1 [ST] 1 [#] (2 [ST]) 1 [#] 6 [ST] 1 [#] 5 [NS]
1 [ST] 3 [#] (2 [ST]) 1 [#] [AT/TL]
5-57
EO1-11138
5. PROGRAMMING OPERATIONS
5.4 How to Access a Program Item
Journal Print
P71
1
PRINTER
#01
#02
#06
1
1
1
1
2
2
2
#01
#02
#06
1
1
1
#01
#02
3
1
10:20TM
5
0131
NOTE:
A connection status of each RKP can also be changed by an operation in the MGR mode. For details,
refer to the section 2.5 RKP Table Change on page 2-3 of the manager’s guide.
■ %+ and %- Preset Rate Setting
A preset rate may be set on each of the [%+] and [%-] keys, one independent rate for each key. Once a rate
is preset, the % key will simply be depressed without a prior rate entry to activate the preset rate. If a rate is
entered prior to the depression of the key, the entered rate (manual rate) will be activated instead.
CONDITION
Any time outside a sale
OPERATION
Mode Lock: SET
When you complete the following
programming, the screen shown below will
appear. Depress the [ESC] key to go
back to the program menu screen.
* SET * 02-06-1999 12:34
PROGRAMMING MISC
01 %1RATE
02 %2RATE
03 %3RATE
04 %4RATE
05 %5RATE
06 %6RATE
07 %7RATE
08 %8RATE
↓
0%
0%
0%
0%
0%
0%
0%
0%
Please input data.
0.00
Pg up
Pg dw
Enter
↑
↓
|Preset Rate| [%+] (For Percent Charge Preset Rate)
......
(0.001 to 99.999 (%);
use the [ . ] key if a decimal portion is contained.)
......
|Preset Rate| [%-] (For Percent Discount Preset Rate)
|Preset Rate| [%3] to [%8] (For Percent Discount Preset Rates for Additional %- Keys)
5-58
EO1-11138
5. PROGRAMMING OPERATIONS
5.4 How to Access a Program Item
ex.) To set 10% on [%+] Key:
Mode Lock: SET
Enter 10, depress [%+].
To reset the rate once set:
Enter 0, depress the required % key.
(Then the % key will always require a manual rate entry in sale entries.)
Journal Print
P00
%+
%1RATE
0139
10%
10:49TM
■ Preset Rate Setting for Selective Itemizers (SI1 and SI2)
If any of [ST1/TL] (or [SI/TL]) and [SI2/TL] keys are installed on the keyboard, a preset rate may be
programmed on each key.
As for the functions and applications of the Selective Itemizers, refer to the description on the next page.
CONDITION
Any time outside a sale
OPERATION
Mode Lock: SET
When you complete the following
programming, the screen shown below will
appear. Depress the [ESC] key to go
back to the program menu screen.
* SET * 02-06-1999 12:34
PROGRAMMING MISC
09 SI1%RATE
10 SI2%RATE
11 CUR RATE1
12 CUR RATE2
13 CUR RATE3
14 CUR RATE4
15 CUR RATE5
16 REG NO.
↑↓
0%
0%
0*
0*
0*
0*
0*
#0
Please input data.
0.00
Pg up
|Preset Rate of SI 1|
[SI1/TL] (or [SI/TL])
......
(0.001 to 99.999 (%);
use the [ . ] key if a decimal portion is contained.)
......
|Preset Rate of SI 2|
[SI2/TL]
ex.) To set 7% as SI 1 preset % rate:
Mode Lock: SET
7 [ST1/TL]
5-59
Pg dw
Enter
↑
↓
EO1-11138
5. PROGRAMMING OPERATIONS
5.4 How to Access a Program Item
Journal Print
P00
SI1 TL
SI1%RATE
0140
NOTES:
7%
11:04TM
1. Whether the calculated amount by the preset SI % rate affects (i.e. add to or subtract from) the
sale total is determined by a program option.
2. To reset the rate once set, enter 0 as the rate. (Then the rate is regarded as 100% if the option
“Non-affect” is selected. With the option “SI Affects Sale Total”, some rate other than “0” should
be programmed.)
Selective Itemizer Functions and Applications
The “Selective Itemizer” is a temporary total memory for each sale and is activated separately from the Main
Itemizer (i.e. sale total memory). If certain PLU items are programmed with the SI (selective itemizer) “net” status,
the Selective Itemizer will function to add up amounts of the SI-net status items in registering the items, while the
Main Itemizer will function to add up all the items in the sale. Thus, near the sale finalization, the operator may
read the SI content by depressing the [SI/TL] key.
A preset % rate may be programmed for each of SI1 and SI2 (on the preceding page), and whether the
calculated amount will add to, subtract from, or non-affect the sale total is a program option. Whether the amount
resulted by depressing the [SI/TL] key will print or non-print is another program option.
The applications of this function may vary from store to store. Some stores may use it for counting the service
stamps to be issued to the customers according to the sale amount of service-stampable items. In this case, the
option “SI Total Non-affects Sale Total” should be selected, and a preset % rate, 1% for example, may be set to
issue one service stamp for every $1.00. Thus the number of stamps to be issued to the customer is displayed
(and printed if so programmed) as a result of calculation with the preset % rate, but the resulted value (the
number of stamps in this case) will not affect the sale total.
Example 1) With option “SI Total Non-affects Sale Total”:
Key Operation in REG Mode
Receipt/Journal Print
1 [PLU] (SI-net)
2 [PLU] (non-SI)
3 [PLU] (SI-net)
[SI/TL] (1% is preset)
[AT/TL]
1 PLU000001
1 PLU000002
1 PLU000003
SI1 TL
SUBTL
1.00TS
1.50T
2.00TS
0.03
4.50
S: SI-net Status
Number of stamps to
be issued.
PLU 1 and PLU 3 are programmed with SI-net-status. On depressing [SI/TL], “0.03” (which is 1% of total
amount of PLU 1 “1.00” + PLU 3 “2.00”) is displayed and printed, and 3 stamps are to be issued to the
customer in this case. The sale total “4.50,” is not affected by the SI calculation.
Other stores may use it for calculating the discount amount for certain sales items during a special discount sales
period by presetting the discount % rate on the SI and programming SI-net status to certain PLUs which are
subject to the special discount.
5-60
EO1-11138
5. PROGRAMMING OPERATIONS
5.4 How to Access a Program Item
Example 2) With option “SI Special Discount”:
Key Operation in REG Mode
1 [PLU] (SI-net)
2 [PLU] (non-SI)
3 [PLU] (SI-net)
[SI/TL] (10% is preset)
[AT/TL]
Receipt/Journal Print
1 PLU000001
1 PLU000002
1 PLU000003
SI1 TL
SUBTL
1.00TS
1.50T
2.00TS
-0.30
4.20
Discount Amount
resulted by SI %
On depressing [SI/TL], “-0.30” (which is 10% discount from the total amount of PLU 1 + PLU 3 items) is
displayed and printed, and that amount is subtracted from the sale total. (4.50 - 0.30 = 4.20)
■ Foreign Currency Exchange Rate Setting
In this program, the exchange rate of each foreign currencies (corresponding to the [CUR 1] to [CUR 5] keys)
will be set. By setting an exchange rate on each Foreign Currency Key, reading the sale total and tendering in
the foreign currency value will be possible for sale finalization.
CONDITION
Any time outside a sale
OPERATION
Mode Lock: SET
When you complete the following
programming, the screen shown below will
appear. Depress the [ESC] key to go
back to the program menu screen.
* SET * 02-06-1999 12:34
PROGRAMMING MISC
09 SI1%RATE
10 SI2%RATE
11 CUR RATE1
12 CUR RATE2
13 CUR RATE3
14 CUR RATE4
15 CUR RATE5
16 REG NO.
↑↓
0%
0%
0*
0*
0*
0*
0*
#0
Please input data.
0.00
Pg up
Pg dw
Enter
↑
↓
|Exchange Rate for Foreign Currency 1|
[CUR 1]
0.000001 to 9999.999999
(Use the [ . ] key if decimal portion is contained in the rate.)
......
|Exchange Rate for Foreign Currency 5|
[CUR 5]
As for how to calculate the Exchange Rate, see the description below.
Foreign Currency Exchange Rate Calculation
1. The rate must be calculated in the subsidiary currency unit values for both the domestic and the foreign
currencies. (In case of calculating the rate from the domestic to a foreign currency with the same zerosuppress form, such as from American $ to French Franc, it will be no problem even if it is calculated in the
main currency of $ and Franc. However, in case of exchanging from a domestic currency such as $ or Franc
to Japanese yen or Italian Lira, or vice versa, this rule must be obeyed; otherwise a wrong rate will result.)
2. Calculation of foreign currency exchange rate is formulated as follows.
1 Foreign Currency = Domestic Currency/Rate
ex.) To obtain an exchange rate converted from the domestic currency of the Japanese ¥ into the foreign
currency American $.
When $1.00 is equal to ¥140, 1 cent = ¥140/100 cent, results in ¥1.4.
5-61
EO1-11138
5. PROGRAMMING OPERATIONS
5.4 How to Access a Program Item
ex.) To set the rate on the preceding page for the [CUR 1] key.
Mode Lock: SET
1 [ . ] 4 [CUR 1]
Journal Print
P00
CUR1
CUR
RATE1
1.4*
11:35TM
0160
Enter 0 to reset an exchange rate once set. You cannot use a foreign currency key of which the rate is 0.
■ Store/Register No. Setting
A maximum of 6 digits may be set as ID No. for the store and/or register. And once set, it will be printed on
every receipt and every transaction on journal.
CONDITION
Any time outside a sale
OPERATION
Mode Lock: SET
When you complete the following
programming, the screen shown below will
appear. Depress the [ESC] key to go
back to the program menu screen.
* SET * 02-06-1999 12:34
PROGRAMMING MISC
09 SI1%RATE
10 SI2%RATE
11 CUR RATE1
12 CUR RATE2
13 CUR RATE3
14 CUR RATE4
15 CUR RATE5
16 REG NO.
↑↓
0%
0%
0*
0*
0*
0*
0*
#0
Please input data.
0.00
Pg up
|Store/Register No.|
Pg dw
Enter
↑
↓
[#]
......
Max. 6 digits; 0 to 999999
ex.) To set the following:
Register No. of this terminal: 3001
Journal Print
OPERATION: Mode Lock: SET
3001 [#]
P00
REG
No.
0161
NOTE:
#3001
11:42TM
The preceding zeros, if entered, will not be printed. For example, if “001234” is entered in the above
operation, “#1234” will always be printed as the Register No.
5-62
EO1-11138
6. VERIFICATION OF PROGRAMMED DATA
6.1 How to verify a Programmed Data through the Operator Display
6.
VERIFICATION OF PROGRAMMED DATA
You can verify each data programmed in the preceding chapter. Two mode lock positions are available to verify
the data; SET and X. Also two ways are available to access a programmed data you want to verify; through the
operator display and through the keyboard.
6.1
How to verify a Programmed Data through the Operator Display
When you turn the mode selector key to the SET or X position, the initial screen shown below will appear.
SET Mode
X Mode
* SET * 02-06-1999 03:04
1
2
3
*X/GTX* 02-06-1999 03:04
PROGRAMMING
PROGRAM READ
PROGRAM DLL
1
2
3
4
5
Please select operation by Enter key.
0.00
Pg up
Pg dw
TOTAL
Enter
›
X
GTX
PROGRAM READ
E-JOURNAL
OTHERS
Please select operation by Enter key.
0.00
0.00
fl
COMB1
COMB2
TOTAL
COMB3
EJ
0.00
fl
A way to access an item you want to verify is the same as that described in the section 4.1.1 How to Access a
Report Item through the Operator Display (on page 4-1 in the manager’s guide) or 5.4.1 How to Access a
Program Item through the Operator Display (on page 5-5 in the manager’s guide).
However, when you select “104 PLU”, the register will ask you which to choose “NORMAL” or “SIMPLE” as
follows.
*X/GTX* 02-06-1999 12:34
PROGRAM READ PLU
1 NORMAL
2 SIMPLE
Please select operation by Enter key.
0.00
Pg up
•
•
Pg dw
Enter
›
fl
Normal Verification .............. You can verify all the programmed data of a PLU table.
Simple Verification .............. You can verify the following data of a PLU table.
(PLU code, PLU name, tax status, link department, 1st preset price)
NOTES:
1. You can verify the following data in the address “100 MISC”.
(Preset rates for the [%], [SI/TL], [CUR] keys, tax table)
2. Addresses to verify time, date, PLU stock are not provided.
6-1
EO1-11138
6. VERIFICATION OF PROGRAMMED DATA
6.2 How to verify a Programmed Data through the Keyboard
6.2
How to verify a Programmed Data through the Keyboard
You can directly access an item you want to verify through a key operation on the keyboard while the mode lock
position is in “SET” or “X”.
■ To read out the data of programming operations with a Submode No., first enter “1,” then each Submode No.,
and finally depress the [AT/TL] key.
For example, to read the programmed data entered in Submode 1 (Store Name/Message, Commercial
Message, Footer Logo Message Programming), operate:
101
[AT/TL]
Submode No. (In case of a 1-digit number, add a “0” on top to be a 2-digit number.)
Always attach “1” to the Program Submode No. for reading data.
NOTE:
Key operations to verify time, date, PLU stock are not provided.
■ To verify the data of the address “100 MISC”:
100
[AT/TL]
■ To designate a zone for the PLU table verification:
104
[ST]
Zone-start [X] Zone-end
PLU Code
PLU Code |
[PLU]
■ To verify a PLU table data by “Simple” format:
1 0 4 [PLU]
NOTE:
To verify the PLU preset-code keys programmed on ECR Keyboard phase Nos. 2 to 5:
127 [ST] 2 to 5 [AT/TL]
6-2
EO1-11109
MA-1650-3 SERIES
3. M/S LEVEL
OPERATOR’S GUIDE
Table of Contents
EO1-11138
FS-2600-1 SERIES
TABLE OF CONTENTS
Page
1. SYSTEM CONFIGURATION ............................................................................ 1-1
2. ADDITIONAL FUNCTION KEY AND REGISTERING PROCEDURE ............. 2-1
EO1-11138
1. SYSTEM CONFIGURATION
1. SYSTEM CONFIGURATION
1.
SYSTEM CONFIGURATION
Making the most of the functions of the previously described FS-2600 standalone, the FS-2600 can be developed
into a master-satellite system.
By connecting a PC, the system can also be expanded to a transaction data capture system.
Operational functions on each terminal ECR basically stay the same as on a standalone ECR, except those
deleted, changed, or added for this M/S system use which are described later.
PC
RS-232C
Master
Terminal
Backup Master
Terminal
Printer
* Printer
Receipt Printer
Journal Printer
RKP (Remote Kitchen Printer)
Printer
Printer
Printer
Printer
Printer
RS-485
Satellite
Terminal
Satellite
Terminal
Printer
Printer
Printer
Printer
Printer
Printer
Max. 6 terminals
Satellite
Terminal
Printer
Printer
Printer
Max. 16 terminals
A system has the following features.
A system has none of the features shown left.
RKP Connection
Master Terminal: 1 unit
Floating Cashier
Backup Master Terminal: 1 unit
Order Entry controlled by Order Table No.
Satellite Terminals: 14 units
Master Terminal: 1 unit
Backup Master Terminal: 1 unit
Satellite Terminals: 4 units
or
Master Terminal: 1 unit
Satellite Terminals: 5 units
1-1
2. ADDITIONAL FUNCTION KEY AND REGISTERING PROCEDURE
EO1-11138
2. ADDITIONAL FUNCTION KEY AND REGISTERING PROCEDURE
2.
ADDITIONAL FUNCTION KEY AND REGISTERING
PROCEDURE
The following is the key that can be installed on the Master Terminal and Back up Master of an in-line system, in
addition to the standalone specifications, and the registering procedure using the key.
RTR
RTR (Register-to-Register) DECLARATION Key ([RTR])
■ By depressing the [RTR] key on the Master Terminal, various in-line jobs
(DLLs, Consolidated Read/Reset Report takings, etc.) can be performed.
PROCEDURE ON A MASTER TERMINAL FOR RTR DECLARATION
Mode Lock: SET, X, Z or MGR/Anytime outside a sale
Depress [RTR].
NOTES:
1. While a PC job is under way ( a command of ULL, DLL, or Read/Reset from the PC), the RTR
Declaration is not possible. Similarly, while the RTR Declaration is on, no PC jobs are possible.
2. While the RTR Declaration is on, no transaction entries in the REG, MGR or - mode are
possible.
3. While the RTR Declaration is on, no Backup Data Check is performed.
4. While the RTR Declaration is on, the following jobs are operable.
• Programming Operations
• DLL Operations (DLL to Satellite Terminals)
• Consolidated Read/Reset Report takings
• Manual Copying of Backup Data
5. The [RTR] key can be programmed to require Manager Intervention.
6. If the option “Auto Data Copying feature” is selected for Copying of Backup Data, the RTR
Declaration is not possible while a backup data update process is under way.
7. If the option “Compulsion of Data Sending to PC” is selected, the RTR Declaration is not possible
until the reset data (the consolidation data) transmission to the PC is completed.
■ By depressing the [RTR] key on the Master Terminal while the RTR Declaration is on, the RTR Declaration
ON status is canceled.
When the [RTR] key is depressed to declare “RTR ON”, the following indicator will appear on the LCD
operator display.
*REG
* 02-06-1999 03:04
RTR S1
RTR Declaration
Indicator
Please input cashier code
DISP1
DISP2
TOTAL
DISP3
2-1
DISP4
0.00
DISP5
2. ADDITIONAL FUNCTION KEY AND REGISTERING PROCEDURE
EO1-11138
3. ADDITIONAL FUNCTION KEY AND REGISTERING PROCEDURE
PROCEDURE ON A MASTER TERMINAL FOR RTR DECLARATION CANCEL
Mode Lock: SET, X, Z or MGR/RTR Declaration is ON
Depress [RTR].
NOTE:
If the RTR declaration cancel is performed while a backup error flag is ON, a copy process of a backup
data will be automatically performed regardless of a program option. (Automatic Copy or Manual Copy
for Backup Data).
2-2
4. M/S LEVEL
MANAGER’S GUIDE
Table of Contents
EO1-11138
FS-2600-1 SERIES
TABLE OF CONTENTS
Page
1. OPERATIONS BEFORE IN-LINE SERVICE .................................................... 1-1
1.1
1.2
1.3
1.4
Terminal Open Check ...................................................................................................... 1-1
Terminal Designation ....................................................................................................... 1-2
Terminal Condition Check ............................................................................................... 1-3
Printer Condition Check ................................................................................................... 1-4
2. READ AND RESET REPORTS ........................................................................ 2-1
2.1
2.2
2.3
Terminal Reports ............................................................................................................. 2-1
In-line Reports ................................................................................................................. 2-1
Operations after In-line report Taking .............................................................................. 2-8
3. PROGRAMMING OPERATIONS ..................................................................... 3-1
3.1
3.2
3.3
Programming Operations Common with Standalone ECR Level .................................... 3-1
Programming Operations Added for In-line Terminals .................................................... 3-2
Verification of Programmed Data Related to In-line Specifications ................................. 3-5
4. DLL (Down-Line-Loading) OPERATIONS ..................................................... 4-1
4.1
4.2
DLL Job List ..................................................................................................................... 4-1
Print Format of DLL Operations ....................................................................................... 4-2
5. PLU MAINTENANCE ....................................................................................... 5-1
5.1
5.2
PLU Table Addition/Change/Deletion with DLL (Submode 63) ....................................... 5-1
PLU Price Change with DLL (Submode 73) .................................................................... 5-3
6. INQUIRY ........................................................................................................... 6-1
7. BACKUP FUNCTION ....................................................................................... 7-1
8. DATA CAPTURE FUNCITON .......................................................................... 8-1
9. MASTER AND BACKUP MASTER ALTERNATION ....................................... 9-1
10. TRANSMISSION ERROR ............................................................................... 10-1
10.1
10.2
10.3
Cause of Error ............................................................................................................... 10-1
Error Display .................................................................................................................. 10-1
Error Canceling Process ................................................................................................ 10-2
11. OTHER OPERATIONS RELATING TO IN-LINE SERVICE ........................... 11-1
11.1
11.2
11.3
11.4
Suspending .................................................................................................................... 11-1
Retry .............................................................................................................................. 11-1
Incomplete Ending ......................................................................................................... 11-1
Cancel ............................................................................................................................ 11-1
EO1-11138
1. OPERATIONS BEFORE IN-LINE SERVICE
1.1 Terminal Open Check
1.
OPERATIONS BEFORE IN-LINE SERVICE
Before entering in-line service operations (In-line Report takings, DLLs, etc.), the following operations are
available if necessary.
1.1
Terminal Open Check
This operation sends a dummy text to those terminals set in the Terminal Connection Table (Submode 69), and
prints out the Register Nos. of the disconnected terminals (i.e. terminals not responding).
CONDITION
Any time outside a sale (operable on the Master Terminal)
OPERATION
Mode Lock: X and RTR Declaration ON
Through the Operator Display
Select “5 OTHERS”.
Select “80 T/M OPEN CHK”.
*X/GTX* 02-06-1999 03:04
RTR
1
2
3
4
5
X
GTX
PROGRAM READ
E-JOURNAL
OTHERS
→
Please select operation by Enter key.
0.00
TOTAL
0.00
COMB1
COMB2
COMB3
EJ
↓
*X/GTX* 02-06-1999 03:04
OTHERS
80 T/M OPEN CHK
81 T/M CHK
82 PRT CHECK
90 CONSOLI READ
98 FILE VER CHK
99 INLINE LOG
RTR
Please select operation by Enter key.
0.00
Pg up
Pg dw
↑
Enter
↓
Through the Keyboard
80 [AT/TL]
Master Terminal Receipt Print
When the check result is normal:
Prints the Report Name only.
12-25-1999
SAT
When any error status is found:
Prints the Register Nos. of the terminals
not connected properly, as well as the Report Name.
#3001
12-25-1999
********************
X80
NOT_CONNECT
********************
0176
SAT
#3001
********************
X80
NOT_CONNECT
#3002
#3003
********************
07:11TM
0178
1-1
07:14TM
EO1-11138
1. OPERATIONS BEFORE IN-LINE SERVICE
1.2 Terminal Designation
1.2
Terminal Designation
This operation can be performed before any in-line service operation. When this operation is skipped, no specific
terminals are designated, i.e., the in-line service operations will be performed to all the terminals.
CONDITION
Any time outside a sale (operable on the Master Terminal)
OPERATION
Mode Lock: SET, X or Z (depending on the in-line service operations to follow) and RTR
Declaration ON
Through the Operator Display (NOTE 2 below)
Select “1 PROGRAMMING”.
Select “T/M DESIGN”.
* SET * 02-06-1999 03:04
RTR
1
2
3
PROGRAMMING
PROGRAM READ
PROGRAM DLL
→
Please select operation by Enter key.
0.00
TOTAL
0.00
Pg up
Pg dw
Enter
↑
↓
* SET * 02-06-1999 03:04
X
RTR
68 PC COMM
T/M DESIGN
69 CONNECT REG
70 INLINE COMM
71 PRINTER
73 PRICE CHG
77 INLINE ID
78 LOGO
TAX TABLE
Please select operation by Enter key.
0.00
Pg up
Pg dw
Enter
↑
↓
Through the Keyboard
[#]
|Register No.| [#]
[AT/TL]
...
Enter the Register No. of a
Terminal which is subject to the inline service operations to follow.
Repeat for other terminals which are
subject to the in-line service operation.
NOTES:
ex.)
1. The Terminal Designation once declared by the above operation will be canceled by changing
the position of the Mode Lock, or by RTR Declaration Cancel, or by turning OFF and ON the
power of the terminal. The designation is automatically canceled on completion of the operation
to follow or when a new designation is operated.
2. You should perform the terminal designation through the operator display only when an in-line
service operation to follow is that regarding the SET mode. As described in NOTE 1, the mode
lock change after designating a terminal results in the cancellation of the terminal designation you
declared.
To designate the following terminal.
Terminal ID No. 4:
Register No. 3003
Mode Lock: SET, X or Z (depending on an inline-service operation to follow)/RTR Declaration ON
[#] 3003 [#] [AT/TL]
1-2
EO1-11138
1. OPERATIONS BEFORE IN-LINE SERVICE
1.3 Terminal Condition Check
Journal Print
P00
#04
T/M
DESIGN
#3003
09:26TM
0189
1.3
Terminal Condition Check
This operation checks the condition of the designated terminals, and prints out the status responded from the
terminals.
CONDITION
Any time outside a sale (operable on Master Terminal)
OPERATION
Mode Lock: X and RTR Declaration ON
Through the Operator Display
Select “5 OTHERS”.
Select “81 T/M CHK”.
*X/GTX* 02-06-1999 03:04
RTR
1
2
3
4
5
X
GTX
PROGRAM READ
E-JOURNAL
OTHERS
→
Please select operation by Enter key.
0.00
TOTAL
0.00
COMB1
COMB2
COMB3
EJ
↓
*X/GTX* 02-06-1999 03:04
OTHERS
80 T/M OPEN CHK
81 T/M CHK
82 PRT CHECK
90 CONSOLI READ
98 FILE VER CHK
99 INLINE LOG
RTR
Please select operation by Enter key.
0.00
Pg up
Pg dw
Enter
↑
↓
Through the Keyboard
81 [AT/TL]
Master Terminal Receipt Print
12-25-1999
SAT
#3001
********************
X81
T/M_CHECK
#3001
OK
#3002
NO RESPONSE
#3003
NO RESPONSE
********************
0191
09:42TM
Status Symbol
OK: The terminal condition is normal.
NO RESPONSE: No response (power-OFF, etc.)
Blank: Other statuses
1-3
EO1-11138
1. OPERATIONS BEFORE IN-LINE SERVICE
1.4 Printer Condition Check
1.4
Printer Condition Check
This operation checks the conditions of the printers connected to each terminal.
CONDITION
Any time outside a sale (operable on each terminal)
OPERATION
Mode Lock: X
Through the Operator Display
Select “5 OTHERS”.
Select “82 PRT CHECK”.
*X/GTX* 02-06-1999 03:04
RTR
1
2
3
4
5
X
GTX
PROGRAM READ
E-JOURNAL
OTHERS
→
Please select operation by Enter key.
0.00
TOTAL
0.00
COMB1
COMB2
COMB3
EJ
↓
*X/GTX* 02-06-1999 03:04
OTHERS
80 T/M OPEN CHK
81 T/M CHK
82 PRT CHECK
90 CONSOLI READ
98 FILE VER CHK
99 INLINE LOG
Please select operation by Enter key.
0.00
Pg up
Pg dw
Enter
↑
Through the Keyboard
82 [AT/TL]
Receipt Print
12-25-1999
X82
1
R
J
RKP1
SAT
#3001
X_PRT_CHECK
OK
OK
OK
0192
OK: The printer condition is normal.
?: Transmission Error
OFF LINE: No response (power-OFF, etc.)
10:06TM
1-4
↓
EO1-11138
2. READ AND RESET REPORTS
2.1 Terminal Reports
2.
READ AND RESET REPORTS
2.1
Terminal Reports
Since most reports are taken as in-line reports on the Master Terminal, some of the reports which are available
on the individual standalone ECR basis cannot be taken on Master or Satellite ECRs of the in-line system. The
following are the reports which are listed in the MANAGER’S GUIDE for the standalone level but cannot be taken
on any ECRs of the in-line system. Other reports not listed below can be taken even in the in-line system. (Before
taking those reports, however, please read the next section 2.2: In-line Reports.)
TERMINAL REPORTS that cannot be taken on any ECRs of the in-line system
DAILY REPORTS
GT REPORTS
REPORT NAME
REPORT NAME
CASHIER READ AND RESET REPORTS
(when adopting the Floating Cashier Feature)
• Individual Cashier Read
• Individual Cashier Reset
• All Cashier Read
• All Cashier Reset
CHECK TRACK (Guest Order Table) WITH
SALES READ AND RESET REPORTS
• Individual Cashier Read
• Individual Cashier Reset
• All Cashier Read
• All Cashier Reset
CHECK TRACK (Guest Order Table) WITHOUT
SALES READ REPORTS
• Individual Cashier
• All Cashier
EMPLOYEE CLOCK-IN/CLOCK-OUT READ AND
RESET REPORTS (Daily and Weekly)
CASHIER GT READ AND RESET REPORTS
(when adopting the Floating Cashier Feature)
• Individual Cashier GT Read
• Individual Cashier GT Reset
• All Cashier GT Read
• All Cashier GT Reset
EMPLOYEE CLOCK-IN/CLOCK-OUT GT READ
AND RESET REPORTS
2.2
In-line Reports
2.2.1
In-line Report Command Executions
Before taking in-line reports, please note the following:
1)
In-line Reset Reports (as well as In-line Read Reports) can be taken on the Master Terminal as long as the
Satellite Terminals are in the idle status (“Signed OFF”condition in case of the cashier code entry type). To
check status of all the terminals connected to the in-line loop, Terminal Condition Check can be operated
(refer to Chapter 1).
2)
When In-line Reports are taken, the power of each Satellite terminal must be turned ON but the Mode Lock
can be in any position.
The operation flow for taking In-line Reports is shown on the next page, and the table of In-line Reports is on the
following pages.
2-1
EO1-11138
2. READ AND RESET REPORTS
2.2 In-line Reports
The key operation for each In-line Report is the same as the corresponding terminal report available on the
standalone ECR. However, the key operation can be executed only on the Master Terminal while the [RTR] key
is turned on.
Conditions required on terminals for In-line Report takings:
Read/Reset Reports (Daily or GT)
Master Terminal:
Any time outside a sale
Satellite Terminals: Signed-OFF condition (Code Entry Method)
Lock Positions Required:
Master Terminal:
Mode Lock: X/RTR Declaration: ON
Mode Lock: Z/RTR Declaration: ON
Satellite Terminals: Any positions
WARNING!
When opening the cash drawer, be careful not to let the drawer hit any person.
OPERATION FLOW OF IN-LINE READ OR RESET REPORTS
To be operated on the
Master Terminal only
Designating Some Terminals
Designating
All Terminals
[#]
|Store/Register No.|
of the terminal to be
designated (max. 6 digits)
Repeat for
all the
terminals to
be designated.
Refer to
Chapter 1
[#]
[AT/TL]
Report Taking Operation for Each Report (see the following pages).
Refer to the
following pages.
Each Terminal s Report Data Collection Process
When the option Individual Terminal
Data Report Issue is selected.
(applicable to Financial Reports only).
In other cases
Each Terminal s
Data Print (from
Master Terminal)
Incomplete Ending:
Uncollected
Terminals
Store/Register
No. Print
Normal Ending
Consolidated
Data Report
End
2-2
Also refer to Retry,
Suspending, and
Cancel operations.
Refer to
Chapter 11.
EO1-11138
2. READ AND RESET REPORTS
2.2 In-line Reports
TABLE OF IN-LINE REPORT OPERATIONS
RTR Declaration: ON
Report Name
COMBINATION REPORTS
• Combination 1 Read:
Mode
Lock
Daily
GT
Daily
GT
Daily
GT
Daily
GT
Daily
GT
Daily
GT
X
X
X
X
X
X
Z
Z
Z
Z
Z
Z
Daily
GT
Daily
GT
X
X
Z
Z
CASHIER REPORTS
(for the Floating Cashier feature)
• Individual Cashier Read: Daily
X
•
Combination 2 Read:
•
Combination 3 Read:
•
Combination 1 Reset:
•
Combination 2 Reset:
•
Combination 3 Reset:
FINANCIAL REPORTS
• Financial Read:
•
•
Financial Reset:
Individual Cashier Reset:
GT
X
Daily
Z
GT
All store All Cashier Read: Daily
GT
• All store All Cashier Reset: Daily
GT
CASHIER REPORTS
(for the Non-Floating Cashier feature only)
• Indiv. Terminal All Cashier Read:
Daily
GT
• Indiv. Terminal All Cashier Reset:
Daily
GT
CREDIT CARD COMPANY SALES REPORTS
• Credit Card Company Sales Read: Daily
GT
• Credit Card Company Sales Reset : Daily
GT
DEPARTMENT GROUP REPORTS (Read only)
• Department Group Read: Daily
GT
MEDIA SALES AND IN-DRAWER READ
(Daily only)
•
Z
X
X
Z
Z
X
X
Z
Z
Key Operation
200
1
201
2
202
[AT/TL]
[AT/TL]
[AT/TL]
[AT/TL]
[AT/TL]
[AT/TL]
[AT/TL]
[AT/TL]
[AT/TL]
[AT/TL]
[AT/TL]
[AT/TL]
3
203
3
203
[AT/TL]
[AT/TL]
[AT/TL]
[AT/TL]
200
1
201
2
202
Code Entry Method:
4 [#] |Cashier ID Code| [AT/TL]
(2-digit manager-assign code)
Start with 204 instead of 4 in the above pattern.
Code Entry Method:
4 [#] |Cashier ID Code| [AT/TL]
(2-digit manager-assign code)
Start with 204 instead of 4 in the above pattern.
4 [ST]
204 [ST]
4 [ST]
204 [ST]
4
204
4
204
[ST]
[ST]
[ST]
[ST]
X
X
Z
Z
6
206
6
206
[AT/TL]
[AT/TL]
[AT/TL]
[AT/TL]
X
X
8 [AT/TL]
208 [AT/TL]
X
9 [AT/TL]
(to be continued on next page)
2-3
EO1-11138
2. READ AND RESET REPORTS
2.2 In-line Reports
TABLE OF IN-LINE REPORT OPERATIONS (continued)
RTR Declaration: ON
Report Name
Mode
Lock
HOURLY RANGE REPORTS
• Hourly Read (Daily only)
• Hourly Reset (Daily only)
DEPARTMENT REPORTS
• All Department Read:
X
Z
Daily
GT
• All Department Reset:
Daily
GT
ALL MEDIA SALES TOTAL AND CASH-INDRAWER READ (Daily only)
PLU REPORTS
• All PLU Read:
Daily
GT
• All PLU Reset:
Daily
GT
• Zone PLU Read:
Daily
X
X
Z
Z
X
X
X
Z
Z
X
Key Operation
10 [AT/TL]
10 [AT/TL]
11
211
11
211
[AT/TL]
[AT/TL]
[AT/TL]
[AT/TL]
12 [AT/TL]
13 [AT/TL]
213 [AT/TL]
13 [AT/TL]
213 [AT/TL]
13 [#] → |Zone-start PLU Code|
[X] → |Zone-end PLU Code| [AT/TL]
Start with 213 instead of 13 in the above pattern.
13 [#] → |Zone-start PLU Code|
[X] → |Zone-end PLU Code| [AT/TL]
Start with 213 instead of 13 in the above pattern.
(Process Reports; NOTE on page 2-5)
13 [#] → |PLU Code| [PLU] → ([ST]) [AT/TL]
•
Zone PLU Reset:
GT
Daily
X
Z
•
Individual PLU Read:
GT
Daily
Z
X
GT
X
X
X
X
Start with 213 instead of 13 in the above pattern.
(Process Reports; NOTE on page 2-5)
13 [#] → 0 [AT/TL]
Start with 213 instead of 13 in the above pattern.
X
(Process Reports; NOTE page 2-5)
14 [#] → |PLU Code| [PLU] → [AT/TL]
X
14 [#] Zone-start [X] Zone-end [AT/TL]
| PLU Code |
PLU Code |
14 [AT/TL]
Repeat for required PLUs.
•
Inactive PLU Read:
Daily
GT
PLU STOCK READ REPORTS (Daily only)
• Individual PLU Stock
Repeatable
•
Zone PLU Stock
• All PLU Stock
CUSTOMER FILE REPORTS (Daily only)
• Individual File Read
• Zone File Read
• Zone File Reset
• All File Read
• All File Reset
• Inactive File Read
PLU GROUP REPORTS
• PLU Group Read:
Daily
GT
• PLU Group Reset:
Daily
GT
X
X
X
Z
X
Z
X
15 [#] |File Code| [X] [AT/TL]
15 [#] Zone-start [X] Zone-end [AT/TL]
| File Code |
File Code |
X
X
Z
Z
24
224
24
224
15 [AT/TL]
15 [#] 0 [AT/TL]
[AT/TL]
[AT/TL]
[AT/TL]
[AT/TL]
(to be continued on next page)
2-4
EO1-11138
2. READ AND RESET REPORTS
2.2 In-line Reports
TABLE OF IN-LINE REPORT OPERATIONS (continued)
RTR Declaration: ON
Report Name
DAY PART REPORTS (Daily only)
• Day Part Read
• Day Part Reset
CHECK TRACK (Guest Order Table)
WITH SALES REPORTS (Daily only)
• Individual Cashier Read
• Individual Cashier Reset
Mode
Lock
X
Z
X
Z
Key Operation
25 [AT/TL]
Code Entry Method:
30 [#] → |Cashier ID Code| [AT/TL]
(2-digit manager-assign code)
Cashier Key Method:
Depress the required Cashier Key, 30 [AT/TL]
• All Store All Cashier Read
• All Store All Cashier Reset
CHECK TRACK (Guest Order Table)
WITHOUT SALES READ REPORTS (Daily only)
• Individual Cashier Read
X
Z
• All Store All Cashier Read
COMBO SALE REPORTS (Daily only)
• Individual Combo Read
X
Code Entry Method:
31 [#] → |Cashier ID Code| [AT/TL]
(2-digit manager-assign code)
Cashier Key Method:
Depress et the required Cashier Key, 31 [AT/TL]
31 [ST]
X
43 [#] → |Combo Code| [#] ([ST]) → [AT/TL]
• All Combo Read
• All Combo Reset
• All Combo Read (detail)
• All Combo Reset (detail)
HOURLY COMBO SALE REPORTS (Daily only)
• Hourly Combo Sale Read
• Hourly Combo Sale Reset
EMPLOYEE CLOCK-IN/CLOCK-OUT REPORTS
• Employee Clock-in/Clock-out Read: Daily
Weekly
GT
• Employee Clock-in/Clock-out Reset: Daily
Weekly
GT
X
Z
X
Z
X
30 [ST]
Repeatable
NOTE:
X
Z
X
X
X
Z
Z
Z
43 [ST]
43 [AT/TL]
44 [AT/TL]
47
247
248
47
247
248
[AT/TL]
[AT/TL]
[AT/TL]
[AT/TL]
[AT/TL]
[AT/TL]
When the “Process Report” is marked, the report can only be taken after taking another report which
consolidates the corresponding data to be based on. For further details, see the following table and
descriptions.
2-5
EO1-11138
2. READ AND RESET REPORTS
2.2 In-line Reports
PROCESS REPORTS AND BASE REPORT DATA
The following table shows which process reports are available after which report data collections.
Reports Collection Required before Process
Report takings
(CONSOLIDATION MEMORY CAPTURE: NOTE 1)
Any of the following PLU reports (NOTE2)
All PLU Read Daily
Zone PLU Read Daily
All PLU Reset Daily
Zone PLU Reset Daily
Any of the following PLU reports (NOTE2)
All PLU Read GT
Zone PLU Read GT
All PLU Reset GT
Zone PLU Reset GT
Either of the following PLU stock reports (NOTE 2)
All PLU Stock Read
Zone PLU Stock Read
NOTES:
2.2.2
Process Reports available
Individual PLU Read Daily
Inactive PLU Read Daily
Individual PLU Read GT
Inactive PLU Read GT
Individual PLU Stock Read
1. CONSOLIDATION MEMORY CAPTURE: When an in-line read or reset report is taken on the
Master Terminal, the consolidated data is automatically stored in the Consolidation Memory of
the Master Terminal. The consolidated data stored there is not only used as the data for a
Process Report but also sent to the PC by a command from the PC when a PC is connected.
However, Consolidation memory capturing of a PLU report and other reports cannot be
performed at the same time. Only one job for the same Report No. can be captured in the
Consolidated Memory (A Read and a Reset of the same report is regarded as one job), and it
always holds the latest consolidated data.
2. The process reports will be output based on the report data previously collected. For example,
when an “Inactive PLU Read” report is taken after a “Zone PLU Read”, only the inactive PLUs in
the designated zone will be printed on the Inactive Read Report.
In-line Report Print Format
IN-LINE REPORT TYPE
An in-line report can be classified into the following five types.
1. Collects data from each terminal to print a consolidation result:
Credit Card Company Sales, Department Group, Hourly Range, All Department, All/Zone PLU, All/Zone
PLU Stock, PLU Group, Day Part, Combo Sales, Hourly Combo Sales Reports
2. Collects data from each terminal to print a collection result per terminal:
Indiv. Terminal All Cashier Report (Non-floating Cashier)
3. Collects data from each terminal to print a collection result per terminal and then print the consolidation result:
Financial, Media Sales & In-drawer and All Media Sales Total & Cash-in-drawer Reports
4. Creates a process data using consolidated data and prints a report:
Indiv. PLU, Inactive PLU and Indiv. PLU Stock Reports
5. Prints data in the center file possessed by the master terminal:
Indiv./All Cashier (Floating Cashier), Guest File, Check Track with/without Sales, Employee Clock-in/
Clock-out Reports
2-6
EO1-11138
2. READ AND RESET REPORTS
2.2 IN-LINE REPORTS
The print format of each report is basically the same as the format of the corresponding standalone terminal
report except that some indications are additionally printed as in-line operation job IDs.
12-25-1999
SAT
#3001
****************************************
RTR-Symbol
Report Name
(When designating a zone, a zone range is printed.)
For print items, refer to the similar report described in the Standalone section.
#111101
#222202
0001Z
0001Z
......
......
Register No., Reset Count
(on Reset Report only)
#999909
0001Z
****************************************
#555505 XXXXXXXXXXXX
#666606 XXXXXXXXXXXX
0176
07:11TM
RTR Symbol
Unfinished register No. and status
NO RESPONSE: No response
BUSY: The terminal is busy.
Blank: Other statuses
Consecutive No., Current Time
Journal Indications on Individual Terminals (when report data is collected)
Read Report Collection Indication
* X03
FINANCIAL
Read Operation Descriptor
22:30TM *
Time of Data Collection
Reset Report Collection Indication
* Z03
= Z03
FINANCIAL
FINANCIAL
22:30TM *
22:30TM =
Time of Data Collection
Time of Clear Command Reception
Reset Operation Descriptor
2-7
EO1-11138
2. READ AND RESET REPORTS
2.3 Operations after In-line report Taking
2.3
Operations after In-line report Taking
The following operations are available after taking in-line reports.
2.3.1
Consolidated report Data Read (Reprint)
This operation issues the report data which is remaining in the Consolidation Memory of the Master Terminal.
OPERATION ON MASTER TERMINAL: Mode Lock: X/RTR Declaration: ON
90 [AT/TL]
When no consolidated data is remaining in the memory, this read operation is not possible.
2.3.2
Enforced Clear of Hold Condition (on Individual Terminals)
This can be operated when the HOLD condition on a terminal can by no means be cleared because the terminal
cannot receive a Clear Command from the Master Terminal for some reason (the Master Terminal becomes
down, etc. before completion of the reset report data collection).
OPERATION ON ANY TERMINAL IN HOLD CONDITION: Mode Lock: Z
9999 [AT/TL]
On operating this, the HOLD condition is cleared, and allows any key-in operations. However, this operation
is regarded as an emergency measure to cope with such trouble as the Master Terminal becomes down, etc.
and thus no other solutions can be chosen, because the sales data memory of those reports can no longer be
collected by the Master Terminal.
2-8
EO1-11138
3. PROGRAMMING OPERATIONS
3.1 Programming Operations Common with Standalone ECR Level
3.
PROGRAMMING OPERATIONS
The system should be programmed fully by your local TOSHIBA TEC representative at the time of delivery
according to the user’s requirements so that daily operations can immediately start. However, some data must be
added or changed daily or in a longer period. Since the volume of programming contents for the system is too
large, this chapter and the following two chapters are provided as guide lines of the user’s daily programming and
maintenance operations. If there are any unclear points or program data other than listed here must be changed
or added, please contact your TOSHIBA TEC representative. Please also note that some programming
operations introduced in the Standalone Level are modified or not available on in-line terminals.
WARNING!
Never try to access a program item other than those in the following list. If you access it and
mistakenly change important data, a malfunction may occur on your completed system.
3.1
Programming Operations Common with Standalone ECR Level
The following is the table of programming operations which are introduced in the Manager’s Guide for the
Standalone Level and can be operated on in-line terminals as well, with the Submode No. and operation
sequence unchanged. However, on in-line terminals, these are usually operated on the Master Terminal only and
down-line-loaded (DLLed) to all the Satellite Terminals. Therefore, if any program data is changed, a DLL is
further necessary to load the new data (after the change) to all the Satellite Terminals (to be described in the next
chapter).
PROGRAMMING JOB LIST
Master: Programming is possible on the master terminal while the RTR declaration is ON.
Satellite: Programming is possible on the master terminal (while the RTR declaration is OFF), the backup master
terminal and the satellite terminals.
O: Available
Submode
Programming Job
No.
1
Store Name/Message, Commercial Message, Footer Logo Message
Programming
2
Cashier Programming
3
Department Table Programming
4
PLU Table Programming
5
Time Setting or Adjustment
6
Date Setting or Adjustment
7
Hourly Range Setting
8
Amount Limit Setting for Function Keys and Guests
12
Non-taxable Limit Amount and Gratuity Rate Setting
13
Minor Group Name Programming
14
Major Group Name Programming
15
Customer File Table Setting
19
Combination Report Table Programming
24
PLU Stock Loading or Changing
26
Tare Table and Scale Unit Weight Programming
27
PLU Preset-code Key and Display Key Setting
3-1
Terminal
Master Satellite
O
O
O
O
O
O
O
O
O
O
O
O
O
O
O
O
O
O
O
O
O
O
O
EO1-11138
3. PROGRAMMING OPERATIONS
3.2 Programming Operations Added for In-line Terminals
Submode
Programming Job
No.
29
PLU Group Name Programming
30
RKP Message Programming
31
Display Message Programming
35
Amount Limit Setting for the [DISC] Key
42
Set Menu Table Programming
43
Combo Sale Table Programming
45
Guest Check Commercial Message Programming
46
Day Part Setting
50
Employee Table Setting
51
Job Code/Working Hour Setting
52
Tender Up Table Setting
53
Display Menu Table Setting
60
PLU Preset Price Setting or Changing
71
Printer Setting
No
% + and % - Preset Rate Setting
SubSelective Itemizer Rate Setting
mode
Foreign Currency Exchange Rate Setting
Store/Register No. Setting
3.2
3.2.1
Terminal
Master Satellite
O
O
O
O
O
O
O
O
O
O
O
O
O
O
O
O
O
O
O
O
O
O
O
O
Programming Operations Added for In-line Terminals
Terminal Connection Table Setting (Submode 69)
This submode is required for in-line services. Enter the In-line ID No. and the Register No. of each terminal
(including the Master Terminal) connected to the in-line cable.
CONDITION
Any time outside a sale
OPERATION
Mode Lock: SET and RTR Declaration is ON.
(Use the SET Mode Keyboard Sheet after depressing the [RTR] key on the REG Mode
Keyboard Sheet.)
Through the Operator Display
Select “1 PROGRAMMING”.
Select “69 CONNECT REG”.
* SET * 02-06-1999 03:04
RTR
1
2
3
PROGRAMMING
PROGRAM READ
PROGRAM DLL
→
Please select operation by Enter key.
0.00
TOTAL
0.00
Pg up
Pg dw
Enter
↑
↓
* SET * 02-06-1999 03:04
PROGRAMMING
RTR
68 PC COMM
T/M DESIGN
69 CONNECT REG
70 INLINE COMM
71 PRINTER
73 PRICE CHG
77 INLINE ID
78 LOGO
TAX TABLE
Please select operation by Enter key.
0.00
Pg up
3-2
Pg dw
Enter
↑
↓
EO1-11138
3. PROGRAMMING OPERATIONS
3.2 Programming Operations Added for In-line Terminals
Through the Keyboard
69 [X]
|In-line ID No.| [ST]
|Register No.| [#]
[AT/TL]
...
...
1 to 16
(NOTES 1 & 2 below)
*
0 to 999999
(NOTE 2 below)
Repeat for other terminals to be connected, including the Master Terminal
itself.
ex.)
To set the following.
Master Terminal
Satellite Terminal
ID No. 1
ID No. 3
* For sequentially programming
In-line ID Nos., the In-line ID
specification can be skipped.
Register No. 3001
Register No. 3002
Mode Lock: SET/RTR Declaration is ON.
69 [X]
1 [ST] 3001 [#]
3 [ST] 3002 [#]
[AT/TL]
Journal Print
P69
#01
#03
NOTES:
CONNECT
REG
#3001
#3002
0196 01:52TM
1. In-line ID No.: Master Terminal ............................................ 1 (fixed)
Backup Master Terminal (if connected) ........ 2 (fixed)
Satellite Terminals ......................................... 3 to 16 (max. 14 terminals)
However, a number of the connectable terminals differs depending on your system configuration.
Refer to the chapter 1. SYSTEM CONFIGURATION of the Operator’s Guide.
2. The In-line ID No. and Register No. of each terminal to be set here must be the same as those
programmed for the terminal in In-line Terminal ID Setting (Submode 77) and Store/Register No.
Setting (no submode) in Chapter 5 in the Manager’s Guide for stand-alone level.
3. To delete an individual terminal from the Terminal Connection Table, enter 0 in place of the Inline ID No. in the above operation pattern.
4. To delete the entire Terminal Connection Table once set, operate:
69 [X] → 0 [AT/TL]
5. If a deleting operation (individual or entire deletion) is performed, the files occupied by the
deleted terminal(s) (such as Floating Cashier File, etc.) are canceled. Therefore, a deleting
operation should be performed only when the system is to be re-built or a terminal is to be
detached from the system.
3-3
EO1-11138
3. PROGRAMMING OPERATIONS
3.2 Programming Operations Added for In-line Terminals
3.2.2
Terminal ID Setting (Submode 77)
This submode is available for in-line terminals (including the master and backup master terminals) . It must be
operated separately on each terminal since the Terminal ID should vary from terminal to terminal. The data set in
this submode is used as the in-line address of the terminal for in-line service operations.
CONDITION
Any time outside a sale
OPERATION
Mode Lock: SET and RTR Declaration is ON (for the Master Terminal)
Mode Lock: SET (for other terminals)
(Use the SET Mode Keyboard Sheet after depressing the [RTR] key on the REG Mode
Keyboard Sheet.)
Through the Operator Display
Select “1 PROGRAMMING”.
Select “77 INLINE ID”.
* SET * 02-06-1999 03:04
RTR
1
2
3
PROGRAMMING
PROGRAM READ
PROGRAM DLL
→
Please select operation by Enter key.
0.00
TOTAL
0.00
Pg up
Pg dw
Enter
↑
↓
* SET * 02-06-1999 03:04
PROGRAMMING
68 PC COMM
T/M DESIGN
69 CONNECT REG
70 INLINE COMM
71 PRINTER
73 PRICE CHG
77 INLINE ID
78 LOGO
TAX TABLE
Please select operation by Enter key.
0.00
Pg up
Pg dw
↑
Enter
↓
Through the Keyboard
77 [X]
|Terminal ID No.|
[AT/TL]
1: Master
2: Backup Master
3 to 16: Satellites
ex.)
To assign Terminal ID No. 4 to a satellite terminal of the in-line system:
Mode Lock: SET
77 [X] 4 [AT/TL]
Journal Print
12-25-1999
P77
INLINE
INLINE ID
SAT
ID
0196
NOTE:
04
01:52TM
Be certain not to set the same terminal ID No. to terminals on the in-line system.
If terminals with the same ID No. exist on the in-line system, malfunction may occur.
3-4
#3001
EO1-11138
3. PROGRAMMING OPERATIONS
3.3 Verification of Programmed Data Related to In-line Specifications
3.3
Verification of Programmed Data Related to In-line Specifications
The programmed data related to in-line specifications can be read for verification purposes.
CONDITION
Anytime outside a sale (Sign OFF required under Cashier Signing Method)
OPERATION
Mode Lock: X or SET
(RTR Declaration is unnecessary on the Master Terminal.)
•
•
Terminal Connection Table ................. 169 [AT/TL]
Terminal ID Setting ............................. 177 [AT/TL]
NOTES:
1. Verifications listed in the Manager’s Guide of the standalone level are also available on all the
terminals of the in-line system.
2. The verification of Terminal Connection Table can be executed on the Satellite Terminals after
the DLL operation.
3-5
EO1-11138
4. DLL (Down-Line-Loading) OPERATIONS
4.1 DLL Job List
4.
DLL (Down-Line-Loading) OPERATIONS
In an in-line system (Master-Satellite system), most programming data are set on the Master Terminal and downline-loaded (DLL) to the Satellite Terminals. The DLL operations introduced in this chapter are pure DLLs, i.e.
merely loading the data programmed in the Master Terminal to Satellite Terminals. DLLs automatically performed
with programmed data changes are introduced in the next chapter. If any other DLLs not introduced in this and
next chapters are required, ask your TOSHIBA TEC representative. Please also note that Terminal Designation
(see Chapter 1) can be operated prior to a specific DLL operation, to designate Satellite Terminals that receive
the DLL.
WARNING!
Never try to perform a DLL operation other than those in the following list. If you perform it and
mistakenly change important data, a malfunction may occur on your completed system.
4.1
DLL Job List
Submode
DLL Job
No.
501
Store Name/Message, Commercial Message, Footer Logo Message
Programming
502
Cashier Programming
503
504
505
507
508
512
513
514
519
526
527
529
530
531
535
542
543
545
546
552
553
569
500
Department Table Programming
PLU Table Programming
Time/Date Setting
Hourly Range Setting
Amount Limit Setting for Function Keys and Guests
Non-taxable Limit Amount and Gratuity Rate Setting
Minor Group Name Programming
Major Group Name Programming
Combination Report Table Programming
Tare Table and Scale Unit Weight Programming
PLU Preset-code Key and Display Key Setting
PLU Group Name Programming
RKP Message Programming
Display Message Programming
Amount Limit Setting for the [DISC] Key
Set Menu Table Programming
Combo Sale Table Programming
Guest Check Commercial Message Programming
Day Part Setting
Tender Up Table Setting
Display Menu Table Setting
Terminal Connection Table Setting
%+ and %- Preset Rate Setting
Selective Itemizer Rate Setting
Foreign Currency Exchange Rate Setting
4-1
Remarks
NOTE on the
next page
EO1-11138
4. DLL (Down-Line-Loading) OPERATIONS
4.2 Print Format of DLL Operations
NOTE:
DLL is possible only when the non-floating cashier feature is used.
CONDITION
Terminals including the Master: Any time outside a sale
(Sign OFF condition is necessary for the Code Entry Method)
OPERATION
Satellite Terminals:
Master Terminal:
Any position if the power is ON
Mode Lock: SET
RTR Declaration: ON
Through the Operator Display
Select “3 PROGRAM DLL”.
Select a DLL item you want to perform.
* SET * 02-06-1999 03:04
RTR
1
2
3
PROGRAMMING
PROGRAM READ
PROGRAM DLL
→
* SET * 02-06-1999 03:04
PROGRAM DLL
590 ALL DLL
507
591 ALL DLL2
508
500 MISC
509
501 STORE NAME
510
502 CASHIER
511
503 DEPARTMENT
512
504 PLU
513
505 TIME/DATE
514
Please select operation by Enter key.
0.00
TOTAL
0.00
Pg up
Pg dw
Enter
↑
↓
RTR
↓
HOURLY
AMOUNT LIMIT
FINANCIAL
PRINT L NAME
SYSTEM OP2
CA TAX & TIP
MINOR GROUP
MAJOR
Please select operation and Enter key.
0.00
Pg up
Pg dw
Enter
↑
↓
Through the Keyboard
|X X X|
[AT/TL]
Submode No.
4.2
Print Format of DLL Operations
Master Terminal Receipt
Satellite Terminal Journal
12-25-1999
SAT
* P504
#3001
****************************************
P504
PLU
****************************************
0176
PLU
22:30TM *
Time of receiving the
DLL
07:11TM
4-2
EO1-11138
5. PLU MAINTENANCE
5.1 PLU Table Addition/Change/Deletion with DLL (Submode 63)
5.
PLU MAINTENANCE
In this chapter, adding, changing, or deleting operations related to PLU Table program data are described. These
are operated on the Master Terminal only. All of these operations are loaded into Satellite Terminals at the same
time.
5.1
PLU Table Addition/Change/Deletion with DLL (Submode 63)
This submode can be operated only on the Master Terminal in an in-line system. This submode allows additions/
changes/deletions of PLUs in the PLU Table File (generated by Submode 4 in the Manager’s Guide for standalone level). The data entered in this submode is immediately loaded into Satellite Terminals, item by item.
■ Programming or Changing
CONDITION
All the terminals:
Anytime outside a sale
OPERATION
Mode Lock: SET and RTR Declaration is ON
(Use the SET Mode Keyboard Sheet after depressing the [RTR] key on the REG Mode
Keyboard Sheet.)
Through the Operator Display
Select “63 PLU ADD/CHG” from
the program menu screen.
Select “1 PROGRAMMING”.
* SET * 02-06-1999 03:04
RTR
1
2
3
PROGRAMMING
PROGRAM READ
PROGRAM DLL
→
Please select operation by Enter key.
0.00
TOTAL
0.00
Pg up
Pg dw
Enter
↑
↓
* SET * 02-06-1999 03:04
PROGRAMMING
35 LIMIT TABLE
48
38 DRAWER WNG
49
39 REPORT NAME
50
42 SET MENU
51
43 COMBO
52
44 SLIP PRINT
53
45 INVO CM MSG
60
46 DAY PART
63
RTR
↑↓
CUR ROUND1
CUR ROUND2
EMPLOYEE
JOB CODE
TENDER UP
MENU TABLE
PRICE
PLU ADD/CHG
Please select operation by Enter key.
0.00
Pg up
5-1
Pg dw
Enter
↑
↓
EO1-11138
5. PLU MAINTENANCE
5.1 PLU Table Addition/Change/Deletion with DLL (Submode 63)
Through the Keyboard
63 [X]
|Address Nos| [#]
|PLU Code|
[PLU]
for sequential-coded item only
Submode No.
Address 1: Link Department
|Department Code| [#]
(1 to 99)
1 [ST]
Address 2: PLU Name
Character Entries [ST]
max. 16 characters
2 [ST]
Operation
procedure
surrounded
by this line
is the same
Repeat for any
as the
operation in address within
Submode 4. the same PLU
by re-entry for
correction.
Address 3: 1st Preset Price
3 [ST]
Address 4: 2nd Preset Price
4 [ST]
Address 5: 3rd Preset Price
5 [ST]
Address 6: 4th Preset Price
Repeat for
other
PLUs.
6 [ST]
Address 7: 5th Preset Price
7 [ST]
Address 8: PLU Status 1
8 [ST]
|Price| [#]
(max. 6 digits)
|Price| [#]
(max. 6 digits)
|Price| [#]
(max. 6 digits)
|Price| [#]
(max. 6 digits)
|Price| [#]
(max. 6 digits)
|Status Code to ON| [#]
Address 9: PLU Status 2
|Status Code to ON| [#]
9 [ST]
Address 10: Tax Status
|Tax Code| [#]
10 [ST]
Address 11: PLU Group
|PLU Group Code| [#]
(1 to 99)
11 [ST]
Address 12: Set Menu Table
12 [ST]
Address 13: Display Menu Table
13 [ST]
|Set Menu Table No.| [#]
(1 to 50)
|Display Menu Table No.| [#]
(max. 10 digits)
Address 14: Stock Quantity
|Stock Quantity| [#]
(0 to 9999.99)
14 [ST]
Address 15: Minimum Stock Quantity
15 [ST]
|Minimum Stock Quantity| [#]
(0 to 9999.99)
Address 16: Takeout Tax Status
|Tax Code| [#]
(max. 4 digits)
16 [ST]
Address 17: Tare Table
|Tare Table No.| [#]
1 to 9
17 [ST]
Address 18: Unit Weight
18 [ST]
|Unit Weight Table| [#]
1 to 11
[ST]
[AT/TL] (to complete this submode)
Executes DLL.
5-2
EO1-11138
5. PLU MAINTENANCE
5.2 PLU Price Change with DLL (Submode 73)
■ Deletion
CONDITION
The sales data of the required PLUs are zero and all terminals are outside a sale,
programming, or report taking operations.
OPERATION
Mode Lock: SET and RTR Declaration is ON
63 [X]
[ITEM CORR]
|PLU Code| [PLU]
[AT/TL]
Repeatable for other PLUs to be deleted.
NOTES:
5.2
1. When the [AT/TL] key is depressed in the above operation, the master terminal sends each
satellite terminal (or the designated satellite terminals) the DLL start command to make it “HOLD”
condition. And then, the master terminal sends the DLL data to each terminal. After the DLL is
completed, the master terminal sends each terminal the DLL end command to release it from
“HOLD” condition. However, a program option allows you to perform a DLL operation even while
each terminal is not in idle status.
2. A maximum of 100 PLU tables can be added or changed in one DLL operation sequence.
PLU Price Change with DLL (Submode 73)
This DLL operation is used to change a PLU price on each price level, and send the data to each satellite terminals.
CONDITION
Any time outside a sale for Master or Satellite
OPERATION
Mode Lock: SET and RTR Declaration is ON
Repeatable for other PLUs
73 [X]
|PLU Code| [PLU]
Max. 6 digits
[PLU Preset-code Key]
[MENU 1 to 5]
|Price Level| [ST]
1 to 5
|New Preset Price| [#]
[AT/TL]
Max. 6 digits
Repeatable for a price change of another price level. When you
change the price of each price level in numerical order, the price level
designation can be skipped.
NOTES:
1. When the [AT/TL] key is depressed in the above operation, the master terminal sends each satellite terminal
(or the designated satellite terminals) the DLL start command to make it “HOLD” condition. And then, the master
terminal sends the DLL data to each terminal. After the DLL is completed, the master terminal sends each
terminal the DLL end command to release it from “HOLD” condition. However, a program option allows you
to perform a DLL operation even while each terminal is not in idle status.
2. A maximum of 100 PLU prices can be changed in one DLL operation sequence.
3. When zero is entered as the New Preset Price value, the PLU is set with a zero price. When the
New Preset Price entry is skipped and the [#] is simply depressed, it will be an open-price PLU.
5-3
EO1-11138
6. INQUIRY
6. INQUIRY
6.
INQUIRY
In the master-satellite system, the data files regarding the following inquiries between the master terminal and
each satellite terminal are maintained in the master terminal center file. Each time an item regarding the data files
are performed on each satellite terminal, the master terminal searches and checks the corresponding file and
responds to the inquiring terminal by sending a result. Also, when an item is finalized on the satellite terminal, the
master terminal will update the data file regarding the item.
•
•
•
•
•
•
•
•
Cashier Occupy and Cancel Inquiry (Floating Cashier Feature)
Check Track (Guest Order Table) Occupy and Cancel Inquiry
Customer File (Regular Customer and New Customer) Inquiry
Employee Clock-in/Clock-out Occupy and Cancel Inquiry
Cashier Change Occupy and Cancel
Receipt and Journal Print Data Transmission
RKP Print Data Transmission
Printer Status Check
6-1
EO1-11138
7. BACKUP FUNCTION
7. BACKUP FUNCTION
7.
BACKUP FUNCTION
(ONLY WHEN THE BACKUP MASTER IS CONNECTED)
(1)
Function
• By connecting the backup master terminal (BM) , the various files stored in the master terminal (M) can
be backed up.
•
The terminal assigned to ID No. 2 will function as a backup master terminal (BM) . By programming ID
No. 2 in the terminal connection table and downloading this data to each terminal, the system will
function as a system in which the backup master terminal (BM) is connected.
•
By changing terminal ID from 2 to 1, the backup master terminal (BM) will function as the master
terminal (M).
<Files to be Backed Up>
Cashier Table
(When the floating cashier system is used)
Check Track (Guest Order) Table
Item Buffer
PC Transmission Information Table
Employee Table
Job Code/Working Hour Table
Customer File Table
NOTE:
Program data
Sales data
Sales data
Sales data
Program data
Program data
Sales data
Program data
Program data
Sales data
Data capture (DC) transaction files are not backed up.
•
Sales data is backed up on a real-time basis.
When sales data of the master terminal (M) is updated, sales data of the backup master terminal (BM)
is updated at the same time.
•
Backup data check function:
Correspondence between the center files and backup data is checked every certain period of time.
•
Backup data update process:
When an error occurs in backup data, the following processing methods can be selected according to
the program option setting.
(1)
Automatic data copy
When the version of the center file stored in the master terminal (M) is different from that stored
in the backup master terminal (BM) , registration jobs are automatically prohibited, the backup
data is properly exchanged.
While updating the backup data, each inquiry from the terminals may result in a “MASTER IS
BUSY” error.
(2)
Manual data copy
When the version of the center file stored in the master terminal (M) is different from that of data
stored in the backup master terminal (BM) , the master terminal (M) gives a short beep at the
timing of issuing the long receipt to warn that the data is not backed up properly.
The operator should update the backup data manually.
7-1
EO1-11138
7. BACKUP FUNCTION
7. BACKUP FUNCTION
(2)
Procedure
1) Changing Program Data (DLL from the PC)
DLL data
PC
M
Backup data
Response
•
BM
Response
When various center files from the PC are received via DLL, the master terminal (M) backs up program
data and sales data of the backup master terminal (BM) automatically and sends the result to the PC.
2) Changing Program Data (Operated on the Master Terminal)
Programming
Operation
•
*
*
M
When various center files are being programmed on the master terminal (M) , the backup error flag of
the relevant file is turned on. (At this time, backup data is not updated.)
For details about the backup error flag, refer to 5) Backup Error Flag.
For an explanation of the backup data update process, refer to 6) Backup Data Update Process.
3) Updating Sales Data
•
After each satellite terminal sends an affect data of which sales data is subject to the data backup to the
master terminal, the same data is sent to the backup master terminal and the sales data is updated.
4) Checking Backup Data
M
Version request
BM
Version data
•
The master terminal (M) sends the version request command to the backup master terminal (BM) every
certain period of time and receives version information about the backup data.
•
The master terminal (M) checks correspondence between the version information received from the
backup master terminal (BM) and the center files (stored in the M) . If an abnormality is found, the
backup error flag is turned on.
•
When a master job is being performed on the master terminal (M) ([RTR] key turned on), or a PC job is
being performed backup data is not checked.
5) Backup Error Flag
•
When there is any difference between the data stored in the master terminal (M) and the backup data
stored in the backup master terminal (BM), the master terminal (M) turns on the backup error flag of the
file in which a difference was found.
•
There are the following five cases when the backup error flag is turned on.
1
The master terminal (M) changes the programming of the center files.
2
A version error is found at the backup data check.
3
The backup job fails after the center file has been downloaded from the PC.
4
Updating of the backup data fails after the center files have been reset.
5
Updating of the backup data fails after the center file (containing Read counter) has been read.
6
The backup master terminal (ID No. 2) is added to the terminal connection table.
7-2
EO1-11138
7. BACKUP FUNCTION
7. BACKUP FUNCTION
•
While the backup error flag is on, the following operation is performed.
The master terminal (M) gives a short beep at the timing when the long receipt is printed to warn
that a backup error has occurred.
•
There are two timings cases the backup error flag is turned off.
1
The backup data is properly backed up according to the backup data update process.
2
The backup master terminal (ID No. 2) is deleted from the terminal connection table.
6) Backup Data Update Process
(This is a process required when the backup data stored in the backup master terminal (BM) is not
updated properly due to an error.)
M
Backup data
BM
Response
•
*
*
*
*
The method for processing the backup error is selected according to a program option setting. Even if
the automatic data copy operation is selected, data copy can also be performed manually.
1
Automatic data copy
When the backup error flag is on (or turned on) , the master terminal (M) automatically sends to
the backup master terminal (BM) the file in which the error has occurred, and updates the backup
data.
2
Manual data copy
The backup data is updated by the manual operations of the operator.
When the backup data is being updated, inquiries from terminals may result in a “MASTER IS BUSY”
error.
When a “MASTER IS BUSY” error occurs, clear the error using the [C] key. Then, update the backup
data again after the master job (backup process) is complete.
Only the files with the backup error flag turned on are sent to the backup master terminal (BM) to
update the backup data.
When the master job is being done on the master terminal (M) ([RTR] key is turned on), backup data is
not checked or updated.
7) Manual Copy of Backup Data
OPERATION ON MASTER TERMINAL: Mode Lock Z/RTR Declaration ON
900 [AT/TL]
7-3
EO1-11138
8. DATA CAPTURE FUNCITON
9. DATA CAPTURE FUNCITON
8.
(1)
(2)
(3)
(4)
(5)
DATA CAPTURE FUNCTION
Function
To make it possible to transfer data to the PC, the details of registration jobs performed on each terminal
are pooled in the master terminal (M) as transaction data.
Buffering Transaction Data
When a terminal performs the finalize operation,transaction data entered in registrations is sent to the
master terminal (M). The master terminal (M) receives the transaction data and pools it in the transaction
buffer.
The transaction data is controlled usually in two buffers. One is for buffering transaction data and the other
is for collecting data from the PC. (When one buffer becomes full, or when the collection request is issued
from the PC, the buffer in use is released for the PC, and the other buffer is used for subsequent
buffering.)
Collecting Transaction Data
The transaction data stored in the master terminal is sent to the PC according to the request from the PC.
If the buffer becomes full when the master terminal receives the transaction data request command from
the PC, the transaction data of the full buffer is sent to the PC. If the buffer is not full,the transaction data in
the buffer (the buffer used for buffering) is sent to the PC.
Processing when the Transaction Buffer is Full
When transaction data is received from the terminal (BM, S), the master terminal checks the vacant area of
the transaction buffer. If the received transaction data cannot be stored in the buffer, the master terminal
sends to the terminal a response indicating that the buffer is full. The terminal receiving this response,
performs journal printing indicating that the transaction data is missing.
Supplementary
• Only when the transaction data capture function is selected by program option, transaction data can be
sent/received and buffered.
• There is no warning reporting the remaining capacity of the transaction buffer.
• Once the transaction data collection command is issued,data in one buffer is collected.
(When data in two buffers is required,this command should be issued twice.)
8-1
EO1-11138
9. MASTER AND BACKUP MASTER ALTERNATION
10. MASTER AND BACKUP MASTER ALTERNATION
9.
MASTER AND BACKUP MASTER ALTERNATION
The Backup Master Terminal can be changed to be used as the Master Terminal for an accident that the Master
Terminal becomes down, etc. And the Master Terminal can be changed to be used as the Backup Master when it
comes back from repair, etc.
To switch from the Backup Master Terminal function to the Master Terminal function:
1 Disconnect the master terminal from the line.
2 When other terminals are in registration operation, finalize and cashier sign-off, or Cashier Key to OFF
operations should be performed.
Since a transmission error occurs at this time, an inquiry job should be completed.
3 Change the backup master terminal address from 2 (BM) to 1 (M). (Therefore, the backup master terminal will
function as the master terminal.)
Refer to Terminal ID Setting (Submode 77) on Chapter 3.
4 Delete the backup master terminal from the terminal connection table on the master terminal.
(Reprogramming is required.)
Refer to Terminal Connection Table Setting (Submode 69) on Chapter 3.
5 Download the terminal connection table.
The following files are guaranteed when the recovery process is performed. If a file is used in another terminal
when the master terminal goes down, however, data stored in the terminal is not guaranteed.
• Files controlled in the master terminal (cashier file, etc.)
• PC transmission information
The following files and data are lost when the master terminal goes down.
• Transaction file for data capture
• Files controlled locally on the master terminal
• Data in the files which are used by other terminals when the master terminal goes down.
9-1
EO1-11138
10. TRANSMISSION ERROR
10.1 Cause of Error
10. TRANSMISSION ERROR
When a terminal makes an inquiry but a communication error occurs for some reason and the inquiry to the other
station is not possible, the message “IRC CONNECT ERR” is displayed on that terminal and operation is
stopped.
When the Master Terminal cannot access the inquiring file because the Master Terminal is receiving DLL data,
the backup data is being updated between the Master and the Backup Master terminals, etc., the message
“MASTER IS BUSY” is displayed and operation is stopped.
10.1
Cause of Error
10.1.1
a)
b)
“IRC CONNECT ERR”
Communication with the other station is not possible due to a connection error (cable cut, Master
Terminal’s Power-OFF, etc.).
Comminication was made, but due to a text error, the other station cannot recognize it correctly.
10.1.2
“MASTER IS BUSY”
Cannot access the inquiring file due to the following causes:
a) The Master Terminal is receiving DLL data from the PC.
b) Programming operations are under way on the Master Terminal.
c) Backup data updating process is under way.
10.2
Error Display
IRC CONNECT ERR
* REG * 02-06-1999 03:04
MASTER IS BUSY
1 1CLKendi
P1S1
* REG * 02-06-1999 03:04
IRC CONNECT ERR 01
1 1CLKendi
P1S1
MASTER IS BUSY
Terminal ID of the other station
0.00
DISP1
NOTE:
DISP2
TOTAL
DISP3
DISP4
0.00
0.00
DISP5
DISP1
Depressing the [C] key cancels the error status.
10-1
DISP2
TOTAL
DISP3
DISP4
0.00
DISP5
EO1-11138
10. TRANSMISSION ERROR
10.3 ERROR CANCELING PROCESS
10.3
Error Canceling Process
There are two error-canceling processes in accordance with the inquiring job contents.
Type 1: Depressing the [C] key will return to the status before the inquiry.
Applicable Jobs:
• Check Track Occupy Declaration
• Check Track Sale Item Entry Inquiry
• Cashier Occupy Inquiry
• Guest Table Inquiry
• Employee Clock-in/Clock-out Occupy Inquiry
• Cashier Change Occupy Inquiry
Type 2: Depressing the [C] key will cancel the error status, displays the following message, and waits for
RETRY or CANCEL.
Applicable Jobs:
• Check Track Affect
• Check Track Table Clear
• Check Track Occupy Cancel
• Cashier Affect
• Cashier Cancel Inquiry
• Guest Table Affect
• Employee Clock-in/Clock-out Affect
• Employee Clock-in/Clock-out Cancel Inquiry
• Cashier Change Affect
• Transaction Data Send
* REG * 02-06-1999 03:04
1 1CLKendi
P1S1
RETRY?
Please input AT/TL key.
0.00
DISP1
DISP2
TOTAL
DISP3
DISP4
0.00
DISP5
For Retry ................... [AT/TL] (Performs re-sending to the other station.)
For Cancel ................ [X] → [ST] (Stops the inquiry, printing on journal “** X → ST **”)
NOTE:
The “Cancel” in Type 2 above is only for the case that the other station is in trouble which cannot be
recovered by a Retry operation.
10-2
11. OTHER OPERATIONS RELATING TO IN-LINE SERVICE
EO1-11138
11.1 Suspending
11. OTHER OPERATIONS RELATING TO IN-LINE SERVICE
The following are other operations relating to in-line service operations.
11.1
Suspending
This is to be operated for the purpose of suspending an in-line service being executed, when any terminals remain
unserviced, and of going on to a “RETRY”, “INCOMPLETE ENDING”, or “CANCEL” operation as the next step.
OPERATION ON MASTER TERMINAL: (Same Lock positions as the in-line job being performed)
Depress [ITEM CORR] until the key-in tone is generated.
DESCRIPTION:
The SUSPENDING operation is allowed any time during an in-line service procedure.
If suspending by the [ITEM CORR] key is accepted, the Master terminal’s display indicates the number of
unserviced terminals. (SUSPENDING of a service execution of one terminal is not possible). Now a “RETRY” or
“INCOMPLETE ENDING” operation can be selected as the next step. (When no key-in operations are made in
about 10 seconds after a SUSPENDING operation, a RETRY process will automatically be executed.)
11.2
Retry
This is to be operated for the purpose of re-attempting the in-line service that has been stopped due to “TIME
OUT” or that has just been suspended by “SUSPENDING” operation.
OPERATION ON MASTER TERMINAL: (Same Lock positions as the in-line job being performed)
Depress [AT/TL].
DESCRIPTION:
The in-line service will again be attempted to the unserviced terminals. This operation is possible any number
of times after a “TIME OUT” condition or a “SUSPENDING” operation as long as any terminals remain
unserviced. (When no key-in operations are made in about 10 seconds after a SUSPENDING operation, a
RETRY process will automatically be executed.)
11.3
Incomplete Ending
This is to be operated to abandon services to unserviced terminals, and ends the in-line service with the services
to service-completed terminals only.
OPERATION MASTER TERMINAL: (Same Lock positions as the in-line job being performed)
Depress [NS].
DESCRIPTION:
If an in-line service being executed does not seem to end normally due perhaps to some abnormal status of
any Satellite Terminals after “TIME OUT”, “SUSPENDING”, and/or “RETRY” operations, the [NS] key can be
depressed to end the in-line service with only the service-completed terminals serviced and the unserviced
terminals remaining unserviced. In case of In-line X or Z Report Collection sequences, reports of only the
service-completed terminals will be issued.
11.4
Cancel
This can be operated when a SUSPENDING condition arises due to a TIME OUT or a SUSPENDING operation.
The entire in-line service being performed is canceled. This operation is effective to in-line read report operations
but not to any in-line reset report operations.
OPERATION MASTER TERMINAL: (Mode Lock: X)
Depress [X].
11-1
TEC