1
GL-1010 Network Fax Operator’s Guide
Version 1.3.4
Your guide to using the Network Fax option with your
e-STUDIO GL-1010 Electronic Document Processing System
GL-1010 Network Fax
Operator ’s Guide
Your guide to using the Network Fax option
with your e-STUDIO GL-1010 Electronic Document
Processing System
END USER SOFTWARE LICENSE AGREEMENT
INSTALLING OR OTHERWISE USING THIS SOFTWARE PRODUCT CONSTITUTES YOUR ACCEPTANCE
OF THE FOLLOWING TERMS AND CONDITIONS (UNLESS A SEPARATE LICENSE IS PROVIDED BY THE
SUPPLIER OF APPLICABLE SOFTWARE IN WHICH CASE SUCH SEPARATE LICENSE SHALL APPLY). IF
YOU DO NOT ACCEPT THESE TERMS, YOU MAY NOT INSTALL OR USE THIS SOFTWARE, AND YOU
MUST PROMPTLY RETURN THE SOFTWARE TO THE LOCATION WHERE YOU OBTAINED IT.
GRANT OF LICENSE:
This is a legal agreement between you, the end-user (“You”), and TOSHIBA TEC Corporation ("TTEC") and its
suppliers. This software, fonts (including their typefaces) and related documentation (“Software”) is licensed for
use with the system CPU on which it was installed (“System”) in accordance with the terms contained in this
Agreement. This Software is proprietary to TTEC and/or its suppliers.
TTEC and its suppliers disclaim responsibility for the installation and/or use of this Software, and for the results
obtained by using this Software. You may use one copy of the Software as installed on a single System, and
may not copy the Software for any reason except as necessary to use the Software on a single System. Any
copies of the Software shall be subject to the conditions of this Agreement.
You may not, nor cause or permit any third party to, modify, adapt, merge, translate, reverse compile, reverse
assemble, or reverse engineer the Software. You may not use the Software, except in accordance with this
license. No title to the intellectual property in the Software is transferred to you and full ownership is retained by
TTEC or its suppliers. Source code of the Software is not licensed to you. You will be held legally responsible
for any copyright infringement, unauthorized transfer, reproduction or use of the Software or its documentation.
TERM:
This license is effective until terminated by TTEC or upon your failure to comply with any term of this
Agreement. Upon termination, you agree to destroy all copies of the Software and its documentation. You may
terminate this license at any time by destroying the Software and its documentation and all copies.
DISCLAIMER OF WARRANTY:
This Software is provided “AS IS” without warranty of any kind, either express or implied, including, but not
limited to, the implied warranties of merchantability, fitness for a particular purpose, title, and non-infringement.
TTEC and its suppliers disclaim any warranty relating to the quality and performance of the Software. If the
Software proves defective, You (and not TTEC or its suppliers) shall be responsible for the entire cost of all
necessary servicing, repair or correction. TTEC and its suppliers do not warrant that the functions contained in
the Software will meet your requirements or that the operation of the Software will be uninterrupted or error
free.
LIMITATION OF LIABILITY:
IN NO EVENT WILL TTEC OR ITS SUPPLIERS BE LIABLE TO YOU FOR ANY DAMAGES, WHETHER IN
CONTRACT, TORT, OR OTHERWISE (except personal injury or death resulting from negligence on the part of
TTEC or its SUPPLIERS), INCLUDING WITHOUT LIMITATION ANY LOST PROFITS, LOST DATA, LOST
SAVINGS OR OTHER INCIDENTAL, SPECIAL OR CONSEQUENTIAL DAMAGES ARISING OUT OF THE
USE OR INABILITY TO USE THE SOFTWARE, EVEN IF TTEC OR ITS SUPPLIERS HAVE BEEN ADVISED
OF THE POSSIBILITY OF SUCH DAMAGES, NOR FOR THIRD PARTY CLAIMS.
U.S. GOVERNMENT RESTRICTED RIGHTS:
The Software is provided with RESTRICTED RIGHTS. Use, duplication or disclosure by the U.S. Government
is subject to restrictions set forth in subdivision (b)(3)(ii) or (c)(i)(ii)of the Rights in Technical Data and Computer
Software Clause set forth in 252.227-7013, or 52.227-19 (c)(2) of the DOD FAR, as appropriate. Contractor/
Manufacturer is TOSHIBA TEC Corporation, 2-4-1, Shibakoen, Minato-ku, Tokyo, 105-8524, Japan.
GENERAL:
You may not sublicense, lease, rent, assign or transfer this license or the Software. Any attempt to sublicense,
lease, rent, assign or transfer any of the rights, duties or obligations hereunder is void. You agree that you do
not intend to, and will not ship, transmit (directly or indirectly) the Software, including any copies of the
Software, or any technical data contained in the Software or its media, or any direct product thereof, to any
country or destination prohibited by the United States Government. This license shall be governed by the laws
of Japan or, at the election of a Supplier of TTEC concerned with a dispute arising from or relating to
this Agreement, the laws of the Country designated from time to time by the relevant Supplier of
TTEC. If any provision or portion of this Agreement shall be found to be illegal, invalid or
unenforceable, the remaining provisions or portions shall remain in full force and effect.
YOU ACKNOWLEDGE THAT YOU HAVE READ THIS LICENSE AGREEMENT AND THAT YOU
UNDERSTAND ITS PROVISIONS. YOU AGREE TO BE BOUND BY ITS TERMS AND
CONDITIONS. YOU FURTHER AGREE THAT THIS LICENSE AGREEMENT CONTAINS THE
COMPLETE AND EXCLUSIVE AGREEMENT BETWEEN YOU AND TTEC AND ITS SUPPLIERS
AND SUPERSEDES ANY PROPOSAL OR PRIOR AGREEMENT, ORAL OR WRITTEN, OR ANY
OTHER COMMUNICATION RELATING TO THE SUBJECT MATTER OF THIS LICENSE
AGREEMENT.
TOSHIBA TEC Corporation, 2-4-1, Shibakoen, Minato-ku, Tokyo, 105-8524, Japan.
TRADEMARKS:
n
Ethernet is a trademark of US Xerox Corporation.
n
The official name of Windows 95 is Microsoft Windows 95 Operating System.
n
The official name of Windows 98 is Microsoft Windows 98 Operating System.
n
The official name of Windows Me is Microsoft Windows Me Operating System.
n
The official name of Windows 2000 is Microsoft Windows 2000 Operating System.
n
The official name of Windows XP is Microsoft Windows XP Operating System.
n
Microsoft, Windows, Windows NT, Windows NT Embedded Runtime, Microsoft Internet Explorer,
and the brand names and product names of other Microsoft products are trademarks of US
Microsoft Corporation in the US and other countries.
n
Apple, AppleTalk, Macintosh, Mac OS, and LaserWriter are trademarks of US Apple Computer
Inc. in the US and other countries.
n
Postscript and Postscript Logo are trademarks of Adobe Systems Incorporated.
n
Netscape Navigator is a trademark of Netscape Communications Corporation.
n
IBM PC/AT and AIX are trademarks of US International Business Machines Corporation.
n
NOVELL, NetWare, and NDS are trademarks of US NOVELL, Inc.
n
TrueType is a trademark of US Apple Computer Inc.
n
Imaging for Windows is a trademark of Eastman Software, Inc., A Kodak Business.
n
Other company names and product names in this manual are the trademarks of their respective
companies.
n
The technology of Dartcom is used in the scanning process.
COPYRIGHT:
Copyright ã 1999-2002 TOSHIBA TEC Corporation. All Rights Reserved.
TABLE OF CON TEN TS
TABLE OF CONTENTS . . . . . . . . . . . . . . . . . . . . . . . . . . . . . . . . . . . . . . . . 7
LIST OF FIGURES . . . . . . . . . . . . . . . . . . . . . . . . . . . . . . . . . . . . . . . . . . . 11
LIST OF TABLES . . . . . . . . . . . . . . . . . . . . . . . . . . . . . . . . . . . . . . . . . . . . 13
PREFACE . . . . . . . . . . . . . . . . . . . . . . . . . . . . . . . . . . . . . . . . . . . . . . . . . . 15
Introduction . . . . . . . . . . . . . . . . . . . . . . . . . . . . . . . . . . . . . . . . . .16
Toshiba’s optional Network Fax Feature for the e-STUDIO GL-1010
system . . . . . . . . . . . . . . . . . . . . . . . . . . . . . . . . . . . . . . . . . . . . . . . . 16
Intended Audience . . . . . . . . . . . . . . . . . . . . . . . . . . . . . . . . . . . .16
Who Should Read This Guide?. . . . . . . . . . . . . . . . . . . . . . . . . . . . . 16
This guide is not intended for digital copier service technicians or
operators. For information on using and maintaining the TOSHIBA eSTUDIO28/35/45 digital copier, refer to the Toshiba Operator’s
Manual for Copying Functions or contact your Toshiba authorized
dealer for support. . . . . . . . . . . . . . . . . . . . . . . . . . . . . . . . . . . . . . . . 16
Scope . . . . . . . . . . . . . . . . . . . . . . . . . . . . . . . . . . . . . . . . . . . . . . . . 16
Using this Guide . . . . . . . . . . . . . . . . . . . . . . . . . . . . . . . . . . . . . .17
Styles and Conventions. . . . . . . . . . . . . . . . . . . . . . . . . . . . . . . . . . . 17
Manual Organization . . . . . . . . . . . . . . . . . . . . . . . . . . . . . . . . . . . . . 18
Terms and Concepts . . . . . . . . . . . . . . . . . . . . . . . . . . . . . . . . . . . . . 18
Supplemental References. . . . . . . . . . . . . . . . . . . . . . . . . . . . . . .20
Quick Start Guide . . . . . . . . . . . . . . . . . . . . . . . . . . . . . . . . . . . . . . . 20
GL-1010 Network Fax Operator’s Guide
7
GL-1010 Administrator’s Guide . . . . . . . . . . . . . . . . . . . . . . . . . . . . .
GL-1010 Operator’s Guide (Basic) . . . . . . . . . . . . . . . . . . . . . . . . . .
GL-1010 TopAccessComposer Operator’s Guide . . . . . . . . . . . . . . .
GL-1010 Scan Operator’s Guide (option) . . . . . . . . . . . . . . . . . . . . .
Application-Specific Online Help . . . . . . . . . . . . . . . . . . . . . . . . . . . .
20
20
20
20
21
OVERVIEW . . . . . . . . . . . . . . . . . . . . . . . . . . . . . . . . . . . . . . . . . . . . . . . . 23
An Integrated Solution . . . . . . . . . . . . . . . . . . . . . . . . . . . . . . . . . 23
Features and Functions . . . . . . . . . . . . . . . . . . . . . . . . . . . . . . . . 24
Functional Highlights . . . . . . . . . . . . . . . . . . . . . . . . . . . . . . . . . . . . .
Software Components . . . . . . . . . . . . . . . . . . . . . . . . . . . . . . . . . . . .
Fax Driver . . . . . . . . . . . . . . . . . . . . . . . . . . . . . . . . . . . . . . . . . . . . .
Address Book Viewer . . . . . . . . . . . . . . . . . . . . . . . . . . . . . . . . . . . .
24
24
24
24
INSTALLATION . . . . . . . . . . . . . . . . . . . . . . . . . . . . . . . . . . . . . . . . . . . . . 25
Installing the Software . . . . . . . . . . . . . . . . . . . . . . . . . . . . . . . . . 26
Overview . . . . . . . . . . . . . . . . . . . . . . . . . . . . . . . . . . . . . . . . . . . . . .
Installing the GL-Fax Driver. . . . . . . . . . . . . . . . . . . . . . . . . . . . . . . .
CD Installation . . . . . . . . . . . . . . . . . . . . . . . . . . . . . . . . . . . . . . . . . .
Add Printer Installation . . . . . . . . . . . . . . . . . . . . . . . . . . . . . . . . . . .
Install Drivers from TopAccess. . . . . . . . . . . . . . . . . . . . . . . . . . . . . .
Uninstalling Client Software. . . . . . . . . . . . . . . . . . . . . . . . . . . . . . . .
26
26
26
29
32
32
SETUP . . . . . . . . . . . . . . . . . . . . . . . . . . . . . . . . . . . . . . . . . . . . . . . . . . . . 35
What are Fax Properties? . . . . . . . . . . . . . . . . . . . . . . . . . . . . . . 36
Printer Versus Document Print Properties. . . . . . . . . . . . . . . . . . . . . 36
Setting Fax Properties . . . . . . . . . . . . . . . . . . . . . . . . . . . . . . . . . 37
Accessing Fax Properties . . . . . . . . . . . . . . . . . . . . . . . . . . . . . . . . .
Send Properties. . . . . . . . . . . . . . . . . . . . . . . . . . . . . . . . . . . . . . . . .
Paper Size Conversions . . . . . . . . . . . . . . . . . . . . . . . . . . . . . . . . . .
Contact Properties. . . . . . . . . . . . . . . . . . . . . . . . . . . . . . . . . . . . . . .
Cover Sheet Properties . . . . . . . . . . . . . . . . . . . . . . . . . . . . . . . . . . .
Sender Properties . . . . . . . . . . . . . . . . . . . . . . . . . . . . . . . . . . . . . . .
37
37
39
39
40
42
Setting up mailboxes for incoming fax Routing . . . . . . . . . . . . . . 43
FAXING . . . . . . . . . . . . . . . . . . . . . . . . . . . . . . . . . . . . . . . . . . . . . . . . . . . 51
Overview . . . . . . . . . . . . . . . . . . . . . . . . . . . . . . . . . . . . . . . . . . . 52
Summary of Steps . . . . . . . . . . . . . . . . . . . . . . . . . . . . . . . . . . . . 52
Using the Network Fax Function . . . . . . . . . . . . . . . . . . . . . . . . . 52
Preparing Documents for Faxing. . . . . . . . . . . . . . . . . . . . . . . . . . . .
Faxing from Windows Applications . . . . . . . . . . . . . . . . . . . . . . . . . .
Selecting Recipients . . . . . . . . . . . . . . . . . . . . . . . . . . . . . . . . . . . . .
Adding New Recipient . . . . . . . . . . . . . . . . . . . . . . . . . . . . . . . . . . . .
Removing Recipients. . . . . . . . . . . . . . . . . . . . . . . . . . . . . . . . . . . . .
Setting Fax Resolution, Page Size and Orientation . . . . . . . . . . . . .
8
52
52
54
55
56
57
GL-1010 Network Fax Operator’s Guide
Preparing the Cover sheet . . . . . . . . . . . . . . . . . . . . . . . . . . . . . . . . .
Entering Sender Information . . . . . . . . . . . . . . . . . . . . . . . . . . . . . . .
Scheduling Faxes. . . . . . . . . . . . . . . . . . . . . . . . . . . . . . . . . . . . . . . .
Send Fax . . . . . . . . . . . . . . . . . . . . . . . . . . . . . . . . . . . . . . . . . . . . . .
57
59
59
61
Managing Faxes . . . . . . . . . . . . . . . . . . . . . . . . . . . . . . . . . . . . . 61
Using GL DocMon . . . . . . . . . . . . . . . . . . . . . . . . . . . . . . . . . . . . . . . 61
Deleting Fax Jobs Using GL DocMon . . . . . . . . . . . . . . . . . . . . . . . . 62
Retrieving Routed Fax Documents (TWAIN) . . . . . . . . . . . . . . . . . . . 63
Scanner Selection - - - - - - - - - - - - - - - - 63
Retrieval- - - - - - - - - - - - - - - - - - - - - - - 63
Retrieving Routed Fax Documents (File) . . . . . . . . . . . . . . . . . . . . . .
Retrieving Routed Fax Documents (TopAccessComposer) . . . . . . . .
Retrieving Routed Fax Documents (Email) . . . . . . . . . . . . . . . . . . . .
Retrieving Routed Fax Documents (iFax) . . . . . . . . . . . . . . . . . . . . .
Using TopAccess . . . . . . . . . . . . . . . . . . . . . . . . . . . . . . . . . . . . . . . .
Deleting Fax Jobs Using TopAccess . . . . . . . . . . . . . . . . . . . . . . . . .
66
67
67
67
67
68
GL FAX ADDRESS BOOK . . . . . . . . . . . . . . . . . . . . . . . . . . . . . . . . . . . . . 71
Overview . . . . . . . . . . . . . . . . . . . . . . . . . . . . . . . . . . . . . . . . . . . 72
Running the GL Fax Address Book . . . . . . . . . . . . . . . . . . . . . . . 72
Navigating the Interface . . . . . . . . . . . . . . . . . . . . . . . . . . . . . . . . 72
Access Using Toshiba GL-1010 Program Group . . . . . . . . . . . . . . . . 72
Access Using Print Properties . . . . . . . . . . . . . . . . . . . . . . . . . . . . . . 72
Navigating the Address Book. . . . . . . . . . . . . . . . . . . . . . . . . . . . 73
Managing Your Private Address Book . . . . . . . . . . . . . . . . . . . . . 74
Adding Contact Entries. . . . . . . . . . . . . . . . . . . . . . . . . . . . . . . . . . . . 74
Copying Contacts from an Address Book . . . . . . . . . . . . . . . . . . . . . 76
Modifying Contact Properties . . . . . . . . . . . . . . . . . . . . . . . . . . . . . . . 77
Creating Groups . . . . . . . . . . . . . . . . . . . . . . . . . . . . . . . . . . . . . . . . . 78
Adding Contacts to Groups . . . . . . . . . . . . . . . . . . . . . . . . . . . . . . . . 78
Removing a Member from a Group . . . . . . . . . . . . . . . . . . . . . . . . . . 81
Removing a Specific Contact or Group from the Toshiba e-STUDIO2845 GL Address Book . . . . . . . . . . . . . . . . . . . . . . . . . . . . . . . . . . . . . 82
Copying and Pasting . . . . . . . . . . . . . . . . . . . . . . . . . . . . . . . . . . . . . 82
Finding an Entry in the Address Book . . . . . . . . . . . . . . . . . . . . . . . . 83
Sorting Address Book Entries . . . . . . . . . . . . . . . . . . . . . . . . . . . . . . 84
Importing or Exporting Address Book Database Entries . . . . . . . . . . 85
Importing Entries . . . . . . . . . . . . . . . . . . . . . . . . . . . . . . . . . . . . . . . . 85
Exporting Entries . . . . . . . . . . . . . . . . . . . . . . . . . . . . . . . . . . . . . . . . 86
GLOSSARY OF TERMS . . . . . . . . . . . . . . . . . . . . . . . . . . . . . . . . . . . . . . . 87
INDEX . . . . . . . . . . . . . . . . . . . . . . . . . . . . . . . . . . . . . . . . . . . . . . . . . . . . . 95
GL-1010 Network Fax Operator’s Guide
9
10
GL-1010 Network Fax Operator’s Guide
LI S T O F F IG U R E S
InstallShield Setup window . . . . . . . . . . . . . . . . . . . . . . . . . . . . . . . . . . . . . 26
e-STUDIO GL-1010 Fax Client CD-ROM InstallShield window . . . . . . . . .
Uninstall Wizard . . . . . . . . . . . . . . . . . . . . . . . . . . . . . . . . . . . . . . . . . . . . .
Fax Driver Properties—Send Tab . . . . . . . . . . . . . . . . . . . . . . . . . . . . . . . .
Fax Driver Properties—Contact Properties dialog . . . . . . . . . . . . . . . . . . .
Fax Driver Properties—Cover Sheet Tab . . . . . . . . . . . . . . . . . . . . . . . . . .
Fax Driver Properties—Send Tab . . . . . . . . . . . . . . . . . . . . . . . . . . . . . . . .
Print Dialog (Microsoft Word) . . . . . . . . . . . . . . . . . . . . . . . . . . . . . . . . . . .
Fax Driver Properties—Send tab . . . . . . . . . . . . . . . . . . . . . . . . . . . . . . . .
Fax Driver Properties—Send page . . . . . . . . . . . . . . . . . . . . . . . . . . . . . . .
New Contact dialog . . . . . . . . . . . . . . . . . . . . . . . . . . . . . . . . . . . . . . . . . . .
Fax Driver Properties—Send page with send “To” list entry . . . . . . . . . . . .
Fax Driver Properties—Send page . . . . . . . . . . . . . . . . . . . . . . . . . . . . . . .
Fax Driver Properties—CoverSheets page . . . . . . . . . . . . . . . . . . . . . . . . .
Fax Driver Properties—Sender Information page . . . . . . . . . . . . . . . . . . . .
Fax Driver Properties—Send page indicating Send Now . . . . . . . . . . . . . .
Schedule Time dialog . . . . . . . . . . . . . . . . . . . . . . . . . . . . . . . . . . . . . . . . .
GL DocMon . . . . . . . . . . . . . . . . . . . . . . . . . . . . . . . . . . . . . . . . . . . . . . . . .
GL DocMon - Fax page . . . . . . . . . . . . . . . . . . . . . . . . . . . . . . . . . . . . . . . .
Twain Folder Setting Dialog . . . . . . . . . . . . . . . . . . . . . . . . . . . . . . . . . . . .
Twain Select Folder . . . . . . . . . . . . . . . . . . . . . . . . . . . . . . . . . . . . . . . . . .
Twain Acquire Dialog . . . . . . . . . . . . . . . . . . . . . . . . . . . . . . . . . . . . . . . . .
TopAccess - Fax Jobs page . . . . . . . . . . . . . . . . . . . . . . . . . . . . . . . . . . . .
TopAccess - Fax Page . . . . . . . . . . . . . . . . . . . . . . . . . . . . . . . . . . . . . . . .
GL-Fax Address Book . . . . . . . . . . . . . . . . . . . . . . . . . . . . . . . . . . . . . . . . .
Address Book . . . . . . . . . . . . . . . . . . . . . . . . . . . . . . . . . . . . . . . . . . . . . . .
GL-1010 Network Fax Operator’s Guide
27
33
38
40
41
42
53
53
54
55
56
57
58
59
60
60
61
62
64
65
65
68
69
73
74
11
New Contact Properties . . . . . . . . . . . . . . . . . . . . . . . . . . . . . . . . . . . . . . . . 75
Contact Properties . . . . . . . . . . . . . . . . . . . . . . . . . . . . . . . . . . . . . . . . . . . . 77
Group Properties . . . . . . . . . . . . . . . . . . . . . . . . . . . . . . . . . . . . . . . . . . . . . 78
Select Group Members dialog . . . . . . . . . . . . . . . . . . . . . . . . . . . . . . . . . . . 79
Select Members Dialog . . . . . . . . . . . . . . . . . . . . . . . . . . . . . . . . . . . . . . . . 80
New Group dialog . . . . . . . . . . . . . . . . . . . . . . . . . . . . . . . . . . . . . . . . . . . . 81
Address Book Viewer . . . . . . . . . . . . . . . . . . . . . . . . . . . . . . . . . . . . . . . . . 82
Find dialog . . . . . . . . . . . . . . . . . . . . . . . . . . . . . . . . . . . . . . . . . . . . . . . . . . 83
Find Dialog . . . . . . . . . . . . . . . . . . . . . . . . . . . . . . . . . . . . . . . . . . . . . . . . . 84
Choose File to Import dialog . . . . . . . . . . . . . . . . . . . . . . . . . . . . . . . . . . . . 85
Save Exported File As dialog . . . . . . . . . . . . . . . . . . . . . . . . . . . . . . . . . . . 86
12
GL-1010 Network Fax Operator’s Guide
LIST OF TABLES
Styles and Conventions Used in this Guide. . . . . . . . . . . . . . . . . . . . . . . . . 17
Terms and Concepts Defined . . . . . . . . . . . . . . . . . . . . . . . . . . . . . . . . . . . . 18
Definition of Common Terms . . . . . . . . . . . . . . . . . . . . . . . . . . . . . . . . . . . . 87
GL-1010 Network Fax Operator’s Guide
13
14
GL-1010 Network Fax Operator’s Guide
PREFACE
The GL-1010 Network Fax Operator’s Guide provides detailed
instructions for installing, setting up and using Toshiba’s optional
Network Fax Feature for the e-STUDIO GL-1010 system. With
this option installed, you can perform the following functions:
n
Fax electronic documents from your workstation.
n
Use the GL-Fax Driver installed on your workstation to
manage faxes: select recipients and send electronic
documents from your desktop.
Use the GL-Fax Address Book installed on your workstation
to manage recipient information.
This preface introduces fax functionality and defines the scope
and audience of this guide.
n
GL-1010 Network Fax Operator’s Guide
15
INTRODUCTION
Toshiba’s optional Network Fax Feature for the eSTUDIO GL-1010 system
Congratulations on purchasing Toshiba’s optional Network Fax
Feature for the e-STUDIO GL-1010 system. Both products
incorporate the latest in state-of-the-art digital and computer
technology. When the Fax and Address Book software is
installed, the digital copier becomes a all-inclusive network
printer with remote LAN and fax capability. The e-STUDIO GL1010 Electronic Document Processing System and GL-Fax
Address Book software distinguishes it from other network
faxing or addressing solutions, providing easy to use, fully
comprehensive solutions. Workgroups will enjoy the ability to
exploit almost limitless capabilities of the digital copier.
INTENDED AUDIENCE
Who Should Read This Guide?
This guide, the GL-1010 Network Fax Operator’s Guide, is
intended for people using the GL-Fax and Address Book optional
features. It provides detailed instructions on configuring and
using the GL-fax software and Address Book Editor.
This guide is not intended for digital copier service technicians or
operators. For information on using and maintaining the
TOSHIBA e-STUDIO28/35/45 digital copier, refer to the Toshiba
Operator’s Manual for Copying Functions or contact your
Toshiba authorized dealer for support.
Scope
This guide assumes that users are familiar with the software
applications they are using to create their documents for printing.
Document setup or application-specific printing functions are not
covered in this manual.
16
GL-1010 Network Fax Operator’s Guide
USING THIS GUIDE
Styles and Conventions
This guide employs several typographic styles to visually convey
information. The following table illustrates the styles used and
defines the conditions in which they are used.
Styles and Conventions Used in this Guide
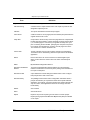
STYLE
USAGE DESCRIPTION
EXAMPLE
BOLD, SANS
SERIF FONT, ALL
CAPS
Copier hard keys.
Press the PRINTER/NETWORK hard key.
SANS SERIF
FONT, ALL CAPS
Soft keys, fields,
function tabs on the
LCD Touch Screen.
Press the ADMIN tab. Press the NETWORK
SETTINGS soft key.
Italic, serif font,
initial caps
Menu names and
screen titles.
From the File menu, choose Print.
Menu options
separated by right
arrows.
Embedded Menu
Options.
From the Start menu, choose
Programs→Toshiba e-STUDIO GL Client
→Toshiba GL Address Book.
Bold, sans serif
font, initial caps
Buttons, controls, tabs,
or menu options on
application windows
and dialog boxes.
Double-click Properties and click Services.
From the Novell Printing group box, click On
to enable Novell Printing. Click OK.
Courier
Text the user types in a
field or from the
command line.
Type the following command:
Variable text that is to
be replaced with
specific text applicable
to the user’s network.
Enter GL-1010<device name>, where device
name is the Microsoft Computer Name
assigned to the GL-1010 controller.
<Brackets
enclosing, italic
text>
GL-1010 Network Fax Operator’s Guide
setup.exe
17
Manual Organization
Chapter 1, Overview summarizes the features and functionary of
the Toshiba’s optional Network Fax Feature for the e-STUDIO
GL-1010 system
Chapter 2, Installation summarizes procedures for installing
software required to enable the fax printing and online address
books on the digital copier to selecting recipients and setting fax
properties.
Chapter 3, Setup defines what are fax properties and how they and
where they are defined.
Chapter 4, Faxing summarizes the steps required to utilize the
GL-Fax Driver from printing to the fax driver to selecting fax
recipients.
Chapter 5, GL Fax Address Book summarizes how to use the
Toshiba e-STUDIO28-45 GL Address Book from adding
contacts and groups to importing and exporting address book
database information.
Terms and Concepts
The following table defines the key terms and concepts used
throughout this guide. These definitions apply within the context
of this guide; they may be used differently by other companies or
in other product guides. In addition to the terminology defined
here, refer to the Glossary at the end of this manual, which
defines even more acronyms and industry terminology.
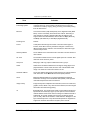
Terms and Concepts Defined
Term
e-STUDIO GL1010 Electronic
Document
Processing
System
18
Definition
This system consists of the TOSHIBA eSTUDIO28/35/45 digital copier with GL-1010
controller. This affords users the convenience of
walk-up copying and network printing using the
same device.
GL-1010 Network Fax Operator’s Guide
Terms and Concepts Defined
Term
Definition
GL-1010
This component of the e-STUDIO GL-1010
Electronic Document Processing System provides
network connectivity between the client
workstations and the digital copier connected to it.
The GL-1010 is physically mounted to the
TOSHIBA e-STUDIO28/35/45. In this guide, it is
sometimes referred to simply as “controller” or
“device”.
Local Operations
Those operations that affect the GL-1010 or
TOSHIBA e-STUDIO28/35/45 functionality and
are performed on the physical device, usually
from the copier’s LCD touch screen. An example
of local operation is changing the IP address of
the GL-1010 from the TCP/IP Setting LCD touch
screen.
Network Printing
Printing from a Windows, Macintosh, or Unix
client workstation to the GL-1010, with the output
produced on the connected TOSHIBA eSTUDIO28/35/45.
Fax Driver
A software component that enables application
programs to interact with the fax software without
the application programs having to concern
themselves with the specific fax requirements.
Delayed Fax
A fax job type that allows user to schedule their
transmission of the job for a future date and time.
Walk-up
functions
Those operations performed from the control
panel of the TOSHIBA e-STUDIO28/35/45. This
includes standard copy functions, as well as
network print monitoring and management
functions.
GL-1010 Network Fax Operator’s Guide
19
SUPPLEMENTAL REFERENCES
Quick Start Guide
The purpose of this guide is to introduce users to the GL-1010
product, summarize installation and operational procedures, and
describe system requirements and specifications. A printed copy
of this manual ships with the GL-1010.
GL-1010 Administrator’s Guide
You can find the .pdf version of this guide on the e-STUDIO GL1010 Admin’s Client CD-ROM. It is intended for the network
administrator and contains detailed information for installing,
configuring, and troubleshooting your Toshiba GL-1010.
GL-1010 Operator’s Guide (Basic)
You can find the .pdf version of this guide on the e-STUDIO GL1010 Client CD-ROM. It is intended for the end user and contains
detailed information for provides detailed instructions for
installing and using the GL-1010 printer drivers and the job
monitoring utility, GL DocMon to print to Toshiba’s e-STUDIO
GL-1010 Electronic Document Processing System. It also
describes how to use the web-based application, TopAccess (End
User Mode) to monitor and manage print jobs on your Toshiba
GL-1010.
GL-1010 TopAccessComposer Operator’s Guide
You can find the .pdf version of this guide on the e-STUDIO GL1010 Admin’s Client CD-ROM and on e-STUDIO GL-1010
Client CD-ROM. It contains information on storing, managing,
editing and printing documents using the web-based tool,
TopAccessComposer.
GL-1010 Scan Operator’s Guide (option)
If you have purchased the optional Scan feature, you will find
that the e-STUDIO GL-1010 Scanner Client CD-ROM contains a
.pdf version of this guide. This guide contains information on
enabling network scanning functionality via the GL-1010. It
includes procedures for configuring scan functionality using the
20
GL-1010 Network Fax Operator’s Guide
web-based utility, TopAccess (End User Mode). The guide also
provides instructions for local scanning and remote management
of scan jobs.
Application-Specific Online Help
All of the e-STUDIO GL-1010 Electronic Document Processing
System software and drivers come with application-specific
online help. The print and fax drivers support “What’s This”
context-sensitive help, which you can access by right-clicking on
any of the fields on the user interface. You can also see taskoriented help topics by clicking on a Help button or choosing the
Contents and Index option from the Help menu. For web-based
help in TopAccess, click the help icon.
GL-1010 Network Fax Operator’s Guide
21
22
GL-1010 Network Fax Operator’s Guide
1
OVERVIEW
AN INTEGRATED SOLUTION
The digital copier with the Toshiba’s optional Network Fax
Feature for the e-STUDIO GL-1010 system and Address Book
simplifies and facilitates your office facsimile needs with a fax
option that enables you to fax digital documents directly from
your desktop.
The Fax Option also includes an Address Book database, where
you can store frequently used fax numbers and other important
recipient information, such as company name, telephone number
and postal address and a fax driver that enables you to send fax
documents.
GL-1010 Network Fax Operator’s Guide
23
FEATURES AND FUNCTIONS
Functional Highlights
The highly intuitive, network GL-Fax Driver software enables
you to select the fax printer driver to electronically fax documents
from your computer to one or more recipients. You can easily
define fax job properties from the send list to fax resolutions. The
GL-Fax Driver is complimented with the GL-Fax Address Book
Viewer. The combination of applications enables you to easily
manage a selection of fax recipients and access the Toshiba
Address Book.
Software Components
Fax Driver
The GL-Fax Driver enables you to setup send lists and send
electronic documents from your PC to one or more contacts or
groups. You print to the fax much the same way you would
choose to print to a designated printer that makes using the
GL-Fax Driver quick and simple. You can select the fax
properties. Fax properties are the attributes you can set to define
sender and recipient information for processing fax jobs such as
dialing options, sender information, fax resolution and page
layout.
NOTE:
Faxing hard-copy
documents must be
performed as a walk-up
function from the digital
copier’s control panel.
Other features include an easy to use fax scheduler that allows
you to setup a date and time to transmit your fax. Cover page
options are also provided. You can include a customized cover
page with your fax transmission that can include sender and
recipient fax information and a detailed message. You can easily
maintain sender and contact information that can be printed on
the cover pages.
Address Book Viewer
With the GL-Fax Address Book Viewer you can effortlessly add
or modify fax recipient names and fax numbers to the Toshiba
Address Book. This utility allows you to manage recipients of the
GL's fax, select and view fax recipients from the Address Book,
as well as recipient fax numbers and other contact information.
Additionally, GL-Fax Address Book Viewer allows you import or
export address book data to or from other address book programs.
24
GL-1010 Network Fax Operator’s Guide
2
I N S TA L LAT I ON
This chapter includes procedures for installing software required
to enable the fax printing and online address books for the digital
copier. It is recommended that you read these instructions in their
entirety before beginning the installation process.
GL-1010 Network Fax Operator’s Guide
25
INSTALLING THE SOFTWARE
Overview
NOTE:
The ibutton must be
installed on the GL-1010
controller and you must
have a facsimile board
installed to the e-STUDIO
copier prior to installing
the GL-1010 fax software.
This information is
provided as an overview
only. For additional
information refer to the
GL-1010 Administrator’s
Guide.
Before you can begin utilizing the Toshiba’s optional Network
Fax Feature for the e-STUDIO GL-1010 systemyou must install
the software using the e-STUDIO GL-1010 Fax Client CD-ROM
provided. You will use the InstallShield client software setup
process.This section describes several ways to add Fax Driver
to user’s workstations. Prior to installing the GL-Fax and
Address Book Editor software, the administrator must install
specific hardware and configure the fax options. Only authorized
users can modify the device.
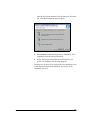
Installing the GL-Fax Driver
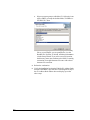
CD Installation
1 Insert the e-STUDIO GL-1010 Fax Client CD-ROM into the
CD-ROM drive.
2
If AutoRun is enabled, the set-up program begins
automatically. If not, choose Run from the Start Menu and
then locate the Setup.exe file on the CD. Click OK to launch
the setup program. The installation wizard leads you through
the process of installing the Fax Driver, Address Book and
TWAIN driver.
InstallShield Setup window
26
GL-1010 Network Fax Operator’s Guide
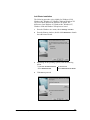
3
Follow the Setup Wizard as it leads you through the
installation steps.
You will be prompted to supply the following information:
M Enter a destination directory or accept the default locaM
tion, which is C:\Program Files\GL-1010\Toshiba eSTUDIO GL-Fax & Address Book.
Select the Toshiba e-STUDIO28-45 GL-Fax, Toshiba eSTUDIO28-45 GL-Address Book and e-STUDIO GL
TWAIN Driver options.
e-STUDIO GL-1010 Fax Client CD-ROM InstallShield window
M Enter the network path to the printer or the queue name
as \\<device name>\dssc.
GL-1010 Network Fax Operator’s Guide
27
M Select a program group to which the GL-1010 tools icons
will be added, or accept the default folder, TOSHIBA eSTUDIO GL Client.
M When the setup program finishes copying the necessary
4
5
28
files to your computer, you are prompted to view the
ReadMe file. Deselect, if desired, and then click Finish to
exit the Setup Wizard. If you select a new file location,
the directory name must conform to the DOS 8.3 naming
convention of an eight-character file name with a threecharacter file extension.
Reboot the workstation.
Verify the installation by selecting Toshiba GL Address Book
from the TOSHIBA e-STUDIO GL Client Program Group. If
the GL-Address Book Editor does not display, repeat the
above steps.
GL-1010 Network Fax Operator’s Guide
Add Printer Installation
The following procedure varies slightly for Windows 95/98,
Windows Me, Windows NT, Windows 2000 and Windows XP.
The screen shots illustrate the Windows 98 options, but
differences from Windows 95, Windows Me, Windows NT,
Windows 2000 and Windows XP options are noted.
1
From the Windows Start menu, choose Settings→Printers
2
From the Printers windows, double-click Add Printer to launch
the Add Printer Wizard.
3
Depending on the operating system, select the following
option.
4
In Windows 95/98/Me/2000/XP:
In Windows NT:
Select Network Printer
Select Network Printer Server
Click Next to proceed.
GL-1010 Network Fax Operator’s Guide
29
5
Locate the GL-1010 printer in the network:
In Windows 95/98/Me/2000/XP:
In Windows NT:
Specify the Network Path or
Enter the Printer Name
queue name of the GL-1010. For or select a printer from
the list of Shared
example:
Printers.
\\<device name>\dssc
NOTE:
Depending on which driver
you want to install, the
GL-1010 printer names are
as follows:
\\<device name>\dssc
\\<device name>\GL_pcl6
\\<device name>\GL_ps
Alternately, click Browse to
navigate the network and locate
the GL-1010 printer.
Each driver is represented by a separate printer icon within the
network:
NOTE:
If the Add Printer Wizard
detects previously installed
driver software, you will be
prompted to either keep or
replace the existing driver.
If the controller software
has been recently updated,
it is recommended that you
replace the driver.
Otherwise, keep the
existing driver.
30
6
Select the \\<device name>\dssc printer and click OK.
7
Follow the Add Printer Wizard as prompted until you are
notified that the fax driver has been installed successfully.
GL-1010 Network Fax Operator’s Guide
The new fax driver now appears in the Windows Printers folder.
GL-1010 Network Fax Operator’s Guide
31
Install Drivers from TopAccess.
If the system administrator has uploaded software to the
controller, users can install the software on their workstations.
1
Click the Install Software link at the bottom of the screen.
2
Click the Fax Driver link.
3
Check the boxes of the software components to install.
4
Click Install.
Uninstalling Client Software
1 If open, close the GL-Fax Driver, GL Fax Address Book or
GL TWAIN Driver applications.
2
32
Insert the e-STUDIO GL-1010 Fax Client CD-ROM into the
CD-ROM drive. If Auto-Run is enabled, the InstallShield
Setup Wizard starts automatically. Otherwise, choose Run
GL-1010 Network Fax Operator’s Guide
from the Start Menu and then locate the Setup.exe file on the
CD. Click OK to launch the setup program.
Uninstall Wizard
3
Select Remove to uninstall all previously installed GL-1010
components from the client workstation
4
Follow the setup wizard as files are removed from your
system. Click Finish to exit the setup program.
You may have to reboot your system before all components, such
as the program items from the Windows Start menu, can be
completely removed.
GL-1010 Network Fax Operator’s Guide
33
34
GL-1010 Network Fax Operator’s Guide
3
SETUP
This chapter important information regarding document and
faxing attributes as well as screen level and instructions for
completing fax properties.
GL-1010 Network Fax Operator’s Guide
35
WHAT ARE FAX PROPERTIES?
Fax properties are the attributes users can set to define sender and
recipient information, final fax appearance and time for
processing fax jobs. For example, you may select Send Fax Now
or Send Fax Later which determines when the fax will be
transmitted. You might also select fax properties such as
resolution and page orientation. You can select individual
contacts and groups to be added to the send “To” list. The names
listed in the send “To” list define whom the fax, will be sent to.
The GL-1010 Fax driver include many user-configurable
properties, which are intuitively organized on property pages.
Printer Versus Document Print Properties
Fax properties come in two varieties: fax sticky and document
sticky. That is, some properties are specific to the fax device,
while others pertain only to the document being printed.
Examples of document print properties include orientation, input
source, and so on.
There are two ways to set properties: through the Window’s
Printers folder or within the application you are printing from.
Generally, you can set fax attributes and, in Windows NT/2000
and Windows XP environments, document attributes via the
Printers folder. You can use Document Defaults (Windows NT
4.0) and Printing Preferences (Windows 2000 and XP) via the
Printers folder to set the document attributes and printer
attributes. By contrast, those properties set within an application
are document sticky only; when you close the application, the
print properties you set are lost.
Furthermore, some applications allow you to specify attributes
that are mirrored by the driver. For example, most applications
allow you to define the page orientation from a Page Setup or
similar dialog box. Whenever this is the case, the application
settings defined for the document take precedence over the driver
settings. So, to continue with the above example, if the page setup
36
GL-1010 Network Fax Operator’s Guide
indicates a Portrait orientation, and you select the Landscape
property within the driver, the document is printed in Portrait
mode.
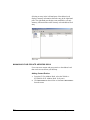
SETTING FAX PROPERTIES
Accessing Fax Properties
The GL-Fax Driver utility allows you to set up and configure fax
properties, such as sender and recipient information and cover
sheet details. Specifically, you can perform the following
functions:
n
Select fax recipients from the address book
n
Add new contacts to the address book
n
Set the fax resolution
n
Delayed Fax
n
Update recipient information
Customize cover sheets
To access the fax properties, users simply select the Properties
button from the Print dialog. For further instructions, refer to
CHAPTER 4 Faxing from Windows Applications
n
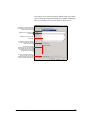
Send Properties
The Send Properties page enables you to select fax recipients,
contacts and groups, from the Address Book.
The Address Book list control allows users to navigate through
the address book hierarchy, and access the properties of a selected
item.
The Send page is divided into two panes. The left pane contains
the Groups. The right pane displays the members of the selected
group or if the Toshiba e-STUDIO28-45 GL Address Book is
selected, all of the members of the entire address book. Selecting
a group in the left pane will display all the members of the
selected group in the right pane.
The “To” list box contains the list of recipients. When a contact is
selected, and the Add button is clicked, the contact is moved to the
“To” recipients list. Selecting a group in the left pane without
GL-1010 Network Fax Operator’s Guide
37
selecting any individual member of the group in the right, then
clicking the Add button, will add the selected group with all of it’s
members to the “To” list.
Using the Send page users can define the fax transmission
schedule, resolution and page layout, department code and setup
fax scheduling.
For further information, refer to CHAPTER 4 Faxing from
Windows Applications.
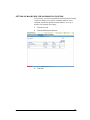
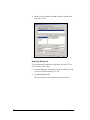
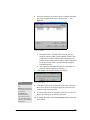
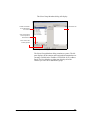
The “To” contains the list of the
selected fax recipients.
Address Book list contains a listing
of all the contacts and groups in
the Address Book. Selecting a
contact or member in the list will
display the contact or members of
the group in the right pane.
Selected Address Book Data. This
list contains the people and groups
selected from the Address Book.
Maximum 5-digit
department code to
identify sending
department
Fax resolution options for the fax
transmission.
Paper size of the original
document.
Orientation of the
original document.
Delayed Fax allows user to Send
Fax Now or Send Fax Later.
If, Send Fax Later is
selected, the Edit
button enables a user
to set the scheduled
date and time.
Fax Driver Properties—Send Tab
38
GL-1010 Network Fax Operator’s Guide
Paper Size Conversions
Document Size A4, B4, A3, LT, LG Computer, LD and Folio are
acceptable original sizes. The size of the originals that can be sent
is determined by annotation with the destination fax. Once the fax
communication is negotiated, the size of the original is converted
on the FAX board. If the client user uses a document size other
then the above size, it will be converted according to the
following table:
ORIGINAL
DOCUMENT
SCALE TO
ACTION
A5
A4
Rotate 90
B5
B4
Rotate 90
Statement
Letter
Rotate 90
Smaller A5 or
Statement
A4
Add white lines
Larger then A3
A3
Reduce to A3
Larger then
Ledger
Ledger
Reduce to Ledger
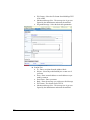
Contact Properties
The Contact Properties dialog displays whenever a user doubleclicks a contact in the Contact List (right pane) of the Send
Properties page. The Contact Properties dialog allows users to
enter all the contact information for a fax recipient such as a
Prefix, First Name, Last Name, Display, Suffix, Company,
Department, Fax Number, Email Address, Use Sub Address and
GL-1010 Network Fax Operator’s Guide
39
Password (check box), Sub Address, Password, and Notes. For
further information, refer to CHAPTER 5 Managing Your Private
Address Book.
Fax Driver Properties—Contact Properties dialog
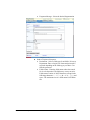
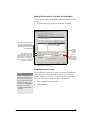
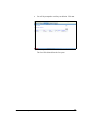
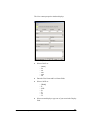
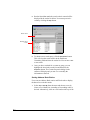
Cover Sheet Properties
The Cover Sheet property page users to send a cover sheet with a
fax transmission. The cover sheet is merged with the all
recipient’s in the “To” list in the Send page to create a final fax
40
GL-1010 Network Fax Operator’s Guide
cover sheet. Users can select what to include on the cover sheet
such as sender or recipient information. For further information,
refer to CHAPTER 4 Faxing from Windows Applications.
To include a cover sheet with a fax
the user selects a cover sheet type
from the drop-down menu.
Subject line to be printed on the
cover sheet.
Message to be printed on the
cover sheet.
To include the sender information
on the cover sheet the user will
select this check box.
To include the recipient
information on the cover sheet the
user will select this check box and
the check boxes for the desired
information to be included.
To include a reference number on
the cover sheet, the user will
check this checkbox and enter the
reference number in the text box.
Fax Driver Properties—Cover Sheet Tab
GL-1010 Network Fax Operator’s Guide
41
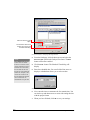
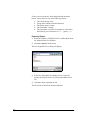
Sender Properties
NOTE:
This information will only
be displayed on the cover
page if Sender Information
is selected on the Cover
Sheet page.
The Sender Information page allows users the ability to enter the
sender’s personal information to be displayed on outbound faxes.
For further information, refer to CHAPTER 4 Faxing from
Windows Applications.
The sender information entered
here will display on the fax cover
sheet.
Fax Driver Properties—Send Tab
42
GL-1010 Network Fax Operator’s Guide
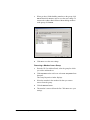
SETTING UP MAILBOXES FOR INCOMING FAX ROUTING
In TopAccess, you can set up mailboxes for incoming fax routing.
TopAccess allows you to specify a mailbox number, owner,
comment, notification options an email address. To set up a
mailbox for incoming fax routing:
1
Click the FAX tab.
2
Click the MAIL BOXES submenu.
3
Click New.
GL-1010 Network Fax Operator’s Guide
43
The Mail Box Settings page appears.
NOTE:
4
Enter the Box Number (required).
If the mailbox number
created exists also in the
copier fax, the incoming fax
will not be routed to the
controller.
5
If desired, enter the Owner and Comment, select notification
options and enter an email address.
6
Click Next.
The Agent Settings Page appears.
44
GL-1010 Network Fax Operator’s Guide
7
Select Send to TWAIN, Send to File, Send to Email, Send to
iFax or Send to TopAccessComposer from the drop-down
list.
n
Send to TWAIN
M Nothing to configure
n
Send to File
M File Format - Select the file format from SinglePage
TIFF (G4), MultiPage TIFF (G4) or PDF
M Destination - Destination is pre-configured by the administrator. Depending on the configuration, you may have
to enter the name of the network folder of your choice or
choose from a pre-determined folder on the network or
the folder in the controller
n
Send to Email
M To - Enter a recipient from the Address Book
M Subject - Select the predefined Subject or enter one of
your own
M From - Enter an email address or email addresses separated by commas
M From Name - Enter your name
M Body - Enter the message you wish sent or No Message
GL-1010 Network Fax Operator’s Guide
45
M File Format - Select the file format from MultiPage TIFF
(G4) or PDF
M Maximum Message Size - The message size is pre-configured by the administrator and cannot be modified
M Fragment Message - Select the desired fragmentation
n
46
Send to iFax
M To - Enter a recipient from the Address Book
M Subject - Select the predefined Subject or enter one of
your own
M From - Enter an email address or email addresses separated by commas
M From Name - Enter your name
M Body - Enter the message you wish sent or No Message
M File Format - The format used is TIFF-S
M Maximum Message Size - The message size is pre-configured by the administrator and cannot be modified
GL-1010 Network Fax Operator’s Guide
M Fragment Message - Select the desired fragmentation
n
Send to TopAccessComposer
M Destination - Select a folder type from Public, Private or
Department. Enter a Login User Name and password if
required depending on the folder type you chose. Confirm the password
M Folder Name - Enter the folder name where the routed
fax is to be deposited. The folder may or may not exist.
Folder names consist of ASCII characters except for the
following characters: / \ : * ? " <> | & = # ' % ; . [ ] { } and
space. The maximum size of a folder name is 64 characters
GL-1010 Network Fax Operator’s Guide
47
M Document Name - The document name will be automatically determined for you at the time of reception
8
Click Select.
It is possible to override the GL-1010 mailbox by editing or
creating a mailbox from the copier front panel that has the same
number. In this case, the copier mailbox will take control over the
fax job with the defined sub address and the mailbox in the
controller is ignored.
A user can assign a password to each GL-1010 mailbox if
needed. This password is for the protection of the GL-1010
mailbox, but does not apply to a fax job's sender-specified
password. This means that even if the sender-specified password
of a fax job does not match the GL-1010 mailbox password, the
48
GL-1010 Network Fax Operator’s Guide
job is not rejected and treated as a normal inbound fax job.
Mailboxes with a password are shown with a lock icon.
By default, the system has two predefined mailboxes.
- : For jobs without a sub address, shown as "- (Undefined)"
? : For jobs with an unknown or undefined sub address, shown as
"? (Unregistered)"
These system mailboxes cannot be deleted but their properties,
except the mailbox number, can be edited. Using these special
mailboxes, users can process any fax jobs routed to the GL-1010
without having to create any other mailboxes.
GL-1010 Network Fax Operator’s Guide
49
50
GL-1010 Network Fax Operator’s Guide
4
FAXING
This chapter includes step-by-step procedures for printing to the
fax driver selecting recipients, optionally including cover sheets
and sending a fax from with in an application.
GL-1010 Network Fax Operator’s Guide
51
OVERVIEW
NOTE:
Faxing hard-copy documents
must be performed as a
walk-up function from the
digital copier’s control
panel.
You can use the GL-Fax Driver option to electronically fax
documents from your computer to one or more recipients. In
addition, you can select fax properties, fax schedule options,
include fax cover sheets and edit sender information.
SUMMARY OF STEPS
The following outline summarizes the steps for sending a fax
from your desktop:
n
Print to Fax Driver.
n
Add recipient’s name and fax numbers.
n
Select a default cover page (optional).
n
Send the fax.
USING THE NETWORK FAX FUNCTION
Preparing Documents for Faxing
To see how objects, such as headers, footers, or drawing objects,
will be positioned on a fax page, switch to your applications’
page layout view. If the software application you are using
provides a Print Preview option, you can use it to view your fax
before it is sent.
NOTE:
For the menu path and
option for printing from
your application, refer to
the application’s printed
documentation and online
help.
52
Faxing from Windows Applications
1 For most Windows applications, you can print an open
document to the network-connected TOSHIBA eSTUDIO28/35/45 copier by choosing Print from the File
menu.
2
Select the digital copier that has the fax option installed from
the list of printers.
3
Click Properties.
GL-1010 Network Fax Operator’s Guide
Depending on the application you
are printing from, you may have to
access printer properties from a
“Setup” or “Options” button instead.
Consult your user documentation if
you are unsure.
Print Dialog (Microsoft Word)
4
Set the desired fax properties from the GL-Fax Driver dialog
tabs.
Fax Driver Properties—Send tab
Each property sheet contains settings that control the way your
fax is printed, when it will be sent, who will receive the fax and
cover sheet options. The following summarizes the options
included on each tab.
GL-1010 Network Fax Operator’s Guide
53
Selecting Recipients
You must specify at least one recipient in order to fax a
document.
NOTE:
1
Choose Print from the File menu.
2
Click Properties.
3
From the Send page, select the Address Book from the dropdown menu. You can select Toshiba Address Book, Copier
Address Book, MAPI Address Book and MS Outlook
Express Address Book.
You can select multiple
recipients from the list. You
can also select multiple
groups as recipients as well.
If a group is selected as a
recipient, all the members
within the group are added
to the recipient list.
− To access the Copier Address Book, the TCP/IP network
protocol must be installed and enabled on both the controller
and the workstation.
− Other than the Toshiba Address Book, all the other address
books are opened in Read-Only mode and cannot be edited..
Address Book List
Contact List
Fax Driver Properties—Send page
4
Select the fax recipients from the Contact List (right pane).
− Selecting the Toshiba Private Address Book will display all
the member of the address book in the Contact list (right
pane).
− Selecting a group from the Address Book list (left pane) will
display all the members of this group in the Contact list
(right pane).
54
GL-1010 Network Fax Operator’s Guide
− Selecting a group in the Address Book list (left pane), without selecting an individual member in the Contact list (right
pane), will add the selected group to the recipient “To” list.
− Selecting a contact person in the Address Book list (right
pane), will add the selected contact to the “To” list.
NOTE:
You can add fax recipients
to the send “To” list that are
not currently listed in the
Address Book by selecting
the New button. For further 5
information, refer to
CHAPTER 4 Adding New
Recipient
6
Click the Add button.
The recipient(s) will be added to the “To” list.
Continue setting up the fax by setting the fax properties as
desired. When finished click OK.
Adding New Recipient
You can add a new recipient not found in the address book.
1
From the Send page, click the New... button. The New Contact
dialog box will display.
New Contact dialog
2
Complete the fax recipient’s contact information. For detailed
information, refer to CHAPTER 5 Adding Contact Entries
3
Optionally, check the Add to Address Book check box to add
the recipient to the Address Book.
GL-1010 Network Fax Operator’s Guide
55
4
When you have finished, click OK to add the contact to the
recipient “To” list.
Fax Driver Properties—Send page with send “To” list entry
Removing Recipients
If you inadvertently added a fax recipient to the send “To” list,
you can easily remove them.
1
From the Send page, select the recipient for which you wish
to remove from the recipient “To” List.
2
Click the Remove button.
The person will be removed from the fax transmission.
56
GL-1010 Network Fax Operator’s Guide
Setting Fax Resolution, Page Size and Orientation
You can set the various fax properties when you prepare a fax to
be sent.
1
From the Send page, set the fax properties as desired.
Fax resolution options for the fax
transmission. Options: Standard
200X100 dpi Fine 200X200 dpi,
Super Fine 200X400 dpi or Ultra
Fine 400x400 dpi
Five-digit
department code
to identify
sending
department
Paper size of the original
document. Options: Letter, A4,
Legal, Statement, Ledger, Folio,
A3, A5, B4, B5, or Computer. For
further details on Paper Size and
conversions, refer to CHAPTER 3
Paper Size Conversions
Orientation of the
original document.
Options: Portrait
or Landscape
Fax Driver Properties—Send page
Preparing the Cover sheet
NOTE:
If recipient information is
selected for inclusion on the
cover sheet, and if there are
more recipients than could
be listed on a single page,
the fax driver will generate
as many cover sheets as
required to include all the
recipients.
You can choose to send a cover sheet with your fax transmission.
The cover sheet is merged with the recipient “To” list data to
create a final fax cover sheet. You can select what to include on
the cover sheet such as sender or recipient information.
1
Choose Print from the File menu.
2
Click Properties.
GL-1010 Network Fax Operator’s Guide
57
3
From the Cover Sheet tab, select a cover sheet from the dropdown list (you can select a Standard, Business or Professional
cover sheet).
Select a cover type to include
with a fax transmission.
Fax Driver Properties—CoverSheets page
58
4
Enter the subject title to be printed on the cover sheet in the
Subject field. Maximum field length is 40 characters.
5
Enter the message to be printed on the cover sheet in the
Message field. Maximum field length is 500 characters.
6
Optionally, check the Sender Information check box to include
the sender’s information on the cover sheet. You must
complete the Sender Information tab for this information to
be displayed. For instructions, refer to Entering Sender
Information on page 59.
7
Optionally, check the Recipient’s Information check box to
include the recipient informational the cover sheet. A
combination of recipient information can be printed by
checking the Name, Company, Department Name, or Fax Number
check boxes as desired.
8
Optionally, check the Reference Number check box to include
a defined reference number on the cover sheet. Type the
reference number in the adjacent field.
GL-1010 Network Fax Operator’s Guide
NOTE:
Sender information will
only be displayed on the
cover sheet if Sender
Information is selected on
the CoverSheet page. For
further information on cover
sheets, refer to Preparing
the Cover sheet on page
57
Entering Sender Information
1 Choose Print from the File menu.
2
Click Properties.
Fax Driver Properties—Sender Information page
3
From the Sender Information page, enter the sender
information you wish to be displayed on fax cover sheets in
the text box. The maximum field length is 500 characters.
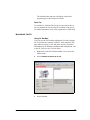
Scheduling Faxes
It is very important that before any faxes are scheduled, the
administrator sets the date and time of the GL-1010 to
synchronize the controller and copier dates and times. This can be
done using the TopAccess web utility.
Choose Print from the File menu.
1
2
Click Properties.
GL-1010 Network Fax Operator’s Guide
59
Select the Send Fax Later
option.
The Edit button will become
enabled. Click to open the
Schedule Date dialog.
Fax Driver Properties—Send page indicating Send Now
NOTE:
The scheduled date can not
be more then one month
from the current date. If the
current month does not have
a date like the current date,
then the date will be set at
the last day of the following
month. For example, if the
current date is March 31st.
then the maximum date that
can be selected for the
scheduled fax is April 30th.
3
From the Send page, click the down-arrow and select the
Send Fax Later option in the Delayed Fax frame. The Edit
button will become enabled.
4
Click the Edit... button. The Schedule Time dialog will
display.
5
Enter the scheduled date. You can click the Date arrow to
display a calendar then allows you to select an date.
Schedule Time dialog
60
6
Next, enter the time to commence the fax transmission. You
can use the up and down arrows to assist with setting the time
with the proper format.
7
When you have finished, click OK to save your settings.
GL-1010 Network Fax Operator’s Guide
The scheduled date and time will display on the Send
properties page in the Delayed Fax frame.
Send Fax
To send the fax, click OK. The fax job is sent to the fax driver.
You can monitor the fax job using GL DocMon or TopAccess.
For further information, refer to these application’s online help.
MANAGING FAXES
Using GL DocMon
Users can use the GL DocMon application’s Fax tab to display
the fax jobs that are currently on the GL-1010 controller. This
page allows the users to view and delete fax jobs. For further
information on GL DocMon installation and configuration, refer
to the GL-1010 Operator’s Guide (Basic).
1
Right-click on the GL DocMon taskbar icon to access the
taskbar menu.
2
Select TOSHIBA e-STUDIO28-45 GL-FAX.
GL DocMon
3
Select DocMon.
GL-1010 Network Fax Operator’s Guide
61
4
From the Device Status window, select the Fax tab.
GL DocMon - Fax page
5
You can view the Document name, Status, Owner, number of
Pages, Size, and the Submitted date and time.
For more details on using GL DocMon, choose Contents and
Index from the applications Help menu to access online Help.
Deleting Fax Jobs Using GL DocMon
1 Right-click on the GL DocMon taskbar icon to access the
taskbar menu.
62
2
Select TOSHIBA e-STUDIO28-45 GL-FAX.
3
Select DocMon.
4
Click the Fax tab from the Device Status Window.
5
In the list box, click the job to be deleted. You can only delete
jobs that you originally submitted.
6
Click Document in the menu bar.
7
From the drop-down menu, select Cancel.
GL-1010 Network Fax Operator’s Guide
Retrieving Routed Fax Documents (TWAIN)
When routed fax data is saved on the controller, it can be
retrieved by using a TWAIN compliant software application. For
example purposes, the “Imaging for Windows” application, a
Windows 95/98/Me/2000 accessory, is used in the following
steps.
Some applications that support TWAIN formats may not work
with the GL TWAIN Driver. Refer to the specific application’s
manual or Help in that case.
Scanner Selection
1
Start the “Imaging for Windows” application.
2
Choose Select Device from the File menu.
3
Select the GL TWAIN Driver in the Select Source window.
4
Click OK.
NOTE:
The TWAIN scanned
data directory is as
follows:
“\\(Controller Name)””\GL_TWAIN” (The
Controller Name is
“GLXXXXXXXXXXX
X” at the time of
shipment.
“XXXXXXXXXXXX”
is the MAC ADDRESS
of the network interface
card connected to the
controller. Windows NT
4.0 does not come with
any TWAIN application
software installed. Please
obtain separately.
Retrieval
The following describes how to use the GL TWAIN Driver to
import routed fax data. Refer to the TOSHIBA e-STUDIO
TWAIN Driver online help for further information.
1
Start the application.
2
Select Scan New from the File menu.
GL-1010 Network Fax Operator’s Guide
63
3
Select the Domain and GL-1010 Device.
M Domain
− Name of a workgroup or a domain name that the controller
belongs to. (At shipment, the default is set to: WORKGROUP).
M Machine Name
− Controller name (At shipment the default is set to:
\\GL_XXXXXXXXXXXX (XXXXXXXXXXXX represents the MAC ADDRESS of the controller))
M Show Folders
− Select a TWAIN folder from which you want to import the
data. Folder Name: FAX-[SUBADDRESS] The sender
specifies the [SUBADDRESS] to route the fax to a specific
mailbox.
M Folder Password
− Enter the password assigned to a protected TWAIN folder.
M Cancel
− Cancel folder selection.
M About
− About GL TWAIN Driver dialog displays.
Twain Folder Setting Dialog
NOTE:
4
If a password is required for the mailbox, the Folder
Password field is enabled. Enter the 5-digit password in the
text box.
5
Click OK. The document list displays.
Refer to the TWAIN
Driver online help for
further information.
64
GL-1010 Network Fax Operator’s Guide
6
Select the document you want to retrieve from the document
list. If the document data status is displayed as “*” it is
protected.
Twain Select Folder
M Document Name: [Sender]-NNN where [Sender] is
7
NOTE:
Statuses shown in the list
are:
Ready-The document is
in a normal state and can
be retrieved.
Processing-The
document is being
retrieved by the user.
“*” -The folder status is
unknown. The document
is protected.
replaced with the sender’s phone number or name if the
sender exists in the Fax address book. Replacing a fax
number with a sender name in address book is controlled
by the fax setting. NNN is an automatically assigned,
sequential number.
M Any characters that cannot be used for a file name are
replaced with the underscore character, "_".
Click Acquire. The Acquire Dialog will display.
Twain Acquire Dialog
8
Click Yes to remove the file from the folder after retrieval or
No to leave the file to be acquired again at a later time.The
scanned image retrieval begins.
9
If a selected document is assigned a password, a screen will
display prompting you to enter the password.
10
To change the folder click the Change Folder button and select
a new folder.
GL-1010 Network Fax Operator’s Guide
65
NOTE:
Some software
applications may not be
able to retrieve multipage scanned images.
11
To refresh the screen to display the latest documents in the
folder click the Refresh button.
12
To Delete a document in the folder, select the document and
then click the Delete button. If a password is assigned to the
selected document, a screen to enter the password displays.
When you are finished, click the Close button to close the GL
TWAIN Driver application and return to the application you are
currently running. During image retrieval, this button cancels the
current document retrieval.
Retrieving Routed Fax Documents (File)
When routed fax data is saved in a controller or network shared
folder, it can be retrieved by using an imaging software
application. For example purposes, the “Imaging for Windows”
application, a Windows 95/98/Me/2000 accessory, is used in the
following steps.
1
Start the “Imaging for Windows” application.
2
From the File menu, select Open.
3
Browse for the shared folder in the controller or network.
In the controller, the folder is called GL_SHARE.
4
Select the file and click Open.
Routed Fax:
M Folder Name: FAX-[SUBADDRESS] The sender specifies the
[SUBADDRESS] to route the fax to a specific mailbox.
M Document Name: [Sender]-NNN.tif/PDF (MultiPage) or
[Sender]-NNN/PageNNNN.tif (SinglePage) where
[Sender] is replaced with the sender’s phone number or
name if the sender exists in the Fax address book.
Replacing a fax number with a sender name in address
book is controlled by the fax setting. NNN is an
automatically assigned, sequential number. The first document is created without the number, and the second
becomes DOCNAME-001.
M A user can specify the document name in the Routed Fax
MailBox via TopAccess.
M Any characters that cannot be used for file name are
replaced with underscore character, "_".
If the controller fails to transfer the fax document by Email or
to store it in the Network file server, the document will be
66
GL-1010 Network Fax Operator’s Guide
stored in the controller hard disk in the folder named
FAXErr-[SUBADDRESS].
Retrieving Routed Fax Documents
(TopAccessComposer)
To learn how to retrieve a fax stored in TopAccessComposer, see
the GL-1010 TopAccessComposer Operator’s Guide.
Retrieving Routed Fax Documents (Email)
The documents are sent to the specified recipients as email
attachments. The sender can add up to 400 recipients manually,
from an address book or from an LDAP server. The attachment
format is a multi-page PDF or TIFF.
Retrieving Routed Fax Documents (iFax)
The documents are sent to the specified recipients as email
attachments. The sender can add up to 400 recipients manually,
from an address book or from an LDAP server. The attachment
format is TIFF-S (A4 or Letter width, 200x200 or 200x100 DPI).
Using TopAccess
Users can use the TopAccess application’s Fax page to display
the fax jobs that are currently on the GL-1010 controller. This
page allows the users to view and delete fax jobs.
NOTE:
1
Start your web browser.
Do not run multiple
instances of TopAccess, as
invalid information may
display.
2
Enter the TopAccess URL (the GL-1010 name or IP address)
and then press Enter.
GL-1010 Network Fax Operator’s Guide
67
3
Select the Fax Jobs page.
TopAccess - Fax Jobs page
4
Select the desired fax print queue to view.
− Current
− Delayed
− All
Deleting Fax Jobs Using TopAccess
1 Start your web browser.
2
Enter the TopAccess URL (the GL-1010 IP address) and then
press Enter.
3
Select the Fax Jobs page.
4
Select the desired fax print queue to view.
− Current
− Delayed
− All
68
5
Check the checkbox adjacent fax(s) that you want to delete.
6
Click the Delete button.
GL-1010 Network Fax Operator’s Guide
7
You will be prompted to confirm your deletion. Click Yes.
TopAccess - Fax Page
The fax will be deleted from the fax queue.
GL-1010 Network Fax Operator’s Guide
69
70
GL-1010 Network Fax Operator’s Guide
5
GL FAX ADDRESS BOOK
You can manage detailed information about the people you
communicate with by using the GL-Fax Address Book. The
application enables you to maintain contact information. You can
use the information stored in the Toshiba e-STUDIO28-45 GL
Address Book to specify fax recipients and compose fax cover
pages.
You can organize the members of the address book to best suit
your faxing needs. One of the features of the address book is
Groups. Groups contain one or more members. By organizing
groups, you can send faxes to multiple fax recipients.
GL-1010 Network Fax Operator’s Guide
71
OVERVIEW
The GL Fax Address Book utility allows you to manage the GL
Fax Address Book properties, manage address books and address
book entries. Particularly, you can perform the following
functions:
n
Create new contacts
n
Create Address Book groups
n
Modify contact information
n
Search the address book database
n
Import Address Book data
n
Export Address Book data
RUNNING THE GL FAX ADDRESS BOOK
You can access the Address Book using two methods:
n
Toshiba GL-1010 program group
n
Print Properties window (limited accessibility)
NAVIGATING THE INTERFACE
Access Using Toshiba GL-1010 Program Group
From the Program Group, you can access the Address Book
Editor to create and edit your private address book.
1
From the Start menu, choose Programs→TOSHIBA e-STUDIO
GL Client→TOSHIBA GL Address Book.
NOTE:
Access Using Print Properties
This method is only
suggested if you are in the
process of sending a fax
and you need to add a fax
recipient to the send list
that is not currently a
member of the Toshiba
Address Book. Otherwise,
use the program group to
access the Address Book
Editor.
From the Print window, you can limitedly create and edit contacts
in the Toshiba Address Book. For further information, refer to
Adding New Recipient on page 55.
72
GL-1010 Network Fax Operator’s Guide
NAVIGATING THE ADDRESS BOOK
The GL Address Book Editor main window consists of two
panes.
GL-Fax Address Book
The left-hand pane contains a tree structure for the Toshiba
Address Book. You can expand or collapse to view/hide Groups
and Contact address book entries.
GL-1010 Network Fax Operator’s Guide
73
Selecting an entry in the left-hand pane of the address book
displays summary information about the entry in the right-hand
pane. The right-hand pane displays non-modifiable, text-only
summary information about the currently selected address book
entry.
Address Book
MANAGING YOUR PRIVATE ADDRESS BOOK
Users can create contact and group entries to the address book
that can be accessed from your desktop.
Adding Contact Entries
1 From the GL Fax Address Book, select the Toshiba eSTUDIO28-45 GL Address Book. (Left pane).
2
74
Click New Contact on the tool bar or select File→New Contact...
from the menu.
GL-1010 Network Fax Operator’s Guide
The New contact properties window displays.
New Contact Properties
3
Select a Prefix as:
−
−
−
−
−
−
[Blank]
Dr.
Mr.
Mrs.
Miss
Ms
4
Enter the First Name and Last Name fields.
5
Select a Suffix as:
6
− [Blank]
− Jr.
− M.D.
− Sr.
− II
− III
− IV
Select a name display or type one of your own in the Display
field.
GL-1010 Network Fax Operator’s Guide
75
NOTE:
Be sure to enter the city code
and telephone number or, if
calling a different country,
enter the country code, city
(or area) code and local
number. If required, enter
the long-distance code.
7
− Prefix First Last-Suffix
− Prefix Last First-Suffix
− Prefix Last, First-Suffix
Type the Company and Department Name for the recipient.
8
Type the required Fax Number for the recipient.
Acceptable field entries are:
0,1,2,3,4,5,6,7,8,9,*,#,+, -, (space) and (comma)
9
Type the Email Address for the recipient.
10
Optionally, Click the check box to enable the Sub Address
and Password fields and enter a Sub Address and/or
Password. If you do not click the check box, the fields will be
grayed out. If you enable the Sub Address and Password
fields, you must enter either a sub address, a password or
both.
Enter a fax sub address to route or forward a fax to a specific
user or fax inbox. The sub address may consist of numbers
between 0 and 9, pound signs (#) and asterisks (*). The
maximum length for sub addresses is 20 characters. Enter a
value such as a return fax number. The password may consist
of numbers between 0 and 9, pound signs (#) and asterisks
(*). The maximum length for the password is 20 characters.
11
Optionally, type any pertinent notes or description.
12
Click OK to create the new entry.
Copying Contacts from an Address Book
You can copy members from other address books to the Fax
Address Book.
76
1
From the GL Fax Address Book, select the Toshiba eSTUDIO28-45 GL Address Book. (Left pane).
1
Click New Contact on the tool bar or select File→New Contact...
from the menu.
2
Click Select From Address Book to add a member of the Copier
Address Book, the MAPI Address Book, or the MS Outlook
Express Address Book to your Fax Address Book.
3
From the Address Books drop-down menu, select the address
book to copy the contact from.
4
Click the address book group to copy from in the left pane.
GL-1010 Network Fax Operator’s Guide
5
Click the contact to copy in the right pane.
6
Click Select.
Modifying Contact Properties
Users can make changes to contact information by invoking the
Properties dialog. Properties dialog can be invoked by double
clicking on the selected contact in the Address Book Viewer
window or by selecting the contact, and then choosing the
Properties menu item.
1
From the GL Fax Address Book, select the Toshiba eSTUDIO28-45 GL Address Book. (Left pane)
2
Click Properties on the tool bar or select File→Properties from
the menu.
The Contact Properties window displays.
Contact Properties
3
Overwrite or add information as desired in Properties
window.
4
Click OK to accept the changes and exit the Properties
window. Click Cancel to exit without changing the Contact
Properties.
GL-1010 Network Fax Operator’s Guide
77
Creating Groups
1 From the GL Fax Address Book, select the Toshiba eSTUDIO28-45 GL Address Book. (Left pane)
2
Click New Group on the tool bar or select File→New Group...
from the menu.
The New window displays.
Name of new group
Indicates total
member count.
List of members
Click to add members
to the group
Click to remove
members from
the group
Click to add members
that are not currently
listed in the address
book to the group
Click to view or
edit a contacts
properties
Group Properties
3
Enter the name for the new group in the Group Name field.
4
Click OK to save your settings.
Adding Contacts to Groups
1 From the GL Fax Address Book, select the group for which
you wish to add members.
2
Click Properties on the tool bar or select File→Properties from
the menu.
The Group Properties window displays.
3
78
Click the Select Members... button.
GL-1010 Network Fax Operator’s Guide
The Select Group Members dialog will display.
New Member list
Toshiba e-STUDIO2845 GL Address Book
list of contacts
Click to add members
not currently listed in
the address book
Click to view or edit a
contacts properties
Select Group Members dialog
The Select Group Members dialog contains two panes. The left
pane displays all the contacts and associated information that are
currently available in the Toshiba e-STUDIO28-45 GL Address
Book. The New Member, or right pane, displays all of the
contacts you select to be added to the group.
GL-1010 Network Fax Operator’s Guide
79
4
To add members to the group, select the name from the
Toshiba e-STUDIO28-45 GL Address Book pane and then
click Select ->. The contact is moved to the New Member list
indicating the selected member is to be added to the group.
Select Members Dialog
80
5
To remove members you have added to the New Member
pane in error, select the contact and then click the <-Remove
button.
6
To add a contact that is not listed in the Toshiba eSTUDIO28-45 GL Address Book, click the New Contact…
button. For further information, refer to Adding Contact Entries
on page 74.
GL-1010 Network Fax Operator’s Guide
7
When you have finished adding members to the group, click
OK and then click OK once more to save the new settings. To
return to the Address Book Editor without adding members
to the group, click Cancel.
New Group dialog
8
Click OK to save the new settings.
Removing a Member from a Group
1 From the GL Fax Address Book, select the group for which
you wish to add members.
2
Click Properties on the tool bar or select File→Properties from
the menu.
The Group Properties window displays.
3
Select the member in the members list that you want to
remove from the group.
4
Click the Remove button.
5
The member is removed from the list. Click OK to save your
settings.
GL-1010 Network Fax Operator’s Guide
81
Removing a Specific Contact or Group from the
Toshiba e-STUDIO28-45 GL Address Book
1 To delete an entry, right-click the folder or name in the
Address Book window, then select Delete.
Address Book Viewer
2
A message box displays, asking you to confirm the deletion.
3
Click Yes to permanently delete the contact or group entry
from the Address Book.
4
Click No to exit the message box without deleting the entry.
Copying and Pasting
The Copy and Paste menu commands are a feature users can use
when working with contact information. For example, you may
want to add a contact to several groups. By using the Copy menu
command you can copy the contact and then paste the
information in other groups.
82
1
Select the contact in the Address Book Viewer that you wish
to copy.
2
Click Copy on the toolbar or select Edit→Copy.
3
Navigate to the Address Book or to a particular group to
paste the contact.
4
Click Paste on the toolbar or select Edit→Paste.
GL-1010 Network Fax Operator’s Guide
5
The contact is added to the Address Book or Group you have
selected. You can now edit the contacts properties as desired
by clicking Properties in the toolbar or selecting
File→Properties from the menu.
Finding an Entry in the Address Book
In order to quickly locate contacts you can search the Address
Book database. You simply type in a string or letters to be used to
search the database. The Address Book Viewer will search for
any entry that contains the specified string. For example, you can
type Smit, and all Address Book entries that match the search
string Smit will be displayed. Including names like Smit, Smith,
Smiths. The search is not limited to names only.
1
Click Edit→Find from the menu.
2
The Find dialog displays.
Find dialog
3
Type the search characters or string in the Find Items
Containing field.
4
Click the Find Now button.
GL-1010 Network Fax Operator’s Guide
83
5
Results found that match the search criteria entered will be
displayed in the results list below. You can stop an active
search by clicking the Stop button.
Search criteria
Matching search
results
Find Dialog
6
To submit a new search query, click the New Search button.
This will clear the search criteria in the Find Items
Containing field and clear the results list. You can now enter
a new search.
7
Once you have searched for a contact or group you can
highlight the item in the results list and then click the
Properties button. The Contact Properties dialog for the
contact will display and you can view or modify the
information as desired.
Sorting Address Book Entries
Users can sort Address Book entries and Find results to display
the data to best suit their needs.
1
84
Select View→Sort By from the menu and choose to sort by
Name or Fax Number in Ascending or Descending order as
desired. Alternatively, click on a row header at the top of the
GL-1010 Network Fax Operator’s Guide
address list or Find results list to sort the column in ascending
or descending order.
Importing or Exporting Address Book Database Entries
NOTE:
The time it takes to import a
Public Address Book may
vary depending on the
number of records
maintained within the file
being imported.
The Import and Export features are provided with the GL Fax
Address Book application. You can import or export address
book application data in .csv file format to/from database.
Additionally, you can import or export the data to either a public
or private address book.
Public Address Books usually reside on a network server and
contain information many network users may need to access.
The Private Address Book resides on a user's workstation.
Importing Entries
1 Select the Toshiba e-STUDIO28-45 GL Address Book from
the Address Book View Window.
2
Click File→Import from the menu.
The Choose a File to Import dialog will display.
Choose File to Import dialog
3
In the Select Address Book File to Import From dialog,
browse for your address book file.
4
Click Ok to begin importing the file.
A import status window will display. When the process is
complete, the imported address will display in the Address Book
Viewer window. If you experience trouble with the import
process, check to verify the file format you are importing. The
file format supported in Comma Delimited (*.CSV) format.
GL-1010 Network Fax Operator’s Guide
85
If one or more records have been skipped during the import
process it may be due to one of the following reasons:
M
M
M
M
M
The record already exists.
Group name contains an invalid character.
The display name is empty.
The fax number is empty.
The fax number is invalid. Fax number are restricted to
the following set of characters: 0-9, +, -, [space], *, #.
Exporting Entries
1 Select the Toshiba e-STUDIO28-45 GL Address Book from
the Address Book View Window.
2
Click File→Export from the menu.
The Save Exported File As dialog will display.
Save Exported File As dialog
3
In the Save Exported File as dialog, browse for the file
location and type the name of your exported address book
file.
4
Click Ok to begin exporting the file.
The file will be created in the location indicated.
86
GL-1010 Network Fax Operator’s Guide
G LO S S A R Y O F TER M S
Definition of Common Terms
Term
Definition
ACS
Automatic Cassette Switching.
ADD
Auto-Duplexing Device. A copier component that allows double sided
printing and copying (standard equipment).
ADF
Auto-Document Feeder. An accessory that allows a document to be fed
or scanned without user intervention.
ADU
Auto-Duplexing Unit. An accessory that allows double sided printing and
copying (optional).
Auto Continue
Set Auto Continue options to specify how you want the digital copier to
respond to paper out conditions.
Bandwidth
The volume of data per unit of time a computer can handle. Bandwidth is
increased by connecting to faster transmission lines.
Bin
An output tray of a finishing unit or other paper output holding peripheral
such as a mailbox sorter.
Booklet Mode
A feature where each page of a document is printed on a half sheet of
paper, which can then be folded and/or stapled to produce a smaller
booklet/magazine. Booklet mode was previously known as magazine
sort. The GL-1010 supports two kinds of Booklet mode: left to right read
mode and right to left read mode.
GL-1010 Network Fax Operator’s Guide
87
Definition of Common Terms
Term
Definition
Bypass Feeder
See Stack Feed Bypass.
Cascade Printing
A feature where a copier switches to the next output tray when the first
designated output tray is full.
Cassette
The copier cassettes that contain the input paper.
Cover Sheet
A feature where one or two pages (front or front/back) are printed with the
original document as a cover.
Creep Size
Creep refers to the amount by which each page sticks out compared with
the last page when folded in a stack. Generally, the longer the document
(i.e., the more pages in a document), the greater the creep size. If you
plan on trimming the final booklet, specifying the creep size can prevent
the contents of the booklet from “creeping” into the page's “trim zone”.
The minimum is 0 and the maximum is 20.
Current Jobs
The list of all print and copy jobs currently queued to the selected GL1010 device can be viewed using either the TopAccess and GL DocMon
application.
Device
Device refers to the GL-1010 connected to a network digital copier.
Often, the term device is used to refer to the entire controller/copier
system.
DHCP
Dynamic Host Configuration Protocol.
Document Identification
Number
The Document Identification Number (DIN) is the code required to
release a Private Print or Proof Print job for printing. Enter the DIN from
the copier control panel.
Document Profile
A pre-defined set of driver settings that allows users to auto-configure
their print job with a click of the mouse.
Document Sticky
The paradigm where actions and/or configuration information about a
print job are transitory to a specific document with a specific software
application. For example, a change is made to the printer's settings and
only the current, client application is aware of the change. See Also
Printer-Sticky.
Drawer
See Cassette.
Driver
See Printer Driver.
Duplex
Duplex is the process of printing on both sides of a sheet of paper.
Duplex printing requires that Automatic Duplex Unit (ADU) be installed
on the copier.
88
GL-1010 Network Fax Operator’s Guide
Definition of Common Terms
Term
Definition
Electronic Document
Processing System
This system consists of the TOSHIBA e-STUDIO28/35/45 digital copier
connected to the GL-1010 controller. This allows users to enjoy the
convenience of walk-up copying, faxing, scanning, and network printing
from the same device.
Ethernet
A local area network (LAN) developed by Xerox, Digital and Intel (IEEE
802.3). It is the most widely used LAN access method. Token Ring is
next. Ethernet is normally a shared media LAN. All stations on the
segment share the total bandwidth, which is either 10 Mbps (Ethernet),
100 Mbps (Fast Ethernet) or 1000 Mbps (Gigabit Ethernet).
Finishing Unit
Finisher.
Frame
A data packet sent through the network. There are several types of
Frames, which differ in the way the data is arranged. In order for the
different nodes within a network to communicate, the same frame type
must be setup for each.
Gateway address
The IP Address of the router that the GL-1010 uses to access devices on
other subnets.
GL-1010
The Toshiba controller used to connect digital copiers to a network. Also
referred to as the device or printer.
Group sort
Multi-page, multi-copy output is collated into sets or groups.
Gutter
Gutter size is the distance between the two logical, facing pages of the
physical booklet. In other words, this is the size of the booklet's inside
margin. The minimum is 0 and the maximum is 150.
Hardware address
The unique address assigned by the manufacturer of a network interface
card. Also known as the Media Access Control (MAC) address.
HTTP
HyperText Transport Protocol. The Internet standard that supports
information exchange on the World Wide Web (WWW). HTTP provides
users with transparent access to the Internet.
Image overlay
Image Overlays are independent document files, which can contain text,
graphics, charts, tables or any other document element, that are merged
with another document during printing.
IP
Internet Protocol. The IP part of the TCP/IP communications protocol. IP
implements the network layer (layer 3) of the protocol, which contains a
network address and is used to route a message to a different network or
subnetwork. IP accepts “packets” from the layer 4 transport protocol
(TCP or UDP), adds its own header to it and delivers a “Datagram” to the
layer 2 data link protocol. It may also break the packet into fragments to
support the maximum transmission unit (MTU) of the network.
GL-1010 Network Fax Operator’s Guide
89
Definition of Common Terms
Term
Definition
IPX
Internetwork Packet Exchange. A NetWare communications protocol
used to route messages from one node to another. IPX packets include
network addresses and can be routed from one network to another.
Jobs Log
The Jobs Log contains a historic record of the jobs submitted to the
GL-1010. The information for each job includes the document name,
size, date and time stamp, and status. The Jobs Log can be filtered to
limit the number of jobs listed to specific types of jobs.
LCF
Large Capacity Feeder. A special paper feeding unit that can hold a large
amount of standard (Letter or A4) sized paper.
LPD
Line printer daemon. A print management program that runs on a host,
such as a Unix machine.
MAC
Media Access Control. The unique address assigned by the
manufacturer of a network interface card.
Magazine Sort
See Booklet Mode.
Manual Feeder
A special paper input unit which can be used to feed a single special
paper (such as envelope, thick paper, etc.) for print job. Also called the
Stack Feed Bypass.
Media
Paper type. For example, bond, transparencies, labels are all different
media types.
Message Log
The Message Log contains a historic record of errors and warnings that
occurred on the GL-1010 or the copier. The information for each
message includes the date, subsystem, and message severity. The
Message Log can be filtered to limit the number of messages listed to
specific criteria.
MFP
Multi-function peripheral. Hardware that combines several functions into
one unit; for example, the combination fax, copier, printer and scanner.
NDPS
Novell Distributed Print Services simplifies the process of setting up,
administering, and troubleshooting Novell printing by migrating away
from queue-based printing toward a more “plug in and print” paradigm.
NDPS Gateway
In order for non NDPS-aware printers, such as the
GL-1010, to operate within the NDPS model, a proprietary “gateway”
must be installed and configured on the network. The Toshiba NDPS
Gateway is distributed on the e-STUDIO GL-1010 Admin CD-ROM.
90
GL-1010 Network Fax Operator’s Guide
Definition of Common Terms
Term
Definition
NDS
NetWare Directory Service. NDS maintains a hierarchical database of
information about the network resources within a global enterprise,
including networks, users, subgroups, servers, volumes and printers.
Unlike the bindery, which was the directory service in NetWare 3.x, NDS
users log onto the network as a whole, not a specific server, and NDS
determines their access rights.
NDS Context
The container or organizational unit that contains the print server object.
Print queue and device objects can be located anywhere within the NDS
tree, but the HP JetDirect print server needs to be configured to use the
fully-qualified print server object name. Select this text box and type the
NDS context.
NDS Tree Name
Refers to the name of the organizational tree used by your network. This
name is normally found in the Net.cfg file located with your MS-DOS
Vlm.exe program or from within the Nwuser.exe program that runs under
Windows. Click the down-arrow in this box and select the appropriate
tree name.
NetBEUI
NetBIOS Enhanced User Interface. Pronounced “net-booey,” it is an
enhanced version of the NetBIOS protocol used by network operating
systems such as LAN Manager, LAN Server, Windows for Workgroups,
Windows 95, Windows 98, Windows Me, Windows NT, Windows 2000
and Windows XP. It formalizes the transport frame that was never
standardized in NetBIOS and adds additional functions.
NetWare
A network operating system from Novell based on a client/server
architecture. Clients log onto one or more file servers, which provide
network services such as Email, printing, and storage.
Network Printing
Printing from a Windows, Macintosh, or Unix client workstation to the
GL-1010, with the output produced on the connected Toshiba digital
copier.
NFS
Network File System. A Unix networking protocol that allows files and
printers to be shared across the network.
NIC
Network Interface Card. A printed circuit board that is installed in both
client (personal computers or workstations) and server machines to
control the exchange of data between them.
N-up
This term refers to the number of page images printed on one sheet of
paper. For example, if you want to print slides or web pages, you might
use the N-up feature to print up to 16 pages on one sheet of paper. Also
called “Multiple Pages Per Sheet” printing.
GL-1010 Network Fax Operator’s Guide
91
Definition of Common Terms
Term
Definition
Orientation
Orientation refers to the direction a document is laid out on a page. A
Portrait orientation produces a vertical page layout (i.e., the page height
is greater than width). A Landscape orientation produces a horizontal
page layout (i.e., the page width is greater than the height).
Page Interleaving
A feature where a blank sheet is inserted between the pages of a print
job. Job Dividing Sheet is not stapled with the rest of the original
document (if stapling is requested). This feature is previously known as
Tab Sheet Insertion. See Also: Cover Sheet and Sheet Insertion.
Paper Attribution on Tray
A feature where an administrator can assign which tray/bin is used for
which purpose (e.g., Tray 1 is to be used for Fax only).
PCL
The command language for the HP LaserJet printers. It has become a de
facto standard used in many printers and typesetters. PCL Level 5,
introduced with the LaserJet III in 1990, also supports Compugraphic's
Intellifont scalable fonts. Starting with the LaserJet 5 in 1996, PCL Level 6
streamlines the graphics and font commands, reducing the amount of
information that has to be sent to the printer.
PCONSOLE
A NetWare utility that can be used to monitor and manage queues on a
NetWare server.
PDL
Page description language. A programming language, such as
PostScript, that describes output to a printer.
Peer to Peer
A network architecture in which nodes communicate directly with other
nodes, as opposed to client/server architecture.
PostScript
A page description language (PDL) from Adobe that is used extensively
on all computer platforms. It is the de facto standard in commercial
typesetting and printing houses. Most all accept and may even require
PostScript files as electronic input.
Printer Driver
Software installed on the client workstation that enables printing to a
device. There are six Toshiba printer drivers on the e-STUDIO GL-1010
Client CD-ROM that permit printing to the GL-1010 controller.
Printer-Sticky
The paradigm where actions and/or configuration information is
permanently saved so that it is accessible later. For example, a change is
made to the printer's settings and all applications are aware of the
change. See also, Document-Sticky.
Printing mode
Printing mode defines the way the print job is processed by the GL-1010:
as a Normal job, a Private Print job, Proof Print job, or Scheduled Print
job.
92
GL-1010 Network Fax Operator’s Guide
Definition of Common Terms
Term
Definition
Private print
Private Print is a printing mode that allows users to send a job from their
workstation, and then hold it until the user enters a private DIN from the
copier to release and print the job.
Proof print
Proof Print is a print mode that allows users to print only the first of a
multi-copy job and review it before releasing and printing the remaining
copies.
Property sheet
Property sheets contain attributes grouped categorically. For example, all
properties that are related to setting finishing options are grouped on the
GL-1010 drivers’ Setup property page.
Property tab
The Print Properties dialog box contains several tabs that allow users to
access property sheets, where options and settings are grouped by
category or function.
Protocol stack
A collection of software that controls communication between devices.
Devices with the same protocol stack can communicate with each other.
Raw Print Job
A print job that is sent to the GL-1010 device by means other than the
GL-1010 printer driver. For example, using DOS commands to print
directly to the local port without using a printer driver. Raw print jobs also
result when users print to a GL-1010 using a different driver version or
type. For example, using a HP driver to print to a GL-1010.
Recoverable error
An error condition that simply requires user intervention to resolve, for
example, paper out or paper jam.
Saddle stitch
Saddle stitching is a binding method whereby a booklet is stapled along
the center and folded.
Scheduled print
Scheduled Print is a print mode that allows users to delay printing a
queued job until a specific date and time.
Sheet insertion
A feature where a blank page is printed in between a designated pages
with the original document. Insertion Sheet is stapled with the original
document (if stapling is requested). See also, Page Interleaving.
SNMP
Simple Network Management Protocol. A widely used network
monitoring and control protocol. Data is passed from SNMP agents,
which are hardware and/or software processes reporting activity in each
network device (hub, router, bridge, etc.) to the workstation console used
to oversee the network. The agents return information contained in a MIB
(Management Information Base), which is a data structure that defines
what is obtainable from the device and what can be controlled.
Originating in the Unix community, SNMP has become widely used on all
major platforms.
GL-1010 Network Fax Operator’s Guide
93
Definition of Common Terms
Term
Definition
Stack Feed Bypass
A special paper input unit which can be used to feed more than a single
sheet of special paper (such as envelope, thick paper, etc.) for print job.
Subnet
A range of IP addresses.
Subnet Mask
A number that identifies a subnetwork so an IP address can be shared by
the local network.
TCP/IP
Transmission Control Protocol/Internet Protocol. The TCP part of TCP/IP
provides transport functions, which ensures that the total amount of bytes
sent is received correctly at the other end. The IP part of TCP/IP provides
the routing mechanism. TCP/IP is a protocol in which the messages
transmitted contain the address of a destination network as well as a
destination station.
Token Ring
A data link protocol (MAC layer) for local area networks (LAN) developed
by IBM (IEEE 802.5). Token Ring is more deterministic than Ethernet. It
ensures that all users get regular turns at transmitting their data. With
Ethernet, all users compete to get onto the network.
Tray
The location on the copier where a print job is output.
URL
Uniform Resource Locator. An address that allows you to access
information on the Internet, either a web page, FTP or Gopher, Usenet, or
a database. URLs can take the following forms: “http://host.domain/page”
and “mailto://[email protected]”.
Watermark
Watermarks are text images (formatted words or phrases) that print in the
background of a document. Watermarks can be printed as transparent
text, on only the first or on all pages of the document, in solid or in outline
form.
94
GL-1010 Network Fax Operator’s Guide
IN DEX
A
C
Add Printer 29
Adding contact entries 74
Adding contacts to Groups 78
Address Book 37
creating private contacts 74
Editor 16
exporting database entries 86
finding entries 83
Groups 71
importing database entries 85
navigating 73
new recipient 55
removing contacts or groups 82
removing recipients 56
running 72
sorting entries 84
Address Book Viewer 24
Company 39, 76
Contact Properties 39
modifying 77
Copy menu 82
Cover sheet 57
Cover Sheet Properties 40
Creating Groups 78
GL-1010 Network Fax Operator’s Guide
D
Delayed Fax
defined 19
Deleting fax jobs 62, 68
Department 39, 76
Display 39, 75
Document size 39
Document sticky 36
95
E
I
Email Address 39, 76
e-STUDIO
GL-1010
Electronic
Document Processing System
defined 18
Exporting database entries 86
Importing database entries 85
F
Fax
deleting jobs 62, 68
managing 61
sending 61
Fax Driver 24
defined 19
installing 26
Fax Number 39, 76
Fax properties 36, 37
Fax sticky 36
Finding entries 83
First Name 39, 75
L
Last Name 39, 75
Local Operations
defined 19
M
Managing faxes 61
Modifying Contact Properties 77
N
Network Printing
defined 19
Notes 40
notes 76
G
O
GL DocMon 61
deleting fax jobs 62
GL-1010
defined 19
features 24
GL-1010 Administrator’s Guide 20
GL-1010 Operator’s Guide (Basic) 20
GL-1010 Scan Operator’s Guide 20
Groups 71
adding contacts 78
removing a member 81
Online help 21
96
P
Page orientation 57
Page size 57
Paper size conversions 39
Password 40, 76
Paste menu 82
Prefix 39, 75
Print properties 72
Printer name 30
Properties
Contact 39
Cover Sheet 40
GL-1010 Network Fax Operator’s
Fax 36
Print 72
Send 37
Sender 42
deleting fax jobs 68
Toshiba GL-1010 Program Group 72
U
Quick Start Guide 20
Uninstalling Client Software 32
Use Sub Address and Password (check
box) 39
R
W
Recipient
adding 55
deleting 56
Removing a member from a Group 81
Removing recipients 56
Resolution 57
Walk-up functions
defined 19
Q
S
Scheduling faxes 59
Selecting recipients 54
Send fax 61
Send Properties 37
Sender information 59
Sender Properties 42
Setting
fax properties 37
fax resolution 57
orientation 57
page size 57
Shared printer 30
Sorting entries 84
Sub Address 40, 76
Suffix 39, 75
T
TopAccess 67
GL-1010 Network Fax Operator’s Guide
97
98
GL-1010 Network Fax Operator’s