1
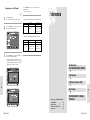
DVD RECORDER-VCR
D-VR3SU
OWNER’S MANUAL
Read this booklet first.
I/
ON/STANDBY
DUBBING
TO DVD TO VCR
C 2004 Toshiba Corporation
TO REDUCE THE RISK OF ELECTRIC SHOCK, DO NOT
REMOVE THE COVER(OR BACK).
NO USER-SERVICEABLE PARTS ARE INSIDE. REFER
SERVICING TO QUALIFIED SERVICE PERSONNEL.
This symbol indicates “dangerous voltage”
inside the product that presents a risk of
electric shock or personal injury.
This symbol indicates important instructions accompanying the product.
Do not install this equipment in a confined space such
as a bookcase or similar unit.
WARNING : To prevent damage which may result in fire
or electric shock hazard, do not expose this
appliance to rain or moisture.
CAUTION : DVD Recorder-VCRS USE AN INVISIBLE
LASER BEAM WHICH CAN CAUSE
HAZARDOUS RADIATION EXPOSURE
IF DIRECTED.
BE SURE TO OPERATE RECORDER
CORRECTLY AS INSTRUCTED.
CAUTION
THIS PRODUCT UTILIZES A LASER.
USE OF CONTROLS OR ADJUSTMENTS OR PERFORMANCE OF PROCEDURES OTHER THAN THOSE
SPECIFIED HEREIN MAY RESULT IN HAZARDOUS
RADIATION EXPOSURE.
DO NOT OPEN COVERS AND DO NOT REPAIR YOURSELF. REFER SERVICING TO QUALIFIED PERSONNEL.
CAUTIONS
Caution: To prevent electric shock, match wide blade of
plug to wide slot, fully insert.
Attention: Pour éviter les chocs électriques, introduíre la
lame la plus large de la fiche dans la borne
correspondante de la prise et pousser jusqu au
fond.
This product satisfies FCC regulations when shielded
cables and connectors are used to connect the unit to
other equipment. To prevent electromagnetic interference with electric appliances, such as radios and televisions, use shielded cables and connectors for connections.
FCC NOTE (for U.S.A):
This equipment has been tested and found to comply
with the limits for a Class B digital device, pursuant to
2 - English
• Toshiba is not liable for any damage caused by fires,
natural disaster (such as thunder, earthquake, etc...)
acts by third parties, accidents, owner's intentional or
unintentional misuse, or uses in other improper conditions.
• Toshiba is not liable for incidental damages (such as
profit loss or interruption in business, modification or
erasure of recorded data, etc.) caused by use or inability to use of this product.
• Toshiba is not liable for any damage caused by neglect
of the instructions described in the owner's manual.
• Toshiba is not liable for any damage caused by misuse
malfunction through simultaneous use of this product
and the connected equipment or software that Toshiba
is not concerned with.
• Toshiba does not dimpensate for contents which were
not recorded/edited because of some malfunctions of
this product or discs during operation, and is not liable
for incidental damages (such as profit loss or interruption in business, etc.) produced by such conditions.
This unit can be used only where the power supply
is AC 120V, 60Hz. It cannot be used elsewhere.
Note This DVD Recorder-VCR is designed and
manufactured to respond to the Region
Management Information.
If the Region number of a DVD disc does not correspond to the Region number of this DVD RecorderVCR, the DVD Recorder-VCR cannot play the disc.
This device is protected by U.S. Patent
Nos.4,631,603;4,577,216;4,819,098;4,907,093; and
6,516,132. This product incorporates copyright
protection technology that is protected by U.S.
patents and other intellectual property rights. Use
of this copyright protection technology must be
authorized by Macrovision,and is intended for
home and other limited viewing uses only unless
otherwise authorized by Macrovision. Reverse
engineering or disassemblyis prohibited.
This product is covered by one or more of the
following U.S. patents:
5,034,830 5,060,200 5,457,669 5,561,649
5,691,858 5,705,762 5,987,417 6,043,912
6,222,983 6,272,096 6,377,524 6,377,531
6,385,587 6,389,569 6,389,570 6,408,408
6,466,532 6,473,736 6,477,501 6,480,829
6,556,520 6,556,521 6,556,522 6,594,208
6,674,697 6,674,957 6,721,493 6,728,474
6,741,535 09/610381 09/610695
It is permissible to record television programs, film,
video tapes and other material only in the event
that third party copyrights and other rights are not
violated.
It is prohibited by law to copy, broadcast, show,
broadcast on cable, play in public, and rent copyrighted material without permission.
Some DVD video discs are copy protected, and any
recordings made from these discs will be distorted.
The product unit accompanying this user manual is
licensed under certain intellectual property rights of certain third parties. In particular, this product is licensed
under the following US patents:
5,991,715, 5,740,317, 4,972,484, 5,214,678, 5,323,396,
5,539,829, 5,606,618, 5,530,655, 5,777,992, 6,289,308,
5,610,985, 5,481,643, 5,544,247, 5,960,037, 6,023,490,
5,878,080, and under US Published Patent Application
No. 2001-44713-A1.
This license is limited to private non-commercial use by
end-user consumers for licensed contents. No rights are
granted for commercial use. The license does not cover
any product unit other than this product unit and the
license does not extend to any unlicensed product unit or
process conforming to ISO/IEC 11172-3 or ISO/IEC
13818-3 used or sold in combination with this product
unit. The license only covers the use of this product unit
to encode and/or decode audio files conforming to the
ISO/IEC 11172-3 or ISO/IEC 13818-3. No rights are
granted under this license for product features or functions that do not conform to the ISO/IEC 11172-3 or
ISO/IEC 13818-3.
Precaution
Important Safety Instructions
CAUTION : PLEASE READ AND OBSERVE ALL WARNINGS AND INSTRUCTIONS GIVEN IN THIS
OWNER’S MANUAL AND THOSE MARKED
ON THE UNIT. RETAIN THIS BOOKLET FOR
FUTURE REFERENCE.
This set has been designed and manufactured to assure personal.safety Improper use can result in electric shock or fire
hazard. The safeguards incorporated in this unit will protect
you if you observe the following procedures for installation,
use and servicing. This unit is fully transistorized and does
not contain any parts that can be repaired by the user.
DO NOT REMOVE THE CABINET COVER, OR YOU MAY
BE EXPOSED TO DANGEROUS VOLTAGE. REFER SERVICING TO QUALIFIED SERVICE PERSONENEL ONLY.
1) Read these instructions.
2) Keep these instructions.
3) Heed all warnings.
4) Follow all instructions.
5) Do not use this apparatus near water.
6) Clean only with dry cloth.
7) Do not block any ventilation openings. Install in accordance with the manufacturer’s instructions.
8) Do not install near any heat sources such as radiators,
heat registers, stoves, or other apparatus (including
amplifiers) that produce heat.
9) Do not defeat the safety purpose of the polarized or
grounding-type plug. A polarized plug has two blades
with one wider than the other. A grounding type plug has
two blades and a third grounding prong. The wide blade
or the third prong are provided for your safely. If the provided plug does not fit into your outlet, consult an electrician for replacement of the obsolete outlet.
10) Protect the power cord from being walked on or
pinched particularly at plugs, convenience receptacles,
and the point where they exit from the apparatus.
11) Only use attachments/accessories specified by the manufacturer
12) Use only with the cart, stand, tripod, bracket, or table
specified by the manufacturer, or sold with the apparatus. When a cart is used, use caution when moving the
cart/apparatus combination to avoid injury from tipover.
13) Unplug this apparatus during lightning storms or when
unused for long periods of time.
14) Refer all servicing to qualified service personnel..
Servicing is required when the apparatus has been damaged in any way, such as power-supply cord or plug is
damaged, liquid has been spilled or objects have fallen
into the apparatus, the apparatus has been exposed to
rain or moisture, does not operate normally, or has been
dropped.
English - 3
Getting Started
Getting Started
Warning
Part 15 of the FCC Rules. These limits are designed to
provide reasonable protection against harmful interference
in a residential installation. This equipment generates, uses
and can radiate radio frequency energy and, if not installed
and used in accordance with the instructions, may cause
harmful interference to radio communications. However,
there is no guarantee that interference will not occur in a
particular installation. If this equipment does cause harmful
interference to radio or television reception, which can be
determined by turning the equipment off and on, the user is
encouraged to try to correct the interference by one or more
of the following measures:
• Reorient or relocate the receiving antenna.
• Increase the separation between the equipment and
receiver.
• Connect the equipment into an outlet on a circuit different from that to which the receiver is connected.
• Consult the dealer or an experienced radio/TV technician for help.
15) When you use headphones, keep the volume at a moderate level. If you use the headphones continuously with
high volume sound, it may cause hearing damage.
16) Do not overload wall outlets : extension cords, or integral convenience receptacles as this can result in a risk
of fire or electric shock.
17) Apparatus should not be exposed to dripping or splashing and no objects filled with liquids, such as vases,
should be placed on the apparatus.
18) Keep your fingers well clear of the disc tray as it is closing. Neglecting to do so may cause serious personal
injury.
19) Do not place a heavy object on or step on the apparatus.
The object may fall, causing serious personal injury and
serious damage to the apparatus.
20) Do not place the apparatus on amplifiers or equipment
that may produce heat.
21) Do not cover the ventilating holes for the inside cooling
fan.
22) Do not use a cracked, deformed, or repaired disc. These
discs are easily broken and may cause serious personal
injury and apparatus malfunction.
23) If the apparatus should smoke or smell, immediately
disconnect the power cord from the wall outlet. Wait
until the smoke or smell stops, then ask your dealer for
a check and repair. Neglecting to do so may cause fire.
24) While it is thundering, do not touch the connecting
cables or the apparatus.
25) The apparatus includes lead, an ingredient of solder
human and the environment. When disposing of this
apparatus, follow the rules and regulations in your area.
Handling Cautions
• Before connecting other components to this recorder, be
sure to turn them all off.
• Do not move the recorder while a disc is being played, or
the disc may be scratched or broken, and the recorder’s
internal parts may be damaged.
• Do not put a flower vase filled with water or any small
metal objects on the recorder.
• Be careful not to put your hand into the disc tray.
• Do not place anything other than the disc in the disc tray.
• Exterior interference such as lightning and static electricity can affect normal operation of this recorder. If this
occurs, turn the recorder off and on again with the
POWER button, or disconnect and then reconnect the
power cord to the wall outlet. The recorder will operate
normally.
• Be sure to remove the disc and turn off the recorder after use.
• Disconnect the power cord from the wall outlet when you
don’t intend to use the recorder for long periods of time.
Maintenance of Cabinet
For safety reasons, be sure to disconnect the power cord
from the wall outlet.
• Do not use benzene, thinner, or other solvents for
cleaning.
• Wipe the cabinet with a soft cloth.
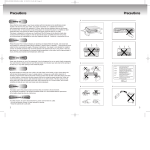
Disc Handling
• Use discs with regular shapes.
If an irregular disc (a disc
with a special shape) is used,
this DVD Recorder-VCR may
be damaged.
Holding discs
• Avoid touching the surface of a disc
where recording is performed.
Cartridge
• This is used to prevent damage by dirt, scratches, etc.
when using a DVD-RAM/RW/R disc.
DVD-RAM, DVD-RW and DVD-R
• Clean with an optional DVD-RAM/PD
disc cleaner. Do not use cleaners or
cloths for CDs to clean DVDRAM/
DVD-RW/DVD-R discs.
DVD-Video, CD
Disc Storage
Be careful not to harm the disc because the data on these
discs is highly vulnerable to the environment.
• Do not keep under direct sunlight.
• Keep in a cool ventilated area.
• Store vertically.
• Keep in a clean protection jacket.
• If you move your DVD Recorder-VCR suddenly from a
cold place to a warm place, condensation may generate on the operating parts and lens and cause abnormal disc playback. If this occurs, remove the disc and
wait for one to two hours with the power on before
attempting playback.
Cautions on handling discs
• Do not write on the printed side with a ball-point pen
or pencil.
• Do not use record cleaning sprays or antistatic. Also,
•
•
•
•
do not use volatile chemicals, such as benzene or
thinner.
Do not apply labels or stickers to discs. (Do not use
discs fixed with exposed tape adhesive or leftover
peeled-off stickers.)
Do not use scratch-proof protectors or covers.
Do not use discs printed with label printers available
on the market.
Do not load warped or cracked discs.
not recorded/edited because of some malfunctions of
this product or discs during operation, and is not
liable for incidental damages (such as profit loss or
interruption in business, etc.) produced by such conditions.
Power Outage
• After a power outage the clock display will flash. Set
the clock to the correct time.
Notes on copyright
• It is prohibited law to copy, broadcast, show, broadcast
Notes on recording and editing
• When you record/edit important content, make trial
operations beforehand to confirm the recorder can
function properly.
Toshiba does not compensate for content which was
not recorded/edited because of some malfunction of
this product or discs during operation, and is not
liable for incidental damages (such as profit loss or
interruption of business, etc.) produced in such conditions.
• When the power cord is disconnected or when a
power failure occurs during any operation of this
product, all contents recorded in this recorder may be
erased.
• Depending on the channel or program, an excessive
sound. Adjust the initial setting of the recording level
when necessary.
• If a program you have set a timer recording includes
copy restriction signals, it may not be recorded. When
programming a recording, confirm that a program you
want to record is not copy-restricted.
• Wipe off dirt or contamination on the disc with a soft
cloth.
• Toshiba does not compensate for contents which were
on cable, play in public, and rent copyrighted material
without permission.
• Some DVD video discs are copy protected,and any
recordings made from these discs will be distorted.
• This product incorporates copyright protection technology that is protected by method claims of certain
U.S, patents and other intellectual property rights
owned by Macrovision Corporation and other rights
owners. Use of this copyright protection technology
must be authorized by Macrovision Corporation, and
is intended for home and other limited viewing uses
only unless otherwise authorized by Macrovision
Corporation. Reverse engineering of disassembly is
prohibited.
• This unit incorporates CPRM (Content Protection for
Recording Media) technology for copyright protection.
Recording and copying on this recorder depend on the
contents as described next page.
VCR Plus+ and PlusCode are registered trademarks
of Gemstar Development Corporation. The VCR
Plus+ system is manufatured under license from
Gemstar Development Corporation.
Exemptions
• Toshiba is not liable for any damage caused by fires,
natural disaster (such as thunder, earthquake, etc.),
acts by third parties, accidents, owner's intentional or
unintentional misuse, or uses in other improper conditions.
• Toshiba is not liable for incidental damages (such as
profit loss or interruption in business, modification or
erasure of recorded data, etc.) caused by use or inability to use of this product.
• Toshiba is not liable for any damage caused by neglect
of the instructions described in the owner's manual.
• Toshiba is not liable for any damage caused by misuse
or malfunction through simultaneous use of this product and the connected equipment or software that
Toshiba is not concerned with.
• Clean the disc by wiping in a straight line from the inside
to the outside of the disc.
4 - English
English - 5
Getting Started
Getting Started
ADDITIONAL SAFETY INSTRUCTIONS
Disc Specifications
• A digital versatile disc (DVD) can contain up to 135minutes of images, 8-language audio and 32 subtitle
languages. It is equipped with MPEG-2 picture compression and Dolby 3D surround, allowing you to
enjoy vivid and clear theater quality images in the
comfort of your own home.
• When switching from the first layer to the second
layer of a double-layered DVD Video disc, there may
be momentary distortion in the image and sound.
This is not a malfunction of the unit.
• Once a DVD-R/RW recorded in Video Mode is finalized, it becomes DVD-Video.
• Use a 700MB(80 minutes) CD-R/RW disc.
If possible, do not use a 800MB(90 minutes) or above
disc, as the disc may not play back.
• If the CD-R/RW disc was not recorded as a closed session, you may experience a delay in the early playback time, and all recorded files may not play.
• Some CD-R/RW discs may not be playable with this
unit, depending on the device which was used to burn
them.
For contents recorded on CD-R/RW media from CDs
for your personal use, playability may vary depending
on contents and discs.
• An audio disc on which 44.1kHz PCM Audio is
recorded.
• Once a DVD-RW/-R recorded in Video Mode is final• You can record onto the available space on the disc
•
• Plays CD-DA format audio CD-R and CD-RW discs.
This unit may not be able to play some CD-R or CDRW discs due to the condition of the recording.
•
•
CD-R/RW
MP3 CD-R/RW
• Only CD-R discs with MP3 files recorded with
ISO9660 or JOLIET format can be played back.
• Only MP3 files with the "mp3" or "MP3" extension
Protection
- This is a format that is used for recording data on a
DVD-RAM or DVD-RW disc. You can repeat recording,
editing, deleting, partial deletion, creation of playlist,
and etc.
- A disc that is recorded in this mode may not be played
by existing DVD players.
This DVD Recorder-VCR can
allow you to protect the contents of your discs, as
described below.
• Cartridge-protected:
With the write-protect tab
set in the protect position,
the contents of the disc cannot be recorded, edited, or
erased.
• DVD-RW (Video mode)
- This is a format that is used for recording data on a
DVD-RW or DVD-R disc. The disc can be played by an
existing compatible DVD player once it has been finalized.
- If a disc that has been recorded in Video mode by a different manufacturer's recorder and other Toshiba model
but has not been finalized it cannot be played or additionally be recorded by this recorder.
DVD-R Disc Playback and Recording
ized, it becomes DVD-Video.
Audio CD
• DVD-RW (VR mode)
•
•
and perform editing functions such as giving titles to
discs and programs and erasing programs before finalizing.
When programming is erased from a DVD-R, that
space does not become available. Once an area on a
DVD-R is recorded on, that area is no longer available
for recording, whether the recording is erased or not.
It takes about 30 seconds for the unit to complete
recording management information after recording finishes.
This product optimizes the DVD-R for each recording.
Optimizing is carried out when you start recording
after inserting the disc or turn on the unit. Recording
onto the disc may become impossible if optimizing is
carried out too many times.
Playback may be impossible in some cases due to the
condition of recording.
It may not be able to play some DVD-R discs depending on the disc and the condition of the recording.
both files and folders.
• DVD-RAM discs come with or without a cartridge. For
•
•
•
•
•
•
•
DVD-RW Disc Playback and Recording
• Only JPEG files with the ".jpg"or ".JPG" extension can
be used.
• The unit can handle a maximum of 1000 including
both files and folders.
• Maximum size of progressive JPEG is 3M pixels.
• MOTION JPEG is not supported.
6 - English
this product, we recommend DVD-RAM discs that
come with cartridges.
Some cartridges are able to eject the disc inside. Even
if you are able to eject the disc, always use the disc
with the cartridge to ensure correct operation.
DVD-RAM discs have a Write Protect tab in order to
avoid accidental erasure of recorded data. With the
Write Protect tab set to PROTECT, you can play the
disc, but recording or erasing will not work. Set the
Write Protect tab to UNPROTECT to format the disc
or erase data.
Ensure that the recording mode is set to VR mode.
Otherwise, this product will not be able to play the
recording.
You cannot play a DVD-RAM in most DVD players
due to compatibility issues.
Only DVD-RAM standard Version 2.1 discs can be
played in this unit.
DVD-RAM recorded on this unit may not work with
other DVD Players. To determine compatibility with
these DVD-RAM discs, refer to the user’s manual for
the player.
This unit is compatible with both non-cartridge and cartridge DVD-RAM, but the write-protect tabs on cartridgetype discs give better protection to your recordings.
❋
DVD-RAM/DVD-RW/DVD-R discs that are incompatible with the DVD-VIDEO format can not be
played with this product.
For more information on recording a DVD, consult
your DVD-RAM/DVD-RW/DVD-R manufacturer.
If poor quality DVD-RAM/DVD-RW/DVD-R discs
are used, your recordings may fail.
Do not use the following discs!
• LD, CD-G, CD-I, CD-ROM, DVD-ROM, VCD, DVD+R
and DVD+RW discs should not be used in this product.
[Note]
Disc types that can be played : CD/CD-R/
CD-RW/MP3/JPEG/DVD-Video/DVD-RAM/ DVDRW/DVD-R. However, if your DVD-RW/-R disc was
recorded with another device, it may be played only if it
was recorded and finalized in video mode.
• Some commercial discs and DVD discs purchased outside your region may not be playable with this product. When these discs are played, either “No disc.” or
“Please check the regional code.” will be displayed.
• If your DVD-RW disc is an illegal copy or is not in
DVD video format, it may also not be playable.
• Recording and playback can be performed on DVDRW discs in both Video and VR Modes.
JPEG CD-R/RW
❋
❋
can be used.
from 32 Kbps to 320 Kbps, the sound may cut in out.
List”
• Disc-protected: See page 89 “Disc Protection”
DVD-RAM Disc Playback and Recording
• For MP3 files recorded with a VBR(Variable Bit Rates),
• Playable bitrate range is from 56Kbps to 320Kbps.
• The unit can handle a maximum of 1000 including
• Program-protected: See page 78 “Locking the title
• Once a DVD-RW recorded in VR Mode is finalized,
you cannot perform additional recording.
• Once a DVD-RW recorded in Video Mode is finalized,
it becomes DVD-Video.
• In both modes, playback can be performde before and
after finalization, but additional recording, deleting
and editing can not be performed after finalization.
• If you want to record the disc in VR Mode and then
record in VR Mode, be sure to execute format. Be careful when executing Format because all the recorded
data will be lost.
• A DVD-RW blank disc is initialized to VR Mode when
first initialized.
COPY PROTECTION
• Many DVD discs are encoded with copy protection.
Because of this, you should only connect your DVD
Recorder-VCR directly to your TV, not to a VCR.
Connecting to a VCR results in a distorted picture from
copy-protected DVD discs.
• This product incorporates copyright protection technology that is protected by methods claims of certain
U.S. patents and other intellectual property rights
owned by Macrovision Corporation and other rights
owners. Use of this copyright protection technology
must be authorized by Macrovision Corporation, and is
intended for home and other limited viewing uses only
unless otherwise authorized by Macrovision
Corporation. Reverse engineering or disassembly is
prohibited.
English - 7
Getting Started
Getting Started
DVD-Video
Using CD-R/RW
Photo CD Playback . . . . . . . . . . . . . . . . . . .54
Viewing Title List . . . . . . . . . . . . . . . . . . . . .75
Setting Up the Audio Options . . . . . . . . . . .30
Playing back MP3 CD . . . . . . . . . . . . . . . . .55
Playing a Title List Entry . . . . . . . . . . . . . . .76
Setting Up the Display (Video) Options . . . .31
Using PIP . . . . . . . . . . . . . . . . . . . . . . . . . . .56
Renaming a Title List Entry . . . . . . . . . . . .77
Setting Up the Parental Control . . . . . . . . . .32
Getting Started
Warning . . . . . . . . . . . . . . . . . . . . . . . . . . . . 2
Precaution . . . . . . . . . . . . . . . . . . . . . . . . . . 3
General Features . . . . . . . . . . . . . . . . . . . . .10
Before Reading the User’s Manual . . . . . . . .11
How to use the DVD Recorder-VCR . . . . . . .11
Front Panel
. . . . . . . . . . . . . . . . . . . . . . . .13
Front Panel Display . . . . . . . . . . . . . . . . . . .13
Rear Panel . . . . . . . . . . . . . . . . . . . . . . . . .14
*VCR Playback
Deleting a Title List Entry . . . . . . . . . . . . . .78
Auto Channel Memory . . . . . . . . . . . . . . . .33
Playing the VCR . . . . . . . . . . . . . . . . . . . . .57
Locking a Title List Entry . . . . . . . . . . . . . .79
Channel Add/Delete . . . . . . . . . . . . . . . . . .34
Tracking . . . . . . . . . . . . . . . . . . . . . . . . . . .57
Deleting a Section from a Title List Entry . .80
RF Output Channel . . . . . . . . . . . . . . . . . . .35
Special VCR Playback Features . . . . . . . . . .58
Creating a Playlist Entry . . . . . . . . . . . . . . .81
Guide Channel Setup . . . . . . . . . . . . . . . . . .35
S-VHS Playback . . . . . . . . . . . . . . . . . . . . .58
Editing a Playlist Entry . . . . . . . . . . . . . . . .83
VCR Setting . . . . . . . . . . . . . . . . . . . . . . . .36
Variable Search System . . . . . . . . . . . . . . . . .59
Editing Scene for a Playlist Entry . . . . . . . . .84
Copying a Playlist Entry to the VCR . . . . . .88
Video Input . . . . . . . . . . . . . . . . . . . . . . . .37
Front Display . . . . . . . . . . . . . . . . . . . . . . .38
Recording
*DVD Recording
Playback
Deleting a Playlist Entry from the Playlist . .88
Disc Manager . . . . . . . . . . . . . . . . . . . . . . . .89
Before Recording . . . . . . . . . . . . . . . . . . . . .60
Reference
*DVD Playback
Recording the current channel you are watching 62
Before Playing . . . . . . . . . . . . . . . . . . . . . . .39
Making a One Touch Recording(OTR) . . . . .63
Troubleshooting (DVD-VIDEO/DVD-RAM/
Playing a Disc . . . . . . . . . . . . . . . . . . . . . . .40
VCR Plus+ Record . . . . . . . . . . . . . . . . . . . .63
DVD-RW/DVD-R) . . . . . . . . . . . . . . . . . . . .96
Using the Search & Skip Functions . . . . . . .42
Making a Timer Recording . . . . . . . . . . . . . .64
Troubleshooting . . . . . . . . . . . . . . . . . . . . .97
Slow Motion Play / Step Motion Play . . . . . .42
Editing Timer Record List . . . . . . . . . . . . . .66
Problems and Solutions (VCR) . . . . . . . . . .98
About QUICK . . . . . . . . . . . . . . . . . . . . . . .43
Deleting a Timer Recording Entry . . . . . . . .67
Specifications . . . . . . . . . . . . . . . . . . . . . . .99
Repeat Play . . . . . . . . . . . . . . . . . . . . . . . . .44
Watching the Images Being Recorded (Time Slip) . .68
Using the A-B Repeat Function . . . . . . . . . .45
Recording From External Devices . . . . . . . .68
Moving to a Scene Directly . . . . . . . . . . . . .45
Recording through a DV input jack . . . . . . .69
Selecting the Subtitle & Audio Language . . .46
*VCR Recording
Changing the Camera Angle . . . . . . . . . . . .47
Basic VCR Recording . . . . . . . . . . . . . . . . . .69
Using Bookmarks . . . . . . . . . . . . . . . . . . . . .48
Special Recording Features . . . . . . . . . . . . .70
Zooming-In . . . . . . . . . . . . . . . . . . . . . . . .49
Record Speed . . . . . . . . . . . . . . . . . . . . . . . .70
On-Screen Menu Navigation . . . . . . . . . . . .25
Check Remaining Time . . . . . . . . . . . . . . . .50
Copy to DVD or VCR . . . . . . . . . . . . . . . . .71
Auto Clock Set . . . . . . . . . . . . . . . . . . . . . .26
Using the Disc and Title menu . . . . . . . . . . .50
Manual Clock Set . . . . . . . . . . . . . . . . . . . .27
Playing Back an Audio CD (CDDA) . . . . . . .51
Channel Set . . . . . . . . . . . . . . . . . . . . . . . .28
Play Option Mode . . . . . . . . . . . . . . . . . . . .52
Tour of the Remote Control . . . . . . . . . . . .15
Connecting & Setting Up
Quick Overview . . . . . . . . . . . . . . . . . . . . . .16
Unpacking . . . . . . . . . . . . . . . . . . . . . . . . .17
Connecting the Antenna Cable . . . . . . . . . .17
Connecting the Video Cable . . . . . . . . . . . .18
Connecting the Audio Cable . . . . . . . . . . . .20
Connecting External Devices . . . . . . . . . . . .22
Connecting Power Cord . . . . . . . . . . . . . . . .23
Preparing the Remote Control . . . . . . . . . . .23
System Setup
Editing
Viewing the Menu Functions for a Disc . . . .73
To Program Tracks . . . . . . . . . . . . . . . . . . . .53
8 - English
English - 9
Getting Started
Getting Started
Contents
Setting Up the Language Features . . . . . . . .29
Time Slip and Picture In Picture (PIP)
The D-VR3 allows you to record and playback high quality
digital images on a DVD-RAM/DVD-RW/DVD-R disc. You
can also edit digital images on DVD-RAM/
DVD-RW discs.
High quality digital audio and video recording and playback
Record up to about 12-hour images with a double side 9.4
GB DVD-RAM disc, and up to about 6-hour images with a
4.7 GB DVD-RAM disc, depending on the recording mode.
Creating DVD video title using DVD-RW/DVD-R disc
With D-VR3SU, D-VR3SC, create your own DVD video title
on 4.7 GB DVD-RW/DVD-R discs.
Use the Time Slip function to playback the recorded images
while a recording is
proceeding (DVD-RAM only). Use the PIP function to view
the playback and recording screens at the same time.
High quality progressive scan
Progressive scanning provides high resolution and flicker
free images. The 10-bit 54-MHz DAC, 2D Y/C Separating
circuitry and Time Base Corrector processor technology provide you with higher image playback and recording quality.
(See pages 19~20.)
Reading the User’s
Manual
Make sure to check the following matters when reading
the user’s manual.
Icons that will be used in manual
Icon
Term
DVD
A variety of functions with easy-to-use user interface
Select the disc type
This unit can record on the following types of discs.
If you want to repeatedly record on the same disc or you want
to edit the disc after recording, select a rewritable DVD-RW or
DVD-RAM type disc. If you want to save a recording without
any changes, choose a non-rewritable DVD-R.
This involves a function available in DVD-RAM
RW
This involves a function available in DVD-RW
R
This involves a function available in DVD-R
CD
This involves a function available in a data CD (CD-ROM,
CD-R, or CD-RW
JPEG
This involves a function available in a data picture CD (CDROM, CD-R, or CD-RW)
Step 2
MP3
This involves a function available in a data CD (CD-ROM,
CD-R, or CD-RW on which
MP3 is recorded)
Unlike a VCR, the recorder automatically starts formatting when
an unused disc is inserted. This is required for the preparation
of recording on a disc.
NOTE
This involves tips or instructions on the page that help
each function operate
This type of disc can be formatted in DVD-Video Recording format (VR mode). You can edit recorded images and create a
playlist in a specific sequence according to your requirements.
Preliminary
Check items before operating
each function
Integrated menu system and messaging functionality allow
you to perform the desired operations conveniently. With a
DVD-RAM/DVD-RW(VR mode) disc, you can edit recorded
images, create playlist, and edit images in specific sequence
according to your needs.
Select an appropriate recording mode between XP, SP, LP and
EP to meet your
recording needs. (See pages 63~65.)
• XP mode - High quality, about 1 hour
• SP mode - Standard quality, about 2 hours
• LP mode - Low quality, about 4 hours
• EP mode - Lower quality, about 6 hours
Record digital camcorder images onto
DVD-RAM/DVD-RW/DVD-R discs or video tape using the
DV input jack (IEEE 1394-4pin). (See page 69.)
About the use of this user’s manual
1) Be sure to be familiar with Safety Instructions before
using this product. (See pages 2~7)
2) If a problem occurs, check for Troubleshooting.
(See pages 96~98)
Copyright
©2004 Toshiba Corporation.
All rights reserved; No part or whole of this user’s
manual may be reproduced or copied without the prior
written permission of Toshiba Corporation.
10 - English
Step 1
RAM
A Variety of Recording Options
Copying digital camcorder content by using DV input jack
Definition
This involves a function available in DVD or Video Mode
DVD-R
How to use the DVD
Recorder-VCR
Format the disc to start recording
Using a DVD-RAM
Using a DVD-RW
This type of disc can be formatted in either DVD-Video format
(Video mode) or DVD-Video Recording format (VR mode). For
an unused disc, a message that asks whether to format in VR
Mode or not is displayed. You can play a video mode disc on
various DVD components. A VR mode disc allows more varied
editing.
Using a DVD-R
This type of disc can be formatted in DVD Video format. After
formatting is complete, you can record on the disc. You can play
this type of disc on various DVD components only when they
have been finalized.
Note
You can only use one format on a DVD-RW.
You can change the DVD-RW format to anoth-
er format. It should be noted that the data of
the disc will be lost when changing formats.
English - 11
Getting Started
Getting Started
General Features
Recording
There are two different recording methods: Direct Recording
and Timer Recording. Timer recording is classified as recording type : Once, Daily or Weekly or recording mode : XP
(high quality mode), SP (standard quality mode), LP (long
recording mode), and EP (extended mode) according to the
recording mode.
Step 6
Finalizing & Playing on
other DVD components
To play your DVD on other DVD components, finalizing may
be necessary. First, finish all editing and recording operations, then finalize the disc.
When using a DVD-RW disc in VR Mode
Description
Getting Started
Getting Started
Step 3
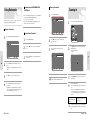
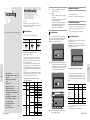
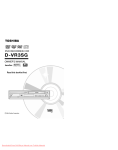
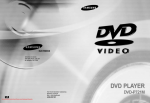
Front Panel
Although finalizing is generally unnecessary when playing
the disc on a VR Mode compatible component, a finalized
disc should be used for playback on that type of component.
1
2
3
4
When using a DVD-RW disc in Video Mode
Step 4
Playing
You can select the title you want to play in a displayed menu
and then immediately start playback.
A DVD consists of sections, called titles, and sub sections,
called chapters.
During recording, a title is created between two points where
you start and stop recording, DVD-R/DVD-RW discs(in
Video mode) can automatically create chapters according to
the recording mode when finalized.
The disc should be finalized first to enable playback on anything compatible other than this recorder. No more editing
or recording can be made on the disc once it has been finalized.
To enable recording on the disc again, Disc should be
unfinalized.
When using a DVD-R disc
You should finalize the disc to play it a compatible component other than this recorder. You cannot edit or record on
the disc once it has been finalized.
I/
ON/STANDBY
DUBBING
TO DVD TO VCR
5
1.
2.
3.
4.
5.
6.
7.
8.
9.
10.
11.
6
7
8
9
10
11
12
13 14
DVD DECK
DVD OPEN/CLOSE BUTTON
VCR DECK
VCR EJECT BUTTON
POWER BUTTON
PROGRESSIVE BUTTON
S-VIDEO INPUT JACK
VIDEO INPUT JACK
AUDIO L.R INPUT JACK
DV INPUT JACK
CHANNEL / BUTTON
12.
13.
14.
15.
16.
17.
18.
19.
20.
21.
15 16 17 18 19
20
21
FRONT PANEL DISPLAY
DVD/VCR SELECT BUTTON
TIME SLIP BUTTON
RECORD BUTTON
REW/SKIP BUTTON (VCR/DVD)
STOP BUTTON
PLAY/STILL BUTTON
F.F/SKIP BUTTON (VCR/DVD)
TO DVD BUTTON
TO VCR BUTTON
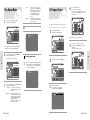
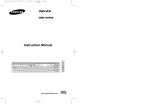
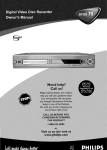
Front Panel Display
Step 5
Editing a recorded disc
Editing on discs is easier than conventional video tapes. The
recorder supports many different edit functions, possible only
with DVDs.
With a simple edit menu, you can operate various edit functions, such as delete, copy, rename, lock, etc., on a recorded
title.
1
7
2
3
8
4
9
5
6
10
11
Creating a playlist (DVD-RAM/-RW in VR mode)
With this recorder, you can create a new playlist on the same
disc and edit it without the change of the original recording.
1. When the indicator is on, DVD is activated.
7. DVD or CD media is loaded.
2. DVD-RAM is activated.
8. Record function is working.
3. DVD-R or DVD-RW is activated.
9. The time, counter position or current deck
4. Progressive Scan mode is working.
5. When you watch SAP/STEREO channel or playback Hi-Fi VCR tapes, STEREO indicator lights.
6. VCR is activated.
12 - English
status is indicated.
10. When you set a Timer recording, it or currentdeck status is indicated. this indicator is lit.
11. VHS Videotape is loaded.
English - 13
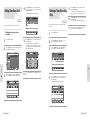
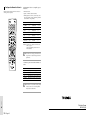
Tour of the Remote Control
Rear Panel
Getting Started
(FROM ANT.)
COMPONENT
VIDEO OUT
LINE OUT
R
R
Y
ON / STANDBY
TV ON / STANDBTY
R
AUDIO
AUDIO
RF
CB/PB
L
LINE IN 1
L
L
DIGITAL AUDIO OUT
CR/PR
OPTICAL
OUT
COAXIAL
VIDEO
VIDEO
(TO TV)
TV MUTE
100 +
1 2 3
4
5
6
7
8
AUDIO
9 10 11
SELECT
INPUT SEL.
DVD
VCR
1.
2.
3.
4.
5.
6.
S-VIDEO OUT JACK
AUDIO OUT L,R JACK
DIGITAL AUDIO OUT JACK (OPTICAL)
DIGITAL AUDIO OUT JACK (COAXIAL)
COMPONENT VIDEO OUT JACK
AUDIO OUT R,L JACK
7.
8.
9.
10.
11.
VIDEO OUT JACK
VIDEO IN JACK
AUDIO IN R,L JACK
RF OUT TO TV JACK
RF ANTENNA INPUT JACK
TV
CH / TRK
VOL
OPEN/CLOSE
F / ADV / SKIP
VCR Plus+
MARKER
RETURN
CLEAR
DISPLAY TV / VCR SUBTITLE REC SPEED
REC
PIP
DVD
VCR
COPY
REC PAUSE
TIME SLIP
1. POWER Button
2. NUMBER Button
3. 100+ Button
Press this to select channel 100 or higher.
4. VCR Button
5. DVD Button
Press this when you use a DVD.
6. OPEN/CLOSE Buttons
To open and close the disc tray.
7. TV Control Button
• VOLUME Button
TV volume adjustment
• CHANNEL Button
Use this to select a TV channel.
8. VCR Plus+ Button
Use to recording using VCR Plus+ function.
9. Playback-related Buttons
Forward/Rewind, Search, Skip, Stop, Play/Pause
14 - English
English - 15
Getting Started
IN
AUDIO OUT
10. MENU Button
Brings up the DVD Recorder-VCR’s setup
menu.
11. TITLE LIST(DISC MENU) Button
Use this to enter the View Recording list/disk
menu.
12. ENTER/DIRECTION Buttons
(UP/DOWN or LEFT/RIGHT Buttons)
This button functions as a toggle switch.
13. RETURN Button
Returns to a previous menu.
14. TV/VCR Button
15. DISPLAY Button
This will display current setting or disc status.
16. REC Button
Use to make a recording on DVD-RAM/-RW/-R
discs.
17. PIP Button
Use to watch a subprogram on the PIP screen
while watching the main program on the main
screen.
18. DVD COPY Button
Press this when you copy VCR to DVD.
19. TV POWER Button
20. AUDIO/TV MUTE Button
Use this to access various audio functions on a
disc (DVD mode).
This operates as sound mute. (TV mode)
21. TV Button
Press this to operate TV.
22. INPUT Button
Select line input signal in external input
mode(Tuner or Line input)
23. F.ADV/SKIP Button
24. MARKER Button
Use this to bookmark a position while playing a
disc.
25. QUICK Button
Use this to view the status of the disc that is
being played.
26. PLAY LIST(TOP MENU) Button
Use this to return to the Top menu, or to view
the recorded files list.
27. CLEAR Button
28. SUBTITLE Button
Press this to switch the DVD’s subtitle language.
29. REC SPEED Button
30. REC PAUSE Button
Use this to pause during recording.
31. TIME SLIP Button
32. VCR COPY Button
Press this when you copy DVD to VCR.
Step 1: Unpacking
You can record non-scrambled channels by selecting the
channel on the DVD Recorder-VCR. Also use this Method if
you watch channels without cable box.
Accessories
A Quick overview presented in this guide will give you
enough information to start using the recorder.
Step 1 : Unpacking
❷
Check for the supplied accessories below.
• Video/Audio Cable
• RF Cable for TV
• Remote Control
• Batteries for Remote Control (AA Size)
• User’s Manual
• Dispose of used batteries according to local environmental
regulations. Do not put them in the household trash.
Connections
Connections
Connecting &
Setting Up
Quick Overview
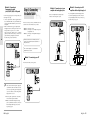
Method1 : Antenna + DVD RecorderVCR + TV : No Cable box
Step 2 : Connecting the Antenna Cable
❷
Step 3 : Connecting the Video Cable
❷
Step 2: Connecting the
Antenna Cable
Step 4 : Connecting the Audio Cable
❷
Step 5 : Connecting External Devices
❷
Step 6 : Connecting the Power Cord
❷
There are several ways to connect your DVD Recorder-VCR.
Select one of the following antenna connections that best
suits you below.
• Method 1 : Antenna + DVD Recorder-VCR + TV : No Cable
box
• Method 2 : Antenna +Cable box + DVD Recorder-VCR + TV
: Cable box with many scrambled channels
• Method 3 : Antenna + DVD Recorder-VCR + Cable box + TV
: Cable box with a few scrambled channels
Note
ohm twin flat leads, use an external antenna connector (300-75 ohm adaptor : not supplied) to connect the antenna to the DVD Recorder-VCR.
If you have two separate antennas (one VHF and
• Quick Overview . . . . . . . . . . . . . . . . . . . 16
• Unpacking . . . . . . . . . . . . . . . . . . . . . . . 17
• Connecting the Video Cable . . . . . . . . . . 18
You can record channels by selecting the channel on the
cable box. You cannot record one channel while watching
another channel. Be sure that the cable box is turned on.
If you are using an off-air antenna that has 300-
Step 7 : Preparing the Remote Control
• Connecting the Antenna Cable . . . . . . . . 17
Method 2 : Antenna +Cable box +
DVD Recorder-VCR + TV : Cable box
with many scrambled channels
• Note to CATV system installer : This reminder is
one UHF), use a UHF/VHF combiner-adaptor
(available at most electronics shops) to connect the
antenna to the DVD Recorder-VCR.
pro-video to call CATV system installer’s attention to
• Connecting the Audio Cable . . . . . . . . . . 20
Article 820-40 of the National Electrical Code (Section 54
• Connecting External Devices . . . . . . . . . 22
of Canadian Electrical Code, Part I), that provides guide-
• Connecting the Power Cord
. . . . . . . . . . 23
lines for proper grounding and, in particular, specifies that
• Preparing the Remote Control . . . . . . . . . 23
the cable ground shall be connected to the grounding system of the building as close to the point of cable entry as
practical.
16 - English
English - 17
Method 3 : Antenna + DVD
Recorder-VCR + Cable box +TV :
Cable box with a few scrambled
channels
Method 3 : Connecting to Component
video input jacks(Y,CB/TB,CR/PB) in
480i mode
Method 2 : Connecting to an S-video
input jack
Connect an S-video cable(not supplied) between the SVIDEO OUT jack on DVD Recorder-VCR and S-VIDEO IN
jack on the TV (or AV amplifier).
• You will enjoy high quality images. S-Video separates the
picture element into black and white (Y) and color (C)
signals to present clearer images than regular video input
mode.
1. Connect Component video cables(not supplied) between
the COMPONENT VIDEO OUT jacks on DVD RecorderVCR and COMPONENT VIDEO IN jacks on the TV (or
AV amplifier).
2. Make sure that the disc has stopped completely before
changing the mode.
If anything is not displayed on front panel display, it is
480i Mode.
Method 1 : Connecting to a video
input jack
Connect a video(yellow) cable between the VIDEO (yellow)
OUT jack on DVD Recorder-VCR and VIDEO(yellow) IN
jack on the TV(or AV amplifier).
• You will enjoy regular quality images.
• Connect audio cables (white and red) between the ANALOG AUDIO OUT jack on the DVD Recorder-VCR and
AUDIO IN jack on TV (or AV amplifier).
Step 3: Connecting the
Video Cable
There are several ways to connect your DVD Recorder-VCR.
Select one of the following video connecting methods that
best suits you below.
• Method 1 : Connecting to a Video input jack
• Method 2 : Connecting to an S-video input jack
• Method 3 : Connecting to Component video input jacks in
480i mode
• Method 4 : Connecting to Component video input jacks in
480p mode
S-Video, Component video and Progressive Output
Modes
• S-Video and Component video output are available only if
your TV supports S-Video input or Component video
input, respectively. If S-Video or Component video output
does not work, check the TV connections and the TV
input selection settings.
18 - English
• You will enjoy high quality accurate color reproduction.
Component video separates the picture element into black
and white (Y), blue (Pb) and red (Pr) signals to present
most clear and clean images.
Make sure that the color coded connections match.
Note
The Y, Pb and Pr component output jacks of your
DVD Recorder-VCR must be connected to the
exact corresponding component input jacks on
your TV. Otherwise, red or blue images will be displayed on the TV screen.
Make sure that the left and right audio output
jacks of your DVD Recorder-VCR are connected to
the left and right audio input jacks of your TV,
respectively.(page 20)
English - 19
Connections
Connections
You can record non-scrambled channels by selecting the
channel on the cable box. You cannot record scrambled
channels that require a cable box.
• Compared to standard interlaced video, progressive scan
doubles the amount of video beam lines fed to your TV,
resulting in a more stable, flicker-free, and clear image than
interlaced video. The progressive scan video output jack is
used in progressive output mode. This is only available
with TVs that support progressive scan.
• Consumers should note that not all high definition television sets are fully compatible with this product and may
cause artifacts to be displayed in the picture. If you experience 480 progressive scan picture problems, it is recommended that you switch the connection to the ‘standard
definition’ output. If there are questions regarding TV set
compatibility with this unit, please contact our customer
service center.
Method 4 : Connecting to
Component video input
jacks(Y,CB/TB,CR/PB) in 480p mode
Your TV must support progressive scan input to allow you to
watch 480p video output.
2. Make sure that the disc has stopped completely before
changing the mode. Press the Progressive button on the
front panel. The mes-sage “Press “Yes” to confirm
Progressive scan mode. Otherwise press “No”.” will be displayed. If you want 480P mode, select yes. If “480P” is displayed on the front panel display, now your DVD
Recorder-VCR is operated on 480P Mode.
If your stereo amplifier only has audio input jacks
(L and R), use the analog audio out jacks.
Method 3 : Connecting to an AV
amplifier with the digital input jack
If your AV amplifier only has a Dolby Digital or DTS
decoder and a digital input jack, use this connection.
To enjoy Dolby Digital or DTS sound, you must set up
the audio settings. (See page 30)
There are several ways to connect your DVD Recorder-VCR.
Select the audio connection that best suits you below.
• Method 1 : Connecting to your TV
• Method 2 : Connecting to a stereo amplifier (analog audio
out / digital audio out)
• Method 3 : Connecting to an AV amplifier with a digital
input jack.
Connections
Connections
1. Connect Component video cables(not supplied) between
the COMPONENT VIDEO OUT jacks on DVD RecorderVCR and COMPONENT VIDEO IN jacks on the TV (or
AV amplifier).
Step 4 : Connecting
the Audio Cable
Method 2 : Connecting to a stereo
amplifier with analog input jacks
Manufactured under license from Dolby Laboratories.
“Dolby” and the double-D symbol are trademarks of
Dolby Laboratories.
“DTS” and “DTS Digital Out” are trademarks of
Digital Theater Systems, Inc.
Method 1 : Connecting to your TV
This connection will use your TV’s speakers.
Make sure that the color coded connections match.
Note
That is, the Y, Pb and Pr component output jacks
of your DVD Recorder-VCR should be connected
to the exact corresponding component input jacks
on your TV. Otherwise, red or blue images will be
displayed on the TV screen.
Once 480p video output mode is selected, Video,
S-Video and 480i outputs are disabled.
Make sure that the left and right audio output
jacks of your DVD Recorder-VCR are connected to
the left and right audio input jacks of your TV,
respectively.(page 21)
20 - English
English - 21
Step 5 : Connecting
External Devices
You can use the LINE IN 2 jacks on the front panel
of the DVD Recorder-VCR. You can record from connected
equipment.
When an input source is inserted into LINE IN 2 while viewing
TV, the input will be switched to LINE IN 2 automatically.
Step 6 : Connecting
the Power Cord
After all connections are complete, plug the power cord
in the wall outlet.
“AUTO” in the front panel display flickers. This means that
the current time is being set automatically (Auto Program)
through the antenna under connection. The setup may take
several minutes.
• Method 1 : Connecting a VCR, Set-Top Box(STB) or DVD
player to the AUDIO/VIDEO LINE IN 1 jacks.
• Method 2 : Connecting a Camcorder to the LINE IN 2 in
jacks.
• Method 3 : Connecting a Camcorder to the DV IN jack.
When it normally operates, the current time is automatically
set and displayed in the front panel display.
Method 1 : Connecting a VCR,
Settop Box(STB) or DVD player to
the AUDIO/VIDEO LINE IN 1 jacks
If “- - - -“ appears, however, it means that auto time setting
has failed.
In that case, set the current time through the manual clock
set, as shown in pages 27~28.
Connecting a VCR or external device to AUDIO/VIDEO
LINE IN 1 jacks of the DVD Recorder-VCR.
You can record a copy free contest from connected equipment (VCR, STB or DVD).
Step 7 : Preparing the
Remote Control
Install Batteries in the Remote Control
• Open the battery cover on the back of the remote.
• Insert two AA batteries. Make sure that the polarities
(+ and -) are aligned correctly.
• Replace the battery cover.
If the remote does not operate properly:
• Check the polarity + - of the batteries (Dry-Cell)
• Check if the batteries are drained.
• Check if the remote sensor is blocked by obstacles.
• Check if there is any fluorescent lighting nearby.
Dispose of used batteries according to local environmental regulations. Do not put them in the household trash.
Method 3 : Connecting a
Camcorder to the DV IN jack
If your camcorder has a DV output jack, connect it to the DV
input jack of your DVD Recorder-VCR.
• If your camcorder has a DV output jack, see page 69 for
more information.
Whenever pulling the power cord out of the wall
outlet and plugging it again, auto time setting will
be working.
• Do not expose the remote sensor of the recorder to a
strong light source such as direct sunlight or other illumination. If you do so, you may not be able to operate the
recorder via the remote control.
You can also use the LINE IN 2 jacks on the front
Note
panel of the DVD Recorder-VCR.
When the S-Video jack and Video jack are both
connected, the S-Video jack will have priority. Line
Selection will be automatically done.
Copy protected content cannot be recorded.
22 - English
• Some models of DV format digital video cameras
may support a different compression format. From
such equipment, recording is not possible.
• Depending on the models of DV format digital video
cameras, recording may not work properly or some
functions may be disabled.
English - 23
Connections
Connections
This allows you to connect your DVD Recorder-VCR to other
external devices and view or record their outputs.
Method 2 : Connecting a
Camcorder to the LINE IN 2 jacks
Setting the Remote Control
Your DVD Recorder-VCR remote control will work with
Toshiba televisions and compatible brands.
Connections
ON / STANDBY
TV ON / STANDBTY
TV MUTE
To determine whether your television is compatible,
follow the instructions below.
1. Switch your television on.
2. Point the remote control towards the television.
3. Hold down the TV button and enter the two-figure code
corresponding to the brand of your television, by pressing
the appropriate numeric buttons.
Brand
Codes
Brand
Codes
TOSHIBA
01
SHARP NEW
08, 13
RCA/GE
02
SANYO
09
SONY
03
MAGNAVOX
10
INPUT SEL.
MITSUBISHI
04
GOLDSTAR
11
OPEN/CLOSE
F / ADV / SKIP
JVC
05
SAMSUNG
12
VCR Plus+
MARKER
HITACHI
06
ZENITH
14
PANASONIC
07, 15
PIONEER
16
100 +
AUDIO
System Setup
On-Screen Menu
Navigation
The on-screen menus allow you to enable or disable various functions on your DVD Recorder-VCR. Use the following buttons to open and navigate through the on-screen
menus.
DVD-RAM(VR)
SELECT
DVD
VCR
TV
CH / TRK
VOL
System Setup
Result: If your television is compatible with the remote control, it will switch off.
It is now programmed to operate with the remote
control.
RETURN
DISPLAY TV / VCR SUBTITLE REC SPEED
REC
PIP
If several codes are indicated for your television
CLEAR
DVD
VCR
COPY
Note
REC PAUSE
MENU Button
2
Up/Down and Left/Right
3
Enter Button
4
Return Button
brand, try each one in turn until you find one that
works.
Press this button on the remote control while the
DVD or VCR is in Stop or Play mode to open the
on-screen MAIN MENU.
TIME SLIP
You can then control the television using the following
buttons.
Button
POWER
INPUT SEL.
VOL + or CH ( or )
TV MUTE
Function
Used to switch the television on and off.
Used to select an external source.
Used to adjust the volume of the television.
Used to select the required channel.
Used to toggle the sound on and off.
The various functions will not necessarily work on
Note
24 - English
1
all televisions. If you encounter problems, operate
the television by using the TV’s remote control.
•
•
•
•
•
•
•
•
•
•
•
•
•
•
•
On-Screen Menu Navigation . . . . . 25
Auto Clock Set . . . . . . . . . . . . . . . 26
Manual Clock Set . . . . . . . . . . . . . 27
Channel Set . . . . . . . . . . . . . . . . . 28
Setting Up the Language Features 29
Setting Up the Audio Options . . . . 30
Setting Up the Display (Video) Options . . . 31
Setting Up the Parental Control . . . 32
Auto Channel Memory . . . . . . . . . 33
Channel Add/Delete . . . . . . . . . . . 34
RF Out Channel . . . . . . . . . . . . . . 35
Guide Channel Setup . . . . . . . . . . 35
VCR Setting . . . . . . . . . . . . . . . . . 36
Video Input . . . . . . . . . . . . . . . . . 37
Front Display . . . . . . . . . . . . . . . . 38
Use these buttons to move the selection bar
up/down and left/right to cycle through the
menu options.
Press this button on the remote control to confirm
any new settings.
Press this button on the remote control to return to
the last MENU screen displayed or to exit the onscreen MENU all together.
English - 25
Auto Clock Set
4
Select Auto Clock Set using the ❷buttons, then
press the ❿ or ENTER button.
No Disc
Clock Set
Auto Clock Set
Manual Clock Set
Time ZONE
Manual Clock Set
Select the time zone of your area using the ❷buttons then press the ❿or ENTER button. Select
Automatic to set the time zone automatically.
This menu is used to set the current time. You need to set
the time to use timer recording.
No Disc
Auto Clock Set
Clock Data CH
: Automatic
Automatic
Time Zone
Atlantic
: Automatic
Daylight Saving
: Automatic
Eastern
Central
1
With the unit in Stop mode, press the MENU button.
Mountain
Pacific
Alaska
Hawaii
No Disc
You must have the antenna connected to set the
Daylight Saving
5
3
Using the ❷buttons, move the selection bar to
“Setup” then press Enter to select.
Select the sub menu (Clock Data CH, Time Zone or
Daylight Saving) using the ❷ buttons, then press
the ❿ or ENTER button.
No Disc
Select the On, Off or Auto using the ❷buttons then
press the ❿or the ENTER button.
Select Automatic to set the daylight saving automatically.
Auto Clock Set
Clock Data CH
No Disc
: Automatic
Open “MENU”
2
Select “Setup”
3
Auto Clock Set
Time Zone
: Automatic
Clock Data CH
Daylight Saving
: Automatic
Time Zone
: Automatic
Daylight Saving
: Automatic
Automatic
Select Clock Set using the ❷buttons, then press
the ❿ or ENTER button.
1
Press the MENU button while the DVD or VCR is
in Stop or Play mode.
Using the ❷ buttons, move the selection bar to
“Setup” then press ENTER to select.
Select “Clock Set”
Use the ❷ buttons to highlight “Clock Set”
then press the ENTER button.
: Automatic
Yes
No
No Disc
Clock Data CH
If your clock is set to the wrong time zone or day-
Select a channel that carries a time signal using the
❷buttons then press the ❿or ENTER button.
Select Auto to set the channel automatically.
No Disc
light saving, you can adjust these settings without
turning off the Auto Clock Set function.
4
Select “Manual Clock Set”
Move the highlight to “Manual Clock Set”, then
press the ENTER button.
• The Clock Set will change as shown.
Clock Data CH
Select channel :
26 - English
Note
Auto
English - 27
System Setup
System Setup
Auto Clock. See page Antenna Connections
Note
The Clock will be automatically set when you turn
off the recorder.
2
If Auto Setup fails to set the DVD Recorder-VCR’s internal
clock by locating a local TV station, follow these steps to set
the date and time manually.
NOTE: For accurate Timer Recording, your DVD RecorderVCR's internal clock must be set correctly.
5
Set the Clock
Use the LEFT/RIGHT buttons to select each of the
following options, then use the
❷ buttons to set each option:
• Month – Set the month
• Day – Set the day.
• Year – Set the year
• Hour – Set the hour
• Minute – Set the minute
• AM/PM – Set the AM/PM
3
Using the ❷ buttons, move the selection bar to
“Channel Set”, then press ENTER to select.
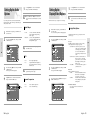
Setting Up the
Language Features
5
Select the desired Language using ❷ buttons,
then press the ❿ or ENTER button.
If you set the player menu, disc menu, audio and subtitle
language in advance, they will come up automatically every
time you watch a movie.
4
1
With the unit in Stop mode, press the MENU button on the remote.
2
Select Setup using ❷buttons, then press the ❿
or ENTER button.
3
Select Language using ❷ buttons, then press the
❿ or ENTER button.
Language setup menu will be displayed.
4
Use ❷ buttons to select the desired sub menu
and press the ENTER or ❿ button.
Press the RETURN or ➛ button to return to the
Select “Antenna/Cable TV”
Move the selection arrow to “Antenna/Cable TV”
then press right button to select from the following
options:
• Antenna - Select if the DVD Recorder-VCR is connected to an indoor or outdoor VHF/UHF
Antenna.
• Cable TV - Select if the DVD Recorder-VCR is
connected to Cable TV.
Note
previous menu. Press the MENU button to exit the
menu.
System Setup
System Setup
Select “Channel Set”
Channel Set
This feature allows you to manually set the DVD RecorderVCR’s tuner band to Antenna or Cable, whichever you connected to the Antenna In jack during initial setup.
• Use this setting only if Auto Setup detected the
incorrect tuner band, i.e. channels are coming in on the
wrong channel numbers.
1
Open “MENU”
2
Select “Setup”
With the DVD in Stop press the MENU button.
Using the ❷ buttons, move the selection bar to
“Setup” then press ENTER to select.
28 - English
English - 29
Use the ❷ buttons to select the desired item.
Then press the RIGHT or ENTER button.
5
Setting Up the Audio
Options
Press the RETURN or ➛ button to return to the
Note
If you set the player menu, disc menu, audio and subtitle
language in advance, they will come up automatically every
time you watch a movie.
previous menu. Press the MENU button to exit the
menu.
Setting Up the
Display(Video) Options
2
Select Setup using ❷buttons, then press the ❿
or ENTER button.
1. PCM :
System Setup
2. Bitstream :
Converts to PCM(2CH) 48kHz audio.
Select PCM when using the Analog
Audio Outputs.
Converts to Dolby Digital Bitstream
(5.1CH). Select Bitstream when using
the Digital Audio Output.
1
2
Select Setup using ❷ buttons, then press the ❿
or ENTER button.
3
Select Video using ❷ buttons, then press the ❿
or ENTER button.
Video option menu will be displayed.
4
Select the sub menu using ❷ buttons, then press
the ❿ or ENTER button.
audio will be heard.
DTS
1. Off :
2. On :
3
4
Select Audio using ❷ buttons, then press the ❿
or ENTER button.
Audio setup menu will be displayed.
Use ❷ buttons to select the desired sub menu
and press the ENTER or ❿ button.
PCM
Bitstream
30 - English
Doesn’t output digital signal.
Outputs DTS Bitstream via digital output only. Select DTS when connecting to
a DTS Decoder.
When DTS soundtrack is played, sound is not outNote
put from Analog Audio Output.
Dynamic Compression
1. On :
2. Off :
To select dynamic compression.
To select the standard range.
Display(Video) Options
This function depends on disc type. It may not work for
some disc types.
Be sure to select the correct Digital Output or no
Note
previous menu. Press the MENU button to exit the
menu.
TV Aspect
Depending on the type of television you have, you may
want to adjust the screen setting. (aspect ratio)
• 4:3 Letter Box : Select when you want to see the
total 16:9 ratio screen DVD supplies,
even though you have a TV with a
4:3 ratio screen. Black bars will
appear at the top and bottom of the
screen.
• 4:3 Pan - Scan : Select this for conventional size TV
when you want to see the central
portion of the 16:9 screen. (Extreme
left and right side of movie picture
will be cut off.)
• 16:9 Wide :
You can view the full 16:9 picture on
your widescreen TV.
Black Level
Adjusts the brightness of the screen.
• 0 IRE :
This is the standard NTSC reference
black level for consistent brightness/contrast across all sources.
• 7.5 IRE :
This will enhance the black level for
increased brightness/contrast when
viewing DVDs.
3D NR(Noise Reduction)
• On : Select to reduce noise from the screen
• Off : Normal
English - 31
System Setup
With the unit in Stop mode, press the MENU button on the remote.
With the unit in Stop mode, press the MENU button on the remote.
You can’t use the Setup functions during playback.
Use the ❷ buttons to select the desired item.
Then press the RIGHT or ENTER button.
Press the RETURN or ➛ button to return to the
Note
This function allows you to setup the TV screen settings.
Digital Output
1
5
Setting Up the Parental
Control
5
Select Password ON/OFF using ❿ and ❷ buttons.
On
Off
The Parental Control function works in conjunction with
DVDs that have been assigned a rating - which helps you
control the types of DVDs that your family watches. There
are up to 8 rating levels on a disc.
2
1
Select Change Password using ❷ buttons, then
press the ❿ or ENTER button.
• The ‘Enter the password.’ message will be
displayed.
2
Enter the 4-digit password using the 0 to 9 buttons
on the remote.
• The ‘Confirm the password.’ message will be displayed.
3
Enter your password again using the 0 to 9 buttons
on the remote.
With the unit in Stop mode, press the MENU button on the remote.
Select Setup using ❷ buttons, then press the ❿
or ENTER button.
Press the RETURN or ➛ button to return to the
3
Select Parental control using ❷ buttons, then
press the ❿ or ENTER button.
Note
6
Select Rating Level you want using ❷ buttons,
then press the ❿ or ENTER button.
• For example, if you select up to Level 6, discs that
contain Level 7, 8 will not play. Larger number
indicates the program is more intended to adult
use only
previous menu. Press the MENU button to exit the
menu.
3
4
Select “Channel Set”
Using the ❷ buttons, move the selection bar to
“Channel Set”, then press ENTER to select.
Run “Auto channel memory”
Move the selection arrow to “Auto Channel
Memory,” then press ENTER to select.
• The DVD Recorder-VCR will automatically
search for all available channels in the selected
Tuner Band. This procedure may take a few
minutes to complete.
• When finished, the lowest channel found will
be displayed.
Auto Channel Memory
Auto Channel Memory will automatically seek and store all
active channels in your area.
4
•Press ENTER button to STOP or cancel scanning.
Enter the 4-digit password using the 0 to 9 buttons
on the remote.
• The ‘Confirm the password.’ message will be displayed. Enter your password again.
Press the RETURN or ➛ button to return to the
Note
32 - English
previous menu. Press the MENU button to exit the
menu.
Refer to Troubleshooting if you forget your password.
1
Open “MENU”
2
Select “SETUP”
With the DVD in stop mode, press the MENU button.
Using the ❷ buttons, move the selection bar to
“Setup” then press ENTER to select.
English - 33
System Setup
System Setup
1
About the Change Password;
Channel Add/Delete
4
Select “Channel Add/Delete”
DVD-VIDEO
Move the selection bar to “Channel Add/Delete,”
then press ENTER to select.
4
Select “RF Output Channel”
5
Change “RF Output CH”
Move the selection bar to “RF output Channel”,
then press right to change.
1
Open “MENU”
2
Select “Setup”
With the DVD in stop mode, press the MENU
button.
Using the ❷ buttons, move the
selection bar to “Setup” then press ENTER to select.
RF Output Channel
5
DVD-VIDEO
Select Channel to Add/Delete
Use the CH / buttons to tune in the channel
number you wish to add or delete.
Use the number buttons to move the channel directly. If you use the navigation ❷ button, the channel will be moved to the next memorized channel.
When you connect the DVD Recorder-VCR to TV with RF
Antenna Cable, follow the steps below to set the
RF output channel.
6
DVD-VIDEO
3
1
Open “MENU”
2
Select “Setup”
Select “Channel Set”
Using the ❷ buttons, move the selection bar to
“Channel Set”, then press Enter to select.
DVD-VIDEO
34 - English
6
Add/Delete Channel.
Press Enter to move the cursor to select Add, then
press ❿if you want to select Delete. Press ENTER
to confirm your selection.
Select channel 3 or 4 using the ❷button.
Then press ENTER to change.
3
Change “TV Channel”
A message will appear on your TV. When the message disappears, change your TV to channel 3 or 4
to match the RF output channel of the player.
With the DVD in Stop or Play mode, press the
MENU button.
Using the ❷ buttons, move the selection bar to
“Setup” then press ENTER to select.
Select “Channel Set”
Using the ❷ buttons, move the selection bar to
“Channel Set,” then press ENTER to select.
Guide Channel Setup
Set these guide channels so you can use VCR Plus+ codes for
timer recording. Before starting the settings, prepare a chart
showing the channels, station names and guide channels.
1
Open “MENU”
2
Select “Setup”
With the DVD in stop mode, press the MENU
button.
Using the ❷ buttons, move the selection bar to
“Setup” then press ENTER to select.
English - 35
System Setup
System Setup
Use this feature if Auto Channel Search missed a
channel that you would like to add and delete a channel you
wish to remove.
3
Select “Channel Set”
4
Select “Guide Channel Setup”
Using the ❷ buttons, move the selection bar to
“Channel Set”, then press ENTER to select.
Move the selection bar to “Guide Channel Setup”.
VCR Setting
4
Select “VCR”
Using the ❷ buttons, move the selection bar to
“VCR”, then press ENTER to select.
7
Select “Auto Repeat”
Move the selection bar to “ Auto Repeat”. It sets the
VCR to play a tape repeatedly [unless a tape control
is activated (Stop, Fast Forward or Rewind)].
If you want your videotapes to play automatically when you
insert them, turn on Auto Play.
:
: n
:
Off
On
Only tapes that are missing the Record Safety Tab
will play automatically when inserted.
5
5
Select the guide channel you want
to set.
1
Open “MENU”
2
Select “Setup”
With the VCR in Stop or Play mode, press the
MENU button.
Select “Tape Length”
Press the RIGHT button to select the Tape Length.
This information is usually printed on the tape box.
The menu cycles through: T-120, T-160 or T-180.
Once the type of cassette is set, the VCR can display
the amount of time remaining on the tape when you
press the INFO. button.
Using the ❷ buttons, move the
selection bar to “Setup” then press ENTER to select.
:
: n
:
DVD-VIDEO
6
Video Input
If you watch video through Line 2, you can choose
Composite or Super(S)-video.
1
Open “MENU”
2
Select “Setup”
With the DVD Recorder-VCR in stop or play mode,
press the MENU button.
Change “TV Channel”
Using the ❷ buttons to select the TV channel
corresponding to the guide channel and press
ENTER.
* Repeat steps 5 and 6 as necessary.
Press the Return button to return to the previous
Note
T-120
T-160
T-180
System Setup
System Setup
Note
menu.
3
Select “System”
Use the ❷ buttons to highlight “System” then
press the ENTER button.
6
Select “Auto Play”
Move the selection bar to “Auto Play,” then press
right button to select from the following options:
• On - The VCR will automatically begin playing a
video tape when it is inserted, as long as the
safety tab of the cassette has been removed.
• Off - Auto play is disabled.
Using the ❷ buttons, move the selection bar to
“Setup” then press ENTER to select.
Press the MAIN MENU button to exit the MAIN
menu.
:
: n
:
36 - English
On
Off
English - 37
3
Select “System”
Use the ❷ buttons to highlight “System” then
press the ENTER button.
2
Select “Setup”
Using the ❷ buttons, move the selection bar to
“Setup” then press ENTER to select.
Before Playing
Playback
Read the following information before playing a disc.
System Setup
This section introduces basic functions of playback
by disc type.
4
Select “Video Input”
Use the ❷ buttons to highlight “Video Input”,
then press ENTER button and choose Line 2
(Composite) or S-Video.
3
Region code (DVD-Video only)
Both the DVD Recorder-VCR and the discs are
coded by region. These regional codes must
match in order for the disc to play. If the codes
do not match, the disc will not play. The Region
Number for this DVD Recorder-VCR is described
on the rear panel of the DVD Recorder-VCR.
Select “System ”
Using the ❷ buttons, move the selection bar to
“System ” then press ENTER to select.
DIGITAL
SOUND
Dolby Digital
DTS
Digital Audio
Disc types that can be played
Disc Types
DVD-VIDEO
STEREO
Stereo
Front Display
You can set the Front Panel Display to be bright all the time,
dim all the time, dim during power off.
1
Open “ MENU”
With the DVD in Stop or Play mode, press the
MENU button. .
38 - English
Set “Front Display”
Move the selection bar to “Front Display,” then
press RIGHT button to select from the following
options:
• Auto dim – Front Panel Display will dim automatically during power off.
• Bright – Front Panel Display will be bright all the
time.
• Dim – Front Panel Display will be dim all the
time.
Auto dim
Bright
Dim
NTSC broadcast system in U.S.A,
Canada, Korea,
Japan,etc.
AUDIO-CD
MP3
Before Playing . . . . . . . . . . . . . . . 39
Playing a Disc . . . . . . . . . . . . . . . 40
Using the Search & Skip Functions . 42
Slow Motion Play / Step Motion Play . . 42
About QUICK . . . . . . . . . . . . . . . . . 43
Repeat Play . . . . . . . . . . . . . . . . . 44
Using the A-B Repeat Function . . . . 45
Moving to a Scene Directly . . . . . . 45
Selecting the Subtitle & Audio Language 46
Changing the Camera Angle . . . . . 47
Using Bookmarks . . . . . . . . . . . . . 48
Zooming-In . . . . . . . . . . . . . . . . . 49
Check Remaining Time . . . . . . . . . 50
Using the Disc and Top Menu . . . . 50
Playing Back an Audio CD (CDDA) . 51
Play Option Mode . . . . . . . . . . . . 52
To Program Tracks . . . . . . . . . . . . 53
Photo CD Playback . . . . . . . . . . . 54
Playing back an MP3 CD . . . . . . . 55
Using PIP . . . . . . . . . . . . . . . . . . 56
Playing the VCR . . . . . . . . . . . . . 57
Tracking . . . . . . . . . . . . . . . . . . . 57
Special VCR Playback Features . . 58
S-VHS Playback . . . . . . . . . . . . . . 58
Variable Search System . . . . . . . . 59
JPEG CDR/RW
MP3 CDR/RW
DVD-RAM
DVD-RW
DVD-R
Recorded content Disc Shape
Max. Playing Time
about 240
about 480
about 80
about 160
about 74
about 20
1(XP: Excellent Quality)
Single sided (5”) 2 (SP: Standard Quality)
(4.7GB)
4 (LP: Long Playback)
6 (EP: Extended)
2 (XP: Excellent Quality)
Double sided (5”) 4 (SP: Standard Quality)
(9.4GB)
8 (LP: Long Playback)
12(EP: Extended)
1 (XP: Excellent Quality)
2 (SP: Standard Quality)
5” (4.7GB)
4 (LP: Long Playback)
6 (EP: Extended)
1 (XP: Excellent Quality)
2 (SP: Standard Quality)
5” (4.7GB)
4 (LP: Long Playback)
6 (EP: Extended)
Single sided(5”)
AUDIO + VIDEO Double sided(5”)
Single sided(3.5”)
Double sided(3.5”)
Single sided(5”)
AUDIO
Single sided(3.5”)
Single sided(5”)
JPEG Images
Single sided(3.5”)
Single sided(5”)
MP3 Audio
Single sided(3.5”)
AUDIO + VIDEO
AUDIO + VIDEO
AUDIO + VIDEO
• You cannot play discs other than those listed above.
• You canot play DVD-RAM discs or non-standardized discs.
etc., even if they may be labeled as above.
• This DVD video player uses the NTSC color system and
cannot play DVD video discs recorded in any other color
system(PAL, SECAM, etc...)
Because of problems and errors that can occur during the
creation of DVD software and/or the manufacture of DVD
discs. Toshiba America Consumer Products. Inc..,
Toshiba Hawaii, Inc, and Toshiba of Canaga, Ltd. cannot
guarantee that this player will play every feature of every
DVD technology, Toshiba DVD players are manufactured to
the highest standards of quality and, as a result, such incompatibilities are very rare. If you happen to experience and
difficulty playing a DVD on a Toshiba DVD player, please
feel free to call our contact listed in “How to Obtain
Warranty Services.”
English - 39
Playback
4
•
•
•
•
•
•
•
•
•
•
•
•
•
•
•
•
•
•
•
•
•
•
•
•
•
NTSC
Disc Logo
Discs that cannot be played
Playing a Disc
•DVD-Video with a region number other than “1” or “ALL”
•3.9 GB DVD-R Disc for Authoring.
•DVD-RAM not recorded following the Video
Recording Standard
•Unfinalized DVD-R recorded on other equipment.
•PAL discs
•DVD-ROM/DVD+RW/PD/MV-Disc/DiVX Video Disc, etc
•Video CD/CVD/SVCD/CD-ROM/CDV/CD-G/CD-I
1
Press the OPEN/CLOSE button.
2
Place a disc gently into the tray with the disc’s label
facing up.
40 - English
ing, as this may cause damage to the disc.
Make sure to press the OPEN/CLOSE button to
Do not push the disc tray while it is being opened
or closed, as this may cause a product malfunction.
Do not place foreign materials on or in the disc
tray.
ON / STANDBY
TV ON / STANDBTY
3
Press OPEN/CLOSE button to close the disc tray.
4
Press the STOP button to stop playback.
TV MUTE
100 +
AUDIO
SELECT
INPUT SEL.
DVD
VCR
TV
CH / TRK
VOL
OPEN/CLOSE
F / ADV / SKIP
VCR Plus+
MARKER
• Your DVD Recorder-VCR closes the disc tray and
plays the disc automatically.
• When a recordable media (DVD-RAM, DVD-RW,
DVD-R, etc.) is used, Auto Playback cannot be
activated without pressing the Play button. When
pressing the Power button while a disc is in the
tray, the unit will be activated. Press PLAY to start
playback.
• If you insert MP3 Disc, your DVD Recorder-VCR
will display the file list on the screen and start.
• When a JPEG disc is inserted, folders and a file list
are displayed in the Album format.
Some functions may perform differently or be dis-
abled depending on the disc type. If this occurs,
refer to the instructions written on the disc case.
Be especially careful that children's fingers are not
caught between the disc tray and the tray chassis
when it closes.
After turning power on, it will take a few
seconds until the DVD operates.
Playback
Playback
discs that are compatible with DVD-RAM Standard
Version 2.0.
Playback and/or recording may not work for some
types of discs, or when specific operations, such as
angle change and aspect ratio adjustment, are being
performed. Information about the discs is written in
detail on the box. Please refer to this if necessary
Do not allow the disc to become dirty or scratched,
Finger prints, dirt, dust, scratches or deposits of cigarette smoke on the recording surface may make it
impossible to use the disc for recording.
To protect a DVD-RAM disc from damage, use a cartridge.
DVD-RAM/R/RW discs may not be able to play on
some DVD players, depending on the player, disc
and the condition of the recording.
Discs with PAL programs recorded on them
cannot be recorded using this product.
CAUTION
open or close the disc tray.
This DVD Recorder-VCR can only operate with
Note
Do not move your DVD Recorder-VCR while play-
When you stop disc play, the recorder remembers
RETURN
CLEAR
Note
DISPLAY TV / VCR SUBTITLE REC SPEED
REC
PIP
DVD
VCR
COPY
REC PAUSE
TIME SLIP
where you stopped, so when you press PLAY button again, it will pick up where you left off. (unless
the disc is removed or the recorder is unplugged,
or if you press the STOP button twice.) This function is only applicable to DVD-VIDEO, DVD-RAM,
DVD-RW, DVD-R or audio CDs (CD-DA).
English - 41
Using the Search &
Skip Functions
Slow Motion Play/
Step Motion Play
About QUICK
DVD-R
Title/Chapter/Time/Audio/Repeat/Zoom
R (V)
5 / 12
1/1
Searching through a Chapter or
Track
During play, press the SEARCH ➛➛ or ❿❿ button on
the remote control. The playback speed will change as
follows.
DVD-VIDEO/
DVD-RAM/DVD-RW
DVD-R
AUDIO CD(CDDA)
PLAYFF1/FR1FF2/FR2
FF3/FR3FF4/FR4FF5/FR5
FF6/FR6
PLAYFF1/FR1FF2/FR2
FF3/FR3
Slow Motion Play
(DVD-VIDEO/DVD-RAM/DVD RW/
DVD-R)
The QUICK functions allows you to easily search for a
desired scene by accessing title, chapter, track and time. You
can also change the subtitle and audio settings and set some
features including Repeat, Angle and Zoom.
During pause mode, press the SEARCH ➛➛ or ❿❿
button on the remote for more than 1 second.
• Each time you press the ❿❿ button :
❿❿ Slow X 1/8 ❿❿Slow X 1/4 ❿❿Slow X 1/2
Press the QUICK button on the remote control during playback.
• Each time you press the ➛➛ button :
➛➛ Slow X 1/8 ➛➛Slow X 1/4 ➛➛Slow X 1/2
To return to normal speed playback, press the ❿II button.
• You can scan the program in reverse order.
During play, press the l➛➛ or ❿❿l button on the remote
control.
• If you press the l➛➛ button
If you press the l➛➛ button, it moves to the beginning
of the chapter or track. Pressing the button once again
within 3 seconds returns to the beginning of the previous chapter or track.
• If you press the ❿❿l button
If you press the ❿❿l button, it moves to the next chapter or track.
What’s a track?
Note
Step Motion Play
(DVD-VIDEO/DVD-RAM/ DVD-RW/
DVD-R)
During pause mode, press the F.ADV button on the
remote.
• Each time the button is pressed, a new frame will
appear.
To return to normal speed playback, press the ❿II button.
No sound is heard during STEP or SLOW mode.
Note
DVD-RAM/DVD-RW
D 2CH
A track is usually a song on a Audio CD
(CDDA) or MP3 disc.
What’s a chapter?
A title on a DVD disc is usually divided into
chapters.
What’s a title?
A title means usually a film contained on a
DVD disc.
This may not work for some discs. When an
audio CD(CD-DA) or a MP3 disc is inserted,
depending on the type, the information display
may not be appear.
Regarding the DVD-Video mode, the Time
Search function does not operate in some discs.
To make the screen disappear, press the QUICK
again.
Title/Time/Subtitle/Audio/Repeat/Zoom
Skipping ahead 30 seconds
In play mode, press F.ADV/SKIP button to cue ahead
exactly 30 seconds.
42 - English
English - 43
Playback
Playback
Skipping Chapters or Tracks
***
DVD-VIDEO
Title/Chapter/Time/Subtitle/Audio/Repeat/Angle/Zoom
To return to normal speed playback, press the ❿II
button.
00:00:04
Repeat Play
Using Repeat Play
(For DVD-VIDEO/DVD-RAM/DVDRW/DVD-R)
Using Repeat Play
(For Audio CD/MP3)
1
Press the QUICK button during playback.
Repeat is highlighted.
2
Press ENTER button.
3
Press the ❷ button to select the Track or Disc
you want to playback repeatedly. For MP3 discs,
you can select Track, Folder or Disc.
4
Press ENTER button.
Repeat play allows you to repeat a track, folder or
the entire disc.
Using the A-B Repeat
Function
For DVD-VIDEO/DVD-RAM/ DVDRW/DVD-R
Moving to a Scene
Directly
You can find the desired scene easily using the QUICK function.
(DVD-VIDEO only supports chapter repeat.)
2
3
Use ❷buttons to select Repeat and use ❿
button to select the Title, Chapter or A-B you want
to play repeatedly.
Press ENTER button.
Repeat play allows you to repeat title, chapter or A-B.
• To make the screen disappear, press the QUICK or
RETURN button.
Press the QUICK button during playback.
1
Press the QUICK button during playback.
2
Use ❷ to select Repeat and use ❿ button
to select A-B.
2
Use ❷ to select the Title, Chapter or time you
want to find the desired scene.
3
Press ENTER button.
3
If you want to select a title or chapter, select it using
the ➛❿ buttons. Then, press the ENTER button.
4
Press the ENTER button at the point where you
want the repeat play to start (A) and then press the
ENTER button at the point where you want the
repeat play to Stop (B).
• You can enter the desired item directly using the
number buttons.
• Your DVD Recorder-VCR will playback the selected section repeatedly.
To return to normal playback
Select Off on the Repeat item or press the CLEAR
button on the remote control.
44 - English
English - 45
Playback
Playback
1
Press the QUICK button.
1
4
If you want to move to a desired time, enter the
time in the sequence of hour, minute, and second
using the number buttons and then press the
ENTER button.
Selecting the Subtitle
& Audio Language
Selecting the Audio language
1
Press the QUICK button during playback.
Audio languages and subtitle languages may not work
depending on disc type.
Changing the Camera
Angle
When a DVD contains multiple angles of a particular scene,
you can select the Angle function.
It is available during playback only.
Selecting the subtitle language
1
Press the QUICK button during playback.
2
1
Press the QUICK button when the
"Angle" is shown on the screen during playback.
2
Use ❷ to select Angle and use ➛❿ button to
select the desired angle.
Use ❷ to select Audio and use ➛❿ button to
select the desired audio language.
• Audio languages may be different because they are
disc-specific.
Playback
Playback
• Some discs allow you to select languages from the
disc menu only.
2
Use ❷ to select Subtitle and use ➛❿ button to
select the desired subtitle language.
• If a disc contains subtitles, you can select a desired
subtitle language by pressing the ➛❿ buttons.
This function is disc-dependent, and may not work
Note
with all DVDs. This function does not work when
a DVD has not been recorded with a multi-camera
angle system.
• Subtitle display may be different depending on
disc type.
• DVD subtitles may overlap with your TVs subtitles.
If this occurs, disable the caption function on your
TV.
• Some discs allow you to select languages from the
disc menu only.
46 - English
English - 47
Using Bookmarks
Bookmarking with DVD-RAM/ DVDRW(VR) disc
• The screen will display “Marker” in place of “Bookmark” if
you are playing a DVD-RAM/DVD-RW(VR).
Set marks at scenes you want to see again so that you can
start playback from the marked position.
Clearing a Bookmark
1
Zooming-In
Press the MARKER button.
• Up to 99 scenes can be marked.
1
• If you press the ENTER button during playback, bookmarks are saved in the order of title.
Press the QUICK button during playback.
Setting a book mark
Playing Back a Bookmark
Press the MARKER button during playback.
2
Press the ENTER button when the desired scene
appears.
3
Press ❿ button to move to the next position.
1
Press the MARKER button.
2
Press the ➛❿ buttons to select a bookmarked
scene.
3
Press the ENTER button to start playing from the
selected scene.
2
Press ➛❿ buttons to select a marked scene
you want to delete.
3
Press Clear button to delete the selected
bookmark.
3
Press ❷➛❿ buttons to move to the area you
want to enlarge.
4
Press the ENTER button.
• The screen will be enlarged to twice the normal
size.
• The number 1 is displayed and the scene is memorized.
When using a DVD-RAM/DVD-RW(VR) the last
Note
4
2
Use ❷ buttons to select Zoom, and then press
the ENTER button.
•
will be displayed.
Playback
Playback
1
Press the ENTER button again when the desired
scene appears.
• The number 2 is displayed and the scene is memorized. Repeat above to bookmark other positions.
You can bookmark up to 10 scenes.
Marker number added will be deleted.
• If you press the ENTER button again after the
screen was enlarged to twice the normal size, the
screen size will be enlarged to four times the normal size.
DVD-VIDEO/
DVD-RAM/DVD-RW/
DVD-R
5
48 - English
normal size 2X 4X 2X
normal size
To return to the normal size, press the ENTER button repeatedly until the screen becomes of normal
size.
English - 49
Check Remaining Time
Press the TOP MENU button to move to the title
menu of the disc.
2
Playing Back an Audio
CD (CDDA)
• Use this button if the disc contains more than one
title. Some discs may not support the title menu
functionality.
Audio CD (CDDA) Screen Elements
1
❷ : Select a track (song).
2
❿ : Playback the selected track (song).
Each disc has a variety of menu functions available.
1
Press Info button on the remote control.
Following information will be displayed.
(Current deck status, recording speed, remaining
time, input channel, current time.)
For DVD-RAM/DVD-RW/ DVD-R
disc
Press the TITLE LIST button to display title list.
1
1
Insert an audio CD (CDDA) into the disc tray.
• The audio CD menu appears and the tracks
(songs) are played back.
Quick
Note
Using the Disc and Top
Menu
Some type of discs contains a dedicated menu system that
allows you to select special functions for title, chapter, audio
track, subtitle, film preview, information on characters, etc.
2
#
• Move to the setup menu related to playback operation.
• You can select audio language and subtitle etc.
provided by the disc.
50 - English
(❿❿l) button: Playback the next track.
5
(l➛➛ ) button: Returns to the beginning of the current track when pressed during playback.
If you press this button within three
seconds after playback starts, the
previous track will be played. If you
press this button after three
seconds,the current track will be
replayed from the beginning.
6
Press and hold the (➛➛/ ❿❿) button: Fast Play
(FF1/FR1, FF2/FR2, FF3/FR3)
Press ❷ buttons to select the track (song) to start
playback from, and then press the ENTER button.
• You can also select the track (song) by pressing
the number buttons on the remote.
CD
Music
Quick
00 :52
01. TRACK 1
For DVD-VIDEO disc
Press the DISC MENU button to enter the disc
menu of the disc.
4
) button: Playback the selected track (song).
Audio CD(CD-DA) Screen Elements
!
@
1
ENTER (
01/12
01. TRACK 1
4:39
02. TRACK 2
4:31
03. TRACK 3
4:30
04. TRACK 4
3:53
05. TRACK 5
4:23
06. TRACK 6
4:24
&
$
%
^
1. Repeat mode: Repeat off/Repeat Track/Repeat
Disc.
2. Current track (song): Displays the number of
the track currently being played.
3. Displays the current play index and total
track num-ber.
4. This shows the operating state of a disc and a
playback time corresponding to a portion that
is currently played.
5. Displays the track list (song list) and the
playing time of each track.
6. Button display.
7. Play Option: Normal, Random, Intro or
Playlist
English - 51
Playback
Playback
Title List : Title refers to a recorded video
stream. Title List shows list to
help you select a title. Since the
title list consists of the information on stream that is actually
recorded, if one title is deleted,
that title cannot be played again.
Play List : This refers to a unit of playback,
which is made by selecting a
desired scene in the entire Title
List. When one playlist is played,
only the scene selected by the
user will play and then stop.
Since only the information necessary for playing a desired scene
is included in a playlist, even if
that playlist is deleted, the original data will not be deleted.
3
• Intro :
The first 10 seconds of each track is
played. If you press the ❿II button
during Intro play, Normal Play will
be performed from the track currently playing. When Intro Play is
completed, Normal Play is performed.
• Playlist :
The Playlist playback option allows
you to select the order in which you
want tracks to play.
Play Option Mode
1
Press the QUICK button during playback.
Repeat mode will be highlighted.
To Program Tracks
4
Press the ENTER button.
The Playlist screen will appear.
Select tracks in the order in which you want
them to play using the❷buttons. Press the
ENTER button.
Music
Quick
Playlist
You can register a maximum 30 tracks in the playlist.
CD
00 :52
03_L.I.E
01/12
The same can be used with a Mp3 disc.
Music
Quick
01. TRACK 1
4:39
02. TRACK 2
4:31
03. TRACK 3
4:30
04. TRACK 4
3:53
05. TRACK 5
4:23
06. TRACK 6
4:24
Note
1
Play Option Normal
Press the QUICK button.
Repeat Mode will be highlighted.
CD
Music
Quick
Press the PLAY button to playback playlist.
00 :52
01. TRACK 1
01. TRACK 1
4:39
02. TRACK 2
4:31
03. TRACK 3
4:30
04. TRACK 4
3:53
05. TRACK 5
4:23
06. TRACK 6
4:24
RETURN
• During Playback, repeat mode will be highlighted.
01/12
2
Select Play Option Mode using the ➛❿ buttons
and press the ENTER button.
Quick
To change repeat mode
• The play option screen will appear.
CD
Music
Quick
00 :52
03_L.I.E
01/12
01. TRACK 1
4:39
02. TRACK 2
4:31
03. TRACK 3
4:30
04. TRACK 4
3:53
05. TRACK 5
4:23
06. TRACK 6
4:24
If you playlisted a wrong track, select the
wrong track using the ❷buttons and press the
CLEAR button.
The wrong track will be removed.
Playback
Playback
• During Stop, Play option will be highlighted.
5
1
Press QUICK during Play to highlight Repeat Mode.
Press ENTER when Repeat Mode is highlighted.
• A screen allowing you to change the repeat mode
(Off, Disc, Track) will appear.
Repeat
2
Select Play Option using the ➛❿buttons.
CD
Music
Quick
00 :32
01. TRACK 1
Off
01/12
01. TRACK 1
02. TRACK 2
4:39
4:31
03. TRACK 3
4:30
04. TRACK 4
3:53
05. TRACK 5
4:23
06. TRACK 6
4:24
RETURN
3
Select a desired play option using the ❷ buttons
and press the ENTER button.
• Normal :
Tracks on a disc are played in the
order in which they were recorded
on the disc.
• Random :
The Random option plays a disc’s
tracks in random order. After a random list is generated and played
completely, another random list is
generated and played.
Ramdom Play continues until the
play option is changed.
52 - English
3
Press the ENTER button.
The play option screen will appear.
Select Playlist using the ❷buttons.
Play Option Playlist
English - 53
Photo CD Playback
1
Insert a photo CD (JPEG) into the disc tray.
2
The screen shown below will appear automatically.
(Press ❿II button to switch to slide show mode.)
4
Use the ➛❿ buttons to select clips menu and then
press the ENTER button.
:
Returns to the Album screen.
:
The unit enters slide show mode. Before
the slide show can begin, the photo interval
(slide show speed) must be set
:
Each title the ENTER button is speed, the
picture rotates 90 degree clockwise.
:
Each time ENTER button is pressed, the
photo is enlarged up to 4X.
(Normal 2X 4X 2X Normal)
Playing back an MP3
CD
1
4
RETURN (
) button:
Moves to the parent of the folder to which the current song belongs.
5
(❿❿l ) button: Playbacks the next track.
6
(l➛➛) button: Returns to the beginning of the current track when it is pressed during playback. If it is
pressed again, your DVD Recorder-VCR plays back
the previous track.
Insert an MP3 CD into the disc tray.
• The MP3 menu is displayed and the tracks
(songs) are played back.
MP3
Music
Quick
00 : 25
03_L.I.E
DJDOC
KIMHJ
When using a combination
MP3/JPEG disc
1
Playback
2
SES
If you want to listen to MP3 files, but you're
currently in Photo mode, press STOP button twice
and then press MENU button to bring up the Menu
screen.
DJDOC
YOUNG
05/16
01_INTRO(####)
RETURN
2
Select Music using the ❷ buttons then press the
❿ or ENTER button. MP3 screen will be shown.
Press the ❷ buttons to select the folder you want
to hear, and then press the ENTER button.
1
If you want to watch Photo files, but you're currently in MP3 mode, press STOP button twice and then
press MENU button to bring up the Menu screen.
• Press the ❷ buttons to select the track (song)
you want to hear, and then press the ENTER button.
• You can also select the desired track (song) by
pressing the number buttons on the remote.
3
When using a combination
MP3/JPEG disc
Select Photo using ❷ buttons, then press the
ENTER button.
2
Select Photo using the ❷ buttons then press the
❿ or ENTER button. Photo screen will be shown.
Buttons on the Remote
1
❷ : Selects a track (song).
2
❿ : Playback the selected track (song).
3
54 - English
ENTER (
) button:
Playbacks the selected track (song) or displays the
files in the selected folder.
English - 55
Playback
To see the next 6 pictures, press the ❿❿l button.
To see the previous 6 pictures, press the l➛➛ button.
Seotaiji2
Using PIP
The PIP function allows you to view a sub screen together
with the main screen in DVD mode.
You can watch both DVD and TV together.
Deactivating PIP
1
Press the PIP button again.
Playing the VCR
Tracking
• PIP will be deactivated.
To play a standard VHS videotape, just insert it into the
VCR deck and press the PLAY button. You can turn on the
Auto Play to enable the VCR deck to play automatically
when you insert a videotape that is missing the Record
Safety Tab. See pages 36~37.
The Tracking adjustment removes almost the white lines
that sometimes appear during playback because of slight differences in recording decks. The TRK button will automatically align the recorded tracks with the playback heads to
solve this problem. You may also set tracking manually.
PIP does not work in VCR mode.
Note
1
1
Press the PIP button.
Adjust Tracking Manually
During playback, press the CH/TRK /
buttons to remove white lines from the picture.
• The current disc is played back on the PIP screen
located at the bottom of the screen.
1
Insert VHS Tape
Insert a standard VHS videotape into the VCR deck.
Playback
2
Play Tape
3
Stop Playback
Playback
• When a videotape is inserted, power will turn on
automatically.
Press the ❿II(PLAY/PAUSE) button on the remote
control or on the front panel of the unit. The videotape will begin to play automatically if it is missing
the Record Safety Tab and Auto Play is turned on.
See pages 36~37.
Switching between the PIP and
main screens
1
Press the PIP button again.
• The main and PIP screen will be switched.
56 - English
Press the (STOP) button on the remote control or
on the front panel of the unit.
English - 57
Special VCR Playback
Features
While a videotape is playing, you can enjoy a variety of special playback features, including Still, Frame Advance, Skip,
Slow motion, and more. Press the Play button again to
resume normal playback.
Pause
The DVD Recorder-VCR allows you to playback high quality S-VHS tapes.
1
Insert a S-VHS Tape
2
Start Playback
Insert an S-VHS tape into the VCR deck.
In Play mode, press ❿II(PLAY/PAUSE) to still a single frame.
2
Frame Advance
3
Fps/Review
In the pause mode, press F.ADV/SKIP to
advance to the next frame.
In Play mode, press Forward (❿❿) or
Rewind (➛➛) to Cue/review at two speeds:
Press ❿II(PLAY/PAUSE) on the remote control to
begin playback of the S-VHS tape.
Variable Search
System
Press the QUICK button to display the search screen in
the stop mode. When a program is recorded, the starting
point is given an Index mark for easy location. However, the
VHS Index Search System (VISS) cannot recognize index
marks made by old VCRs. If the VCR has trouble finding a
mark, it is probably because the cassette was recorded on a
VCR without VISS. If you want to index two programs in a
row, set your VCR to stop, then start recording each
program.
3
End search
Use this feature when you want to search for a blank
position to record a program on a cassette. While a
cassette is stopped, press the QUICK button. The
VCR will fast forward, searching for a blank position,
and then automatically stop at that position. If the
VCR reaches the end of the tape during end search,
the tape will be ejected.
Scan and play
Use scan and play when you don’t know exactly
where a program is located on a cassette tape.
- Forward Intro Scan
Highlight “Forward Intro Scan”, then press the
ENTER button.
- Reverse Intro Scan
Highlight “Reverse Intro Scan”, then press the
ENTER button.
1 Go to [0:00:00] stop
Use this feature when you want to search for the
[0:00:00] counter position on a cassette. Press the
CLEAR button at the point on the tape where you
want to set the counter to [0:00:00].
While a cassette is stopped, press the QUICK button. The VCR will rewind or fast forward, searching for the [0:00:00] counter position, and then
automatically stop at that position.
Playback
Playback
1
S-VHS Playback
2
• Picture Search — Press and release to advance the
tape forward or backward at 5 times normal
speed.
• Jet Search — Press and hold to advance the tape
forward or backward at 7 times normal speed.
4
Skip
5
Slow motion
In Play mode, press F.ADV/SKIP to cue ahead exactly
30 seconds. Press F.ADV/SKIP repeatedly up to 4
times to cue ahead 2 minutes.
In pause mode, press ❿❿ button for slow motion.
Press the press ❿❿ button repeatedly to vary slow
motion speed from 1/5 to 1/30 of normal playback.
Press the PLAY button twice to resume normal
viewing.
58 - English
English - 59
Finalize
Recording
Before Recording
Note
This unit can record on various types of discs. Before
recording, read the following instructions and select the disc
type according to your preference.
This section shows various DVD recording methods.
Recordable discs
Recording Formats
This recorder can record on the following discs.
DVD-RAM
DVD-RW
DVD-R
watching . . . . . . . . . . . . . . . . . . . 62
• Making a One Touch Recording
•
•
•
•
•
•
•
•
•
•
•
(OTR) . . . . . . . . . . . . . . . . . . . . . 63
VCR Plus+ Record . . . . . . . . . . . . . . 63
Making a Timer Recording . . . . . . . . 64
Editing Timer Record List . . . . . . . 66
Deleting a Timer Recording Entry . . 67
Watching the Images Being Recorded
(Time Slip) . . . . . . . . . . . . . . . . . . 68
Recording From External Devices . 68
Recording through a DV Input jack . . . 69
Basic VCR Recording . . . . . . . . . . 69
Special Recording Features . . . . . . 70
Record Speed . . . . . . . . . . . . . . . . 70
Copy to DVD or VCR . . . . . . . . . . 71
60 - English
This can be due, among other reasons, to problems and
errors that can occur during the creation or recording of
DVD and other software and the manufacture of software
discs (including blank discs).
Moreover, because of variations in the quality of discs, this
recorder may not be able to record on all discs that bear a
DVD-RAM, DVD-R or DVD-RW logo, but you should not
encounter difficulty if you use only high quality recordable
DVD discs.
If you happen to encounter difficulties playing or recording
a DVD disc of playing a CD disc, please feel free to call our
Customer Service Hotline at 1-800-319-6684.
Compatibility between the DVD Recorder-VCR and
Other Company’s Recorder.
Disc Types
Recording
format
DVD-RAM
VR Mode
VR Mode
DVD-RW
V Mode
DVD-R
V Mode
Recording Device Finalizing Additional Recording in
the DVD Recorder-VCR
Toshiba
X
Recordable
X
Recordable
Other Company
Not
recordable
finalized
Toshiba
Recordable
not finalized
Not recordable
finalized
Other Company
Recordable
not finalized
finalized
Not recordable
Recordable (D-VR3)
Toshiba
not finalized Not Recordable (Other
Toshiba Models)
finalized
Not recordable
Other Company
not finalized
Not recordable
finalized
Not recordable
Recordable (D-VR3)
Toshiba
not finalized Not Recordable (Other
Toshiba Models)
finalized
Not recordable
Other Company
not finalized
Not recordable
When you insert an unused disc, the following message
appears. Since available functions differ depending on the
disc type, select a disc that best fits your preferences.
DVD-RAM: Use after formatting the disc.
DVD-RW( Video mode)/-R
• This mode automatically creates chapters at specified
intervals during finalization.
• Simple editing (erasing titles/changing title name).
DVD-RW(VR mode)/-RAM
• This mode involves multiple editing functions (such as
deletion of a whole title, partial deletion of a title,
etc.).
• Various editing options using a created Playlist.
Unrecordable pictures
Pictures with copy protection cannot be recorded on this
DVD Recorder-VCR.
When the DVD Recorder-VCR receives a copy guard
signal while recording, recording stops and the following
message appears on the screen.
Unformatted Disc
Do you want to format this disc?
Yes
No
You cannot record copy protected movie.
DVD-RW: When unused DVD-RW disc is first inserted, the
message "Do you want to intialize this disc" will
be displayed. If you select Yes, the disc will be formatted in VR mode. If you want to change the
mode, refer to Formatting a Disc on page 91.
Uninitiallized Disc
Do you want to initialize this disc?
Yes
Concerning copy control signals.
Broadcasts that contain copy control signals may have one
of the following three signal types, Copy-Free, Copy-Once
and Copy-Never. If you want to record a copy-once type
program, use DVD-RW with CPRM in VR Mode and DVDRAM.
No
Copy-Free
Copy-Once
Yes
No
VR mode
Yes
Yes*
Video mode
Yes
No
DVD-R (For General Ver.2.0)
Yes
No
DVD-RAM (Ver.2.1)
Yes
Yes*
DVD-RW(Ver.1.1)
Copy-Never
DVD-RW(Ver.1.1)
with CPRM
Disc Name
:
Mana
Choose the recording format for DVD-RW.
DVD-VR
DVD-V
Once “Copy Once” has been recorded, additional recording
cannot be performed.
This * marked parts are compatible with CPRM.
DVD-R: Formatting DVD is unnecessary and only Video
Mode Recording is supported.
English - 61
Recording
Recording
•DVD-RWs and DVD-RAMs are rewritable.
•DVD-Rs are non-rewritable.
• Before Recording . . . . . . . . . . . . . 60
• Recording the current channel you are
- This closes the DVD-R/RW so no additional
recording can be done.
Unfinalize
- This allows additional recording on a finalized
DVD-RW disc.
- A DVD-RW disc that has been recorded by DAO
in a PC cannot be unfinalized.
- A DVD-RW disc that has been recorded in Video
Mode of a different maker’s recorder and other
Toshiba model cannot be unfinalized.
- A DVD-R disc cannot be unfinalized.
Recording the current
channel you are watching
DVD-RAM DVD-RW
DVD-R
4
Press the REC button.
5
Press the STOP button to stop or finish a recording
in progress.
• / is displayed on the screen and recording
begins.
DVD-RAM DVD-RW
Pausing / Resuming
Press the CHANNEL / button to select
the channel you want to record.
Insert the disc.
Use the channel / button or number
buttons to select the channel to record.
1
Press the MENU button.
• Press the ❷ buttons to select Timer Rec and
then press the ENTER or ❿ button.
• Select VCR Plus+ Record
• TV channel: 2 to 69
DVD-RAM(VR)
Timer Record
Setup VCR Plus+ Record
Note
2
during recording.
Press the REC Speed button on remote control, to
select the recording speed (quality).
Recording will stop automatically if there is not
• XP(High, approx. 1 hour) SP(Standard, approx.
2 hours) LP(Low, approx. 4 hours) EP(Extended
Play, approx 6 hours)
RAM
enough space for recording.
Up to 99 titles can be recorded onto a disc.
If the power interrupted due to power failure or
other reasons, the title being recorded will not be
saved onto the disc.
Recording will stop automatically if a copy protected image is input.
Do not use DVD-R authoring discs with this unit.
Start Recording.
Timer Rec.
Timer Record
Scheduled Record List
Follow the instructions on page 62 to begin recording.
Copy
Title List
Playlist
Disc Manager
MOVE
3
Activate OTR.
While in Record mode, press the REC button again
to activate One-Touch Recording (OTR).
• Record length 0:30 appears on the On-Screen
Display and the DVD Recorder-VCR will record
for exactly 30 minutes.
SELECT
RETURN
EXIT
• If the current time is not set. Set the current time first.
2
Enter VCR Plus+ Code number.
DVD-RAM(VR)
VCR Plus+ Record
Setup
Timer Rec.
4
Add Recording Time.
Continue pressing REC to add recording time in 30
minute increments up to 4 hours.
Enter VCR plus+ Code number. [0-9]
Copy
Title List
Playlist
• The DVD Recorder-VCR stops recording automatically when the time has elapsed.
Disc Manager
MOVE
SELECT
RETURN
DVD-RAM(VR)
EXIT
VCR Plus+ Record
Setup
Timer Rec.
Enter VCR plus+ Code number. [0-9]
Copy
9
2
3
0
1
7
5
8
Title List
Playlist
Disc Manager
MOVE
62 - English
SELECT
RETURN
EXIT
English - 63
Recording
Recording
DVD-R
1. Check the antenna cable is connected.
2. Check the remaining time of the disc.
3. Check the date and time are correct.
Make sure the Clock has been set (Setup - System Setting)
before you proceed with a timer recording.
• CATV channel: 1 to 125
/
You can’t change the recording mode and channel
3
1
• Press the REC PAUSE button again during pause to
resume recording.
• You can switch channels by pressing the CH
buttons while recording pauses.
2
DVD-RAM DVD-RW
DVD-R
• The message “Updating the information of disc.
Please wait for a moment”.
• Press the REC PAUSE button to pause a recording in
progress.
1
VCR Plus+ Record
One-Touch Recording (OTR) allows you to add recording
time in 30-minute increments up to 4 hours at the touch of
a button.
1. Check the antenna cable is connected.
2. Check the remaining time of disc.
DVD-RAM/DVD-RW/DVD-R discs should be formatted in
advance before beginning recording. Most new discs are
sold unformatted. Make sure to format your unformatted
discs before recording.
Press the OPEN/CLOSE button and place a recordable disc on the disc tray.
Making One Touch
Recording (OTR)
3
• The Timer Recording screen is displayed.
If you enter VCR Plus+ Code number correctly.,
all recording informations will be set
automatically.
Making a Timer Recording
Scheduled Record List
No
01
02
To
Date
DVD-RAM DVD-RW
Source 01:34
DVD-R
01/04
Start 12
MOVE
02
01 AM End
Modo
Type once
4
Edit
No.01
SELECT
RETURN
01 AM
SP
EXIT
1. Check the antenna cable is connected.
2. Check the remaining time of the disc.
3. Check the date and time are correct.
Make sure the Clock has been set (Setup - System Setting)
before you proceed with a timer recording.
After check if all record information is right, press
ENTER button.
Scheduled Record List
DVD-RAM(VR)
No. To Source Date Start
End
Type Mode Edit
01 DVD CH 34 01/04 07:55PM 12:10AM Once SP
02
1
! Press the MENU button.
@ Press the❷ buttons to select Timer Rec., and
then press the ENTER or ❿ button.
# Select Timer record.
DVD-RAM(VR)
SELECC.
VOLVER
SALIDA
Timer Record
Setup VCR Plus+ Record
Timer Rec.
Timer Record
• The Timer Recording screen is displayed. Fill the
input items using the arrow buttons.
3
Playlist
MOVE
SELECT
RETURN
will appear on the front panel. It means that a
timer recording is registered.
• TO : Select the media to record DVD or VCR.
• SOURCE : The video input source (L1 or L2), or
the broadcasting channel you want to
make a timer recording from.
• Date : Set the recording day.
• Start/End Time : Start and end time of the timer
recording.
• Type (Recording cycle).
Once : Records once.
Weekly : Records at a set time every week.
Daily : Records at a set time every day.
• Mode (Recording mode).
If the timer settings overlap
The programs are recorded in order of priority. If
timer recording is set for the first program and then
again for the second program and both programs
overlap, the following message will appear on the
screen: “This setting is identical with 1”
The message shows that the first program has priority. After recording of the first program is complete,
the second program starts being recorded.
To exit without saving the current setting
Press the MENU or TIMER REC button.
To return to the previous menu
Press the RETURN button if you don’t want to set a
timer recording.
DVD
AUTO : Select when you want to set video quality automatically. It depends on the remaining time on the DVD.
XP (high quality) : Select when audio and video qualities are
important. (Approx. 1 hour)
4
Turn the power off to finish the timer recording.
•
will blink if disc or tape is not inserted.
SP (standard quality) : Select to record in standard quality.
(Approx. 2 hours)
EXIT
The timer recording time may differ from the set
Note
time depending on disc status and overall timer
recording status (for example, recording times
overlapping, or when the previous recording ends
within 2 minutes before the start time of the next
recording.)
VCR
AUTO : Select when you want to set video quality automatically. It depends on remaining time of VCR tape.
SP : Standard Play, for best picture quality and for long
preservation.
Source
64 - English
SLP : Super Long Play, for maximum recording time (3
times SP).
English - 65
Recording
Disc Manager
•
If you make a mistake
Press the ➛❿button to select the item you want to
change.
EP (extended mode) : Select when a longer recording time is
required. (Approx.6 hours about 1.2
Mbps)
Title List
Press the ENTER button.
➛❿: Moves to the previous/next item,
❷: Sets a value.
LP (low quality) : Select when a long recording time is
required.(Approx. 4 hours)
Scheduled Record List
Copy
Recording
Set timer recording option.
Press the MENU button.
• If the current time is not set. Set the current time
first.
MOVER
2
Editing Timer Record List
DVD-RAM DVD-RW
4
Press the ❷ button to select the number of the
timer recording you want to edit, and then press the
ENTER or ❿ button.
• The Edit and Delete items are displayed.
Deleting a Timer Recording
Entry
DVD-R
DVD-RAM DVD-RW
Editing the settings for a timer
recording
5
1
Press the MENU button.
2
Press the ❷ button to select Timer Rec., and then
press the ENTER or ❿ button.
DVD-RAM(VR)
Press the ❷ button to select Edit, and then press
the ENTER button.
• The Timer Recording screen is displayed.
Edit the items you want to modify. See the Timer
Recording section for more information on Timer
Recording Input items.
1
Press the MENU button.
2
Press the ❷ button to select Timer Rec., and
then press the ENTER or ❿ button.
3
Press the ❷ button to select scheduled Record
List, and then press the ENTER or ❿ button.
Timer Record
Press the ❷ button to select Delete, and then
press the ENTER button.
6
Press the ➛❿ buttons to select Yes, and then press
the ENTER button.
• The selected entry will be deleted from the list.
7
Press the MENU button after finishing the operation. The menu screen will disappear.
• You will be prompted with the delete confirm
message such as ‘Do you want to delete No.02?’.
DVD-R
Follow these directions to delete an entry from the timer
record list.
Follow these directions to edit the timer record list.
5
DVD-RW(VR)
Setup VCR Plus+ Record
Timer Rec.
Timer Record
Scheduled Record List
CH 09 11/22 09:22AM 10:30AM
Copy
Once
SP
CH 05 12/10 12:30AM 09:00AM Weekly LP
03
Title List
Playlist
MOVE
3
SELECT
RETURN
EXIT
Press the ❷ button to select scheduled Record
List, and then press the ENTER or ❿ button.
6
Press the ENTER button to confirm the edited setting.
4
Recording
Recording
Disc Manager
Press the ❷ button to select the number of the
timer recording you want to delete, and then press
the ENTER button.
• The Edit and Delete items are displayed.
DVD-RW(VR)
CH 09 11/22 09:22AM 10:30AM
Once
SP
CH 05 12/10 12:30AM 09:00AM Weekly
03
66 - English
English - 67
Watching the Images
Being Recorded (Time Slip)
Recording From
External Devices
DVD-RAM
This function allows you to watch the recently recorded 10second images on the PIP screen while a recording is in
progress.
1
Press the TIME SLIP button on the remote control.
1
Connect the Line out jack of your External
Devices to the Line IN jack on the front or
rear of your DVD Recorder-VCR using
Audio/Video Cable.
2
Power on your DVD Recorder-VCR and
switch to Line In mode by pressing the
INPUT SEL on the remote .
The front panel display changes on the
following sequence
Channel Number L1 L2 DV
• The recently recorded 10-second images are
played back on the PIP screen.
• This function starts to operate 10 seconds from
the time you press the REC button.
• On the TIME SLIP screen, you can playback,
scan, or perform other operations for the recorded
program using the playback related buttons.
Press the ➛➛button to scan the recording in the
reverse order, from the end to the start.
Press the ❿❿button to scan to the recently
recorded 10- second images.
Press the STOP button once to clear the TIME SLIP
function.
• To stop a recording while a TIME SLIP function is
in progress, press the STOP button twice.
3
When your DVD Recorder-VCR is in the
stop state, set the operation mode of your
External Devices to play mode.
4
Press the REC button on your DVD
Recorder-VCR when the image from which
you want to start recording is displayed.
5
Follow these directions to record onto a disc or tape the
outputs of a camcorder that has a DV output jack.
1
You can record a TV show in progress by inserting a blank
tape and pressing the (REC) button. You can even add
time in 30-minute increments up to 4 hours by pressing the
(REC)button repeatedly; see page 63.
2
Power on your DVD Recorder-VCR and switch to
DV mode by pressing the INPUT SEL. on the
remote. Insert the disc.
Be sure your videotape has a Record Safety Tab. If
3
Devices when recording through Line In mode
using Audio/Video cable.
Note
With your DVD Recorder-VCR stopped, set the
operation mode of your camcorder to play mode.
1
4
Press the REC button on your DVD Recorder-VCR
when the image from which you want to start
recording is displayed.
5
Press the STOP button on your DVD Recorder-VCR
when the recording is finished.
Insert Tape
Insert a blank VHS tape into the VCR deck.
• Make sure the tape is long enough to record the
entire program.
To change the Recording Speed, see page 70.
2
Select a Channel to Record
Use the 0–9 buttons or the Channel UP/DOWN
arrow buttons to select the desired channel, or press
the INPUT SEL. button to select Line 1, Line 2 or
DV if recording from an external device connected
to the front or rear Line inputs, respectively.
Recorder-VCR even if they have a DV output jack.
Also refer to the user manual for your camcorder
when recording through a DV jack.
3
The Time Slip feature only works with DVD-RAM
Note
the tab is missing, you can cover the opening with
a small piece of tape. Do not cover this opening
unless you are sure you want to record over the
tape.
Some camcorders may not work with your DVD
Note
Note
Before starting
1. Check TV channel and Antenna connections.
2. Check the remaining time on the tape.
Connect the DV output jack of your camcorder to
the DV input jack on the front of your DVD
Recorder-VCR using a DV cable.
Press the STOP button on your DVD
Recorder-VCR when the recording is finished.
Also refer to the user manual for your External
Basic VCR Recording
Start Recording
Press the (REC) button on the remote control or
front panel.
For options while recording is in progress, see
“Special Recording Features”.
discs.
68 - English
4
Pause/Resume Recording
5
Stop Recording
Press the (REC/PAUSE) button.
Press (REC) again to resume.
Press the (STOP) button.
English - 69
Recording
Recording
2
Follow these directions to record onto a disc or a tape
from External Devices.
Recording through a DV
input jack
Special Recording
Features
Record Speed
DVD-RAM(VR)
Copy to DVD or VCR
Edit Copylist
---/00/2000 1 00:00:44
---/00/2000 12:00 PM
1 Scene
While a recording is in progress, you can watch a different
channel, watch a different media, or add recording time in
30-minute increments.
You can slow down the recording speed from SP to SLP in
order to fit six hours of programming on a T-120 tape.
00/00/00 12:00:00 PM
DVD-RAM DVD-RW
DVD-R
You can copy DVD to VCR or VCR to DVD.
Press MENU button and select Copy.
1
Watch a Different Channel
Press the TV/VCR button on the remote to switch to
your TV tuner, then select a different channel on
your television.
Start Recording
1
3
Follow the Basic Recording instructions on page 69.
DVD-RAM(VR)
Copy
Select the Copylist, you want to
copy
using the ❷ buttons and then press ❿ button.
To copy play list, select “Copy”.
DVD --> VCR
2
Watch a different media during
recording
2
You can watch DVD during VCR recording or watch
Video tape during DVD recording.
• During VCR recording, insert a DVD in the DVD
deck. The output will automatically change to the
DVD and start playback.
• During DVD recording, insert a Video tape in the
VCR deck. The output will automatically change
to the VCR and start playback. (Only if tape is
missing the safety tab)
3
Add Recording Time
Set Record Speed
VCR --> DVD
DVD-RAM(VR)
Press the REC SPEED button on the remote control
to set the Record Speed to one of the following
options:
Edit Copylist
---/00/2000 1 Play
00:00:44
Rename
Edit Scene
• SP – Standard Play, for best picture quality.
Copy
Disc Manager
• SLP – Super Long Play, for maximum recording
time (3 times SP).
---/00/2000 12:00 PM
1 Scene
Delete
00/00/00 12:00:00 PM
DVD to VCR
The selected Record Speed will appear on the front
panel display and on-screen display.
Note
1
Refer to the One-Touch Recording (OTR).
Select DVD --> VCR to copy DVD
to VCR.
Direct copy DVD to VCR
4
Recording DVD and VCR at the
same time
You can record DVD and VCR at the same time, but
both modes must be set up to record separately.
• Press the DVD/VCR button to set the unit to DVD
or VCR mode.
• Choose Line input mode (Ch, Line1, Line2 or DV).
for DVD or VCR.
• Choose REC mode for DVD or VCR.
• Press REC button for DVD or VCR.
Maximum Recording Time - SP vs. SLP
Tape Length SP (Standard Play) SLP (Super Long Play)
T-120
2 hrs
6 hrs
T-160
2hrs 40 mins
8 hrs
T-180
3 hrs
9 hrs
When you watch or record on the VCR
Note
When DVD Recorder-VCR is connected to TV
Note
using S-Video or component video cable, the
playback screen on the video tape will not display
during DVD recording.
You cannot record different channel at the same
time.
The DVD and VCR cannot start recording at the
exact same time. You must set one mode to start
recording, then the other.
70 - English
Recording
Recording
• Check the remaining time on the tape.
during DVD Recording, some function buttons
may not operate.
The message “This function is not available.” will
be displayed.
SP(Standard Play) is for best picture quality.
SLP(Super Long Play) is for maximum recording
time.
2
If you want to copy from the
Copylist, choose “Edit Copylist”.
• To copy from “Edit Copylist”, you need to make a
Copylist. To make and select a “New Copylist”
(See pages 81~82).
• If you want to copy directly, choose “Direct
Copy”.
DVD-RAM(VR)
DVD-->VCR
1
Insert DVD disc you want to copy.
2
Insert VHS tape.
3
Press VCR copy button on front panel or remote
control.
4
To stop recording press the stop button.
• You can only use the Direct Copy feature on
DVD-R and DVD-RW(V) discs.
• The pause button is not effective in the Copylist.
New Copylist
Edit Copylist
Direct Copy
Disc Manager
English - 71
VCR to DVD
1
Press Enter button to choose the
list you want to copy.
4
Select VCR --> DVD to copy VCR
to DVD.
DVD-RAM(VR)
VCR-->DVD
VCR --> DVD scene will be displayed.
Start
End
00:00:21
• Check the remaining time on the disc.
02
--:--:--
Editing
Viewing the Menu
Functions for a Disc
00:01:04
--:--:--
DVD-RAM DVD-RW
DVD-RAM(VR)
Copy
PLAY
DVD --> VCR
There are a variety of menu functions depending on the disc
type. Press the MENU button.
Copy All
VCR --> DVD
5
Disc Manager
To copy Copylist, select “Copy”.
Start
02
Press ENTER button to select the
start position.
No Disc
VCR-->DVD
DVD-RAM(VR)
2
DVD-R
00:01:10
No Disc
End
00:00:21
Play
--:--:--
Copy
Setup
Timer Rec.
Delete
You can use ❿II, l➛➛ or ❿❿l ,➛➛or ❿❿ buttons to
search for the Start position.
00:00:43
PLAY
Copy All
VCR-->DVD
DVD-RAM(VR)
Start
• The VCR will fast forward, searching for a start
position and then automatically start a copy.
End
00:00:21
--:--:--
• It may not be match up with Start and END point
exactly.
Recording
DVD-VIDEO
• If you want to copy all content, select “Copy All”.
00:00:25
PLAY
Copy All
DVD-VIDEO
Direct copy VCR to DVD
A copylist will be generated.
• In VCR mode, the copylist cannot be saved.
VCR-->DVD
DVD-RAM(VR)
Start
End
00:00:21
02
--:--:--
72 - English
Insert the VHS tape you want to copy.
2
Insert Recordable DVD disc.
3
Press DVD copy button on front panel or remote
control.
4
To stop recording press the stop button.
00:01:04
--:--:--
00:01:04
PLAY
1
•
•
•
•
•
•
•
Copy All
•
•
•
•
•
•
Viewing the Menu Functions for a Disc 73
Viewing Title List . . . . . . . . . . . . . 75
Playing a Title List Entry . . . . . . . . 76
Renaming a Title List Entry . . . . . . . 77
Deleting a Title List Entry . . . . . . 78
Locking a Title List Entry . . . . . . . 79
Deleting a Section from a Title List
Entry . . . . . . . . . . . . . . . . . . . . . . 80
Creating a Playlist Entry . . . . . . . . . . . . . 81
Editing a Playlist Entry . . . . . . . . . 83
Editing Scene for a Playlist Entry . 84
Copying a Playlist Entry to the VCR . . 88
Deleting a Playlist Entry from the
Playlist . . . . . . . . . . . . . . . . . . . . . 88
Disc Manager . . . . . . . . . . . . . . . . 89
Setup
Timer Rec.
Title Menu
Disc Menu
English - 73
Editing
3
Select the End position in the same
way.
CD
DVD-RW(VR)
CD
DVD-RW(VR)
2
Viewing Title List
Setup
Timer Rec.
Copy
Title List
Playlist
Disc Manager
Setup
Timer Rec.
Press the ❷ button to select Title List, and then
press the ENTER or ❿ button,
or press the TITLE button on the remote control.
• The Title List screen is displayed.
!
DVD-RAM DVD-RW
@
#$
% ^
DVD-R
00:00:21
You can playback the recorded titles, edit a title name, edit
record list entries and lock or unlock the record list.
00:00:03
Sport
00:00:15
Movie
00:00:18
00:06:32
1
JPEG+MP3
02/01/01
00:25:30(PM)
Insert the recorded disc.
Press the MENU button.
06
00:08:16
07
00:09:36
&
DVD-R(V)
! Playback screen for recorded entry.
@ Information window for the selected entry: Title
name, recording date, recording time, lock status, recording mode.
DVD-R(V)
Setup
Timer Rec.
Copy
Title List
Disc Manager
Setup
Timer Rec.
Photo
Music
# Recorded entry No.
$ Recorded entry title.
% Recording duration (i.e., playtime).
^ Record list edit items.
& Button display.
DVD-RAM(VR)
Record List edit items
Press the MENU button again to hide the menu
Setup
Timer Rec.
Copy
Title List
Playlist
Disc Manager
Note
screen. You can configure the settings on the Setup
screen using the arrow and ENTER buttons.
If recording or editing could have been finished
properly because of any kinds of error, such as
sudden power failure, The recording or editing
might have not been done. Please be aware that a
material that has been damaged is unable retrieved
to its original content.
1
• Play : Playbacks the selected entry.
• Rename : Renames the title of the selected entry.
• Delete : Deletes the selected entry from the list.
Title List : Title refers to a recorded video stream.
Note
74 - English
Press the ❷ button to select an entry to edit, and
then press the ENTER or ❿ button.
Title List shows a list to help you select
a title. Since the title list consists of the
information on data that is actually
recorded, if one title is deleted, that title
cannot be played again.
• Edit : Deletes a desired section.
(DVD-RAM/DVD-RW(VR mode)
• Protect : Locks or unlocks the selected entry.
2
Press the MENU button after the operation is finished.
The menu screen will disappear.
English - 75
Editing
Editing
DVD-RAM(VR)
Playing a Title List Entry
4
Press the ❷ button to select Play, and then press
the ENTER button.
• The selected entry (title) will be played back.
4
Renaming a Title List
Entry
Press the ❷ button to select Rename, and then
press the ENTER button.
• The Rename screen is displayed.
DVD-RAM(VR)
You can also playback a recorded program by
DVD-RAM DVD-RW
DVD-R
Follow these directions to playback an entry from the Title
List.
1
Insert the disc.
Press the MENU button.
Note
pressing the QUICK button and using the title,
chapter or time items.
DVD-RAM DVD-RW
DVD-R
Follow these directions to rename a title list entry, i.e., to
edit the title of a recorded program.
1
Insert the recorded disc.
Press the MENU button.
2
Press the ❷ button to select Title List, and then
press the ENTER or ❿ button,
5
Enter the desired characters using the arrow (❷
➛❿) buttons.
• Back Space: Moves the cursor to the previous
character. (Functions the same as CLEAR )
• Space: Enters a blank and moves the cursor to the
right.
or press the TITLE LIST button on the remote
control.
• Delete: Deletes the character at the cursor position.
• The View Title List screen is displayed.
• Clear: Deletes all the character inputs.
3
6
Press the arrow buttons to select Save, and then
press the ENTER button.
• The changed title is displayed on the title item of
the selected entry.
Press the ❷ button to select Title List, and then
press the ENTER or ❿ button,
or press the TITLE LIST button on the remote
control.
Editing
Editing
• The Edit Title List menu is displayed.
2
• Save: Registers the character inputs.
Press the ❷ button to select an entry you want
to rename from Title List, and then press the
ENTER or ❿ button.
• The View Title List screen is displayed.
3
Press the ❷ button to select an entry you want
to playback from Title List, and then press the
ENTER or ❿ button.
• The Edit Movie List menu is displayed.
76 - English
English - 77
4
Deleting a Title List
Entry
DVD-RAM DVD-RW
DVD-R
• DVD-RAM(VR), DVD-RW(VR mode): Since
Playlist is present, the message “Do you want to
delete? (Related Playlist may be deleted.)” is displayed.
DVD-RW(Video mode), DVD-R: Since Playlist is
not present, the message “Do you want to delete?”
is displayed.
• You cannot delete a protected entry.
If you want to delete a protected entry, select
“OFF” in the protection menu.
Follow these directions to delete an entry from the Title List.
1
Press the ❷ button to select Delete, and then
press the ENTER button.
Insert the recorded disc.
Press the MENU button.
Locking a Title List
Entry
DVD-RAM DVD-RW
4
Press the ❷ button to select Protection, and then
press the ENTER button.
5
Press the ➛❿ buttons to select On, and then press
the ENTER button.
DVD-R
Follow these directions to lock an entry if you want to protect it from unexpected deletions.
1
Insert the recorded disc.
Press the MENU button.
may be deleted.)
2
Press the ❷ button to select Title List, and then
press the ENTER or ❿ button,
2
or press the TITLE LIST button on the remote
control.
• You will be prompted with the confirmation message ‘Title Protection:’.
Press the ❷ button to select Title List, and then
press the ENTER or ❿ button.
• The View Title List screen is displayed.
• The Lock icon on the information window for the
selected entry changes to the locked status.
Press the ➛❿ buttons to select off, and then press
the ENTER button to unlock Title Protection.
• The View Title List screen is displayed.
3
Press the ❷ button to select an entry you want
to delete from Title List, and then press the ENTER
or ❿ button.
Be careful, since you cannot recover an entry once
Note
it is deleted from Title List.
3
Press the ❷ button to select an entry you want
to protect from Title List, and then press the ENTER
or ❿ button.
• The Edit Title List menu is displayed.
• The Edit Title List menu is displayed.
Press the ➛❿ button to select yes and than press
the ENTER button.
Editing
Editing
5
78 - English
English - 79
Deleting a Section from
a Title List Entry
4
Press the ❷ button to select Edit, and then press
the ENTER button. The Edit Program is displayed.
! Playback bar
7
Press the ENTER button at the end point.
8
The image and time at the end point are
displayed the end point window.
Creating a Playlist Entry
@ Playtime
# Section deletion start point window and time
$ Section deletion end point window and time
DVD-RAM DVD-RW
DVD-RAM DVD-RW
VR mode
Follow these directions to delete a section from a Title List
entry.
#
!
1
$
Insert the recorded disc.
Press the MENU button.
• You cannot recover a section once it is deleted
from Title List.
2
Follow these directions to create a new playlist entry from a
recorded title.
Press the ❷ button to select Title List, and then
press the ENTER or ❿ button,
or press the TITLE LIST button on the remote control.
1
Insert the recorded disc.
Press the MENU button when the disc is stopped.
2
Press the ❷ button to select Playlist, and then
press the ENTER or ❿ button.
3
Press the ❷ button to select New Playlist, and
then press the ENTER or ❿ button.
@
5
Search the start points of the section you
want to delete using the playback related buttons.
9
• Playback related buttons: ❿II , l➛➛ , ❿❿l , ➛➛,
❿❿.
Press the ❷ buttons to select Delete, and then
press the ENTER button.
• Message “Do you want to delete?” will be displayed.
• If you want to cancel, press RETURN button to
return to the Title List screen.
• The View Title List screen is displayed.
Be careful, since you cannot recover a
3
Press the ❷ button to select an entry you want
to edit from Title List, and then press the ENTER or
❿ button.
• The Edit Title List menu is displayed.
Note
6
section once it is deleted from Title List.
Press the ❷ button to select Start, and then press
the ENTER button.
• The image and time at the start point are
displayed on the start window.
Editing
Press the MENU button to exit the menu after the
operation is finished.
The Title List screen will disappear.
The length of the selection to delete should be at
Note
least 5 seconds long.
If the length of the section to delete is less than 5
Play List : The Playlist is a unit of playback, that is
Note
created by selecting a desired scene in
the Title List. Since only the information
necessary for playing a desired scene is
included in a playlist, even if that
playlist is deleted, the original data will
not be deleted.
seconds, you will be prompted with the message
“The range is too short”.
If the end time precedes the start time, you will be
prompted with the message “End point cannot be
marked earlier than start point”.
80 - English
English - 81
Editing
10
• The Make Scene screen is displayed.
4
Select the start point of the section from which you
want to create a new scene using the playback related buttons, and then press the PAUSE button.
7
• Playback related buttons: ❿II, ❿❿l , l➛➛ ,
❿❿,➛➛
Press the ENTER button to select END point.
• The image and time at the end point are
displayed on the End window.
Editing a Playlist Entry
5
• The yellow-colored selection bar moves to the
Make item.
Press the ❷ button to select a function to use,
and then press the ENTER button.
• Play: Playbacks the selected entry.
• Rename: Renames the title of the selected entry.
Functionality is the same as the Rename
item in the Edit Record List.
• The screen returns to the Edit Playlist screen. 2
Scene No.001
• Edit Scene: Edits scenes of the selected entry.
DVD-RAM DVD-RW
Scene No.001
VR mode
• Copy: Copies the selected entry.
Follow these directions to playback or edit (rename,
edit scene, copy and delete ) the newly created playlist
entries.
5
Press the ❷ button to select Start, and then press
the ENTER button.
• The image and time at the start point are
displayed on the Start window.
8
• The yellow-colored selection bar moves to the
End item.
Scene No.001
9
Press the ENTER button to confirm.
• A new make scene screen is displayed.
• Scenes to be made will be added to the current
playlist.
• Repeat the above steps to make more than one
scene.
1
Insert the recorded disc.
Press the MENU button when the disc is stopped.
2
Press the ❷ button to select Playlist, and
then press the ENTER or ❿ button.
3
Press the ❷ button to select Edit Playlist, and
then press the ENTER or ❿ button,
or press the PLAY LIST button on the remote control.
If you want to cancel. press the ❷ buttons to
select RETURN, and then select the ENTER button.
• Delete: Deletes the selected entry from the list.
6
Press the MENU or PLAYLIST button after the operation is finished. The Playlist screen will disappear.
• The Edit Playlist screen is displayed.
• The Edit Playlist screen is displayed.
Playing Playlist Entries
10
Follow these directions to playback the playlist entries.
• The Playlist screen will disappear.
1
You can create up to 30 playlist entries.
Note
4
Press the ❷ button to select an entry (title) you
want to edit from the Playlist,and then press the
ENTER or ❿ button.
Press the ❷ button to select Play, and then select
the ENTER button.
• The playlist entries will be played back.
• The screen returns to the Edit Playlist screen
when the playback is finished.
• The Edit Playlist menu is displayed.
:Play, Rename, Edit Scene, Copy, Delete
2
82 - English
Press the STOP button to stop the playback in
progress.
• The screen returns to the Edit Playlist screen.
English - 83
Editing
Editing
6
Search the end point of the section from which you
want to create a new scene using the playback related buttons, and then press the ❿II button.
Press the MENU or RETURN button to exit the
menu.
Renaming Playlist Entries
Follow these directions to rename a playlist entry, i.e., edit
the title of a playlist entry.
5
Editing Scene for a
Playlist Entry
Press the ❷ button to select Edit Scene, and then
press the ENTER button
• The Edit Scene screen is displayed.
Edit Scene
Scene No.
1/9
Playlist No. 3
Play
Modify
1
2
Press the ❷ button to select Rename, and
then press the ENTER button.
• The Rename screen is displayed.
Select the desired characters using the arrow
❷➛❿ buttons.
DVD-RAM DVD-RW
Follow these directions to edit scenes for a playlist
entry.
1
B. Modifying a Scene (Replacing
a Scene)
01
00:00:26
02
00:00:07 03
00:00:04
VR mode
00:00:03
05
00:00:11 06
00:00:04
2
Press the arrow buttons to select Modify, and then
press the ENTER button.
Move
Add
04
1
Press the arrow buttons to select the scene you want
to modify, and then press the ENTER button.
Delete
• The Modify Scene screen is displayed.
Insert the recorded disc.
Press the MENU button when the disc is stopped.
• Functionality is the same as the Rename item
in the Edit Record List screen.
01
02
2
Press the ❷ button to select Playlist, and then
press the ENTER or ❿ button.
3
Press the ❷ button to select Edit Playlist, and
then press the ENTER or ❿ button,
or press PLAY LIST button on the remote control.
A. Playing a Desired Scene
1
00:00:17
00:00:06
03
04 04
9 Scene
00/05/10 10:25:30(PM)
Press the arrow buttons to select the scene you want
to playback, and then press the ENTER button.
• The playlist entry to playback is selected.
3
• The Edit Playlist screen is displayed.
Select the start point of the section with which you
want to modify the selected scene using the playback
related buttons.
• Playback related buttons: ❿II, ❿❿l , l➛➛,➛➛, ❿❿.
4
3
Press the arrow buttons to select save, and then
press the ENTER button.
Press the ❷ button to select an entry (title) you
want to edit from the Playlist,and then press the
ENTER or ❿ button.
• The Edit Playlist menu is displayed.
• The Name you changed is displayed on the title
item of the selected playlist entry.
01
02
03
9 Scene
00/05/10 10:25:30(PM)
84 - English
2
Press the ENTER button.
• The selected scene is played back.
4
Press the ❷ button to select Start, and then press
the ENTER button.
• The image and time at the start point are
displayed on the Start window.
English - 85
Editing
Editing
04 04
00:00:17
00:00:06
5
Press the ENTER button at the end point of the
scene.
3
Press the arrow buttons to select the position where
you want to move the selected scene, and then press
the ENTER button.
4
• The selected scene is moved to the new
position.
6
• The scene you wanted to modify is changed with
the selected section.
You cannot move the selected scene to the position
Note
C. Moving a Scene
(Changing the Position of a Scene)
• The image and time at the start point are
displayed on the Start window.
Press the arrow buttons to select the scene you want
to move (change the position), and then press the
ENTER button.
of the next scene, because the selected scene
should be inserted before that position.
5
Select the end point of the section you want to add
as a new scene using the playback related buttons.
6
Press the ❷ button to select End, and then press
the ENTER button.
1
Press the arrow buttons to select the scene you want
to delete, and then press the ENTER button.
2
Press the ❷ buttons to select delete, and then
press the ENTER button.
• The image and time at the end point are displayed
on the End window.
D. Adding a Scene
Add Scene
1
Scene NO.001
Press the arrow buttons to select the scene before
which you want to add a new scene, and then press
the ENTER button.
Start
• A yellow selection window is displayed on the
scene to add as a new scene.
Press the ❷ buttons to select Move, and then
press the ENTER button.
2
Press the ❷ buttons to select Add and then press
the ENTER button.
• The Add Scene screen is displayed.
3
7
Add
End
00:00:00
Cancel
Press the ❷ buttons to select Add, and then
press the ENTER button.
Editing
Editing
• A yellow selection window is displayed on the
scene to move.
00:00:15
00:00:15
03/05/10 10:25:30(AM)
2
E. Deleting a Scene from the
Playlist
Press the ❷ buttons to select Change, and then
press the ENTER button.
• If you want to cancel a modification, select cancel
and then press the ENTER button.
1
Press the ❷ button to select Start, and then press
the ENTER button.
• The section you wanted to add is added before the
scene selected in step 1.
Select the start point of the section to which you want
to add the scene in step 1 using the playback related
buttons.
• Playback related buttons: ❿II, ❿❿l , l➛➛ ,➛➛, ❿❿
• If you want to cancel select cancel and then press
the ENTER button.
86 - English
English - 87
Copying a Playlist Entry
to the VCR
Deleting a Playlist Entry
from the Playlist
DVD-RAM DVD-RW
1
2
Press the ❷ button to select Playlist, and then
press the ENTER or ❿ button.
Press the ❷ button to select Delete, and then
press the ENTER button.
• You will be prompted with the delete confirmation
message ‘Do you want to delete?’.
Disc Manager
Do you want delete?
DVD-RAM DVD-RW
VR mode
Insert the recorded disc and the tape.
Press the MENU button when the disc is stopped.
5
DVD-RAM DVD-RW
VR mode
1
DVD-R
Editing Disc Name
Insert the recorded disc.
Press the MENU button when the disc is stopped.
Follow these directions to give a name to a disc
3
Press the ❷ button to select Edit Playlist, and
then press the ENTER or ❿ button,
or press the PLAY LIST button on the remote
control.
2
3
• The Edit Playlist screen is displayed.
Press the ❷ button to select Playlist, and
then press the ENTER or ❿ button.
Press the ❷ button to select Edit Playlist, and
then press the ENTER or ❿button,
or press the PLAY LIST button on the remote control.
6
Press the ➛❿ buttons to select Yes, and then press
the ENTER button.
1
Insert the disc.
Press the MENU button when the disc is stopped.
2
Press the ❷ button to select Disc Manager, and
then press the ENTER or ❿button.
3
Press the ❷ button to select Disc Name, and
then press the ENTER or ❿ button.
4
Enter the desired characters using the arrow
buttons.
• The screen returns to the Edit Playlist screen
automatically after the delete operation finished.
• The Edit Playlist screen is displayed.
4
Press the ❷ button to select an entry (title) you
want to delete from the Playlist, and then press the
ENTER or ❿ button.
• The Edit Playlist menu is displayed.
Play, Rename, Edit Scene, Copy, Delete
4
Press the ❷ button to select an entry(title) you
want to copy to the VCR, and then press the
ENTER or ❿ button.
• The Edit Name screen is displayed.
Editing
5
Press the ❷ button to select Copy, and then press
the ENTER button.
• The title you choose is played and copied to VCR
tape.
88 - English
English - 89
Editing
• The Edit Playlist menu is displayed.
Play, Rename, Edit Scene, Copy, Delete
5
Press the arrow buttons to select Save, and then
press the ENTER button.
3
Press the ❷ button to select Disc Protection, and
then press the ENTER or ❿ button.
Formatting a DVD-RAM/DVD-RW Disc
4
• A disc name is given to the disc.
Press the ➛❿ buttons to select Yes, and then press
the ENTER button.
• The disc is formatted.
Use these instructions to format a disc. The cartridge write
protect tab should be set to the unprotect position. The disc
protection should also be cleared.
Disc Manager
1
DVD-RW
You will be prompted with the confirmation message
“Choose the recording format for DVD-RW”.
Insert a disc to be formated.
Press the MENU button with the disc stopped.
Choose the recording format fot DVD-RW.
DVD-VR
You may need to clear cartridge protection or
Note
4
Press the ❷ button to select Protected, and then
press the ENTER button.
2
Press the ❷ button to select Disc Manager, and
then press the ENTER or the ❿ button.
unlock the protect before beginning editing.
DVD-VR and DVD-V are defined according to their recording format
Disc Protection
Disc Protection allows you to protect your discs from disc
format and program deletion due to unintended operations.
Editing
Disc Manager
DISC
1
Press the MENU button when the disc is stopped.
Disc Protection will operate only if cartridge protect
is cleared.
Note
Press the ❷ button to select Disc Manager, and
then press the ENTER or ❿ button.
3
DVD-VR
Possible
(Partial editing is possible)
DVD-V
Inconvenience
DVD-RAM
DVD-RW
DVD-RW
DVD-R
Press the ❷ button to select Disc Format, and
then press the ENTER or the ❿ button.
• You will be prompted with the confirmation message 'Do you want to format disc?'.
• If you press ENTER you will be prompted with
the confirmation message 'All data will be deleted.
Do you want to continue?'.
Editing
Editing
2
DVD-V
Do you want to format disc?
Disc Manager
90 - English
English - 91
Delete All Title Lists
Finalizing a disc
Cartridge Protect Info (DVD-RAM)
Once a disc is finalized, you cannot delete entries
DVD-RW
DVD-RAM DVD-RW
DVD-R
Follow these instructions to delete all title lists.
Disc Protect allows you to protect discs from disc formatting
and program deletion due to unintended operations. The
cartridge write protect tab should be set to the unprotect
position to be able to make a recording to a DVD-RAM disc.
DVD-R
After you record titles onto a DVD-RW/DVD-R disc with
your DVD Recorder-VCR, it needs to be finalized before it
can be played back on compatible external devices.
Note
from the record list.
After being finalized, the DVD-R operates in the
same manner as a DVD-Video.
Depending on the kind of disc, the displayed
screen may be slightly different.
Finalizing will be taken few minutes. If you turn
1
2
Insert the recorded disc.
Press the MENU button with the disc stopped.
Press the ❷ button to select Disc Manager, and
then press the ENTER or the ❿ button.
DVD-RAM(VR)
Cartridge Protection Info
1
Insert the disc.
Press the MENU button with the disc stopped.
2
Press the ❷buttons to select Disc Manager, and
then press the ENTER or the ❿ button.
3
Press the ❷ buttons to select Cartridge
Protection Info, and then press the ENTER or the
❿ button.
the unit on/off or open the tray during finalizing,
you will not be able to use the disc anymore.
1
Insert the recorded disc.
Press the MENU button with the disc stopped.
2
Press the ❷buttons to select Disc Manager, and
then press the ENTER or the ❿ button.
• The cartridge protection info for the disc is displayed.
If the disc cartridge is protected, open the disc tray
and check the disc.
Disc Manager
Disc Setting
3
Press the ❷ button to select Delete All Title Lists,
and then press the ENTER or the ❿ button.
Disc cartridge is protected.
• You will be prompted with the confirmation message 'Do you want to delete all title lists?'.
open tray and check disc.
OK
DVD-RAM(VR)
Press the ❷ button to select Disc Finalize, and
then press the ENTER or the ❿ button.
• You will be prompted with the message 'Do you
want to finalize disc?'. If you select Yes, you will be
prompted again with the message ' Disc will
be finalized. Do you want to continue?'
Do you want to delete all title lists?
If the disc cartridge is not protected, proceed with
recording to the disc.
Cartridge Protection Info
YES
Editing
Editing
3
Disc Setting
• You cannot delete a protected entry.
If you want to delete a protected entry, disable
Protection for it on the Lock item.
Disc cartridge is not protected.
Open tray and check disc.
• Disc Protection: When Protected or Cartridge
Protection has been set, or when a DVD-RAM is
used, data cannot be deleted from a disc.
OK
Press the ➛❿ buttons to select Yes, and then press the
ENTER button.
4
Press the ➛❿ buttons to select Yes, and then press
the ENTER button.
• The disc is deleted.
92 - English
• The disc is finalized.
Disc Protection will operate only if cartridge proNote
tect is set to Not Protected.
English - 93
Press the ➛❿ buttons to select Yes, and then press the
ENTER button.
Unfinalizing a disc (V/VR mode)
• The disc is unfinalized.
Reference
DVD-RW
1
Insert the finalized disc.
Press the MENU button with the disc stopped.
• A DVD-RW can be finalized or unfinalized in Video mode.
Mark
2
Press the ❷ button to select Disc Manager, and
then press the ENTER or ❿ button.
Operation
Finalize
DVD-VIDEO(RW)
Same as
DVD-Video
Unfinalize
DVD-RW(V)
Additional
recording, protection
and deletion are possible.
• A DVD-RW can be finalized or unfinalized in VR mode.
Mark
Operation
3
Finalize
DVD-RW(VR:F)
Unfinalize
DVD-RW(VR)
Additional recording,
Additional recording,
deletion, editing, and
deletion, editing, and
protection are impossible.
protection are possible.
Press the ❷ button to select Disc Unfinalize, and
then press the ENTER or ❿ button.
• You will be prompted with the message 'Do you
want to unfinalize disc?'. If you select Yes, you will
be prompted again with the message ' Disc will be
unfinalized. Do you want to continue?'
Troubleshooting
(DVD-VIDEO/DVD-RAM/DVD-RW/DVD-R)
❷
Troubleshooting
❷
Editing
Problems and Solutions (VCR)
❷
❷
• Troubleshooting (DVD-VIDEO/DVD-RAM/
LIMITED WARRANTY TO ORIGINAL
PURCHASER
DVD-RW/DVD-R) . . . . . . . . . . . . . . 96
• Troubleshooting . . . . . . . . . . . . . . 97
• Problems and Solutions (VCR) . . . . 98
• Specifications . . . . . . . . . . . . . . . . . 99
94 - English
English - 95
Reference
Specifications
Troubleshooting
(DVD-VIDEO/DVD-RAM/DVD-RW/DVD-R)
Troubleshooting
If you experience any of the following difficulties while using this product, check the list below before consulting
your nearest Toshiba dealer.
No power.
The input is displayed
for a while when the
power turns on.
• Check whether the power cord is securely plugged into the wall outlet.
• Did you press the power button of your DVD Recorder-VCR.
The DVD Recorder-VCR requires some time to initialize after it is turned on.
Cannot record TV
programs.
• Did you set the DVD Recorder-VCR channel settings correctly?
• Check the free space on your DVD-RAM/DVD-RW/DVD-R disc.
• Check the antenna cable is connected.
Timer recording does
not work
properly.
• Check the recording time, end time and current time settings again.
• Recording will be cancelled, if the power is removed due to a power
failure or other reason during recording.
Cannot record.
• Check whether the disc is formatted. This product can record on
formatted discs only. (See page 91.)
• Is the DVD-RAM cartridge protected?
Set the write protect tab to the unprotect position.
• Check whether your DVD-RAM/DVD-RW/DVD-R disc has a sufficient free space.
I pressed the REC
button but there is
no response.
Recording is available on DVD-RAM/DVD-RW/DVD-R discs only.
If a program is copy protected, you cannot record it.
I forget the pass
word for parental
care.
Press the ➛➛ and ❿❿ buttons of your DVD Recorder-VCR at the same time when the power
is on. All settings including password will revert to factory settings. Do not use it if not
absolutely required.
(Note that this function is available only when there is no disc inserted.)
Cannot playback the
disc.
• Check whether the disc is inserted correctly with the label facing up.
• Check the regional code of your DVD disc.
• This DVD Recorder-VCR cannot playback some types of disc. (See page 7.)
96 - English
You cannot use the operation or function due to one of the following reasons:
(1) Your DVD disc does not support the feature (for example, angles)
(2) You've requested a title, chapter, or scan time that is out of the correct range.
Play mode settings are
different from the settings configured with
the Setting menu.
The disc does not support all the selected functions.
In this case, some settings you configure on the Setting menu may not work properly.
Cannot change the
aspect ratio.
Aspect ratio is fixed for DVD disc.
No audio output.
Check whether you selected correct digital output options in the Audio Output Options
menu.
No video or audio output.
The disc tray is ejected
after 2 to 5 seconds.
Did you move your DVD Recorder-VCR suddenly from a cold place to a warm place? In this
case, remove discs and wait for one to two hours with the power on, and then, insert the disc
and try to playback again. It will work properly when condensation is removed.
Angle operation does not
work during playback of a
DVD disc.
Angle operation is available only when the disc contains the images captured at different
angles.
The disc revolves, but
no image or bad quality images are output.
• Check whether there is damage or foreign materials on your disc.
• Some discs with bad manufacturing quality may not be played back.
• If the scene changes from dark to bright suddenly, the screen
may jitter temporarily, but it is not a defect.
Desired sound
language and
subtitle language are
not played.
Sound languages and subtitle languages are disc-specific.
Only the sound and subtitle languages contained on a DVD disc are
available and displayed on the disc menu.
No progressive
(480P) output.
• Check whether “480P” is displayed on front panel.
• Make sure to change the component video output using the Progressive button when the
disc is stopped.
The remote control
doesn't work.
• Point the remote control at the remote control sensor on your DVD recorder-VCR.
Operate within distance. (15ft)
Remove obstacles between your DVD Recorder-VCR and remote control.
• Check whether the batteries are depleted.
Other problems
• Read the table of contents and then find and read the sections
describing your problem, and follow the directions given.
• Turn the unit off and on.
• If your problem still persists, contact your nearest Toshiba service center.
Reference
Reference
No sound.
• Are you watching a program in slow or skip mode?
If you are playing a program at a speed other than normal speed, sound
is not output.
• Check the connections and initial settings.
• Check whether the disc is damaged.
Clean up the disc, if necessary.
• Check whether the disc is inserted correctly with the label facing up.
icon appears on
the screen.
English - 97
Problems and Solutions (VCR)
Specifications
Before contacting a Toshiba authorized service center, perform the following simple checks.
Problem
Explanation/Solution
No power
Check that the power plug is connected to a wall outlet.
Have you pressed the POWER button?
You cannot insert a video cassette
A video cassette can only be inserted with the window
General
side up and the safety tab facing you.
The television program was not recorded
Check the DVD Recorder-VCR antenna connections.
Is the DVD Recorder-VCR tuner properly set?
Check if the safety tab is intact on the cassette.
Timer recording was unsuccessful
Re-check the recording start/stop time settings and the current time
Check whether you insert a tape which has enough time record
No playback picture or the picture
is distorted
Check to see if you are using a prerecorded tape.
You cannot see normal broadcasts
Check the TUNER/EXTERNAL setting. It should be on TUNER.
Check the TV antenna connections.
Press the TRK ( or ❷) buttons to minimize this effect.
Noise bars or streaks on playback
120V AC, 60Hz
Power consumption
45 Watts
Weight
9.03 lb
Dimensions
16.9 in(W) x 10.6 in(D) x 3.1 in(H)
Operating temp.
+41°F to +95°F
Other conditions
Keep level when operating. Less than 75% operating humidity
Video
1.0 V p-p at 75Ω load, sync negative
S-Video input (Y: 1.0Vp-p, C: 0.286Vp-p at 75Ω load)
Input
Max. Audio Input Level
2Vrms
DV Input
IEEE 1394(4p) compatible jack
Receivable Channels
Regular TV broadcasting: VHF (2~13), UHF (14~69)
Cable TV broadcasting: 1~125
Audio
When the ❿II button is pressed
during playback, the still picture
has severe “noise bar” streaks
A still picture may have “noise bars”, depending on the
Video Head Cleaning
If poor pictures appear on a variety of cassettes, the video
Min. 100 dB signal-to-noise ratio
Output
condition of the tape. Press the TRK ( or ❷) buttons
during SLOW motion to minimize this effect.
If you are unable to solve the problem after reading the above instructions, note:
Audio output jacks 1, 2
Optical/Coaxial digital audio output support
Max. 0.005% total harmonic distortion (T.H.D)
• at average 1 KHz
Video
Video output jacks 1
S-Video output 1 (Y:1.0Vp-p, C:0.286Vp-p at 75Ω load)
heads may need cleaning. This is not a common problem
and unless it appears, the heads should not be cleaned.
When cleaning the video heads, read all instructions
provided with the head cleaning cassette. Incorrect head
cleaning can permanently damage the video heads.
Component output
(Y: 1.0Vp-p, Pb: 0.70Vp-p, Pr: 0.70Vp-p at 75Ω load)
Picture Compression format
Audio Compression format
DVD
The model and serial number on the rear of your DVD Recorder-VCR
The warranty information
A clear description of the problem
Then contact nearest Toshiba authorized service center.
MPEG-II
Dolby AC-3 256kbps
XP (about 8 Mbps), SP (about 4 Mbps), LP (about 2 Mbps),
Recording Quality
EP (about 1.2 Mbps)
Video S/N Ratio
Min. 50dB at standard recording
Audio S/N Ratio
Min. 75dB
Audio frequency characteristics
20 Hz ~ 20 KHz
• The design and specifications may change without prior notice.
Audio Output
For DVD discs, audio signals recorded at 96kHz sampling frequency are converted into and output at 48kHz digital output.
Disc Type
98 - English
DVD
VIDEO-CD
AUDIO CD(CDDA)
Analog Audio Output
48 / 96KHz
44.1KHz
44.1KHz
Digital Audio Output
48KHz
44.1KHz
44.1KHz
English - 99
Reference
Reference
Power requirements
Limited Warranty DVD PLAYER/RECORDER
Toshiba America Consumer Products, L.L.C,. ("TACP") makes the following limited warranties to original consumers in the United States. THESE LIMITED WARRANTIES EXTEND TO THE ORIGINAL CONSUMER PURCHASER OR ANY PERSON RECEIVING THIS DVD PLAYER/RECORDER AS A GIFT FROM THE ORIGINAL
CONSUMER PURCHASER AND TO NO OTHER PURCHASER OR TRANSFEREE.
PRODUCTS PURCHASED IN THE U.S.A. AND USED IN CANADA ARE NOT COVERED BY THESE WARRANTIES.
PRODUCTS PURCHASED IN CANADA AND USED IN THE U.S.A. ARE NOT COVERED BY THESE WARRANTIES.
Limited One (1) Year Warranty on Parts*
TACP further warrant the parts in this DVD PLAYER/RECORDER against defects in materials or workmanship for a period of one (1) year after the date of
original retail purchase. DURING THIS PERIOD,
TACP WILL, AT-TACP’S OPTION, REPAIR OR
REPLACE A DEFECTIVE PART WITH A NEW OR
REFURBISHED PART WITHOUT CHARGE TO YOU
FOR THE PART, PROVIDED THAT IF A DEFECTIVE
PART IS REPAIRED OR REPLACED AFTER NINETY (90) DAYS FROM THE DATE OF ORIGINAL
RETAIL PURCHASE, THE CONSUMER PAYS ALL
LABOR CHARGES INVOLVED IN THE REPAIR OR
REPLACEMENT. YOU MUST DELIVER THE
ENTIRE DVD PLAYER/RECORDER TO AN AUTHORIZED TACP SERVICE STAITON. YOU MUST PAY
FOR ALL TRANSPORTATION AND INSURANCE
CHARGES FOR THE DVD PLAYER/RECORDER TO
AND FROM THE SERVICE STATION.
*Rental Units
The warranty for rental units begins with the first
rental or thirty (30) days from the date of shipment to
the rental firm, whichever comes first.
*Commercial Units
DVD PLAYER/RECORDER(s) sold and used for
commercial purposes have a limited ninety (90) day
warranty.
100 - English
Owner's Manual and Demographic Card
You should read this owner's manual thoroughly
before operating this DVD PLAYER/RECORDER.
You should complete and mail the enclosed
Demographic card within ten days after you, or the
person who has given you this product as a gift, purchased this DVD PLAYER/RECORDER. This is one
way to enable TACP to provide you with better customer service and improved products. Failure to
return the Demographic card will not affect your
rights under this warranty.
Your Responsibility
THE ABOVE WARRANTIES ARE SUBJECT TO THE
FOLLOWING CONDITIONS:
(1) You must provide your bill of sale or other proof
of purchase.
(2) All in-warranty servicing of this DVD
PLAYER/RECORDER must be made by a specified Authorized TACP Service Station.
(3) The warranties from TACP are effective only if the
DVD PLAYER/RECORDER is purchased and
operated in the U.S.A. or Puerto Rico.
(4) Labor service charges for set installation, set up,
adjustment of customer controls and installation
or repair of hook up related items and/or antenna
systems are not covered by these warranties.
Reception problems caused by inadequate antenna systems are your responsibility.
(5) Warranties extend only to defects in materials or
workmanship as limited above and do not extend
to any DVD PLAYER/RECORDER or parts which
have been lost or discarded by you or to damage
to DVD PLAYER/RECORDER or parts caused by
misuse, accident, Acts of God, such as lightning
or fluctuations in electric power, improper installation, improper maintenance or use in violation of
instructions furnished by TACP; or to units which
have been modified or had the serial number
removed, altered, defaced or rendered illegible.
(2) You must include a copy or original bill of sale or
other proof of purchase along with the entire DVD
PLAYER/RECORDER to the Authorized TACP
Service Station specified by the Call Center. You
must pay for all transportation and insurance
charges for the DVD PLAYER/RECORDER to the
Service Station.
HOW STATE LAW RELATES TO WARRANTY
THIS WARRANTY GIVES YOU SPECIFIC LEGAL
RIGHTS, AND YOU MAY ALSO HAVE OTHER
RIGHTS WHICH MAY VARY FROM STATE TO
STATE IN THE U.S.A. SOME STATES OF THE
U.S.A. DO NOT ALLOW LIMITATIONS ON HOW
LONG AN IMPLIED WARRAYNTY LASTS, WHEN
AN ACTION MAY BE BROUGHT, OR THE EXCLUSION OR LIMITATION OF INCIDENTAL OR CONSEQUENTIAL DAMAGES, SO THE ABOVE LIMITATIONS OF EXCLUSIONS MAY NOT APPLY TO YOU
UNDER SUCH CIRCUMSTANCES.
For additional information, visit TACP's web site:
www.tacp.toshiba.com
Time for Taking Action
ALL WARRANTIES IMPLIED BY THE LAW OF ANY
STATE OF THE U.S.A., INCLUDING THE IMPLIED
WARRANTIES OF MERCHANTABILITY AND FITNESS FOR A PARTICULAR PURPOSE, ARE
EXPRESSLY LIMITED TO THE DURATION OF THE
LIMITED WARRANTIES SET FORTH ABOVE. WITH
THE EXCEPTION OF ANY WARRANTIES IMPLIED
BY THE LAW OF ANY WARRANTIES IMPLIED BY
THE LAW OF ANY STATE OF THE U.S.A. AS HEREBY LIMITED, THE FOREGOING WARRANTY IS
EXCLUSIVE AND IN LIEU OF ALL OTHER WARRANTIES, GUARANTEES, AGREEMENTS AND
SIMILAR OBLIGATIONS OF TACP WITH RESPECT
TO THE REPAIR OR REPLACEMENT OF ANY
PARTS. IN NO EVENT SHALL TACP OR BE LIABLE
FOR CONSEQUENTIAL OR INCIDENTAL DAMAGES.
No person, agent, distributor, dealer or company is
authorized to change, modify or extend the terms of
these warranties in any manner whatsoever. The time
within which action must be commenced to enforce
any obligation of TACP arising under this warranty or
under any law of the United States or of any state
thereof is hereby limited to 90 days from the date you
discovered or should have discovered, the defect. This
limitation does not apply to implied warranties arising
under the law of any state of the U.S.A.
Reference
Reference
Limited Ninety (90) Day Warranty on Labor*
TACP warrant this DVD PLAYER/RECORDER and
its parts against defects in materials or workmanship
for a period of ninety (90) days after the date of original retail purchase. DURING THIS PERIOD, TACP
WILL, AT TACP's OPTION, REPAIR OR REPLACE A
DEFECTIVE PART WITH A NEW OR REFURBISHED PART WITHOUT CHARGE TO YOU FOR
PARTS OR LABOR.
YOU MUST DELIVER THE ENTIRE DVD
PLAYER/RECORDER TO AN AUTHORIZED TACP
SERVICE STATION. YOU MUST PAY FOR ALL
TRANSPORTATION AND INSURANCE CHARGES
FOR THE DVD PLAYER/RECORDER TO AND
FROM THE SERVICE STATION.
How to Obtain Warranty Services
If, after following all of the operating instructions in
this manual and checking the section
"Troubleshooting", you find that service is needed:
(1) For instruction on how to obtain warranty service
for your DVD PLAYER/RECORDER, contact
TACP Call Center's toll free number at 1-866-5837353.
English - 101
Warning
PARA REDUCIR EL RIESGO DE DESCARGA ELÉCTRICA,
NO RETIRE LA CUBIERTA (NI LA PARTE POSTERIOR). EN
EL INTERIOR SE ENCUENTRAN PIEZAS QUE NO
PUEDEN SER REPARADAS POR EL USUARIO. PÓNGASE
EN CONTACTO CON PERSONAL DE SERVICIO TÉCNICO
CUALIFICADO PARA CUALQUIER REPARACIÓN.
El símbolo indica "voltaje peligroso" en el
interior del producto que conlleva el riesgo de descarga eléctrica o lesiones.
Este símbolo indica que el producto se
acompaña de instrucciones importantes.
NOTA FCC (para EE.UU.):
Este equipo ha sido probado y se ha certificado como compatible con los límites para dispositivos digitales de Clase B
conforme a la Parte 15 de las Normas FCC. Dichos límites
están diseñados para facilitar una protección razonable frente
a interferencias dañinas en una instalación residencial. Este
equipo genera, emplea y puede emitir energía de radiofrecuencia y, si no se instala conforme a las instrucciones,
puede causar interferencias dañinas a las comunicaciones
por radio. No obstante, no existe garantía de que no se produzcan interferencias en instalaciones concretas. Si el equipo
crea interferencias dañinas a la recepción de radio o televisión, lo cual puede determinarse apagando y encendiendo
el equipo, se aconseja al usuario que intente corregir la interferencia siguiendo uno de los siguientes procedimientos:
• Vuelva a orientar o cambie de sitio la antena de recepción.
• Aumente la distancia entre el equipo y el receptor.
• Conecte el equipo a una toma que esté en un circuito
distinto del circuito al que está conectado el receptor.
• Consulte a su distribuidor o a un técnico de radio/TV
cualificado para que le ayude.
Esta unidad sólo puede utilizarse si el suministro
Nota
No instale el equipo en un espacio cerrado, como una
librería o módulo similar.
AVISO: : Para evitar daños que puedan provocar un
incendio o descarga eléctrica, no exponga el
aparato a la lluvia o humedad.
PRECAUCIÓN : LA GRABADORA DE DVD – VCR
UTILIZA UN HAZ LÁSER QUE
PUEDE PROVOCAR UNA EXPOSICIÓN PELIGROSA A RADIACIÓN
AL MIRARLO DIRECTAMENTE.
UTILICE LA GRABADORA DE
FORMA CORRECTA SEGÚN LAS
INSTRUCCIONES.
PRECAUCIÓN
AVISOS
Precaución: Para evitar una descarga eléctrica, conecte la
clavija más ancha a la toma correspondiente
e insértela completamente.
Attention: Pour éviter les chocs électriques, introduíre la
lame la plus large de la fiche dans la borne
correspondante de la prise et pousser jusqu au
fond.
Este producto cumple la normativa FCC cuando se utilizan cables y conectores blindados para conectar la
unidad a otros equipos. Para evitar interferencias electromagnéticas con otros electrodomésticos, como radios o
televisores, utilice cables y conectores blindados para
realizar las conexiones.
102 - Español
Queda prohibido por ley copiar, emitir, mostrar,
emitir por cable, reproducir en público y alquilar
material protegido por copyright sin autorización.
Algunos discos de DVD cuentan con protección
anti copia por lo que las grabaciones de éstos
pueden mostrar distorsiones.
Precaución
Instrucciones importantes de seguridad
PRECAUCI : LEA Y OBSERVE TODAS LAS ADVERTENCIAS E INSTRUCCIONES DETALLADAS EN
ESTE MANUAL DEL USUARIO, ASÍ COMO
LAS INDICADAS EN LA UNIDAD. CONSERVE ESTE FOLLETO PARA FUTURAS
CONSULTAS.
Esta unidad ha sido diseñada y fabricada para garantizar la
seguridad personal. El uso indebido puede resultar en una
descarga eléctrica o incendio. Los dispositivos de seguridad
incorporados en esta unidad le protegerán siempre que siga
los procedimientos detallados a continuación para la instalación, uso y mantenimiento de la unidad. Esta unidad está
totalmente transistorizada y no contiene piezas que puedan
ser reparadas por el usuario.
NO RETIRE LA PUERTA DEL ARMARIO O QUEDARÁ
EXPUESTO
A UN VOLTAJE PELIGROSO. PARA CUALQUIER
REPARACIÓN, CONTACTE EXCLUSIVAMENTE CON
PERSONAL DE MANTENIMIENTO CUALIFICADO.
1) Lea las instrucciones.
2) Guarde las instrucciones.
3) Atención a todas las advertencias.
4) Siga las instrucciones.
5) No utilice este aparato cerca del agua.
6) Límpielo sólo con un trapo seco.
7) No bloquee ninguna abertura de ventilación e instálelo
conforme a las instrucciones del fabricante.
8) No lo instale cerca de fuentes de calor como radiadores,
rejillas de aire caliente, estufas u otros aparatos (incluidos
los amplificadores) que produzcan calor.
9) No fuerce el objetivo de seguridad del enchufe polarizado
o el enchufe de tierra. Un enchufe polarizado tiene dos
hojas, una más ancha que la otra. Un enchufe de tierra
tiene dos hojas y un tercer terminal de tierra. La hoja
ancha o el tercer terminal son para su seguridad. Si el
enchufe suministrado no entra en la toma, consulte a un
electricista para sustituir la toma obsoleta.
10) Proteja el cable de alimentación para que no se pise o
apriete, especialmente en enchufes, tomas de corriente y
el punto de donde salen del aparato.
11) Use sólo acoples o accesorios que especifique el fabricante.
12) Utilícelo sólo con un carro, soporte, trípode, repisa o
mesa que especifique el fabricante o que se venda con el
aparato. Cuando se utilice un carro, tenga precaución al
mover la combinación del carro y del aparato para evitar
heridas derivadas de un vuelco.
13) Desenchufe este aparato durante tormentas de relámpagos o cuando no se utilice durante mucho tiempo.
14) Encargue el mantenimiento a personal de servicio cualificado. El aparato necesita reparación cuando se ha dañado
de algún modo: enchufe o cable de alimentación dañado,
líquido derramado u objetos caídos sobre el aparato, si el
aparato se ha expuesto a la lluvia o a la humedad, si no
funciona con normalidad o si se ha caído.
Español - 103
Español
Español
ESTE PRODUCTO UTILIZA UN LÁSER.
EL USO DE CONTROLES, AJUSTES O PROCEDIMIENTOS DISTINTOS DE LOS ESPECIFICADOS EN EL PRESENTE DOCUMENTO PUEDEN PROVOCAR UNA PELIGROSA EXPOSICIÓN A RADIACIÓN.
NO RETIRE LAS CUBIERTAS NI REPARE EL APARATO
USTED MISMO. PÓNGASE EN CONTACTO CON PERSONAL DE SERVICIO TÉCNICO CUALIFICADO PARA
CUALQUIER REPARACIÓN.
eléctrico es AC 120V, 60Hz. No se puede utilizar en
otras condiciones.
Esta grabadora de DVD - VCR está diseñada y fabricada para responder a la Información de gestión
de regiones. Si el número de región del disco DVD
no se corresponde con el número de región de la
grabadora de DVD - VCR, no se podrá reproducir
el disco en la unidad.
Este dispositivo está protegido por las patentes estadounidenses número 4.631.603; 4.577.216;
4.819.098; 4.907.093 y 6.516.132. Este producto
incorpora la tecnología de protección de copyright
que está protegida por las patentes estadounidenses
y otros derechos de propiedad intelectual. El uso de
esta tecnología de protección de copyright debe
estar autorizada por Macrovision y está prevista
sólo para uso doméstico y otros usos de visualización limitados, a menos que Macrovision
autorice lo contrario. Queda prohibida la aplicación
de ingeniería inversa o desmontaje.
Este producto está cubierto por una o varias de las
siguientes patentes estadounidenses:
5,034,830 5,060,200 5,457,669 5,561,649
5,691,858 5,705,762 5,987,417 6,043,912
6,222,983 6,272,096 6,377,524 6,377,531
6,385,587 6,389,569 6,389,570 6,408,408
6,466,532 6,473,736 6,477,501 6,480,829
6,556,520 6,556,521 6,556,522 6,594,208
6,674,697 6,674,957 6,721,493 6,728,474
6,741,535 09/610381 09/610695
Está permitida la grabación de programas de televisión, películas, cintas de vídeo y demás material
siempre que no se violen los derechos de propiedad
de terceros u otros derechos.
• Toshiba no se responsabilizará de los daños causados
por incendios, desastres naturales (como rayos, terremotos, etc.), acciones de terceros, accidentes, uso indebido intencionado o no por parte del usuario y demás
usos indebidos.
• Toshiba no se responsabilizará de los daños adicionales
(como pérdida de beneficios o cese de negocio, modificación o borrado de datos grabados, etc.) provocados
por el uso o imposibilidad de utilizar este producto.
• Toshiba no se responsabilizará de los daños que resulten del incumplimiento de las instrucciones descritas
en el manual del usuario.
• Toshiba no se responsabilizará de cualesquiera daños
que resulten del mal uso, mal funcionamiento por uso
simultáneo de este producto y el equipo o software
conectado del que Toshiba no sea responsable.
• Toshiba no compensará al usuario por el contenido
que no se grabe o edite debido a un mal funcionamiento del producto o los discos durante su manejo, así
como tampoco será responsable de los daños secundarios (como pérdida de beneficios o cese de negocio,
etc.) provocados por tales condiciones.
INSTRUCCIONES DE SEGURIDAD
ADICIONALES
15) Cuando utilice auriculares, mantenga el volumen a un
nivel moderado. Si utiliza auriculares de forma continuada a un nivel alto puede sufrir lesiones en el oído.
16) No cargue en exceso las tomas de pared, alargaderas, o
receptáculos integrales, ya que esto puede provocar un
incendio o descarga eléctrica.
17) Evite mojar o salpicar el aparato y no coloque sobre éste
objetos con líquidos, como jarrones.
18) Procure separar los dedos de la bandeja del disco mientras ésta se esté cerrando. De lo contrario podría sufrir
graves lesiones.
19) No coloque objetos pesados sobre el aparato ni se suba
encima de éste. El objeto podría caer, provocando graves
lesiones o daños al aparato.
20) No coloque el aparato sobre un amplificador u otro
equipo que emita calor.
21) No cubra los orificios de aireación para el ventilador
interno.
22) No utilice discos con grietas, deformados o reparados.
Dichos discos podrían romperse fácilmente y provocar
graves lesiones y el mal funcionamiento del aparato.
23) Si observa que sale humo del aparato o que huele a quemado, desconecte de inmediato el cable de la toma de
pared. Espere hasta que cese el humo o el olor. A continuación, diríjase a su distribuidor para que lo revise y
repare. De lo contrario podría producirse un incendio.
24) En caso de tormenta eléctrica, no toque los cables de
conexión ni el aparato.
25) El aparato incluye plomo, un componente de soldadura
empleado en el PCB que es una sustancia dañina para el
ser humano y el medio ambiente. Al deshacerse del
equipo, siga las normas aplicables en su zona.
Precauciones de manejo
• Antes de conectar otros componentes a este grabador,
Español
• Extraiga el disco y apague el grabador tras su utilización.
• Desconecte el cable de alimentación de CA de su toma
cuando no vaya a utilizar el grabador durante mucho
tiempo.
• Limpie el disco en línea recta desde el interior al exterior.
104 - Español
For safety reasons, be sure to disconnect the power cord
from the wall outlet.
• Do not use benzene, thinner, or other solvents for
cleaning.
• Wipe the cabinet with a soft cloth.
Manejo del disco
• Utilice discos con formas regulares. Si utiliza un disco con
forma irregular (un disco con
una forma especial), podrá
dañar este grabador de DVD y
reproductor de vídeo.
Agarrar los discos
• Se utiliza para evitar estropear con
suciedad, rayaduras, etc. al utilizar
un disco DVD-RAM/RW/R.
Cartucho
• This is used to prevent damage by dirt, scratches, etc.
when using a DVD-RAM/RW/R disc.
DVD-RAM, DVD-RW y DVD-R
• Límpielos con un limpiador de discos
DVD-RAM/PD opcional. No utilice
limpiadores ni trapos para CD para
limpiar discos DVD-RAM/DVDRW/DVD-R.
DVD-Vídeo, CD
Almacenamiento del disco
Tenga cuidado para no estropear el disco, ya que sus
datos son muy vulnerables al entorno.
• No los coloque a la luz directa del sol.
• Manténgalos en una zona ventilada y fresca.
• Almacénelos en vertical.
• Manténgalos en una funda de protección limpia.
• Si mueve el grabador de DVD y de vídeo de repente de
un lugar frío a uno caliente, puede generarse condensación en las piezas de funcionamiento y en el objetivo
y quizá se reproduzcan mal. En este caso, quite el
disco y espere una o dos horas con la unidad encendida antes de intentar reproducirlo.
Notas acerca de la grabación y edición
• Al grabar o editar material importante, realice pruebas
de antemano para verificar que la grabadora funciona
correctamente.
Toshiba no compensará al usuario por el contenido
que no se grabe o edite debido a un mal funcionamiento del producto o los discos durante su
manejo, así como tampoco será responsable de los
daños secundarios (como pérdida de beneficios o cese
de negocio, etc.) provocados por tales condiciones.
• Al desconectar el cable de alimentación o si se produce un corte de luz mientras el aparato está funcionando, puede que se borre todo el contenido grabado.
• Según el canal o emisión, si el nivel de entrada de
sonido es excesivo pueden producirse ruidos o puede
que el sonido de grabación esté entrecortado. Ajuste la
configuración inicial del nivel de grabación, si procede.
• Si el programa para el que ha programado una
grabación incluye señales de restricción de copia,
puede que éste no se grabe. Al programar una
grabación, verifique el programa que desea copiar no
está protegido frente a copia.
• Toshiba no compensará al usuario por el contenido que no se grabe o edite debido a un
mal funcionamiento del producto o los discos
durante su manejo, así como tampoco será
responsable de los daños secundarios (como
pérdida de beneficios o cese de negocio, etc.)
provocados por tales condiciones.
Corte de luz
• Tras un corte de luz, el reloj parpadea. Ponga
el reloj en hora.
Notas acerca del copyright
• Queda prohibido por ley copiar, emitir,
mostrar, emitir por cable, reproducir en público y alquilar material protegido por copyright
sin autorización.
• Algunos discos de DVD cuentan con protección anti
copia por lo que las grabaciones de éstos pueden
mostrar distorsiones.
• Este producto incorpora la tecnología de protección de
copyright que está protegida por ciertas patentes estadounidenses y otros derechos de propiedad intelectual
que son propiedad de Macrovision Corporation y otros
propietarios. El uso de esta tecnología de protección de
copyright debe estar autorizada por Macrovision
Corporation y está prevista sólo para uso doméstico y
otros usos de visualización limitados, a menos que
Macrovision Corporation autorice lo contrario. Queda
prohibida la aplicación de ingeniería inversa o
desmontaje.
• Esta unidad incorpora la tecnología CPRM (Content
Protection for Recording Media) de protección de
copyright para dispositivos de grabación, autorizada
por el foro DVD. La grabación y copia con esta
grabadora quedará sujeta a lo descrito en la siguiente
página.
• Limpie la suciedad o la contaminación del disco con
un trapo suave.
Precauciones a la hora de manejar discos
• No escriba en el lado imprimido con un bolígrafo o
con un lápiz.
• No utilice pulverizadores o antiestáticos de limpieza
•
•
•
•
de discos de vinilo. Tampoco utilice productos químicos volátiles, como el benceno o diluyentes.
No aplique etiquetas ni pegatinas en los discos. (No
utilice discos con cinta adhesiva expuesta o con restos
de pegatinas quitadas.)
No utilice tapas ni protectores a prueba de rayaduras.
No utilice discos impresos con impresoras de etiquetas disponibles en el mercado.
No cargue discos encorvados ni con fisuras.
Excepciones
• Toshiba no se responsabilizará de los daños causados
por incendios, desastres naturales (como rayos, terremotos, etc.), acciones de terceros, accidentes, uso
indebido intencionado o no por parte del usuario y
demás usos indebidos.
VCR Plus+ y PlusCode son marcas registradas de
Gemstar Development Corporation. El sistema VCR
Plus+ está fabricado bajo licencia de Gemstar
Development Corporation.
• Toshiba no se responsabilizará de los daños
adicionales (como pérdida de beneficios o cese
de negocio, modificación o borrado de datos
grabados, etc.) provocados por el uso o
imposibilidad de utilizar este producto.
• Toshiba no se responsabilizará de los daños
que resulten del incumplimiento de las
instrucciones descritas en el manual del
usuario.
• Toshiba no se responsabilizará de cualesquiera
daños que resulten del mal uso, mal funcionamiento por uso simultáneo de este producto y el equipo o software conectado del
que Toshiba no sea responsable.
Español
asegúrese de desconectar todos.
• No mueva el grabador mientras está reproduciendo un
disco, ya que éste puede rayarse o romperse y pueden
dañarse las partes internas del grabador.
• No coloque un jarrón de flores lleno de agua o pequeños
objetos metálicos sobre el grabador.
• No coloque la mano sobre la bandeja del disco.
• No coloque nada que no sea un disco en su bandeja.
• La interferencia exterior, como rayos o electricidad estática, puede afectar al funcionamiento normal de este
grabador. Si ocurre esto, apague el grabador y enciéndalo
de nuevo con el botón POWER o desconecte y vuelva a
conectar el cable de alimentación en la toma de CA. El
grabador funcionará con normalidad.
Maintenance of Cabinet
Español - 105
Especificaciones del disco
DVD-Vídeo
• Un disco versátil digital (DVD) puede contener hasta
135 minutos de imágenes, audio en 8 idiomas y 32
idiomas de subtítulos. Está equipado de compresión
de imágenes MPEG-2 y Dolby 3D envolvente, que
permite disfrutar de imágenes de calidad de cine viva
y más clara en la comodidad de su hogar.
• Cuando cambie de la primera capa a la segunda de un
disco de vídeo DVD de doble capa, quizá exista distorsión momentánea en la imagen y en el sonido, lo que
no significa que funcione mal la unidad.
• Una vez finalizado un DVD-R/RW grabado en el modo
de vídeo, se convierte en DVD-Vídeo.
CD de audio
Utilización de CD-R/RW
• Utilice un disco CD-R/RW de 700MB (80 minutos).
En la medida de lo posible, no utilice discos de 800MB
(90 minutos) o más, pues es posible que el disco no se
lea en la unidad.
• Si el disco CD-R/RW no se grabó como sesión cerrada,
quizá observe un retardo en el principio del tiempo de
reproducción y quizá no se reproduzcan todos los
archivos grabados.
• Algunos discos CD-R/RW no se pueden reproducir
con esta unidad, en función del dispositivo que se utilizó para grabarlos. Para contenidos grabados en
medios de CD-R/RW a partir de CD para uso personal,
la capacidad de reproducción dependerá del contenido
y de los discos.
Grabación y reproducción de discos DVD-R
de vídeo, se convierte en DVD-Vídeo.
• Un disco de audio donde se graba sonido de 44,1 kHz
•
•
CD-R/RW
•
MP3 CD-R/RW
• Sólo pueden reproducirse discos CD-R con archivos
•
•
•
•
MP3 grabados con el formato ISO 9660 o JOLIET.
Sólo pueden reproducirse archivos MP3 con la extensión “.mp3” y “.MP3”.
Para archivos MP3 grabados con velocidad de bits
variable (VBR), de 32 kbps a 320 kbps, el sonido
puede cortarse en ocasiones.
El intervalo de velocidad de bits reproducible es de 56
Kbps a 320 Kbps.
La unidad puede admitir un mínimo de 1.000 archivos
y carpetas.
•
• La grabación y la reproducción pueden realizarse en un
•
• Sólo pueden reproducirse archivos JPEG con las exten-
•
tección de copia. Por ello, sólo debe conectar el
grabador de DVD y de vídeo directamente al TV, no a
un vídeo. Si lo conecta a un vídeo, se distorsionará la
imagen de discos DVD protegidos contra copia.
• Este producto incorpora tecnología de protección de
derechos de autor protegida mediante reivindicaciones
de métodos de ciertas patentes de EE.UU. y otros derechos de propiedad intelectual propiedad de
Macrovision Corporation y de otros propietarios de
derechos. Macrovision Corporation debe autorizar la
utilización de esta tecnología de protección de derechos
de autor, que está concebida para usos caseros y otros
tipos de visualización limitada únicamente, a menos
que autorice lo contrario Macrovision Corporation.
Está prohibido desmontar o invertir la ingeniería.
• Está permitida la grabación de programas de televisión,
películas, cintas de vídeo y demás material siempre que
no se violen los derechos de propiedad de terceros u
otros derechos.
• DVD-RW (modo de Vídeo)
- Se trata de un formato utilizado para grabar datos en
un disco DVD-RW o DVD-R. El disco puede reproducirse en un reproductor de DVD existente una vez
finalizado.
- Si un disco se ha grabado en el modo de vídeo con un
grabador de otra marca pero no se ha finalizado, no
podrá reproducirlo o grabarlo más en este grabador.
Grabación y reproducción de discos DVD-RAM
• Los discos DVD-RAM vienen con o sin cartucho. Para
•
•
•
•
•
•
•
este producto, recomendamos discos DVD-RAM que
vengan con cartuchos.
Algunos cartuchos pueden expulsar el disco. Aunque
pueda expulsar el disco, utilice siempre el disco con el
cartucho para garantizar un funcionamiento correcto.
Los discos DVD-RAM disponen de una lengüeta de protección contra escritura para evitar la eliminación involuntaria de los datos grabados. Con la lengüeta de protección contra escritura establecida en PROTECT, podrá
reproducir el disco, pero no grabar ni eliminar.
Establezca la lengüeta de protección contra escritura en
UNPROTECT para formatear el disco o borrar datos.
Asegúrese de que el modo de grabación esté configurado en el modo VR, de lo contrario este producto no
podrá reproducir la grabación.
No puede reproducir un DVD-RAM en la mayoría de
reproductores de DVD por problemas de compatibilidad.
Sólo pueden reproducirse discos DVD-RAM estándar
Versión 2.0 en esta unidad.
DVD-RAM grabados en esta unidad quizá no funcionen con otros reproductores de DVD. Para determinar
la compatibilidad con estos discos DVD-RAM, consulte el manual del usuario del reproductor.
Esta unidad es compatible con DVD-RAM sin cartucho o
con él, pero las lengüetas de protección contra escritura
de los discos con cartucho ofrecen más protección en las
grabaciones.
Protección
Este grabador de DVD y
vídeo permite proteger el
contenido de los discos,
como se describe a continuación.
• Protección de cartucho:
Con la lengüeta de protección contra escritura en la posición de protegida, el contenido del disco no puede grabarse, editarse o borrarse.
• Protección de programa: consulte la página 76
“Bloquear la lista de títulos”
• Disco protegido: consulte la página 87 “Protección de
discos”
❋
❋
❋
Con este producto no pueden reproducirse discos
DVD-RAM/DVD-RW/DVD-R que sean incompatibles con el formato DVD-VÍDEO.
Para obtener información adicional sobre la
grabación de un DVD, consulte al fabricante del
DVD-RAM/DVD-RW/DVD-R.
Si se utilizan discos DVD-RAM/DVD-RW/DVD-R de
mala calidad, quizá haya errores en la grabación.
•
y carpetas.
• El tamaño máximo de JPEG progresivo es 3M píxeles.
• No se admite JPEG DE MOVIMIENTO.
•
•
disco DVD-RW en el modo de vídeo y en el modo VR.
Una vez finalizado un DVD-RW grabado en el modo
VR, no podrá grabar más.
Una vez finalizado un DVD-RW grabado en el modo
de vídeo, se convierte en DVD-Vídeo.
En ambos modos, la reproducción puede realizarse
antes y después de la finalización, pero la grabación,
eliminación y edición adicionales no pueden realizarse
tras la finalización.
Si desea grabar el disco en el modo VR y después en el
modo V, ejecute Format. Tenga cuidado al ejecutar
Format, puesto que pueden perderse todos los datos
grabados.
Un disco en blanco DVD-RW se inicializa en el modo
VR cuando se inicializa al principio.
No utilice los siguientes discos!
• LD, CD-G, CD-I, CD-ROM, DVD-ROM, VCD, DVD+R
and DVD+RW discs should not be used in this product.
[Note]
Disc types that can be played : CD/CD-R/
CD-RW/MP3/JPEG/DVD-Video/DVD-RAM/ DVDRW/DVD-R. However, if your DVD-RW/-R disc was
recorded with another device, it may be played only if it
was recorded and finalized in video mode.
• Some commercial discs and DVD discs purchased outside your region may not be playable with this product. When these discs are played, either “No disc.” or
“Please check the regional code.” will be displayed.
• If your DVD-RW disc is an illegal copy or is not in
DVD video format, it may also not be playable.
Español - 107
Español
• La unidad puede admitir un mínimo de 1.000 archivos
106 - Español
• Numerosos discos de DVD están codificados con pro-
Grabación y reproducción de discos DVD-RW
JPEG CD-R/RW
siones “.jpg” y “.JPG”.
Español
•
realizar funciones de edición como poner títulos a los
discos y programas y borrar programas antes de
finalizarlos.
Cuando se borra la programación de un DVD-R, ese
espacio no estará disponible. Una vez que ha grabado
en una zona de un DVD-R, ahí no podrá grabar, independientemente de si se borra la grabación o no.
La unidad tarda aproximadamente 30 segundos en
completar la información de gestión de grabación tras
finalizar ésta.
Este producto optimiza el DVD-R para cada grabación.
La optimización se realiza cuando empieza la
grabación tras insertar el disco o activar la unidad. La
grabación en el disco puede resultar imposible si la
optimización se realiza demasiadas veces.
La reproducción resultará imposible en algunos casos
por el estado de la grabación.
Esta unidad puede reproducir discos DVD-R grabados
y finalizados con un grabador de vídeo Samsung DVD.
Quizá no pueda reproducir algunos discos DVD-R en
función del disco y del estado de la grabación.
COPY PROTECTION
- Se trata de un formato utilizado para grabar datos en
un disco DVD-RAM o DVD-RW. Puede repetir la
grabación, edición, eliminación parcial, creación de listas de reproducción, etc.
- Un disco grabado en este modo no puede escucharse
en un reproductor de DVD existente.
• Una vez finalizado un DVD-R/RW grabado en el modo
• Puede grabar en el espacio disponible del disco y
PCM.
• Reproduce formato de audio CD-DA y discos CD-R y
CD-RW. Quizá la unidad no pueda reproducir algunos
discos CD-R o CD-RW por el estado de la grabación.
• DVD-RW (modo VR)
Características
generales
The D-VR3 permite grabar y reproducir imágenes digitales
de alta calidad en discos DVD-RAM/DVD-RW/DVD-R.
También puede editar imágenes digitales en discos DVDRAM/DVD-RW.
Grabación y reproducción de audio y vídeo digital de alta
calidad
Grabe hasta 12 horas de imágenes con un disco de DVDRAM de 9,4 GB de doble cara y hasta 6 horas de imágenes
con un disco DVD-RAM de 4,7 GB, en función del modo de
grabación.
Creación de un título de vídeo DVD con un disco DVDRW/DVD-R
Con un the D-VR3, cree su propio título de vídeo DVD en
discos DVD-RW/DVD-R de 4,7 GB.
Grabación y reproducción simultánea e Imagen dentro de
imagen (PIP)
Use la función Time Slip (Grabación y reproducción
simultánea) para ver las imágenes grabadas mientras se realiza la grabación (sólo en DVD-RAM). Use la función PIP
para ver las pantallas de reproducción y de grabación
simultáneamente.
Barrido progresivo de alta calidad
El barrido progresivo produce imágenes de alta resolución y
sin parpadeos. La tecnología de procesador Corrector de
base de tiempos y de circuitos de separación 2D Y/C de 10
bits a 54 MHz DAC ofrece la máxima calidad de grabación y
reproducción de imágenes. (Consulte las páginas 17-18).
Antes de leer el
manual del usuario
Compruebe los siguientes puntos antes de leer el manual
del usuario.
Iconos que se usarán en el manual
Icono
Término
DVD
Varias funciones con una interfaz de uso sencillo
RAM
El sistema de menú integrado y la función de mensajería
permiten realizar las operaciones que desee fácil y cómodamente. Con un disco DVD-RAM o DVD-RW (modo VR)
puede editar imágenes grabadas, crear una lista de reproducción y editar imágenes en una secuencia concreta según sus
necesidades.
Varias opciones de grabación
Seleccione el modo de grabación apropiado (XP, SP, LP o
EP) para satisfacer sus necesidades.
(Consulte las páginas 61-62).
• Modo XP: alta calidad, cerca de 1 hora
• Modo SP: calidad estándar, cerca de 2 horas
• Modo LP: calidad baja, cerca de 4 horas
• Modo EP: calidad inferior, cerca de 6 horas
Copiar contenido de la videocámara digital utilizando la
clavija de entrada de DV
Definición
Se trata de una función
disponible en DVD o en DVDR en el modo de vídeo.
Selección del tipo de disco
Esta unidad puede grabar en los siguientes tipos de discos.
Si desea seguir grabando en el mismo disco o desea editar el
disco tras la grabación, seleccione un tipo de disco regrabable
DVD-RW o DVD-RAM. Si desea guardar la grabación sin
ningún cambio, elija un DVD-R no regrabable.
Se trata de una función
disponible en DVD-RAM.
RW
Se trata de una función
disponible en DVD-RW.
R
Se trata de una función
disponible en DVD-R.
CD
Se trata de una función
disponible en un CD de datos
(CD-ROM, CD-R o CD-RW).
JPEG
Se trata de una función
disponible en CD (CR-ROM,
CD-R o CD-RW)
MP3
Se trata de una función
disponible en un CD de datos
(CD-ROM, CD-R o CD-RW
donde se graba MP3).
Paso 2
Formatear el disco para
iniciar la grabación
A diferencia de un VCR, el grabador inicia automáticamente el
formateo cuando se introduce un disco sin utilizar. Esto es necesario para la preparación de la grabación de un disco.
Utilización de un DVD-RAM
NOTA
Este tipo de disco puede formatearse en el formato de grabación
de vídeo DVD (modo VR). Puede editar la imagen grabada y
crear una lista de reproducción en una secuencia concreta según
sus necesidades.
Preliminary
Compruebe los elementos
antes de manejar cada función
Utilización de un DVD-RW
Acerca de la utilización de este manual del
usuario
1) Familiarícese con las instrucciones de seguridad antes de
utilizar este producto. (Consulte las páginas 2~5)
2) Si ocurre un problema, consulte la Solución de problemas. (Consulte las páginas 93~95)
Copyright
©2004 Samsung Electronics Co.
Todos los derechos reservados. No puede reproducirse ni copiarse ninguna parte o la totalidad de este manual del usuario sin
el permiso escrito previo de Samsung Electronics Co.
Este tipo de disco puede formatearse en el formato de vídeo
DVD (modo Vídeo) o formato de grabación de vídeo DVD
(modo VR). Con un disco no utilizado, aparecerá un mensaje
que pregunta si desea formatear en el modo de VR. Puede reproducir un disco en el modo Vídeo en varios componentes de
DVD. Un disco del modo VR permite una edición más variada.
Utilización de un DVD-R
Este tipo de disco puede formatearse en el formato de vídeo
DVD. Tras completarse el formateo, puede grabar en el disco.
Puede reproducir este tipo de disco en varios componentes de
DVD sólo después de finalizarse.
Nota
Sólo puede utilizar un formato en un DVD-RW.
Puede cambiar del formato de DVD-RW a
otro. Tenga en cuenta que los datos del disco
pueden perderse al cambiar de formato.
Español - 109
Español
Español
Paso 1
Se trata de consejos o instrucciones de la página que pueden
ayudar al funcionamiento.
Grabe imágenes de cámara de vídeo digital en discos DVDRAM, DVD-RW, DVD-R utilizando una clavija de entrada DV
(IEEE 1394-4 patillas). (Consulte la página 66).
108 - Español
Cómo utilizar el
grabador de DVD y vídeo
Conexión e
Instalación
Introducción rápida
Paso 1: Desembalaje
❷
Puede grabar canales no codificados seleccionando el canal
en el grabador de DVD y vídeo. Use este método también si
ve canales sin caja de conexiones.
Accesorios
La introducción rápida de esta guía le ofrecerá información
suficiente para empezar a utilizar el grabador.
Paso 1: Desembalaje
Método 1: Antena + grabador de DVD
y vídeo + TV: Sin caja de conexiones
Compruebe los siguientes accesorios suministrados.
• Cable de vídeo / audio
• Cable RF para TV
• Mando a distancia
• Pilas para el mando a distancia (tamaño AA)
• Manual del usuario
• Deseche las pilas conforme a la normativa medioambiental
local. No las tire en su cubo de la basura.
Paso 2: Conexión del cable de antena
❷
Paso 3: Conexión del cable del vídeo
❷
Paso 4: Conexión del cable de audio
❷
Paso 5: Conexión de dispositivos externos
❷
Paso 6: Conexión del cable de alimentación
❷
Paso 7: Preparación del mando a distancia
Paso 2: Conexión del
cable de antena
Existen varios modos de conexión del grabador de DVD y
vídeo. Seleccione una de las siguientes conexiones de antena
que se adapte mejor a sus necesidades.
• Método 1: Antena + grabador de DVD y vídeo + TV: Sin
caja de conexiones
• Método 2: Antena + caja de conexiones + grabador de
DVD y vídeo + TV: Caja de conexiones con
muchos canales codificados
• Método 3: Antena + grabador de DVD y vídeo + caja de
conexiones + TV: Caja de conexiones con
algunos canales codificados
Método 2: Antena + caja de conexiones + grabador de DVD y vídeo + TV:
Caja de conexiones con muchos
canales codificados
Puede grabar canales seleccionando el canal en la caja de
conexiones. No puede grabar un canal mientras está viendo
otro. Asegúrese de que la caja de conexiones esté encendida.
Si está utilizando una antena fuera del aire que
Nota
tiene línea doble plana de 300 ohmios, utilice un
conector de antena externo (adaptador de 300-75
ohmios: no suministrado) para conectar la antena
al grabador de DVD y vídeo.
Si tiene dos antenas (una VHF y la otra UHF), use
• Nota sobre el instalador del sistema CATV :
este recordatorio remite al instalador del sistema CATV al
• Conexión del cable de antena . . . . . . . . . 111
artículo 820-40 de la Ley de Electricidad Nacional
• Conexión del cable del vídeo . . . . . . . . . . 112
(Sección 54 de la Ley de Electricidad Canadiense, Parte I),
• Conexión del cable de audio . . . . . . . . . . 114
que ofrece pautas para toma de tierra correcta y, en espe-
• Conexión de dispositivos externos
cial, señala que la toma de tierra del cable debe estar
. . . . . 116
• Conexión del cable de alimentación . . . . 117
• Preparación del mando a distancia . . . . . 117
110 - Español
Español
Español
• Desembalaje . . . . . . . . . . . . . . . . . . . . . . 110
un adaptador-combinador UHF/VHF (disponible
en la mayoría de las tiendas de electrónica) para
conectar la antena al grabador de DVD y vídeo.
conectada al sistema de tierra del edificio, lo más cercana
posible al punto de la entrada del cable (siempre que
resulte práctico).
Español - 111
Método 3: Antena + grabador de
DVD y vídeo + caja de conexiones
+ TV: Caja de conexiones con
algunos canales codificados
Puede grabar canales no codificados seleccionando el canal
en la caja de conexiones. No puede grabar canales codificados que requieran una caja de conexiones.
• Comparado con el vídeo entrelazado estándar, el barrido
progresivo duplica la cantidad de líneas de haces de vídeo
alimentadas al TV, produciendo una imagen más estable,
sin parpadeos y clara que el vídeo entrelazado. La clavija
de salida del vídeo de barrido progresivo se utiliza en el
modo de salida progresivo. Esto sólo está disponible para
televisores que admiten el barrido progresivo.
• Los consumidores deben tener en cuenta que no todos los
televisores de alta definición son totalmente compatibles
con este producto y pueden aparecer artefactos en la imagen. En caso de problemas de imágenes de barrido progresivo de 525, se recomienda que el usuario cambie la conexión a la salida de “definición estándar”. Si existen preguntas relativas a la compatibilidad del TV con esta unidad,
póngase en contacto con nuestro centro de servicio al
cliente 1-800-SAMSUNG.
Método 3: Conexión a clavijas de
entrada de vídeo de componente
(Y,CB/TB,CR/PB) en el modo 480i
Método 2: Conexión a una clavija
de entrada de S-vídeo
Conecte un cable de S-vídeo (no suministrado) entre la clavija de SALIDA de S-VÍDEO del grabador de DVD y vídeo y la
clavija de ENTRADA de VÍDEO (amarillo) del TV (o amplificador AV).
• Ya puede disfrutar de imágenes de gran calidad. S-Vídeo
separa el elemento imagen en señal de blanco y negro (Y)
y color (C), para mostrar imágenes más nítidas que el
modo de entrada de vídeo tradicional.
1. Conecte cables de vídeo de componente (no suministrado)
entre las clavijas de SALIDA de VÍDEO de COMPONENTE del grabador de DVD y vídeo y las clavijas de
ENTRADA de VÍDEO de COMPONENTE del TV (o
amplificador AV).
2. Asegúrese de que el disco se ha detenido completamente
antes de cambiar el modo.
Si no aparece algo en la pantalla del panel frontal, será el
modo 480i.
Método 1: Conexión a una clavija
de entrada de vídeo
Conecte un cable de vídeo (amarillo) entre la clavija de SALIDA de VÍDEO (amarillo) del grabador de DVD y vídeo y la
clavija de ENTRADA de VÍDEO (amarillo) del TV (o amplificador AV).
• Disfrutará de imágenes de calidad normal.
• Conecte los cables de audio (blanco y rojo) entre la clavija
de SALIDA DE AUDIO ANALÓGICO del grabador de
DVD y vídeo y la clavija de ENTRADA DE AUDIO del TV
( o amplificador AV).
Paso 3: Conexión del
cable del vídeo
Existen varios modos de conexión del grabador de DVD y
vídeo. Seleccione uno de los siguientes métodos de conexión
de vídeo que mejor le convenga.
• Método 1: Conexión a una clavija de entrada de vídeo
• Método 2: Conexión a una clavija de entrada de S-vídeo
• Método 3: Conexión a clavijas de entrada de vídeo de
componente en el modo 480i
• Método 4: Conexión a clavijas de entrada de vídeo de
componente en el modo 480p
• La salida de S-vídeo y vídeo de componentes sólo están
disponibles si su TV admite entrada de S-vídeo o de vídeo
de componentes, respectivamente.
Si no funciona la salida de S-Vídeo o de vídeo de componentes, compruebe las conexiones del TV y la configuración
de la selección de entrada del TV.
112 - Español
Asegúrese de que coincidan las conexiones con
Nota
códigos de color. Las clavijas de salida de componentes Y, Pb y Pr del grabador de DVD y vídeo
deben estar conectadas a las clavijas exactas de
entrada de componentes correspondientes en el
TV, de lo contrario aparecerán imágenes rojas o
azules en la pantalla de TV.
Asegúrese de que las clavijas de salida de audio
derecha e izquierda del grabador de DVD y vídeo
estén conectadas a las clavijas de entrada de audio
izquierda y derecha del TV, respectivamente.
(Página 18)
Español - 113
Español
Español
Modos de salida S-vídeo, vídeo de componentes y
progresivo
• Disfrutará de reproducción de color de imágenes de alta
calidad. El vídeo de componente separa el elemento de
imagen en señales blancas y negras (Y), azules (Pb) y rojas
(Pr) para presentar imágenes más claras y limpias.
Método 4: Conexión a clavijas de
entrada de vídeo de componente
(Y,CB/TB,CR/PB) en el modo 480p
Su TV debe admitir la entrada de barrido progresivo para
poder ver la salida de vídeo 480p.
1. Conecte cables de vídeo de componente (no suministrado)
entre las clavijas de SALIDA de VÍDEO de COMPONENTE del grabador de DVD y vídeo y las clavijas de
ENTRADA de VÍDEO de COMPONENTE del TV (o
amplificador AV).
2. Pulse el botón Progressive en el panel frontal. Se muestra
el mensaje "Pulse "Sí" para confirmar el modo de rastreo
progresivo. De lo contrario, pulse “No”. Si desea el modo
480P, seleccione Sí. Si aparece “480P” en la pantalla del
panel frontal, ahora el grabador de DVD y vídeo funcionará en el modo 480P. Asegúrese de que el disco se ha
detenido completamente antes de cambiar el modo.
Paso 4: Conexión del
cable de audio
Método 2: Conexión a un amplificador estéreo con clavijas de
entrada analógica
Si su amplificador estéreo sólo tiene clavijas de entrada de
audio (Izda. y dcha.), use las clavijas de salida de audio
analógico.
Existen varios modos de conexión del grabador de DVD y
vídeo. Seleccione la conexión de audio que mejor le convenga.
Método 3: Conexión con un amplificador AV que tiene clavija de entrada digital
Si su amplificador AV sólo tiene un descodificador Dolby
Digital o DTS y una clavija de entrada digital, utilice esta
conexión. Para disfrutar de sonido Dolby Digital o DTS, configure los ajustes de audio. (Consulte la página 28)
• Método 1 : Conexión a un TV
• Método 2 : Conexión a un amplificador estéreo (salida de
audio analógica o digital)
• Método 3 : Conexión con un amplificador AV que tiene
clavija de entrada digital.
Fabricado con licencia de Dolby Laboratories. “Dolby” y
el símbolo de doble D son marcas comerciales de Dolby
Laboratories.
“DTS” y “DTS Digital Out” son marcas comerciales de
Digital Theater Systems, Inc.
Método 1: Conexión a un TV
Esta conexión utilizará los altavoces del TV.
Asegúrese de que coincidan las conexiones con
Nota
códigos de color. Es decir, las clavijas de salida de
componentes Y, Pb y Pr del grabador de DVD y
vídeo deben estar conectadas a las clavijas exactas
de entrada de componetes correspondientes en el
TV, de lo contrario aparecerán imágenes rojas o
azules en la pantalla de TV.
Una vez seleccionado el modo de salida del vídeo 480p,
Español
Español
se deshabilitarán las salidas Vídeo, S-Vídeo y 480i.
Asegúrese de que las clavijas de salida de audio
derecha e izquierda del grabador de DVD y vídeo
estén conectadas a las clavijas de entrada de audio
izquierda y derecha del TV, respectivamente.
(Página 19)
114 - Español
Español - 115
Paso 5: Conexión de
dispositivos externos
Método 2: Conexión de una
videocámara a los jacks LINE IN 2
También puede utilizar los jacks LINE IN 2 del panel frontal
de la grabadora de DVD - VCR. Puede grabar desde el equipo
conectado.
Al insertar una fuente de entrada en LINE IN 2 mientras ve la
televisión, la entrada cambia automáticamente a LINE IN 2.
Paso 6: Conexión del
cable de alimentación
Esto permite conectar el grabador de DVD y vídeo a otros
dispositivos externos y ver o grabar sus salidas.
Tras completar todas las conexiones, enchufe el cable de alimentación a la toma.
• Método 1 : Conexión de un VCR, Receptor (STB) o reproductor de DVD a las clavijas de ENTRADA DE LÍNEA
1 DE AUDIO/VÍDEO.
• Método 2 : Conexión de una videocámara a los jacks LINE
IN 2.
• Método 3 : Conexión de una videocámara a la clavija de
ENTRADA DE DV.
“AUTO” parpadeará en la pantalla del panel frontal. Esto
significa que el tiempo actual se está configurando
automáticamente (Auto Program) mediante la antena con
conexión. La configuración puede durar varios minutos.
Cuando funciona con normalidad, la hora actual se configura
automáticamente y aparece en la pantalla del panel frontal.
Method 1 : Conexión de un VCR, un
descodificador o reproductor de DVD
a los jacks AUDIO/VIDEO LINE IN 1.
Si aparece “——”, significa que ha fallado la configuración
de la hora.
En ese caso, configure la hora mediante la configuración de
la hora manual, como se ve en las páginas 25-26.
Conexión de un VCR o un dispositivo externo a los jacks
AUDIO/VIDEO LINE IN 1 de la grabadora de DVD - VCR.
Puede grabar programas de copia libre desde un equipo
conectado (VCR, descodificador o DVD).
Paso 7: Preparación
del mando a distancia
Instale las pilas en el mando a distancia
• Abra la tapa de las pilas en la parte posterior del mando a
distancia.
• Inserte dos pilas AAA. Asegúrese de que las polaridades (+
y -) sean correctas.
• Cierre la tapa de las pilas.
Si el mando a distancia no funciona correctamente:
• Compruebe la polaridad + - de las pilas (pila seca)
• Compruebe si las pilas están descargadas.
• Compruebe si hay algún obstáculo que bloquee al sensor
remoto.
• Compruebe si hay alguna luz fluorescente cerca.
Deshágase de las pilas conforme a la normativa medioambiental local. No las tire a la basura.
Método 3: Conexión de una videocámara a la clavija de ENTRADA DE DV
Si la videocámara tiene una clavija de salida de DV, conéctela
a la clavija de entrada de DV del grabador de DVD y vídeo.
• Si su videocámara tiene una clavija de salida de DV, consulte la página 73 para obtener información adicional.
Cada vez que desenchufe el cable de alimentación de la toma
de pared y lo vuelva a enchufar, se realizará el ajuste
automático de la hora.
No exponga el sensor remoto de la grabadora a una fuente de
luz fuerte como la luz del sol u otra fuente de iluminación.
De lo contrario, tal vez no pueda controlar la grabadora
desde el mando a distancia.
También puede utilizar los jacks LINE IN 2 del panel
frontal de la grabadora de DVD - VCR.
Cuando se conecta la clavija de S-Vídeo y de
Vídeo, la clavija de S-Vídeo tendrá prioridad. La
selección de línea se realizará automáticamente.
El contenido protegido contra copia no podrá
grabarse.
116 - Español
• Algunos modelos de cámaras digitales con formato DV
puede que acepten un formato de compresión distinto. En
tal caso, no podrá grabar desde tales equipos.
• Según el modelo de cámara de vídeo digital con formato
DV, puede que la grabación no funcione correctamente o
que algunas funciones queden inhabilitadas.
Español
Español
Nota
Español - 117
Configuración del mando a distancia
El mando a distancia del vídeo funcionará con televisores
Samsung y marcas compatibles.
ON / STANDBY
TV ON / STANDBTY
TV MUTE
100 +
AUDIO
SELECT
INPUT SEL.
DVD
VCR
1. Encienda el televisor.
2. Apunte con el mando a distancia al televisor.
3. Mantenga pulsado el botón TV y escriba el código de dos
cifras correspondiente a la marca del televisor, pulsando los
botones numéricos correspondientes.
Marca
Código
Marca
Código
TOSHIBA
01
SHARP NEW
08, 13
RCA/GE
02
SANYO
09
SONY
03
MAGNAVOX
10
MITSUBISHI
04
GOLDSTAR
11
JVC
05
SAMSUNG
12
HITACHI
06
ZENITH
14
PANASONIC
07, 15
PIONEER
16
TV
CH / TRK
VOL
Para determinar si el televisor es compatible, siga estas
instrucciones.
OPEN/CLOSE
F / ADV / SKIP
VCR Plus+
MARKER
Resultado: Si el televisor es compatible con el mando a distancia, se apagará.
Ahora está programado para funcionar con el
mando a distancia.
Si se indican varios códigos para la marca del teleRETURN
CLEAR
DISPLAY TV / VCR SUBTITLE REC SPEED
REC
PIP
DVD
VCR
COPY
Nota
visor, pruebe con cada uno hasta que encuentre el
que funciona.
REC PAUSE
TIME SLIP
A continuación, podrá controla el televisor utilizando estos
botones.
Botón
POWER
INPUT SEL.
VOL + o CH ( o )
TV MUTE
Función
Utilizado para encender y apagar el televisor.
Utilizado para seleccionar una fuente externa.
Utilizado para ajustar el volumen del televisor.
Utilizado para seleccionar el canal necesario.
Utilizado para encender y apagar el sonido.
Las funciones no necesariamente estarán operativas
Español
Nota
en todos los televisores. Si encuentra problemas,
maneje el televisor directamente.
Printed in Korea
BY634781(02)
118 - Español