1
TOSHIBA
28ZT29B
32ZT29B
36ZT29B
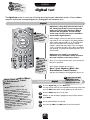
integrated digital
terrestrial
colour television
owner’s manual
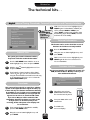
Remember…
?
For television
operation
queries, plea
se
ring the
helpline…
For quick reference please see the
INDEX at the back of this manual.
Contents…
SETTING UP
For your safety – some basic procedures for your own safety
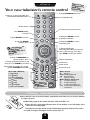
Your new television’s remote control – an illustration and details
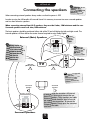
Connecting the speakers – external speakers
Connecting and turning on – details of the back connections and turning on your new TV
digital auto tune – tuning-in the digital services
digital favourites and re-ordering – setting up your favourites and re-ordering programmes
digital re-tuning – adding new digital services and re-running auto tune
analogue auto and manual tune – tuning in the analogue stations
analogue programme skip – preventing certain analogue programmes from being viewed
analogue manual fine tuning and programme sorting – changing programme positions
3
4
5
6
8
9
10
11
13
14
USING THE TV
General controls – changing programmes and accessing the digital on-screen TV guide
Sound controls – for digital and analogue viewing
Picture controls – personalising the picture style, scan mode, digital noise reduction
Picture controls continued – black stretch, picture size/position
Picture controls continued – automatic format (widescreen), blue screen, geomagnetic adjustment, still picture
digital and analogue widescreen viewing
15
16
17
18
19
20
ADDITIONAL FEATURES
digital setting – languages, subtitles, modem settings
Parental control – preventing the viewing of chosen digital stations
Parental control continued – using the censorship and locked services functions
The timer, panel lock and time display – details and functions
AV connections and input selection – settingsockets to enable your TV to recognise connected equipment
21
22
23
24
25
RECORDING
Recording digital broadcasts – setting up, details of NEXTVIEW video recorders
Recording from your TV continued – timed digital recordings
26
27
SPECIAL SOUND FEATURES
Dolby Digital
Digital Pro Logic – setting up and adjusting
Digital Surround Processor – Surround Sound features and functions
28
29
30
TELETEXT
digital text – details of the new and innovative text service
analogue teletext – setting up the teletext alphabets, choosing modes and sub-pages
analogue teletext continued – auto and list modes
analogue teletext continued – the controls – using teletext and the remote control buttons
31
32
33
34
TECHNICAL
The technical bits – digital manual tuning, downloads, technical information, common interface slot
35
CONNECTING EQUIPMENT
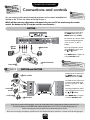
Connections and controls – connecting equipment to the front/side of the TV and using the controls
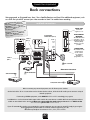
Back connections – connecting equipment to the back of the TV
36
37
FOR YOUR GUIDANCE
Questions and Answers
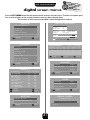
digital screen menus – a page of the menus specifically for the digital TV
Screen menus – a page of the screen menus for your quick reference
Notes – a page for you to record your own information, software licence agreement
Index and Specifications of your integrated digital TV
38
41
42
43
44
SETTING UP
For your safety
This equipment has been designed and manufactured to meet international safety standards but, like any electrical
equipment, care must be taken if you are to obtain the best results and safety is to be assured. So, please read the
points below for your own safety. They are of a general nature, intended to help you with all your electronic
consumer products and some points may not apply to the goods you have just purchased.
Air Circulation…
Do not…
DON'T remove any fixed cover as this may expose
dangerous voltages.
Leave at least 10cm clearance around the television to
allow adequate ventilation. This will prevent the TV
from overheating and consequential possible damage
to the TV. Dusty places should also be avoided.
DON'T obstruct the ventilation openings of the
equipment with items such as newspapers,
tablecloths, curtains, etc. Overheating will cause
damage and shorten the life of the equipment.
Heat Damage…
Damage may occur if you leave the TV in direct sunlight
or near a heater. Avoid places subject to extremely high
temperatures or humidity, or locations where the
temperature is likely to fall below 5°C (41°F).
DON'T allow electrical equipment to be exposed to
dripping or splashing or objects filled with liquids,
such as vases, to be placed on the equipment.
Mains Supply…
DON’T place hot objects or naked flame sources,
such as lighted candles or nightlights on, or close to
equipment. High temperatures can melt plastic and
lead to fires.
The mains supply required for this equipment is 230v
AC 50Hz. Never connect to a DC supply or any other
power source. DO ensure that the TV is not standing
on the mains lead. DO NOT cut off the mains plug
from this equipment, this incorporates a special Radio
Interference Filter, the removal of which will impair its
performance. In the UK, the fuse fitted in this plug is
13A, and is approved by ASTA or BSI to BS1362. It
should only be replaced by a correctly rated and
approved type and the fuse cover must be
refitted. IF IN DOUBT PLEASE CONSULT A
COMPETENT ELECTRICIAN.
DON'T use makeshift stands and NEVER fix legs with
wood screws. To ensure complete safety, always fit the
manufacturer’s approved stand or legs with the fixings
provided according to the instructions.
DON'T listen to headphones at high volume, as such
use can permanently damage your hearing.
DON'T leave equipment switched on when it is
unattended, unless it is specifically stated that it is
designed for unattended operation or has a standby
mode. Switch off using the switch on the equipment
and make sure your family know how to do this.
Special arrangements may need to be made for
infirm or handicapped people.
Do…
DO read the operating instructions before you attempt
to use the equipment.
DON'T continue to operate the equipment if you are
in any doubt about it working normally, or it is
damaged in any way – switch off, withdraw the mains
plug and consult your dealer.
DO ensure that all electrical connections (including the
mains plug, extension leads and inter-connections
between pieces of equipment) are properly made and
in accordance with the manufacturers’ instructions.
Switch off and withdraw the mains plug before making
or changing connections.
ABOVE ALL – NEVER let anyone, especially
children, push anything into holes, slots or any
other openings in the case – this could result in a
fatal electric shock.
DO consult your dealer if you are ever in doubt about
the installation, operation or safety of your equipment.
NEVER guess or take chances with electrical
equipment of any kind – it is better to be safe
than sorry.
DO be careful with glass panels or doors
on equipment.
3
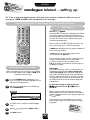
SETTING UP
Your new television’s remote control
Please s
ee
41 and 4 pages
2 for full
details o
f the
on-scree
n MENU
S.
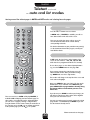
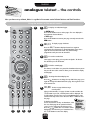
To display ANALOGUE text services
To bring up on-screen information and
for the teletext initial/index function
For On/Standby mode
Number buttons
To select input from external sources
Turns DIGITAL subtitles
on and off
To display DIGITAL text services
To display the DIGITAL on-screen
programme information
To access the DIGITAL
operation menus
To display the DIGITAL on-screen
programme guide
reference
… For quick
ase see
to topics, ple
f
at the end o
the INDEX
this manual.
To change teletext pages
When using menus the arrows move the
cursor on the screen up, down, left or
right. SELECT to confirm your selection
To access the ANALOGUE and
general operation menus
Teletext control buttons
To change programme positions up and
down/Favourite DIGITAL up and down
To exit menus
Volume control
Select equipment operation. You can also
operate a TOSHIBA VCR and DVD
When in VCR or DVD mode:
press to PAUSE
press to EJECT
press l
to SKIP-REWIND
press
l to SKIP-FORWARD
press to PLAY
press to STOP
press
to REWIND
press
to FAST FORWARD
To mute the sound
m
wq
s
r
p
q
s
When in TV mode:
Still picture
ATV/DTV Analogue/Digital mode
Picture preferences
Widescreen viewing
When in Analogue Teletext mode:
To reveal concealed text
To hold a wanted page
To enlarge teletext display size
8/9 To select a page whilst viewing a
normal picture
u
m
een
To switch betw
V
AT
:
TV
E
U
ANALOG
DTV
:
TV
AL
IT
IG
D
and
n
press this butto
{
r
q
s
The batteries... and the effective range…
Remove the back cover to reveal the battery compartment and make sure you insert the batteries
the right way round.
Suitable battery types for this remote are UM-4, AAA or IEC R03 1.5V.
Dispose of them in a designated disposal area. Do not combine a used, old battery with a
new one or mix battery types.
The performance of the remote control will deteriorate beyond a distance of five metres
or outside an angle of 30 degrees from the centre of the TV.
4
SETTING UP
!
WARNING:
attempt to sh do not
ar
external spea e
kers with
your Hi-Fi as
serious
damage may
occur.
Connecting the speakers
When connecting external speakers always make sure that the power is OFF.
In order to enjoy the full benefits of Surround Sound it is necessary to connect two rear surround speakers
and two front extension speakers.
When connecting external front Hi-Fi speakers, they must be 8 ohm, 10W minimum and the rear
Surround speakers must be 8 ohm, 10W minimum.
The front speakers should be positioned either side of the TV and will deliver the left and right sound. The
internal speakers will then deliver the centre channel required to enjoy Dolby Digital.
Don’t
rg
fo et to set
the switch
to EXT.
External (Main) Speakers
! Alw
ays make sure
that the lead
with the
stripe (or rais
ed edge) is
connected to
the RED
terminal and
the other
(smooth) lead
is
connected to
the
BLACK termin
al.
When you
connect a W
oo
make sure yo fer,
u
choose Woo
fe
EXT. in the A r
Connection V
menu.
Active Woofer
External
(Main) Speaker
TV
External
(Main) Speaker
ested
These are sugg
positions only.
kers to
Place your spea
the
suit and adjust
ssary.
balance as nece
Surround
Speaker
Surround
Speaker
round
In order to enjoy the sensations of Sur
two
Sound TV it is necessary to connect the
cables
Surround Speakers. These speakers and
with
are supplied and should be sited in line
t the
the normal viewing position. To connec
nector
Surround Speakers simply press the con
and insert the cable.
Surround Speakers
5
SETTING UP
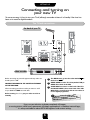
Connecting and turning on
your new TV
To conserve energy it is best to turn your TV off, although remember to leave it in Standby if the timer has
been set to record a digital broadcast.
The TV back connections…
the back of your TV
1
SCART 3
2
SCART 1
SCART 2
3
IN
video recorder
OUT
IN/OUT
SAT
Before connecting any external equipment always make sure
that the power is OFF.
CONNECT THE AERIAL TO THE SOCKET ON THE BACK
OF THE TELEVISION.
When connecting your video recorder you must use a full
21-pin SCART lead AND an aerial cable.
Before running Auto Tune put your video recorder to
Standby.
1
The AERIAL must go into the socket marked
the back of the TV.
2
AERIAL CABLE from the TV socket (marked VCR) to
AERIAL IN on back of the VCR.
3
SCART LEAD from Scart 2 on the back of the TV to
the IN/OUT SCART socket on the back of the VCR.
Without this, you will not be able to view videos or
record digital programmes.
e VCR to either
If you connect th
TV, the
the back of the
events.
Scart 1 or 3 on
ond to any timer
VCR will not resp
!
If you use your television to display completely still images,
or moving pictures which have a permanent still image superimposed i.e. broadcast network logos,
it is always advisable to reduce BOTH the brightness and contrast settings.
6
on
SETTING UP
Connecting and turning on
your new TV continued
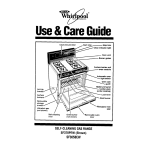
…and switching your new TV on
28ZT29B
With the controls on the FRONT of the TV:
Power Button
If the red power-on light on the front is unlit,
press the POWER button on the FRONT to
switch the set on, then press a number button
on the remote control to see the screen.
ORANGE = Timer Recording
GREEN = Telephone line
RED = Power On
GREEN = On Timer is set
32/36ZT29B
Power button
With the controls on the SIDE of the TV:
If the red power-on light on the front is unlit, press the
POWER button on the SIDE to switch the set on, then press
a number button on the remote control to see the screen.
ORANGE = Timer Recording
GREEN = Telephone line
RED = Power On
GREEN = On Timer is set
…and with the remote control:
i
Press the Standby Button :
This allows you to put the set into standby mode when leaving the TV
unattended for short periods of time. To return to TV mode press the
button, or any of the numbered buttons on the remote control.
The picture may take a few seconds to appear.
i
7
SETTING UP
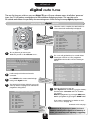
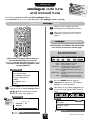
digital auto tune
The very first time you switch on your new Digital TV you will see a welcome screen. At all other ‘power-on‘
times your TV will perform a comprehensive self test before displaying a picture. This may take up to
20 seconds and reduces the possibility of encountering errors while viewing the many digital programmes.
auto tuning the digital services
5
When the search is complete, the total number of
services found will momentarily be displayed.
REPLACE EXISTING SERVICES
!
The lis
ALL available t will show
programmes
– wheth
subscribed or er you have
no
you will not be t. However,
able to view
those needing
subscription.
Service
Data
TV
TV
TV
TV
TV
TV
Audio
TV
TV
Programme
028 FourText
012 CBBC
013 CBeebies
010 BBC FOUR
007 BBC CHOICE
011 BBC NEWS 24
017 BBCi
045 BBC PARLMNT
002 BBC TWO
001 BBC ONE
Scan complete 56 new services found
1
The very first time you turn on your
Toshiba TV you will see the welcome screen…
6
Welcome
Thank you for choosing this Toshiba television.
First you need to tune in your television.
Please ensure the aerial is connected
before proceeding.
Press
It will remind you that the aerial must be
connected.
3
Press SELECT on the remote control to begin
tuning in the digital services.
4
SERVICE LIST
to continue.
2
The menu
s will guid
e you
as to whic
h buttons
on the
remote co
ntrol to p
ress.
The REPLACE EXISTING SERVICES screen will
come up and the red progress bar will track the
programmes being found.
7
REPLACE EXISTING SERVICES
Programme
028 FourText
012 CBBC
013 CBeebies
010 BBC FOUR
007 BBC CHOICE
011 BBC NEWS 24
017 BBCi
045 BBC PARLMNT
002 BBC TWO
001 BBC ONE
Progress
Service
Data
TV
TV
TV
TV
TV
TV
Audio
TV
TV
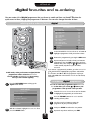
The screen will go blank for a few seconds before
showing the SERVICE LIST. The programme
highlighted in this list will be the one showing on
the TV.
Programme
001 BBC ONE
002 BBC TWO
003 ITV 1
004 Channel 4
005 Channel 5
006 ITV 2
007 BBC CHOICE
009 Teletext
010 BBC FOUR
011 BBC NEWS 24
Up/Down
Favourite
Service Favourite
TV
Yes
TV
Yes
TV
Yes
TV
Yes
TV
Yes
TV
Yes
TV
Yes
Data
Yes
TV
Yes
TV
Yes
Remove
Go To
From the SERVICE LIST you can:
Move Up/Down the list with the Q and P buttons;
Deselect/Select a Favourite with S or R buttons
(see page 9);
Remove a programme by pressing the RED button;
Go To a programme by pressing the SELECT button.
If you remove a programme by mistake run Add
New Services. See page 10.
Continued on the next page…
The red b
ar
will show
the
progress
being ma
de.
8
!
Please note: If you get a poor picture, i.e. loss of
definition and the picture appears to be made up of
blocks, your aerial may need adjusting or upgrading.
SETTING UP
digital favourites and re-ordering
You can create a list of digital programmes that you favour to watch and then use the P buttons for
quick access to them, skipping the programmes in between. You can also change the order of them.
f e
selecting and re-ordering favourite digital programmes
FAVOURITES LIST
Service
TV
TV
TV
TV
TV
TV
TV
Data
TV
TV
Programme
001 BBC ONE
002 BBC TWO
003 ITV 1
004 Channel 4
005 Channel 5
006 ITV 2
007 BBC CHOICE
009 Teletext
010 BBC FOUR
011 BBC NEWS 24
Up/Down
Go To
!
Favourite
s on
DTV mod ly work in
e.
analogu After
e viewin
g,
press the
button. ATV/DTV
Remove
Re-order
3
In this FAVOURITES LIST use the Q or P button to
highlight a programme which you wish to remove.
4
Remove the programme by pressing the RED button.
5
Repeat until you are left with a list of your favourite
programmes. Press the EXIT button when you have
finished. Now, when using the P buttons on the
remote control, only those in your list will be
accessed.
f e
If you remove a programme by accident, go to the Service List
in the MAIN MENU. Highlight the programme and with the
S or R button, turn No to Yes. The programme may be put
back at the end of the FAVOURITES LIST. To re-order the list,
see below.
In DTV mode, when you first tune-in digital, ALL the
programmes will be selected as Favourites.
You can edit the FAVOURITES LIST by removing
those you won’t watch regularly.
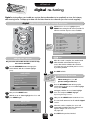
re-ordering digital programmes
1
Press the DTV MENU button to bring up the
digital MAIN MENU.
You can re-order the programmes in the Favourite
List so that when you use the P buttons, the
programmes come up in the order you wish.
f e
MAIN MENU
Timer Programming
1
From the Favourite List use the Q and P buttons
to highlight the programme you wish to move.
2
Press the YELLOW button to Re-order and the
wording will turn yellow.
3
Use the Q and P buttons to move the
programme to your preferred position.
4
And press SELECT to confirm the new position.
5
Repeat for any others and then press EXIT.
Favourite List
Service List
Common Interface
Setup
Up/Down
2
Enter
With the Q button, highlight Favourite List. Then
press the SELECT button.
9
!
Rememb
er to
the ATV/ press the
DT
to select V button
b
DIGITAL etween
and
ANALOG
UE mode
s.
SETTING UP
digital re-tuning
Digital re-tuning allows you to add new services that are broadcast or to completely re-tune; for instance,
after moving house. To keep up-to-date with the latest free-to-view channels you must re-tune regularly.
digital adding channels and re-running auto tune
4
With Add New Services highlighted press
SELECT. Your existing list will come up and the TV
will now search for any new services available.
ADD NEW SERVICES
Programme
028 FourText
012 CBBC
013 CBeebies
010 BBC FOUR
007 BBC CHOICE
011 BBC NEWS 24
017 BBCi
045 BBC PARLMNT
002 BBC TWO
001 BBC ONE
The red b
will show ar
the
progress
being ma
de.
Service
Data
TV
TV
TV
TV
TV
TV
Audio
TV
TV
Progress
EXIT
adding new services
This procedure will enable the TV to search for any
new services available.
1
5
When the search is complete, the number found
will be detailed at the bottom and any new
services found will be added to the SERVICE
LIST. From here you can add to your Favourites
as previously detailed.
6
Press EXIT to finish.
Press the DTV MENU button to bring up the
MAIN MENU. With the Q button highlight
Setup.
MAIN MENU
If an
Locked (s y station is
ee
you will b page 23)
e
your PIN asked for
be
are able to fore you
re-tune.
Timer Programming
Favourite List
Service List
Exit
re-running auto tune
When running Auto Tune all
previous settings will be lost.
Common Interface
Setup
Up/Down
1
Press the DTV MENU button to bring up the
MAIN MENU. Use the Q or P button highlight
Setup. Press SELECT.
2
And again, with the Q or P button highlight
Auto Tune and press SELECT. Highlight
Replacing Existing Services.
3
Now press the SELECT button to start Auto Tune.
4
The search will commence for all available digital
services.
5
When the search is complete, the screen will
momentarily go blank before the SERVICE LIST
appears and you can set Favourites.
See pages 8/9.
6
Press EXIT when you have finished.
Enter
2
Now press the SELECT button.
3
With the Q or P button highlight Auto Tune and
press SELECT again.
AUTO TUNE
Add New Services
Replace Existing Services
Up/Down
Start
10
!
SETTING UP
…Remem
ber…
ANALOG for
U
operatio E
n
DIGITAL after
operatio
must ha n, you
ve
the ATV/
DTV butt pressed
on
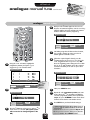
analogue auto tune
and manual tune
Auto tuning searches for all the available analogue stations.
As an alternative to auto tune, you can tune-in your analogue stations manually.
tuning-in your analogue stations
2
When the search is complete the TV will
automatically return to programme position 1.
3
If the picture is not clear you can change the
station order, using Programme sorting, on
page 14.
analogue manual tuning
Several functions are included in the manual tuning
menu and are covered on the next few pages.
These options will appear as
you move across the screen:
Programme
Until you tune-in analogue channels, when you
press the ATV/DTV button you will see the
Auto Tuning prompt. You will need to run Auto Tune
to be able to watch analogue programmes whilst
recording digital TV.
Programme:
This will take 2 to 3
minutes
Press the SELECT button on the remote control to
begin the search for available analogue stations.
x x x x x will flash and the bullet will move
along the line as the search progresses.
The channel number on which a station is being
broadcast.
Only used if you experience interference/weak signal.
See page 14.
Station identification. You can use the P and Q
or S and R buttons to enter up to seven characters.
1
Press the TV MENU button to display the
analogue menu bar. Use the S or R button to
highlight Set up from the top bar.
2
Now with the P or Q button, highlight Manual
tuning in the menu options and the R button to
select.
Auto tuning
Colour
Auto tuning
Manual tuning
Programme sorting
Teletext
Channel : 21
Station :
EXIT
EXIT
AUTO
Set up
Searching
the
television to
complete the
search.
* means nothing has been stored or the facility
to skip the programme is ON. See page 13.
…allow
Search up and down for a signal.
Station:
Station
The number to be pressed on the remote control.
Specific to certain areas. See page 12.
Manual fine tuning:
Press SELECT to start the
tuning for Analogue TV
channels.
Programme skip/ Manual fine
Channel
tuning
Search:
Channel:
You have selected analogue
TV for the first time.
Search
System:
Programme skip:
Auto tuning
1
System
: To exit
: To exit
11
Continued on the next page…
!
SETTING UP
…Remem
ber…
ANALOG for
U
operatio E
n
DIGITAL after
operatio
n, you
mu
the ATV/ st have pressed
DTV butt
on
analogue manual tune continued
analogue manual tuning
6
Now press the R button again to select Search.
Press the P button to begin the search. Searching
will flash and the television will show the channel
numbers whilst the search is progressing.
Manual tuning
Searching
6
I
RRR
* 32
0
SELECT : To store
MENU : To return
7
On finding a signal it will show on the television,
if it is not the channel you want, press the P
button again to restart the search.
8
When the required signal is found, press the
R button to move to Programme skip. Press the
P or Q button to turn Programme skip Off.
Press the R button to move along to Station. With
the P, Q, S and R buttons, put in the required
characters to identify it. You can use up to seven
characters.
Using the P or Q button, highlight the
programme position you require e.g. we
suggest Prog. 6 for a local channel.
Manual tuning
Sys.
I
I
I
I
I
I
Channel
22
28
25
32
37
* 69
SELECT : To select
4
EXIT
Prog.
1
2
3
4
5
6
Station
BBC1
BBC2
ITV
CH4
CH5
: To exit
Manual tuning
Station
6
…Your TV
may display
different
Channel
numbers…
SELECT : To store
MENU : To return
5
: To exit
Press the R button to select System and use P or
Q to ensure I is selected. (The system option
will not need to be changed again for the
UK.)
Now press SELECT to store.
Press EXIT when you have finished tuning in.
This TV has direct channel entry if
the channel numbers are known.
Select the Manual tuning screen in Step 4. Enter
the Programme number, the System, then the
Channel number. Press SELECT to store.
PLEASE NOTE
12
: To exit
11
0
EXIT
EXIT
Repeat for each programme position you want
to tune. Press the P or Q button repeatedly to
select the programme position, then repeat from
step 5. Or, press TV MENU to return to the list of
channels and select the next number to tune.
* 69
0 LOCAL
10
System
I
39
SELECT : To store
MENU : To return
9
Manual tuning
I
Press SELECT to select.
6
: To exit
3
EXIT
SETTING UP
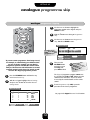
analogue programme skip
analogue programme skipping
3
Use the P or Q button to highlight the
programme position to be skipped and press
SELECT to select.
4
With the R button move along to Programme
skip.
5
Use the P or Q button to turn Programme
skip : On. Press SELECT to store.
Manual tuning
*
2
I
skip
: On
Programme
on the screen
ped
indicates a skip
sition.
programme po
* 28
0 BBC2
SELECT : To store
MENU : To return
To prevent certain programmes from being viewed,
for example, a certain film by your children whilst
you are out for the evening, you can skip the
programme position and take the remote control
with you. The television will still function as normal
using the controls on the front of it, but the set will
not show the skipped programme position.
1
Press the TV MENU button and from the top
menu bar select Set up.
2
With the Q button highlight Manual tuning.
And press the R button to select the Manual
tuning screen.
6
Then press the
TV MENU button
and either repeat
from Step 3 or
press EXIT to finish.
EXIT
: To exit
gramme
Each pro be
has to
position ALLY selected
U
e
ID
IV
IND
gramm
with Pro
and set r Off.
o
skip On
The skipped programme positions cannot now
be selected by the P and P buttons or by the
controls on the front of the TV, but can still be
accessed by the number buttons on the remote
control.
f
7
e
To turn Programme skip OFF, repeat the
procedure on the chosen programme.
Manual tuning
Sys.
I
I
I
I
I
I
Channel
22
28
25
32
37
39
Prog.
1
2
3
4
5
6
Station
BBC1
BBC2
ITV
CH4
CH5
LOCAL
See page 22 for Digital Parental Lock functions
SELECT : To select
EXIT
: To exit
13
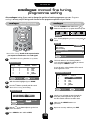
SETTING UP
analogue manual fine tuning,
programme sorting
After analogue tuning, if you want to change the position of certain programmes you can. Program
sorting is an easy way of storing each channel on the programme position of your choice.
analogue manual fine tuning
analogue programme sorting
1
Press the TV MENU button and then the S or R
button to select the Set up option from the top bar.
Set up
2
Press Q to highlight Programme sorting and R to
select.
EXIT
AUTO
Manual fine tuning should not be required unless
you experience interference or a weak signal.
: To exit
Select Manual tuning from the Set up menu.
3
Prog.
1
2
3
4
5
6
Sys.
I
I
I
I
I
I
Channel
22
28
25
32
37
39
EXIT
As you do so the selected station will be moved
to the right of the screen.
Programme sorting
Prog.
1
2
3
4
5
6
: To exit
2
With the station highlighted, press SELECT.
3
Press the R button repeatedly until the words
Manual fine tuning are showing.
Channel
SELECT : To select
Station
BBC1
BBC2
ITV
CH4
CH5
LOCAL
The list of stations is now showing. With the
Q or P button highlight the station you want to
move and press SELECT to select.
Manual tuning
1
Colour
Auto tuning
Manual tuning
Programme sorting
Teletext
Set up
28
25
32
37
39
Station
22
BBC1
BBC2
ITV
CH4
CH5
LOCAL
SELECT : To set
EXIT
: To exit
Manual tuning
Manual fine tuning
1
I
22 + 2 BBC1
SELECT : To store
EXIT
4
Use the Q or P button to move through the
list to your preferred position. As you do so
the other stations will move to make room.
5
Now press the SELECT button to set
your move.
6
Repeat as necessary and then press EXIT.
: To exit
MENU : To return
4
With the P or Q button adjust to get the best
picture and sound.
5
Press SELECT to store and then EXIT.
14
!
USING THE TV
Rememb
er to
the ATV/ press the
DT
to select V button
b
DIGITAL etween
and
ANALOG
UE mode
s.
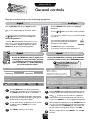
General controls
There are a number of ways to view and change programmes.
digital
selecting and changing programmes
Press the ATV/DTV button again to view analogue
broadcasts.
Press the ATV/DTV button to select digital operation.
Then, use the number buttons on the remote control
or…
Press the
f e
2
The programme position will be displayed on
the screen with an indication of whether the
BBC2
broadcast is in Stereo/Mono.
Stereo
…from the DTV MAIN MENU select the Favourite List
or the Service List to view the programme list. Use the
P and Q buttons to highlight a programme and the
SELECT button to go to that selected programme.
The CALL button can be used to display
or remove this at any time whilst watching the TV.
digital on-screen INFO
digital on-screen GUIDE
Pressing the GUIDE button will bring up the TV GUIDE
which has a picture preview and a REMINDER function.
Pressing the INFO button whilst in digital mode
will bring up on-screen information. Selecting
Next will bring up the following programme’s
details. Selecting the Now option will bring up
the current programme details.
Channel 5
09:30 – 10:00
NOW
09:31
21/03/2002
The Fun House
Subtitles
Unclassified
Beach combing. Today Phyllis and Jo go to the beach to
see what they can find.
If you use the P buttons you will
only see the programmes selected as
Favourites, see page 9.
Next
P+/P-
Programme
001 BBC ONE
002 BBC TWO
003 ITV 1
004 Channel 4
005 Channel 5
006 ITV 2
Up/Down
Press the INFO button once to bring up the basic
details for the programme you are currently viewing.
Press INFO again to bring up More information.
2
09:31
21/03/2002
09:30 – 10:00
Beach combing.
Today Phyllis and Jo go to the
beach to see what they can find.
Select
1
e f
TV GUIDE
[Childrens]
INFO Exit
f P e buttons or one of the numbered buttons.
A * on the screen indicates a skipped programme position.
See page 13.
…if Favourites have been chosen (see page 9) press
the P buttons to enable you to view only your
favourite programmes or…
005
analogue
Now
09:00
09:25
08:34
09:30
09:30
09:25
Next
Kilroy
Teletubbies
Local News & Weather
4Learning: Scientific Eye
The Fun House
What’s on Itv2
Add Reminder
Go To
1
Press the GUIDE button. Details of the programme you are
watching, along with an audio/visual preview will come up.
View the Next scheduled programme and its details
by pressing the R button. Pressing Sor R will take you
back to the Now programme’s details.
2
Using S , R, Q and P view Next and Now programme
details from the list. Current programmes will show in the
preview. Press SELECT to Go To the highlighted programme.
3
To view details of other programmes, use the Q and
P buttons and press SELECT to Go To that
programme.
3
With a programme highlighted, press the YELLOW button to
set a Reminder that will prompt you when the programme
is about to start. Pressing YELLOW again will cancel it. You
can only request one programme at a time. Then EXIT.
4
Press INFO to exit the on-screen guide.
4
When the prompt appears, press SELECT to view it or EXIT
to cancel.
15
!
USING THE TV
Rememb
er to
the ATV/ press the
DT
to select V button
b
DIGITAL etween
and
ANALOG
UE mode
s.
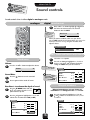
Sound controls
Sound controls when in either digital or analogue mode.
analogue and digital sound controls
3
Now, with the Q button highlight the adjustment
bar on the line below and use the S and R
buttons to alter then EXIT.
The difference
will
only be noticea
ble
on sound with
a
strong bass.
Bass boost
25
When you connect a Woofer, make sure you choose
Woofer EXT. from the second screen of the AV connection
menu (see Feature menu), using the Q button. Then
adjust as above.
AV connection
EXT.
Woofer
Bass, Treble and Balance adjustments
Press the +
j — button to adjust the volume.
Volume
25
2
Press the Q button to highlight Bass, Treble or
Balance. Use the S and R buttons to alter the
settings and EXIT when you have finished.
See pages 28
-30 for th
Surround optio e
ns.
For analogue
sound only, ch
oose
between STER
EO
and MONO.
k button to turn the sound off.
1
Press the
2
Press it again and the sound will return.
Press the TV MENU button and with
the S or R button select the Sound
option from the top bar.
2
Press the Q button to highlight Bass boost and
with the S or R button turn it ON (or OFF).
Stereo/Mono
ON
STEREO
1
Press the Q button to highlight Dual. Use the
S and R buttons to select between Dual 1, Dual
2 or Mono.
+ 3
0
0
60
Dual
16
ON
STEREO
ON
Surround
Bass
Treble
Balance
Ext. Woofer
0
0
0
Sound
25
Stereo/Mono
60
Bilingual transmissions are rare. If they are
transmitted Dual will appear in the Sound menu.
Sound
Surround
Bass
Treble
Balance
Bass boost
+ 3
0
0
Bilingual broadcasts
Bass Boost – to enhance the depth of sound
1
Surround
Bass
Treble
Balance
Ext. Woofer
Sound Mute:
Sound
DUAL 1
1
Select the Sound option.
Volume:
1
Sound menu
USING THE TV
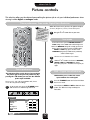
Picture controls
This television offers you the choice of personalising the picture style to suit your individual preferences when
viewing in either digital or analogue mode.
Picture preferences, Scan mode, Digital Noise Reduction
Within this Picture menu you have the options to adjust
The Tint
Contrast, Brightness, Colour, Tint or Sharpness.
ma
be adjust y only
ed o
tape whic n a
h has
been reco
2 Using the S or R button alter to your taste.
rded and
played ba
ck on an
NTSC vid
eo
recorder,
AUTO co when in
lour mod
Scan mode
e.
Scan mode has four options. NATURAL, ACTIVE and
100Hz settings run at 100Hz and reduce background
flicker. The NATURAL setting will normally give the best
pictures, but in programmes such as football matches,
ACTIVE or 100Hz may give a smoother result.
PROGRESS. (Progressive) is 50Hz and is particularly
suited to NTSC images.
1
Select Scan mode from the Picture menu.
2
With the S or R button select between NATURAL,
ACTIVE, 100Hz and PROGRESS. to choose
the picture you prefer – the difference may only be
slight.
Picture preferences
DNR – Digital Noise Reduction
This television offers you the choice of personalising
the picture style to suit your own preferences. By
button you can view the different
pressing the
picture styles available:
DNR enables you to ‘soften’ the screen
representation of a weak signal.
m
Picture mode-1 to 3 for preset options and, Picture
mode-M is for your own settings:
So, to set your own, press the TV MENU button
and select Picture from the top menu bar.
Picture
: To exit
EXIT
50
50
50
0
0
Contrast
Brightness
Colour
Tint
Sharpness
Scan mode
DNR
NATURAL
AUTO
1
17
1
Press the TV MENU button and select DNR from
the Picture menu.
2
Select between AUTO and OFF to obtain the best
picture. The differences may not always be
noticeable.
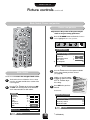
USING THE TV
Picture controls continued
Black Stretch, Picture size/position
Picture size/position
Adjustment to the position of the picture may be
made to suit your viewing preferences.
1
Press the TV MENU button and from the Feature
menu highlight Picture size/position.
Black Stretch increases the strength of dark colours.
Press the S or R buttons to select between ON
and OFF. The effect depends on the broadcast
and is most noticeable on dark colours.
Back
Horizontal position
Horizontal width
Vertical position
Vertical height
: To exit
ON
The options
available to yo
u when
in the Picture
size/
position screen
will
vary dependin
g upon
the widescree
n format
you have chos
en, as
detailed on pa
ge 20,
and when view
ing
connected eq
uipment.
Picture size/position
: To exit
Press EXIT when you have
finished.
!
18
* 36ZT29B only
EXIT
4
EXIT
Black Stretch
With the Q and P buttons,
highlight an option and with
the S or R button adjust
the settings.
NATURAL
AUTO
3
50
50
50
0
0
Press the R button to view the options available
for the picture format you have selected
(see page 20).
In Cinema:
Picture
Contrast
Brightness
Colour
Tint
Sharpness
Scan mode
DNR
2
2
: To exit
1
To select Black Stretch from the Picture menu
press the Q button until the lower section of the
screen appears.
OFF
ON
ON
Black Stretch
EXIT
*
Feature menu
AV connection
Picture size/position
Surround set up
Panel lock
Automatic format
Blue screenON
Geomagnetic
USING THE TV
Picture controls continued
Automatic format, Blue screen, Geomagnetic adjustment, Still picture
Automatic format (Widescreen)
Geomagnetic adjustment (36ZT29B only)
When this TV receives a true Widescreen picture and
Automatic format is ON, it will automatically be
displayed in Widescreen format, irrespective of the
TV’s previous settings.
If your picture is not level it could be due to the
earth’s magnetic field.
Use the S or R button to turn Automatic format
ON or OFF.
2
Press the S or R button to rotate the picture to its
best position.
Feature menu
: To exit
EXIT
Still picture
: To exit
Using the latest technology this television’s 100Hz
double scanning plus digital picture processing
produces a flicker-reduced picture.
In addition, a still – similar to freeze frame on
a VCR – can be held on the screen.
Blue screen
With Blue Screen set to ON, when no signal is being
received, the TV will turn off the sound and switch
the screen to blue. After 20 minutes the TV will
switch to Standby mode.
1
Press the TV MENU button and from the Feature
menu highlight Blue screen.
2
Use the S and R buttons to select ON or OFF.
1
u button will hold an image on the
u again to return to TV mode.
Pressing the
screen. Press
OFF
ON
ON
EXIT
*
Feature menu
AV connection
Picture size/position
Surround set up
Panel lock
Automatic format
Blue screen
Geomagnetic
OFF
ON
ON
*
OFF
ON
ON
EXIT
*
AV connection
Picture size/position
Surround set up
Panel lock
Automatic format
Blue screenON
Geomagnetic
Feature menu
AV connection
Picture size/position
Panel lock
Automatic format
Blue screen
Geomagnetic
2
Choose Geomagnetic from the Feature menu.
1
Press the TV MENU button and from the Feature
menu highlight Automatic format.
1
: To exit
19
* 36ZT29B only
USING THE TV
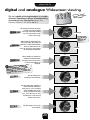
digital and analogue Widescreen viewing
button
Press the
view the
to
ly
d
te
repea
ble.
ila
options ava
{
This set is capable of showing broadcasts in a number
of formats. Depending on the type of broadcast being
transmitted you may select between Super live,
Cinema, Subtitle, 14:9, Wide and 4:3.
SUPER
This setting will enlarge the image
to fit the screen by stretching
the
image horizontally, holding
LIVE
the correct proportions at the
centre of the image.
SUPER LIVE
ith
Experiment w
you
them all until
at
th
le
sty
a
find
suits you…
When watching ‘letterbox format’
films/video tapes, this setting will
eliminate or reduce the black bars
CINEMA
at the top and bottom of the
screen by zooming in and selecting
the image without distortion.
SUBTITLE
CINEMA
When subtitles are included on
a letterbox format broadcast,
this setting will raise the picture
to ensure that all the text is
displayed.
SUBTITLE
n is
TV MENU butto
Whenever the ze setting will
cture si
pressed the pi e menus are ON the
th
le
hi
w
change
menus do not
to ensure the
is
is
Th
.
en
re
able area.
sc
ges of the view
overlap the ed
!
14:9
WIDE
4:3
SUBTITLE
Use this setting when
watching a 14:9 broadcast.
14:9
Use this setting when watching a
widescreen DVD, widescreen
video tape or a 16:9 broadcast
(when available). Due to the
range of widescreen formats
(16:9, 14:9, 20:9 etc.) you may
see black bars on the top and
bottom of the screen.
WIDE
Use this setting to view a true
4:3 broadcast.
4:3
20
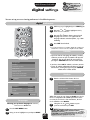
ADDITIONAL FEATURES
!
digital settings
Remember to press the
the ATV/DTV button
to select between
DIGITAL and
ANALOGUE modes.
You can set up your own viewing preferences in the following menus…
digital preferences
3
With Languages highlighted, press SELECT again.
4
Using the P or Q button, highlight Subtitles,
Data Services or Audio.
5
Using the Sor R buttons choose your preferred
language. For Subtitles a + sign beside the
language indicates extra descriptions, e.g. a door
slamming.
6
Press EXIT when finished.
If your preferred language is not available, English will normally be the
default. If there is loss of sound choose English for Audio and EXIT.
Subtitles
If you have chosen a language for subtitles, as above,
each time you turn on your TV, subtitles will appear if
broadcast. You can turn them off, or on again, by
pressing the SUBTITLE button on the remote control.
SETUP MENU
Languages
If you have chosen Off for subtitles, each time you turn
on your TV, subtitles will not appear. However, you can
turn them on, or off again, by pressing the SUBTITLE
button on the remote control.
Modem
Parental Control
Auto Tune
Manual Tune
Check For Download
Modem
Technical Information
Up/Down
1
Enter
From the SETUP MENU choose Modem.
MODEM
LANGUAGES
Dial Mode
Tone
Subtitles
English
Dial Prefix
Enable
Data Services
English
Prefix Number
9
Audio
English
Up/Down
Up/Down
Change
Change
Within this menu you can choose to Enable Dial Prefix
for use in conjunction with a PABX system then set the
necessary Prefix Number. For most homes, the Dial
Prefix should be set to Disable.
Languages
Choosing your preferred language for Subtitles,
Data Services and Audio.
1
Press the DTV MENU button.
2
Using Q or P highlight Setup and press SELECT.
2
21
Using the P, Q, Sand R buttons set your
preferences and then press EXIT.
All items of telephone equipment have a Ringer
Equivalence
Number – REN – which is used to calculate the numbe
r of items
which may be connected to any one telephone line.
This TV has a
nominal REN of 1. A total of 4 is allowed. If 4 is exceed
ed, then
telephones and other equipment may not ring.
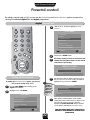
ADDITIONAL FEATURES
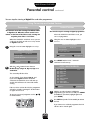
Parental control
By setting a security code, a PIN, you can use the Censorship and Locked Services options to prevent the
viewing of certificated digital films and digital programmes.
digital Parental Lock
3
With the P or Q button highlight Parental
Control.
SETUP MENU
Languages
Modem
Parental Control
Auto Tune
Manual Tune
Check For Download
Technical Information
Up/Down
Enter
4
And press the SELECT button.
5
The factory setting is 1234. You must enter this
number first using the numbers on the remote
control before proceeding.
PARENTAL CONTROL
Please enter PIN
* * * *
Use 0 – 9
Setting up Parental Lock
6
To enable the Parental Control options, you need to
first set up a security code, a PIN.
1
2
Press the DTV MENU button to bring up the
digital MAIN MENU.
Highlight Setup and SELECT.
MAIN MENU
!
Remember
to make a
note of your
number. You
will need it if
you want to
change your
PIN.
You will now be able to choose your own PIN. In
the Parental Control menu use the Q button to
highlight Change PIN. Press SELECT.
CHANGE PIN
Enter New PIN
– – – –
Confirm New PIN
– – – –
Use 0 – 9
Timer Programming
7
Favourite List
Service List
Common Interface
Setup
Up/Down
Now with the number buttons on the remote
control, put in four numbers that you choose to be
your PIN. You need to enter the same four
numbers to Confirm New PIN and you will then
see the options available for Parental Control.
YOU WILL NEED YOUR PIN IF YOU WISH TO
UNLOCK A PROGRAMME OR TO RUN AUTO
TUNE AGAIN.
Enter
22
ADDITIONAL FEATURES
Parental control continued
You can stop the viewing of digital films and other programmes.
Using Censorship and Locked Services
Censorship
Locked Services
You can now censor the viewing of certificated films
in digital mode. When the remote control or the
buttons on the front of the TV are used, viewing can
only take place if the PIN is known.
You can also stop the viewing of digital programmes
Also in the PARENTAL CONTROL screen, you
can Lock programmes.
Within the PARENTAL CONTROL screen you can
set the age at which you wish Censorship to start
on digital broadcasts.
1
Using the Q or P button highlight Locked
Services.
PARENTAL CONTROL
1
Using the Q or P button highlight Censorship.
Censorship
No Block
Change PIN
PARENTAL CONTROL
Censorship
Locked Services
No Block
Up/Down
Change PIN
Change/Enter
Locked Services
Up/Down
2
2
Change/Enter
Press SELECT and the LOCK / UNLOCK
SERVICES list will come up.
LOCK / UNLOCK SERVICES
With the S and R buttons choose between
No Block, Age 5, Age 10, Age 15, Age 18 or
Total Block.
Programme
001 BBC ONE
002 BBC TWO
003 ITV 1
004 Channel 4
005 Channel 5
006 ITV 2
007 BBC CHOICE
009 Teletext
010 BBC FOUR
011 BBC NEWS 24
The censorship will take effect.
So, for example, if you choose Age 15, and
try to view a digital Certificate 18 film the
CENSORSHIP ENABLED screen will come up
and the PIN will have to be entered for further
viewing.
Up/Down
If the user does not have the PIN, the programme
will not be viewable. Switching the TV off and then
on again will not reset it.
To go to an uncensored programme use the
or number buttons.
Lock
Lock/Unlock
3
With the Q and P buttons, highlight the
programme(s) you wish to Lock and press SELECT
to Lock them. (To unlock, highlight again and
press SELECT.)
4
Press EXIT and put the TV into standby to activate
the lock.
fPe
If you want to view a locked programme the PIN
will have to be entered again.
23
ADDITIONAL FEATURES
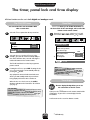
The timer, panel lock and time display
All these functions are for use in both digital and analogue mode.
The ON/OFF timer
Panel lock
You can tell the TV to turn itself ON or OFF
after a certain time.
1
Panel lock allows you to disable the buttons on
the front of the TV. You can though, still use all of the
buttons on the remote control.
Select the Timer option from the top menu bar.
1
From the Feature menu select Panel lock and
then choose ON or OFF with the S or R buttons.
Timer
Select the On timer (or the Off timer). If, for
example, you want the TV to turn ON (or OFF) in
one and a half hours time, enter 01:30 using the
numbered buttons on the remote control.
*
EXIT
ON
ON
ON
2
: To set
: To exit
AV connection
Picture size/position
Surround set up
Panel lock
Automatic format
Blue screenON
Geomagnetic
0-9
EXIT
Feature menu
00:30
00:00
Off timer
On timer
: To exit
The TV will switch back on to the last programme
position viewed.
3
When Panel lock is ON
, you will be reminded
on the screen when you
press any of the front
panel buttons. Once the
set has been switched
off it can ONLY be bro
ught out of standby
using the remote contro
l.
If setting the Off timer press EXIT. If setting the On
timer you must put the set into Standby mode by
pressing the button.
i
Any equipment connected with Scart leads must
also be put into Standby mode to prevent them
being displayed when the timer switches on.
Time display
When the On timer has been set, the GREEN
On timer indicator on the front of the TV will be lit
(see page 7).
The time display facility allows you to see
the current time on the TV screen.
If the On timer has been set, you do
not have to wait to
watch the television. You can bring the
set back to life by
pressing the button. However, the
GREEN timer light
will stay on until the set time period has
passed.
t
If you press the
button on the remote control whilst
watching the TV you will see a time display from the
broadcaster.
i
It will remain on the screen for about 5 seconds.
24
* 36ZT29B only
ADDITIONAL FEATURES
37
Please see page
e
th
of
w
vie
for a clear
n
tio
ec
nn
co
ck
ba
ns…
recommendatio
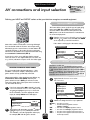
AV connections and input selection
Defining your INPUT and OUTPUT sockets so that your television recognises connected equipment.
Selecting the INPUT signal
This feature allows you to specify the type of signal going
into Scarts 2 (EXT 2) or 3 (EXT 3) on the back of the
television and the sockets on the front (which are also
EXT 3). Please refer to the manufacturers’ instructions for
the connected equipment.
From the Feature menu select AV connection and
with the S or R button select either AV or S-VIDEO
as the required input for EXT2 and EXT3.
1
If the colour is missing try the alternative setting.
Most video recorders and decoders send a signal through
the Scart lead to switch the TV to the correct Input socket.
Alternatively press the external source selection button
repeatedly until you see the picture from your equipment.
You must use this button to view equipment connected using
the COMPONENT VIDEO INPUT (EXT 4).
B
Digital Audio on the screen indicates that the external
source has been set as a digital audio input, see below. An
S e.g. EXT2S, indicates the input is set for an S-Video signal.
Back
Digital input-1
Digital input-2
EXT2 input
EXT3 input
EXT2 output
Woofer
EXT 4
EXT 3
AV
S-VIDEO
EXT 1
EXT.
AV connection
Selecting the OUTPUT signal for Scart 2
Input Selection
This feature enables you to select the source to output
from Scart 2. e.g. If you connect a stereo decoder to Scart
1 and a stereo video recorder to Scart 2, and select EXT 1
as the EXT2 output (i.e. you will output the signal received
through Scart 1 directly out to Scart 2), you will be able to
record the stereo decoder transmission in stereo.
SELECTING THE DIGITAL AUDIO SIGNAL
This set is provided with 2 digital audio inputs – DA-1
and DA-2 – so that, for example, a DVD player and a
games console can stay permanently connected.
Having connected the video signal from your DVD to, say,
COMPONENT VIDEO INPUT (EXT4) and from your
games console to Scart 3 (EXT3) you will now need to
connect the audio cables to the inputs on the back of the
set, then match the two up.
Again, from the Feature menu select
AV connection.
EXT 4
EXT 3
AV
S-VIDEO
EXT 1
OFF
AV connection
2
Back
Digital input-1
EXT 4
Digital input-2
EXT 3
EXT2 input
AV
EXT3 input
S-VIDEO
output
1
Q button
ThenEXT2
for the
2nd connection, press theEXT
to
Woofer
highlight
Digital input-2 (coaxial) thenEXT.
with the
2
If you have connected to DA-1 (optical), select AV
connection from the Feature menu and press the
Q button to highlight Digital input-1 then with
the S or R buttons, select the appropriate video
input, for example EXT 4 for the DVD player.
Back
Digital input-1
Digital input-2
EXT2 input
EXT3 input
EXT2 output
VCR sync Timer
AV connection
1
1
S or R buttons, select the appropriate video input,
for example, EXT 3 for the games console.
With S or R change the EXT2 output option to:
Monitor = The picture on screen.
TV
= The last television programme selected –
DTV
ATV
EXT 1
EXT 3
25
=
=
=
=
digital or analogue.
The most recent digital programme selected.
The most recent analogue programme selected.
The picture from equipment connected to Scart 1.
The picture from equipment connected to Scart 3 or
the front input sockets.
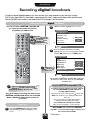
RECORDING
Recording digital broadcasts
In order to record digital broadcasts you must connect your video recorder to your television using a
Full (21-pin) Scart lead. This Scart lead is connected to the Scart 2 socket on the back of the television and
into the IN/OUT Scart socket on the back of the VCR. See page 7 for Connections.
setting up to record digital broadcasts
If you do not have a NEXTVIEW compatible VCR
you cannot use this feature and you must
programme your VCR as usual.
With the Q button, highlight AV connection.
EXIT
3
*
OFF
ON
ON
Remember to press the
the ATV/DTV button
to select between
DIGITAL and
ANALOGUE modes.
Feature menu
AV connection
Picture size/position
Surround set up
Panel lock
Automatic format
Blue screenON
Geomagnetic
!
2
: To exit
Press the R button and with the Q button
highlight VCR sync Timer and press the R button
to turn it ON and then press the EXIT button.
is
EXT2 output
t to
se
ly
al
ic
at
m
auto
rding.
DTV when reco
!
Back
Digital input-1
Digital input-2
EXT2 input
EXT3 input
EXT2 output
VCR sync Timer
EXT 4
EXT 3
AV
AV
DTV
ON
AV connection
EXIT
: To exit
This will allow a NEXTVIEW compatible VCR to respond to
the television’s Timer events. Now, set your NEXTVIEW
compatible video...
!
on your NEXTVIEW compatible VCR...
dcasts, your
…when recording widescreen broa
it will
k
bac
play
on
that
VCR should be set so
e’ setting.
‘wid
the
to
TV
the
ch
swit
y
icall
automat
You will not need to programme your video as this TV
can control NEXTVIEW compatible VCRs when
recording digital broadcasts.
Some of the settings on this page are made on your
NEXTVIEW compatible VCR. Please refer to the VCR
Owner’s Manual for details of how to do this on
your model.
First, on your TV remote control, press the
button until
EXT2 shows on TV the screen, enabling the VCR menus
to be seen.
B
Now, set your video to recognise that the signal is
coming from the TV (nexTViewLink setting).
See your VCR owner’s handbook for details.
Timer sync
1
Now, set up your recordings… see the next page…
Many TOSHIBA video recorders are NEXTVIEW
compatible… your dealer will be happy to advise you of
the current models available.
Press the TV MENU button on the TV remote
control and the R button to highlight Feature
menu.
26
* 36ZT29B only
RECORDING
Recording continued
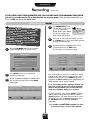
IF YOU HAVE A NEXTVIEW COMPATIBLE VCR, YOU DO NOT HAVE TO PROGRAMME YOUR VIDEO
just set it to record from the TV as described on the previous page. Once you have turned VCR sync
Timer to ON you can set the digital timer.
setting up a timed digital recording
Please note, if you are vie
wing a DIGITAL
programme at the same
time as recording it,
you must NOT change to
an
programme or access an other DIGITAL
y on-screen menus
– the new programme wi
ll be recorded and so
will the menus. You can,
however, view an
ANALOGUE programme
wh
recording is taking place ilst the digital
bu
ANALOGUE to DIGITAL the t if you change from
digital programme
display will be recorded
.
1
Press the DTV MENU button on the TV remote
control and highlight Timer Programming.
4
The ENTER DETAILS screen
will now come up. Use the S ,
R , P, Q and number
buttons on the remote control
to enter your settings. The
timer uses the 24 hour clock.
5
Once you are happy with your settings, you must
press SELECT to Store Entry. This will take you back
to choose another time slot.
6
Repeat for any more programmes you wish to
record and then press the EXIT button.
Use the RED
button if you
wish
to cancel/rem
ove
any entries.
You can enter up to ten timed recordings.
MAIN MENU
ENTER DETAILS
Timer Programming
Programme
Favourite List
Service List
Common Interface
12:24
002
21/03/2002
BBC TWO
Start date
21/03/2002
Start time
13:00
Repeat
Stop time
14:25
Subtitles
Once
Yes
Setup
Up/Down
Enter
Up/Down
2
Press SELECT and the screen will show the
available recording slots.
3
Use the Q button to highlight an available slot or
one you want to change and press the SELECT
button again.
TIMER PROGRAMMING
Programme
––– –––––
––– –––––
––– –––––
––– –––––
––– –––––
––– –––––
Up/Down
Date
––/––
––/––
––/––
––/––
––/––
––/––
–––
–––
–––
–––
–––
–––
12:24
Start
––:––
––:––
––:––
––:––
––:––
––:––
Stop
––:––
––:––
––:––
––:––
––:––
––:––
Edit entry
Store Entry
One minute before the Start time is reached, the orange
indicator on the front of the TV will flash and you will be
prompted on the TV screen. Press SELECT to go to that
programme or EXIT to cancel the timer programming. The
orange indicator stays on during recording.
If you are watching another digital programme and
ignore the prompt, the television will automatically
switch to the programme to be recorded. This may
cause the programme display to be recorded.
21/03/2002
Repeat
––––
––––
––––
––––
––––
––––
Adjust
Sub
––
––
––
––
––
––
You will not be able to watch another digital programme
whilst recording is taking place. If you do select another
digital programme, you will be warned on the TV screen.
You can however, view an analogue programme. Press
the ATV/DTV button then choose an analogue
programme.
Remove
If your VCR is not NEXTVIEW compatible you must
program your video. See your video manual.
27
SPECIAL SOUND FEATURES
Dolby Digital
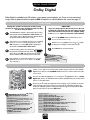
Dolby Digital is available from DVD players, some games console players, etc. These must be connected
using a Scart or phono lead for the picture AND an optical or a coaxial cable for the sound see page 37.
Dolby Digital
Arrange the speakers around your normal viewing
positions (as shown on page 6) and then make sure that
the TV is set up as follows:
1
The DVD/Games console is connected to the TV using
phono leads to the COMPONENT VIDEO INPUT or a
Scart lead to Scart 3, and an optical or coaxial cable to
the optical/coaxial sockets, DA-1 or DA-2.
2
The Digital input-1 (optical)/ Digital input-2 (coaxial)
in the AV connection menu (see page 25) is set to
EXT 3 if Scart 3 is used or EXT 4 if the equipment is
connected to COMPONENT VIDEO INPUT.
3
If external front speakers are connected
the external switch (found on the back
of the TV) is set to EXT. You will not hear the centre
channel without external front speakers connected.
4
DELAY TIME…
If you sit a long way from the TV and close to the rear
speakers the sound from the rear will reach you before
the sound from the front. You can use a higher setting
in the Delay time option to restore the correct balance.
Rear speakers are connected and the Rear speaker
option in the Surround set up menu is set to YES.
(See next page.)
1
Press the TV MENU button and from the Feature
menu select Surround set up.
2
With Delay time highlighted, use the S or R button
to change the setting to a value that suits you.
3
Press EXIT when you have finished.
!
If rear speake
rs are NOT
selected in th
e Su
menu, you will rround set up
no
from your rear t hear any sound
speakers.
Adjustments
!
1
Set the volume and balance of the front speakers to your preference. Play a Dolby
Digital source and press the TV MENU button on the TV’s remote control. Select the
Sound menu.
2
Press the Q button to highlight Surround and press R. Highlight the title, e.g. Dolby
Digital 3/2, which is an indication of the channels available from your current sound
source, see the table below.
3
Then press the R button and adjust the levels using the P or Q button to select the
centre and two rear speakers in turn. Press either the S or R button to adjust. The
number of adjustable speakers will depend upon the signal received from the DVD
player. To cancel the test press the EXIT button.
in the
Alternatively, use the Test mode
29.
e
pag
see
u,
men
up
set
d
Surroun
y Pro Logic,
If the DVD playing is recorded in Dolb
, centre
right
front
left,
t
i.e. 4 channel stereo (fron
nels.
chan
4
the
ct
dete
will
TV
the
and rear)
test is run
In this instance, when the Surround
nels
chan
four
the
gh
throu
the TV will cycle
in use.
the DVD
In order to get full Dolby Digital,
player must be connected using the
coaxial or optical links.
Dolby Digital
1/0 = Centre speaker only.
2/0 = Front Left and Front Right only.
2/1 = Front Left and Front Right +
Rear Left and Rear Right combined.
2/2 = Front Left and Front Right +
Independent Rear Left and Independent Rear Right.
3/0 = Front Left and Front Right and Centre.
No Rear Speakers.
3/1 = Front Left and Front Right and Centre +
Rear Left and Rear Right combined.
3/2 = Front Left and Front Right and Centre +
Independent Rear Left and Independent Rear Right.
28
SPECIAL SOUND FEATURES
Dolby Pro Logic
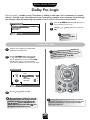
Dolby Pro Logic – available on many TV broadcasts in addition to video tapes. Uses a combination of 4 speaker
channels – front-left, centre, front-right and two rear. If external front speakers are not connected, the left and right
front channels will be delivered through the speakers in the TV and you will not hear a centre channel.
Surround set up
EXIT
YES
Back
Rear speaker
Surround test
Delay time
1
Press the TV MENU button and from the Feature
menu select Surround set up.
2
Using the S or R buttons turn Rear speaker to
YES.
: To exit
!
YES in the Rear
n must
speaker optio Test Mode
e
th
r
be chosen fo
n…
tio
nc
fu
to
below
Surround Test Mode
1
Set the volume and balance of the front
speakers to your preference.
2
Press the TV MENU button to bring up the
Sound menu. With Surround highlighted,
press R. With Dolby Pro Logic selected, EXIT
and go to the Feature menu to select the
Surround test from the Surround set up menu.
speakers try
ot connect rear
nn
ca
u
yo
If
but you
!
ereo in Step 2,
St
3
by
ol
D
g
in
nnected
select
ont speakers co
fr
al
rn
te
ex
ve
must ha
EXT.
al switch set to
and the extern
61
51
61
EXIT
Left
Centre
Right
Rear right
Rear left
Surround test
: To exit
Use the S and R buttons to adjust.
3
The test will play a ‘white noise’ through
each speaker in turn. The display will show
you which speaker is in play, adjustments
may be made whilst it is highlighted. The
Centre channel will only be adjustable once
the external switch has been set to EXT.
!
Inserting the headphone jack will mute the sound from
all speakers and deliver a normal stereo left and right signal.
There are no Dolby Digital or Surround effects available
when using headphones.
29
SPECIAL SOUND FEATURES
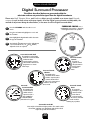
Digital Surround Processor
The effects described below are generated within the
television and are not part of the signal from the digital broadcaster.
Please note: Hall, Theatre, Disco, and Stadium effects are only available on a stereo signal. Pseudo
surround works on both mono and stereo signals. All of the Digital surround modes are adjustable, the
method of adjustment being described below, is the same for all the Digital Surround effects.
1
Press the TV MENU and select the Sound
menu.
2
Press the Q button to highlight Surround and
the R button.
3
Now highlight the digital mode which best suits
the type of broadcast.
4
And with the R button to access the adjustments
screen and with the P, Q, S and R buttons,
adjust the levels as required.
SURROUND SOUND uses a
combination of 4 speakers – front-left,
front-right and two rear speakers.
…if you c
h
adjust on oose to
e Digital
surround
you will n mode,
o
the others t effect
.
Surround Sound: Hall
To reproduce in the living
room the surround effects
similar to those
experienced in a large
concert hall. Ideal for TV
programmes or music
video tapes.
Surround Sound:
Theatre
To reproduce the
surround effects similar
to those experienced in
a movie theatre filled
with a rich warm sound.
Ideal for movies with
stereo sound.
Surround
Sound: Stadium
To reproduce the
surround effects
similar to those
experienced in a
large football or
baseball stadium
packed for a live game.
Surround Sound: Off
Uses only the front left and right speakers. This mode can be
selected for watching news broadcasts and the like which
require no special sound features.
30
TV
Surround Sound:
Pseudo
To create a
synthetic sound
effect for movies
and TV shows
recorded in
mono.
Surround Sound:
Disco
To create the
atmosphere of a
room so full of
music that it
seems to engulf
the listener. An ideal
sound mode for
listening to pop videos.
!
Rememb
er to
press the
th
ATV/DTV e
b
to select utton
DIGITAL
mode.
TELETEXT
digital text
The digital text service is a new way of viewing and using the new information services. It has a modern,
computer-style format, incorporating pictures, photographs and interactive views.
digital text
Text is no
available t
fo
digital sta r all
tions and
is depend
a
the broad nt on
caster.
To make
sure that a
ll
text appe the
ars
within the
viewing a
re
choose AU a
T
mode from O
Teletext op the
ti
on page 3 ons
2.
t’s
Weather, Wha
,
rt
o
Sp
s,
w
e
...N
ent, Travel,
On, Entertainm
Finance...
ts YOU in control…
…Digital text pu
over’,
for pages to ‘flip
no more waiting
ges,
pa
y
ke
rough the
YOU can move th
speed.
n
ow
ds, at YOUR
backwards, forwar
look at,
to
se
oo
ge you ch
pa
er
ev
ch
hi
w
d,
An
enu to
helpful pop-up m
you can access a
ons,
cti
se
e
dex of all th
take you to an in
on the
n
tto
bu
g the BLUE
sin
es
pr
by
y
pl
sim
g greater
addition to offerin
In
l.
ro
nt
co
e
ot
m
re
be faster
s, digital text will
ge
pa
er
ov
l
ro
nt
co
d
er page access an
to use, with quick
navigation.
Digital text is a huge leap forward in the world of
text, offering high quality on-screen images with
multi-colour, photographic still images. With its
advanced text and graphics and user-friendly
screen usage, this free, text service is available to
anyone with a digital television.
Unlike analogue teletext, you don’t have to remember
page numbers. You can simply use the coloured buttons
on the remote control and the P, Q, S and R buttons
and use the pull-down menus and move around –
navigate – quickly and easily. And, because it’s a digital
service, as with the TV pictures, there will be no problems
with ‘ghosting’, or interrupted reception that misses and
cuts out words.
Digital text is fast, simple to use and full of
information for you and help is always at hand at
the touch of a button on the remote control.
There are even pop-up menus on the screen to help you
find your way around!
At the touch of a button you can access
News, Sport, Weather, What’s On,
Entertainment, Travel, Finance...
and more, depending on which programme you are on.
moving around digital text
If you press the DTV
MENU button whilst
watching text, you will
cancel the text service.
1
To access digital text, press the TEXT button.
You may need to wait a few seconds while the text service loads. If you
press the TEXT button whilst viewing digital text, you will cancel it.
2
Press the BLUE button to access the index.
3
With the Q and P buttons, highlight your chosen subject and then
press SELECT.
4
Use the coloured buttons as instructed.
5
Press either the TEXT or the EXIT button to return to normal TV.
31
!
Rememb
er to
press the
th
ATV/DTV e
b
select AN utton to
ALOGUE
mode.
TELETEXT
analogue teletext – setting up
This TV has a multi-page teletext memory, which takes a few moments to load and it offers two ways of
viewing text – AUTO and LIST which are explained on the next page.
Selecting the character set and viewing mode and general information
About teletext
The
button:
6/7
67
/
Pressing the
button once will bring up the teletext
screen. Press again to superimpose the teletext over a
normal broadcast picture. Press again to return to normal
TV mode. You need to return to normal viewing if you
wish to change programmes.
67
/
When you first press the
button to access the text
service, the first page you see will be the initial page.
In AUTO mode this displays the main subjects available and
their relevant page numbers.
In LIST mode you will see whichever page number is
currently stored on the RED button.
To access any teletext page, enter the 3 digit page number,
using the numbered buttons on the remote control,
e.g. 430, or to advance to the next page press the
P (or P ) button, to go back to the previous page press
the P (or Q ) button.
f
Selecting characters and modes
Sub-pages
Once in this chosen page, if there are sub-pages they will
automatically load into memory without changing the
one you are reading. Arrows will appear along side the
page number, indicating sub-pages which have loaded to
the left or right of the one on the screen. If there are many
sub-pages it will take a long time for them all to load and
this will depend on the speed with which the broadcaster
transmits them.
Before using teletext you can choose the correct alphabet
(Character) and whether to view in LIST or AUTO mode,
(explained on the next page).
1
Press the TV MENU button and from the Set up
menu, use the P or Q button to highlight Teletext
and then the R button to select.
2
With Character highlighted, use the R button to
select CHARACTER-1.
To access the sub-pages in memory press the
( ) button, then use the Sand R buttons to
view them.
XB
Whilst in sub-pages mode an indicator will show in the
bottom left of the screen. After a short time of inactivity the
indicator will disappear. To access the sub-pages again press
the ( ) button.
Teletext
CHARACTER-1
AUTO
XB
Back
Character
Mode
e
3
To select the Mode, with the Q button highlight
Mode.
4
With the S or R button choose AUTO or LIST.
5
Press EXIT to finish.
These sub-pages will remain available to view until you
choose another page or, in normal TV mode, you change
programme.
See pag
details oe 34 for
remote c n the
teletext bontrol’s
uttons…
32
TELETEXT
Teletext continued
– auto and list modes
Moving around the teletext pages in AUTO and LIST modes and selecting favourite pages.
Moving around
Auto
Press the
6/7 button to access teletext.
In AUTO mode, if FASTEXT, is available, you will see
four coloured titles at the base of the screen.
To access one of the four given subjects, press the
relevant coloured button on the remote control,
corresponding to the title.
For further information on your particular text system(s),
see the broadcast teletext index page or, consult your
local Toshiba dealer.
List
In LIST mode, the four choices at the bottom of the
screen are now numbers – 100, 200, 300 and 400,
which have been programmed into the TV’s memory.
To view these pages use the coloured prompt buttons
e.g. press the GREEN button to view page 200.
If you want to change these stored pages press the
coloured button for the colour you want to change,
e.g. GREEN and enter the 3 digit number.
This number will change in the top left of the screen and
in the coloured highlight.
Now press SELECT to store your choice. The bars at the
bottom of the screen will flash white. Whenever you
press SELECT all four page numbers showing along
the bottom will be stored and the previous ones
will be lost.
If you do not press SELECT to confirm your change, you
will not have stored your choice and it will be forgotten
when you leave the teletext screen.
There are two Modes: AUTO will display FASTEXT, if
available. LIST will display your four favourite pages. In
either mode, as an alternative to the coloured buttons
you can access a page by entering a 3-digit number,
using the buttons on the remote control, or to advance to
the next page press the P ( or P ) button, to go back
to the previous page press the P ( or Q ) button.
You may view other pages by simply entering the 3 digit
page number – but DO NOT press SELECT or you will
lose the favourite already stored.
f
e
Teletext continued over the page…
33
TELETEXT
Remem
cancel te ber to
x
changing t before
– press th programmes
e
/
button tw
ice.
analogue teletext – the controls
67
Now you have set up teletext, below is a guide to the remote control teletext buttons and their functions.
Using the buttons on the remote control
2
1
1
T
To display an index/initial page:
In AUTO-mode
Press the
button to access index pages. The one displayed is
dependant on the broadcaster.
T
In LIST-mode
Press the
button to return to your page currently stored on the
RED button.
T
2
6/7
To display a page of teletext:
67
/
button to display teletext. Press again to
Press the
superimpose the teletext over a normal broadcast picture. Press
again to return to normal TV mode. You cannot change
programmes until you return to normal TV.
3
r
To reveal concealed text:
Some pages cover topics such as quizzes and jokes. To discover
the solutions press the
button.
r
4
q
To hold a wanted page:
This feature is included as it is part of the broadcast teletext system
but you will not need it as this TV allows you to control the display
of sub-pages.
5
s
To enlarge the teletext display size:
Press the
button once to enlarge the top half of the page, press
again to enlarge the bottom half of the page. Press again to revert
to the normal size.
s
6
8/9
To select a page whilst viewing a
normal picture:
When in teletext mode, if a page selection is made and then the
/
button is pressed, a normal picture will be displayed. The
TV will indicate when the page is present by displaying the page
/
number at the top of the screen. Press the
button to view
the page.
You must
To display news flashes:
cancel the
To view news flashes as they are broadcast, select news flash
the news flash page for the particular teletext
page before
service (see the index page of teletext service).
changing
Press the / button. The news flashes will be programmes.
displayed as and when they are broadcast. Press
the / button to cancel the display.
89
67
3
4
5
6
89
89
34
TECHNICAL
The technical bits…
digital Manual Tuning, Downloads, Technical Information and Common Interface
3
SETUP MENU
Languages
You can watch
E
an ANALOGU
hilst
w
e
m
m
ra
og
pr
is
d
a downloa
taking place…
Modem
Parental Control
Auto Tune
Manual Tune
Technical Information
Check For Download
Technical Information
Up/Down
This function can be used to check the version of
hardware and software currently installed.
Enter
1
Press the DTV MENU button.
Manual Tune
2
Using the Q or P button highlight Setup and
press SELECT.
This option gives details of channel numbers,
frequencies and other technical information.
3
With Technical Information highlighted, press
SELECT again for Hardware and Software
Version information.
1
Press the DTV MENU button. With the Q or P
button highlight Setup Menu and press SELECT.
2
With the Q or P button highlight Manual Tune
and press SELECT.
3
With Check For Download highlighted, press
SELECT again. If a download is available you
will be prompted NOW or LATER. If you
choose NOW, a progress bar will show whilst
downloading. If you choose LATER, set a time
and leave the TV in Standby.
Common Interface
The Common Interface slot enables the insertion of a
CAM (Conditional Access Module) to allow you to
view additional broadcasts.
If you know the channel numbers of the digital
services in your area, you can select them in turn
using the S and R buttons and add services this way,
as an alternative to Add New Services from the
digital AUTO TUNE option.
COMMON INTERFACE
No CI Module
Downloads
Enter
This option will cause the TV to search for a software
update on the digital broadcast signals and keep up
to date with any new functions and features that may
be available to you. If, whilst you are watching DTV
and a download is available, a screen prompt will
appear. You can choose to download YES or NO.
If you choose NO you will be reminded of the
outstanding download each time you switch on the
TV. If you choose to download, and you are
recording, all the subsequent screen displays will
be recorded too.
1
If you want to check if a download is available,
press the DTV MENU button.
2
Using the Q or P button highlight Setup and
press SELECT.
35
1
Take off the cover of your
DVB Common Interface Slot.
This is on the back of your TV.
2
Insert your CAM with its card
into this slot.
3
Then follow the
on-screen displays.
!
ng
When pluggi
to
in
s
ie
accessor
the
ANY socket on tive
ra
pe
TV, it is im
OFF.
to turn the TV
CONNECTING EQUIPMENT
Connections and controls
!
When connec
equipment alw ting
ay
to the relevant s refer
owner’s
manual for fu
ll details.
You can connect a wide variety of external equipment via the sockets located behind
the flap on the TV. Press the centre of the flap to open it.
Whilst all the necessary adjustments and controls for your new TV are made using the remote
control, the buttons on the TV may be used for some functions…
28ZT29B – front connections and controls
To bring up the TV menu press
the MENU button. Press the
MENU button twice to EXIT.
To control the TV’s volume and to
move left and right through the
—
menus press the +
j
buttons.
DIGITAL
CAMERA
HEADPHONES
To change programmes and to
move through the menus press
the
f F e buttons.
Press MENU and — together to
swap to ATV/DTV mode.
COMPUTER GAMES
function must be
uipment
to both the fr
ont/side and
rear
terminals at th
e same time.
J
CAMCORDER
! The panel lock
off.
! DO NO
T connect eq
32ZT29B and 36ZT29B – side connections and controls
To bring up the TV menu press
the MENU button. Press the
MENU button twice to EXIT.
DIGITAL CAMERA
To control the TV’s volume and
to move left and right through
—
the menus press the +
j
buttons.
COMPUTER
GAMES
DOLBY
D I G I T A L
100Hz Dynamic Frame Scan
Progressive Scan
To change programmes and to
move through the menus press
the
CAMCORDER
f F e buttons.
Press MENU and — together
to swap to ATV/DTV mode.
HEADPHONES
If you connect mono sound equipment, connect the audio output of the equipment to the L/Mono socket on the TV.
To select the Inputs, press the
B button until the display shows EXT3 or EXT3S as described on page 25.
Before connecting any external equipment, turn off all main power switches.
Please note: Inserting the headphone jack will mute the sound from all speakers and deliver a normal stereo left and right signal.
36
CONNECTING EQUIPMENT
Back connections
We recommend, as illustrated here, Scart 1 for a Satellite Receiver and Scart 3 for additional equipment, such
as a DVD. But you MUST connect your video recorder to Scart 2 to enable timer recording.
nt video
using compone
Note: If you are
e)
525P (Progressiv
and you have a
in functions
rta
ce
,
T4
EX
input (NTSC) on
:9 and
. Picture Still, 14
will not work eg
ats.
4:3 viewing form
menu
n in the Set Up
The Colour optio
the
ode and DNR in
and the Scan M
t.
en
ill not be pres
Picture menu w
…and back connections
SERIAL PORT
Socket for
engineer’s use
DVB COMMON
INTERFACE
The DVB Common
Interface is for a
Conditional Access
Module (CAM).
Contact a service
provider.
COMPONENT
VIDEO INPUT (EXT 4)
SCART 3
(EXT 3)
SCART 1
(EXT 1)
MODEM PORT
The modem needs
connecting for
on-air services
e.g. shopping,
interactive
programmes etc.
SCART 2
(EXT 2)
ACTIVE WOOFER
Alternative Connections
VIDEO RECORDER
SATELLITE RECEIVER
DVD/GAMES CONSOLE
Before connecting any external equipment, turn off all main power switches.
On the back of the TV are 3 Scart sockets and a selection of other sockets, all of which will enable you to connect a variety of
external equipment.
If connecting S-VIDEO equipment, set the INPUT for EXT2 or EXT3 accordingly. See page 25.
In addition there is a fixed external audio output which enables the connection to a suitable Hi-Fi unit and a phono socket to
enable an active Woofer to be connected. When you connect a Woofer, make sure you choose Woofer EXT. from the
AV connection option in the Feature menu.
If your TV automatically switches over to monitor the external equipment you can return to normal TV simply by pressing the
desired programme position button. To recall the external equipment, press the
button repeatedly to select between EXT1, EXT2, EXT3 or EXT4.
B
37
Remember…
FOR YOUR GUIDANCE
?
For television
operation
queries, plea
se
ring the
helpline…
Questions and Answers…
If you experience what seem like problems operating your TV, we
recommend you read through the simple checks below and on pages 39 and 40 before calling the helpline.
Why is there no sound or picture?
A
Check that the mains switch is on and check all the
connections. Press the Standby button on the
remote control to make sure that the TV is not in Standby
mode. Press a number button on the remote control to
cancel any Timer off setting.
Q
A
i
Q
There IS a picture, but why is there little or no colour?
A
When using an external source, for instance, a poor
quality video tape, if there is little or no colour,
improvements may sometimes be achieved. The
television is factory set to AUTO in the Set up menu to
automatically display the best colour system.
To check that you have the best colour…
Why am I not receiving a clear digital picture?
From the Set up menu select Colour.
1
Check the signal level.
Press the DTV MENU button then with the Q or P
button highlight Setup and press SELECT. Then highlight
Manual Tune and press SELECT.
Set up
Q
Why does the picture and sound breakup ‘mosaic’
or the image freeze?
A
Check the signal level in Manual Tune.
Check the aerial. You may have to contact your
aerial technician to re-position the aerial.
Check the connections and cables. The cables may be
defective and require replacement.
Q
A
Q
A
Q
A
Q
A
Why can’t I see the DTV MAIN MENU
You are in analogue mode. Press the ATV/DTV
button.
Why can’t the digital text service be seen?
The digital programme you are on is not broadcasting
digital text. Try another digital programme.
Why does the LOCKED CHANNEL display come up?
You have chosen to Lock the programme. See the
Parental control pages.
Why is the video picture good but there is no sound?
Check the Scart lead connection.
EXIT
Colour
Auto tuning
Manual tuning
Programme sorting
Teletext
As long as the signal level bar is green the signal is good.
If the bar is yellow/red the signal is poor and you should
contact your aerial technician.
AUTO
Q
: To exit
With the S or R button, choose between AUTO,
PAL, SECAM, NTSC 4. 43 or 3. 58.
2
Q
Why has the screen turned blue?
A
Blue screen in the Feature menu is ON. When
no signal is being received, the TV will turn off the
sound and switch the TV screen to blue. After 20 minutes
the TV will switch to Standby mode.
Q
A
Q
Why is the video recorder/DVD picture in black and white?
Check that the correct input has been chosen. See
AV connections.
Why can’t I see the video tape/DVD I am playing?
A
Make sure you have connected the VCR/DVD player
using a Scart lead and see page 37 for
connections.
Q
38 A
Can anything else cause a poor picture?
Yes. You must ensure that the aerial lead is
connected directly to the TV and not the VCR.
FOR YOUR GUIDANCE
Questions and
Answers…
…For quic
reference to k
topics,
see the INDEX
at the
back of this
manual.
continued
Q
I have a picture, but why have I no sound?
Press the volume button +
button.
j – or the sound mute
Ak
Check the Languages option in the SET UP MENU.
Choose English Audio.
Q
Why am I not receiving a clear analogue picture?
A
You may be experiencing interference or a weak
signal. First, try a different station and check your
aerial connections. Then you can fine tune, press the TV
MENU button and select Set up. From the Manual
tuning screen highlight the channel and press SELECT.
Use the S or R buttons to select Manual fine tuning
and adjust/optimise the picture with the P and
Q buttons.
Q
Why are the colours wrong when I play an NTSC source?
Q
A
Why doesn’t the remote control work?
Check that the switch on the side of the remote
control is set to TV mode.
Check that the batteries aren’t dead and that they are
inserted correctly.
Q
A
Q
Why is there no sound coming from the front speakers?
Change the setting of the speaker switch on the
back of the TV.
Why is there no Dolby Surround?
A
If you are unable to obtain surround sound effects
from the rear speakers whilst playing a Dolby
Surround video tape, check that the video recorder is a
stereo unit and that it is connected to the TV by means of
one of the 21-pin Scart sockets.
A
Connect the source via a Scart lead and play.
Also check that Rear speaker option in the Surround
set up menu is set to YES and check you have the correct
Dolby mode.
1
From the Set up menu select Colour. With the
S or R button choose AUTO and then EXIT.
Run the Surround test mode as described in the Dolby
Pro Logic section of this manual.
2
Now, go to the Picture menu and with the
S or R button, adjust the Tint.
Q
A
Why don’t the controls on the front of the TV work?
Check that Panel lock is not ON: using the remote
control select Panel lock from the Feature menu.
Q
Why is the analogue teletext not very good?
A
Good text performance depends on a strong
broadcast signal. This normally requires a roof or
loft aerial. If the text is unreadable, check your aerial.
Also, go to the main index page of teletext and look for
the User Guide. This will give you details of basic teletext
operation. If you need further help, see the analogue
teletext section in this manual.
With the S or R buttons turn Panel lock OFF.
Q
Q
Why don’t the
f P e buttons work?
A
You have no programmes chosen as Favourites.
From the digital MAIN MENU select Service List.
Highlight the programme(s) and with the S and R buttons
turn Favourite to Yes.
You have Programme skip : On in the Manual tuning
TV MENU.
A
Why do I not have any analogue teletext sub-pages?
There are none broadcast or they have not yet
loaded. Press the ( ) button to access. See the
analogue teletext section.
Q
39 A
XB
Why is there no digital teletext?
There is none broadcast at this time, try later or use
analogue text in the meantime.
FOR YOUR GUIDANCE
Remember…
Questions and
Answers…
continued
Q
A
Q
I have forgotten my PIN.
Use 2846 and then change it to a PIN of your
choice. Make a note of your new number!
A
To ensure that no one else can change the PIN block out
this number using a black felt pen.
Q
A
Q
Why is there a message permanently displayed on
the screen?
A
?
For television
operation
queries, plea
se
ring the
helpline…
Having selected digital subtitles ON, why can’t I
see them on the TV?
Subtitles are not currently being transmitted by the
broadcaster.
Why can’t I see some of the digital stations?
You will need to upgrade your subscription. Contact
your service provider for details.
Remove it by pressing the CALL button.
Cleaning the screen and cabinet…
After turning off the power, clean the screen and cabinet with a soft, dry cloth. We
recommend that you do not use any proprietary polishes or solvents on the screen or cabinet
as this may cause damage.
Disposal…
When the set reaches the end of its useful life please dispose of it in accordance with Local
Government Regulations or at a recycling centre.
40
!
FOR YOUR GUIDANCE
digital screen menus
Rememb
er to
the ATV/ press the
DT
to select V button
b
DIGITAL etween
and
ANALOG
UE mode
s.
Press the DTV MENU button on the remote control to access the main menu. To access the options press
the Q and P button on the remote control to move you down through them.
The functions of each menu are described in detail throughout this Manual.
MAIN MENU
MANUAL TUNE – DIGITAL TERRESTIAL
Timer Programming
Favourite List
Service List
Common Interface
Setup
Channel
Frequency (kHz)
Tx Mode
Guard Interval
21
47400
2K
1/32
Network ID
Transport ID
Provider
3018
Services found 9
4000
Services added 0
Carlton Digital
Level
Bit Error
Up/Down
8
Enter
Exit
EXIT
SETUP MENU
Channel change
TIMER PROGRAMMING
Languages
Programme
––– –––––
––– –––––
––– –––––
––– –––––
––– –––––
––– –––––
Modem
Parental Control
Auto Tune
Manual Tune
Date
––/––
––/––
––/––
––/––
––/––
––/––
–––
–––
–––
–––
–––
–––
12:24
Start
––:––
––:––
––:––
––:––
––:––
––:––
Up/Down
Stop
––:––
––:––
––:––
––:––
––:––
––:––
21/03/2002
Repeat
––––
––––
––––
––––
––––
––––
Edit entry
Sub
––
––
––
––
––
––
Remove
Check For Download
Technical Information
Up/Down
LANGUAGES
Enter
SERVICE LIST
Programme
001 BBC ONE
002 BBC TWO
003 ITV 1
004 Channel 4
005 Channel 5
006 ITV 2
007 BBC CHOICE
009 Teletext
010 BBC FOUR
011 BBC NEWS 24
Service
TV
TV
TV
TV
TV
TV
TV
Data
TV
TV
Up/Down
Favourite
Favourite
Yes
Yes
Yes
Yes
Yes
Yes
Yes
Yes
Yes
Yes
Subtitles
English
Data Services
English
Audio
English
Up/Down
MODEM
Remove
Go To
Dial Mode
Tone
Dial Prefix
Enable
Prefix Number
9
Up/Down
AUTO TUNE
PARENTAL CONTROL
Add New Services
Please enter PIN
– – – –
Replace Existing Services
Up/Down
Change
Use 0 – 9
Start
41
Change
!
FOR YOUR GUIDANCE
Screen menus
Rememb
er to
the ATV/ press the
DT
to select V button
b
DIGITAL etween
and
ANALOG
UE mode
s.
Press the TV MENU button on the remote control to see your top menu bar. This white menu bar will show
five different topics in symbols. As you select each symbol by pressing the S or R button, its respective
options will appear below. To access the options press the Q button on the remote control to move you
down through them.
The functions of each menu are described in detail throughout this Manual.
Note: The options marked with † can only be used when in ATV mode. * 36ZT29B only.
The PICTURE Menu
The analogue SET UP Menu
NATURAL
AUTO
EXIT
50
50
50
0
0
Contrast
Brightness
Colour
Tint
Sharpness
Scan mode
DNR
Colour
Set up
Picture
AUTO
† Auto tuning
† Manual tuning
† Programme sorting
Teletext
EXIT
: To exit
: To exit
The TIMER Menu
Press the Q button
to access the second part
of the Picture menu.
Timer
Picture
ON
Black Stretch
0-9
EXIT
: To exit
The SOUND Menu
!
STEREO
AV connection
Picture size/position
Surround set up
Panel lock
Automatic format
Blue screenON
Geomagnetic
EXIT
42
: To exit
OFF
ON
ON
*
: To exit
Feature menu
Stereo/Mono
ON
The options
available to yo
u when
in the Picture
size/
position screen
will
vary dependin
g upon
the widescree
n format
you have chos
en, as
detailed on pa
ge 20,
and when view
ing
connected eq
uipment.
25
0
0
0
Surround
Bass
Treble
Balance
Bass boost
EXIT
: To set
: To exit
The FEATURE Menu
Sound
†
00:00
00:00
EXIT
Off timer
On timer
FOR YOUR GUIDANCE
Notes…
LICENCE AGREEMENT
The copyright in certain software comprised in this Integrated Digital Television (“this product”) and included to enable you (an
individual or legal entity) to use interactive television features (‘the Software’) is owned by DTS (‘the Owner’). By using this product
you agree with the Owner to be bound by the terms of the Agreement which will govern your use of the Software.
The Licence
You are:
(1) permitted to use the Software only in conjunction with this product;
(2) not permitted to transfer or load the Software from this product to any other product or equipment;
(3) save to the extent and in the circumstances expressly required to be permitted by law, not permitted to rent, lease, sub-license, loan, copy,
modify, adapt, merge, translate, reverse engineer, decompile, disassemble or create derivative works based on the whole or any part of the
Software or use, reproduce or deal in the Software or any part thereof in any way;
(4) permitted to transfer the Software and the benefit of the Agreement to another person provided that that person has agreed to accept the
terms of the Agreement. If any transferee does not accept such terms then the Agreement shall automatically terminate. The transferor does
not retain any rights under the Agreement in respect of the transferred Software;
(5) required at all times to maintain the copyright notice attached to or incorporated within this product which notice draws attention to the
Owner’s rights.
Nothing in this Licence affects your right to dispose of this product to any other person provided you do not remove alter or destroy any
copyright notice attached to or supplied with this product.
Term
This Agreement is effective until you terminate it by disposing of this product or destroying it so that it is no longer capable of use. It will also
terminate if you fail to abide by its terms.
43
Subject
Page
Adding digital services ................................................10
Audio output ................................................................37
Auto tune – digital ........................................................8
Auto tune – analogue .................................................11
Automatic Format (Widescreen) ....................................19
AV connections .............................................................25
Balance ........................................................................16
Bass .............................................................................16
Bass Boost ....................................................................16
Bilingual Broadcast .......................................................16
Black Stretch ................................................................18
Blue Screen ..................................................................19
Brightness ....................................................................17
Conditional Access Module (CAM) ................................35
Censorship – digital ....................................................23
Changing Programmes .................................................15
Colour..........................................................................17
Colour system ..............................................................39
Common Interface – digital .........................................35
Connections – back ......................................................37
Connections – initial .......................................................6
Connections – front/side...............................................36
Connections – speakers ..................................................5
Contrast .......................................................................17
digital re-tuning ..........................................................10
DNR – Digital Noise reduction ......................................17
Downloads – digital ....................................................35
Favourite digital programmes........................................9
Geomagnetic adjustment (36ZT29B only)......................19
Headphone socket........................................................36
Indicator lights ...............................................................7
Input selection..............................................................25
Languages – digital.....................................................21
Locked services – digital ..............................................23
Manual fine tuning – analogue ...................................14
Manual tune – analogue.............................................11
Manual tune – digital ..................................................35
Menus – digital ...........................................................41
Subject
Page
Menus – general .........................................................42
Modem – digital..........................................................21
On-screen TV guide – digital .......................................15
Panel Lock ....................................................................24
Parental Control – digital ............................................22
PIN – digital ................................................................22
Picture Preferences .......................................................17
Picture size/position......................................................18
Programme Skip – analogue .......................................13
Programme Sorting – analogue...................................14
Questions and Answers ................................................38
Recording digital broadcasts........................................26
Remote control ...............................................................4
Re-ordering digital programmes....................................9
Scart ............................................................................37
Scan mode ...................................................................17
Sharpness ....................................................................17
Controls .......................................................................36
Sound mute .................................................................16
Standby..........................................................................7
Stereo/mono ................................................................16
Still Picture ...................................................................19
Subtitles – digital ........................................................21
Surround set up – Digital Surround Processor ...............30
Surround set up – Dolby Digital ....................................28
Surround set up – Dolby Pro Logic ................................29
System – analogue......................................................12
Technical information – digital.....................................35
Teletext – digital ..........................................................31
Teletext – analogue .....................................................32
Time Display ................................................................24
Timers ..........................................................................24
Tint ..............................................................................17
Treble...........................................................................16
Volume ........................................................................16
Widescreen viewing......................................................20
Woofer .........................................................................16
Specifications and accessories of your integrated digital TV…
Broadcast systems/channels
DIGITAL
UHF UK21-UK69
ANALOGUE PAL-I
PAL-B/G
UHF E21-E69
VHF E2-E12, S1-S41
SECAM-L
UHF F21-F69
VHF F1-F10, B-Q
SECAM-D/K UHF R21-R69
VHF R1-R12
Video Input
Modem Type
V22bis DTMF
REN (ringer equivalent number) 1
Programme Positions
100
Visible Screen Size
28ZT29B
32ZT29B
36ZT29B
Display
16:9 aspect ratio
Sound output
(at 10% distortion)
Main
Centre
Surround
10W + 10W rms
10W
10W + 10W
Power consumption
(approx.)
28ZT29B
32ZT29B
36ZT29B
180W
155W
165W
UHF UK21-UK69
PAL, NTSC 3.58/4.43
External connections
EXT1
Input
21-pin Scart
RGB, A/V
EXT2
Input/Output
21-pin Scart
A/V, S-video,
Selectable output
EXT3
Input (back)
21-pin Scart
Input (front/side) 4-pin
Phono jack
Phono jacks
A/V, S-video
S-video
Video
Audio L + R
EXT4
Input
Y, PB/CB, PR/CR
Audio L + R
Phono jacks
Phono jacks
Digital Audio Input
Optical or Coaxial
Fixed Output
Phono jacks
Output to Active Woofer
Phono socket
Telephone Modem
RJ11 jack
Common Interface
Modules
Audio L + R
66cm
76cm
86cm
Dimensions (approx.)
28ZT29B
110cm (W) 120cm (H) 42cm (D)
32ZT29B
118cm (W) 130cm (H) 56cm (D)
36ZT29B
135cm (W) 140cm (H) 60cm (D)
Weight (approx.) 28ZT29B 42kg 32ZT29B 53kg 36ZT29B 74kg
Headphone Socket
3.5mm stereo
Accessories
Remote control
2 batteries (UM-4, AAA, IEC R03 1.5V)
2 Surround Speakers
© Toshiba Information Systems (U.K.) Limited
All rights reserved.
Reproduction in whole or part without written permission is strictly prohibited.
Manufactured under license from Dolby Laboratories.
“Dolby”, “Pro Logic”, and the double-D symbol are trademarks
of Dolby Laboratories.
Confidential unpublished works. Copyrights 1992-1997 Dolby
Laboratories. All rights reserved.
Toshiba Information Systems (U.K.) Limited
Consumer Products Division,
European Service Centre,
Admiralty Way, Camberley,
Surrey, GU15 3DT, UK
Specification is subject to change without notice.
2356 5528
Originated by Kensa Creative Solutions, Saltash, Cornwall.