1
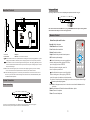
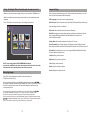
SDPF1079
Introduction
Table of Contents
Congratulations on your purchase of Digital Photo Frame, model SDPF1079.
Before operating the unit, please read this manual thoroughly, and retain it for future
reference. This manual will help you use many of the exciting and useful features that
will make your Digital Photo Frame viewing more enjoyable.
1
1
This Digital Photo Frame lets you view digital pictures directly from your camera's
memory cards. You will be able to create a slideshow using multiple transition effects or
display one picture at a time. No computer, digital camera or Internet connection is
required.
Main unit controls
2
This Digital Photo Frame is compatible with the following popular memory card
formats: USB, SD,MultiMedia Card, and Memory Stick.
System connection
2
Package Contents
Remote control
3
photo
4
4
Digital Photo Frame
AC Adaptor
User's Manual
Remote Control
Photo Frame Stand
5
6
7
7
Installing Your Unit
Locate the removable easel and place in the corresponding holes at the back of the unit.
Plug in the AC adaptor into power outlet. Plug the other end into the unit.
After the content is stored on the target flash device. Insert the device into the correct
slot.
Note: Please ensure that you have one photo file loaded onto the memory card.
Turn on the unit by sliding ON/OFF switch to ON.
1
Main Unit Controls
Using your SD card
Upon using an SD card, insert it to the corresponding slot flatly with the label side facing you.
6
5
7
DC IN 5V
3
Note: Please do not disconnect USB device or plug out SD/MMC/MS card while they are working with the
unit.Functional failure may occur in case of wrong operations.
4
Remote Control
DC IN 5V
2
Button Description and Function:
1
Slide
Show
Standby:Switch the power
Standby
Slide Show:Start a slideshow
Func
Func:Switch slide show effect
Rotate
Setup
Rotate:Clockwise rotation
1. DC in 5V
2. USB port
3. SD card slot
4. ON/OFF :turn on and turn off the unit
5.
:Use this button to move cursor up and down when at setting menu; When playing JPEG files, press it
to play prev/next JPEG file; When the picture is enlarged, press it to move the picture up and down .
:Use this button to move cursor left and right when at setting menu; When playing JPEG files, press it
to counter-clockwise and clockwise rotate the picture; When the picture is enlarged, press it to move
the picture left and right .
6.OK:To confirm when selecting an option on the menu; When displaying pictures, press it to call setup
menu; When at time set mode, press this button to call setup menu and its submenu.
7.M: When automatic playing photo or in clock mode, press this button to return the main menu; When in
main menu, press this button to switch among device, folder and clock; U nder "SETUP" mode, press
this button to back to previous.
System Connection
Setup:Press this key to enter into setup menu
OK:Select an option and play
: Use this button to move cursor up and down
when at setting menu;When playing JPEG files,
press it to play prev/next JPEG file;
When the picture is enlarged, press it to
move the picture up and down .
OK
Exit
Mode
Zoom+
Zoom-
: Use this button to move cursor left and right
when at setting menu; When playing JPEG files,
press it to counter-clockwise and clockwise rotate
the picture; When the picture is enlarged, press it to move the picture left and right .
:Select an option and play/pause
Exit: Back to the upper menu,return to the main menu and switch between device
and clock.
Mode:Switch between Photo slide show and Calendar + photo
Zoom+: Zoom in the picture
Zoom-: Zoom out the picture
Power connection
DC IN 5V
Plug one end of the supplied AC/DC power adaptor into the DC input jack of the unit, then plug the
other end into the AC power receptacle. Please refer to the illustration above.
2
3
Using Your Digital Photo Frame through the remote control
Make sure you have at least one image file on your memory cards or USB flash drive.
Image Settings
While viewing an individual image, press “ Setup” button on the remote control, you will
then be given a list of possible features to change:
Switch on the frame and insert memory cards into the unit, it will automatically start
slideshow.
OSD Language: Select the on screen display language.
Press “ Exit” button on the remote control, it will display the main menu.
Slide Duration: Select the duration of time (5Seconds/10Seconds/1 Minute/10 Minutes )
that each image is shown in a slideshow.
USB
SD/MMC/MS
Slide Order: Select the slideshow order (Normal or Random).
Family
Slide Effect: Adjust the transition effect between each image in a slideshow. Optional
effect includes Off/Random/Slide/Door/Shutter/Mosaic/Cross Comb/Corner
Slide/Snail/Dissolving/Roll.
Scene
Display Mode: Select image display size (Original or Full screen).
Photo Play Mode: Select image play mode with Single play mode/ Slide show mode/
Multi image mode/Multi round thumb/ Round thumb/Free thumb/ Puzzle /Photo info on/off.
Photo Effect: Select display color for current image with Black& White/Sepia 1/Sepia
2/ Sepia 3/No effect (original color).
16:05
Contrast: Debug screen contrast.
Brightness: Debug screen brightness.
NOTE: Icons of above Media (USB,/SD/MMC/MS) shall appear
automatically on MENU screen when certain memory card is inserted. Icons shall
disappear when corresponding card is removed from card slot.
Color: Debug screen saturation.
Reset: Revert to the factory settings.
Version:Display the software version.
Browsing Images
Press “Exit” button repeatedly to have the cursor position move to
Folder-Device-Clock orderly.
When the cursor position moving to the Device, use the directional arrows
to highlight the desired flash device(USB, SD/MMC/ MS), press “ OK ” button or wait for 3
seconds, cursor position will move to the thumbnail image of the first folder of the
corresponding device .
When the cursor position moving to the folder, use the directional arrows
to highlight the desired folder, press “ OK” button or wait for 3 seconds, cursor
position will move to thumbnail format picture of the corresponding folder .
When the cursor position moving to the thumbnail image ,using the directional arrows
to highlight a thumbnail image, press “OK” button to view the desired image or
wait for 10 seconds, system will go into the calendar + photo mode.
4
5
Clock / Calendar Settings
Troubleshooting
16:05 , press “ OK ” button or
Press" Exit" repeatedly to highlight “ Clock” icon
wait for 3 seconds, it will enter into clock/calendar interface.
Press “Setup” button on the remote control, you will then be given a list of possible
settings:
Symptom
Cause
Corrective Actions
Digital Photo
Frame doesn't
power on
The power connector
to the unit is not
securely inserted.
Make sure you connect the AC adaptor to the frame
properly.
No photo files
on the memory
card
Card is broken.
Change for a new card.
The file doesn't
play.
Incompatible file
format
Make sure there is at least one supported
image file on the memory card.
Compatible photo format: JPEG, BMP,GIF,
TIFF, PNG
OSD Language: Select the on screen display language English / French / German /
Italian
Date& Time: Press “ O K ” and use the directional arrows
(YY-MM-DD), Time and Time mode(12 hours /24 hours).
to set Date
Auto Power: Press “ OK ” and use the directional arrows
to select Repeat
mode (Disable, One Day , Weekday , Every Day, Weekend),and set time for power
on time, power off time.
Calendar Display: Select calendar display mode( With slide /With single /With clock).
Contrast: Debug screen contrast
Specifications
Brightness: Debug screen brightness
Color: Debug screen saturation
Type
10 inch Digital Photo Frame
Resolution
800*480 Pixel
Output
5V 1.0 A
Input
AC100-240V~50/60Hz
Working Temperature
0-40
Display Mode
16:9
File Format
JPEG,BMP,GIF,TIFF,PNG
Cards
SD/MMC/MS
USB Ports
USB Slave
Dimension
320*229*40 mm
0.99 kg
Weight
6
7