1
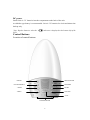
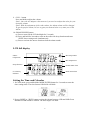
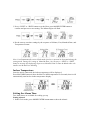
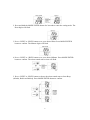
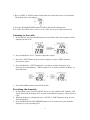
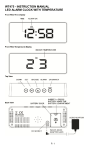
User Manual of WT 493
Introduction
Congratulations on your purchase of this smart unit. This unit can be used as a radio to
catch the latest news and enjoy the beautiful music; it can also be used as an alarm clock
to wake you up by smooth melodies. When used as a light, it will be able to show you the
indoor temperature and the real time.
Power Supply
AC adaptor
The supplied AC/DC adaptor is suitable for use on AC mains supplying of 100-240V, 50/
60Hz and should only be connected to a mains supplying with these parameters.
Cautions:
- The included AC/DC adaptor is for this unit only. Do not use it with other equipments.
- When the unit is not going to be used for long, disconnect the AC/DC adaptor from
the AC outlet.
- When the AC/DC adaptor is plugged in, the apparatus is not completely disconnected
from the main power source, even when the unit is turned off.
- To completely disconnect the power input, the AC/DC adaptor of the apparatus
should be disconnected from the mains, as the disconnected device is the AC/DC
adaptor of apparatus.
- Be sure to use it near the wall outlet. If a malfunction occurs, disconnect the plug
from the wall outlet at once.
- The AC/DC adaptor and main unit shall not be exposed to dripping or splashing; no
objects filled with liquids, such as vases, shall be placed on the apparatus.
- The ventilation should not be impeded by covering the ventilation openings with
items, such as newspapers, table-cloths, curtains, etc;
- No naked flame sources such as lighted candles should be placed on the apparatus;
- Attention should be drawn to environmental aspects of battery disposal;
The AC/DC adaptor of the apparatus should not be obstructed or should be easily
accessed during the intended use.
Battery Backup system
Ensure that the unit continues to operate during an AC power disruption (in order to
preserver the battery life, the backlight is switched off). The clock, date and alarm
settings as well as presetting channels will be kept in the memory; however, the clock
time may require adjustment for exact accuracy.
Caution: Battery shall not be exposed to excessive heat such as sunshine, fire or the like.
The normal function of the product may be disturbed by strong electromagnetic
interference. If so, simply press the volume button to resume normal operation by
following the instruction manual.
1
DC power
Install 2AA×1.5 V batteries into the compartment at the back of the unit.
An alkaline type battery is recommended. 2AA×1.5 V batteries for clock and alarm time
backup only.
Note: Replace batteries when the “
LCD.
” indicator is displayed in the bottom left of the
Control Buttons
Location of control buttons
RADIO
MODE ENTER
ON/OFF PRESET
MAX/MIN
+/NEXT
LIGHT
-/PREV
SOUNDS
+VOL –
SNOOZE/SLEEP
2
Functions of Control Buttons
1. MODE ENTER button
(a) In Clock mode, press to show alarm1, alarm2 and calendar.
(b) In Clock mode, press and hold for 2 seconds to enter clock, calendar and
temperature format setting mode.
(c) In Alarm mode, press and hold for 2 seconds to enter Alarm1 or Alarm2 setting
mode.
(d) In setting mode, press to confirm the settings.
2. MAX / MIN button
(a) Press to show the MAX and MIN temperature.
(b) Press and hold for 2 seconds to clear the Max/Min temperature value when the
Max/Min temperature is displayed.
3. ☼ LIGHT button
(a) Press to turn ON/ OFF the light.
(b) Press and hold, together with the +/NEXT button or -/PREV button to adjust the
brightness when the light is ON.
4. SOUNDS button
(a) Press to cycle the melodies and save one as the alarm source.
(b) Press and hold for 2 seconds to stop the melody.
(Melody1→Melody 2→Melody 3→Melody 4→Melody 5→Silent→Melody 1)
Note: If Silent was selected, Melody1 will be chosen as the alarm source for waking up
by Melody.
5. RADIO button
(a) Press to turn ON/OFF the radio.
(b) Press and hold for 2 seconds to active the radio with sleep function, the SLEEP
icon will be showed.
6. ON/OFF PRESET button
(a) Press to turn ON/OFF Alarm1 or Alarm2 in the Alarm mode.
(b) Press to select the preset channels for radio in radio mode, there are 5 channels
available.
(c) Press and hold for 2 seconds to store the presetting channels of the radio.
7. +/NEXT
(a) Press to increase the value in the setting mode.
(b) Press and hold to scan forward in Radio mode.
(c) Press to turn ON/OFF the backlight.
8. -/PREV
(a) Press to decrease the value in the setting mode.
(b) Press and hold to scan backward in Radio mode.
3
9. +VOL – button
Press and hold to adjust the volume.
Note1: Once the AC adaptor is disconnected, you need to readjust the value for your
desirable volume.
Note2: With the adjustment of the radio volume, the Alarm volume will be changed.
To get the perfect volume, be sure to gain your desired value every time you set the
Alarm.
10. SNOOZE/SLEEP button
(a) Press to turn ON the LCD backlight for 5 seconds.
(b) Press and hold for 2seconds to turn on the radio with sleep function and enter
SLEEP timer setting mode simultaneously.
(c) Press to activate the snooze function when the alarm sounds.
LCD full display
Indoor
temperature
Max temperature
Min temperature
Sleep function
Sounds alarm time
Low battery
indicator
Radio alarm time
Setting the Time and Calendar
1. In Clock mode, press and hold the MODE ENTER button for 2 seconds to enter the
time setting mode. The time format 12Hr/24Hr will blink.
2. Press +/NEXT or -/PREV button to select the format between 12Hr and 24Hr. Press
MODE ENTER button to confirm. The Hour digits will flash.
4
3. Press +/NEXT or -/PREV button to set the Hour, press MODE ENTER button to
confirm and process to next setting. The Minute digits will flash.
4. Do the same to set other settings by the sequence of: Minute, Year, Month & Date, and
Temperature Format.
Note: It will automatically exit to Clock mode if no key is pressed in 10seconds during the
setting mode. During the setting of Month & Date, you can press +/NEXT or -/PREV
button to arrange the displaying sequence as Month & Date or Date & Month when the
small icons M and D are blinking.
Indoor Temperature
Once the unit is connected, the indoor temperature will be displayed.
Press MAX/MIN button to show the MAX or MIN temperature for 5seconds, then it will
automatically turn back to indoor temperature display.
Setting the Alarm Time
Two alarm times are available for waking you up.
Setting Alarm1:
1. In the Clock mode, press MODE ENTER button once to show the Alarm1.
5
2. Press and hold the MODE ENTER button for 2seconds to enter the setting mode. The
Hour digits will flash.
3. Press +/NEXT or -/PREV button to set your desired Hour. Press MODE ENTER
button to confirm. The Minute digits will flash.
4. Press +/NEXT or -/PREV button to set your desired Minute. Press MODE ENTER
button to confirm. The alarm sound sources icon will flash.
5. Press +/NEXT or -/PREV button to choose the alarm sound sources from Beep
(default), Radio and Melody. Press MODE ENTER button to confirm.
6
Note: When Alarm1 is not activated, only the icon 1 is showed in the upper right, once it
is activated, the “
” (Beep), “
” (Radio) or “ ♪” (Melody) icon will be showed.
If the radio is ON during the wake-up time, regardless the alarm source is Beep, Radio or
Melody; it will alarm by Beep sound and temporally stop the radio. The radio will be
resumed after stopping the alarm. Alarm 2 will be in the same case.
Setting Alarm2:
1. In the Clock mode, press MODE ENTER button twice to show the Alarm2.
2. Set Alarm2 with the same operation as setting Alarm1.
Note: When the light is OFF and it is 30 minutes to the alarm time, light will be turned
ON in 6 steps with 5minutes per step to fully brighten up.
To Stop the Alarm:
1. When the alarm time is reached, it will sound by Beep, Radio or Melody following
your preset value.
2. Press any button except SNOOZE /SLEEP button to stop the alarm.
3. Press SNOOZE/SLEEP button to activate the snooze function. The alarm will sound
again in 5 minutes until you press any button except SNOOZE/SLEEP button to stop the
alarm.
Note1: The Alarm will sound for 5 minutes. No matter the Alarm is stopped automatically
or manually, the light will be turned off in 5 minutes from the stopping of the Alarm.
Note2: In Alarm1 or Alarm2 displaying mode, you can press ON/OFF PRESET button to
turn ON/OFF the alarm.
Sleep function
1. In Clock mode, press and hold the SNOOZE/SLEEP button for 2 seconds to turn on
the radio with sleep function; The SLEEP icon will be showed, starting to count down.
Note: Pressing and holding the Radio button for 2 seconds will get the same effect.
2. Press and hold the SNOOZE/SLEEP button for 2 seconds to enter the sleep timer
setting mode.
7
3. Press +/NEXT or -/PREV button to adjust the sleep interval between 1-120 minutes.
The default value is 60 minutes.
4. Press the SNOOZE/SLEEP button to confirm and exit the setting mode.
Note: When the SLEEP timer counts to 0, the radio will be turned off automatically.
Listening to the radio
1. In Clock mode, press the RADIO button to turn ON the radio, the frequency will be
displayed on the LCD.
2. Press and hold the +VOL – button to adjust the volume.
3. Press the +/NEXT button to increase the frequency or press -/PREV button to
decrease the value.
4. Press and hold the +/NEXT button for 2 seconds to scan the frequency in up
direction; press and hold the -/PREV button for 2 seconds to scan the frequency in
down direction
5. Press the RADIO button to turn OFF the radio.
Presetting the channels
1. In radio mode, press ON/OFF PRESET button to select channel CH1 (default), CH1
will be showed in the display for 2 seconds, indicating the frequency will be saved as
CH1.
2. When the frequency is displayed, press +/NEXT or -/PREV button to scan for your
desired frequency.
3. Press and hold the ON/OFF PRESET button for 2 seconds to store your desirable
frequency as your presetting CH1.
8
4. In radio mode, press ON/OFF PRESET button to select channel CH2. Do the same to
set CH2, CH3, CH4 and CH5.
Note: It is not a necessary to select CH1 for the first one, you can select from CH1 to
CH5 as you prefer.
Note: When the radio is ON, you can press the ON/OFF PRESET button to cycle the
preset channels, there are 5 channels available. In radio mode, press MODE ENTER
button to showed the Clock, Alarm1, Alarm2 and Calendar for 5 seconds, and it will
automatically exit, displaying the radio frequency.
9