1
P.N. 109934
IMPORTANT
SAFEGUARDS
When using electrical appliances, to reduce the risk of fire, electric
shock, and/or injury to persons, basic safety precautions should
always be followed, including the following:
. READ ALL INSTRUCTIONS, PRODUCT LABELS AND
WARNINGS BEFORE USING THE BREADMAKER.
l
l
l
l
Do not touch hot surfaces. Always use oven mitts when
handling hot materials, and allow metal parts to cool before
cleaning. Allow the breadmaker to cool thoroughly before
putting in or taking off parts.
When unit is not in use and before cleaning, unplug the
breadmaker from wall outlet.
To protect against risk of electrical shock, do not immerse
the appliance or plugs in water or other liquids.
Close supervision is always necessary when this or any
appliance is used by or near children, or incapacitated persons.
l
Do not allow anything to rest on the power cord.
l
Do not plug in cord where people may walk or trip on it.
l
l
; 2 ::
l
Do not operate this or any appliance with a frayed or damaged
cord, or plug, or after the appliance malfunctions or is dropped
or has been damaged in any manner. Take appliance to the
nearest Authorized Service Facility for examination, repair
or electrical or mechanical adjustment.
Do not let the cord dangle over the edge of a table or counter
or touch hot surfaces. Do not place on an unsteady or
cloth-covered surface.
Avoid contact with moving parts.
l
l
l
l
l
l
l
Do not use attachments not recommended by the manufacturer;
they may cause fire, electric shock or injury.
Do not use outdoors or for commercial purposes.
Do not place the appliance near a hot was or electric burner,
or in a heated oven.
To unplug, press the “STOP” button, grip plug and pull from
wall outlet. Never pull on the cord.
Use of Extension Cords: A short power supply cord has been
provided to reduce the risk of injury resulting from becoming
entangled in or tripping over a longer cord. Extension cords
are available from hardware stores and may be used with care.
If used, the extension cord must be at least 10 amps and 120 volts.
The cord should be arranged so that it will not drape over the
counter or tabletop where it can be pulled by children or tripped
over accidentally. If the appliance is of the grounded type,
the extension cord should be grounding-type 3-wire cord.
Electrical Power: If electric circuit is overloaded with other
appliances, your breadmaker may not operate properly.
The breadmaker should be operated on a separate electrical
circuit from other operating appliances.
This appliance has a polarized plug (one blade is wider than
the other). To reduce the risk of electric shock, this plug will fit
in a polarized outlet only one way. If the plug does not fit fully
in the outlet, reverse the plug. If it still does not fit, contact
a qualified electrician. Do not modify the plug in any way.
THIS BREADMAKER
Is
FOR
HOUSEHOLD USE ONLY
SAVE THESE INSTRUCTIONS
.
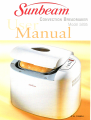
Congratulions
You are the owner of a S U N B E A M Breadmaker.
Please read all of the instructions in this manual carefully before
you begin to use this appliance. Proper care and maintenance will
ensure the long life of this appliance and its trouble-free operation.
Save these instructions and refer to them often for cleaning and
care tips.
(4)
Important
Safeguards . . . . . . . . . . . . . . . . . . . . . . . . . . . . . . . . . . . .
.2
......................................
5
Operating Instructions . . . . . . . . . . . . . . . . . . . . . . . . . . . . . . . . . . .
6
Sunbeam No. 5895 Convection Breadmaker Display/Cyclc
7
Table of Contents
Functions
Operating the Dough Cycle . . . . . . . . . . . . . . . . . . . . . . . . . . . . . . .
8
Operating the Bake Cycle . . . . . . . . . . . . . . . . . . . . . . . . . . . . . . . .
8
Special Functions . . . . . . . . . . . . . . . . . . . . . . . . . . . . . . . . . . . . . . .
9
Power Failure Memory
9
..................................
Abnormal Condition and Self-Protection
.....................
9
Working Condition . . . . . . . . . . . . . . . . . . . . . . . . . . . . . . . . . . . . .
9
Malfunction
9
..........................................
Beeper . . . . . . . . . . . . . . . . . . . . . . . . . . . . . . . . . . . . . . . . . . . . . . .
10
Example of Operation Procedure . . . . . . . . . . . . . . . . . . . . . . . . . . .
.10
RECIPES
White Bread . . . . . . . . . . . . . . . . . . . . . . . . . . .
.ll
Traditional White Bread . . . . . . . . . . . . . . . . . . .
.I2
French Bread . . . . . . . . . . . . . . . . . . . . . . . . . . .
.13
Whole Wheat Bread . . . . . . . . . . . . . . . . . . . . . .
.14
Orange-Anise Sweet Bread . . . . . . . . . . . . . . . . .
.15
Chocolate-Walnut Zucchini Bread
.I6
...........
Dough . . . . . . . . . . . . . . . . . . . . . . . . . . . . . . . .
.17
Your Own Recipes . . . . . . . . . . . . . . . . . . . . . . .
.18
Warranty Information
.19
....................
1. No matter which recipe you have chosen, put the ingredients in
one at a time as stated in the recipe. Breadmaker yeast is preferred
when using breadmakcrs, and it should be added last and mixed
thoroughly with the other dry ingredients. If you choose to use
the delay function, do not let the yeast come into contact with any
of the liquid ingredients. This will effect the action of the yeast.
Important: After a baking cycle, the breadmakcr will not opcrare
until it has cooled down.
Important: The breadmaker
has an automatic “Keep Warm” setting
that will automatically keep your bread warm for up to
one hour after the baking cycle is complete. If you wish
to stop this function after it is activated, press the
“Start/Stop” button and hold until you hear a beep.
Important: DO NOT press the “Start/Stop” button while the
breadmaker is making bread. This will cause the machine
to reset to your initial setting and you will need to start
over again, with all new ingredients.
Caution: The breadmaker
can become very hot. DO NOT handle
the machine while it is operating. DO NOT lift the lid
while the breadmaker is baking bread,
2. Insert the bread pan down into the
baking chamber and twist in a slight
clockwise motion until you hear a click.
This indicates that the bread pan is
properly installed. Then close the lid.
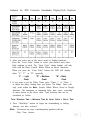
3. When you plug the breadmaker in, the
number “1” will be displayed in the LED
for 4 seconds. It will then change to the
working time of the first cvclc display
“0:58’ The “Express” indicator light
will remain on. The following chart
shows other bread or baking functions
that you may select by pressing the
“Sclcct” button.
Sunbeam No. 5895 Convection Breadmaker Display/Cycle Functions
4. After you select one of the above bread or baking functions,
Press the “Crust Color” button to select your desired crust color light, medium or dark. The “Crust Color” choice button will only
work with the Basic, French, Whole Wheat or Sweet functions.
When you press the “Crust Color” button, the LED will display
either “L”, “P’” or “H” repeatedly.
“L” - Light
“P” - Medium
“H” - Dark
Crust
Crust
Crust
5. If you want to use the Delay Timer, press “Timer +” or “Timer -”
to adjust the delay starting time you desire. The Delay Timer will
only work within the Basic, French, Whole Wheat, Sweet or Dough
functions. The maximum or minimum delay time varies according
to times shown in the above chart. Total working time can be
calculated as below:
TOTAL W ORKING TIME = W ORKING TIME AT INITIAL STATE + D ELAY TIME
6. Press “Start/Stop” button to begin the breadmaking or baking
function you have selected.
NOTE: Do not use any recipe containing dairy products with any
Delay Timer function.
NOTE: If you want to stop or reset the machine at any time during
a cycle, press and hold the “Start/Stop” button for 1 second.
This will take you back to the beginning of the bread
or baking function you have selected. Then repeat the
above operation, starting at Step Number 4.
While the breadmaker is kneading the dough mixture,
DO NOT touch the control panel.
7. When the display shows “O:OO”, the hreadmakcr has completed its
cycle and you will then hear 10 beeps. The breadmaker will then
begin the “Keep Warm” cycle. During this “Keep Warm” period,
the colon “:” will blink steadily. After a period of 1 hour the
“Keep Warm” cycle will be completed and you will hear 12 beeps.
The LED display will then go hack to its original state.
8. This breadmakcr will also remind you to add either fruit or nuts
if you use the Basic, French or Whole Wheat menu. During this
cycle, you will hear 10 beeps which will remind you to add
either the fruit or nuts. Simply open the lid with caution
to add the extra ingredients.
Operation of Dough Cycle
The Dough cycle is similar to other cycles. This setting lets you prepare
dough for rolls, specialty breads, pizza, etc., which you then shape by
hand, allow to rise, then hake in a conventional oven. There will he
12 beeps to remind you that the dough cycle is complete.
Operation of Bake Cycle
The baking time of the Bake cycle is 1 hour. (At 300°F)
Select the “Bake” cycle by pressing the “Select” button until an “8”
appears in the LED and the related indicator “ON”. Then press the
“Start/Stop” button to start the baking process.
When the baking time is over, “0:OO” will be displayed and the
breadmaker will emit 10 beeps. Press “Start/Stop” to stop the cycle
or the breadmaker will automatically go into “Keep Warm” cycle.
If the item you have chosen to hake has finished within the working
time, you can press the “Start/Stop” button to stop baking and return
, to the original state of the Bake cycle.
CQ
1. Power Failure Memory
Your breadmaker has a memory function. If the machine loses
power LESS THAN 5 minutes, it will revert to the time remaining
before loss of power. However, the total breadmaking or baking time
will he altered from the original setting:
TIME = POWER OFF TIME + PREVIOUS REMAINING TIME
If the machine loses power LONGER THAN 5 minutes, and power is
then re-applied, it will revert to the original startup setting (Express).
ACTUAL W ORKING
2. Abnormal Condition and Self-Protection
This breadmaker has the ability to adjust the starting working
condition and self-protection in case of abnormal conditions.
Working Condition
lf existing conditions are not suitable to the working cycle you have
selected, the breadmakcr will not operate. For example, if the baking
chamber temperature is too high or too low to meet the working
temperature (that is, the temperature is lower than 14°F o r higher
than 133”F), when you choose breadmaking or bake cycle, the machine
will not operate and will sound 3 beeps as a reminder and “EOO” or
“E0l” will show in the display.
In this case, take out the bread pan and reinsert it when the temperature
has recovered. If the breadmaker does not work when you resume use,
see “How To Obtain Warranty Service” in this Instruction Manual.
Malfunction
The breadmaker is also able to self-adjust to malfunctions, such as
thermostat in “ON” state or short circuit, etc. In this case the display
will show “EEE” and you will hear continuous beeps.
If the sensor is in short circuit when you plug it in, it will display “EEE”
in the LED display and emit continuous beeps. See “How To Obtain
Warranty Service” in this Instruction Manual.
Overview of Breadmaker Features
3. Beeper
The Beeper has the following functions:
1) One beep: Anytime breadmaker is first plugged in
and receiving power.
2) One beep for each press of: “Select”, “Crust Color”, “Timer + ”
or “Timer - ”
3) One beep: When you press “Start/Stop” to start or stop
the operation.
4) 10 continuous beeps: Breadmaking or baking function complete,
then “Keep Warm” function begins.
5) 12 continuous beeps: When the total working cycle is completed,
Example of Operation Procedure
Assuming that you are making French bread with dark crust color:
1. Insert bread pan with ingredients into the breadmaker.
Gently close the lid.
2. Plug in.
3. Press “Select” button to “3P”, which will be displayed on LED.
4. Press “Crust Color” button to “H” for dark crust color,
which will be displayed on LED.
5. Press “Start/Stop” button to start breadmaking.
6. If you want to reset or stop breadmaking during the breadmaker
operation, press “Start/Stop” to come back to the beginning
of the cycle.
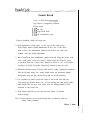
White Bread
1
1
2
2
2
1
cup minus 2 Tbsp. water (95”-104°F)
large egg
Tbsp. canola or other vegetable oil
Tbsp. sugar
Tbsp. dry milk powder
tsp. salt
3 cups bread flour
1 Tbsp. + 1 tsp. brcadmaker yeast
1. Insert kneading blade in bread pan.
2. Add ingredients, except yeast, to the pan in the order given.
With finger, make a small indentation on one side of the flour.
Add yeast to the indentation, making sure it does not come into
contact with the liquid ingredients.
3. Insert bread pan into breadmaker; gently close lid. Plug the power cord
into a wall outlet. Press the “Select” button until the “Express” cycle is
reached. Press the “Start/Stop” button to star the cycle.
4. When the machine emits 10 beeps, the bread is ready. Unplug the machine.
Lift the lid and, using oven mitts, firmly grasp the bread-pan handle
and gently twist the pan, then pull up and out of the machine.
,
5. Use a spatula to gently loosen the sides of the bread from the pan;
turn bread pan upside down onto a wire cooling rack and gently shake
until bread falls out onto rack. Make sure the mixing paddle is still
attached to the bread pan.
6. Turn hrcad right-side up on rack and cool about 15 minutes before slicing.
NOTE: Do not use this recipe (containing dairy products) with any
Delay Timer function.
YIELD: 1 LOAF
Traditional White Bread
1 cup + 6 Tbsp. water (75”.85°F)
2 Tbsp. canola or other vegetable oil
2 Tbsp. sugar
2 Tbsp. dry milk powder
1 tsp. salt
4 cups bread flour
2 tsp. breadmaker yeast
1. Insert kneading blade in bread pan.
2. Add ingredients, except yeast, to the pan in the order given. With finger,
make a small indentation on one side of the flour. Add yeast to the
indentation, making sure it does not come into contact with the liquid
ingredients.
3. Insert bread pan into breadmaker; gently close lid. Plug the power cord
into a wall outlet. Press the “Select” button until the “Basic” cycle is
reached. Press the “Crust Color” button to select a crust color (light,
medium or dark). Press the “Start/Stop” button to start the cycle.
4. When the machine emits 10 beeps, the bread is ready. Unplug the machine.
Lift the lid and, using oven mitts, firmly grasp the bread-pan handle and
gently twist the pan, then pull up and out of the machine.
5. Use a spatula to gently loosen the sides of the bread from the pan;
turn bread pan upside down onto a wire cooling rack and gently shake
until bread falls out onto rack. Make sure the mixing paddle is still
attached to the bread pan.
slicing.
6. Turn bread right-side up on rack and cool about 15 minutes before
YIELD:
1
LOAF
French Bread
1 cup + 2 Tbsp. water (75”.85°F)
2 tsp. butter or margarine, softened
1 Tbsp. sugar
l-112 tsp. salt
3-l/4 cups bread flour
2-l/2 tsp. breadmaker yeast
I, Insert kneading blade in bread pan.
2. Add ingredients, except yeast, to the pan in the order given.
With finger, make a small indentation on one side of the flour.
Add yeast t o the indentation, making sure it does not come into
contact with the liquid ingredients.
3. Insert bread Pan into breadmaker; gently close lid. Plug the power cord
into a wall outlet. Press the “Select” button until the “French” cycle
is reached. Press the “Crust Color” button to select a Crust color (light,
medium or dark). Press the “Start/Stop” button to start the cycle.
4. When the machine emits 10 beeps, the bread is ready. Unplug the machine.
Lift the lid and, using oven mitts, firmly grasp the bread-pan handle
and gently twist the pan, then pull up and out of the machine.
5. Use a spatula to gently loosen the sides of the bread from the pan;
turn bread pan upside down onto a wire cooling rack and gently shake
until bread falls cut onto rack. Make sure the mixing paddle is still
attached to the bread Pan.
6. Turn bread right-side up on rack and cool about 15 minutes
before slicing.
NOTE: Do not use this recipe (containing dairy products) with any
Delay Timer function.
YIELD: 1 LOAF
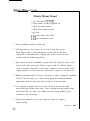
Whole Wheat Bread
l-3/4 cups water (75”.85°F)
3 Tbsp. canola or other vegetable oil
3 Tbsp. dry milk powder
2 Tbsp. brown sugar, packed
2 tsp. salt
4-t/2 cups whole wheat flour
l-112 tsp. breadmaker yeast
1. Insert kneading blade in bread pan
2. Add ingrcdicnts, except yeast, to the pan in the order given.
With finger, make a small indentation on one side of the flour.
Add yeast to the indentation, making sure it does not come into
contact with the liquid ingredients.
3. Insert bread pan into breadmaker; gently close lid. Plug the power cord
into a wall outlet. Press the “Select” button until the “Whole Wheat”
cycle is reached. Press the “Crust Color” button to select a crust color
(light, medium o r dark). Press the “Start/Stop” button to sfart the cycle.
4. When the machine emits 10 beeps, the bread is ready. Unplug the machine.
Lift the lid and, using oven mitts, firmly grasp the bread-pan handle
and gently twist the pan, then pull up and out of the machine.
5. Use a spatula to gently loosen the sides of the bread from the pan;
turn bread pan upside down onto a wire cooling rack and gently shake
until bread falls out onto rack. Make sure the mixing paddle is still
attached to the bread pan.
6. Turn bread right-side up on rack and cool about 15 minutes
before slicing.
Y I E L D : 1 LOAF
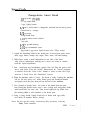
Orange-Anise Sweet Bread
l/3 cup water (75”.85°F)
l/3 cup whole milk
3 eggs, lightly beaten
II2 cup (1 stick) butter or margarine, softened and cut into 6 pieces
Grated zest of 1 orange
II2 cup sugar
4 cups bread flour
l-l/2 tsp. anise seeds, crushed
1 tsp. salt
II2 tsp. ground nutmeg
2-112 tsp. breadmaker yeast
Egg wash (1 egg white, lightly beaten with 1 Tbsp. watt)
1. Attach the kneading blade in the bread pan. In bread pan, place water,
milk, eggs, butter, orange zest, sugar, flour, anise, salt and nutmeg.
2. With finger, make a small indentation at one side of the flour.
Add yeast to indentation, making sure it does not come in contact
with the liquid ingredients.
3. lnsert bread pan into breadmaker; gently close lid. Plug the power cord
into a wall outlet. Press the “Select” button until the “Sweet” program
is reached. Press the “Crust Color” button to select a crust color (light,
medium 01 dark). Press the “Start/Stop” button.
4. When the machine emits 10 beeps, the bread is ready. Unplug the machine.
Lift the lid and, using oven mitts, firmly grasp the bread-pan handle
and gently twist the pan, then pull up and out of the machine
5. Use a spatula to gently loosen the sides of the bread from the pan;
turn bread pan upside down onto a wire cooling rack and gently shake
until bread falls out onto {rack. Turn bread right-side up. Make sure
the mixing paddle is still attached to the bread pan.
6. Using a pastry brush, lightly brush top of bread with egg wash;
cool about 20 minutes before slicing.
NOTE: Do not use this recipe (containing dairy products) with any
Delay Timer function.
YIELD: 1 L o a f
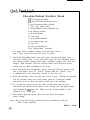
Chocolate-Walnut Zucchini Bread
l/2 cup chopped walnuts
112 cup semi-sweet chocolate pieces
2 cups all-purpose flour, divided
3 large eggs, lightly beaten
113 cup canola or other vegetable oil
2 tsp. baking powder
1 tsp. baking soda
314 cup sugar
1 tsp. ground cinnamon
1 tsp. grated orange peel
l/2 tsp. salt
l/2 tsp. ground allspice
2-l/2 cups shredded zucchini
‘I In a small bowl, combine walnuts and chocolate pieces;
add 2 Tbsp. of the flour and toss well; set aside.
2. Attach the Ikneading blade in the pan; spray the pan and blade with
non-stick cooking spray. In the pan, place eggs, oil, the remaining flour,
the baking powder, baking soda, sugar, cinnamon, orange peel, salt and
allspice. Add zucchini, then the floured walnuts and chocolate pieces
along with any flour remaining in the howl.
3. Insert bread pan into breadmaker; gently close lid. Plug the power cord
into a wall outlet. Press the “Select” button until the “Quick” cycle
is reached Press the “Start/Stop” button to start the cycle.
4. When the machine emits 10 beeps, the bread is ready. Unplug the machine.
Lift the lid and, using oven mitts, firmly grasp the bread-pan handle
and gently twist the pan, then pull up and out of the machine.
5. Use a spatula to gently loosen the sides of the bread from the pan;
turn bread pan upside down onto a wire cooling rack and gently shake
until bread falls out onto rack. Make sure the mixing paddle is still
attachcd to the bread pan.
6. Turn bread right-side up on rack and cool about 20 minutes
before slicing.
NOTE: Do not use this recipe (containing dairy products) with any
Delay Timer function.
YIELD: 1 LOAF
t> 6’
Dough
l-l/4 cups wafer (75” - 85°F)
3 Tbsp. olive or vegetable oil
1 tsp. salt
4 cups bread flour
2-l/4 tsp. breadmaker yeast
1. Insert kneading blade in bread pan.
2. Add ingredients, except yeast, to tbe pan in the order given.
With finger, make a small indentation on one side of the flour.
Add yeast to the indentations,
making sure it does not come into
contact with the liquid ingredients.
3. Insert bread pan into breadmaker; gently close lid. Plug the power cord
into a wall outlet. Press the “Select” button until the “Dough” cycle
is reached. Press the “Start/Stop” button to sfart the cycle.
4. When the machine emits 10 beeps, the dough is ready. Unplug the machine.
Lift the lid, firmly grasp the bread-pan handle and gently twist the pan,
then pull up and out of the machine. Make sure the mixing paddle is still
attached to the bread pan.
To Prepare Pizzas:
1. Place dough in a howl sprayed with non-stick cooking spray
and let rest 15 minutes.
2. Punch down dough, remove from howl and cut dough into 2 pieces.
3. Preheat oven to 425°F. Grease two 12.inch round pizza pans and
using greased hands, work with one piece of dough to fit one pan;
repcat with other piece of dough and pan.
4. Top each piece with sauce, cheeses and other toppings of choice.
5. Bake each pie 20 - 25 minutes until crust is golden brown and topping
is bubbly.
MAKES DOUGH
FOR
Two 12-Inch PIZZAS
SUN400_3831Tstr2SL_EN/SP 3/14/02 12:06 PM Page 18
7
Notes
notes
Notas
7
notas
One-Year Limited Warranty
Sunbeam Products, Inc. (“Sunbeam”) warrants that for a period of ONE year
from the date of purchase, this product will be free from defects in material
and workmanship. Sunbeam, at its option, will repair or replace this product
or any component of the product found to be defective during this warranty
period. Replacement will be made with a new or remanufactured product or
component. If the product is no longer available, replacement may be made
with a similar product of equal or greater value. This is your
exclusive warranty.
This warranty is valid for the original retail purchaser from the date of initial
retail purchase and is not transferable. Keep the original sales receipt. Proof of
purchase is required to obtain warranty performance. Sunbeam dealers,
service centers or retail stores selling Sunbeam products do not have the right
to alter, modify or any way change the terms and conditions of this
warranty.
This warranty does not cover normal wear of parts or damage resulting
from any of the following: negligent use or misuse of the product, use on
improper voltage or current, use contrary to the operating instructions,
disassembly, repair or alteration by anyone other than Sunbeam or an
Authorized Sunbeam Service Center. Further, the warranty does not cover
Acts of God or acts of nature, such as fire, flood, hurricanes and tornadoes.
Sunbeam shall not be liable for any incidental or consequential damages
caused by the breach of any express or implied warranty. Except to the extent
prohibited by applicable law, any implied warranty of merchantability or
fitness for a particular purpose is limited in duration to the duration of the
above warranty. Some states, provinces or jurisdictions do not allow the
exclusion or limitation of incidental or consequential damages or limitations
on how long an implied warranty lasts, so the above limitations of exclusion
may not apply to you. This warranty gives you specific legal rights, and you
may also have other rights that vary from state to state or province to
province. N OTE : For products acquired outside the United States, please see
country specific warranty insert.
16
warranty
Sunbeam Products Inc. (“Sunbeam”) garantiza que, por un período de UN año a
partir de la fecha de compra, este producto estará libre de defectos en el material
y en su fabricación. Bajo la opinión de Sunbeam, reparará o repondrá este
producto o cualquier componente del mismo si se encuentra defectuoso durante
el periodo de garantía. La reposición se hará con un producto o un componente
nuevo o refabricado. Si el producto ya no está disponible, la reposición se hará
con un producto similar de igual o mayor valor. Esta es su garantía exclusiva.
Esta garantía es válida para el comprador original a partir de la fecha de compra
inicial y no es transferible. Guarde el recibo de compra original. La prueba de
compra es requerida para obtener los servicios de garantía. Los vendedores de
productos Sunbeam, los centros de servicio o tiendas que vendan productos
Sunbeam no tienen el derecho de alterar, modificar o realizar ningún otro
cambio a los términos y condiciones de esta garantía.
Esta garantía no cubre el desgaste por uso normal o daños de partes como
resultado de lo siguiente: uso negligente o mala utilización del producto,
uso con una corriente eléctrica o un voltaje inadecuados, uso contrario
a las instrucciones de operación, desensambles, reparaciones o alteraciones
que no sean hechas por Sunbeam o por un Centro de Servicio Autorizado
Sunbeam. Además, lla garantía no cubre factores imprevisibles tales como
incendio, inundaciones, huracanes y tornados.
Sunbeam Products Inc. no se hace responsable por ningún daño emergente
o incidental causado por el rompimiento de cualquier garantía expresa o implícita.
Excepto al alcance prohibido por la ley aplicable, cualquier garantía implícita de
comercialización o arreglo para un propósito particular, está limitada en duración
de la garantía antes mencionada. Algunos estados, provincias o jurisdicciones
no permiten la exclusión o limitación de los daños incidentales o consecuentes
ni las limitaciones en la duración de una garantía implícita, por lo tanto
las limitaciones o exclusiones anteriores pueden no aplicarse en su caso.
Esta garantía le otorga derechos legales específicos y usted también puede tener
otros derechos que varían de un estado a otro o de una provincia a otra.
N OTA : Para productos adquiridos fuera de los Estados Unidos, por favor revise
la tarjeta de garantía incluida por el distribuidor autorizado.
Cómo Obtener Servicio de la Garantía
How to Obtain Warranty Service
Take the product to an Authorized Sunbeam Service Center. You can find the
nearest Authorized Sunbeam Service Center by calling 1-800-458-8407 or
visit our Website at www.sunbeam.com.
Lleve el producto a un Centro de Servicio de Productos Sunbeam Autorizado.
Puede obtener una lista de centros de servicio y otras instrucciones de
reparación/reemplazo llamando al teléfono: 1-800-458-8407 o envíe un
mensaje por correo electrónico a: [email protected].
NO REGRESE ESTE PRODUCTO AL LUGAR DE COMPRA
Garantía Limitada de 1 Año
16
garantía
DO NOT RETURN THIS PRODUCT TO THE PLACE OF PURCHASE
SUN474_3835Tstr4SL_EN/SP
4/29/02
9:23 AM
Page 20
Impreso en China
©2002 Sunbeam Products, Inc. Todos los derechos reservados.
Sunbeam® es marca comercial registrada de Sunbeam Products, Inc.
Distribuido por Sunbeam Products, Inc.
Boca Raton, FL 33431
NO
ENVÍE ESTE PRODUCTO A LA DIRECCIÓN QUE APARECE MÁS ARRIBA
www.sunbeam.com
Para hacer consultas sobre el producto:
Sunbeam Consumer Service
P. O. Box 948389
Maitland, FL 32794-8389
1.800.458.8407
ENVÍE ESTE PRODUCTO AL LUGAR DONDE LO COMPRÓ
TO THE
P LACE
OF
P URCHASE
For product questions:
Sunbeam Consumer Service
P. O. Box 948389
Maitland, FL 32794-8389
1.800.458.8407
www.sunbeam.com
D O N OT S END P RODUCT
TO THE
A BOVE A DDRESS
©2002 Sunbeam Products, Inc. All rights reserved.
Sunbeam® is a registered trademark of Sunbeam Products, Inc.
Distributed by Sunbeam Products, Inc.
Boca Raton, FL 33431
Printed in China
NO
D O N OT S END T HIS P RODUCT