1
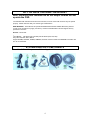
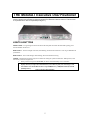
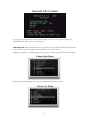
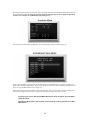
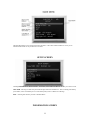
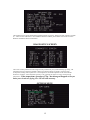
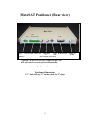
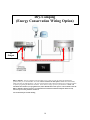
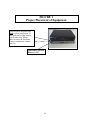
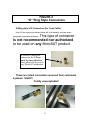
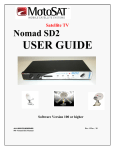
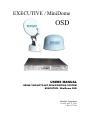
EXECUTIVE / MiniDome
OSD
USERS MANUAL
USING THE MOTOSAT DISH POINTING SYSTEM
EXECUTIVE / MiniDome OSD
MotoSAT Corporation
Created April 22, 2003
1-800-247-7486
CONGRATULATIONS!
…on your purchase of your Satellite RV-TV system from MotoSAT.
We are excited here at MotoSAT to introduce to you the cutting edge of Satellite
technology. The features of the new dish positioning system will have you
feeling in total control.
SYSTEM FEATURES
•
•
•
•
•
•
•
•
•
•
Totally automated. Just select “Find Satellite” and the dish
will do the rest
Control your satellite system with your receivers remote
control
On-Screen menus allow for easy configuration of your system
Move to any satellite at will with your remote control
Locate ANY satellite and add it to your system
Quick reacquiring of last acquired satellite
Re-peaking option if vehicle has settled
Auto Stow within one minute if the vehicle has been moved
Manual stowing of Dish without having to turn on TV
Works with DirecTV, Dish Network and Bell Express VU with
Infrared remote capability
2
TABLE OF CONTENTS
Do You Have The Right Receiver?………………………….….
MotoSAT Shipped Components………………………………...
The MotoSAT Positioner…………………………………………
How to Reset Memory ……………………………………
Functions of your MotoSAT System…………………………..
Using your MotoSAT System…………………………………...
THE MAIN MENU SCREEN………………………………………
Changing receiver output between channel 3 and 4
THE SETUP SCREEN…………………………………………....
THE INFORMATION SCREEN………………………………….
THE DIAGNOSTIC SCREEN……………………………………
High Operating Temperature warning
THE OPTIONS MENU SCEEN………………………………....
THE SATELLITE SETUP SCREEN……………………………
THE POWER BUTTON MENU SCREEN……………………..
How to use the OSD with any receiver………………………
Tone Setting
WIRING DIAGRAM………………………………………………
Rear View
Dry-Camping (Power Saving)
WARRANTY ………………………………………………………
TROUBLESHOOTING…………………………………………..
FIGURE 1 (Receiver set back).……………………………….
FIGURE 2 (O-Ring style F-Connectors) ……………………
FIGURE 3 (A/B Switches) ……………………………………..
UPDATING RECEIVER SOFTWARE …………………………
3
4
4
5
5
6
7
8
11
12
13
13
15
16
16
17
20
24
25
26
27
28
DO YOU HAVE THE RIGHT RECEIVER?
Note: Receivers with remotes that do not output Infrared will not
operate the OSD.
Your MotoSAT dish will work with most all new receivers, but some of the older receivers may not operate
properly. Please make sure that your receiver type is listed below*:
DISH NETWORK - The Positioner will operate with most all Dish Network Satellite Receivers, past and
current (some exceptions may apply, see above). Please consult MotoSAT Technical support with any
questions or concerns.
DirecTV – Works with:
*RCA Models -
420 Series (420, 440 480) and 430 Series (430, 450, 485).
Sony SAT-A65, B65, A65-A, B65-A
Hughes GCEBO, GCEBOA, GAEBO, GABEOA, Remotes on these models are EXTREMELY sensitive and
are not recommended.
SYSTEM SHIPPED COMPONENTS
Your MotoSAT satellite system would have shipped with these components.
4
THE MotoSAT Executive OSD Positioner
NOTE – You will need to place the MotoSAT Positioner (OSD) inside the same cabinet that your receiver is
located. Wireless communication is happening between the MotoSAT Positioner and the TV Receiver that
is not possible when units are separated (see Figure 1).
LIGHTS & BUTTONS
GREEN LIGHT - The green light on the far-left side of the front panel shows that the Dish LNB is getting power
from the Satellite TV Receiver.
RED LIGHT 1 – The first red light on the left, when blinking, shows that the Positioner is receiving a command from
your Remote.
RED LIGHT 2 – The second red light, when blinking, shows that the dish is moving.
POWER - The MotoSAT Positioner only has one button for turning the system ON and OFF. When pressed, it will
turn ON the positioner and glow blue.
a. When pressed for longer than 10 seconds, this button will automatically stow a raised dish.
b. When pressed for longer than 30 seconds, this button will erase the Remote Setting and then the
display will ask you to press the Guide button on your remote to pick your receiver type. This
task will also erase all satellite selections except 101° (DirecTV), 119° (Dish NetWork) and 91°
(Bell ExpressVu)
This is a Memory Reset Function
5
FUNCTIONS OF YOUR MotoSAT SYSTEM
AUTOMATIC SEARCH AND LOCK ON THE CORRECT SATELLITE
MotoSAT gives you on-screen control of your satellite system. No matter where you find yourself in the
United States, your system is smart enough to make sure you have connected to the satellite of your
choice. Simply choose “Find Satellite” on the Main Menu screen displayed on your TV and follow the
on-screen instructions.
STOWING THE DISH
Stowing the dish is only necessary when using the MotoSAT Executive “open face” dish, which does
need to be stowed for traveling. You have the option of stowing the dish from the on-screen controls, or
by pressing and holding the ON button of the Positioner for more than 10 seconds.
QUICK RE-ACQUIRING OF LAST KNOWN SATELLITE
Sometimes you may have wanted to stow the dish because of high winds of some other reason. As
long as the vehicle has not moved, you may choose this option from the main menu and the dish will
rise up and go directly to the satellite with out having to do a search pattern.
MOVING THE DISH TO ANOTHER SATELLITE
You have the option of moving your dish to another satellite at will when a different satellite has different
programming. To change satellites while you’re watching TV, press the OFF button on the remote…this
action will bring up the MotoSAT Power Off menu that allows you to switch to another satellite. Here
you may highlight the satellite you wish to move to.
NOTE – All MotoSAT systems normally come with only one Satellite location. Adding other satellite
locations is easy. All you need are the “working” satellite longitudes from your dealer and enter these
longitudes in the “Add or Remove Satellite” menu.
RE-PEAKING ON SATELLITE IF RIG HAS SETTLED
If you own a bus or other rig that settles over time, this option is for you. Instead of stowing and
relocating the satellite, which is time consuming, you may simply choose “Re-Peaking” and the dish will
begin to re-peak on the satellite to strengthen the signal. To get to the repeaking options, simply press
the OFF button on the remote and the “Power Off Button” menu will appear.
NOTE – You must be on the satellite for this function to work. Re-Peaking only recenters the dish on the
satellite.
ADDING AND REMOVING SATELLITES
Normally, your MotoSAT dish will come with 1 satellite location. You have the ability to add other
satellites to your system, and then quickly move the dish to each of them any time you like.
To ADD a satellite, please go to the “Add or Remove Satellite” menu.
SAFETY STOWING OPTIONS
Your MotoSAT system has certain Stow features that you may desire to use or not. There are three
options:
•
•
•
You can automatically stow dish if the power goes off on the Satellite Receiver.
You can automatically stow the dish if AC power is lost to the rig.
You can automatically stow the dish of the signal is lost. This feature is good if you
accidentally move the rig without stowing the dish first.
To change any of these items, please go to the “Options” menu screen.
CHANGING DISH SIZE
Your installer normally sets this function. You have the option of choosing an 18” dish or a 24” dish.
Default is 18”. This setting is found on the “Options” menu screen. (MiniDome is same as 18” dish).
6
CHANGING REMOTE CONTROL TYPE
Your installer normally sets this function. However, you may have purchased a new Satellite Receiver,
in which case, you will need to tell the MotoSAT positioner which kind of Satellite Receiver you are now
using. Holding the front panel button in for 30 seconds can also do this function. If the power button is
held in for 30 seconds it will also erase satellites stored in memory. (See POWER pg. 4 for details).
To make this selection, please go to the “Options” menu screen.
TESTING DISH
A Test Dish function is automatically executed at time of installation. Any further selection of this
feature will check all functional capabilities of the mount. If Test Dish fails, go to Trouble Shooting.
7
USING YOUR MotoSAT SYSTEM
There are four basic operations that you will use any time you want to watch television.
1. TURNING ON THE SYSTEM
2. FINDING SATELLITE
3. STOWING THE DISH
4. TURNING OFF THE SYSTEM
Of course there are many other functions you may perform, but for now, let’s focus on getting the TV working.
TURNING ON THE SYSTEM
Two things need to be turned ON in order for your system to function.
•
•
The MotoSAT Positioner box
Your television
NOTE: Your Satellite Receiver will be turned on by The MotoSAT Positioner when it needs to be turned on. The
MotoSAT “ON” button illuminates blue when it is on. Obviously, the TV must be turned on.
When the system turns on, you should immediately see the MotoSAT Positioner Main Menu Screen seen below, if not,
press “Menu” on your satellite receivers’ remote.
CHANGING RECEIVER OUTPUT TO CHANNEL 3 OR 4*
To change the output of your satellite receiver from 3 to 4 or back, simply (with FIND SATELLITE
selected) press the 3 key on your remote for channel 3 and/or 4 for channel 4.
Note: DON’T FORGET TO CHANGE THE CHANNELS ON YOUR TV TO CORRESPOND TO THE
CHANGE JUST MADE.
*Some OSD Positioners have a manual 3 / 4 switch in the back. If your system has this manual
switch, then, you must do it manually.
8
THE MAIN MENU SCREEN
If you do not see the MotoSAT Screen appear when you power up the system, please go to
TROUBLESHOOTING at the end of the manual.
FIND SATELLITE - While the Main Menu screen is on your TV screen, use your Receiver’s Remote to navigate this
screen. In this case, you will be using the UP and DOWN arrows on the remote control.
Highlight the “Find Satellite” command and then press the “SELECT” button on your remote. This menu will appear:
Choose State Menu
Please select your State and press the Select Key on your Remote to bring up the City window.
Choose City Menu
9
Please choose the city you are in or closest to. Once you do that, the below menu will appear and the dish will start to
move automatically. Note: Pressing the #1 button at this time will open up the receivers Signal Strength Menu
and allow you to monitor the satellite finding and peaking process.
Searching Menu
Once the dish has found satellite, the MotoSAT screens will disappear, and you will be watching TV.
POWER BUTTON MENU
When you’re watching TV and you hit the “Power Off” button on your Satellite Receiver, the first screen that will
appear will be this Power Button Menu. Here you have the option to move your dish to a different satellite, Stow your
Dish, or to go to the Main Menu screen or simply exit.
Notice that you have the option to PEAK on your current satellite. This is used for when your rig has settled, or the
dish has moved slightly and you want to re-peak so that your signal strength is as good as it can be.
If you turn your receiver OFF and the Main Menu Screen does not appear, press the Menu
button to acquire.
Pressing the Menu button, with any other screen showing, will bring you back to the Main
Menu Screen.
10
The Main Menu allows you to perform some basic operations. It also shows which Satellite TV service you are
subscribed and whether or not your dish has ever tested.
SETUP SCREEN
Choosing INFORMATION, DIAGNOSTICS, OPTIONS, and SATELLITE SETUP will take you to those screens.
TEST DISH - Selecting Test Dish will put the dish through a full motor and limit test. This is normally performed by
your installer, and we recommend you run a Test Dish anytime you have a Motor Error Message.
EXIT – Selecting Exit will take you back to the Main Menu.
INFORMATION SCREEN
11
The information screen shows manufacturing information about your system. When it was built, and who it was built
by… which of course is MotoSAT. Also included is MotoSAT’s address, phone numbers and web site as well as
Hardware and Software Revision information.
DIAGNOSTICS SCREEN
This screen is used by MotoSAT technical support to help trouble shoot your system when things go wrong. The
information here lets us pinpoint a problem so that it can be fixed as quickly as possible. Notice the Temp
(Temperature) reading on the top left corner. This temperature is the actual temperature of the cabinet that the
Positioner is located in. If the temperature gets above 150° a message will appear on screen, warning of high
temperatures.
If the temperature goes above 175°… the message will appear to let you
know your circuits are frying, over 185 will void warranty.
OPTIONS MENU
12
STOW DISH ON - You have the option of having the dish stow when Power is turned off, when AC power is turned
off and when the signal is lost (a nice safety feature for when you drive off with the dish up). You may change these
options to NO by selecting them with your remote and pressing the LEFT and RIGHT keys.
SENSITIVITY - 18-inch dishes should be set to 3.
24-inch dishes it should be set to 5.
DISH SIZE – Depending on which size dish you ordered (the default is 18”), the dish size will need to be set… The
installer normally will do this. (Executive 18” or 24”, MiniDome 18”)
TONE SETTING – (This optional setting is available on software versions 305 and later. To obtain latest
software go to www.motosat.com/osd and follow software loading procedures.) This setting option adjusts the
ability of the OSD to recognize the proper tone setting to allow for proper satellite acquiring.
a. The tone settings for RCA, Dish Network, and Bell Express Vu receivers should be 7.
b. The tone settings for Sony and Hughes receivers it should be set to 15.
Why would you need to adjust the Tone Settings?
If your system stops or peaks on the proper satellite, but continues to search or, if your system stops or
peaks and stays on an improper satellite you will need to adjust TONE SETTING.
Tone setting may be adjusted in increments of 100 by using the right or left arrow keys.
a.
If the system stops on the right satellite but moves on then, lower the tone setting
value.
b.
If the system stops on the wrong satellite and stays there, raise the tone setting
value.
CHANGE REMOTE TYPE – (Note: The remote control that came with the Satellite Receiver must be used.
Remotes not outputting and Infrared signal is not authorized or acceptable. Universal remote controls must
match manufacture of the satellite receiver or your system will not work properly). Your system should be
working fine from the installer, but there may be a time when you purchase a new Receiver system. This would be the
time that you would change the new satellite receiver to be recognized by the MotoSAT system. If you select this
option, you will be shown a number of remote types that will appear like a slideshow. Press the “GUIDE” button on
your remote when the correct remote type appears. With some remotes, you will receive a second screen where you
will be asked to select what model receiver you have. Highlight the correct receiver, and press select. That’s it!
IGNITION STOW – This option is done by tapping into a circuit that is activated at the time you are ready to start
your RV. This means, any 12-24 VDC circuit that comes alive when you want to move your RV, such as Brake Light,
TV Travel Turn off Switch, etc. This voltage, when present, will cause the dish to return to the stowed position for
traveling automatically. See inset below.
1
+
2
-
Pins
3
Ignition Stow
12 to 24
VDC
13
Power Control Cable Out to TV
Antenna In
Video Data Interface Satellite In
+ or
Out
(LNB)
Ignition
Dry-Camping connection
Stow
SATELLITE SETUP SCREEN
The great thing about your satellite system is that you can switch from one satellite to another at will to take advantage
of different programming on different satellites. Note: some receivers may not load their Guide properly on
alternate satellites. This is a receiver issue; contact your receiver manufacture for assistance.
This screen is a where you add and remove satellites to the positioner. You may also change the satellite that you want
the system to search for when you select the Find Satellite Option on the Main Menu. All satellites in orbit are given
a Longitude number. Numbers like 91, 101, 110, 119, are all satellite locations. On the above screen are listed 4
satellites with one open slot left to add another satellite. The maximum number of satellites you can have programmed
is 5.
To ADD a satellite, simply highlight “Add Satellite” and press “Select” on the remote. You then will simply enter a
longitude address on that screen, and that’s it!
To change the satellite options, highlight the satellite you want to change press Select or OK. You may not change the
satellite that is considered the default if you try to select that one nothing will happen. When you select a satellite to
change its options another screen will come up, press the Select or OK button to make it the default, press the 5 button
to delete it.
14
Satellite Options
To get to the Satellite Options Screen press the Select or OK button on a highlighted satellite on the satellite setup
screen. Note: You can not change the options on the satellite that is considered the default. If you select the default
satellite, nothing will happen. If you select one of the other satellites then you may press the select or OK button to
make it the default or the 5 button to delete it.
WIRING DIAGRAM
A professional installer should have installed your unit, however, you may need to
unplug and re-plug in cables from time to time. The diagram below shows how your dish
is wired inside your Rig.
15
MotoSAT WIRING DIAGRAM
16
MotoSAT Positioner (Rear view)
Rear View
1 2 3*
Pins
123456789
9 Pin
Power Control Cable Out to TV Antenna In
Video Data Interface Satellite In
+ or
Out
(LNB)
Ignition *
Dry-Camping connection
*Ignition = When 12 to 24 VDC is applied to pin 3 the
dish will return to stowed position automatically.
**Pin 9 – Purple wire going to this position is optional.
Positioner Dimensions
1 ¼” inch tall, by 11” inches wide, by 9” deep
17
Dry-Camping
(Energy Conservation Wiring Option)
TV
Output
DRY-CAMPING - This Dry Camping connection allows you to conserver power by turning off the MotoSAT
positioner after you’ve found satellite. This Cable must be connected for this option to work. When ON Satellite,
simply turn OFF your OSD Positioner. All power to the Positioner will be disconnected and your system will continue
to operate by bypassing the MotoSAT Positioner. There will be no usage of power by the Positioner. NOTE: All
Automatic Stow functions (except Ignition Stow) will be disabled due to lack of power to the Positioner when the
DRY-CAMPING option is activated. The Automatic Stow Functions mentioned in Options Menu can only
activate if power to the positioner remains on.
Also excellent help for trouble shooting.
18
TROUBLESHOOTING
THE MOTOSAT SCREEN DOES NOT APPEAR
1.
If you can’t get a MotoSAT menu to appear on your television, make sure it isn’t something simple like
cables not being connect properly or that the power is OFF on your Television, TV Receiver, or MotoSAT
positioner.
2.
Next… It may be that your Television is on the wrong channel. Turn the Television channel to 3… and if
that doesn’t work… Change it to 4. (In this case you are not changing the Satellite Receiver Channels, just
the television itself.)
3.
If that didn’t work, press the OFF button on the Satellite Receiver Remote Control. This should bring up the
“Power Off” Menu. On this menu is a selection that will take you to the Main Menu.
4.
Disconnect and reconnect 12 VDC to Positioner.
“Please Wait” APPEARS AND DOES NOT GO AWAY
1. Positioner and Receiver not stacked properly (see figure 1).
2. Audio cables not connected.
3. On Dish Network receivers 2700/2800 series, audio volume may not be turned to
maximum.
5. Improper remote option selected.
6. Receiver latched up. Disconnect 110 power and reconnect (don’t just turn Off then ON, remove the power
and reapply).
7. Dish Network/Bell View Express receivers must have a security or Smart card inserted all the way.
8. Fluorescence lights, in front of the receiver, have been known to cause the system to stay on “Please wait”
after you selected the “City”.
“Satellite Receiver turns ON then OFF”
1. Video and/or Audio wires are not connection to the controller properly.
2. Positioner and Receiver not stacked properly (see figure 1).
3. Remove power from the Satellite Receiver and reapply.
LOCATES SATELLITE THEN CONTINUES SEARCH OR DOES NOT STOP ON CORRECT SATELLITE.
1.
If you are using a Dish Network receiver’s model numbers 2700 or 2800 the volume control for the
receiver must be set at maximum. Failure to do so will result in not finding the satellite.
DURING SEARCH, THE DISH STOWS BEFORE FINDING SATELLITE.
1. No power from satellite receiver to OSD Positioner. (No GREEN light on Positioner.)
2. Dish movement may be restricted.
21
FIGURE 1
Proper Placement of Equipment
Receiver has to be placed just
back of clear plastic front. If
placed forward of this location
it will cause error “Please
Wait” because the Positioner
cannot communicate with the
receiver.
Approximate set back
distance is 1/4”
22
FIGURE 2
“O” Ring Style Connectors
O-Ring style of F-Connectors (for Coax Cable)
Use of Coax connectors shown below will void warranty and can cause
This type of connector
is not recommended nor authorized
to be used on any MotoSAT product.
equipment intermittent problems.
If you use O-Ring style
connectors, the O-Rings
must be removed before
being allowed to be used in
any MotoSAT installation.
These are actual connectors removed from customers
systems. UGH!!!!
Totally unacceptable!!
23
FIGURE 3
MotoSAT
Bulletin 010501
A/B Switches
Product effected: All MotoSAT products and all satellite systems in general.
Problem: a. Insertion of A/B switch into satellite signal cable going to the roof mounted
antenna can cause selective dropping of channel frequencies.
b. Loss of certain channels can result. (Usually, but not limited to, Network Feeds
on DTV).
Explanation: The practice of utilizing a mechanical switch (A/B
switch) to disconnect the roof mount antenna and connect to a
ground mount can cause problems. The problems are extremely
difficult to diagnose since symptoms can be related to many different areas. They will
often show up as:
a. Loss of one or more channels.
b. Loss of one or more transponders.
c. Not allowing the automatic system to find the satellite.
d. Freeze framing on one or more channels.
e. Lower than normal signal strength on one, several or all of the
transponders.
Solution: If you have an A/B switch in-line with your roof mount antenna (automatic
or not) and you exhibit one or more of the above symptoms, then bypass the A/B switch
and see if the problem goes away. If it does, remove the A/B Switch and find a way
NOT TO USE IT.
Call for more details or suggestions contact your MotoSAT dealer.
24
Updating of Operating Software in the
OSD Positioner
Your OSD Positioner contains software which may be reloaded (updated) by the
use of a computer and a 9 pin serial cable. The procedure for updating your
software to the latest version is as follows:
1. Go to MotoSAT web site to obtain the most current revision of software. The site
is www.motosat.com/osd.
2. Select OSD Software and download to a folder of your choice.
3. Select Exec OSD Manual and download to a folder that you can access. Some
changes may affect the way your system currently operates, so you will want to
have the latest manual.
4. Connect your 9 pin serial cable from your computer to the back of the OSD
Positioner.
5. Turn off the OSD Positioner
6. Start HyperTerminal on the computer. This is usually done by going to
a. Start - Programs – Accessories – Communications – HyperTerminal
(Note: make sure that HyperTerminal is setup for XON/SOFF flow control,
8 data bits, 1 stop bit, no parity, 9600 baud).
7. Turn on the OSD Positioner and press the “*” key within 3 seconds. You will get
some copyright info and a local prompt (local>). If you see nothing, you are
connected to the wrong communications port. If you see, “Main Menu OSD
Diags” you took too long to press the “*” key. Turn the Positioner back off then
on again. The “*” key must be pressed within 3 seconds of the ON button being
pressed.
8. At the local> prompt, type “eload”. Local> eload will appear. Press “Enter”.
9. In the HyperTerminal menu, select “transfer” and then select “send text file”.
10. Select the file “EeDataNNN.text” where NNN is the version number of the data
being loaded.
11. When finished you will ger the local> prompt back.
12. At the local> prompt, type “fbulk”. Local> fbulk will appear. Press “Enter”.
13. You will get a local> prompt back, at this prompt type “fload”. Local> fload will
appear. Press “Enter”.
14. In the HyperTerminal menu, select “transfer” and then select “send text file”.
15. Select “the file OsdFlashNNN.txt” where NNN is the version number of the data
being loaded.
16. At the local> prompt, type “default”. Press “Enter”.
17. When you get back to the local> prompt, you are done.
Your OSD Positioner now has the latest version of the MotoSAT software loaded. You
are now ready to take advantage of any and all software updates which will affect the
overall performance of your system.
25
MORE INFORMATION…
Please visit www.motosat.com for the latest information regarding your MotoSAT
products or e-mail [email protected] for additional information.
CONTACTING MOTOSAT…
MotoSAT Technical Assistance can be reached at 800-247-7486. Our hours of
operation are 9AM to 5PM Monday through Friday Mountain Time.
OUR ADDRESS IS…
MotoSAT
2343 South, 2300 West
Salt Lake City, UT 84119
26