1
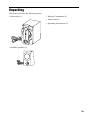
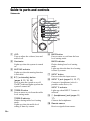
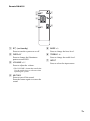
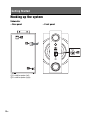
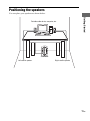
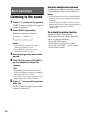
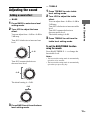
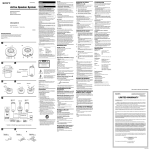
4-140-464-21(2)
Active
Speaker
System
Operating Instructions
SRS-DB500
©2009 Sony Corporation
WARNING
To reduce the risk of fire or electric
shock, do not expose this apparatus
to rain or moisture.
To reduce the risk of electrical shock,
do not open the cabinet. Refer
servicing to qualified personnel only.
Do not install the appliance in a confined
space, such as a bookcase or built-in cabinet.
To reduce the risk of fire, do not cover the
ventilation opening of the apparatus with
newspapers, tablecloths, curtains, etc.
Do not place the naked flame sources such as
lighted candles on the apparatus.
To reduce the risk of fire or electric shock, do
not expose this apparatus to dripping or
splashing, and do not place objects filled
with liquids, such as vases, on the apparatus.
As the main plug is used to disconnect the
system from the mains, connect the system
to an easily accessible AC outlet. Should you
notice an abnormality in the system,
disconnect the main plug from the AC outlet
immediately.
The system is not disconnected from the
mains as long as it is connected to the AC
outlet, even if the system itself has been
turned off.
Excessive sound pressure from earphones
and headphones can cause hearing loss.
Do not expose batteries or apparatus with
battery-installed to excessive heat such as
sunshine, fire or the like.
2GB
For customers in Europe
Disposal of Old
Electrical &
Electronic
Equipment
(Applicable in the
European Union
and other European
countries with
separate collection
systems)
This symbol on the product or on its
packaging indicates that this product shall
not be treated as household waste. Instead
it shall be handed over to the applicable
collection point for the recycling of
electrical and electronic equipment. By
ensuring this product is disposed of
correctly, you will help prevent potential
negative consequences for the environment
and human health, which could otherwise be
caused by inappropriate waste handling of
this product. The recycling of materials will
help to conserve natural resources. For more
detailed information about recycling of this
product, please contact your local Civic
Office, your household waste disposal
service or the shop where you purchased the
product.
For customers in Europe
Disposal of waste
batteries (applicable
in the European
Union and other
European countries
with separate
collection systems)
This symbol on the battery or on the
packaging indicates that the battery provided
with this product shall not be treated as
household waste.
On certain batteries this symbol might be
used in combination with a chemical symbol.
The chemical symbols for mercury (Hg) or
lead (Pb) are added if the battery contains
more than 0.0005% mercury or 0.004% lead.
By ensuring these batteries are disposed of
correctly, you will help prevent potentially
negative consequences for the environment
and human health which could otherwise be
caused by inappropriate waste handling of
the battery. The recycling of the materials
will help to conserve natural resources.
In case of products that for safety,
performance or data integrity reasons require
a permanent connection with an incorporated
battery, this battery should be replaced by
qualified service staff only.
To ensure that the battery will be treated
properly, hand over the product at end-of-life
to the applicable collection point for the
recycling of electrical and electronic
equipment.
For all other batteries, please view the
section on how to remove the battery from
the product safely. Hand the battery over to
the applicable collection point for the
recycling of waste batteries.
For more detailed information about
recycling of this product or battery, please
contact your local Civic Office, your
household waste disposal service or the shop
where you purchased the product.
Notice for customers: The
following information is only
applicable to equipment sold in
countries applying EU
Directives.
The manufacturer of this product is Sony
Corporation, 1-7-1 Konan Minato-ku
Tokyo, 108-0075 Japan. The Authorized
Representative for EMC and product
safety is Sony Deutschland GmbH,
Hedelfinger Strasse 61, 70327 Stuttgart,
Germany. For any service or guarantee
matters please refer to the addresses given
in separate service or guarantee
documents.
3GB
Table of Contents
Unpacking.................................... 5
Guide to parts and controls.......... 6
Getting Started
Hooking up the system ................ 8
Positioning the speakers ............ 11
Basic Operations
Listening to the sound ............... 12
Adjusting the sound................... 13
Changing the display ................. 14
Additional Information
Troubleshooting......................... 15
Precautions ................................ 16
Specifications ............................ 17
4GB
Unpacking
Check that you have the following items:
• Subwoofer (1)
• Remote Commander (1)
• Audio cord (1)
• Operating Instructions (1)
• Satellite speakers (2)
5GB
Guide to parts and controls
Subwoofer
1
3
2
4
5
6
7
8
9
q;
A JOG
Turn to adjust the volume, bass and
treble level.
B Illuminator
Lights up when the system is turned
on.
C MUTING indicator
Lights up when the muting function
is activated.
D "/1 (on/standby) button
(pages 9, 12, 15, 16)
Press to turn the system on or off.
The "/1 indicator lights up when the
system is turned off.
E TREBLE button
Press to enter or exit from the treble
level setting mode.
TREBLE indicator
Flashes during treble level setting
mode.
Lights up when the treble level
setting is done by remote.
6GB
F BASS button
Press to enter or exit from the bass
level setting mode.
BASS indicator
Flashes during bass level setting
mode.
Lights up when the bass level setting
is done by remote.
G INPUT button
Press to select the input source.
H INPUT 2 jack (pages 10, 12, 17)
Connect to headphones jack of a
portable audio device, etc.
INPUT 2 indicator
Lights up when INPUT 2 source is
selected.
I i (headphones) jack (pages 12,
17)
Connect the headphones.
J Remote sensor
Receives signals from remote.
Remote RM-AS31
7
6
5
4
1
2
3
A "/1 (on/standby)
Press to turn the system on or off.
E BASS +/–
Press to change the bass level.
B DISPLAY
Press to change the illuminator
pattern around JOG.
F TREBLE +/–
Press to change the treble level.
C VOLUME +/–*
Press to adjust the volume.
G INPUT
Press to select the input source.
* The VOLUME + button has a tactile dot.
Use the tactile dot as a reference when
operating the system.
D MUTING
Press to turn off the sound.
Press the button again to restore the
sound.
7GB
Getting Started
Hooking up the system
Subwoofer
– Rear panel
– Front panel
A
B
1
2
INPUT 2
D
C
1 To satellite speaker (left)
2 To satellite speaker (right)
8GB
A INPUT 1 L/R jacks
Use an audio cord (supplied) to connect INPUT 1 jack to LINE OUT or headphones jack
of portable audio device, computer, etc.
Portable audio device, computer,
etc.
L
INPUT 1
Red
White
To INPUT 1
jack
To LINE OUT or
headphones jack
(stereo mini-jack)
Getting Started
R
Audio cord (supplied)
B Satellite speakers
Be sure to insert the connector straight into the terminals.
L
R
SPEAKER
C Power
Connect the power cord to a wall outlet after you have make all connections. The "/1
indicator is turned on. When you press "/1, the system turns on and the "/1 indicator is
turned off.
Continued l
9GB
D INPUT 2 jack
Use a connecting cord (not supplied) to connect INPUT 2 jack to LINE OUT or
headphones jack of portable audio device, etc.
Subwoofer
Portable audio device, etc.
To INPUT 2
jack
To LINE OUT or
headphones jack
(stereo mini-jack)
Connecting cord (not supplied)
Note
When the system is connected to the monaural jack of the source device, the sound may not come
through the right satellite speaker. In such a case, use the optional plug adaptor PC-236MS or PC-234S.
Using the remote
Slide and remove the battery compartment lid, and insert the two R03 (size AAA) (not
supplied) batteries, E side first, matching the polarities shown below.
E
e
e
E
Notes
• If you do not use the remote for a long period of time, remove the batteries to avoid possible damage
from battery leakage and corrosion.
• When the remote no longer operates the system, replace both batteries with new ones.
• Batteries installed devices shall not be exposed to excessive heat such as sunshine, fire or the like.
10GB
Positioning the speakers
You can place your speakers as shown below.
Getting Started
Portable audio device, computer, etc.
Subwoofer
Left satellite speaker
Right satellite speaker
11GB
Using the headphones/earphones
Basic Operations
Connect the headphones/earphones to the
i (headphones) jack on the subwoofer.
Notes
Listening to the sound
1 Press "/1 to turn on the system.
The "/1 indicator lights off when the
system is turned on.
2 Press INPUT repeatedly.
Each press changes as follows:
t INPUT 1 t INPUT 2
Notes
• Select INPUT 1 to listen to device
connected to INPUT 1 jack.
• Select INPUT 2 to listen to device
connected to INPUT 2 jack.
3 Start playing on the connected
device.
4 Turn JOG (or press VOLUME +/–
on the remote) to adjust the
volume.
Tips
• Depending on the connected device, it
may be necessary to adjust the volume on
the connected device as well.
• The volume level on the system may vary
depending on the connected device.
5 Press "/1 to turn off the system
after use.
The "/1 indicator lights up when the
system is turned off.
12GB
• If the connected device has a BASS BOOST
function, set it to off as it may cause audible
distortion.
• If connecting the speaker to a device with a
built-in radio or tuner, radio reception may not
occur or sensitivity may be reduced
significantly.
To activate the muting function
Press MUTING on the remote.
The muting function will be canceled
when you do the following.
• Press MUTING again.
• Turn JOG to increase the volume.
Press the VOLUME + on the remote.
• Turn off the system.
— TREBLE
Adjusting the sound
Adding a sound effect
1 Press TREBLE to enter treble
level setting mode.
2 Turn JOG to adjust the treble
effect.
1 Press BASS to enter bass level
You can adjust from –8 dB to +8 dB in
2 dB step.
Turn JOG clockwise to increase treble
level.
Turn JOG counterclockwise to
decrease treble level.
The initial setting is 0 dB.
setting mode.
2 Turn JOG to adjust the bass
effect.
You can adjust from –8 dB to +8 dB in
2 dB step.
Turn JOG clockwise to increase bass
level.
3 Press TREBLE to exit from the
treble level setting mode.
Basic Operations
— BASS
To set the BASS/TREBLE function
using the remote
JOG
+8 dB
Press BASS/TREBLE +/– to change the
bass/treble level.
Notes
MUTING
Turn JOG counterclockwise to
decrease bass level.
• The bass/treble setting mode is automatically
quit after a few seconds.
• The bass/treble setting mode is automatically
quit when you press any key.
JOG
–8 dB
MUTING
The initial setting is +2 dB.
+2 dB
JOG
MUTING
3 Press BASS to exit from the bass
level setting mode.
13GB
Changing the display
Changing the illuminator
You can select the illuminator as you
want.
Press DISPLAY on the remote
repeatedly to select the illuminator
you want when the system is
turned on.
Each time you press the button, the
illuminator changes cyclically as follows:
Deco light mode1) t Volume mode2) t
Power meter mode3) t Off
1)
This mode is the default mode. The
illuminator flashes randomly.
2)
The illuminator shows the volume level.
3)
The illuminator lights up base on the input
source level.
Notes
• When you turn JOG +/– (or press
VOLUME +/– on the remote), illuminator
shows the current volume level.
• When you adjust the bass/treble level,
illuminator shows the current bass/treble
level.
14GB
The sound is distorted.
Additional Information
Troubleshooting
Should you encounter a problem with
your speaker system, check the following
list and take the indicated measures. If the
problem persists, consult your nearest
Sony dealer.
When the "/1 indicator flashes
After checking the above items
and fixing any problems, wait for
5 minutes before plug in the power
cord again and turn on the system. If
the "/1 indicator still flashes, or if the
cause of the problem cannot be found
even after checking all the above
items, consult your nearest Sony
dealer.
General
There is hum or noise in the speaker
output.
• Make sure all the connections have been
correctly made.
• Make sure the connected device are not
positioned too close to the TV set or
monitor.
The sound has suddenly stopped.
• Make sure all the connections have been
correctly made.
• Make sure the muting function is turned
off.
There is no sound output from the
headphone.
• Check the headphone connection.
• Check that the audio source on the
selected channel is played back.
• Make sure the muting function is turned
off.
Additional Information
Immediately unplug the power cord,
and check the following items.
• Are you using only the supplied
speakers?
• Are the + and – speaker cords
short-circuited?
• Is anything blocking the ventilation
holes on the rear of the subwoofer
unit?
• Turn JOG counterclockwise.
• Turn down the volume level on the
connected device. Or, if the connected
device has a BASS BOOST function,
set it to off.
The remote does not function.
• Remove the obstacles between the
remote and the unit.
• Move the remote closer to the unit.
• Point the remote at the unit’s sensor.
• Replace the batteries.
• Move the unit away from the
fluorescent light.
There is no sound.
• Turn JOG clockwise (or press
VOLUME + on the remote).
• Turn up the volume on the connected
device.
• Check that headphones are not
connected.
• Check the speaker connections.
• Make sure the muting function is turned
off.
• Check that you have selected the correct
device with the INPUT button.
Continued l
15GB
Speakers
There is no sound from the speaker
system.
• Make sure all the connections have been
correctly made.
• Make sure the satellite speaker and the
connected device have been turned up
properly.
• Connect only the supplied speakers.
• Check if the headphones are connected.
If there are, disconnect them.
To reset the system to factory
settings
If the system still does not operate
properly after performing the above
measures or other troubles not described
above occur, reset the system as follows:
1 Unplug the power cord.
2 Wait for 5 minutes before plug the
power cord back in.
3 Press "/1 to turn on the system.
4 Press INPUT and "/1 at the same
time and hold for 3 seconds.
The system is reset to the factory settings.
You need to readjust all the settings you
made, such as volume, bass level, treble
level and input source.
Precautions
On safety
• The nameplate indicating operating
voltage, power consumption, etc., is
located on the rear exterior.
• Before operating the system, be sure
that the operating voltage of the system
is identical with that of your local power
supply.
• Unplug the system from the wall outlet
if it is not to be used for an extended
period of time. To disconnect the cord,
pull the cord by grasping the plug.
Never pull the cord itself.
• Should any liquid or solid object fall
into the system, unplug the system’s
power cord and have the system
checked by qualified personnel before
operating it any further.
• For efficient heat dissipation, ensure
there is sufficient space to the rear of the
subwoofer. Also, avoid placing objects
on the unit.
• Do not insert your hand or any objects
into the hole of the subwoofer and
satellite speaker.
On power source
If main plug of the system is disconnected
from the AC outlet while the system is on
standby mode, the "/1 indicator will
continue to lights up for about 2 minutes,
depends on time taken for the internal
high efficiency audio grade switching
mode power supply to be fully
discharged.
On operation
• Do not drive the speaker system with a
continuous wattage exceeding the
maximum input power of the system.
• Before connecting, turn off the speaker
system, the PC and audio device to
avoid damaging the speaker system.
• The volume level should not be turned
up to the point of distortion.
16GB
• Although this system is magnetically
shielded, do not leave recorded tapes,
watches, personal credit cards or floppy
disks using magnetic coding in front of
the system for an extended period of
time.
If the TV picture or monitor display is
magnetically distorted
On placement
• Do not set the speakers in an inclined
position.
• Do not leave the system in a location
near heat sources, or in a place subject to
direct sunlight, excessive dust,
moisture, rain or mechanical shock.
On cleaning
Do not use alcohol, benzene, or thinner to
clean the cabinet.
If you have any questions or problems
concerning your speaker system, please
consult your nearest Sony dealer.
Speaker section
Satellite speaker
Speaker system
Full range, magnetically shielded
Speaker units
6.5 cm, cone type
Enclosure type
Bass reflex
Impedance
4Ω
Cord length
1.5 m
Subwoofer
Speaker system
Woofer
Speaker units
16 cm, cone type
Enclosure type
Bass reflex
Impedance
2Ω
Additional Information
Although this system is magnetically
shielded, there may be cases that the
picture on some TV sets/personal
computers may become magnetically
distorted. In such a case, turn off the
power of the TV set/personal computer
once, and after 15 to 30 minutes turn it on
again. In the case of a personal computer,
take appropriate measures, such as data
storage, before turning it off.
When there seems to be no improvement,
locate the system farther away from the
TV set/personal computer. Furthermore,
be sure not to place objects in which
magnets are attached or used near the TV
set/personal computer, such as audio
racks, TV stands, toys etc. These may
cause magnetic distortion to the picture
due to their interaction with the system.
Specifications
Amplifier section
Rated output
75 W + 75 W (10% T.H.D., 1 kHz,
4 Ω) (Satellite speaker)
150 W (10% T.H.D., 100 Hz, 2 Ω)
(Subwoofer)
Input
RCA jack × 1 (INPUT 1)
Voltage: 1 V
impedance: 10 kilohms
Stereo mini jack × 1 (INPUT 2)
Voltage: 500 mV
impedance: 4.7 kilohms
Output
Stereo mini jack × 1 (i (headphones))
Continued l
17GB
General
Dimensions (w/h/d)
Approx. 94 × 196 × 135 mm
(3 3/4 × 7 3/4 × 5 3/5 in)
(Satellite speaker)
Approx. 221 × 403 × 411 mm
(8 3/4 × 15 7/8 × 16 1/4 in)
(Subwoofer)
Mass
Approx. 0.7 kg (1 lb 9 oz)
(Satellite speaker)
Approx. 8.5 kg (18 lb 12 oz)
(Subwoofer)
Power requirements
European, Oceanian, China,
Argentina, South East Asia, India,
Bangladesh and Sri Lanka model:
AC 220 - 240 V, 50 Hz
Mexican, Brazil, Colombia and
Venezuela model: AC 120 V, 60 Hz
Taiwan model: AC 110 V, 60 Hz
Power consumption
65 W
Power consumption (during standby mode)
0.5 W
Optional accessory
Connecting cord
RK-G136, RK-G138
Plug adaptor
PC-236MS, PC-234S
Design and specifications are subject to
change without notice.
18GB
Printed in Malaysia
(2)