1
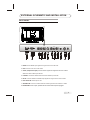
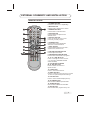
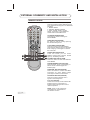
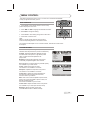
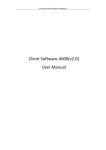
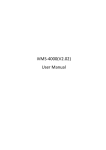
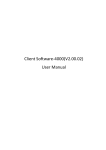
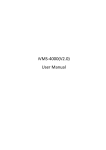
Instruction Manual
LCD-22L19
22" LCD TV/MONITOR
SIZE:A5
Description:
MANUAL(8M34A)
Job No.
95120H
Brand Name:
MODEL:
22L19
P/No.
REV:0
skyworth
Scale:
Engineering Dept:
Artwork By:
Date:
Checked By:
Date:
Approved By:
Date:
2009-06-04
SAFETY PRECAUTIONS
Read all of the instructions before operating the set. Keep these instructions well
for later use.
PRODUCT
The ventilation should not be impede by covering the ventilation
openings with items, such as newspaper, table-cloths, curtains, etc.
Do not push any objects of any kind into this unit through the cabinet slots
as they could touch the current carrying parts or short-circuit parts, resulting
in fire, electric shock, or damage to the unit.
Unplug the set when it is not used for a long period of time.
Do not dismantle this product by yourself as this may cause damage.
Do not touch the screen surface with fingers as this may scratch or mar the
LCD screen.
Do not impact the LCD screen with hard pressure as this may damage the
LCD screen severely.
The battery (battery or batteries or battery pack) shall not be exposed
to excessive heat such as sunshine, fire or the like.
POWER
Please use the core plug as required.
PLUG
Unplug the set under the following conditions:
If the set will not be used for a long period of time.
If the power cord or the power outlet/plug is damaged.
Follow the instructions to install and adjust the product. Adjust those
controls that are covered in this operating instructions as improper
adjustment of other controls may result in damage. If this happens, unplug
the set and refer to the service personnel.
If the set is subject to impact or has been dropped to have the cabinet
damaged.
The mains plug is used as the disconnect device and shall remain
readily operable.
POWER CORD & SIGNAL CABLE
Do not allow anything to rest on or roll over the power cord & signal cable.
Protect the power cord & signal cable from being trampled.
Do not overload the power cord or power outlet.
Do not expose the power cord & signal cable to moisture.
1
SAFETY PRECAUTIONS
USE ENVIRONMENT
Do not install this equipment in a confined space such as a book
case or similar unit. To prevent injury, this apparatus must be securely
attached to the wall mount fastened on the wall.
Place the set on a place that allows good ventilation.
Do not use the set near damp, and cold areas, protect the set from
overheating.
Keep away from direct sunlight.
The apparatus shall not be exposed to dripping or splashing and
that no objects filled with liquids, such as vases, shall be placed
on the apparatus.
Do not use the set near dust place.
To reduce the risk of fire or electric shock, do not expose this appliance
to rain or moisture.
No naked flame sources, such as lighted candles, should be placed on
the apparatus.
CLEANING
Dust the set by wiping the screen and cabinet with a soft, clean cloth or
some special liquid cleaner.
Do not apply excessive force to the screen when cleaning.
Do not use water or other chemical cleaner to clean the screen as this
may damage the surface of the LCD screen.
32
CONTENT
SAFETY PRECAUTION .................................................................................1
CONTENT ..................................................................................................... 3
INTRODUCTION, FUNCTIONS AND FEATURES ....................................... 4
EXTERNAL SCHEMATIC AND INSTALLATION ........................................... 5
FRONT PANEL ................................................................................... 5
BACK PANEL ..................................................................................... 6
ANTENNA/CABLE CONNECTION .................................................... 7
REMOTE CONTROL ......................................................................... 8
PACKAGING ......................................................................................10
SETUP TV ..................................................................................................... 11
MENU CONTROL ......................................................................................... 12
BASIC OPERATION ........................................................................... 12
PICTURE SETTINGS ......................................................................... 12
SOUND SETTINGS ............................................................................ 13
INSTALLTION SETTINGS .................................................................. 13
TIME SETTINGS ................................................................................ 14
FUNCTION SETTINGS ...................................................................... 15
GEOMETRY SETTINGS .................................................................... 16
SHORTCUT FUNCTIONS ............................................................................ 17
TROUBLESHOOTING .................................................................................. 18
SPECIFICATIONS ......................................................................................... 19
3
INTRODUCTION, FUNCTIONS AND FEATURES
BRIEF INTRODUCTION:
Thanks for your purchase of our digital high-definition LCD television! This product with
diverse functions is designed to fulfill the optimum requirements from commercial, industrial
and household uses. LCD television possesses the display function of both TV and PC. It
features advanced picture performance, smaller in size and lighter in weight, meanwhile,
consumes less power and makes no radiation. The new generation LCD provides you with
comfortable, safe and environmental protection feeling.Some description could be little different
base on different model.
FUNCTIONS
TV FUNCTIONS
1. Auto and manual tuning.
2. 200 preset programs (0-199).
3. Supports PAL, SECAM and NTSC color system as well as BG, DK, I and M sound system.
4. Component input supports 480i/p, 576i/p, 720p@50/60Hz and 1080i@50/60Hz formats.
5. HDMI supports 480i/p, 576i/p, 720p@50/60Hz, 1080i@50/60Hz, 1080p@50/60Hz,
640x480@60Hz,800x600@60Hz, 1024x768@60Hz, 1280x1024@60Hz, 1440x900@60Hz
and 1680x1050@60Hz, 1.3A compliant.
6. AV and S-VIDEO inputs are available.
7. Full-function infrared remote control.
8. 3 Selectable color temperatures.
9. English, Russian, Chinese menu (could be different based on different model ).
10. Sleep timer and program recall shortcut.
11. Enter standby mode automatically after 10 minutes without signal in TV mode.
PC MONITOR FUNCTIONS
1. Auto resizing & centering, perfect geometric graphic.
2. Supports PC sound source input.
3. Supports 640x480,800x600,1024x768,1280x1024,1440x900, 1680x1050 PC formats,
refresh rate is 60Hz.
FEATURES
1. Embedded digital color gain control circuit, provides better brightness and reality.
2. Embedded 5-line comb filter.
3. Black/white Level Stretch Circuit.
4. Auto signal format recognition, plug and play.
5. High class LCD screen features,high brightness, high contrast and wide viewing angle,
responding fast.
6. Component input supports 1080i high definition signal formats.
7. Support HDMI input, 1.3A compliant.
8. This TV can be used as a high-performance PC monitor for it has a VGA interface.
Computer sound source can also be supported to realize the multimedia function.
9. Low power consumption in standby mode to save energy.
10. Latest high integrated digital processor chip.
4
EXTERNAL SCHEMATIC AND INSTALLATION
FRONT PANEL
Note: The graphics are for representation only.
1
2
3
4
5
6
7
10
10
9
8
1.AV/TV Button
2.Menu Button
3.Program Up Button
4.Program Down Button
5.Volume Up Button
6.Volume Down Button
7.Standby Button
8.Power Indicator
9.Remote Sensor
10.Speakers
5
EXTERNAL SCHEMATIC AND INSTALLATION
BACK PANEL
Note: The graphics are for representation only.
AV IN
HDMI
1
VGA
2
Y
Pb
3
Pr
S-VIDEO
4
R-AUDIO-L
VIDEO
5
VGA AUDIO IN
75
6
ANT EARPHONE
7
8
1. HDMI:Connect HDMI input signal from signal source such as DVD.
2. VGA: Connect a PC via a VGA cable.
3. YPbPr (Component input): Connect YPbPr signal from signal source such as DVD.
Share the same AUDIO input with AV.
4. S-VIDEO: Connect S-VIDEO Share the same AUDIO input with AV.
5. AV IN: Connect AUDIO and VIDEO input signal from signal source such as DVD.
6. VGA AUDIO IN: Audio input for PC.
7. ANTENNA IN: Connect a coaxial cable to receive signal from the antenna or cable.
8. EARPHONE: Audio output, speakers will be muted when earphone plugged.
6
EXTERNAL SCHEMATIC AND INSTALLATION
ANTENNA/CABLE CONNECTION
There are two kinds of antenna in use.
VHF TV ANTENNA
TWO KINDS OF ANTENNA
UHF TV ANTENNA
No need to install adapter
To TV VHF/UHF
ANTENNA jack
(Note 1)
U/V MIXER
COAXIAL ANTENNA
Need to install adapter
VHF/UHF
(75
)
(Note 2)
FLAT CABLE
1. Connect the plug of the antenna cable or CATV cable to the cable (not provided
with this unit), then connect to the antenna input of this unit for best reception.
2. If the antenna cable in your home is other than the above two, or you have
problems in installing the antenna, please contact your dealer.
Notes:
1. Current outdoor antenna or cable TV usually use 75 OHM coaxial antenna cable.
For better reception suggest using this kind of antenna cable.
2. Flat cable or indoor antenna are old designed, the reception may not be good enough.
7
EXTERNAL SCHEMATIC AND INSTALLATION
REMOTE CONTROL
1. STANDBY BUTTON
Press to turn the TV on or off(standby).
1
2
3. NUMBER BUTTONS
Press to enter a channel number .
4. AV/TV BUTTON
Press to display the signal source
selection menu.
3
4
6
5
7
5. RECALL BUTTON
Press this button to return to the
previously viewed program.
8
9
6. SLEEP BUTTON
Press to select a time period after
which the TV will turn itself off.
11
10
16
2. MUTE BUTTON
Press to mute or restore the TV sound.
13
14
7. INFO BUTTON
Press to display status such as zoom ,
signal source ,time and so on .
15
17
8. VOLUME UP/DOWN BUTTON
Press to adjust the volume.
12
9. PROGRAM UP/DOWN BUTTON
Press to select memorized TV programs.
10. Z- / Z+ (t /u ) BUTTON
Press to change the screen format:
4:3, 16:9.(Only available for wide
screen models)
11. LEFT/RIGHT/UP/DOWN
(p /q / t /u ) BUTTON
Press to select menu items or
signal sources.
12. OK BUTTON
Press to enter selected item.
13. MENU BUTTON
Press this button to enter the menu screens
for various optional adjustable settings.
14. EXIT BUTTON
Press to exit on screen display directly.
15. PICTURE BUTTON
Press to select a different picture effect.
16. SOUND BUTTON
Press to select a different sound effect.
17. FAV. BUTTON
Press to select FAV. program one by one.
8
EXTERNAL SCHEMATIC AND INSTALLATION
REMOTE CONTROL
18. SOUND TYPE BUTTON(NICAM)
Press this button to select different sound
type. Relevant sound types in TV SOURCE
as below:
1. MONO: MONO
2. STEREO: MONO, STEREO
3. DUAL : MONO, DUAL1, DUAL2
NOTE: This button is unavailable for
models without NICAM function.
19.TEXT BUTTON(OPTION)
This button is used for entering the
teletext MENU.
20.MIX BUTTON(OPTION)
the button is used as closing /opening
the teletext Background.
21.HOLD BUTTON(OPTION)
Press this button to hold the Teletext
page without update to prevent the page
from changing. Press again to release
the hold state.
18
20
24
19
23
27
22.SIZE BUTTON(OPTION)
Press this button you can select
22
21 different image sizes: Normal, double
high top, double high bottom.
26
25
23.INDEX BUTTON (OPTION)
Press this button to enter the Teletext's
index MENU.
24.SUB.PAGE BUTTON (OPTION)
Subcode mode, gives, the possibility to
select certain subcode pages of a
teletext page.
25.REVEAL BUTTON (OPTION)
Press this button to reveal the hidden
information for some Teletext pages
press again to hide the information.
26.CANCEL BUTTON (OPTION)
Press this button to appear the TV
signal on the background.
27.F1-F4 (OPTION)
These four color key are for relative fast
teletext function in the bottom of
teletext page and organizer function
relative operation .
NOTE: These 19-27 buttons are
unavailable for models without
TELETEXT function.
9
EXTERNAL SCHEMATIC AND INSTALLATION
For using the remote control, follow these instructions:
1. Open the back cover of the remote control, then insert two AAA batteries
with polarities matching with the marks inside the battery compartment. Then,
close the back cover.
2. Point the remote control towards the infra-red remote sensor on the main unit.
If there is an obstacle between the main unit and remote control, the remote
control may not operate properly.
3. Replace the batteries immediately once the remote control is found not to work
properly.
4. Do not mix new batteries with old ones, or batteries of different brands.
5. When the battery is to be exhausted, electrolyte-leaking may occur and damage
may be caused to the remote control. When the operation is not sensitive, the
batteries may become weak, so please replace the batteries.
6. If the remote control is not to be used for a long period of time, please remove
the batteries to avoid electrolyte leaking.
PACKAGING
You should have:
Television
Remote control
User Guide
Warranty Card
2 x AAA battery
Stand
Wall mount
10
SETUP TV
There are several steps you need to follow before you can turn on the TV.
Follow the instructions below to set up and turn on your TV. Operation could be
different base on existence of hard power switch.
1. Plug the end of the power cord into
an appropriate wall outlet and connect the
antenna cable or CATV cable.
2. Turn on the TV.
When the power of the TV is connected,
the power indicator lights up in red, the
TV is in standby mode, press the " "
button on the remote control or function
keys panel on TV to switch the TV to
normal operation mode.
3. Turn off the TV.
Press the " " button on the remote
control or function keys panel on TV
to switch the TV to standby mode.
Note:
Unplug the set from the AC outlet when it is not used for a long period of time.
4. Select the TV channel or adjust the TV sound.
Press PROGRAM UP/DOWN
on the remote control to select
memorized TV programs (press
VOLUME UP/DOWN to adjust
the volume).
11
Press PROGRAM UP/DOWN
on the TV key panel to select
memorized TV programs (press
VOLUME UP/DOWN to adjust
the volume).
Press the number buttons
to enter a program number
directly, after a while, the
set will turn to the program
automatically.
MENU CONTROL
This section explains the menus of your TV. Each menu is outlined and detailed
to help you get the most from your TV.
BASIC OPERATION
1. Press MENU on the remote control or on the TV key
panel to display the main menu.
2. Press t/u and p/q to highlight the desired menu/item.
3. Press t/u to change the setting.
4. Press MENU to save setting and go back to last menu.
5. Press EXIT to exit the menu.
Note:
Button on the key panel have the same functions
as the corresponding buttons on the remote control.
The scheme and description are in TV mode as below, there will be a note if there
is exception.
PICTURE SETTINGS
Picture mode Adjusts the brightness, contrast,
saturation and sharpness of the picture simultaneously.
Contrast Adjusts the difference between the light
and dark areas of the picture. To get better picture
value, Contrast should be adjusted to the
proper value.
Brightness Adjusts the brightness of the picture,
and usually is adjusted together with Contrast.
PICTURE
Standard
Picture mode
Contrast
Brightness
Hue
Colour
Sharpness
Move
Select
MENU
Return
Hue Adjusts the hue of the picture to get better quality.
It is available only in NTSC mode.
Colour Adjusts the richness of colour.
This function is not available in PC mode.
Sharpness Adjusts the sharpness of the picture.
This function is not available in PC mode.
Colour temp. Adjusts the colour temperature of
the picture,to select the option:Normal, Warm,
Cool and User as you desired.
PICTURE
Warm
Colour temp.
Colour mode
Backlight
Move
Select
MENU
Return
Note: Cool is for a more blue palette of picture colors,
Warm is for a more red palette of picture colors, and
Normal is between the two.
User mode is available only in PC mode.
Colour mode Adjusts the RGB colour of the picture.
It is available only in User option of Colour temp.
Backlight Adjusts the level of back light.
(could be different base on different model)
12
MENU CONTROL
SOUND SETTINGS
Sound mode Select the audio mode as you desired.
The audio mode are Standard,Music, Film, Voice.
SOUND
Voice
Sound mode
Bass
Treble
Balance
Surround
Sound type
Move
Bass Adjusts the lowest part of the sound.
Treble Adjusts the highest part of the sound.
Off
FM MONO
Select
MENU
Return
Balance Adjusts how much audio (loudness) gets
sent to the left and right speakers.
Surround Set surround effect on or off
This function is not available in TV mode.
Sound type Select the sound type as FM MONO,
NICAM MONO, STEREO, DUAL I, DUAL II.This function
available only in TV mode.This item is unavailable for
models without NICAM function.
INSTALLATION SETTINGS
Note:These settings are only available in TV mode.In AV
or S-Video mode, only Colour sys. option can
be adjusted.
INSTALLATION
Auto install.
Channel
Colour sys.
Sound sys.
Manual install.
Move
35
PAL
D/K
120.25MHZ
Select
MENU
Auto install. Searches and saves channels
automatically.
Notes:
1. If you press the MENU button to stop auto scan
process, the frist saved channel will be shown.
2.The TV is mute when starting auto scan.
3.You need set the correct sound system according your
local signal to get good performance before or after auto
scan.
Return
Channel Sets the received TV channel No.
Colour sys. Selects colour system.
Sound sys. Selects sound system.If there is no
sound or the sound is weak, you should change the
sound system accordingly.
Manual install. Searches the channel manually.
Press u to search upwards (higher frequency),
press t or MENU to stop the searching process.
press t to search downwards (lower frequency),
press u or MENU to stop the searching process.
Notes:
1. The searching process will stop when a channel has
been found, and the channel will be saved.
2. You can start searching from any frequency by
changing channel number.
13
MENU CONTROL
Fine tuning Tune RF frequency finely.
Skip Sets the current channel to skip or not.
Notes:
1. If the channel is set to skip, you can not
select it by pressing PROGRAM UP/DOWN on
the remote control. You can select it exactly by
entering channel No. Using number buttons on the
remote control.
2.If a channel is set to skip, the channel No. colour
shows on the screen is red.
Fav.channel Accesses favorite channel setting.
Press FAV. key on remote control to navigate
favorite channels.
INSTALLATION
120.25MHZ
Fine
Skip
Fav. channel
Move
Off
Select
MENU
Return
FAV. CHANNEL
Fav.
Fav.
Fav.
Fav.
Fav.
Fav.
channel01
channel02
channel03
channel04
channel05
channel06
Move
Select
MENU
Return
TIME SETTINGS
Current time Lets you set the current time.
Turn off time Lets you set a time for the TV to
turn itself off.
Wake up time Lets you set a time for the TV to
turn itself on.
Wake up channel Lets you set a channel for the TV
to turn itself on.It is available only when Wake up
source is set to be TV.
TIME
01:28
--:---:-35
TV
Current time
Turn off time
Wake up time
Wake up channel
Wake up source
Move
Select
MENU
Return
Wake up source Lets you set a signal source for
the TV to turn itself on.
14
MENU CONTROL
FUNCTION SETTINGS
Language Select you desired OSD language.
FUNCTION
English
16:9
Language
Zoom
OSD halftone
Parent ctrl.
Move
Select
MENU
Return
PARENT CTRL.
New pin code
Front panel
Lock TV
Lock AV
Lock S-VIDEO
Lock YPBPR
Move
On
On
On
On
On
Select
Return
PAREN CTRL.
On
On
Lock VGA
Lock HDMI
Move
MENU
Select
MENU
Return
Zoom select your desired picture zoom effect.
You can select 16:9 or 4:3(only available for wide screen
modesl).
OSD halftone select different OSD background
transparent by it .
Parent ctrl. Enter Parental Control menu you
can set control of it.
Press u or OK key to entry menu.Input correct
password to entry sub menu when Pin item is
highlight . The initial password is "0000".
NOTE: If you forget the password, please
contact service provider.
New pin code / Repeat pin code
Input and confirm new PIN code if you want
to change the password.
Front panel Press u key to lock function
key panel or not.
Lock TV, Lock AV, Lock S-VIDEO, Lock YPBPR,
Lock VGA, Lock HDMI
Press u key to lock respective signal source or not.
GEOMETRY SETTINGS
Available only in PC mode.
GEOMETRY
Auto adjust
H-Position
V-Position
Clock
Phase
Move
Auto adjust Adjusts the screen display to the best
state automatically.
Note: You can adjust this value accordingly if the picture
is not in the proper position. Then adjust the H-Position,
V-Position ,H-Size and Phase options to get better quality.
H-Position Changes the horizontal position of the picture.
Select
MENU
Return
V-Position Changes the vertical position of the picture.
Clock Adjusts the sampling frequency of A/D.
Note: The option is usually adjusted with H-Position and
V-Position, This can make picture get better quality. You
also can use Auto function to make picture better.
Phase Adjusts the sampling phase of A/D.
Note: You can adjust this value accordingly if there are
close bright dots on the picture or linear shimmer
phenomenon happens.
15
SHORTCUT FUNCTIONS
This section explains the shortcut and convenient functions .
PICUTRE shortcut
1. Press the PICTURE button on the remote control to display the current picture
state.
2. Press the PICTURE button repeatedly to select different picture effect.
3. The on screen display will disappear in 3 seconds if you stop adjusting.
Note: You can select Standard, Bright, Personal or Soft.
SLEEP shortcut
1. Press the SLEEP button on the remote control to display the sleep time.
2. Press the SLEEP button repeatedly to select a time period after which the TV
will turn itself off.
3. The on-screen display will disappear in 3 seconds if you stop adjusting.
Note: You can select 0 (off), 15 , 30, 45, 60, 90, or 120 minutes. In
the last minute of the sleep time, the words "POWER OFF" will display on
the screen. You can press any button to cancel the setting at
this time.
SOUND shortcut
1. Press the SOUND button on the remote control to display the current sound state.
2. Press the SOUND button repeatedly to select different sound effect.
3. The on-screen display will disappear in 3 seconds if you stop adjusting.
Note: You can select Standard,Film,Music,Voice, Personal.
AV/TV shortcut
1. Press the AV/TV button on the remote control to display the signal source
selection menu.
2. Press the p/q buttons to select your desired signal source.
3. Press the u or OK buttons to confirm your selection.
4. The on-screen display will disappear in 10 seconds if you stop adjusting.
16
SHORTCUT FUNCTIONS
Z-/Z+ shortcut( only available for wide screen models)
Press to change the screen format: 4:3, 16:9.
( Only available for wide screen models)
FAV. shortcut
1. Press the FAV. button on the remote control repeatly , it will select
FAV. channel cyclely.
2. Set your favorite programs before this operation.
INFO shortcut
Press this button to display the settings on the screen.
RECALL shortcut
Press this button to return to the previously viewed program.
17
TROUBLESHOOTING
NO PICTURE, NO SOUND
1. Check if the fuse or circuit breaker is working.
2. Plug another electrical device into the outlet to
make sure it is working or turned on.
3. Power plug is bad contact with the outlet.
4. Check the signal source.
NO COLOR
1. Change the color system.
2. Adjust the saturation.
3. Try another channel. Black-white program may
be received.
SNOWY DOTS AND INTERFERENCE
If the antenna is located in the fringe area of a
television signal where the signal is weak, the
picture may be marred by dots. When the signal
is extremely weak, it may be necessary to install
a special antenna to improve the reception.
1. Adjust the position and orientation of the
indoor/outdoor antenna.
2. Check the connection of antenna.
3. Fine tune the channel.
4. Try another channel. Broadcasting failure may
happen.
IGNITION
REMOTE CONTROL DOES NOT WORK
1. Change the batteries.
2. Batteries are not installed correctly.
3. Main power is not connected.
Black spots or horizontal streaks appear, or the
picture flutters or drifts. This is usually caused by
interference from car ignition system, neon lamps,
electric drills, or other electrical appliance.
GHOST
NO PICTURE, NORMAL SOUND
1. Adjust the brightness and contrast.
2. Broadcasting failure may happen.
Ghosts are caused by the television signal
following two paths. One is the direct path, the
other is reflected from tall buildings, hills, or other
objects. Changing the direction or position of the
antenna may improve the reception.
NORMAL PICTURE, NO SOUND
1. Press the volume up button to increase volume.
2. Volume is set to mute, press MUTE to restore
sound.
3. Change the sound system.
4. Broadcasting failure may happen.
RADIO FREQUENCY INTERFERENCE
This interference produces moving ripples or
diagonal streaks, and in some case, loss of
contrast in the picture. Find out and remove the
radio interference source.
UNORDERLY RIPPLES ON THE PICTURE
It is usually caused by local interference, such as
cars, daylight lamps and hair driers. Adjust the
antenna to minimize the interference.
BLANK SCREEN IN PC MODE
Perhaps the TV can not recognize the resolution set
by the PC. Suggest to change to the best resolution
or other standard resolutions of Windows system.
Set refresh rate to be 60Hz.
18
SPECIFICATIONS
Mode:
LCD-22L19
2W+2W
Audio output power (L+R):
Working voltage:
100-240V~ 50/60Hz
Rated power consumption:
60W
Screen size - diagonal:
54.8cm
Dimensions (W x D x Hmm):
528 x 200 x 390mm
Net weight:
4.3Kg
Environment:
Working temperature: 5oC~35oC
Working humidity: 20%~80%
Storage temperature: -15oC~45oC
Storage humidity: 10%~90%
Channel coverage: 470MHz Full-Channel Cable TV
System:
TV: PAL, SECAM, NTSC, BG/DK/I/M
AV: PAL, SECAM, NTSC
Preset programs: 200 (0~199)
Status displaying method: On screen display
Function adjustment indicator: Menu display
Language of OSD: English, Russian, Chinese
(could be different based on different model)
RF aerial input: 75 ohm unbalanced
AV video input: 75 ohm, 1.0Vp-p, RCA
AV audio input: 10k ohm, 0.5Vrms
19