1
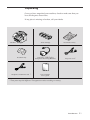
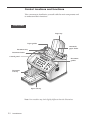
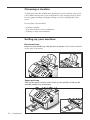
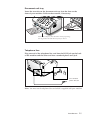
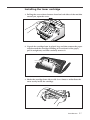
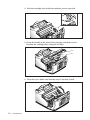
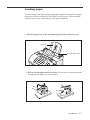
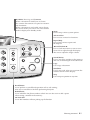
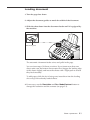
Laser Plain Paper Facsimile
User’s Guide
Home
Visit us at:
www.samsungelectronics.com/fax
P/N: JC68-00925A Rev.1.00
Trademark Notices
• SF-515 and Samsung Logo are trademarks of Samsung Electronics Co., Ltd.
• Windows is a trademark of Microsoft Corporation.
• IBM is a trademark of international Business Machines.
• Centronics is a trademark of Centronics Data Computer Corporation.
• Other name and the trademarks mentioned in this manual are trademarks of their respective
holders.
Contents
Chapter 1
Installation
Unpacking _________________________________________ 1.1
Control locations and functions _______________________ 1.2
Choosing a location _________________________________ 1.4
Setting up your machine _____________________________ 1.4
Document tray ___________________________________ 1.4
Paper exit tray ___________________________________ 1.4
Document exit tray _______________________________ 1.5
Telephone line ___________________________________ 1.5
Extension phone (optional) ________________________ 1.6
AC power cord ___________________________________ 1.6
Installing the toner cartridge __________________________ 1.7
Loading paper ______________________________________ 1.9
Paper type and size __________________________________ 1.11
Chapter 2
Getting started
Using the control panel ______________________________ 2.1
Using the number keypad ____________________________ 2.3
Setting up your fax number and name__________________ 2.6
Setting the time and date _____________________________ 2.7
Adjusting volume ___________________________________ 2.8
Chapter 3
Basic operation
Sending a fax
Preparing documents for faxing or copying ____________3.1
Setting document resolution and contrast _______________3.2
Loading document ___________________________________3.3
Sending a fax automatically ___________________________3.4
i
Receiving a fax
Receiving a fax ______________________________________3.5
Receiving automatically in FAX mode __________________3.6
Receiving manually in TEL mode ______________________3.6
Receiving in AUTO mode ____________________________3.7
Receiving automatically in ANS/FAX mode ____________3.7
Receiving manually using an extension telephone _______3.8
Making a copy
Copying overview ___________________________________3.9
Making a simple copy ________________________________3.9
Advanced copy features ______________________________3.10
Other functions
Redial _____________________________________________3.11
Sending a recall _____________________________________3.12
Monitoring a dual job status __________________________3.12
Automatic dialling
One-touch dialling ___________________________________3.13
Speed dialling_______________________________________3.15
Searching for a number in the memory _________________3.17
Chapter 4
Advanced fax
Broadcasting ________________________________________ 4.1
Delayed fax _________________________________________ 4.2
Priority fax__________________________________________ 4.4
Polling _____________________________________________ 4.5
Adding documents to a scheduled operation ____________ 4.7
Cancelling a scheduled operation ______________________ 4.7
ii
Chapter 5
Additional features
Printing reports______________________________________ 5.1
System setup ________________________________________ 5.2
Group dialling_______________________________________ 5.7
Clearing memory ____________________________________ 5.9
Chapter 6
Troubleshooting
Troubleshooting
Clearing jams _______________________________________ 6.1
LCD error messages _________________________________ 6.5
Fixing problems _____________________________________ 6.7
Maintenance
Cleaning the OPC drum ______________________________ 6.9
Adjusting shading ___________________________________ 6.10
Setting the machine to be checked by phone ____________ 6.10
Sending toner low information to the service company ___ 6.11
Cleaning the document scanner _______________________ 6.11
Managing the toner cartridge _________________________ 6.14
Appendix
FCC regulations _____________________________________ 7.1
Canadian radio interference regulations ________________ 7.1
EC declaration of conformity __________________________ 7.2
Laser safety statement ________________________________ 7.5
Safety information ___________________________________ 7.6
Power saver ________________________________________ 7.7
Replacing the fitted plug _____________________________ 7.8
Specifications _______________________________________ 7.9
Index ______________________________________________ 7.11
iii
Important safety information
Always be careful when using the machine. To reduce the risk of fire, electrical shock,
and other injuries, keep these safety considerations in mind when installing, using,
and maintaining your machine:
• Stability. Place the machine on a secure, stable surface. The machine can be seriously
damaged if it falls.
• Power supply. Provide correct power to the machine, as listed on the back of the
machine. If you are not sure of the type of power that is supplied to your home or
office, call your electric company.
• Grounding. If the plug has three prongs, it must be plugged into a grounded (three
hole) outlet. Grounded plugs and outlets are designed for your safety – do not try to
make a three-prong plug fit into a two-prong outlet by modifying the plug or outlet in
any way. If you cannot insert the plug into your wall outlet easily, the outlet should be
inspected by a qualified electrician.
• Overload. Do not plug too many electrical devices into a wall outlet or an extension
cord. An overloaded outlet is a fire and electrical shock hazard.
• Cleaning. Before cleaning the machine, unplug it from both the power outlet and the
telephone jack. Clean exposed parts with a soft cloth slightly dampened with water.
Do not use aerosol cleaners.
• Thunderstorms. Unplug electrical appliances during thunderstorms. Avoid using any
telephone (except a cordless model) during a thunderstorm, since there is a small
chance you could get an electrical shock from lightning.
• Gas leaks. Never use any telephone close to a gas leak. If you think gas is leaking, call
the gas company immediately, but use a telephone that is far away from the leakage
area. A small electrical spark in the telephone could cause a fire or explosion.
• Ozone. This product produces ozone during normal operation. The ozone produced is
dependent on copy volume and is heavier than air. If your machine is installed as specified in the installation procedures, ozone output levels meet safe limits.
iv
Precautions
When using your machine, these precautions should always be followed.
1. Never push objects of any kind into your machine through the case or cabinet
openings. They may touch dangerous voltage points, creating a risk fire or shock.
Never spill liquid of any kind onto or into the machine.
2. Slots and openings in the back and sides of your machine’s cabinet are provided for
ventilation. To ensure a reliable operation of the machine and to protect it from overheating, these openings must not be blocked or covered. Your machine should never be
placed on, near, or over a radiator, heater, air conditioner, or ventilation duct.
3. Do not use your machine near water, in wet locations, or outdoors.
4. Do not allow anything to rest on the power cord, line cord, or PC interface cable.
Do not locate your fax machine where the cords will be damaged by persons walking
on them.
5. Do not allow pets to chew on the power cord, line cord, or PC interface cable.
6. Do not put your hands into the fuser area. The fuser is extremely hot and severe
burns can result from the contact. Do not put your hands into the scanner motor,
scanner bracket and scanner motor cover, either.
7. Always use materials specially designed for your machine. Use of other materials may
result in poor performance and could create a hazardous situation.
8. Use supplies or cleaning materials only as directed. Keep all supplies and materials out
of the way of children.
9. The power supply turns this machine on and off. Make sure that your machine is
installed near an outlet and is easily accessible.
10. Your machine is equipped with an energy saving device to conserve power when the
machine is not in use. The machine may be left on continuously.
11. Never remove covers or guards that require a tool for removal. There are no
operator serviceable areas inside your machine. Refer servicing to authourized service
personnel.
12. Never defeat interlock switches. This machine is designed to restrict operator access to
unsafe areas. Covers, guards and interlock switches are provided to ensure that the
machine will not operate with covers opened.
13. Use of an extension cord with this machine is not recommended or authorized.
14. Avoid direct viewing of the document lights. The lamps are bright and, while not
harmful, they may cause an annoying afterimage. Always keep the document cover
closed during operation and storage.
15. Avoid exposing the toner cartridge to light for extended periods of time.
16. Do not touch the green photoreceptor. Scratches or smudges that appear on the
photoreceptor will result in poor copy quality and may shorten the service life.
17. This equipment is not designed for making telephone calls when the power fails.
Alternative equipment should be made available for access to emergency services.
v
Safety notes
Your machine and the supplies are designed and tested to meet strict safety
requirements. Included are safety agency examination and approval and compliance
to established environmental standards. Please read the following instructions carefully
before operating your machine, and refer to them as needed to ensure the continued safe
operation of your machine.
Follow all warnings and instructions marked on or supplied with the product.
Symbology:
= High Voltage
= Warning
= Heated Surface (Fuser, Scanner motor, Scanner motor bracket,
Scanner motor cover)
WARNING: Use of the controls, adjustments or performance of procedures
other than those specified herein may result in a hazardous radiation
exposure.
vi
1
Installation
Unpacking
Once you have unpacked your machine, check to make sure that you
have all the parts shown here.
If any piece is missing or broken, call your dealer.
Toner cartridge
Machine
TAM lead * (UK Only)
(Telephone Answering Machine)
Document tray
Telephone/modem line cord
*
Document exit tray
AC power cord *
Laser facsimile
user’s guide
* These parts may look different. The appearance varies according to country.
Installation
1.1
Control locations and functions
Take a moment to familiarize yourself with the main components and
to understand their functions.
Front view
Paper tray
Paper guides
Automatic
paper feeder
Document tray
Document feeder
Control panel
Document
guides
Document
exit tray
Paper exit tray
Note: Your machine may look slightly different than the illustration.
1.2
Installation
Rear view
Power cord connector
Telephone line jack
Extension telephone jack
Inside
Cover
Toner cartridge
Cover release buttons
(right and left)
Installation
1.3
Choosing a location
To help guarantee the trouble-free operation of your machine, place it on
a flat, stable surface near your workstation. Leave enough space to allow
for easy paper loading and paper exiting, as well as opening the front
cover.
Do not place your machine:
- In direct sunlight.
- Near heat sources or air conditioners.
- In dusty or dirty environments.
Setting up your machine
Document tray
Insert two tabs on the tray into the slots as shown. Fold out the extender
on the tray, if necessary.
Paper exit tray
Pull out the paper exit tray on the front of your machine. Fold out the
extender on the tray, if necessary.
1.4
Installation
Document exit tray
Insert the two tabs on the document exit tray into the slots on the
front of your machine. Fold out the extender, if necessary.
Extender
Insert one end first, then the other end by squeezing
this leg inward to make the tray easy to insert.
Telephone line
Plug one end of the telephone line cord into the LINE jack on the back
of the machine and the other end into a standard phone wall jack.
LIN
E
EXT
.
To a standard
phone wall jack
Note: You must use the telephone line cord which is supplied with your machine.
Installation
1.5
Extension phone (optional)
If you want to use a regular phone or answering machine with your
machine, connect the phone into the EXT. jack.
Plug the cord of your regular phone or answering machine into the
TAM(telephone answering machine) lead and plug the TAD(telephone
answering device) lead into the EXT. jack at the back of the machine.
LIN
E
EXT
.
To a regular phone
TAM lead
Note: You must use the TAM lead which is supplied with your machine.
AC power cord
Plug one end of the cord into the back of the machine and the other
end into a standard AC power outlet.
The machine will turn on and the display will show ‘SYSTEM INITIAL’.
If there is no cartridge installed or no paper, the display will show
‘JAM/NO CARTRIDGE’
To AC
outlet
If you want to turn it off, unplug the power cord.
1.6
Installation
Installing the toner cartridge
1. Pulling the cover release buttons found on both sides of the machine
toward you, open the cover.
2. Unpack the cartridge from its plastic bag, and then remove the paper
rolled around the cartridge. Holding on to each end of the paper,
pull it straight out, and then carefully remove it.
3. Shake the cartridge from side to side 5 or 6 times to redistribute the
toner evenly inside the cartridge.
Installation
1.7
4. Find the cartridge slots inside the machine, one on each side.
5. Grasp the handle at the front of the cartridge and slide it down
between the cartridge slots, and push it firmly.
6. Close the cover. Make sure that the cover is securely closed.
1.8
Installation
Loading paper
For best results, use high quality xerographic paper. The automatic paper
feeder can hold a maximum of 150 sheets of plain paper. The maximum
capacity may be less, depending on the paper thickness.
1. Pull the paper tray on the automatic paper feeder all the way up.
Paper tray
Automatic paper feeder
2. Flex or fan the paper back and forth. Do not fold or crease the paper.
Straighten the edges on a level surface.
Installation
1.9
3. Insert the paper with the print side facing you.
Place the print side
facing you.
4. Adjust the paper guides to the width of the print material. Slide the
guides until they lightly touch the stack of print material. Do not
bend the print material.
Paper guide
1.10 Installation
Paper type and size
Satisfactory print and receive quality can be obtained with many types of
plain paper. Since the quality of plain paper varies widely, test the print
quality before buying large quantities of paper. Your machine uses a
variety of papers including:
• Xerographic paper
• Bond paper
• Dual-purpose paper
Because all papers vary in physical characteristics, you can receive mixed
results from different packages of paper even through the packages
contain the same paper. If you encounter undesirable results, try the other
side of the paper, a different type, or another package of the same kind of
paper.
DO NOT use the following types of paper with your machine:
• Continuous form feed paper
• Synthetic paper
• Thermal paper
• Multi-sheet forms and documents
• Chemically treated paper
• Papers with raised, embossed lettering
To load paper with a preferred print side:
• If you are using xerographic paper, load the paper with the preferred
print side facing down.
• If you are using letterhead or bond paper, load the paper with the
preferred side facing up.
The following papers can be used in your machine for fax:
• Letter : 216 x 279 mm (8.5 x 11.0 in.) - 60 g/m2 ~ 90 g/m2 (16 ~ 24 lb)
• A4 : 210 x 297 mm (8.3 x 11.7 in.) - 60 g/m2 ~ 90 g/m2 (16 ~ 24 lb)
• Legal : 216 x 356 mm (8.5 x 14.0 in.) - 60 g/m2 ~ 90 g/m2 (16 ~ 24 lb)
Installation 1.11
2
Getting
started
Using the control panel
LCD display
The display shows the current status of
your machine and guides you through
various tasks using a menu system for
each operation.
Resolution
Resolution
Use to choose the resolution of
copied or transmitted documents.
One-touch dial
Use to call most frequently used
numbers with one button.
1
2
3
4
5
6
7
8
9
10
ABC
1
2
GHI
JKL
4
5
PQRS
TUV
7
8
Symbols
0
Number keypad
Use to dial numbers manually or
to enter letters.
Speed
Use to dial calls and send fax documents
by entering a 2-digit number.
2.1
Getting started
Rcv.Mode (Receiving mode)/Contrast
When a document is loaded, use to choose
the contrast characteristic of copied or transmitted documents.
When a document is not loaded, use to choose
the receive mode you want to use. The selected
mode is displayed in Standby mode.
Advanced Fax
Use to access various fax functions.
Rcv.Mode/
Contrast
Setup
DEF
Recall/
Status
3
MNO
Report/
Help
Scroll/Volume
Copy
Search/Delete
WXYZ
9
Advanced
FAX
Redial/
Pause
6
Setup
Use to setup various system options.
Start/Enter
On hook dial
Stop
Report/Help
Use to print various reports and
the help list.
➛Scroll/Volume ❿
Use to scroll menu items or use to move
cursor left or right through the display.
Also use to adjust the ringer volume.
Search/Delete
Use to search for numbers in the memory.
Also use to delete digits in the edit mode.
Copy
Use to copy a document.
Start/Enter
Use to start a job. Also use to activate the
selection shown on the display.
Speed
Stop
Use to stop an operation at any time.
Recall/Status
Use to perform a switch-hook operation such as call waiting.
Also use to switch the LCD while performing dual jobs.
Redial/Pause
Use to redial the last phone number called. You can also use it to add a pause
when storing a number in the memory.
On hook dial
Use to dial numbers without picking up the handset.
Getting started
2.2
Using the number keypad
As you perform various tasks, you will need to enter names and numbers. For example, when you set up your machine you enter your name
(or your company’s name) and telephone number. When you store a onetouch dial or speed dial, you also enter the telephone numbers and
names.
When the display asks you to enter a name, the LCD display reads:
NAME:
You can use the procedures described below to enter alphanumeric characters, special symbols or spaces.
Entering alphanumeric characters
You can also include special symbols (space, plus sign, etc.) in the name
by using the 0 key. See `KEYPAD CHARACTER ASSIGNMENTS’ on
page 2.4.
1. Locate the button labeled with the letter you want – then press the
button repeatedly until the correct letter appears on the display.
ABC
DEF
1
2
3
GHI
JKL
MNO
4
5
6
PQRS
TUV
WXYZ
7
8
9
Symbols
0
Speed
For example, to enter an O, press 6 (labeled MNO). Each time you
press 6, the display shows a different letter–first M, then N, and O, and
finally 6.
The letter appears on the display as shown below.
NAME:O
2.3
Getting started
2. When the letter you want appears on the display, press another number key labeled with the next letter you want.
If the next letter is printed on the same number button, move the
cursor by pressing ❿, then press the button.
The blinking cursor moves right and the next letter appears on the
display.
NAME:OP
3. Select additional letters in the same way. When you have finished
entering the letters, press Start/Enter.
KEYPAD CHARACTER ASSIGNMENTS
Key
Assigned numbers, letters, or characters
1
Space ➝ 1
2
A ➝ B ➝ C ➝ 2
3
D ➝ E ➝ F ➝ 3
4
G ➝ H ➝ I ➝ 4
5
J ➝ K ➝ L ➝ 5
6
M ➝ N ➝ O ➝ 6
7
P ➝ Q ➝ R ➝ S ➝ 7
8
T ➝ U ➝ V ➝ 8
9
W ➝ X ➝ Y ➝ Z ➝ 9
0
+ ➝ - ➝ , ➝ . ➝ ‘ ➝ / ➝
➝ # ➝ & ➝ 0
Getting started
2.4
Entering numbers
You can enter the number of the remote fax machine manually by using
the number keypad. The number you pressed appears on the display.
TEL:95551212_
When the display asks you to enter a number, you can also use a onetouch dial button (including group dial) or a 2-digit speed dial number.
Editing numbers or name
If you make a mistake while entering a number or name, move the cursor
under the wrong digit by using ➛ or ❿. Then press the correct number to
change, or press Search/Delete to delete the number.
Inserting pause
With some private telephone systems, you must dial an access code (9, for
example) and listen for a second dial tone before dialling an outside
number. In such cases, you must insert a pause in the number. Insert a
pause in a number when you are setting up a one-touch or a speed dial
number, or when you dial a number without lifting the handset.
To insert a pause, press Redial/Pause while entering the number.
When you dial a number, the dialling process pauses for a specified time
at the point where you pressed Redial/Pause.
If you require a longer pause time, press Redial/Pause twice.
2.5
Getting started
Setting up your fax number and name
Your fax number and name will be printed at the top of each page sent
from your machine.
1. Press Setup on the control panel. The display shows the first setup
menu; FAX NUMBER/NAME.
2. Press Start/Enter to access the Fax Number/Name menu. The display
shows ‘FAX NUMBER’.
3. Press Start/Enter. The displays asks you to enter the telephone
number.
If there is a number or name already set, the number or name appears.
4. Enter the telephone number which your machine is connected to. You
can include + and - symbol in the phone number by pressing and #
button respectively.
If you make a mistake, press ➛ or ❿ to move the cursor under the
wrong digit, then enter the correct number to change or press
Search/Delete to delete the number.
5. Press Start/Enter when the number on the display is correct.
The display asks you to enter your name.
6. Enter your name using number keypad.
You can enter alphanumeric characters using the number keypad, and
include special symbols by pressing 0 repeatedly.
For details on how to use the number keypad to enter alphanumeric
characters, see page 2.3.
If you want to enter the same letter or number in succession (e.g. SS,
AA, 777), enter one digit, then move the cursor by pressing the ❿ button, and enter the next digit.
If you want to insert a space in the name, you can also use the ❿ button to move the cursor to skip the position.
7. Press Start/Enter when the name on the display is correct.
Getting started
2.6
Setting the time and date
The current time and date are shown on the display when the machine is
on and ready for use (standby mode). The time and date are printed on
all faxes you send.
Note: If power to the machine is cut off for over 30 minutes, when power
is restored, the machine prompts you to reset the time and date.
1. Press Setup. The display shows the first setup menu; FAX
NUMBER/NAME.
2. Press ➛ or ❿ until ‘TIME/DATE SETUP’ appears, then press
Start/Enter. The display asks you to choose a date format.
3. Press Start/Enter.
4. Press ➛ or ❿ until you find the desired date format, then press
Start/Enter.
If you select USA, the time and date appears in the order of month,
day, then year. The EUROPE format will be displayed in the order of
day, month, then year.
The display shows the currently set time and date using the selected
date format.
25-06-2002 12:30
(‘Europe’ type)
5. Enter the correct time and date using the number keypad.
Day
Month
Year
Hour
Minute
= 01~31
= 01~12
= four digits
= 00~23
= 00~59
You can also use ➛ or ❿ to move the cursor under the digit you want
to correct, then enter a new number.
6. Press Start/Enter when the time and date on the display is correct.
If you enter an invalid number, the machine beeps and does not proceed to the next step. If this happens, just reenter the correct number.
The display shows the time and date you have set, then returns to
Standby mode.
25-JUN 12:30 FAX
2.7
Getting started
Adjusting volume
Ringer volume
1. Press ➛ or ❿ in standby mode.
The display shows the current ringer volume setting.
2. Press ➛ or ❿ until you find the desired loudness. Four levels are
available; 0~3.
You will hear the selected volume and the display will show the level.
Setting ‘0’ turns the ringer off. The machine will work normally even if
the ringer is set to off.
3. The change stores into memory and the machine returns to standby
mode.
Speaker volume
1. Press On hook dial to adjust the speaker volume. If you cannot hear
dial tone, check the phone line connection.
2. Press ➛ or ❿ repeatedly until you find the desired loudness.
The display shows the current volume level.
3. The change stores into memory and the machine returns to standby
mode.
Alarm volume/Key volume
If you set the alarm volume menu ON, alarm tone sounds when an error
occurs. If you set the key volume menu ON, key tone sounds each time
any key is pressed.
1. Press Setup and ➛ or ❿ until ‘VOLUME SETUP’ appears, then press
Start/Enter. The display shows ‘ALARM VOLUME’.
2. Press Start/Enter to access the Alarm Volume menu. To access the Key
Volume menu, press ➛ or ❿ until ‘KEY VOLUME’ appears, then
press Start/Enter.
3. Press ➛ or ❿ to turn the sound ON or OFF, then press Start/Enter.
4. To return to Standby mode, press Stop.
KEY volume ON
DIAL volume
ON
KEY volume
ON
KEY volume OFF
1)*Auto dial : OFF
2) Manual dial : ON
OFF
*Auto dial : Broadcasting, Delay TX, Priority TX, Onetouch/Speed dial TX
Getting started
2.8
3
Basic
operation
Sending a fax
Preparing documents for faxing or copying
You can use the machine to fax or copy documents that are printed on
standard letter or A4 size paper. Follow these guidelines to prepare your
documents.
• Do not attempt to feed the following types of documents into the
machine: - wrinkled, curled, or folded paper
- chemically processed paper (pressure-sensitive paper,
carbon-coated paper, etc.)
- coated paper (glossy, etc.)
- too thin (onion skin, airmail paper, etc.)
- too thick paper
- too small or short paper (such as a label, voucher, etc.)
- the paper which is made of cloth or metal
Instead, make copies using a standard copy machine and insert the
copies into the document tray.
• Remove all staples, paper clips and the like before feeding the document.
• Make sure any glue, ink or correction fluid on the paper is completely
dry before feeding the document.
• Do not feed documents with pages that are different sizes or of different
thicknesses.
ACCEPTABLE DOCUMENTS (for ADF1)
Document size
Max
Min
Effective scanning width
Single sheet
2 or more sheets
8.5 in. (W) x 14 in. (L)
(216 mm x 356 mm)
8.5 in. (W) x 11.7 in. (L)
(216 mm x 297 mm)
5.8 in. (W) x 5.0 in. (L)
(148 mm x 128 mm)
8.26 in. (210 mm)
Number of sheets which can
be loaded at a time
Thickness of document
Print quality
1
Up to 20
0.07 mm ~ 0. 15 mm
0.075 mm ~ 0. 12 mm
Uncoated on both sides
ADF stands for Automatic Document Feeder. It allows you to stack original documents,
which will be faxed or copied one by one.
Basic operation
3.1
Setting document resolution and contrast
We recommend sending documents printed using a typewriter, felt tip pen,
black ink or laserwriter. The paper should be white or very light, and of
normal weight – not cardboard. Blue lines on a ruled pad do not fax well.
When you send normal documents, you need not adjust the resolution and
the contrast.
If you send documents with unusual contrast characteristics, including
photographs, you can adjust the resolution and contrast to send a highquality transmission of the documents.
Resolution
Press the Resolution button to increase sharpness and clarity. By pressing the Resolution button repeatedly after loading a document, you can
choose between STANDARD, FINE or SUPER FINE mode.
STANDARD works well for documents with normal sized characters.
FINE is good for documents containing small characters or thin lines, or
print from a dot-matrix printer.
SUPER FINE works well for documents containing extremely fine details
SUPER FINE works only if the remote machine also has the SUPER FINE
featres.
Contrast
Press the Rcv. Mode/Contrast button to compensate for the brightness or
darkness of your outgoing document. By pressing the Rcv.
Mode/Contrast button repeatedly after loading a document, you can
choose between NORMAL, DARKEN, LIGHTEN or PHOTO.
NORMAL works well for normal documents.
DARKEN works well for light print or faint pencil markings. The light
image and text on the document will be darker on the printed page.
LIGHTEN works well for dark print. The dark image and text on the document will be lighter on the printed page.
PHOTO is used when faxing photographs or other documents containing
colour or shades of gray. Although your machine will not transmit colour,
it will print and send up to 64 shades of gray. When you choose this
mode, you should set the resolution to FINE.
3.2
Basic operation
Loading document
1. Turn the page face down.
2. Adjust the document guides to match the width of the document.
3. Slide the sheet down into the document feeder until it is gripped by
the machine.
Document guide
The automatic document feeder seizes and pulls in the page.
You can insert up to 20 sheets at a time. If you insert more than one
sheet, make sure the bottom sheet enters first. Stagger the leading edge
of the sheets slightly, and insert the sheets with a slight push to ensure
they feed smoothly.
To add pages while the fax is being sent, insert them into the loading
slot on top of the already loaded sheets.
4. If necessary, use the Resolution and Rcv. Mode/Contrast button to
change the resolution and the contrast (see page 3.2).
Basic operation
3.3
Sending a fax automatically
1. After loading a document, enter the number of the remote fax
machine using the number keypad.
One-touch or speed dialling is also available if you have already stored
the number into a one-touch or speed dial number. For information on
storing and using numbers in the memory, see page 3.12.
If you make a mistake while entering a number, move the cursor under
the wrong digit by using ➛ or ❿, and correct the number or press
Search/Delete to delete the number.
2. Press Start/Enter when the number appears correctly on the display.
The machine dials the number, then begins to transmit.
Cancelling transmission
Press Stop any time during transmission.
Confirming transmission
When the last page of your document has been sent successfully, the
machine beeps and returns to standby mode.
If something went wrong during your fax transmission, an error message
appears on the display. For a listing of error messages and their meanings, see page 6.5.
If you receive an error message, press Stop to clear the message and try
to send the document again.
You can set your machine to print out a confirmation report automatically
each time sending is completed. For more information, see `SENDING
CONFIRM’ on page 5.3.
Automatic redial
When you send a fax, if the number you have dialled is busy or there is
no answer, the machine will automatically redial the number every three
minutes up to a maximum of two times.
The display shows ‘RETRY REDIAL?’. To redial the number without
waiting, press Start/Enter. To cancel the automatic redial, press Stop.
3.4
Basic operation
Receiving a fax
Receiving a fax
Receiving modes
Your machine has four receiving modes:
• In FAX mode, the machine answers an incoming call and immediately
goes into receive mode, waiting for a fax to be sent.
• In AUTO mode, the machine answers an incoming call expecting to
receive a fax. If the machine does not sense a fax signal, it will
continue to sound the ringing tone to tell you it is a phone call. If you
do not lift the handset during the ringing, the machine will switch to
automatic fax receiving mode.
• In ANS/FAX mode, the answering machine answers an incoming call,
and the caller can leave a message on the answering machine. If the
fax machine senses a fax tone on the line, the call automatically
switches over to the fax machine. To use the ANS/FAX mode, you
have to attach an answering machine to the extension telephone jack
on your fax machine (see page 1.5).
• In TEL mode, the automatic fax reception is turned off. You can receive
a fax only by picking up the handset and pressing Start/Enter.
The current receiving mode is displayed when the machine is in Standby
mode.
25-JUN 15:30 FAX
Receiving mode
If you seldom use the fax line for voice conversations, set the fax machine
to receive a fax automatically by selecting FAX mode.
Basic Operation
3.5
Distinctive ring pattern detection (DRPD)
You can receive a call using distinctive ring pattern detection (DRPD)
feature. “Distinctive ring” is a telephone company service which enables
a user to use a single telephone line to answer several different telephone
numbers. For details on this feature, see page 5.6.
Receiving automatically in FAX mode
1. Press Rcv.Mode/Contrast until the display shows ‘FAX MODE’.
2. When you get a call, the machine answers the call on a specified
number of rings and receives a fax automatically. You can change the
number of rings. See ‘RINGS TO ANSWER’ on page 5.4.
To adjust the ringer volume, see ‘Adjusting volume’ on page 2.8.
Receiving Manually in TEL Mode
1. Press Rcv.Mode until the display shows ‘TEL.’
2. When the ringer sounds, Press On Hook Dial.
3. If you hear a fax tone, press Start on the machine.
4. The machine begins receiving a fax, and returns to standby
modo When the reception is complete.
3.6
Basic Operation
Receiving in AUTO mode
1. Press Rcv.Mode/Contrast until the display shows ‘AUTO MODE’.
2. When you get a call, the machine answers it.
If a fax is being sent, the machine goes into receiving mode.
If the machine does not detect a fax signal, it will continue ringing to
tell you it is a phone call. You should pick up the handset to answer the
call, or it will switch to automatic receiving mode.
Receiving automatically in ANS/FAX mode
To use this mode, you must attach an answering machine to the extension
telephone jack on the back of your machine (see page 1.6).
1. Press Rcv.Mode/Contrast until the display shows ‘ANS/FAX MODE’.
2. When you get a call, the answering machine answers it. If the caller
leaves a message, the answering machine stores the message normally.
If your machine hears a fax tone on the line, the fax receive mode is
activated.
Notes:
• If you have set your machine to ANS/FAX mode and your answering machine is
switched off, or no answering machine is connected to your machine, the fax
machine will automatically go into FAX mode after 10 rings.
• If your answering machine has a ‘user-selectable ring counter’, set the machine
to answer incoming calls within 1 ring.
• If you are in TEL mode (manual reception) when the answering machine is
connected to your machine, you must switch off the answering machine, or the
outgoing message from the answering machine will interrupt your phone
conversation.
Basic Operation
3.7
Receiving manually using an extension
telephone
This features works best when you are using an extension telephone
connected to the extension telephone line jack on the machine. You can
receive a fax from someone you are talking to on the extension telephone
without having to go to the fax machine.
1. When you receive a call on the extension phone and hear fax tones,
press the keys “ 9 ” (star nine star) on the extension telephone.
The machine receives the document.
Press the buttons slowly in sequence. If you still hear the fax tone from
the remote machine, try pressing “ 9 ” once again.
“ 9 ” is the remote receive start code preset at the factory. The first
and the last asterisks are fixed, but you can change the middle number
to whatever you choose.
For more information, see ‘RCV. START CODE’ on page 5.5.
2. When you have finished speaking and receiving documents, replace
the handset of the extension telephone.
3.8
Basic Operation
Making a copy
Copying overview
When you make a copy, your machine provides several option features
you can choose as follows:
-Multiple copies : 1 to 99 copies of the document can be made.
-Zoom rate : You can reduce or expand the image size by 1% increments
from 50% to 130%.
-Collation : When this menu is set to ON, the machine sorts the print
jobs. All pages of the document are printed in reverse order before the
next copy is printed. For example, if you copy a three-page job to print 2
copies, the machine prints page 3, page 2, page 1, page 3, page 2, page 1.
Making a simple copy
To make a direct single copy without setting any options, take the following steps:
1. Load a document with the print side facing down. If necessary, press
Rcv.Mode/Contrast button to adjust the contrast. For details on the
contrast, see page 3.2.
2. Press Copy twice. The machine starts copying.
Basic Operation
3.9
Advanced copy features
You can adjust the copy quantity, size and collation. Take the following
steps:
1. Load a document with the print side facing down. If necessary, adjust
Rcv.Mode/Contrast button to change the contrast. For details on the
contrast, see page 3.2.
2. Press Copy. The display asks you to enter the number of copies (1 to 99).
3. If you need two or more copies, enter the desired number using the
number keypad, then press Start/Enter. You can also press
Start/Enter without setting the number of copies. The display shows
the next option; zoom rate.
4. If you want to reduce or expand the image size, enter the number of
the desired zoom rate, then press Start/Enter.
The display asks you to turn the copy collation yes or no. Setting ‘YES’
will sort the print job.
5. Press ➛ or ❿ to choose YES or NO.
YES (Sort)
NO (Group)
1
2
1
1
3
2
2
3
2
1
2
1
6. Press Copy or Start/Enter to begin the copy operation.
Note: When you set the copy options, pressing Copy anytime begins the copy
operation immediately without displaying the remaining options.
3.10 Basic Operation
Other functions
Redial
To redial the number last called
Press Redial/Pause. If a document is loaded in the document feeder, the
machine automatically begins to send.
To search through redial memory
1. Press and hold Redial/Pause for 2 seconds.
The redial memory in your machine retains the last 10 numbers called.
If you have dialled the same number multiple times, the machine does
not count the duplicates.
2. Press ➛ or ❿ to search through the memory until you find the number you want.
3. When the number you want appears on the display, press Start/Enter
to dial. If a document is loaded in the document feeder, the machine
automatically begins to send.
Basic Operation 3.11
Sending a recall
Some special phone services require a switch-hook signal for proper
operation. For example, if you have call-waiting, you can put a call on
hold and take a second call on the same line by pressing the
Recall/Status button.
1. When you are on the telephone and hear the call waiting signal,
press Recall/Status once. The first caller is on hold and you are
speaking to the second caller.
2. Press Recall/Status again to talk to the first caller again.
Note: If you do not have a special service that uses the switch-hook signal, do not
press Recall/Status during a call. If you do, you could disconnect the
line.
Monitoring a dual job status
Your machine can perform more than one of many functions simultaneously. For example, you can :
• Receive a fax into the memory while making a copy.
• Store a fax document for later transmission while printing an incoming
fax.
When the machine performs dual tasks, press Recall/Status to see the
current status on the display of the other operation. Each time you press
Recall/Status, the current status of the two operations displays alternatively.
3.12 Basic Operation
Automatic dialling
One-touch dialling
One-touch dialling lets you use any one of the 10 one-touch buttons to
automatically dial a number.
Storing a number for one-touch dialling
1. Press and hold one of ten one-touch buttons for 2 seconds that you
want to assign. The display shows `Txx:’, where `xx’ represents the
selected one-touch button number.
Txx:_
2. Enter the number you want to store by using the number keypad,
then press Start/Enter.
To insert a pause between numbers, press Redial/Pause; a ‘P’ appears
on the display.
If you make a mistake while entering a number, use ➛ or ❿ to move
the cursor under the wrong digit, then enter the correct digit, or press
Search/Delete.
If the number is already assigned to another one-touch button, the
display alerts you with the registered one-touch button, and asks you
to continue storing another one-touch dial number.
Basic Operation 3.13
3. The display asks you to enter a name. Enter the desired name. For
information on how to enter names, see page 2.3.
Or
If you do not want to assign a name, skip this step.
If you assign a name to the number, the name appears on the display
when you press the one-touch button.
4. Press Start/Enter when the name appears correctly or without entering a name.
5. To set another one-touch number, press the desired one-touch button
and repeat steps 2 through 4.
Or
To return to standby mode, press Stop.
Editing a number for one-touch dialling
If you press and hold the one-touch button where the phone number is
already registered, the display shows the number.
TEL:025413000
Press ➛ or ❿ to move the cursor to the desired number and edit the
number. When you complete editing, press Start/Enter.
Note: When you press the one-touch button stored for group dial, the display
briefly shows ‘G-REGISTERED’ to indicate that the button is used for
group dial, then you can edit the number.
Sending a fax using a one-touch number
1. Load a document you want to send by fax.
2. Press the one-touch button (1 through 10) where you stored a number.
The number will be automatically dialled, then the document begins to
transmit when the remote fax machine answers the phone.
3.14 Basic Operation
Speed dialling
You can store up to 80 numbers in 2-digit speed dial locations (01-80).
Storing a number for speed dialling
1. Press and hold Speed for 2 seconds.
❿##
LOC. [01-80]❿
2. Enter a 2-digit location number (01 through 80) where you want to
store a number, then press Start/Enter.
If a number has already been stored in the location you chose,
the display shows the number.
3. Enter the number you want to store, then press Start/Enter.
Sxx:025413000
where xx represents the speed location
you have selected at step 2.
If the number you entered has already been assigned to another speed
location, the display alerts you with the registered speed location.
4. To assign a name to the number, enter the desired name. For information on how to enter names, see page 2.3.
Or
If you do not want to assign a name, skip this step.
5. Press Start/Enter when the name appears correctly or simply without
entering a name.
6. To store more telephone numbers, repeat steps 2 through 5.
Or
To return to standby mode, press Stop.
Basic Operation 3.15
Editing a number for speed dialling
1. Press and hold Speed for 2 seconds.
2. Enter the 2-digit location number where the phone number you want
to edit has been stored, then press Start/Enter. The display shows the
number.
TEL:025413000
3. Press ➛ or ❿ to move the cursor to the desired number and edit the
number. When you complete editing, press Start/Enter.
Note: When you press the speed dial number stored for group dial, the display
briefly shows ‘G-REGISTERED’ to indicate that the number is used for
group dial, then you can edit the number.
Sending a fax using a speed number
1. Load a document that you want to send by fax.
2. Press Speed, then enter a 2-digit speed dial location number.
3. Press Start/Enter to dial the number. The number will be automatically dialled, then the document will begin to be transmitted when the
remote fax machine answers the phone.
3.16 Basic Operation
Searching for a number in the memory
There are two ways to search for a number in the memory. You can either
scan from A to Z sequentially, or you can search using the first letter of
the name associated with the number.
Searching sequentially through the memory
1. Press Search/Delete, then press ❿ to move downward through the
memory until you find the number you want. To move upward,
press ➛ .
Pressing ❿ allows you to search downward through the entire memory
in alphabetical order (from A to Z), and ➛ allows you to search
upward in reverse alphabetical order (from Z to A).
Each time you press ➛ or ❿, the display shows the next number stored
in the memory.
While searching through the machine’s memory, you will see that each
entry is preceded by one of three letters: ‘T’ for one-touch dial, ‘S’ for
speed, or ‘G’ for group dial number. These letters tell you how the
number is stored.
2. When the number you want appears on the display, press Start/Enter
to dial.
If a document is loaded, the document begins to be transmitted when
the remote fax machine answers the phone.
Searching with a particular first letter
1. Press Search/Delete, then press the button labelled with the letter
you want to search for. A name beginning with the letter appears on
the display.
For example, if you want to find the name ‘MOBILE,’ press the ‘6’
button, which is labelled with ‘MNO.’
2. Press ❿ to display the next name in the list, or ➛ to display the
previous name.
3. When the name and number you want appear, press Start/Enter to
dial.
Basic Operation 3.17
MEMO
3.18 Basic Operation