1
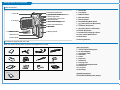
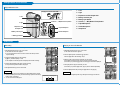
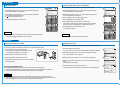
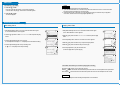
Digital Video Camcorder
SC-M102/M105/M110
Features......................................................2
Notes and Safety Instructions ....................3
Getting to Know Your Camcorder...........4
Video Mode .........................................5
Photo Mode .........................................6
MP3 Mode..................................................6
Voice Recorder Mode ................................7
Maintenance........................................8
* Samsung Electronics’ Internet Home Page
http://www.samsung.com
Troubleshooting .........................................9
Features
Integrated Digital CAM/DSC operation
An integrated digital imaging device that easily converts between a Digital CAM
and a Digital Still Camera with comfortable and easy recording.
High Resolution Image Quality (Digital Still Camera)
Employing 800K CCD Pixel, a maximum resolution of 800x600 is available.
100x Digital Zoom
Allows the user to magnify an image up to 100x its original size.
Colorful TFT LCD
A high-resolution (210K) colorful TFT LCD gives you clean, sharp images as well
as the ability to review your recorded files immediately.
Electronic Image Stabilizer (EIS)
With the CAM, you can reduce unstable images by avoiding natural shaking
movements.
Various Digital Effects
The DSE (Digital Special Effects) allows you to give the film a special look by
adding various special effects.
USB Interface for Data Transfer
You can transfer still images and video file or any other files to a PC using the
USB interface.
PC Cam for multi-entertaining
You can use this the CAM as a PC camera for video chatting, video conference
and other PC camera applications.
Voice Record / Playback with vast memory
You can record voice and store it in the internal memory, Memory Stick and
Memory Stick Pro (Option) and playback the recorded voice. The unit is tapless
and records on Memory Sticks.
Plus Advantage, MP3
With the CAM, you can playback MP3 files stored in the internal memory,
Memory Stick and Memory Stick Pro (Option).
2
Notes and Safety Instructions
Notes Regarding the Battery Pack
Precautions on the CAM Care
1. Please note the following precautions for use:
2. Please keep this device in a safe place. The device contains a lens that can be damaged by
shock. Keep away from the reach of the children.
-
- Do not place your device in a wet place. Moisture and water may cause the device to
malfunction.
- To avoid electric shock, do not touch your device or power cable with wet hands.
- Do not use the flash close to another’s eyes. The flash emits a strong light that may cause
damage similar to direct sunlight on one’s eyesight. Particular care should be observed if
photographing infants, when the flash should be no less than 3 feet from your subject.
- If the device is not working properly, please consult your nearest dealer or authorized Samsung
service facility. Disassembling the device yourself may cause irrecoverable damage which will be
difficult to repair.
- Clean the device with a dry, soft cloth. Use a soft cloth moistened with a mild detergent solution
for removing stains. Do not use any type of solvent, especially benzene, as they may seriously
damage the finish.
- Keep your device away from rain and saltwater. After using, clean the device. Saltwater may
cause the parts to corrode.
-
Notes Regarding COPYRIGHT
1. Television programs, movie video tapes, DVD titles, films and other program materials may be
copyrighted. Unauthorized recording of copyrighted materials may infringe on the rights of the
Copyright owners and is contrary to copyright laws.
2. All the trade names and registered trademarks mentioned in this manual or other documentation
provided with your Samsung product are trademarks or registered trademarks of their respective
holders.
Notes Regarding Moisture Condensation
1. A sudden rise in atmospheric temperature may cause condensation to form inside the CAM.
For Example:
- Entering or leaving a heated place on a cold day might cause condensation inside the product.
- To prevent condensation, place the product in a carrying case or a plastic bag before exposing it
to a sudden change of temperature.
Notes Regarding the CAM
1. Do not leave the CAM exposed to high temperature (above 60°C or 140°F).
For example, in a parked closed car in summer or exposed to direct sunlight.
2. Do not let the CAM get wet.
Keep the CAM away from rain, salt water, or any other form of moisture.
The CAM will be damaged if immersed in water or subjected to high levels of moisture.
It is recommended to use original battery pack that is available at SAMSUNG service center.
Make sure the battery pack is fully charged before starting to record.
To preserve battery power, keep the CAM turned off when you are not operating it.
If your device is left in STBY mode without being operated for more than 5 minutes,
it will automatically turn itself off to protect against unnecessary battery discharge.
Make sure that the battery pack is attached firmly in place.
The new battery pack provided with the product is not charged. Before using the battery pack,
you need to fully charge it.
Do not drop the battery pack. Dropping the battery pack may damage it.
Fully discharging a Lithium Polymer battery damages the internal cells. The battery pack may be
prone to leakage when fully discharged.
To avoid damage to the battery pack, make sure to remove the battery when no charge remains.
Clean the terminal to remove foreign substance before inserting the battery pack.
✤
✤
When the battery reaches the end of its life, please contact your local dealer.
Batteries must be disposed of as chemical waste.
Be careful not to drop the battery pack when you release it from the CAM.
Notes Regarding a Trademark
The logos regarding DivX, DivX Licensed are the trademark of DivX, Network, Inc and can be used
after contracting license.
Notes Regarding the Lens
1. Do not film with the camera lens pointing directly at the sun.
2. Direct sunlight can damage the CCD (Charge Coupled Device, the imaging sensor).
Notes Regarding the LCD Display
1. The LCD monitor has been manufactured using the high precision technology. However, there
may be tiny dots (red, blue or green in color) that appear on the LCD monitor. These dots are
normal and do not affect the recorded picture in any way.
2. When you use the LCD monitor under direct sunlight or outdoors, it maybe difficult to see the
picture clearly.
3. Direct sunlight can damage the LCD monitor.
Precautions Regarding Service
1. Do not attempt to service the CAM yourself.
2. Opening or removing covers may expose you to dangerous voltage or other hazards.
3. Refer all servicing to qualified service personnel.
Precautions Regarding Replacement Parts
1. When replacement parts are required, be sure the service technician has used replacement parts
specified by the manufacturer and having the same characteristics as the original part.
2. Unauthorized substitutions may result in fire, electric shock or other hazards.
3
Getting to Know Your Camcorder
Rear & Left View
1 Built-in MIC
1. Built-in MIC
7. Back/Multi-Play
6.
Back( ) / Left / Multi-Play
Mode button
Mode button
2 LCD display
7. switch
8.
[▲ ]switch
(Zoom
(Zoom
out (W)
out// RPS
Rewind
switch)
( ) switch)
9. OK button
8.
button(Play,
(Play/Pause)
Pause)
3 DISPLAY button
9. [▼ ]switch (Zoom in/ FPS switch)
11. Record/Stop
10.
Record/Stop button
button
2.
2. LCD
LCD Monitor
display
4 MP3 Hold switch
5 Built-in Speaker
12. Record/Power/Charging
11.
Power / Charging indicator
indicator
6 Back/Multi-Play Mode button
13. Power
12.
OFF switch
switch
/ Mode
/ ModeSelector
Selector
7 [▲ ]switch (Zoom out/RPS switch)
14. Menu button
13.
8 OK button (Play/Pause)
9 [▼ ]switch (Zoom in/ FPS switch)
15. Memory Stick Slot
14.
4. LCD(DISPLAY)
3. DISPLAY button
10 Record /Stop button
11 Record/Power /Charging indicator
5.4.MP3
MP3LOCK
Hold switch
12 Power switch/Mode Selector
13 Menu button
6. Built-in Speaker
5.
14 Memory Stick Slot
Accessories Supplied with the CAM
Make sure that the following basic accessories are supplied with your CAM.
1. Lithium Polymer Battery pack 2. AC Power Adapter
5. Cradle
6. Earphones
9. Instruction Book/Quick Guide 10. Software CD
3. Video/Audio Cable
4. USB Cable
7. Hand Strap
8. Carrying Case
11. Lens Cover
12. Neck Strap
Basic Accessories
1. Lithium Polymer Battery pack
2. AC Power Adapter
3. Video/Audio Cable
4. USB Cable
5. Cradle
6. Earphones
7. Hand Strap
8. Carrying Case
9. Instruction Book/Quick Guide
10. Software CD
11. Lens Cover
12. Neck Strap
13. Extended life Battery Pack
(Option)
Optional Accessories
13. Extended life Battery Pack (Option)
4
Getting to Know Your Camcorder
Right & Bottom View
1 Lens
Hanging Lens Cover on the CAM
2 Light
3 Earphones and AV Output Jack
1. Lens
4 Battery insertion part
5 Battery eject button
6. Volume +, - / MF(Manual Focus) button
2. Light
6 Volume +, - / MF (Manual Focus) button
7 Tripod Receptacle
8 Cradle Receptacle
/MF
3. Earphones and
AV Output Jack
7. Tripod Receptacle
4. Battery insertion part
8. Cradle Receptacle
5. Battery eject button
9 Strap Hook
9. Strap Hook
Video Mode
Recording
You can record video and store it in memory.
Playing on the LCD Monitor
1
1. Slide [Mode Selector] down to turn on the CAM.
◆ The Video Record screen appears.
◆ You can select Video mode or Previous mode as the start-up mode in
System Settings.
Video Record
00:00 / 10:57
2
Video Record
Video
ideo Record
00:16 / 10:41
2. Press the [Menu] button and slide the [▲ /▼ ] switch.
Press the [OK] button after selecting <Play>.
SF / 720
BLC
STBY
SF / 720
2
Video
ideo Record
STBY
SF / 720
Record
Play
3. Slide the [▲ /▼ ] switch to find the video file you want to play.
◆ Each time you slide the [▲ /▼ ] switch, the frame moves horizontally.
◆ Each time you press the [+]/[-] button, another page of 6 frames is displayed.
BLC
00:16 / 10:50
4. Slide [Mode Selector] up to turn off the CAM.
1
1. Slide [Mode Selector] down to turn on the CAM.
◆ The Video Record screen appears.
BLC
2. Press [Record/Stop] button to start recording.
◆ [● REC ] indicator displays on LCD.
◆ The elapsed and remaining times are displayed and it starts recording.
3. Press the [Record/Stop] button again to stop recording.
◆ It stops recording and the CAM is ready again.
You can view playback of video files on the LCD monitor.
SF / 720
3
Video Record
REC
SF / 720
Settings
Back
00:16 / 10:41
STBY
3
Video
ideo Play 100-0056
4
Video
ideo Play 100-0056
4. Press [OK] button to play the video file you want.
◆ Each time you press the [OK] button, play or pause is selected repeatedly.
BLC
00:16 / 10:41
STBY
5. Press the [Back] button after pressing the [OK] button to stop playing.
Video Record
Notes
✤
✤
✤
If the Auto Shut Off is set, the CAM turns off automatically after 5 minutes.
Detach the Battery Pack when you finish recording to prevent unnecessary
battery power consumption.
You can check the recording time.
Notes
✤
Elapsed time Remaining time
00:00 / 10:57
STBY
You can press the [Back] button to go directly to the first page of 6 frames.
00:01 / 00:16
5
Photo Mode
Capturing Images
You can take photos as well as record video files.
Viewing Photo files on the LCD Monitor
1
The LCD monitor allows you to view your photo right after taking them.
Mode Selection
2
1. Slide [Mode Selector] down to turn on the CAM and slide it down again.
◆ The <Mode Selection> screen appears.
1. Slide [Mode Selector] down to turn on the CAM and slide it down again.
◆ The <Mode Selection> screen appears.
Photo
MP3
Photo
MP3
Voice Recorder
Voice Recorder
2. Slide the [▲ /▼ ] switch to select Photo mode and press the [OK] button.
◆ The CAM is ready for taking pictures.
◆ [
] indicator is displayed on LCD.
File Browser
2
Photo Capture
800
Capturing...
3. Press [Record/Stop] button to take pictures.
Mode Selection
Video
Video
2. Slide the [▲ /▼ ] switch to select Photo mode and press the [OK] button.
◆ The Photo Capture screen appears.
File Browser
3
Photo Capture
800
Capture
3. Press the [Menu] button and slide the [▲ /▼ ] switch.
Press the [OK] button after selecting <View>.
View
Settings
Capturing...
Back
3
Photo Capture
800
4. Slide the [▲ /▼ ] switch to find the photo you want to view.
◆ Each time you slide the [▲ /▼ ] switch, the frame moves horizontally.
◆ Each time you press the [+]/[-] button, a page(6 frames) moves.
4
Photo View 100-0022
5
Photo View
View 100-0022
5. Press [OK] button to view the photo you want.
◆ The full screen displays.
Note
✤
If the battery is low and the battery charge icon blinks, the light will not operate
and the light icon( ) will not appear in the LCD screen.
Note
✤
Capturing...
Display time may vary depending on the picture size.
MP3 Mode
Copying Music files to the CAM
You can transfer music files from your PC to the internal memory, Memory Stick or Memory Stick Pro.
For copying music files, the CAM must be connected to your PC with the USB cable.
1. Connect the CAM to a PC with the USB cable.
◆ Your computer recognizes the CAM and the symbol for
removable drive will appear in ‘My Computer’.
Playing Music files
You can hear the music copied from your PC directly or with the Memory Stick.
1. Connect the earphones to the CAM.
◆ You can also hear the music from the Built-in speaker without the earphones.
3
Mode Selection
Video
Photo
2. Double-click the new removable drive to open.
2. Slide [Mode Selector] down to turn on the CAM and slide it down again.
◆ The <Mode Selection> screen appears.
3. Select the MP3 folder and double-click to enter.
3. Slide the [▲ /▼ ] switch to select MP3 mode and press the [OK] button.
MP3
Voice Recorder
File Browser
4
MP3 Play
1 hey jude.mp3
4. Drag and drop the MP3 file from your PC into the MP3 folder
under MSAMSUNG.
Disconnecting USB Connection
After completing the data transfer, you must disconnect the cable in the following way.
1. Select the removable disk icon and click the right mouse button to select ‘Safely Remove Hardware’.
2. Select ‘Stop’ and disconnect the USB cable when the pop-up screen disappears.
2 I believe I can fly.mp3
4. Slide the [▲ /▼ ] switch to find the music you want to hear and press the [OK]
button.
◆ The selected music is played.
5. Press the [OK] button again to stop hearing music.
◆ Each time you press the [OK] button, play or pause is selected alternately.
3 black or white.mp3
4 Let it be.mp3
5 What a wonderful world.mp3
5
MP3 Play
2. I belive i can fly.mp3
4.4 Kbytes
Stereo 44.1KHz 128Kbps
03:19 / 04:32
Notes
✤
✤
Transferring and playing with the Memory Stick operates in the same way as the internal memory.
When connecting the CAM to your PC, if the message ‘USB-D07 Capture Device hasn’t passed Windows
Logo testing’ appears, do not be concerned, it is OK to proceed with file transfer.
6
MP3 Mode
The use of [ ▲ /▼ ] switch
✤
Notes
Press the [▲ ] switch
First 2 seconds after start playing - the previous file appears.
2 seconds after start playing - the first scene of the file appears.
✤
‘----’ is displayed depending on the title of MP3 file.
✤
If you slide the Hold switch to on, all buttons except the Power switch and volume +/- button are locked.
The MP3 hold switch operates only in the MP3 mode.
In MP3 playback mode, a file name may not be displayed correctly or an MP3 file may not playback.
In this case, rename the file name using English alphabets only.
✤
✤
Press the [▼ ] switch
The next file appears.
Voice Recorder Mode
Recording Voice
Playing Voice files
You can record voice using the built-in microphone in the CAM.
1. Slide [Mode Selector] down to turn on the CAM and slide it down again.
◆ The <Mode Selection> screen appears.
You can hear the voice file connecting earphones.
2
1. Slide [Mode Selector] down to turn on the CAM and slide it down again.
◆ The <Mode Selection> screen appears.
Mode Selection
Video
9
Photo
2. Slide the [▲ /▼ ] switch to select Voice Recorder mode and press the [OK]
button.
Voice Recorder
File Browser
Voice Record
3
3. Press the [Record/Stop] button to record voice.
◆ The elapsed time and <● REC > is displayed. The CAM starts recording.
4. Press the [Record/Stop] button to stop recording voice.
◆ < ■ STBY> is displayed and it stops recording.
Stereo 8KHz 128Kbps
MP3
2. Slide the [▲ /▼ ] switch to select Voice Recorder mode and press the [OK]
button.
3. Press the [Menu] button when the <Voice Record> screen appears.
00:00:16 / 00:24:32
3
Stereo 8KHz 128Kbps
00:00:16 / 00:24:32
REC
4. Slide the [▲ /▼ ] switch to select <Play> and press the [OK] button.
Play
Stereo 8KHz 128Kbps
Back
5. Slide the [▲ /▼ ] switch to select the file you want to play.
00:00:16 / 00:24:32
Voice Record
6. Press the [OK] button to play the recorded voice.
◆ Press the [OK] button to pause playing.
9
Stereo 8KHz 128Kbps
00:00:16 / 00:24:32
STBY
Voice Record
Record
9 2004/01/01 12:18:12 AM
4
Voice Record
2
4
1 2004/01/01
STBY
6
STBY
Voice Play
12:22:00 AM
2 2004/01/02
1:23:00 AM
3 2004/01/03
5:39:00 AM
4 2004/01/07
7:13:00 AM
5 2004/01/07
11:54:00 AM
Voice Play
2 01/01/2004 01:23
5.0 Mbytes
Stereo 8KHz 128Kbps
00:00:12 / 00:05:12
The button and switch you use when playing the recording
Play/Pause [
] button: Play or pause the voice file
Rewind [ ] switch: Rewind the voice file backward (Press and hold over 2 seconds)/Move to the previous file
Fast Forward [ ] switch: Wind the voice file forward (Press and hold over 2 seconds)/Move to the next file
Note
✤
Press the [Back] button while recording standby status to view the file list.
7
Maintenance
Cleaning and Maintaining the CAM
After using the CAM
Cleaning the Body
1. For the safekeeping of the CAM, follow these steps.
To Clean the Exterior of the CAM
- Turn the CAM off.
- Remove the Battery Pack.
- Remove the Memory Stick.
3. Do not drop or in anyway shock the CAM.
To clean the exterior, use a soft dry cloth. Wipe the body gently.
Do not apply excessive force when cleaning, gently rub the surface.
The LCD monitor surface should not be pressed. Use a soft dry cloth to clean the surface.
To clean the lens, use an optional air blower to blow out dirt and other small objects. Do not wipe
the lens with cloth or your fingers. If necessary, use lens cleaning paper.
- Do not use thinner, alcohol or benzene for cleaning. Otherwise, the finish may be damaged.
- Cleaning should be done only after the battery pack has been removed, and other power sources
have been disconnected.
4. For prolonged use of the CAM, avoid using it in places subject to excessive
humidity or dust.
Using the Built-in Rechargeable Battery
2. To prevent any damage to the LCD monitor, do not apply excessive force on
its moving parts.
5. Do not leave the CAM in places subject to:
-
Excessive humidity, steam, soot or dust.
Excessive shock or vibration.
Extremely high (over 50°C or 122°F) or extremely low (under 0°C or 32°F) temperatures.
Strong electromagnetic fields.
Direct sunlight or in a closed car on a hot day.
6. For the safe use of the battery pack, follow these.
- To conserve battery power, be sure to turn off the CAM power when not in use.
- Battery consumption may vary depending on the condition of use.
Recording with many starts and stops, frequent zooming,
and recording in low temperatures will shorten actual recording times.
- Dispose of used battery packs promptly. Do not dispose of them in fire.
- The battery pack will become warm during charging and use. This is not a malfunction.
- The battery pack has a limited service life.
If the period of use becomes noticeably shorter with a normal charge,
the battery pack is at the end of its service life. Replace it with a new battery pack.
-
The CAM incorporates a rechargeable lithium cell that maintains the date and
other settings even when the AC adaptor and the battery are removed.
The rechargeable lithium cell is automatically recharged when the CAM is used.
Charging the Built-in Rechargeable Battery
If The CAM is not used at all, the cell runs down in 5 days. In this case,
connect the AC adaptor to the CAM and turn on the power switch.
Then leave it for 24 hours. After that, set the date and other settings again.
7. For the safe use of the Memory Stick and the Memory Stick Pro, follow these.
- The Memory Stick should be stored away from heaters and other heat sources.
Avoid storing Memory Sticks under direct sunlight and avoid electromagnetic fields.
- Do not power off any devices while transferring data, as this may destroy the data.
- Back up your image data often to a hard disk or other permanent storage media.
- Format the Memory Stick periodically.
- When formatting the Memory Stick or Memory Stick Pro, format in the CAM.
If you format it on PC, use the ‘Memory Stick Formatter’ in the supplied software CD.
8
Troubleshooting
Self Diagnosis Display
Display
Not enough free space
Corrupted file
Paper error
Printer error
Ink error
Wrong error
USB transfer error
Low battery
Holding the key
Card error
Not formatted
Write error
Read error
Not supported format
Write protected
MPEG decoding error
✤
Informs that…
Not enough free space for saving files
The file is corrupted
The paper is insufficient.
The paper is caught in the printer.
Ink is low.
The file is wrong.
The error is occurred while transferring data.
Battery is low.
The hold key is locked.
The memory card is corrupted.
Format the memory card.
Failed to write.
Failed to read.
The format is not supported.
Memory Stick is protected to write.
The video file is corrupted.
Action
Check the space of internal memory or the Memory Stick.
Delete the corrupted file.
Check the paper in the printer. If there is no paper, insert paper.
Check that paper is caught in the printer. Pull out the caught paper.
Check if the ink or toner is low.
Check that the file is JPEG.
Disconnect the USB cable and connect it again.
Charge the battery pack or connect the AC Adapter.
Unlock the hold key and operate the CAM.
Format the Memory Stick or replace it with a new one.
Format the Memory Stick.
Check the memory space or format the memory.
Delete the file.
The AVI or JPEG file that is not supported.
Unlock the Memory Stick.
Delete the corrupted file.
If these instructions do not solve your problem, contact your nearest Samsung dealer or authorized service center/personnel.
Symptom
No power is supplied
DATE/TIME is wrong
Focus does not adjust automatically
The Memory Stick will not load properly
Color balance of picture is not natural
Digital zoom does not work
Files stored in the Memory Stick cannot be deleted
Images on the LCD monitor appear dark
Rear of the LCD monitor is hot
Play, rewind and fast forwarding do not work
Memory Stick cannot be played back (Photo mode)
No picture is taken when is fully pressed
Built-in Light will not come on
Cannot Record a video
LCD screen turns off
Possible Causes
The power is not connected properly
The battery is dead
The battery is too cold
The DATE/TIME is not set
Focus is set to manual mode
Recording was done in a dark place
Lens is covered with condensation
Memory stick is in wrong position
Something is stuck in the Memory Stick slot
White balance adjustment is required
Digital special effect is applied
Memory Stick is protected
File is locked
Ambient is too bright
Ambient temperature is too low
Prolonged use of LCD monitor
The Photo Mode is selected
The Video Mode is selected
Not enough free memory space is remained
Memory card is formatted by different devices
Light is forced to cancel
Light is not available for recording
The ‘Photo Mode’ is selected
To save power consumption, the LCD screen and
Camera s power turns off if there is no button operation
for a certain period of time (depending on operation
mode), which is not a malfunctioning
Measure
Connect the AC adapter properly
Replace the dead battery pack
Warm up the battery or move to warmer place
Set the DATE/TIME
Set focus to AUTO
Use strobe or lit the place
Clear the lens and check the focus
Insert the Memory Stick properly
Clear the Memory Stick slot
Set proper white balance
Turn off the digital special effects
Remove the protection tab of Memory Stick
Remove the lock on the file
Adjust the brightness and angle of LCD
Low temperatures might produce a dark LCD display
This is not a malfunction
Close the LCD monitor to turn if off, or turn your device off to cool down
Select ‘Video Mode’ and select ‘Play’
Select ‘Photo Mode’ and select ‘View’
Delete files from the Memory Stick
Format the Memory Stick on the CAM
Select different Light mode
Select ‘Video Mode’
Operating any button will turn the camera on
Pressing the button once again will operate its function
9