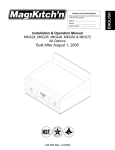
1
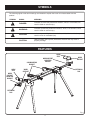
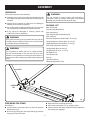
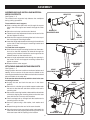
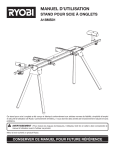
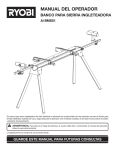
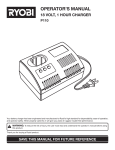
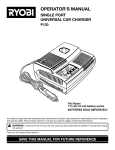
OPERATOR’S MANUAL
MITER SAW STAND
A18MS01
Your miter saw stand has been engineered and manufactured to Ryobi’s high standard for dependability, ease of operation,
and operator safety. When properly cared for, it will give you years of rugged, trouble-free performance.
WARNING: To reduce the risk of injury, the user must read and understand the operator’s manual before using
this product.
Thank you for buying a Ryobi product.
SAVE THIS MANUAL FOR FUTURE REFERENCE
TABLE OF CONTENTS
n Rules for Safe Operation ................................................................................................................................................. 2
n Symbols........................................................................................................................................................................ 3-4
n Features........................................................................................................................................................................... 4
�n Assembly ...................................................................................................................................................................... 5-9
�n Operation.................................................................................................................................................................... 9-11
�n Maintenance .................................................................................................................................................................. 12
RULES FOR SAFE OPERATION
Safe operation of this accessory requires that you read and
understand this operator’s manual, the operator’s manual for
the table saw and all labels affixed to the tool.
just to make sure that no problems will occur when
the cut is made.
n Do not modify or use this stand for any purpose for
which it is not intended.
READ ALL INSTRUCTIONS
n This stand is designed to be used on a flat stable
surface. Do not use the stand on an uneven surface.
Be sure to allow enough room to handle and properly
support the workpiece.
n Know your accessory. Read the operator’s manual
carefully. Learn its applications and limitations, as
well as the specific potential hazards related to this
accessory.
n Follow the tool mounting instructions carefully, and
ensure the tool is fastened securely.
n Keep the work area clean. Cluttered work areas and
work benches invite accidents.
n �Maximum weight of the miter saw and workpiece
together must not exceed 400 pounds.
n Always wear safety glasses with side shields.
Everyday glasses have only impact resistant lenses. They
are NOT safety glasses.
n Do not apply an unbalanced load that could cause the
miter saw stand to tip over.
n This stand will accommodate many miter saws. However, it should never be used on any miter saw with a
blade diameter larger than 12 in. or with any slide miter
saw with a blade diameter larger than 10 in. Always
confirm any miter saw used is mounted securely and is
stable before plugging in the miter saw. Before turning
on the saw, perform a dry run of the cutting operation
n Save these instructions. Refer to them frequently and
use them to instruct others who may use this accessory.
If you loan someone this accessory, loan them these instructions also to prevent misuse of the product and
possible injury.
WARNING:
This stand is designed for use with miter saws with a blade diameter not larger than 12 in., or a slide miter saw with a
blade diameter not larger than 10 in.
2
SYMBOLS
Some of the following symbols may be used on this tool. Please study them and learn their meaning. Proper interpretation of these symbols will allow you to operate the tool better and safer.
SYMBOL
NAME
DESIGNATION/EXPLANATION
V
Volts
Voltage
A
Amperes
Current
Hz
Hertz
Frequency (cycles per second)
W
Watt
Power
Minutes
Time
Alternating Current
Type of current
Direct Current
Type or a characteristic of current
No Load Speed
Rotational speed, at no load
Class II Construction
Double-insulated construction
Per Minute
Revolutions, strokes, surface speed, orbits etc., per minute
Wet Conditions Alert
Do not expose to rain or use in damp locations.
Read The Operator’s Manual
To reduce the risk of injury, user must read and understand
operator’s manual before using this product.
Eye Protection
Always wear safety goggles, safety glasses with side shields, or
a full face shield when operating this product.
Safety Alert
Precautions that involve your safety.
No Hands Symbol
Failure to keep your hands away from the blade will result in serious personal injury.
No Hands Symbol
Failure to keep your hands away from the blade will result in
serious personal injury.
Pinch Point
To reduce the risk of injury or damage, avoid contact with
any pinch point.
No Hands Symbol
Failure to keep your hands away from the blade will result in
serious personal injury.
Hot Surface
To reduce the risk of injury or damage, avoid contact with any
hot surface.
min
no
.../min
3
SYMBOLS
The following signal words and meanings are intended to explain the levels of risk associated with this
product.
SYMBOL
SIGNAL
MEANING
DANGER:
Indicates an imminently hazardous situation, which, if not avoided, will
result in death or serious injury.
WARNING:
Indicates a potentially hazardous situation, which, if not avoided, could
result in death or serious injury.
CAUTION:
Indicates a potentially hazardous situation, which, if not avoided, may
result in minor or moderate injury.
CAUTION:
(Without Safety Alert Symbol) Indicates a situation that may result in
property damage.
FEATURES
WORK
STOP
SAW MOUNTING
BRACKET
WORK
STOP
WORK SUPPORT
MOUNTING
BRACKET
WORK
SUPPORT
WORK
SUPPORT
EXTENSION
RAIL
WORK
SUPPORT
MOUNTING
BRACKET
EXTENSION
RAIL
Fig. 1
4
ASSEMBLY
UNPACKING
WARNING:
This product requires some assembly.
n Carefully remove the tool and any accessories from the
box. Make sure that all items listed in the packing list are
included.
n Inspect the tool carefully to make sure no breakage or
damage occurred during shipping.
n Do not discard the packing material until you have carefully inspected and satisfactorily operated the tool.
n If any parts are damaged or missing, please call
1-800-525-2579 for assistance.
Do not connect to power supply until assembly is
complete. Failure to comply could result in accidental
starting and possible serious personal injury.
PACKING LIST
Miter Saw Stand
Saw Mounting Brackets (2)
Work Supports (2)
Work Support Mounting Brackets (2)
Work Stops (2)
Extension Adjustment Knobs (M8 x 25 mm) (2)
Length Adjustment Knobs (M8 x 15 mm) (2)
Height Adjustment Knobs (M8 x 15 mm) (2)
Work Stop Adjustment Knobs (2)
Carriage Bolts (M6 x 60 mm) (2)
Carriage Bolts (5/16 in. x 2 in.) (4)
Flat Washers (4)
Lock Washers (4)
Nuts (4)
Operator’s Manual
Warranty Registration Card
WARNING:
If any parts are missing do not operate this tool until the
missing parts are replaced. Failure to do so could result
in possible serious personal injury.
WARNING:
Do not attempt to modify this tool or create accessories not recommended for use with this tool. Any such
alteration or modification is misuse and could result in a
hazardous condition leading to possible serious personal
injury.
LEG
LOCKING
PIN
Fig. 2
PREPARING THE STAND
n Repeat with the remaining three legs.
See Figure 2.
n Lay the stand’s top surface down on the floor with the
folded legs on top.
n Lift the stand and place it in an upright position.
n Check to ensure the stand is stable and all the legs have
the locking pins engaged.
n Push in a leg locking pin and rotate that leg up until the
locking pin clicks into place.
5
ASSEMBLY
ASSEMBLING AND INSTALLING MATERIAL
WORK SUPPORTS
WORK STOP
See Figures 3 - 5.
The material work supports help balance the workpiece
during cutting operations.
To assemble the work support:
n Slide a carriage bolt (M6 x 60 mm) through the square
hole in the work support and extend through the other
side.
CARRIAGE
BOLT
WORK STOP
ADJUSTMENT KNOB
n Place the work stop over the end of the bolt
n Thread a work stop adjustment knob over the end of the
bolt and tighten to secure.
WORK
SUPPORT
n Slide the work support rail through the hole in the top of
the work support mounting bracket.
Fig. 3
n Insert the height adjustment knob through the small hole
on the side of the work support mounting bracket and
tighten to secure.
WORK
SUPPORT
To install the work supports:
n Slide the work support mounting bracket over the extension rail so that the extension rail extends through the
opening in the bracket. Position the work support at the
desired location on the extension rail.
n Insert a length adjustment knob through the opening in
the bottom of the work support mounting bracket and
tighten to secure.
WORK SUPPORT
MOUNTING
BRACKET
n Repeat with the other support.
ATTACHING SAW MOUNTING BRACKETS
See Figures 6 - 7.
Always position the saw to achieve maximum balance and
stability. All four corners of the saw must be bolted to the
mounting brackets before use. Make sure bolts do not extend
above the table of the miter saw.
If the saw has holes that line up with the slots in the saw
mounting brackets:
HEIGHT
ADJUSTMENT KNOB
Fig. 4
WORK
SUPPORT
n Unplug the saw and lock the saw arm in the down
position.
n Place a 2 x 4 or similar type of stable support underneath
the saw to raise the saw and allow access to the saw’s
mounting feet.
n Place a saw mounting bracket underneath the raised side
of the saw, aligning the mounting holes on the miter saw
base with the slot in the top of the bracket.
n Feed a carriage bolt up through both the bracket and a
mounting hole in the saw.
EXTENSION
RAIL
n Secure in place using a flat washer, lock washer and
nut.
n Repeat through the other end of the same bracket.
n Place the second saw mounting bracket underneath the
other side of the saw, aligning the mounting holes on the
miter saw base with the opening in the bracket.
LENGTH
ADJUSTMENT KNOB
6
Fig. 5
ASSEMBLY
MITER SAW
NUT
LOCK WASHER
FLAT WASHER
SAW MOUNTING
BRACKET
2x4
SLOT
CARRIAGE BOLT
Fig. 6
n Mount the saw to a mounting surface at least 1/2 in.
thick using 5/16 hex head screws, washers, and nuts
(not included).
n Install carriage bolts as previously described.
n After making sure both brackets are parallel to each other,
finger tighten all four nuts to hold in position.
n Drill holes in the mounting surface to match the slots in
the saw mounting brackets.
If the saw has holes that do not line up with the slots in
the saw mounting brackets:
n Proceed with installation as previously described.
n Unplug the saw and lock saw arm in the down position.
MITER SAW
NUT
LOCK WASHER
FLAT WASHER
NUT
LOCK WASHER
MOUNTING
SURFACE
FLAT WASHER
SAW MOUNTING
BRACKET
SLOT
CARRIAGE BOLT
Fig. 7
7
ASSEMBLY
MOUNTING THE MITER SAW TO THE STAND
n Lock the brackets in position by lowering the locking
levers.
See Figures 8 - 9.
Use the handles located at the rear of the mounting brackets
to aid in installing or removing saw and bracket assembly.
n L
� ift the saw and bracket assembly, allowing the assembly
to tilt slightly toward your body.
NOTE: Continue to hold the mounting bracket assembly
with one hand until both levers are securely locked.
n Check position and adjust, if necessary, to make sure
the weight of the saw is evenly balanced over the rails
as shown in figure 9.
n While still tilted toward you, hook the front edge of the
bracket assembly onto the front rail of the stand.
n Ensure the saw is fully seated and locked in position, then
securely tighten the four nuts holding the saw to the saw
mounting brackets.
WARNING:
�To remove saw from stand:
To avoid serious personal injury, make sure the curved
front edge of the mounting brackets are securely seated
over the front rail before seating the other end of the
brackets. Failure to do so could cause you to lose control
of the saw mounting assembly, which could cause serious personal injury.
n Raise the locking levers to unlock the saw and mounting
bracket assembly.
�n Grasp the handles on either side of the assembly and lift
away from the rear rail of the stand to disengage.
n �With the assembly tilted slightly toward you, lift the front
part of the assembly to disengage from the front rail of
the stand.
n Lower the bracket assembly to allow the rear edge of the
bracket to seat fully over the rear rail.
��
��
��
��
��
��
��
��
��
��
��
��
��
��
�
�
�
�
�
�
�
�
�
�
�
��
�
��
�
��
�
��
�
��
�
��
�
��
�
��
�
��
��
��
��
��
��
��
��
��
��
��
�
��
�
��
�
��
�
��
�
��
�
��
�
��
�
��
�
��
�
�
�
�
�
�
�
�
�
�
��
��
��
��
��
��
��
��
��
��
��
��
��
��
Fig. 8
WARNING:
The mounting brackets are designed to fit snugly over the stand rails. With the locking levers in the lowered (locked)
position, you should not be able to remove the saw and bracket assembly from the rails. If the mounting brackets will
not fit over the rails, or if the mounting brackets can be removed from the rails when the levers are locked, remove from
the saw and bracket assembly immediately and tighten the bracket adjustment screw as described in the Maintenance
section of this manual. Failure to heed this warning may result in serious personal injury.
8
ASSEMBLY
��
��
��
��
��
��
��
��
��
��
��
��
��
��
�
�
�
�
�
�
�
�
�
�
�
�
�
�
�
�
�
�
�
��
��
��
��
��
��
��
��
��
��
��
��
��
��
LOWER
LOCKING LEVERS
TO SECURE
TO STAND
Fig. 9
OPERATION
WARNING:
WARNING:
Do not use any attachments or accessories not recommended by the manufacturer of this tool. The use of attachments or accessories not recommended can result
in serious personal injury.
Do not allow familiarity with tools to make you careless. Remember that a careless fraction of a second is
sufficient to inflict serious injury.
WARNING:
APPLICATIONS
You may use this tool for the following purpose:
Always wear safety goggles or safety glasses with side
shields when operating tools. Failure to do so could result in objects being thrown into your eyes, resulting in
possible serious injury.
n To provide a stable, secure work surface for a miter
saw
9
OPERATION
USING THE EXTENSION RAILS
BUILDING AND INSTALLING AN OPTIONAL
WORKSHELF
See Figure 10.
Use the extension rails when working with larger
workpieces.
To extend the rails:
n Loosen the extension adjustment knob.
See Figures 12 - 14.
Use the following directions, if desired, to build a workshelf
for the miter stand.
Materials needed:
n Extend the rail to the desired position.
n 9 x 20 in. plywood, 3/4 in. thick
n Tighten the extension adjustment knob.
n 8 wood screws, 1-1/4 in. length
n Drill and bit to drill and countersink screw holes
Building the workshelf:
n Make cuts as shown in the cutting diagram below.
EXTENSION
RAIL
3/4"
3/4"
3/4"
3 1/2"
EXTENSION
ADJUSTMENT
KNOB
Fig. 10
USING THE WORK STOPS
See Figure 11.
Raise the work stops whenever you need to make repetitive
cuts of the same size. To avoid a greater risk of binding or
pinching, do not use both work stops at the same time.
To raise the work stops:
13"
n Loosen the work stop adjustment knob.
n Raise the work stop to the desired position.
n Tighten the work stop adjustment knob.
WORK STOP
9"
WORK STOP
ADJUSTMENT
KNOB
Fig. 12
n Cut the ends of the three 3/4 in. pieces so that two are
6 in. long and one is 7-1/2 in. long.
n Align the two 3/4 x 6 in. plywood strips vertically along
the left and right sides of the 9 x 13 in. base, making sure
the front edges are flush.
n Pre-drill and countersink holes for screws in each of the
strips as shown in figure 10; install screws.
Fig. 11
NOTE: Locate the screws at least 2 in. away from the
bottom corners of the assembly.
10
OPERATION
n Insert the 3/4 x 7-1/2 in. plywood strip horizontally between the 6 in. strips, making sure the long edge is flush
with the base.
UPPER TUBE
n Pre-drill and countersink two holes; install screws.
NOTE: The corners of the shelf can now be mitered, if
desired, to remove sharp edges.
LOWER TUBE
LOWER TUBE
n Place the 3-1/2 x 9 in. piece of plywood horizontally
1-3/4 in. above the vertical plywood strips. Make sure
the left and right edges of the wood are flush with the
sides of the base.
UPPER TUBE
n Pre-drill and countersink two holes in the center of wood
as shown.
Installing the workshelf:
n Remove the 3-1/2 x 9 in. plywood and insert shelf between
top and bottom rails of miter stand until edge of vertical
strips touch miter stand front rail.
6"
n Place the 3-1/2 x 9 in. plywood between the front and
back rails of the miter stand. Re-align the pre-drilled holes
in the top piece with the pre-drilled holes in the base of
the shelf.
7 1/2"
n Install screws in pre-drilled holes to secure shelf.
3/4"
9"
Fig. 13
BACK
RAIL
1-3/4 in. WOOD
SCREWS
��
��
��
��
��
��
��
��
��
��
��
��
��
��
�
�
�
�
3-1/2 x 9 in.
PLYWOOD
�
�
�
�
�
�
�
�
�
�
�
�
�
�
�
��
��
��
��
��
��
FRONT
RAIL
��
��
��
��
��
��
��
��
VERTICAL
STRIP
SHELF BASE
Fig. 14
11
MAINTENANCE
To adjust:
n Use a wrench to slightly loosen the nut.
WARNING:
When servicing, use only identical Ryobi replacement
parts. Use of any other parts may create a hazard or
cause product damage.
n Turn the screw with a phillips screwdriver. Rotate clockwise if the bracket assembly needs to be tightened or
counterclockwise if the assembly needs to be loosened.
n Install the bracket on the miter stand rails and lower the
locking lever to check the adjustment.
WARNING:
Always wear safety goggles or safety glasses with side
shields during power tool operation or when blowing
dust. If operation is dusty, also wear a dust mask.
n When the correct position is achieved, wrench tighten
the nut to secure.
n Repeat with the second mounting bracket.
GENERAL MAINTENANCE
MOUNTING
BRACKET
Avoid using solvents when cleaning plastic parts. Most
plastics are susceptible to damage from various types of
commercial solvents and may be damaged by their use. Use
clean cloths to remove dirt, dust, oil, grease, etc.
WRENCH
WARNING:
Do not at any time let brake fluids, gasoline, petroleumbased products, penetrating oils, etc., come in contact
with plastic parts. Chemicals can damage, weaken or
destroy plastic which may result in serious personal
injury.
BRACKET ADJUSTMENT SCREW
See Figure 15.
Mounting brackets are designed to fit snugly over the stand
rails. With the locking levers in the lowered (locked) position,
you should not be able to remove the saw and bracket assembly from the rails. If the saw and bracket assembly can
be removed from the rails when the levers are locked, the
bracket adjustment screws need to be tightened. If the saw
and bracket assembly will not fit over both rails, the bracket
adjustment screws needs to be loosened.
NOTE: The saw should be removed from the mounting
brackets before attempting to tighten or loosen the bracket
adjustment screws.
NUT
SCREWDRIVER
BRACKET
ADJUSTMENT
SCREW
Fig. 15
RYOBI TECHNOLOGIES, INC.
1428 Pearman Dairy Road, Anderson, SC 29625
Post Office Box 1207, Anderson, SC 29622-1207
Phone 1-800-525-2579
www.ryobitools.com
983000-710
5-05