1
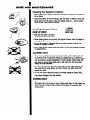
T IWA
mn
men
Mfl
men
men
ntrn
umn
men
men
men
itcn
men
bnumn
b men
I\ mn
P men
t men
a men
d men
- men
men
men
mn
men
men
mn
mn
mn
8
men
RCA
men
mn
mum
iwn
mn
HIGH
FIDELITY
WARNING: TO PREVENT FIRE OR
ELECTRIC SHOCK HAZARD, DO
NOT EXPOSE THIS PRODUCT TO
RAIN OR MOISTURE.
TliE
ffiNlNlNG
FLAW ANDARRM.
MUD WilMlK TliE
TRIANGLE Is A
SIGN
ALERllNG YOU OF
-DANGEROUS
VOLTAGE- lNSlGE
TM PnoGucT.
WARMffi
CAUTION: TO REDUCETnE
RISK OF ELECTRICSnOCK.
DO NOT REMOVE COVER
(OR OACK). NO USER-‘
SERVICEISLE PARTS INSIDE. REFER SERVICING
,O GUAlJFlEU SERWCE
PERSONNEL.
TNE EXCLAMATION
POINT WITHIN TnE
TlllANGLE .IS A
WARNING
SIGN
ALERTINGYOU OF
I Y P0 KTA N1
IWSTRUCTlONS
ACCOYPANVING
TliE PRODUCT.
SEE MARKING ON GOl-lOM I BACK OF PRODUCT
AUDIO SYSTEM
USE &CARE GUIDE
CONTENTS
GETTING STARTED
For YourOwnRecords
...............................................................................
UnpackingYourSystem
..............................................................................
WheretoPlacetheSystem
.........................................................................
BASIC
.
.
...4
CONNECTIONS
ConnectingtheTwoUnits
.............................................................................
.
Connecting Speakers..............................................................................
...5
Placing Speakers ..................................................
........................................
ConnectingtheAntenna
. ..:..::::::::::::::::::::::::::::::::
AddinganAuxillaryComponent
...............
..................
ProvidingAC Power ...............................................................................
...........................................................................
Connecting Headphones..
BASIC
OPERATING
.
.
...7
.
INSTRUCTIONS
.
.
..g
.
..g
.
.
..18
POWERONMode
..................................................................................
STANDBYMode..
...................................................................................
Selecting a Source of Sound .........................................................................
Adjusting Volume ....................................................................................
Adjusting Balance ..................................................................................
Selecting EqualizerSettings
...........................................................................
BassBoost..
......................................................................................
Surround Sound ..................................................................................
uslNG
THE
TUNER
(RADIO)
SelectingtheTuner..................................................................................i
Switching Between AM and FM ......................................................................
Tuning in a Station ................................................................................
Storing Stations in Memory (Tuner Presets) .............................................................
SelectingaPreset
Station.. ........................................................................
FM StereoReception..
............................................................................
USING
THE
COMPACT
DISC
o
..11
..ll
.11
..12
..12
PLAYER
ReadingtheDisplay.................................................................................i
CAUTION:RemoveLockinglnserts
..................................................................
Selecting the Compact Disc Player ..................................................................
Loading and Removing Discs .. ._ ...................................................................
Playing Discs ....................................................................................
Playing and Loading Discs Simultaneously
...................................................
........................................................................
SkippingtoaSpecificTrack
Search Forward/Reverse ...........................................................................
SettingtheDisplay..................................................................................l
ProgrammingtheOrderofTracks......................................................................l
CancelingaProgram..
............................................................................
RepeatingDiscsandTracks...........................................................................l
Playing Tracks in Random Order (Shuffle) ..............................................................
INTRO SCAN Feature .............................................................................
....................................................................
mNCHRODubbingfromCDtoTape
Compact Disc EDITFeature ...........................................................................
USING
THE
DUAL
TAPE
...
3
..13
..14
..14
..14
..... .15
..16
..16
6
7
..18
8
.19
..19
DECK
SelactingtheTapeDeck ..............................................................................
......................................................................
InsertingandRemavingCassettes
.........................................................................
ImportantTapeDeckFunctions
PlayingaCaasette(OneSide)onDeckl
...............................................................
PlayingaC~e(8oth~des)onOeck2..............................................................2
Playing Two Cassettes Without Interruption ........
..............................
Important Recording pOint............................................................................2
RecordingfromaCompact
Disc.......................................................................2
Dubbing(~ing)aCassette.........................................................................2
RecordingaRadioBroadcast.........................................................................2
RecordingfromanAuxiliarySource....................................................................2
USING
THE
REMOTE
AND
MAINTENANCE
CleaningtheSystem’sExterior
Ca~ofCassetteDeck.s..
..........................................................................
TapeCare.........................................................................................2
.....................................................................................
EreseP~~ion
TROUBLECHECKS
....................................................................................
LIMITED
..........
3
.23
3
4
4
4
5
WARRANTY
..2 5
5
..2 5
.........................................................................
HandlingCompact Discs ..............................................................................
ONE-YEAR
........
CONTROL
Installing Batteries .................................................................................
TurningtheSystemOn
andOtf........................................................................2
Adjusting\folume
.................................................................................
PlayingtheTuner(Radio)
.............................................................................
PlayingcOmpact
Discs ...............................................................................
CARE
.
..............................................................
..2 8
8
BACK COVER
IMPORTANT
PRECAUTIONS
INFORMATION
1
Do Not Open the Cabinet
If the cabinet is opened, you may be exposed to dangerously high voltages. Never open the cabinet under any circumstances.
Do Not Touch the Pickup Lens
The pickup - the heart of the Disc player - is located inside of the disc tray opening. To avoid dust collecting on
the pickup, do not leave the tray open for long periods.
If the lens becomes dirty, clean it with a soft brush or use
an air blower brush designed for camera lenses.
Do Not-Touch the Player with Wet Hands
Do not handle the player or power cord when your hands
are wet or damp. If water or any other liquid enters the
player cabinet, take the player to an authorized service
center for inspection.
THANK
va
YOU
I
laser Product Safety
This Compact Disc Player uses a laser to “read” the
music on the disc. The laser mechanism corresponds to
the cartridge and stylus of a traditional record player.
Although this product is completely safe when operated according to directions, you should understand that lasers
can emit hazardous radiation and can cause damage to
eyes if handled improperly.
- WARNING NEVER OPERATE THIS PRODUCT
WITH THE CABINET REMOVED.
CAUTION: use of controls, adjustments or performance of
procedures other than those specified here in may result in
hazardous radiation exposure.
Any repairs or internal adjustments should be made only by a
l
trained repairman.
.for selecting RCA. Your new RCA audio system features the superior
sound characteristics, quality engineering, and excellent construction that
RCA is known for worldwide.
Key features of your new CD player include:
l
AM/FM/FM stereo digital tuner with up to 24 station presets
l
3disc carousel compact disc player for continuous listening pleasure
l
Dual-cassette player/recorder
l
Full sound controls included convenient equalizer settings for jazz, reck,
classical, etc.
l
Easy-to-use, multi-function remote control
This Use and Care Guide provides the information you need to set up,
operate, and maintain your new RCA audio system. Please read the Use
and Care Guide thoroughly to learn how to get the best performance and
greatest listening pleasure.
For Your Own Records
Please record the following information. It will be useful if you ever need to
contact an RCA dealer regarding service.
Model No. RP-9753
Date of Purchase:
Name of Store:
Serial No.
(see back panel of unit)
GETTING
STARTED
(continued)
Unpacking Your System
Carefully remove all items from the shipping carton. Be sure to remove all
packing materials and wrappings.
We recommend that you save the shipping carton and packing materials in
the event you want to store, transport, or ship the unit in the future.
Your new RCA audio system includes the following items:
l
l
l
l
Tuner/Amplifier unit
CD/Cassette unit
Hand-held remote control
l-meter FM antenna wire
AM loop antenna
. Two front speakers
l
Two P-meter speaker wires
l
Where to Place the System
l
l
l
l
Choose a convenient location that provides a solid, level surface. Do not
place the unit on a soft surface such as carpeting or foam rubber.
Select a location away from direct sunlight, radiators, air ducts, and other
sources of heat.
Avoid locations that are subject to moisture, mechanical
excessive dust.
vibration,
Be sure the location provides adequate air circulation. Good ventilation
essential to protect the system from internal heat built-up.
NOTE: Locate your system in a spot that allows for best positioning
speakers. Optimal sound reproduction occurs when:
l
l
l
shock, or
is
of the
Speakers are placed at least seven feet apart and facing the listener.
Speakers are placed at least two to three feet out from the wall to prevent
accentuated bass response.
Also see “Placing
Speakers,”
page 6, for suggested
speaker positions.
IMPORTANT: MOISTURE CONDENSATION
Moisture is often seen on the inside of the windows in a warm room on a
cold winter day. Moisture can also form inside the player in a similar manner
in the following cases;
l
Immediately after a heater has been turned on.
l
In a steamy or very humid room.
l
When the unit is suddenly moved from a cold environment to a warm moist one,
for example, in moving a unit from a cool air conditioned room to an outside
porch on a humid summer day.
If moisture forms inside this player, it may not operate properly. To corI rect this problem, turn off the power and wait about 20 or 30 minutes for
1 the moisture to evaporate.
BASIC
CONNECTIONS
Connecting the Two Units
Your new RCA audio system includes a Tuner/Amplifier unit and a
CD/Cassette unit. These are designed so that the CD/Cassette unit rests on
top of the Tuner/Amplifier unit.
I
l
Connect the SYSTEM CONTROL plug on the back of the Tuner/Amplifier
unit to the SYSTEM CONTROL receptacle on the back of the CD/Cassette
unit. Note that the plug has one row of nine pins and one row of eight
pins. Insert the plug so that its pins fit into the corresponding slots in the
receptacle.
NOTE: Press the plug snugly into place to assure a complete connection.
Never connect or disconnect with power on!
CASSETTE/CD
UNIT -
TUNER/AMPLIFIER
-
$I ; Connecting the Speakers
BACK
Your system comes equipped with two front and two surround (rear) speaker
terminals. All speakers connect to terminals located on the back of Tuner/
Amplifier unit. You should connect the front speakers first.
OF SPEAKER
To connect
SPEAKER
l
CONNECTIONS
l
l
0
the two front speakers:
Connect one speaker wire to the terminals on back of one front speaker.
Press tabs to open, and insert end of white-striped wire in red (+) terminal
and end of black wire in black (-) terminal.
Run the speaker wire to the terminals labeled FRONT SPEAKERS on back
of the Tuner/Amplifier unit and connect to the Left (L) set of terminals. Insert end of white-striped wire in red (+) terminal and end of black wire in
black (-) terminal.
Connect the second front speaker in the same way, using the Right (R) terminals: white-striped wire to red (+) terminal, black wire to black (-)
terminal.
NOTE: On all speaker connections,
makes contact with the terminal.
To connect
two surround
be sure that the bare end of each lead
speakers
(not included):
Use only 8D speakers. Speakers with specifications other than 851may be damaged or may damage the system . Such damage becomes the owner’s responsibility.
l
Follow the same steps used to attach front speakers, but use the terminals labeled SURROUND SPEAKERS to make the connections. Be sure to connect
positive (+) to red terminals
and negative
(-) to black terminals.
l
To aim the speakers and adjust them for optimal performance,
Speakers,” next.
see “Placing
Placing Speakers
The diagram below shows suggested
speakers.
arral )ements of front and surround
l-
)RlGHT[
-
ANTENNA
-FM
FRONT
Connecting the Antennas
-
-AM
-
Two antennas are supplied with your unit: an AM loop antenna and an FM
wire antenna. These connect to the rear panel of the Tuner/Amplifier unit.
Antennas must be connected for proper AM and FM reception.
l
l
I
ANTENNA
piziq
I
FRONT
CONNECTIONS
-
I
Connect the AM antenna to the two terminals labeled “AM LOOP” Press
tabs to open and insert either bare wire lead into either terminal. Place
antenna on a flat surface and adjust position for best AM reception.
Connect the bare wire lead of the FM antenna to either one of the terminals labeled “FM 3OOD.” Press tab to open terminal and insert the lead .
Extend the antenna to its full length and adjust for best FM reception.
NOTE: On all antenna connections,
makes contact with the terminal.
be sure that the bare end of each lead
BASIC
CONNECTIONS
(continued)
Adding an Auxiliary Component
Use the VlDEOlAUX input jacks on the back of the Tuner/Amplifier unit to
add a component that provides an additional source of sound into your
system - a tape recorder, CD player, VCR, camcorder, or other compatible
device.
l
Match the left and right output plugs from the auxiliary component
Left (L) and Right (R) VIDEO/AUX input jacks.
The auxiliary components
recording.
to the
provides a source of sound for both p!aying and
NOTE: The VlDEOlAUX input jacks are not recommended
ting a phonograph.
for use in conneo
OR
Providing AC Power
l
Plug the power cord into an AC power outlet that accepts the polarized
plug, which has one blade wider than the other.
The red STANDBY indicator will light (even though the POWER button is
off) to show that the unit is plugged in and ready to operate.
IMPORTANT: The polarized plug is an important safety feature. lt will fit into
the power outlet only one way. If the plug won’t go into the outlet completely,
reverse it and try inserting it the other way. If it still won’t fit, contact a
qualified electrician to change the outlet, or use a different one. Do not attempt to bypass this ssfety feature.
Connecting Headphones
l
Connect headphones
Connecting
headphones
using the-PHONES
automatically
jack on the front of the unit.
cuts off sound to all speaks.
BASIC
1.
2.
3.
4.
5.
OPERATING
INSTRUCTIONS
POWER button
STANDBY indicator
SENSOR for remote control
PHONES jack
EQUALIZER selector buttons
6. VOLUME
7. SOURCE buttons (TUNER,
NOTE: See “USING THE REMCITE CONTROL,”
operating your system from a distance.
POWER
00
TAPE, CD, AUWAV)
8. BALANCE
9. SURROUND
BUllON
10. BASS BOOST BU’ll’ON
page 25, for instructions
POWER ON Mode
l
Press the POWER button and release.
The LCD display lights, and the system begins operating from the sound
source last selected - the tuner, the dual tape deck, the CD player, or a
properly connected auxiliary component.
STANDBY Mode
STANDBY
on
. With power on, press the POWER button and release. (You can press
POWER on the unit itself or on the remote control.)
The LCD display goes off, and the STANDBY indicator comes on.
BASIC
OPERATION
CD
TAPE
(conflnued)
Selecting a Source of Sound
0 II II II
TUNER
INSTUCTJONS
The source selector buttons - TUNER, TAPE, CD, and AUXIAV the sources of sound available to you through the system.
AUXlAV
indicate
To select a source of sound, simply press the button that represents the
desired source. The system shifts to the selected source.
l
Adjusting Volume
Turn the VOLUME dial clockwise to increase volume. Turn it counterclockwise to decrease volume.
l
NOTE: The “mute” function is available through the remote control. Press
the MUTE button to suspend the output of sound. Press MUTE again to
restore volume to the current setting.
Adjusting Balance
BALANCE
Turn the BALANCE dial clockwise to increase the proportion of sound
delivered to the Right speakers.
Turn the BALANCE dial counterclockwise to increase the proportion of
sound delivered to the Left speakers.
l
0
l
l
. Set the dial to the “center”
all speakers.
position to deliver the same load of sound to
Selecting Equalizer Settings
Press the button that provides the set of frequency adjustments
find most suitable to your listening material or listening taste.
l
You can select from JAZZ, POP, ROCK, CLASSICAL,
cies given equal emphasis).
that you
or FLAT (all frequen-
When you select a setting, the display shows the graphic equalizer
adjustments for that setting.
Bass Boost
Use BASS BOOST to increase the bass response delivered to all connected
speakers, both front and surround.
BASS
BOOST
0
l
l
P
I
Press the BASS BOOST button to activate this option (“BASS BOOST”
message appears on the display).
Press the button again to turn the option off (BASS
displayed).
BOOST message not
BASIC
OPERATING
lNSTRUCTlONS
(continued)
Bass boost is intended to enhance the quality of sound at low-volume levels.
This option should usually be set to OFF at higher volumes to prevent possible distortion of sound and damage to speakers.
Surround Sound
Use SURROUND to activate the “surround
change applies to all speakers.
SURROUND
0
l
l
USING
sound”
effect. The effective
Press the SURROUND button to turn this option on (“SURROUND
SOUND” message is displayed).
Press the button again to turn the option off (‘SURROUND
message not displayed).
THE TUNER
SOUND”
(RADIO)
STANDBY
0
II
TUNER
0
1.
2.
3.
4.
MANUAL SEEK DOWN
PRESET DOWN
PRESET UP
MANUAL/SEEK UP
5. MEMORY PROGRAM
6. FM ST/MONO
7. SAND
Selecting the Tuner
Your new RCA system includes a tuner that lets you listen to receivable AM
and FM radio signals.
l
To select the tuner, press the TUNER selector button. The display indicates
the tuner’s current setting. For example:
AM can be received from 536 to 1720 KHz. FM can be received from 67.9 to
167.9 MHz.
BIASIC OPERATION
INSTUCTIONS
(continued)
Switching Between AM and FM
To change from AM to FM (or vice versa) press the SAND button.
l
Pressing SAND switches the system back and forth between the two recep
tion modes.
Tuning in a Station
Press and hold MANUAL/SEEK V or MANUAL/SEEK A for at least one
second and the tuner will scan automatically down or up for a receivable
radio signal. It stops when it reaches a signal that is strong enough for
clear reception.
l
Press and hold again to resume the search.
Press MANUAL/SEEK V or MANUAL/SEEK A to move down or up a
single tuning step. Use this option to search for stations manually or to fine
tune reception of a weak station.
l
Press and hold MANUAL/SEEK V or MANUAUSEEK A to move rapidly
down or up to a desired point in the frequency range. Release when the
desired frequency is reached, and the system stops on the first station with
a strong enough signal for clear reception.
l
Storing Stations in Memory (Tuner Presets)
The system can store up to 24 different stations easy selection later on.
16 FM and 6 AM -
To store a preset station: Select an AM or FM station usjng
explained in the preceding section. Press MEMORY PROS
flashes the “MEMMY”
message, giving you 5 seconds to
number - from 1 to 6 for AM’ stations, from 1 to 16 for FM
l
l
for
the tuning options
once. The display
select a preset
stations.
While the “MEMORY”
message is flashing, press PRESET V or
PRESET A to reach the preset number that you want to store the station.
While the “MEMORY”
message
again to confirm the selection.
is flashing,
press MEMORY PROS
The station is stored, and its preset number is diiayed.
NOTE: Storing a station in memory automatically
ly stored under the selected preset number.
erases any station previous-
..‘
‘-?;$
1
BASIC
OPERATION
Selecting
INSTRUCTIONS
(continued)
a Preset Station
To select a preset station:
l
..Yw
*;.
.&
rti,,,.
ii-<
;,j.
,d
$jij
1.c\
$2
*.,
.&
Select the desired tuning mode (AM or FM). Press the BAND button to
switch between the two modes.
Press PRESET A or PRESET V to reach the number that stores the
desired station.
l
The display shows the currently selected preset number.
/
tg
FM H
IL
?sfiiiimmmremIprm
yE
yz
yF
YeJ =a
MHz
FLAT
yy
F1(F
EO PRESEls
-XG. NOTE: If power is interrupted or if the unit is unplugged, tuner presets are re?Y tained for approximately 7 days. After 7 days, these settings must be
‘!? reprogrammed.
l“i-_I
“.:
:+.;-
j.‘* FM Stereo
Reception
-.. Reception in FM Stereo mode provides the “fuller” sound available in broad‘&
casts that feature an FM stereo signal.
*..’ ‘ l Press the FM ST/MONO button to set the tuner to FM Stereo mode before
:
you start tuning for a station. The FM AUTO message appears on the
.:
display.
.
$$ l While you are tuning, the “STEREO” message lights on the display
-y;
d.%
.-;
whenever you’re receiving a station in clear FM stereo.
: :“
,;..&
.S,.
*r
+k*~
, r.. :,*.
$..‘r
l
If reception is weak in FM Stereo mode, press the FM ST/MONO button to
turn the FM Stereo option off (“FM AUTO” message not displayed). This
will improve reception by reducing static (but will also cancel the stereo
effect).
USING
THE COMPACT
1.
2.
3.
4.
5.
6.
7.
8.
DISC PLAYER
TIME
EDIT
SYNCHRO DUBBING
PLAY/PAUSE
STOP
TRACK REVERSE
TRACK FORWARD
SEARCH REVERSE
9.
10.
11.
12.
13.
SEARCH FORWARD
INTRO SCAN
REPEAT
OPEN/CLOSE
RANDOM
14. DISC SELECT
15. PROGRAM
Reading the Display
1.
2.
3
4.
5.
Currently selected disc (uppermost number)
Play (b) or pause (II) indicator
Current track number
Time information (see “Setting the Display”)
Program, Edit, Random, and Repeat indicators
’ ~EtED-f
Q
di!iigJs;es:sE1,
II
CAUTION: Remove Locking Inserts
FNO plastic inserts are included to lock and protect the disc tray during shipp
ing. Before operating the compact disc player, you must remove these
Inserts.
l
With the system in POWER ON mode, press OPEN/CLOSE
pact disc player to open the disc tray.
* Turn each insert cltiise
on the com-
until it stops, then lift the insert out to remove it.
Be sure to save the inserts for future use in transporting
the system.
I
THE
II
PLAYER
Selecting the Compact Disc Player
To select the compact disc player, press the CD selector button. The
system will now operate with the CD player as the selected source of
sound, available for playback or recording.
l
CD
0
OPEN/CLOSE
0
(continued)
Loading and Removing Discs
The disc tray holds up to 3 compact discs, accommodating
Sinch sizes. To load discs:
l
Press the OPEN/CLOSE
l
Place discs on the tray, label side up.
either 5-inch or
button. The disc tray slides out.
If necessary, press the DISC SELECT button to rotate the tray and provide
access to the rear compartment.
l
NOTE: Discs play in numerical sequence (first 1, then 2, then 3). If you
want to play the discs in a particular sequence, insert them in the desired
order.
NOTE: When you switch to POWER ON mode, the disc in the rear compartment (beneath the laser arm) is recognized as disc 1. If the rear compartment is empty, the CD player will recognize the first disc it accesses as
disc 1.
l
Press OPEN/CLOSE
to close the disc tray.
NCYTE: To play a Sinch (8 cm) disc, be sure to place it in the recessed inner
circle of the disc tray. Never place a standard !5-inch (12 cm) disc on top of a
Sinch disc.
To remove discs:
l
l
l
l
Press H (STOP) to stop play.
Press the OPEN/CLOSE
remove discs.
button. The disc tray slides out, allowing you to
Press DISC SELECT to rotate the tray and provide access to the rear disc
compartment.
Press OPEN/CLOSE
to close the disc tray.
Playing Discs
l
Load the discs you want to play, as described
in the previous section.
USING
THE COMPACT
DISC PLAYER
(continued)
If the CD player is in stop mode, press ,111 (PLAY/PAUSE) and the first
available disc will start to play. The display flashes the number of the currently playing disc above the numbers of the other two discs.
l
Play starts with the first track of the selected disc and continues sequentially
through the last track on disc 3. The compact disc player then enters stop
mode.
During play, the display shows the number of the current track and the elapsed time since the start of that track. For example, the display would look like
this if track 4 is playing and 3 minutes and 5 seconds have elapsed since it
started:
40
-l7
&
/
NOTE: See “Setting
l
l
g:#s
b
the Display,” page 16, for additional display options.
To pause during playing of a disc, press b/II
symbol II displays in pause mode. Press b/II
To stop play at any time, press l
(PLAY/PAUSE). The pause
a second time to resume.
(STOP).
NOTE: When you press the DISC SELECT button, the disc tray moves ahead
to the next compartment. If the compartment is empty, the current dll
number shown in the display will remain steady and the display will show
zeros.
NOTE: If a disc is playing, pressing DISC SELECT will move the disc tray
ahead to play the next available disc, skipping empty compartment,
and
stopping on disc 3.
NOTE: When you press ,111 (PLAY/PAUSE) starting from stop mode, the currently selected disc plays. If the compartment is empty, the disc tray moves
ahead to play the next available disc, skipping empty compartments.
Playing and Loading Discs Simultaneously
You can open the disc tray without stopping the currently playing dii
Simply
press OPEN/CLOSE on the CD player, and the tray opens, providing access
to the two front disc compartments. Play continues without interruption.
q
THE COMpAC’lr
(continued)
Skipping to a Specific Track
You can move quickly to the start of any track on the current disc by using
the TRACK buttons. The disc may be in play, pause, or stop mode.
@Q
l
To skip forward to the start of the next track, press w
l
To skip back to the start of the previous track,, press )rr
(track forward).
(track reverse).
If you skip to a new track while the disc is playing, the selected track begins
to play automatically. To play the selected track starting from stop or pause
mode, press ,Al (PLAY/PAUSE).
Search Forward /Reverse
You can move quickly forward or backward within the current disc by using
the SEARCH buttons. The CD player may be in play or pause mode.
QO
l
Press and hold m
(search forward) to move rapidly ahead.
l
Press and hold 4
(search reverse) to move rapidly backward.
l
Release the button at the desired point.
If the CD player is in play mode, play continues from that point at normal
speed. If the unit is in pause mode, press ,111 (PLAY/PAUSE) to resume
play at normal speed.
Setting the Display
While a disc is playing, the display shows the track currently playing and the
elapsed playing time of that track:
l
Press the TIME button to show time remaining
on the current track:
l
Press TIME again to show the time remaining
on the entire arsc:
USING
THE COMPACT
l
l
DISC PLAYER
lcontinuedl
Press TIME again to return to the original display of elapsed time since the
start of the current track.
Press STOP to stop play and show the total number of tracks and total
playing time of the selected disc.
Programming the Order of Tracks
You can program the CD player to play tracks in any desired order, using
discs in any sequence, and repeating tracks as often as you like. The program may contain up to 32 tracks. Follow the steps explained here to enter
and play a program.
Preparing
to Program
Tracks:
1. Press CD to select the CD player as the source of sound.
2. Load all desired discs.
NOTE: When you enter program mode in step 4, the disc in the front left
compartment of the disc tray will be recognized as disc 1. To help keep
track of which disc is in which position, you may want to leave the disc
tray open while entering the program.
3. If a disc is playing, press H (STOP).
Entering
and Playing the Program:
4. Press PROGRAM to enter program mode.
The display shows the “PROGRAM”
message and indicates the program
step number as “01.” The display flashes disc 1 and shows its position in
the front left of the disc tray.
You can follow
display flashes
steps 6 and 7 to program
disc 1.
tracks from disc 1 while the
A
pQzzmiq
5. Press DISC SELECT to select the disc that contains the desired track. The
display flashes the currently selected disc.
THE COMPACT
$<
I
(continued]
6.
Press w (track forward) or trr (track reverse) to select the track from
the selected disc. The track number is displayed before the “F!” For example, track 3 from disc 1 displays like this:
7.
Press PROGRAM
6.
Repeat steps 5 to 7 to store additional
i?
9.
r.<a;
;
:
: ?
,“;1’ 10.
‘.,.
$.
1.f
‘-. .;
a’-
DISC PLAYER
to lock in the selected track.
When you’ve programmed
to store the program.
tracks, up to a maximum
of 32.
all the tracks you want to play, press n (STOP)
Press PROGRAM to activate the program, then press ,111 (PLAY/PAUSE)
to play it. The display shows the message “PROGRAM”
while the program is playing.
I
Play continues to the end of the last programmed
enters stop mode.
track. The CD player then
NOTES:
To skip ahead to the next track in the program, press m (track forward).
Press H (STOP) to stop play. The program is deactivated (but still stored
in memory for later use) and the CD player will play tracks in normal sequence. To play the program again, press PROGRAM to reactivate the
program, then press b/II (PLAY/PAUSE).
l
Canceling a Program
l
Press H (SKIP) to stop play and set CD player to stop mode.
l
Hold down the PROGRAM
button and press n (STOP).
NOTE: The program is automatically canceled when the system is switched
from POWER ON to STANDBY mode.
Repeating Discs and Tracks
The repeat feature allows you to repeat play of a single track, a single disc, a
programmed set of tracks, or all discs in the disc tray. Pressing the REPEAT button move9 the display through the following options: repeat 1 (current track), repeat
disc, repeat all discs (or all programmed tracks), repeat feature off.
USING
THE COMPACT
DISC PAYER
To repeat the current track continuously,
“REPEAT 1” option.
l
(continued)
press REPEAT to select the
To repeat the current disc continuously (or all tracks in a program),
REPEAT to select the “REPEAT DISC” option.
l
press
. To repeat continuously all discs in the disc tray, press REPEAT to select
the “REPEAT ALL DISC” option.
To cancel the repeat feature, press REPEAT until no repeat message appears on the display.
l
Playing Tracks in Random Order (Shuffle)
The random feature lets you play tracks in random order. Selections are
played in random sequence until all tracks have been played.
Press RANDOM to switch the random feature on.
l
When random mode is active, the display shows the “RANDOM”
message.
A maximum of 20 tracks per disc and 60 tracks total can be shuffled, with
tracks beyond those maximums not playing.
Press RANDOM again to switch the random feature off.
l
NOTE: You can activate repeat and random modes at the same time to provide a fresh, continuous sequence of sound.
INTRO SCAN Feature
INTROSCAN
This option lets you “preview” tracks, playing the first 10 seconds of each
track before moving to the next.
l
0
l
Press INTRO SCAN to begin the scanning process.
The scan begins with the current track and continues through the last track
on disc 3. The CD player then enters stop mode.
To stop the scan and allow a track to continue playing, press INTRO SCAN
a second time. Play continues forward, in sequence, through all remaining
tracks.
USING
THE COMPACT
DISC PLAYER
(continued)
SYNCHRO Dubbing from CD to Tape
The SYNCHRO DUBBING feature lets you initiate play of a disc and recording of that disc onto cassette by pressing a single button.
l
Press the CD selector button.
l
Insert the cassette in tape deck 1 and press RECORD.
l
Insert the disc and select the desired track.
l
Press SYNCHRO
DUBBING.
Play of the disc and taping of it onto the cassette begin simultaneously.
NOTE: See “Important
guidelines.
Recording
Points,” page 23, for additional
recording
Compact Disc EDIT Feature
Use the EDIT feature on the CD player to automatically calculate the number
of tracks on a selected disc that will fit on a cassette of a designated length.
This feature prevents “running out of room” during a recording.
1. Press CD to select the compact disc player.
2. Insert the cassette you will record on in tape deck 1.
3. Press RECORD to prepare the tape deck to record.
4. Insert the disc you want to record from and select it using the DISC
SELECT button.
5. Press the EDIT button.
The display flashes the selected disc and shows the EDIT message. It also
shows 4696 as the preliminary setting for total playing time of the cassette.
(potal playing time includes both sides.)
6 To change the cassette’s total playing time, press W or )rr. The options
available are 46, 64, 66, and 90 minutes - standard playing times for
cassettes.
7. To adjust a selected standard playing time in one-minute
increments,
press
USING
THE COMPACT
DISC PLAYER
(continued)
8
Press EDIT. The CD player enters pause mode, and the display shows the
total playing time of tracks that can fit onto side A of the cassette.
9.
Press the SYNCHRO
button on the CD player.
The cassette in tape deck 1 advances for 8 seconds (to prevent recording
onto the tape’s “leader”). After 8 seconds, the disc begins playing and is
recorded onto the cassette.
When the selected tracks have been played,the tape deck stops
automatically, and-the CD player enters pause mode and displays “b” to
indicate that it is ready to play the tracks that will fit on side B of the
cassette. Advance the tape to end of side A by pressing m (fast forward).
10. Take the cassette out and reverse it so that recording can continue on
side B.
11. Press RECORD on tape deck 1.
12. Press SYNCHRO
DUBBING on the CD player.
The cassette advances 8 seconds, then play of the disc and recording onto the-cassette begin. The CD player stops automatically when it has
played all tracks that will fit on side B of the cassette.
USING
THE DUAL
TAPE DECK
I
DECK 1
DEOK 2
\
\
1.
2.
3.
4.
5.
8.
7.
8.
9.
I
r--
DECK 1 (Play/Ret)
RECORD
PLAY
REWIND
F.FWD
STOP/EJECT
PAUSE
HS DUBBING BUT-ION
HS DUBBING INDICATOR
10.
11.
12.
13.
14.
15.
18.
17.
MODE
PLAY
REWIND
PFWD
STOP/EJECT
DIRECTION
DECK 2 (Play Only)
TAPE DIRECTION LED
INDICATORS
USiNG
II
THE DUAL
Selecting
TAPE DECK
(continued)
the Tape Deck
To select the dual tape deck, press the TAPE selector button. The system
switches to the tape deck as the selected source of sound:
l
TAPE
Inserting
and Removing
Cassettes
To insert a cassette in either tape deck 1 or tape deck 2:
0
STOP!EJECT
l
Press STOP/EJECT to open the door of the tape deck.
l
Insert the cassette with the exposed part of the tape facing down.
l
Push the door closed. The cassette is now properly
To remove the cassette, press STOP/EJECT
the tape can be removed.
inserted.
The tape deck door opens and
NOTE: If the cassette is playing, press STOP/EJECT once to stop play, a second time to open the tape deck door.
Important
Press 44 (rewind) deck 1, to rewind the tape rapidly. The function
stops automatically when the end of the tape is reached.
l
m
Tape Deck Functions
Press )D (fast forward) deck 1, to go forward quickly to any point on a
tape. The function stops automatically when the end of the tape is
reached.
l
l
l
l
Press 44 or DW (fast wind), Deck 2, to rewind or fast forward positions of the tape quickly. Press the fast wind button with the symbol indicating the opposite direction in which the tape was traveling to
rewind. Press the fast wind button with the symbol indicating the same
direction to fast forward. The tape direction is indicated by the lighted
tape direction LED.
Press STOP/EJECT to halt all tape functions currently
cluding play, fast forward, rewind, and record.
in progress, in-
On tape deck 1, press PAUSE to suspend cassette playing and recording functions. Press PAUSE a second time to resume.
Playing a Cassette
(One Side) on Deck 1
Cassettes in deck 1 play from the left reel to the right, then stop - so to play
an entire side of a cassette, you need to begin with the full reel on the left.
l
Insert the cassette you want to play.
l
To begin play, press the ) (PLAY) button.
Play will continue
until the left reel is empty.
l
To pause during play, press II (PAUSE). Press II again to resume.
l
To stop play, press STOP/EJECT.
To play the other side of the tape in deck 1, reverse the tape and insert it with
the full reel on the left.
USJNG THE DUAL
TAPE DECK (continued)
Playing a Cassette (Both Sides) on Deck 2
Tapes in deck 2 can be set to play in either direction - from left to right or
from right to left.
Insert the cassette you want to play.
l
Select the desired direction of play by pressing the 4 DIR ) button. The
direction of play is indicated by the lighted LED.
l
Select the desired play mode:
l
1) One-Play Mode: Press MODE button to the “in” position. Tape deck 2
plays to the end of one side, reverses automatically and plays the other
side, then stops.
2) Continuous Loop.Mode: Set MODE button to the “out.” position. Tape
de$kpT&laaboth
srdes of the cassette continuously until you press
Press ) (PLAY) to begin playing the cassette.
Press STCPlEJECT to stop play.
l
l
Playing Two Cassettes Without Interruption
To play two cassettes without interruption
(first tape deck 2, then deck 1):
l
Insert a cassette in each tape deck, both with the full reel on the left.
l
Use the 4 DIR ) button to select left-to-right
l
Set MODE button to the “in” position.
l
Press F (PLAY) on tape deck 2. Play begins.
l
Press II (PAUSE) on tape deck 1.
l
Press ) (PLAY) on tape deck 1.
play direction for deck 2.
After both skies have played, the cassette in tape deck 2 will stop, and the
cassette in deck 1 will start playing.
lb stop the cassette in deck 2 and start the cassette in deck 1, press
SKIP/EJECT on deck 2. The cassette in deck 1 will begin playing
automatically.
II
Important Recording Points
l
l
I
l
l
You can record on tape deck 1 only.
You can record from any source other than tape deck 1, including tape
deck 2, the CD player, the tuner, and any properly connected auxiliary
sources such as a VCR or second cassette deck.
The recording level is automatically adj,usted. Adjusting volume,
balance, equalizer settings, bass boost, etc., will not affect recording.
When you plan to record at the start of-a cassette, advance the tape by
pressing PLAY, then press STOP/EJECT after 4 to 5 seconds have
passed. This prevents recording onto the cas&te’s “leader,” a Mank
piece of taps at the start and end of every cassette.
USING
THE DUAL
TAPE DECK
(continued)
Recording from a Compact Disc
Press the CD selector button to select the compact disc player as the
source for recording.
l
Load the disc you want to record from and select it using the DISC
SELECT button.
If necessary, press W (track forward) or W (track reverse) to reach the
desired track.
Insert the cassette you will record on in tape deck 1, advancing past the
tape’s leader if necessary.
l
l
l
Press RECORD button on tape deck 1. (PLAY depresses
Press SYNCHRO on the CD player to begin recording.
l
l
automatically.).
Recording will continue sequentially until you stop the record function or until
the tape ends.
NOTE: To stop the cassette from recording, press n (STOP) on the CD
player, then press stop/eject button on the cassette to return the record button
to its normal position.
HS DUBBING
ON/OFF
Dubbing (Copying) a Cassette
To copy at normal playing speed, be sure the HIGH SPEED DUBBING button
is in the “out” position.
To copy at high speed, press the HIGH SPEED DUBBING button to the “in”
positron.
l
l
l
l
l
l
l
l
Press
Insert
Insert
tape’s
Press
Press
the TAPE selector button to select the
the cassette you want to copy in tape
the cassette you will record on in tape
leader if necessary.
PAUSE on deck 1.
RECORD on deck 1. (PLAY depresses
tape player.
deck 2.
deck 1, advancing
past the
automatically.)
Press PLAY on deck 2.
Playback of tape 2 and recording onto tape 1 begin simultaneously.
(PAUSE automatically releases on tape deck 1.)
Press STOP/EJECT on tape deck 1 to stop the recording process. The
cassette in deck 2 continues to play until you stop it separately or until the
tape ends.
IMPORTANT: This product is capable of substantial uses that do not constitute infringements under the Copyright Laws. It is sold only for such
uses, and it should not be used to infringe the Copyrights of others.
Recording a Radio Broadcast
l
l
Insert the cassette to be recorded on in tape deck 1, advancing
tape’s leader if necessary.
Press TUNER to select the tuner as the source for recording.
past the
Press the RECORD button on tape deck 1 to start recording. (PLAY
depresses automatically.)
Recording continues until the tape ends or until you press STOP/EJECT or
PAUSE to interrupt the recording process.
l
USING
0
AUIUAV
THE DUAL
USING
(continued)
Recording from an Auxiliary Source
l
l
l
0
TAPE DECK
l
Connect the auxiliary sound source (a VCR, another tape deck, etc.) as
described on page 7.
Press AUX to select the auxiliary unit as the source of sound.
Insert the cassette to be recorded on in tape deck 1, advancing
tape’s leader if necessary.
past the
Press the RECORD button to begin recording from the auxiliary source.
(PLAY depresses automatically)
Recording continues until the tape ends or until you press STOP/EJECT or
PAUSE to interrupt the recording process.
THE REMOTE
CONTROL
Installing Batteries
l
l
l
Slide cover off battery compartment.
Install 2 “AAA” batteries. Be sure to position the batteries in the directions
indicated inside the battery compartment.
Replace the cover.
NOTE: When changing batteries, please be sure to dispose of old batteries
properly, observing all state and local regulations.
The remote control allows you to control basic functions of your audio system
from a distance. To use the remote control effectively, always aim the top of it
directly at the SENSOR eye while pressing the function buttons.
The remote control provides remote selection of the TUNER, TAPE, CD, and
AUX selector buttons, and remote operation of the compact disc player and
the tuner. Operate the dual cassette deck using the controls located on the
CD/Cassette unit.
Turning the System On and Off
l
l
Press the POWER button to switch from STANDBY to POWER ON mode.
The system begins operating with the sound source that was active when
the system was last used.
Press the POWER button to switch from POWER ON to STANDBY mode.
Adjusting Volume
l
Press VOLUME
A to increase volume.
l
Press VOLUME
v to decrease volume.
l
l
Press MUTE to suspend the output of sound. The red indicator light on the
VOLUME dial flashes when mute is active.
Press MUTE again to restore volume to the current setting.
USING
THE REMOTE
(continued)
Playing the Tuner (Radio)
; TUNER
I
8
aWI
: BAND
l
Press TUNER to select the tuner as the source of sound.
l
Press BAND to switch from FM to AM and vice versa.
Press PSCAN to automatically scan preset stations. The system pauses to
play each preset for 5 seconds, giving you the chance to stop on the station or allow the scan to continue. Press PSCAN again to stop on a
desired station or to stop the scan process.
l
i0
; PSCAN
:O
I
,-w-m--
CONTROL
l
Playing Compact Discs
Be sure the desired discs are inserted in the disc tray.
l
Press CD to select the compact disc player as the source of sound.
l
Press W/II (PLAY/PAUSE) to begin play.
l
Press ,111 (PLAY/PAUSE) to suspend play. Press again to resume.
l
Press H (STOP) to stop play.
Press Dbl (track forward) to move. to the start of the next track or W
(track reverse) to move to the start of the previous track.
l
l
Press and hold DW (search forward) to move rapidly ahead.
l
Press and hold 4
l
Press b. (open/close) to open the disc tray.
l
Press DISC to advance to the next disc compartment.
l
Press INTRO SCAN to turn the intro scanning feature on and off.
(search reverse) to move rapidly backward.
Press REPEAT to advance through the repeat options: repeat track, repeat
disc, repeat all discs, repeat off.
l
Press RANDOM to turn the random (shuffle) feature on and off.
l
Programming
the CD Player with the Remote
Press n (STOP)
l
to
Control:
stop play.
Press PROGRAM to enter program mode. The display shows disc 1 in the
front left of the disc tray.
l
Press DISC to select the disc that contains the desired track? The display
flashes the selected disc.
Press W (track forward) or I44 (track reverse) to select the desired
track. The track number is displayed before the “I?”
l
l
l
l
l
Press PROGRAM to lock in the selected track. Repeat the preceding three
steps to store additional tracks, up to a maximum of 32.
Press n (STOP) to store the program.
Press PROGRAM
to play it.
to activate the program,
then press b/II
(PLAY/PAUSE)
NOTES:
l
To skip ahead to the next track in the program,
l
Press n (STOP) to stop play and deactivate the program.
l
l
press W
(track forward).
To play the program again, press PROGRAM to reactivate the program,
then press ,111 (PLAY/PAUSE).
To cancel the program, press n (STOP), then on the CD/Cassette
unit itself, hold down the PROGRAM button and press n (STOP).
CARE AND MAINTENANCE
Cleaning the System’s Exterior
Before cleaning the system, disconnect
fire or shock.
l
AC power to prevent the hazard of
. Clean the exterior of the unit using a soft dust cloth. If desired, use a soft,
damp cloth and mild soap to clean the display sections - but be careful
not to scratch these sensitive panels!
Handling Compact Discs
CARE OF DISCS
II
am
#oITMAwlo
With this CD player, use discs
which display the mark shown.
l
When holding discs, do not touch their signal surfaces. Hold the edges or
one edge and the center of the hole.
l
Do not affix labels or adhesive tape to the label surfaces. Also do not
scratch or damage the label.
l
Discs rotate at high speed inside the player. Do not use damaged
or warped) discs.
l
(cracked
CLEANING DISCS
The presence of finger prints or smudges on the surface of the disc will
not directly affect the recorded signals, but depending on the degree of
contamination, the brigMness of the IigM reflected from the signal surfaces
may be reduced, causing degradation of sound quality. Always keep your
disc clean by wiping them gently with a soft cloth from the inner edge
toward the outer perimeter.
l
l
l
If a disc becomes very dirty, wet a soft cloth in water. After wringing out
well, wipe the dirt away gently, and then remove any water drops with
another dry cloth.
Do not use record cleaning sprays or anti-static agents on discs. Also,
never clean discs with benzene, thinner, or other volatile soivents which
may cause damage to the disc surface.
S7VRlNG DISCS
l
Discs are made of the same kinds of plastic used for conventional records.
Be careful not to allow discs to warp; always store them in their cases, vertically, avoiding locations with high heat or humidii, or extremely tow
temperatures.
CARE AND MAINTENANCE
Care of Cassette Decks
l
Periodic cleaning of the tape heads and capstan is necessary to maintain
good sound reproduction. The build up of iron oxide particles, which is
often even more severe with inferior tapes, will reduce the performance of
the cassette. It is recommended that the heads and capstan be cleaned
after every 25 hours of use; more often if playback has deteriorated. To
clean, use a cotton swab moistened with an audio head cleaner solution or
n wipe dry with another swab.
PINCH
Always unplug the power cord when using a liquid cleaner and allow 30
minutes drying time.
l
All tape heads inevitably become slightly magnetized after long use. This
may cause noise or loss of high-frequency response in playback.
Demagnetize the heads occasionally with a head demagnetizing
cassette
(available from many audio equipment stores).
NOTE: Never use any metal objects on or near the tape heads. Do not allow
any cleaning material to fall into tape assembly.
Tape Care
Do not expose your cassettes to direct sunlight or store them in hot places.
High temperatures may warp the cassette shell or damage the tape itself.
Keep your cassettes in their boxes when they are not in the Cassette Deck.
This keeps dust from entering the cassette shells.
Your tapes can be erased by magnetic fields produced by permanent
magnets, electric motors, electrical transformers, and other devices. Keep
tapes away from magnets and magnetic fields.
Wind the tape to one end before removing it from your Cassette Deck. When
it is fully wound, only the tape leader will be visible, not the tape itself. Avoid
touching either tape or leader. Even the natural oils on your hands can
damage a tape; if oils become deposited on the tape transport mechanism of
your Cassette Deck, they could contaminate other tapes.
If a tape is accidentally pulled from a cassette, insert the tapered end of a
large pencil or similar object into the center of the tape hub and gently wind
the tape back into the cassette. Be careful not to twist or wrinkle the tape.
Care should be taken that all excess tape is wound into the cassette and is
taut. If slack is allowed to exist, it can cause the tape to become twisted
around the pinch roller and capstan which could result in a damaged
cassette.
CARE AND MAINTENANCE
I
Erase Protection
Your Cassette Deck erases whatever is on a tape when it records new
material. To protect a tape from accidental erasure, break off one or both
plastic tabs (one for each tape side) on the back of the cassette. If you later
decide to record on the tape, seal over the hole with a piece of cellophane
tape-
TROUBLE
CHECKS
Use the suggestions below to check out problems. If a problem persists, or if you suspect the CD
player is malfunctioning,
contact your RCA dealer for service.
Problem
System
What to 00
doe8 not turn on
Be sure power cord is firmly inserted in appropriate
outlet.
l
Check the outlet by plugging
l
l
No sound
Adjust volume setting.
l
Check for proper connection
l
No sound from one channel
I
plug that
unit.
of speaker wires.
Be sure you’ve selected the correct source: TUNER, TAPE, CD or
AUX.
Be sure MUTE is not activated (red indicator on VOLUME dial
flashes).To deactivate, press MUTE button on the remote control.
. Check for proper connection
or Right).
l
another device into it.
Check for full engagement of the SYSTEM CONTROL
connects the Tuner/Amplifier unit and the CD/Cassette
l
l
AC power
of speaker wires on the channel (Left
Check BALANCE setting and adjust sound distribution
necessary.
if
j
TROUBLE
CHECKS
Poor radio reception
l
Check AM/FM antenna connections.
l
Adjust antenna position for better reception.
Try turning off electrical appliances near the unit - including
dryers, vacuum cleaners, and fluorescent lights.
l
Compact
Compact
disc will not play
disc sound
skips
l
Be sure the disc tray contains a disc.
l
Assure that all discs are inserted label side up.
l
Clean discs as explained in “Care and Maintenance.”
l
Press HI
l
Be sure CD source button is selected.
l
Clean the disc as explained
or noisy recordings
control
does not work
to the disc. Do not
Inspect recording heads. Clean them, if necessary,
cedures explained in “Care and Maintenance.”
l
using pro-
Demagnetize recording heads following steps explained
and Maintenance.”
l
Remote
in “Care and Maintenance.”
Check for vibration or shock that may affect the CD player. If
necessary, move it to a different location.
l
Distorted
(PLAY/PAUSE) to begin play from pause or stop mode.
Check for warping, scratches, or other damage
insert damaged discs into the disc tray.
l
hair
l
l
l
l
l
l
l
in “Care
Be sure the CD player is plugged into a working AC outlet.
Press POWER button to assure that the system is set to POWER
ON mode (display is lit).
Press the function button qn the remote that activates the desired
component: TUNER, TAPE, CD or AUX.
Replace batteries if they are weak. Assure that batteries face in
the directions indicated inside the battery chamber of the remote
control.
Point the remote control directly at the SENSOR eye while pressing buttons.
Move closer to system while using the remote control.
Be sure there are no obstacles between the remote and the
system.
NOTES
ONE-YEAR
LIMlTED
WARRANTY
What does your warranty covet?
l Any defect
in material or
workmanship.
For how long after the original
purchase?
l One year.
l The warranty
for rental units begins
with the first rental.
What will we do?
l
Provide you with a new, or at our
option, a reconditioned
unit.
l The exchange
unit is warranted for
the remainder of your product’s
original one-year warranty period.
How do you make a warranty
claim?
l
Properly pack your unit. Include
any cables, etc., which were
originally provided with the product.
We recommend using the original
carton and packing materials.
l
Include in the package a copy of
the sales receipt or other evidence
of date of original purchase. If the
unit was a gift, provide a statement
specifying the date received. Also
print your name and address and a
description of the defect.
l Ship
the unit standard UPS or
equivalent to:
Thomson Consumer
Electrcrnics, Inc.
Product Exchange Center
32 Spur Drive
El Paso, Texas 79906
Model
RP-975&I
347A756~1
93-12
(Rev.
0)
Pay any charges billed to you by
the Exchange Center for service not
covered by the warranty.
l A new or reconditioned
unit will be
shipped to you prepaid freight.
What does your warranty not
cover?
l Customer
instruction. Your Owner’s
Manual provides information regarding operating instructions and user
controls. For additional information,
ask your dealer.
l
Installation and set-up service adjustments.
l Batteries.
l
Damage from misuse or neglect.
l
Products which have been modified
or incorporated into other products.
l
Product purchased or serviced outside the USA.
How does state law relate to this
warranty?
l This warranty
gives you specific
legal rights, and you may also have
other rights which vary from state to
state.
What if you purchased your unit in
Canada?
l Refer
to the Canadian Warranty.
l
For products purchased outside the
United States and Canada, see
dealer for warranty.
Thomson
Consumer
Electronics,
Inc.