1
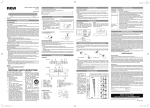
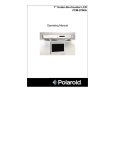
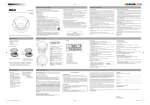
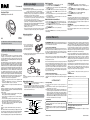
User manual
Before you begin
Radio Operation
Important Battery Precaution
CAUTION: Danger of explosion if battery is incorrectly replaced.
Replace only with the same or equivalent type.
- Any battery may present a risk of fire, explosion, or chemical burn
if abused. Do not try to charge a battery that is not intended to be
recharged, do not incinerate, and do not puncture.
- Non- rechargeable batteries, such as alkaline batteries, may leak if left
in your product for a long time. Remove the batteries from the product
if you are not going to use it for a month or more.
- Do not mix old and new batteries and do not mix alkaline, standard
(carbon-zinc), or rechargeable (Ni-Cd, Ni-MH, etc.) batteries.
- Discard any leaky or deformed battery immediately. They may
cause skin burns or other personal injury.
- Batteries shall not be exposed to excessive heat such as
sunshine, fire or the like.
- Please help to protect the environment by recycling or disposing
of batteries according to Federal, state, and local regulations.
Armband Radio
AM/FM Digital Tuner with LCD
1. Press ON/OFF button to turn the radio ON or OFF.
2. Select FM or AM with the AM/FM button.
3. Tap CH+ button to select next station. A total of 20FM and 10AM
stations can be stored.
4. Tap < TUNE > buttons to decrease/increase frequency by 1 step.
5. Or press and hold either < TUNE > button to search for next
available station.
6. Put on your armband radio on your arm and adjust the belt until
it feels comfortable.
7. Press VOL+/- button to adjust headphone volume after
connecting the headphone.
Radio Station Preset and Select
1. Tune to desired station (refer to Radio Operation step 1 to 5).
2. Press and hold MEMORY button till “P xx” is flashing where
“xx” is the preset number to be stored.
3. Press < TUNE > buttons to select a preset number that you want
to store the station.
4. Press MEMORY button to store your setting.
NOTE :
Press and Hold APP button to search the presetted station
automatically.
Setting CLOCK
1. Press ON/OFF button until the CLOCK is displayed.
2. Press and hold CLOCK button until the HOUR digits are
flashing.
3. Press < TUNE > buttons to adjust the HOUR digits.
4. Press CLOCK button to set MINUTE digits (MINUTE digits are
flashing).
5. Press < TUNE > buttons to adjust the MINUTE digits.
6. Press CLOCK button to save the setting.
Antenna
This radio has a built-in AM antenna. Since the built-in AM antenna is
somewhat directional, it may be necessary on weaker AM stations to
rotate the radio slightly until you get the best possible reception. When
listening to FM programs, be sure to fully extend the headphone wire
since it is used as FM antenna.
Headphones
This radio has been equipped with a HEADPHONE jack for private
listening.
Please extend the headphone wire since it is also the antenna for FM
radio reception.
Batteries Installation
1. Open the battery door.
EN/E
Limited Warranty
RP312
It is important to read the user manual prior to using your
new product for the first time.
Safety Information
FCC Information
This device complies with Part 15 of the FCC Rules. Operation
is subject to the following two conditions: (1) This device may
not cause harmful interference, and (2) this device must accept
any interference received, including interference that may cause
undesired operation.
This equipment has been tested and found to comply with the
limits for a Class B digital device, pursuant to Part 15 of FCC Rules.
These limits are designed to provide reasonable protection against
harmful interference in a residential installation. This equipment
generates, uses, and can radiate radio frequency energy and, if not
installed and used in accordance with the instructions, may cause
harmful interference to radio communications. However, there
is no guarantee that interference will not occur in a particular
installation. If this equipment does cause harmful interference to
radio or television reception, which can be determined by turning
the equipment off and on, the user is encouraged to try to correct
the interference by one or more of the following measures:
• Reorient or relocate the receiving antenna.
• Increase the separation between the equipment and
receiver.
• Connect the equipment into an outlet on a circuit different
from that to which the receiver is connected.
• Consult the dealer or an experienced radio/TV technician for
help.
WARNING:
Changes or modifications to this unit not expressly approved by
the party responsible for compliance could void the user’s authority
to operate the equipment.
Headset Safety
• Do not play your headset at a high volume. Hearing experts
advise against continuous extended play.
• If you experience a ringing in your ears, reduce volume or
discontinue use.
• Do not use while operating a motorized vehicle or bicycle, it
may create a traffic hazard and is illegal in many areas.
• Even if your headset is an open-air type designed to let you
hear outside sounds, don’t turn up the volume so high that
you can’t hear what’s around you.
Power
This device operates with 2”AAA” batteries (not included).
NOTE:
After the radio has been used extensively, the quality of the sound
may deteriorate and volume may decrease. When this happens,
remove old batteries and replace with a complete new set.
This Class B digital apparatus complies with Canadian ICES-003.
AVC MULTIMEDIA (“AVC”) makes the following limited warranty. This
limited warranty extend to the original consumer purchaser and is limited
to non-commercial use of the product.
2. Insert 2 “AAA” batteries. Be
sure to match the polarity of
the batteries as indicating inside
the battery compartment.
3. Close the battery door.
4. Insert the belt and pull out the belt under the device until it
fits flush against the battery door.
One Year Parts & Labor Warranty
AVC products purchased in the United States are warranted to be free
from defects in materials or workmanship for a period of one year from
the date of their original retail purchase. If the unit fails to conform to
this warranty, we will service the product using new or refurbished parts
and products, at AVC’s sole discretion.
During a period of one year from the effective warranty date, AVC will
provide, when needed, service labor to repair a manufacturing defect at
its designated Service Center.
New or remanufactured replacements for defective parts or products will
be used for repairs by AVC at its designated Service Center for one year
from the effective warranty date. Such replacement parts or products
are warranted for an additional one year from the date of repair or
replacement. The Customer will be required to ship the unit to the Service
Center indicated at the time Customer Support is contacted to make
the necessary repairs. The customer is responsible for all transportation
charges to the service facility.
NOTE:
For battery replacement, loosen the belt before opening the
battery door.
Packaging and Shipping Instruction
When you send the product to the AVC service facility you must use the
original carton box and packing material or an equivalent as designated
by AVC.
LIMITED WARRANTY
Batteries Replacement
• The symbol“
“ icon will flash whenever the battery is
nearly exhausted, so please replace batteries.
• Turn off the radio before replace batteries since it can protect
the preset stations and all settings for about 1 minute during
batteries replacement, otherwise, all settings including preset
stations and clock will be reset.
Operations
Display
HEADPHONE jack
ON/OFF
VOL. +/-
< TUNE >
AM/FM/APP
MEMORY/CH+
Your Responsibility
(1) You must retain the original sale receipt to provide proof of
purchase.
(2) These warranties are effective only if the product is purchased and
operated in the U.S.A. or Canada.
(3) Warranties extend only to defects in material or workmanship, and do
not extend to any product or parts which have been lost or discarded,
or damage to product or parts caused by misuse, accident, improper
operation or maintenance, or use in violation of instructions provided
with the product, or to product which has been altered or modified
without authorization of AVC, or to products or parts thereof which
have had the serial number removed or changed.
Out of Warranty
In the event your product requires repair after the limited warranty
period has expired, please visit our Customer Support Center at
www.RCAav.com
Important: You are responsible for any transportation, shipping or
insurance relative to the return of product to our Product Returns
Center.
All warranties implied by state law, including the implied warranties
of merchantability and fitness for a particular purpose, are expressly
limited to the duration of the limited warranties set forth above. With
the exception of any warranties implied by state law as hereby limited,
the foregoing warranty is exclusive and in lieu of all other warranties,
guarantees, agreements and similar obligations of manufacturer or seller
with respect to the repair or replacement of any parts. In no event shall
AVC be liable for consequential or incidental damages.
No person, agent, distributor, dealer or company is authorized to change,
modify or extend the terms of these warranties in any manner whatsoever.
The time within action must be commenced to enforce any obligation
of AVC arising under the warranty or under any statute, or law of the
United States or any state thereof, is hereby limited to one year from the
date of purchase. This limitation does not apply to implied warranties
arising under state law.
This warranty gives you specific legal rights and you may also have other
rights, which may vary, from state to state. Some states do not allow
limitation on how long an implied warranty lasts, when an action may
be brought, or the exclusion or limitation of incidental or consequential
damages, so the above provisions may not apply to you.
For more information on other products and services, please visit our
web site at
www.RCAav.com
Important: Also keep your “Bill of Sale” as proof of purchase.
Model no. .............................................................................................
Product name .......................................................................................
Type of set ............................................................................................
Serial no. ...............................................................................................
Invoice no. ............................................................................................
Purchased .............................................................................................
Dealer name .........................................................................................
FOR SERVICE AND REPAIR, PLEASE VISIT
www.RCAav.com
Specifications and external appearance are subject to change
without notice.
CLOCK
Printed in China
811-R31291W010
Manual para
el usuario
Radio con banda para el brazo
sintonizador digital AM/FM con LCD
EN/E
RP312
Es importante leer el manual para el usuario antes de usar
por primera vez su producto nuevo.
Información referente a la
seguridad
Información de la FCC
Este aparato cumple con la Parte 15 del Reglamento de la FCC. Su
funcionamiento queda sujeto a las dos condiciones siguientes: (1) Este
aparato no puede ocasionar interferencia dañina, y (2) este aparato
debe aceptar cualquier interferencia recibida, incluida la interferencia
que pudiera ocasionar un funcionamiento no deseado.
Este equipo ha sido puesto a prueba y se ha determinado que cumple
con los límites para aparatos digitales Clase B, según lo acordado en la
Parte 15 del Reglamento de la FCC. Estos límites están diseñados para
proporcionar una protección razonable contra interferencia dañina en
una instalación residencial. Este equipo genera, usa, y puede irradiar
energía de frecuencias radiales y, de no instalarse y usarse de acuerdo
con las instrucciones, podría ocasionar interferencia dañina en las
comunicaciones de radio. No obstante, no existe garantía que no vaya
a producirse interferencia en una instalación particular. Si este equipo
de hecho causara interferencia dañina en la recepción de la radio o del
televisor, lo que se puede determinar al apagar y encender el equipo,
alentamos al usuario a tratar de corregir la interferencia siguiendo una
o más de las medidas siguientes:
• Oriente la antena de recepción hacia otra dirección o póngala en otro
lugar.
• Aumente la distancia de separación entre el equipo y el receptor.
• Conecte el equipo en un enchufe de pared que se encuentre en un
circuito diferente de aquel al cual está conectado el receptor.
• Pida ayuda a su vendedor o a un técnico de radios y televisores con
experiencia.
Según estipula el reglamento de la FCC, las modificaciones que no estén
expresamente aprobadas por el fabricante podrían anular la autoridad
del usuario para hacer funcionar el equipo.
ADVERTENCIA:
Cambios o modificaciones a esta unidad no aprobados específicamente
por la parte responsable del cumplimiento podrían invalidar la
autoridad del usuario para operar el equipo.
Seguridad al usar los auriculares
• No toque música por los auriculares a un volumen alto. Los expertos
en materia de audición no aconsejan escuchar música de duración
extendida y continua.
• Si siente que le zumban los oídos, baje el volumen o suspenda el usote
los auriculares.
• No use los auriculares mientras esté operando vehículos motorizados
o bicicletas, ya que esto puede crear un riesgo de accidente de tránsito
y es ilegal en muchas partes.
• Aun cuando sus auriculares cuenten con un diseño abierto al aire para
permitirle escuchar sonidos exteriores, no suba el volumen tan alto que
no pueda escuchar lo que le rodea.
Corriente
Este aparato funciona con 2 pilas “AAA” (no vienen incluidas).
NOTA:
Una vez que la radio se haya usado mucho, la calidad del sonido
se puede deteriorar y el volumen podría disminuir. Cuando esto
ocurra, quite las pilas antiguas y cámbielas por un juego completo
de pilas nuevas.
Cumple con la especificación Canadiense ICES-003 clase B.
Funcionamiento de la radio
Antes de comenzar
Precaución importante referente a las pilas
CUIDADO: peligro de explosión si la pila se cambia incorrectamente.
Cambie sólo por el mismo tipo de pila o un tipo de pila
equivalente.
• Toda pila puede representar un riesgo de incendio, explosión,
o quemadura química si se hace un mal uso de ella. No intente
cargar una pila que se supone no se debiera recargar, no la
queme ni la perfore.
• El líquido del interior de las pilas no recargables, tales como las
pilas alcalinas, puede filtrarse si se deja dentro de su producto
por mucho tiempo. Retire las pilas del producto si no lo va a
usar por un mes o más.
• No mezcle pilas antiguas con pilas nuevas ni tampoco mezcle
pilas alcalinas, con pilas estándar (carbono-zinc) o pilas
recargables (Ni-Cd, Ni-MH, etc.)
• Deseche inmediatamente cualquier pila que esté deformada
o goteando, ya que ellas pueden ocasionar quemaduras en la
piel u otras lesiones.
• No se debe exponer las pilas a temperaturas extremadamente altas
tales, como son la luz del sol, el fuego o fuentes de calor similares.
• Por favor, ayude a proteger el medio ambiente reciclando o
desechando las pilas según lo acordado en las regulaciones
federales, estatales y locales.
Instalación de las pilas
2. Introduzca 2 pilas “AAA”. Asegúrese
de seguir las indicaciones de polaridad
de las pilas que aparecen dentro del
compartimiento para pilas.
3. Cierre la tapa del compartimiento
para pilas.
4. Introduzca la correa y extiéndala por debajo del aparato hasta
que ésta quede alineada sobre la tapa del compartimiento para
pilas.
NOTA:
Para cambiar las pilas,
suelte la correa antes
de abrir la tapa del
compartimiento para
pilas.
Cambio de las pilas
•El ícono con el símbolo “
“ empezará a parpadear cada
vez que la pila esté por agotarse, por lo tanto sírvase cambiar
las pilas.
• Apague la radio antes de cambiar las pilas, ya que esto puede
proteger las estaciones programadas en la memoria y todas las
configuraciones por cerca de 1 minuto durante el cambio de
las pilas; de lo contrario, se borrarán todas las configuraciones,
incluidas las estaciones de la memoria y el reloj.
Funcionamiento
enchufe para
AURICULARES
ON/OFF
VOL. +/-
< TUNE >
AM/FM/APP
Programación y selección de estaciones de
radio
1. Sintonice la estación deseada (lea los pasos 1 al 5 de la sección
“Funcionamiento de la radio”).
2. Oprima y mantenga oprimido el botón MEMORY hasta que “P
xx” empiece a parpadear en el visualizador. “xx” es el número
de programación que se va a guardar en la memoria.
3. Oprima los botones < TUNE > para seleccionar un número de
programación bajo el cual desee guardar la estación.
4. Oprima el botón MEMORY para guardar su configuración.
NOTA:
Oprima Y mantenga oprimido el botón APP para buscar las estaciones
presetted automáticamente.
Configuración del RELOJ
1. Oprima el botón ON/OFF hasta que CLOCK aparezca en el
visualizador.
2. Oprima y mantenga oprimido el botón CLOCK hasta que los dígitos
de la HORA comiencen a parpadear en el visualizador.
3. Oprima los botones < TUNE > para ajustar los dígitos de la HORA.
4. Oprima el botón CLOCK para configurar los dígitos de los
MINUTOS (los dígitos de los MINUTOS comienzan a parpadear en el
visualizador).
5. Oprima los botones < TUNE > para ajustar los dígitos de los MINUTOS.
6. Oprima el botón CLOCK para guardar la configuración.
Antena
Esta radio cuenta con una antena AM incorporada. Dado que la antena
AM incorporada es un tanto direccional, en el caso de las estaciones
AM más débiles podría ser necesario rotar ligeramente la radio
hasta que obtenga la mejor señal de recepción posible. Al escuchar
programas de la banda FM, asegúrese de extender por completo
el cable de los auriculares, ya que éste hace a la vez de antena FM.
Auriculares
Esta radio ha sido equipada con un enchufe para AURICULARES para
poder escuchar en forma privada. Por favor extienda el cable de los
auriculares, ya que éste es además la antena para la recepción
de la radio FM.
Garantía Limitada
1. Abra la tapa del compartimiento
para pilas.
visualizador
1.Oprima el botón ON/OFF para encender (ON) o apagar (OFF) la radio.
2. Seleccione FM o AM utilizando el botón AM/FM.
3. Toque ligeramente el botón CH+ para seleccionar la siguiente
estación. Se puede almacenar un total de 20 estaciones FM
y 10 estaciones AM.
4. Toque ligeramente los botones < TUNE > para subir o bajar
de frecuencia, un punto a la vez.
5. O bien, oprima y mantenga oprimido cualquiera de los botones
< TUNE > para buscar la siguiente estación disponible.
6. Póngase en el brazo la radio con brazalete de tela y ajuste la
correa hasta que ésta se sienta cómoda.
7. Oprima el botón VOL+/- para ajustar el volumen de los
auriculares, después de conectarlos.
MEMORY/CH+
AVC MULTIMEDIA (“AVC”) proporciona la siguiente garantía limitada.
Esta garantía limitada se extiende al comprador consumidor original y
está limitada al uso no comercial del producto.
Garantía de Un Año en Partes y Mano de Obra
Los productos AVC comprados en los Estados Unidos están garantizados
y están libres de defectos en materiales o mano de obra por un periodo
de un año desde la fecha de su compra al detalle original. Si la unidad
falla durante el cumplimiento de esta garantía, nosotros le daremos
servicio al producto usando partes y productos nuevos o reconstruidos,
a la sola discreción de AVC.
Durante un período de un año desde la fecha en vigor de la garantía, AVC
proveerá, cuando sea necesario, mano de obra de servicio para reparar
un defecto de manufactura en su Centro de Servicio designado.
New or remanufactured replacements for defective parts or products will
be used for repairs by AVC at its designated Service Center for one year
from the effective warranty date. Such replacement parts or products
are warranted for an additional one year from the date of repair or
replacement. The Customer will be required to ship the unit to the Service
Center indicated at the time Customer Support is contacted to make
the necessary repairs. The customer is responsible for all transportation
charges to the service facility.
Instrucción de Empaque y Envío
Cuando usted envíe el producto a la instalación de servicio AVC debe
usar la caja y el material de empaque originales o un equivalente según
sea indicado por AVC.
GARANTIA LIMITADA
Todas las garantías implícitas por ley estatal, incluyendo las garantías
implícitas de comercialización y adecuación para un propósito particular,
son limitadas expresamente a la duración de las garantías limitadas
establecidas anteriormente. Con la excepción de cualquier garantía implícita
por ley estatal conforme se limitado en el presente documento, la garantía
antecedente es exclusiva y en lugar de todas las otras garantías, acuerdos y
obligaciones similares de fabricante o vendedor con respecto a la reparación
o reemplazo de cualquier parte. En ningún caso AVC será responsable por
daños consecuenciales o incidentales.
Ninguna persona, agente, distribuidor o compañía está autorizado a
cambiar, modificar o ampliar los términos de estas garantías en manera
alguna. El tiempo en que la reclamación debe ser iniciada para hacer
exigible alguna obligación de AVC derivada bajo la garantía o bajo algún
estatuto, o ley de los EE.UU. o cualquier estado integrante de estos, es por
este medio limitado a un año desde la fecha de compra. Esta limitación no
aplica a garantías implícitas derivadas bajo la ley estatal.
Esta garantía le da derechos legales específicos y usted puede también tener
otros derechos, los cuales pueden variar, de estado a estado. Algunos estados
no permiten limitación en cuanto al tiempo de duración de una garantía
implícita, cuando se presenta una reclamación, o la exclusión o limitación de
daños incidentales o consecuenciales, por lo tanto las anteriores provisiones
pueden no aplicar a usted.
Para más información sobre otros productos y servicios, por favor visite
nuestro sitio web en www.RCAav.com
Importante: también conserve su “Nota de Venta” como prueba de
compra.
Modelo no. ...................................................................................
(1) Usted debe conservar el recibo de venta original para suministrar
prueba de compra.
(2) Estas garantías son efectivas solamente si el producto es comprado
y operado en los EE.UU. o Canadá.
(3)Las garantías se extienden solamente para defectos en el material
o mano de obra, y no cubren producto o parte alguno que pudiera
haberse perdido o desechado, o daño a producto o partes causado
por el mal uso, accidente, operación o mantenimiento inapropiados,
o por el uso en violación de las instrucciones suministradas con el
producto, o producto que haya sido alterado o modificado sin la
autorización de AVC, o productos o partes del mismo a los que se
les haya removido o cambiado el número de serie.
Tipo de equipo ...................................................................................
Fuera de Garantía
Fecha de compra .................................................................................
En el caso de que su producto requiera reparación después de la expiración
del período de garantía limitada, por favor contacte a nuestro Centro de
Soporte al Cliente al www.RCAav.com
Importante: usted es responsable por cualquier transporte, envío o
seguro con relación a la devolución del producto a nuestro Centro de
Devoluciones de Producto.
Nombre de Producto ....................................................................
No. de serie .........................................................................................
No de factura ......................................................................................
Nombre del Distribuidor ....................................................................
PARA SERVICIO Y REPARACION, POR FAVOR VISITE
www.RCAav.com
Especificaciones y apariencia externa sujetos a cambio sin notificación.
RELOJ
Impreso en China