1
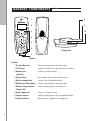
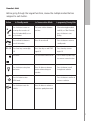
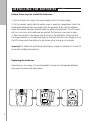
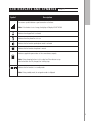
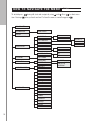
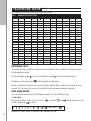
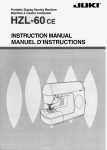
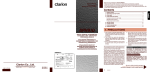
Polycom KIRK 2010 User Guide DEAR CUSTOMER We would like to thank you for purchasing the telephone. We hope you will enjoy it. Please read the following thoroughly and observe the operating instructions and information provided. NOTE: To subscribe the handset, please use the SN (IPEI) number, which you find on the handset label and the box label. Copyright ©. All rights reserved. All forms of copying or reproduction of the product or its associated user guide are strictly prohibited. Package Contents The following items are included in the package: - One DECT handset unit NOTE: Additional handsets may be included according to product package. - One charger unit - Three rechargeable batteries (1.2V 600 mAh per battery) - One power supply unit - One user's guide In this guide ■■■■ Handset components. . . . . . . . . . . . . . . . . . . . . . . . . . . . . . . 6 Handset Units . . . . . . . . . . . . . . . . . . . . . . . . . . . . . . . . . . . . .7 Installing the batteries . . . . . . . . . . . . . . . . . . . . . . . . . . . . 8 Lcd displays and symbols . . . . . . . . . . . . . . . . . . . . . . . . . . 9 how to navigate the menu. . . . . . . . . . . . . . . . . . . . . . . . . 10 Everyday use. . . . . . . . . . . . . . . . . . . . . . . . . . . . . . . . . . . . . . . 11 Making a telephone call . . . . . . . . . . . . . . . . . . . . . . . . . . . . .11 Answering a telephone call. . . . . . . . . . . . . . . . . . . . . . . . . . . 11 Call Handling. . . . . . . . . . . . . . . . . . . . . . . . . . . . . . . . . . . . . . 11 Redial. . . . . . . . . . . . . . . . . . . . . . . . . . . . . . . . . . . . . . . . . . .11 View missed calls . . . . . . . . . . . . . . . . . . . . . . . . . . . . . . . . . . .11 View incoming calls. . . . . . . . . . . . . . . . . . . . . . . . . . . . . . . . .11 Telephone book. . . . . . . . . . . . . . . . . . . . . . . . . . . . . . . . . . . . 12 Entering text . . . . . . . . . . . . . . . . . . . . . . . . . . . . . . . . . . . . . .12 Add new entry. . . . . . . . . . . . . . . . . . . . . . . . . . . . . . . . . . . .12 View telephone book. . . . . . . . . . . . . . . . . . . . . . . . . . . . . . .13 Edit telephone book . . . . . . . . . . . . . . . . . . . . . . . . . . . . . . . .13 features. . . . . . . . . . . . . . . . . . . . . . . . . . . . . . . . . . . . . . . . . . . 13 Select language . . . . . . . . . . . . . . . . . . . . . . . . . . . . . . . . . . . .13 Change ring pattern. . . . . . . . . . . . . . . . . . . . . . . . . . . . . . . .14 Adjust volume . . . . . . . . . . . . . . . . . . . . . . . . . . . . . . . . . . . . .14 Key beeps. . . . . . . . . . . . . . . . . . . . . . . . . . . . . . . . . . . . . . . .14 Keypad lock . . . . . . . . . . . . . . . . . . . . . . . . . . . . . . . . . . . . . . .1 15 Range indicator . . . . . . . . . . . . . . . . . . . . . . . . . . . . . . . . . . . .15 Battery. . . . . . . . . . . . . . . . . . . . . . . . . . . . . . . . . . . . . . . . . . .16 Guide to basic functions . . . . . . . . . . . . . . . . . . . . . . . . . . . 17 Technical specifications. . . . . . . . . . . . . . . . . . . . . . . . . . . . 18 Troubleshooting. . . . . . . . . . . . . . . . . . . . . . . . . . . . . . . . . . . 18 19 INTERNATIONAL REGULATORY & PRODUCT INFORMATION . . . . . . . . . . . . . . . . . . . . . . 19 Important safety instruction . . . . . . . . . . . . . . . . . . . . . . . . . . . . . Intrinsic safety. . . . . . . . . . . . . . . . . . . . . . . . . . . . . . . . . . . . . 20 H a n d s e t c ompo n e n t s ■■■■ 1 8 2 9 3 10 4 5 6 Charger Unit 7 Handset Handset 1 Ear piece/Receiver Transmits communications and audio signals 2 LCD Screen Displays the current status and function of the handset 3 Headset jack Connects to external headset (optional) 4 Function keys Dials numbers and accesses handset functions 5 Battery compartment Contains three rechargeable batteries 6 Mouth piece/ Microphone Transmits communications and audio signals 7 Handset charge contacts Receives charging power from charger unit Charger Unit 8 Power supply unit Connects to AC power source 9 Charger contacts Supplies charging power to the rechargeable batteries 10 Power indicator Indicates power is applied to the charger unit Handset Unit Before going through the keypad functions, review the multiple modes that are assigned to each button. Button R ON OFF 0–9 In Standby mode In Conversation Mode In programming/Viewing Mode Press this button to answer an incoming call or to make a call Press this button briefly to turn on the handset This button switches between two lines When reviewing phone book, redial list, or Caller ID records, press this button to start dialing Press and hold this button to turn off the handset Press this to end a call Press this button to return to standby mode Press these keys to enter digits 0-9 Press these keys to send DTMF signal 0-9 Press these keys to enter digits 0-9 No function Press this button to mute the call Press this button to go back to previous menu or to cancel an action Press this button to view phone book entries OK Press this button to decrease receiver volume during conversation Press this button to enter MENU mode Press this button to enter the redial list Press this button to scroll through menu selection Press this button to confirm an action or a selection Press this button to activate or deactivate speakerphone mode I n s ta l l i n g t h e b at t e r i e s ■■■■ Follow these steps to install the batteries: 1. On the charger unit, plug in the power supply unit to the mains supply. 2. On the handset, gently slide the battery cover to open the compartment. Insert the rechargeable batteries that are provided with the package. Make sure the batteries follow the polarity indication marked inside the battery compartment. The LCD screen will turn on as soon as the batteries are inserted. Put the back cover back in place. 3. Place the handset in the charger unit as shown in the illustration. Make sure that the charge indicator on the base unit lights up and that the bars in the charger icon on the LCD screen scroll from bottom to top showing that charging is in progress. Important! To obtain the best battery performance, charge the handset for at least 12 hours after installing the batteries. Replacing the batteries Depending on your usage, it is recommended to change the rechargeable batteries every year to achieve best performance. AAA 1.2 v 600mAh AAA 1.2v 600mAh LCD D i s p l ay s a n d s y m b o l s Symbol ■■■■ Description The antenna symbol indicates a good connection to the base Note: If the handset is out of range, the display will display NO NETWORK. Indicates when keypad lock is activated Indicates when the phone line is in use Indicates that the handset speakerphone mode is activated Indicates that the handset microphone is muted Indicates a graphical representation of the current battery capacity Note: During charging the bars in this symbol scroll from bottom to top. After the batteries are fully charged, d the scrolling stops. Indicates that the handset is in standby mode Note: During standby mode, the assigned number is displayed. Ho w t o n a v i g at e t h e me n u To access press item. Pressing ■■■■ during idle state and navigate by using and . Press to select menu takes you back one level. To leave the menu or cancel long press . CALLER LIST PHONEBOOK NEW ENTRY REDIAL SILENT CHG. EXT. MELODY ON OFF ... INT. MELODY TONE SETUP HS NAME REG. MENU ANSWER MODE RING VOLUME OFF RANGE WARN ON AC CODE: _ _ _ _ CANCEL HS CANCEL HS CONFIRM? ANY KEY NORMAL DEUTSCH FRANçAIS ITALIANO PYCCKNň NEDERLANDS PORTUGUÊS DANSK SVENSKA TÜRKçE POLSKI EΛΛHNIKA 10 OFF SUBSCRIBE ENGLISH ESPA~ NOL LANGUAGE MELODY 10 ON KEY TONE EDIT NAME MELODY 1 E v e r y d ay u s e ■■■■ Making a telephone call Post dialling Press off hook -key and wait for the dialling tone. Then, dial the desired telephone number with the numeric keys. To end a call push the hook -key. Pre-dialling When the telephone is on-hook, enter the telephone number and press off hook. The number will now be dialled. Speakerphone Enter the telephone number and press . When contact is made speak through the microphone. To end a speakerphone call press . Answering a telephone call When the telephone rings, lift handset and begin conversation. The number of the caller will be displayed. Pressing mutes the incoming calls. C a l l H a n d l i n g ■■■■ Redial To redial a telephone number press using and . Press to dial a number. when the telephone is in idle state. Navigate View missed calls To view a list of missed calls press Press to dial a number. when the telephone is in idle state. View incoming calls To view incoming calls, enter the Menu then Call List. Navigate using Press to dial a number. and . 11 Te l ep h o n e b oo k ■■■■ The telephone book lets you store up to 40 entries. Key Character selection 1 2 3 4 5 6 7 8 9 0 1 2 3 4 5 6 7 8 9 0 . , A D G J M P T W Space B E H K N Q U X 0 1 C F I L O R V Y + 2 3 4 5 6 S 8 Z & ? À Ď ğ l Ñ 7 Ұ 9 @ ! Á È Ì Ł Ń Ŕ Ù Ŵ / : Â É Í Ĺ Ň Ř Ú Ý $ Æ ě ı Ą ∆ Ĭ ç Z θ Ć Д И Č Ж Й Б З Қ Г Õ ß Ф Ż Ö П Ш Ž Ø Σ Щ Ψ Θ Φ Ъ Ω Ү Ц Ы Ч ´ Ã Ê Î Ŀ Ò Ś Û `Y % ( Ä Ë Ï Λ Ó Š Ü Ŷ Ю Я ) Å Ĕ Ĩ П Ô Ş Ũ Ź Л b Э Entering text The numeric keys can also be used for entering letters. This is useful for storing contacts in the telephone book. In the text editor press once for the letter A, press To delete a character press twice for the letter N etc. and long press to exit menu. While you select a character the cursor will be invisible. Upon release of a key wait one second for the cursor to move to the next slot and proceed entering characters. Add New Entry You can add a new entry to the telephone book in three different ways: 1. On-hook Enter the number when on-hook. Press contact and press to save. and then John Smith Remark: to insert space in between two names press 12 0. and . Enter a name for the 2. Via the menu Press to enter the menu and find the item . Choose and enter the telephone number. See point (1) for further instructions. 3. From the Call lists You can also store a number shown in the calls lists (Received, Dialled and Missed calls). Press when the telephone number is shown. See point (1) for further instructions. View telephone book The telephone book is accessed by pressing . To navigate the menu press and . Entries can be accessed quickly by entering the first letter of the contact, i.e. press 6 once to view contacts beginning with M, press 3 twice to view contacts beginning with E etc. To call a number from the telephone book press . Edit telephone book The edit option is only accessible via the menu. You can also choose to delete an entry. fe at u r e s ■■■■ Select language To change menu language press to enter the main menu. Find the LANGUAGE menu and press to enter it. Select diseri to save. esirable language and press Long press to cancel and exit menu. 13 Change ring pattern Enter the menu and choose the item . Navigate melodies with and . Each melody will be played as they are highlighted. To choose a melody press . Adjust volume Up/down To adjust the volume enter the menu and choose RING VOLUME. Change volume with and . Press to save. Mute To mute the microphone during call press . Repeat to turn the microphone back on. Key beeps Turn on/off Press to enter menu. Press to find the item choose to turn key beep off or 14 and press to turn back on. . Now Keypad lock To lock the keypad press followed by LOCKED! displays on the screen. *. Repeat to unlock. The icon and KEYS Range Indicator 4 bars indicates the signal level. Good coverage OK coverage Limited coverage Poor coverage 15 Battery See battery level in display. – Talk time 120 hours. – Standby time 100 5 hours. – The battery icon will be flashing when the battery is low. This will be accompanied by a beep. 16 Gu i d e t o b a s i c fu n c t i o n s ■■■■ How to What to do Enter the menu When telephone is in idle state (on-hook) press Make a telephone call Press off hook Answer a telephone call When telephone rings ��������������� press off hook Redial Press to view redial list To store press or off hook� Dial received calls Enter the Menu then Call list then Received and press . Adjust volume During call press or The volume level (1-6) will be displayed. Mute microphone During call press Change ring melody Press Disable key beeps Press Lock the keypad Press Add entry to telephone book Enter number when on-hook. Press then . Enter name for contact to enter menu. Press to find item . Browse the available melodies with or . Press to save melody to enter menu. Press to find item . Choose between enable or isable with d and . Press to save , then * . Repeat to unlock and 17 Te c h n i c a l s pe c i f i c at i o n s ■■■■ ■DECT/GAP compatible 2 hours ■Battery talk time approx. 10 ■Telephone book: 40 entries ■Caller ID ■Hands free operation ■Redial: 10 entries ■Setting of handset and ■Call log: 10 entries loudspeaker volume ■ 10 Polyphonic melodies ■2 line illuminated display, 12 digits/ 12 characters ■Missed calls: 10 entries ■DTMF transmission ■Operational temperature: 0-4°C ■Battery stand by time approx. 100 5 hours T r ou b l e s h oo t i n g ■■■■ My telephone does not work ■Make sure that you have inserted batteries into the battery compartment, and that they are inserted with correct polarity. ■ Push the hook switch once and wait for dialling tone again. ■ If the person at the other end of the conversation does not hear your voice, make sure that you have not pressed Mute. To test, press the Mute button once more and your telephone should resume to normal operation. ■ You may be out of reach from a base. Please contact your service operator. Caller’s number does not show on my telephone ■ Callers may suppress their caller’s number when making their telephone call. Caller’s number does not necessarily display when a call is received. ■ If a call is made from abroad, caller’s number cannot always be transmitted. 18 INTERNATIONAL REGULATORY & PRODUCT INFORMATION This KIRK 2010 Handset has been marked with the CE mark. This mark indicates compliance with EEC Directives 89/336/EEC, 73/23/EEC 1999/5/EC. A full copy of the Declaration of conformity can be obtained from Polycom Ltd, 270 Bath Road, Slough, Berkshire, SL1 4DX, UK. The WEEE Marking on this equipment indicates that the product must not be disposed of with unsorted waste, but must be collected separately. IMPORTANT SAFETY INSTRUCTIONS Before using your telephone equipment, you should always follow basic safety instruction to reduce the risk of fire, electrical shock and injury to persons, and damage to property. 1. 2. 3. Read and understand all instructions. Follow all warnings and instructions including those marked on the product. Unplug this product before cleaning. Do not use liquid cleaners or aerosol cleaners. Use damp cloth for cleaning. 4. Do not install the telephone equipment in the bathroom or near a wash bowl, kitchen sink, or laundry tub, in a wet basement, or near a swimming pool. 5. Slots or openings in the equipment are provided for ventilation to protect it from over-heating. These openings must not be blocked or covered.6. The product should be operated only from the type of power source indicated on the instructions. If you are not sure of the type of power supply, consult your dealer or local power company. 7. Do not overload wall outlets and extension cords as this can result in fire or electrical shock. 8. Never push objects of any kind into this product through cabinet slots as they may touch dangerous voltage points or short out parts that could result in fire, electrical shock, or injury. Never spill liquid of any kind into this product. 9. To reduce the risk of electrical shock or burns, do not disassemble this product. Opening or removing covers may expose you to dangerous voltages, dangerous electrical current, or other risks. Incorrect reassemble can cause electrical shock when the appliance is subsequently used. If the product need repair, consult your dealer. 10. Refer servicing to qualified service personnel. 1 11. 12. 13. 14. 15. 16. 17. 18. Avoid using telephone during an electrical storm. There may be a risk of electrical shock from lightning. Do not use the telephone to report a gas leak in the vicinity of the leak. Do not place the base or charger near microwave ovens, radio equipment, or non-ground connected televisions. These appliances may cause electrical interference to the base or handset. The charger must be placed on a hard, flat surface and connected to a functional 120 volt AC power source depending on the country of use. This telephone will not operate in the event of a blackout. Please keep a backup phone for emergencies. Installation must be performed in accordance with all relevant national wiring rules. Plug acts as Disconnect Device - The socket outlet to which this apparatus is connected must be installed near the equipment and must always be readily accessible. This device and its antenna must not be co-located or operatinig in conjunction with any other antenna or transmitter. INTRINSIC SAFETY Do not use the handset in conditions where there is a danger of electrically ignited explosions. Exposure to sunlight, heat and moisture Do not expose the wireless phone to direct sunlight for long periods. Keep the wireless phone away from excessive heat and moisture. Spare parts and accessories Use only approved spare parts and accessories. The operation of non- approved parts cannot be guaranteed and may even cause damage. Power failure In the event of a power failure or flat battery, you cannot use the handset to make or receive calls. Battery Precautions 1. Periodically clean the charge contacts on both the charger and handset. 2. Exercise care in handling batteries in order not to short the batteries with conducting materials such as rings, bracelets, and keys. The batteries or conducting material may overheat and cause burns or fire. 3. Do not open or mutilate the batteries. Released electrolyte is corrosive and may cause damage to the eyes or skin. The electrolyte may be toxic if swallowed. 4. During charging batteries heat up. This is normal and not dangerous. 5. Lithium cell installation Caution - Danger of Explosion if Battery is incorrectly replaced. Replace only with the same or equivalent type recommended by the manufacturer. Dispose of used batteries according to the manufacturer’s instructions. 20 NOTICES Before installing this equipment, users should ensure that it is permissible to be connected to the facilities of the local telecommunications company. The equipment must also be installed using an acceptable method of connection. The customer should be aware that compliance with the above conditions may not prevent degradation of service in some situations.Repairs to certified equipment should be coordinated by a representative designated by the supplier. Any repairs or alterations made by the user to this equipment, or equipment malfunctions, may give the telecommunications company cause to request the user to disconnect the equipment.Users should ensure for their own protection that the electrical ground connections of the power utility, telephone lines and internal metallic water pipe system, if present, are connected together. This precaution may be particularly important in rural areas. EMC CAUTIONS: Users should not attempt to make such connections themselves, but should contact the appropriate electric inspection authority, or electrician, as appropriate. If your telephone equipment causes harm to the telephone network, the telephone company may ask you to disconnect the system from the line until the problem has been corrected or they may discontinue your service temporarily. If possible, they will notify you in advance, But if advance notice is not practical, you should be notified as soon as possible. You will be informed of your right to file a complaint with the FCC. Your telephone company may make changes in its facilities, equipment, operations, or procedures that could affect the proper functioning of your telephone system, If they do and it is possible, you will be notified in advance to give you an opportunity to maintain uninterrupted telephone service. If you experience trouble with this telephone system, disconnect it from the network until the problem has been corrected or until you are sure that the equipment is not malfunctioning. Note: This equipment has been tested and found to comply with the limits for a class B digital device, pursuant to local regulations. These limits are designed to provide reasonable protection against harmful interference in a residential installation. This equipment generates, uses and can radiate radio frequency energy and, if not installed and used in accordance with the instructions, may cause harmful interference to radio communications. However, there is no guarantee that interference will not occur in a particular installation. If this equipment does cause harmful interference to radio or television reception, which can be determined by turning the equipment off and on, the user is encouraged to try to correct the interference by one or more of the following measures: - Reorient or relocate the receiving antenna. - Increase the separation between the equipment and receiver. - Connect the equipment into an outlet on a circuit different from that to which the receiver is connected. - Consult the dealer or an experienced radio/TV technician for help. FCC Note: This device complies with part 15 of the FCC rules. Operation is subject to the following two conditions: (1) This device may not cause harmful interference, and (2) this device must accept any interference received, including interference that may cause undesired operation. SAR: Device has been tested for SAR compliance for head and body worn configurations. The highest reported SAR values are: head 0.056 W/kg, and body worn 0.017 W/kg 1 2 IC Note: Operation is subject to the following two conditions: (1) This device may not cause interference, and (2) this device must accept any interference, including interference that may cause undesired operation of the device. The Term “IC“: before the certification/registration number only signifies that the Industry Canada technical specifications were met. Privacy of communications may not be ensured when using this telephone. Power Outage: In the event of a power outage, your wireless telephone will not operate. The wireless telephone requires electricity for operation. You should have a telephone which does not require electricity available for use during power outages. Information to user: The users manual or instruction manual for an intentional or unintentional radiator shall caution the user that changes or modifications not expressly approved by the party responsible for compliance could void the user’s authority to operate the equipment. NOTE EMC: Cet appareil a ètè soumis à un essai et jugè conforme aux normes règissant les limites ètablies pour un dispositif numèrique de classe B, conformèment aux règlements locaux.Ces limites visent à assurer une protection raisonnable contre des interfèrences pouvant nuire à l’appareil utilisè dans un secteur rèsidentiel. Cet èquipment gènère et utilise des radiofrèquences, et peut en èmettre. S’il n’est pas installè et utilisè selon les directives fournies, il risque de perturber les radiocommunications. L’exploitation de cet appareil dans un secteur particulier est toutefois susceptible de produire des interfèrences nuisibles. Si cet èquipement provoque des interfèrences lors de la rèception des radiofrèquences ou des frèquences de tèlèvision, ce qui peut être vèrifiè en mettant l’appareil hors tension, puis en le remettant sous tension, l’utilisateur doit prendre l’une des mesures suivantes pour corriger la situation: - rèorienter ou relocaliser l’antenne de rèception; - augmenter la distance entre l’appareil et l’antenne de rèception; - brancher l’appareil à une prise d’un circuit diffèrent de celui auquel l’antenne est branchèe; - consulter le dètaillant ou un technicien en radiotèlèvision d’expèrience pour obtenir de l’aide. 22