1
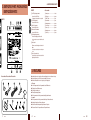
Owner’s manual Mode d’emploi Manual de instrucciones Thank you for purchasing the Clarion DPH910. ∗ Please read this owner’s manual in its entirety before operating this equipment. ∗ Check the contents of the enclosed warranty card and keep it carefully with this manual. ∗ The operating instructions are not provided with this manual. For the operating instructions, refer to the owner’s manual of the source unit. Contents 1. 2. 3. 4. 5. 6. 7. 8. DPH910 DIGITAL GRAPHIC & PARAMETRIC EQUALIZER / DSP / CROSSOVER PROCESSOR MODULE • EGALISEURS GRAPHIQUE ET PARAMÈTRIQUE NUMÈRIQUES / DSP / DIVISEUR DE FRÈQUENCES • ECUALIZADOR GRÁFICO Y PARAMÉTRICO/PROCESADOR DE SONIDO DIGITAL/MÓDULO PROCESADOR DE RED DIVISORA Clarion Co., Ltd. 2001/1 (Z/To·K) 50 DPH910 All Rights Reserved. Copyright © 2001: Clarion Co., Ltd. Printed in Japan / Imprimé au Japon / Impreso en Japón PRECAUTIONS ......................................................................................................... 2 IDENTIFICATION OF PARTS ................................................................................... 3 FEATURES ................................................................................................................ 4 FUNCTIONS OF DPH910 .......................................................................................... 5 Functions common to each mode .............................................................................. 5 Standard-mode functions ........................................................................................... 6 Professional-mode functions ..................................................................................... 8 INSTALLATION ....................................................................................................... 10 CONNECTIONS ....................................................................................................... 11 SYSTEM EXAMPLES .............................................................................................. 13 SPECIFICATIONS ................................................................................................... 14 1. PRECAUTIONS 1. This unit does not operate independently. The unit must be used with a source unit that has a cable connection for CeNET wire bound (sold separately). 2. The DPH910 can easily be damaged by moisture, high temperatures or high humidity. Keep the inside of the car clean and well ventilated. 3. Never subject the DPH910 to strong shocks or open its case. Doing so may result in damage. This equipment has been tested and found to comply with the limits for a Class B digital device, pursuant to Part 15 of the FCC Rules. These limits are designed to provide reasonable protection against harmful interference in a residential installation. This equipment generates, uses, and can radiate radio frequency energy and, if not installed and used in accordance with the instructions, may cause harmful interference to radio communications. However, there is no guarantee that interference will not occur in a particular installation. If this equipment does cause harmful interference to radio or television reception, which can be determined by turning the equipment off and on, the user is encouraged to consult the dealer or an experienced radio/TV technician for help. 4. Use a soft, dry cloth to wipe dirt off the DPH910. Never use a hard cloth or thinners, alcohol, etc. For tough dirt, apply some cold or lukewarm water to a soft cloth and wipe off the dirt gently. 5. When the source unit is switched to the traffic announcement or PTY interrupt reception while using the DPH910, the effect from DPH910 doesn’t work. 6. Some tracks may sound distorted when adjusted; this is nomal and not a cause for concern. CAUTION CHANGES OR MODIFICATIONS NOT EXPRESSLY APPROVED BY THE MANUFACTURER FOR COMPLIANCE COULD VOID THE USER’S AUTHORITY TO OPERATE THE EQUIPMENT. INFORMATION FOR USERS:. CHANGES OR MODIFICATIONS TO THIS PRODUCT NOT APPROVED BY THE MANUFACTURER WILL VOID THE WARRANTY AND WILL VIOLATE FCC APPROVAL. Be sure to unfold and read the next page. Veuillez déplier et vous référer à la page suivante. Cerciórese de desplegar y de leer la página siguiente. GP-976B-51 280-7616-00 2 DPH910 2. IDENTIFICATION OF PARTS / PRINCIPALES PIÈCES / IDENTIFICACIÓN DE PARTES DPH910 2. IDENTIFICATION OF PARTS DPH910 Accessories 1 CeNET input/output terminal Connect the CeNET cable. 1 2 3 4 5 6 7 8 9 ∗ Equipment to this terminal is not specified. 2 Front RCA terminals Connect the RCA cable. 3 Rear RCA terminals Connect the RCA cable. 4 Subwoofer RCA terminals Connect the RCA cable. 5 Digital signal input terminal Connect the digital optical fiber cable. Name plate ............................... RCA cable ................................ CeNET cable ............................ Ground lead .............................. Mounting bracket ...................... Cord clamp ............................... Canoe clip ................................. Mounting screw ........................ Cable clip .................................. 1 sheet 2 pieces 1 piece 1 piece 2 pieces 2 pieces 4 pieces 4 pieces 1 pieces ∗ After connection, be sure to fix it with the cable clip. 6 Reset switch When no sound is heard, press this switch. Note: Pressing the reset switch performs the system check. 7 Cable clip insertion holes Insert the cable clip in this hole and fix the digital optical fiber cable. 3. FEATURES Accessories / Accessoires / Accesorios 3 DPH910 ■ Switchable Subwoofer Output (Stereo/Mono) and Adjustable Line Level Subwoofer Output ■ Selectable Subwoofer Low Pass Frequency and High Pass Frequency ■ 4V/6ch Gold-Plated RCA Line Level Output, 2 Optical Digital Inputs < STD mode > ■ 12 Pre-Programed and 6 User Programmable Sound Field Memories ■ 7 Adjustable Sound Field Parameters ■ 5 Seating Position Memories ■ 7 Band Digital Graphic Equalizer ■ 6 Pre-Programed and 6 User Programmable Grapic Equalizer Memories < Pro mode > ■ 6 Pre-Programed and 6 User Programmable Virtual Space Enhancer Memories ■ 3 Adjustable Virtual Space Enhancer Parameters ■ 3 Band Front and Rear Independent Digital Parametric Equalizer ■ 6 Front and 6 Rear Pre-Programed Parametric Equalizer Memories 4 DPH910 DPH910 49 4. FUNCTIONS OF DPH910 With the DPH910, you can enjoy the DSF and equalizer effects by simulating the sound field using the easy menu with simple operation (standard mode), and also by simulating the sound field by adjusting the sound according to the width of the car interior (professional mode). • Choose either standard mode or professional mode to adjust the sound field and sound quality. • The following major functions are available on the DPH910: Functions common to each mode Spectrum analyzer display, auto loudness, etc. STD mode Graphic equalizer function, DSF function, etc. PRO mode Virtual Space Enhancer function, parametric equalizer function, etc. • In this manual, graphic equalizer is hereafter referred to as G.EQ, Virtual Space Enhancer referred to as VSE, and parametric equalizer referred to as P.EQ. Functions common to each mode 7-band spectrum analyzer display Spectrum analyzer display of 7 bands is possible. Auto Loudness Adjustments You can vary the amount of compression between 0 and 10 without changing the loudness. Subwoofer Adjustments Test-tone Output Test tones can be output in the following order to check the speaker connections: FRONT-LEFT ➜ FRONT-RIGHT ➜ REAR-LEFT ➜ REAR-RIGHT ➜ WOOFER-LEFT ➜ WOOFERRIGHT ➜ ALL(all speakers) ➜ OFF(no sound) Title Input You can assign and display titles for the DSF, G.EQ, VSE and P.EQ settings you have set. 4V preout The preout voltage is raised to 4 V, providing characteristics that are resistant to noise during signal transmission. Note: • Since noise or sound distortion may occur when an external amplifier is connected to this unit, keep the amplifier gain at a lower level. Digital signal input terminal Since 2 digital input signal terminals are provided with this unit, up to 2 units with digital signal output terminals (such as a CD changer) can be connected. Notes: • When the DPH910 and a unit with digital signal output terminal are connected with the digital optical fiber cable, and the digital optical fiber cable is disconnected, no sound is heard. Reconnect the digital optical fiber cable. • If you want to listen to music from an analogue input, disconnect the digital optical fiber cable and perform a system check by operating the source unit. The following adjustments can be made if a subwoofer is connected: 1. You can set the speakers to: “OFF”, “MONO” and “STEREO”. 2. You can set the subwoofer volume to: 0 to 14 3. You can set the low-pass filter frequency to: 50Hz, 80Hz or 120Hz. ∗ The slope of the low-pass filter is 24dB/oct. High-pass Adjustments You can select the frequency of the high-pass filter from Through, 50Hz, 80Hz and 120Hz. ∗ The slope of the high-pass filter is 18dB/oct. DPH910 5 Standard-mode functions <G.EQ (Graphic Equalizer) functions> G.EQ effect ON/OFF switching 4. IMPACT; Low and high frequencies emphasized. 5. SMOOTH; Medium and high frequencies reduced. 6. FLAT; Original sound. You can turn the sound quality effect of the G.EQ ON or OFF by operating the buttons of the source unit. Selection of the basic G.EQ menus 6 basic G.EQ menus are stored in the DPH910. You can select an appropriate sound quality according to the music. The basic G.EQ menus are as follows: 1. BASS BOOST; Low frequencies emphasized. 2. HIGH BOOST; Medium and high frequencies emphasized. 3. ACOUSTICAL; Medium frequencies (vocals) emphasized. Equalizer setting You can adjust the sound quality using the G.EQ menus as you like. The settings for the basic G.EQ menus are shown in the following table. The adjustment range of each frequency is between -12dB and +12dB. G.EQ memory (User memory) You can store 6 kinds of sound quality into the memory which are edited on the basis of the basic G.EQ menus. Graphic equalizer parameter (dB) 12kHz 50Hz 100Hz 200Hz 400Hz 1kHz 3kHz 1. BASS BOOST +5 +6 -4 +2 0 0 0 2. HIGH BOOST 0 0 0 -2 +4 +3 +4 3. ACOUSTICAL 0 +2 +1 +4 +6 +5 +1 4. IMPACT +4 +4 +3 +1 +3 +5 +5 5. SMOOTH +2 +2 0 -2 -4 -4 -2 6. FLAT 0 0 0 0 0 0 0 Standard-mode functions DSF effect ON/OFF switching You can turn the sound field effect of the DSF ON or OFF by operating the buttons of the source unit. Setting of the listening position You can select one of the preadjusted listening positions according to the seat position. The following 6 listening positions are available: FULL SEAT, FRONT-RIGHT, FRONT-LEFT, FRONT, REAR and PASS. Fine-tuning the Listening Position The time taken for the sound to leave the speaker and reach you can be fine-tuned to create a natural sound field, no matter where you are sitting in the car. Selection of the sound field (DSF) menus 12 basic DSF menus are stored in the DPH910. 6 Editing the G.EQ DPH910 <DSF functions> You can select an appropriate sound field according to the music. The basic DSF menus are as follows: BASIC 1 1. HALL: Large concert hall. 2. CHURCH: Church with a vaulted ceiling. 3. STADIUM: Large stadium without roof or walls. 4. LIVEHOUSE: Live performance hall, larger than a jazz club. 5. CLUB: Club with strong bass. 6. JAZZCLUB: Jazz club with a low ceiling. BASIC 2 1. DOME: Indoor sports arena. 2. CHAMBER: Large, echoing hall. 3. PARK: Vast outdoor area. 4. THEATER: Movie or drama theatre. 5. STUDIO: Listening room in a home. 6. BGM: Vocals cut. Standard-mode functions <DSF functions> Editing the DSF About the sound field system You can adjust the sound field using the DSF menus as you like. • The DSF parameters and their contents are as follows: EFFECT: Adjusts the percentage of reflected sound. INITIAL DELAY: Adjusts the distance between sound source and reflecting surfaces. REAR MIX: Adjusts the ratio of the direct sound output from the rear speaker. REVERB TIME: Adjusts reverberation length. ROOM SIZE: Adjusts expansion. HIGH: Adjusts the percentage of high frequencies in reverberations. LIVENESS: The sense of the room’s dynamics can be adjusted. • The settings for the basic DSF menus and the adjustment ranges are shown in the following table. The DPH910 divides the sound field into three systems: reverberation, early-reflection and B.G.M. The reverberation system is the part of the sound field where reverberating sound is vivid, while the early-reflection system is the part of the sound field where reflected sound is emphasized. • DSF menus for the reverberation system: HALL, CHURCH, DOME, CHAMBER • DSF menus for the early-reflection system: STADIUM, LIVEHOUSE, CLUB, JAZZCLUB, PARK, THEATER, STUDIO • DSF menus for the B.G.M system: B.G.M Notes: • There are some parameters that cannot be adjusted, depending on the sound field system. • The reverberation system cannot adjust ROOM SIZE and LIVENESS parameters. • The early-reflection system cannot adjust REVERB TIME and HIGH parameters. • The B.G.M system can adjust only the EFFECT parameter. DSF memory (User memory) You can store 6 sound fields into the memory which, are edited on the basis of the basic DSF menus. DSF parameter Initial setting Sound field EFFECT INITIAL DELAY REAR MIX ROOM SIZE LIVENESS REVERB TIME HIGH BASIC 1 BASIC 2 1. HALL 50% 50ms 100% 2.5s 0.5 2. CHURCH 50% 95ms 100% 9.5s 0.5 3. STADIUM 50% 85ms 100% 2.0 5 4. LIVEHOUSE 50% 20ms 100% 2.0 5 5. CLUB 50% 3ms 100% 2.0 5 6. JAZZCLUB 50% 1ms 100% 2.0 5 1. DOME 50% 65ms 100% 7.0s 0.5 2. CHAMBER 50% 25ms 100% 4.2s 0.5 3. PARK 50% 100ms 100% 2.0 5 4. THEATER 50% 1ms 100% 2.0 5 5. STUDIO 50% 1ms 100% 2.0 5 6. B.G.M 100% 0.1 to 4 0 to 10 0.3 to 10s 0.1 to 1 Adjustment range 0 to 100% 0 to 100ms 0 to 100% DPH910 7 Professional-mode functions <VSE (Virtual Space Enhancer) functions> VSE effect ON/OFF switching Editing the VSE menus You can turn the sound pressure distribution compensation effect of the VSE ON or OFF by operating the buttons of the source unit. You can adjust the sound pressure distribution on the basis of the basic VSE according to the car type. • The VSE adjustment contents are as follows: DIFFUSE Compensates for spacial impression. CAR WIDTH Compensates for the width of the car’s interior (lateral direction). CAR LENGTH Compensates for the length of the car’s interior (longitudinal direction). • The adjustable range of the VSE menus are 1 to 10 for each item. Selection of the VSE menus 6 basic VSE menus are stored in the DPH910 according to the car type. The basic VSE menus are as follows: 1. FLAT 2. BASS BOOST 3. HIGH BOOST 4. IMPACT 5. ACOUSTICAL 6. SMOOTH The settings of DIFFUSE, CAR WIDTH and CAR LENGTH for each basic VSE menu is the center value (5) that meets each car type. VSE memory (User memory) You can store 6 kinds of sound pressure distribution into the memory which, are edited on the basis of the basic VSE menus. Professional-mode functions P.EQ effect ON/OFF switching 1. SEDAN You can turn the transmission frequency characteristics compensation effect of the P.EQ ON or OFF by operating the buttons of the source unit. Selection of the P.EQ menus 6 basic P.EQ menus are stored in the DPH910 according to the car type and the speaker installation position. • The different car types and the speaker installation positions are as follows: Vehicle type 1. Sedan-1 2. Sedan-2 3. Wagon-1 4. Wagon-2 5. MIN VAN-1 6. MIN VAN-2 <P.EQ (Parametric Equalizer) functions> front: 2WAY rear: Rear parcel 2. SEDAN front: FULL rear: Rear door 3. WAGON front: 2WAY rear: Beside the luggage 4. WAGON front: FULL rear: Rear door 5. MIN VAN front: 2WAY rear: Beside the luggage 6. MIN VAN front: FULL rear: Equivalent to rear door • The settings of the basic P.EQ menus are as follows: Parametric Equalizer Parameter Channel BAND 1 BAND 2 BAND 3 Front 250Hz/F, 3/Q, -8dB/G 2kHz/F, 1/Q, -4dB/G 5kHz/F, 1/Q, -4dB/G Rear 250Hz/F, 3/Q, -10dB/G 1.25kHz/F, 5/Q, 0dB/G 8kHz/F, 5/Q, 0dB/G Front 250Hz/F, 7/Q, -10dB/G 800Hz/F, 3/Q, -4dB/G 8kHz/F, 1/Q, -5dB/G Rear 80Hz/F, 7/Q, +3dB/G 125Hz/F, 5/Q, -12dB/G 1.25kHz/F, 5/Q, 0dB/G Front 250Hz/F, 3/Q, -8dB/G 1kHz/F, 3/Q, -8dB/G 10kHz/F, 1/Q, -6dB/G Rear 250Hz/F, 3/Q, -8dB/G 800Hz/F, 1/Q, -8dB/G 8kHz/F, 5/Q, 0dB/G Front 250Hz/F, 7/Q, -8dB/G 400Hz/F, 7/Q, -10dB/G 1.25kHz/F, 7/Q, -8dB/G Rear 125Hz/F, 3/Q, -8dB/G 500Hz/F, 5/Q, -5dB/G 1.6kHz/F, 3/Q, 0dB/G Front 125Hz/F, 5/Q, -4dB/G 1.25kHz/F, 3/Q, -4dB/G 2kHz/F, 7/Q, +3dB/G Rear 250Hz/F, 1/Q, -6dB/G 630Hz/F, 3/Q, -4dB/G 8kHz/F, 5/Q, 0dB/G Front 250Hz/F, 3/Q, -4dB/G 1.25kHz/F, 3/Q, -8dB/G 80Hz/F, 3/Q, +3dB/G Rear 250Hz/F, 3/Q, -8dB/G 500Hz/F, 5/Q, -5dB/G 8kHz/F, 5/Q, 0dB/G F; Center frequency (Hz), Q; Q curve, G; Gain(dB) 8 DPH910 Professional-mode functions <P.EQ (Parametric Equalizer) functions> Editing the P.EQ menus P.EQ memory (User memory) You can compensate for the frequency characteristics using the basic P.EQ according to your car type. • The P.EQ adjustment contents are as follows: Channel selection Select the channel to be compensated (front or rear). Selection of center frequency Select the center frequency that you want to compensate from the range of 20Hz to 20kHz. (1/3 octave step, 31 points) Selection of Q-curve Set the sharpness of the Q-curve to one of the parameters: 1, 3, 5, 7 and 20. Gain adjustment Adjust the gain (output level) in the range of 12dB to +12dB. (1dB step, 25 points) You can store 6 frequency characteristics into the memory, which are edited on the basis of the basic P.EQ menus. About the compensation of frequency characteristics See Figure 1 concerning the relationship of the center frequency, Q-curve (Q) and gain. Level (dB) Q curve (Q) F Q= f 3dB Gain (G) f Frequency curve Center frequency (F) Frequency (Hz) Figure 1 About the Q-curve (Q) For the Q-curve (Q), setting larger values makes the curve sharper, setting smaller values makes the curve flatter. (Figure 2) Selecting the Q-curve (Q) opposite to the frequency curve to be compensated makes the frequency characteristics flat. Q curve (Q) High Q curve; 20 Low Q curve; 1 Figure 2 DPH910 9 5. INSTALLATION 1. Before starting, be sure to disconnect the battery’s negative “−” terminal to prevent accidents due to short-circuits. 2. Location Consider safety and operability when selecting a place for installation. Avoid the following. • Locations where the unit will hamper driving. • Locations where the unit could injure passengers if the car stops suddenly. • Locations exposed to direct sunlight or hot air from the heater, etc. • Locations where the unit may be exposed to rain or water. 3. Be sure to use the included screws and brackets. Screws other than those supplied could damage the unit. Case Case Damage 8mm max. 4. When drilling holes in the dashboard, etc., be sure to check beforehand that there are no harnesses or other wires on the inside. Installation example (Installing the unit under the driver’s seat) Note: Please read this chapter referring to “2. INDENTIFICATION OF PARTS” at the beginning of this manual. 1. Attach the mounting brackets 5 to the sides of the DPH910 using the screws 8 provided. 2. Select the location on the floor mat. Drill holes in the floor mat to match the positions of the holes in the mounting brackets 5. 3. Insert the canoe clips 7 from the rear of the floor mat and install the DPH910. ∗ There are three mounting holes on each side of the DPH910. Select the appropriate holes to match to the installation location. ÀÀÀÀÀÀÀÀÀÀÀÀ @@@@@@@@@@@@ ;;;;;;;;;;;; ÀÀÀÀÀÀÀÀÀÀÀÀ @@@@@@@@@@@@ ;;;;;;;;;;;; ÀÀÀÀÀÀÀÀÀÀÀÀ @@@@@@@@@@@@ ;;;;;;;;;;;; ÀÀÀÀÀÀÀÀÀÀÀÀ @@@@@@@@@@@@ ;;;;;;;;;;;; ÀÀÀÀÀÀÀÀÀÀÀÀ @@@@@@@@@@@@ ;;;;;;;;;;;; 10 DPH910 6. CONNECTIONS REAR FRONT Note: Please read this chapter referring to “2. INDENTIFICATION OF PARTS” at the beginning of this manual. FRONT REAR 1 2 3 4 DPH910 How to make wirings 1. CeNET Cable Orient the CeNET 3 cable in the direction shown in the figure and insert it until it is locked in position. To remove the CeNET cable, pull it by lightly grasping the slide cap A in your fingers. 6 5 CAUTION • Wire the CeNET cable so that there is minimal tension in the cable, and the connection part will not come off. • To extend the CeNET cable, use either CCA520 (98.4˝/2.5m) or CCA-521 (23.6˝/0.6m) (both are separately sold CeNET extension cables.). 2. RCA Cable Attach the supplied name plate 2 on the RCA cable to show where to connect it. After checking where to connect it from the name plate, connect the RCA cable. RO NT F 1 RCA cable (2) Connect it to the source unit’s front input terminals (gray) to use the source unit’s built-in amplifier or to the amplifier’s front input terminals. 2 RCA cable (2) Connect it to the source unit’s rear input terminals (black) to use the source unit’s built-in amplifier or to the amplifier’s rear input terminals. 3 RCA extension cable (sold separately) Connect it to the subwoofer amplifier. 4 CeNET cable (3) Connect it to the source unit, CD changer or MD changer. 5 Digital optical fiber cable (sold separately) Connect it to the source unit, CD changer or MD changer. 6 Ground lead (4) Connect it to vehicle chassis ground. CAUTION • Do not remove the insulating cap of the RCA cable that is not to be connected, to prevent short-circuit. • Fix the connection part of the RCA cable with insulating tape B so that it will not come loose and disconnect. DPH910 11 How to make wirings 3. Digital Optical Fiber Cable When you connect the digital optical fiber cable to the digital input terminal or to the digital output terminal, firmly insert it until it is locked in position. Connect the black slid cap side to the digital input terminal of the DPH 910. Note: Do not bend the digital optical fiber cable through a loop smaller than 1˝ (3cm) in radius. Doing so will greatly reduce perfomance. To remove the digital optical fiber cable, pull it by lightly grasping the slide cap C of the cable in your fingers. C 4. Ground lead Tighten the small terminal of the ground lead E together with the mounting bracket 5, and connect the large terminal to the metal part of the car body using the car screw D. If grounding is not achieved, noise results. 9 E Digital optical fiber cable (Black slide cap side) 5 D After connecting, fasten the cable using the included cable clip 9. One cable clip can fix up to 2 digital optical fiber cables. 12 DPH910 8 7. SYSTEM EXAMPLES System with external power amplifier and DSP 1 0 ! 6 8 5 3 DPH910 4 9 7 2 @ System with internal power amplifier and DSP 0 ! $ # 8 6 5 7 DPH910 2 1 Source unit compatible with CeNET connection 2 CD changer compatible with CeNET connection 3 4-channel power amplifier For connection with the front/rear speakers. 4 2-channel power amplifier For connection with the subwoofer speakers. 5 CeNET cable (provided with the CD changer) Using this cable, connect the DPH910 to the CD changer. 6 CeNET cable (provided with the DPH910) Using this cable, connect the DPH910 to the source unit. 7 Digital optical fiber cable Using this cable, connect the DPH910 to the CD changer. 8 RCA cable (provided with the DPH910) Using this cable, connect the DPH910 to the 4-channel power amplifier for the front/rear speakers, or connect the DPH910 to the front /rear line out terminal of the source unit. 9 RCA cable Using this cable, connect the DPH910 to the 2-channel power amplifier for the subwoofer speaker. 0 Front speakers ! Rear speakers @ Subwoofer speakers # RCA cable for front/rear line in Connect this cable to the DPH910. $ RCA cable for non-fader line out This is not used for this system. Note: • The longest wiring length of the CeNET cable is less than 65.62ft (20m). When you connect the CeNET cable, be careful not to exceed the wiring length of 65.62ft (20m). DPH910 13 8. SPECIFICATIONS ● S/N ratio: ........................................... 107 dB (digital input) 83 dB (analogue input) ● Frequency response: ........................ 10 Hz to 20 kHz (±1 dB) ● Separation: ........................................ 100 dB (digital input) 80 dB (analogue input) ● Harmonic distortion: ......................... 0.006% (digital input)(1 kHz) 0.006% (analogue input)(1 kHz) ● Voltage gain: ..................................... 2.5 dB (Volume max : 4V pre-out) ● Analogue input: ................................. 1.5 VRMS (Max.) ● Digital input: ...................................... 44.1 kHz sampling frequency, 16-bit digital audio data ● A/D conversion: ................................ 20-bit linear, 64 times oversampling ● D/A conversion: ................................ 24-bit linear, 128 times oversampling ● DSF: Basic: ................................................ 12 modes User: ................................................. 6 modes ● Graphic equalizer (7 bands): Basic: ................................................ 6 modes User: ................................................. 6 modes ● Virtual Speace Enhancer: Basic: ................................................ 6 modes User: ................................................. 6 modes ● Parametric equalizer: ........................ 3 bands x 2 (independent front/rear) Center frequency: ............................. 20 Hz to 20 kHz, 1/3 octave steps, 31 points Q curve: ............................................ 1 to 20 GAIN: ................................................ ±12 dB Preset: ............................................... 6 types ● Auto loudness: .................................. on/off ● Subwoofer: Voltage gain: ..................................... +12 dB (max. woofer volume) LPF cut off frequency: ...................... Through, 50 Hz, 80 Hz, 120 Hz LPF slope: ......................................... 24 dB/oct ● Front / Rear: HPF cut off frequency: ...................... Through, 50 Hz, 80 Hz, 120 Hz HPF slope: ........................................ 18 dB/oct ● Power supply voltage: ....................... DC 14.4V (10.8V to 15.6V), negative ground ● Power consumption: ......................... 560 mA ● External dimensions: ........................ 9-1/16˝ (W) x 1˝ (H) x 6-11/16˝ (D) [230 (W) x 25 (H) x 170 (D)mm] ● Weight: .............................................. 2.091lb. (0.95 kg) 14 DPH910