1
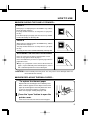
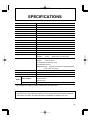
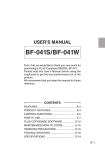
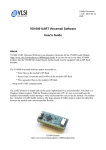
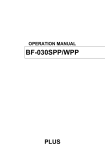
OPERATION MANUAL
BF-035
BOARD FAX
English
Français
Deutsch
Italiano
Español
中国語
PLUS
Note:
This equipment has been tested and found to
comply with the limits for a Class A digital device,
pursuant to Part 15 of the FCC Rules. These
limits are designed to provide reasonable
protection against harmful interference when the
equipment is operated in a commercial
environment. This equipment generates, uses,
and can radiate radio frequency energy and, if
not installed and used in accordance with the
instruction manual, may cause harmful
interference to radio communications. Operation
of this equipment in a residential area is likely to
cause harmful interference in which case the
user will be required to correct the interference
at his own expense.
OPERATION MANUAL
BF-035
PLUS
English
First of all, we would like to thank you very much
for purchasing a PLUS Board Fax (Electronic
Copyboard) CONFERENCE MODEL.
Please read this Operation Manual before using
the machine to get the best performance out of
the product.
We recommend that you keep this manual for
future reference.
EXPLANATION OF UL REGULATORY LABEL
(USA ONLY)
PLEASE NOTE: The description "Computer Rooms" on the
label located on the rear of the copyboard, refers to areas where
an abundance of computer control equipment (such as high output
servers) is being used, It does NOT refer to environments such
as offices or classrooms where there are simply PC's being used.
UL regulations require that we place a warning label in regard to
this item being used in a "Computer Room". Please understand
that this equipment will in no way interfere with the running of
computer equipment or peripherals. The UL regulation simply
applies to all items that contain flammable material in excess of a
specified area, We would like to further stress that there is no
inherent risk of this equipment causing a fire. It is only pointing
out that should a fire occur, then this equipment will also burn
along with any other flammable materials contained in the room.
Should you have any questions whatsoever about this information,
please call PLUS Corporation of America directly at (201)8182700
CONTENTS
FEATURES ......................................................... 1
PRODUCT FEATURES ...................................... 2
CONTROL FUNCTIONS ..................................... 3
HOW TO USE ..................................................... 4
MAINTENANCE/HOW TO STORE ..................... 7
HANDLING PRECAUTIONS ............................... 7
TROUBLE SHOOTING ....................................... 8
SPECIFICATIONS .............................................. 9
BF-035 BOARD FAX CARTON CONTENTS
Please be sure all of the following items are included in
the carton with the BF-035 BOARD FAX
Copyboard main unit .......... 1
ACCESSORIES
● Set of Dry-eraseble markers (one each black, red
and blue).
● Dry-Eraser (1)
● Fax Paper (30m(96ft) , 12mm(w/1/2") core)
● Operation Manual with warranty card
OPTIONAL ACCESSORIES
● PC interface board - to enable integration of the
BF-035 and your Personal Computer
FEATURES
●
●
●
●
The 1300mm(51")W × 920mm(36")H writing surface provides
ample space to record all information discussed during meetings.
Since the unit can instantly print an A4/Letter sized copy of
what is on the panel, your audience is freed from distracting
note taking and can fully concentrate on the subject at hand.
This unit has been designed with 4 writing panels (page 1-4)
which can be printed out. The 5th panel is designed for use as
a projection screen only.
The BF-035 can be easily upgraded for use with your PC (with
optional PC interface board)
CAUTION: Please do not write on the 5th panel (projection
screen) as it is non-erasable and will stain.
1
PRODUCT FEATURES
FRONT
Writing panel
50mm(2") × 50mm (2")
gridded surface area
Tray
Printer
Operation panel
T-shaped stand
Printer hatch
Caster
REAR
Expansion slot
(for optional upgrades)
T-shaped stand
(
2
Optional accessory sold separately:
PC interface board - to enable downloading of board information from the
BF-035 to the PC
)
CONTROL FUNCTIONS
OPERATION PANEL
PLUS BOARDFAX
BF-035
1
2
POWER ON
3
4
SCREEN
OPEN
A
POWER
B
PAPER OUT
C D
PAGE
E
PAGE-L
COPY
F
G
REPEAT
H
PC
PAGE-R
SCREEN
I
J
K
A
Opening button .............................. Press this button to open the printer hatch when replacing
the thermal paper.
B
Power switch .................................. Press "I" to turn ON the power when starting machine
operation.
C
Power lamp ..................................... Press the switch, and the green lamp will blink on and off.
The lamp will stay lit (green) when the read sensor inside
the machine is ready for operation.
D Paper warning lamp ....................... When the thermal paper has run out, the red lamp will
light. Load new recording paper.
E
Page lamp ....................................... These lamps indicate which panel is on display presently.
The blinking green lamp indicates the page to which the
unit is turning to. (The SCREEN is indicated by an orange
lamp.)
F
PAGE-L ........................................... Press this key to slide the panel to the left. (Press once
for each panel you wish to turn to.)
G Copy ................................................ The panel displayed will be printed out on A4/Letter sized
thermal paper. The print out will be reduced proportionally
to the original information on the panel.
H Repeat key ...................................... You can make another copy of the last panel by pressing
this key. The panel will not move while the unit is reprinting.
I
PC COPY key .................................. For use with optional PC interface kit.
J
PAGE-R ........................................... Press this key to slide the panel to the right. (Press once
for each panel you wish to turn to.)
K
Screen key ...................................... Press this key to move to the fifth panel. The unit will not
move to the fifth panel with the PAGE-L key. Press the
SCREEN key again to return to page 1.
3
HOW TO USE
■ BEFORE USE...
● Engage the caster locks to prevent board
movement.
● Plug in and turn ON the power switch.
● Turn on the power switch, and the panel
will slide to show the first page. After
blinking on and off 2-3 times, the power
lamp remains lit.
■ WHEN COPYING...
Press the copy key.
The panel slides once, and the written material will be copied on
A4/Letter sized paper.
However, when page 5 (projection screen) is shown, the panel
will not move even if the key is pressed.
Repeat key
To reprint the last panel press the repeat key.
Continue to press for additional identical copies.
The panel will not move during this process.
This function will not work until at least one printed copy has
been made after the unit is powered on.
To remove printed copy
Simply hold the corner of the page against the top edge of
the printer mouth and gently tear it off.
4
POWER ON
POWER
PAPER OUT
HOW TO USE
■ WHEN SLIDING THE PANEL FORWARD...
PAGE-L
When page 1 is displayed, press the PAGE-L key, and the
panel will move to page 2.
The page number increases as many times as you press
the key.
The desired page (the page you wish to turn to) number
will be indicated by the blinking LED.
PAGE-R
When page 4 is displayed, press the PAGE-R key, and the
panel will move to page 3.
The page number decreases as many times as you press
the key.
The page you wish to tarn to will be indicated by a flashing LED.
ACCESSING THE PROJECTION SCREEN
Press the screen key to move to the projection screen.
Press the key again to return to page 1.
Press the PAGE-R key to move to a specific page from the
projection screen.
●Page 5 is a projection screen, Please do not write on
page 5, if you accidentally write something on it, erase it
with a cloth dampened with a neutral detergent.
CAUTION:
Do not manually move the panel. This may cause severe damage and is not
covered under the warranty.
■ WHEN REPLACING THERMAL PAPER...
*To replace the thermal paper
Replace with new thermal paper in the following cases:
When a red line appears on the edges of the thermal
paper.(A red line appears when only about one meter
(3 feet) or so of thermal paper is remaining.)
When the red paper warning lamp lights red.
Press the "open" button to open the
printer cover.
Take out the core left over from the thermal paper.
5
HOW TO USE
As illustrated, set the new roll in
so that the tip of thermal paper
extends about 20cm (8") from the
outlet.
To close the cover, push both ends
of it until it locks with a clicking noise.
At this time, make sure that the
thermal paper has not slipped off the
edge.
Cut off the extra thermal paper
from the printer outlet.
Replace the recording paper in the following situations
● When a red line appears at the edges of the recording paper. The red line will
appear when there is only about one meter (3 feet) or so of recording paper left on
the roll.
● When the paper out lamp lights red.
Note:
● Please use only the correct type of recording paper.
● Particular attention must be given to the winding direction of the recording paper, since
copying cannot be performed if the winding direction of the recording paper is reversed.
● Be sure to keep the recording paper straight when loading, failure to do so may cause
wrinkling or tearing of the paper during the copy function.
*Automatic Power Cut-off Function
If there is no key operation for about an hour, the fluorescent lamp inside the unit automatically
shuts off and the machine enters a state of power conservation. (At this time, the power indicator
remains lit.)
Once a key is pressed, the fluorescent lamp will light again, and the normal operating condition
is restored.
6
MAINTENANCE/HOW TO STORE
Carry out the following maintenance procedures periodically to ensure high quality
printing performance at all times.
(1) Cleaning of pages 1-4
When the surface gets stained, wipe it off with a slightly damp cloth. Also, if the stain
is particularly stubborn, use a solution of water-thinned neutral detergent to clean.
Do not start using the machine until the panel has completely dried.
(2) Cleaning of projection screen (page 5)
Wipe ordinary stains in the same manner as shown in (1).
If something is written on this screen by accident, wipe it off with a cloth dampened
with a neutral detergent.
(3) Cleaning of tray and outer frame
Wipe away any dirt or residue left by the markers in the tray and the outer frame
with a slightly damp cloth.
HANDLING PRECAUTIONS
<FOR SAFE USE>
1. Avoid placing the machine in hot spots where it is exposed to direct sunlight or
next to an air conditioning duct.
2. When using sticky tape on the surface of the panel, do not leave it on for a long
time. Moreover, after removing it, wipe the panel clean.
Do not hit or pierce the panel with any hard or sharp objects.
3. Do not leave writing or marks on pages 1-4 for a long time since it may become
difficult to erase.
4. As thinner, benzine, alcohol, etc., may discolor or mark the main unit and the
panels, (1-4 page) never use such chemicals when cleaning.
5. Use only the correct type of thermal paper.
When storing thermal recording paper, avoid the following places. This is important
because storage in such places may cause color development or discoloration.
(1) Places where the paper is exposed to direct sunlight.
(2) Places where the paper is exposed to temperatures of more than 35˚C (95˚F)
and humidity of 85% or over.
(3) Places adjacent to alcohol, thinner, benzine, ammonia, etc.
7
HANDLING PRECAUTIONS
6. When replacing the thermal paper, do not place any objects on the open printer
cover or apply weight to it.
7. After use, be sure to turn OFF the power switch. In addition, when it is not to be
used for a long time, make certain that the plug is pulled form the outlet.
8. Always use the correct type of marker. Be careful not to use other markers as the
panel may be damaged or, in some cases, the ink may be difficult to remove.
9. To ensure all information will be printed, leave a slight margin around the edge of
the panel as indicated below.
20mm
30mm
30mm
20mm
10. When moving this machine, disengage the caster locks, hold both the right and
the left sides of the main unit firmly, and avoid any sudden jolts or shocks.
TROUBLE SHOOTING
<PLEASE CHECK THISE SIMPLE POINTS BEFORE REQUESTING SERVICE>
CONDITIONS
CHECKPOINTS
Check if the power cord is plugged into
outlet.
When pressing the copy key does not
Check if the paper warning lamp (red) is
lit.
result in copying
Although the printer is functioning, nothing
Check if winding direction of thermal paper
is copied on the thermal paper
is backwards. (No copy can be is made on
the back of thermal paper)
When characters written on the panel
If something is written on page 5 by
cannot be erased even using an eraser
accident, wipe it off with a cloth dampened
with neutral detergent. Check if any marker
except the correct type has been used to
write on pages 1-4. Wipe off with a damp
cloth or neutral detergent.
When copy is dirty
Check for ink residue on the panel. If it is
stained, wipe off carefully with a soft damp
cloth.
∗ If no satisfactory result can be achieved even after the above, contact your dealer or PLUS
CORPORATION.
When the power fails
8
SPECIFICATIONS
Item
Specification
Board surface size
W1300 × H920 mm (51-3/16 × 36 inch)
Effective reading size
W1240 × H800 mm (48-7/8 × 34-3/4 inch)
Number of pages
5 pages (4 pages can be copied)
Screen
The 5th page is a projection screen 1240 (50") × 880 (35")
Panel driving method
Bi-directional scrolling method
Grid
50mm sq./2" sq.
Writing instruments
Special dry erase markers (black/blue/red)
Reading method
CCD sensor plane scanning
Recording method
Thermal printing with thermal head
Recording density
8 dot/mm/203 DPI
Recording paper
Special thermal sensitive paper (30-m roll/98 FT)
Size of thermal paper
A4 size (210 × 297mm) Letter size (8-1/2 × 11 inch)
Recording color
Black
Recording speed
1-surface copy: 11 sec/copy
Operating conditions
Temperature:5-35˚C/40-95˚F
Humidity:
Power source
30-85%
North America
Europe
(Without dew condensation)
120V AC 60Hz
230V AC 50Hz
Asia/Oceania220-240V AC 50Hz
Central South America
Middle/Near East
Respective rated local voltage/frequency
(110V, 120V, 220-240V)
Power consumption
60W at stand-by, 120W at operation
Outer dimensions:
W1470 × D600 × H1885 mm
Weight
45 kg
(57-7/8 × 23-5/8 × 74-2/8 inch)
Special thermal recording paper (30-m roll/98 FT)
Others
Consumables
Special markers
Special eraser
Optional Accessory
PC interface kit
*Specifications are subject to change without notice for improvement.
Placing this unit next to equipment or buildings (such as broadcasting stations) where strong
RF interference is generated may sometimes cause printing to become blurred or disordered
when copies are made. This does not indicate a breakdown or problem in this unit.
9
14-4146-01A