1
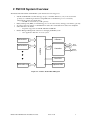
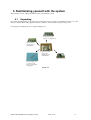
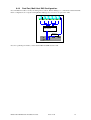
FS3102 Hardware Installation
Guide
Version 1.0
European Headquarters
Plasmon Data Limited,
Whiting Way,
Melbourn,
Hertfordshire ,
SG8 6EN,
U.K.
For more information:
www.raidtec.com
[email protected]
Tel: +44 (0) 1763 262963
Fax: +44 (0) 1763 264444
Plasmon and Raidtec are registered trademarks of Plasmon Plc. Copyright 2005
Table of Contents
1
Preface _______________________________________________________________________________ 5
1.1
Introduction ______________________________________________________________________ 5
1.2
Disclaimer ________________________________________________________________________ 5
1.3
Trademarks _______________________________________________________________________ 5
1.4
Modifications______________________________________________________________________ 5
1.5
FCC Radio Frequency Interference Statement __________________________________________ 6
1.6
FCC Booklet Information ___________________________________________________________ 6
1.7
Shielded Cables ____________________________________________________________________ 6
1.8
Compliance _______________________________________________________________________ 6
1.8.1
CANADA: ____________________________________________________________________ 6
1.8.2
EUROPE: _____________________________________________________________________ 6
2
FS3102 System Overview_________________________________________________________________ 7
3
General Precautions and Electrical Considerations ___________________________________________ 8
3.1
4
5
Cleaning Instructions _______________________________________________________________ 9
Safety and Emissions ___________________________________________________________________ 10
4.1
Safety ___________________________________________________________________________ 10
4.2
FC Lasers. _______________________________________________________________________ 10
4.3
Emissions ________________________________________________________________________ 10
4.4
Immunity ________________________________________________________________________ 10
4.5
Safe Handling ____________________________________________________________________ 10
Familiarising yourself with the system _____________________________________________________ 11
5.1
Unpacking _______________________________________________________________________ 11
5.2
What’s in the box _________________________________________________________________ 12
5.3
System Views_____________________________________________________________________
5.3.1
System Front View _____________________________________________________________
5.3.2
System LED Indicators__________________________________________________________
5.3.3
System Back View _____________________________________________________________
5.3.4
Controller Indicators ____________________________________________________________
6
13
13
13
14
14
Installing the FS3102 system ____________________________________________________________ 16
6.1
Installing Disk Drives ______________________________________________________________ 16
6.2
Installing SFPs (Optical transceivers)_________________________________________________ 16
6.2.1
SFP Removal _________________________________________________________________ 17
6.2.2
SFP Replacement ______________________________________________________________ 17
6.3
Installing a Host Bus Adaptor (HBA) _________________________________________________ 17
6.4
Cabling the Host and the FS3102 ____________________________________________________
6.4.1
Single Port/Host DAS Configuration _______________________________________________
6.4.2
Dual Port, Single Host SAN configuration. __________________________________________
6.4.3
Dual Port, Multi Host DAS Configuration. __________________________________________
18
18
18
19
7
Configuring the FS3102 ________________________________________________________________ 20
8
Battery Backup Unit (BBU) _____________________________________________________________ 21
8.1
Data Hold Time___________________________________________________________________ 21
8.2
Maximum Memory Current ________________________________________________________ 21
Raidtec FS3102 Hardware Installation Guide
Version 1.0
2
8.3
Battery Pack Replacement Policy ____________________________________________________ 21
8.4
BBU Indicators ___________________________________________________________________ 21
9
Field Replaceable Units (FRUs) __________________________________________________________ 22
10
Plasmon Technical Support. ___________________________________________________________ 23
Appendix A - Alerts ________________________________________________________________________ 24
Failure Events __________________________________________________________________________ 24
Alert Messages _________________________________________________________________________ 26
Notifications __________________________________________________________________________ 26
Warnings_____________________________________________________________________________ 26
Appendix B - RAID Features ________________________________________________________________ 28
RAID Levels ___________________________________________________________________________ 28
Logical Volumes ________________________________________________________________________ 28
RAID Creation _________________________________________________________________________ 28
RAID Expansion ________________________________________________________________________ 28
Expansion By Row _____________________________________________________________________ 28
Expansion By Column __________________________________________________________________ 28
RAID Verify ___________________________________________________________________________ 29
Stripe Size _____________________________________________________________________________ 29
Stripe Unit Size _________________________________________________________________________ 29
Caching _______________________________________________________________________________
Read Cached Data _____________________________________________________________________
Streaming Read Data ___________________________________________________________________
Write Cached Data _____________________________________________________________________
29
29
29
29
Auto Rebuild ___________________________________________________________________________
Disabled _____________________________________________________________________________
Priority ______________________________________________________________________________
Background___________________________________________________________________________
30
30
30
30
Appendix C - System Specifications ___________________________________________________________ 31
Electrical Characteristics _________________________________________________________________
Voltage Rating ________________________________________________________________________
Current Consumption ___________________________________________________________________
Power Consumption ____________________________________________________________________
31
31
31
31
Environmental Conditions ________________________________________________________________
Temperature __________________________________________________________________________
Relative Humidity______________________________________________________________________
Altitude ______________________________________________________________________________
Shock _______________________________________________________________________________
Vibration_____________________________________________________________________________
Air Flow _____________________________________________________________________________
31
31
31
31
31
31
32
Mechanical Specifications ________________________________________________________________ 32
Weight ______________________________________________________________________________ 32
Dimensions ___________________________________________________________________________ 32
Appendix D - Supported Disk Drives __________________________________________________________ 33
Supported Drive List ____________________________________________________________________ 33
Appendix E - Ethernet Interface References ____________________________________________________ 34
Supported Interfaces ____________________________________________________________________ 34
Supported Protocols _____________________________________________________________________
HTTP (Web) __________________________________________________________________________
SMTP (Email)_________________________________________________________________________
SNMP Traps __________________________________________________________________________
Raidtec FS3102 Hardware Installation Guide
Version 1.0
3
34
34
34
34
Default IP Address ______________________________________________________________________ 34
Restoring Default IP Address _____________________________________________________________ 34
Raidtec FS3102 Hardware Installation Guide
Version 1.0
4
1 Preface
1.1
Introduction
This document has been produced to outline the steps required to install a Raidtec FS3102 Raid system. The
document also includes some of the features available and includes the systems specifications.
Refer to the FS3102 Management User Guide for detailed instructions on installing the Raidtec Manager TM
software.
1.2
Disclaimer
The information in this document is subject to change without notice and should not be construed as a
commitment by Plasmon Data Ltd. or its agents. Plasmon Data Ltd. assumes no responsibility for any errors
that may appear in this document except in so far as alterations may be made subsequent to receiving written
indication of the information concerned.
The product description in this document is intended solely for use in operation, installation and maintenance
of the Plasmon Data Ltd. Plasmon Raidtec FS3102 Subsystem. Use of this document for all other purposes,
without prior written approval from Plasmon Data Ltd. is prohibited.
Copyright © 2005
Plasmon Data Limited
Whiting Way, Melbourn
Nr. Royston Hertfordshire
United Kingdom SG8 6EN
All rights reserved. No part of this document may be reproduced, photocopied, stored on a retrieval system, or
transmitted without express permission of Plasmon Data Ltd.
1.3
Trademarks
FS3102 is a trademark of Plasmon Data Ltd. All other names, brands, products and services are trademarks or
registered trademarks of their respective companies.
1.4
Modifications
Changes or modifications not expressly approved by Plasmon Data Ltd. could void the user’s warranty.
Raidtec FS3102 Hardware Installation Guide
Version 1.0
5
1.5
FCC Radio Frequency Interference Statement
This equipment generates, uses, and can radiate radio frequency energy. If not installed and used in strict
accordance with the manufacturer’s instructions, it may cause interference to radio and television reception.
The limits are designed to provide reasonable protection against interference in a residential installation.
However, there is no guarantee that interference will not occur in a particular installation.
NOTE: This equipment has been tested and found to comply with the limits for a Class A computing device in
accordance with the specifications in Subpart B of Part 15 of FCC rules.
If this equipment does cause interference to radio or television reception, the user is encouraged to try one or
more of the following corrective measures:
Reorient the receiving antenna.
Relocate the computer with respect to the receiver.
Move the computer away from the receiver.
Plug the computer into a different outlet so that computer and receiver are on different branch circuits.
Consult the dealer or an experienced radio/television technician for additional suggestions.
1.6
FCC Booklet Information
The following booklet, prepared by the Federal Communications Commission, may also be helpful in
resolving interference issues:
How to Identify and Resolve Radio/TV Interference Problems.
This booklet is available from the U.S. Government Printing Office, Washington, DC 20401,
Stock No. 004-000-00345-4.
1.7
Shielded Cables
Shielded Interference Cable(s) must be used according to FCC 15.838d.
1.8
1.8.1
Compliance
CANADA:
This digital apparatus does not exceed the Class A limits for noise emissions from digital apparatus set out in
the Radio Interference Regulations of the Canadian Department of Communications.
Le présent appareil numérique n'émet pas de bruits radioélectriques dépassant les limites applicables aux
appareils numériques de la class A prescrites dans le Règlement sur le brouillage radioélectrique édicté par le
ministère des Communications du Canada.
1.8.2
EUROPE:
This device complies with EU EMC Directive 89/336/EEC and was
assessed to the requirements of the following:
EN 55022-1994+A1, A2 CISPR 22 Class A.
EN 50082-1-1997 (EN 61000-4-2,3,4,5,6,11).
This product was designed, developed, and manufactured under
an NQA registered I.S. EN ISO 9001-2000 quality system.
Raidtec FS3102 Hardware Installation Guide
Version 1.0
6
2 FS3102 System Overview
The Raidtec FS3102 2Gb FC-SATA RAID system includes the following pieces:
•
•
•
•
•
2Gb FC-SATA RAID controller that supports up to 16 SATA disk drives (only 12 are used in this
product), two 2Gb FC target interfaces using SFPs and a 1 Gb Ethernet port for connectivity
(management software and email alerts)
o 256 MB of cache memory (1 GB optional)
Battery Backup Unit (BBU) for maintaining power to the cache memory during power failures (optional)
2U 12 bay enclosure with two redundant PSU modules, three redundant fan modules and a backplane
SATA disk drives in shuttles
o Capacities supported are 250 GB, 400 GB and 500 GB
Raidtec Manager Management Software for managing the RAID system
o Java Application that runs on a host system
3 Blowers
SATA HDD 1
Dual
2 Gb FC
SATA HDD 2
Backplane
SATA II
Controller
Gigabit
Ethernet
Dual PSU
SATA HDD 12
Optional BBU
Figure 2-1: Raidtec FS3102 Block Diagram
Raidtec FS3102 Hardware Installation Guide
Version 1.0
7
3 General Precautions and Electrical
Considerations
Read all these instructions before setting up and using your system!
Follow all warnings and instructions noted on the computer and in the operating instructions.
Save these instructions for future reference.
Use of a non-interruptible power supply is strongly recommended.
Do not set up or use this device near water. Electrical shock and damage may occur if water shorts out high
voltage parts.
Do not block the enclosure vents or place this device in a built-in installation unless proper ventilation is
provided. Blocking enclosure vent could cause installed components to overheat and operate unreliably.
Avoid setting the device on a bed, sofa, carpet, pillow or other soft surfaces that can cover the enclosure vents.
Never set the device on a radiator, heat register, or other heat source.
Never insert foreign objects into the enclosure slots. Fire, electrical shock, and/or damage may occur if such
objects short out high voltage parts.
Operate the device using the correct type of AC power source, as specified on the label (typically, 115V/60Hz
in the US and Canada; 230V/50Hz in the UK and Europe).
Plug the power cord into a properly grounded electrical outlet to prevent electrical shock.
Do not use adapter plugs or remove the grounding prong.
Replace any obsolete outlet. If you use an extension cord with the system, use a 3-wire extension cord and
make sure that the extension cord’s ampere rating is sufficient to handle the load of all the equipment plugged
into it.
Use an approved surge suppresser to protect the equipment from erratic electricity supply.
Install new or replace failed disk drives with drives that are listed on the Plasmon approved drive list ONLY.
Check that the total load of all devices attached to one cord or one outlet never exceeds 15 amperes. The
wattage rating for most devices is listed on the label for the product.
Do not set any object on the power cord. Situate the power cord away from traffic areas so it will not be
stepped on or tripped over.
Prevent static electricity from permanently damaging your electronic components.
Electro Static Discharge (ESD) measures when handling components such as drives.
Observe the proper
Do not attempt to service this device yourself except as explained in the manual.
The maximum operating ambient temperature is 40˚ Celsius.
The rear of the unit should have at least 300mm clearance from any other objects for ventilation.
The power supply cord provides the safety earth connection. The power supply cord should be connected to
an outlet that is grounded in accordance with the National Electric Code (NEC).
Contact service personnel for assistance if:
•
A power cable or plug is frayed or damaged.
Raidtec FS3102 Hardware Installation Guide
Version 1.0
8
•
The device is exposed to rain or water, or liquid has been spilled into it.
•
The device is dropped or the enclosure is damaged.
•
The device does not operate normally when the operating instructions are followed.
CAUTION
RISK OF EXPLOSION IF THE NVRAM BATTERY IS REPLACED BY AN INCORRECT
TYPE.
DISPOSE OF USED BATTERIES ACCORDING TO THE INSTRUCTIONS
3.1
Cleaning Instructions
Turn off the equipment and unplug it from the electrical outlet before cleaning.
Use a damp cloth for cleaning. Never apply liquid or aerosol cleaners directly to computing devices.
If the device gets wet, unplug all system power cables and contact Plasmon Data Ltd. Technical Support for
assistance.
Raidtec FS3102 Hardware Installation Guide
Version 1.0
9
4 Safety and Emissions
4.1
Safety
The Raidtec FS3102 is certified to the following standards.
UL60950-1, CSA 22.2 No 60950-1-03, EN 60950, IEC 60950-1:2001
4.2
FC Lasers.
Warning:
Lasers can cause permanent eye damage, which may result in permanent blindness, and therefore must be treated
with respect and used with caution. This product uses lasers, which are classified as Class 1, which have a very low
output power and are considered to be non-hazardous.
The Laser used in this product is Class 1 compliant and conforms to IEC 60825-1.
4.3
Emissions
The Raidtec FS3102 is certified to the following standards.
EN 55022 Class A, FCC Class A CFR47 Part 15
4.4
Immunity
The Raidtec FS3102 is certified to the following standards.
EN 55024, EN 6100-3-2, EN 6100-3-3
4.5
Safe Handling
The product is conditioned for safe handling in regards to sharp edges and corners. Anti-static precautions should
be observed when handling the RAID controller or the disk drives.
Raidtec FS3102 Hardware Installation Guide
Version 1.0
10
5 Familiarising yourself with the system
The following section outlines the different parts of the FS3102 system.
5.1
Unpacking
Be careful when unpacking the system from its packaging and get assistance when lifting the chassis out of the
main box. Check all the items against the delivery dockets to ensure that all of the parts are present.
It is shipped in a packing carton, as depicted in Figure 5-1.
Disk Drive Box (Qty
depends on configuration)
Dummy Shuttle
(Qty depends on
configuration)
System is packed
in protective
shipping foam in
an internal box.
Accessory Box x 1
Foam packaging that
covers the system
incorporates the Rack
mounting kit.
Figure 5-1
Raidtec FS3102 Hardware Installation Guide
Version 1.0
11
5.2
What’s in the box
Table 5-1 outlines the standard kit supplied with a Raidtec FS3102.
FS3102 Enclosure x 1
Drive Shuttle
(Up to 12 depending on capacity)
Dummy Drive Shuttle
(used to fill empty drive bays)
Fibre Optic Cable (5m) x 2
PSU Cable × 2 (Country Specific)
Ethernet Cable x 1
Raidtec Manager CD
Rack Mounting Brackets (×
× 2) & Screws
(Optional)
(Refer to Rack Mount Procedure for
installation)
SFP (Optical Transceivers) x 2
(Pre-installed in Controller)
Table 5-1
Raidtec FS3102 Hardware Installation Guide
Version 1.0
12
5.3
System Views
The FS3102 system is a 2U 12 bay enclosure with two redundant PSU modules, three redundant fan modules and a
backplane.
5.3.1
System Front View
Figure 5-2
5.3.2
System LED Indicators
System Power LED
Blue = Good
Red = One PSU module not working
Check Event log
Temperature Indicator
Blue = Temperature OK
Red = Over Temperature Alarm
Check Event log
Fan Indicator
Blue = Fans Working
Red = One or more fans not working.
Check event log.
Figure 5-3 – System Indicator LEDs
5.3.2.1
Disk Drive Numbering
The disk drives are numbered in the following sequence (as you are looking at the front of the system);
Bay 1
Bay 5
Bay 9
Raidtec FS3102 Hardware Installation Guide
Bay 2
Bay 6
Bay 10
Bay 3
Bay 7
Bay 11
Version 1.0
Bay 4
Bay 8
Bay 12
13
5.3.3
System Back View
Power Switch
Alarm Reset
FC Port A
FC Port B
Figure 5-4 – System Back View
5.3.3.1
PSU 1
PSU 2
5.3.4
PSU Module and Fan Module Numbering
Fan 1
Fan 2
Fan 3
Controller Indicators
Figure 5-5 describes what each activity light indicates. Refer to Table 5-2 for a detailed explanation of each
indicator.
Drive
Activity
Power
FCA Activity*
FCB Activity*
Ethernet
Fault
Link
Controller
Ready
Ethernet
Activity
*Note: Even though a cable may be connected, the indicator activity LED’s will only illuminate when there is
activity on that channel.
Figure 5-5 – Controller Activity Indicators
Raidtec FS3102 Hardware Installation Guide
Version 1.0
14
INDICATOR
Power
FC A Activity
COLOUR
Green
Green/Red
FC B Activity
Green/Red
Drive Activity
Fault
Controller Ready
Ethernet Link
Green
Red
Green
Green (1000BaseT)
Orange (100BaseT)
Ethernet Activity
Green
DESCRIPTION
Solid when power is available to the controller
Flashes green when there is activity on FC Port A
Solid red when FC Port A is down or unconnected
Flashes when there is activity on FC Port B
Solid red when FC Port B is down or unconnected
Flashes when there is activity on any drive
Solid if a fault is detected that activates the alarm
Solid when the controller is ready
Solid when connected to a functioning 1000BaseT or
100BaseT network.
Off when not connected or connected to a 10Base T
network.
Flashes when there is activity on the network
Table 5-2
Raidtec FS3102 Hardware Installation Guide
Version 1.0
15
6 Installing the FS3102 system
6.1
Installing Disk Drives
Note: Disk drives do not have to be installed in any particular sequence when setting up the FS3102.
Slide the lock release button to the right to release the drive tray handle, (see Figure 6-1). Using the drive tray
handle, insert the drive tray into the system with the disk facing up (see Figure 6-2). Push the drive tray all the way
in to the system and close the drive tray handle to engage the connector.
Drive Tray Handle
Lock Release Button
Figure 6-1
Figure 6-2 Drive Inserted half way in to System
Note: The drive handle mechanism is the same for both drive and dummy shuttles.
6.2
Installing SFPs (Optical transceivers)
The SFPs (Figure 6-3) are fitted to the Fibre Channel controller ports at the factory prior to shipping.
Figure 6-3 – SFP
Raidtec FS3102 Hardware Installation Guide
Version 1.0
16
In the event that the SFPs need to be changed, carry out the following procedure’s while referring to Figure 6-4
SFP
Controller
SFP Handle
Figure 6-4
6.2.1
1.
2.
6.2.2
1.
2.
SFP Removal
Remove the SFP from the controller by lowering the SFP handle to the down position.
Gripping the handle, slide the SFP out from the controller fully.
SFP Replacement
With the SFP handle in the lowered position, align the SFP to the controller port and insert fully until you
feel the connector engaging.
Turn the handle up until it clicks to the home position (ref: Figure 6-5)
SFP
Figure 6-5
6.3
Installing a Host Bus Adaptor (HBA)
Install the prescribed host bus adaptor in the host computer using the documented procedure supplied by the host
computer manufacturer.
Raidtec FS3102 Hardware Installation Guide
Version 1.0
17
6.4
Cabling the Host and the FS3102
The FS3102 has three typical configurations as follows;
Note: For descriptive reasons the Raidtec Manager is shown installed on the Host system. The Raidtec Manager
software will most likely be installed on the system administrators PC.
6.4.1
Single Port/Host DAS Configuration
Note: The Ethernet cable is used by the management software, Raidtec Manager, to communicate with the FS3102.
Host
Fibre
6.4.2
Ethernet
Dual Port, Single Host SAN configuration.
Note: The Ethernet cable is used by the management software, Raidtec Manager, to communicate with the FS3102.
Host
Fibre
Raidtec FS3102 Hardware Installation Guide
Version 1.0
Ethernet
18
6.4.3
Dual Port, Multi Host DAS Configuration.
Note: The Ethernet cable is used by the management software, Raidtec Manager, to communicate with the FS3102.
In this configuration, the computer running Raidtec Manager does not have to be part of the SAN.
Host
Host
Host
Host
Host
Host
SAN Switch
Ethernet
Note: For optimum performance, ensure that the HBA and SFPs used are 2Gb.
Raidtec FS3102 Hardware Installation Guide
Version 1.0
19
7 Configuring the FS3102
Raidtec Manager needs to be installed on an administrators PC.
Refer to the FS3102 Raid Manager User Guide for configuring the RAID storage using Raidtec Manager .
Raidtec FS3102 Hardware Installation Guide
Version 1.0
20
8 Battery Backup Unit (BBU)
The Battery Backup Unit (BBU) is an optional subsystem that provides security against data loss during power
failures. Power is provided to cache memory only so that when the system restarts, write cached data may be
written to the disk. The system detects when the power is failing and puts the cache memory into self-refresh
mode. When the system restarts, the cache memory is scanned for valid cache data. The write cache is rebuilt and
retained until the disks are ready to accept data.
8.1
Data Hold Time
The exact time the BBU will maintain the data in the cache memory is dependent on the specific cache memory
installed, the condition of the battery, the amount of charge in the battery and the temperature of the BBU. The
BBU is designed to supply current to the cache memory for a minimum of 72 hours at 25°C ambient when fully
charged.
8.2
Maximum Memory Current
The BBU is designed with 4200mAh capacity batteries. The batteries are organized in 2 packs of 6 batteries, 1
pack per controller. Each pack includes a smart battery function, using a gas gauge device to control the battery
critical information.
The maximum current that can be supplied for self refresh operations and still meet the 72 hour specification at end
of battery life is 133mA per controller.
8.3
Battery Pack Replacement Policy
The battery pack replacement policy is based on the available remaining capacity. The firmware will check the
available capacity and send an alert to notify the administrator to change the battery pack if remaining capacity
falls below 80% of the design capacity.
Under normal operation, a battery pack should last 2 to 3 years before it needs to be replaced.
8.4
BBU Indicators
INSERT BBU
PICTURE
The back of the BBU has 2 sets of LEDs, one set for each battery pack.
INDICATOR
Charge/Full
COLOUR
Green/Yellow
Replace
Red
Raidtec FS3102 Hardware Installation Guide
DESCRIPTION
Solid green when the battery pack is fully charged
Solid yellow when the battery pack is charging
Solid red when the battery pack needs replacing
Version 1.0
21
9 Field Replaceable Units (FRUs)
The following table of components shows the field customer replaceable units (FRUs) in the system.
FRU NAME
DESCRIPTION
Controller
SFP
RAID controller
Fibre Channel
Transceiver
Power supply
module
Disk Drive
Cooling fan
Battery Backup Unit
BBU Battery Pack
PSU
Disk
Fan
BBU (optional)
Battery Pack
(optional)
NUMBER IN
SYSTEM
1
2
ONLINE
REPLACEABLE
No
Yes
CUSTOMER
REPLACEABLE
Yes
Yes
2
Yes
Yes
12 (maximum)
3
1
1
Yes
Yes
Yes
Yes
Yes
Yes
Yes
Yes
Please refer to Technical Support for advice on replacing any parts other then the disks on a FS3102.
Raidtec FS3102 Hardware Installation Guide
Version 1.0
22
10 Plasmon Technical Support.
If you have any questions, problems, or suggestions, you can reach Plasmon Technical Support in any of the
following ways:
Plasmon Tech Support
Plasmon (Europe)
By E-mail.
By telephone.
By FAX.
[email protected]
+44 (0)1763 262963
+44 (0)1763 264407
Raidtec FS3102 Hardware Installation Guide
Version 1.0
23
Appendix A - Alerts
Failure Events
The following table summarizes the operation of the system in the presence of various failures.
Email refers to an email notification sent by the controller over the Ethernet interface to an assigned email address,
SNMP refers to an SNMP trap sent by the controller over the Ethernet interface to a designated SNMP recipient
and Event log refers to an event logged in the Alert Log in the Raidtec Manager Management Software.
FAILURE
CLASS
Power
(BBU Not
present)
FAILURE
TYPE
Total Loss
Power
(BBU Not
present)
Transient
Loss
Power
(BBU Present)
Total Loss
Power
(BBU Present)
Transient
Loss
Disk
(RAID Level 1,
5 or 10)
Drive
removed or
drive failure
No effect.
RAID volume
degraded.
Disk
(RAID Level 0)
Drive
removed or
drive failure
Advanced
drive failure
notice
RAID is
inaccessible
No effect
No effect
Advanced
drive failure
notice
Medium
Error
No effect
No effect
Disk
(RAID Level 1,
5 or 10)
Disk
(RAID Level 0)
Disk
(RAID Level 1,
5 or 10)
EFFECT ON
DATA
Data may be
lost if write
cache is
enabled
Data may be
lost if write
cache is
enabled
No effect
provided
outage is
shorter than
BBU hold time
No effect
Raidtec FS3102 Hardware Installation Guide
EFFECT ON
AVAILABILITY
System unavailable
EFFECT ON
PERFORMANCE
N/A
USER
NOTIFICATION
Event log
System unavailable
during power loss.
Controller takes 7
seconds to reboot and
60 seconds for the
system to become
available.
System unavailable
N/A
Event log
N/A
Event log
N/A
Event log
Performance may
drop
Event log, Email
and SNMP
N/A
Event log, Email
and SNMP
Event log, Email
and SNMP
No effect
Performance will
drop if spare is
available to rebuild
the failing drive to
None
Stripe will be rebuilt
on alternate sectors.
Performance may
drop
System unavailable
during power loss.
Controller takes 7
seconds to reboot and
60 seconds for the
system to become
available.
Loss of high
availability. System
will become
unavailable on
second failure.
RAID unavailable
Version 1.0
Event log, Email
and SNMP
Disk statistics
updated in
controller
If threshold met,
Event log, Email
and SNMP
24
FAILURE
CLASS
Disk
(RAID Level 0)
FAILURE
TYPE
Medium
Error
EFFECT ON
DATA
Data loss
EFFECT ON
AVAILABILITY
None except for the
data loss
EFFECT ON
PERFORMANCE
None
Link
FC link total
failure
No effect
N/A
Link
FC link
transient
parity errors
No effect
System unavailable
unless alternate SCSI
path is used in cluster
configuration.
System remains
available
Backplane
(RAID Level 1,
5 or 10)
SATA link
failure
No effect
RAID volume
degraded
Backplane
(RAID Level 0)
Backplane
(RAID Level 1,
5 or 10)
SATA link
failure
SATA link
degraded
RAID is
inaccessible
No effect
Backplane
(RAID Level 0)
SATA link
degraded
Enclosure
Loss of high
availability, system
may become
unavailable on
second failure
RAID unavailable
Performance will
drop as command
timeouts, bus resets
and retries occur
Performance may
drop.
Event log, Email
and SNMP
N/A
Event log, Email
and SNMP
Disk statistics
updated in
controller
If threshold met,
Event log, Email
and SNMP
Disk statistics
updated in
controller
If threshold met,
Event log, Email
and SNMP
Event log, Email
and SNMP
Event log, Email
and SNMP
No effect
Performance may
drop.
No effect
No effect
Performance may
drop.
Fan Failure
No effect
No effect
Enclosure
PSU module
failure
No effect
BBU
BBU failure
No effect
Controller
Hardware
failure
Software
failure,
controller
reboot
User data loss
is possible
No effect
User data is
maintained in
cache during
controller
reboot
System availability at
risk until fan replaced
System availability at
risk until PSU
module replaced
User data at risk from
transient power
failure if write
caching is enabled.
System unavailable
System unavailable
during controller
reboot. Controller
takes 7 seconds to
reboot and 60
seconds for the
system to become
available.
Controller
Raidtec FS3102 Hardware Installation Guide
USER
NOTIFICATION
Disk statistics
updated in
controller
If threshold met,
Event log, Email
and SNMP
Event log, Email
and SNMP
No effect
Event log, Email
and SNMP
No effect
Event log, Email
and SNMP
N/A
Event log
Performance may
drop if command
timeouts occur.
Event log, Email
and SNMP
Version 1.0
25
Alert Messages
The following Notifications and Warnings are sent by the controller.
Notifications
Normal operation of power supply in slot <number> restored
Normal operation of fan in slot <number> restored
The temperature in the system is now within the acceptable range
Creating RAID ‘<name>’, useable capacity: <capacity> GB
RAID ‘<name>’ is now accessible
Initialising RAID ‘<name>’
Initialisation of RAID ‘<name>’ deferred for a higher priority RAID
RAID ‘<name>’ initialisation complete
Deleting RAID ‘<name>’
Expanding RAID ‘<name>’ by adding rows
Expanding RAID ‘<name>’ by adding <number of columns> column(s)
Initialising expansion space on RAID ‘<name>’
RAID ‘<name>’ expand complete
Rebuilding RAID ‘<name>’
Rebuild of RAID ‘<name>’ deferred for a higher priority RAID
RAID ‘<name>’ rebuild complete
Disk in bay <number> is no longer part of RAID ‘<name>’
Verifying RAID ‘<name>’
Verification of RAID ‘<name>’ deferred for a higher priority RAID
RAID ‘<name>’ verification complete
Logical volume '<name>' created
Logical volume '<name>' deleted
Logical volume '<name>' capacity expanded to <capacity>
Logical volume '<name>' ID:LUN changed to <SCSI ID>:<LUN>
Logical volume '<name>' changed to '<new name>'
Starting Firmware <version> (<build time and date>) reboot <reboot count>
Network up at IP address <IP address>, netmask <netmask>
Password has changed
Fibre Channel Port <port> is up at <speed> Gb in <fibre channel mode> mode
Warnings
Disk in bay <number> is missing
Disk in bay <number> has excessive errors
Disk in bay <number> is running out of reallocation blocks
Disk in bay <number> has run out of reallocation blocks
Disk in bay <number> has failed
Power Supply Module in slot <number> is not working properly
Fan in slot <number> is not working properly
The temperature in the system has exceeded <threshold value> threshold
The temperature in the system has dropped below 10C/50F
RAID ‘<name>’ initialisation failed to complete
RAID ‘<name>’ verify failed to complete
RAID ‘<name>’ expand failed to complete
RAID ‘<name>’ rebuild failed to complete
RAID ‘<name>’ is degraded due to disk failures
RAID ‘<name>’ is inaccessible due to disk failures
RAID ‘<name>’ has no suitable spare available
Cannot start scheduled verify on RAID ‘<name>’
Controller hardware error
Firmware download checksum failed, the binary may be corrupted
Firmware ID does not match, the binary is not for this product
Raidtec FS3102 Hardware Installation Guide
Version 1.0
26
An attempt to write flash memory failed
The serial number on this system is incorrect
NVRAM checksum invalid, restoring default settings
NVRAM battery is exhausted and needs replacement
Fibre Channel Port <port> link error
Fibre Channel Port <port> is down
Raidtec FS3102 Hardware Installation Guide
Version 1.0
27
Appendix B - RAID Features
RAID Levels
The controller supports RAID levels 0, 1, 5 and 10.
NOTE: RAID level 1 and RAID level 10 are functionally equivalent. RAID level 1 is used when the RAID is built
with 2 drives, RAID level 10 when more than 2 drives are used.
Logical Volumes
The controller supports up to 1024 independent logical volumes. Each logical volume will be identified by a LUN.
The controller only supports a single node name.
RAID Creation
RAIDs and logical volumes are created and managed using the Raidtec Manager management software. When a
RAID level 5 is created, the parity in the volume must be initialized. The RAID controller will read every stripe,
calculate parity and write the parity. This can take several hours depending on the capacity of the disks. The RAID
is made available from when it is created, but full performance is not achieved until the RAID is fully initialized.
NOTE: 2 GB of each disk is reserved for reallocated blocks by the controller. Therefore the capacity formed will
be slightly less than the nominal capacity available from the drives.
NOTE: Usable drive capacities are fixed to allow drives to be used from different manufacturers. The result is that
some capacity may be lost due to the difference in actual capacities between different manufacturers even though
the nominal capacity is the same.
NOTE: If the disks that are being used to form the RAID have different capacities, the RAID will be created using
the smallest disk capacity of the different disks. Additional capacity on larger disks will be lost.
RAID Expansion
The Raidtec FS3102 system supports online expansion of the RAID. This expansion is accomplished in two
possible ways, by row or by column. The controller decides what the best way of expanding the RAID is. The user
does not have the ability to choose the expansion method.
Expansion By Row
The RAID will be expanded by row if possible. To expand by row, the number of disks that are being added to the
RAID must be the same number that are in the RAID that is being expanded. The RAID will be expanded by
adding an additional row of disks to the RAID. The number of columns in the RAID will remain the same. If the
original RAID was level 5, the controller will have to initialize parity for the new row.
NOTE: If the disks that are being used to form the additional row have different capacities, the row will be
expanded using the smallest disk capacity of the disks being added. Additional capacity on larger disks will be
lost. The capacity of the disks in the new row can be different from the first row of disks.
Expansion By Column
Raidtec FS3102 Hardware Installation Guide
Version 1.0
28
If there are insufficient disks to form an entire new row, the RAID will be expanded by adding columns to the
stripe. This involves adding extra disks to each row (this will be a single row unless the RAID has already been
expanded by adding an additional row). When this is done, a re-striping operation is necessary. The system reads
each stripe in turn and writes it to an expanded stripe. This is a time consuming operation.
NOTE: Expansion by column will expand the RAID using the same disk capacity that was used in the existing
columns. If the disks that are being used to expand the RAID have smaller capacities than the columns already in
the RAID, the expansion will not be allowed. If the disks that are being used to expand the RAID have larger
capacities than the columns already in the RAID, the additional capacity on the larger disks will be lost.
RAID Verify
A RAID level 5 may be checked for valid parity by initiating a verify operation. The system reads each stripe and
checks for valid parity. At the end of the verify process the system sends an Alert if any stripes were found with
invalid parity.
Stripe Size
Each RAID can consist of up to a maximum of 12 disks.
Stripe Unit Size
The stripe unit size is set by the profile. See the Raidtec Manager specification for more details.
Caching
The Raidtec FS3102 comes with 256 MB of cache memory as standard. The system supports up to 1 GB as an
option. The cache memory is used for both read and write data. There are three kinds of caching implemented by
the system firmware.
Read Cached Data
The system records the number of read and write commands that occur in the same physical stripe. When the
number of commands exceeds a preset threshold, the system will allocate storage space to cache this data. This
increases performance because subsequent read operations can be serviced from memory instead of reading from
the disk.
Streaming Read Data
The system records the starting block and block size of each SCSI command received. When the start block of a
new command matches the last block of a previous command the system detects that there is a stream of
commands in progress and prefetches data up to 16 times the size of the original command. This increases
performance by lowering the latency of subsequent commands in the stream.
Write Cached Data
When write caching is enabled, good status is returned immediately, before the data is written to disk. This
increases performance in two ways. Firstly it lowers command latency to the host. Secondly, by coalescing
contiguous write data into larger segments before it is written to disk, seeks are reduced and bandwidths increased.
Raidtec FS3102 Hardware Installation Guide
Version 1.0
29
NOTE: If write caching is enabled, data may be lost if power is removed prior to the data being written to the
disks. If write caching is enabled, a UPS or/and a BBU should be used in the system.
Auto Rebuild
The Raidtec FS3102 has 3 rebuild options if a RAID becomes degraded. These are disabled, priority and
background. These options can be set from Raidtec Manager. Background is the default setting. The RAID can
still be accessed during a rebuild, but performance will be reduced.
If a verify is scheduled when a rebuild is in progress, the verify will not take place.
Disabled
If Auto Rebuild is set to Disabled, the RAID will not rebuild unless the administrator manually selects Rebuild in
Raidtec Manager. If a RAID becomes degraded, an alert will still be generated even if Auto Rebuild is set to
disabled.
Priority
If Auto Rebuild is set to Priority, the RAID will rebuild as quickly as possible while still allowing reading and
writing to occur. Read and write performance may be substantially reduced from normal operation.
Background
If Auto Rebuild is set to Background, the RAID will rebuild, but priority will be given to normal read and write
operations. If there is a high level of read and write activity, the rebuild may take a long time.
Raidtec FS3102 Hardware Installation Guide
Version 1.0
30
Appendix C - System Specifications
Electrical Characteristics
Voltage Rating
90 VAC to 264 VAC
Single phase, 47 Hz to 63 Hz
Power supplies are autoranging
Current Consumption
115 VAC – 8 A maximum
230 VAC – 5 A maximum
Power Consumption
350 W maximum (fully populated enclosure)
Environmental Conditions
Temperature
•
•
10ºC to 40ºC (50ºF to 104ºF) – operating
-30ºC to 60ºC (-22ºF to 140ºF) – non-operating
Relative Humidity
•
Non-condensing, 10% to 90% - operating and non-operating
Altitude
•
•
0 to 3050 m (10,000 ft) – operating
0 to 12200m (40,000 ft) – non-operating
Shock
•
•
5g, 11 msec half sine - operating
20 g, 11 msec half sine - non-operating
Vibration
•
•
0.2 g, 5-500-5 Hz swept sine - operating
1 g, 5-500-5 Hz swept sine - non-operating
Raidtec FS3102 Hardware Installation Guide
Version 1.0
31
Air Flow
Front to back
Cooling must be provided to ensure internal temperature is maintained below 55ºC. The unit should be kept in a
dust-filtered environment to ensure long life for the cooling fans.
Mechanical Specifications
Weight
All 12 disks installed (without packaging): 25 kg (55 lbs) maximum
Dimensions
The Raidtec FS3102 is a 2U high, standard rackmount width product.
Height: 88 mm (3.5 in)
Width: 443 mm (17.5 in) – not including mounting brackets
Depth: 551 mm (21.7 in) – enclosure only, does not include anything that protrudes out from the front or back of
the enclosure.
Raidtec FS3102 Hardware Installation Guide
Version 1.0
32
Appendix D - Supported Disk Drives
Supported Drive List
The controller is pre-configured with a list of supported disk drive types. Only supported disk drive types can be
used in the system.
The following capacities, manufacturers and models are currently supported. Other disk drives may be supported
in the future.
CAPACITY
250 GB
250 GB
250 GB
250 GB
400 GB
400 GB
500 GB
MANUFACTURER
Seagate
Maxtor
Maxtor
Hitachi
Seagate
Hitachi
Hitachi
MODEL
ST3250832AS
7Y250M0
7L250S0
HDS722525KLSA80
ST3400832AS
HDS724040KLSA80
HDS725050KLA360
If a disk drive that is not supported is put in the system, the disk cannot be used as part of a RAID or for assigning
as a local or global spare.
Raidtec FS3102 Hardware Installation Guide
Version 1.0
33
Appendix E - Ethernet Interface References
Supported Interfaces
The Ethernet interface supports 10, 100 and 1000 base T full duplex connections. Connection speed is determined
automatically.
Supported Protocols
HTTP (Web)
HTTP is used by the Raidtec Manager Management Software to remotely monitor and manage the system. The
version of the protocol supported is HTTP 1.0.
Please refer to the FS3102 Installation and User Guide.
SMTP (Email)
SMTP is used to send email alerts. Alerts are described in Appendix A. SMTP alert notification can be enabled
from Raidtec Manager.
SNMP Traps
SNMP traps can be used to send alerts. A single trap type is used for all events. This trap contains a variable
binding which contains the alert as described in Appendix A. SNMP traps can be enabled from Raidtec Manager.
See the Raidtec Manager specification for details.
Default IP Address
If no IP address has been previously assigned and DHCP is not enabled, the Raidtec FS3102 system will use
169.254.XXX.YYY as the default IP address, where XXX.YYY is derived from the serial number of the
controller. The IP address may be changed through the serial port or by using Raidtec Manager after connecting to
the system by manually selecting the default IP address and setting the NetMask to 255.255.0.0.
To connect to the system using the default IP address, it may be necessary to reconfigure the network adaptor on
the computer that has Raidtec Manager installed to access the default IP address and NetMask. After changing the
IP address, the Raidtec FS3102 system should be power cycled to reset the IP address. Raidtec Manager should
also be closed and restarted to search for the IP address of the system.
Restoring Default IP Address
To restore the Raidtec FS3102 controller back the default IP address, press and hold the reset button on the
controller while powering the system up. This restores the default IP address and netmask, enables DHCP and
resets the password back to ‘admin’.
Raidtec FS3102 Hardware Installation Guide
Version 1.0
34
A
G
R
Alerts .................................... 24
Auto Rebuild ........................ 30
General Precautions and
Electrical Considerations .... 8
B
H
RAID ..7, 10, 22, 24, 25, 26, 28,
29, 30, 33
RAIDserver-TFX ..................... 1
Raidtec Manager TM .............. 20
Battery Backup Unit ............. 21
Host Bus Adaptor (HBA) ..... 17
C
I
Cabling ................................. 18
Caching................................. 29
Compliance............................. 6
Configuring the FS3102 ....... 20
Controller Indicators............. 14
Installing ............................... 16
Installing the SFP’s............... 16
Safety and Emissions ............ 10
Single Port/Host DAS ........... 18
Specifications........................ 31
Stripe Size............................. 29
Supported Drive List............. 33
L
T
Led Indicators ....................... 13
Technical Support ................. 23
Trademarks ............................. 5
D
Disk Drive .......................13, 22
Dual Port............................... 19
E
Environmental Conditions .... 31
Expansion ........................28, 29
F
FC Lasers.............................. 10
FCC ........................................ 6
FS3102 System Overview ...... 7
S
M
Mechanical Specifications .... 32
Modifications.......................... 5
U
Unpacking............................. 11
N
V
Notifications ......................... 26
Views .................................... 13
P
W
PSU Module ......................... 14
Warnings............................... 26
Raidtec FS3102 Hardware Installation Guide
Version 1.0
35