1
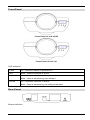
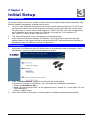
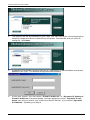
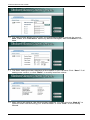
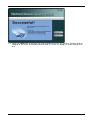
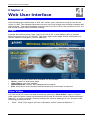
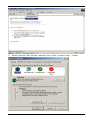
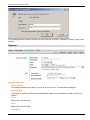
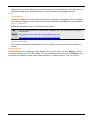
Internet Camera
ICA-101/ICA-101W
User’s Manual
Copyright
Copyright (C) 2003 PLANET Technology Corp. All rights reserved.
The products and programs described in this User ’s Manual are licensed products of PLANET
Technology, This User’s Manual contains proprietary information protected by copyright, and
this User’s Manual and all accompanying hardware, software, and documentation are copyrighted.
No part of this User’s Manual may be copied, photocopied, reproduced, translated, or reduced
to any electronic medium or machine-readable form by any means by electronic or mechanical.
Including photocopying, recording, or information storage and retrieval systems, for any purpose other than the purchaser's personal use, and without the prior express written permission
of PLANET Technology.
Disclaimer
PLANET Technology does not warrant that the hardware will work properly in all environments
and applications, and makes no warranty and representation, either implied or expressed, with
respect to the quality, performance, merchantability, or fitness for a particular purpose.
PLANET has made every effort to ensure that this User ’s Manual is accurate; PLANET disclaims liability for any inaccuracies or omissions that may have occurred.
Information in this User’s Manual is subject to change without notice and does not represent a
commitment on the part of PLANET. PLANET assumes no responsibility for any inaccuracies
that may be contained in this User ’s Manual. PLANET makes no commitment to update or keep
current the information in this User ’s Manual, and reserves the right to make improvements to
this User’s Manual and/or to the products described in this User ’s Manual, at any time without
notice.
If you find information in this manual that is incorrect, misleading, or incomplete, we would
appreciate your comments and suggestions.
CE mark Warning
The is a class B device, In a domestic environment, this product may cause radio interference,
in which case the user may be required to take adequate measures.
Trademarks
The PLANET logo is a trademark of PLANET Technology. This documentation may refer to
numerous hardware and software products by their trade names. In most, if not all cases, these
designations are claimed as trademarks or registered trademarks by their respective companies.
Revision
User’s Manual for PLANET Internet Camera:
Model: ICA-101/ICA-101W
Rev: 1.0 (May 2003)
Part No. EM-ICA101
ii
TABLE OF CONTENTS
CHAPTER 1 INTRODUCTION ...................................................................................... 1
ICA-101/ICA-101W Features ................................................................................. 1
Package Contents ................................................................................................. 2
Physical Details..................................................................................................... 2
CHAPTER 2 INSTALLATION........................................................................................ 5
Requirements ........................................................................................................ 5
Connecting ICA-101 series to the Camera Stand............................................... 5
Hardware Install Procedure.................................................................................. 6
CHAPTER 3 INITIAL SETUP ........................................................................................ 7
Preparation ............................................................................................................ 7
Procedures ............................................................................................................ 7
CHAPTER 4 WEB USER INTERFACE ....................................................................... 12
Introduction ......................................................................................................... 12
Login .................................................................................................................... 12
View Video ........................................................................................................... 12
Administration..................................................................................................... 15
CHAPTER 5 CLIENT UTILITY .................................................................................... 26
Install Procedure ................................................................................................. 26
Using Viewer & Recorder Utility ........................................................................ 28
APPENDIX A FREQUENTLY ASKED QUESTIONS .................................................. 33
APPENDIX B TROUBLE SHOOTING......................................................................... 34
APPENDIX C SPECIFICATION................................................................................... 36
i
Chapter 1
Introduction
1
As broadband communication gets more and more popular, transferring video and
audio through networks has become a major issue. The ICA-101 family provides an
advanced Internet Camera solution, supporting wired or wireless Ethernet networking.
The ICA-101/ICA-101W can be placed wherever there is a wired/wireless LAN or an
available xDSL/Cable modem connection, and the ICA-101 family also supports DDNS.
Even when your gateway does not support DDNS, it can still co-operate with the ICA101 family and provide live images to Internet users.
The ICA-101 family uses advanced MPEG-4 video compression technology. An advanced microcomputer is integrated into this camera to digitize live video, and then
compress the video stream using MPEG-4. The high compression capabilities of
MPEG-4 reduce network bandwidth requirements to amazingly low levels. With their
Plug-N-Watch capability, a network administrator or system operator can seamlessly
complete network deployment in just minutes!
ICA-101/ICA-101W Features
Simple to use
Plug-N-Watch capability to simplify system integration in an existing network environment
Suitable for home, business, or public facilities
The ICA-101 family can be deployed in many different situations and reduce the cost
of human resources, offering flexibility, affordability, and reliability for surveillance of
manufacturing and other facilities.
Remote Monitoring and Management.
ICA-101 series can fully integrate with your network. By the conveniences of world
wide Internet, you can do the monitoring anywhere. Via add-on utility, network administrators can decide whether individuals or the whole team may access ICA-101 series.
Multi-user password protection support offers more flexibility while managing ICA-101
series.
Multiple platform support
Supports TCP/IP networking, SMTP e-mail, HTTP, PPPoE and other Internet related
protocols. The ICA-101 family can be applied and utilized in a mixed operating system
network environment.
Easy configuration
The network administrator can configure and manage ICA-101 family via Windowsbased utility or web interface.
1
Internet Camera User Guide
Bundled recording utility
Provides the convenience to schedule your recording plan.
Motion detection
Monitoring any suspicious movement in specific area.
DDNS support
In order to view video over Internet, the user must know the Internet IP address of the
gateway used by the camera. If the gateway has a dynamic IP address, DDNS (Dynamic DNS) is required. Since many gateways do not support DDNS, this function is
incorporated into ICA-101 family.
Audio support
With an external microphone attached, audio can be recorded with live images.
Package Contents
The following items should be included:
• Internet Camera unit
• Camera Stand Accessory
• Power Adapter
• CD-ROM
• Quick Installation Guide
If any of the above items are damaged or missing, please contact your dealer immediately.
Physical Details
2
Front Panel
Front Panel of ICA-101W
Front Panel of ICA-101
LED definition:
PWR
On - Internet Camera is powered on.
ACT
Blink - Internet Camera is active.
LAN
On – LAN port is active.
Blink – Data is transferring via LAN port.
WLAN
On – Wireless interface is active.
Blink – Data is transferring via wireless interface.
Rear Panel
Button definition
3
Internet Camera User Guide
Reset Button
This button has two (2) functions:
•
When pressed and released, Internet Camera will
reset (restart).
•
When reset button is pressed over 3 seconds and
then release. ALL data will be clear and restore ALL
settings to the factory default values.
.
4
2
Chapter 2
Installation
Requirements
ICA-101
ICA-101W
Network Environment
LAN
10/ 100M Ethernet
10/ 100M Ethernet
IEEE 802.11b Wireless LAN
Monitoring System Recommended
System Hard- •
ware
•
•
CPU: Pentium II, 266 MHz or above
Memory Size: 32 MB (64 MB recommended)
VGA card resolution: 800x600 or above
System Requirement for Viewer & Recorder Application
Support OS
Win 98 SE, Win 2000, Win Me, Win XP
System
Hardware
•
CPU: Pentium III, 450 MHz or above
•
Memory Size: 128 MB (256 MB recommended)
•
VGA card resolution: 800x600 or above
Connecting ICA-101 series to the Camera Stand
ICA-101 series comes with a camera stand accessory with a swivel ball screw head
that can be attached to ICA-101 series' bottom screw hole. Attach the camera stand to
ICA-101 series and station it for your application. There are three holes located in the
base of the camera stand allowing ICA-101 series to be mounted on the ceiling or any
wall securely.
5
Internet Camera User Guide
Hardware Install Procedure
1.Connect an Ethernet cable
Connect one end of an Ethernet cable to the LAN port located on the ICA-101/101W
rear panel and attach the other end to the network device (hub or switch). If you want
to use wireless connection for ICA-101W, you can skip this step.
2.Attach the external power supply
Connect the provided power adapter to the ICA-101’s connector labeled "5VDC" on
rear panel.
3.Check the LEDs
The PWR would flash for few seconds to detect network connection. The network
indication LEDs (LAN or WLAN) would be on depending on which network type is
available.
6
Chapter 3
Initial Setup
Preparation
3
The initial setup of ICA-101 series must be done through bundled Setup Wizard utility.
Before starting installation, please ensure that:
•
Your PC can establish a physical connection to the Internet Camera. The PC and
the Internet Camera must be directly connected (using the LAN port on the Internet Camera) or on the same LAN segment. That is, the PC must be configured to
an IP address and subnet mask in 192.168.0.x segment. For example: IP:
192.168.0.2, subnet mask: 255.255.255.0.
•
The Internet Camera must be installed and powered ON.
•
If the Internet Camera's default IP Address (192.168.0.20) is already used by
another device, the other device must be turned OFF until the Internet Camera is
allocated a new IP Address during configuration.
Procedures
1. Insert the CD-ROM into the CD-ROM drive to initiate the autorun program. Once
completed, a menu screen would appear as follow.
2. Click on Setup Wizard hyperlink to activate the initial setup.
If the above screen is not shown, you can start the installation as follows.
• Click on Start Menu/ Run.
• Enter “D:\Utility\wizard.exe” in the appeared box, where “D” is the letter of your
CD-ROM drive.
• Click on “OK” button.
3. Once the wizard is activated, it would search available camera automatically.
7
Internet Camera User Guide
4. The screen will list all cameras in your LAN. You can view their current settings by
selecting respective Device Name from left panel. Choose the one you want to
configure, click Next.
5. A password verification screen will pop up. Please key in administrator name and
password for login. The default strings are admin/admin.
6. In the next screen, you can select “Fixed IP Address” or “Dynamic IP Address”.
Fixed IP Address is recommended, and can always be used. Dynamic IP Address can only be used if your LAN has a DHCP Server. If you select “Dynamic
IP Address”, please go to step 8.
8
7. Enter the desired network settings: IP Address, Subnet Mask, and Default Gateway. Click “Next” to proceed.
8. If you are using ICA-101, please skip to step 10. This screen allows you to configure wireless settings: Mode, Authentication Type, ESSID, Domain, and Channel.
Enter appropriate values in each field, then click “Next”.
9. WEP key settings are used to secure your wireless connection. Enter the suitable
settings in each field, then click “Next”.
9
Internet Camera User Guide
10. The next screen allows you to enter a suitable Description, and set the correct
Date, Time, and Time Zone. Make any desired changes, then click Next to continue.
11. The Save settings screen displays all the details of your camera. Click “Save” if all
settings are correct, or click “Back” to modify incorrect values.
12. After saving all settings, the follow screen appears. You can click the “Web UI” to
connect to the camera using your Web Browser, or click “Exit” to close Setup
Wizard.
10
13. Click on “Web UI” to access the web interface of ICA-101 series. Please refer to
chapter 4 for more information about web UI. Click on “Exit” to close Setup Wizard.
11
Internet Camera User Guide
Chapter 4
Web User Interface
4
Introduction
After finishing the initial setup of ICA-101 series, your camera is ready to use for all
users in LAN. This chapter describes how to view live image and manage camera with
web browser. The demonstration screens are from ICA-101W, the screens of ICA-101
are similar except some wireless settings.
Login
Activate the web browser, type “http://192.168.0.20” in the address box to access
Welcome page of ICA-101 series. The lower right of the page shows information of
Device Name, Description, and IP Address.
There are four options which are available for all screens:
• Home: return to Welcome page.
• View Video: view live images.
• Administration: access the management screens.
• Exit: close the current screen and terminate the connection to camera.
View Video
You can view live video via web browser by selecting “View Video” option. Please
note that this option needs to download and install an ActiveX control “NetCamPlayerweb.ocx” to your computer. Please change the security settings of your browser with
following procedures first.
1. Click “Tools” from upper tool bar of browser, select “Internet Options…”.
12
2. Select “Security” tab, choose “Internet” zone. Click “Custom Level…” button.
13
Internet Camera User Guide
3. Find the settings of “Download unsigned ActiveX controls”, change the option to
“Prompt”.
4. Click “OK” button.
5. Click “Yes” while Warning dialog box appears.
6. Click “Apply”, then “OK” button to finish the setting.
After the setting is done, a “Security Warning” dialog box would appear while you
select “View Video”. Ensure the path and the ocx file name is correct, then click “Yes”
to continue.
14
Once the installation is successfully finished, you will see the live video immediately.
Administration
Once you click “Administration” option, a dialog box will pop up. Please enter default
username/password as admin/admin to access the management screens.
15
Internet Camera User Guide
The management screens contain 5 sub-screens: System, Network, Image, User, and
Status.
System
System Settings:
Device Name:
This field displays the name of your ICA-101 series. It cannot be changed.
Description:
This field is used for entering a descriptive name for the location used by ICA-101
series.
Time:
Enter the current time.
Date:
Enter the current date.
Timezone:
16
Select the time zone where you are locating from the drop-down list. If you are in a
daylight saving area, check the box in front of “Adjust for daylight saving”.
NTP:
Time Server:
Enable or disable the Time Server feature as required. If enabled, ICA-101 series
will contact a Network Time Server at regular intervals and update its internal time.
Server Address:
Enter the Address of the Time Server in this field.
M
Please find below NTP server web address for your reference to set the
time server.
Note http://www.eecis.udel.edu/~mills/ntp/clock1.htm
http://www.eecis.udel.edu/~mills/ntp/clock2.htm
Update Schedule:
This option determines how often ICA-101 series synchronizes its time with time
server.
Apply/Cancel:
After making sure all settings in the System are correct, click on the “Apply” icon to
store the settings for ICA-101 series. You can alternatively click on the “Cancel” icon
to restore all settings to the values last saved to or retrieved from ICA-101 series.
17
Internet Camera User Guide
Network
IP Setting:
There are two options to select from the IP setting.
M
Note
Access to ICA-101 series is done through assigning a proper IP address.
Please make sure to use a vacant IP address when you assign the IP address for ICA-101 series. This will prevent errors from occurring if the IP
address is overlapped.
Obtain Address Automatically (DHCP):
If your network already exists a DHCP server, you can select this option for ICA101 series to get an IP address automatically.
Fixed IP Address:
You can select this option and directly enter the network settings.
18
The default settings are as follows:
· Default IP – 192.168.0.20
· Subnet Mask – 255.255.255.0
Wireless Setting: (ICA-101W only)
Mode:
Use this option to determine the type of wireless communication for ICA-101W.
There are two choices of Infrastructure, and Ad-hoc. The default setting for the
Connection Mode is Infrastructure.
Authentication Type:
Select appropriate authentication type, Open System or Shared Key, which
matches with your current wireless network.
ESSID:
This field is used to setup which wireless network (ESSID: Extended Service Set ID)
ICA-101W is to be connected for communication. The ESSID is a unique identifier
shared among all points in a wireless network environment. The default ESSID is
ANY, which will let ICA-101W connect to ANY access point under Infrastructure
mode. To connect ICA-101W to a specific access point on the network, make sure
to set ESSID of ICA-101W the same as the AP’s ESSID for communication. Type
any string up to 32 characters long (spaces, symbols, and punctuation are not allowed) in the ESSID box.
To connect ICA-101W to an Ad-hoc wireless workgroup make sure to set the same
wireless channel and ESSID to match with the PC/Notebook wireless channel and
ESSID for direct wireless communication under the Ad-hoc wireless workgroup.
Domain:
This option allows you to change the wireless domain of ICA-101W freely.
Channel No:
The pull down menu provides the wireless channel for communication. A "channel"
is a range of frequencies to be used in communication between ICA-101W and Access Point in Infrastructure mode or ICA-101W and PC/Notebook in Ad-hoc mode.
Select the appropriate channel from the drop-down list.
WEP:
The current WEP status is shown here. To configure WEP settings, please click
“Configure WEP” button.
19
Internet Camera User Guide
WEP Key Setting:
WEP Encryption: Select the option used on your Wireless LAN.
None - This is the default setting. If selected, data is not encrypted before being
transmitted.
64 Bit Keys - If selected, data is encrypted with the 64-bit default key you entered below.
128 Bit Keys - If selected, data is encrypted with the 128-bit default key you entered below.
Passphrase: Enter a phrase in this field, then click “Generate” button. ICA101W will generate 4 key values automatically.
Default Key: Specify a key value as default WEP key.
Key Value: If WEP Encryption is enabled, you must enter at least one key value.
All transmissions are encrypted with Default Key. Other wireless stations must
use the same key value in the same position of their key table. (It does not have
to be selected as the default key.)
The other key values are optional, and are used only for decrypting data. This allows you to use different keys for transmitting and receiving, if required.
When inputting a key value, follow these rules:
• For 64 Bit Encryption, keys must be 10 characters.
• For 128 Bit Encryption, keys must be 26 characters.
Keys must be entered in Hex characters, which are A ~ F, and 0 ~ 9
DDNS:
DDNS:
20
Enable or disable DDNS function.
Service Provider:
Choose a service provider from the list. ICA-101 series only supports DynDNS currently.
Host Name:
Enter the host name which DDNS service provider assigned to you.
Account:
Enter the login name for your DDNS account.
Password:
Enter the password for your DDNS account.
Check WAN IP schedule:
This option determines how often ICA-101 series checks the WAN IP status.
Options:
UPnP:
If UPnP is enabled, ICA-101 series will broadcast its availability using UPnP. UPnP
compatible systems such as Windows XP will then be able to detect the presence
of ICA-101 series.
Second Port:
This option allows you to open a second port for ICA-101 series. The HTTP connections (using your Web Browser) can use the port number you specified below
instead of the standard HTTP port 80. The configurable port range is 1024~65534.
Apply/Cancel:
After making sure all settings in the System are correct, click on the “Apply” icon to
store the settings for ICA-101 series. You can alternatively click on the “Cancel” icon
to restore all settings to the values last saved to or retrieved from ICA-101 series.
Image
21
Internet Camera User Guide
Video Settings:
Resolution:
Select the desired video resolution format ranging from 160x120 and 320x240 (default).
Image Quality:
Select the desired image quality with five levels from very low to very high. Lower
image quality will generate more compact file size and use less bandwidth; viseversa.
Power line frequency:
Please check your local electricity frequency and select proper value for ICA-101.
Adjustment:
Exposure:
Select Automatic or Manual as required.
If manual exposure is selected, an exposure value option will appear in the right.
The default value is 32.
Red/Green/Blue:
Adjust the respective color settings with default setting at 32.
Defaults:
Click “Defaults” button to restore Exposure and Red/Green/Blue values back to default.
Options:
Time Stamp:
Enable this option, the current time can be shown on the video image.
Text Overlay:
Enable this option, and enter the text contents in the right. The string you entered
will appear on the upper right of video image.
22
Audio:
Enable Audio function by selecting this option. Please note that this function requires an external microphone attached to the MIC IN port of ICA-101 series.
Apply/Cancel:
After making sure all settings in the Image are correct, click on the “Save” icon to
store the settings for ICA-101 series. You can alternatively click on the “Cancel” icon
to restore all settings to the values last saved to or retrieved from ICA-101 series.
User
Admin Login:
These fields are used for entering the Administrator ID along with the password to
access the Administration settings. Be sure to enter the password twice to confirm the
details, once in the Password field and again in the Verify Password field. The default
settings for Administrator ID and Password are both admin.
User Access:
You can set the access privileges for users here. The default setting is “Allow access
by everyone”. The alternative option is “Allow access by only users in database”. If you
23
Internet Camera User Guide
use this option, you have to add users in the database below.
Alerts:
Select “Send E-mail Alert when Motion Detected” and enter the relevant information
such as Receiver e-mail Address, Sender e-mail Address, Subject of the mail, SMTP
server address, and authentication information if needed.
M
Note
Motion Detection can be activated by rapid changes of light, as well as by
moving object. For this reason, it should be used indoor and the light is fairly
constant.
Send to:
Enter the receiver e-mail address in the field.
Show “From” as:
Enter the sender e-mail address in the field. This field must be entered with a valid
e-mail format.
Subject:
Enter the subject of outgoing mail.
Outgoing Mail SMTP Server:
Enter the address of SMTP server used to send the mail. Please ensure the server
is using SMTP protocol and able to relay mails for you. Some SMTP server may
require authentication. You can select “My Mail Server Requires Authentication”,
and enter the Account Name and Password fields below for authentication.
Status
The Status screen displays the detailed information of ICA-101 series, includingg
Device Name, Description, MAC Address, IP Address, Network Mask, Gateway IP,
F/W version, and Current Viewers.
24
Upgrade Firmware:
Click “Upgrade Firmware” button, a dialog box appears. Use “Browse” button to locate
the upgrade file in your computer, then click “Start Upgrade” to start the upgrading.
M
Note
Do not interrupt the upgrading procedure during proceeding; or the inner
component might be permanently damaged.
System Log:
ICA-101 series will record the system events here. You can use these logs for diagnosis.
Refresh:
Click “Refresh” button to renew the system log.
Restart:
Click “Restart” button to reboot your camera.
Restore Factory Defaults:
Click “Restore Factory Defaults” button to load default settings to camera.
25
Internet Camera User Guide
Chapter 5
Client Utility
5
Install Procedure
STEP 1
Insert the CD-ROM into the CD-ROM drive to initiate the autorun program. Once
completed a menu screen will appear as follows:
STEP 2
To install the Viewer & Recorder Application click on the "Viewer & Recorder" hyperlink to activate the installation procedure for the application program.
If the above screen is not shown, you can start the installation as follows.
1. Click on Start Menu/ Run.
2. Enter “D:\Utility\setup.exe” in the appeared box, where “D” is the letter of your CDROM drive.
3. Click on “OK” button.
STEP 3
The Welcome screen will appear. Click on the “Next” button to proceed with the
installation.
26
STEP 4
A “Choose Destination Location” screen appears, you may click on “Next” to accept
the recommended destination location or click on “Browse” to select another location.
After specifying the desired destination location, click on “Next” to proceed further.
STEP 5
The Select Program Folder prompt will appear providing information of where the
application will be located, click on “Next” to continue. Click on “Back” can return to
the previous screens.
27
Internet Camera User Guide
STEP 6
A message box appears to inform you that an ActiveX plug-in has been installed to
your computer..
STEP 7
Once the setup is complete, the following message box pops up. Click “OK” button to
close the screen.
Using Viewer & Recorder Utility
After successfully installing the utility, this icon,
Double click on it to launch the program.
, will be added to the desktop.
28
Once the utility is executed, its main screen appears as follow.
The Camera List displays all available ICA-101 series you have defined.
The Current Recordings lists scheduled recording activity in progress.
Add Camera
Click “Add Camera” button, the utility will search available cameras in LAN automatically. Once it finds the camera, the detailed information will be displayed. If the camera
has enabled User Access control, you have to enter the authorized Name and Password in Login field. Then click “Add” button, the camera will be added to the Camera
List immediately.
29
Internet Camera User Guide
If you want to add a camera which located on Internet, click “Internet” tab and fill in the
necessary information: IP address, port number, and login name/password (if required).
Click “Test” button to check the connection to the camera, and click “Add” to add the
camera to Camera List.
Modify Camera
If a camera’s IP address or port number has been changed, you can use this option to
rebuild the connection. Select an existing camera from Camera List, click “Modify
Camera” button. After modifying, you can click “Test” button to check the connection.
Click “Save” to save the changes.
30
Delete Camera
Select an existing camera from Camera List, click “Delete Camera” button to remove it
from the list.
View
To view live video with utility, select an existing camera from Camera List, then click
“View” button. The live video of the selected camera will pop up immediately. There
are three control buttons available in this screen.
cording, and
is for play,
is for re-
is for stop.
Files
Click “Files” button to check the files which have been recorded in your computer.
Select a file and click “Play”, your computer will use Media Player program to play the
file. Select a file and click “Delete” to delete it. Click “Explore” button to open the folder
which stores these video files.
31
Internet Camera User Guide
Preferences
To set recording preferences, click “Preferences” button. You can modify File Location
and Time Limit here. The Time Limit sets the maximum time period of a recording
session which started by clicking button on the View screen.
Schedule
To schedule a recording session, click “Schedule” button. The screen displays all
scheduled recordings.
Click “Add” button, and select desired parameters, then click “Save” button. The new
schedule will be added to the list immediately. To modify an existing schedule, select
the schedule and click “Modify”. Change the parameters to desired values, then click
“Save”. To delete an existing schedule, select the schedule and click “Delete” button.
The record will be removed from list right away.
32
Appendix A
Frequently Asked Questions
A
Internet Camera Features
Q: What is an Internet Camera?
A: The Internet Camera is a standalone system connecting directly to an Ethernet
or Fast Ethernet network. And ICA-101W also supports the wireless transmission
based on the IEEE 802.11b standard. It is different from the conventional PC Camera, the Internet Camera is an all-in-one system with built-in CPU and web-based
solutions providing a low cost solution that can transmit high quality video images
for monitoring. The Internet Camera can be managed remotely, accessed and
controlled from any PC/Notebook over the Intranet or Internet via a web browser.
Q: What algorithm is used to compress the digital image?
A: ICA-101 series utilizes the MPEG-4 image compression technology providing
high quality images for users. The high compression capabilities of MPEG-4 reduce
network bandwidth requirements to amazingly low levels.
Q: What is the wireless transmission range for ICA-101W?
A: Generally the wireless distance can go up to 100 meters indoors and up to 300
meters outdoors. The range is limited by the number of walls, ceilings, or other
objects that the wireless signals must pass through. Typical ranges vary depends
on the types of materials and background Radio Frequency (RF) noise in your home
or business and the configuration setting of your network environment.
Internet Camera Installation
Q: Can ICA-101 series be used outdoors?
A: ICA-101 series is not weatherproof. It needs to be equipped with a weatherproof
case to be used outdoors, and it is not recommended.
Q: What network cabling is required for ICA-101 series?
A: ICA101 series uses Category 5 UTP cable allowing 10 Base-T and 100 Base-T
networking.
Q: Can ICA-101 series be setup as a PC-cam on the computer?
A: No, ICA-101 series can be used only on Ethernet and Fast Ethernet network.
Q: Can ICA-101 series be connected on the network if it consists of only private IP
addresses?
A: Yes, ICA-101 series can be connected to LAN with private IP addresses.
Q: Can ICA-101 series be installed and work if a firewall exists on the network?
A: Yes, you can use Second Port function to allow the traffic from Internet passing
through firewall and access your ICA-101 series..
33
Internet Camera User Guide
Appendix B
Trouble Shooting
B
Q: I cannot access the Internet Camera from a web browser.
A: If ICA-101 series do not respond, check the following:
• Machine is properly installed, LAN or WLAN connection is OK, and it is powered
ON. You can test the connection by using the "Ping" command:
Open the MS-DOS window or command prompt window.
Enter the command:
ping 192.168.0.20
If no response is received, either the connection is not working, or your PC's
IP address is not compatible with ICA-101 series’ IP Addresses. (See next
item.)
• Ensure that your PC is using an IP Address within the range 192.168.0.1 to
192.168.0.254 (excluding 192.168.0.20).
Also, the Network Mask should be set to 255.255.255.0 to match ICA-101 series. In Windows, you can check these settings by using Control Panel-Network
to check the Properties for the TCP/IP protocol.
Q: The Viewer & Recorder utility does not list my ICA-101 series.
A: Please check the following:
• ICA-101 series is installed, LAN connections are OK, it is powered ON and
startup is complete.
• Ensure that your PC and the Wireless/Ethernet Network Camera are on the
same network segment. (If you don't have a router, this must be the case.)
• Ensure that your PC has the TCP/IP network protocol loaded. In Windows, this
is done by using Control Panel-Network. If an entry for TCP/IP -> Network card
is not listed, use Add - Protocol - Microsoft - TCP/IP to add it. You then need to
select the new entry (TCP/IP -> Network card), click Properties, and configure
the IP Address tab.
• If your LAN has a DHCP Server, you can select "Obtain an IP Address automatically".
• Otherwise, you must select "Specify an IP Address", and enter values for IP
Address, Subnet Mask, and Gateway. All devices on your LAN must use compatible values. Remember that each device needs a unique IP Address, and the
same Subnet Mask.
Q: Why does the Internet Camera work locally but not externally?
A1: Might be caused from the firewall protection. Need to check the Internet firewall
with your system administrator.
A2: The default router setting might be a possible reason. Need to double check if
the configuration of the default router settings is required.
Q: Why do a series of broad vertical white lines appear through out the image?
34
Appendix A - Troubleshooting
A: A likely issue is that the CMOS sensor becomes overloaded when the light
source is too bright such as direct exposure to sunlight or halogen light. You need to
reposition the Internet Camera into a more shaded area immediately for the bright
light will damage the CMOS sensor.
Q: There is bad focus on ICA-101 series, what should be done?
A: The focus might not be correctly adjusted for the line of sight. You need to adjust
the focus manually by rotating the lens clockwise or counterclockwise..
Q: Noisy images occur. How can I solve the problem?
A1: The video images might be noisy if ICA-101 series is used in a very low light
environment. To solve this issue you need more light.
Q: There is a poor image quality, how can I improve the image?
A1: A possible cause might be the incorrect display properties configuration for your
desktop. You need to open the Display Properties on your desktop and configure
your display to show at least 65’000 colors, for example at least 16-bit.
M
Note
Applying only 16 or 256 colors on your computer will produce dithering
artifacts in the image.
A2: The configuration on ICA-101 series image display is incorrect. You need to
adjust the image related parameter to improve images such as exposure, and colors. Please refer to the Image section of Chapter 4 for detail information.
Q: There are no images available through the web browser?
A: The ActiveX might be disabled. If you are viewing the images from Internet Explorer make sure ActiveX has been enabled in the Internet Options menu.
Alternatively, you can use the Viewer & Recorder utility for viewing the required
images.
35
C
Appendix C
Specification
Model
ICA-101
ICA-101W
Hardware Specifications
10/100M Ethernet port
1
Wireless LAN
None
IP assignment
Manually assigned, DHCP
WEP encryption
None
64-bit, 128-bit
LED indicator
PWR, ACT, LAN
PWR, ACT, LAN, WLAN
Power requirement
DC 5V, 2A
Audio support
Yes
Dimension
164 x 88 x 53 mm
Operating temperature
0 ~ 40 degree C
Storage temperature
-10 ~ 70 degree C
Humidity
5% ~ 95% non-condensing
Built-in 802.11b wireless LAN
module
Video Specifications
Image sensor
CMOS, 1/4 inch, VGA resolution
Lens
Fixed focus
Resolution
160 x 120, 320 x 240
Focus extension
70cm - ∞
Compression
MPEG-4
Management / Features
Management
Web interface, Utility
Additional Features
Image recording, NTP Support, Email auto send; System
event log, Web or Utility firmware upgrade, Motion detection, DDNS, UPnP, Open second port, Time stamp, Realtime monitoring
36