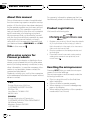
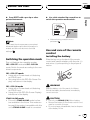
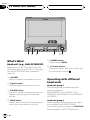
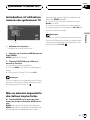
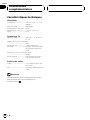
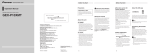
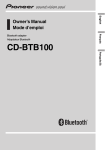
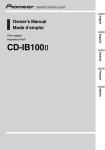
1
English Operation Manual Mode demploi Hide-away TV tuner Syntoniseur TV escamotable Français GEX-P5700TV Contents Thank you for buying this Pioneer product. Please read through these operating instructions so you will know how to operate your model properly. After you have finished reading the instructions, keep this manual in a safe place for future reference. Precautions IMPORTANT SAFEGUARDS 3 To ensure safe driving 3 To avoid battery exhaustion 4 Before You Start Information to User 5 For Canadian model 5 About this unit 5 Video system of a connected component 5 About this manual 6 After-sales service for Pioneer products 6 Product registration 6 Resetting the microprocessor 6 Switching the operation mode 7 Use and care of the remote control 7 Installing the battery 7 Using the remote control 8 Whats What Remote control 9 Other remote controls 9 When using a Pioneer car DVD players remote control 9 When using a Pioneer car DVD players remote control 9 TV tuner (SRC mode) Whats What 10 Head unit (e.g., AVH-P5700DVD) 10 Operating with different head units 10 Function compatibility charts 11 Head unit group 1 11 Head unit group 2 11 Head unit group 3 11 Head unit group 4 11 Watching the television 12 Storing and recalling broadcast stations 13 2 En Introduction of advanced TV tuner operation 14 Storing the strongest broadcast stations sequentially 14 Additional Information Specifications 15 Section 01 Precautions IMPORTANT SAFEGUARDS 1 Read this manual fully and carefully before operating your display. 2 Keep this manual handy as a reference for operating procedures and safety information. 3 Pay close attention to all warnings in this manual and follow the instructions carefully. 4 Do not allow other persons to use this system until they have read and understood the operating instructions. 5 Do not install the display where it may (i) obstruct the drivers vision, (ii) impair the performance of any of the vehicles operating systems or safety features, including air bags, hazard lamp buttons or (iii) impair the drivers ability to safely operate the vehicle. 6 As with any accessory in your vehicles interior, the display should not divert your attention from the safe operation of your vehicle. If you experience difficulty in operating the system or reading the display, please park safely before making adjustments. 7 Please remember to wear your seat belt at all times while operating your vehicle. If you are ever in an accident, your injuries can be considerably more severe if your seat belt is not properly buckled. 8 Never use headphones while driving. 9 To promote safety, certain functions are disabled unless the parking brake is on, and the vehicle is not in motion. 10 Never set the volume of your display so high that you cannot hear outside traffic and emergency vehicles. WARNING ! Do not attempt to install or service your display by yourself. Installation or servicing of the display by persons without training and experience in electronic equipment and automotive accessories may be dangerous and could expose you to the risk of electric shock or other hazards. English Please read all of these instructions regarding your display and retain them for future reference. To ensure safe driving WARNING ! LIGHT GREEN LEAD AT POWER CONNECTOR IS DESIGNED TO DETECT PARKED STATUS AND MUST BE CONNECTED TO THE POWER SUPPLY SIDE OF THE PARKING BRAKE SWITCH. IMPROPER CONNECTION OR USE OF THIS LEAD MAY VIOLATE APPLICABLE LAW AND MAY RESULT IN SERIOUS INJURY OR DAMAGE. ! To avoid the risk of accident and the potential violation of applicable laws, the front TV feature should never be used while the vehicle is being driven. Also, rear displays should not be in a location where it is a visible distraction to the driver. ! In some countries or states the viewing of images on a display inside a vehicle even by persons other than the driver may be illegal. Where such regulations apply, they must be obeyed and this units TV features should not be used. This unit detects whether your vehicles parking brake is engaged or not, and prevents you from watching TV on the front display while driving. When you attempt to watch a TV, the screen turns to black and nothing is displayed. En 3 Section 01 Precautions To watch TV on the front display, park your vehicle in a safe place and apply the parking brake. To avoid battery exhaustion Be sure to run the vehicle engine while using this unit. Using this unit without running the engine can result in battery drainage. WARNING Do not use with vehicles that do not feature an ACC position. 4 En Section 02 Before You Start Information to User ! ! ! ! For Canadian model This Class B digital apparatus complies with Canadian ICES-003. English Alteration or modifications carried out without appropriate authorization may invalidate the users right to operate the equipment. Also, this unit damage, smoke, and overheat could result from contact with liquids. Keep this manual handy as a reference for operating procedures and precautions. Always keep the volume low enough so that you can hear sounds from outside the vehicle. Protect this unit from moisture. If the battery is disconnected or discharged, the preset memory will be erased and must be reprogrammed. Important (Serial number) The serial number is located on the bottom of this unit. For your own security and convenience, be sure to record this number on the enclosed warranty card. About this unit This unit is a TV tuner for reception of TV broadcasts. Combining it with a separately sold display with AV-BUS lets you enjoy TV entertainment (refer to this units installation manual for details concerning the AV-BUS). The tuner frequencies on this unit are allocated for use in North America. Use in other areas may result in poor reception. This unit features a REAR OUT, letting you watch TV on a rear display (sold separately). WARNING: Handling the cord on this product or cords associated with accessories sold with the product may expose you to chemicals listed on proposition 65 known to the State of California and other governmental entities to cause cancer and birth defects or other reproductive harm. Wash hands after handling. CAUTION Video system of a connected component This unit is NTSC system compatible. When connecting an external component to this units REAR OUT, be sure the component is compatible with the same video systems. If it is not, images will not be correctly reproduced. WARNING: ! Be sure to stop driving and park your vehicle in a safe place before watching the TV. ! Watching the TV while driving is dangerous and could result in an accident. ! This units REAR OUT is for connection of a display to enable passengers in the rear seats to watch the TV. NEVER install the rear display in a location that enables the driver to watch the TV while driving. ! Do not allow this unit to come into contact with liquids. Electrical shock could result. En 5 Section 02 Before You Start About this manual This unit features a number of sophisticated functions ensuring superior reception and operation. All the functions have been designed for the easiest possible use, but many are not self-explanatory. This operation manual will help you benefit fully from this units potential and to maximize your listening enjoyment. We recommend that you familiarize yourself with the functions and their operation by reading through the manual before you begin using this unit. It is especially important that you read and observe WARNINGs and CAUTIONs in this manual. After-sales service for Pioneer products Please contact the dealer or distributor from where you purchased this unit for after-sales service (including warranty conditions) or any other information. In case the necessary information is not available, please contact the companies listed below: Please do not ship your unit to the companies at the addresses listed below for repair without advance contact. U.S.A. Pioneer Electronics (USA) Inc. CUSTOMER SUPPORT DIVISION P.O. Box 1760 Long Beach, CA 90801-1760 800-421-1404 CANADA Pioneer Electronics of Canada, Inc. CUSTOMER SATISFACTION DEPARTMENT 300 Allstate Parkway Markham, Ontario L3R OP2 1-877-283-5901 6 En For warranty information please see the Limited Warranty sheet included with this unit. Product registration Visit us at the following site: 1 Register your product. We will keep the details of your purchase on file to help you refer to this information in the event of an insurance claim such as loss or theft. 2 Receive updates on the latest products and technologies. 3 Download owners manuals, order product catalogues, research new products, and much more. Resetting the microprocessor Pressing RESET lets you reset the microprocessor to its initial settings. The microprocessor must be reset under the following conditions: ! Prior to using this unit for the first time after installation ! If the unit fails to operate properly ! When strange or incorrect messages appear on the display ! When setting the position of the operation mode switch on this unit Section 02 Before You Start % Use a thin standard tip screwdriver to switch the operation mode switch. English % Press RESET with a pen tip or other pointed instrument. RESET button Note If you reset the microprocessor, memorized broadcast stations and other information is erased, and this unit returns to its initial settings. Switching the operation mode This unit features two operation modes: SRC : OSD OFF mode and SRC : OSD ON mode. Switch the mode according to the combined components. ! After switching, reset the microprocessor. Use and care of the remote control Installing the battery Slide the tray out on the back of the remote control and insert the battery with the plus (+) and minus () poles pointing in the proper direction. SRC : OSD OFF mode ! Using with a Pioneer head unit featuring an IP-BUS input. ! Not using this units OSD (On Screen Display) indications in the display. SRC : OSD ON mode ! Using with a Pioneer head unit featuring an IP-BUS input. ! Using this units OSD (On Screen Display) indications in the display. STAND ALONE mode ! This units STAND ALONE mode is a feature available in the future. This mode can be used if the product compatible with this units STAND ALONE mode is connected. WARNING Keep the battery out of the reach of children. Should the battery be swallowed, immediately consult a doctor. CAUTION ! Use only one CR2025 (3 V) lithium battery. ! Remove the battery if the remote control is not used for a month or longer. ! Do not recharge, disassemble, heat or dispose of the battery in fire. En 7 Section 02 Before You Start ! Do not handle the battery with metallic tools. ! Do not store the battery with metallic materials. ! In the event of battery leakage, wipe the remote control completely clean and install a new battery. ! When disposing of used batteries, please comply with governmental regulations or environmental public institutions rules that apply in your country/area. Using the remote control Point the remote control in the direction of the front panel to operate. Important ! Do not store the remote control in high temperatures or direct sunlight. ! The remote control may not function properly in direct sunlight. ! Do not let the remote control fall onto the floor, where it may become jammed under the brake or accelerator pedal. 8 En Section 03 Whats What 1 4 2 5 English 3 5 POWER button SRC : OSD ON mode Press to turn the rear display on or off when the TV is not selected as a source. SRC : OSD OFF mode Press to turn the rear display on or off when the TV is not selected as a source. Other remote controls You can also perform operations with the remote controls shown below. Remote control This units supplied remote control is mainly for use by rear seat passengers. When using, point at the front panel or signal receptor on the combined Pioneer head unit. 1 CH CALL button SRC : OSD ON mode When the TV is selected as a source, or, when the rear TV is on and the TV is not selected as a source: Channel information is displayed on the front and rear display. SRC : OSD OFF mode When the TV is selected as a source, or, when the rear TV is on and the TV is not selected as a source: Channel information is displayed on the rear display. 2 BAND button Not used. 3 MENU button Not used. 4 a/b/c/d buttons SRC : OSD ON mode Press to do manual seek tuning and preset tuning. Also used for controlling functions. SRC : OSD OFF mode Press to do manual seek tuning and preset tuning. Also used for controlling functions. When using a Pioneer car DVD players remote control When using a remote control supplied with SDV-P7, AVX-P7300DVD, XDV-P90. 1 r button Press and hold to BSSM on or off. 2 Remote control operation mode switch When operating a TV, be sure to set the remote control operation mode switch to TV position. When using a Pioneer car DVD players remote control When using a remote control supplied with AVH-P7600DVD, AVH-P7500DVD, AVHP6600DVD, AVH-P6500DVD, AVX-P8DVD or optional remote control CD-R5. 1 1-10 (16) buttons Press to do direct channel select. 2 Joystick Move to do manual seek tuning and preset tuning. 3 Remote control operation mode switch When operating a TV, be sure to set the remote control operation mode switch to TV position. En 9 Section 04 TV tuner (SRC mode) 1 2 3 Whats What Head unit (e.g., AVH-P5700DVD) Operate this unit (for TV reception) with the connected head unit. Instructions in this manual use AVH-P5700DVD as an example of head unit. 1 VOLUME Press to increase or decrease the volume. 2 Signal receptor Receives signals from a remote control. 3 SOURCE button This unit is turned on by selecting a source. Press to cycle through all the available sources. 4 BAND button Press to select among two TV bands and to cancel the control mode of functions. 10 En 4 56 5 A.MENU button Press to display MENU. 6 a/b/c/d buttons Press to do manual seek tuning. Also used for controlling functions. Operating with different head units Head unit group 1 The following head units featuring touch panel key operation. AVH-P7600DVD, AVH-P7500DVD, AVHP6600DVD, AVH-P6500DVD, AVH-P5700DVD, AVX-P8DVD Head unit group 2 When using the following head units, operation is different from AVH-P5700DVD. The following head units featuring FUNCTION button operation or SOFT KEY operation. Section 04 TV tuner (SRC mode) Head unit group 3 When using the following head units, operation is different from AVH-P5700DVD. The following head units featuring MULTI-CONTROL operation. DEH-P8600MP, DEH-P860MP, DEH-P80MP, DEH-P8MP, DEH-P7700MP, DEH-P770MP Head unit group 4 When using the following head units, operation is different from AVH-P5700DVD. The following head units are navigation units featuring touch panel key operation. AVIC-N2, AVIC-N1, AVIC-D1 Head unit group 2 English FH-P5000MP, FH-P4200MP, DVH-P5000MP, DEH-P9600MP, DEH-P960MP, DEH-P6500MP, DEH-P850MP, DEH-P7600MP, DEH-P760MP, DEH-P7500MP, DEH-P750MP, DEH-P6700MP, DEH-P670MP, DEH-P6600, DEH-P660, DEHP6500MP, DEH-P650MP, DEH-P5600MP, DEHP560MP, DEH-P5500MP, DEH-P550MP, DEHP4700MP, DEH-P470MP, DEH-P4600MP, DEHP460MP, DEH-P4500MP, DEH-P450MP, DEHP3700MP, DEH-P3600, DEH-P360, DEH-P3500, DEH-P350, DEH-P35, DEH-P2600, DEH-P26, DEH-P2500, DEH-P250, DEH-P25 Controls Select TV as a source Press SOURCE. Select a band Press BAND. Preset tuning Press a or b. Manual tuning (step by step) Press c or d. Seek tuning Press and hold c or d. Preset memory Press and hold 1-10 (16). Direct recall Press 1-10 (16). BSSM Press FUNCTION (FUNC) (A.MENU). a/b Preset channel list Press FUNCTION (FUNC) (A.MENU). a/b/c/d Head unit group 3 Controls Select TV as a source Press SOURCE. Select a band Press BAND. Preset tuning Push MULTI-CONTROL up or down. Function compatibility charts Manual tuning (step by step) Push MULTI-CONTROL left or right. Head unit group 1 Seek tuning Push and hold MULTI-CONTROL left or right. Select a function Use MULTI-CONTROL. Controls Select TV as a source Press SOURCE. Select a band Touch BAND. Preset tuning Touch a or b. Manual tuning (step by step) Touch c or d. Seek tuning Keep touching c or d. Select a function Touch A.MENU and then touch FUNCTION. Head unit group 4 Controls Select TV as a source Press SOURCE. Select a band Touch BAND. Preset tuning Touch a or b. En 11 Section 04 TV tuner (SRC mode) Watching the television Controls Manual tuning (step by step) Touch c or d. Seek tuning Keep touching c or d. Select a function Touch A.MENU and then touch FUNCTION. 1 2 3 4 5 1 Source icon Shows which source has been selected. 2 Band indicator Shows which band the TV tuner is tuned to. 3 Preset number indicator Shows which preset has been selected. 4 Channel indicator Shows which channel the TV tuner is tuned. 5 Preset list display Shows the preset list. 1 Touch the screen to display the touch panel keys. 2 Touch BAND to select a band. Touch BAND repeatedly until the desired band is displayed, TV1 or TV2. 3 To select a preset channel, touch a preset channel on the list. The preset channel you selected is tuned in. # When the list of channels is not displayed, touch LIST. 12 En Section 04 TV tuner (SRC mode) # You can also perform manual tuning by pressing c or d button. Notes ! Up to 24 stations, 12 for each of two TV bands, can be stored in memory. ! You can also use a and b to recall stations assigned to preset tuning keys P1P12. English 4 To perform manual tuning, briefly touch c or d. The channels move up or down step by step. 5 To perform seek tuning, keep touching c or d for about one second and release. The tuner will scan the channels until a broadcast strong enough for good reception is found. # You can cancel seek tuning by briefly touching either c or d. # If you keep touching c or d you can skip broadcasting channels. Seek tuning starts as soon as you release the keys. # You can also perform seek tuning by pressing and holding c or d button. Storing and recalling broadcast stations If you touch any of the preset tuning keys P1P12 you can easily store up to 12 broadcast stations for later recall with the touch of a key. % When you find a station that you want to store in memory, keep touching one of preset tuning keys P1P12 until the preset number stops flashing. The number you have touched will flash in the preset number indicator and then remain lit. The selected station has been stored in memory. The next time you touch the same preset tuning key the station is recalled from memory. # To switch between P1P6 and P7P12, touch or . # When the touch panel keys are not displayed, you can display them by touching the screen. # When P1P6 and P7P12 are not displayed, you can display them by touching LIST. En 13 Section 04 TV tuner (SRC mode) Introduction of advanced TV tuner operation # To cancel the storage process, touch BSSM again. # You can also perform this operation by pressing and holding CH CALL on the remote control. Note Storing broadcast stations with BSSM may replace broadcast stations you have saved using P1P12. 1 1 Function display Shows the function name. 1 Press A.MENU button to display MENU. MENU appears on the display. 2 Touch FUNCTION to display the function name. The function name is displayed. # To return to the previous display, touch BACK. # To return to the TV picture, touch ESC. Note If you do not operate the function within about 30 seconds, the display is automatically returned to the TV picture. Storing the strongest broadcast stations sequentially % Touch BSSM on the function menu to turn BSSM on. BSSM begins to flash. While BSSM is flashing the 12 strongest broadcast stations will be stored in order from the lowest channel up. When finished, BSSM disappears. 14 En Appendix Additional Information Specifications English General Power source ............................. 14.4 V DC (10.8 15.1 V allowable) Grounding system ................... Negative type Max. current consumption ..................................................... 0.6 A Dimensions (W × H × D) ... 172 × 30 × 150 mm (6-3/4 × 1-1/8 × 5-7/8 in.) Weight .......................................... 0.7 kg (1.54 lbs) TV tuner Reception channel .................. VHF 2 13 ch, UHF 14 69 ch Color system .............................. NTSC compatible Usable sensitivity ..................... 11 dBµ (75 W, Mono) Video S/N ..................................... Over 40 dB (59 dBµ RF input, White Peak 100%) Video S/N 30 dB usable sensitivity ..................................................... 44 dBµ Antenna input ........................... 4 ch Diversity (ø 3.5 mm Mini plug type) Rear display output Video .............................................. 1 Vp-p/75W (TV: White 100% Modulated) Sound ............................................ 500 mVrms/15kW (TV: 100% Modulated) Note Specifications and the design are subject to possible modifications without notice due to improvements. En 15 Table des matières Nous vous remercions davoir acheté cet appareil Pioneer. Nous vous prions de lire ces instructions dutilisation afin que vous sachiez utiliser votre appareil correctement. Quand vous aurez fini la lecture de ces instructions, rangez ce mode demploi dans un endroit sûr pour référence ultérieure. Précautions REGLES DE PROTECTION IMPORTANTES 17 Pour assurer une conduite en sécurité 17 Pour éviter lépuisement de la batterie 18 Avant de commencer Pour le modèle canadien 19 Quelques mots sur cet appareil 19 Système vidéo dun composant connecté 19 Quelques mots sur ce mode demploi 19 Service après-vente des produits Pioneer 20 Enregistrement du produit 20 Réinitialisation du microprocesseur 20 Changement de mode dutilisation 21 Utilisation et soin du boîtier de télécommande 21 Installation de la pile 21 Utilisation de la télécommande 22 Description de lappareil Boîtier de télécommande 23 Autres commandes à distance 23 Quand vous utilisez une télécommande de lecteur de DVD voiture Pioneer 23 Quand vous utilisez une télécommande de lecteur de DVD voiture Pioneer 24 Syntoniseur TV (mode SRC) Description de lappareil 25 Appareil central (par exemple, AVHP5700DVD) 25 Utilisation avec différents appareils centraux 25 Tableaux de compatibilité des fonctions 26 Appareils centraux du groupe 1 26 Appareils centraux du groupe 2 26 Appareils centraux du groupe 3 27 Appareils centraux du groupe 4 27 16 Fr Regarder la télévision 27 Mise en mémoire et rappel des stations démission 28 Introduction à lutilisation avancée du syntoniseur TV 29 Mise en mémoire séquentielle des stations les plus fortes 29 Informations complémentaires Caractéristiques techniques 30 Section 01 Précautions REGLES DE PROTECTION IMPORTANTES Veuillez lire toutes les instructions concernant votre écran et les conserver pour référence ultérieure. ATTENTION ! Nessayez pas dinstaller votre écran ou den faire lentretien vous-même. Linstallation ou lentretien de lécran par des personnes sans formation et sans expérience en équipement électronique et en accessoires automobiles peuvent être dangereux et vous exposer à des risques délectrocution ou à dautres dangers. Français 1 Lisez soigneusement la totalité de ce mode demploi avant dutiliser votre écran. 2 Conservez ce mode demploi à portée de main afin de vous y référer pour toutes utilisations et les informations de sécurité. 3 Observez attentivement tous les avertissements contenus dans ce manuel et suivez soigneusement les instructions. 4 Ne laissez pas dautres personnes utiliser ce système avant quelles aient lu et compris les instructions dutilisation. 5 Ninstallez pas lécran là où il peut (i) gêner la vision du conducteur, (ii) dégrader le fonctionnement de systèmes dutilisation ou les dispositifs de sécurité du véhicule, incluant les airbags, les commandes du signal de détresse, ou (iii) dégrader la capacité du conducteur à utiliser le véhicule en sécurité. 6 Comme pour tout accessoire à lintérieur de votre véhicule, lécran ne doit pas distraire votre attention dune utilisation en toute sécurité de votre véhicule. Si vous rencontrez des difficultés à utiliser le système ou lire lécran, garez-vous en sécurité avant deffectuer les réglages. 7 Rappelez-vous de porter votre ceinture bouclée en permanence pendant la conduite de votre véhicule. Si vous avez un accident, vos blessures peuvent être considérablement plus graves si votre ceinture nest pas bouclée correctement. 8 Nutilisez jamais des écouteurs en conduisant. 9 Pour renforcer la sécurité, certaines fonctions sont désactivées si le frein de parking nest pas serré et si le véhicule nest pas à larrêt. 10 Ne réglez jamais le volume de votre écran à un niveau tel que vous ne puissiez pas entendre la circulation extérieure et les véhicules de secours. Pour assurer une conduite en sécurité ATTENTION ! LE FIL VERT CLAIR DU CONNECTEUR DALIMENTATION EST PREVU POUR DÉTECTER LÉTAT STATIONNÉ ET DOIT ÊTRE CONNECTE À LALIMENTATION DU COMMUTATEUR DU FREIN A MAIN. UNE MAUVAISE CONNEXION OU UNE UTILISATION INCORRECTE DU FIL PEUT VIOLER LA LOI APPLICABLE ET SE TRADUIRE PAR DES DOMMAGES CORPORELS OU MATERIELS GRAVES. ! Pour éviter le risque daccident et une violation potentielle des lois applicables, le dispositif télé avant ne doit jamais être utilisé pendant la conduite du véhicule. En outre, les écrans arrières ne doivent pas être placés dans un endroit où ils constituent une distraction visible au conducteur. Fr 17 Section 01 Précautions ! Dans certains états ou pays il peut être illégal même pour des personnes autres que le conducteur de regarder des images sur un écran à lintérieur dun véhicule. Quand cette réglementation est applicable, elle doit être respectée, et les fonctions télévision de cet appareil ne doivent pas être utilisées. Cet appareil détecte si le frein à main de votre véhicule est serré ou non, et vous empêche de regarder la télévision pendant que vous conduisez. Quand vous essayez de regarder la télévision, lécran devient noir et rien ne saffiche. Pour regarder la télévision sur lécran avant, garez votre voiture dans en endroit sûr et serrez le frein à main. Pour éviter lépuisement de la batterie Assurez-vous de faire tourner le moteur du véhicule pendant que vous utilisez cet appareil. Utiliser cet appareil sans faire tourner le moteur peut entraîner lépuisement de la batterie. ATTENTION Nutilisez pas cet appareil avec des véhicules qui ne possèdent pas de position ACC. 18 Fr Section 02 Avant de commencer Pour le modèle canadien Cet appareil numérique de la classe B est conforme à la norme NMB-003 du Canada. Cet appareil est un syntoniseur TV pour la réception démissions de télévision. Sa combinaison avec un écran vendu séparément disposant dun AV-BUS vous permet de regarder la télévision (reportez-vous au mode demploi de lappareil pour avoir des détails sur lAV-BUS). Les fréquences du syntoniseur de cet appareil sont attribuées pour une utilisation en Amérique du Nord. Lutilisation de lappareil dans dautres régions peut provoquer une réception de mauvaise qualité. Cet appareil dispose dune sortie REAR OUT, qui vous permet de regarder la télévision sur un écran arrière (vendu séparément). PRÉCAUTION ! Ne laissez pas cet appareil venir en contact avec des liquides. Cela pourrait provoquer une électrocution. Tous contact avec des liquides pourrait aussi provoquer des dommages, de la fumée et une surchauffe de lappareil. ! Conservez ce mode demploi à portée de main afin de vous y référer pour les modes dopération et les précautions. ! Maintenez toujours le niveau découte à une valeur telle que vous puissiez entendre les sons provenant de lextérieur du véhicule. ! Protégez lappareil contre lhumidité. ! Si la batterie est débranchée, ou déchargée, le contenu de la mémoire sera effacé et une nouvelle programmation sera nécessaire. Cet appareil est compatible avec le système NTSC. Quand vous connectez un composant externe à la sortie REAR OUT de cet appareil, assurez-vous que ce composant est compatible avec les mêmes systèmes vidéo. Dans le cas contraire, les images ne seront pas reproduites correctement. ! Noubliez pas darrêter de conduire et de garer votre véhicule dans un endroit sûr avant de regarder la télévision. ! Regarder la télévision tout en conduisant est dangereux et pourrait provoquer un accident. ! La sortie REAR OUT de cet appareil est utilisée pour connecter un écran permettant aux passagers des sièges arrière de regarder la télévision. NE JAMAIS installer lécran arrière dans un endroit qui permet au conducteur de regarder la télévision pendant quil conduit. Français Quelques mots sur cet appareil Système vidéo dun composant connecté Quelques mots sur ce mode demploi Cet appareil possède des fonctions sophistiquées qui lui assurent une réception et un fonctionnement de haute qualité. Toutes les fonctions ont été conçues pour en rendre lutilisation la plus aisée possible, mais un grand nombre ne sont pas auto-explicatives. Ce mode demploi vous aidera à profiter pleinement du potentiel de cet appareil et à optimiser votre plaisir découte. Nous vous recommandons de vous familiariser avec les fonctions et leur utilisation en lisant lensemble du mode demploi avant de commencer à utiliser lappareil. Il est particulièrement important que vous lisiez et respectiez les indications ATTENTION et PRÉCAUTION de ce mode demploi. Fr 19 Section 02 Avant de commencer Service après-vente des produits Pioneer Veuillez contacter le revendeur ou le distributeur chez qui vous avez acheté cet appareil pour le service après-vente (y compris les conditions de garantie) ou pour toute autre information. Au cas où les informations nécessaires ne sont pas disponibles, veuillez contacter les sociétés indiquées ci-dessous : Nexpédiez pas lappareil pour réparation à lune des adresses figurant ci-dessous sans avoir pris contact préalable. États-Unis. Pioneer Electronics (USA) Inc. CUSTOMER SUPPORT DIVISION P.O. Box 1760 Long Beach, CA 90801-1760 800-421-1404 CANADA Pioneer électroniques du Canada, Inc. Département de service aux consommateurs 300 Allstate Parkway Markham, Ontario L3R OP2 1-877-283-5901 en cas de déclaration à votre assurance pour perte ou vol. 2 Recevez les mises à jour sur les derniers produits et les plus récentes technologies. 3 Téléchargez les modes demploi, commandez les catalogues des produits, recherchez de nouveaux produits, et bien plus. Réinitialisation du microprocesseur Appuyer sur RESET réinitialise le microprocesseur à ses réglages initiaux. Le microprocesseur doit être réinitialisé dans les conditions suivantes : ! Avant la première utilisation de cet appareil après son installation ! En cas danomalie de fonctionnement de lappareil ! Quand des messages étranges ou incorrects saffichent sur lécran ! Quand vous réglez la position du commutateur de mode dutilisation de lappareil % Appuyez sur RESET avec la pointe dun stylo ou un autre instrument pointu. Pour connaître les conditions de garantie, reportez-vous au document, Garantie limitée, qui accompagne cet appareil. Enregistrement du produit Rendez-nous visite sur le site suivant : Touche RESET Remarque 1 Enregistrez votre produit. Nous conserverons sur fichier les détails de votre achat pour vous permettre de vous reporter à ces informations 20 Fr Si vous réinitialisez le microprocesseur, les stations mémorisées et les autres informations sont effacées, et lappareil revient à ses réglages initiaux. Section 02 Avant de commencer Changement de mode dutilisation Utilisation et soin du boîtier de télécommande Cet appareil possède deux modes de fonctionnement : le mode SRC : OSD OFF et le mode SRC : OSD ON. Changez de mode en fonction de la combinaison des composants. Installation de la pile Sortez le porte-pile de larrière de la télécommande et insérez la pile en respectant les polarités (+) et (). Mode SRC : OSD ON ! Utilisation avec un appareil central Pioneer équipé dune entrée IP-BUS. ! Utilisation des indications OSD (Affichage sur écran) de cet appareil sur lécran. Mode STAND ALONE ! Le mode STAND ALONE de cet appareil est une fonction qui sera disponible à lavenir. Ce mode peut être utilisé si le produit compatible avec le mode STAND ALONE de cet appareil est connecté. % Utilisez un tournevis étroit à tête standard pour changer la position du commutateur de mode dutilisation. ! Après le changement de mode, réinitialisez le microprocesseur. Français Mode SRC : OSD OFF ! Utilisation avec un appareil central Pioneer équipé dune entrée IP-BUS. ! Non-utilisation des indications OSD (Affichage sur écran) de cet appareil sur lécran. ATTENTION Conservez la pile hors de portée des enfants. Au cas où la pile serait avalée, consultez immédiatement un médecin. PRÉCAUTION ! Utilisez seulement une pile CR2025 (3 V) au lithium. ! Retirez la pile si la télécommande nest pas utilisé pendant un mois ou plus. ! Ne rechargez pas la pile, ne la démontez pas, ne la chauffez pas et ne la jetez pas dans le feu. ! Ne manipulez pas la pile avec un outil métallique. ! Ne conservez pas la pile avec des objets métalliques. ! En cas de fuite de la pile, nettoyez soigneusement la télécommande puis mettez en place une pile neuve. ! Lors de la mise au rebut des piles usagées, respectez les règlements nationaux ou les instructions locales en vigueur dans le pays ou la région en matière de conservation ou de protection de lenvironnement. Fr 21 Section 02 Avant de commencer Utilisation de la télécommande Pointez la télécommande dans la direction de la face avant de lappareil à télécommander. Important ! Ne laissez pas la télécommande exposée à des températures élevées ou à la lumière directe du soleil. ! La télécommande peut ne pas fonctionner correctement en lumière directe du soleil. ! Ne laissez pas la télécommande tomber sur le plancher, où elle pourrait gêner le bon fonctionnement de la pédale de frein ou daccélérateur. 22 Fr Section 03 Description de lappareil 3 1 4 2 Boîtier de télécommande La télécommande fournie avec cet appareil est principalement pour lutilisation par les passagers des sièges arrière. Quand vous lutilisez, visez la face avant ou le récepteur de signal sur lappareil central combiné Pioneer. 1 Touche CH CALL Mode SRC : OSD ON Quand la télévision est sélectionnée comme source, ou quand la télévision arrière est en service et que la télévision nest pas sélectionnée comme source : Les informations sur le canal sont affichées sur lécran avant et lécran arrière. Mode SRC : OSD OFF Quand la télévision est sélectionnée comme source, ou quand la télévision arrière est en service et que la télévision nest pas sélectionnée comme source : Les informations sur le canal sont affichées sur lécran arrière. 2 Touche BAND Non utilisée. 3 Touche MENU Non utilisée. 5 Touche POWER Mode SRC : OSD ON Appuyez sur cette touche pour mettre lécran arrière en service ou hors service quand la télévision nest pas sélectionnée comme source. Mode SRC : OSD OFF Appuyez sur cette touche pour mettre lécran arrière en service ou hors service quand la télévision nest pas sélectionnée comme source. Français 5 4 Touches a/b/c/d Mode SRC : OSD ON Appuyez sur cette touche pour effectuer une recherche manuelle des stations et un accord sur présélection. Utilisée aussi pour contrôler les fonctions. Mode SRC : OSD OFF Appuyez sur cette touche pour effectuer une recherche manuelle des stations et un accord sur présélection. Utilisée aussi pour contrôler les fonctions. Autres commandes à distance Vous pouvez aussi utiliser la télécommande pour effectuer les opérations suivantes. Quand vous utilisez une télécommande de lecteur de DVD voiture Pioneer Quand vous utilisez une télécommande fournie par SDV-P7, AVX-P7300DVD, XDV-P90. 1 Touche r Appuyez sur cette touche et maintenez-la enfoncée pour mettre BSSM en service ou hors service. Fr 23 Section 03 Description de lappareil 2 Commutateur de mode de fonctionnement de la télécommande Quand vous utilisez une télévision, assurezvous de mettre le commutateur de mode dutilisation de la télécommande en position TV. Quand vous utilisez une télécommande de lecteur de DVD voiture Pioneer Quand vous utilisez une télécommande fournie avec AVH-P7600DVD, AVH-P7500DVD, AVHP6600DVD, AVH-P6500DVD, AVX-P8DVD ou une télécommande optionnelle CD-R5. 1 Touches 1-10 (16) Appuyez pour effectuer une sélection directe des canaux. 2 Joystick Appuyez sur cette touche pour effectuer une recherche manuelle des stations et un accord sur présélection. 3 Commutateur de mode de fonctionnement de la télécommande Quand vous utilisez une télévision, assurezvous de mettre le commutateur de mode dutilisation de la télécommande en position TV. 24 Fr Section 04 Syntoniseur TV (mode SRC) Français 1 2 3 Description de lappareil Appareil central (par exemple, AVH-P5700DVD) Utilisez cet appareil (pour la réception de la télévision) avec lappareil central connecté. Les instructions de ce mode demploi utilisent AVH-P5700DVD comme exemple dappareil central. 1 VOLUME Appuyez sur ces touches pour augmenter ou diminuer le niveau sonore. 2 Récepteur de signal Reçoit les signaux dun boîtier de télécommande. 3 Touche SOURCE Cet appareil est mis en service en sélectionnant une source. Appuyez sur cette touche pour parcourir les différentes sources disponibles. 4 56 4 Touche BAND Appuyez sur cette touche pour choisir entre deux bandes TV et annuler le mode commande des fonctions. 5 Touche A.MENU Appuyez sur cette touche pour afficher MENU. 6 Touches a/b/c/d Appuyez sur ces touches pour effectuer la recherche manuelle des stations. Egalement utilisées pour commander les fonctions. Utilisation avec différents appareils centraux Appareils centraux du groupe 1 Les appareils centraux suivants disposant dun clavier tactile. Fr 25 Section 04 Syntoniseur TV (mode SRC) AVH-P7600DVD, AVH-P7500DVD, AVHP6600DVD, AVH-P6500DVD, AVH-P5700DVD, AVX-P8DVD Appareils centraux du groupe 2 Quand vous utilisez les appareils centraux suivants, lutilisation diffère de celle de AVHP5700DVD. Les appareils centraux suivants supportant le fonctionnement de la touche FUNCTION ou le fonctionnement en SOFT KEY (touches logicielles). FH-P5000MP, FH-P4200MP, DVH-P5000MP, DEH-P9600MP, DEH-P960MP, DEH-P6500MP, DEH-P850MP, DEH-P7600MP, DEH-P760MP, DEH-P7500MP, DEH-P750MP, DEH-P6700MP, DEH-P670MP, DEH-P6600, DEH-P660, DEHP6500MP, DEH-P650MP, DEH-P5600MP, DEHP560MP, DEH-P5500MP, DEH-P550MP, DEHP4700MP, DEH-P470MP, DEH-P4600MP, DEHP460MP, DEH-P4500MP, DEH-P450MP, DEHP3700MP, DEH-P3600, DEH-P360, DEH-P3500, DEH-P350, DEH-P35, DEH-P2600, DEH-P26, DEH-P2500, DEH-P250, DEH-P25 Appareils centraux du groupe 3 Quand vous utilisez les appareils centraux suivants, lutilisation diffère de celle de AVHP5700DVD. Les appareils centraux suivants disposant dun MULTI-CONTROL. DEH-P8600MP, DEH-P860MP, DEH-P80MP, DEH-P8MP, DEH-P7700MP, DEH-P770MP Appareils centraux du groupe 4 Quand vous utilisez les appareils centraux suivants, lutilisation diffère de celle de AVHP5700DVD. Les appareils centraux suivants sont des appareils de navigation disposant dun clavier tactile. AVIC-N2, AVIC-N1, AVIC-D1 26 Fr Tableaux de compatibilité des fonctions Appareils centraux du groupe 1 Commandes Sélection de la télévision comme source Appuyez sur SOURCE. Sélection dune bande Touchez BAND. Accord sur présélection Touchez a ou b. Accord manuel (en étapes) Touchez c ou d. Accord automatique Touchez c ou d de façon continue. Sélection dune fonction Touchez A.MENU puis FUNCTION. Appareils centraux du groupe 2 Commandes Sélection de la télévision comme source Appuyez sur SOURCE. Sélection dune bande Appuyez sur BAND. Accord sur présélection Appuyez sur a ou b. Accord manuel (en étapes) Appuyez sur c ou d. Accord automatique Appuyez de façon continue sur c ou d. Mémoire de présélection Appuyez sur 1-10 (16) de façon prolongée. Rappel direct Appuyez sur 1-10 (16). BSSM Appuyez sur FUNCTION (FUNC)(A.MENU). a/b Liste des canaux présélectionnés Appuyez sur FUNCTION (FUNC)(A.MENU). a/b/c/d Section 04 Syntoniseur TV (mode SRC) Appareils centraux du groupe 3 Commandes Appuyez sur SOURCE. Sélection dune bande Appuyez sur BAND. Accord sur présélection Poussez MULTI-CONTROL vers le haut ou vers le bas. Accord manuel (en étapes) Poussez MULTI-CONTROL vers la gauche ou vers la droite. Accord automatique Poussez de façon continue MULTI-CONTROL vers la gauche ou vers la droite. Sélection dune fonction Utilisez MULTI-CONTROL. Appareils centraux du groupe 4 Commandes Sélection de la télévision comme source Appuyez sur SOURCE. Sélection dune bande Touchez BAND. Accord sur présélection Touchez a ou b. Accord manuel (en étapes) Touchez c ou d. Accord automatique Touchez c ou d de façon continue. Sélection dune fonction Touchez A.MENU puis FUNCTION. 1 2 3 4 Français Sélection de la télévision comme source Regarder la télévision 5 1 Icône de la source Elle indique la source choisie. 2 Indicateur de gamme Indique la bande sur laquelle le syntoniseur TV est accordé. 3 Indicateur de numéro de présélection Il indique le numéro de la présélection choisie. 4 Indicateur de canal Indique le canal sur lequel le syntoniseur TV est accordé. 5 Affichage de la liste de présélection Montre la liste de présélection. 1 Touchez lécran pour afficher les touches du clavier tactile. 2 Touchez BAND pour choisir la gamme. Touchez répétitivement BAND jusquà ce que la gamme désirée, TV1 ou TV2 soit affichée. 3 Pour sélectionner un canal présélectionné, touchez un canal présélectionné sur la liste. Laccord est fait sur le canal présélectionné. Fr 27 Section 04 Syntoniseur TV (mode SRC) # Si la liste des canaux nest pas affichée, touchez LIST. 4 Pour effectuer un accord manuel, touchez brièvement c ou d. Les canaux augmentent ou diminuent pas par pas. # Vous pouvez aussi effectuer un accord manuel en appuyant sur la touche c ou d. 5 Pour effectuer un accord automatique, touchez c ou d pendant environ une seconde puis ôtez le doigt. Le syntoniseur examine les canaux jusquà ce que se présente une émission dont la réception est jugée satisfaisante. # Vous pouvez annuler laccord automatique en touchant brièvement c ou d. # Si vous touchez de façon prolongée c ou d, vous pouvez sauter des canaux. Laccord automatique démarre dès que vous relâchez les touches. # Vous pouvez aussi effectuer un accord automatique en appuyant sur la touche c ou d. Mise en mémoire et rappel des stations démission Si vous touchez une des touches de présélection P1P12 vous pouvez aisément mettre en mémoire jusquà 12 stations démission que vous pourrez ultérieurement rappeler en touchant la touche appropriée. % Lorsque vous trouvez une station que vous désirez mettre en mémoire, maintenez le contact sur une des touches de présélection P1P12 jusquà ce que le numéro de la présélection cesse de clignoter. Le nombre que vous avez touché clignote sur lindicateur de numéro de présélection puis reste allumé. La station sélectionnée a été mise en mémoire. 28 Fr Lorsque vous touchez à nouveau cette même touche de présélection, la station en mémoire est rappelée. # Pour basculer entre P1P6 et P7P12, touchez ou . # Quand les touches du clavier tactile ne sont pas affichées, vous pouvez les afficher en touchant lécran. # Quand P1P6 et P7P12 ne sont pas affichés, vous pouvez les afficher en touchant LIST. Remarques ! La mémoire peut contenir 24 stations, 12 pour chacune des deux bandes TV. ! Vous pouvez aussi utiliser a et b pour rappeler les stations affectées aux touches de présélection P1P12. Section 04 Syntoniseur TV (mode SRC) Introduction à lutilisation avancée du syntoniseur TV croissant des canaux. Quand lopération est terminée, BSSM disparaît. # Pour annuler la mise en mémoire, touchez BSSM à nouveau. # Vous pouvez aussi effectuer cette opération en appuyant de façon prolongée sur CH CALL sur le boîtier de télécommande. 1 La mise en mémoire de fréquences à laide de la fonction BSSM peut provoquer le remplacement de stations précédemment enregistrées en utilisant les touches P1P12. Français Remarque 1 Afficheur des fonctions Il indique le nom de la fonction. 1 Appuyez sur la touche A.MENU pour afficher MENU. MENU apparaît sur lécran. 2 Touchez FUNCTION pour afficher le nom de la fonction. Le nom de la fonction est affiché. # Touchez BACK pour revenir à laffichage précédent. # Pour revenir à limage TV, touchez ESC. Remarque Si vous ne réglez aucun paramètre de la fonction pendant environ 30 secondes, laffichage revient automatiquement à limage TV. Mise en mémoire séquentielle des stations les plus fortes % Touchez BSSM sur le menu des fonctions pour mettre la fonction BSSM en service. BSSM commence à clignoter. Pendant que BSSM clignote, les 12 stations démission les plus fortes sont enregistrées dans lordre Fr 29 Annexe Informations complémentaires Caractéristiques techniques Généralités Alimentation .............................. 14,4 V DC (10,8 15,1 V acceptable) Mise à la masse ....................... Pôle négatif Consommation maximale ... 0,6 A Dimensions (L x H x P) ......... 172 × 30 × 150 mm Poids .............................................. 0,7 kg Syntoniseur TV Canal de réception ................. VHF can 2 13, UHF can 14 69 Système de couleurs compatible ..................................................... NTSC Sensibilité utile ......................... 11 dBµ (75 W, Mono) S/B Vidéo ..................................... Supérieur à 40 dB (59 dBµ en entrée RF, Crête Blanc 100%) Sensibilité utile pour S/B Vidéo 30 dB ..................................................... 44 dBµ Entrée antenne ......................... 4 can Diversity (Type Mini prise diamètre 3,5 mm) Sortie écran arrière Vidéo .............................................. 1 Vc-c/75 W (TV: Blanc Modulé 100%) Son ................................................. 500 mVeff/15kW (TV: Modulé 100%) Remarque Les caractéristiques et la présentation peuvent être modifiées sans avis préalable à fin damélioration. 30 Fr PIONEER CORPORATION 4-1, MEGURO 1-CHOME, MEGURO-KU, TOKYO 153-8654, JAPAN PIONEER ELECTRONICS (USA) INC. P.O. Box 1540, Long Beach, California 90801-1540, U.S.A. TEL: (800) 421-1404 PIONEER EUROPE NV Haven 1087, Keetberglaan 1, B-9120 Melsele, Belgium TEL: (0) 3/570.05.11 PIONEER ELECTRONICS ASIACENTRE PTE. LTD. 253 Alexandra Road, #04-01, Singapore 159936 TEL: 65-6472-7555 PIONEER ELECTRONICS AUSTRALIA PTY. LTD. 178-184 Boundary Road, Braeside, Victoria 3195, Australia TEL: (03) 9586-6300 PIONEER ELECTRONICS OF CANADA, INC. 300 Allstate Parkway, Markham, Ontario L3R OP2, Canada TEL: 1-877-283-5901 PIONEER ELECTRONICS DE MEXICO, S.A. de C.V. Blvd.Manuel Avila Camacho 138 10 piso Col.Lomas de Chapultepec, Mexico, D.F. 11000 TEL: 55-9178-4270 HÒ¡ýPlø =lø : ð-qïµ44_13 ûq : (02) 2521-3588 HÒûP/Plø /]w/ÎLFm-Ã 9901-6¤ ûq : (0852) 2848-6488 Published by Pioneer Corporation. Copyright © 2005 by Pioneer Corporation. All rights reserved. Publié par Pioneer Corporation. Copyright © 2005 par Pioneer Corporation. Tous droits réservés. Printed in Japan Imprimé au Japon <KSNZF> <05C00000> <CRD3993-A> UC