1
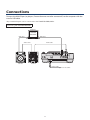
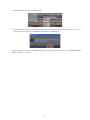
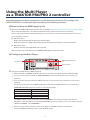
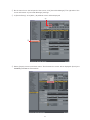
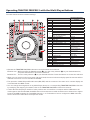
Multi Player CDJ-850 TRAKTOR PRO/PRO 2 Connection Guide Introduction The CDJ-850 is equipped with a computer control mode that allows DJ software developed by other companies to be controlled upon connecting the Multi Player to a computer with a USB cable. Pioneer provides a dedicated MIDI mapping file for TRAKTOR PRO/PRO 2, a DJ software product from Native Instruments. By using this file, you can control TRAKTOR PRO/PRO 2 from the Multi Player. You can also use the Multi Player as a TRAKTOR PRO/PRO 2 audio output device. •TRAKTOR is the registered trademark of Native Instruments GmbH. •Windows®, Windows 7, Windows Vista® and Windows XP are the registered trademarks and trademarks of Microsoft Corporation registered in the United States of America and other countries. •Mac OS is the trademark of Apple Inc. registered in the United States of America and other countries. 2 Connections Connect the Multi Player (or players, if more than one are to be connected*) to the computer with the use of a USB cable. *Up to 4 Multi Players can be connected to the TRAKTOR PRO/PRO 2. Connecting with TRAKTOR PRO/PRO 2 Computer TRAKTOR PRO/PRO 2 USB cable USB cable Audio cable Audio cable R USB CDJ-850 CONTROL R L AUDIO OUT L Rear panel DJ mixer Power cable 3 To an AC outlet Deleting the old version of the MIDI mapping file from TRAKTOR PRO/PRO 2 If the old version of the MIDI mapping file (PIONEER_CDJ-850.tsi) has already been imported into TRAKTOR PRO/PRO 2, please delete it before importing the new version. Delete the old version from TRAKTOR PRO/PRO 2 according to the following steps. The following steps are not required if you are importing the MIDI mapping file (PIONEER_CDJ-850.tsi) for the first time. Skip to “’Using the Multi player as a TRAKTOR PRO/PRO 2 controller” on page 7. This example shows the operation on TRAKTOR PRO for Windows. The operation is the same on the Macintosh, except that the menu name changes from [File] to [Traktor]. 1 Start TRAKTOR PRO/PRO 2. On the [File] menu, select [Preferences...] to display the [Preferences...] screen. 4 2 On the menu list on the left panel of the screen, click [Controller Manager]. The right side of the screen will switch to [Controller Manager] settings. 3 Check the selection under [Device Setup]. Confirm that [Generic MIDI] is selected for [Device]. If the option is not selected, click and select the corresponding option from the pulldown menu. ③ ② 4 In [Device Setup], click [Edit...]. A pulldown menu will be displayed. 5 5 Select [Delete] from the pull down menu. 6 Click [Yes] when the popup window confirming if you would like to perform the operation or not is displayed. The old version of PIONEER_CDJ-850.tsi is deleted now. To import the new version of the MIDI mapping file, see “’Using the Multi player as a TRAKTOR PRO/ PRO 2 controller” on page 7. 6 Using the Multi Player as a TRAKTOR PRO/PRO 2 controller After the equipment has been connected, turn on the power for each device, then configure the TRAKTOR PRO/PRO 2 and the Multi Player according to the following procedure. Downloading the MIDI mapping file 1 Download the MIDI mapping file from the Pioneer website: http://pioneer.jp/support/download/dj-e/cdj-850/ Since the download file is in the ZIP compressed format, extract the file before proceeding. The file may automatically expand depending on your browser, in which case there will be no need for you to expand it yourself. Windows users Right click the download file and select [Extract All]. After the expansion wizard is displayed, specify the destination folder for the extracted files. Macintosh users Double click the downloaded ZIP file to expand. After the zip file is extracted, the file PIONEER_CDJ-850.tsi will be extracted. Configuring the Multi Player UTILITY BROWSE [PC] button TAG LIST INFO MENU BACK TAG TRACK /REMOVE STANDBY PC [MENU (UTILITY)] button DISC EJECT USB STOP USB Rotary selector DISC 1 /16 1/8 1 TIME MODE AUTO CUE IN / CUE OUT 2 VINYL SPEED ADJUST CUE / LOOP RELOOP/ EXIT TOUCH / RELEASE DELETE MEMORY 2 Configure the Multi Player’s MIDI channels. 1 Press and hold the [MENU (UTILITY)] button for 1 second or longer to switch to UTILITY mode. 2 Turn the rotary selector and select [MIDI CHANNEL]. Press the rotary selector to choose your selection. 3 Turn the rotary selector and select a MIDI channel (1–4). Press the rotary selector to choose your selection. The initial configuration of the MIDI mapping file will map the MIDI channels to corresponding TRAKTOR PRO/PRO 2 decks as shown in the following table. CDJ-850 MIDI channel TRAKTOR PRO/PRO 2 deck MIDI CHANNEL 1 Deck A MIDI CHANNEL 2 Deck B MIDI CHANNEL 3 Deck C MIDI CHANNEL 4 Deck D The MIDI channel for the multi-player is set to CHANNEL 1 by factory settings. Following the mappings in the table above, set each CDJ-850 MIDI channel you wish to use to one of the channels between CHANNEL 1 and CHANNEL 4. 4 Press the rotary selector again to save the changes to the MIDI channel configuration. Press the [MENU (UTILITY)] button to exit UTILITY mode. 7 3 Press the [PC] button on the Multi Player to switch the Multi Player to control mode. “CONNECTED” will appear in the main unit’s display console. Set the CDJ-850 to control mode on all units you wish to use. Importing the MIDI mapping file into TRAKTOR PRO/PRO 2 4 Import the MIDI mapping file into TRAKTOR PRO/PRO 2 according to the following steps. This example shows the operation on TRAKTOR PRO for Windows. The operation is the same on the Macintosh, except that the menu name changes from [File] to [Traktor]. 1 Start TRAKTOR PRO/PRO 2. On the [File] menu, select [Preferences...] to display the [Preferences...] screen. 8 2 On the menu list on the left panel of the screen, click [Controller Manager]. The right side of the screen will switch to [Controller Manager] settings. 3 In [Device Setup], click [Add...]. A pulldown menu will be displayed. ③ ② 4 Select [Import] from the pull down menu. The file selection screen will be displayed. Specify the PIONEER_CDJ-850.tsi extracted file. 9 5 Check the selections under [Device Setup]. Confirm that [Generic MIDI] is selected for [Device], [All Ports] for the [In-Port], and [Focus] for the [Device Target]. If any option is not selected, click and select the corresponding option from the pulldown menu. 6 Click [Close] and the [Preferences...] screen will close. The above settings will allow you to control TRAKTOR PRO/PRO 2 from the Multi Player machine. If you will use the Multi Player as a TRAKTOR PRO/PRO 2 audio output device, see the “Using Multi Players as TRAKTOR PRO/PRO 2 Audio Output Devices” on page 12. 10 Operating TRAKTOR PRO/PRO 2 with the Multi Player Buttons The table below shows the default settings CDJ-850 button 8 9 a c UTILITY BROWSE TAG LIST INFO MENU d BACK TAG TRACK /REMOVE STANDBY PC DISC EJECT USB STOP USB 1 DISC 1 /16 1 1/8 2 TIME MODE b 1/4 1/2 AUTO CUE VINYL SPEED ADJUST IN / CUE OUT IN ADJUST OUT ADJUST CUE / LOOP RELOOP /EXIT LOOP 4 CALL TOUCH / RELEASE DELETE MEMORY 8 JOG MODE AUTO BEAT LOOP VINYL i 7 BEAT SELECT TEMPO DIRECTION 6 10 16 WIDE REV MASTER TEMPO TRACK SEARCH 2 j h e f DISC EJECT 7 8 9 10 11 11 TRACK SEARCH FWD TRACK SEARCH REV SEARCH FWD SEARCH REV CUE PLAY/PAUSE Jog dial (press the top surface) Jog dial (scratch) Jog dial (Turn the outer perimeter) VINYL (JOG MODE) LOOP IN/CUE LOOP OUT RELOOP/EXIT AUTO BEAT LOOP 8 - 1/16 BEAT SELECT 12+13 BACK + Rotary selector (push) 12+13 BACK + Rotary selector (turn) 6 SEARCH 3 g 0 CUE 4 1 2 () 2 () 3 () 3 () 4 5 PLAY / PAUSE FWD REV TEMPO 5 MULTI PLAYER CDJ-850 13 Rotary selector (push) 13 Rotary selector (turn) 14 15 16 TEMPO RANGE MASTER TEMPO TEMPO MEMORY DELETE CUE/LOOP CALL FWD CUE/LOOP CALL REV 17 18 19 () 19 () 6 TRAKTOR PRO/PRO 2 function Unload Load Next Load Prev Seek Position Seek Position CUE PLAY/PAUSE Scratch On Scratch tempo bend (stepless) CD mode Loop In/Set Cue Loop Out Loop Active Loop Size Control Loop Size Control Fold/expand nodes within the tree Move Up and Down within the tree Select a list Move Up and Down within a list Tempo Range Key-Lock Tempo Store Cue/Loop Delete Cue/Loop Next Cue/Loop Prev Cue/Loop •Operate the TRAKTOR PRO/PRO 2 browser tree and browser list as follows. Browser tree: While pressing the [BACK] button (c), turn the rotary selector (d) to your desired selection, and press the selector to choose the selection. Browser list : Turn the rotary selector (d) to your desired selection. Press the selector to choose the selection. •When you use such functions as scratch and pitch bend, the sound volume and play speed increments will be different from when run on a standalone CDJ-850. •The operation of Multi Player LED indicators (ON, OFF) and the contents of the main unit’s console display are not linked with the MIDI control. •You can change the assignment of any Multi Player button to a corresponding TRAKTOR PRO/PRO 2 function by modifying the mapping. For details, refer to the TRAKTOR PRO/PRO 2 instruction manual. •If other Pioneer CDJ player models or other products are connected to a computer with a USB cable to be used together with the CDJ-850, the MIDI channel for these other models should be set to Channel 5 or higher because the MIDI mapping file uses MIDI channels 1 – 4. For details on how to configure the MIDI channels, see the instruction manual for the respective model. 11 Using Multi Players as TRAKTOR PRO/PRO 2 Audio Output Devices Set up the computer and TRAKTOR PRO/PRO 2 in accordance with the following procedures. When Using Windows®(supported OS: Windows 7, Windows Vista®, Windows XP) 1 Install the [Pioneer_CDJ_Driver] driver software into the computer. Either install [Pioneer_CDJ_Driver] from the CD-ROM supplied with the Multi Player, or download the latest edition from the following website. http://pioneer.jp/support/download/index-e.html 2 Select [Pioneer CDJ ASIO] with the [File] [Audio Setup...] function on the TRAKTOR PRO/PRO 2. 3 The Multi Player will be automatically set up at the audio output device. If the settings are not made automatically, set the necessary parameters manually with [File] [Audio Setup...] [Output Routing]. When Using Mac OS It is not necessary to install the driver software. Set up the computer parameters in accordance with the following procedures if multiple Multi Players are to be used as audio output devices. When Using the Mac OS X 10.5.X 1 Connect the Multi Player (or players, if more than one are to be connected) to the computer with the use of a USB cable. 2 Start up [AUDIO MIDI Settings] from the [Applications]–[Utilities] folder. 3 In the menu bar at the top of the screen select [Device Set Editor] from the [Audio] menu. 4 Click [+] on the [Device Set Editor] screen to add the new Device settings. 5 Select the added Device setting, and then add a tick to [CDJ-850] to it for the required number of Multi Players. 6 Select the Device setting created with procedure 5 with [Traktor] [Preferences...] [Audio Setup] on the TRAKTOR PRO/PRO 2. 7 The Multi Player will be automatically set up at the audio output device. If the settings are not made automatically, set the necessary parameters manually with [Traktor] [Preferences...] [Audio Setup] [Output Routing]. 12 When Using the Mac OS X 10.6.X 1 Connect the Multi Player (or players, if more than one are to be connected) to the computer with the use of a USB cable. 2 Start up [AUDIO MIDI Settings] from the [Applications]–[Utilities] folder. 3 Click [+] on the [Audio Device] screen to add the new Device settings. 4 Select the added Device setting, and then add a tick to [CDJ-850] to it for the required number of Multi Players. 5 Select the Device setting created with procedure 4 with [Traktor] [Preferences...] [Audio Setup] on the TRAKTOR PRO/PRO 2. 6 The Multi Player will be automatically set up at the audio output device. If the settings are not made automatically, set the necessary parameters manually with [Traktor] [Preferences...] [Audio Setup] [Output Routing]. 13 Published by Pioneer Corporation. Copyright © 2011 Pioneer Corporation. All rights reserved. PIONEER CORPORATION 1-1, Shin-ogura, Saiwai-ku, Kawasaki-shi, Kanagawa 212-0031, Japan PIONEER ELECTRONICS (USA) INC. P.O. BOX 1540, Long Beach, California 90801-1540, U.S.A. TEL: (800) 421-1404 PIONEER ELECTRONICS OF CANADA, INC. 300 Allstate Parkway, Markham, Ontario L3R 0P2, Canada TEL: 1-877-283-5901, 905-479-4411 PIONEER EUROPE NV Haven 1087, Keetberglaan 1, B-9120 Melsele, Belgium TEL: 03/570.05.11 PIONEER ELECTRONICS ASIACENTRE PTE. LTD. 253 Alexandra Road, #04-01, Singapore 159936 TEL: 65-6472-7555 PIONEER ELECTRONICS AUSTRALIA PTY. LTD. 5 Arco Lane, Heatherton, Victoria, 3202, Australia, TEL: (03) 9586-6300 PIONEER ELECTRONICS DE MEXICO S.A. DE C.V. Blvd.Manuel Avila Camacho 138 10 piso Col.Lomas de Chapultepec, Mexico, D.F. 11000 TEL: 55-9178-4270 DRI1027-A