1
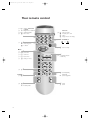
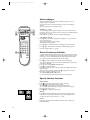
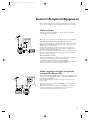
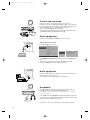
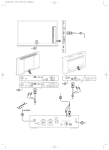
3104 305 4756.1.gb 28-05-1999 16:31 Pagina 1
English
Contents
Installation
Your remote control ________________________________________2
Preparation _______________________________________________3
Installation_________________________________________________3
Search for and Store TV channels
Select the menu language and country ______________________4
Automatic installation ___________________________________4
Manual installation ______________________________________5
English
Give name_________________________________________________6
Reshuffle the programme list _________________________________6
Select favourite TV channels __________________________________6
Install TV set up ____________________________________________7
The keys on the front of the TV _______________________________7
Operation
Use of the remote control __________________________________8-9
Use of the menus
Picture menu __________________________________________10
Sound menu___________________________________________10
Features menu _________________________________________11
Teletext _______________________________________________13-14
Connect peripheral equipment _________________________15-18
Tips ____________________________________________________19
Index ___________________________________________________19
Lexicon ________________________________________________20
1
3104 305 4756.1.gb 28-05-1999 16:31 Pagina 2
Your remote control
p. 17 u
p. 9 X
p. 14 j
p. 9 i
selection of EXT1, EXT2
or FRONT
bilingual choice + sound info
continuous subtitles
info on screen
Teletext
u
X
j
i
f
d
h
U
p. 9
s
P
fi
P
fi
personal preferences
reduce image noise
no function
solution to riddles
mix tv/txt picture - hold
enlarge
subpage selection / time display
Installation
p. 3
yÚ
s
p. 13 f
d
h
U
f
U
yÚ
B
p. 8
B
p. 8
R programme selection
switch to standby
Menu
p. 3
p. 10
p. 10
p. 11
p. 3
p. 8
B select your choice
k
k
k
È
m
picture menu
MENU
sound menu
-
incredible sound on/off
-
V
+
1
2
3
OK
4
5
6
m
7
8
9
0
◊
0
F b
p. 8
2
+
P volume key
activate your choice
Teletext
p. 13 b
P
features menu
¬
p. 8
teletext on/off
q
picture format
S
freeze the picture
q
a
S
M
p. 8
¬
0
sound temporarily
switched off
previous programme
a
M
picture
sound
3104 305 4756.1.gb 28-05-1999 16:31 Pagina 3
Preparation
& Place the TV on a solid surface.
For ventilation, leave at least 5 cm free all around the TV.
To prevent any unsafe situation, do not place any objects on top of the TV.
é Insert the aerial plug tightly into the aerial socket x at the back of the
TV. You can improve the picture quality by using the suppressor-aerial cable
supplied.
CABLE
“ Insert the mains plug in the wall socket with a mains voltage of 220V - 240V.
‘ Remote control: Remove the cover of the battery compartment.
Insert the 2 batteries supplied (type R03G-1,5V).
The batteries supplied do not contain the heavy metals mercury and cadmium.
Nevertheless in many countries exhausted batteries may not be disposed of with your
household waste. Please ensure you dispose of exhausted batteries according to local
regulations.
( Switch TV on : Press the power switch A on the front of your TV.
A green indicator and the screen light up.
If the indicator is red, press the R key on the remote control.
RO3 / AAA
The green lamp blinks every time you press a key on the remote control.
When you switch on your set for the first time, the MENU LANGUAGE automatically
appears on the screen. Alternatively the explanation appears in the different
languages.
Installation
Select the INSTALLATION menu :
u
X
j
i
f
d
h
U
yÚ
s
fi
& Open the door of the remote control.
é Press f and U at the same time.
B
o
π
p
œ
To use the menus
& Use the B keys to select a menu item.
MENU
é Use the blue OK key to activate.
“ Use the red MENU key to return or to switch menu off.
o
π
p
œ
o
Select
o
π
p
π
p
œ
œ
MENU
Return / Switch menu off
XXXXXXX
OK
Activate
Abc Defghijklm
Xxxxxxx
Xxxxxx Xxxxxxxxx
Xxxx Xxxxxxxxx
Xxxx Xxxx
Xxxxxxxxxxxx
XXXXXXX
Abc Defghijklm
Xxxxxxx
Xxxxxx Xxxxxxxxx
Xxxx Xxxxxxxxx
Xxxx Xxxx
Xxxxxxxxxxxx
3
3104 305 4756.1.gb 28-05-1999 16:31 Pagina 4
o
π
p
Select
œ
Store TV channels
MENU
Return / Switch menu off
Select the menu language and country
OK
Activate
First, you have to select your language and your country.
INSTALLATION
Menu Language
Country
Automatic Installation
Manual Installation
English
•••
•••
MENU
LANGUAGE
COUNTRY
•••
•••
•••
UK
•••
•••
•••
Other
é Select your language and press the blue OK key.
“ Select Country and press the blue OK key.
•••
•••
•••
•••
& Select the Menu Language and press the blue OK key.
‘ Select the country where you are now located and press the blue OK key.
Select Other when none of the countries applies.
•
AUTOMATIC
INSTALLATION
Searching
Automatic Installation
Automatic installation
In the Automatic Installation menu select On with the CD keys to activate the
searching. All TV channels are searched for and stored automatically.
0 % ................... 100 %
0
1
2
3
4
.
.
.
BBC1
BBC2
...
...
...
...
...
10
11
12
13
..
..
..
..
...
...
...
...
...
...
...
...
If a cable system which broadcasts ACI (Automatic Channel Installation) or a
TV channel transmitting a teletext page with the frequencies and programme
names of all the TV channels which can be received, is detected, the search is
stopped and a programme list appears.
The programme list is automatically filled with all the programme numbers and
names of the TV channels transmitted.
AUTOMATIC
INSTALLATION
You can now search for and store the TV channels in two different ways: using
automatic installation or manual installation (tuning-in channel by
channel).
Select your choice and press the blue OK key.
Automatic Installation
It is possible that the cable company or the TV channel displays a broadcast selection
menu. Layout and items are defined by the cable company or the TV channel.
Make your choice with the B keys and press the blue OK key.
On
•
To exit from the menu
Press the red MENU key.
Go on to page 6.
4
3104 305 4756.1.gb 28-05-1999 16:31 Pagina 5
Manual installation
0
1
2
3
4
MANUAL
INSTALLATION
5
6
7
8
9
10
11
12
13
...
Searching for and storing TV channels is done channel by channel.
You must go through every step of the Manual Installation menu.
Selection Mode is only present and lights up if the country you selected also
offers the channel option (C-channels for aerial channels, S-channels for cable
channels).
You can choose either channel or frequency mode.
(Selection Mode)
System
Search
Programme No.
Store
& Select the TV system
• Select the country or part of the world from where you want to receive the
TV channel.
If you are connected to a cable system, select your country.
é Search for a TV channel
The frequency or the channel number increases until a TV channel is found.
In case of poor reception, you can improve the reception by adjusting the
frequency with the R key.
Direct selection of a TV channel
If you know the frequency, or the C- or S-channel number, enter it directly
with the digit keys 0 to 9.
Ask for a list from your cable company or dealer, alternatively consult the
Table of frequencies on the inside backcover of this handbook.
“ Enter the programme number with the digit keys.
‘ Store steps & till “
• Select Store and press the blue OK key.
Repeat every step to store another TV channel.
•
To exit from the menu :
Press the red MENU key.
5
3104 305 4756.1.gb 28-05-1999 16:31 Pagina 6
Give name
INSTALLATION
Menu Language
Country
Automatic Installation
Manual Installation
Give Name
Reshuffle
Favourite Programmes
Setup
It is possible to change the name stored in the memory or to assign a name
to a TV channel which has not yet been entered. A name with up to 5 letters
or numbers can be given to the programme numbers 0 to 99. For example
SUPER, BBC1,... Between 99 and 0, in the column in the middle, you can also
name any peripherals that are connected.
& Select Give Name in the Installation menu and press the blue OK key.
é Select the programme number.
“ Press the blue OK key.
GIVE NAME
90
91
92
93
94
95
96
97
98
99
EXT1
EXT2
FRONT
0
1 BBC1
2 BBC2
3 ....
4 ....
5 ....
.......
‘ Select the character with the EF keys.
( Select the following position with the CD keys.
§ Select the following character.
è Press the blue OK key when finished.
! Press the red MENU key to return to the Installation menu.
A space, numbers or other special characters are located between Z and A.
Reshuffle the programme list
According to your preference you can change the order of the stored TV
channels.
RESHUFFLE
90
91
92
93
94
95
96
97
98
99
EXT1
EXT2
FRONT
0
1 BBC1
2 BBC2
3 ....
4 ....
5 ....
.......
& Select Reshuffle in the Installation menu and press the blue OK key.
é Select the programme number you want to change.
Use the CD keys to select another column of the programme list.
“ Press the blue OK key.
‘ Select the new number.
( Press the blue OK key.
Repeat the reshuffling until all TV channels are allocated as you like.
§ Press the red MENU key to return to the Installation menu.
Select Favourite TV channels
EXT1
EXT2
FRONT
FAVOURITE
PROGRAMMES
0 ...
1 ...
2 ...
3 ...
4 ...
5 ...
.....
Programme Number
Favourite
10 ...
11 ...
12 ...
13 ...
14 ...
15 ...
......
After leaving the installation you can browse through the TV channels by
pressing the R key. Only those TV channels which are in the favourite list
will be displayed. The non-favourite TV channels can still be selected with the
digit keys.
& Select Favourite programmes in the Installation menu and press the blue
OK key.
é Select your favourite programme number.
“ Select Favourite.
‘ Select Yes or No.
( Repeat é to ‘ for every TV channel you want to change into a favourite
or a non-favourite TV channel.
§ Press the red MENU key to return to the Installation menu.
6
3104 305 4756.1.gb 28-05-1999 16:31 Pagina 7
Install TV Setup
INSTALLATION
Menu Language
Country
Automatic Installation
Manual Installation
Give Name
Reshuffle
Favourite Programmes
Setup
& Use the B keys to select the menu item.
é Use the blue OK key to activate.
“ Use the red MENU key to return or switch menu off.
CD-i / Photo CD
See Connect Peripheral Equipment, TV and a CD-i / Photo CD, p. 16.
CD-i/Photo CD
Decoder/Descrambler
Information Line
SETUP
DECODER/
DESCRAMBLER
Programme
Decoder Status
Define Decoder/Descrambler programme numbers
If you have connected a decoder or a descrambler, see p. 15, you can define
one or more programme numbers as decoder programme numbers.
•
Press the CD keys to select Off , EXT1 or EXT2, the euroconnector where
you connected your decoder.
Select Off if you do not want the selected programme number being activated
as a decoder programme number.
•
Information Line
After the selection of a TV programme or after pressing the i key on the
remote control, a TV channel which broadcasts teletext may transmit the name
of the TV channel or the programme name or another message which appears
briefly in the information line at the bottom of the screen.
When selected Off, the information line will only appear after pressing the i
key, and not after the selection of a TV channel.
To exit from the menu
‘ Keep the red MENU key pressed.
The keys in front of the TV
Should your remote control be lost or broken you can still change some of
the basic picture and sound settings with the keys on front of the TV.
•
•
MENU
-- +
Press the MENU key repeatedly to select Volume, Brightness, Colour,
Contrast, Treble or Bass.
Press the - or + key to regulate the selected adjustment.
When the menu adjustment is not displayed, the - and + keys enable you
to select the TV channels.
The selected adjustment automatically switches off when after 10 sec. no action has
been executed.
7
3104 305 4756.1.gb 28-05-1999 16:31 Pagina 8
Use of the remote control
B
R
Standby
Programme selection
To browse through the TV channels activated in the
Favourite Programme menu. See p. 6.
The TV set is switched off and the red
indicator lights up.
To switch the TV on again, press R or the
digit keys.
P
Your TV consumes energy in the standby mode.
Energy consumption contributes to air and water
pollution. We advise to switch off your TV
overnight instead of leaving it on standby. You
save energy.
u
X
j
i
f
d
h
U
Volume
The volume is adjusted. If you want to store the
volume adjustment in the memory, see the Features
menu, Store PP, p. 11 to store the same volume
yÚ
fi
s
B
o
π
p
m
œ
Incredible sound
In MONO sound mode, this feature, when
switched on, enables you to hear a spatial
effect of sound.
In STEREO sound mode, when Incredible
Sound On is selected, it seems as though
the loudspeakers are spread further apart
from one another.
MENU
®
-
P
+
0/9
Ò
-
V
+
†
1
2
3
To select a TV channel.
For a two digit programme number, enter the
second digit within 2 seconds.
‡ OK
4
5
6
π m
7
8
9
¬
Digit keys
Mute key
◊
Fb
‡
q
¬
0
0
Interrupt the sound temporarily or restore it.
a
0
SMART CONTROLS
®
q
Wide Screen
To switch to a Wide Screen format.
A black band appears at the top and bottom
of the screen.
The TV has an automatic switching function. Video
recorders or programmes carrying special signals
will automatically switch the TV to the correct
screen format.
S
Freeze
To activate/de-activate the frozen picture.
8
S
M
Previous programme
The previously selected TV channel is displayed.
The ◊ indication has a video recorder function.
aM
Smart Controls keys
To select predefined picture and sound settings.
Picture (a key)
Each time it is pressed, a different picture setting is
selected, corresponding with a specific predefined
setting of Contrast, Colour, Sharpness and Contrast
Plus.
Sound (M key)
Each time it is pressed a different sound setting is
selected, corresponding with a specific predefined
setting of Treble, Bass and Loudness.
Personal refers to the personal preference setting
of picture and sound which you have stored with
Store PP in the Features menu, p. 11.
The smart picture and sound settings are set to
Manual until the personal adjustments are stored.
3104 305 4756.1.gb 28-05-1999 16:31 Pagina 9
i Permanent programme number
Screen information
u Select peripherals
Press this key repeatedly to select
or FRONT-Y/C,
according to where you connected your
peripherals
(see p. 17).
EXT1-CVBS, EXT2- Y/C
u
X
j
i
f
d
h
U
yÚ
s
X Bilingual choice and
fi
B
sound mode selection
Press this key
• to switch from Stereo to Mono sound, in
case of stereo transmission, or from Digital
Sound to Digital Sound available, in case
of digital transmission;
• to choose between language Y (Dual Y) or
language Z (Dual Z), in case of bilingual
transmission.
The setting is stored for each TV channel
separately.
Press for 5 seconds to activate/de-activate the
continuous display of the programme number.
Press briefly to display information about the
selected TV channel and programme, the sound
reception, the selected DNR setting and picture
format and the remaining time set with the
sleeptimer.
o
π
p
U
œ
MENU
®
-
P
+
Ò
-
V
+
†
1
2
3
‡ OK
4
5
6
u
X
j
i
f
d
h
U
Time display
The time, downloaded from the TV channel (with
teletext) stored on programme number 1 or under
the lowest favourite programme number, is
displayed in the upper left corner of the screen.
This function is not available when continuous subtitles
have been switched on (see page 14).
s Personal Preferences
Restore picture and sound settings, stored in
the features menu (see p. 11).
yÚ
s
fi
P Digital Noise Reduction
To reduce the image noise and improve
picture quality when receiving weak signals.
Press this key to select DNR On or DNR Off.
DNR can be individually set for each TV
channel.
B
o
π
p
œ
MENU
®
-
P
+
Ò
-
V
+
†
1
2
3
‡ OK
4
5
6
π m
7
8
9
◊
Fb
‡
q
®
S
¬
0
0
a
SMART CONTROLS
M
9
3104 305 4756.1.gb 28-05-1999 16:31 Pagina 10
Use of the menus
o
π
p
Select adjustments
œ
& Press the red, green or yellow colour key to display/cancel the PICTURE,
SOUND or FEATURES menu.
MENU
Picture menu
é Use the B keys to select the menu item.
Sound menu
“ Use the blue OK key to activate.
Features menu
Activate
OK
Picture menu
When you are watching a TV channel in the NTSC-system, or if a NTSC peripheral
is connected to one of the euroconnectors, the option Hue also appears and can be
adjusted.
PICTURE
FEATURES
Contrast
Brightness
Colour
Sharpness
Tint
Contrast Plus
Store PP
Programmes
Sleeptimer
Message
Child Lock
Sharpness
You can adjust the Sharpness for each TV channel separately.
Normal/Warm/Cool
On/Off
•
Tint
Select the colour temperature: Normal, Warm or Cool.
Contrast Plus
It is preferred to switch On the Contrast Plus function to make the contrast
between darker and brighter picture parts more outspoken.
In certain circumstances it may be preferred to switch Off Contrast Plus.
•
Store the modified adjustments for Contrast, Brightness, Colour, Tint and
Contrast Plus for all TV channels with Store PP in the FEATURES menu.
on/off
Sound menu
SOUND
HEADPHONE
Volume
Balance
Treble
Bass
Loudness
Headphone
Volume
Dual
Switch Loudness on or off
When Loudness On is selected, the low and high frequencies are amplified so
that the natural balance is restored when listening at a low volume.
The selected setting for Loudness is stored for all TV channels.
Headphone
See Connect Peripheral Equipment, p. 16 for the connection of the headphone.
On/Off
Y-Z
•
Select Dual to choose between the dubbed or original language when the TV
channel broadcasts in 2 languages.
•
Store the modified adjustments for Volume, Balance, Treble and Bass for all TV
channels with Store PP in the FEATURES menu.
•
10
To exit from the menus
Press the corresponding red, green or yellow colour key.
3104 305 4756.1.gb 28-05-1999 16:31 Pagina 11
o
Select adjustments
π
p
œ
Features menu
MENU
Picture menu
& Press the yellow colour key to display/cancel the FEATURES menu.
Sound menu
é Use the B keys to select the menu item.
Features menu
Activate
FEATURES
“ Use the blue OK key to activate.
OK
Store PP
Programmes
Sleeptimer
Message
Child Lock
Store PP
The adjustments of Contrast, Brightness, Colour and Contrast Plus made in
the picture menu and the adjustments of Volume, Balance, Treble, Bass and
Loudness made in the sound menu can be stored in memory for all the stored
TV channels.
on/off
•
•
Good Night
Select Programme list
Programme numbers from the favourite list are displayed in white characters.
Programme numbers which are not in the favourite list are displayed in black.
The current TV channel on the screen is indicated with a black block.
Press the CD keys to select another column of the programme list.
Press the blue OK key to select the desired TV channel.
Sleeptimer
With the sleeptimer you can set a time period after which the TV should
switch itself off to standby.
The counter runs from Off up to 180 min. or from 180 min. down to Off.
One minute before the TV is set to go to standby, the remaining minute and
the message Good Night appear on screen. You can always switch off your
set earlier or change the set time.
Child Lock
If the child lock is on, the TV can only be switched on with the remote control.
The - and + keys on front of the TV cannot be used to select a TV channel. In
this way you can prevent unauthorised use of your TV.
If the message Child Lock On appears, the child lock must be switched off
before you can use the - and + keys on the TV to select a TV channel.
11
3104 305 4756.1.gb 28-05-1999 16:31 Pagina 12
FEATURES
Store PP
Programmes
Sleeptimer
Message
Child Lock
Message
With this function you can enter a personal message on 2 lines which will be
displayed automatically when the set is switched on from standby.
For example: I'll be late this evening. Don't wait for dinner.
on/off
Message ...................
...........................
MESSAGE
Change
Clear
Type
Run
•
•
•
Change
Select with the EF keys the letter or number you want to enter.
Select with the D key the next position.
Press the blue OK key when you have entered the complete message.
•
Clear
Press the blue OK key to remove a previous message.
•
Type
Press the CD keys to select the way the message will be displayed : Wipe,
Slide, Fall or Fade.
•
Run
Press the CD keys to select the display frequency : Continuous, Once or
No.
•
12
Display message
Switch the TV to standby.
The message appears on the screen when the TV is switched on again.
If you selected Once, the message will disappear from the screen after
30 seconds.
If you selected Continuous, the message will appear on the screen until the
display frequency is switched off in the Message menu.
The message does NOT appear when Continuous Subtitles have been switched
On. See Teletext, p. 14.
3104 305 4756.1.gb 28-05-1999 16:31 Pagina 13
Teletext
Most TV channels broadcast information via teletext. Each channel which
broadcasts teletext transmits a page with information on how to use its
teletext system. Look for the teletext page with the main index (usually p. 100).
TV programmes are sometimes subtitled for the hard of hearing.
u
X
j
i
f
d
h
U
Depending on the TV channel, teletext is transmitted in different systems.
The colours used in the options line correspond with the colour keys of your
remote control.
B
About the Easy Text system
i
yÚ
fi
s
o
The Easy Text system considerably reduces the waiting time (on condition the
teletext broadcast of the particular TV channel is switched on for at least half a
minute) by :
• a fast and direct selection of previous and following pages which are in
transmission
• a direct selection of the pages referred to in the options line
• a habit watcher list: frequently used pages are put in a list of preferred
pages, so that they are immediately available afterwards
• the precapturing of the page numbers referred to in the displayed page
• the precapturing of all the subpages to be controlled by the teletext
pages.
π
p
œ
MENU
k
b
®
-
P
+
Ò
-
V
+
†
1
2
3
‡ OK
4
5
6
π m
7
8
9
◊
Fb
‡
q
®
S
¬
0
0
0
Switch Teletext on and off
a
SMART CONTROLS
M
•
Press b to switch on or off the teletext.
The main index page appears on the screen together with two information
lines at the top and one option line at the bottom of the screen.
Select a Teletext page
•
•
With the digit keys
Enter the desired page number with the digit keys.
The page counter seeks the page or the page appears immediately when the
page number has been stored in the memory.
A message appears when you have entered a non existent or an incorrect page
number. Page numbers beginning with 0 or 9 do not exist. Choose another number.
With the option line
Select with the colour keys, corresponding to the coloured options at the
bottom of the screen, the desired subject.
Quickly run through the teletext pages
•
Press EF to run through the previous or the following pages.
Select the previously selected txt page
•
Press the 0 key.
Select the index teletext page
•
Press the white colour key to display the main index (usually p.100).
•
Only for the T.O.P teletext broadcasts :
T.O.P orders the pages in categories and adds other possibilities of enhancing
ease of use.
Press i. A T.O.P. overview of the teletext subjects available appears.
Not all TV channels broadcast the T.O.P. teletext. When the teletext system
is not T.O.P. teletext, a message appears at the top of the screen.
Select with the B keys the desired subject and press the blue OK key.
•
13
3104 305 4756.1.gb 28-05-1999 16:31 Pagina 14
Select subpages
When a selected teletext page consists of different subpages, one of the
subpages appears on the screen.
The coloured number in the first information line refers to the displayed
subpage.
The other subpages can be selected in 2 ways :
f
d
u
X
j
i
f
d
h
U
yÚ
s
fi
B
j
h
U
•
o
•
2. By adding a subcode:
Press U. Enter the desired subpage with the digit keys : e.g. 3 for the third
page of seven subpages.
The TV searches for the selected subpage.
Automatically rotating subpages:
Press U again to cancel the subcode. The subpages rotate automatically.
•
•
Press U again. The information line with the available subpages appears.
Select the subpages with the CD keys.
π
p
œ
•
MENU
b
®
-
P
+
Ò
-
V
+
†
1
2
3
‡ OK
4
5
6
π m
7
8
9
◊
Fb
‡
q
¬
0
Select Continuous Subtitles
0
TV channels which broadcast teletext often transmit certain programmes with
subtitling. See the corresponding page in the index teletext page. For each TV
channel you can store a subtitle page which will be displayed continuously if
the programme being broadcast is transmitted with subtitles.
a
SMART CONTROLS
®
S
1. With the CD keys.
The other subpage numbers appear in white as soon as the transmission has
found them. They are stored in the memory so that they are available while the
teletext page is on screen.
Select with the CD keys the previous or the following subpage.
M
•
•
•
•
Press b to switch on teletext, and select the proper subtitle page.
The selected subtitle page appears and also the subtitles when the programme
transmitted is subtitled.
Press j. The message Subtitle stored appears.
Press b to switch off teletext.
Every time a programme of the selected TV channel is subtitled, the subtitles
will be available.
When there are no subtitles available, only b is displayed on the screen.
Press j to switch the subtitles on or off.
The message Subtitles On or Off appears.
For every TV channel the subtitle page should be stored separately.
Special teletext functions
•
•
•
•
•
14
Mix / Interrupt
Press d to overlay the teletext page on the TV programme.
Press d again to de-activate the screen overlay.
The display b indicates that you are still in the teletext mode.
You can select a page number. When the page has been found, the page
number appears on the screen.
Press d again to display the teletext page.
Enlarge
Press h repeatedly to display the upper part, the lower part and then to
return to the normal page size. When the upper part is displayed, you can
scroll the text line per line by using the EF keys.
Reveal
Press f to reveal/conceal the hidden informations, such as solutions to
riddles and puzzles.
3104 305 4756.1.gb 28-05-1999 16:31 Pagina 15
Connect Peripheral Equipment
There is a wide range of audio and video equipment that can be connected
to your TV. The following connection diagrams show you how to connect it.
Video recorder
•
CABLE
Connect the aerial cables 1, 2 and, to obtain a better picture quality,
eurocable 3 as shown opposite.
Only if you do not connect the eurocable 3, you have to do the following :
1
3
EXTERNAL
2
•
•
2
•
4
•
•
•
Search for and store the test signal of the video recorder
Unplug the aerial cable 1 from the aerial socket x of your video recorder.
Switch on your TV and put the video recorder on the test signal. (See the
handbook for your video recorder.)
Search for the test signal of your video recorder in the same way as you
searched for and stored the TV signals. See Installation, Searching for and
storing TV channels, Manual Installation, p. 5.
Store the test signal either under programme number 0 or between 50 an 99.
Replace the aerial cable in the aerial socket x of your video recorder after
you have stored the test signal.
Decoder and video recorder
Connect a eurocable 4 to your decoder and to the special euroconnector of
your video recorder. See also the video recorder handbook.
See Define Decoder/Descrambler prog. numbers as well, p. 7.
You can also connect your decoder directly to EXTERNAL 1 with a eurocable
or with an aerial cable to the aerial socket x of your TV.
Video recorder and other peripherals
(except CD-i/Photo CD)
•
1
4
2
5
3
EXTERNAL
1
2
CABLE
•
Connect the aerial cables 1, 2 and 3 as shown opposite. Better picture
quality can be obtained if you also connect eurocable 5 to EXTERNAL 2 and a
eurocable 4 to EXTERNAL 1 or 2.
Look for the test signal of your peripheral in the same way as you do for a
video recorder.
When a video recorder is connected to EXTERNAL 1 you can only record a
programme from your TV.
Only when a video recorder is connected to EXTERNAL 2 it is possible to
record a programme from your TV as well as from other connected
equipment. See Record with your video recorder, p. 18.
15
3104 305 4756.1.gb 28-05-1999 16:31 Pagina 16
Camera and camcorder
L
A
U
D
IO
VI
R
EO S
D •VH
S
•
•
•
•
Connect your camera or camcorder at the front side of your TV.
Connect the equipment to VIDEO 2 and AUDIO L 1 for mono equipment.
Press the X key under the door of the remote control repeatedly to select
the sound coming from one or both loudspeakers of your TV.
Also connect AUDIO R 1 for stereo equipment.
S-VHS quality with a S-VHS camcorder is obtained by connecting the S-VHS
cables with the S-VHS input 3and AUDIO inputs 1.
1 2 3
Other equipments
Connect the eurocable 1 to EXTERNAL 1 as shown opposite.
EXTERNAL
1
•
Only for CD-i and Photo CD :
Press f and U at the same time.
INSTALLATION
1
•
•
Menu Language
Country
Automatic Installation
Manual Installation
Give Name
Reshuffle
Favourite Programmes
Setup
SETUP
CD-i/Photo CD
Present
Decoder/Descrambler
Information line
Select CD-i/Photo CD Present in the Setup menu of the INSTALLATION
menu.
This offers you optimum picture quality for your CD-i or Photo CD.
Keep the red MENU key pressed to switch off all menus.
Audio equipment
•
AUDIO
Connect the audio cables to the audio input of your audio equipment and to
AUDIO L and R at the back of your TV.
You can listen to your TV sound via your audio equipment.
Headphone
n
•
•
Insert the plug into the headphone socket L at the front side of the TV.
Press ¬ to switch off the internal loudspeakers of the TV.
The headphone impedance must be between 8 and 4000 Ohm. The headphone
socket has a 3.5 mm jack.
In the SOUND menu select Headphone to adjust the headphone volume and
to select dubbed or original language (when the TV channel broadcasts in two
languages) for your headphone sound. See p. 10.
If you want to connect more equipment to your TV, consult your dealer.
16
3104 305 4756.1.gb 28-05-1999 16:31 Pagina 17
To select connected equipment
•
•
u
u
X
j
i
f
d
h
U
Equipment connected with an aerial cable only :
Select the programme number under which you have stored the test signal
with the digit keys.
Equipment connected to a euroconnector or to the front side of
the TV
Press repeatedly the u key to select EXT1, EXT2 or FRONT, according to
where you connected your equipment at the back or the front side of your TV.
Remark : Most equipment (decoder, video recorder) carries out the switchover itself.
yÚ
s
fi
B
•
o
π
p
œ
Do you want to watch TV channels again ?
Enter the programme number of the TV channel which you want to watch with
the digit keys.
MENU
-
®
+
P
u
X
j
i
f
d
h
U
Video recorder keys
Most of the video equipment from our range of products can be operated with
the remote control of the TV.
yÚ
fi
s
Y
B
o
B
p
œ
MENU
®
®
-
P
+
Ò
Ò
-
V
+
†
†
1
2
3
‡
‡
4
5
6
π
π
7
8
F
‡
‡
q
®
®
S
¬
-P+
9
◊
F
Press simultaneously on the VCR key and:
π
0
®
Ò
†
‡
π
F
3
◊
SMART CONTROLS
M
for record,
for rewind,
for fast forward,
for stop,
for play,
for programming (on certain models),
for selecting 1- or 2- digit programme numbers from the
video recorder tuner,
R
a
k
k
k
k
k
b
0
for fast programme selection from the video recorder tuner,
0 to 9
to select a programme number from your video recorder
tuner,
B to switch off the video recorder temporarily
These keys function with video recorders which use the RC5 signalling standard.
17
3104 305 4756.1.gb 28-05-1999 16:31 Pagina 18
Record with your video recorder
To record S-VHS quality, connect a S-VHS peripheral directly to the video
recorder.
1. Record a TV programme
using only an aerial cable
•
•
Select the programme number on your video recorder.
Set your video recorder to record.
(See the handbook for your video recorder.)
Switching programme numbers on your TV does not disturb recording !
•
•
•
using a eurocable connected to the
euroconnector EXTERNAL 2
using a eurocable connected to the
euroconnector EXTERNAL 1
With a video recorder connected to EXTERNAL 2 it is
possible to record a programme from your TV as
well as from other connected equipment.
With a video recorder connected to EXTERNAL 1 you
can only record a TV channel.
Select the programme number on the TV.
Select the right external on your video
recorder.
Set your video recorder to record.
You record what you are watching on the
screen.
•
•
Select the programme number on the TV.
Set your video recorder to record.
Switching to a programme from a connected
peripheral equipment does not disturb
recording .
Do not switch programme numbers or do not
switch off your TV when you are recording !
2.
Record a programme on your video recorder connected to
EXTERNAL 2 from Audio/Video equipment connected to EXTERNAL or
FRONT
•
•
•
Switch on the equipment.
Select the right external on your video recorder.
Set your video recorder to record.
You record what you are watching on the screen.
Do not switch programme numbers or do not switch off your TV when you are
recording !
To watch TV programmes again, press twice the programme number you want to
select. Then the recording is stopped and your video recorder switches to standby.
18
3104 305 4756.1.gb 28-05-1999 16:31 Pagina 19
Tips
Care of the screen
Clean the TV with a slightly damp soft
cloth. Do not use abrasive solvent as it can
damage the TV screen.
Poor Picture
Have you selected the correct TV system?
Is your TV or house aerial located too
close to loudspeakers, non-earthed audio
equipment or neon lights, etc. ?
Mountains or high buildings can cause
double pictures or ghost images.
Sometimes you can improve the picture
quality by changing the direction of the
outside aerial.
Is the picture or teletext unrecognisable?
Check if you have entered the correct
frequency. See Installation, p. 5.
Are brightness and contrast out of
adjustment ? Press the s key.
Sometimes poor picture quality is possible
when having activated a S-VHS camera or
camcorder connected to the front side of
your TV and another peripheral is
connected to EXT1 or EXT2 at the same
time. In this case switch off one of the
other peripherals.
No picture
Is the aerial connected properly ? Are the
plugs tightly connected in the aerial socket?
Is the aerial cable in good condition and
does it have suitable plugs ? Are the
connection facilities to a possible second
TV in good condition ? If in doubt, consult
your dealer.
No picture means that the selected
peripheral equipment is not transmitting a
picture.
Has the child lock been switched off ?
(p. 11)
Remote control
If your TV no longer responds to the
remote control, the batteries may be
dead.
You can still use the Menu keys and the
-/+ keys at the front of your TV.
Menu
Have you selected the wrong menu ? Press
the same key again to exit from the menu.
No solution
Switch your TV off and then on again.
Never attempt to repair a defective
TV yourself.
Check with your dealer or call a TV
technician.
End of life directives
Your new TV contains materials which can
be recycled and reused.
At the end of life specialised companies
can dismantle the discarded TV to
concentrate the reusable materials and to
minimise the amount of materials to be
disposed of.
Please ensure you dispose of your old TV
according to local regulations.
How to dispose of dead batteries ?
The batteries supplied do not contain the
heavy metals mercury and cadmium.
Nevertheless in many countries dead
batteries may not be disposed of with your
household waste. Please ensure you dispose
of dead batteries according to local
regulations.
Index
a automatic installation, 4
ACI, 4
b bilingual broadcast, 9
c camcorder, 15
CD-i / Photo CD, 16
child lock, 11
clock, 9
country, 4
d decoder/descrambler, 7
digital, 9
DNR, 9
e easy text, 13
eurocable, 15
f favourite programmes, 6
freeze, 8
frequency, 5
g give name, 6
h headphone, 16
hue, 10
i incredible sound, 8
info on screen, 9
information line, 7
interrupt the sound, 8
l language, 4
loudness, 10
m manual installation, 5
menu language, 4
message, 12
p permanent programme number, 9
personal preferences, 9
picture adjustments, 10
programme list, 6
r recording, 18
reshuffle, 6
s search for TV channels, 5
set up, 7
sleeptimer, 11
smart controls, 8
sound adjustments, 10
sound mode, 9
stereo, 9
store PP, 11
store TV channels, 4
subpages teletext, 14
subtitles, 14
S-VHS, 18
switch TV on, 3
t teletext, 13
v video recorder, 15
w wide screen, 8
19
3104 305 4756.1.gb 28-05-1999 16:31 Pagina 20
Lexicon
100 Hz
100 Hertz provides a superior solution to
the problem of picture flicker which is
particularly noticeable with larger screen
sizes. In a conventional TV, the picture
area is scanned 50 times a second (50
Hertz) – a frequency which is still
detectable by the human eye in the form
of a flickering picture. In 100 Hertz sets,
the picture area is scanned at a rate of 100
times per second (100 Hertz). At this
frequency, the eye cannot detect flicker,
resulting in a clearer picture which is more
relaxing to the eye.
Automatic Channel Installation (ACI)
Automatically installs all TV channels in the
same order as offered by your cable
company, provided of course that the data
is transmitted. It also automatically
includes programme number and
programme name.
With ACI, channel installation is fully
automatic, simple and done within
seconds.
Child Lock
Feature to prevent children from viewing
unwanted channels.
DNR
Digital Noise Reduction.
By encoding signals digitally in 100 Hz sets
with Digital Scan it is possible to clean up
picture noise. This is especially beneficial in
poor signal areas and when viewing poor
quality video tapes.
20
Easy Text
Teletext memory that automatically
memorises Teletext pages and gives you
instant access to them.
Sleeptimer
Function with which you can set a time
period after which the TV should switch
itself off to standby.
Euroconnector
A 21-pins connector system enabling you
to simply connect various types of
audio/video and computer equipment.
Picture Freeze
TV mode which allows you to “freeze” a
certain image in order to study a specific
detail at ease, e.g. to make notes of certain
programme information like phone
numbers.
Incredible sound
Feature to enrich the sound performance
of your TV set or audio equipment. It
enhances the stereo effect by giving the
impression that the speakers are
positioned much wider apart than they
actually are.
Menu
On-screen display of functions and
facilities in a well-organised survey, which
you can select using your remote control.
NTSC
The broadcasting system used in the USA,
Japan and parts of South America and
Southeast-Asia.
Smart Controls
Keys on the remote control to select
predefined picture and sound settings.
Teletext
See also Easy Text
WST: World Standard Teletext.
FLOF: Full Level one Features. System
applied by the BBC, RVE.... that provides a
fast access to the teletext pages.
TOP: Table of (Teletext) Pages. German
system for an easy access to the teletext
pages.
Tint (or Hue in NTSC)
TV-function to modify the general colour
balance between cool and warm and to
adjust it according to your personal
preference.