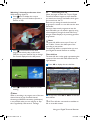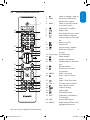
1
DTR 7510
www.philips.com/support
For support call 0870 900 9070
EN Digital Terrestrial Receiver
DTR 7510 200910.indd 1
16/10/2009 17:40:43
2
DTR 7510 200910.indd 2

16/10/2009 17:40:43
1
Important
4
2
2.1
2.2
2.3
2.4
2.5
Your Digital Terrestrial Receiver
What’s in the box?
What you also need (not supplied)
Digital Terrestrial Receiver overview
Main menu overview How to read this manual
6
6
7
7
8
8
3
3.1
3.2
3.3
3.4
Getting started
Prepare
Connect
Install
RETUNE procedure:
9
9
10
10
11
4
Using your Digital Terrestrial
Receiver
Watching live TV Controlling Live TV
Recording
HDD library
Play files from an USB device
13
13
16
18
21
21
4.1
4.2
4.3
4.4
4.5
5
5.3
5.4
5.5
5.6
5.7
5.8
5.9
Use more of your Digital Terrestrial
Receiver
22
Digital Terrestrial Receiver full
overview
22
Digital Terrestrial Receiver display full
overview
23
Remote control full overview
25
Menu full overview
26
TV guide
26
Channel manager
30
HDD Library
32
USB
32
Settings
33
6
6.1
6.2
6.3
Maintenance
Cleaning
Replacement
Disposal
39
39
39
39
7
Accessories and connections 40
5.1
5.2

DTR 7510 200910.indd 3
ENGLISH
Table of contents
7.1 Connecting a DVD player / external
recorder
7.2 Connecting your audio equipment
7.3 Universal remote control
40
40
41
8
Guarantee and service
47
9
Technical data
47
10 Frequently asked questions
49
11 Glossary
51
12 Index
53
13
13.1
13.2
13.3
13.4
13.5
Remote control brand code list
Setup Code For All TVs
Setup Code For All VCRs
Setup Code for All Digital Video Disks
Setup Code for All Audio AMP/Tuners
Setup Code for All Audio
Amplifiers (A)
54
54
55
56
57
Contact information
59
Trademarks and partner logos
59
58
3
16/10/2009 17:40:44
1
Important
Take time to read this User Manual before using the Digital Terrestrial Receiver.
It contains important information and notes regarding how to operate it.
Disposal of your old product
Your product is designed and manufactured with high quality materials
and components, which can be recycled and reused.
When this crossed-out wheeled bin symbol is attached to a product or
its packaging, it means the product is covered by European Directive
2002/96/EC.
Please inform yourself about the local separate collection process for
electrical and electronic products.
Please act according to your local rules and do not dispose of your old
products with your normal household waste. The correct disposal of
your old product will help prevent potential negative consequences for
the environment and human health.
The “Material recyclability symbol” affixed on package cardboard and
user manual means these parts are recyclable.
So do not dispose of them with your normal household waste.
The “Material recyclability symbol” affixed on plastic packaging parts
means these parts are recyclable.
So do not dispose of them with your normal household waste.
The “Green Dot” affixed on cardboard means PHILIPS pays a financial
duty to the “Avoidance and Recovery of Packaging Waste” organization.
4
DTR 7510 200910.indd 4
Important
16/10/2009 17:40:44
ENGLISH
Your receiver is powered using an AC power cord. The Digital Terrestrial Receiver has been
manufactured to meet the appropriate safety standards, but the instructions below must be followed
to operate it safely. These instructions must be kept for future reference.
Danger
• The Digital Terrestrial Receiver does not contain any user-serviceable parts. Do not attempt to
open them. All maintenance work must be carried out by qualified services centres.
• The supplied mains plug may be a non-rewireable type or a rewireable type. Both types contain
an approved 3A fuse. If you need to replace the fuse, use an ASTA- or BSI-approved BS 1362 fuse,
rated at 3A and marked with either of these symbols.
• Non-rewireable plugs have the fuse beneath a fuse cover on the plug face. Use a screwdriver to
lever off the fuse cover, replace the fuse with a new one and refit its cover. Never use a plug if its
fuse cover is missing.
• Rewireable plugs have the fuse inside. Use a screwdriver to remove the plug’s back cover, then
lever out the fuse and replace it with a new one. Replace the plug’s back cover. If the supplied
mains plug is not suitable for your mains socket-outlet, remove its fuse and then cut the plug off
the lead. Destroy the severed plug immediately to avoid the shock hazard which would exist if this
were to be plugged into a mains socket. Do not attempt to repair or modify the mains lead or
plug. Fit an appropriate mains plug on the lead. If this plug contains a fuse, it should be as described
above. If you are using a non-fused plug, an external fuse must not exceed 5A.
• Make sure that children do not place any foreign objects in any of the openings.
Warnings
• Before connecting the AC power cord to the mains, check that the mains supply voltage
corresponds to the voltage printed on it. If the mains voltage is different, consult your dealer.
• The AC power cord has been designed for indoor use only.
• It is recommended to unplug the AC power cord from the mains during lightning storms.
• Periodically inspect the AC power cord for damage. Do not use if damage is found. Always refer to
qualified services centres.
• To prevent fire or shock hazard, do not expose the Digital Terrestrial Receiver to rain or moisture.
• The Digital Terrestrial Receiver should be placed on a firm surface, and the ventilation openings
must not be covered with items, such as newspapers, table clothes, curtains, etc.
• Do not install the Digital Terrestrial Receiver near heat sources such as radiators, stoves or other
apparatus that produce heat. Protect it from direct sunlight.
• When installing the Digital Terrestrial Receiver, ensure there is a gap of approximately 5 cm
around the Digital Terrestrial Receiver to enable air to circulate freely and prevent overheating.
• Leave accessible the AC power cord in case emergency shutdown is required.
• Do not place any combustible objects on the Digital Terrestrial Receiver (candles, etc.).
• No objects filled with liquids, such as vases, shall be placed on the unit. The Digital Terrestrial
Receiver shall not be exposed to dripping or splashing. Should this happen, disconnect the AC
power cord from the mains and consult qualified services centres.
• Do not move the product or turn the power off suddently while the hard disk drive is running.
The company shall not be liable for any corruption of data on the hard disk drive caused by the
carelessness or misuse of users.
Refer also to the cautions throughout this manual.
Important
DTR 7510 200910.indd 5
5
16/10/2009 17:40:44
2
Your Digital Terrestrial
Receiver
Congratulations on your purchase and welcome
to Philips!
To fully benefit from the support that Philips
offers, register your product at
www.philips.com/welcome.
With this Digital Terrestrial Receiver, you never
need to schedule your life around your favourite
TV programmes. Thanks to the built in hard disk
drive (HDD) that records programmes as you
watch them, you can pause live TV, or repeat a
scene you missed. Want to record a programme
so that you can watch it later? Just press the
record button.
2.1
Once you begin to record, you are free to watch
other recorded programmes.You can even watch
the programme that you are recording from the
start without disruption to the recording, or
record two channels at the same time.
Need to schedule a recording in advance? Simply
access the Electronic programme guide, which
lists the TV programme schedule for the next
eight days.
And you can do much more than just record on
this recorder
What’s in the box?
Digital Terrestrial Receiver
User manual
Remote control and
2 batteries
SCART cable
AC Power cord
Quick Start Guide
Caution
Plastic bags can be dangerous.
To avoid suffocation keep the bag away from babies and children.
6
DTR 7510 200910.indd 6
Your Digital Terrestrial Receiver
16/10/2009 17:40:45
What you also need (not supplied)
ENGLISH
2.2
RF Cable
2.3
TV Set
Digital Terrestrial Receiver
overview
E
A B CD
Front Panel
A Standby
B Programme C Programme +
D Record
E Display
F Front panel door
F
Front Panel
A
B
C
D
Rear Panel
E
I
FG
H
A
B
C
D
E
F
G
H
Remote control unit
Your Digital Terrestrial Receiver
DTR 7510 200910.indd 7
Rear Panel
A RF IN*
B RF OUT*
C AUX scart*
D TV scart*
E SPDIF audio out (digital)*
F L/R audio out* (analogue)
G HDMI*
H Power**
I ON/OFF Switch**
* Safety extra low voltage
**Hazardous voltage
Remote control unit
A Standby
B Source selection
C Alphanumeric keypad, Exit, Back
D Programme information
E Up/Down
Left/Right
OK keys
F Recorder functions
G Volume control
Programme+/ProgrammeH System keys Menu Fav list,
7
16/10/2009 17:40:48
2.4
Main menu overview
Press MENU on the remote control to
access the main menu.
2.5
How to read this manual
Danger
Describes situations in injury or loss of life.
Warning
Describes actions that may cause damage to the
product.
Caution
Describes the actions required to avoid
dangerous or illegal situations.
Note
Additional information.
Use the / /
/
arrow keys to
navigate through the different options.
The visible option is automically validated.
Use also these keys to navigate through
different level of menus.
Press OK to validate your choice in a list of
items.
Tip
Information that is useful to know but not
essential to the task. For example, information
about alternative use.
Note
For more information, see chapter 5.4 Menu full
overview.
8
DTR 7510 200910.indd 8
Your Digital Terrestrial Receiver
16/10/2009 17:40:48
Getting started
Prepare the smart card
ENGLISH
3
The basic steps to get you started are described
in this chapter.
3.1
Prepare
Prepare the remote control
To be able to receive scrambled digital channels
from pay-TV providers, you need a smart card
(not supplied) from the provider broadcasting
those channels.
Open the battery compartment.
Insert the two batteries supplied according
to the indications (+/-) inside the
compartment.
Close the battery compartment.
Note
Point the remote control directly at the remote
sensor on the front panel and select the desired
function.
Warning
Insert the smart card with the chip facing down.
Notes
•You can access the information stored on
the smart card by selecting MENU, and
then the Menu/Settings/Smart Card
submenu.
•For more information about smart cards or
operators, consult your installer or dealer.
Caution
Do not mix batteries or keep them in the remote
control for long periods of time without use.
Batteries must not be disposed of with your
household waste but to a local separate battery
collection system.
Do not dispose of batteries in a fire.
Getting started
DTR 7510 200910.indd 9
9
16/10/2009 17:40:48
3.2
Connect
Danger
Risk of electric shock!
Make sure all the devices are disconnected from
the mains before making any connections.
HDMI connection
Use this connection if your TV set is fitted with
a HDMI input.
SCART connection
Use this connection if your TV set is not fitted
with a HDMI input.
Connect the aerial cable from the wall
socket to the RF IN socket at the rear of
the Digital Terrestrial Receiver.
Connect the RF OUT socket at the rear
of the Digital Terrestrial Receiver to the RF
input of your TV set using a RF cable.
Connect the supplied scart cable to the
scart input of the TV set and to the TV scart
socket at the rear of the Digital Terrestrial
Receiver.
Plug your TV set to the mains. Do not plug
your Digital Terrestrial Receiver yet!
Note
The fan extracts hot air from the device:
Check that there is enough place and
fresh air around the device to avoid
overheating.
Connect the aerial cable from the wall
socket to the RF IN socket at the rear of
the Digital Terrestrial Receiver.
Connect the RF OUT socket at the rear
of the Digital Terrestrial Receiver to the RF
input of your TV set using a RF cable.
Connect a HDMI cable to the HDMI input
of the TV set and HDMI socket at the rear
of the Digital Terrestrial Receiver.
Plug your TV set to the mains. Do not plug
your Digital Terrestrial Receiver yet!
Note
The HDMI cable is not supplied
3.3
Install
Before you start installation, make sure you have
made all the required connections.
Switch on your TV set and select the correct
source (refer to the user manual of your TV set).
Note
The display format being managed by the Digital
Terrestrial Receiver, set your TV to “full screen”
or to the similar equivalent setting.
10
DTR 7510 200910.indd 10
Plug the power cord into the mains and
set the switch at the rear of the Digital
Terrestrial Receiver to position ON.
Getting started
16/10/2009 17:40:49
Depending on your TV set, select the
appropriate TV shape setting using the
arrow keys of the remote control.
Note
For more information about TV shapes, see
chapter Settings.
Press OK. The Channel search screen
appears.
Search failure
In case of channel search failure, a black screen
with a No signal message is displayed.
/
Before starting a new search, check the RF cable
connection to your Digital Terrestrial Receiver
as described in chapter 3.2 Connect.
Once you have checked all those points, apply
the Retune procedure:
3.4
RETUNE procedure:
Press MENU on the remote control to
access the main menu.
Use the /
Settings.
Press OK.
Getting started
DTR 7510 200910.indd 11
ENGLISH
The TV shape screen appears.
arrow keys to highlight
11
16/10/2009 17:40:50
Use the / arrow keys to highlight
Installation.
Screen Scan mode selection:
Press OK.
The scan process displays channels found with
signal level and quality. of all sources analysed
Press OK.
Use the / arrow keys to highlight Full installation.
Press OK.
On screen Scan mode selection, select
Scan type fast.
Note
If the number of TV/Radio stays at 0 value,
refer to chapter 10 Frequently asked questions.
You could try again from this step, choosing
Scan type automatic, or advanced but it
could take more than 30 minutes.
If the problem remains, contact your dealer.
Note
If signal level stays low and red, during the full
scan operation, check the cables.
If Power seems ok but Quality indicator stays
low and red, check the availability of digital
signals in your area. If you are supposed to
have access to digital signal, check your aerial
installation.
If some local variant exist, these extra channels
will start with number 800.
When the scan is finished, your Digital
Terrestrial Receiver display again the screen
of scan mode selection. Press Exit
Enjoy your Digital Terrestrial Receiver.
12
DTR 7510 200910.indd 12
Getting started
16/10/2009 17:40:51
Using your Digital
Terrestrial Receiver
4.1
Watching live TV
Digital Terrestrial Receiver wake-up
To wake up your Digital Terrestrial Receiver
from standby, press: STANDBY on the front
panel or remote control
Channel lists
While watching digital TV, you can access existing
channel lists. See creation of a channel list in
chapter channel manager..
Press FAV to display the channels of the
current list.
ENGLISH
4
Note
In order to reduce power consumption, switch
your Digital Terrestrial Receiver to standby
mode whenever you are not using it.
For maximum energy saving we recommend
you to switch off the Digital Terrestrial Receiver
using the switch at the back of the Digital
Terrestrial Receiver if you are not using it for a
long time.
Channel selection
To change channels, use P+/P- or the numerical
keys of the remote control or on the front
panel.
Press BACK to move to the previous channel
you watched.
A quicker way is to use FAV to use a Channel
lists. OK will present the channel, OK again
hides the Channel list. You could create your
own channel list, see §5.6 Channel manager.
Another quick way to select a channel is using
the channel banner, see on next page.
Note
When two records are ongoing at the same
time on two different frequencies, zapping is only
allowed on those two frequencies. Unavailable
channels are in grey in the Favorite list menu.
Recording from the time shift buffer will
record the full programme even if you start
the recording after the programme has already
begun. At the end of this operation, the playback
will start again automatically at the point
where you started the recording. The recorded
programme will be indicated in red in the Time
Shift bar (Refer to page 19).
Using your Digital Terrestrial Receiver
DTR 7510 200910.indd 13
Press the
arrow key to go to the
Channel lists menu.
Scroll up or down to the desired channel list
using the / arrow keys.
Press OK or
arrow key to display the
channels of the selected list.
Scroll up or down to the desired channel
using the / arrow keys.
Press OK to select the channel, or EXIT.
Press OK again or FAV or EXIT to close
the channel list.
13
16/10/2009 17:40:52
Notes
•You can only zap through the channels of
the current list.
•To manage your favourite lists, see chapter
5.6 Channel manager.
Press
again to display more information
on the current programme.
Channel banner
Every time you tune to a channel, the channel
banner appears, displaying information on this
channel, including information on the current
programme.
The channel banner is displayed for 4 seconds as
per default.
While watching a channel, you can display
the channel banner at anytime by pressing
info
button.
Press
a third time or EXIT to close the
channel banner.
Volume control
To increase or decrease the volume, use the
VOL+/- key.
To mute the sound, press .
Use the / arrow keys to display the
titles of the current and next programmes
broadcast on other channels.
Press OK to select the channel
or EXIT to remove the Channel banner and
stay tuned to the current channel.
Note
The volume level is also controlled from your
TV set. It can also be controlled using your TV
remote control.
In case of external amplificator, the volume level
is only managed by the external device.
A change of volume is shown on-screen using
a bar graph, while the
icon in the top left
corner of the screen indicates audio mute.
Icon
Description
Dolby Digital
available
Alternate audio
available
Subtitles available
Teletext available
14
DTR 7510 200910.indd 14
Using your Digital Terrestrial Receiver
16/10/2009 17:40:52
Press either the
key, or the
key
or the
key. Now the Tools menu is
displayed for this programme.
Choose the relevant item using the arrow
keys / .
Press the arrow key
and then / to
modify the selected item.
Press
or OK to validate the
modification.
Press the EXIT key to close the Tools
menu.
Pause live TV
At any time, you can pause the programme that
is being watched. The broadcast programme is
temporarily recorded in the time-shift buffer to
allow later resume of the playback.
ENGLISH
Options control
You can change the subtitles, audio language or
TV format for a particular programme.
Simply press
to pause any live TV
programme. The Time shift bar appears.
Resume playback by pressing
again.
To return to the live TV programme,
press
.
Press EXIT or OK to close the time shift
bar.
TV Guide
The TV Guide gives an overview of the
scheduled programmes.
Press
on your remote control to view
the scheduled programmes. Press
again
to display the 8 days TV Guide (EPG).
Note
Available languages depend on the transmitted
content.
Note
TV format is also interpreted by your TV set.
With an analog connection to a flat TV, the TV
set could change the format automatically to
propose a better view.
0n HDMI the TV set receives information about
the format of broadcast. If TV set is in automatic
mode, the format chosen by TV set could update
automatically.
Using your Digital Terrestrial Receiver
DTR 7510 200910.indd 15
Press the
/
arrow keys to navigate
between programmes and the / arrow
keys to navigate through channels.
Press EXIT to close the TV guide.
Note
Not all channels offer an extensive TV guide.
Some channels provide the current day
programme but do not offer detailed
descriptions.
15
16/10/2009 17:40:53
Watching 2 channels at the same time
While watching digital TV:
Press
once to display the current
programme in an inset window (Picture in
Picture, or PiP).
Press
a second time to view both
programmes side by side on the screen
(PaP).You can press the P+/- key to change
the channel displayed on the left picture.
4.2
Controlling Live TV
When you begin to watch live TV, your Digital
Terrestrial Receiver begins to store whatever
you watch into the time shift buffer, which gives
you control over live TV.
Each time you change channels, the watched
programme is stored in a new title into the time
shift buffer.
Once you have stored programmes into the
time shift buffer, you can watch it again by using
a free navigation through the time shift bar, by
doing an Instant Replay or by accessing previous
programmes.
Note
The time shift buffer stores up to 3 hours of
live TV. After 3 hours, the oldest part of the
recording is overwritten.
The time shift buffer is emptied when you turn
your Digital Terrestrial Receiver to standby.
Time shift bar
The time shift bar is a bar-graph representing the
contents of the time shift buffer, filled from the
right leftwards.
Press OK to display the time shift bar.
Press
a third time to return to normal
viewing.
Note
When a recording is in progress, one of the two
channel has to be the recorded channel.
Accessing to MHEG5 interactivity (red button)
is not possible when you are using Pip or Pap:
this is signalled by “data service” message.
16
DTR 7510 200910.indd 16
At any time, Press OK or EXIT to hide the
time shift bar.
All Time shift bar commands are availabe on
live or recorded content.
Using your Digital Terrestrial Receiver
16/10/2009 17:40:54
High speed playback:
Can only be activated when watching live or
recorded content (not paused, or slow motion)
Press longtime (1 or 2 seconds) on
or
to display the Time shift bar and start the
rewind or fast forward with double speed (x2).
Another press increases the speed up to
x32. Available speeds are x2, x4, x8, x16 and x32.
Press
to go back to normal speed.
Press the
key to return to live TV
programme, and then OK to exit the time shift
bar.
Low speed playback:
When the playback is paused (by pressing
)
A short press on the
or
arrow
keys lets you rewind or forward in slow motion.
Available speeds in this mode are x1/2, x1/4 and
x1/8.
Press the
key to return to live TV
programme, and then OK to exit the time shift
bar.
Instant Replay
This feature allows you to replay what you have seen
during the last 30 seconds.
Press the
arrow key. The time shift bar
is displayed and you watch the previous 30’ TV
content.
Press the
key to return to live TV
programme, and then OK to exit the time shift
bar.
Using your Digital Terrestrial Receiver
DTR 7510 200910.indd 17
Access previous programmes
You can display a list of previously watched
programmes to make your navigation easier.
ENGLISH
Moving within the programe:
Use the / /
/
arrow keys to
navigate through the time shift bar:
•The arrow keys let you move from one
title to the previous title
•The arrow keys let you move from one
title to the next title
•The
/
arrow keys allow you to
move according to the chapter size
(5 minutes by default) .
Press the
key to return to live TV
programme, and then OK to exit the time shift
bar.
Press OK to display the time shift bar
Press the yellow-coloured key to display
the previous programmes stored on the
time shift buffer.
Move to the desired programme by using
the / arrow keys.
Press OK to select the programme.
Press EXIT to close the time shift bar.
Clearing the Time Shift buffer
Press OK to display the time shift bar.
Press the blue-coloured key. The time-shift
buffer is immediately emptied.
Changing channel for more than 3 second
create a new content on the time shift bar list of
events.
See also chapter 5.9 Settings about the
Recorder Settings menu. to change duration
of chapter.
17
16/10/2009 17:40:54
4.3
Recording
Your Digital Terrestrial Receiver is compatible
with following Freeview + requirements, it is
limited to two recording at the same time.
Accurate recording
Recordings start and stop at the times sent by
the broadcasters. If a programme starts early or
runs late the record time will automatically be
adjusted to record the whole programme. So
you are sure to get your program recorded from
its very beginning to its last second.
Recording a TV programme that is
currently playing
While you watch live TV, press
.
The record begins immediatly.
To stop a record: Press
to display the
Please select action menu.
This feature could create a conflict between
two recordings that seems to have no overlap
at the time of programming.. Duration of such
recordings cannot be changed.
Series Link
If a programme you wish to record is in a
series, you can record the whole series. If the
programme changes to a different day or time
the Digital Terrestrial Receiver will track these
changes and still record the programme
Using series recording intensively could
create a lot of recordings.Your Digital
Terrestrial Receiver may also have to cancel
some recordings if more than two occur
simultaneously (recording conflicts).
Use this feature with mesure.
Split recordings
If a programme has two or more parts split
by another entry in the TV Guide (e.g. a film
divided into two parts by a News programme)
you will be given the option to record all parts
automatically.
Select Stop recording by using the
/ arrow keys to stop recording the
corresponding channel.
To ajust the duration of this record:
Press INFO button, then press red button.
Note
It is impossible to record more than two
channels at the same time. If you try to record
more than two channels, the Please select action
menu displays a warning message:
Alternate instances
If a scheduled recording(s) overlap with other
programmes set to record, you will be given
the option to record one of the programmes
later that day or week, on the same channel or a
different channel.
by pressing Timer button you could check
and correct decisions taken to resolve conflicts.
18
DTR 7510 200910.indd 18
Using your Digital Terrestrial Receiver
16/10/2009 17:40:55
Recording a TV programme through the
Time Shift Bar
While you watch live TV, press OK.
The time shift bar appears.
Press the yellow-coloured key to display the
previous programmes.
Move to the desired programme by using
the / arrow keys.
Press OK to select the programme.
Press
. to start the record.
Note
Recording from the time shift buffer will record
the full programme from beginning to the end,
even if you start the recording after the
programme has already begun. As this is a
relatively complex operation, the box does not
display the image while the buffer is transferring
the start of the programme (to the hard disk). At the end of this operation, the playback will
start again automatically at the point where you
started the recording. The recorded programme
will be indicated in red in the Time Shift bar.
Recording by setting a timer through the
TV guide
Press
on the remote control to go to the
TV Guide.
Scroll to the programme you want to
record.
Press
on the remote control.
Press EXIT several times to close the
menus.
ENGLISH
Recording a TV programme that you have
been watching
While you watch live TV, press OK.
The time shift bar appears.
Press the the
arrow key. to find the
chapter where you want to start to record..
Press
to start the record.
Recording with a series link
Press
on the remote control to go to the
TV Guide.
Press
again to go to the 8 days TV Guide.
Use the / / / arrow keys to scroll
to the programme you want to record.
Press the red-coloured key.
If the programme is in a series, the Digital
Terrestrial Receiver displays the following
screen:
Select the action to perform:
•Press the red-coloured key to record the
current episode only.
•Press the green-coloured key to record the
whole series (see notes about limitations
and conflicts).
Once you have pressed one of those two
keys, the record is set.
Note: all record programming are called
Timers recording. By pressing Timer button
you could access to the list, check and correct
decisions taken to resolve conflicts.
Using your Digital Terrestrial Receiver
DTR 7510 200910.indd 19
19
16/10/2009 17:40:56
You can see in the Timers recording menu
the episodes that are planned to record with a
specific icon next to their titles:
Recording by setting a timer through the
timer key
Press the key.
Press the blue-coloured key.
Set the timer options by using the /
arrow keys and use the
/
arrow keys
to modify the options values:
•Status: to enable or disable the timer
•Repetition: once, daily, or weekly
•Action: used to describe the action taken
at the defined date and time: recording,
recording (locked)
•Day of week: available only if Repetition is
set to once or weekly
•Date: option available only if Repetition is
set to once
•Begin time
•End time
•Channel: press OK to display the list of
channels and press OK again to make a
selection
Press EXIT several times to close the
menus, or press again to close the menu.
Note
•Set timers are reprensented by a clock
icon.
•It is impossible to record more than two
channels at the same time.
20
DTR 7510 200910.indd 20
•If you try to record more than two
channels using a timer, the third record will
have a red symbol next to it.
Tips
•You can start watching the programme
you are recording while recording is still in
progress.
•You can record any programme you have
watched within the past 3 hours.
•You can watch other channels while you
record. Select another using the remote
control.
•When two records are ongoing at the
same time on two different frequencies,
zapping is only allowed on those two
frequencies. Unavailable channels are in
grey in the Favorite list menu.
List of icons in timer recordings
Icon
Description
Series recording
Protected content
Programme scheduled for
recording
Conflict
Using your Digital Terrestrial Receiver
16/10/2009 17:40:56
Playback of Records
Press HDD on the remote control.
Scroll to the desired item using the /
arrow keys.
Press OK. to start viewing, “HDD” text and
disque icon is dispayed on the front display.
In case of protected programme, enter your
PIN code.
4.5
Play files from an USB device
The integrated USB port allows you to read the
following files:
•Music: MP3 files
•Images: JPEG files
ENGLISH
4.4
HDD library
You can store up to 78 hours of video.
Insert the USB device into the USB port.
Press USB on your remote control or the
USB button on the front panel.
Scroll to the desired type of file using the
or arrow keys.
Press OK
Scroll to the desired file or folder using the
or arrow keys.
Press OK to start playing.
Warning
Your Digital Terrestrial Receiver can only read
files recorded with a FAT16 or FAT32-compliant
file format. and USB 2.0 devices only.
To control the playback, you have to use the
Time Shift Bar: All the commands and mode of
the Time shift bar are available. See page 16.
Press OK to display the time shift bar.
At any time, Press OK or EXIT to hide the
time shift bar.
High speed playback:
When you are viewing a content with the
normal speed.,
A long pressure on
or
will display
the Time shift bar and start the rewind or fast
forward with double speed (x2)..
Another pressure increase the speed up to
x32. Available speeds are x2, x4, x8, x16 and x32.
Press
to go back to normal speed.
Press the
key to return to live TV
programme, and then OK to exit the time shift
bar.
Using your Digital Terrestrial Receiver
DTR 7510 200910.indd 21
21
16/10/2009 17:40:57
5
Use more of your Digital
Terrestrial Receiver
This chapter gives a complete description the
functionalities of your Digital Terrestrial Receiver.
5.1
Digital Terrestrial Receiver full
overview
1
2 3 4
Front Panel
1 2
3
Rear Panel
4
5
6
5
6
7
Front Panel
1
STANDBY button with indicator, switch
to standby/wake up
Green LED: watching mode
Red LED: standby mode
Orange LED: initialisation mode
2
P-, previous programme
3
P+, next programme
4
RECORD, instant recording
5
Recording LED, indicates recording
6
Display panel
7
EPG, open/close EPG
8
HDD, open/close HDD library
9
USB, access USB contents
10 USB connector*
11 Smart card reader
22
DTR 7510 200910.indd 22
7 8 9
10
11
8
9
Rear Panel
1
RF IN*, input to connect your aerial cable
from the wall socket
2
RF OUT*, output to connect your
recorder to a VCR/TV set/another
receiver
3
AUX scart* output to connect your
external recorder or DVD player
4
TV scart*, output to connect your TV set
5
SPDIF*, digital audio output
6
L/R audio*, Left/Right analogue audio
outputs
7
HDMI*, output to connect your TV set
with HDMI input
8
ON/OFF switch**, turn on/off your Digital
Terrestrial Receiver
9
Power**, output to connect the mains
cord
* Safety extra low voltage
** Hazardous voltage
Use more of your Digital Terrestrial Receiver
16/10/2009 17:40:59
Digital Terrestrial Receiver display
full overview
ENGLISH
5.2
Interpretation of front display pictograms
Lit when playing HDD contents
Lit when playing USB contents
DIRECT
Lit when watching live TV
Use more of your Digital Terrestrial Receiver
DTR 7510 200910.indd 23
23
16/10/2009 17:40:59
Interpretation of front display messages
Digital Terrestrial Receiver connected to mains
and in standby
Digital Terrestrial Receiver in standby
Initiating Digital Terrestrial Receiver
Digital Terrestrial Receiver tuned on a digital TV
channel
Digital Terrestrial Receiver tuned on a digital
radio channel
Menu
Playback from HDD library or USB device
Software upgrade starting
Successful software upgrade
Software upgrade failure
Digital Terrestrial Receiver overheating
24
DTR 7510 200910.indd 24
Use more of your Digital Terrestrial Receiver
16/10/2009 17:40:59
Remote control full overview
1
29
28
2
3
27
4
26
5
6
7
8
25
24
23
22
21
9
10
11
12
20
13
14
15
19
18
16
17
Use more of your Digital Terrestrial Receiver
DTR 7510 200910.indd 25
1
2
3
4
HDD
BACK
Switch to standby / wake up
Open/close HDD library
Alphanumeric keypad
Switch to previous channel
or previous section
5
Open/close TV GUIDE
6
Replay / Left,
7
Skip / Right, Sub menu access.
8
Move up/down within lists
OK
Confirm selection. Time shift
bar.
9
Return to live TV
10
Pause live TV
11
Stop recording / playback
12 P+/-
Select next / previous
channel
13 Colour keys Contextual keys
14
Select subtitles
15
Display / hide teletext
16 FAV
Channel selection, Favourite
lists
17
Pip Pap selection
18
Access to all recorded
programmes.
19 MENU
Open / close menu
20
Open / close TV format
menu
21
Open / Close Tools menu
22 VOL +/-
Turn the volume up/down
23
Mute / Restore sound
24
Instant recording
25
Instant replay
26
Information banner
27 EXIT
Close Menu / Info Banner /
Time shift bar
28 USB
Access USB contents
29 SELECT
Mode selection:STB must be
highligted by first press
ENGLISH
5.3
25
16/10/2009 17:41:00
5.4
Menu full overview
While watching digital TV:
Press MENU to display the main menu.
To scroll to the appropriate menu item,
press the / arrow keys.
To display the corresponding sub-items,
press OK or
.
Note
To open a locked menu item, you must enter
your PIN Code.
Once you have highlighted an adjustable item,
you can view the list of available settings or
corresponding numerical values on the righthand side of the screen.
•Set the appropriate setting using the arrow
keys.
•Use the numerical keys to enter values if
necessary.
•Use the coloured keys to perform
contextual actions. The actions that can be
performed are described at the bottom of
the screen.
•Press BACK or the
arrow key to save
your changes and return to the previous
screen.
•Press MENU to exit the menu system.
26
DTR 7510 200910.indd 26
5.5
TV guide
In this menu you can access the programme
guide and also check the timer recordings.
Press MENU to display the main menu
Use the / arrow keys to highlight TV
Guide.
Press OK. The TV Guide menu is displayed.
The following options are available from this
screen:
•Programme guide
•Timer recordings
•Sleep & wake-up timers
Note that Timer recordings list contains
the recordings based on timer but also the
recordings that are programmed through EPG
including serial recording and alternate events.
It is the place where you should check the
conflicts that could be detected (not linked
to recordings moving in time to follow the
accuraccy requirement).
Use more of your Digital Terrestrial Receiver
16/10/2009 17:41:00
8 days TV guide (EPG)
Once you are in the Programme guide
menu, press the yellow-coloured key to
display the 8-days TV guide (EPG).
ENGLISH
5.5.1 TV Guide
The TV Guide offers you an overview of the
programmes that will be broadcast during the
next 8 days.
Once you are in the TV Guide menu,
use the / arrow keys to highlight
Programme guide.
Press OK. The Programme guide menu is
displayed.
Press the appropriate contextual keys:
Note
When you are watching TV, you can directly
access the Programme guide menu by
pressing the
key (What’s on and Next
information).
For more information on a programme,
highlight it by using the / / / arrow
keys.
Press the appropriate contextual keys:
•Press OK to preview the programme.
•Press the red-coloured key to record the
highlighted programme.
•Press the green-coloured key to display
informations about the programme.
•Press the yellow-coloured key to display
the 8-days guide.
•Press the blue-coloured key to watch the
highlighted channel.
Close the guide by pressing the EXIT key.
Use more of your Digital Terrestrial Receiver
DTR 7510 200910.indd 27
•Press OK to preview the programme.
•Press the red-coloured key to record the
highlighted programme.
•Press the green-coloured key to display the
guide of the previous day.
•Press the yellow-coloured key to display
the next day guide.
•Press the blue-coloured key to watch the
highlighted channel.
Close the guide by pressing the EXIT key.
If you want to go back to the Programme
guide menu, press BACK.
Notes
•When you are watching TV, you can
directly access the 8 days TV Guide by
pressing the
key twice.
•Pressing Info will display significance of
colors.
•When you just activate your recorder, it
take up to 20 minutes for the EPG to be
fully complete.
•Programmes already over will not appear
will not appear in EPG.
27
16/10/2009 17:41:01
Tip If you want to record a scheduled
programme, move to this programme and
press the
key,. When you move the focus
(white color) the event will be colored in red
(recording or recording programmed)
5.5.2 Timer recordings
The Timer recordings menu lists all the
current recordings that are programmed.
Once you are in the TV Guide menu, use
the / arrow keys to highlight Timer
recordings.
Press OK.
The Timer recordings menu is displayed.
Press
to enable the timer.
Set the timer options by using the /
arrow keys and use the
/
arrow keys
to modify the options values.
•Status: to enable or disable the timer
•Repetition: once, daily, or weekly
•Action: used to describe the action taken
at the defined date and time: recording,
recording (locked)
•Day of week: set the day when you want
to record. This option is available only if
Repetition is set to once or weekly
•Date: set the date when you want to
record. This option is available only if
Repetition is set to once
•Begin time
•End time
•Channel: select the channel you wish to
record. Press OK to display the list of
channels and press OK again to make a
selection
Once all the options are set, press EXIT.
Your timer is set.
Set a timer
Once you are in the Timer recordings
menu, press the blue-coloured key.
The following screen is displayed:
28
DTR 7510 200910.indd 28
Clear timer
Select the timer by using the / arrow
keys.
Press the yellow-coloured key.
The timer is immediately cleared.
Modify a timer
Select the timer by using the / arrow
keys.
Press the green-coloured key.
You can now modify the timer settings.
Once you have modified all the options you
needed to, press EXIT to save the changes.
Use more of your Digital Terrestrial Receiver
16/10/2009 17:41:01
In that case:
Select the marked timer by using the /
arrow keys.
Press the red-coloured key to solve the
conflict.
5.5.3 Sleep & wake-up timers
The Sleep & wake-up timers can put the
Digital Terrestrial Receiver to standby/wake-up
mode, like an alarm clock.
Once you are in the TV Guide menu, use
the / arrow keys to highlight Sleep &
wake-up timers.
Press OK.
The Sleep & wake-up timers menu is
displayed.
Set a timer
Once you are in the Sleep & wake-up
timers menu, select a timer by using the
arrow keys.
Press OK.
The following screen is displayed:
/
ENGLISH
Conflict
You may have conflicts between two timers.
Conflicts are represented by red marks:
Set the timer options by using the /
arrow keys and use the
/
arrow keys
to modify the options values.
•Status: to enable or disable the timer
•Repetition: once, daily, or weekly
•Action: used to describe the action taken
at the defined date and time: recording,
recording (locked)
•Day of week: set the day when you want
to record. This option is available only if
Repetition is set to once or weekly
•Date: set the date when you want to
record. This option is available only if
Repetition is set to once
•Begin time
•End time
•Channel: select the channel you wish to
record. Press OK to display the list of
channels and press OK again to make a
selection
Once all the options are set, press EXIT.
Your timer is set.
Use more of your Digital Terrestrial Receiver
DTR 7510 200910.indd 29
29
16/10/2009 17:41:02
Clear a timer
Select the timer by using the / arrow
keys.
Press the yellow-coloured key.
The timer is immediately cleared.
Tips
•You can start watching the programme
you are recording while recording is still in
progress.
•You can record any programme you have
watched within the past 3 hours.
•You can watch other channels while you
record. Select another using the TV remote
control.
5.6
Channel manager
At installation, all the channels found are added
to the All channels list. From this list, you
may create, delete, and rename favourite lists
according to your preferences.
Press MENU to display the main menu.
Scroll to the Channel manager menu item
using the / arrow keys, and then press
OK.
The following options are available from this
screen:
•All channels
•Favorite lists
Select Favorite lists using the
keys.
Press OK.
/
arrow
Add/remove channels from a favourite list
Three lists are created by default: TV1 to TV3.
Press OK again.
Press FAV to select the current list. The
name of the list is displayed on top right
corner.
Press the red-coloured key.
Scroll to the channels you want to add or
remove to the current list, and select them
individually by pressing OK.
Selected channels are marked with an arrow.
30
DTR 7510 200910.indd 30
Use more of your Digital Terrestrial Receiver
16/10/2009 17:41:02
ENGLISH
•The Favourites lists menu is also used
to edit individual favourite lists.To edit a
given favourite list, select this list on the
right hand side of the screen.You can then
access various edition features.
Sort the selected list automatically:
Once you are in the Favourite lists menu,
scroll to the list you want to sort using FAV.
Press the yellow-coloured key.
Press the appropriate colour key depending
on the type of sorting you want to perform:
Press
to return to the favourite lists. The
new list is now displayed.
Rename a favourite list
Once you are in the Favourite lists menu,
scroll to the list you want to rename using
FAV.
Press the blue-coloured key.
•Press the red-coloured key to sort all
channels according to their name.
•Press the green-coloured key to sort all
channels according to their type.
•Press the yellow-coloured key to sort all
channels according to their frequency.
•Press the blue-coloured key to sort all
channels according to their number.
Press EXIT several times to exit the
Favorite lists menu.
Sort the selected list manually
Once you are in the Favourite lists menu,
scroll to the list you want to sort using FAV.
Press the yellow-coloured key.
Press FAV
Press the / arrow keys to highlight the
channel you want to move and press OK.
Enter the desired name using the / /
/
arrow keys.
Press OK to validate or BACK to cancel.
Notes
•When you activate one of the favourite
lists by pressing FAV while watching
digital TV, the Digital Terrestrial Receiver
only zaps through your favourite channels.
Press FAV again to toggle between your
favourite lists and the All channels list.
Use more of your Digital Terrestrial Receiver
DTR 7510 200910.indd 31
Press the / arrow keys to move the
selected channel.
31
16/10/2009 17:41:03
Press OK.
Press EXIT several times to exit the
Favorite lists menu.
5.7
HDD Library
Press MENU to display the main menu.
Scroll to the HDD Library menu item
using the / arrow keys.
Press OK.
Note
Protected programmes are marked with a
padlock next to it
Note
Content that are currently recording are marked
with a red circle next to it.
Watch recorded content
Once you are in the HDD Library menu,
use the / arrow keys to highlight the
programme you want to watch.
Press OK.
The programme is displayed.
Protect recorded content
Once you are in the HDD Library menu,
use the / arrow keys to highlight the
programme you want to watch.
Press the blue-coloured key. The programme
is now protected.
Delete recorded content
Once you are in the HDD Library menu,
use the / arrow keys to highlight the
programme you want to watch.
Press the red-coloured key. The programme
is immediately deleted.
Note
If the content is protected, your PIN-Code will
be asked before deletion.
5.8
USB
The integrated USB port allows you to read the
following files:
•Music: MP3 files
•Images: JPEG files
Note
Only USB keys are recognized by the Digital
Terrestrial Receiver. External Hard Disk Drives,
digital music players may not work with the
Digital Terrestrial Receiver.
Plug an USB key into the USB port in the
front panel, behind the door.
Press MENU to display the main menu.
Scroll to the USB menu item using the /
arrow keys.
32
DTR 7510 200910.indd 32
Use more of your Digital Terrestrial Receiver
16/10/2009 17:41:03
5.9
Settings
ENGLISH
Press OK.
Press MENU to display the main menu.
Use the / arrow keys to highlight the
Settings menu item.
Press OK.
Choose between Music and Picture the
type of files you want to play using the /
arrow keys, and then press OK.
Use the / /
/
arrow keys to
select the desired file.
Once the desired file is highlighted, press
OK to start playing.
You can perform the following actions,
depending of the type of file you are playing:
•Music: Press
to play the file. Press
to stop playing the file. Press the redcoloured key to delete the file. Press the
yellow-coloured key to toggle between
playing modes (you can choose between
Single song, All songs and Shuffle).
Finally, press the blue-coloured key to
enable or disable the loop.
•Picture: Use the red-coloured key to
dezoom and the green-coloured key to
zoom. Press the yellow-coloured key to
rotate the displayed picture.
Tip
You can access directly to your USB key by
pressing USB on the remote control, or by
using the USB button on the front panel.
Warning
Only files recorded with a FAT16 or FAT32compliant file format can be read.
Use more of your Digital Terrestrial Receiver
DTR 7510 200910.indd 33
5.9.1 Preferences
Once you are in the Settings menu, select
Preferences using the / arrow keys.
Press OK.
Preferences is used to set the following options:
•Display settings
•Language preferences
•Watching preferences
•Recorder settings
•System settings
•HDMI settings
•Time settings
33
16/10/2009 17:41:04
Display settings
Language preferences
Set appropriate values for:
•Banner duration: banner display duration
from 1 to 8 seconds
•Banner transparency: from 0 to 100 % in
steps of 25 %
•MHEG-5: choose between ON and OFF.
Select your preferred language for the following:
•Audio language
•Subtitle language
Note
With the
key you may access additional text
and multimedia contents. MHEG (Multimedia
and Hypermedia Expert Group) is a standard
that offers you information about various
contents like life style, shopping or sports events
and results.
Press
or the red-coloured key to bring
up the text menu for the current channel.
Use the / arrow keys to navigate
through the menu.
Use OK to select an item.
Additionally the four coloured keys (Red,
Green,Yellow and Blue) help you to navigate
through the content of a page. Their use
varies for different stations. Function is
commonly explained at the bottom of the
display.
Press
again to leave the MHEG, or press
EXIT.
34
DTR 7510 200910.indd 34
You can also set the Audio language and/or
Subtitle language options to OFF to disable
them.
Watching preferences
Set appropriate values for the following:
•TV shape: defines the way the video
format is adapted: 4:3 Letter Box, 4:3
Center Cut-Out or 16:9 Widescreen
•Power on mode: last viewed channel or
defined channel
•Power on channel: if you have set Power
on mode to defined channel, choose the
channel to be tuned at power on
Use more of your Digital Terrestrial Receiver
16/10/2009 17:41:05
Note
The TV shape is managed by the Digital
Terrestrial Receiver. But TV set manage dalso the
adaptation of input format to shape and siae. Set
your TV to the similar equivalent setting (refer
to the user manual of your TV set).
Recorder settings
System settings
ENGLISH
•Lip synchronisation: Set to on by default.
Other choices are progressive and off
•Small video size: size of the inset window
in PiP mode, choose between small,
standard and large
•Small video position: select the corner in
which the inset windwo in PiP mode shall
be displayed
•TV scart output
•RGB level
•AUX scart
•SPDIF & HDMI audio: Set the value to
PCM for stereo and Dolby Digital for
multi-surround sound output on audio
amplifier
•Antenna powering
HDMI settings
•Live TV playback: set the maximum
duration of live TV playback, from 30
minutes to 3 hours, or disable it
•Instant replay: set the time of instant replay,
from 10 seconds to 1 minute
•Chapter size: set the Time shift buffer’s
default storage size from 1 minute to 15
minutes
•Recording duration: Set the recording
default duration, from 30 minute to 3
hours.
Use more of your Digital Terrestrial Receiver
DTR 7510 200910.indd 35
•Output resolution: only two choices are
possible to set HDMI output resolution:
“automatic” mode (by default) or “576i”
mode.
•Mode: select HDMI if your TV set is fitted
with an HDMI input or select DVI if your
TV set is only fitted with a DVI input. In the
latter case, you need an HDMI-DVI cable
or a HDMI-DVI adapter.
35
16/10/2009 17:41:05
Note
•All TV do not support 576i output.
•In case of black screen after selecting an
HDMI output, please connect a SCART
cable to your TV set to change the output
HDMI resolution.
Time settings
Set the appropriate time using the coloured keys.
5.9.2 Parental control
Once you are in the Settings menu, select
Parental control using the / arrow
keys.
Press OK.
Locking options include:
•Locking access to the menu
•Locking access to individual channels
•Locking access to programmes according
to their maturity rating.
Parental Control is also used to change the PIN
Code of the Digital Terrestrial Receiver.
Activation options
Enable or disable the following:
•Menu lock
•Channel lock
•Maturity lock
If you enable Maturity lock, select a Maturity
level. Maturity level is used to set PIN Code
protection on programmes according to their
maturity rating.
This feature is based on broadcast ratings.Very
few channels are broadcasting ratings.
Set a maturity level from age 2 to 18 to prevent
undesired access to programmes for which
maturity rating is higher. For instance, to prevent
your child from watching a programme nonsuitable to children below 10, set the maturity
rating to 10.
To access this programme, you will be prompted
to enter your PIN Code.
Channel lock
To lock or unlock channels:
Scroll to the channel you want to lock or
unlock.
Press the green-coloured key to lock or
unlock the channel. Locked channels are
marked with a padlock.
Press OK to exit the channel list
Note
•Channel lock is effective only if you have
enabled the channel lock option.
•A locked channel is locked in all the lists it
belongs to.
Parental Control is used to activate locking
options. A PIN Code is used to prevent access
to locked items.
36
DTR 7510 200910.indd 36
Use more of your Digital Terrestrial Receiver
16/10/2009 17:41:06
Note
Once you have changed your PIN Code, keep
it secret to prevent others from using it. If you
forget or lose your PIN Code, refer to chapter
Frequently asked questions.
Channel installation
This sub-menu is used to manage channel
installation and update TV/Radio services in the
main list
•Update installation: manual update
•Full installation: choose between fast,
(recommanded) automatic and
advanced. (long) see Retune page 11
•Erase channel lists: Use this option to
delete all channels and favorite lists.
ENGLISH
PIN Code
To change your PIN Code:
Enter your PIN Code.
Enter your new PIN Code.
Enter your new PIN Code again.
Note
The PIN Code default value is 0000.
5.9.3 Installation
Once you are in the Settings menu, select
Installation using the / arrow keys.
Press OK.
Antenna setting
This sub-menu is used to check the signal level
and quality. If the signal power and quality is not
adequate, adjust your antenna.
Note
For information on the UHF channels available in
your area refer to your local dealer.
This menu is used to:
•Manage channel installation
•Position your antenna - Test signal level and
quality
•Manage the Hard Disk Drive
•Check software upgrades and information
•Restore the Digital Terrestrial Receiver
factory settings.
Disabling Hard drive is a way to reduce Fan
noise. HDD is a source of heat and not using it
reduces the need for using the internal fan.
Use more of your Digital Terrestrial Receiver
DTR 7510 200910.indd 37
Hard disk drive
•Record files: press OK to delete all
•Format disk: press OK to format disk
•Hard disk drive: use the
/
arrow
keys to enable or disable Hard Disk Drive.
Note
•Disabling the Hard Disk Drive also disables
all the recording functions and Time Shift
Buffer functions.You won’t be able to
access the recorded programmes.
•Information on the HDD reference and
capacity is displayed in the bottom right
corner.
37
16/10/2009 17:41:06
Software information
This menu gives you information on the Digital
Terrestrial Receiver, including the model type
and current software version.
Software upgrade
Software upgrade is used to display the current
software version.
In order to maintain advantages of software
improvements we are carrying out, please check
regularly on the DTG web site, (http://www.dtg.
org.uk/industry/download_schedule.php) in the
“Freeview downloads” tables, for the availability
of a new software version for the Philips
DTR7510/05 digital terrestrial recorder.
5.9.4 Smart Card
Once you are in the Settings menu, select
Smart Card using the / arrow keys.
Press OK.
If there is a new software version broadcast,
please follow the instructions:
Press red colored button to check if an
update is available. It will take few minutes.
If a new version is found, press OK to install
it. Press OK to confirm.
When update is finished, it will reboot the box.
Factory reset
Factory Reset is used to restart the Digital
Terrestrial Receiver in its initial state: it is
protected by code (default 0000)
Reset & restart: you lose all data and information
previously stored, and you have to restart first
installation.
This menu provides you access to the following
options:
•System info
•Operator
•Maturity
•PIN code
System info: displays card system info
Operator: displays card operators info
Maturity: provides information about maturity
level
PIN code: use it to change the card PIN code
All recordings on hard drive are deleted !!
Conditional access
The Conditional access sub-menu is used
to give information on the Nagra-Mediagard
conditionnal access embedded in the software
version of your digital terrestrail recorder.
38
DTR 7510 200910.indd 38
Use more of your Digital Terrestrial Receiver
16/10/2009 17:41:07
Maintenance
ENGLISH
6
6.1
Cleaning
For cleaning, use a soft, damp (not wet) cloth.
Never use any abrasive cloth and aerosol
cleaners
6.2
Replacement
The Digital Terrestrial Receiver does not contain
any user-serviceable parts. Do not attempt to
open it. All maintenance work must be carried
out by qualified service centres.
6.3
Disposal
Your product is designed and manufactured with
high quality materials and components, which
can be recycled and reused.
Please inform yourself about the local separate
collection process for electrical and electronic
products.
Please act according to your local rules and
do not dispose of your old products with your
normal household waste. The correct disposal
of your old product will help prevent potential
negative consequences for the environment and
human health.
Maintenance
DTR 7510 200910.indd 39
39
16/10/2009 17:41:07
7
Accessories and
connections
7.1
Connecting a DVD player /
external recorder
Connect the terrestrial antenna cable from
the wall socket or from a table-top antenna
to the “RF IN” socket at the rear of the
Digital Terrestrial Receiver
Connect the “RF OUT” socket at the rear
of the Digital Terrestrial Receiver to the
RF input of your DVD player / external
recorder using a RF cable
Connect the RF output at the rear of your
recorder to the RF input of your TV set
using a RF cable
Connect the SCART cable to the SCART
input of the TV set and to the “EXT1 TO
TV” SCART socket at the rear of the Digital
Terrestrial Receiver. Your recorder does
not include any recording feature from Scart
input.
You could also connect an HDMI cable to
the HDMI input of the TV set and to the
“HDMI” socket at the rear of the Digital
Terrestrial Receiver
To connect the Digital Terrestrial Receiver to
the mains, refer to chapter Getting started
40
DTR 7510 200910.indd 40
7.2
Connecting your audio equipment
Option A – Analogue connection
Connect the L/R audio outputs to the relevant
inputs of your audio equipment using a double
CINCH cable (not supplied).
Consult the user manual of your audio
equipment to choose the proper analogue audio
inputs.
Option B – Digital connection
Your audio equipment is fitted with a digital
audio input:
Connect the DIGITAL audio output of the
Digital Terrestrial Receiver to the relevant audio
input of your audio equipment using a single
CINCH cable (not supplied).
Consult the user manual of your audio
equipment to choose the proper digital audio
input.
Notes
With digital connection, Mute and Volume
operations are managed by your audio
equipment and not any more by your recorder.
Accessories and connections
16/10/2009 17:41:07
Universal remote control
Prior to using your universal remote control,
check or set the following:
•Device you want to control (Mode
selection)
•Volume and mute control assignment
•Brand setting for your TV, VCR, DVD and
Amplifier
7.3.1 Mode selection (selecting the
device you want to control)
Your 5-in-1 remote control can be used to
control most of your audio/video equipment
through various modes:
•STB mode for the control of your Digital
Receiver
•TV mode for the control of your TV set
•VCR mode for the control of your VCR
•DVD mode for the control of your DVD
or DVD Recorder
•AMP mode for the control of your audio
tuner/amplifier.
Press SELECT once to check which mode
is active.To change the mode, press SELECT
repeatedly until the desired mode is signalled by
the corresponding indicator.
The mode sequence is:
STB --> TV --> VCR --> DVD --> AMP.
7.3.2 Volume and mute control
assignment
Default volume and mute control
assignment
For each mode, you can select the device of
your audio/video set-up to which volume and
mute control is assigned.
When in STB mode, the volume functions
(VOL+/- and
keys) can be controlled
through your TV set, amplifier, or digital receiver.
By default, volume control is performed through
a Philips brand TV set.
Accessories and connections
DTR 7510 200910.indd 41
When in TV, VCR or DVD mode, the volume
functions (VOL+/- and
keys) can be
controlled through your TV set or amplifier. By
default, volume control is performed through a
Philips brand TV set.
When in AMP mode, the volume functions
(VOL+/- and
keys) can be controlled
through a Philips brand amplifier only.
ENGLISH
7.3
Changing the volume and mute control
assignment
The procedures below assume you start from
default settings.
Your Digital Receiver (STB), TV, VCR or DVD
audio outputs are “all” connected to your
amplifier. We advise you to assign volume control
to your amplifier for all modes (STB, TV, VCR,
and DVD).
To do so:
Press SELECT repeatedly to select the
AMP mode.
Simultaneously press keys 1 and 3 until the
AMP indicator turns on then release these
keys.
Enter code 993.The indicator surrounding
the key blinks once after each entry.
Press the VOL-/+ key.The indicator
surrounding the key blinks twice.
From then on, whatever mode you are in, the
AMP indicator turns on each time you press one
of the (VOL+/- and
keys).
When controlling the volume, make sure the
source selector of your amplifier is properly set
(refer to your amplifier user manual for source
selection).
Note
If your TV set is only fitted with SCART
connectors (no HDMI, no DVI and no YPbPr),
we advise you to assign volume control to your
digital receiver for the STB mode.
41
16/10/2009 17:41:08
To do so:
Press SELECT repeatedly to select the STB
mode.
Simultaneously press keys 1 and 3 until the
STB indicator turns on then release the keys.
Enter code 993.The indicator surrounding
the key blinks once after each digit entry.
Press the VOL-/+ key.The indicator
surrounding the key blinks twice.
You have made several setting changes and you
want to restore the default volume control
assignment settings
(see table in next paragraph)
Default volume control assignment means:
•in TV mode, volume control is performed
through a Philips brand TV set
•in VCR mode, volume control is performed
through a Philips brand TV set
•in DVD mode, volume control is
performed through a Philips brand TV set
•in AMP mode, volume control is performed
through a Philips brand amplifier only.
To restore default settings:
Simultaneously press keys 1 and 3 until the
indicator surrounding the key blinks twice
then release these keys.
Enter code 981.The indicator surrounding
the key blinks twice.
7.3.3 Changing the brand setting of your
remote control for your TV,VCR,
DVD or Amplifier
By default at first power up or at first
installation, your universal remote control is preset to control your Digital Receiver as well
as most Philips brand audio/video devices.
If you have other brands of devices, or if the
presets do not enable you to control your
Philips device, please follow the procedure
below.
42
DTR 7510 200910.indd 42
Choose one brand code, made up of 4 digits,
from the code list at the end of this manual.
(If several codes are possible, go through this
procedure with the first code and try your
remote control. If you are not successful,
repeat the procedure with the second code,
and so on).
Press the SELECT key repeatedly to
choose the mode corresponding to the type
of device you want to set up (TV, VCR, DVD
or Amp/Tuner).
Simultaneously press digits 1 and 3 until the
indicator surrounding the key blinks twice
then release these keys.
Enter the 4 digit code corresponding to the
device brand you have chosen.The indicator
surrounding the key blinks once after each
one of the first three entries.The indicator
surrounding the key blinks twice after the
fourth entry.
If an invalid code has been entered, the indicator
surrounding the key blinks once only. Restart
from step 1.
Notes
•If the battery change takes more than 1
minute the remote control may return to
the Philips default settings.Therefore you
have to proceed with a new setting of your
remote control with the help of the table
above for your non-Philips branded devices.
•All manufacturers are concerned about
the constant improvement of their
products.Although your remote control is
compatible with most of the equipment of
the following list, Philips cannot guarantee
its operation with the complete range of
products on the market
Accessories and connections
16/10/2009 17:41:08
1
ENGLISH
7.3.4 Using the universal remote control
with your TV
1
2
3
4
16
5
15
6
7
8
9
10
11
12
13
14
2
14
3
4
5
6
15
16
13
12
11
Standby
0-9Channel selection
BACK
Last channel recall
Change value of menu item
option
Change value of menu item
option
Item selection in menu /
OK
Acknowledge of selection
P+/-
Channel Up/Down
Colour keys Contextual keys in teletext
MENU
Open/Close menu
Movie Expand /
TV display format
Audio track selection
VOL+/-
Volume Up/Down
Sound Mute
Open/close On Screen Display
EXIT
Exit, menu off
SELECT
Remote control Mode
selection
7
8
10
9
See p25 for Digital Recorder Mode (STB)
Accessories and connections
DTR 7510 200910.indd 43
43
16/10/2009 17:41:08
7.3.5 Using the universal remote control
with your VCR (VCR mode)
1
11
2
10
9
8
1
2
3
4
5
6
Standby
0-9Channel selection
Play/pause
Stop
P+/-Channel Up/Down
TIMER
Recording (Press TIMER +
OK to start recording)
7
Movie Expand
8 VOL+/-
Volume Up/Down
9
Sound Mute
10
Record
11 SELECT
Remote control Mode
selection
3
4
5
7
6
See p25 for Digital Recorder Mode (STB)
44
DTR 7510 200910.indd 44
Accessories and connections
16/10/2009 17:41:08
1
17
ENGLISH
7.3.6 Using the universal remote control
with your DVD player (DVD mode)
1
2
3
4
2
16
15
3
5
6
7
8
9
10
4
5
14
13
12
6
7
8
11
12
13
14
15
16
17
Standby
0-9Channel selection
Change value of menu item
option
Change value of menu item
option
Item selection in menu /
OK
Acknowledge of selection
Play/pause
Stop
P+/-
Channel Up/Down
Subtitle selection
TIMER
Recording (Press TIMER +
OK to start recording)
MENU
Open/Close menu
Movie Expand /
TV display format
VOL+/-
Volume Up/Down
Sound Mute
Open/close On Screen Display
EXIT
Exit, menu off
SELECT
Remote control Mode
selection
9
11
10
See p25 for Digital Recorder Mode (STB)
Accessories and connections
DTR 7510 200910.indd 45
45
16/10/2009 17:41:09
7.3.7 Using the universal remote control
with your tuner/amplifier (AMP
mode)
1
10
2
3
4
1
2
3
4
5
6
7
0-9
P+/-
Colour keys
8 VOL+/-
9
10 SELECT
Standby
Channel selection
Tuning Down
Tuning Up
Preset Up/Down
Channel Up/Down
Red : Select SAT input
Green : Select TV input
Yellow : Select DVD input
Blue : Select tuner / amplifier
input
Volume Up/Down
Sound Mute
Remote control Mode
selection
5
9
8
6
7
See p25 for Digital Recorder Mode (STB)
46
DTR 7510 200910.indd 46
Accessories and connections
16/10/2009 17:41:09
Guarantee and service
For the Philips warranty applicable to this
product, we refer you to the Philips website
www.philips.com/guarantee. In the event you
do not have an Internet connection, please
contact your local Philips Consumer Care
Centre. Contact details are given in the Contact
information chapter of this manual.
9
Technical data
ENGLISH
8
This product is in conformity with European
95/47/EC and 2002/21/EC directives.
The product complies with the following
European council Directives: 2006/95/EEC and
89/336/EEC.
Tuner/Reception/Transmission
• DVB: Terrestrial
• Demodulation type: COFDM 2K/8K, MPEG-2
DVB compliant, Network: MFN/SFN, QAM,
QPSK
• Input frequency range: 474-862 MHz
• Number of TV tuners: 2
Video Recording
• Recording enhancements: One Touch Record
(OTR), split event, series recording, accuracy
Storage Media
• Hard Disk Capacity: 160 GB
• HDD video recording capacity: 78 hrs
• HDD recording enhancements: Instant Replay,
Pause Live TV, Time Shift Buffer, Hard Disk
Space Used, Hard Disk Space Free
• Extra Hard Disk Technology: Simultaneous
Record & Playback
• HDD Type: 3.5” HDD
Connectivity
• Terrestrial antenna interface: RF in, IEC 169-2,
RF out, (bypass) IEC 169-2
• Video Output - Digital: HDMI
• TV scart out: Audio L/R, CVBS, RGB
• VCR scart out: Audio L/R, CVBS
• Audio Output - Analog: Audio L/R (cinch)
• Audio Output - Digital: Coaxial (cinch)
• USB: USB 2.0
Guarantee and service
DTR 7510 200910.indd 47
47
16/10/2009 17:41:09
Convenience
• Child Protection: Child Lock+Parental Control
• Convenience Enhancements: Electronic
Programming Guide, Automatic Overheat
Warning, On-screen Display
• Ease of Installation: Autoinstall
• Events timer/reminder: 20
• Favorite list radio programs: 4
• Favorite list TV programs: 4
• Parental control: Lock with PIN code, Child
timer
• Programmable Events: 32
• Recording: Record failure alarm, Record
header message
• Signal strength indication
• User Interface: 8 days Electronic program
Guide, Automatic program list update, Multiple
subtitles supported, Now & Next ESG, On
Screen Display on TV, Software upgrade over
the air, TV and Radio mode
Power
• Mains power: 230 V
• Power consumption: < 23 W
• Standby power consumption: < 12 W
Still Picture Playback
• Picture compression format: JPEG
• Playback Media: USB flash drive
Due to continued improvements, this
information is subject to change without notice.
Dimensions
• Carton dimensions (WxDxH):
320x245x65mm
• Product dimensions (WxHxD):
240x44x145mm
• Temperature (storage): -20° to 60° Celsius
• Weight: 0.98 kg
• Weight incl. packaging: 1 780 kg
• Temperature (operation) 5° to 35° Celsius
Accessories
• Included Accessories: AC power cord, SCART
cable, Remote Control, User Manual, Quick
start guide
• Batteries: 2x AA
Video Decoding
• Compression Format: MPEG-2 MP@HL (high
definition), MPEG-2 MP@ML (std definition)
• Conditional access system: Mediaguard (card
not supplied)
• De-scrambling: Smart Card reader
• Resolution: up to 1920 x 1080 interlaced
• Aspect Ratio: 16:9, 4:3 Letterbox, 4:3 Pan Scan
• Video bitrate: Up to 15 Mbit/s
Audio Decoding
• Compression format: Dolby Digital, MPEG
layer I/II, MP3
• Sound system: Dolby Digital, Dolby Digital
downmixed to stereo, Stereo
System Specifications
• CPU speed: 240 MHz
• Flash memory size: 16 MB
• Ram size: 64 MB
48
DTR 7510 200910.indd 48
Technical data
16/10/2009 17:41:09
Connection
On-screen display working but there is no
reception
Check the installation and see retune page 11.
Intermittent reception
Check all connections and cables
Aerial could also be the root cause of issues.
The picture is not sharp and on-screen
text is difficult to read
•Change the TV scart output setting to
RGB from the System settings screen
•Refer to your TV user manual
•Use the SCART cable supplied with the
Digital Terrestrial Receiver
What is HDMI?
High-Definition Multimedia Interface (HDMI) is
a high-speed digital interface that can transmit
uncompressed high definition video and digital
multi channel audio. It delivers perfect picture
and sound quality, completely free from noise.
HDMI is fully backward compatible with DVI
Why does it take so long to display the
contents of my USB device?
• This could be due to the large number of
files (>500 files/folders) or size of the files
(>1MB)
• There could be other non-supported files in
the device that the system is trying to read/
display
• File system must be FAT16 or FAT32
• Device must be USB 2.0
No sound Nor picture but the front panel
LED is lit in red
Press on the front panel.
Frequently asked questions
DTR 7510 200910.indd 49
Set-up
The LED on the front panel does not light
up after 5 secondes.
• Check that the power cord is correctly
connected. Disconnect this cord and
reconnect it to ensure it is in place
• Check that power is available at the wall
socket
ENGLISH
10 Frequently asked
questions
No sound or picture but the front panel
LED is blinking green
Press the red-coloured key, and then enter your
PIN Code to disable protection.
The remote control does not operate the
Digital Terrestrial Receiver
• Press stop button to verify if you are not in
playback
• Make sure the Digital Terrestrial Receiver is
on STB: press Select button, the STB must
be highlighted on the small screen of the
remote. If no target is highlighted check the
batteries, press Select again to highlight STB.
• Make sure you are pointing your remote
control at the front panel of the Digital
Terrestrial Receiver
You cannot find all the channels you think
should be available.
Try re-tuning the Digital Terrestrial Receiver,
following the relevant steps in chapter Install.
Check in the 800 range.
If you are still missing channels, call your
customer service adviser.
Even if you use the numerical keys, you
cannot access a particular channel.
Enter your PIN Code to access the channel or
unlock it. The default PIN Code is 0000.
You set a recording but did not record
what you wanted.
Make sure that your recorder did not get more
than two records to do at the same time.
49
16/10/2009 17:41:10
You set a recording but did not record
what you wanted.
Press Timer to check if an alternate instance was
selected because of conflicts.
You have forgotten your PIN Code
When prompted for your PIN Code, enter the
Master PIN Code. This will allow you to proceed
as well as reset the current PIN Code to its
default value (default is 0000). The Master PIN
Code is 3001. Keep this code secret to prevent
others from using it.
What are Titles and Chapters?
A recorded movie contains titles and chapters,
which are similar to the titles and chapters of a
book. A title is often a complete movie and is split
into chapters, or individual scenes from the movies.
Installation
No sound or picture but the front panel
LED is lit in green
• Check the connections at the wall socket
and Digital Terrestrial Receiver
• Check the EXT1 TO TV SCART connection,
or the HDMI connection
The picture on some channels seems to
have been stretched or squashed.
Check the Digital Terrestrial Receiver TV shape
setting, following the information in paragraph
Watching preferences. If you have a wide screen
TV, you may also need to check the settings on
your TV. The display format being managed by
the Digital Terrestrial Receiver, set your TV to
“full screen” or to the similar equivalent setting
(refer to the user manual of your TV set).
The order of the channels has changed.
Refer to paragraph Sort the selected list: to
change the order again.
Programmes are recorded as a single title. They
may consist of one chapter or a few chapters
within a title, depending on the recording
settings.
How do I set up titles and chapters?
The Digital Terrestrial Receiver will automatically
create a new title every time you start a new
recording.
The HDD doesn’t respond but the power
is on
Check if HDD is enabled.
Unplug the recorder from the mains. wait for 10
minutes, power on again.
If the problem persist, call your retailer.
50
DTR 7510 200910.indd 50
If you have tried all of the actions suggested
above and could not solve the problem, contact
your customer service adviser.
The message Overheating is displayed on
the front panel
• Unplug the Digital Terrestrial Receiver from
the mains to cool it down.
• Make sure that it is placed on a firm surface,
with the ventilation openings not covered
with items such as newspapers, table clothes,
curtains, etc.
• Make sure that the heat could be evacuated:
the receiver must not be included in a close
cabinet
• If the problem persists, contact your local
Philips Consumer Care Centre
Frequently asked questions
16/10/2009 17:41:10
DVB
Digital Video Broadcasting
Analogue audio
Sound that has not been turned into numbers.
Analogue sound is available from the LEFT/
RIGHT AUDIO outputs. The red and white
sockets send audio through two channels, the
left and right.
EPG
Electronic Programme Guide
Aspect ratio
Aspect ratio refers to the length to height ratio
of TV screens. The ratio of a standard TV is 4:3,
while the ratio of a high-definition or wide TV is
16:9. The letterbox format allows you to enjoy a
picture with a wider perspective on a standard
4:3 screen.
Delay
The time difference between a sonic event and
its perception at the listening position. Use the
Lip Synchronization feature to cancel the delay.
De-scrambling/scrambled
Many TV channels are scrambled. To de-scramble
them you need specific smart cards provided by
different pay-TV providers.
Digital audio
Sound signal that has been converted into
numerical values. Digital sound is available
when you use the DIGITAL AUDIO OUT
COAXIAL. These sockets send audio through
multiple channels, instead of just two channels as
analogue does.,Volume and mute are managed
by audio equipment.
Dolby Digital
A surround sound system developed by Dolby
Laboratories containing up to six channels of
digital audio (front left and right, surround left
and right, centre and subwoofer),Volume and
mute are managed by audio equipment.
Glossary
DTR 7510 200910.indd 51
ENGLISH
11 Glossary
HDD
Hard Disk Drive
HDMI
HDMI is a standard for video interfacing; it can
convey a massive amount of digital data. It means
it can easily support all HDTV standards.
HDTV
High-Definition Television
JPEG
A very common digital still picture format. A
still-picture data compression system proposed
by the Joint Photographic Expert Group, which
features small decrease in image quality in
spite of its high compression ratio. Files are
recognized by their file extension “JPG” or
“JPEG”.
Lip Synchronization
Setting used to synchronize sound and pictures
in case a delay is experienced, in particular if the
sound of speech does not match lip movements.
MP3
A file format with a sound data compression system.
“MP3” is the abbreviation of Motion Picture Experts
Group 1 (or MPEG-1) Audio Layer 3. By using the
MP3 format, one CD-R or CD-RW can contain
about 10 times more data than a regular CD. Files
are recognized by their file extension “.mp3”.
51
16/10/2009 17:41:10
MPEG
Motion Picture Experts Group. A collection of
compression systems for digital audio and video.
PaP
Picture and Picture
PiP
Picture in Picture
PIN Code
4-digit code used to prevent access to
inappropriate programmes (parental control).
SCART Loop-through
Function allowing automatic signal by-pass for
playback from a VCR or DVD player/recorder
connected to SCART EXT2.
SDTV
Standard Definition Television.
Smart Card
Card to be inserted into the Common Interface.
It is provided by the pay-TV provider whom you
took out a subscription.
Surround
A system for creating three dimension sound
fields full of realism by arranging multiple
speakers around the listener.
USB key
Small size storage device. It is used to store
all types of computer files. A USB key can be
connected to the USB port located on the front
panel of the Digital Terrestrial Receiver.
52
DTR 7510 200910.indd 52
Glossary
16/10/2009 17:41:10
ENGLISH
12 Index
Connect
basic connection, 10
Consult the TV Guide, 15
Control Live TV, 16
Control Volume, 14
Use channel lists, 13
Use the time shift bar, 16
Favorite lists
Rename a favorite list, 27
Sort a favorite list, 28
Front display
Interpret front display messages, 22
Interpret front display pictograms, 21
Wake-up the Digital Video Recorder, 13
Watch 2 channels at the same time, 15
Watch previously broadcast programs, 17
View channel/program info, 14
HDD titles
Playback from HDD library, 19
Install
First installation, 10
Search failure, 11
Pause live TV, 15
Playback
Playback from HDD library, 19
Playback from USB, 19
Record, 17
Remote control
Use the remote control, 23
Retune 11
Select a channel, 13
Set programme options, 14
Index
DTR 7510 200910.indd 53
53
16/10/2009 17:41:10
13 Remote control brand
code list
13.1
Setup Code For All TVs
Akai Bang & Olufsen Beko BenQ Daewoo Dell Emerson Ferguson Firstline Funai Goodmans
Grundig
54
DTR 7510 200910.indd 54
0036, 0062, 0087, 0099, 0190, 0205, 0235, 0243, 0244, 0245, 0291, 0388, 0398, 0404, 0439, 0460, 0500, 0507, 0543, 0575, 0583, 0608, 0629, 0633, 0658, 0675, 0741, 0742, 0772, 0839, 1564
0114, 0592
0222, 0319, 0397, 0445, 0513, 0633, 0741, 0742, 0835, 1064
1783
0036, 0063, 0135, 0136, 0197, 0205, 0244, 0245, 0291, 0401, 0478, 0526, 0583, 0661, 0688, 0892, 0907, 1782, 1783, 1936
1481
0039, 0063, 0071, 0072, 0097, 0100, 0114, 0129, 0197, 0204, 0205, 0221, 0222, 0274, 0309, 0347, 0388, 0397, 0398, 0478, 0513, 0695, 0741, 1936
0100, 0136, 0220, 0222, 0265, 0314, 0362, 0470, 0575, 0587, 0652, 1064
0036, 0099, 0235, 0243, 0244, 0262, 0265, 0274, 0348, 0388, 0401, 0438, 0558, 0571, 0583, 0695, 0741, 0835, 1064
0291, 0695
0036, 0038, 0062, 0063, 0099, 0243, 0244, 0245, 0262, 0265, 0291, 0362, 0398, 0401, 0507, 0514, 0526, 0543, 0583, 0587, 0606, 0614, 0657, 0661, 0688, 0695, 0741, 0835, 0907, 1064, 1190, 1927, 1936
0036, 0063, 0097, 0190, 0222, 0470, 0514, 0562, 0583, 0614, 0657, 0710, 0733
Hitachi
Hoher
InFocus
JVC
LG
Loewe
Logik Magnavox
Matsui
Metronic
NEC
Nokia Orion
Panasonic
0036, 0062, 0063, 0071, 0099, 0129, 0132, 0135, 0136, 0184, 0190, 0205, 0221, 0244, 0309, 0383, 0390, 0500, 0507, 0508, 0519, 0526, 0535, 0543, 0575, 0605, 0656, 0661, 0746, 0751, 0771, 0911, 1064, 1072, 1164, 1197, 1252, 1508, 1603
0741, 0892
0779
0063, 0097, 0120, 0220, 0245,
0398, 0445, 0535, 0633, 0677, 0680, 0710
0087, 0135, 0205, 0583, 0671, 0741, 0742, 1175, 1664
0114, 0319, 0539, 0543, 0660, 0682
0036, 0038, 0087, 0099, 0220, 0398, 0907
0062, 0063, 0087, 0309, 0462, 0733, 1481, 1782
0036, 0038, 0062, 0063, 0099, 0190, 0204, 0222, 0235, 0243
0244, 0262, 0362, 0379, 0382, 0383, 0390, 0398, 0460, 0470, 0482, 0514, 0543, 0571, 0583, 0606, 0656, 0741, 1064
0652
0036, 0038, 0063, 0197, 0205, 0244, 0272, 0291, 0347, 0401,
0439, 0482, 0526, 0535, 0614
0688, 0731, 0732, 1197, 1297, 1731
0190, 0235, 0347, 0366, 0373
0388, 0401, 0500, 0507, 0575
0633, 0637, 0658
0038, 0204, 0205, 0262, 0291
0347, 0348, 0382, 0439, 0470
0543, 0558, 0571, 0583, 0682
0741, 0907, 1935, 1943
0062, 0099, 0135, 0190, 0220
0235, 0253, 0388, 0394, 0450
0535, 0543, 0575, 0677, 0880
1337, 1677
Remote control brand code list
16/10/2009 17:41:10
0036, 0039, 0072, 0114, 0135
0205, 0220, 0265, 0388, 0401
0450, 0539, 0583, 0632, 0799
1481, 1783
0038, 0136, 0190, 0193, 0197
0314, 0388, 0450, 0513, 0539
0787
0099, 0100, 0348, 0438, 0648
0652, 0657, 0661, 1064
0482, 0637, 0645
0036, 0062, 0063, 0072, 0087
0099, 0120, 0190, 0205, 0235
0243, 0244, 0253, 0291, 0317
0389, 0397, 0398, 0509, 0583
0614, 0645, 0671, 0709, 0745
0839
0038, 0063, 0072, 0099, 0131
0132, 0135, 0184, 0197, 0235
0243, 0244, 0291, 0366, 0397
0439, 0535, 0571, 0582, 0731
1782
0039, 0097, 0190, 0244, 0245
0274, 0286, 0379, 0388, 0398
0421, 0571, 0583, 0675, 0695
0741, 1064, 1164
0036, 0063, 0120, 0184, 0220
0283, 0518, 0543, 0677, 0695
0845, 1190, 1220
0184, 0220, 0222, 0562
0038, 0063, 0120, 0129, 0184
0197, 0220, 0380, 0390, 0677
0861, 1532, 1678
0439, 0733, 1564
0253, 0583, 0677
0100, 0136, 0314, 0362, 0373
0513, 0525, 0587, 0614, 0652
0741
0136, 0314, 0362, 0587, 0652
0036, 0038, 0062, 0063, 0072
0087, 0097, 0120, 0129, 0136
0193, 0222, 0244, 0291, 0439
0450, 0535, 0645, 0671, 0677
0741, 0745, 1190, 1535, 1731
0244, 0583, 0695, 1064, 1190
0751, 1782
Remote control brand code list
DTR 7510 200910.indd 55
13.2
Setup Code For All VCRs
Aiwa Akai Alba Aristona Daewoo
Denon
Emerson
Ferguson
Firstline
Funai
Goldstar
Grundig
Hitachi
JVC
Kenwood
LG
Loewe
Magnavox
Matsui
Metronic
NEC
Nokia Panasonic
Philips
Pioneer
Proline
0027, 0059, 0064, 0334, 0375
0379, 0769, 1164
0047, 0064, 0068, 0133, 0267
0342, 0375, 0379, 0669
0027, 0047, 0099, 0108, 0305
0342, 0375, 0379
0108, 0173
0047, 0064, 0072, 0131, 0305
0379, 0664, 0669, 0871, 1164
0069, 0108
0027, 0064, 0070, 0072, 0099
0267, 0305, 0375, 0620, 0664
0027, 0068, 0193, 0305, 0347
0348
0064, 0070, 0072, 0099, 0305
0375, 0507, 1164
0027, 0064, 0099, 0305, 0620
0027, 0064, 0065, 0253, 0305
0507, 1164
0061, 0099, 0108, 0253, 0347
0374, 0375, 0376, 0379, 0769
0027, 0064, 0068, 0069, 0072
0108, 0193, 0267, 0620
0068, 0072, 0094, 0108, 0411
0065, 0068, 0094, 0411
0064, 0065, 0069, 0072, 0267
0507, 1164
0064, 0108, 1589
0027, 0064, 0075, 0108, 0253,
0267, 0620, 0669
0064, 0267, 0305, 0375, 0376
0379, 0769
0108,
0064, 0065, 0068, 0075, 0094
0131, 0305, 1164
0068, 0069, 0075, 0108, 0131
0133, 0267, 0305, 0342, 0579
0027, 0047, 0253, 0863, 0864
1589
0027, 0061, 0072, 0075, 0108
0173, 0253, 0411, 0620, 1296
0069, 0094, 0108, 1830
0027, 0305, 0347, 0669
ENGLISH
Philips
Pioneer
Proline
Sagem Samsung Sanyo Schneider
Sharp Siemens Sony TCL
Technics
Telefunken
Thomson
Toshiba
Vestel
Viewsonic
55
16/10/2009 17:41:10
Pye
Radiola
Samsung Sanyo Schneider
Sharp Siemens Sony Technics
Telefunken
Thomson
Toshiba
56
DTR 7510 200910.indd 56
0027, 0108
0108
0027, 0065, 0072, 0267, 0459
0647
0027, 0074, 0075, 0094, 0131
0267, 0375, 1164
0027, 0064, 0069, 0099, 0108
0173, 0267, 0305, 0375, 0379
0669, 0924, 1164
0027, 0059, 0064, 0074, 0075
0596
0064, 0108, 0131, 0173, 0347
0374
0027, 0059, 0061, 0074, 0075
0094, 0133, 0253, 1059
0027, 0064, 0108, 0253
0068, 0305, 0347, 0348, 0411
0521, 0620, 0669
0068, 0094, 0305, 0347, 0348
0411, 0521, 0749
0027, 0068, 0069, 0070, 0072
0094, 0108, 0267, 0379, 0411
0459, 0769
13.3
Setup Code for All Digital Video
Disks
Aiwa Alba Bang & Olufsen
BenQ Daewoo
Denon
Emerson
Ferguson
Firstline
Funai
Goodmans
Grundig
Hitachi
Hoher
Humax
JVC
Kenwood
Kiss
LG
LiteOn
Loewe
Magnavox
Marantz Matsui
Metronic
Mustek Nakamichi
0560, 0668, 1163, 1270
0566, 0699, 0722, 0726, 0740
0744, 0757, 0810, 1078, 1167
1722
1052
1263
0732, 0741, 0797, 0811, 0859
0860, 0896, 0897, 0899, 1196
1933, 1945
0517, 0661, 1661
0618, 0702, 0732
0678, 0722, 0925, 1722, 1757
0678, 0740, 0826, 0870, 0896
0702, 0722
0678, 0717, 0740, 0750, 0757
0810, 0817, 0860, 0906, 1031
1167, 1248, 1281, 1757, 1950
2034, 2041
0566, 0578, 0678, 0697, 0713
0722, 0728, 0732, 0740, 0802
0817, 1031, 1063, 1722,1757
1947, 2073
0600, 0691, 0692, 0722, 0740
0884, 1946, 1947, 2021
0678, 0740, 0853, 0858, 1031
1251
0673
0530, 0566, 0650, 0894, 1191
1928, 1967
0517, 0561, 0764, 1090
0692, 0868, 2030
0618, 0768, 0774, 0817, 0896
1933, 2010, 2029
1085, 1185, 1188
0566, 0768, 0912
0530, 0566, 0673, 0702, 0740
0912, 1167
0530, 0566, 0702
0678, 0699, 0722, 0740, 1031
1722, 1757
0717
0757, 1757, 1944
1226, 1249
Remote control brand code list
16/10/2009 17:41:10
0530, 0654, 1639, 2012
0858
0517, 0530, 0598, 1037, 1932
1935
0530, 0566, 0673, 0702, 0912
1185, 1839, 1840, 1938
0517, 0552, 0598, 0658, 1838
1927, 1992
0678, 0699, 0713, 0737, 0860
1031, 1942
0673
0517, 0600, 0771, 0847, 1102
1955, 1959, 2035
0566, 0678, 0732, 0740, 0806
0810, 0815, 0817, 0858, 0896
1128, 1180
0657, 0702, 0740, 0779, 2042
0560, 0600, 0799, 0891, 1097
1122, 1160, 1560, 1660, 1930
1960, 2008
0543, 0598, 0719, 0722, 0744
0768, 0786, 0795, 0817, 0860
1033, 1224, 1254, 1956, 1957
1962, 2011
0517, 1932
0816, 0817, 0860, 1110, 1255
0549, 0578
0530, 0566, 0600, 0722, 1072
2033
0517, 0566, 0673
0757, 1757, 1944
Remote control brand code list
DTR 7510 200910.indd 57
13.4
Setup Code for All Audio AMP/
Tuners
Bang & Olufsen
Bose Cambridge Audio
Denon
Harmon Kardon
Hoher
JBL JVC
Kenwood
Koss
LG
Magnavox
Marantz Matsui
NAD Nakamichi
Onkyo Panasonic
Philips
Pioneer
Samsung Sony Teac
Technics
Telefunken
Thomson
Toshiba
Yamaha
0826
1382
1674
0148, 1131, 1387, 1487
1316, 1331, 1337
1284
1317
0101, 0491, 1226, 1227, 1401
1522
0213, 0739, 1054, 1308, 1340
1596, 1597
0771
1320, 1551
1296
0771, 1296, 1316
0771, 0774, 0824
0347, 0636
1340
1325, 1347, 1558
1315, 1335, 1545, 1790
1296, 1316, 1742
0213, 0316, 1050, 1211, 1311
1486, 1683
1226, 1308, 1322, 1331, 1451
0820, 1185, 1285, 1468, 1481
1585, 1685, 1785, 1786, 1885
0490, 0636, 0680, 0771, 0774
0781, 0824, 1205, 1226, 1253
1298, 1306, 1308, 1417, 1452
1490, 1506, 1555
0235, 1335, 1336, 1545,1790
1417
1181, 1381
1599
0203, 0213, 0739, 1050, 1303
1358
ENGLISH
Onkyo Packard Bell
Panasonic
Philips
Pioneer
Proline
Pye
Samsung Schneider
Sharp Sony Teac
Technics
Telefunken
Thomson
Toshiba
Yamaha
Yukai 57
16/10/2009 17:41:10
13.5
Setup Code for All Audio
Amplifiers (A)
Pioneer
Sony Teac
Telefunken
Thomson
Yamaha
58
DTR 7510 200910.indd 58
0327
0716
1301
1357
1156
0381
Remote control brand code list
16/10/2009 17:41:10
Trademarks and partner logos
The Philips wordmark and the Philips shield
are registered trademarks of Koninklijke Philips
Electronics N.V. and are used by Pace plc under
license from Koninklijke Philips Electronics N.V.
DTR 7510
Serial number:
UNITED KINGDOM
Philips CE, The Philips Centre,
Surrey
Phone: 0870 900 9070 (ps tn)
ENGLISH
Contact information
Manufactured under license from Dolby
Laboratories.
“Dolby” and the double-D symbol are
trademarks of Dolby Laboratories.
HDMI, and HDMI logo and High-Definition
Multimedia Interface are trademarks or
registered trademarks of HDMI licensing LLC.
Trademark of the DVB Digital Video
Broadcasting Project (1991 to 1996)
100% recycled paper
100% papier recyclé
Contact information
DTR 7510 200910.indd 59
59
16/10/2009 17:41:12
© 2009 Koninklijke Philips Electronics N.V.
All rights reserved.
Document order number: 3111 176 53842
DTR 7510 200910.indd 60
16/10/2009 17:41:12