1
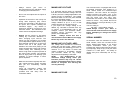
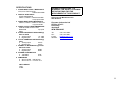
MODEL AVP1/APV1P
DOLBY DIGITAL® DTS® PROCESSOR/PREAMPLIFIER
OWNERS MANUAL
AVP1/
AVP1P
OWNERS MANUAL
to understand every detail by familiarising
yourself with the controls and features as
you read. You will find it easier to install
using the relevant sections of this manual as
a reference.
We have attempted to explain every feature
and operational facet clearly and concisely.
Your Perreaux dealer will be happy to assist
if you encounter any unforeseen problems.
Care should be taken to avoid the use of
solvents for cleaning particularly on
plated Classic series products. Use only
a soft cleaning cloth with a mild solution
of non caustic detergent if necessary.
Non plated Classic series products may
be cleaned with a polish designed for
use on aluminium.
CONTENTS
Read this manual, install your AVP1
correctly and realise the sonic significance
of your investment in Perreaux.
Perreaux products are designed to provide
the utmost in sonic realism and electronic
reliability with a functional yet elegant
appearance, this reflects the care and
craftsmanship applied during all stages of
construction.
To maintain the consistently high quality that
you expect from us, and we expect from
ourselves, Perreaux products are essentially
handcrafted.
We maintain the human link throughout,
from design and construction, through to the
ultimate test, your music, your system, your
ears.
INTRODUCTION
Congratulations on your PERREAUX Model
AVP1 purchase. To realise the full potential
of your Perreaux AVP1 you need to
appreciate all aspects of its operation.
Before installing the AVP1 into your system,
read the entire manual carefully. Endeavour
Because we too listen to our products we
know that with your Perreaux you will
discover many more of the musical secrets
we strive to reveal.
Note. All references to Models AVP1P are
also applicable to Model AVP1 Classic
series product other than the front panel
cleaning instructions .
Safety Instructions
Important Information
Front Panel Controls
Front Panel Display & Indicators
Rear Panel
Remote Control
On Screen Display (OSD)
Getting Started
Installation and Operation Precautions
Specifications
2
2
3
4
5
7
8
8
8
10
SAFETY INSTRUCTIONS
1. Read Instructions
All safety and operational instructions
should be read before the AVP1 is
operated. Keep the Owners Manual in a
safe place for future reference.
2. Follow Instructions
All installation, operation and other
instructions should be followed.
3. Warnings
All warnings on the AVP1 and in the
Owners Manual should be strictly
adhered to.
4. Water and Moisture
The AVP1 should not be used near
water, for example near a bathtub,
2
washbowl, kitchen sink, laundry tub, in a
wet basement, near a swimming pool,
etc.
5. Rack / Wall / Ceiling Mounting
The AVP1 should be rack mounted only
in a heavy-duty rack or stand that is
recommended for audio equipment use.
Mounting to a wall or ceiling should be
via a heavy-duty bracket or shelf
designed for audio equipment use.
6. Heat
The AVP1 should be situated away from
heat sources such as radiators, stoves,
or other appliances that produce
excessive amounts of heat.
7. Power Sources
The AVP1 should be connected to
mains power supply only of the type
described in the operating instructions,
or as marked on the rear of the AVP1
8. Power Cord Protection
The mains power supply cord should be
routed so that it is not likely to be walked
on or pinched by items placed on or
against it. Pay particular attention to the
cord at power points, convenience
receptacles, and the point where it exits
from the AVP1.
9. Cleaning
When cleaning any Perreaux product
use lukewarm water with a few drops of
mild detergent.
DO NOT USE SOLVENTS.
10. Non-use Periods
The mains power cord of the AVP1
should be unplugged from the
mains/line outlet when the unit is to be
left unused for long periods of time.
11. Object and Liquid Entry
Care should be taken so that objects
and/or liquids do not accidentally fall
inside the AVP1.
12. Damage Requiring Service
Qualified service personnel should
service the AVP1 if any of the following
occur:
a. The mains power-supply cord,
and/or plug have been damaged
b. Objects have fallen, or liquid has
been spilt into the AVP1
c. The AVP1 has been exposed to
rain and/or excessive moisture
d. The AVP1 does not appear to
operate normally, or exhibits a
marked change in performance
e. The AVP1 has been dropped, or
the chassis damaged.
performing any switching functions or
connection alterations of any type to your
AVP1, or to any other part of your entire
system. This caution also applies to the
normal use of your Laser Disc player, Tuner,
Cassette Deck, etc.
PRODUCT SUPPLIED WITHOUT
MAINS PLUG
If your unit comes with a 3-core cable but
without a plug, make certain LIVE and
NEUTRAL leads are connected correctly to
your plug terminals.
IMPORTANT:
The wires of the
mains/line lead in this unit are coloured
in accordance with the following code:
IMPORTANT INFORMATION
BROWN
LIVE
BLUE
NEUTRAL
GREEN/YELLOW
EARTH/GROUND
As the wire colours in the mains lead of this
unit may not correspond exactly with those
coloured markings on the terminals of your
plug proceed as follows:
- The wire which is coloured BLUE must
be connected to the terminal which is
marked with the letter N, or colour
coded BLUE or BLACK.
- The wire which is coloured BROWN
must be connected to the terminal which
is marked with the letter P or L, or colour
coded BROWN or RED.
- The
wire
which
is
coloured
GREEN/YELLOW must be connected to
the terminal which is marked with the
letter
E,
or
colour
coded
GREEN/YELLOW or GREEN.
Always make sure the attenuator / volume
control of your AVP1 or source unit is set to
–80dB
and
the
mains/line
supply
disconnected from your AVP1 prior to
NOTE:
Any modifications to the
mains/line voltage setting within your
AVP1 may only be carried out by a
13. Servicing
The user should not attempt to service
the AVP1 beyond those means
described in the owners’ manual. All
other servicing should be referred to
qualified service personnel.
14. Grounding or Polarisation
Precautions should be taken so that the
grounding or polarisation of the AVP1
are correct, and are maintained
throughout the entire system.
3
qualified Perreaux service agent. Failure
to recognise this warning will void any
warranty.
5
FRONT PANEL CONTROLS
1
2
3
4
POWER STANDBY(STBY) /ON
BUTTON
Press this button to turn the AVP1
ON or to STANDBY.
Note: In STANDBY mode power is
cut to everything except the internal
Microprocessor
VOLUME / ATTENUATOR INCREASE
/ DECREASE BUTTONS
These buttons when depressed
increase ¿ or decrease À the
volume setting. The volume
adjustment range is –80dB (min) to
0dB (max) in 1dB steps.
SURROUND MODE BUTTON
Press this button to select the
chosen listening mode: Digitial
Surround, Pro-Logic or Stereo
INPUT SELECT BUTTON
Press this button to sequentially
select one of eight input sources:
Video 1,Video 2, Video 3, MD
(Optical Digital), VCR, AUX, TAPE
or CD and the input LED’s will point
to the selected source. Video 1,
Video 2 and Video3 are coaxial
Digital Inputs, MD is Optical
(TOSLINK) Digital Input and VCR,
AUX, TAPE and CD and Stereo
analog inputs.
NOTE: The AVP1 will detect the
input source that you are playing
automatically. But it can be changed
manually if the auto-detected source
is not the desired source.
If you have no surround speakers set
the mode to Off (no light)
SPEAKER SETUP, FRONT, CENTRE,
REAR and SUBWOOFER
a Press SPEAKER SETUP button
then the SETUP LED will light up.
b Press the FRONT, REAR, CENTRE
and SUB.W buttons to select the
speaker size that you are going to
use. The AVP1 will then produce
suitable signal outputs to match the
size and number of speakers in your
system. The front panel speaker
indicator lights indicate speaker setup as detailed in the “Front Panel
Display and Indicator” section of this
manual
c Press SPEAKER SETUP button
again to disable this function when
you finish your speaker mode
setting.
Note: The front speakers cannot be
turned off but can be set for large or
small
The small speaker setting limits the
bandwidth supplied to above 120Hz
Bass information is re-routed from the
applicable small speaker channels to
the sub channel.
The OSD displays the setting of the
applicable speaker/s during this set-up
For Full Range (Large) speakers the
Applicable LED will Indicate RED.
For
Smaller
Limited
Bandwidth
Speakers (Small) the Applicable LED
will Indicate GREEN
For Speaker Off the Applicable LED
will turn OFF
LARGE speakers are speakers that
can comfortably reproduce frequencies
below 120Hz.
6
REMOTE SENSOR WINDOW
This area houses the
sensor.
FRONT PANEL
INDICATORS
AND
The AVP1 has numerous items of
display information as follows.
1
2 and ½ Digits Display
a MASTER VOLUME
The MASTER VOLUME indicates
the attenuation levels of all channels
from –80dB to 0dB by 1dB/steps on
the display.
b
CHANNEL LEVEL
The adjustable CHANNEL LEVEL
range from +10dB to –10dB for the
selected channel is shown on the
display. After finishing the channel
level adjustment, the display will
return to the Master Volume Level 5
seconds later.
c
DELAY TIME FOR REAR AND
CENTER CHANNEL
SMALL speakers are speakers that
cannot comfortably reproduce
frequencies below 120Hz.
E.g. If you are using small Rear
surround speakers, set the Rear Mode
to Small (green).
DISPLAY
remote
4
The adjustable DELAY TIME range
from 0 to 5ms for centre channel or
0 to 15ms for rear channel will be
shown on the display when it under
Digital Dolby Mode. The adjustable
DELAY TIME range from 0 to 30ms
for fear channel will be shown on
the display when it is under Pro
logic Mode. After finishing the delay
time setting, the display will return
to the Master Volume level 5
seconds later.
2
L.. and R. and LS and RS LEDs will
light in YELLOW
CENT. and SUB.W LEDs will be
OFF.
f
CHANNEL INDICATOR (6 DUAL
COLOUR LEDs)
Normally these 6 dual colour LEDs will
indicate how many channels are
encoded in the program that you are
playing.
g
h
a
Digital Source 3/2/1:
All 6 LEDs will light in YELLOW
b
Digital Source 3/2:
5 LEDs will light in YELLOW and
SUB.W. LED will be OFF.
c
Digital Source 3/1:
L. and CEN. and R. LEDs will light
in YELLOW
LS. and RS. LEDs will light in
GREEN to indicate the REAR
channels are MONO and the
SUB.W LED will be OFF.
d
e
Digital Source 3/0
L. and CEN. and R. LEDs will light
in YELLOW
LS. and RS. and SUB.W LEDs will
be OFF.
Digital Source 2/2:
Digital Source 2/1:
L.. and R. LEDs will light in
YELLOW
LS. and RS. LEDs will light in
GREEN to indicate the REAR
channels are MONO.
CENT. and SUB.W LEDs will be
OFF.
Digital and Analog Source 2/0:
L.. and R. LEDs will light in
YELLOW
LS. and RS. and CENT. and
SUB.W LEDs will be OFF.
b
REAR SPEAKERS
LARGE light RED
SMALL light GREEN
OFF light off
c
CENTRE SPEAKER
LARGE light RED
SMALL light GREEN
OFF light off
d
SUBWOOFER SPEAKER
LARGE light RED
OFF light off
LARGE speakers are speakers that
can comfortably reproduce
frequencies below 120Hz.
SMALL speakers are speakers that
cannot comfortably reproduce
frequencies below 120Hz.
Digital and Analog Source 1/0:
CEN. LED will light in YELLOW and
the other LEDs will be OFF.
NOTE: When a 2-channel surroundencoded Dolby Digital source is
present, the L. and R. LEDs will light in
YELLOW. The CEN. And SUB.W
LEDs will be OFF, and the LS. and RS.
LEDs will light in GREEN to indicate a
mono surround channel.
NOTE: When a 2/0 surround-encoded
Dolby Digital source is present and Pro
Logic is set to auto-detect, the unit will
automatically
Pro
Logic
mode
playback.
3
LARGE light RED
SMALL light GREEN
NOTE: After finishing the speaker
mode setting, the 6 LEDs will return to
channel indicator 5 seconds later.
4
AUDIO
PROGRAM
INDICATORS
a
a
Dolby Digital Indicator
This RED LED will light up when the
program during playback is Dolby
Digital encoded.
b
DTS Indicator
This RED LED will light up when the
program during playback is “dts”
encoded.
SPEAKER MODE
The 6 LEDs will show the SPEAKERS
MODE when in Speaker Set-up Mode.
ENCODED
c
PCM Indicator
FRONT SPEAKERS
5
This RED LED will light up when the
program during playback is PCM
digital encoded.
5
MUTE
Sound will be muted and the 2 and ½
digits display will blink when the remote
MUTE button has been pressed. Press
the MUTE button again to disable the
function.
6
DYNAMIC RANGE
The Dynamic Range LED indicates
whether Dynamic Range Compression
is ON or OFF as selected using the
remote.
ON: The indicator LED is illuminated
Green.
OFF: The indicator LED is not
illuminated
7
TEST
The TEST LED indicates that the unit is
in test tone mode. Test mode can only
be selected by the remote.
8
STANDBY LIGHT
Standby light illuminates during Standby
Yellow = Video (composite) Input / Output
AUDIO ANALOG OUTPUTS
1
FRONT L and R AUDIO OUTPUT
Connect to a power amplifier to
drive the front left and right
speakers.
2
REAR L and R AUDIO OUTPUT
Connect to a power amplifier to
drive the rear left and right
speakers.
3
CENTRE AUDIO OUTPUT
Connect to a power amplifier to
drive the centre speaker.
outputs of an AUXILIARY audio
device such a TV.
8
TAPE AUDIO L and R INPUT
Analog signal left and right channel
inputs can be connected to TAPE
RECORDER audio outputs.
9
CD AUDIO L and R INPUT
Analog signal left and right channel
inputs can be connected to a CD
player audio outputs.
DIGITAL AUDIO INPUTS
4
5
SUBWOOFER AUDIO OUTPUT
Connect to a power amplifier for
driving a subwoofer.
In the case of using a subwoofer
with a built-in amplifier, connect the
Subwoofer Audio output of the
AVP1 to the “Line in” input of the
subwoofer.
VCR REC. L and R OUTPUT
Analog signal output for VCR
recording. Connects to a VCR’s
record inputs.
10
MD OPTICAL DIGITAL INPUT
Optical
Digital
Audio
input.
Connected to a MD’s Optical Digital
Output.
11
VIDEO 1 COAXIAL DIGITAL
AUDIO INPUT
Coaxial
Digital
Audio
input.
Connected to a A/V source digital
audio output such a DVD player.
12
VIDEO 2 COAXIAL DIGITAL
AUDIO INPUT
Coaxial
Digital
Audio
input.
Connected to a A/V source digital
audio output such a DVD player.
13
VIDEO 3 COAXIAL DIGITAL
AUDIO INPUT
Coaxial
Digital
Audio
input.
Connected to a A/V source digital
audio output such a DVD player.
REAR PANEL
IMPORTANT NOTE:
THE
ANALOG
INPUT
/
OUTPUT
SOCKETS ON THE REAR OF THE AVP1
ARE
COLOUR
CODED
AND
CORRESPOND TO THE TABLE BELOW
(With the exception of Centre (CENT) and
Subwoofer (SUB.W) inputs/outputs.
Red
White
= Right Channel Input / Output
= Left Channel Input / Output
ANALOG AUDIO INPUTS
6
VCR AUDIO L and R INPUTS
Analog signal left and right channel
inputs. Connects to VCR’s audio
outputs.
7
AUX AUDIO L and R INPUT
Analog signal left and right channel
inputs can be connected to the
VIDEO INPUTS
6
14
15
16
17
VIDEO 1 COMPOSITED VIDEO
INPUT
Composite video signal input can be
connected to A/V source video
output such as DVD player.
VIDEO 2 COMPOSITED VIDEO
INPUT
Composite video signal input can be
connected to A/V source video
output such as DVD player.
VIDEO 3 COMPOSITED VIDEO
INPUT
Composite video signal input can be
connected to A/V source video
output such as DVD player.
VCR COMPOSITED VIDEO INPUT
Composite video signal input can be
connected to a VCR’s composite
video output.
18
VCR
COMPOSITED
VIDEO
RECORD OUTPUT
Composite video output can be
connected to a VCR’s composite
video input.
19
MONITORED
COMPOSITED
VIDEO OUTPUT
Composite video signal output can
be connected to TV’s composite
input. This video output is used for
On Screen Display function.
20
VIDEO 1 S-VIDEO INPUT
S-VIDEO video signal input can be
connected to a A/V source S-VIDEO
video output such as DVD player.
21
VIDEO 2 S-VIDEO INPUT
S-VIDEO video signal input can be
connected to a A/V source S-VIDEO
video output such as DVD player.
22
VIDEO 3 S-VIDEO INPUT
S-VIDEO video signal input can be
connected to a A/V source S-VIDEO
video output such as DVD player.
23
VCR S-VIDEO INPUT
S-VIDEO video signal input can be
connected to a VCR’s S-VIDEO
video output.
24
VCR S-VIDEO VIDEO RECORD
OUTPUT
S-VIDEO video signal output can be
connected to a VCR’s S-VIDEO
video record input.
25
MONITOR
S-VIDEO
VIDEO
OUTPUT
S-VIDEO video signal output can be
connected to a S-VIDEO video of a
TV. This S-VIDEO video output will
NOT equip ON Screen Display
function.
26
MAINS CONTROL OUTPUT
This is a DC voltage output, which
can connect to turn a multi-channel
power amplifier ON and OFF if
equipped with a DC voltage control
input jack.
7
The LEVEL + / - controls allow you
to vary the level of any of the six
channels in the AVP1 when
selected with the CHANNEL button
to obtain the correct balance for
your listening position. Pushing the
LEVEL - button will cause the level
of the applicable channel to be
attenuated (decreased in volume).
Pushing the LEVEL + button will
cause the level of the applicable
channel to be attenuated. During
any LEVEL adjustment the display
will indicate the level in dB in a
range of +10 to -10dB. Master
volume level will be displayed after
approximately 3 seconds if the
LEVEL button is not used.
Note: the LEVEL adjustments are
memorised for each surround mode
i.e. LEVEL must be set for each
surround mode.
Note: the selected channel for a
flashing light on the front panel
display and the OSD displays
adjustment if using composite video
monitor out
REMOTE CONTROLS
The AVP1 comes supplied with a
PERREAUX 29 button full function infrared
remote control.
1
2
STANDBY
The power or standby control button
is located both on the remote
controls and front panel. Depressing
this control alternately causes the
AVP1 to switch to standby mode or
normal operation mode. When
switching from standby to normal
operation the display on the front
panel will illuminate and in standby
one Red LED only is illuminated.
When not using the AVP1 we
recommend leaving the AVP1 in
standby mode. If the AVP1 is not
being used for a long period of time
we recommend disconnecting the
AC plug from the mains receptacle.
MUTE
Press this button to mute the sound
output. The Volume Level Display
on the front panel will blink when
muted.
5
3
4
CHANNEL
Depressing this button alternately
selects each of the six channels for
level adjustment (in conjunction
with the LEVEL up down button)
during playback or whilst using the
TEST
button
selected
noise
generator (see LEVEL and TEST
button functions below)
LEVEL + / - (Channel Trim /
Balance)
MASTER VOLUME ¿ (UP) /
DOWN À
These buttons when depressed
increase or decrease the master
volume
setting.
The
volume
adjustment range is –80 (min) to 0
(max).
6
INPUT SOURCE BUTTONS
VIDEO 1, VIDEO2, VIDEO3, MD,
AUX, TAPE and CD buttons are
directly selectable.
7
SURROUND MODE (DSP)
SETTING BUTTON
Press this button to select the
chosen listening mode: Digital
Surround, Pro-Logic or Stereo
8
TONE TEST
Depressing this control selects the
pink noise generator in the AVP1
used for initial set-up of level
balance between all channels either
by ear or via a sound pressure /
level meter. Channels are selected
manually via the CHANNEL button
and adjusted with the LEVEL + / buttons. Depress the test button
again to turn off this function
9
DYNAMIC RANGE
Depress this button when using an
Dolby Digital source specified for
Dynamic Range Compression. A
red LED on the front panel screen
and the OSD will indicate when this
function is selected.
Note: This control is only applicable
to Dolby Digital encoded software.
10
DSP SURROUND
This function can only be operated
by the remote. The operating
procedures are:
Press this button to select one of 7
different DSP surround options
The following 7 different DSP
surround modes will be shown on
TV if the composite video output of
the AVP1 is connected to the TV:
NO SURROUND
ROOM LAG
ROOM SML
THEATER LAG
THEATER SML
a
b
8
c
d
11
12
HALL LAG
HALL SML
STADIUM
Press the “UP” or DOWN” button on
the remote to select one of the DSP
surround modes.
Press the “ENTER” button on the
remote handset to complete the
DSP surround mode selection.
AM/FM, TUNING +/-, PRESET
+/_,AM/FM, PTY
These buttons are not functional for
the AVP1
UP, DOWN, ENTER, + and –
These 5 buttons are used for
selection of some extra functions
such as CENTRE and REAR
CHANNEL TIME DELAY, DSP
SURROUND MODE and SLEEP
ON/OFF functions from the remote
handset. These buttons are used in
conjunction with the ON SCREEN
DISPLAY (OSD).
a CENTRE and REAR CHANNEL
TIME DELAY: This is only available
for Dolby Digital and Dolby Pro
Logic surround mode.
• Press UP button to select one
function of CENTRE DELAY,
REAR DELAY or SLEEP.
• Press + or – button to adjust the
delay time for the channel
selected.
b SLEEP: It is a function of the AVP1
to set SLEEP ON or OFF
• Press UP button to select SLEEP
function
• Press ENTER to set SLEEP ON
or OFF
The Remote control uses 2 internal "AAA"
size batteries and may be changed by
removing the plastic panel forward out of the
remote base
ON SCREEN DISPLAY (OSD)
The AVP1 is equipped with OSD, which
functions when any control is applied
Note: OSD does not function when using S
VHS output connections
4 At low levels, ensure the system is
operating correctly and that each input is set
for the correct mode and level
NOTE:
Always ensure the AVP1 is
disconnected from the mains supply
before making any connections or
alterations.
INSTALLATION AND OPERATION
PRECAUTIONS
-
Leave the top and bottom of the AVP1
clear at all times allowing adequate
airflow around the sides of the unit. Do
not site this unit directly on carpet or
other soft surfaces.
Do not place
auxiliary equipment directly on top of the
AVP1.
-
Always operate in a horizontal position.
-
Install away from excessive heat and
moisture. Do not allow the ambient
temperature around the AVP1 to exceed
40º Celsius (105º Fahrenheit.)
-
Check the mains/line voltage stated on
the rear panel of your. AVP1 Supply
voltage must be within +/- 5% of the
stated voltage.
-
Connect all your hi-fi equipment to the
same mains/line source to avoid
possible earthing problems.
-
Do not change the fuse to any type or
rating other than that indicated on the
rear panel or owners manual.
GETTING STARTED
Having connected all the individual
components to your AVP1 we would
recommend you set up the system as
follows
1
With the master level set at a
reasonably low level set the size and
number of speakers being used in the
system using the speaker mode buttons on
the remote
2
Engage the test function and set the
individual balance of each channel using the
channel and level + / - buttons for each
analog and digital input in use - turn off the
test mode
3
Using a Dolby Digital / DTS and / or
Prologic source, set the rear and centre
delay times for the surround mode being
used on each input.
With the remote
UP/DOWN buttons and OSD set up the
DELAY TIME for the centre and rear
channels.
9
-
Always
ensure
your
AVP1
is
disconnected from the mains/line supply
if changing the mains/line fuse.
-
Do not run the outputs into the inputs of
the AVP1.
-
Operation of the AVP1 in the vicinity of a
strong radio frequency (RF) source
should be countered by RF filtering on
all inputs and outputs including the
mains/line supply.
Any doubts or
suspicions should be conveyed to your
Perreaux dealer. RF interference can
cause serious loudspeaker damage.
-
Always set the volume to -80 before
making any connection alterations or
when changing input sources. The
reason for this precaution is to protect
your loudspeakers against bursts of very
high powered signals from a high level
source such as a CD player. This
Situation can arise when playing a low
output cassette with a fairly high volume
control setting then switching to CD
where a high level of signal is present at
the source input sockets. The resulting
burst of high power may damage your
speakers or cause damage in some
power amplifiers.
-
Make all connections logically and carefully, outputs first then inputs, checking
that you are maintaining channel
integrity.
Keep all inter-linking cables and
loudspeaker leads as far apart as
possible and well away from all
mains/line cables.
MAINS/LINE VOLTAGE
It is important that the AVP1 be operated
from the correct mains/line voltage. This unit
is factory set for the voltage applicable to the
original country of destination. The voltage
label and switch on the rear panel indicate
the correct operating voltage.
The AVP1 will operate satisfactorily within a
voltage variation of up to +/- 5% of that
voltage at which the unit has been set.
If you require the voltage setting to be
altered, e.g. relocation to another area, city
or country, or extraordinarily high or low
voltages, contact your Perreaux dealer.
Qualified service personnel can only
perform this modification.
NOTE:
Always ensure this unit is
disconnected from the Mains/Line supply
before any covers are removed
MAINS/LINE VOLTAGE LABEL
The voltage label indicates the mains/line
voltage the unit will accept. Always check
this setting when first installing your AVP1. A
variance of +/- 5% above or below that
voltage indicated is acceptable. Contact
your Perreaux dealer for any voltage
adjustment and updating of this label.
NOTE:
Any modifications to the
mains/line voltage setting within your
Perreaux product may only be carried
out by a qualified Perreaux service agent.
Failure to recognise this warning will
void any warranty.
The Perreaux AVP1 is equipped with a user
serviceable mains/line fuse situated in a
small drawer below the mains/line-input
receptacle. The fuse cannot be changed
without removing the power cord. In the
unlikely event of fuse failure always replace
with the same type and value fuse.
Remember that fuses do not usually blow
without a reason. Any doubts about fuse
failure should be conveyed directly to your
Perreaux dealer.
The fuse rating is:
100-240V Normal Blow 500mA
NOTE: Always ensure your AVP1 is
disconnected from the mains/ line supply
before attempting to change the mains/
line fuse.
SERIAL NUMBER
All Perreaux units are allocated a unique
serial number, which are recorded at the
factory against build details. If you should
require information about your unit,
providing the serial number will help achieve
a prompt reply. Keep a copy of all your serial
numbers in a safe place. The ability to
identify and prove ownership can be very
useful.
MAINS/LINE FUSE
10
SPECIFICATIONS
1 AUDIO INPUT LEVEL / IMPEDANCE
VCR, AUX TAPE and CD
200mV/22K OHM
2 DIGITAL AUDIO INPUT
LEVEL/IMPEDANCE
VIDE0 1, VIDEO 2, VIDEO 3and MD
0.5Vp-p/75 OHM
3 VIDEO INPUT LEVEL/IMPEDENCE
VIDEO1, VIDEO 2, VIDEO 3 and VCR
1Vp-p/75 OHM
4 VIDEO OUTPUT LEVEL/IMPEDENCE
VCR RECORD OUTPUT and
MONITOR
1Vp-p/75
OHM
5 AUDIO FREQUENCY RESPONSE @
20Hz to 20kHz
a Analog Inputs
+0, -3dB
b Digital Inputs
+0, -3dB
6 TOTAL HARMONIC DISTORTION @
1kHz
a Analog Inputs
0.04%
b Digital Inputs
0.02%
7 SIGNAL TO NOISE RATIO @ 1Vrms
OUTPUT LEVEL
a Analog Inputs
90dB
b Digital Inputs
90dB
8 POWER CONSUMPTION
a 115V60Hz
40W
b 230V50Hz
40 W
9 DIMENSION
a W*H*D in MM 482*88*315
b W*H*D in inch 19.0*3.5*12.4
PERREAUX INDUSTRIES LTD
RESERVES THE RIGHT TO CHANGE
SPECIFICATIONS FOR THE
IMPROVEMENT OF THIS PRODUCT.
Designed and Manufactured in
New Zealand
Perreaux Industries Ltd
PO Box 47-413
Ponsonby
Auckland
NEW ZEALAND
Tel:
Fax:
E-mail:
Website:
+64 9 815 5452
+64 9 815 5981
[email protected]
www.perreaux.com
NETT WEIGHT
7.5kg
16.5lb.
11