1
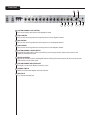
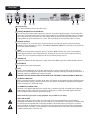
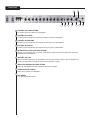
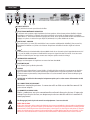
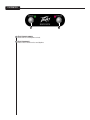
6505®+ 112 Combo
GuitarAmplifier
Operating
Manual
www.peavey.com
WARNING: When using electrical products, basic cautions should always be followed, including the following:
1.
Read these instructions.
2. Keep these instructions.
3.
Heed all warnings.
4.
Follow all instructions.
5.
Do not use this apparatus near water.
6.
Clean only with a dry cloth.
7.
Do not block any of the ventilation openings. Install in accordance with manufacturer’s instructions.
8.
Do not install near any heat sources such as radiators, heat registers, stoves or other apparatus (including amplifiers) that
produce heat.
9.
Do not defeat the safety purpose of the polarized or grounding-type plug. A polarized plug has two blades with one wider than
the other. A grounding type plug has two blades and a third grounding plug. The wide blade or third prong is provided for your
safety. If the provided plug does not fit into your outlet, consult an electrician for replacement of the obsolete outlet.
10. Protect the power cord from being walked on or pinched, particularly at plugs, convenience receptacles, and the point they exit
from the apparatus.
11.
Only use attachments/accessories provided by the manufacturer.
12.
Use only with a cart, stand, tripod, bracket, or table specified by the manufacturer, or sold with the apparatus. When a cart is
used, use caution when moving the cart/apparatus combination to avoid injury from tip-over.
13.
Unplug this apparatus during lightning storms or when unused for long periods of time.
14.
Refer all servicing to qualified service personnel. Servicing is required when the apparatus has been damaged in any way, such
as power-supply cord or plug is damaged, liquid has been spilled or objects have fallen into the apparatus, the apparatus has
been exposed to rain or moisture, does not operate normally, or has been dropped.
15.
Never break off the ground pin. Write for our free booklet “Shock Hazard and Grounding.” Connect only to a power supply of the
type marked on the unit adjacent to the power supply cord.
16.
If this product is to be mounted in an equipment rack, rear support should be provided.
17.
Note for UK only: If the colors of the wires in the mains lead of this unit do not correspond with the terminals in your plug‚
proceed as follows: a) The wire that is colored green and yellow must be connected to the terminal that is marked by the letter
E‚ the earth symbol‚ colored green or colored green and yellow. b) The wire that is colored blue must be connected to the
terminal that is marked with the letter N or the color black. c) The wire that is colored brown must be connected to the terminal
that is marked with the letter L or the color red.
18.
This electrical apparatus should not be exposed to dripping or splashing and care should be taken not to place objects
containing liquids, such as vases, upon the apparatus.
19.
The on/off switch in this unit does not break both sides of the primary mains. Hazardous energy can be present inside the
chassis when the on/off switch is in the off position. The mains plug or appliance coupler is used as the disconnect device, the
disconnect device shall remain readily operable.
20.
Exposure to extremely high noise levels may cause a permanent hearing loss. Individuals vary considerably in susceptibility to
noise-induced hearing loss, but nearly everyone will lose some hearing if exposed to sufficiently intense noise for a sufficient
time. The U.S. Government’s Occupational Safety and Health Administration (OSHA) has specified the following permissible
noise level exposures:
Duration Per Day In Hours
8
6
4
3
2
1 1⁄2
1
1⁄2
1⁄4 or less
Sound Level dBA, Slow Response
90
92
95
97
100
102
105
110
115
According to OSHA, any exposure in excess of the above permissible limits could result in some hearing loss. Earplugs or protectors to
the ear canals or over the ears must be worn when operating this amplification system in order to prevent a permanent hearing loss, if
exposure is in excess of the limits as set forth above. To ensure against potentially dangerous exposure to high sound pressure levels, it is
recommended that all persons exposed to equipment capable of producing high sound pressure levels such as this amplification system be
protected by hearing protectors while this unit is in operation.
SAVE THESE INSTRUCTIONS!
ENGLISH
IMPORTANT SAFETY INSTRUCTIONS
ATTENTION: L’utilisation de tout appareil électrique doit être soumise aux precautions d’usage incluant:
1. Lire ces instructions.
2.
Gardez ce manuel pour de futures références.
3.
Prétez attention aux messages de précautions de ce manuel.
4.
Suivez ces instructions.
5.
N’utilisez pas cette unité proche de plans d’eau.
6.
N’utilisez qu’un tissu sec pour le nettoyage de votre unité.
7.
N’obstruez pas les systèmes de refroidissement de votre unité et installez votre unité en fonction des instructions de ce manuel.
8.
Ne positionnez pas votre unité à proximité de toute source de chaleur.
9.
Connectez toujours votre unité sur une alimentation munie de prise de terre utilisant le cordon d’alimentation fourni.
10.
Protégez les connecteurs de votre unité et positionnez les cablages pour éviter toutes déconnexions accidentelles.
11.
N’utilisez que des fixations approuvées par le fabriquant.
12.
Lors de l’utilsation sur pied ou pole de support, assurez dans le cas de déplacement de l’ensemble enceinte/support de prévenir tout
basculement intempestif de celui-ci.
13.
Il est conseillé de déconnecter du secteur votre unité en cas d’orage ou de durée prolongée sans utilisation.
14.
Seul un technicien agréé par le fabriquant est à même de réparer/contrôler votre unité. Celle-ci doit être contrôlée si elle a subit des
dommages de manipulation, d’utilisation ou de stockage (humidité,…).
15. Ne déconnectez jamais la prise de terre de votre unité.
16.
Si votre unité est destinée a etre montée en rack, des supports arriere doivent etre utilises.
17.
Note pour les Royaumes-Unis: Si les couleurs de connecteurs du cable d’alimentation ne correspond pas au guide de la prise
secteur, procédez comme suit: a) Le connecteur vert et jaune doit être connectrer au terminal noté E, indiquant la prise de terre
ou correspondant aux couleurs verte ou verte et jaune du guide. b) Le connecteur Bleu doit être connectrer au terminal noté N,
correspondnat à la couleur noire du guide. c) Le connecteur marron doit être connectrer au terminal noté L, correspondant à la
couleur rouge du guide.
18.
Cet équipement électrique ne doit en aucun cas être en contact avec un quelconque liquide et aucun objet contenant un liquide, vase
ou autre ne devrait être posé sur celui-ci. 1
9.
L’interrupter (on-off) dans cette unité ne casse pas les deux côtés du primaire principal. L’énergie hasardeuse peut être preésente
dans châssis quand l’interrupter (on-off) est dans le de la position. Le bouchon principal ou atelage d’appareil est utilisé comme le
débrancher l’appareil restera facilement opérable.
20.
Une exposition à de hauts niveaux sonores peut conduire à des dommages de l’écoute irréversibles. La susceptibilité au bruit varie
considérablement d’un individu à l’autre, mais une large majorité de la population expériencera une perte de l’écoute après une
exposition à une forte puissance sonore pour une durée prolongée. L’organisme de la santé américaine (OSHA) a produit le guide
ci-dessous en rapport à la perte occasionnée:
Durée par Jour (heures)
8
6
4
3
2
1 1⁄2
1
1⁄2
1⁄4 ou inférieur
Niveau sonore moyen (dBA)
90
92
95
97
100
102
105
110
115
D’après les études menées par le OSHA, toute exposition au delà des limites décrites ce-dessus entrainera des pertes de l’écoute chez
la plupart des sujets. Le port de système de protection (casque, oreilette de filtrage,…) doit être observé lors de l’opération cette unité ou
des dommages irréversibles peuvent être occasionnés. Le port de ces systèmes doit être observé par toutes personnes susceptibles d’être
exposées à des conditions au delà des limites décrites ci-dessus.
GARDEZ CES INSTRUCTIONS!
FRENCH
INSTRUCTIONS IMPORTANTES DE SECURITE
SICHERHEITSHINWEISEACHTUNG: Beim Einsatz von Elektrogeräten müssen u.a. grundlegende Vorsichtsmaßnahmen befolgt werden:
1.
Lesen Sie sich diese Anweisungen durch.
2.
Bewahren Sie diese Anweisungen auf.
3.
Beachten Sie alle Warnungen.
4.
Befolgen Sie alle Anweisungen.
5.
Setzen Sie dieses Gerät nicht in der Nähe von Wasser ein.
6.
Reinigen Sie es nur mit einem trockenen Tuch.
7.
Blockieren Sie keine der Lüftungsöffnungen. Führen Sie die Installation gemäß den Anweisungen des Herstellers durch.
8.
Installieren Sie das Gerät nicht neben Wärmequellen wie Heizungen, Heizgeräten, Öfen oder anderen Geräten (auch Verstärkern),
die Wärme erzeugen.
9.
Beeinträchtigen Sie nicht die Sicherheitswirkung des gepolten Steckers bzw. des Erdungssteckers. Ein gepolter Stecker weist zwei
Stifte auf, von denen einer breiter ist als der andere. Ein Erdungsstecker weist zwei Stifte und einen dritten Erdungsstift auf. Der breite
Stift bzw. der dritte Stift dient Ihrer Sicherheit. Sollte der beiliegende Stecker nicht in Ihre Steckdose passen, wenden Sie sich bitte an
einen Elektriker, um die ungeeignete Steckdose austauschen zu lassen.
10.
Schützen Sie das Netzkabel, sodass niemand darauf tritt oder es geknickt wird, insbesondere an Steckern oder Buchsen und ihren
Austrittsstellen aus dem Gerät.
11.
Verwenden Sie nur die vom Hersteller erhältlichen Zubehörgeräte oder Zubehörteile.
12.
Verwenden Sie nur einen Wagen, Stativ, Dreifuß, Träger oder Tisch, der den Angaben des Herstellers entspricht oder zusammen
mit dem Gerät verkauft wurde. Wird ein Wagen verwendet, bewegen Sie den Wagen mit dem darauf befindlichen Gerät besonders
vorsichtig, damit er nicht umkippt und möglicherweise jemand verletzt wird.
13.
Trennen Sie das Gerät während eines Gewitters oder während längerer Zeiträume, in denen es nicht benutzt wird, von der
Stromversorgung.
14.
Lassen Sie sämtliche Wartungsarbeiten von qualifizierten Kundendiensttechnikern durchführen. Eine Wartung ist erforderlich, wenn
das Gerät in irgendeiner Art beschädigt wurde, etwa wenn das Netzkabel oder der Netzstecker beschädigt wurden, Flüssigkeit oder
Gegenstände in das Gerät gelangt sind, das Gerät Regen oder Feuchtigkeit ausgesetzt wurde, nicht normal arbeitet oder heruntergefallen ist.
15.
Der Erdungsstift darf nie entfernt werden. Auf Wunsch senden wir Ihnen gerne unsere kostenlose Broschüre „Shock Hazard and
Grounding“ (Gefahr durch elektrischen Schlag und Erdung) zu. Schließen Sie nur an die Stromversorgung der Art an, die am Gerät
neben dem Netzkabel angegeben ist.
16.
Wenn dieses Produkt in ein Geräte-Rack eingebaut werden soll, muss eine Versorgung über die Rückseite eingerichtet werden.
17.
Hinweis – Nur für Großbritannien: Sollte die Farbe der Drähte in der Netzleitung dieses Geräts nicht mit den Klemmen in Ihrem
Stecker übereinstimmen, gehen Sie folgendermaßen vor: a) Der grün-gelbe Draht muss an die mit E (Symbol für Erde) markierte
bzw. grüne oder grün-gelbe Klemme angeschlossen werden. b) Der blaue Draht muss an die mit N markierte bzw. schwarze Klemme
angeschlossen werden. c) Der braune Draht muss an die mit L markierte bzw. rote Klemme angeschlossen werden.
18.
Dieses Gerät darf nicht ungeschützt Wassertropfen und Wasserspritzern ausgesetzt werden und es muss darauf geachtet werden,
dass keine mit Flüssigkeiten gefüllte Gegenstände, wie z. B. Blumenvasen, auf dem Gerät abgestellt werden.
19.
Der Netzschalter in dieser Einheit bricht beide Seiten von den primären Haupleitungen nicht. Gerfährliche Energie kann anwesend
innerhalb des Chassis sein, wenn her Netzschalter im ab Poistion ist. Die Hauptleitungen stöpseln zu oder Gerätkupplung ist benutzt,
während das Vorrichtung abschaltet, das schaltet Vorrichtung wird bleiben sogleich hantierbar ab.
20.
Belastung durch extrem hohe Lärmpegel kann zu dauerhaftem Gehörverlust führen. Die Anfälligkeit für durch Lärm bedingten
Gehörverlust ist von Mensch zu Mensch verschieden, das Gehör wird jedoch bei jedem in gewissem Maße geschädigt, der über
einen bestimmten Zeitraum ausreichend starkem Lärm ausgesetzt ist. Die US-Arbeitsschutzbehörde (Occupational and Health
Administration, OSHA) hat die folgenden zulässigen Pegel für Lärmbelastung festgelegt:
Dauer pro Tag in Stunden
8
6
4
3
2
1 1⁄2
1
1⁄2
1⁄4 oder weniger
Geräuschpegel dBA, langsame Reaktion
90
92
95
97
100
102
105
110
115
Laut OSHA kann jede Belastung über den obenstehenden zulässigen Grenzwerten zu einem gewissen Gehörverlust führen. Sollte die Belastung
die obenstehenden Grenzwerte übersteigen, müssen beim Betrieb dieses Verstärkungssystems Ohrenstopfen oder Schutzvorrichtungen im
Gehörgang oder über den Ohren getragen werden, um einen dauerhaften Gehörverlust zu verhindern. Um sich vor einer möglicherweise
gefährlichen Belastung durch hohe Schalldruckpegel zu schützen, wird allen Personen empfohlen, die mit Geräten arbeiten, die wie dieses
Verstärkungssystem hohe Schalldruckpegel erzeugen können, beim Betrieb dieses Geräts einen Gehörschutz zu tragen.
BEWAHREN SIE DIESE SICHERHEITSHINWEISE AUF!
DEUTSCH
WICHTIGE SICHERHEITSHINWEISE
Intended to alert the user of the presence of important operating and maintenance (servicing) instructions in the literature accompanying
the product.
ENGLISH
Intended to alert the user to the presence of uninsulated “dangerous voltage” within the product’s enclosure that may be of sufficient
magnitude to constitute a risk of electric shock to persons.
CAUTION: Risk of electrical shock — DO NOT OPEN!
CAUTION: To reduce the risk of electric shock, do not remove cover. No user serviceable parts inside. Refer servicing to qualified service
personnel.
WARNING: To prevent electrical shock or fire hazard, this apparatus should not be exposed to rain or moisture‚ and objects filled with
liquids‚ such as vases‚ should not be placed on this apparatus. Before using this apparatus‚ read the operating guide for further warnings.
Este símbolo tiene el propósito de alertar al usario de la presencia de instruccones importantes sobre la operación y mantenimiento en la
información que viene con el producto.
SPANISH
Este símbolo tiene el propósito, de alertar al usuario de la presencia de “(voltaje) peligroso” sin aislamiento dentro de la caja del producto
y que puede tener una magnitud suficiente como para constituir riesgo de descarga eléctrica.
PRECAUCION: Riesgo de descarga eléctrica ¡NO ABRIR!
PRECAUCION: Para disminuír el riesgo de descarga eléctrica, no abra la cubierta. No hay piezas útiles dentro. Deje todo mantenimiento
en manos del personal técnico cualificado.
ADVERTENCIA: Para prevenir choque electrico o riesgo de incendios, este aparato no se debe exponer a la lluvia o a la humedad. Los
objetos llenos de liquidos, como los floreros, no se deben colocar encima de este aparato. Antes de usar este aparato, lea la guia de
funcionamiento para otras advertencias.
Ce symbole est utilisé dans ce manuel pour indiquer à l’utilisateur qu’il ou qu’elle trouvera d’importantes instructions concernant l’utilisation
et l’entretien de l’appareil dans le paragraphe signalé.
FRENCH
Ce symbole est utilisé dans ce manuel pour indiquer à l’utilisateur la présence d’une tension dangereuse pouvant être d’amplitude
suffisante pour constituer un risque de choc électrique.
ATTENTION: Risques de choc électrique — NE PAS OUVRIR!
ATTENTION: Afin de réduire le risque de choc électrique, ne pas enlever le couvercle. Il ne se trouve à l’intérieur aucune pièce pouvant
être reparée par l’utilisateur. Confiez I’entretien et la réparation de l’appareil à un réparateur Peavey agréé.
AVIS: Dans le but de reduire les risques d’incendie ou de decharge electrique, cet appareil ne doit pas etre expose a la pluie ou a l’humidite
et aucun objet rempli de liquide, tel qu’un vase, ne doit etre pose sur celui-ci. Avant d’utiliser de cet appareil, lisez attentivement le guide
fonctionnant pour avertissements supplémentaires.
Dieses Symbol soll den Benutzer auf wichtige Instruktionen in der Bedienungsanleitung aufmerksam machen, die Handhabung und
Wartung des Produkts betreffen.
DEUTSCH
Dieses Symbol soll den Anwender vor unisolierten gefährlichen Spannungen innerhalb des Gehäuses warnen, die von Ausreichender
Stärke sind, um einen elektrischen Schlag verursachen zu können.
VORSICHT: Risiko — Elektrischer Schlag! Nicht öffnen!
VORSICHT: Um das Risiko eines elektrischen Schlages zu vermeiden, nicht die Abdeckung enfernen. Es befinden sich keine Teile darin,
die vom Anwender repariert werden könnten. Reparaturen nur von qualifiziertem Fachpersonal durchführen lassen.
WARNUNG: Um elektrischen Schlag oder Brandgefahr zu verhindern, sollte dieser Apparat nicht Regen oder Feuchtigkeit ausgesetzt
werden und Gegenstände mit Flüssigkeiten gefuellt, wie Vasen, nicht auf diesen Apparat gesetzt werden. Bevor dieser Apparat verwendet
wird, lesen Sie bitte den Funktionsführer für weitere Warnungen.
Tarkoitettu kiinnittämään käyttäjän huomio tärkeisiin käyttö- ja huolto-ohjeisiin tuotteen mukana seuraavassa ohjeistuksessa.
FINNISH
Tarkoitettu kiinnittämään käyttäjän huomio sellaiseen eristämättömään vaaralliseen jännitteeseen tuotteen kotelossa, joka saattaa olla
riittävän suuri aiheuttaakseen sähköiskuvaaran.
VAROITUS: Sähköiskun vaara — ÄLÄ AVAA!
VAROITUS: Sähköiskuvaaran vuoksi älä poista kantta. Ei sisällä käyttäjän huollettavissa olevia osia. Huoltaminen tulee jättää pätevän
huoltohenkilöstön tehtäväksi.
VAARA: Sähköiskun tai tulipalon vaaran estämiseksi tätä laitetta ei saa altistaa sateelle tai kosteudelle, eikä sen päälle saa asettaa
nesteellä täytettyjä esineitä, kuten maljakoita. Ennen laitteen käyttöä lue muut varoitukset käyttöohjeesta.
Är avsedd att uppmärksamma användaren på förekomsten av viktiga handhavande- och underhållsinstruktioner (service) i den litteratur
som medföljer produkten.
OBSERVERA: Risk för elektrisk stöt – ÖPPNA INTE!
OBSERVERA: För att minska risken för elektrisk stöt, avlägsna inte höljet. Inga delar inuti kan underhållas av användaren. Låt kvalificerad
servicepersonal sköta servicen.
VARNING: För att förebygga elektrisk stöt eller brandrisk bör apparaten inte utsättas för regn eller fukt, och föremål fyllda med vätskor,
såsom vaser, bör inte placeras på denna apparat. Läs bruksanvisningen för ytterligare varningar innan denna apparat används.
SWEDISH
Är avsedd att varna användaren för förekomsten av oisolerad ”farlig spänning” inom produktens hölje som kan vara av tillräcklig nivå för att
personer ska riskera elektrisk stöt.
ENGLISH
6505®+ 112 Combo
Guitar Amplifier
After forging the sound of aggression for more than 15 years, Peavey is making its highly respected, high-gain 6505® Series
amplifier available for the first time in a 1x12 combo-amp configuration. The new 6505 Plus 112 combo harnesses the full gain
and legendary tone of the Peavey 6505 Series, which since 1991 has defined the sounds of extreme rock guitar, into a format
that is equally suited to clubs, rehearsal rooms and studios. Five select 12AX7 preamp tubes and a pair of 6L6GC power-amp
tubes provide the tonal foundation for the 6505 Plus 112 combo, while patented circuitry such as Peavey's Resonance control
tweak its legendary tone. Both the Lead and Rhythm channels feature independent three-band EQ, pre/post gain controls
and Presence and Resonance adjustment. The Rhythm channel also includes a footswitchable Crunch boost. The 6505 Plus
112 combo also features the Peavey MSDI™ microphone-simulated direct interface, which eliminates the need for miking by
allowing users to route the amp's signal directly to a recording device or mixing console. Additional features include threespring reverb, effects loop and external speaker outputs, plus a 12" Sheffield® loudspeaker in a sealed-back cabinet that offers
maximum resonance and sound projection.
Before you begin playing through your amplifier, it is very important to ensure that the product has the proper AC line voltage
supplied. You can find the proper voltage for your amp printed next to the IEC line (power) cord on the rear panel of the unit.
Each product feature is numbered. Refer to the front panel diagram in this manual to locate the particular features next to its
number.
Please read this guide carefully to ensure your personal safety as well as the safety of your amplifier.
FEATURES:
• 60 watts RMS
• 16, 8 or 4 ohms
• Five 12AX7 preamp tubes and two 6L6GC power-amp tubes
• Effects loop
• Separate three-band EQ on each channel
• Separate Resonance and Presence controls on each channel
• Separate pre/post gain on each channel
• Footswitchable Crunch boost on Rhythm channel
• Three-spring reverb
• MSDI™ microphone-simulated XLR direct output
• 12" Sheffield® loudspeaker
• External speaker outputs
• Lighted Peavey logo with dimmer control
Front Panel
13
1
2
3
1
2
4
5
6
7
8
9
10
11
12
POWER SWITCH
This two-way switch applies mains power to the unit.
STANDBY SWITCH
This two-way switch allows the amp to be placed in the STANDBY mode. In the STANDBY position the tubes
stay hot but the amplifier is not operational. Switching to the ON position places the amp in active mode.
3
LEAD CHANNEL PRESENCE CONTROL
Adjusts the high-frequency damping factor of the power amplifier, which gives the amp a "mellow" character
when fully counterclockwise and more of "biting" or forward character when rotated clockwise.
4
LEAD CHANNEL RESONANCE CONTROL
Adjusts the low-frequency damping factor of the power amplifier, which gives the amp a "tighter" sound
when fully dialed counterclockwise and an increasingly "looser" sound when adjusted clockwise.
5
6
7
8
RHYTHM CHANNEL PRESENCE CONTROL
Adjusts the high-frequency damping factor of the power amplifier, which gives the amp a "mellow" character
when fully counter-clockwise and more of "biting" or forward character when rotated clockwise.
RHYTHM CHANNEL RESONANCE CONTROL
Adjusts the low-frequency damping factor of the power amplifier, which gives the amp a "tighter" sound
when fully dialed counter clockwise and an increasingly "looser" sound when adjusted clockwise.
MASTER REVERB CONTROL
Controls the amount of spring reverb in the signal chain.
LEAD CHANNEL POST CONTROL
This control adjusts the volume of the Lead channel.
9
HIGH CONTROL
This passive control regulates the high frequencies for the Lead channel.
10
MID CONTROL
This passive control regulates the mid frequencies for the Lead channel.
11
LOW CONTROL
This passive control regulates the low frequencies for the Lead channel.
12
PRE GAIN CONTROL
Adjusts the amount of gain in the Lead channel. Turning this knob clockwise will increase the amount of
distortion present in the signal.
13
LEAD CHANNEL INDICATOR LIGHT
This light is on when the Lead channel is active.
Front Panel
20
18
14
14
15
16
17
18
15
16
17
19
21
RHYTHM CHANNEL POST CONTROL
This control adjusts the volume of the Rhythm channel.
HIGH CONTROL
This passive control regulates the high frequencies for the Rhythm channel.
MID CONTROL
This passive control regulates the mid frequencies for the Rhythm channel.
LOW CONTROL
This passive control regulates the low frequencies for the Rhythm channel.
RHYTHM CHANNEL CRUNCH SWITCH
Engaging this switch turns on the Crunch effect, increasing the amount of distortion present in the
signal on the Rhythm channel.
19
PRE GAIN CONTROL
Adjusts the amount of gain in the Rhythm channel. Turning this knob clockwise will increase the amount
of distortion present in the signal.
20
RHYTHM CHANNEL INDICATOR LIGHT
This light is on when the Rhythm channel is active.
21
CHANNEL SWITCH
Switches between the Rhythm and Lead channels.
22
INPUT JACK
1/4" instrument input jack.
22
Rear Panel
24
23
25
26
27
28
29
30
23
EFFECTS LOOP
1/4" Send and Return jacks for the effects loop.
24
CABINET IMPEDANCE SELECTOR SWITCH
This three-position switch allows appropriate selection of speaker cabinet impedance. If two loudspeaker
enclosures of equal impedance are used, the switch should be set to half the individual value. For example,
two 16-ohm enclosures necessitate an 8-ohm setting, while two 8-ohm enclosures would require a 4-ohm
setting. Minimum speaker impedance is 4 ohms. The stock setting for the internal speaker is 16 ohms.
25
26
27
28
SPEAKER OUTPUTS
These paralleled 1/4" mono (TS) jacks are provided for the connection of speaker enclosure(s). Again,
minimum speaker impedance is 4 ohms. The CABINET IMPEDANCE SWITCH (24) should be set to match the
load of the speaker cabinet(s).
MSDI™
Microphone Simulated Direct Interface. Peavey's exclusive MSDI simulates the sound of a microphone
placed approximately 8" from loudspeaker cone, allowing the user to send a clean signal to the mixing
console. This is a non-powered output and safe for use with any mixing console.
GROUND LIFT
Engage this switch if the mix engineer is hearing a hum in the MSDI output This should eliminate the hum.
FOOTSWITCH
1/4" input for the optional footswitch.
29
FUSE
A fuse is located within the cap of the fuse holder. This fuse must be replaced with one of the same type
and value to avoid damaging the amplifier and voiding the warranty. If the amp repeatedly blows the fuse, it
should be taken to a qualified service center for repair.
WARNING: THE FUSE SHOULD ONLY BE REPLACED AFTER THE POWER CORD HAS BEEN DISCONNECTED.
30
IEC MAINS CONNECTOR
This is a standard IEC power connector. An AC mains cord having the appropriate AC plug and ratings for the
intended operating voltage is included in the carton. The mains cord should be connected to the amplifier
before connecting to a suitable AC outlet.
U.S DOMESTIC AC MAINS CORD
The mains cord supplied with the unit is a heavy-duty, 3-conductor type with a conventional 120 VAC plug
with ground pin. If the outlet used does not have a ground pin, a suitable grounding adapter should be
used, and the third wire should be grounded properly.
Never break off the ground pin on any equipment. It is provided for your safety.
NOTE: FOR UK ONLY
If the colors of the wires in the mains lead of this unit do not correspond with the colored markings
identifying the terminals in your plug, proceed as follows: (1) The wire that is colored green and yellow must
be connected to the terminal that is marked by the letter E, the Earth symbol, colored green, or colored
green and yellow. (2) The wire that is colored blue must be connected to the terminal that is marked with
the letter N or the color black. (3) The wire that is colored brown must be connected to the terminal that is
marked with the letter L or the color red.
FOOTSWITCH
31
32
CHANNEL SWITCH
Selects between the Rhythm and Lead channels.
EFFECTS SWITCH
Activates the Rhythm channel Crunch boost.
6505+® 112 Combo Specifications
6505+ 112 Combo
Rated Power & Load:
Tube Complement:
60 W(rms) into 4, 8, or 16 Ω (selectable)
2 x 6L6GC, 5 x 12AX7/ECC83
Power Consumption:
150 W, 60 Hz, 120 VAC (Domestic)
150 W, 50/60 Hz, 220-240 VAC (Export)
Dimensions (H x W x D):
22.3"(567mm) x 25.5" (648mm) x 11.2" (285mm)
Weight:
64.2 lbs. (29.1 kg)
Preamp Specifications
NOTE: The following specifications were measured with all preamp controls set at "5"
(Crunch "out"); Post Gains set at "10," Reverb, Resonance and Presence all set at "0."
Preamp Input:
(MSDI™) Microphone Simulated Direct Interface:
Impedance: 1 ohms
Nominal Sensitivity (Rhythm): -32.8dBV, 23.0m (rMS)
Nominal Sensitivity (Lead): -63.5dBV, 667uV (rms)
Load Impedance: 6k ohms or greater
Nominal Output Level: -29.1dBV, 35.0V (rms)
Crunch Boost (Clean channel only):
Special two-button unit with LED indicators (not included, Peavey #00592720) for channel selection (Channel) and remote activation of the Crunch boost (BOOST).
Increased gain and altered reponse for very brown voicing.
Equalization (both channels)
Remote Footswitch: (optional)
Custom Low, Mid & High EQ.
Effects Return:
Load Impedance: 22k ohms or greater
Nominal Output Level: -3.0dBV, 0.7V (rms)
NOTE: Specifications subject to change without notice.
FRANÇAIS
6505®+ 112 Combo
Guitar Amplifier
Apres avoir forgé le son de l’agressivité pendant plus de 15 ans, Peavey apporte sur le marché une nouvelle version inspirée
de la célèbre série haut gain universellement connue sous le nom de 6505, pour la premier fois un combo 1X12. Le nouveau
combo 6505+ 112 sonne avec le même full gain et tonalité que tous les amplis de la série 6505, qui depuis 1991 a défini les
sonorités du rock guitaristique extrême, dans un format pratique, transportable, pour les clubs, salles de répétitions et studios.
Cinq lampes 12AX7 sélectionnées pour le préampli plus une paire de 6L6GC pour la partie puissance donnent au 6505 +112 la
personnalité fondamentale que l’on s’attend à entendre tandis que les circuits brevetés tell que Peavey’s Résonance control
contribuent au son légendaire. Les canaux Lead et Rythme ont chacun une équalisation à trois bandes indépendante, pré/post
gain, contrôles Présence et Résonance. Le canal rythmique inclus également un contrôle au pied du boost Crunch. Le 6505
Plus 112 inclus aussi une interface directe de simulation de microphone MSDI qui élimine le besoin d’avoir un micro extérieur
et ainsi passer directement dans la console ou l’enregistreur. Dans les caractéristiques figurent aussi une réverb trois ressorts,
boucle d’effets, et sortie extension baffle additionnel, plus un HP Sheffield logé dans un baffle fermé qui offre un maximum de
projection et de chaleur.
Avant que vous ne commenciez à utiliser votre amplificateur c’est très important de vérifier que votre produit et équipé du bon
AC voltage. Vous pouvez trouver la référence du voltage imprimé à coté du IEC (puissance) sur le panneau arrière de l’ampli.
Chaque produit est numéroté. Référez vous au diagramme qui est apposé sur le panneau avant qui est dans ce manuel pour
localiser les particularités de chaque fonction.
S’il vous plait lisez attentivement ce guide pour votre sécurité et celle de votre ampli.
Caractéristiques:
• 60 watts RMS
• 16, 8 ou 4 ohms
• Cinq lampes 12AX7 section préampli et deux lampes 6L6GC section puissance
• Boucle d’effets
• EQ trois bandes indépendants sur chaque canal
• Contrôles Résonance et Présence indépendants sur chaque canal
• Pré/post gain indépendant sur chaque canal
• Boost Crunch activable par pédalier sur le canal Rythme
• Réverb trois ressorts
• MSDI™ simulation microphone XLR sortie directe
• Haut parleur 12” (31cm) Sheffield®
• Sortie HP externe
• Logo Peavey lumineux avec contrôle atténuateur
Front Panel
13
1
2
3
1
2
3
4
5
6
7
4
5
6
7
8
9
10
11
12
INTERRUPTEUR D’ALIMENTATION
Cet interrupteur contrôle la mise en tension de l’unité.
INTERRUPTEUR STAND-BY
Cet interrupteur permet la mise en stand-by de l’unité. Sélectionner sur ON permet de mettre l’ampli en
mode actif.
CONTRÔLE DE PRéSENCE SUR CANAL LEAD
Ajuste les hautes fréquences du facteur d’amortissement de l’amplificateur de puissance qui donnera un
caractère sonore Moelleux quand complètement tourné dans la sens contraire des aiguilles de montre et au
contraire plus agressif dans le sens des aiguilles.
CONTRÔLE DE RéSONANCE SUR LE CANAL LEAD
Ajuste les basses fréquences du facteur d’amortissement de l’amplificateur de puissance qui donnera un
caractère sonore un son «serré» quand complètement tourné sens contraire des aiguilles de montre et au
contraire un son «baveux» quand tourné dans le sens normal des aiguilles de montre.
CONTRÔLE DE PRéSENCE SUR LE CANAL RYTHME
Ajuste les hautes fréquences du facteur d’amortissement de l’amplificateur de puissance qui donnera un
caractère sonore Moelleux quand complètement tourné dans la sens contraire des aiguilles de montre et au
contraire plus agressif dans le sens des aiguilles.
CONTRÔLE DE RéSONANCE SUR LE CANAL RYTHME
Ajuste les basses fréquences du facteur d’amortissement de l’amplificateur de puissance qui donnera un
caractère sonore un son «serré» quand complètement tourné sens contraire des aiguilles de montre et au
contraire un son «baveux» quand tourné dans le sens normal des aiguilles de montre.
CONTRÔLE MASTER REVERB
Contrôle la quantité de réverb à ressorts dans la chaîne du signal
8
CONTRÔLE POST CANAL LEAD
Ce contrôle ajuste le volume du canal Lead
9
CONTRÔLE DES AÏGUES
Ce contrôle passif régule les hautes fréquences du canal Lead
10
CONTRÔLE DES MéDIUMS
Ce contrôle passif régule les fréquences médium du canal Lead
11
CONTRÔLE DES BASSES
Ce contrôle passif régule les fréquences basses du canal Lead
12
CONTRÔLE PRé -GAIN
Ajuste la quantité de gain dans le canal Lead. Tourner ce bouton dans le sens des aiguilles de montre
augmentera la distorsion présente dans le signal.
13
INDICATEUR LUMINEUx CANAL LEAD
Cette lumière est active quand le canal Lead est actif
Front Panel
20
18
14
14
15
16
17
18
15
16
17
19
CONTRÔLE POST CANAL RYTHME
Ce contrôle ajuste le volume du canal Rythme
CONTRÔLE DES AIGUËS
Contrôle passif de régulation des hautes fréquences pour le canal Rythme
CONTRÔLE DES MEDIUMS
Contrôle passif de régulation des fréquences médium pour le canal Rythme
CONTRÔLE DES BASSES
Contrôle passif de régulation des fréquences basses pour le canal Rythme
INTERRUPTEUR CRUNCH SUR CANAL RYTHME
Engager cet interrupteur met en fonction l’effet Crunch, augmentant ainsi la quantité de distorsion
présente sur le canal Rythme
19
CONTRÔLE PRE GAIN
Ajuste la quantité de gain sur le canal Rythme. En tournant ce bouton dans le sens des aiguilles de
montre on augmente le montant de distorsion présent dans le signal
20
INDICATEUR LUMINEUx DU CANAL RYTHME
Quand le canal Rythme est actif l’indicateur lumineux est allumé
21
COMMUTATEUR DE CANAUx
Commute les canaux Lead & Rythme.
22
JACK ENTRéE
1/4" instrument Jack d’entrée
21
22
Rear Panel
24
23
25
26
27
28
29
30
23
BOUCLE D’EFFETS
1/4" Jack Envoi et retour pour la boucle d’effets
24
SéLECTEUR D’IMPéDANCE DES BAFFLES
le sélecteur trois positions régit l’impédance des haut parleurs. Si deux hauts parleurs (baffles) d’égales
impédances sont utilisés, le sélecteur devra être positionné sur la moitié de chaque valeur. Par exemple
deux baffles 16 - ohms nécessiteront un réglage sur 8-ohms, alors que deux baffles 8-ohms nécessiteront un
réglage sur 4-ohms. La valeur à ne pas dépasser (minimum) est 4-ohms. Maximum 16-ohms.
25
26
27
28
29
30
SORTIE HAUT - PARLEUR
Ces sorties jack 1/4” mono (TS) sont dédiées à une connexion additionnelle de baffle(s). Encore une fois,
líimpédance minimum est 4 ohms et le sélecteur d’impédance de baffles devra être réglé sur la bonne
valeur.
MSDI™
L’interface Direct de Simulation Micro Peavey MSDI simule le son d’un micro placé approximativement à 8"
(~2,50 m) du baffle, cela permet à l’utilisateur d’envoyer un signal clair dans la console. C’est une sortie
passive et sécurisée pour un usage courant avec n’importe quelle console de mixage.
INTERRUPTEUR GROUND LIFT
Engager cet interrupteur si l’ingénieur son entend un hum dans MSDI.
FOOTSWITCH JACK
1/4" d'entrée pour la pédale optionnelle.
FUSIBLE
Un fusible est positionné dans le porte fusible. Ce fusible doit être remplacé par exactement un du même
type et de même valeur sous peine d’endommager l’amplificateur et de perdre la garantie. Si le fusible
s’avérait sauter en permanence, l’ampli devrait dans ce cas être emmené dans un centre technique agrée
pour réparation.
ATTENTION: Le fusible doit être remplacé uniquement après que le cordon secteur d’alimentation ait été
déconnecté.
IEC CONNECTEURS DE PUISSANCE
Connecteur standard de puissance. Ce connecteur relié au câble secteur doit être connecté à la
prise secteur adaptée.
U.S DOMESTIC AC MAINS CORD
Broche 3 conducteurs avec prise conventionnelle 220V nantie d’une prise de terre. Si votre prise
maison n’a pas de prise de terre, un adaptateur prise de terre doit être utilisé et le troisième fil
monté proprement.
Ne désengagez jamais la prise de terre d’aucun équipement. C’est votre sécurité.
NOTE: FOR UK ONLY
If the colors of the wires in the mains lead of this unit do not correspond with the colored markings identifying the
terminals in your plug, proceed as follows: (1) The wire that is colored green and yellow must be connected to the
terminal that is marked by the letter E, the Earth symbol, colored green, or colored green and yellow. (2) The wire
that is colored blue must be connected to the terminal that is marked with the letter N or the color black. (3) The
wire that is colored brown must be connected to the terminal that is marked with the letter L or the color red.
FOOTSWITCH
31
32
Sélecteur de canaux
Sélectionne le canal Rythme ou Lead.
Sélecteur Boost
Active le boost Crunch sur la canal Rythme
Spécifications 6505+® 112 Combo
6505+ 112 Combo
Puissance & Impédances
Lampes:
60 W(rms) into 4, 8, or 16 Ω (sélectionnable)
2 x 6L6GC, 5 x 12AX7/ECC83
Consommation de puissance:
150 W, 60 Hz, 120 VAC (USA)
150 W, 50/60 Hz, 220-240 VAC (Export)
Dimensions (H x W x D):
22.3"(567mm) x 25.5" (648mm) x 11.2" (285mm)
Poids:
29.1 kg (64.2 lbs.)
Preamp Specifications
NOTE: Les spécifications suivantes ont été mesurées avec tous les contrôles du préampli
réglés à "5" ( Crunch out) Post gain à "10", Réverbe, Résonance et Présence réglés à "10".
Pré-ampli Input:
(MSDI™) Interface de simulation Microphone
Impédance: 1 ohms
Sensibilité Nominale (Rhythm): -32.8dBV, 23.0m (rms)
Sensibilité Nominale (Lead): -63.5dBV, 667uV (rms)
Load Impedance: 6k ohms or greater
Nominal Output Level: -29.1dBV, 35.0V (rms)
Crunch Boost (Canal Clair uniquement):
Pédalier deux boutons avec LED (optionnel, pas inclus
Peavey# 00592720) pour sélection de canaux et activation à
distance du booster de Crunch.
Augmente le gain et altère la réponse pour un voicing beaucoup plus chaud.
Pédalier: (optionnel)
Equalization (deux cannaux)
Custom Low, Mid & High EQ.
Effets Return:
Load Impedance: 22k ohms or greater
Nominal Output Level: -3.0dBV, 0.7V (rms)
NOTE: Spécifications sujettes à changement sans préavis.
PEAVEY ELECTRONICS CORPORATION LIMITED WARRANTY
Effective Date: 09/15/2010
What This Warranty Covers
Your Peavey Warranty covers defects in material and workmanship in Peavey products purchased and serviced in the U.S.A. and Canada.
What This Warranty Does Not Cover
The Warranty does not cover: (1) damage caused by accident, misuse, abuse, improper installation or operation, rental, product modification or neglect; (2) damage occurring
during shipment; (3) damage caused by repair or service performed by persons not authorized by Peavey; (4) products on which the serial number has been altered, defaced or
removed; (5) products not purchased from an Authorized Peavey Dealer.
Who This Warranty Protects
This Warranty protects only the original purchaser of the product.
How Long This Warranty Lasts
The Warranty begins on the date of purchase by the original retail purchaser. The duration of the Warranty is as follows:
Product Category Duration
Guitars/Basses, Amplifiers, Preamplifiers, Mixers, Electronic Crossovers and Equalizers
2 years *(+ 3 years)
Drums 2 years *(+ 1 year)
Enclosures 3 years *(+ 2 years)
Digital Effect Devices and Keyboards and MIDI Controllers 1 years *(+ 1 year)
Microphones 2 years
Speaker Components (incl. Speakers, Baskets, Drivers, Diaphragm Replacement Kits and Passive Crossovers)
Tubes and Meters 90 Days
Cables Limited Lifetime
AmpKit Link, Xport, Rockmaster Series, Strum’n Fun, RetroFire, GT & BT Series Amps 1 year
1 year
[* Denotes additional Warranty period applicable if optional Warranty Registration Card is completed and returned to Peavey by original retail purchaser within 90 days of purchase.]
What Peavey Will Do
We will repair or replace (at Peavey’s discretion) products covered by Warranty at no charge for labor or materials. If the product or component must be shipped to Peavey for
Warranty service, the consumer must pay initial shipping charges. If the repairs are covered by Warranty, Peavey will pay the return shipping charges.
How To Get Warranty Service
(1) Take the defective item and your sales receipt or other proof of date of purchase to your Authorized Peavey Dealer or Authorized Peavey Service Center.
OR
(2) Ship the defective item, prepaid, to Peavey Electronics Corporation, International Service Center, 412 Highway 11 & 80 East, Meridian, MS 39301. Include a detailed description
of the problem, together with a copy of your sales receipt or other proof of date of purchase as evidence of Warranty coverage. Also provide a complete return address.
Limitation of Implied Warranties
ANY IMPLIED WARRANTIES, INCLUDING WARRANTIES OF MERCHANTABILITY AND FITNESS FOR A PARTICULAR PURPOSE, ARE LIMITED IN DURATION TO THE LENGTH OF
THIS WARRANTY.
Some states do not allow limitations on how long an implied Warranty lasts, so the above limitation may not apply to you.
Exclusions of Damages
PEAVEY’S LIABILITY FOR ANY DEFECTIVE PRODUCT IS LIMITED TO THE REPAIR OR REPLACEMENT OF THE PRODUCT, AT PEAVEY’S OPTION. IF WE ELECT TO REPLACE THE
PRODUCT, THE REPLACEMENT MAY BE A RECONDITIONED UNIT. PEAVEY SHALL NOT BE LIABLE FOR DAMAGES BASED ON INCONVENIENCE, LOSS OF USE, LOST PROFITS,
LOST SAVINGS, DAMAGE TO ANY OTHER EQUIPMENT OR OTHER ITEMS AT THE SITE OF USE, OR ANY OTHER DAMAGES WHETHER INCIDENTAL, CONSEQUENTIAL OR
OTHERWISE, EVEN IF PEAVEY HAS BEEN ADVISED OF THE POSSIBILITY OF SUCH DAMAGES.
Some states do not allow the exclusion or limitation of incidental or consequential damages, so the above limitation may not apply to you.
This Warranty gives you specific legal rights, and you may also have other rights which vary from state to state.
If you have any questions about this Warranty or services received or if you need assistance in locating an Authorized Service Center, please contact the Peavey International
Service Center at (601) 483-5365.
Features and specifications are subject to change without notice.
Logo referenced in Directive 2002/96/EC Annex IV
(OJ(L)37/38,13.02.03 and defined in EN 50419: 2005
The bar is the symbol for marking of new waste and
is applied only to equipment manufactured after
13 August 2005
U.S. CUSTOMER WARRANTY REGISTRATION
Optional Product Extended Warranty Registration
Give us some information and put your extended warranty into effect!
Please take a few minutes to fill out this information/survey sheet to help us get to know and serve you better.
To save time, submit your warranty registration online at www.peavey.com/support/warrantyregistration
1.
7. How did you learn about this Peavey product? (select best answer)
First Name
Initial Last Name
Street Address
❒
❒
❒
❒
❒
❒
Magazine review
Newspaper review
Radio advertisement
Advertised special
Friend/Relative’s recommendation
Salesperson’s recommendation
❒
❒
❒
❒
❒
Teacher’s recommendation
Catalog or flyer
Saw in store
Use by professional
Other
8. Which other brands/models did you consider?
City
State/Province
Postal Code
(
)
Telephone Number
E-mail Address
9. How would you describe your level of musicianship/technical expertise?
(
)
Fax Number
Date of birth
❒ Beginner - Never played or taken less than one (1) year of lessons
❒ Intermediate - One (1) to five (5) years of lessons or playing
❒ Advanced - More than five (5) years of lessons or playing; play professionally
Gender
❒M
❒F
2.
10. Education: (select best answer)
Model
Serial # Date of Purchase Price Paid
Name of store where purchased Availability of product
Friend/Relative’s recommendation
Store credit card
Knowledgeable staff
Availability of lessons
Technical instruction
❒
❒
❒
❒
❒
❒
Past favorable experience
Best price
Advertised special
Convenient location
Received as a gift
Other
5. Where do you most often shop for music and sound products?
❒ Independent retailer
❒ Mass market retailer
❒ Mail order magazines
❒
❒
❒
❒
❒
Under $15,000
$15,000 - $24,999
$25,000 - $34,999
$35,000 - $49,999
$50,000 - $74,999
❒ $75,000 - $99,999
❒ $100,000 - $149,999
❒ Over - $150,000
12. Which of the following is your primary source of information on musical
products: (select best answer)
State
4. Top two (2) reasons why you purchased from this store/dealer:
❒
❒
❒
❒
❒
❒
High school
Some college
Completed college
Graduate school
11. Which best describe your family income? (select best answer)
3.
City
❒
❒
❒
❒
❒ Newspaper ads
❒ Internet/Web sites
❒ Other
❒
❒
❒
❒
❒
Television
Radio
Internet
Newspaper
Magazines
❒
❒
❒
❒
Mail order catalogs
Direct mail
Literature from manufacturer
Other
13. What is your main motivation for buying new equipment?
❒ Replacing old product
❒ Want new and leading edge equipment
❒ Fullfill a specific need
❒ Supplement existing products
❒ Value
❒
❒
❒
❒
❒
Impulse
Need for improved performance
New technology
Availability of product
Other
6. What two (2) factors most influenced your purchase of this product?
❒
❒
❒
❒
❒
Peavey brand name
Craftsmanship
Features for price
Bundled accessories
Sound quality
❒
❒
❒
❒
❒
Product appearance
Durability
Prior experience with Peavey
Packaging
Other
14. Please list your three most frequently visited Web sites.
1. http://__________________________________________
2. http://__________________________________________
3. http://__________________________________________
15. In your opinion, what could Peavey do to improve its products and/or service? Please use the space below to tell us your answer.
Revised 1/11
Thank you for taking the time to fill out our survey! Don’t forget to fold and tape
(with Peavey address facing out), affix postage stamp and drop in the mail!
Logo referenced in Directive 2002/96/EC Annex IV
(OJ(L)37/38,13.02.03 and defined in EN 50419: 2005
The bar is the symbol for marking of new waste and
is applied only to equipment manufactured after
13 August 2005
FROM:
Place
Postage
Here
Peavey Electronics
Corporation
Attn: Warranty Department
P.O. Box 5108
Meridian, Ms 39302-5108