1
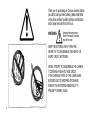
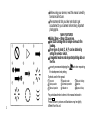
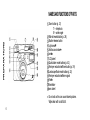
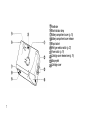
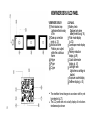
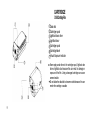
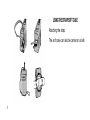
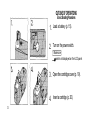
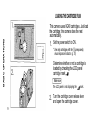
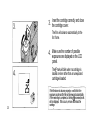
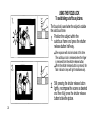
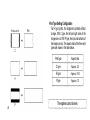
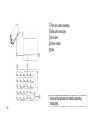
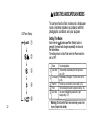
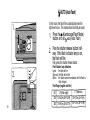
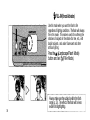
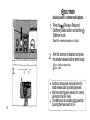
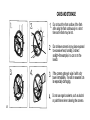
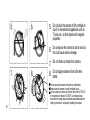
INSTRUCTIONS
Before using your camera, read this manual carefully to ensure
correct use.
Thank you for purchasing an Olympus camera. Before
you start to use your new camera, please read these
instructions carefully to obtain optimum performance
and a longer service life from the unit.
WARNING
Ignoring this warning may
result in the death or serious
injury of the user.
KEEP THE BATTERIES AWAY FROM FIRE.
NEVER TRY TO DISASSEMBLE, RECHARGE, OR
SHORT CIRCUIT BATTERIES.
NEVER ATTEMPT TO DISASSEMBLE THE CAMERA;
IT CONTAINS A HIGH VOLTAGE CIRCUIT.
IF THE INTERNAL PARTS OF THE CAMERA ARE
EXPOSED DUE TO DROPPING OR DAMAGE,
REMOVE THE BATTERIES IMMEDIATELY TO
PREVENT FURTHER USAGE.
2
Before using your camera, read this manual carefully
to ensure correct use.
We recommend that you take test shots to get
accustomed to your camera before taking important
photographs.
MAIN FEATURES
Built-in 30mm ~ 60mm 2X zoom lens.
Use IX240 cartridge film for simple one-touch film
loading.
Three types of prints (C, H, P) can be obtained by
setting the selector switch.
A magnetic head records important printing data on
the film.
use only processors displaying the
film development and printing.
Symbols used in this manual:
Incorrect
Next operation
Manual operation
Operation order
Automatic operation
Indicator on
mark when requesting
Indicator blinking
Attention
Depress halfway
Pay particular attention to items in this manual enclosed in
boxes
.
Product shown in pictures and illustrations may be slightly
3
different from this unit.
4
PREPARATIONS
Names and functions of parts ............................................. 6
Viewfinder display/LCD panel ............................................... 8
Cartridge ................................................................................. 9
Using the strap/Soft case .................................................. 11
Outline of operations ........................................................... 12
Loading the battery ............................................................. 15
Checking the battery .......................................................... 16
Points to remember ............................................................. 17
BASIC OPERATIONS
Loading the cartridge film .................................................... 19
Taking pictures ...................................................................... 21
Using the focus lock ............................................................ 24
After shooting ........................................................................ 25
Unloading the cartridge film ................................................ 26
ADVANCED TECHNIQUES
CAMERA MAINTENANCE
5
Setting the print type ........................................................... 27
Using the landscape/flash modes ...................................... 32
Auto (Auto-flash) .................................................................. 33
Landscape ............................................................................ 34
Flash Off ............................................................................... 35
Fill-in (Forced Activation) ................................................... 36
Auto Slow ............................................................................. 37
Using red-eye reduction/selftimer ...................................... 38
Red-eye reduction .............................................................. 39
Selftimer .............................................................................. 40
Correcting the data .............................................................. 41
Printing the date and time ................................................... 42
Questions and answers ..................................................... 43
Care and storage ................................................................ 45
Battery handling .................................................................. 48
Troubleshooting ................................................................... 50
Specifications ..................................................................... 53
NAMES AND FUNCTIONS OF PARTS
PREPARATIONS
Zoom button (p. 21)
T — telephoto
W — wide-angle
Mid-roll rewind button (p. 26)
Shutter release button
Light sensor
Autofocus window
Lens
LCD panel
Quartz date mode buttons (p. 42)
Red-eye reduction/selftimer button (p. 39)
Landscape/flash mode button (p. 32)
Red-eye reduction/selftimer signal
Flash
Viewfinder
Lens barrel
Do not soil as this can cause blurred pictures.
Wipe clean with a soft cloth.
6
Viewfinder
Flash indicator lamp
Battery compartment cover (p. 15)
Battery compartment cover release
Tripod socket
Print type selector switch (p. 27)
Power switch (p. 19)
Cartridge cover release lever (p. 19)
Strap eyelet
Cartridge cover
7
VIEWFINDER DISPLAY/LCD PANEL
VIEWFINDER DISPLAY
Flash indicator lamp
Lights when flash is ready
to fire.
Close-up correction
marks (p. 23)
Autofocus frame
Position your subject
within the autofocus
frame.
H type
P type
C type
LCD PANEL
Battery check
Displayed only when
battery level is low (p. 16).
Flash mode display
(p. 32)
Landscape mode display
(p. 34)
Red-eye reduction
display (p.39)
Quartz date mode
display (p. 41)
Cartridge mark
Lights when a cartridge is
loaded.
Exposure counter display
Selftimer display (p. 40)
The viewfinder format changes in accordance with the print
type selected (p. 27).
8
The LCD panel does not actually display all indications
simultaneously as shown.
CARTRIDGE
IX 240 Cartridge Film
Data disk
Cartridge spool
Lightlock door drive
Lightlock door
Cartridge spool
Cartridge label
Visual Exposure Indicator
Never apply undue force to the cartridge spool, lightlock door
drive or lightlock door because this can result in damage or
exposure of the film. Using a damaged cartridge can cause
camera trouble.
Do not allow the data disk to become soiled because this can
render the cartridge unusable.
9
Understanding The Visual Exposure Indicator
Unexposed
Partially exposed
Exposed
Processed
Only cartridges with the
(unexposed) visual exposure
indicator can be used with this camera.
When a cartridge with other than the visual exposure indicator
is loaded, the camera will rewind the film and set the cartridge
to (exposed).
Take along plenty of film cartridges when traveling to foreign
countries and other areas where cartridge purchasing may be
difficult.
Do not forcibly move the visual exposure indicator because
this may damage the cartridge. Using a damaged cartridge
can result in camera trouble.
10
USING THE STRAP/SOFT CASE
Attaching the strap.
The soft case can also be carried on a belt.
11
OUTLINE OF OPERATIONS
Basic Shooting Procedures
1.
Load a battery (p. 15).
2.
Turn on the power switch.
Make sure
mark is not displayed on the LCD panel.
12
3.
Open the cartridge cover (p. 19).
4.
Insert a cartridge (p. 20).
5.
Close the cartridge cover. The film will
automatically advance to the first
frame (p. 20).
6.
Make sure the cartridge mark
is lit
and the exposure counter display is
correct.
The exposure counter indicates the
number of exposures remaining.
13
Operate the zoom button to compose
7.
the scene (p. 21).
8.
subject on which you want to focus
Place the autofocus frame on the
(p. 22).
9.
Press the shutter release button and take
the picture (p. 22).
The shutter will not release when the flash
indicator lamp is blinking.
14
10.
When the film reaches the end it will
automatically rewind (p. 26).
11.
Open the cartridge cover and remove
the cartridge (p. 26).
LOADING THE BATTERY
Use one 3V lithium Battery (CR-2)
1.
Open the battery compartment cover.
When replacing the battery, make sure to turn
the power switch OFF before unloading the
batteries.
Take care not to injure your fingernail
when opening the battery cover.
2.
Insert the new battery correctly as
shown and close the battery
compartment cover tightly.
Align the (+) and (-) directions of the batteries
correctly as shown.
Read "Battery Handling" on page 48.
15
CHECKING THE BATTERY
Turn the power switch ON and check the
battery condition.
Display
Meaning
mark not displayed.
Battery level is OK.
mark blinks.
Battery power is low.
Exposure counter not
displayed.
Battery is dead and should
be replaced immediately.
Note: Keep spare batteries on hand when going on a long trip
or when using the camera in cold weather. Adjust the data of
the Quarz Date every time the battery is replaced.
16
POINTS TO REMEMBER
Hold the Camera Correctly.
1. Correct.
2.
Correct.
3.
Incorrect.
Try not to hold the barrel. When set to TELE, the lens will
automatically return to WIDE after 3 minutes.
Keep your fingers and the strap away from the lens and flash.
As the focal length becomes larger. Camera shake or
movement becomes more noticeable. Hold the camera firmly
with both hands while keeping your elbows at sides to prevent
the camera from shaking.
17
Proper Shutter Release.
The shutter release button has two clicks. Practice
before loading the film.
1.
Depress the shutter release button
halfway to lock the focus.
Focus and exposure will be locked properly.
Make sure
Make sure the flash indicator lamp next to the
viewfinder is lighted. This lamp goes out quickly
in bright conditions.
2.
Depress the shutter release button fully
to release the shutter and take the
picture.
Cautions:
Press the shutter release button gently.
Avoid shaking the camera when pressing the shutter
release button to prevent blurry pictures.
18
LOADING THE CARTRIDGE FILM
BASIC OPERATIONS
This camera uses IX240 cartridges. Just load
the cartridge; the camera does the rest
automatically.
1. Set the power switch to ON.
* Use only cartridges with the (unexposed)
visual exposure indicator. (p. 10)
Determine whether or not a cartridge is
loaded by checking the LCD panel
cartridge mark
Make sure
The LCD panel is not displaying the
2.
19
mark.
Turn the cartridge cover release lever
and open the cartridge cover.
3.
Insert the cartridge correctly and close
the cartridge cover.
The film will advance automatically to the
first frame.
4.
Make sure the number of possible
exposures are displayed on the LCD
panel.
The mark will blink when no cartridge is
loaded or when other than an unexposed
cartridge is loaded.
If the film does not advance properly,
will blink in the
exposure counter and the film will be rewound automatically.
When rewinding is completed, a blinking (processed) mark
will be displayed. If this occurs, remove and reload the
20
cartridge.
TAKING PICTURES
1.
Turn the Power switch to ON.
Make sure
The lens barrier is open, the lens is extended
and the LCD panel is lighted.
2.
Look through the viewfinder, press the
Zoom lever and compose the picture.
Do not look directly at the sun through the
viewfinder.
On TELE, the lens can zoom-in to 60mm.
On WIDE, the lens can zoom-out to 30mm.
21
The zoom operates in five (5) stages.
When set to any focal length other than 30mm, the
lens will automatically return to the 30mm position
after approximately three (3) minutes.
3.
Position the subject inside the
autofocus frame.
4.
halfway.
Depress the shutter release button
The shutter will not release while the flash
indicator lamp is blinking.
To take a picture with the subject outside the
autofocus frame as shown here, use the focus
lock (p. 24).
5.
Depress the shutter release button fully
to take the picture.
The film will advance automatically to the next
frame and the exposure counter display will be
reduced by one (1).
22
Working Distance
The focus range of the camera is 0.6 m (2ft) to
(infinity).
It is recommended that you use the Landscape mode (p. 34)
when taking pictures of scenery.
Before the shutter is released, the image in the viewfinder will
become larger but this does not affect the image in the
picture.
Focus is adjusted automatically by the autofocus but,
depending on the conditions, the autofocus may have
difficulty focusing on some subjects (p.43).
Close-up Correction
Picture frame
Close-up correction marks
Image area of picture at 0.6 m (2ft)
The viewfinder's picture frame shows the area that can be shot
for subjects at However, the picture area will move lower in
the viewfinder as you get closer to the subject. At 0.6 m (2ft), the
shaded area is the actual available image area. In this case, the
subject should be positioned below the close-up correction
marks.
23
USING THE FOCUS LOCK
To avoid taking out of focus pictures.
The focus lock is used when the subject is outside
the autofocus frame.
1.
Position the subject within the
autofocus frame and press the shutter
release button half-way.
The exposure will also be locked at this time.
The autofocus lock is released when the finger
is removed from the shutter release button.
When the shutter release button is pressed, the
flash indicator lamp will light instantaneously.
2.
24
Still pressing the shutter release button
lightly, recompose the scene as desired
and then fully press the shutter release
button to take the picture.
AFTER SHOOTING
Turn the Power switch to OFF.
Make sure
That the lens is retracted and the lens barrier is
closed.
25
UNLOADING THE CARTRIDGE FILM
The film will be rewound automatically when the
end of the roll is reached.
Wait until the sound of motor operation stops and blinks in
the exposure counter display, then open the cartridge cover
and remove the cartridge. The cartridge visual exposure
indicator will be set to
(exposed).
Rewinding in Mid-roll
To rewind the film in mid-roll, use a pointed object
such as a ballpen to lightly press the mid-roll rewind
button.
The cartridge visual exposure indicator (exposed) is set
even when the film is rewound before the end is reached.
Because of that, cartridges cannot be re-used after being
rewound in mid-roll. However, the visual exposure of
cartridges that were rewound when no exposure have been
made will remain (unexposed) This cartridge can be
used even when rewound.
Do not forcibly move the visual exposure indicator because
26
this may damage the cartridge. Using a damaged
cartridge can result in camera trouble.
SETTING THE PRINT TYPE
Setting The Print Type
ADVANCED TECHNIQUES
Set the print type selector switch to the desired
type: C, H or P.
Print type selector switch
H type viewfinder
C type viewfinder
P type viewfinder
The print type setting is magnetically recorded
on the film. The number of exposures that can
be taken on a roll does not change when the
print type is changed.
27
Print area on film
Print
Print Type Setting Configuration
For H type prints, the images are printed without
change. With C type, the left and right sides of the
images are cut. With P type, the tops and bottoms of
the images are cut. The aspect ratios of the three print
types are shown in the table below.
Print type
Aspect ratio
C type
Approx. 2:3
H type
Approx. 9:16
P type
Approx. 1:3
The negatives cannot be seen.
28
Requesting Development and Printing
Use only processors displaying the
mark when
requesting film developing and printing. The developed
film will be returned in the cartridge. The prints will be
marked with the same ID number found on the film, as
shown on page 30.
29
Print rear surface (example)
Index prints (example)
ID number
Frame number
Date
Ask your local processor for details concerning
index prints.
30
Making Additional Prints (Extra printing)
1. Make sure that the cartridge ID number is the same
as the ID numbers on the backs of the regular prints
or index prints to be copied before taking the cartridge
to the processor.
2. Use the frame numbers printed on the backs of the
regular prints or index prints when ordering additional
copies.
Print prices will differ depending on the print type.
The handling of index prints will differ depending on
the processor.
Ask your local processor for details.
31
USING THE LANDSCAPE/FLASH MODES
LCD Panel Display
This camera has four flash modes and a landscape
mode. Use these modes in accordance with the
photographic conditions and your purpose.
Setting The Modes
Each time the
(Landscape/Flash Mode) button is
pressed, the mode will change sequentially as shown in
the table below.
The setting returns to Auto Flash when the Power switch is
set to OFF.
Mode
Auto Flash
Landscape
Flash Off
Fill-in
Auto Slow
32
Function/Application
The flash fires automatically when the light level is
low. (p.33)
For landscape photography. The flash does not fire.
(p.34)
For when you do not want to use the flash (p. 35).
The flash always fires when a picture is taken (p. 36).
Use when photographing people with a night
background (p. 37).
Warning Do not use the flash when extremely close to the
eyes of people and animals.
AUTO (Auto Flash)
In this mode, the flash fires automatically when the
light level is low. This mode should normally be used.
1.
Press the
(Landscape/Flash Mode)
button and set AUTO (Auto Flash).
2.
Press the shutter release button halfway. If the flash indicator lamp is on,
the flash will fire.
Fully press the shutter release button.
Flash Indicator Lamp Indications
Lights:
the flash will fire
Goes out: the flash will not fire
Blinks:
the shutter cannot be released until the flash is
fully charged.
Flash Range (negative color film)
ISO
200
400
33
W (Wide angle)
0.6~4.4m (2ft~14.5ft)
0.6~6.3m (2ft~20.7ft)
T (Telephoto)
0.6~2.3m (2ft~7.6ft)
0.6~3.3m (2ft~10.9ft)
LANDSCAPE
This mode is recommended for landscape
photography. The focus is set at a position farther
away than normal, so landscapes can be
photographed more clearly.
Press the
(Landscape/Flash Mode)
button and set
(Landscape Mode).
The flash will not fire.
The shutter speed can be set to as slow as 1/6
sec. In dark places, it is recommended that a
tripod be used to avoid blurring due to camera
shake.
Moving subjects will be blurred when
photographed at the slower shutter speeds.
34
FLASH OFF
Use this mode when you do not want to use the flash
even in a dark place. The flash will not fire even if the
light level is low. This mode can also be used in such
places as museums where flash is prohibited, for night
scenes, etc.
Press the
(Landscape/Flash Mode)
button and set (Flash Off Mode).
The shutter speed can be set to as slow as 1/6 sec.
It is recommended that a tripod be used to avoid
blurring due to camera shake.
35
FILL-IN (Forced Activation)
Use this mode when you want the flash to fire
regardless of lighting conditions. The flash will always
fire in this mode. This mode is useful for softening the
shadows of subjects in the shade of a tree, etc., with
backlit subjects, and under fluorescent and other
artificial lighting.
Press the
(Landscape/Flash Mode)
button and set (Fill-in Mode).
36
Always make sure the subject is within the flash
range (p. 33). The effect of the flash will be less
evident in bright lighting.
AUTO SLOW
Both people and night scenes can be
clearly photographed in this mode.
When taking pictures of people with a night background, this mode produces clear images of both.
Press the
(Landscape/Flash Mode)
button and set
(Auto Slow Mode).
37
The shutter speed can be set to as slow as 1/6 sec.
It is recommended that a tripod be used to avoid
blurring due to camera shake.
USING RED-EYE REDUCTION/SELFTIMER
This camera also has a
Selftimer) mode.
Setting The Mode
(Red-eye Reduction/
Press the
(Red-eye Reduction/Selftimer)
Mode button to set the modes in the
following sequence.
LCD Panel Display
Mode
(no display)
OFF
Red-eye Reduction (p. 39)
Selftimer (p. 40)
38
RED-EYE REDUCTION
This mode is used to reduce the phenomenon which
causes eyes to appear red in pictures. The red-eye
reducing lamp lights before the shutter is released to
reduce this phenomenon.
Press the
(Red-eye Reduction/Selftimer)
Mode button and set the
(Red-eye
Reduction) mode.
The red-eye reducing effect will be reduced in the
following cases.
1. When the subject is not looking directly at the redeye reducing lamp.
2. When the subject is far away.
The red-eye reducing effect differs depending on
39
individual differences.
SELFTIMER
Include yourself in commemorative pictures.
1.
Press the
(Red-eye Reduction/
Selftimer) Mode button and set the
Selftimer mode.
Mount the camera securely on a tripod.
2.
Aim the camera as desired and press
the shutter release button when ready.
8 sec.: Selftimer indicator blinks.
2 sec.: Lights.
40
Autofocus and exposure are locked when the
shutter release button is partially depressed.
After the shutter has been released, the camera
will return to the OFF mode.
The selftimer can be canceled during operation
by turning the Power switch to OFF.
CORRECTING THE DATA
1.
Press the Mode button to call out the
date display.
2.
(1) Press the SEL button repeatedly until
the data to be reset blinks.
(2) Use the SET button to set the desired
numerals.
Year/month/day and hour/minute are reset in
different modes.
3.
When all of the data has been reset,
press the SEL button until the data stops
blinking.
* Data is automatically compensated from the
year 1996 to 2035.
41
PRINTING THE DATE AND TIME
Press the MODE button to select the display
to be printed.
Each time the MODE button is pressed, the display
will change in the sequence shown above.
No printing
Year/month/day
Month/day/year
Day/month/year
Hour/minute
42
The printing of dates is handled differently by
different processors. For details, ask your local
processor.
Date data is recorded magnetically but is not
printed on the film.
Date data is recorded magnetically to enable
printing on either the front or the back of prints.
QUESTIONS AND ANSWERS
Q: What kind of subjects are difficult for autofocus? And
CAMERA MAINTENANCE
what should be done in such cases?
A: The following subjects are difficult for autofocus;
therefore, use the focus lock to focus on another subject
at the same distance or, when the subject is at a
distance, use the Landscape mode.
1. Glossy subjects.
2. Black objects.
3. Scenes shot through glass or metal netting.
4. Objects such as smoke or fire that have no substance.
5. Scenes in which the sun appears in the picture.
Q: When a cartridge is inserted, the motor can be heard but
the film does not advance.
A: Remove the cartridge and check the visual exposure
indicator. If the visual exposure indicator is set to O
(unexposed) re-insert the cartridge; otherwise, insert a
new cartridge.
Q: What happens if the cartridge cover is opened with a
partially exposed cartridge inside?
A: Close the cartridge cover immediately. There is
possibility of the film in the cartridge being exposed and
rendered useless; therefore, the film will be rewound. In
43
such cases, insert a new cartridge.
Q: How long will the battery last?
A: Approximately 10 rolls of 25-exposure film (50% flash
usage) can be taken. The battery may last even longer if
the flash and zoom are used infrequently.
Q: What should I do if the lens becomes dirty?
A: Use lens cleaner and lens tissue and gently wipe the lens
clean.
Q: When is the exposure metered?
A: When the shutter release button is partially depressed the
exposure is metered at the same time that the focus is
adjusted. Both are locked while the shutter release button
is partially depressed.
Q: Does the flash become hot?
A: The flash can become hot if used continuously. At such
times stop using the camera briefly to give the flash time to
cool.
Q: Can reversal film be used?
A: Yes. However, the flash range will be approximately 70%
of that for negative film.
Q: Is it possible to change the print type (C, H, P type) when
having copies made?
A: Yes. However, this is handled differently by different
44
processors. For details, ask your local processor.
CARE AND STORAGE
1.
Do not touch the front surface of the flash
after using the flash continuously in a short
time as the flash may be hot.
2.
Do not leave camera in any place exposed
to excessive heat, humidity, or direct
sunlight--for example, in a car or on the
beach.
45
3.
If the camera gets wet, wipe it with a dry
towel immediately. The salt in seawater can
be especially damaging.
4.
Do not use organic solvents, such as alcohol
or paint thinner when cleaning the camera.
5.
Do not place the camera or film cartridge on
top of or near electrical appliances such as
TV sets, etc., or other objects with magnetic
properties.
6.
Do not expose the camera to dust or sand as
this could cause serious damage.
7.
8.
Do not shake or shock the camera.
Do not apply excessive force to the lens
barrel.
Do not expose the camera to formalin or naphthalene.
Please keep the camera in a well-ventilated place.
Do not expose the camera to extreme heat (over 40°C/104°F)
or to extreme cold (below –10°C/40°F). Low temperatures,
even within this range, may sometimes cause deterioration in
battery performance, temporarily disabling the camera.
46
When transporting the camera from a cold place to a warm
place or in the event of a sudden temperature change, put
the camera into a plastic bag. This allows the camera's
temperature to change slowly. Once the camera has
adjusted to the new temperature, you can remove it from the
bag and use it.
Keep your hair, hands, strap etc. away from the autofocus
window, lens, light sensor and flash.
Avoid leaving the camera unused for long periods of time.
This can cause mold to grow on the camera as well as other
problems. Try to press the shutter release button and check
the operation of camera before use.
Some airport X-ray machines can damage the film in your
camera. Try to avoid passing your camera through these
machines. Give to the security officer for manual inspection.
This camera is controlled by a microcomputer. Problems with
the microcomputer can affect or stop camera operation. If
this happens, remove the batteries, then reload them and try
the camera again. Strong electrical fields can also interfere
with the operation of this camera so try to avoid places or
objects that generate such fields.
This camera is not suitable for professional use or for use
47
under severe conditions.
BATTERY HANDLING
Use the batteries correctly. Incorrect usage can
result in leaking, heat and damage. When replacing
the batteries, make sure the plus (+) and minus (-)
terminals are correctly aligned.
Do not short, disassemble or charge the batteries.
Never throw batteries into fire because this can
result in spliting or explosion.
Store batteries out of the reach of children. If a
battery is swallowed, consult a physician
immediately.
Battery performance will drop temporarily at lower
temperatures. In cold areas, protect the camera by
using protective gear or placing it inside your
clothing. Even when performance drops due to low
temperature, it will be restored at normal
temperatures.
Sweat or oil on the plus (+) and minus (-) terminals
can cause poor contact. Wipe batteries carefully
with a dry cloth before use.
48
We recommend that you carry spare batteries on
long trips, especially in foreign countries where
availability is questionable.
Please note that the battery supplied with the
camera is for test purposes only; therefore, the
service life cannot be guaranteed.
There is danger of battery leakage when the camera
is not used for an extended period; therefore,
remove the battery and store in a location with low
humidity and temperature of 20 degrees C or less.
Always observe the cautions listed on the battery.
Dispose of used batteries as prescribed by local
regulations.
49
TROUBLESHOOTING
OPERATING PROBLEMS
The camera does not work.
The power is OFF.
Set the power switch to ON. (p. 21)
The battery is loaded incorrectly.
Reload the battery correctly. (p. 15)
The battery is exhausted.
Replace the battery with a new one. (p. 16)
The battery performance has dropped due to cold.
Keep the camera warm while using it. (p. 48)
The cartridge has been exposed and rewound.
Remove the cartridge. (p. 26)
The cartridge is inserted incorrectly.
Remove the cartridge and re-insert correctly. (p. 19)
The flash indicator lamp blinks and the shutter cannot be
released.
The flash is not yet completely recharged.
Remove your finger from the shutter release button, wait
several seconds until recharging is completed, and then take
the picture. (p. 33)
The flash will not fire even when the light level is low.
The Flash Off mode has been set.
50
Set another flash mode. (p. 35)
You are using high-speed film.
Set the Fill-in mode and take the picture. (p. 36)
PROBLEMS WITH PICTURES
Some pictures are out of focus.
The camera moved when the shutter release button was
pressed.
Hold the camera correctly and press the shutter release
button gently. (p. 18)
The subject was outside the autofocus frame.
Position the subject in the center of the frame or use the
focus lock. (p. 24)
The lens or autofocus window was dirty.
Clean the lens and autofocus window. (p. 6)
A finger, etc., was in front of the autofocus window.
Hold the camera correctly, keeping the fingers, etc.,
away from the autofocus window. (p. 17)
The subject was closer than the minimum focusing
distance of 0.6m (2ft).
Position the subject 0.6m (2ft) or more away from the
camera and take the picture. (p. 22)
51
You stood directly in front of the camera and pressed the
shutter release button when using the selftimer.
Press the shutter release button while looking through
the viewfinder, not when standing in front of the camera.
(p. 40)
The finished prints are dark.
The fingers, etc., were in front of the flash.
Hold the camera correctly so the flash is not covered by
the fingers, etc. (p. 17)
The subject was beyond the flash range.
Position the subject within the flash range. (p. 33)
The Flash Off mode was set.
Check the flash mode and reset if necessary. (p. 35)
The picture was taken with backlighting.
Set the Fill-in mode and take the picture. (p. 36)
The colors in indoor pictures are not normal.
The colors were affected by the color of the indoor lighting.
Set the Fill-in mode and take the picture. (p. 36)
52
SPECIFICATONS
Type: Fully automatic, autofocus lens-shutter camera
with built-in 30mm ~ 60mm zoom lens.
Film format: IX240 cartridge film.
Image size: 16.7mm x 30.2mm
Print type: Three selectable types (C, H, P) with
magnetic IX (information input) function.
Lens: Olympus lens, 30mm ~ 60mm, F4.5 ~ 8.5,
5 elements in 5 groups.
Zoom drive: Step zoom system.
Shutter: Electronically controlled lens shutter.
Shutter speeds: 1/6 sec. ~ 1/320 sec.
Focusing: Active type autofocus with focus lock.
Focusing range: 0.6m (2ft) ~ infinity. Landscape mode
Viewfinder: Real image type zoom viewfinder. C, H, P
print type selection.
Magnification: 0.32X~0.59X.
53
Viewfinder displays: Autofocus frame, close-up
correction frame, flash indicator lamp.
Exposure control: Programmed AE, auto-flash at low
light levels.
Exposure counter: Subtractive type LCD panel
display.
Film speed range: Automatic setting.
Automatic setting range: IS050 ~ IS01600.
Film loading: One-touch insertion, automatic loading
(automatically advances to first frame when
camera back is closed).
Film advance: Automatic film winding.
Film rewind: Automatic rewind at end of roll. Mid-roll
rewind also possible.
Selftimer: Electronic selftimer with approx. 10 sec.
delay.
54
Flash: Built-in flash.
Flash recycle time: approx. 8 sec. (with new battery at
normal temperature).
Flash range:
ISO200 negative color:
WIDE: 0.6m ~ 4.4m (2ft~14.5ft)
TELE: 0.6m ~ 2.3m (2ft~7.6ft)
ISO400 negative color:
WIDE: 0.6m ~ 6.3m (2ft~20.7ft)
TELE: 0.6m ~ 3.3m (2ft~10.9ft)
55
Red-eye reduction lamp included.
Flash modes: Auto-flash
Fill-in
Flash Off
Auto Slow
Battery check: Displayed on LCD panel.
Power source: One 3V lithium battery (CR-2).
Dimensions: 114mm (W) x 62mm (H) x 39mm (D)
(4.5X2.2X1.5 in) (excluding protrusions).
Weight: 200 grams (7 oz) (not including battery).
SPECIFICATIONS FOR DATE UNIT
Data recording method: Recording using magnetic IX
(information input) function.
Data coding: No data, year-month-day, month-dayyear, day-month-year and day-hour-minute.
External display of recorded data:
Always displayed on LCD panel.
Automatic calendar function:
Automatic compensation to the year 2035.
Power source: ordinarily used with camera body.
SPECIFICATIONS ARE SUBJECT TO CHANGE
WITHOUT ANY NOTICE OR OBLIGATION ON THE
PART OF THE MANUFACTURER.
56
OLYMPUS OPTICAL CO.,LTD.
San-Ei Building, 22-2, Nishi Shinjuku 1-Chome, Shinjuku-ku, Tokyo, Japan. Tel. 03-3340-2211
OLYMPUS AMERICA INC.
Two Corporate Center Drive, Melville, NY 11747-3157, U.S.A. Tel. 516-844-5000 / 800-622-6372
OLYMPUS OPTICAL CO. (EUROPA) GMBH.
(Premises/Goods delivery) Wendenstrasse 14-16, 20097 Hamburg, Germany. Tel. 040-237730
(Letters) Postfach 10 49 08, 20034 Hamburg, Germany.
OLYMPUS OPTICAL CO. (U.K.) LTD.
2-8 Honduras Street, London EC1Y0TX, United Kingdom. Tel. 0171-253-2772