1
918 CLI Manual
11/12/98 12:56 PM
OWNER’S
MANUAL
Page 2
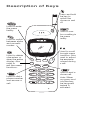
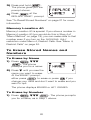
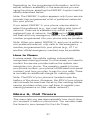
Description of Keys
Press and hold
the key to
switch the
phone on and
off.
Used to enter
the menu
facility.
P
W
R
Used to switch
between alpha
and numeric
modes.
Used to delete
characters or
clear the entire
display. Also
used to
exit the menu
functions.
Used to dial a
phone number
and answer a
call.
A
B
C
MENU
WýV
Used to scroll
through menu
functions. Also
used to adjust
the earpiece
volume during
a call.
OK
CLR
SEND
Used to confirm a setting in
the menu
facility.
END
1
2abc
3def
4 ghi
5 jkl
6 mno
7pqrs
8 tuv 9 wxyz
0
#
Used to end a
phone call.
Note: When
you press and
hold the key,
the keyguard
feature is
activated.
Quick Guide
Making a call
Key in the area code and
phone number and press the
key
Receiving a call
Press any key except the
Switching on/off
Press and hold the
Activate Keyguard
Press and hold the
Press
then
key
key
key or
Deactivate Keyguard
Press
Activate PINCALL
Key in
PINCALL
then enter PIN Code and then
press the
key
Deactivate PINCALL
Key in
Adjust Volume
Calling Card Call
Clear a digit
Clear display
Ending a Call
Last number redial
then
PINCALL
then press the
key
Press V to increase and W to
decrease the volume (in a call)
Enter destination phone number and
press and hold the
key for more
than 1 second
Press the
key
Press and hold the
key
Press the
key
Ensure the display is clear and press
Last 10 dialed numbers Ensure the display is clear and press
. Press W to view dialed
numbers. Press
to dial
Memory Functions
9 Key Emergency Call Press and hold the
key for more
than 4 seconds
(Note: Emergency dialing menu must be set to on)
One-Touch dialing
Press and hold the
seconds
key for a few
Storing a number
Ensure the display is clear, enter area
code and number.
Press the
key to enter a name.
Press and hold the
key
Search for a name
With a clear display, press the
key then W
Search for a number
Press W key to scroll through stored
numbers
Speed dialing
Press a location number (1-40) and
then
The Menu Facility
Enter menu facility
Press the
Enter function
Press the
key
Exit menu facility
Press the
Menu shortcut
(For Menus 1-9)
Press the
Menu number
Scroll
Press W to scroll forward and V to
scroll backward
Select option
Press the
key
key
key and then the
key
To Activate Calling Card (Menu 13)
Card
Type
Uses this U.S.A.
access number
Includes these cards
A
Sprint
MCI
PacBell
1-800-877-8000
1-800-950-1022
1-800-555-5321
B
MCI
MCI
GTE
1-800-888-8000
1-800-674-0700
1-800-225-5483
C
AT&T
Sprint
PacBell
1-800-225-5288
1-800-277-7468
1-800-522-2020
AT&T10
Sprint
10288
10333
D
Ameritech
E
MCI
(press
at $&&(66#
180%(5" prompt)
1-800-999-9000
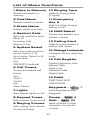
Contents
1. For Your Safety
Making Calls . . . . . . .
Emergency Calls . . . .
Regulations . . . . . . . .
. . . . .
.......
.......
.......
. . . .
.....
.....
.....
. . .
....
....
....
.1
.2
.2
.2
2. Battery and Signal . . .
To Install the Battery . . . . . . .
To Remove the Battery . . . . .
To Charge the Battery . . . . . .
To Discharge the Battery . . . .
Important Battery Information
Signal Strength Indication . . .
. . . .
.....
.....
.....
.....
.....
.....
. . .
....
....
....
....
....
....
3
.3
.3
.4
.5
.6
.7
3. The Basics . . . . . . . . . . . . .
Switching On/Off . . . . . . . . . . . . . . .
Making a Call . . . . . . . . . . . . . . . . . .
Ending a Call . . . . . . . . . . . . . . . . . . .
Answering a Call . . . . . . . . . . . . . . . .
Adjusting the Earpiece Volume . . . .
Last Number Redial . . . . . . . . . . . . .
Speed Dialing . . . . . . . . . . . . . . . . . .
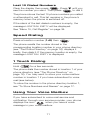
1 Touch Dialing . . . . . . . . . . . . . . . . .
Using Your Voice Mailbox . . . . . . . .
9 Key Emergency Dialing . . . . . . . . .
Keyguard . . . . . . . . . . . . . . . . . . . . .
Calling Card Call . . . . . . . . . . . . . . . .
PIN Call . . . . . . . . . . . . . . . . . . . . . . .
What is Prepaid Mode? . . . . . . . . . .
. . .
....
....
....
....
....
....
....
....
....
....
....
....
....
....
8
.8
.8
.9
.9
10
10
11
11
11
12
12
13
14
15
4. The Phone Directory . . . . . . . . 16
Alpha Mode . . . . . . . . . . . . . . . . . . . . . . . . 16
To Store Numbers and Names . . . . . . . . 17
To Erase Stored Names and Numbers . . 20
To Recall Stored Numbers . . . . . . . . . . . . 21
To Recall Stored Names . . . . . . . . . . . . . 21
i
5. The Menu . . . . . . . . . . . .
Accessing Menus by Number . . . .
List of Menu Functions . . . . . . . . .
Menu 1, Store To Memory . . . . . .
Menu 2, Find Name . . . . . . . . . . . .
Menu 3, Erase Name . . . . . . . . . .
Menu 4, Restrict Calls . . . . . . . . . .
Menu 5, System Select . . . . . . . . .
Menu 6, Call Timers . . . . . . . . . . . .
Menu 7, Lights . . . . . . . . . . . . . . . .
Menu 8, Keypad Tones . . . . . . . . .
Menu 9, Ringing Volume . . . . . . . .
Menu 10, Ringing Type . . . . . . . . .
Menu 11, Emergency Key 9 . . . . .
Menu 12, NAM Select . . . . . . . . . .
Menu 13, Calling Card . . . . . . . . . .
Menu 14, Change Lockcode . . . . .
Menu 15, Call Register . . . . . . . . .
Menu 16, Debit (prepaid only) . . . . . .
. . . . 22
. . . . . 22
. . . . . 23
. . . . . 24
. . . . . 24
. . . . . 24
. . . . . 24
. . . . . 25
. . . . . 27
. . . . . 28
. . . . . 29
. . . . . 30
. . . . . 30
. . . . . . 31
. . . . . . 31
. . . . . 32
. . . . . 34
. . . . . 34
. . . . . 35
6. Additional Features . . . . . . . . . 40
Sending DTMF (“Touch”) Tones . . . . . . . 40
7. Accessories . . . . . . . . . . . . . . 42
8. Reference Information
Important Safety Information .
Care and Maintenance . . . . . .
Troubleshooting . . . . . . . . . . .
Technical Information . . . . . . .
. .
...
...
...
...
. . . . 52
. . . . . 52
. . . . . 55
. . . . . 56
. . . . . 57
Nokia 1-Year Limited Warranty . . 58
ii
1. For Your Safety
Read these simple guidelines before using your
phone. Failure to comply with these guidelines
may be dangerous or illegal.
For more detailed safety information, see
“Important Safety Information” on page 52.
Road Safety Comes First
Don't use a hand-held phone while driving; park
the vehicle first.
Switch Off In Hospitals
Switch off your phone when near medical
equipment. Follow any regulations or rules in
force.
Switch Off On Aircraft
Mobile phones can cause interference. Using
them on aircraft is illegal.
Switch Off When Refueling
Do not use the phone at a refueling point. Do not
use near fuels or chemicals.
Switch Off Near Blasting
Do not use the phone where a blasting operation
is in progress. Observe restrictions, and follow
any regulations or rules in force.
Use Sensibly
Use only in the normal position (to ear). Avoid
unnecessary contact with the antenna when
phone is on.
Interference
All mobile phones may be subject to radio
interference, which may affect the performance
of the phone. Therefore, you should never rely
solely upon any cellular phone for essential
communications (e.g., medical emergencies).
Qualified Service
Only qualified service personnel may install or
repair cellular phone equipment. Use only
approved accessories and batteries.
1
Making Calls
1) Switch the phone on and make sure it is in service.
2) Enter the phone number including area code then
press
. To end a call press
. To
answer a call press
.
Emergency Calls
1) Switch the phone on. Make sure it is on and in
service.
to clear the display. Enter the
2) Press and hold
emergency number (e.g. 911) and press
.
Give your location. Do not end the call until given
permission to do so.
See “9 Key Emergency Dialing” on page 12.
Regulations
FCC/Industry Canada Notice
A cellular phone may cause TV or radio interference
(e.g., when using a phone in close proximity to electronic
receiving equipment). The FCC/Industry Canada can
require you to stop using your cellular phone if such
interference cannot be eliminated. If you require
assistance, please contact your local service facility.
This device complies with part 15 of the FCC rules.
Operation is subject to the condition that this device
does not cause harmful interference.
The cellular phone described in this guide is approved
for use in AMPS networks.
2
2. Battery and Signal
Your phone is powered by a rechargeable battery. Use
only batteries approved by the phone manufacturer and
recharge your battery only with the chargers approved
by the manufacturer. See “Important Battery
Information” on page 6.
A new battery must be fully charged
before being used for the first time. A new
battery’s full performance is achieved
only after two or three complete charge
and discharge cycles!
To Install the Battery
To Remove the Battery
Switch off the power before removing the battery.
3
To Charge the Battery
Plug the charger into a standard
AC wall outlet then connect the
connector to the bottom of your
phone.
When charging starts the battery
segments scroll and the phone beeps once.
You can use the phone during
the charging, but the charging
will be reduced for the duration
of the call. Note that if the battery
is completely empty and you are
using the Standard Travel
Charger (ACH-8U), you can’t
use the phone until it has enough charge to operate.
After the segments of the battery indicator bar
stop scrolling and the bar is entirely displayed,
the battery is charged.
If the battery is too hot or cold, the charging
may be interrupted.
Charging Times
The battery charging times below are approximate.
Standard
Charger
(ACH-8U)
Rapid
Charger
(ACH-6U)
Slim 800 mAh
NiMH (BMT-1L)
6 hours
90 minutes
Extended 800 mAh
NiCd (BKL-2S)
6 hours
90 minutes
Battery
4
Talk and Standby Times
Battery operation times depend greatly on how you use
the batteries, as well as on the coverage of the network
and network parameters set by the cellular service
provider.
Battery
Talk Time
Standby Time
Slim 800 mAh
NiMH (BMT-1L)
1 hour 40 minutes
21 hours
Extended 800 mAh
NiCd (BKL-2S)
1 hour 40 minutes
21 hours
To Discharge the Battery
A battery lasts longer and performs better if you fully
discharge it from time to time!
To discharge the battery, either leave your phone
switched on until it turns itself off or use the battery
discharge feature of any approved accessory available
for your phone.
Note: Do not attempt to discharge the battery by any
other means.
Battery Low
You get this message and a
warning tone when the battery
charge is low and only a few
minutes of talk time remain.
When the battery charge is too low for the phone to
operate, RECHARGE BATTERY is displayed and a
warning tone is given. After about 10 seconds, the
phone automatically switches itself off.
Note: If Silent Service has been selected, no audible
warning tones are given.
Charge the battery as described earlier in this section.
5
Important Battery Information
•
Use only batteries and chargers approved by the
phone manufacturer.
•
When a charger is not in use, disconnect it from the
power source. Do not leave the battery connected
to a charger for longer than a week; overcharging
may shorten its life.
•
If left unused, a fully charged battery will discharge
itself in about a week at room temperature.
•
Never use any charger or battery that is damaged
or worn out.
•
Use the battery only for its intended purpose.
•
Do not short circuit the battery. Accidental short
circuiting can occur when a metallic object
(e.g. coin, clip, or pen) causes direct connection of
the + and - terminals of the battery (metal strips on
the back of the battery), for example when you
carry a spare battery in your pocket or purse.
Short circuiting the terminal may damage the
battery or the connecting object.
•
Leaving the battery in hot or cold places, such as in
a closed car in summer or winter conditions,
reduces the capacity and lifetime of the battery.
Always try to keep the battery between 59°F and
77°F (15°C and 25°C). A phone with a hot or cold
battery may temporarily not work (or charge) even if
the battery is fully charged. NiMH battery
performance is particularly limited in temperatures
below 14°F (-10°C).
•
Temperature extremes affect the ability of your
battery to charge: it may require cooling or warming
first.
•
When the battery is not in use, store it uncharged in
a cool, dark and dry place.
•
The battery is a sealed unit with no serviceable
parts. Do not attempt to open the case.
•
It is recommended that you allow your battery to
fully discharge before you recharge it.
6
•
The battery can be charged and discharged
hundreds of times but it will eventually wear out.
When the operating time is noticeably shorter than
normal, it is time to buy a new battery.
•
Do not dispose of a battery in a fire!
•
Dispose of used batteries in accordance with any
local regulations.
NiCd
NICKEL CADMIUM BATTERIES MUST BE
RECYCLED OR DISPOSED OF PROPERLY.
MUST NOT BE DISPOSED OF IN MUNICIPAL
WASTE.
Signal Strength Indication
A cellular phone sends and receives radio signals. As
with all radio equipment, the quality of radio reception
depends on the strength of the radio signal in the area
where you are operating your phone.
The strength of the cellular signal is shown by
the vertical bar on the left-hand side of the
display. The higher the bar, the stronger the
signal is where you are operating your
phone.
When
is displayed, the phone is
outside of the cellular service area and calls
cannot be made or received.
If the signal is poor and you are using the phone in a
building, you may get better reception near a window.
7
3. The Basics
Switching On/Off
Press and hold the power key for one second
to switch the phone on or off.
IMPORTANT! Do not switch on the phone
when cellular phone use is prohibited or when
it may cause interference or danger.
Making a Call
If your phone has an extendable antenna, extend the
antenna fully. As with any other radio transmitting
device, avoid unnecessary contact with the antenna
when the phone is switched on.
Enter the area code + number, then press
.
Check with your operator to see if you must enter the
area code.
If the PIN CALL is set to on, press
again after
the tone. See “To Activate PIN Call” on page 14 for
details.
If you make a mistake dialing, press
to erase digits
one by one. Press and hold
to clear the whole
display.
NO SERVICE appears and a beep is given if you try to
make a call when your phone is outside of the cellular
service area.
NOT ALLOWED appears if you try to make a restricted
call.
PRESS MENU appears if Keyguard is on.
IN USE and the dialed phone
number appears on the
display when you press
. The call is connected
when the phone number
disappears from the display.
8
To make a call while you have a call in
progress:
Enter the phone number or recall the number from the
memory and press
. This puts the current call on
hold and dials the new call.
Note: You can do this only if you have subscribed to this
network service.
Ending a Call
Press
.
Note: If you press and hold
, Keyguard is
then
activated. To deactivate Keyguard, press
.
Answering a Call
Press any key except the power or
Note: You can press
incoming call. Pressing
keys.
to silence the ringing of an
will not answer the call.
To answer a waiting call (normally indicated by a beep)
press
.
Note: If Keyguard is active, a call can only be answered
with
.
Note: Call Waiting is a network feature. You need to
subscribe to it through your service provider to use it.
Calling Line Identification
If you have subscribed to and
activated Calling Line
Identification (a network
service), the phone displays
the caller’s phone number as
the phone rings.
The phone displays the caller’s name if you have that
person’s name and number stored in your phone.
Otherwise it displays CALL, NO ID CALL, or PRIVATE
ID CALL.
9
If you have set Ringing Volume to SILENT SERVICE, the
phone’s lights flash and the phone makes a short beep.
You can answer a call any time, even while using the
Keyguard, memory or menu functions.
If you don't answer a call, the message 1 CALL MISSED
or n CALLS MISSED will remain on the display until
you press any key (except the on/off key) to clear
the display. The phone stores the caller’s number
(if available) in the list of Missed Calls (see “Menu 15, Call
Register” on page 34).
Adjusting the Earpiece Volume
During a call, press W or V
to decrease or increase the
earpiece volume level. The
display must be clear.
Note: The W and V keys
scroll through memory and
the menu when not in a call.
Last Number Redial
Clear the display then press
10
.
Last 10 Dialed Numbers
Clear the display then press
. Press W until you
see the number you want. Then press
to dial it.
The phone stores the last 10 phone numbers you called
or attempted to call. This list remains in the phone's
memory when the phone is switched off.
If the stack of the last dialed numbers is empty, the
message LOCATION EMPTY will be displayed.
See “Menu 15, Call Register” on page 34.
Speed Dialing
Press a location number (1-40) then
.
The phone recalls the number stored in the
corresponding location number in your phone directory
(see “The Phone Directory” on page 16), displays it
briefly, then dials it. If the memory location is empty, the
message LOCATION EMPTY is displayed.
1 Touch Dialing
Hold
for a few seconds.
The phone dials the number stored in location 1 of your
phone directory (see “The Phone Directory” on
page 16). You may want to store your voice mailbox
number in location 1 if you have subscribed to voice
mail (see below).
To store the number in the phone directory location 1,
see “To Store Numbers and Names” on page 17.
Using Your Voice Mailbox
If you have subscribed to voice mail service and
notification through your service provider, your phone
displays the icon
when you have a voice
message in your voice mailbox.
11
If you have stored your voice mailbox number in location
1, you can simply press and hold
to call your
voice mailbox. Otherwise, dial your voice mailbox number
to listen to your messages.
9 Key Emergency Dialing
Press and hold
for more than 4 seconds.
The phone dials the emergency number programmed
into your phone and displays the message EMERG. CALL
TRY if Emergency Key 9 is set to on (EMERG. 9 ON).
The emergency number is displayed only after you have
entered the last digit of the number.
Note: Official emergency numbers vary by location
(e.g., 911 or another official emergency number).
However, only one emergency number is programmed
into your phone to be dialed automatically by one-touch
emergency dialing, which may not be the proper
number in all circumstances.
Note: 9 Key Emergency Dialing does not operate when
the Keyguard feature is activated. However, an
emergency call can be made without deactivating the
Keyguard by entering the whole emergency number
programmed into your phone and then pressing
.
Keyguard
•
Press and hold
to activate Keyguard.
•
Press
then
to deactivate Keyguard.
You can also activate Keyguard this way.
Keyguard locks the phone's keypad to prevent
accidental keypresses (e.g. when the phone is in a
pocket or a bag).
KEYGUARD ACTIVE remains on the display until
Keyguard is deactivated.
12
Answering a call with Keyguard active
Press
.
During the call, the keypad remains unlocked and the
phone can be used normally. After the call is ended,
Keyguard automatically becomes active again.
The phone cannot be switched off when Keyguard is
active. However, if you give a quick press to the power
key with Keyguard active, the phone’s lights go on for
15 seconds, regardless of the Lights setting.
Note: When Keyguard is activated, calls may be
possible to the emergency number programmed into
your phone (e.g., 911 or another official emergency
number). However, one-touch 9-key emergency dialing
(`the 9 key') does not operate.
To make an emergency call with
Keyguard active
Enter the emergency number preprogrammed into your
phone (e.g. 911) and press
.
The emergency number is displayed only after you have
entered the last digit of the number.
The phone dials the emergency number programmed into
the phone and displays the message EMERG. CALL TRY.
Calling Card Call
When making a call, the call charges can be directed to
a selected long distance service provider, if the card
number is sent to the network during the call setup.
Before making an automatic calling card call, you have to
activate one of the calling card options from the menu
CALLING CARD.
1) Enter the area code and phone number.
2) Press and hold
for more than one second.
Note: If no calling card is activated, the phone will
make a normal call to the phone number entered.
13
CARD CALL remains on the display until the access
number has been sent to the network. The phone
asks you to WAIT FOR PROMPT.
3) After the tone or voice prompt, press
.
CARD CALL remains on the display; the phone asks
you to again WAIT FOR PROMPT.
4) If you get another tone or voice prompt, press
again.
Note: This procedure may not apply to all calling card
options programmed into your phone. Please look at
the back of your calling card or contact your long
distance company for more information.
If you are making a calling card call with PIN CALL ON,
go through steps 1 and 2 above. The phone displays PIN
. Then
CALL. When you hear a tone, press
continue with steps 3 and 4 above.
PIN Call
You can activate or deactivate PIN Call, a security
feature that requires a PIN Code every time you make a
call.
Note: If you are using the phone in an area that doesn’t
require PIN dialing, deactivate PIN Call.
To Activate PIN Call
7462255
1) Enter
(PINCALL).
(spells
2) The phone asks for your
four-digit PIN Code. Enter
your PIN code and press
.
The phone briefly displays
PIN CALL ON.
Making a Call with PIN Call On
1) Make the call as usual (see “Making a Call” on
page 8).
14
The phone displays PIN CALL.
2) After you hear a tone, press
again.
Wait for your call to be connected.
Note: If you’re in a network that doesn’t support
PIN Calls, but your phone has PIN Call On, the
phone tries to send a PIN anyway. To stop this,
make the call as usual, then press
to end the
PIN Call attempt.
To Deactivate PIN Call
7462255
1) Enter
.
The phone asks for your four-digit PIN Code.
2) Don’t enter your PIN Code, just press
.
The phone briefly displays PIN CALL OFF.
Note: When the phone is set to PIN CALL ON, an
emergency call to the emergency number programmed
into your phone (e.g., 911 or another official emergency
number) will be dialed as a normal call without the PIN
code request.
What is Prepaid Mode?
To activate your phone through TRACFONE®, call the
toll free number on the card included with this Owner’s
Manual.
If you activate your phone through TRACFONE, see
“Menu 16, Debit” on page 35 for information on the
features available.
Important note: Your phone cannot be activated
through TRACFONE and another cellular service
provider at the same time.
Note: If you have questions regarding any of the prepaid
features in your phone, contact TRACFONE Customer
Service at 1-800-867-7183.
15
4. The Phone Directory
Your phone can store:
•
up to 40 names and numbers in its directory
•
one additional number in a “notepad”, which is
erased whenever you switch off the phone
Stored names can be up to 16 characters long and
numbers can have up to 32 digits.
See “Memory Location 40” on page 20 for an important
note about Memory Location 40.
Alpha Mode
To enter names, retrieve numbers based on names, and
view names, press
. The phone displays ABC
to indicate that you can use keys to enter letters, and
that you are viewing names rather than numbers.
When a name is displayed you can also press
see the associated number.
to
To Enter Letters
Put the phone in Alpha mode by pressing
. You can
then enter letters. The table on the next page shows the
characters you can enter while the phone is in Alpha mode.
To correct mistakes, press
to clear the whole display.
or press and hold
16
Key
One
press
1
-
&
.
2
A
B
C
3
D
E
F
4
G
H
I
5
J
K
L
6
M
N
O
7
P
Q
R
8
T
U
V
W
X
Y
9
Two
Three
Four
presses presses presses
:
S
Z
∗
Enter another letter from the same key
without waiting for the cursor to move to
the next space.
#
Space between letters
The identical name may be used only once in memory.
REPLACE NAME? appears when you try to store a name
already in memory.
To Store Numbers and Names
Quick Store
1) Clear the display, then enter the area code and
phone number.
2) (Optional:) Press
3) Press and hold
then enter the name.
.
The phone stores the number in the first empty
memory location. If there aren’t any empty spaces
you get the message NO SPACE.
17
Menu Method
.
1) Press
Wý
The phone prompts you
for a name:
2) Enter a name then press
. If you don’t want
to store a name, just
press
at the prompt.
The phone prompts you
for a number:
3) Enter the area code and
phone number then
.
The phone prompts you
to store the number in the
first available memory
location:
or enter the
4) Press
location number where
you want the number to be stored then press
.
Note: To store the number in the “notepad”, press
at the “STORE TO n?” prompt then press
Storing Pause and Wait Characters
You can store a 2.5 second pause (p) or a wait (w)
character in a stored number. The reason to do this is
for automatic sending of Touch Tones.
1) To enter a Pause (“p”),
press
.
2) To enter a Wait (“w”),
press
.
18
For more information on the use of “pause” and “wait”
characters, see “Automatically Sending Touch Tones” on
page 40.
Notes about Storing Numbers
REPLACE NAME?
This appears if the name is already in use. The phone
displays the number (in the upper right hand corner) of
the location where it is stored. To replace the information
already stored, press
.
STORE TO?
This appears if there is no empty location available.
Enter the memory location where you want to store the
information (existing content will be overwritten). Enter a
location number and press
.
REPLACE CONTENT?
This prompts you to replace the contents of the selected
location. To replace the information, press
.
ALREADY STORED
This appears if both the phone number and name are
already stored. The phone prompts you to move the
information to the first empty memory location (e.g., MOVE
, or enter a different location
TO 5?). Press
number then press
.
Press
if STORE, REPLACE or MOVE appears and
you do not want to continue.
The phone exits the store function, and the information
you tried to store reappears on the display. You can reattempt to store the information in the phone directory
memory as described above, or you can clear the display
by pressing and holding
.
To Change the Number Stored with a
Name
1) Recall the number from memory.
key to erase the current number one
2) Use the
digit at a time, then key in the new number.
19
.
3) Press and hold
The phone gives you the
prompt shown.
at the
4) Press
REPLACE NAME? prompt.
See “To Recall Stored Numbers” on page 21 for more
information.
Memory Location 40
Memory Location 40 is special. If you store a number in
Memory Location 40 (you would do this in Step 4 of
“Menu Method” on page 18), you can make calls to that
number even if you turn on the INCOMING ONLY
restriction under Menu 4, Restrict Calls. See “Menu 4,
Restrict Calls” on page 24.
To Erase Stored Names and
Numbers
To Erase by Name
WWWý
. The phone
prompts you for a name:
1) Press
2) Press Wýuntil you see the
name you want to erase.
At the ERASE? prompt,
either press
to erase or press
if you
change your mind and don’t want to erase and you
want to quit.
The phone displays ERASED or NOT ERASED.
To Erase by Number
. The phone prompts
1) Press
WWWý
you for a name, as in Step 1 above.
20
and the
2) Press
phone asks, LOCATION?.
3) Press Wýuntil you see the
number you want to
erase, or enter a location
number. At the ERASE?
prompt, press
or press
your mind.
if you change
The phone displays ERASED or NOT ERASED.
Note: The notepad memory is automatically erased
when you switch the phone off.
To Recall Stored Numbers
With the display clear of numbers, press and hold Wýto
scroll through stored numbers.
To Recall Stored Names
With the display clear of numbers or names, press
then W. Or, press
then enter the first few
letters of the name and press W.
The phone scrolls through stored names.
You can also use Menu 2, Find Name:
WWý
. The phone
prompts you for a name:
1) Press
2) Key in the name or its first
letter(s), or press Wýuntil
you see the name you
want. If you don’t enter anything for 5 seconds after
NAME? displays, the first stored name will appear.
Press
to display the phone number.
to make a call to the displayed name
3) Press
or phone number.
21
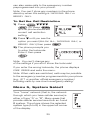
5. The Menu
When you press
, you
get this screen. Press W or V
to scroll through the menus.
Each menu allows you to see
and change specific phone
settings.
When you’re scrolling through the menus, press
when you see the menu you want.
Use the WýorýV key to scroll through the setting options
of a menu. The current setting is always displayed first.
Press
to set the option to the item shown on the
screen.
Use
to exit the menu without changing the settings.
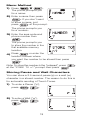
Accessing Menus by Number
The menu functions are numbered. You can get into
menus 1 to 9 by pressing
then the menu
number.
Note: Menus 10 to 16 cannot be accessed by using this
method.
Once you’re in the menu, use the W or V key to scroll
through the available settings. The current setting is
always displayed first.
Press
to select the displayed setting, or use
to exit the menus without changing the settings.
22
List of Menu Functions
1 Store to Memory 10 Ringing Type
Stores information in
memory
Selects ringing types
(5 types)
2 Find Name
11 Emergency
Key 9
Recalls memory entries
3 Erase Name
Erases memory entries
4 Restrict Calls
Sets call restriction level:
Allow All
Incoming Only
Memory Only
5 System Select
Sets the roaming option:
Home Type A or B
Non-Home Type A or B
Home Area
Any
PREFER’D (optional)
6 Call Timers
Shows and resets call
timers:
Last
Total 1
Total 2
Life
Clear Timers
7 Lights
Sets the 9 Key Emerg.
dialing on/off
12 NAM Select
Shows and selects your
cellular number
13 Calling Card
Selects and activates a
calling card option
14 Change Lockcode
Changes the four-digit lock
code
15 Call Register
Shows temporary lists:
Missed Calls
Clear Lists
Received Calls
Dialed Calls
16 Debit
TIMETANK INFO
CHECKSUM
∗
Keyguard -
Sets display lights on/off
Activates/deactivates
Keyguard
8 Keypad Tones
Pause -
Sets keypad tones on/off
Wait -
9 Ringing Volume
Adds a Pause or Wait
character to a stored
number
Sets ringing tone volume
(3 volume levels)
23
#
##
Some menu functions described below can be operated
in several different ways. Only one alternative is described
here, with references to alternative methods.
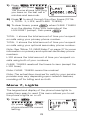
Menu 1, Store To Memory
You can store names and phone numbers in the phone
with this menu. See “Menu Method” on page 18 for
details on storing names and numbers with Menu 1.
Menu 2, Find Name
You can find phone numbers and names stored in the
phone with this menu. See “To Recall Stored Names” on
page 21 for details on finding a name with Menu 2.
Menu 3, Erase Name
You can erase the contents of a memory location by
name or memory location number with this menu.
See “To Erase Stored Names and Numbers” on page 20
for details on erasing memory location contents with
Menu 3.
Menu 4, Restrict Calls
You can restrict certain types of calls with this menu.
You need your four-digit lock code to change any of the
settings in this menu.
ALLOW ALL means that there are no restrictions to
incoming or outgoing calls.
INCOMING ONLY means that you cannot make outgoing
calls; you may only receive calls. However, you can
make calls to the number stored in location 40 and to
the emergency number preprogrammed into your
phone. See “Memory Location 40” on page 20.
MEMORY ONLY means that you can make outgoing calls
only to numbers stored in the phone’s memory. You
24
can also make calls to the emergency number
preprogrammed into your phone.
Note: You can’t store any numbers in the phone
directory when this setting is INCOMING ONLY or
MEMORY ONLY.
To Set the Call Restriction
WWWWý
(Or press
4). The phone shows the
current call restriction
setting.
1) Press
2) Press Wýuntil you see the
option you want (ALLOW ALL, INCOMING ONLY, or
.
MEMORY ONLY) then press
3) The phone prompts you
to enter the lockcode.
Enter it then press
.
Note: You can’t change any
of the settings if you don’t know the lockcode!
If you enter the wrong lockcode, the phone displays
CODE ERROR and exits the menu.
Note: When calls are restricted, calls may be possible
to the emergency number programmed into your phone
(e.g., 911 or another official emergency number)
including calls by one-touch emergency dialing.
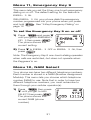
Menu 5, System Select
Your “home” network (that is, the network
through which you have cellular service) is
either of type “A” or “B”. Many areas that
provide cellular service have both an A and
B system. The phone shows the selected
system type (A or B) in the upper left corner
of the display.
25
With Menu 5, you tell the phone which system to
choose when you roam (that is, try to use your phone in
an area other than your “home” network). Your phone
must choose which system to use (A or B) so it takes the
information from your choice in Menu 5.
Contact your cellular service provider for information
about the roaming agreements they have with other
cellular service providers.
To Select the Roaming Mode
WWWWWý
(Or press
5). The phone shows the
current System Select
setting.
1) Press
2) Press Wýuntil you see the option you want (ANY,
HOME TYPE A or B, NON-HOME TYPE A or B, HOME
.
AREA, or PREFER’D) then press
ANY means that the phone uses both systems A and B.
The phone uses its home system when possible and the
non-home type system when service is not available in
its home type system.
HOME TYPE A (or HOME TYPE B) means that the phone
uses only its home type system (A or B). Note that the
phone displays HOME TYPE A or HOME TYPE B
depending on whether your phone’s home system is
type A or B.
NON-HOME TYPE A (or NON-HOME TYPE B) means the
phone uses only the non-home type system (A or B,
depending on what your phone’s home system type is).
HOME AREA means the phone uses only its home area
and home system. In other words, it cannot roam.
PREFER’D allows you to use information programmed
into your phone by your service provider. This
information lists the networks in which the phone will
provide the best possible service.
•
Press
ýto select the PREFER’D option.
26
Depending on the programmed information, and the
actual network availability in the area where you are
using the phone, selecting the PREFER’D option has the
effects described below.
Note: The PREFER’D option appears only if your service
provider has programmed a list of preferred networks
into your phone.
If you select PREFER’D, your phone may be able to
select the preferred (e.g., low-cost billing rate) type of
network. If service is available only within a nonpreferred type of network, the
part of
will flash and only emergency calls to the emergency
number programmed into your phone may be possible.
Note: When you select PREFER’D, and you’re within a
non-preferred network, only calls to the emergency
number programmed into your phone (e.g., 911 or
another official emergency number) may be possible.
How to Roam
In some areas, the cellular system automatically
recognizes roaming phones. In other areas, you need to
contact the service provider before the system can
recognize your phone. The operator needs to know
your phone number, your phone's ESN (electronic serial
number), and how you plan to pay for your calls. There
is normally an additional charge for roaming calls.
Note: The ESN of your phone is located under the
battery of the phone. (However, the ESN of your phone
can normally be read over the air by the roaming cellular
service providers when you call them to register your
roaming presence on their cellular network.)
Menu 6, Call Timers
This menu lets you see approximately how much time
you’ve spent in calls on your phone. You can also reset
the timers to zero (except for the Life Timer).
27
WWWWWWýýý
. (Or press
6.)
The phone shows how long
you were on the last call in
minutes and seconds.
1) Press
2) Press Wýto scroll through the other timers (TOTAL
1, TOTAL 2, LIFE, and CLEAR TIMERS).
when CLEAR TIMERS
3) To clear timers, press
is on the display. Enter your lockcode at the
.
LOCKCODE? prompt, then press
TOTAL 1 shows the total amount of time you’ve spent
on calls using your primary phone number.
TOTAL 2 shows the total amount of time you’ve spent
on calls using your optional secondary phone number.
Note: See “Menu 12, NAM Select” on page 31 for more
information on primary and optional secondary phone
numbers.
LIFE shows the total amount of time you’ve spent on
calls using both of your numbers.
CLEAR TIMERS resets all the timers to zero (except the
LIFE timer).
Note: CLEAR TIMERS cannot be undone!
Note: The actual time invoiced for calls by your service
provider may vary depending upon network features,
rounding-off for billing and so forth.
Menu 7, Lights
The keypad and display of the phone have lights to
make them easy to read. This menu allows you to set
the phone's lights on or off.
1) Press
.
WWWWWWWýýý
(Or press
7.) The
phone shows the current
setting.
28
2) Press Wýto LIGHTS ON or LIGHTS OFF then press
.
With Lights On
If the phone is in hand-portable mode or connected to
a charger, the lights come on when you press a key,
and stay on for 15 seconds. The lights also come on
when the phone rings and stay on for 15 seconds after
the phone rings.
When the phone is connected to a handsfree car kit, the
lights remain on continuously.
With Lights Off
If the phone is in hand-portable mode or connected to
a charger, the lights remain off continuously.
When the phone is connected to a handsfree car kit, the
lights come on when you press any key and stay on for
15 seconds. The lights also come on when the phone
rings and stay on for 15 seconds after the phone rings.
Menu 8, Keypad Tones
When you press the buttons on your phone, the phone
beeps (the sound depends on which key you press).
With this menu, you can turn the beeping sounds on or
off.
1) Press
ý8. The
phone shows the current
setting.
2) Press Wýto KEYTONES ON
or KEYTONES OFF then
press
.
Note: You can still send DTMF tones even when the
keypad tones are switched off.
Note: Keypad tones are set off when you choose
SILENT SERVICE in Menu 9, Ringing Volume.
29
Menu 9, Ringing Volume
With this menu you choose the ringing volume. As you
scroll through the options RINGING HIGH and RINGING
LOW, the phone rings so you can hear what each setting
sounds like.
1) Press
ý9. The
phone shows the current
setting.
2) Press Wýto RINGING
HIGH, RINGING LOW, or
SILENT SERVICE then press
.
If you choose SILENT SERVICE,
the phone won’t ring when you
have an incoming call. Instead it
beeps once, flashes the lights,
and displays CALL. The phone
displays SILENT when you aren’t in a call and when you
aren’t using the other functions of the phone. This
message is to remind you that the ringing tone is set to
off.
Note: All other tones of the phone, except for the
charger connected tone, are also switched off.
Menu 10, Ringing Type
With this menu you choose the ringing type. As you
scroll through each of the five options, the phone rings
so you can hear what each type sounds like.
1) Press
ýthen press
W until you get to RINGING
.
TYPE then press
The phone shows the
current setting.
2) Press Wýto hear the types, then press
when you hear the one you want.
30
Menu 11, Emergency Key 9
This menu lets you set the 9 key one-touch emergency
dialing on or off. The default setting for the feature is
EMERG. 9 ON.
With EMERG. 9 ON, your phone dials the emergency
number programmed into your phone when you press
and hold
. See “9 Key Emergency Dialing” on
page 12.
To set the Emergency Key 9 on or off
1) Press
ýand press W
until you get to EMERGENCY
.
KEY 9 then press
The phone shows the
current setting.
2) Press Wýto EMERG. 9 OFF or EMERG. 9 ON, then
press
.
Note: The Emergency Key 9 one-touch dialing operates
when calls are restricted, but does not operate when
the Keyguard is on.
Menu 12, NAM Select
Your phone can have two different telephone numbers.
Each number is stored in a NAM (Number Assignment
Module). This menu lets you choose which telephone
number (NAM) to use. Note that in order to have two
different telephone numbers, you must subscribe to
them through your cellular operator(s).
1) Press
ýthen press
W until you get to NAM
.
SELECT then press
The phone shows the
current NAM (phone
number).
31
2) Press Wýto the NAM you want (if there are two
available) then press
.
Note: If only one NAM is programmed into your phone,
only that number can be selected from this menu.
Note: The phone cannot use both numbers at the same
time and you cannot change the number during a call.
Note: If your phone is set to your first number, you can
only receive calls via that number. You may be able to
forward calls from your second number to your first
number so you don’t miss any calls, if this service is
available from your network provider. For more
information, please contact your cellular service
provider.
Menu 13, Calling Card
This menu lets you store calling card information in your
phone. You can select the calling card option, or you
can select NO CARD. For making an automatic calling
card call, see “Calling Card Call” on page 13.
You need to store the calling card information in your
phone to use this feature. After you store the
information, that option is also the one used when you
make Calling Card calls.
1) Press
ýthen press W
until you get to CALLING
.
CARD then press
The phone asks you for
your lockcode.
. The phone
2) Enter the lockcode and press
displays the currently-selected option or NO CARD.
32
3) Select whether your calling card is Card Type A, B,
C, D, or E (described below).
Card
Type
Includes these
cards
Uses this U.S.A.
access number
A
Sprint
MCI
PacBell
1-800-877-8000
1-800-950-1022
1-800-555-5321
B
MCI
MCI
GTE
1-800-888-8000
1-800-674-0700
1-800-225-5483
C
AT&T
Sprint
PacBell
1-800-225-5288
1-800-277-7468
1-800-522-2020
AT&T10
Sprint
10288
10333
(press
at ACCESS
NUMBER? prompt)
D
Ameritech
E
MCI
1-800-999-9000
Press Wýto the option you want then press
.
If you select NO CARD, previously stored calling card
data is erased and the phone exits the menu facility.
4) At ACCESS NUMBER?, enter
the telephone number to
access your calling card
provider then press
.
At CARD ID CODE? enter
your card number (including any PIN number) then
press
.
When STORED is briefly
displayed, the card has been activated, and the
previously stored calling card data erased.
Note: To exit the menu without changing the calling
card settings, press and hold
at the CARD ID
CODE? prompt.
33
Menu 14, Change Lockcode
This lets you change your phone’s four-digit lockcode.
1) Press
ýthen press W
until you get to CHANGE
LOCKCODE then press
. The phone asks
you for your lockcode.
2) Enter the lockcode and press
.
If you enter an incorrect lockcode, the phone
displays CODE ERROR and exits the menu.
3) The phone asks for a new
lockcode. Enter a new
code (four numbers) and
press
.
4) When the phone prompts
you to CONFIRM the new lock code, reenter the
numbers you entered in Step 3 then press
.
STORED confirms that the lock code has been changed.
Menu 15, Call Register
To access this menu, press
, then press W or V
to scroll to CALL REGISTER, then press
. Next,
press W or V to scroll through the lists of calls that the
phone keeps for you. Press
, to select one of the
lists:
MISSED CALLS shows you the phone number(s) of the
last 10 people that have tried to call you, but you haven’t
answered the phone.
Note: This feature might not be supported in your
network.Contact your service provider for details.
If there are 10 missed calls saved in your phone, the
next missed call is added to the list and the oldest
missed call in your phone is dropped.
34
If you don't answer a call, the message 1 CALL MISSED
or n CALLS MISSED will remain on the display until you
press any key (except the on/off key) to clear the
display.
1) When your phone alerts you that you have missed
calls, you can view the numbers by scrolling to the
CALL REGISTER menu, or by simply pressing W or
V. The missed calls are stored in your phone in the
order they were received.
2) To dial a number in the Missed Calls list, scroll to
the number you wish to call and press
.
Once you dial a number from the Missed Calls list,
the number is dropped from this list and added to
the Dialed Calls list.
CLEAR LISTS erases the Missed Calls, Received Calls,
and Dialed Calls lists. You need to enter the phone’s
lock code to clear lists.
RECEIVED CALLS shows you the phone number(s) of
the last 10 people who have called and reached you.
DIALED CALLS shows you the last 10 phone numbers
you’ve dialed.
Note: The phone displays the phone number of received
and missed calls only if the cellular system is able to
identify the caller and you have Calling Line Identification
active. See “Calling Line Identification” on page 9.
Menu 16, Debit
If you activate your phone as prepaid through
TRACFONE, your phone will have an additional menu
item called DEBIT.
If you activate the prepaid option, your phone functions
the same way as it did before, with some additional
features. These features are listed and explained in this
section.
35
To access the Debit menu, press
then press V
to go immediately to the Debit menu. Press W or V to
scroll through the menu options.
TIMETANK INFO shows you the amount of prepaid
airtime units you have left in your phone.
At the TIMETANK INFO screen, press
, and your
phone displays the number of units remaining (indicated
as U) as well as the date by which you should redeem
another prepaid cellular card.
CHECKSUM is a customer service only menu item, used
for debit verification.
Adding Airtime Units to Your Phone
Each time you want to add units to your phone, you
must purchase another TRACFONE prepaid cellular
card and then contact TRACFONE customer service.
Important note: You must add airtime units to your
phone every 60 days (before your airtime card due date)
to maintain your cellular service or your service will be
interrupted. To reactivate service, redeem a prepaid
cellular card and a new number will be issued to you.
Switching On/Off
When you first turn your phone on, REMEMBER AIRTIME
CARD DUE and a date appear.
This reminds you that this is the date you must purchase
additional airtime in order to retain your current phone
number and cellular service. The date automatically
updates once you add units to your phone.
UNITS and the number of units currently in your phone
appears after another few second pause. This number
automatically updates while you are in a call, at the end
of a call, and once you add units to your phone.
Note: When your phone displays the REMEMBER
AIRTIME message, you can press any key to skip the
subsequent CARD DUE and UNITS messages and ready
the phone for immediate use.
36
Making a Call
For complete information on making a call, refer to
“Making a Call” on page 8.
Once you have placed a call
your phone displays the charge
rate of units per minute as well
as a timer which tracks the
duration of the call expressed in
minutes and seconds.
When there are only ten minutes of talk time left in your
phone, your phone sounds a beep that continues once
a minute. If you hang up before the amount of time in
your phone expires, your phone continues to beep once
a minute during the next call.
If you try to make a call and there are no units left in your
phone, your phone beeps and displays the message
TIMETANK EMPTY.
Ending a Call
For complete information on ending a call, refer to
“Ending a Call” on page 9.
Once you press
, your
phone displays the remaining
units (indicated as U) and the
duration of the call expressed in
minutes and seconds.
Note: Due to rounding, there may be a difference
between the call time length shown on the screen after
you terminate a call and the call time length shown
under the menu, Call Timers.
Answering a Call
For complete information on answering a call, refer to
“Answering a Call” on page 9.
Note: Call Waiting is not available if your phone is in
prepaid mode.
37
When you answer a call your phone displays the charge
rate of units per minute as well as a timer which tracks
the duration of the call expressed in minutes and
seconds.
After three seconds the charge rate of units per minute
is replaced by only the number of units remaining in your
phone (indicated as U).
When there are only ten minutes of talk time left in your
phone, your phone sounds a beep that continues once
a minute. If you hang up before the amount of time in
your phone expires, your phone continues to beep once
a minute during the next call.
If there are no units left in your phone, your phone will
not ring for incoming calls.
9 Key Emergency Dialing
For complete information on 9 key emergency dialing,
refer to “9 Key Emergency Dialing” on page 12.
When you make an emergency call, the amount of units
being used and the duration of the call are not tracked
by your phone.
This means you are not charged for 911 calls. Even
when there are no units in your phone, you are able to
make 911 calls.
Making a Calling Card Call
For complete information on making a calling card call,
refer to “Calling Card Call” on page 13.
While you are in a call, your phone displays the number
of units being used, as well as a timer which tracks the
duration of the call.
Making a Call with PIN Call On
For complete information on making a call with PIN call
on, refer to “Making a Call with PIN Call On” on page 14.
Once the call is connected, your phone displays the
number of units being used, as well as a timer which
tracks the duration of the call.
38
NAM Select
If your phone is in prepaid mode, you cannot change the
NAM programming. For complete information on NAM
selection, refer to “Menu 12, NAM Select” on page 31.
39
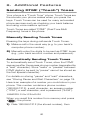
6. Additional Features
Sending DTMF (“Touch”) Tones
Your phone is a “Touch Tone” phone. Touch Tones are
the sounds your phone makes when you press the
keys. Touch Tones can be used for many automated
phone services such as checking your bank balance
and using voice mailbox options.
Touch Tones are called “DTMF” (Dual Tone Multi
Frequency) tones in the phone.
Manually Sending Touch Tones
Pressing the keys during call sends Touch Tones.
1) Make a call in the usual way (e.g. to your bank's
computer phone number).
2) Manually enter the digits to be sent as DTMF tones
(e.g., your bank account number and password).
Automatically Sending Touch Tones
To automatically send Touch Tones, store the DTMF
sequence after the access phone number (separated by
a “wait” character). Store “waits” or “pauses” between
DTMF digits to be sent (a “pause” cannot be stored as
the first special character).
For details on storing “pause” and “wait” characters,
see “Storing Pause and Wait Characters” on page 18.
Here is an example of a number you could store in your
phone. This number contains a phone number
(18005551212), a wait character, an access number
(“1234”), a wait character, and a password (“3434”).
18005551212w1234w3434
When you recall this number from memory and press
, the phone:
1) Dials 18005551212 (the stored number), then
40
again. When you
2) “Waits” for you to press
do, the phone sends the numbers 1234.
3) “Waits” for you to press
the numbers 3434.
again then sends
Here is an example that uses both “waits” and “pauses”:
18005551212w1234p3434
When you recall this number from memory and press
, the phone:
1) Dials 18005551212 (the stored number), then
again. When you
2) “Waits” for you to press
do, the phone sends the numbers 1234.
3) Pauses 2.5 seconds then sends the numbers
3434.
If the Menu 8, Keypad Tones, has been set to off, the
DTMF tones will still be sent, but you will not hear them.
To end the call, press
after the DTMF
transmission is completed and the phone has returned to
the normal call mode.
41
7. Accessories
An extensive range of accessories is available for your
phone. You can select the accessories that best
accommodate your specific communication needs.
For availability of the accessories, please check with
your local dealer.
A few practical rules for accessory operation:
•
Keep the accessories out of small children's reach.
•
When you disconnect the power cord of any
accessory, grasp and pull the plug, not the cord.
•
Check regularly that all cellular phone equipment in
a vehicle is mounted and operating properly.
•
Installation of complex car equipment must be
completed by qualified personnel only.
IMPORTANT! Use only batteries, chargers and
accessories approved by the phone manufacturer.
The use of any other types may invalidate any
approval or warranty applying to the phone, and
may be dangerous.
42
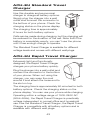
ACH-8U Standard Travel
Charger
Use this durable and economical
charger to charge all battery options.
Simply plug the charger into a wall
outlet and connect the connector to
the bottom of your phone. Check the
charging status on the phone display.
The charging time is approximately
6 hours for both battery options.
Calls can be made during charging, but the charging will
be reduced for the duration of the call. Note that if the
battery is completely empty, you can’t use the phone
until it has enough charge to operate.
The Standard Travel Charger is available for different
voltage levels and comes with different wall plugs.
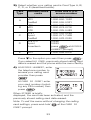
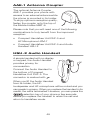
ACH-6U Rapid Travel Charger
Extremely light and functionally
designed, the Rapid Travel Charger
charges your phone battery quickly.
Plug the charger into a wall outlet and
connect the connector to the bottom
of your phone. When not using the
charger, you can wrap the cord
around it and attach the loose end to
the slot on top.
The charging time is approximately 90 minutes for both
battery options. Check the charging status on the
phone display. You can use your phone while charging.
Operating within a voltage range of 100V-240V AC
(50Hz-60Hz), the Rapid Travel Charger is practically
voltage independent in normal office and household
use. Like the Standard Travel Charger, the Rapid Travel
Charger is compatible with all battery options and is
available with different wall plugs.
43
The Rapid Travel Charger can also be used with the
Compact Desktop Charging Stand CGH-9.
CGH-9 Compact Desktop
Charging Stand
The Compact Desktop
Charging Stand provides
mounting for both the
phone and a spare battery.
Connect your charger to the
back of the Compact
Desktop Charging Stand,
and then plug the charger
into a wall outlet. Place your
phone and/or a spare battery in the stand to begin
battery charging.
Charging order is the phone battery first, and then the
spare battery. Check the charging status of the phone
battery on the phone display.
Compatible with all battery options, the Compact
Desktop Charging Stand can be used together with the
Rapid Travel Charger ACH-6U. The charging time is
approximately 90 minutes for both battery options.
In addition, the Compact Desktop Charging Stand
offers a discharging facility for the spare battery.
Discharging helps extend battery life. Place the spare
battery in the stand and press the discharge button.
When the battery is totally discharged, recharging will
begin automatically. You can also stop discharging
before it is finished by pressing the button again.
Recharging will begin immediately.
The discharge button is equipped with an LED indicator
for the spare battery. A blinking red light indicates
discharging. A continuous red light indicates charging,
and a green light indicates the spare battery is fully
charged. Charge the battery until the light turns green.
44
DTK-12 Compact Desktop
Charger Kit
This kit provides all you need to
make the use of your phone as
convenient as possible in both
home and office environments.
It provides you with rapid
charging and discharging
facilities as well as a place to
keep your phone in a
convenient ready-to-use
upright position.
The Compact Desktop
Charging Stand CGH-9 and the Rapid Travel Charger
ACH-6U are combined to create this kit.
The charging time is approximately 90 minutes for both
battery options.
Carry Accessories
A range of carry accessories is available for your phone,
including the following:
•
Leather Carry Sleeve LCS-4
•
Belt Clip BCP-7
45
HDXK-7 Headset Kit
The compact and functional Headset
Kit (Headset Adapter HDA-3 and
Headset HDC-2) provides you with a
convenient handsfree facility that you
can use anywhere.
Connect the Headset Adapter HDA-3
to the bottom of your phone, and plug
the Headset HDC-2 to the adapter.
Note: When using the Headset
Adapter, connect your charger to the
adapter if you need to charge your
phone.
EXK-2 Executive Kit
Consisting of the Rapid Cigarette
Lighter Charger LCH-6, Extended
800 mAh NiCd battery BKL-2S
and the Leather Carry Sleeve
LCS-4, this kit combines extended
talk time and mobility.
LCH-6 Rapid Cigarette Lighter
Charger
The multivoltage Rapid
Cigarette Lighter Charger
ensures that your phone is
always ready for use. The small
charger's functional design fits
well with most car lighters and
interiors.
46
Charging times are the same as those for ACH-6U.
The charging time is approximately 90 minutes for both
battery options. Calls can be made during the charging.
A green light indicates that the Rapid Cigarette Lighter
Charger is ready to charge. Check the charging status
on the phone display. The input voltage is 12 or 24 V
DC, negative grounding.
The Rapid Cigarette Lighter Charger can be used with
all accessories available for your phone.
Avoid prolonged charging with the Rapid Cigarette
Lighter Charger when the car engine is not running.
This may cause the battery of your car to drain.
Note: In some cars the cigarette lighter plug is not
provided with power when the ignition is switched off.
Verify that the green LED light is on.
LCM-1 Mobile Installation Charger
The multivoltage Mobile
Installation Charger powers your
phone from the car battery when
the ignition is switched on and
leaves the cigarette lighter
vacant.
You can use the Mobile Installation Charger in any
vehicle with a 12 or 24 V DC connection, negative
grounding.
The charging time is approximately 90 minutes for both
battery options.
The Mobile Installation Charger housing has a four pin
connector for the Power Cable PCM-5, and on the
opposite end a connector for the output cable, which
connects the Mobile Installation Charger directly to the
DC connector of your phone or to the Compact
Handsfree Unit.
The Mobile Installation Charger can be installed in the
most convenient location for you.
Installation must be made by qualified personnel only.
47
MBT-9 Mobile Holder
Designed to fit and complement your car’s
interior, the Mobile Holder holds your phone
firmly in place by its three-point hold and
sturdy structure.
You can easily place the
phone into the holder with one hand.
Tilt the phone and place it into the
holder top first, then push the bottom
in until you hear a click.
Pressing the release
buttons on both sides of the holder
loosens the bottom lock. You can now
pick up the phone from the holder and
take it with you.
The Mobile Holder is easy to install using
a snap-on swivel mount HHS-6 or
mounting plate MKE-7 to a convenient
location within your car.
Always secure the phone in its holder. Do not place the
phone on the passenger seat or in a place where it can
break loose in a collision or sudden stop.
48
AAE-1 Antenna Coupler
The optional Antenna Coupler
AAE-1 provides your phone with
access to an external antenna while
the phone is mounted in its holder.
To enjoy optimum reception quality,
fasten the coupler onto the top of
the Mobile Holder MBT-9.
Please note that you will need one of the following
combinations to truly benefit from the improved
reception:
•
Compact Handsfree Unit PHF-5 and
HF Microphone HFM-7
•
Compact Handsfree Unit PHF-5 and Audio
Handset HSU-2
HSU-2 Audio Handset
A simple handset with no display
or keypad, the Audio Handset
provides privacy for
conversation.
Connect the Audio Handset to
the bottom of Compact
Handsfree Unit PHF-5. The
connector is marked with .
When you lift the Audio Handset
from its holder, the HFloudspeaker and HF-microphone will be muted and you
can speak in privacy. When you replace the handset in its
cradle, the call is terminated. However, you can press the
selection key of your phone a few seconds
before you replace the handset to retain the call and
return to handsfree mode.
49
CARK-80 Mini Car Kit
The Mini Car Kit provides you with
a quick charging facility and holds
your phone firmly in place. It is
comprised of the Mobile Holder
MBT-9 and the Rapid Cigarette
Lighter Charger LCH-6, snap on
swivel mount HHS-6 and
mounting plate MKE-7. See
previous sections for more
information on these kit
components.
CARK-82 Compact Handsfree
Car Kit
You may choose the Compact Handsfree Car Kit to
provide a convenient charging facility combined with
external antenna connection and handsfree capability
as well.
50
•
The Mobile Holder MBT-9 keeps your phone firmly
in place.
•
The Compact Handsfree Unit PHF-5 with its
internal speaker and HF Microphone HFM-7 offers
you a seamless handsfree function.
•
The Antenna Coupler AAE-1 can be attached
directly to the Mobile Holder MBT-9 to provide
connection to an external antenna for optimum
reception quality.
•
The Mobile Installation Charger LCM-1 can be
connected to the Compact Handsfree Unit PHF-5 to
power your phone from the car battery via the ignition.
•
May be used with the optional Audio Handset
HSU-2, for private conversations.
Note that complex car accessories must be installed by
qualified personnel only.
51
8. Reference Information
Important Safety Information
Traffic Safety
Do not use a hand-held phone while driving a vehicle.
If using a hand-held phone, park the vehicle before conversing.
Always secure the phone in its holder; do not place the phone
on the passenger seat or where it can break loose in a collision
or sudden stop.
The use of an alert device to operate a vehicle's lights or horn
on public roads is not permitted.
Remember, road safety always comes first!
Operating Environment
Remember to follow any special regulations in force in any area
and always switch off your phone whenever it is forbidden to use
it, or when it may cause interference or danger.
When connecting the phone or any accessory to another
device, read its user’s guide for detailed safety instructions.
Do not connect incompatible products.
As with other mobile radio transmitting equipment, users are
advised that for the satisfactory operation of the equipment and
for the safety of personnel, it is recommended that the
equipment should only be used in the normal operating position
(held to your ear with the antenna pointing over your shoulder).
Electronic Devices
Most modern electronic equipment is shielded from radio frequency (RF) signals. However, certain electronic equipment may
not be shielded against the RF signals from your wireless phone.
Pacemakers
Pacemaker manufacturers recommend that a minimum separation of 6 inches (20 cm.) be maintained between a handheld
wireless phone and a pacemaker to avoid potential interference
with the pacemaker. These recommendations are consistent
with the independent research by and recommendations of
Wireless Technology Research. Persons with pacemakers:
•
•
•
•
Should always keep the phone more than 6 inches (20 cm)
from their pacemaker when the phone is switched on;
Should not carry the phone in a breast pocket;
Should use the ear opposite the pacemaker to minimize
the potential for interference.
If you have any reason to suspect that interference is
taking place, switch off your phone immediately.
52
Hearing Aids
Some digital wireless phones may interfere with some hearing
aids. In the event of such interference, you may want to consult
your service provider.
Other Medical Devices
Operation of any radio transmitting equipment, including cellular
phones, may interfere with the functionality of inadequately
protected medical devices. Consult a physician or the
manufacturer of the medical device to determine if they are
adequately shielded from external RF energy or if you have any
questions. Switch off your phone in health care facilities when
any regulations posted in these areas instruct you to do so.
Hospitals or health care facilities may be using equipment that
could be sensitive to external RF energy.
Vehicles
RF signals may affect improperly installed or inadequately
shielded electronic systems in motor vehicles (e.g. electronic fuel
injection systems, electronic anti-skid (anti-lock) braking systems,
electronic speed control systems, air bag systems). Check with
the manufacturer or its representative regarding your vehicle. You
should also consult the manufacturer of any equipment that has
been added to your vehicle.
Posted Facilities
Switch your phone off in any facility where posted notices so
require.
Potentially Explosive Atmospheres
Switch off your phone when in any area with a potentially
explosive atmosphere and obey all signs and instructions.
Sparks in such areas could cause an explosion or fire resulting
in bodily injury or even death.
Users are advised to switch off the phone while at a refueling
point (service station). Users are reminded of the need to
observe restrictions on the use of radio equipment in fuel depots
(fuel storage and distribution areas), chemical plants or where
blasting operations are in progress.
Areas with a potentially explosive atmosphere are often but not
always clearly marked. They include below deck on boats;
chemical transfer or storage facilities; vehicles using liquefied
petroleum gas (such as propane or butane); areas where the air
contains chemicals or particles, such as grain, dust or metal
powders; and any other area where you would normally be
advised to turn off your vehicle engine.
Vehicles
Only qualified personnel should service the phone, or install the
phone in a vehicle. Faulty installation or service may be dangerous
and may invalidate any warranty which may apply to the unit.
53
Check regularly that all wireless phone equipment in your vehicle
is mounted and operating properly.
Do not store or carry flammable liquids, gases or explosive
materials in the same compartment as the phone, its parts or
accessories.
For vehicles equipped with an air bag, remember that an air bag
inflates with great force. Do not place objects, including both
installed or portable wireless equipment, in the area over the air
bag or in the air bag deployment area. If in-vehicle wireless
equipment is improperly installed and the air bag inflates,
serious injury could result.
Switch off your phone before boarding an aircraft. The use of
wireless telephones in an aircraft may be dangerous to the
operation of the aircraft, disrupt the wireless telephone network
and may be illegal.
Failure to observe these instructions may lead to the suspension
or denial of telephone services to the offender, or legal action, or
both.
Emergency Calls
IMPORTANT!
This phone, like any cellular phone, operates by using radio signals, cellular and landline networks, as well as user-programmed
functions which cannot guarantee connection in all conditions.
Therefore, you should never rely solely upon any cellular phone
for essential communications (e.g. medical emergencies).
Remember, to make or receive any calls, the phone must be
switched on and in a service area with adequate cellular signal
strength.
Emergency calls may not be possible on all cellular phone
networks or when certain network services and/or phone
features are in use. Check with local cellular service providers.
To make an emergency call
1) If the phone is not on, switch it on by pressing and holding
the power key.
2) Press and hold
for several seconds to ready the
phone for calls.
3) Enter the emergency number for your present location
(e.g., 911 or another official emergency number). Emergency
numbers vary by location.
4) Press
.
If certain features are in use (e.g., Keyguard), you may first need
to turn those features off before you can make an emergency call.
Consult this document and your local cellular service provider.
54
When making an emergency call, remember to give all the
necessary information as accurately as possible. Remember that
your cellular phone may be the only means of communication at
the scene of an accident - do not end the call until given
permission to do so.
Radio Frequency (RF) Signals
Your wireless handheld portable telephone is a low power radio
transmitter and receiver. When it is ON, it receives and also
sends out radio frequency (RF) signals.
In August, 1996, the Federal Communications Commission
(FCC) adopted RF exposure guidelines with safety levels for
handheld wireless phones. Those guidelines are consistent with
safety standards previously set by both U.S. and international
standards bodies:
ANSI C95.1 (1992)*, NCRP Report 86 (1986)*, ICNIRP (1996)*.
Those standards were based on comprehensive and periodic
evaluations of the relevant scientific literature. For example, over
120 scientists, engineers, and physicians from universities,
government health agencies and industry reviewed the available
body of research to develop the ANSI Standard (C95.1).
The design of your phone complies with the FCC guidelines (and
those standards).
For body worn operation, to maintain compliance with FCC RF
exposure guidelines, use only Nokia approved accessories.
When carrying the phone while it is on, use the specific Nokia
belt-clip that has been tested for compliance.
Use of non-Nokia-approved accessories may violate FCC RF
exposure guidelines and should be avoided.
*American National Standards Institute, National Council on
Radiation Protection and Measurements; International
Commission on Non-Ionizing Radiation Protection.
Using This Guide
The cellular phone described in this guide is approved for use in
AMPS networks.
A number of features included in this guide are called Network
Services. They are special services provided by cellular service
providers. Before you can take advantage of any of these
Network Services, you must subscribe to the service(s) you
require from your home service provider. You can then activate
these functions as described in this guide.
The manual activation commands for various network services
are not presented in this guide (e.g., using * and # characters for
activating or deactivating services). The phone nevertheless is
capable of handling commands given in that form. For these
commands, please consult with your service providers.
55
Care and Maintenance
Your phone is a product of superior design and craftsmanship
and should be treated with care. The suggestions below will
help you to fulfil any warranty obligations and allow you to enjoy
this product for many years.
Keep the phone and all its parts and accessories out of small
children's reach.
Keep the phone dry. Precipitation, humidity and liquids contain
minerals that will corrode electronic circuits.
Do not use or store the phone in dusty, dirty areas as its moving
parts can be damaged.
Do not store the phone in hot areas. High temperatures can
shorten the life of electronic devices, damage batteries, and
warp or melt certain plastics.
Do not store the phone in cold areas. When the phone warms
up (to its normal operating temperature), moisture can form
inside the phone, which may damage the phone's electronic
circuit boards.
Do not attempt to open the phone. Non-expert handling of the
phone may damage it.
Do not drop, knock or shake the phone. Rough handling can
break internal circuit boards.
Do not use harsh chemicals, cleaning solvents, or strong
detergents to clean the phone. Wipe it with a soft cloth slightly
dampened in a mild soap-and-water solution.
If the phone or any of its accessories are not working properly,
take them to your nearest qualified service facility. The personnel
there will assist you, and if necessary, arrange for service.
Troubleshooting
If the power does not come on or stay on
Make sure the battery is properly installed and charged.
Be sure that the contacts on the battery and the charging stand
are clean.
Battery charge may be too low for operation. Check the display
and listen for the low battery warning tones.
If the power comes on, but the phone does not work
Check the NO SVC indicator, you might be out of the cellular
service area.
Make sure that the antenna is properly installed and if your
phone has an extendable antenna, make sure that the antenna
is extended to its full length.
Check if there is an error message on the display after switching
the phone on. If so, contact your local dealer.
56
Technical Information
Weight:
7.6 oz. with Extended 800 mAh
NiCd Battery
6.7 oz. with Slim 800 mAh
NiMH Battery
Transmitting Power:
0.6 W (+ 2 dB - 4 dB)
Operating Voltage:
4.8 V (Internal Battery),
120 V (AC), 12 V (car)
Frequency Band:
824.040 - 848.970 MHz (Tx)
869.040 - 893.970 MHz (Rx)
Number of Channels:
832
Memory Locations:
40
Memory Capacity:
Alpha: 16 characters/location
Numeric: 32 digits/location
Nokia, Connecting People and the Original Accessories logos are
trademarks of Nokia Corporation and/or its affiliates.
The information contained in this User Guide was written for Nokia phone
NHA-5NA.
The right to make changes and improvements to any of the products
described in this guide without prior notice is reserved.
© 1999/2000 Nokia Mobile Phones. All rights reserved.
© 1999 TRACFONE is a registered trademark of Topp Telecom, Inc.
These commodities are authorized by the U.S. Government for export only
to Canada, Mexico, or the United States. They may not be resold, diverted,
transferred, or otherwise disposed of in any other country, either in their
original form or after being incorporated through an intermediate process
into other end-items, without the written approval of the U.S. Department
of State.
Part No. 9359048 Issue No. 6.
Printed in Canada
57
07/00
9. Nokia 1-Year Limited
Warranty
Nokia Mobile Phones, Inc. ("NMP") warrants that this cellular
phone ("Product") is free from defects in material and
workmanship that result in Product failure during normal usage,
according to the following terms and conditions:
1. The limited warranty for the Product extends for ONE (1)
year beginning on the date of the purchase of the Product.
2. The limited warranty extends to the original purchaser of the
Product ("Consumer") and is not assignable or transferable to
any subsequent purchaser/end-user.
3. The limited warranty extends only to Consumers who
purchase the Product in the United States.
4. During the limited warranty period, NMP will repair, or
replace, at NMP's option, any defective parts, or any parts that
will not properly operate for their intended use with new or
factory rebuilt replacement items if such repair or replacement is
needed because of product malfunction or failure during normal
usage. No charge will be made to the Consumer for any such
parts. NMP will also pay for the labor charges incurred by NMP
in repairing or replacing the defective parts. The limited warranty
does not cover defects in appearance, cosmetic, decorative or
structural items, including framing, and any non-operative parts.
NMP's limit of liability under the limited warranty shall be the
actual cash value of the Product at the time the Consumer
returns the Product for repair, determined by the price paid by
the Consumer for the Product less a reasonable amount for
usage. NMP shall not be liable for any other losses or damages.
These remedies are the Consumer's exclusive remedies for
breach of warranty.
5. Upon request from NMP, the Consumer must prove the
date of the original purchase of the Product by a dated bill of
sale or dated itemized receipt.
6. The Consumer shall bear the cost of shipping the Product
to NMP in Melbourne, Florida. NMP shall bear the cost of
shipping the Product back to the Consumer after the
completion of service under this limited warranty.
7. The Consumer shall have no coverage or benefits under this
limited warranty if any of the following conditions are applicable:
58
a) The Product has been subject to abnormal use, abnormal
conditions, improper storage, exposure to moisture or
dampness, unauthorized modifications, unauthorized
connections, unauthorized repair, misuse, neglect, abuse,
accident, alteration, improper installation, or other acts which
are not the fault of NMP, including damage caused by shipping.
b) The Product has been damaged from external causes
such as collision with an object, or from fire, flooding, sand, dirt,
windstorm, lightning, earthquake or damage from exposure to
weather conditions, an Act of God, or battery leakage, theft,
blown fuse, or improper use of any electrical source, or damage
caused by the connection to other products not recommended
for interconnection by NMP.
c) NMP was not advised by the Consumer in writing of the
alleged defect or malfunction of the Product within fourteen (14)
days after the expiration of the applicable limited warranty
period.
d) The Product serial number plate or the accessory data
code has been removed, defaced or altered.
e) The defect or damage was caused by the defective
function of the cellular system or by inadequate signal reception
by the external antenna.
8. If a problem develops during the limited warranty period, the
Consumer shall take the following step-by-step procedure:
a) The Consumer shall return the Product to the place of
purchase for repair or replacement processing.
b) If "a" is not convenient because of distance (more than 50
miles) or for other good cause, the Consumer shall ship the
Product prepaid and insured to:
Nokia Mobile Phones, Inc.
Attn: Repair Department
795 West Nasa Blvd.
Melbourne, FL 32901
c) The Consumer shall include a return address, daytime
phone number and/or fax number, complete description of the
problem, proof of purchase and service agreement (if
applicable). Expenses related to removing the Product from an
installation are not covered under this limited warranty.
d) The Consumer will be billed for any parts or labor charges
not covered by this limited warranty. The Consumer will be
responsible for any expenses related to reinstallation of the
Product.
59
e) NMP will repair or authorize the repair of the Product
under the limited warranty within 30 days after receipt of the
Product by NMP or an NMP authorized service center. If NMP
cannot perform repair covered under this limited warranty within
30 days, or after a reasonable number of attempts to repair the
same defect, NMP at its option, will provide a replacement
Product or refund the purchase price of the Product less a
reasonable amount for usage.
f) If the Product is returned to NMP during the limited
warranty period, but the problem with the Product is not
covered under the terms and conditions of this limited warranty,
the Consumer will be notified and given an estimate of the
charges the Consumer must pay to have the Product repaired,
with all shipping charges billed to the Consumer. If the estimate
is refused, the Product will be returned freight collect. If the
Product is returned to NMP after the expiration of the limited
warranty period, NMP's normal service policies shall apply and
the Consumer will be responsible for all shipping charges.
9. The Product consists of newly assembled equipment that
may contain used components that have been reprocessed to
allow machine compliance with Product performance and
reliability specifications.
10. ANY IMPLIED WARRANTY OF MERCHANTABILITY, OR
FITNESS FOR A PARTICULAR PURPOSE OR USE, SHALL BE
LIMITED TO THE DURATION OF THE FOREGOING LIMITED
WRITTEN WARRANTY. OTHERWISE, THE FOREGOING
LIMITED WARRANTY IS THE CONSUMER'S SOLE AND
EXCLUSIVE REMEDY AND IS IN LIEU OF ALL OTHER
WARRANTIES, EXPRESS OR IMPLIED. NMP SHALL NOT BE
LIABLE FOR SPECIAL, INCIDENTAL OR CONSEQUENTIAL
DAMAGES, INCLUDING BUT NOT LIMITED TO, LOSS OF
ANTICIPATED BENEFITS OR PROFITS, LOSS OF SAVINGS OR
REVENUE, PUNITIVE DAMAGES, LOSS OF USE OF THE
PRODUCT OR ANY ASSOCIATED EQUIPMENT, COST OF
CAPITAL, COST OF ANY SUBSTITUTE EQUIPMENT OR
FACILITIES, DOWNTIME, THE CLAIMS OF ANY THIRD PARTIES,
INCLUDING CUSTOMERS, AND INJURY TO PROPERTY,
RESULTING FROM THE PURCHASE OR USE OF THE
PRODUCT OR ARISING FROM BREACH OF THE WARRANTY,
BREACH OF CONTRACT, NEGLIGENCE, STRICT TORT, OR
ANY OTHER LEGAL OR EQUITABLE THEORY, EVEN IF NMP
KNEW OF THE LIKELIHOOD OF SUCH DAMAGES. NMP SHALL
NOT BE LIABLE FOR DELAY IN RENDERING SERVICE UNDER
THE LIMITED WARRANTY, OR LOSS OF USE DURING THE
PERIOD THAT THE PRODUCT IS BEING REPAIRED.
60
11. Some states do not allow limitation of how long an implied
warranty lasts, so the above one-year warranty limitation may
not apply to you (the Consumer). Some states do not allow the
exclusion or limitation of incidental and consequential damages,
so certain of the above limitations or exclusions may not apply
to you (the Consumer). This limited warranty gives the
Consumer specific legal rights and the Consumer may also have
other rights which vary from state to state.
12. NMP neither assumes nor authorizes any authorized service
center or any other person or entity to assume for it any other
obligation or liability beyond that which is expressly provided for
in this limited warranty including the provider or seller of any
extended warranty or service agreement.
13. This is the entire warranty between NMP and the
Consumer, and supersedes all prior and contemporaneous
agreements or understandings, oral or written, and all
communications relating to the Product, and no representation,
promise or condition not contained herein shall modify these
terms.
14. This limited warranty allocates the risk of failure of the
Product between the Consumer and NMP. The allocation is
recognized by the Consumer and is reflected in the purchase
price of the Product.
15. Any action or lawsuit for breach of warranty must be
commenced within eighteen (18) months following delivery of
the Product.
16. Questions concerning this limited warranty may be directed
to:
Customer Service, USA
Nokia Mobile Phones, Inc.
7725 Woodland Center Boulevard, Suite #150
Tampa, Florida 33614
Teléfono: 1-888-NOKIA2U (1-888-665-4228)
Usuarios de TTY : 1-800-24NOKIA (1-800-246-6542)
Fax.: (1) 813-249-9619
17. The limited warranty period for NMP supplied attachments
and accessories is specifically defined within their own warranty
cards and packaging.
© Nokia is a registered trademark of Nokia Corporation.
61
NOTES
62
Para obtener un manual del usuario en español favor
de llamar o enviar un fax al teléfono 1-888-NOKIA2U,
fax 813-249-9619.
63
64