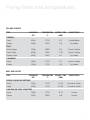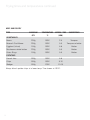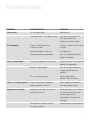
1
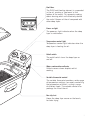
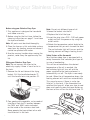
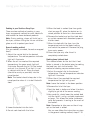
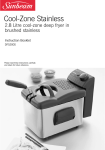
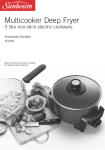
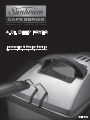
Contents
Sunbeam’s Safety Precautions
Congratulations
Features of your Stainless Deep Fryer
Using your Stainless Deep Fryer
Hints for perfect frying
Frying times and temperatures
Care and Cleaning
The Perfect Chip
Recipes
Troubleshooting
2
3
4
6
8
9
11
13
14
23
Sunbeam’s Safety Precautions
SAFETY PRECAUTIONS FOR YOUR STAINLESS
DEEP FRYER.
• Before use always ensure that the internal tank is
positioned correctly in the fryer body. ie the max/min
level should be on the left of the fryer.
• Never connect the fryer to the electricity supply
without placing oil in the tank first.
• If using solid fat, remove the lid and the basket, cut
the fat into pieces and place them directly into the
tank. Do not melt solid fat in the frying basket as it
may damage the appliance.
• Never operate the fryer with oil level below the
minimum mark or above the maximum mark.
• Do not touch any metal surfaces of the product while
it is in use as they will be hot.
• Remove excess moisture and ice particles from food
before deep frying.
• Excessive moisture in oil, can cause turbulence and
could lead to overflowing.
• Check oil levels are correct before and during deep
frying.
• Be careful when lifting lid during and after cooking.
Steam can result in serious burns. Never place face
over deep fryer.
• Never decant oil from deep fryer while still hot.
• Do not move deep fryer once it is in use.
• Only use the oils recommended in this instruction
booklet.
• To reduce moisture build, it is recommended to
leave the unit on for 5 minutes after cooking and
then allow to cool with lid off.
Sunbeam is very safety conscious when designing and
manufacturing consumer products, but it is essential
that the product user also exercise care when using
an electrical appliance. Listed below are precautions
which are essential for the safe use of an electrical
appliance:
• Read carefully and save all the instructions provided
with an appliance.
• Always turn the power off at the power outlet before
you insert or remove a plug. Remove by grasping the
plug - do not pull on the cord.
• Turn the power off and remove the plug when the
appliance is not in use and before cleaning.
• Do not use your appliance with an extension cord
unless this cord has been checked and tested by a
qualified technician or service person.
• Always use your appliance from a power outlet of the
voltage (A.C. only) marked on the appliance.
• This appliance is not intended for use by persons
(including children) with reduced physical, sensory
or mental capabilities, or lack of experience and
knowledge, unless they have been given supervision
or instruction concerning use of the appliance by a
person responsible for their safety.
• Children should be supervised to ensure that they do
not play with the appliance.
• The temperature of accessible surfaces may be high
when the appliance is operating.
• Never leave an appliance unattended while
in use.
• Do not use an appliance for any purpose other than
its intended use.
• Do not place an appliance on or near a hot gas
flame, electric element or on a heated oven.
• Do not place on top of any other appliance.
• Do not let the power cord of an appliance hang over
the edge of a table or bench top or touch any hot
surface.
• Do not operate any electrical appliance with a
damaged cord or after the appliance has been
damaged in any manner. If damage is suspected,
return the appliance to the nearest Sunbeam
Appointed Service Centre for examination, repair
or adjustment.
• For additional protection, Sunbeam recommend
the use of a residual current device (RCD) with
a tripping current not exceeding 30mA in the
electrical circuit supplying power to your appliances.
• Do not immerse the appliance in water
or any other liquid unless recommended.
• Appliances are not intended to be operated
by means of an external timer or separate remote
control system.
• This appliance is intended to be used in household
and similar applications such as: staff kitchen areas
in shops, offices and other working environments;
farm houses; by clients in hotels, motels and other
residential type environments; bed and breakfast
type environments.
If you have any concerns regarding the performance and use of your appliance, please visit www.sunbeam.
com.au or contact the Sunbeam Consumer Service Line.
Ensure the above safety precautions are understood.
2
3
Congratulations
Congratulations on the purchase of your
Sunbeam Café Series Deep Fryer.
The Sunbeam Café Series delivers quality,
style and superior performance capturing
the essence of the commercial kitchen.
Inspired by heavy-duty equipment found in
restaurants, cafés and bars, the Café Series™
is built to last. It brings together a range
of appliances designed to expertly create
authentic café food and beverages at home.
Uncompromising blends of stainless steel,
glass and die-cast alloy characterise the
range. Advanced technology and functional
design guarantee the performance of each
product will exceed expectations
Creating authentic tempura or classic
fish and chips has never been this easy
before. The Sunbeam Café Series Deep
Fryer features 2400 watts of power and a
1.25kg cooking capacity. The deep fryer has
been designed with ‘cool-zone’ technology
for healthier deep frying. The element is
suspended in the oil to create a ‘cool-zone' at
the bottom of the vessel.
This results in cleaner oil and more precise
temperature control while cooking. The
‘cool-zone’ also prevents cooking debris
from gathering around the element and
burning effectively doubling the life of the
oil. Providing a safe and simple way to cook,
the deep fryer’s basket is easily lifted in and
out of the cooking vessel by its cool touch
handle.
Cooking delicious crispy food is so easy!
3
Features of your Stainless
Deep Fryer
Lid
Allows steam to escape whilst aiding in the
filtration of oil droplets. It also has a large
viewing window to monitor your results.
Remove lid whilst food is fryer.
Reset button
Due to the safety thermostat that switches
your fryer off in case of overheating, the reset
button allows you to reset your stainless deep
fryer once the appliance has cooled down.
Basket with 1.25kg food capacity
The removable mesh cooking basket has a
1.25kg food capacity. The basket has two
frying levels and you can shake it whilst
cooking just like a commercial deep fryer.
The basket also features a cool touch handle
which folds away for easy storage.
Stainless steel tank
The large stainless steel tank holds an oil
capacity of 4.0 litres.
4
Cool-Zone
The 2400 watt heating element is suspended
in the oil, creating a ‘cool-zone’ at the
bottom of the vessel. This prevents cooking
debris burning which will effectively double
the useful lifespan of the oil compared with
other deep fryers.
Power on light
The power on light indicates when the deep
fryer is switched on.
Temperature control light
0
11
15
13
90
17
Temperature control light indicates when the
deep fryer is heating the oil.
190
Po
wer
Re
70
ady
25
30
0
11
5
Re
90
70
ady
25
30
20
5
0
Tim
10
OFF
Tim
er
15
ON
te
Co mp
ntr
ol
10
0
OFF
Po
wer
20
15
13
17
190
15
ON
te
Co mp
ntr
ol
On/off switch
The on/off switch turns the deep fryer on
and off.
er
Water condensation collector
Collects excess steam droplets whilst
cooking.
Variable thermostat control
The variable thermostat provides a wide range
of temperature settings, accurately controlling
the temperature of the oil, suiting a range
of different foods. The variable control also
prolongs the life of the oil.
Non slip feet
Keeps the deep fryer secure on the bench,
for safer frying.
5
Using your Stainless Deep Fryer
Note: All parts must be dried thoroughly.
3.Place the fryer on a flat and stable surface
away from any heating source and where it
cannot be splashed with water.
4.Use the carrying handles when moving the
product, never carry the appliance by the
lid.
Filling your Stainless Deep Fryer
Note: Do not connect the fryer to the
electricity supply if there is no oil or fat in
the tank.
1.Remove the lid and take out the frying
basket. Pull the handle backwards ➀
until the handle locks into position ➁.
➀
➁
3.Lower the basket into the oil.
4.Replace the lid of the fryer.
5.Insert the plug into a 230 - 240 volt power
outlet and turn the power on by using the
on/off switch.
6.Rotate the temperature control knob to the
temperature that you wish to cook the food.
The red indicator light will turn on and the
heating element will begin heating the oil.
Safety Feature of the thermostat
Your stainless deep fryer is equipped with a
safety thermostat that switches your fryer off
in case of overheating.
This will be activated when the desired
temperature of the oil is reached, the
red indicator light will turn off and the
power supplied to the heating element is
automatically cut off. The fryer is now ready
to cook. When the oil temperature drops, the
heating element will switch on automatically.
This may also occur if there is no (or too
little) oil in the tank. If the thermostat has
switched the fryer off, allow your fryer to cool
down and carefully press the reset button on
the front of the unit on the left hand side ➂.
15
13
17
190
0
11
2.Before using for the first time, follow the
cleaning instructions on page 11 and clean
the fryer and basket.
Note: Do not mix different types of oil.
90
Before using your Stainless Deep Fryer
1.This appliance is designed for household
and indoor use only.
Po
wer
Rea
70
dy
25
30
6
F
5
➂
0
OF
Tim
er
10
2.Pour good quality vegetable, nut or seed oil
into the oil tank until it reaches between
the ‘MIN’ and ‘MAX’ marks indicated
on the inside of the stainless steel tank.
Never operate the fryer without oil or with
insufficient oil in the tank.
20
te
Co mp
ntr
ol
15
ON
Using your Sunbeam Stainless Deep Fryer continued
Cooking in your Stainless Deep Fryer
There are two methods of cooking in your
fryer; one general method for most foodstuffs
and another for home battered products.
Note: During cooking, steam will build up in
the fryer, so when lifting the lid use a kitchen
glove or mitt to protect your hand.
General cooking method
(For pre-cooked, crumbed, floured or wrapped
food.)
1.Adjust the control dial to the desired
temperature. The red temperature indicator
light will illuminate.
5.When the food is cooked (see time guide
chart on page 9), place the basket on its
raised position to drain for a few seconds.
6.Remove the basket and put the fried food
on a plate covered with absorbent paper or
kitchen towel.
7.When finished with the fryer, turn the
temperature knob to the lowest setting
and switch the power off. Remove the plug
from mains power.
8.Clean the fryer only after the oil is
completely cooled down.
Cooking home battered food
2.When the oil has reached the required
temperature, the green ready light will
illuminate. Remove the lid, lift the basket
and put it on the rest ➃ so that it is not
in contact with the oil. Place the food,
(should be as dry as possible) into the
raised basket.
This method allows for the fact that if wet
batter is placed in the basket prior to cooking
the food may stick to the basket. This
method of cooking requires extreme care.
Note: The basket should always be in the
raised position when it is to be filled with
food.
2.When the oil has reached the required
temperature the light will go out.
1.Adjust the control dial to the desired
temperature. The red temperature indicator
light will illuminate.
Note: Leave the basket in the down position.
3.Remove the lid of the fryer.
➃
4.Coat the food in batter and allow it to drain
slightly to get rid of the excess coating.
5.Very carefully, slowly lower the coated food
into the hot oil, using a suitable implement
or tongs. This allows the batter to become
solid and prevents it sealing to the mesh of
the basket.
3.Lower the basket into the tank.
4.Do not cook food with the lid on.
Note: Remember to take care as the oil may
spit as the food is added.
You can now follow the instructions as given
in the general cooking method, steps 4 - 8.
7
Hints for perfect frying
1. Never use the fryer without oil.
2. Always use the best quality oil possible.
We recommend corn, nut, seed or light
olive oil. Never use butter, margarine or
regular olive oil or extra virgin olive oil.
8
6. Large pieces of food should not be deep
fried, as they take to long to cook thus
absorbing too much oil.
3. Avoid mixing oils of different qualities or
types.
7. Fry small amounts at a time, adding too
much at a time will decrease the oils
temperature and increase the chance that
food will stick together.
4. Change the oil when it becomes brown or
milky in colour.
8. Make sure that food is dry before frying,
wet food will splatter.
5. Take into account the food to be cooked
before setting the frying temperature. As
a general guide precooked food will need
a higher temperature than raw food, and
the larger the individual items the lower
the temperature should be.
9. Always dry or roll wet food in flour before
coating in a batter. Otherwise the extra
steam created will separate the coating
from the food.
10.Preheat the oil with the lid on.
11.Remove lid whilst cooking.
Frying times and temperatures
FISH AND SEAFOOD
Type
MAXIMUM
QTY
TEMPERATURE APPROX. TIME
°C
(min)
SUGGESTIONS
PRAWNS
Fresh
600g
170C
5-7
Crumb/batter
Frozen
600g
190C
3-5
Fry frozen
Small pieces
400g
180C
3-5
Crumb / batter
Fresh fillets
600g
160C
7-10
Crumb / batter
Frozen fillets
600g
160C
5-7
Fry frozen
Fresh
500g
170C
5-7
Crumb / batter
Frozen
500g
170C
3-5
Fry frozen
FISH
CALAMARI
Meat and poultry
Type
MAXIMUM
QTY
TEMPERATURE APPROX. TIME
°C
(min)
SUGGESTIONS
Fresh chicken portions
Small
400g
170C
10-15
Crumb or batter
Large
600g
170C
15-20
Crumb or batter
Chicken or Veal Schnitzel
Fresh
250g
170C
5-10
Crumb
Frozen
250g
180C
3-8
Crumb
9
Frying times and temperatures continued
Meat and poultry
Type
MAXIMUM
QTY
TEMPERATURE APPROX. TIME
°C
(min)
SUGGESTIONS
VEGETABLES
Beans
200g
180C
2-4
Tempura
Broccoli /Cauliflower
250g
180C
3-5
Tempura or batter
Eggplant (slices)
150g
180C
4-6
Batter
Mushrooms whole button
200g
180C
3-5
Batter
Onion Rings
150g
180C
3-5
Batter
500g
180C
4-6
Potatoes
French fries
Chips
500g
180C
5-10
Wedges
500g
190C
10-15
Always blanch potato chips at a lower temp. Then brown at 190ºC.
10
Care and Cleaning
Care and Cleaning
Cleaning should only be carried out when the
fryer is switched off and the plug removed
from the socket. Your fryer should have
completely cooled.
➀
Lid and permanent filter
Your stainless deep fryer features a
permanent filter that we advise you to clean
at regular intervals. Either put the entire
lid into the dishwasher or into hot soapy
water and let it soak there for 5-10 minutes.
Shake the remaining water out of the lid and
let it dry.
➁
110
70
25
er
Tim
OFF
15
20
10
90
er
Pow
On
ON
5
p
Temtrol
Con
13
0
19
The basket and its handle can be hand
washed in warm soapy water. It should be
thoroughly dried afterwards. When the oil has
completely cooled, the tank of your fryer can
be removed for cleaning by following these
instructions:
Oil dy
Rea
150
0
170
30
Basket, handle and removable tank
➂
1.Remove the lid ➀, frying basket ➁ and
control unit ➂ from the stainless steel
tank ➃.
2.Remove the stainless steel tank from its
shell by placing your finger tips under the
rim of the tank.
3.Once removed, drain the oil contained in
the tank through a funnel into a suitable
container.
➃
Note: Never pour used oil down sink.
4.The fryer body can be washed by hand
in hot soapy water and the oil tank in a
dishwasher.
5.Dry the tank thoroughly and replace it in
the body of your fryer.
11
Care and Cleaning continued
Always make sure that the tank is completely
dry before you put it back into your fryer.
Note: You may store your filtered oil in the
fryer if you make sure that it is covered by
the lid.
The control unit
1.Remove the control unit and heating
element.
12
Never immerse the control unit in water or
any other liquid.
2.Clean with a damp cloth or kitchen paper.
Ensure that the wires connected to the
heating element are not damaged whilst
cleaning.
The Perfect Chip
• For perfect fries and wedges, old potatoes
are ideal. The potato should be of a low
starch, waxy variety i.e. Sebago, Russet
Burbank, Spunta, King Edward, Bintje.
• Make sure that the chips are cut to even
size to guarantee even cooking.
• The cut chips should be rinsed under
running water until the water runs
clear. This removes excess starch from
the potatoes, the starch burns at high
temperatures.
• Dry on kitchen towel before frying.
• Remove the lid whilst cooking.
• Shake the basket at short intervals to
encourage even browning and to stop
chips sticking together.
• Cooking times will vary depending on the
size of your fries or chips and the variety
of the potato used.
Please Note: If cooking 1kg of homemade
raw potato chips, it is recommended that
only 3.5 litres of oil is used.
Hints for cooking the perfect frozen chip.
• Do not defrost frozen pre-cooked chips.
For the best results they should be taken
directly from the freezer to the fryer.
• Heat oil to the maximum setting, 190°C.
• For best results for frozen chips refer to
chip packet.
• Allow chips to drain for a moment before
removing from the basket and seasoning.
• Homemade fries are double cooked.
The first fry blanches the chips so that
they cook through. The second fry colours
the chips and gives them a crisp crust.
Use the table below as a guide.
1St Fry (blanch)
2nd fry
Thin fries - french fries
140°C
5 min
190°C
5 min
Thick chips
140°C
7-8 min
190°C
7-8 min
Wedges
140°C
10 min
180°C
10 min
Allow oil to heat up to 2nd temperature before re-immersing the basket in the hot oil.
13
Recipes
For perfect batter
1. Always sift all dry ingredients, then add
liquids. Mix until smooth.
Tempura batter
½ cup plain flour
2. Keep your batter as cold as possible (it
will be crisper).
1 teaspoon bicarb soda
3. Coat food in seasoned flour before batter,
the batter will stick to the food better.
1 egg
4. Fry until golden brown.
5. Always use the 'Cooking Home Battered
Food' technique, see page 8 for more
information.
Beer batter
1 cup plain flour
¼ cup rice flour
1 cup soda water (ice cold)
Note: It’s very important to keep this batter
cold. A good tip is to chill all ingredients
before use.
Easy crispy coating
1 egg
1 tablespoon water or milk
½ teaspoon baking powder
1 cup rice flour or cornflour
pinch salt
pinch of salt/pepper
¾ cup cold beer
Crispy sesame batter
1 cup cornflour
2 eggs
¹/³ cup water (cold)
2 tablespoon sesame seeds
Sweet fritter batter
1 egg
²/³ cup milk
1 cup self raising flour
1 tablespoon sugar
1 tablespoon melted butter or margarine
14
1. Beat egg and water or milk. Season flour
with salt and pepper.
2. Dip food in egg mix and then coat with
flour.
3. Deep fry at 170ºC to 190ºC depending on
size of foodstuff, until crispy, this coating
will not colour much.
Recipes continued
Prawn cutlets
750g green king prawns
4. Drain. Serve with sweet and sour sauce
and fried or steamed rice if desired.
plain flour
1 egg, lightly beaten
Calamari
500g squid, washed and cleaned
2 cups fresh breadcrumbs
½ cup plain flour
lemon wedges to serve
1 egg, lightly beaten
1. Peel and devein prawns, leaving tails
intact. Dry thoroughly.
1 cup dried breadcrumbs
2. Coat prawns in flour, then egg, then
breadcrumbs. Shake off excess crumbs.
3. Heat the oil to 180ºC and fry cutlets for
4-5 minutes until golden brown.
4. Drain and serve immediately with lemon
wedges.
Deep fried pork balls
500g minced pork
Makes 14 to 16 balls
2 tablespoon plain flour
2 tablespoon cornflour
1 tablespoon soy sauce
1 teaspoon garlic salt
1 teaspoon ground black pepper
1 egg, lightly beaten
1. Remove the insides and head of the squid.
Wash and dry thoroughly.
2. Cut the squid tubes into 1cm rings.
3. Coat the squid pieces in flour, egg and
then breadcrumbs.
4. Heat the oil to 170ºC and fry the squid
until golden brown.
5. Drain and serve immediately with tartare
sauce and lemon wedges.
Tartare Sauce
250ml of good quality mayonnaise with
1 tablespoon chopped tarragon and parsley,
a ½ tablespoon of capers and 1 tablespoon
of chopped gerkins. Season with salt and
pepper to taste.
1. Combine all ingredients in a large bowl,
mix thoroughly. Picking up mixture; slap
against the side of the bowl until the mix
seems more elastic or sticky. This should
only take a few slaps.
2. Shape mixture into 4cm balls.
3. Heat oil to 180ºC. Place pork balls in
the basket 5-6 at a time, cook for 8-10
minutes until golden brown.
15
Recipes continued
Dim Sims
125g small green prawns, shelled and
deveined
Spring Rolls
Makes about 24 rolls
500g green prawns, shelled and deveined
500g minced pork
½ small head of cabbage, thinly shredded
100g cup chopped bamboo shoots
230g can of water chestnuts, drained and
finely chopped
100g cup chopped water chestnuts
1 onion, finely chopped
1 tablespoon sherry
1 tablespoon soy sauce
1 teaspoon salt
pinch pepper
40 gow gee wrappers
500g minced pork
125g fresh shitake mushrooms, roughly
chopped
1 green capsicum, seeded and finely
chopped
1 onion, finely chopped
2 tablespoon dry sherry
2 tablespoon soy sauce
1. Finely chop prawns and combine with
pork.
1 teaspoon sugar
2. Add all other ingredients and mix well to
combine.
¼ teaspoon ground ginger
3. Place 1 heaped teaspoon of pork mixture
onto the centre of each wrapper and
gather the sides of the wrapper around the
filling, leaving a small opening at the top.
4. Heat the oil to 180ºC and deep fry about
10 at a time, until golden brown, about
4-5minutes.
5. Drain and serve with sweet and sour sauce
if desired.
½ teaspoon salt
455g packet spring roll wrappers
1 egg, lightly beaten with 2 tablespoons
water
1. Finely chop prawns and combine with
pork.
2. Add cabbage, water chestnuts,
mushrooms, capsicum, onion, sherry,
soy, sugar, salt and ginger. Mix well to
combine.
3. Place 2-3 tablespoons of the mixture in
the corner of a spring roll wrapper. Roll
the wrapper folding in the sides to encase
the filling.
4. Brush a little egg mix on the end of
wrapper to help it seal.
5. Heat oil to 180ºC, deep fry until golden
brown, about 5 minutes.
6. Drain and serve with dipping sauce.
16
Recipes continued
Minted pea wontons
3 medium potatoes, peeled and cut into
2cm dice
1 onion, peeled and finely chopped
2 teaspoon oil
1 teaspoon ground cumin
220g can peas
¼ cup mint, chopped
125g wonton wrappers
1. Boil the diced potato until just cooked.
Drain.
2. In a saucepan cook onion in oil until soft
add cumin and peas and rough mash.
Remove from heat.
3. Add potato and mint. Stir to combine.
4. Place about 2tsp of mix onto each wonton
wrapper and bring edges together. Seal
with a light brush of water.
5. Heat fryer to 190ºC, and deep fry until
golden brown, about 3-4 minutes.
6. Serve with minted yoghurt if desired.
Southern fried chicken Makes 4 - 6 servings
750g chicken drumsticks
½ cup flour
½ teaspoon salt
½ teaspoon hot paprika (optional)
1 egg, beaten with 2 tablespoons water
1 cup dried breadcrumbs
1. Mix flour with salt and paprika. Dry
drumsticks and coat in seasoned flour.
2. Dip each drumstick into egg mixture
separately and coat in breadcrumbs.
3. Heat oil to 170ºC
4. Place 3 - 4 drumsticks into the basket
at a time and fry till cooked through and
golden, about 15 to 20 minutes.
5. Drain well and keep hot while other pieces
are cooking.
Classic Buffalo Wings
Makes 32 wings
16 small chicken wings
¹/³ cup Maggi hot chilli sauce
80g butter, melted
Blue cheese dressing or
Ranch dressing for dipping
1. Cut tips from chicken wings and discard.
Cut wings in half at joint.
2. Heat oil in fryer to 190°C.
3. Combine the chilli sauce and butter and
whisk through to combine.
4. Deep fry wings in batches until wings are
crisp and cooked through. Drain well.
Keep wings warm while cooking remaining
batches.
5. Place wings in a large bowl and toss
through chilli sauce.
6. Serve wings with blue cheese or ranch
dressing.
17
Recipes continued
Potato dumplings
60g butter
Makes approx. 25-30
1¼ cups water
1 teaspoon salt
1 cup plain flour, sifted
3 eggs
4 medium potatoes, peeled, cooked and
mashed.
1. Place butter, salt and water into a
saucepan and bring to the boil.
2. Add the sifted flour all at once and stir
vigorously with a wooden spoon over a low
to medium heat, until the dough forms
and pulls away from the edges of the pan.
Remove from heat and set aside to cool
for 5 minutes.
3. Add eggs one at a time to the dough,
beating well between additions. The dough
should look smooth and shiny.
4. Add mash to dough and beat mixture until
smooth.
5. Heat fryer to 170ºC.
6. Using two spoons scoop heaped balls of
mixture into the fryer basket. Deep fry
about 8 at a time for 4-5 minutes, and
golden brown.
Fried Cheese Scones
Filling
2 leeks, finely sliced
20g butter
100g grated gruyére or cheddar cheese
1 egg
¼ cup cream
salt and pepper
Dough
30g butter, diced
1½ cups self-raising flour
½ teaspoon s alt
¾ cup milk
1. F
or filling. Saute leeks in butter until soft.
Remove from the heat and mix through
cheese, egg, and cream. Season and set
aside to cool.
2. F
or Dough. Place butter, flour and salt
in a bowl and rub the mixture between
fingertips until it resembles fine
breadcrumbs. Add milk and bring dough
together.
3. T
urn dough out onto a floured bench and
knead lightly for 2-3 minutes.
4. T
ake about 2 tablespoons of the dough at
a time and work into a flat circle. Place 1
teaspoon of the filling in the centre and
work edges together, pinching to seal. Be
careful to keep the thickness of the dough
as even as possible.
5. H
eat oil to 160ºC, frying about 8 at a time
until puffy and golden.
6. Drain and serve hot.
18
Recipes continued
Fried Mozzarella Sticks
185g Mozzarella cheese
2 tablespoons milk
¼ cup plain flour
1 egg, lightly beaten
1 cup Japanese breadcrumbs
sea salt and freshly ground black pepper
1 ½ cups Italian tomato sauce
1. Heat oil in a wok, add ginger, garlic,
onions and sesame seeds. Stir fry for 1
minute, add oyster sauce. Remove from
heat set aside to cool.
1. Cut Mozzarella into 1½ cm thick sticks.
4. Glaze with remaining egg and sprinkle
lightly with extra sesame seeds.
2. Dip the sticks into the milk then flour;
shake off excess.
3. Dip sticks into the egg then coat into the
flour seasoned with salt and pepper.
4. Place coated sticks onto a tray and place
into the freezer for about 25 minutes.
5. Heat oil to 170°C. Deep fry for about 30
seconds or until the crumbs are golden;
drain on absorbent paper.
2. Cut 8 – 2cm (squares) from pastry sheets.
3. Place a tablespoon of onion mixture into
each square, glaze edges with egg. Bring
the four corners to the centre and pinch
edges to seal.
5. Heat oil to 180ºC and fry till golden
brown, about 4 minutes.
Meat fritters
1 cup self raising flour
salt and pepper
1 egg
2 tablespoons oil
6. Serve with warmed tomato sauce.
¼ cup water
Note: Japanese breadcrumbs are available
from Asian grocers or good supermarkets.
½ – ¾ cup milk
Green onion and sesame puffs
1 tablespoon vegetable oil
1 teaspoon fresh grated ginger
1 clove garlic crushed
12 green onions, sliced
½ cup sesame seeds
2 tablespoon oyster sauce
2 sheets ready rolled shortcrust pastry
1 egg yolk, beaten
extra sesame seeds
Makes 12 fritters
2 cups cooked, diced leftover meat (beef,
pork, lamb, chicken)
1 onion, chopped finely
1. Place the flour, salt and pepper into a
small mixing bowl. Add egg, oil and water,
mix till smooth.
2. Beat in milk as required to form a loose
batter. Add meat and onion.
3. Heat oil to 160ºC. Spoon batter into the
hot oil. Cook until golden brown, about 5
minutes.
4. Drain and serve with reheated leftover
gravy.
19
Recipes continue
Meatballs
750g minced topside steak
Makes about 18
Felafel
1½ cup dried chickpeas, washed and soaking
1 onion, chopped
1 onion chopped
½ cup breadcrumbs
½ teaspoon chilli powder
2 tablespoons chopped parsley
1 teaspoon cumin, ground
½ teaspoon salt
½ teaspoon coriander, ground
½ teaspoon pepper
2 cloves garlic, crushed
½ teaspoon dried mixed herbs
3 teaspoons lemon juice
2 teaspoons Worcestershire sauce
¼ cup chopped parsley
1 egg, lightly beaten
½ cup besan flour (chickpea)
1. Combine meat, onion, breadcrumbs,
parsley, seasoning, herbs and
Worcestershire sauce.
1 egg
2. Add enough egg to bind mixture together.
2. Place chickpeas in a saucepan with 1 litre
of water, simmer for 1 hour. Drain well.
3. Shape the mixture into 25mm balls,
refrigerate meatballs for 1 hour.
4. Heat oil to 160ºC
5. Fry for 6-7 minutes, till golden. Drain and
serve with a spicy dipping sauce.
Potato crisps
4 potatoes, washed and peeled
2 cups water, salted
1. Cut potatoes into wafer thin slices. Place
the slices into the salted water and allow
to stand for 1-2 hours.
2. Drain potatoes and dry thoroughly.
3. Heat oil to 180ºC and fry a small quantity
at a time, shaking frequently during
cooking. Cook for 3-4 minutes.
4. Drain and serve hot or cold, sprinkle with
salt if desired.
20
1. Soak chickpeas overnight, drain. Rinse
well.
3. Blend the chickpeas with the rest of the
ingredients in a food processor. Chilli
mixture.
4. Heat oil to 160ºC. Shape felafel into
4cm balls and fry 8- 10 at a time for 3-4
minutes.
5. Sever hot or cold with hummus and
Lebanese bread.
Recipes continued
pinch of salt
Apple fritters
Serves 4
2 apples, peeled and sliced into 5mm thick
rings.
pinch of pepper
½ cup plain flour
1 egg, lightly beaten
Fritter batter (see page 14)
¹/³ cup milk
2 tablespoons caster sugar
Corn fritters
¾ cup self raising flour
Makes about 12
300g can of corn kernels, drained
½ teaspoon ground cinnamon
1. Sift flour, salt and pepper into a bowl.
ice cream to serve
2. Combine egg and milk.
1. Heat oil to 170ºC.
3. Using a mixer, gradually add milk mix to
the dry ingredients and beat until smooth.
Add corn to mix.
2. Coat apple slices in flour and then dip in
batter. Fry for 4-5 minutes and golden.
4. Heat the oil to 180ºC. Drop batter by the
tablespoonful into the hot oil and fry till
golden, about 5-7 minutes.
3. Drain and toss in cinnamon sugar. Serve
with ice cream.
Strawberry stack
12 wonton wrappers
Serves 4
Kofte Potatoes
500g potatoes, cooked and mashed
1 cup thickened cream
2 eggs
½ teaspoon vanilla extract
¹/³ cup desiccated coconut
250g punnet strawberries, hulled and halved
1 cup grated Parmesan cheese
icing sugar to dust
salt and pepper
1. Heat oil to 180ºC
2 tablespoon flour
2. Fry wonton wrappers, a couple at a time,
until just coloured. Drain on absorbent
paper.
2 eggs, lightly beaten
1 cup dried breadcrumbs
1. Combine the first five ingredients.
2. Coat 1 tablespoon of the mixture in flour,
then egg mix and then in breadcrumbs.
Repeat with remaining mixture.
2 tablespoons sugar
3. To serve stack crispy wrappers with
strawberries, and sweetened whipped
cream. Dust top with icing sugar.
3. Heat oil to 170ºC and fry 6 - 8 at a time
till golden, about 4-5 minutes.
NOTE: for something different use sweet
potato or pumpkin in place of the potato.
21
Recipes continued
Buttermilk doughnuts
2 teaspoons dry yeast
1 ¼ cups buttermilk
¼ cup caster sugar
4 cups plain flour
1 teaspoon salt
¼ cup light olive oil
2 eggs, lightly beaten
Cinnamon sugar
1 cup caster sugar
2 teaspoons ground cinnamon
1.In a small bowl, whisk the yeast into the
warmed buttermilk with 1 tablespoon of
the sugar. Mix well and stand in a warm
place for 1 minutes or until the mixture
begins to bubble.
2.Sift the remaining sugar, flour and salt
into a large bowl. Make a well in the
centre and mix through the oil, eggs and
yeast mixture. Mix to a soft dough.
3.Place mixture onto a lightly floured
surface and knead dough for about 10
minutes or until dough is smooth and
elastic.
22
4.Place dough in a bowl; cover, and stand
in a warm place for about 40 minutes or
until dough has doubled in size.
5.Turn dough onto a lightly floured surface
and knead again for about 5 minutes
or until smooth and elastic. Roll dough
out to a 1 cm thickness for a thinner
doughnut or to a 1½ cm thickness for a
thicker doughnut. To cut doughnuts use
either a doughnut cutter or a 9cm cutter
and a 3cm cutter. Place doughnuts onto
a tray lined with baking paper and cover
with plastic wrap, stand in a warm place
for about 20 minutes.
6.Heat oil to 160°C. Cook doughnuts, in
batches, turning once during cooking,
until golden in colour.
7.Drain doughnuts on absorbent paper then
toss in cinnamon sugar mixture.
Troubleshooting
problem
Possible cause
Solution
Strong smell
Oil has gone bad.
Replace oil.
The correct oil is not being used.
Use only high quality oil.
Do not mix oils of a
different quality or type.
Oil overflowing
Fryer is filled above the maximum level.
Check oil level on the inside
of fryer.
Wet food placed in hot oil.
Dry food first.
Stated quantities exceeded.
Do not fry food above the
weight indicated.
Food is not browning
Cooking temperature is too low.
Adjust the dial to the correct
cooking temperature.
Basket is overloaded.
Do not fry food above the
stated quantities and
weights.
Oil is not hot enough.
Faulty thermostat.
Consult Service Centre.
Chips are sticking together Food not washed thoroughly before placed in the oil.
Wash potatoes thoroughly
and dry before frying.
Appliance not working
Appliance has been turned on
without fat or oil.
Allow the fryer to cool down,
fill with oil and press the
reset button that is
concealed at the back of
the fryer.
Choose cooking temperature.
Temperature control dial not at correct setting.
23
Notes
24
12 Month Replacement Guarantee
In the unlikely event that this appliance develops any malfunction
within 12 months of purchase (3 months commercial use) due
to faulty materials or manufacture, we will replace it for you free
of charge.
Should you experience any difficulties with
your appliance, please phone our customer
service line for advice on 1300 881 861 in
Australia, or 0800 786 232 in New Zealand.
Alternatively, you can send a written claim
to Sunbeam at the address listed below.
On receipt of your claim, Sunbeam will
seek to resolve your difficulties or, if the
appliance is defective, advise you on how
to obtain a replacement or refund.
Your Sunbeam 12 Month Replacement
Guarantee naturally does not cover misuse
or negligent handling and normal wear and
tear.
Similarly your 12 Month Replacement
Guarantee does not cover freight or any other
costs incurred in making a claim. Please
retain your receipt as proof of purchase.
The benefits given to you by this guarantee
are in addition to your other rights and
remedies under any laws which relate to the
appliance.
Our goods come with guarantees that cannot
be excluded under the Australian Consumer
Law and under the New Zealand Consumer
Guarantees Act.
In Australia you are entitled to a
replacement or refund for a major failure and
for compensation for any other reasonably
foreseeable loss or damage. You are also
entitled to have the goods repaired or
replaced if the goods fail to be of acceptable
quality and the failure does not amount to
a major failure.
Should your appliance require repair or
service after the guarantee period, contact
your nearest Sunbeam service centre.
For a complete list of Sunbeam’s authorised
service centres visit our website or call:
Australia
www.sunbeam.com.au
1300 881 861
Units 5 & 6, 13 Lord Street
Botany NSW 2019 Australia
New Zealand
www.sunbeam.co.nz
0800 786 232
26 Vestey Drive, Mt Wellington
Auckland, New Zealand
Need help with your appliance?
Contact our customer service team or visit
our website for information and tips on
getting the most from your appliance.
In Australia
Visit www.sunbeam.com.au
Or call 1300 881 861
In New Zealand
Visit www.sunbeam.co.nz
Or call 0800 786 232
is a registered trademark.
Made in China.
Due to minor changes in design or otherwise,
the product may differ from the one shown in this leaflet.
© Copyright. Sunbeam Corporation Limited 2004.
ABN 45 000 006 771
Sunbeam Corporation is a division of GUD Holdings Ltd.
Units 5 & 6, 13 Lord Street
Botany NSW 2019 Australia
Unit 3, Building D
26 Vestey Drive
Mt Wellington Auckland
New Zealand
Sunbeam Corporation is a division of GUD Holdings Ltd.
08/11