1
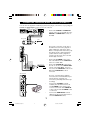
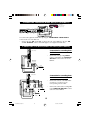
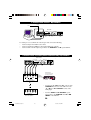
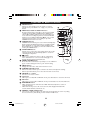
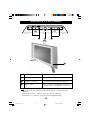
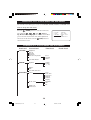
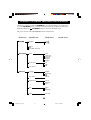
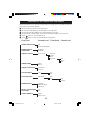
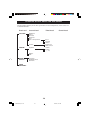
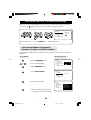
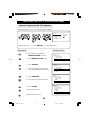
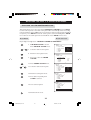
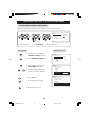
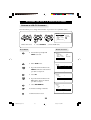
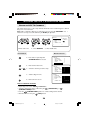
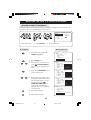
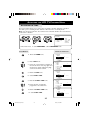
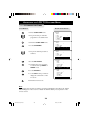
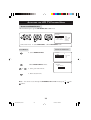
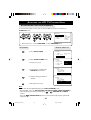
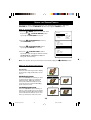
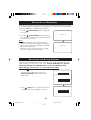
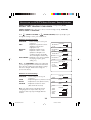
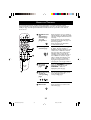
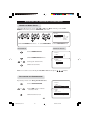
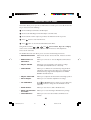
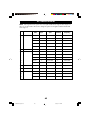
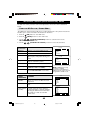
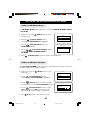
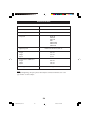
LCD TV
15PF9936
Operating Instructions
15PF9936/69 p1
1
4/7/03, 12:53 PM
TABLE OF CONTENTS
Safety Information/Precaution ................................................................................................ 3
Hooking Up Your TV Use / Care of Remote Control ....................................................4
Checking the Supplied Accessories ....................................................................................... 5
Dressing the Cables .................................................................................................................. 5
Monting Procedures for LCD TV........................................................................................... 6
Connecting the Audio/Video Sockets (Playback) /(Recording) ...................................... 7 – 8
Connecting the Audio Equipment, Amplifier and Subwoofer ......................................... 9
Connecting the Headphone .................................................................................................... 9
Connecting the FM Radio Mains ............................................................................................ 9
Connecting the PC Equipment ............................................................................................... 10
Connecting the HD (High Definition) Equipment ..............................................................10
Functions of Remote Control .................................................................................................11 – 12
Functions of TV Top Controls ............................................................................................... 13
Accessing the TV Main Menu and Sub-Menus......................................................................14
Overview of TV Main Menu and Sub-Menus .......................................................................14 – 15
Overview of FM Radio Main Menu and Sub-Menus ...........................................................16
Overview of PC Main Menu and Sub-Menus .......................................................................17
Overview of HD Main Menu and Sub-Menus ......................................................................18
Accessing the TV Installation Menu
Choosing the Menu Language and Automatic Tuning of LCD TV Channels ..............19
Manual Tuning of LCD TV Channels ................................................................................... 20
Selecting the Colour/Sound System........................................................................................21
Fine Tuning of LCD TV Channels ..........................................................................................22
Sorting of LCD TV Channels .................................................................................................23
Editing of LCD TV Channels ..................................................................................................24
Naming of LCD TV Channels ................................................................................................25
Using the LCD TV Picture/Sound Menu ...............................................................................26
Accessing the TV Features Installation Menu
Activating the Timer...................................................................................................................27 – 28
Using the Mode Select ..............................................................................................................29
Activating the Child Lock..........................................................................................................30 – 33
Using the Screen Formats ........................................................................................................34
Activating the Sleeptimer.......................................................................................................... 35
Activating the Active Control .................................................................................................35
Activating the TV Smart Picture /Sound Control .............................................................. 36
Using the Teletext...................................................................................................................... 37 – 38
Accessing the FM Radio Installation Menu
Language, Auto Store, Manual Store, Sort, Name ............................................................. 39
Using the FM Radio Sound Menu............................................................................................ 40
Using the FM Radio Smart Sound Control........................................................................... 40
Accessing the FM Radio Features Menu
Activating the Timer...................................................................................................................41
Using the Mode Select ..............................................................................................................42
Activating the Screensaver........................................................................................................42
Accessing the PC Mode ............................................................................................................43
PC Display Setup.........................................................................................................................44
Using the PC Picture-in-Picture Feature............................................................................... 44
PC Modes Support .....................................................................................................................45
Accessing the HD (High Definiton) Mode
Using the HD Picture/Sound Menu ........................................................................................46
Using the HD Mode Select ......................................................................................................47
Using the HD Lock Channel ....................................................................................................47
Before Calling Service (TV Mode) ......................................................................................... 48
Before Calling Service (PC / FM Radio Mode) ....................................................................49
Specifications................................................................................................................................50
2
15PF9936/69 p2-6
2
4/7/03, 12:54 PM
SAFETY INFORMATION
•
–
–
–
–
Disconnect mains plug when :
the red light below the TV screen is flashing continuously.
cleaning the TV screen. Never use abrasive cleaning agents.
there is a lightning storm.
the set is left unattended for a prolonged period of time.
• No naked flame sources, such as lighted candles, should be placed on top of the TV or
in the vicinity.
• Do not place your TV set under direct sunlight or heat.
• Leave at least 5 cm around each side of TV set to allow for proper ventilation.
• Avoid placing your set (e.g. near the window) where it is likely to be exposed to rain or
water.
• No objects (such as vases) filled with liquids should be placed on top the TV so as to avoid
dripping or splashing of liquids on the set.
PRECAUTION
• Do not shift or move the set around when it is switched on.
• Do not connect AC/DC adaptor to your set that does not originally comes with the set.
Only use recommended part that is approved by Philips manufacturer.
• Caution : Do not use cover or enclose the AC/DC adaptor with any objects like a cloth or
box which might shorten the life time of the equipment.
• Do not touch, push or rub the surface with hard object.
• When the surface becomes dusty, wipe gently with absorbent cotton or other soft materials
like chamois, soak with petroleum benzene. Do not use acetone, toluene and acohol as it
causes chemical damage to the polarizer.
• Wipe off saliva or water droplets as soon as possible. Long time contact with polarizar
causes deformations and colour fading.
• Be careful of condensation at sudden temperature change. Condensation does damage to
polarizar or electrical contact parts. After condensation fades, smear or spot will occur.
Recycling Directive – To minimise harm to the environment, the batteries
supplied with the TV set do not contain mercury or nickel cadmium. If possible,
when disposing of batteries, use recycling means available to you.Your TV set
uses materials which are reusable or which can be recycled.To minimise the
amount of waste in the environment, specialist companies recover used sets
for dismantling and collection of reusable materials (contact your dealer).
3
15PF9936/69 p2-6
3
4/7/03, 12:54 PM
HOOKING UP YOUR TV (BASIC CONNECTION)
Ñ
Positioning of the TV set
É
5 cm
5cm
5 cm
Ñ
Ñ É
É
• Place your TV set on a solid base, strong enough to
withstand the weight of the set.
• Leave a space of at least 5 cm around each side of the
TV set to allow for proper ventilation.
ª Do not place TV set near a radiator or other sources
of heat.
• Do not place TV set where it can be exposed to rain
or excessive moisture.
Antenna Connection
• Connect the aerial plug to the antenna socket ¬
on the backcover.
Mains Connection
• Insert the mains plug into the wall socket. For correct
mains voltage, refer to type sticker at the rear of the
adaptor.
• Consult your dealer if mains supply is different.
Note : This diagram is not representative of the actual
plug and socket.
Switching on the Set
• Press the main power button on the top controls
to switch on/off the TV.
• If the set is on standby (indicator is red), press the
Power button on the remote control to switch on
set.
USE/CARE OF REMOTE CONTROL
• Insert the correct type of batteries into the
compartment.
• Ensure the batteries are placed in the right
direction.
4
15PF9936/69 p2-6
4
4/7/03, 12:54 PM
CHECKING THE SUPPLIED ACCESSORIES
The following accessories are supplied together with the LCD set.
MO
VCR D
DV
DE
æ
v
SM
T
o
AR
X
AC
E
g
NU
TIV
ME
CO
AR
L
SM
RO
b
NT
T
V
k
OK
TE
MU
PC
¬
TV
1
P
q
4
RA
7
DIO
2
5
8
3
i
6
0
9
Remote Control
2 AA Batteries
Antenna Cable
Mains Plug
Note : This plug is not
representative of the actual
plug.
DRESSING THE CABLES
For better cable management, it is advisable to insert all cables through the hole of the
stand as shown in the diagram after connecting to the respective connectors. For connection
description, refer to sections on :
– Connecting the Audio/Video Sockets (Playback)
– Connecting the Audio/Video Sockets (Recording)
– Connecting to the Audio Equipment, Amplifier and Subwoofer
– Connecting to the Headphone
– Connecting to the FM Radio Mains
– Connecting the PC Equipment
– Connecting the HD (High Definition) Equipment
5
15PF9936/69 p2-6
5
4/7/03, 12:54 PM
MOUNTING PROCEDURES FOR LCD TV
If you want to mount the LCD TV on any device, this set has four mounting interfaces fulfilling
VESA specifications.
Rear of LCD TV
Screws
Screws
Stand
1) Lay the LCD TV face-down on a flat surface with a cushion or other soft material to
protect the screen.
2) Remove all cables connected on the TV.
3) Remove the four screws and then remove the stand from the LCD TV.
4) Screw in mounting plate. Reconnect all cables to the LCD TV.
You are now ready to mount the device. Below is an example of adjusted ranges and
mounting options (VESA compatible).
6
15PF9936/69 p2-6
6
4/7/03, 12:54 PM
CONNECTING THE AUDIO/VIDEO SOCKETS (PLAYBACK)
You can view the playback of VCR tapes (Video Disc players, camcorders, etc.) by using the
AUDIO and VIDEO INPUT sockets on the rear of the TV.
L
Audio in (PC / HD)
HD input
R
DC in
Y
FM ANT COMP
75
Pb
AV1
in
Pr
PC input (VGA)
Audio
out
Rear of TV
Pr
Pb
Y
VIDEO
INPUT
–
L
R
Audio in
Video in
AV1
in
Monitor
out
Connect the VIDEO and AUDIO IN
sockets on the rear of the LCD TV to the
AUDIO and VIDEO OUT sockets on
the VCR.
Rear of VCR
VCR
OUT
OUT
OUT
ANTENNA
VIDEO
R AUDIO L
IN
IN
IN
The S-Video connection on the Side of
the LCD TV is used for the playback of
S-VHS VCR tapes, Video Discs, Video
Games or Compact Disc-Interactive (cd-i)
discs. Better picture detail and clarity is
possible with the S-Video playback as
compared to the picture from a normal
antenna (RF) connection.
VCR (Equipped
with Video and
Audio sockets)
OUT
OUT
R AUDIO L
VIDEO
IN
IN
OUT
OUT
S-VIDEO
ANTENNA
Back of S-VHS VCR
IN
–
Connect the S-VIDEO socket on the
side of the LCD TV to the S-VHS OUT
socket on a S-VHS VCR.
–
Connect the AUDIO IN sockets from
the rear of the TV to the AUDIO OUT
sockets on the VCR. Note : You need
not connect the VIDEO IN socket of the
LCD TV if S-VIDEO IN socket is
connected.
Side Controls
For more convenient direct playback
connections, the Side Audio/Video Input
sockets allow for quick and easy
connections, particularly Camcorder tape
recordings.
Camcorder
–
Connect the S-VIDEO socket (if
available) from the Camcorder to the
Side S-VIDEOsocket of the TV. You
need not connect the Side VIDEO IN
socket of the TV if the S-VIDEO socket
is connected.
–
Connect the AUDIO OUT sockets
(Right and Left) from the Camcorder to
the Side AUDIO IN sockets.
7
15PF9936/69 p7-13
7
4/7/03, 12:55 PM
CONNECTING THE AUDIO/VIDEO SOCKETS (PLAYBACK)
DVD (Equipped
with "Y", "Pb" and "Pr"
and Output sockets)
L
R
DC in
Audio in (PC / HD)
HD input
Y
Pb
FM ANT COMP
75
AV1
in
Pr
PC input (VGA)
Audio
out
Pr
Pb
Y
VIDEO
INPUT
Y
L
R
Audio in
Pb
Pr
L
AUDIO
R
Video in
AV1
in
Monitor
out
You can view the playback of DVD discs by using the COMPONENT VIDEO INPUT
sockets at the rear of the LCD TV.
–
Connect the “Y”, “Pb” and the “Pr” sockets at the rear of the LCD TV to the “Y”, “Pb”
and “Pr” OUTPUT sockets of the DVD player to view playback of DVD discs.
CONNECTING THE AUDIO/VIDEO SOCKETS (RECORDING)
Side Sockets
Connection for recording from
the TV channel
–
VCR (Equipped
with Video and
Audio sockets)
OUT
OUT
OUT
ANTENNA
VIDEO
R AUDIO L
IN
IN
IN
VCR
Side Sockets
OUT
OUT
OUT
ANTENNA
VIDEO
R AUDIO L
IN
IN
Connect the corresponding INPUT
sockets of the VCR to the MONITOR
OUTPUT sockets at the rear of the
LCD TV.
Connection for recording from
one VCR to another VCR
OUT
OUT
OUT
ANTENNA
VIDEO
R AUDIO L
IN
IN
IN
–
Connect the sockets of the VCR which
you want to record from, to the
corresponding sockets at AV2.
–
Connect the sockets of the receiving VCR
to the MONITOR OUTPUT sockets
at the side of the LCD TV.
IN
VCR 2
VCR (Equipped
with Video and
Audio sockets)
VCR 1
8
15PF9936/69 p7-13
8
4/7/03, 12:55 PM
CONNECTING TO THE AUDIOEQUIPMENT,AMPLIFIER AND SUBWOOFER
Connect the audio cable to the audio input
of your audio equipment and to AUDIO L
and R at the rear of the TV
Side Controls
SUBWOOFER
If you have a subwoofer, connect the cable
from Subwoofer Out socket to an external
amplifier.
SPEAKERS
L
R
You can listen to your TV sound via your
audio equipment.
Note : If you want to connect more
equipment to your TV, consult your dealer.
CONNECTING TO THE HEADPHONE
SIDE CONTROLS
(EXTERNAL 2)
Insert the plug into the headphone soket
; at the Side sockets of the LCD TV.
CONNECTING TO THE FM RADIO MAINS
Rear of TV
L
R
DC in
Audio in (PC / HD)
HD input
Y
Pb
FM ANT COMP
75
AV1
in
Pr
PC input (VGA)
Audio
out
To FM
Radio
Mains
Pr
Pb
Y
VIDEO
INPUT
R
L
Audio in
Video in
AV1
in
Monitor
out
To enable you to access FM radio mode in
the TV, you must connect from FM Antenna
socket to the
FM Radio mains.
9
15PF9936/69 p7-13
9
4/7/03, 12:55 PM
CONNECTING THE PC EQUIPMENT
Adaptor
To Mains
Rear of TV
L
R
DC in
Audio in (PC / HD)
HD input
Y
FM ANT COMP
75
Pb
AV1
in
Pr
PC input (VGA)
Audio
out
Pr
Pb
Y
VIDEO
INPUT
R
L
Audio in
Video in
AV1
in
Monitor
out
To enable you to access PC mode in the TV, you must connect the following :
–
–
–
Connect adaptor from DC in to the mains.
Connect the PC input (VGA) to the Monitor Output of your PC
Connect Audio L and R output of your PC to the Audio IN L and R of your LCD TV.
CONNECTING THE HD (HIGH DEFINITION) EQUIPMENT
Rear of TV
L
Audio in (PC / HD)
HD input
R
DC in
Y
Pb
FM ANT COMP
75
AV1
in
Pr
PC input (VGA)
Audio
out
Pr
Pb
Y
VIDEO
INPUT
Monitor
out
R
L
Audio in
Video in
AV1
in
DVD (Equipped
with "Y", "Pb" and "Pr"
and Output sockets)
AUDIO
VIDEO
OUTPUT
Back of DVD player
▲
OR
–
Connect the “Y”,“Pb and the “Pr” sockets of the
HD INPUT at the rear of the LCD TV to the
“Y”, “Pb” and “Pr” OUTPUT sockets of the
DVD player.
–
Connect Audio L and R OUTPUT of your
Set-top box to the Audio IN L and R of HD
INPUT of the LCD TV.
▼
OUTPUT
HDTV Set-Top Box
10
15PF9936/69 p7-13
10
4/7/03, 12:55 PM
FUNCTIONS
OF
REMOTE CONTROL
& POWER button
– Switch set off to standby mode. To switch on set from
standby mode, press Channel +/– , Digit (0 -9) or Power
&
2
button.
é
v
é MODE button/VCR and DVD indicators
“
Press the Mode button repeatedly to choose between VCR
or DVD mode. The VCR or DVD indicator will light up if
‘
selected. Once VCR or DVD mode is selected, it allows you
(
access to the Record, Play, Stop, Pause, Forward and Rewind
§
functions for your VCR or DVD player. Note : The set will
k
è
switch to TV mode if there is no activity on any of the
!
VCR/DVD buttons after 20 seconds.
“ VCR/DVD buttons
ç
VCR/DVD buttons allows you access to the Record, Play, Stop,
V
Pause, Forward and Rewind functions for your VCR or DVD
0
player (Applicable to only certain models of PHILIPS). For
1
these functions to be enabled, you must select VCR or DVD
1
2
3
mode by the MODE button.
6
5
4
‘ SLEEPTIMER button
8
7
9
It allows you to select a time period after which the set will
switch to standby mode automatically. (Refer to section on
0
2
“Activating the Sleeptimer”
( 4 button
3
Allows you to switch from Stereo to Mono sound during
stereo transmission or to choose between language5or
language6during dual sound transmission.
§ SMART SOUND button
Press the Smart Sound button repeatedly to access 4 different
types of sound settings and choose your desired setting.
è MENU button
Displays the main menu. Also exits menu from screen.
! CURSOR LEFT/UP button
– Cursor Left button allows you to select the sub-menus and adjust the settings.
– Cursor Up button allows you to select the next item on the menu.
ç VOLUME + / – button
Increases or decreases volume.
0 TV button
When you are in PC, HD or FM Radio mode, press this button to enter into TV mode.
1 PC button
When you are in TV, HD or FM Radio mode, press this button to enter into PC mode.
MODE
A/CH
VCR
DVD
æ
o
g
X
b
SMART
ACTIVE
SMART
CONTROL
MENU
MUTE
¬
CH
OK
PC
RADIO
TV
HD
i
2 INDEX/OSD button
– When in teletext mode, it functions as an Main Index button (Refer to section on
“Using the Teletext).
– When in TV mode, press to exit on-screen menu. Also displays information like
current channel number, sound mode, etc..
3 FORMAT / TIMER (VCR) button
In TV mode, it allows to select your desired screen format. Refer to section on (“Using
the Screen Format”). Also allows you timer function in VCR mode.
11
15PF9936/69 p7-13
11
8/21/03, 3:29 PM
q
FUNCTIONS
OF
REMOTE CONTROL
4 AV / TELETEXT button
– In TV mode, it allows you to select the AV channels.
2
– In Teletext mode, it allows to access teletext information. 4
(Refer to section on “Using the Teletext”)
v
5
5 PICTURE-IN-PICTURE ON/OFF button
6
– When in PC mode, it allows you to call up a sub-screen
within your main screen enabling you to watch a TV channel.
6 PICTURE-IN-PICTURE POSITION button
k
– When in PC mode, it allows you to position the sub-screen
to be on the top left, top right, bottom right or the bottom
left corner of your screen.
7 ALTERNATE CHANNEL button
Allows to alternate between the current channel and the
V
previous channel.
25
8 TELETEXT / HOLD button
1
2
3
– In teletext mode, it allows you to access teletext
information (Refer to section on “Using the Teletext”) .
6
5
4
– In VCR or DVD mode, it serves as a pause function for
8
7
9
your VCR or DVD player.
0
91TELETEXT button
Allows to access teletext mode.
20
1 SMART PICTURE button
Press the Smart Picture button repeatedly to access 5
different types of picture settings and choose your desired
setting.
21 ACTIVE CONTROL button
Adjusts settings automatically for optimal picture quality under any
signal conditions (Refer to section on “Using the Active Control”)
22 SURROUND SOUND button
– Allows you to select Incredible Surround, and Stereo sound when transmission is in
stereo mode.
– Allows you to select Spatial Sound or Mono sound when transmission is in mono mode.
MODE
A/CH
VCR
DVD
æ
g
X
b
SMART
ACTIVE
SMART
7
o
CONTROL
MENU
8
9
20
21
22
23
24
MUTE
¬
CH
OK
PC
RADIO
TV
HD
i
q
CURSOR RIGHT / DOWN buttons
Cursor Right button allows you to access the sub-menus adjust the settings.
Cursor Down button allows you to select the next item on the menu.
24 CHANNEL + / – buttons
Allows you to select channels in ascending or descending order.
25 MUTE button
Mutes sound. To restore sound, press button again.
23
–
–
RADIO button
Allows to access radio mode. (Refer to section on “Accessing the FM Radio Installation
Menu ”)
27 HD (High Definition) button
Allows you to select the High definition mode when the “Y”, “Pb and the “Pr” sockets
at the HD INPUT at the rear of the LCD TV are connected to the to the “Y”, “Pb” and
“Pr” OUTPUT sockets of the DVD player.
28 DIGIT (0 -9) buttons
Allows you select a channel. Note : For a 2-digit number, the second digit must be
entered before the “–” sign disappears.
26
12
15PF9936/69 p7-13
12
5/6/03, 1:03 PM
26
27
28
FUNCTIONS OF TV TOP CONTROLS
&
“
➩
é
‘
&
Mains Power button
Switch mains power on or off.
é
Volume – / + buttons
Adjust sound volume softer/louder.
“
Channel – / + buttons
Select channel in descending/ascending order.
‘
Remote Sensor
Acts as a sensor for activating the controls of the
TV when remote control handset is aimed at it.
Note
• You can enter the main menu by pressing both the Volume- and+buttons at the
same time.
• Press the Channel + or – button to select the next item on the menu.
• Press Volume + or – button to access sub-menu and adjust the settings.
13
15PF9936/69 p7-13
13
4/7/03, 12:56 PM
ACCESSING THE TV MAIN MENU AND SUB-MENUS
The TV main menu allows you to access to the Picture, Sound, Features and Install menus
How to call up the main menu
Press the
MENU
(MENU) button to enter the main menu.
,
,
and
(Cursor
The 4 buttons
Up, Down, Left and Right) on the remote control allow
you to select the desired menu item, make adjustments
and access the sub-menus. Use the i (OSD) button to
exit menu from screen.
• PICTURE
• SOUND
• FEATURES
• INSTALL
▲
É
LANGUAGE
AUTO STORE
MANUAL STORE
SORT
CHANNEL EDIT
OVERVIEW OF TV MAIN MENU AND SUB-MENUS
First Level
Second Level
PICTURE
Brightness
Colour
Contrast
Sharpness
Colour Temperature
Third Level
Fourth Level
Cool
Normal
Warm
Incredible Picture
SOUND
Equalizer
120Hz
500Hz
....... etc.
Balance
AVL
Incredible Surround
FEATURES
Timer
Time
Start Time
Stop Time
Channel
Activate
Display
Mode Select
FM Radio
HD
PC
Child Lock
Widescreen
14
15PF9936/69 p14-18
14
8/15/03, 1:34 PM
......... OVERVIEW OF TV MAIN MENU AND SUB-MENUS
First Level
Second Level
Third Level
INSTALL
Language
English
B. Melayu
Auto Store
Search
Manual Store
Colour System
Sound System
Fourth Level
Auto
PAL
.... etc
Auto
B/G
.... etc
Search
Channel
Store
Fine Tune
Sort
From
To
Exchange
Channel Edit
Skipped
Name
Personal
15
15PF9936/69 p14-18
15
4/7/03, 12:58 PM
OVERVIEW OF FM RADIO MAIN MENU AND SUB-MENUS
This TV also provides you with the FM RADIO for your listening pleasure. To enable you to
access the FM RADIO mode, you must connect the cable from FM Rntenna socket to the
FM Radio mains. Press
RADIO
(FM RADIO) button to enter into FM Radio mode.
Here is an overview of the FM RADIO Main menu and Sub-menus
First Level
Second Level
Third Level
SOUND
Equalizer
120HZ
500HZ
....... etc.
Fourth Level
Balance
AVL
Incredible Surround
FEATURES
Timer
Time
Start Time
Stop Time
Channel
Activate
Display
Mode Select
TV
HD
PC
Screensaver
INSTALL
Language
English
B. Melayu
Auto Store
Search
Manual Store
Search
Channel
Store
Sort
From
To
Exchange
Name
Personal
16
15PF9936/69 p14-18
16
4/7/03, 12:58 PM
OVERVIEW OF PC MENU AND SUB-MENUS
This TV also allows you use your TV as a PC monitor. To enable you to access PC mode in the
TV, you must connect the following :–
&
é
“
‘
(
§
Connect DC input terminal to the AC adaptor.
Connect the Mains Plug from the AC adaptor to the AC outlet.
Connect the PC input (VGA) to the Monitor Output of your PC.
Connect Audio L and R output of your PC to the Audio in (PC) L and R of your TV.
Press
button to enter into PC mode.
Press
button to enter into the PC Main Controls Menu.
PC
MENU
First Level
Second Level Third Level Fourth Level
AUDIO SELECTION
PC
TV/Source/FM Radio
BRIGHTNESS &
CONTRAST
Brightness
Contrast
ADJUST COLOR
Color Temp
Normal
Warm
Cool
Personal
VIDEO NOISE
Phase
Clock
ADJUST POSITION
Horizontal
Vertical
AUTO ADJUST
Save
Yes
No
PIP CONTROLS
PIP Switch
Off
On
MODE SELECT
TV Mode
FM Radio Mode
HD Mode
RESET TO FACTORY
SETTINGS
No
Yes
VIEW FORMATS
Native
Wide Screen
Red
Green
Blue
Size
Position
17
15PF9936/69 p14-18
17
8/15/03, 1:35 PM
OVERVIEW OF HD MENU AND SUB-MENUS
The HD (High Definition) mode offers you Picture and Sound adjustments, Mode Select and
Lock Channel feature.
First Level
Second Level
PICTURE
Brightness
Color
Contrast
Sharpness
Hue
Color Temperature
Third Level
Cool
Normal
Warm
Full Screen
Wide Screen
Format
SOUND
Fourth Level
Equalizer
120Hz
500Hz
....... etc.
Balance
AVL
MODE
SELECT
TV Mode
FM Radio Mode
PC Mode
LOCK
CHANNEL
18
15PF9936/69 p14-18
18
8/15/03, 1:35 PM
ACCESSING THE LCD TV INSTALLATION MENU
Before you access the TV installation menu, ensure you are in TV mode. If you are not in TV
mode, press the
(TV) button on the remote control to enter into TV mode.
TV
MENU
k
MENU
k
k
MENU
▲
INSTALL
Ñ
Ñ LANGUAGE
•É ENGLISH
• AUTO STORE
B.MELAYU
• MANUAL STORE
• SORT
• CHANNEL EDIT
•
1. Enter main menu.
2. Select INSTALL.
▼
3. Enter Install menu.
CHOOSING THE MENU LANGUAGE AND
AUTOMATIC TUNING OF LCD TV CHANNELS
The Language menu allows you to set the TV’s on-screen menu to be shown in your desired
language.
Press Button
Result on Screen
4. Enter LANGUAGE mode.
or
5. Select desired language.
6 Exit LANGUAGE mode.
INSTALL
Ñ LANGUAGE
• AUTO STORE
• MANUAL STORE
• SORT
• CHANNEL EDIT
i
INSTALL
Ñ
• LANGUAGE
• AUTO STORE
Ñ MANUAL STORE
• SORT
• CHANNEL EDIT
9. When automatic tuning of channels
is completed, exit menu from screen.
15PF9936/69 p19-26
19
4/7/03, 12:59 PM
▲
•
É
SEARCH
▼
▲
•ÉSEARCHING
PLEASE WAIT
CHANNEL FOUND 8
048.31 MHZ
▼
19
ENGLISH
B.MELAYU
▼
•
8. Start automatic tuning.
É
•
INSTALL
• LANGUAGE
Ñ AUTO STORE
• MANUAL STORE
• SORT
• CHANNEL EDIT
7. Select AUTO STORE.
▲
•
ACCESSING THE LCD TV INSTALLATION MENU
MANUAL TUNING OF LCD TV CHANNELS
Manual tuning allows you to store each programmes manually.
k
MENU
k
MENU
k
MENU
▲
INSTALL
Ñ
Ñ LANGUAGE
•É ENGLISH
• AUTO STORE
B.MELAYU
• MANUAL STORE
• SORT
• CHANNEL EDIT
•
1. Enter main menu.
2. Select INSTALL.
3. Enter Install menu.
Press Button
4.
5.
▼
Result on Screen
Press button repeatedly until
MANUAL STORE is selected.
Enter MANUAL STORE menu.
INSTALL
MANUAL STORE
• COLOUR SYSTEM
• SOUND SYSTEM
Ñ SEARCH
• CHANNEL
• STORE
▲
•
•É 196.23MHZ
▼
6.
7.
Select SEARCH.
Start manual tuning. Searching stops
once a transmitting channel is found.
INSTALL
MANUAL STORE
• COLOUR SYSTEM
• SOUND SYSTEM
Ñ SEARCH
• CHANNEL
• STORE
▲
•
•É 196.23MHZ
▼
8.
1
2
4
5
6
7
8
9
Select CHANNEL.
3
9.
Key in the desired channel number.
0
INSTALL
MANUAL STORE
• COLOUR SYSTEM
• SOUND SYSTEM
• SEARCH
Ñ CHANNEL
• STORE
▲
•
•É
18
•
▼
INSTALL
MANUAL STORE
• COLOUR SYSTEM
• SOUND SYSTEM
• SEARCH
• CHANNEL
Ñ STORE
10. Select STORE.
11. Store tuned channel.
▲
•
•É
▼
i
12. Exit menu from screen.
20
15PF9936/69 p19-26
20
4/7/03, 12:59 PM
STORED
ACCESSING THE LCD TV INSTALLATION MENU
SELECTING THE COLOUR/SOUND SYSTEM
This feature allows you to select your desired COLOUR and SOUND system. If AUTO
is selected, the respective colour and sound system will be automatically selected according
to the transmission system. Note : Select your desired colour and sound system manually if
reception is poor at AUTO mode. If the colour system is selected manually, that is, AUTO
is not selected, the sound system selected should also not be AUTO and vice versa.
Press Button
Result on Screen
Repeat step 1 to step 5 as in “MANUAL TUNING OF CHANNELS”
6.
or
COLOUR SYSTEM is selected.
Enter COLOUR SYSTEM mode.
7.
Select the desired colour system.
8.
Exit from colour system mode.
9.
Proceed to select the SOUND
SYSTEM.
INSTALL
MANUAL STORE
Ñ COLOUR SYSTEM
• • SOUND SYSTEM
• SEARCH
• CHANNEL
• STORE
▲
•
É
AUTO
PAL
SECAM
▼
INSTALL
MANUAL STORE
• COLOUR SYSTEM
Ñ SOUND SYSTEM
• SEARCH
• CHANNEL
• STORE
▲
•
AUTO
B/G
B/K
▼
10. Enter SOUND SYSTEM mode.
or
11. Select the desired sound system.
INSTALL
MANUAL STORE
• COLOUR SYSTEM
Ñ SOUND SYSTEM
• SEARCH
• CHANNEL
• STORE
▲
•
É
AUTO
B/G
D/K
▼
12. Exit from sound system mode.
13. Press button repeatedly until
STORE is selected.
INSTALL
MANUAL STORE
• COLOUR SYSTEM
• SOUND SYSTEM
• SEARCH
• CHANNEL
Ñ STORE
▲
•
•É
▼
INSTALL
MANUAL STORE
• COLOUR SYSTEM
• SOUND SYSTEM
• SEARCH
• CHANNEL
Ñ STORE
14. Store selected system.
▲
•
•É
▼
i
15. Exit menu from screen.
21
15PF9936/69 p19-26
21
8/15/03, 1:37 PM
STORED
ACCESSING THE LCD TV INSTALLATION MENU
FINE TUNING OF LCD TV CHANNELS
This feature allows you to adjust picture reception in areas of weak reception.
MENU
k
k
MENU
k
MENU
▲
INSTALL
Ñ
Ñ LANGUAGE
•É ENGLISH
• AUTO STORE
B.MELAYU
• MANUAL STORE
• SORT
• CHANNEL EDIT
•
1. Enter main menu.
2. Select INSTALL.
▼
3. Enter Install menu.
Result on Screen
Press Button
4. Press button repeatedly until
MANUAL STORE is selected.
5. Enter MANUAL STORE menu.
INSTALL
MANUAL STORE
Ñ COLOUR SYSTEM
• SOUND SYSTEM
• SEARCH
• CHANNEL
• STORE
▲
•É AUTO •
PAL
SECAM
▼
6. Press button repeatedly until
FINE TUNE is selected.
or
7. Start fine-tuning until desired
picture and sound is obtained.
INSTALL
MANUAL STORE
• SOUND SYSTEM
• SEARCH
• CHANNEL
• STORE
Ñ FINE TUNE
▲
É
▼
8. Select Store.
9. Store last fine-tuned status.
INSTALL
MANUAL STORE
• COLOUR SYSTEM
• SOUND SYSTEM
• SEARCH
• CHANNEL
Ñ STORE
▲
•
•É
▼
i
10. Exit menu from screen.
22
15PF9936/69 p19-26
22
8/15/03, 1:37 PM
STORED
ACCESSING THE LCD TV INSTALLATION MENU
SORTING OF LCD TV CHANNELS
This menu allows you to change channel number of your choice for a particular station.
MENU
MENU
k
k
k
MENU
▲
INSTALL
Ñ
Ñ LANGUAGE
•É ENGLISH
• AUTO STORE
B.MELAYU
• MANUAL STORE
• SORT
• CHANNEL EDIT
•
1. Enter main menu.
2. Select INSTALL.
3. Enter Install menu.
Result on Screen
Press Button
4. Press button repeatedly until
SORT is selected.
5. Enter SORT menu.
1
2
3
4
5
6
7
8
9
6. Key in the channel number in the
0
FROM column, that is the channel
you want to swap from.
7. Select TO.
1
2
4
5
6
8
9
7
▼
3
8. Key in the channel number in the
0
INSTALL
• LANGUAGE
• AUTO STORE
•▲ MANUAL STORE
•▼É SORT
• CHANNEL EDIT
FROM
TO
EXCHANGE
INSTALL
SORT
Ñ FROM
• TO
• EXCHANGE
▲
•
É
▼
INSTALL
SORT
• FROM
Ñ TO
• EXCHANGE
▲
•
É
TO column, that is, the channel
you want to swap to.
9. Select EXCHANGE.
10. Activate exchange of channels.
i
INSTALL
SORT
• FROM
• TO
Ñ EXCHANGE
▲
•
É
▼
11. Exit menu from screen.
23
6
▼
23
15PF9936/69 p19-26
8
4/7/03, 12:59 PM
EXCHANGED
ACCESSING THE LCD TV INSTALLATION MENU
EDITING OF LCD TV CHANNELS
This feature allows you to edit or skip channels which have bad or weak TV signal or channels
that you do not watch often.
Note : Once a channel is skipped, you cannot have access to it by the CHANNEL + or –
button. You can only access the channel by the DIGIT (0 -9) button.
MENU
k
k
MENU
k
MENU
▲
INSTALL
Ñ
Ñ LANGUAGE
•É ENGLISH
• AUTO STORE
B.MELAYU
• MANUAL STORE
• SORT
• CHANNEL EDIT
•
1. Enter main menu.
2. Select INSTALL.
3. Enter Install menu.
Press Button
Result on Screen
4. Press button repeatedly until
CHANNEL EDIT is selected.
INSTALL
• LANGUAGE
• AUTO STORE
• MANUAL STORE
• SORT
Ñ CHANNEL EDIT
5. Enter channel edit mode.
or
6. Select the channel you want to skip.
7. Activate skipped mode.
i
▼
8. Exit menu from screen.
É
•
How to add back channels
• Repeat steps 1 to 5 as in “Editing of Channels”.
• Select the channel you want to add back by the
(CURSOR DOWN) button.
• Press the
(CURSOR UP) or
(CURSOR RIGHT) button to activate adding back of channel.
• Exit menu from screen by the
i
(OSD) button.
24
15PF9936/69 p19-26
24
•
3
4
5
6
7
É
INSTALL
• LANGUAGE
• AUTO STORE
• MANUAL STORE
• SORT
Ñ CHANNEL EDIT
INSTALL
• LANGUAGE
• AUTO STORE
• MANUAL STORE
• SORT
Ñ CHANNEL EDIT
•
3
4
5
6
7
4/7/03, 12:59 PM
É
3
4
5
6
7 SKIPPED
ACCESSING THE LCD TV INSTALLATION MENU
NAMING OF LCD TV CHANNELS
This feature allows you to enter a new name or modify an existing name of a channel for 40
programmes (from 1 to 40) including external channels.
MENU
MENU
k
k
k
MENU
▲
INSTALL
Ñ
Ñ LANGUAGE
•É ENGLISH
• AUTO STORE
B.MELAYU
• MANUAL STORE
• SORT
• CHANNEL EDIT
•
1. Enter main menu.
2. Select INSTALL.
3. Enter Install menu.
Press Button
Result on Screen
4.
or
or
MENU
i
Press button repeatedly until
NAME is highlighted.
5.
Enter NAME mode.
6.
Select desired preset name and
press
(CURSOR RIGHT)
button to store selected pre-set
name.
7.
If you select PERSONAL, move
to first character slot
8.
Press button repeatedly to cycle
through the characters and select
desired character. Move to next
character slot by the
(CURSOR RIGHT) button
and key in the next character.
(You can enter up to a maximum
of 5 characters)
9.
Store named channel.
INSTALL
• AUTO STORE
• MANUAL STORE
• SORT
• CHANNEL EDIT
Ñ NAME
•
8
É
▲
▲
•É PERSONAL
INSTALL
• AUTO STORE
• MANUAL STORE
• SORT
• CHANNEL EDIT
Ñ NAME
▲
•É
_
▼
INSTALL
• AUTO STORE
• MANUAL STORE
• SORT
• CHANNEL EDIT
Ñ NAME
▲
•É
BBC_1
▼
INSTALL
• AUTO STORE
• MANUAL STORE
• SORT
• CHANNEL EDIT
Ñ NAME
10. Exit menu from screen.
25
▲
▲
INSTALL
• AUTO STORE
• MANUAL STORE
• SORT
• CHANNEL EDIT
Ñ NAME
25
15PF9936/69 p19-26
▼
8/15/03, 1:38 PM
▲
▲
•
É
PERSONAL
USING THE LCD TV PICTURE/SOUND MENU
The picture and sound menus allow you to make adjustments to the picture and sound. It also
allow you to select and activate other features in the menu.
1. Press the
MENU
(MENU) button to enter main menu.
(CURSOR UP/DOWN) buttons to select the items on the
2. Use the
PICTURE/SOUND menu.
(CURSOR LEFT/RIGHT) buttons to access the sub-menus.
3. Use the
Picture
menu items
Activities
PICTURE
Brightness
Increase or decrease brightness level.
Colour
Increase or decrease color level.
Contrast
Increase or decrease contrast level until
lightest parts of the picture show good
detail.
Sharpness
Increase or decrease sharpness level to
improve detail in the picture.
Colour Temp
Allows you a choice of 3 picture settings
(NORMAL, WARM and COOL).
Incredible
Picture
Select “ON” to allow you to optimise the
total contrast for improved picture quality.
Sound
menu items
Activities
Equalizer
Allows you a choice of different sound
frequencies.
BALANCE
Increase or decrease to adjust balance
level.
AVL
(Auto Volume
Leveller)
As variation in signal conditions can result
a sudden change in volume during in
commercial breaks or channel switching,
selecting the “ON” function will enable
the volume to remain at a standard
volume level.
Incredible
Surround
Allows you to select between Stereo,
Dolby Virtual and Incredible Surround
sound. when transmission is in stereo.
Allows you to select between Spatial and
Mono sound when transmission is in
mono.
•
•
•
•
•
É
38
PICTURE
•
•
•
•
Ñ
COLOUR
CONTRAST
SHARPNESS
COLOUR TEMP
INCR.PICTURE
COLOUR
•
É
ON
•
Note : HUE feature is only
applicable to NTSC
programmes. The HUE item
will not appear on the menu if
programme is in PAL mode.
SOUND
▲
•
•
•
•
•
▼
É
EQUALIZER
BALANCE
AVL
INCR.SURROUND
26
15PF9936/69 p19-26
▲
BRIGHTNESS
COLOUR
CONTRAST
SHARPNESS
COLOUR TEMP
Ñ
26
8/15/03, 1:38 PM
120HZ
500HZ
1500HZ
5KHZ
10KHZ
ACCESSING THE LCD TV FEATURES MENU
ACTIVATING THE TIMER
The Timer feature allows you to set the timer to switch to another channel at a specified
time while you are watching another channel or when the TV is on standby mode.
Note : For the timer to function, the set must not be switched off. Once the set is switched
off, the timer is disabled.
k
MENU
MENU
k
MENU
k
FEATURES
▲
É
▼
•
•
•
•
TIMER
MODE SELECT
CHILD LOCK
FORMAT
TIME
START TIME
STOP TIME
CHANNEL
ACTIVATE
1. Enter main menu. 2. Select FEATURES. 3. Enter FEATURES menu.
Press Button
Result on TV Screen
4. Enter the TIMER menu.
FEATURES
TIMER
▲
•
TIME
• START TIME
• STOP TIME
• CHANNEL.
• ACTIVATE
FEATURES
TIMER
É
Ñ
5. Enter TIME mode.
1
2
4
5
6
7
8
9
3
0
6. Key in the current time For example, if
the current time is 12:30, key digit 1 and
2 in the hour column, followed by digit
3 and 0 in the minute column.
•
•
•
•
•
8. Select START TIME.
Ñ
•
•
•
9. Enter the START TIME mode.
1
2
3
4
5
6
8
9
7
0
MENU
11. Exit from START TIME mode.
•
•
•
•
▼
▲
TIME
START TIME
STOP TIME
CHANNEL
ACTIVATE
TIME
START TIME
STOP TIME
CHANNEL
ACTIVATE
•
É
--:--
▲
•
FEATURES
TIMER
•
•
Ñ
•
•
TIME
START TIME
STOP TIME
CHANNEL
ACTIVATE
27
27
12:30
É
FEATURES
TIMER
Ñ
10. Key in the time you want the
programme to be switched on.
12 Select STOP TIME.
15PF9936/69 p27-38
▲
•
FEATURES
TIMER
7. Exit from TIME mode.
MENU
TIME
START TIME
STOP TIME
CHANNEL
ACTIVATE
Ñ
--:--
4/7/03, 1:00 PM
É
13:30
▼
▲
•
É
--:--
ACCESSING THE LCD TV FEATURES MENU
......... ACTIVATING THE TIMER
Press Button
Result on TV Screen
13. Enter STOP TIME mode.
1
2
4
5
6
7
8
9
3
0
14. Key in the time you want the
programme to be switched off.
FEATURES
TIMER
•
•
Ñ
•
•
15. Exit from STOP TIME mode.
MENU
▲
•
15:30
É
▼
FEATURES
TIMER
•
•
•
16. Select CHANNEL.
TIME
START TIME
STOP TIME
CHANNEL
ACTIVATE
Ñ
•
▲
TIME
START TIMEE
STOP TIME
CHANNEL
ACTIVATE
•
3
É
▼
▼
1
2
4
5
6
7
8
9
0
3
17. Key in the channel you want to
switch to.
FEATURES
TIMER
•
•
•
Ñ
•
▲
TIME
START TIMEE
STOP TIME
CHANNEL
ACTIVATE
•
8
É
▼
▼
FEATURES
TIMER
18. Select ACTIVATE.
19. Activate timer. You can select
to activate timer by DAILY or
ONCE mode.
Ñ
▲
TIME
START TIMEE
STOP TIME
PROG. NO
ACTIVATE
•
É
ONCE
FEATURES
TIMER
20. Select DISPLAY.
21 Select ON mode if you want to
display the current time on the
TV screen.
i
•
•
•
•
•
•
•
•
Ñ
▲
START TIME
STOP TIMEE
CHANNEL
ACTIVATE
DISPLAY
•
É
ON
22. Exit menu from screen.
Note
30 seconds before the timer is activated, a message indicating the time left for the channel
switch will appear on the screen. To disable the channel switch, press any button on the
remote control.
28
15PF9936/69 p27-38
28
4/7/03, 1:01 PM
ACCESSING THE LCD TV FEATURES MENU
USING THE MODE SELECT
This menu allows you to go into FM RADIO, HD or PC mode.
MENU
k
MENU
k
MENU
k
FEATURES
▲
É
▼
•
•
•
•
TIMER
MODE SELECT
CHILD LOCK
WIDE SCREEN
TIME
START TIME
STOP TIME
CHANNEL
ACTIVATE
1. Enter main menu. 2. Select FEATURES. 3. Enter FEATURES menu.
Result on TV Screen
Press Button
4. Select MODE SELECT.
FEATURES
•
Ñ
•
•
TIMER
MODE SELECT
CHILD LOCK
WIDE SCREEN
▲
▲
•
É
FM RADIO
HD
PC
▼
5.Enter MODE SELECT menu.
FEATURES
MODE SELECT
Ñ
or
FM RADIO
• HD
• PC
6. Select your desired mode.
7. Enter selected mode.
Note : You can also access directly the FM RADIO. HD and PC modes by the
buttons.
PC
29
15PF9936/69 p27-38
29
8/15/03, 1:45 PM
RADIO
HD
and
ACCESSING THE LCD TV FEATURES MENU
ACTIVATING THE CHILD LOCK (ACCESS CODE)
The Child Lock feature allows you to lock channels on your TV Top Controls to prevent your
children from watching programmes you deem undesirable.
Note : You cannot have access to the locked channels via the top controls of the TV set once
the channels are locked. You can only have access to the locked channels via the remote
control. Keep the remote control out of reach so as to prevent your children from having
access to it.
k
MENU
MENU
k
k
MENU
FEATURES
▲
É
▼
•
•
•
•
TIMER
MODE SELECT
CHILD LOCK
FORMAT
TIME
START TIME
STOP TIME
CHANNEL
ACTIVATE
1. Enter main menu. 2. Select FEATURES. 3. Enter FEATURES menu.
Press Button
Result on TV Screen
4. Select CHILD LOCK.
FEATURES
•
•
•
•
▲
É
▼
TIMER
MODE SELECT
CHILD LOCK
FORMAT
ACCESS CODE
--:--
FEATURES
5. Enter ACCESS CODE mode.
1
2
4
5
6
7
8
9
3
0
1
2
3
4
5
6
8
9
7
0
6. Key in access code 0711
(0711 is the default access code).
A message INCORRECT will
appear.
7. Key in 0711 the second time.
When the message CORRECT
appears, the CHILD LOCK
menu is now accessible.
You can now proceed to change
the access code of your choice.
•
•
Ñ
•
TIMER
MODE SELECT
CHILD LOCK
FORMAT
FEATURES
•
•
Ñ
•
TIMER
MODE SELECT
CHILD LOCK
FORMAT
30
ACCESS CODE
X X X X
CORRECT
FEATURES
CHILD LOCK
Ñ LOCK CHANNEL
• CHANGE CODE
• CLEAR ALL
30
15PF9936/69 p27-38
ACCESS CODE
X X X X
INCORRECT
4/7/03, 1:01 PM
▲
•
É
2
3
4
5
6
ACCESSING THE LCD TV FEATURES MENU
ACTIVATING THE CHILD LOCK (CHANGE CODE)
Press Button
Result on TV Screen
8. Select CHANGE CODE.
FEATURES
CHILD LOCK
• LOCK CHANNEL
Ñ CHANGE CODE
• CLEAR ALL
ENTER
NEW CODE
– – – –
9. Enter CHANGE CODE mode.
1
2
4
5
6
7
8
9
3
0
1
2
4
5
6
7
8
9
3
10. Key in the access code of your
choice.
11. Confirm access code.
0
When the new code is confirmed,
the message CORRECT will
appear.
i
FEATURES
CHILD LOCK
• LOCK CHANNEL
Ñ CHANGE CODE
• CLEAR ALL
ENTER
NEW CODE
x x x x
FEATURES
CHILD LOCK
• LOCK CHANNEL
Ñ CHANGE CODE
• CLEAR ALL
CONFIRM
CODE
x x x x
FEATURES
CHILD LOCK
• LOCK CHANNEL
Ñ CHANGE CODE
• CLEAR ALL
CONFIRM
CODE
x x x x
CORRECT
12. Exit menu from screen.
Note : After you have exit menu from screen and you want to enter child lock menu again ,
you need to key the new access code only once. If you have forgotten the new access code,
key in 0711 twice to enter the child lock menu. Upon entering the child lock menu, you can
proceed to change code again.
31
15PF9936/69 p27-38
31
4/7/03, 1:01 PM
ACCESSING THE LCD TV FEATURES MENU
ACTIVATING THE CHILD LOCK (LOCK CHANNEL)
MENU
k
MENU
k
MENU
k
FEATURES
▲
É
▼
•
•
•
•
TIMER
MODE SELECT
CHILD LOCK
FORMAT
TIME
START TIME
STOP TIME
CHANNEL
ACTIVATE
1. Enter main menu. 2. Select FEATURES. 3. Enter FEATURES menu.
Press Button
Result on TV Screen
4. Select CHILD LOCK .
FEATURES
•
•
•
•
▲
É
▼
5. Enter ACCESS CODE mode.
Ñ
7. Enter LOCK CHANNEL mode.
or
8. Select the channel you want to block.
9. Activate blocking of channel. A
keylock symbol will appear beside
the channel number indicating that
it is locked.
i
ACCESS CODE
--:--
FEATURES
•
•
•
6. Key in access code .
TIMER
MODE SELECT
CHILD LOCK
FORMAT
TIMER
MODE SELECT
CHILD LOCK
FORMAT
ACCESS CODE
X X X X
CORRECT
FEATURES
CHILD LOCK
Ñ LOCK CHANNEL •É
2
• CHANGE CODE
3
• CLEAR ALL
4
5
6
FEATURES
CHILD LOCK
Ñ LOCK CHANNEL
• CHANGE CODE
• CLEAR ALL
•
É
3F
4
5
6
7
10. Exit menu from screen.
Note : You cannot have access to the locked channels via the top controls of the TV set.
You can only have access to the locked channels via the remote control.
When AV1 source is locked, CV1 source is automatically locked. Like-wise, if CV1 source is
locked, AV1 source is also automatically locked as they share the same audio input.
If you attempt to enter the INSTALL menu after locking a channel, a message
“Enter ACCESS CODE” will appear on the screen. You need to enter the ACCESS
CODE to enable you to enter the INSTALL menu.
32
15PF9936/69 p27-38
32
4/7/03, 1:01 PM
ACCESSING THE LCD TV FEATURES MENU
ACTIVATING THE CHILD LOCK (CLEAR ALL)
To unlock channels that you have locked, enter the Child Lock menu and activate the
CLEAR ALL mode.
MENU
k
MENU
k
MENU
k
FEATURES
▲
É
▼
•
•
•
•
TIMER
MODE SELECT
CHILD LOCK
FORMAT
TIME
START TIME
STOP TIME
CHANNEL
ACTIVATE
1. Enter main menu. 2. Select FEATURES. 3. Enter FEATURES menu.
Press Button
Result on TV Screen
4. Select CHILD LOCK.
FEATURES
•
•
•
•
▲
É
▼
5. Enter ACCESS CODE mode.
Ñ
7. Press button repeatedly until
CLEAR ALL is selected.
8. Activate clearing of all locked
channels.
i
ACCESS CODE
--:--
FEATURES
•
•
•
6. Key in access code.
TIMER
MODE SELECT
CHILD LOCK
FORMAT
TIMER
MODE SELECT
CHILD LOCK
FORMAT
ACCESS CODE
X X X X
CORRECT
FEATURES
CHILD LOCK
• LOCK CHANNEL
• CHANGE CODE
Ñ CLEAR ALL
FEATURES
CHILD LOCK
• LOCK CHANNEL
• CHANGE CODE
Ñ CLEAR ALL
▲
•
É
▲
• CLEARED
É
9. Exit menu from screen.
Note
You can also unlock individual channel by the LOCK CHANNEL menu
• Repeat step 1 to 7 as in “ACTIVATING THE CHILD LOCK (LOCK CHANNEL)”.
• Select the channel you want to unlock by the
or
(CURSOR UP / DOWN)
buttons.
• Press the
(CURSOR RIGHT) button to unlock channel (the keylock symbol will
disappear).
33
15PF9936/69 p27-38
33
4/7/03, 1:01 PM
USING THE SCREEN FORMAT
You can have a choice of different formats for your viewing pleasure, namely : - 4:3 mode,
EXPAND 4:3 mode and COMPRESS 16:9 mode through the FORMAT menu.
How to access the Screen Format
1. Press the
MENU
(MENU) button to enter main menu
FEATURES
(CURSOR DOWN) button
and press the
repeatedly until FEATURES is selected.
▲
É
▼
•
•
•
•
2. Press the
(CURSOR RIGHT) button to
enter FEATURES menu.
TIMER
MODE SELECT
CHILD LOCK
FORMAT
TIME
START TIME
STOP TIME
CHANNEL
ACTIVATE
FEATURES
•
•
•
3. Press the
(CURSOR DOWN) button
repeatedly until FORMAT is selected.
Ñ
TIMER
MODE SELECT
CHILD LOCK
FORMAT
•
É
4:3
FEATURES
•
•
•
4. Press the
(CURSOR RIGHT) button
repeatedly to cycle through the different formats
(4:3, Expand 4:3 or Compress 16:9) and
select your desired format.
Ñ
TIMER
MODE SELECT
CHILD LOCK
FORMAT
•
É
EXPAND 4:3
æ
Note : You can also select your desired Screen Format directly by the
(FORMAT) button
When to use the Screen Formats
4:3 format
Select the 4:3 format if you want to display
the 4:3 picture using the full surface of the
screen.
➩
EXPAND 4:3 format
Select the EXPAND 4:3 format if you want
to expand movie images recorded in the
letterbox format. When this format is
selected, the black horizontal bars at the
top and bottom are expanded thus filling
up the entire TV screen.
➠
➩
➩
COMPRESS 16:9 format
Select the COMPRESS 16:9 format if you
want to compress full screen movie images
into letterbox format. When this format is
selected, black horizontal bars can be seen
at the top and bottom of the TV screen.
➩
➠
34
15PF9936/69 p27-38
34
5/5/03, 2:09 PM
ACTIVATING THE SLEEPTIMER
Sleeptimer function allows you to select a time period in which the set will switch to standby
mode automatically upon reaching the selected time period. You have a choice of time period
starting from OFF up to a maximum of 240 minutes
1. Press the
(SLEEPTIMER) button to display the
time period.
SLEEP OFF
2. Press the
(SLEEPTIMER) button repeatedly to
cycle through the various time periods and select the
time period of your choice.
➠
Note
• During the last minute of a Sleep time setting, an
on-screen countdown will be displayed. Pressing any
button on the remote control during the countdown
will cancel the Sleep-timer.
• During the last 10 seconds of a Sleep timer setting,
an on-screen display will read Goodbye.
SLEEP 240
ACTIVATING THE ACTIVE CONTROL
This feature automatically adjust settings for optimal picture quality continuously under any
signal conditions. You have a choice of 4 modes : ACTIVE CONTROL OFF, ACTIVE
CONTROL MIN, ACTIVE CONTROL MED and ACTIVE CONTROL MAX
HOW TO ACCESS AND SELECT THE ACTIVE CONTROL MODE
ACTIVE
(ACTIVE CONTROL) button
1. Press the
CONTROL
repeatedly to cycle through the various four
ACTIVE CONTROL modes and select your
desired mode.
ACTIVE CTRL OFF
ACTIVE CTRL MIN
➠
2. Press i (OSD) button to exit menu from screen
or wait for the On-Screen Display to time out.
ACTIVE CTRL MAX
35
15PF9936/69 p27-38
35
8/15/03, 1:47 PM
ACTIVATING THE LCD TV SMART PICTURE / SOUND CONTROL
SMART PICTURE feature offers you a choice of 5 picture settings, namely, RICH,
NATURAL, SOFT, PERSONAL and MULTIMEDIA.
SMART SOUND feature offers you a choice of 4 sound settings, namely, THEATRE,
MUSIC, VOICE and PERSONAL.
SMART
SMART
Press
(SMART PICTURE) or
(SMART SOUND) button repeatedly to cycle
through the settings to select your desired mode.
Definition of Picture Settings
PERSONAL
: Picture settings are set to your
preference.
RICH
: Emphasize very vibrant colours.
(Suitable for AV mode in
brightly-lit room)
NATURAL
: Emphasize original colours.
SOFT
: Emphasize “warm” colours.
(Suitable for dimly-lit room
condition and gives cinema-like
effect when light is switched off).
MULTIMEDIA : Emphasize “soft” colours. (Suitable
for playing computer games,
surfing, etc.)
Note : The PERSONAL setting is the setting that
you set up using the Picture menu in the main menu.
This is the only setting in the Smart Picture settings
that can be changed. All the other settings are
pre-set at the factory.
PERSONAL
BRIGHTNESS
COLOR
PICTURE
RICH
SHARPNESS
BRIGHTNESS
COLOR
PICTURE
SHARPNESS NATURAL
BRIGHTNESS
COLOR
PICTURE
SOFT
SHARPNESS
BRIGHTNESS
48
41
81
3
42
30
50
3
43
30
75
3
43
COLOR
PICTURE
SHARPNESS MULTIMEDIA
BRIGHTNESS
COLOR
PICTURE
SHARPNESS
27
79
3
45
30
71
3
Definition of Sound Settings
PERSONAL : Sound settings are set to your
preference.
VOICE
: Emphasize high tone. (Treble boosted)
MUSIC
: Emphasize low tone. (Bass boosted)
THEATRE
: Emphasize sensation to action.
(Bass and Treble boosted)
Note : The values shown in the Picture/Sound
Setting diagrams are sample values only. Your
television’s values may vary and display different
numbers.
PERSONAL
120HZ
500HZ
1500HZ
5KHZ
120HZ
10KHZ
500HZ
1500HZ
120HZ
5KHZ
500HZ
10KHZ
1500HZ
120HZ
5KHZ
500HZ
10KHZ
1500HZ
5KHZ
10KHZ
VOICE
MUSIC
THEATRE
36
15PF9936/69 p27-38
36
8/15/03, 1:47 PM
20
6
6
59
515
6
520
36
6
26
9
615
6
17
19
USING THE TELETEXT
If a TV channel broadcast contains teletext information, each channel that broadcasts
teletext transmits a page (index page) with information on how to use the teletext system,
usually on page 100. The system transmitted is indicated in the option line at the bottom
of the screen.
2
MODE
A/CH
v
VCR
DVD
æ
o
X
g
‘
&
SMART
ACTIVE
SMART
b
& On/Off teletext
and
Superimpose
teletext page
over TV
programme
b
CONTROL
k
MENU
“
MUTE
¬
V
CH
OK
PC
é Selecting a
teletext page
RADIO
TV
HD
1
2
3
4
5
6
7
8
i
0
1
2
4
5
6
7
8
9
3
0
é
9
q
“ Accessing
a teletext
page
(
CH
‘ Direct Access to
an item or
corresponding
pages
æ
Press the button once to switch on
teletext display. (A channel in which
teletext is being transmitted must be
selected).
Press the button the second time
superimpose the teletext page over
the TV programme.
Press the button the third time
to exit teletext mode.
Key in the required teletext page
(3 digits). The page number is
displayed at the top left hand corner
of the screen. When the teletext
page is located, the counter stops
searching. If the counter keeps
searching, it means that the page is
not available for selection. If you
make a mistake in keying the page
number, you have to complete
keying the 3-digit number before
re-keying the correct page number.
Press the CHANNEL + button to
display the next page and the
CHANNEL – button to
display the previous page.
The 4-colour buttons allow you to
access directly an item or
corresponding pages.
o
( Main Index
Press the button to return to the
main index page.
i
37
15PF9936/69 p27-38
37
4/7/03, 1:01 PM
USING THE TELETEXT
§ Dual Page
Text
2
MODE
A/CH
v
VCR
DVD
æ
§
g
X
b
è
è Hold
SMART
ACTIVE
SMART
X
ç
o
g
CONTROL
k
MENU
!
!
MUTE
¬
V
CH
OK
PC
For a teletext page with sub-pages,
press the Cursor Left or Right
button to access the previous subpage or the next subpage.
ç Reveal/
Conceal
Press the button once to reveal hidden
information (solutions to puzzles,
riddles, etc). Press the button the
second time to conceal information.
This button is applicable only to
teletext page with puzzles, riddles, etc.)
HD
1
2
3
4
5
6
7
8
9
i
0
If the page has sub-pages, use the
Cursor Right or Left button to
access the next or previous page
! Selecting a
sub-page
RADIO
TV
Not applicable.
q
v
How to select your favourite page
This feature allows you select 4 of your favourite or most commonly viewed page and stored
them in the favourite page selection. You can then access directly your favourite page by the
colour buttons without having to key in the page number.
1. Press the
b
(TELEXTEXT ON/OFF) button to enter teletext mode.
2. Press the
(MENU) button to enter favourite page selection. Note : The colour
alphabets at the bottom of the screen is now changed to page numbers.
MENU
3. Key in your favourite page by the
1
2
4
5
6
8
9
7
3
(DIGIT 0 -9) buttons.
0
4. Press the
page.
i
(OSD) button followed by your desired colour button to store your favourite
5. Repeat step 3 to 4 to select and store other favourite pages.
6. To exit Favourite page mode, press
7. Press the
b
MENU
(MENU) button.
(TELEXTEXT ON/OFF) button twice to exit teletext mode.
38
15PF9936/69 p27-38
38
9/9/03, 2:52 PM
ACCESSING THE FM RADIO INSTALLATION MENU
This TV also provides you with the FM RADIO for your listening pleasure. To enable you to
access the FM RADIO mode, you must connect the cable from FM Antenna socket to the
FM Radio mains.
Press Button
RADIO
Result on TV Screen
1. Enter into FM Radio mode.
Ñ
•
•
•
SOUND
FEATURES
INSTALL
EQUALIZER
BALANCE
AVL
INCR.SURROUND
•
•
•
SOUND
FEATURES
INSTALL
LANGUAGE
AUTO STORE
MANUAL STORE
SORT
NAME
É
▼
2. Enter FM RADIO main menu.
MENU
3. Press button button repeatedly
until INSTALL is highlighted.
▲
É
4. Enter INSTALL menu.
or
5. Press button button repeatedly to
scroll through the available FM Mode
On-screen options. These options
include LANGUAGE, AUTO STORE,
MANUAL STORE, SORT and NAME.
LANGUAGE – Choose to view the
On-screen menu in your desired language.
AUTO STORE – Allows you to search
the FM antenna signal and store any FM
channel it finds in the TV’s memory.
MANUAL STORE – Allows you to
manually tune any available FM signals.
SORT– Allows you to rearrange your
stored FM stations in the order you
prefer.
NAME – Allows you to apply a name
to your programmed FM radio stations.
Add your own personal name or choose
one from the predefined list.
6. Adjust or select items within the
highlighted feature sub-menu.
i
▲
INSTALL
Ñ
Ñ LANGUAGE
•É ENGLISH
• AUTO STORE
B.MELAYU
• MANUAL STORE
• SORT
• NAME
•
INSTALL
• LANGUAGE
Ñ AUTO STORE
• MANUAL STORE
• SORT
• NAME
•
•
É
SEARCH
▼
SEARCH
CHANNEL
STORE
INSTALL
• LANGUAGE
• AUTO STORE
•▲ MANUAL STORE
•▼É SORT
• NAME
INSTALL
• LANGUAGE
• AUTO STORE
• MANUAL STORE
• SORT
Ñ NAME
7. Exit menu from screen.
39
▲
INSTALL
• LANGUAGE
•▲ AUTO STORE
•▼É MANUAL STORE
• SORT
• NAME
39
15PF9936/69 p39-51
▼
5/5/03, 2:13 PM
FROM
TO
EXCHANGE
▲
•
É
PERSONAL
USING THE FM RADIO SOUND MENU
The Sound menu allows you to make adjustments to the sound.
Note: Ensure you are in FM RADIO mode before you access FM RADIO main menu.
k
MENU
k
MENU
SOUND
▲
•
•
•
•
•
▼
1. Press
button to enter FM RADIO
main menu. SOUND option is
highlighted.
or
EQUALIZER
BALANCE
AVL
INCR.SURROUND
120HZ
500HZ
1500HZ
5KHZ
10KHZ
2. Press
button to enter the
SOUND menu.
MENU
3. In the SOUND menu, press
É
button to adjust level or select desired setting.
buttons to select the various SOUND menu items and
4. Use the
make your desired adjustments and access the sub-menus.
5. Press
i
button to exit menu from screen.
Sound menu items
Activities
EQUALIZER
Allows you a choice of different sound frequencies.
BALANCE
Increase or decrease to adjust balance level.
AVL
(Auto Volume
Leveller)
As variation in signal conditions can result a sudden
change in volume during FM channel switching, selecting
the “ON” function will enable the volume to remain at a
standard volume level.
INCREDIBLE
SURROUND
Allows you to select between Incredible Surround
Dolby Virtual or Stereo sound when transmission is in
stereo. Allows you to select between Spatial and Mono
sound when transmission is in mono.
USING THE FM RADIO SMART SOUND CONTROL
FM RADIO SMART SOUND feature offers you a choice of 5 sound settings, namely,
ROCK, POP, CLASSICAL, JAZZ, and PERSONAL.
1) Press the
RADIO
(FM RADIO) button to enter FM RADIO mode.
SMART
2) Press
(SMART SOUND) button repeatedly to cycle through the various settings
and select your desired sound mode.
3) Press the
i
(OSD) button to exit On-Screen display .
40
15PF9936/69 p39-51
40
8/25/03, 5:30 PM
ACCESSING THE FM RADIO FEATURES MENU
ACTIVATING THE TIMER
The Timer feature allows you to set the timer to switch to another FM channel at a specified
time while you are listening another FM channel. For the timer to function, the set must not be
switched off. Once the set is switched off, the timer is disabled. Note : Ensure you are in FM
RADIO mode before you access FM RADIO main menu.
MENU
k
k
MENU
MENU
k
FEATURES
▲
É
▼
•
•
•
▲
1. Enter FM RADIO main menu.
2. Select FEATURES.
TIMER
MODE SELECT
SCREENSAVER
TIME
START TIME
STOP TIME
CHANNEL
ACTIVATE
3. Enter FEATURES menu.
Use the Menu and Cursor Up, Down, Right and Left buttons to access the Timer
menu to : – select the items. make the following adjustments or activate the timer.
1
TIME
2
3
buttons to key in the
: Use the
current time to enable functioning
of the timer feature.
4
7
5
6
8
9
FEATURES
TIMER
▲
0
1
2
3
START TIME : Use the
buttons to key in the
time you want the channel to be
switched on.
4
7
5
6
8
9
0
1
2
3
STOP TIME : Use the
buttons to key in the
time you want the program to be
switched off.
4
7
5
6
8
9
0
1
CHANNEL
2
3
: Use the
buttons to key in the
FM channel number.
4
5
6
7
8
9
0
ACTIVATE
: Use the Cursor buttons to select
between the Once and Daily mode
to activate the timer.
TIME
• START TIME
• STOP TIME
FEATURES
• CHANNEL.
•TIMER
ACTIVATE
Ñ TIME
• START TIME
• STOP TIME
• CHANNEL
FEATURES
• TIMER
ACTIVATE
Ñ
: Use the Cursor buttons to select
the ON option to display current
time on screen.
▲
•
13:30
É
▼
▲
•
▼
TIME
START TIMEE
STOP TIME
Ñ
CHANNEL
• ACTIVATE
FEATURES
TIMER
•
•
•
•
15:30
É
▲
•
•
•
•
É
FM8
▼
▼
▲
TIME
START TIMEE
STOP TIME
CHANNEL
ACTIVATE
•
É
ONCE
FEATURES
TIMER
•
•
•
•
▲
START TIMEE
STOP TIMEE
CHANNEL
ACTIVATE
DISPLAY
41
41
▼
TIME
START TIME
Ñ
STOP TIME
• CHANNEL
FEATURES
•
ACTIVATE
TIMER
Ñ
15PF9936/69 p39-51
12:30
É
•
•
Ñ
DISPLAY
•
8/25/03, 5:30 PM
•
É
ON
ACCESSING THE FM RADIO FEATURES MENU
USING THE MODE SELECT
This feature allows you to go into TV, HD or PC mode. Note : Ensure you are in FM
RADIO mode before you access FM RADIO main menu.
MENU
k
k
MENU
MENU
k
FEATURES
▲
É
▼
•
•
•
1. Enter FM RADIO main menu.
2. Select FEATURES.
Press Button
TIMER
MODE SELECT
SCREENSAVER
TIME
START TIME
STOP TIME
CHANNEL
ACTIVATE
3. Enter FEATURES menu.
Result on Screen
4. Select MODE SELECT.
FEATURES
•
Ñ
•
TIMER
MODE SELECT
SCREENSAVER
TV
HD
PC
5. Enter MODE SELECT menu.
or
FEATURES
MODE SELECT
6. Select your desired mode.
Ñ
TV
▲
• HD
• PC
7. Enter selected mode.
Note : You can also access directly the TV, HD and PC modes by the
TV
HD
PC
buttons.
ACTIVATING THE SCREENSAVER
Repeat Steps 1 to 3 as in “Using the Mode Select”.
FEATURES
4. Select SCREENSAVER.
•
•
Ñ
or
i
5. Select ON option to activate
screensaver mode.
TIMER
MODE SELECT
SCREENSAVER
ON
FEATURES
•
•
•
▲
TIMER
MODE SELECT
SCREENSAVER
•
É
6.Exit menu from screen.
▼
42
15PF9936/69 p39-51
42
8/25/03, 5:30 PM
ON
ACCESSING THE PC MODE
This TV also allows you use your TV as a PC monitor. To enable you to access PC mode in the
TV, you must connect the following :–
& Connect DC input terminal to the AC adaptor.
é Connect the Mains Plug from the AC adaptor to the AC outlet.
“ Connect Audio L and R output of your PC to the Audio IN L and R of your TV.
‘ Press
PC
( Press
MENU
button to enter into PC mode.
button to enter into the PC Main Controls Menu.
,
,
and
(Cursor Down, Up, Left and Right)
Using theThe 4 buttons
on the remote control allow you to select the desired menu item, make adjustments
and access the sub-menus.
The PC Main Controls menu allows you to access for the followiong menu items :
– AUDIO SELECTION
Allows audio selection between the PC , TV/Source and FM
Radio.
– BRIGHTNESS and
CONTRAST
Allows you to increase or decrease Brightness and Contrast
level.
– ADJUST COLOR
Adjusts the color temperature of the picture. 3 settings
are available (Normal, Warm, Cool or Personal).
– VIDEO NOISE
Allows you to eliminate the vertical bars by using the Clock
adjustment of Video Noise. Also allows you to eliminate the
horizontal bars by using the Phase Adjustment of VIDEO
NOISE in the Main Controls.
– ADJUST POSITION
Allows you to adjust the horizontal and vertical image position.
– AUTO ADJUST
Allows you to do automatic adjustments of settings.
– PIP CONTROLS
(PIP ON/OFF) button to allow you go into PIP mode.
Press
PIP Controls allows to change the Size and Position of the
subscreen.
– MODE SELECT
Allows you enter into TV, HD or FM Radio mode.
– RESET TO FACTORY
SETTINGS
Allows you to reset all settings to Default Factory settings
– VIEW FORMATS
Allows you to choose between Native and Wide Screen
formats.
æ
43
15PF9936/69 p39-51
43
8/25/03, 5:30 PM
PC DISPLAY SETUP
When you are using the TV as a Computer Display, follow the procedures for PC Display setup.
Note : Different Window versions may give different PC Display setup procedures.
1. Press
(PC) button on the remote control to enter PC mode.
Note : The LCD TV will go on standby mode automatically within 5 seconds if no PC
signal is detected.
PC
2. Click on “Settings” on the Window Start menu.
3. Select “Control Panel”.
4. Click on “Display” and a display dialog-box will appear.
5. Navigate to the “Settings” tab on the display dialog-box.
6. Select the required “Colours and Resolution” and click “OK”.
7. Dialog-box “..Does Not Support..’ message will be displayed if set does not support settings.
USING THE PC PICTURE-IN-PICTURE FEATURE
Picture-in-Picture feature allows you to call up a subscreen within your main screen.
How to switch on the Picture-in-Picture Window screen
1. Press
PC
(PC) button on the remote control to enter PC mode.
æ
(PIP On/Off) button to switch on Picture-in-Picture screen (A large size
2. Press the
PIP screen appears).
3. Press the
4. Press the
5. Press the
æ
æ
æ
(PIP On/Off) button a second time to change PIP screen to a medium size.
(PIP On/Off) button a third time to change to a small size.
(PIP On/Off) buuton a fourth time to exit PIP screen.
Note : PC mode supports Picture-in-Picture with PC refresh rate not more than 60Hz.
How to position the Picture-in-Picture screen
2. In PC mode, press the
Picture screen.
æ
(Picture-in-Picture On/Off) button to switch on Picture-in-
o
3. Press the
(PIP Position) button repeatedly to position PIP screen to the position of
your choice. (You can choose to position your PIP screen to be on the top left/top right/
bottom right or bottom left hand corner).
4. Press the
æ
(PIP On/Off) button three times to exit PIP screen.
44
15PF9936/69 p39-51
44
5/5/03, 2:14 PM
PC MODES SUPPORT
Note : If the signal from the system does not equal the PC Modes Support, there may be no
video or corrupted video. Proceed to change the system to the right resolution that the PC
mode support.
No.
Resolution
Refresh
Rate
640 x 480
60 Hz
N
31,500 kHz
N
25,175 MHz
2
67 Hz
N
35,000 kHz
N
30,240 MHz
3
72 Hz
N
37,900 kHz
N
31,500 MHz
4
75 Hz
N
37,500 kHz
N
31,500 MHz
5
85 Hz
N
43,300 kHz
N
36,000 MHz
1
Vertical
Sync
Horizontal
Sync
Horizontal
Polarity
Pixel
Frequency
6
720 x 400
70 Hz
P
31,469 kHz
N
28,322 MHz
7
800 x 600
56 Hz
P
35,100 kHz
P
36,000 MHz
8
60 Hz
P
37,900 kHz
P
40,000 MHz
9
72 Hz
P
48,100 kHz
P
50,000 MHz
10
75 Hz
P
46,900 kHz
P
49,500 MHz
11
85 Hz
P
53,700 kHz
P
56,250 MHz
12
832 x 624
75 Hz
P
49,700 kHz
P
57,300 MHz
13
1024 x 768
60 Hz
N
48,400 kHz
N
65,000 MHz
14
70 Hz
N
56,500 kHz
N
75,000 MHz
15
75 Hz
P
60,000 kHz
P
78,750 MHz
16
85 Hz
P
68,700 kHz
P
94,500 MHz
45
15PF9936/69 p39-51
45
5/5/03, 2:14 PM
ACCESSING THE HD (HIGH DEFINITION) MODE
The HD mode offers you Picture and Sound adjustments, Mode Select and Lock Channel
feature.
USING THE HD PICTURE / SOUND MENU
The HD Picture and Sound menus allow you to make adjustments to the picture and sound. It
alsoallow you to select and activate other features in the menu.
1. Press the
HD
2. Press the
MENU
(HD) button to enter HD mode.
(MENU) button to enter main menu.
(CURSOR UP/DOWN) buttons to select the items on the
3. Use the
HD PICTURE/SOUND menu.
(CURSOR LEFT/RIGHT) buttons to access the sub-menus.
4. Use the
Picture
menu items
Activities
Brightness
Increase or decrease brightness level.
Color
Increase or decrease color level.
Contrast
Increase or decrease contrast level until
lightest parts of the picture show good
detail.
PICTURE
Sharpness
Increase or decrease sharpness level to
improve detail in the picture.
Hue
Imcrease or decrease hue level
Color Temp
Allows you a choice of 3 picture settings
(NORMAL, WARM and COOL).
Format
Allows you to choose between NORMAL
4:3 and COMPRESSION 16:9 formats.
Sound
menu items
Activities
Equalizer
Allows you a choice of different sound
frequencies.
BALANCE
Increase or decrease to adjust balance
level.
AVL
(Auto Volume
Leveller)
As variation in signal conditions can result
a sudden change in volume during in
commercial breaks or channel switching,
selecting the “ON” function will enable
the volume to remain at a standard
volume level.
BRIGHTNESS
COLOR
CONTRAST
SHARPNESS
HUE
COLOR TEMP
Ñ
É
PICTURE
COLOR
CONTRAST
SHARPNESS
HUE
COLOR TEMP
FORMAT
Ñ
NORMAL 4:3
46
É
Note : HUE feature is only
applicable to NTSC
programmes. The HUE item
will not appear on the menu if
programme is in PAL mode.
SOUND
EQUALIZER
Ñ
120HZ
500HZ
1500HZ
5KHZ
10KHZ
BALANCE
AVL
SOUND
EQUALIZER
120HZ
500HZ
1500HZ
5KHZ
10KHZ
BALANCE
Ñ
AVL
46
15PF9936/69 p39-51
38
5/5/03, 2:14 PM
É
ON
É
-12
ACCESSING THE HD (HIGH DEFINITION) MODE
USING THE HD MODE SELECT
The HD MODE SELECT feature allows you to switch to TV MODE, FM RADIO MODE,
or PC MODE.
1. In HD mode, press the
HD main menu.
MENU
(MENU) button to enter
(CURSOR DOWN) button
2. Press the
repeatedly until MODE SELECT is highlighted.
3. Use the
(CURSOR /RIGHT) button to
MODE SELECT menu
4. Use the
(CURSOR UP/DOWN) buttons
to select TV MODE, FM RADIO MODE or
PC MODE.
MAIN
PICTURE
SOUND
MODE SELECT
LOCK CHANNEL
MODE SELECT
TV MODE
FM RADIO MODE
PC MODE
HD1
(CURSOR RIGHT) button to activate selected HD mode.
5. Press
USING THE HD LOCK CHANNEL
The HD LOCK CHANNEL feature allows you to lock the HD mode channel to censor the
viewing of programme not suitable for children.
1. In HD mode, press the
main menu.
MENU
(MENU) button to enter
2. Use the
(CURSOR DOWN) button
repeatedly until LOCK CHANNEL is highlighted..
3. Use the
1
2
4
5
6
8
9
7
MAIN
PICTURE
SOUND
MODE SELECT
LOCK CHANNEL
ACCESS CODE
----
3
(DIGIT) buttons to enter the four digit
0
Access Code to set uo the LOCK CHANNEL function.
4. Use the
(CURSOR /RIGHT) button to select
ON or OFF options. If ON option is selected, the
HD channel will not allow viewing of programmes.
5. Press
i
MAIN
PICTURE
SOUND
MODE SELECT
LOCK CHANNEL
(OSD) button to exit menu from screen.
47
15PF9936/69 p39-51
47
5/5/03, 2:14 PM
Ñ
ON
É
BEFORE CALLING SERVICE (TV MODE)
Below is a list of frequently occurred symptoms. Before you call for service, make these simple
checks. Some of these symptoms can easily be rectified if you know what to do.
Symptom
What you should do
No power
• Check whether adaptor is connected properly into cinch.
• Check the TV’s AC power cord is plugged into the mains
socket. If there is still no power, disconnect plug. Wait for
60 seconds and re-insert plug. Switch on the TV again.
No picture
• Check whether transmission is in TV mode. Press
(TV
button) on remote control to confirm.
• Check the antenna connection at the rear of the TV.
• Possible TV station problem. Try another channel.
Good picture
but no sound
• Try increasing the volume.
• Check that the sound is not muted. If it is muted, press the
Mute button on the remote control to restore sound.
• Chek that your headphone is not connected.
Good sound but poor
colour or no picture
• Try increasing the contrast and brightness setting.
Snowish picture and
noise
• Check antenna connection at the rear of the TV.
Horizontal dotted lines
• Possible electrical interference e.g. hairdryer, vacuum
cleaner, etc. Switch off appliances.
Double images or
“Ghost” images
• Possible poor positioning of antenna. Using a highly
directional antenna may improve reception.
TV not responding to
remote control handset
• Check life span of batteries of remote control handset.
• Aim remote control handset directly at remote control
sensor lens on the TV.
An after-image appears
• If an image remains in the screen for an extended period of
time, it may be imprinted in the screen and leave an afterimage. This usually disappears after a few hours.
An after-image remains
after the power has been
turned off
• This is characteristic of liquid crystal and is not caused by a
malfunction or deterioration of the liquid crystal. This afterimage will disappear after a set amount of time.
TV
48
15PF9936/69 p39-51
48
5/5/03, 2:14 PM
BEFORE CALLING SERVICE (PC / FM RADIO MODE)
Below is a list of frequently occurred symptoms when you are in PC /FM RADIO mode .
Before you call for service, make these simple checks. Some of these symptoms can easily be
rectified if you know what to do.
Symptom
What you should do
Incorrect Display position
• Adjust the image position using the Horizontal Position and/
or Vertical Position in the PC Mains Controls menu.
No Video Input
• Make sure the monitor cable is properly connected to the
PC input (VGA) at the rear of the TV.
• Check whether the monitor cable has bent pins.
Vertical flicker appears
• Try eliminating the vertical bars by using the Clock
Adjustment of VIDEO NOISE in the Main Controls.
Horizontal flicker appears
• Try eliminating the horizontal bars by using the Phase
Adjustment of VIDEO NOISE in the Main Controls.
Screen too bright or dark
• Try adjusting the contrast and brightness in the Main
Controls.
Cannot access FM radio
• Check whether the connection from FM Antenna socket to
the FM Radio mains is done correctly.
49
15PF9936/69 p39-51
49
5/5/03, 2:14 PM
SPECIFICATIONS
15PF9936
Picture tube screen size
380 mm
Audio Output
2 X 3W
TV System
NTSC M
PAL B/G
PAL D/K
PAL I
SECAM B/G
SECAM D/K
SECAM K1
Playback System
NTSC 3.58, NTSC 4.43, PAL 60
Set Dimensions without stand
Length
Height
Depth
493 mm
307 mm
65 mm
Set Dimensions with stand
Length
Height
Depth
493 mm
343 mm
176 mm
Net Weight of Set with stand
6.2 kg
Note
For Operating Voltage, Frequency, Power Consumption and Version Number, refer to the
type number on mains adaptor.
50
15PF9936/69 p39-51
50
9/5/03, 3:05 PM
3139 125 30992
51
15PF9936/69 p39-51
51
8/25/03, 6:20 PM