1
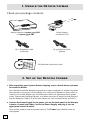
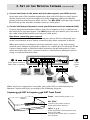
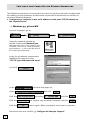
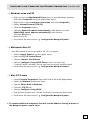
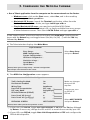
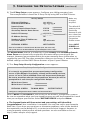
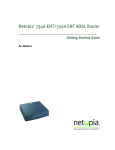
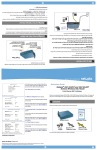
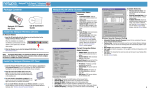
Making Broadband Work™
Cayman® 3346-ENT
Cayman® 3356-ENT
Quickstart Guide
ADSL
Router
N
LA
1
N
LA
2
N
LA
3
N
LA
4
DS
LS
YN
C
r
we
Po
Copyright © 2003, Netopia, Inc. All rights reserved. Netopia, Cayman and the Netopia logo are
registered trademarks and Making Broadband Work is a trademark of Netopia, Inc. All other
trademarks are the property of their respective owners.
V. 24/07/03
1
1. Unpack the Netopia Cayman
Check your package contents:
N
LA
1
N
LA
2
r
C
e
4
3
N LAN SYN Pow
L
DS
LA
Netopia Router: Cayman 3346-ENT
or Cayman 3356-ENT
RJ-11 Telephone Cable
(lavender)
Power Supply
and Power Cord
RJ-45 Ethernet Cable
(yellow)
CD-ROM and Quickstart Guide
2. Set up the Netopia Cayman
1. After unpacking your Cayman Router shipping carton, decide where you want
to locate the Router.
You should install the Netopia Cayman near your computer or another location
that permits easy access and visibility. You can lay the Netopia Cayman flat, or
mount it on a wall. Make sure any Ethernet cables are kept away from power
cords, fluorescent lighting fixtures, and other sources of electrical interference.
Put the Netopia Cayman in a location where air can circulate freely around it.
2. Connect the Power Supply to the power jack on the back panel of the Netopia
Cayman. Connect the Power Cord to the Power Supply and plug it into an
appropriate electrical outlet.
Turn on the power using the power switch. The Power light should come on
solid green.
2
2. Set up the Netopia Cayman (continued)
3. Connect the Router to the phone wall jack that supports your ADSL service.
Insert one end of the lavender telephone cable in the DSL port on the Cayman
Router back panel. Insert the other end of the telephone cable into the telephone jack connected to your ADSL service. The DSL SYNC indicator light should
blink for up to two minutes and then come on solid green.
4. Connect the Netopia Cayman to create your Ethernet local area network (LAN).
Connect the yellow Ethernet cable to your first computer and to a LAN port on
the back of the Cayman Router. The LAN light for the port where you connected
the cable should blink briefly and come on solid green.
E
N
G
L
I
S
H
Note about connecting your network:
After you have connected your first computer, please finish configuring your
router and Internet access before connecting any other computer or device.
When your router is configured and your Internet access is up and running,
connect each additional computer or device to a switch port on the back of the
Cayman Router with an Ethernet cable (maximum length 100 meters). If you
need more than four ports, connect a hub or a switch to the Netopia Cayman
using a standard Ethernet cable.
4
3
3
LAN
2
1
Power
Off / On
2
DSL
to the phone wall jack
(ADSL filter or splitter)
to the
power
jack
4
Ethernet hub
or switch
When all of your connections are made, the status LEDs on the front of your
Netopia Cayman will light, according to the following diagram:
Cayman 3346-ENT & Cayman 3356-ENT Front Panel
Power - Green when power is on.
DSL SYNC N
LA
1
N
LA
2
N
LA
3
N
LA
4
DS
LS
YN
C
r
we
Po
Flashes green when training
Solid green when trained.
LAN 1, 2, 3, 4 Solid green when connected to each
port on the LAN.
Flashes green when there is activity
on each port.
3
Configure your Computer for Dynamic Addressing
The following instructions assume that you want to use the automatic configuration
and address sharing features of the Router to provide IP information to devices on
your local Ethernet network.
1. Configure your computer to use an IP address on the same TCP/IP network as
the Cayman Router:
> Windows 95, 98 and ME
On your computer, go to:
Open the network window by
double-clicking the Network Icon.
(Windows ME users: if the network icon
is hidden, click on the “View All Control
Panel Options” - a link at the left-side of
the control panel window)
In the list of network components,
highlight the entry that says
“TCP/IP (your Ethernet card here)”
and click
In the
window that pops up,
select
and click
Click the DNS Configuration tab, select
Click the
Click the
Gateway
Disable DNS
and click
tab, remove any installed Gateways and click
button again. When prompted, restart your computer.
Proceed to the next section “3. Configure the Netopia Cayman”.
4
Configure your Computer for Dynamic Addressing (continued)
> Windows 2000 and XP
• Right click on the My Network Places icon on your Windows desktop
and select Properties from the drop-down menu.
• Right click on your Local Area Connection and select Properties.
• Select Internet Protocol [TCP/IP].
• Click the Properties button.
• Click the Obtain IP address automatically radio button and the
Obtain DNS server address automatically radio button.
Click the OK button.
E
N
G
L
I
S
H
• Restart your PC.
• Proceed to the next section “3. Configure the Netopia Cayman”.
> Macintosh Mac OS
Your Macintosh must be using Mac OS 7.6.1 or higher.
• Select Control Panels from the Apple menu.
• Open the TCP/IP Control Panel.
• Choose Connect: Via Ethernet.
• Choose Configure: Using DHCP Server. Save and close the
“Control Panels” window. You do not have to restart the Macintosh.
• Proceed to the next section “3. Configure the Netopia Cayman”.
> Mac OS X users
• Launch System Preferences from the Dock or from the Apple Menu.
• Select the Network Preference Pane.
• Choose Show: Built-in Ethernet.
• Click the TCP/IP tab.
• Choose Configure: Using DHCP.
• Quit System Preferences. You do not have to restart the Macintosh.
• Proceed to the next section “3. Configure the Netopia Cayman”.
2. To connect additional computers that will use the address sharing features of
the Netopia Cayman, repeat step 1.
5
3. Configure the Netopia Cayman
1. Run a Telnet application from the computer on the same network as the Router.
• Windows users: click on the Start menu, select Run, and in the resulting
entry box, type telnet 192.168.1.1
• Macintosh OS X users: launch the Terminal application, either from the
Dock or from the Utilities folder, and type telnet 192.168.1.1
• Classic Macintosh OS users: you need to install the NCSA Telnet
application, included on the Netopia CD, or freely available from user groups
or other freeware sources. Then launch NCSA Telnet and type 192.168.1.1
In the Telnet screens, move from field to field with the arrow keys. Select/execute
items with the Return key, and toggle items (Yes/No, On/Off, ...) with the Tab key
followed by Return.
A/ The Telnet window displays the Main Menu.
Cayman Router
Easy Setup...
WAN Configuration...
System Configuration...
Utilities & Diagnostics...
Statistics & Logs...
Quick Menus...
Quick View...
Select Easy Setup
and press Return.
Return/Enter goes to Easy Setup -- minimal configuration.
You always start from this main screen.
B/ The ADSL Line Configuration screen appears.
ADSL Line Configuration
Trellis Coding Enabled:
Fast Retrain Enabled:
On
On
Wiring Type
Data Link Encapsulation
RFC 1483 Mode
PPP over Ethernet (PPPoE)
AutoSense
RFC 1483
Bridged 1483
Off
Data Circuit VPI (0-255)
Data Circuit VCI (32-65535)
8
35
PREVIOUS SCREEN
NEXT SCREEN
Make any changes
that your ISP
requires.
If necessary, turn
on PPPoE or
PPPoA.
Select NEXT SCREEN
and press Return.
Return/Enter takes you back to previous screen.
> If your ISP uses PPPoE, toggle PPP over Ethernet to On with the Tab key followed
by Return. If necessary, change the VPI and VCI to match those used by your ISP.
> If your ISP uses PPPoA, toggle Data Link Encapsulation to PPP and configure the
PPPoA default profile.
6
3. Configure the Netopia Cayman (continued)
If your ISP uses PPPoA, follow the instructions (the example below is based on
ADSL “Wires Only” in the UK - parameters may change according to your ISP):
ADSL Line Configuration
Trellis Coding Enabled:
On
Fast Retrain Enabled:
On
Wiring Type
Data Link Encapsulation
PPP Mode
AutoSense
PPP
VC Multiplexed
Data Circuit VPI (0-255)
Data Circuit VCI (32-65535)
0
38
PREVIOUS SCREEN
NEXT SCREEN
Return/Enter takes you back to previous screen.
Make any
changes
that your
ISP requires.
E
N
G
L
I
S
H
Select NEXT
SCREEN and
press Return.
If necessary, toggle PPP Mode from VC Multiplexed to LLC SNAP and change the
VPI and VCI to match those used by your Internet Service Provider.
Please note:
This example is based on ADSL “Wires Only” in the UK. ADSL “Wires Only” uses
PPPoA and different VPI/VCI than those by default. As a result, you need to set
Data Link Encapsulation to PPP, VPI to 0 and VCI to 38. PPP Mode remains VC
Multiplexed by default. Parameters may change according to your ISP!
Proceed to the next screen.
C/ The Connection Profile 1: Easy Setup Profile screen appears.
The example below is based on IP Easy Set Up using NAT by default.
Connection Profile 1: Easy Setup Profile
Address Translation Enabled:
IP Addressing...
Yes
Unnumbered
Remote IP Address:
Remote IP Mask:
127.0.0.2
255.255.255.255
PPP Authentication...
Send Host Name:
Send Secret:
CHAP
PREVIOUS SCREEN
login
password_
NEXT SCREEN
Return/Enter brings you to next screen.
Enter basic information about your WAN connection with this screen.
Make any
changes
required.
Select NEXT
SCREEN and
press Return.
Set the Remote IP Address to 127.0.0.2 - this will allow the Netopia Cayman to
automatically pick up the IP address of the remote gateway of your Internet Service
Provider. If you know this address, you can also enter it here.
Set PPP Authentication to the mode used by your ISP. In the BT Wires Only example
this would be CHAP mode. In the Send Host Name and Send Secret fields, enter
the login and password supplied by your ISP. Proceed to the next screen.
7
3. Configure the Netopia Cayman (continued)
D/ The IP Easy Setup screen appears. Configure your LAN parameters here.
The example below is based on IP Easy Set Up using NAT and DHCP Server.
IP Easy Setup
Ethernet IP Address:
Ethernet Subnet Mask:
192.168.1.1
255.255.255.0
Domain Name:
Primary Domain Name Server:
Secondary Domain Name Server:
______
0.0.0.0
0.0.0.0
Default IP Gateway:
127.0.0.2
IP Address Serving:
On
Number of Client IP Addresses:
1st Client Adress:
100
192.168.1.100
PREVIOUS SCREEN
NEXT SCREEN
Enter an IP address in decimal and dot form (xxx. xxx. xxx. xxx).
Set up the basic IP & IPX attributes of your Netopia in this screen.
Make any
changes
required.
The default IP
gateway must
match the
Remote IP address value that
you set on the
Connection
Profile screen
Select NEXT
SCREEN and
press Return.
The Domain Name and the IP addresses of your Primary and Secondary Domain
Name Server are dynamically acquired by the router when connecting to the
Internet. However, we recommend that you enter manually these information as
supplied by your ISP. The other parameters allow you to change, if necessary, the
default settings and the DHCP Server features of your Cayman Router.
E/ The Easy Setup Security Configuration screen appears.
Easy Setup Security Configuration
It is strongly suggested that you password-protect configuration
access to your Netopia. By entering a Name and Password pair here,
access via serial, Telnet and Web server will be password protected.
Be sure to remember what you have typed here, because you will be
prompted for it each time you configure this Netopia.
Write Access Name:
Write Access Password:
PREVIOUS SCREEN
TO MAIN MENU
RESTART DEVICE
Configure a Configuration Access Name and Password here.
Enter a Name and Password to limit access to the Router’s configuration screens.
Be sure to remember what you have typed because you will be prompted for it each
time you configure your Router. Select RESTART DEVICE and press Return.
2. The Cayman Router will then restart and your settings will take effect.
Congratulations! Your installation is complete. You can now surf to your favourite
Web sites. If you have any questions or encounter problems, refer to the detailed
documentation on the Netopia CD, or contact our technical support. Answers to
many frequently asked product-related questions are also available on-line at:
http://www. netopia.com/support
8
Netopia Europe
2, rue du Docteur Lombard
92130 Issy-Les-Moulineaux
FRANCE
tel: +33 1 45 29 91 00
fax: +33 1 45 29 91 09
[email protected]
Netopia UK
c/o M. Nathan-Amissah
58 Poulton Avenue
Sutton
Surrey SM1 3PY
UNITED KINGDOM
[email protected]
Netopia Deutschland
Am Fuchsberg 4
D-21423 WINSEN
DEUTSCHLAND
[email protected]
Netopia Nederland
Becanusstraat 13
Suite B04
6216 BX Maastricht
NEDERLAND
[email protected]
Internet
www.netopia.com
www.netopia-europe.com
www.netopia.co.uk
www.netopia.fr
www.netopia.de
www.netopiaAG.ch
www.netopia.it
Hotline
> in English
+44 (0)20 7295 00 36
[email protected]
> en français
(0,15 Euros HT/min)
N° local France : 0825 06 2424
DOM TOM : +33 (0)1 41 83 44 71
[email protected]
> auf Deutsch (für Swisscom &
Bluewin Kunden)
+41 (0)900 000 106 (2,5 CHF/min)
[email protected]
Netopia Part Number 6180061-00-01
EU-ENT_3346-3356_QSG-240703