1
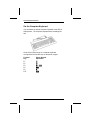
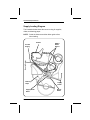
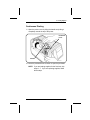
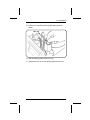
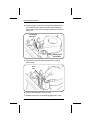
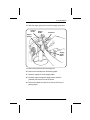
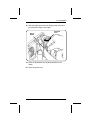
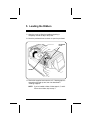
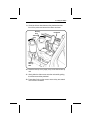
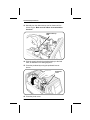
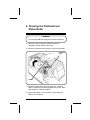
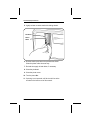
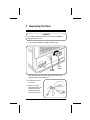
Monarch 9401®/ 9402 ®
Thermal Printers
Equipment Manual
TC9401EM Rev. C 6/94
©1989-1994 Monarch Marking Systems, Inc. All rights reserved.
Each product and program carries a respective written
warranty, the only warranty on which the customer can rely.
Monarch reserves the right to make changes in the product
and the programs and their availability at any time and without
notice. Although Monarch has made every effort to provide
complete and accurate information in this manual, Monarch
shall not be liable for any omissions or inaccuracies. Any
update will be incorporated in a later edition of this manual.
WARNING
This equipment has been tested and found to comply with the limits for
a Class A digital device, pursuant to Part 15 of the FCC Rules. These
limits are designed to provide reasonable protection against harmful
interference when the equipment is operated in a commercial
environment. This equipment generates, uses, and can radiate radio
frequency energy and, if not installed and used in accordance with the
instruction manual, may cause harmful interference to radio
communications. Operation of this equipment in a residential area is
likely to cause harmful interference in which case the user will be
required to correct the interference at his own expense.
CANADIAN D.O.C. WARNING
This digital apparatus does not exceed the Class A limits for radio
noise emissions from digital apparatus set out in the Radio Interference
Regulations of the Canadian Department of Communications.
Le présent appareil numérique n’émet pas de bruits radioélectriques
dépassant les limites applicables aux appareils numériques de la
classe A prescrites dans le Réglement sur le brouillage radioélectrique
édicte par le ministère des Communications du Canada.
WARNING
The power cord is intended to serve as the disconnect device. The
socket-outlet shall be near the equipment and shall be easily
accessible.
WARNUG
Der Stromversorgungskabel dient als abschaltvorrichtung. Die
Steckdose soll in der Nahe der Einheit und liecht zunganglich liegen.
Trademarks
Monarch, 9401 and 9402 are registered trademarks of Monarch Marking Systems, Inc.
Table of Contents
1. Introduction ....................................................................... 1
2. Installing the Printer ........................................................ 3
3. Using the Keys ................................................................. 5
On the Keypad ............................................................ 5
On the Computer Keyboard ........................................ 6
4. Loading Supplies .............................................................. 7
Supply Loading Diagram............................................. 8
Continuous Printing..................................................... 9
On-Demand Printing ................................................. 13
5. Loading the Ribbon ........................................................ 19
6. Cleaning the Printhead and Platen Roller .................... 23
7. Replacing the Fuse ......................................................... 25
8. Troubleshooting.............................................................. 27
9. Specifications.................................................................. 31
Printer......................................................................... 31
Supplies...................................................................... 32
i
9401/9402 Equipment Manual
ii
1. Introduction
The 9401® (5-key keypad) and 9402 ® (21-key keypad)
printers are available with a number of options:
• formats 54-69 (9402 only)
• formats 70-85 (9402 only)
• memory card
• memory expansion board
• computer keyboard
• scanner
• battery pack
• ribbon take-up reel
• ribbon delivery spool
1
9401/9402 Equipment Manual
To install and use your printer, read all the sections of the
manual that apply. If your printer does not have
• take-up reels, skip "Continuous Printing."
• a ribbon delivery spool, skip "Loading the Ribbon."
Backing Paper
Take-up Reel
Ribbon Take-up
Reel
Ribbon Delivery
Reel
You should also have these 9401/9402 manuals:
2
Operator’s Handbook
Explains how to enter data
and print labels.
System Administrator’s
Guide
Explains format design,
communications, data structures,
and how to send formats and
batch data on-line.
Messages Manual
Lists off-line and on-line messages
and what action you should take
(if any).
2. Installing the Printer
1. Place the printer on a level surface.
Power
Cord
RS-232
Cable
Power
Switch
Keyboard
Connector
CAUTION
The power switch must be Off while you connect any
cables to the printer.
2. If you are going to use the printer on-line, connect the
RS-232 (on-line) cable as shown.
3. If you are going to use the optional Monarch computer
keyboard, remove the keyboard from its separate shipping
carton. Then, remove the plastic cap from the end of the
keyboard cable and connect it to the keyboard connector
on the printer.
3
9401/9402 Equipment Manual
NOTE: The keyboard cable is marked with the word "TOP" to
help you connect it to the printer.
4. Connect the power cord to the socket as shown. Plug the
other end of the cord into a grounded 110VAC electrical
outlet.
4
3. Using the Keys
Both printers have a display (with two 16-character lines) and
five function keys. The 9402 printer has 16 additional keys to
allow off-line data entry. For information on printing data
off-line, refer to the 9401/9402 Operator’s Handbook.
Data
Entry
Keys
(9402
Only)
Function
Keys
(9401/9402)
On the Keypad
Interrupts printing.
Returns the display to the next higher
menu
(when you press
once).
Returns the display to the Main menu
(when you press and hold
).
Displays the next menu item.
Displays the previous menu item.
Selects the displayed menu item.
5
9401/9402 Equipment Manual
On the Computer Keyboard
You can attach an optional computer keyboard to the 9401 or
9402 printers. The computer keyboard looks something like
this:
Some of the function keys on a computer keyboard
correspond to the function keys on the printer keypad.
Function
Key
F1
F2
F5
F6
F9
F10
6
Printer Keypad
Equivalent
1
2
5/8
6
9
7
4. Loading Supplies
The 9401/9402 printers print on
• Tags, which can be fed out the exit chute in one strip
(see "Continuous Printing").
• Labels, which can be fed out the exit chute:
− in one strip (see "Continuous Printing").
− one at a time while the backing paper rewinds inside
the printer (see "On-Demand Printing").
NOTE: On-demand printing is available only on printers
equipped with a take-up reel.
7
9401/9402 Equipment Manual
Supply Loading Diagram
The illustration below shows the correct routing for supplies,
ribbon, and backing paper.
NOTE: Guide the ribbon around the ribbon guide rollers
when loading.
Ribbon
Ribbon
Guide
Rollers
Front of Printer
Printed
Supply
Backing
Paper
Supply Guide
Roller
8
Supply
Platter
Supply
Guide
4. Loading Supplies
Continuous Printing
1. Open the printer cover by lifting the handle and pulling it
completely around the top of the printer.
Printhead
Lever
Handle
2. Move the printhead lever as shown to open the printhead.
NOTE: If you are loading supplies for the first time, skip
steps 3 - 7. If you are replacing supplies, follow
all the steps.
9
9401/9402 Equipment Manual
3. If backing paper isn’t rewound on the backing paper
take-up reel, manually rewind and remove the old supply
roll.
Backing Paper
Take-up Reel
NOTE: Change the ribbon when loading new supplies, if
necessary (see "Loading the Ribbon").
4. If the backing paper is rewound on the backing paper
take-up reel, loosen the old supplies enough to tear the
backing paper where shown. Manually rewind and remove
the supply roll.
Tear Backing
Paper Here
10
Backing Paper
Take-up Reel
4. Loading Supplies
5. Pull the wire clip off the backing paper take-up reel as
shown.
Wire Clip
6. Slide the backing paper off the wire clip.
7. Replace the wire clip on the backing paper take-up reel.
11
9401/9402 Equipment Manual
8. Slide the supply guide to the top of the supply guide roller.
9. Remove the seal from the new roll of supplies.
10. Remove the first label from the backing paper.
11. Place the roll of supplies on the supply platter.
Feed
Mark
Supply
Guide
Printhead
Lever
Supply
Sensor
Supply
Guide
Roller
12. Feed the supply through the supply sensor, past the
printhead, and up to the feed mark (red line).
13. Slide the supply guide down the supply guide roller until it
just touches the edge of the supply strip.
14. Close the printhead by turning the printhead lever as
shown.
15. Close the printer cover.
12
4. Loading Supplies
On-Demand Printing
1. Open the printer cover by lifting the handle and pulling it
completely around the top of the printer.
2. Move the printhead lever as shown to open the printhead.
Printhead
Lever
Handle
NOTE: If you are loading supplies for the first time, skip
steps 3 - 7.
3. If backing paper is not rewound on the backing paper
take-up reel, manually rewind and remove the old supply
roll.
Backing Paper
Take-up Reel
13
9401/9402 Equipment Manual
4. If backing paper is rewound on the backing paper take-up
reel, loosen the old supplies enough to tear the backing
paper where shown, then manually rewind and remove the
supply roll.
Tear backing
paper here
Backing Paper
Take-up Reel
5. Pull the wire clip off the backing paper take-up reel as
shown below.
Wire
Clip
6. Slide the backing paper off the wire clip.
7. Replace the wire clip on the backing paper take-up reel.
14
4. Loading Supplies
8. Slide the supply guide to the top of the supply guide roller.
Front of
Printer
Supply
Guide
Printhead
Supply
Sensor
Supply
Guide
Roller
9. Remove the seal from the new supply roll.
10. Remove the first label from the backing paper.
11. Place the supply roll on the supply platter.
12. Feed the supply through the supply sensor, past the
printhead, and out the front of the printer.
13. Remove the labels from the first 10 inches (254 mm) of
backing paper.
15
9401/9402 Equipment Manual
14. Loop the backing paper back through the platen unit as
shown.
Platen
Unit
15. Remove the wire clip from the backing paper take-up reel.
Backing Paper
Take-up Reel
Wire
Clip
16. Wrap the backing paper around the backing paper take-up
reel as shown.
17. Slide the wire clip over the backing paper and backing
paper take-up reel.
16
4. Loading Supplies
18. Slide the supply guide down the supply guide roller until it
just touches the edge of the supply.
Supply
Guide
Printhead
Lever
19. Close the printhead by turning the printhead lever as
shown.
20. Close the printer cover.
17
9401/9402 Equipment Manual
18
5. Loading the Ribbon
1. Open the cover by lifting the handle and pulling it
completely around the top of the printer.
2. Move the printhead lever as shown to open the printhead.
Printhead
Lever
Handle
3. Rewind the supplies back onto the roll. If backing paper is
rewound on the take-up reel, tear it as described in
"Loading Supplies."
NOTE: If you’ve loaded a ribbon, follow steps 4, 5, and 6.
If there is no ribbon, skip to step 7.
19
9401/9402 Equipment Manual
4. Remove the old ribbon by pulling the wire clips as shown.
Delivery
Reel
Wire
Clip
Ribbon
Take-up
Reel
5. Remove the ribbon cores from the wire clips and discard
them.
6. Place the wire clips back on the ribbon take-up reel and
delivery reel.
7. Remove the new ribbon from the package.
8. Place the full delivery core on the delivery reel as shown.
NOTE: The delivery reel feeds the ribbon in a clockwise
direction. The ribbon take-up reel winds the
ribbon in a counterclockwise direction.
20
5. Loading the Ribbon
9. Guide the ribbon down between the printhead and the
front of the printer and around the rollers as shown.
Delivery
Core
Printhead
Take-up
Core
Ribbon
Take-up
Reel
10. Place the take-up core (empty core) on the ribbon take-up
reel.
11. Gently slide the ribbon cores onto the reels while guiding
the ribbon around the printhead.
12. Press down firmly on the cores to ensure they are seated
on the ribbon reel bases.
21
9401/9402 Equipment Manual
13. Manually turn the ribbon take-up reel as shown until the
ribbon is tight. Make sure the ribbon is not wrinkled or
bunched.
Ribbon Take-up
Reel
14. Slide the supply through the printhead and up to the feed
mark, as described in "Loading Supplies."
15. Close the printhead by turning the printhead lever as
shown.
Printhead
Lever
16. Close the printer cover.
22
6. Cleaning the Printhead and
Platen Roller
WARNING
Turn the power Off and unplug the cord before cleaning.
1. Open the cover by lifting the handle and pulling it
completely around the top of the printer.
2. Move the printhead lever as shown to open the printhead.
Printhead
Lever
Handle
3. Wind the supplies back onto the supply roll. If backing
paper is rewound on the backing paper take-up reel, tear it
as described in "Loading Supplies."
4. Remove the ribbon, if one is loaded. See "Loading the
Ribbon" in this manual.
23
9401/9402 Equipment Manual
5. Lightly moisten a cotton swab with rubbing alcohol.
Printhead
Platen
Roller
6. Rub the swab up and down the printhead as shown.
Clean the platen roller the same way.
7. Re-load the supply roll and ribbon, if necessary.
8. Close the printhead.
9. Close the printer cover.
10. Turn the power On.
11. If printing is not improved, call Service toll free at the
number on the back cover of this manual.
24
7. Replacing the Fuse
CAUTION
As a safety measure, be sure to turn the printer Off and
unplug the power cord.
1. Turn the printer Off and unplug the power cord.
Power
Switch
Fuse
Cover
Facing the back of the printer, press and turn the fuse
cover as shown until it pops out.
3. Pull the fuse out of
the cover.
4. Insert a 1.5 amp,
250V slow blow fuse
into the fuse cover
and push until the
fuse is fully seated.
25
9401/9402 Equipment Manual
5. Line up the notches in the fuse cover with the slots in the
receptacle and insert the fuse.
6. Push the fuse cover and turn as shown until it locks in
place.
7. Plug in the power cord.
26
8. Troubleshooting
If you have a problem that isn’t listed, see the 9401 Messages
Manual or call Monarch Service.
Problem
Corrective Action
The display is blank after
you turn On the printer.
Turn the printer Off and make sure
the power cord is properly plugged
into the printer and a
grounded 110VAC receptacle.
Check the fuse and replace it, if
necessary (refer to "Replacing the
Fuse"). If the problem continues,
call Service.
The machine continuously
feeds supplies without
printing.
Turn the machine Off and check the
supply path. Make sure the supply
is fed through the supply sensor
and the supply guide touches the
top edge of the supply.
Be sure the supply roll is loaded
correctly on the supply platter.
Printed data wraps around
or is partially lost.
Load the correct supply size.
Printed data becomes
misaligned.
Make sure the supplies are loaded
correctly.
The printer doesn’t print.
If you haven’t loaded a ribbon, load
one. If you have loaded a ribbon,
load it correctly.
Make sure you have "direct"
supplies loaded if you are printing
without a ribbon.
Load the correct supply size.
Adjust the print position.
Check the print contrast setting.
27
9401/9402 Equipment Manual
Problem
Corrective Action
Printing is compressed or
distorted.
Clean the printhead and platen
roller.
Printing has shadows or
smears.
Clean the printhead.
Lower the print contrast.
Change supplies to thermal direct
or thermal transfer.
Reload the ribbon correctly.
Light printing.
Change supplies to thermal direct
or thermal transfer.
Reload the ribbon correctly.
Raise the print contrast.
Heavy printing.
Clean the printhead.
Lower the print contrast.
Change supplies to thermal direct
or thermal transfer.
Voids in the printing.
Clean the printhead.
Clean the platen roller.
Change supplies to thermal direct
or thermal transfer.
Reload the ribbon correctly.
28
8. Troubleshooting
Problem
"Check Ribbon" message
appears.
Corrective Action
Check to see if there is no ribbon or
the printer is at the end of the
ribbon. In either case, replace the
ribbon.
The ribbon is jammed. Check the
ribbon path and reload the ribbon, if
necessary.
"Out of Paper" message
appears.
Replace the supply roll, if it is empty.
Make sure the supplies are loaded
correctly.
No response from the
computer keyboard.
Turn the printer Off. Make sure the
keyboard cable is firmly seated in
the socket. Turn the printer On.
29
9401/9402 Equipment Manual
30
9. Specifications
Printer
Length:
16.5 inches (419 mm)
Width:
10.5 inches (267 mm)
Height:
9 inches (229 mm)
Weight:
15.5 lbs. (7.05 kg)
Shipping Weight:
22 lbs. (10 kg)
Power:
Domestic: 115 VAC, 80W, .7A, 60 Hz.
International: 220 VAC, 80W, .35A, 50 Hz.
Fuse:
1.5 amp, 250V slow blow
Normal operation: 8 hrs. per day, not to exceed 40 hrs.
per 7 days
Display:
Liquid crystal display with 2 lines
16 characters per line
Printhead:
Thermal
2 inches wide (51.0 mm / 384 dots)
192 dots/inch (7.5 dots/mm)
Printing method:
Thermal transfer (ribbon)
or Thermal direct
Ribbon type:
Black
Temperature:
Operating
Thermal Transfer: 40˚F to 95˚F (4˚C to 35˚C)
Thermal Direct: 40˚F to 110˚F (4˚C to 43˚C)
Storage
15˚F to 120˚F (-10˚C to 49˚C)
31
9401/9402 Equipment Manual
Relative humidity: Operating
Storage
10% to 80% (no condensation)
5% to 90%
Ribbon widths:
1.26 inches (32.0 mm)
1.57 inches (39.88 mm)
2.10 inches (53.34 mm)
Ribbon length:
308.4 feet (94 meters)
Ribbon storage:
41˚F to 95˚F (5˚C to 35˚C). DO NOT leave
ribbons in direct sunlight, high temperatures,
or high humidity.
Print speed:
2 inches (51.0 mm) per second
Print image
length:
(9401) the first 6 inches of the tag (153 mm)
(9402) the first 4 inches of the tag (102.0 mm)
width:
2 inches
Supplies
Supply types:
Thermal transfer or thermal direct
(tags or labels)
Width:
Maximum
Minimum
2.5 inches (63.5 mm)
0.75 inches (19.05 mm)
Length:
Maximum
Minimum
9 inches (228.6 mm)
0.75 inches (19.05 mm)
Supply thickness: Maximum
Minimum
Roll diameter:
32
10 mil
6 mil
Inside diameter: 3 inches (76.2 mm)
Outside diameter: 6.75 inches (171.45 mm)
For supplies, service, or assistance call:
TOLL FREE:
1-800-543-6650 (In the U.S.A.)
1-800-263-4650 (In Canada)
Published by Technical Communications Department.
Printed in the U.S.A.