1
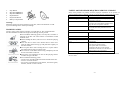
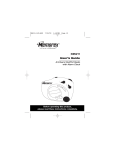
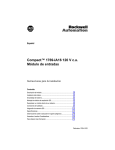
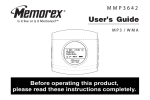
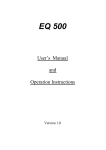
Mini Compo CD Player
with Radio
Model: MX9790
Memcorp, Inc.
Weston, FL
Printed in Hong Kong
Note: Please read and follow these instructions before using your unit.
Visit our website at www.memorexelectronics.com
WARNING
IMPORTANT SAFETY INSTRUCTIONS
TO PREVENT ELECTRIC SHOCK; DO NOT USE THIS PLUG WITH AN
EXTENSION CORD RECEPTACLE OR OTHER OUTLET UNLESS THE
BLADES CAN BE FULLY INSERTED TO PREVENT BLADES
EXPLOSURE.
TO PREVENT FIRE OR SHOCK HAZARD; DO NOT EXPOSE THIS
APPLIANCE TO RAIN OR MOISTURE.
1.
2.
3.
4.
5.
6.
7.
8.
9.
10.
"CAUTION - TO PREVENT ELECTRICAL SHOCK, MATCH WIDE
BLADE PLUG TO WIDE SLOT FULLY INSERT."
11.
12.
13.
14.
-1-
Read these instructions.
Keep these instructions.
Heed all warnings.
Follow all instructions.
Do not use this apparatus near water.
Clean only with dry cloth.
Do not block any ventilation openings. Install in accordance with the manufacturer’s
instructions.
Do not install near any heat sources such as radiators, beat registers, stoves, or other
apparatus (including amplifiers) that produce heat.
Do not defeat the safety purpose of the polarized or grounding-type plug. A polarized plug
has two blades with one wider than the other. A grounding-type plug has two blades and a
third grounding prong. The wide blade or the third prong is provided for your safety. If
the provided plug does not fit into your outlet, consult an electrician for replacement of
the obsolete outlet.
Protect the power cord from being walked on or pinched particularly at plug, convenience
receptacles, and the point where they exit from the apparatus.
Only use attachments/accessories specified by the manufacturer.
Unplug this apparatus during lightening storms or when unused for long periods of time.
Refer all servicing to qualified service personnel. Servicing is required when the
apparatus has been damaged in any way, such as power-supply cord or plug is damaged,
liquid has been spilled or objects have fallen into the apparatus, the apparatus has been
exposed to rain or moisture, does not operate normally, or has been dropped.
This appliance shall not be exposed to dripping or splashing water and that no object
filled with liquids such as vases shall be placed on the apparatus.
-2-
LOCATION OF CONTROLS
CONNECTING THE LOUDSPEAKERS
Connect the cables of the two loudspeakers to the corresponding input (R) for the
right speaker and input (L) for the left speaker, located at the back of the unit.
Warning:
z Connect the loudspeakers before powering the unit:
z The unit may not work properly or get damaged if you use speakers
different than the ones supplied with the unit
AC OPERATION
1.
2.
3.
4.
5.
6.
7.
8.
9.
10.
11.
12.
13.
14.
15.
Speakers
Function Switch
Power Switch
Stereo Headphones Jack
Volume Control Knob
Skip / Backward Search Button
Remote Sensor
Skip / Forward Search Button
Power Indicator
Program Button
ON / OFF Alarm Switch
Display
(CD, Time, AM/FM Station, Alarm)
Alarm Set Button
Time Set Button
Hour Set Button
-3-
16.
17.
18.
19.
20.
21.
22.
23.
24.
25.
26.
27.
Minute Set Button
Repeat Button
Play/Pause Button
FM Stereo Indicator
Stop Button
CD Door
Tuning Knob
CD Door Open Button
CD Door Close
Band Switch
AC Socket
Left Speaker Jack
28.
29.
Right Speaker Jack
FM Wire Antenna
Connect the plug to the AC socket of the unit and the other end to a standard AC
outlet.
ATTENTION
1. Do not plug or unplug the power cable while you have wet hands;
2. When planning not to use this unit for a long time, disconnect the power
cable from the wall outlet;
3. When disconnecting the power cord from the wall outlet, do not pull on the
cord in order to avoid shock risks caused by damaged cable.
SET THE CORRECT TIME
Before starting to set the time, make sure that the Function Switch is not on Radio
position.
Press and hold the time button as well as the Hour and Minute buttons simultaneously,
in order to set the time. Release all buttons when reaching the correct time.
RADIO OPERATION
1.
2.
3.
Set the Function Selector to Radio position;
Set the band selector to AM/FM position;
Adjust the TUNING control to tune in a radio station.
SET THE ALARM TIME
Before starting to set the alarm time, make sure that the Function Switch is not on
Radio position.
Press and hold simultaneously the Alarm button as well as the Hour and Minute
buttons, to adjust the alarm time. Release all buttons when reaching the desired alarm
time and the display will go back to regular time.
-4-
RADIO WAKE UP FUNCTION
Select the desired radio station and set the volume to the desired level and
make the following steps:
1. Slide the Function Switch to auto position;
2. Press the ALARM ON/OFF button once to activate the alarm
function and the display will show "((((( • "indicating that the alarm is
ON and press the ALARM ON/OFF button again to cancel;
3. Set the alarm time as indicated at the SET ALARM TIME section
and the unit’s radio will turn on at the pre-selected time.
BUZZER WAKE UP FUNCTION
Follow the same instructions as for Radio Wake up Function, but slide the
Function Switch to Alarm position. The buzzer will sound for 3 minutes.
CD PLAYER OPERATION
To play a CD, please follow the steps underneath:
1. Set the Function Selector to the CD position;
2. Press the OPEN button in order to open the CD door;
3. Insert the CD with the printed side facing up and close the CD door;
4. Disc information (total number of tracks) will appear on the LED
display;
5. Press PLAY/PAUSE button to start playing the CD;
6. Adjust the volume control to the desired volume level;
7. Press STOP, to stop playing the CD
SKIP DURING PLAY MODE
1. Press SKIP button once to skip to the beginning of the next track;
2. Press SKIP button once to skip to the beginning of the correct
track;
3. Press SKIP twice quickly in succession to go back to previous
tracks.
SEARCH DURING PLAY MODE
1. Press and hold the search buttons to quickly advance or reverse
through the music at high speed;
2. Release the SEARCH button to return to normal play mode.
-5-
PROGRAMMING THE CD PLAYER
The programming of the CD player should be done during STOP mode.
1. Press the PROGRAM button to begin programming the CD player;
2. Press SKIP or SKIP buttons, to select desired track;
3. Press PROGRAM button again to store this track in memory;
4. Repeat steps from 2 to 3 to store more tracks in memory. You can store a
maximum of 19 tracks in the memory.
5. Press PLAY/PAUSE button to play the disc in the programmed order;
6. To stop playing, press STOP;
7. To cancel the programming, press STOP button and open the CD player
door or select a different function (OFF/RADIO etc.)
REPEAT FUNCTION
To repeat the same track:
- Press REPEAT button before or while playing the song. The REPEAT
symbol "
" will light up on the display.
To repeat the whole disc:
-
Press REPEAT button twice. The REPEAT symbol "
" will light up on
the display.
To cancel the repeat function:
- Press REPEAT button three times. The REPEAT indicator will be cleared
from the display.
PAUSE FUNCTION
1. While playing a CD, press PLAY/PAUSE button once to temporarily pause
the play.
2. Press PLAY/PAUSE button again to resume play.
REMOTE CONTROL OPERATION
Open the Battery Compartment Door and insert two pieces "AAA" size batteries into
the battery compartment with battery polarity as shown inside the battery
compartment.
Point the remote control at the remote sensor. The functions of the buttons on the
remote control are same as the corresponding controls on the main unit.
-6-
1.
2.
3.
4.
5.
6.
USEFUL ADVICE BEFORE REQUIRING SERVICE SUPPORT
Stop Button
Skip/SearchButton
Skip/SearchButton
Repeat Button
Play/Pause Button
Battery Compartment
Warning:
When the remote will not be used for a long time, remove the batteries in order
to prevent damage due to electrolyte leakage.
HANDLING A DISC
Always protect a disc against scratches, soil and dust etc. We recommend that
the discs should be stored in the original case during non-use periods.
Bear in mind the following points, since any dirt, scratches or
warping of the disc can cause broken or intermittent sound
and also noise.
z When holding the discs, take care not to touch the playing
surface.
z Store the discs in their cases. Return them to their cases
with the label surface facing up and push down lightly on
the label surface.
z Do not place discs near a heating device or a place where
the temperature is high or in dusty areas.
z Do not write on the label surface using a ballpoint pen and
do not stick labels on the CD.
z Wipe away any fingerprints or dust on the playing surface
of a disc using a soft cloth.
Bear in mind the following points:
- Always wipe from the inside toward the outside of the disc.
- Never in a circular motion.
- Do not use conventional record cleaners, anti-static agents,
benzene, thinner or other solvents.
-7-
Many of the problems are probably caused by improper adjustments of the product or by
simple problems. Before contacting your Service Centre for help, check the following table.
PROBLEM
CAUSE AND REMEDY
GENERAL
No Power Supply
- Check that the power cord is properly
connected to wall out.
No Audio
- Adjust the volume.
- You have not connected the speaker boxes;
plug the main unit speaker terminals.
Evident Audio Disturbances
- Your Hi-Fi system is too close to a TV set
or a VCR; move away from the TV set or
the VCR.
RADIO RECEPTION
The FM Stereo Indicator Blinks.
- Rotate the set and extend the FM Antenna.
Evident Audio Disturbance.
- Rotate the set and extend the FM Antenna.
CD OPERATION
The CD Compartment does not
- The disc is not placed correctly in its
close
compartment.
The Playback does not start
- The CD is dirty.
- The CD was placed wrongly.
- The pause mode was activated.
- Inside the CD player some moisture
condensation occurred; leave the unit in a
warm room for one or two hours.
No Audio During Playback
- The CD surface is dirty or scratched.
If after checking this table the unit fails to operate normally. Consult the nearest Authorized
Service centre.
-8-
CARE AND MAINTENANCE
Precautions
1. Always turn OFF the unit after use;
2. Keep the unit away from magnetic objects, water or any heat sources;
3. Use a clean soft moist cloth to clean the unit’s cabinet. Do not use
chemical cleaners that could damage the finishing of the unit;
4. Never touch the CD pickup lens. If fingerprints get on the pickup lens,
use a commercial lens cleaner.
5. Disconnect the unit from any power sources before starting the
cleaning operation.
SPECIFICATION
CD SECTION
Channels:
Pick up light source:
RADIO SECTION
Frequency range:
2 channels
semiconductor laser
Antenna:
AM 520 - 1710 KHz
FM 87.5 - 108 MHz
FM antenna wire
GENERAL
Power output
Power consumption
Power source
2W + 2W
15W
AC 120V ~ 60Hz
Specifications are subject to change without further notice.
FOR ADDITIONAL SET-UP OR OPERATING ASSISTANCE, PLEASE VISIT
OUR WEBSITE AT WWW.MEMOREXELECTRONICS.COM OR CONTACT
CUSTOMER SERVICE AT (954) 660-7100
PLEASE KEEP ALL PACKAGING MATERIAL FOR AT LEAST 90 DAYS IN
CASE YOU NEED TO RETURN THIS PRODUCT TO YOUR PLACE OF
PURCHASE OR MEMOREX.
FOR PARTS AND ACCESSORIES, CONTACT FOX INTERNATIONAL AT
1-800-321-6993
-9-