1
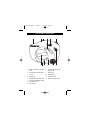
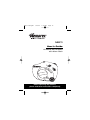
MB211.O/M.QXD
7/22/03
1:49 PM
Page 10
MB211
User’s Guide
Armband AM/FM Radio
with Alarm Clock
Before operating this product,
please read these instructions completely.
MB211.O/M.QXD
7/22/03
1:49 PM
Page 1
Thank you for purchasing this Memorex audio system.
The serial number of your unit can be found on a label on the rear of the cabinet.
We suggest that you record the serial number in the space provided below in
case this information is ever needed at a future date.
PLEASE KEEP ALL PACKAGING MATERIAL FOR AT LEAST 90 DAYS IN
CASE YOU NEED TO RETURN THIS PRODUCT TO YOUR PLACE OF
PURCHASE OR TO MEMOREX.
Model Number:
MB211
Serial Number: _______________________________________
BATTERY INSTALLATION
BATTERY INSTALLATION:
Open the battery compartment by sliding it downward and lifting it up. To
prevent the possibility of losing the cover, it cannot be removed.
Insert two (2) "AAA" size batteries (not included) following the polarity
diagram. Slide the battery
compartment back in place.
+
—
—
+
BATTERY PRECAUTIONS
Follow these precautions when using batteries in this device:
1. Use only the size and type of batteries specified.
2. Be sure to follow the correct polarity when installing the batteries, as indicated on the battery
compartment. Reversed batteries may cause damage to the device.
3. Do not mix different types of batteries together (e.g. Alkaline, Carbon-zinc and Rechargeable) or old
batteries with fresh ones.
4. If the device is not to be used for a long period of time, remove the batteries to prevent damage or injury
from possible battery leakage.
5. Do not try to recharge batteries not intended to be recharged; they can overheat and rupture. (Follow
battery manufacturer’s directions.)
IMPORTANT NOTE WHEN CHANGING BATTERIES:
Make sure to change the batteries within 30 seconds, otherwise the time
and memory may be lost.
1
MB211.O/M.QXD
7/22/03
1:49 PM
Page 2
LOCATION OF CONTROLS
1
2
3
4
7 8 9
1.
10
Battery Compartment (Rear of
6
11
12
8.
Armband Release Button
Armband Strap Holder (Rear
9.
SET Button
Unit)
2.
5
(Rear of Unit)
of Unit)
10. MODE Button
3.
Earbud Jack
11. TUNING Control
4.
AM/FM Dial Scale and Pointer
12. BASS (ON/OFF) Switch
5.
Function (OFF/FM/AM) Switch
6.
VOLUME Control
7.
Time Display
2
MB211.O/M.QXD
7/22/03
1:49 PM
Page 3
INSTALLATION
TO USE THE ARM STRAP
1
2
Insert the belt strap into the belt clip,
then fold the belt strap and fasten the
velcro.
Insert the belt clip into the main unit,
then push the belt clip until it locks in
place at the end of the belt clip holder.
3
4
Straighten the other side of the belt,
then put the belt around your arm (it
will rope your arm itself). Fasten the
velcro so the unit is secure.
TO REMOVE THE BELT CLIP:
Press and hold the Belt Clip release
button, then push the belt clip out to
remove it from the unit.
EARBUDS:
Included with this unit are earbuds. Make sure the VOLUME control is at
minimum and insert the earbud plug into the earbud jack on the top of the
unit. Place the earbuds into your left and right ears, corresponding to the
“L” and “R” mark on each earbud.
NOTE: You must have the earbuds plugged in to hear the alarm sound.
3
MB211.O/M.QXD
7/22/03
1:49 PM
Page 4
OPERATION
TO LISTEN TO THE RADIO
1
2
1
2
Insert the earbuds into the Earbud
jack ❶ and slide the Function switch ❷
to select AM or FM.
Rotate the TUNING control to tune a
station.
3
4
1
2
Adjust the VOLUME control ❶ and
BASS switch ❷ as desired.
When done listening, slide the
Function switch to the OFF position.
BASS BOOST
1
Antennas
FM: Extend the earbud wire for best
reception.
AM: Turn the unit for better AM
reception.
To emphasize the bass, slide the
BASS switch to the ON position. Slide
to the OFF position to turn the bass
feature off.
4
MB211.O/M.QXD
7/22/03
1:49 PM
Page 5
OPERATION (CONTINUED)
TO SET OR RESET THE ACTUAL TIME AND DATE
1
2
1
2
1
2
Press the SET button ❶ four times;
the month will appear. Repeatedly
press the MODE button ❷ until the
desired month appears.
Press the SET button ❶ again; the day
will appear. Repeatedly press the
MODE button ❷ until the desired day
appears.
3
4
1
2
1
2
Press the SET button ❶ again; the
minutes will appear. Repeatedly press
the MODE button ❷ until the desired
minute appears. Press the SET button
❶ then the MODE button ❷ and the
time will be set.
Press the SET button ❶ again; the
hours will appear. Repeatedly press
the MODE button ❷ until the desired
hour appears. Make sure to set the
correct AM/PM or 24 hour time setting.
5
MB211.O/M.QXD
7/22/03
1:49 PM
Page 6
OPERATION (CONTINUED)
TO SET OR RESET THE ALARM TIME
2
1
2
1
1
2
Press the SET button ❶ again; the alarm
minutes will blink. Repeatedly press the
MODE button ❷ until the desired alarm
minute appears. Press the SET button ❶
again and the alarm time will be set.
Press the SET button ❶ twice; the alarm
hour will blink. Repeatedly press the
MODE button ❷ until the desired alarm
hour appears. Make sure to set the
correct AM/PM or 24 hour time setting.
TO TURN THE ALARM ON
1
2
1
Set the alarm time as previously instructed. Press the SET button ❶ once; the
alarm time will blink. Press the MODE button ❷ once to activate the alarm; the
alarm indicator (“ ) ) ”) will appear. Press the MODE button ❷ a second time to
activate the alarm and the Hourly Beep feature (explained on next page); the
Alarm indicator (“ ) ) ”) and Beep indicator (“ )) ”) will appear. Press the SET
button ❶ three times to return to the Time display. When the actual time matches
the selected preset alarm time, the alarm (beep sound) automatically turns on. To
shut off the alarm, see TO SHUT THE ALARM OFF section on the next page.
) )
)
) )
NOTES:
• You must have the earbuds plugged in and be listening to the radio to
hear the alarm sound.
• The alarm will be a beeping sound; you cannot set the unit to wake to the
radio sound.
• The alarm will sound for 30 seconds when it reaches the alarm time.
6
MB211.O/M.QXD
7/22/03
1:49 PM
Page 7
OPERATION (CONTINUED)
TO SHUT THE ALARM OFF
1
To shut the alarm off, when the alarm is
sounding, press the SET button ❶ once and the
alarm time will be reset for the next day. To turn
off the alarm and not set it for the next day,
press the SET button ❶ again, then press the
MODE button ❷ until the Alarm indicator (“ )) )) ”)
disappears to deactivate the alarm. Press the
SET button ❶ until the current time appears in the
display.
2
1
SNOOZE
1
The alarm can be temporarily turned
off manually by pressing the MODE
button when the alarm is sounding;
the Alarm indicator (“ ) ) ”) will blink in
the display. The alarm will turn back
on automatically five minutes later.
) )
TO SET THE HOURLY BEEP
1
2
1
When this feature is activated, a beep will be heard every hour, when listening to
the radio. Press the SET button ❶ once; the alarm time will blink. Press the
MODE button ❷ twice to activate the alarm and the Hourly Beep feature; the
Alarm indicator (“ ) ) ”) and Beep indicator (“ )) ”) will appear. Press the MODE
button ❷ a third time to activate the Hourly Beep feature only; the Beep indicator
(“ )) ”) will appear. Press the SET button ❶ three times to return to the Time
display.
)
) )
)
NOTE: You must have the earbuds plugged in and be listening to the radio
to hear the alarm sound.
7
MB211.O/M.QXD
7/22/03
1:49 PM
Page 8
TROUBLESHOOTING GUIDE
If you experience a problem with this unit, check the chart below before
calling for service.
SYMPTOM
POSSIBLE
CAUSE
POSSIBLE
SOLUTION
The earbuds are not
Plug in the earbuds.
RADIO
No sound.
connected.
VOLUME control at min- Increase the VOLUME
imum position.
control.
Noise or sound
AM: Interference from
Turn the radio for
distorted on AM
traffic.
better AM reception.
or FM.
FM: Earbud wire is
Extend Earbud wire.
not extended.
CLOCK
Time is not set.
Battery connected
Check the battery and/
improperly, not con-
or replace battery.
nected or dead.
Clock is not set.
Set the clock.
Alarm does not
Clock is not set.
Set the clock.
sound.
Alarm time is not set.
Set alarm time.
FOR ADDITIONAL SET-UP OR OPERATING ASSISTANCE, PLEASE VISIT
OUR WEBSITE AT:
WWW.MEMOREXELECTRONICS.COM
OR CONTACT CUSTOMER SERVICE AT 1-800-919-3647.
PLEASE KEEP ALL PACKAGING MATERIAL FOR AT LEAST 90 DAYS IN
CASE YOU NEED TO RETURN THIS PRODUCT TO YOUR PLACE OF
PURCHASE OR TO MEMOREX.
FOR PARTS AND ACCESSORIES, CONTACT FOX INTERNATIONAL AT
1-800-321-6993.
8
MB211.O/M.QXD
7/22/03
1:49 PM
Page 9
Memcorp, Inc.
Weston, FL
Printed in Hong Kong
Visit our website at www.memorexelectronics.com