1
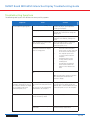
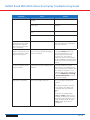
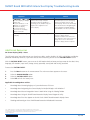
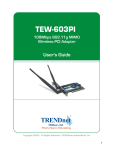
SMART BoardTM SBID 6052i
Interactive Display Troubleshooting Guide
Introduction
This document helps you to identify and resolve different issues that customers might have with the SMART BoardTM SBID
6052i interactive display.
Initial Troubleshooting
Customers call in for a variety of product issues. If you can’t easily identify the cause of the issue, it is recommended that
you first instruct the customers to check the LED status and diagnostic lights to see if there are any issues with the touch
connection panel (SC11). If the LED status and diagnostic lights indicate that the touch connection panel (SC11) is functioning,
instruct the customers to run the SMART Connection Wizard to see if there are any touch connection panel (SC11)
recognition, camera (s), pencil, eraser, or calibration issues. In addition, you can remind the customers to ensure their finger or
pencil is at a right (90º) angle to the interactive display.
The following section outlines how to troubleshoot the interactive display using the LED status and diagnostic lights and the
SMART Connection Wizard, and a tip on how to position your finger or pencil on the interactive display.
1.
Troubleshoot touch connection panel (SC11) issues using the LED status and diagnostic lights
There are two LED status and diagnostic lights located on the touch connection panel (SC11). These two lights indicate the
condition of the touch connection panel (SC11). Refer to p. 38–39 of the SMART Board SBID 6052i Interactive DisplayTM
Installation and User’s Manual for solutions if there are issues with the touch connection panel (SC11).
Note: The touch connection panel (SC11) is located behind the top-centre section of the interactive display. If your interactive
display is mounted on a wall, you might require a ladder and mirror to see the LED status and diagnostic lights.
2.Troubleshoot touch connection panel (SC11) recognition, camera, pencil, eraser, or calibration issues by
running the SMART Connection Wizard
If the computer doesn’t recognize the touch connection panel (SC11), or if there are potential issues with the camera(s),
pencil, eraser, or calibration, always run the SMART Connection Wizard first to see if it can identify and resolve any related
issues. To run the SMART Connection Wizard’s troubleshooting procedures, refer to p. 39–41 of the SMART Board SBID 6052i
Interactive Display Installation and User’s Manual.
3.
Position your finger or pencil at a right (90°) angle to the interactive display
For best results, keep your finger or pen at a right (90°) angle to the interactive display. Do not allow your wrist, clothing
or other fingers to get too close to the display. This may trigger an inaccurate touch point. When you draw with your index
finger, keep your other fingers curled up as if you were holding a coin in the palm of your hand. When you draw with a pen,
hold your pen so that you fingers are away from the pen nib.
SMART Technologies
May 2010
SMART Board SBID 6052i Interactive Display Troubleshooting Guide
Troubleshooting Symptoms
The following table lays out the solutions for some specific symptoms.
Symptoms
There is no image on your display
or a No Input message appears
Cause
Solution
Your computer is in Standby mode.
Touch the display, move the mouse
or touch any key on your keyboard to
activate your computer.
The display input is incorrect.
If you’re using a laptop, turn on the
external video connection or change the
display input.
Your computer is off.
Turn on your computer (or press the
computer’s reset button), and log on as
usual.
Your computer isn’t connected to
the interactive display.
Ensure the USB 2.0 cable is connected
from your computer to the touch
connection panel (SC11).
The touch connection panel,
computer, and interactive display
aren’t receiving power.
Ensure:
•
•
•
•
The main power switch is turned
off.
The touch connection panel
power cord is securely connected
to the touch connection panel
The computer power cord
is securely connected to the
computer
The display power cord is
securely connected to the
terminal panel
You may also try a different
power cord to confirm the
problem is not related to the
cable
Turn on the main power switch.
Tip: The main power switch is located on
the terminal panel underneath the
interactive display.
Your interactive display does not
respond to touch but you can see
the computer desktop. You might
see a red light on the touch
connection panel (SC11).
Your computer doesn’t recognize
the touch connection panel (SC11).
OR
The cameras are not transmitting
information to the computer.
Unplug and plug in the power cord to
reset the interactive display. Ensure the
USB 2.0 cable is connected from the touch
connection panel (SC11) to the computer.
The pencil doesn’t work.
The pencil’s battery charge might be
low or the battery is dead.
Replace the battery.
The battery orientation might be
backwards.
Remove the battery. Insert it correctly
inside the battery compartment.
SMART Technologies
May 2010
SMART Board SBID 6052i Interactive Display Troubleshooting Guide
Symptoms
Cause
Solution
The SMART Board service may not be
running.
Start the SMART Board service.
The SMART Board Diagnostics dialog box
may be open.
Close the SMART Board Diagnostics
dialog box.
The SMART Board Control Panel may be
open.
Close the SMART Board Control Panel
The pencil nib might be worn out.
Replace the pencil nib.
Gaps appear in the digital ink
when writing on the display.
Writing/touch recognition
doesn’t work in a particular
area of the display.
The camera view may be obstructed.
Check to see if there is anything on the
interactive display that is blocking the
view of the camera(s).
The interactive display
behaves erratically (the cursor
jumps around or the display
becomes unresponsive).
The interactive display may have
experienced an electrostatic discharge or
a power interruption.
Reset the interactive display by
pressing the Reset button on the
touch connection panel (SC11) or
disconnecting and reconnecting
the power cord. This restarts all
components of the interactive display.
All data (including the orientation data)
stored in the touch connection panel is
retained.
The image is blurry, too large
or doesn’t completely fill the
interactive display.
Your computer’s video resolution
settings don’t match your display’s native
resolution.
Refer to the section titled Connecting
a Personal Computer in the NEC
MultiSync s521 User’s Manual for the
correct computer video resolution, and
then change the computer’s screen
resolution (right-click the desktop, and
then select Properties > Settings
> Screen Resolutions) to match
the interactive display.
The image is unstable,
unfocused, or swimming.
The computer may be experiencing
connection or display card issues.
Check the display VGA cable and make
sure it is properly connected to the
computer.
OR
Use a different computer. This helps
you to identify if your display card
is compatible with your interactive
display.
OR
Use the On-Screen-Display (OSD)
Picture and Adjust controls to focus
and adjust the image by increasing or
decreasing the fine adjustment. If you
change the display mode, the OSD
Adjust settings may need to be
reconfigured.
SMART Technologies
May 2010
SMART Board SBID 6052i Interactive Display Troubleshooting Guide
Symptoms
Cause
Solution
There is a delay between your Your computer might be running too many Close some open applications.
touch/writing and the response applications.
of the interactive display.
Your computer doesn’t meet the minimum
system requirements.
Upgrade your computer or replace
it with a more powerful computer.
A computer with USB 2.0 support is
recommended.
You might not be using a USB 2.0 cable
to connect the interactive display to the
computer.
For connection information, refer to
the section titled Making Power and
Computer Connect on p.12 of the
SMART Board SBID 6052i Interactive
DisplayTM Installation and User’s Manual.
Excessive light in the room is effecting the
interactive display’s performance.
Close any blinds and shades, or turn off
all halogen and LED lights in the room/
area.
Digital ink doesn’t align with
your pencil or finger when
writing on the interactive
display.
The interactive display hasn’t been properly Orient your interactive display.
oriented.
There is no sound when using
your interactive display.
Speakers haven’t been installed (speakers
aren’t included with the interactive
display).
Install speakers and connect them to
either the computer or the LCD display
side terminal panel. Refer to the section
titled Connecting External Equipment
with the Terminal Panels on p.18 of the
SMART Board SBID 6052i Interactive
Display Installation and User’s Guide.
There are audio connection issues.
Ensure the audio cable is properly
connected.
There are volume/mute issues.
Check to see if the volume is muted.
OR
Check the volume level.
There are computer audio issues.
Check to see if the computer supports
an audio signal through the DisplayPort.
If unsure, contact the computer
manufacturer.
The SMART Board icon doesn’t SMART Board software isn’t running.
appear in the notification area.
SMART Technologies
Double-click the SMART Board Tools
icon on your desktop, or select
Start > SMART Board Tools.
May 2010
SMART Board SBID 6052i Interactive Display Troubleshooting Guide
Symptoms
Cause
Solution
You are not able to designate
the correct display for multiple
displays with
Microsoft® Windows® 7. The
calibration or orientation of
the interactive display
proceeds as expected,
but a touch on one display
registers on another.
If you have multiple interactive displays
connected to a single computer
running the Microsoft Windows 7
operating system, Windows may not
assign touch recognition to the
correct display.
Complete the calibration and
orientation processes on each display,
and then Configure your pen and
touch displays. Refer to the Knowledge
Base document titled: Designating the
Correct Display for Multiple Displays
with Windows 7 for these procedures.
There is a persistent image on
the display.
An image displayed for too long.
This is not permanent. Turn off the
interactive display and the
computer and leave them off for the
same amount of time as the persistent
image was on-screen. Turn on the
interactive display and the computer.
Additional Resources
On-Screen-Display (OSD) – Reset
The OSD main menu items allow you to reset the picture, adjust, audio, schedule, PIP, OSD, multi display, and display
protection individually. However, if you want to reset them all at once, you can use the FACTORY RESET feature.
With the FACTORY RESET feature, you can reset the OSD options back to factory settings except for the date & time,
language, OSD rotation, input name, change security password, security lock and security password.
To access the FACTORY RESET:
1.
2.
3.
4.
Press the Menu button on the remote control. The main menu icons appear on the screen.
Select the PRO ADVANCED option
Select the FACTORY RESET option
Select YES to finish the factory reset
Applicable Knowledge Base articles:
•
Knowledge Base Correcting Registry or System Preferences File Issues
•
Knowledge Base Designating the Correct Display for Multiple Displays with Windows 7
•
Knowledge Base Gesture Recognition Doesn’t Work When Using the Floating Toolbar
•
Knowledge Base Using the SMART Board Interactive Display Frame Diagnostic Utility
•
Knowledge Base Two Lines Appear on the 400 Series SMART Board Interactive Display Frame
•
Touching and Drawing on Your SMART Board Interactive Whiteboard is Inaccurate
©2010 SMART Technologies ULC. All rights reserved. SMART Board, SMART Notebook, smarttech and the
SMART logo are trademarks or registered trademarks of SMART Technologies ULC in the U.S. and/or other countries.
All other third-party product and company names may be trademarks of their respective owners.
Printed in Canada 05/2010.
SMART Technologies
May 2010