1
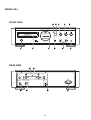
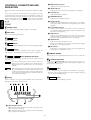
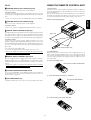
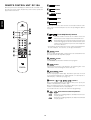
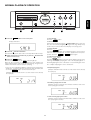
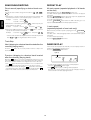
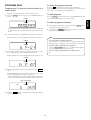
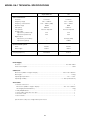
MODEL SA-1 TECHNICAL SPECIFICATIONS
Super Audio CD
CD
2channels
2Hz — 100kHz
2channels
2Hz — 20kHz
2Hz — 50kHz (-3dB)
109dB
2Hz — 20kHz
98dB
0.0012%
Precision of quartz
0.0015%
Precision of quartz
Audio Characteristics
Channels
Frequency range
Frequency characteristics
Dynamic range
THD (1kHz)
wow & flutter
Analog output
output level (unbalanced)
2.2V
2.4V
4.4V
4.8V
—
—
0.5Vp-p (75Ω)
-19dBm
Laser
Wave length
AlGaAs
650nm
AlGaAs
780nm
Sampling frequency
2.8224MHz
44.1kHz
output level (balanced)
Digital output
output level (cinch JACK)
output level (optical)
Optical Readout System
Power Supply
U version ...................................................................................................................... AC 120V 60Hz
Power Consumption ....................................................................................................................... 33W
Cabinet, etc.
Dimensions (Width × Height × Depth) .................................................................. 458 × 133 × 365mm
Net weight .................................................................................................................................. 17.7kg
Operating temperatures ................................................................................................ +5ºC ~ +35ºC
Operating humidity ........................................................................................... 5 ~ 90% (without dew)
Accessories
• Remote control unit ......................................................................................................................... 1
Dimensions (Width × Height × Depth) ............................................................... 44 × 17.5 × 239mm
Net weight (without Batteries) ................................................................................................... 175g
• AAA (R03) Batteries ........................................................................................................................ 2
• Stereo audio cable with cinch pins ................................................................................................ 1
• AC Power Cord ............................................................................................................................... 1
• User’s Guide ................................................................................................................................... 1
Specifications subject to change without prior notice.
27
MODEL SA-1
FRONT VIEW
Ú0 Ú1 c
v
PLAY
b
STOP
PAUSE
SACD/CD
DISPLAY
REP 1
RND TRACK
PLAY
PROGRAM
TOTAL
POWER
SACD
OPEN/CLOSE
CD
SUPER AUDIO CD PLAYER SA-1
z
x
REAR VIEW
m
.
n
,
A B
R
L
UNBALANCED
CONNECTION
COLD(-)
CONNECTION
COLD(-)
2
2
3
R
HOT(+)
BALANCED
L
1
3
HOT(+)
1
ANALOG OUTPUTS
GROUND
DIGITAL OUTPUTS
OPTICAL
AC IN
GROUND
FILTER
COAXIAL
STANDARD
CUSTOM
C
D
D
28
F
INTRODUCTION
PRODUCT FEATURES
Thank you for selecting the Marantz SA-1 Super Audio CD Player for your
A / V system.
This Compact Disc Player incorporates a number of features designed
to enhance the listening of your favorite audio sources.
Please read these operating instructions carefully. We recommend that
you read the entire user guide before you attempt to connect or operate
the player.
After you have reviewed the contents of this manual,we suggest that you
make all system connections before you attempt to operate the unit.
This is the first Super Audio CD Player to be released on the market after
some thoroughgoing preparations made by Phillips and Marantz who
are the developers of Super Audio CDs. It is a showpiece model which
is designed to achieve a sophisticated reproduction of the sound
performance inherent to Super Audio CDs. The main features of this unit
include:
• A DF7 digital filter (TDA 1307) with 8X oversampling (during CD
playback)
Refer to the figures on the pages at the back of this user’s guide. The
callout numbers on the figures correspond to those found in the text.
• A low noise distortion circuitry featuring a differential configuration
HDAM
• Audio circuitry kept free from noise by using a super ring toroidal
transformer, featuring a large capacity and low leakage flux and
shielded by a copper-plated cover, for the main power transformer
and by employing a separate transformer for the exclusive use of the
display tube
INSTALLATION
Remember the following important points when installing the player:
• Do not expose the player to rain or moisture, as this may cause
damage to the player.
• A high-rigidity, high-precision zinc diecast mechanism chassis and
aluminum diecast disc tray firmly anchored by a double-bottom
chassis constructed with two layers of 3.2 mm thick copper-plated
steel plates
• All players produce some heat during operation and this heat must be
allowed to disperes freely. Do not close any ventilation openings and
insure that there is adequate ventilation space behind, beside and
above the player.
• An elegant design with a luxury look achieved by the extravagant use
of aluminum block and thick aluminum sheet materials
• Prevent extra heat from reaching the unit. Never put the player in the
full glare of the sun or near a heat source.
• A stylish remote control unit made of aluminum top plate
PRECAUTIONS
The following precautions should be taken when operating the equipment.
GENERAL PRECAUTIONS
When installing the equipment ensure that:
– the ventilation holes are not covered.
– air is allowed to circulate freely around the equipment.
– it is placed on a vibration-free surface.
– it will not be exposed to excessive heat, cold, moisture or dust.
– it will not be exposed to direct sunlight.
– it will not be exposed to electrostatic discharges.
In addition, never place heavy objects on the equipment.
If a foreign object or water does enter the equipment, contact your
nearest dealer or service center.
Do not pull out the plug by pulling on the mains lead; grasp the plug.
It is advisable when leaving the house for an extended period, or during
a thunderstorm, to disconnect the equipment from the mains supply.
5
ENGLISH
• A D/A converter which directly converts the DSD signals into analog
signals with a high sound quality by means of DAC7 (TDA 1547 x 4)
ENGLISH
ABOUT SUPER AUDIO
COMPACT DISCS
Super Audio CD is the next-generation audio disc format. It has been
jointly developed and standardized by Sony and Phillips of the Netherlands which are CD licensers. Compared with the Pulse Code Modulation (PCM) system used for digital audio recording as typified by
conventional CDs, the Super Audio CDs are recorded using the Direct
Stream Digital (DSD) system which has about 4 times more information
per unit time. The system theoretically achieves a dynamic range of 120
dB within the audible frequency band and a wide playback frequency
band that exceeds 100 kHz. It is capable of recording a maximum of 255
programs for up to 109 minutes.
The glossy side shining like a rainbow is the front side of the disc, and
the side on which the label is printed is the back.
Unlike conventional turntables for playing analog discs, the SA-1 Super
Audio CD Player reads the information recorded on the disc from
underneath without contacting it using a beam of laser light. Therefore,
the performance of a compact disc will not degrade like conventional
analog records.
Handle discs carefully so as not to damage or scratch the front side.
To protect the disc, avoid placing it in the following locations:
– In direct sunlight or near a source of heat like a heater.
– In a place which is damp or dirty.
– In a place which could be exposed to rain, such as near a window.
ABOUT THE DISCS WHICH CAN BE
PLAYED BY THIS UNIT
Always keep the disc surface clean.
Up to six billion data units are recorded on the front side of the disc.
When cleaning the disc surface, always be sure to use a special
compact disc cleaner and wipe as shown below.
This unit can play the following 4 kinds of discs.
(As seen with the label surface facing up)
1. Super Audio CDs (single-layer discs)
Super Audio CDs feature a 2-layer construction, and the layer on
which the Super Audio CD signals are recorded is called the highdensity (HD) layer. Only Super Audio CD signals are recorded on
single-layer discs.
Dummy (unrecorded) player
Wipe in a radial direction.
Do not wipe in circumferential direction.
High-density (HD) player
• Do not use conventional record cleaner for analog records, as this will
adversely affect the disc surface.
Store discs properly by placing them in their disc cases.
2. Super Audio CDs (dual-layer discs)
• Do not attach a piece of paper or sticker on the label side of disc.
When a disc has a piece of plastic tape or rental CD label with paste
protruded from the edge or when a disc has a trace of such a sticky
object, do not attempt to play the disc. If such a disc is played on the
CD player, impossibility of taking out the disc or other malfunction may
result.
These discs have two HD layers to enable prolonged playback. They
are made with a semi-transparent film so that both layers can be
played without having to flip the disc over. Switching between the two
playback layers is done automatically.
HD layer
HD layer
• Do not use a disc with a special shape.
Do not attempt to play a disc with a special shape such as a heartshaped disc or octagonal disc. Otherwise the equipment malfunction
may result.
3. CD/CD-R discs (recorded in the CD-DA format)
(Conventional music CDs)
These are the music CDs available in stores today.
CD layer
4. Hybrid discs (Super Audio CD + CD)
These feature a combination of the CD layer of conventional discs and
one HD layer of the Super Audio CDs.
When one of these discs is read by this unit, priority is given to playing
the HD layer of the Super Audio CD. To play the CD layer, switch over
to this layer by pressing the SACD/CD button on the main unit or on
the remote control unit while the unit has stopped operating.
WARNINGS FOR LASER RADIATION
CD layer
HD layer
6
CAUTION:
INVISIBLE LASER RADIATION WHEN OPEN. DO
NOT STARE INTO BEAM.
DANGER:
INVISIBLE LASER RADIATION WHEN OPEN. AVOID
DIRECT EXPOSURE TO BEAM.
CONNECTIONS
NOTE
For protection of the components and the speakers, be sure to turn off the power before making
connections.
Pre-main amplifier, etc.
CD UNBALANCED
R
L
R
L
LINE
2
GND
CD BALANCED
R
PUSH
PUSH
L
LINE
3
PLAY
SELECTION
TAPE1
MM
MC
CONNECTION
REC
1 — GND 2 — COLD 3 — HOT
SEPARATE
TAPE2
R
L
L
COUPLED
R
REC
PHONO
Unbalanced connectioncords
(included)
R
PRE OUT
R
PLAY
L
MAIN IN
L
R
L
Balanced connection cords
(commercially available)
→ See page 14.
Rear Panel
R
L
UNBALANCED
CONNECTION
COLD(-)
CONNECTION
COLD(-)
2
2
3
R
HOT(+)
BALANCED
3
L
1
HOT(+)
1
ANALOG OUTPUTS
GROUND
GROUND
FILTER
DIGITAL OUTPUTS
OPTICAL
COAXIAL
STANDARD
CUSTOM
Optical fiber cable
(commercially available)
Coaxial cable
(commercially
available)
Digital input device
DA converter
DIGITAL
IN
DIGITAL
IN
Optical
Coaxial
Digital amplifier
CD Recorder
MD/DAT
etc.
7
ENGLISH
LINE
1
w RND (Random) indicator
CONTROLS, CONNECTIONS AND
INDICATORS
Lights up in the random play mode.
e TRACK indicator
Please read the following instructions referring to the illustration on page
28.
Lights up when the track number being played is displayed.
r PLAY indicator
ENGLISH
Some of the operations described in this user’s guide can only be
operated from the remote control unit. In the description of controls, the
names of the buttons which are available on both the main unit and the
remote control unit are enclosed in
, and the names of the buttons
which are available only on the remote control unit are enclosed in
.
Light up during Disc playback.
t PROGRAM indicator
Lights up in the programming mode.
y TOTAL indicator
Indicates the remaining playing time of the entire disc. In program
mode, this indicator shows the remaining playing of the current
program.
FRONT
z POWER switch
u Track number indicator
Indicates the total number of the tracks on the disc when the unit
has stopped operating. During play, it indicates the number of the
track which is now playing.
Press to switch power ON, and press again to switch OFF.
x DISC TRAY
i TIME indicator
Place a disc with the label side up.
c
Indicates the total playing time of the disc when the unit has
stopped operating. During play, it indicates the playing time
which has elapsed for the track which is now playing.
PLAY button
o SACD indicator
Press to start playback.
Lights when a Super Audio CD is read.
v
* In the case of a hybrid disc (see page 6), priority is given to playing
the HD layer of the Super Audio CD.
STOP button
Press to stop playback. This button is also used for deleting a program.
b
!0 CD indicator
Lights when a conventional music CD is read. It also lights when
PAUSE button
the CD layer on a hybrid disc is read.
Press to interrupt playback temporarily. When pressed again, the
indicator goes out and playback resumes from the same position.
n
,
, REMOTE SENSOR
This window receives signals transmitted from the remote control unit.
(Track Skip/Search) buttons
These serve as both the track skip buttons and search buttons for the
main unit only.
.
OPEN/CLOSE button
Pressing the
OPEN/CLOSE button opens the disc tray. Place a
compact disc on the tray with the label side facing up. Gently press the
front of the disc tray to close.
: The same number of tracks as the number of times the
button is pressed are skipped in the forward direction.
When the button is held down, tracks are searched (fast
forward).
⁄0
: When this button is pressed, play returns to the start of the
track now being played. The same number of tracks as the
number of times the button is pressed can be skipped in the
reverse direction. When the button is held down, tracks are
searched (fast backward).
SACD/CD button
Press to change the layer to be played on a hybrid disc. (See page 6)
* The layer can be changed only when the unit has stopped operating.
It cannot be changed during play.
m Display
⁄1
Shows information such as the power ON/OFF state, track number,
playing time and current operation mode.
Turns the display window lighting on and off.
q we r t y
REP 1
RND TRACK
PLAY
PROGRAM
TOTAL
i
u
SACD
CD
o
!0
q REP (Repeat) indicators
REP: Lights up during all-track repeat mode, which plays all the
tracks on the disc repeatedly.
REP 1: Lights up during 1-track repeat mode, which repeatedly
plays a single track repeatedly.
8
DISPLAY button
REAR
USING THE REMOTE CONTROL UNIT
A ANALOG OUTPUT jacks (Unbalanced jack)
1. Remote control
Operate the remote control unit (RC-1SA) within a distance of approx. 5
m from the infrared signal reception window (remote sensor) on the front
of the SACD player.
Remote control operation may not be possible if the remote control unit’s
transmitter is not pointing in the direction of the remote sensor or if there
is an obstruction between the transmitter and the remote sensor.
Connect to the CD or AUX input jacks of a preamplifier.
Connection method:
Connect to the CD or AUX input jacks of the amplifier. Be sure to connect
the red jack to the R (right) input jack and the white jack to the L (left) input
jack.
Remote control operating range
SA-1
B ANALOG OUTPUT jacks (Balanced jack)
Connect to the CD or AUX input jacks of a preamplifier.
Connection method:
Connect to a component equipped with balanced input connector.
C DIGITAL OUTPUT OPTICAL output jack
The digital signal can transmitted in the form of light through an optical
fiber cable and photocoupler. The optical signal transmission features
low signal loss due to cables and complete isolation of the ground loop
so that the very high quality can be reproduced without any digital noise
Approx. 5m
Connection method:
Connect this jack to aD/A converter, digital sound processor or an
amplifier equipped with a Digital Optical input jack. Remove the caps
from the DIGITAL OUTPUT OPTICAL jack and the Optical input jack of
the connected component and connect the two jacks through an optical
fiber cable.
60°
Remote control unit (RC-1SA)
* Do not bend the optical fiber cable.
* Leave the cap attached when the OPTICAL jack is not used.
2. Loading batteries
Batteries in this remote control unit have a life of approximately 1 year
under normal operating conditions. If the remote control unit is not going
to be used for an extended period of time, remove the batteries. Also, if
you notice that the batteries are starting to run down, replace them as
soon as possible.
* Only the CD signals are output from the DIGITAL OUTPUT OPTICAL
jack. No Super Audio CD signals are output.
D DIGITAL OUTPUT COAXIAL output jack
By connecting this jack to a digital audio component (D/A converter,
digital sound processor, etc.), digital signals from compact discs can be
transmitted directly from the player without first being converted to
analog.
q
Remove the battery cover.
Remote control unit (RC-1SA) Rear side
* Only the CD signals are output from the DIGITAL OUTPUT COAXIAL
jack. No Super Audio CD signals are output.
E FILTER (STANDARD/CUSTOM) switch
This is set to STANDARD or CUSTOM depending on the amplifier or
speakers which are to be connected. For details, refer to the section on
the filter switch on page 14.
w
F AC POWER INPUT jack
Insert the batteries with correct +/– orientation.
Two AAA-size (R03) batteries
Using the provided AC cord, connect to a household AC power outlet.
e
9
Close the battery cover until it clicks shut.
ENGLISH
* Never connect these jacks to the PHONO input jacks of the amplifier.
c
PLAY button
When the power to the SACD player is ON and a disc is loaded on the
disc tray, the remote control unit (RC-1SA) can be used to operate the
player’s various functions.
v
STOP button
b
PAUSE button
⁄0
SACD/CD button
⁄1
DISPLAY button
ENGLISH
REMOTE CONTROL UNIT RC-1SA
Ú0
Ú2
Ú3
c
b
v
SACD/CD
DISPLAY
PROG
PLAY MODE
TIME
These buttons have the same functions as the buttons with the same
names on the main unit front panel. See the corresponding descriptions
on page 8.
Ú1
Ú4
Ú5
n
,
(Track Skip/Search) buttons
CANCEL
1
2
3
4
5
6
7
8
9
10/0
: The same number of tracks as the number of times the
button is pressed are skipped in the forward direction.
: When this button is pressed, play returns to the start of the
track now being played. The same number of tracks as the
number of times the button is pressed can be skipped in
the reverse direction.
Ú6
>10
* These buttons are provided on the remote control unit separately from
the search buttons. For searches, use the ⁄7 search buttons.
n
Ú7
⁄2
PROG button
Press to activate program play, so that only the selected tracks from the
disc loaded on the disc tray will be played.
⁄3
CANCEL button
Used to delete specified track numbers from a program.
⁄4
TIME button
Switches the time shown on the display to the remaining time of the
current track or the remaining time of the entire disc.
RC-1SA
⁄5
PLAY MODE button
Press for repeat play or random play. Each time it is pressed, one mode
is selected in the following cycle: "All-track repeat" → "1-track repeat" →
"Random play" → "Release" (see page 12)
⁄6 Numeric (
1 to 9 , 10/0 , >10 ) buttons
When used during playback, these buttons allow you to specify the
number of another track you want to play.
When used during stop mode, these buttons allow you to specify the
number of a track from which to start playback.
These buttons are also used to select tracks for programming.
⁄7
,
(Search Reverse/Forward) buttons
: When pressed during playback, this button fast-reverses
the play position.
: When pressed during playback, this button fast-forwards
the play position.
10
NORMAL PLAYBACK OPERATION
PLAY
STOP
PAUSE
SACD/CD
DISPLAY
REP 1
PLAY
PROGRAM
TOTAL
ENGLISH
RND TRACK
POWER
SACD
OPEN/CLOSE
CD
SUPER AUDIO CD PLAYER SA-1
1
3
4
2
q Press the POWER switch to turn on the power.
To stop playback:
Press the STOP button.
Display indications
To remove the disc:
Open the disc tray by pressing the OPEN/CLOSE button, remove the
disc, then close the tray by lightly pressing its front edge. Always keep
the disc tray closed even when the CD player is not being used.
To pause playback:
Press the
PAUSE button.
The PAUSE indicator lights up and playback pauses at the position
where the button was pressed. To resume playback from the pause
PLAY button again.
position, press the
PAUSE or
w Press the OPEN/CLOSE button.
When the disc tray opens, place a disc on the tray with the label side up.
e Gently press the front of the disc tray or press the
OPEN/CLOSE
To switch the time display:
Press the TIME button.
Each time the TIME button is pressed, the time display changes in the
following order: Elapsed playing time of the currently playing track →
Remaining playing time of the current track → Total remaining time in the
disc → Elapsed playing time of the current track.
button to close the tray.
r Press the PLAY button.
When the button is pressed, the PLAY indicator lights up.
While the disc is playing, the display shows the track number and
elapsed playing time of the track currently playing, along with the
numbers of the tracks still to be played or playing.
* In the case of an SACD/CD hybrid disc, priority is given to playing the
SACD layer. To play the CD layer, first stop the unit's operation, and
use the ⁄0 SACD/CD button to switch to the CD layer.
¡Elapsed playing time
(Example: When 0 minutes and 36 seconds of track 3 have already
been played)
(Example: When 2 minutes and 17 seconds of track 5 have already
been played)
TRACK
TRACK
PLAY
PLAY
¡Remaining playing time of a track
(Example: Track 3 is playing, and 6 minutes and 20 seconds of the
track's playing time remain)
TRACK
PLAY
¡Total remaining playing time of disc
(Example: Track 3 is playing, and 48 minutes and 38 seconds of the
disc's playing time remain)
TRACK
11
PLAY
TOTAL
SEARCHING/SKIPPING
REPEAT PLAY
Direct search (specifying a desired track number)
All-track repeat (repeated playback of all tracks
on the disc)
Specify the track number using numeric buttons ( 1 - 9 , 10/0 ,
>10 ).
During playback, press the PLAY MODE button once.
The “REP” indicator lights up and all the tracks on the disc are played
repeatedly.
Even if the PLAY MODE button is pressed in stop mode, playback will
start and repeat playback will be carried out.
To resume normal playback:
Press the PLAY MODE button third. The “REP” indicator goes out,
repeat mode is cancelled and normal playback resumes.
¡With tracks 1 to 10, specify directly which track is to be played, and
immediately the track is searched and its play is commenced.
Example :
ENGLISH
→ Press 3 .
Track 10 → Press 10/0 .
Track 3
¡With tracks 11 and following, first press >10 , and then specify the
track number to be played.
Example :
¡With tracks 100 and following, first press >10
specify the track number to be played.
Example :
1-track repeat
(repeated playback of one track only)
Track 12 → Press >10 . Then press 1 and 2 .
twice, and then
While the track you want to repeat is playing, press the PLAY MODE
button twice.
The “REP” and “1” indicators light up and the current track will be played
repeatedly.
To cancel 1-track repeat play:
Press the PLAY MODE button twice.
Track 123 → Press >10 twice. Then press 1 , 2
and 3 .
* If 10 seconds are allowed to elapse before the next button is pressed
after >10 or 1 , the original status will be restored.
Track Skip
RANDOM PLAY
Next (skipping to a desired track located after the
currently playing track)
Press the
desired track.
In this mode, the CD player automatically selects and plays tracks in
random order. All tracks are played once.
Press the PLAY MODE button third.
button the necessary number of times to skip to the
Light up
Previous (skipping to a desired track located
after the currently playing track)
RND TRACK
PLAY
When the
button is once pressed during play, play moves to the
start of the track now playing. Press this button for the same number of
times as the number of tracks to be skipped in the reverse direction.
* If the
button has been pressed within 2 or so seconds from the
start of the track now playing, play moves to the previous track.
• To stop random playback and resume normal playback:
Press the PLAY MODE button again.
button twice in the middle
* In All-track repeat mode, pressing the
of the first track in a disc skips to the last track, and pressing the
button in the middle of the last track skips to the first track.
• If the
button is pressed during random playback:
Each time one of these buttons is pressed, the CD player selects a
track at random and starts playing that track.
12
PROGRAM PLAY
To check the program contents
Programming (To play the desired tracks in a
certain order)
Press the
button while the unit has stopped operating.
The programmed tracks (track numbers) will appear one after the other
in the sequence in which they were programmed.
(Example: To program track No. 6 first, then track No. 14.)
To add programs
Press the PROG button in stop mode. The PROGRAM indicator
flashes.
Press the PROG button in the stop mode. The PROGRAM indicator will
flash, indicating that programs can now be added.
Flashes
To delete programmed tracks
PROGRAM
* If the operations in step and following are not performed within 30
seconds in this mode, the unit will automatically return to the stop
mode.
w
Then press the CANCEL button to delete the tracks in sequence
starting with the one programmed last.
• How many tracks is it possible to program?
Up to 20 tracks can be included in the program. With delete
programming, up to 20 tracks can be omitted from the program.
PROGRAM
• How do you play programmed tracks repeatedly?
Press the PLAY MODE button once. The REP indicator lights up
and the program playback will be repeated.
• How do you play programmed tracks in a random order?
No.
Then program another track by repeating the procedure in step 2
above. Up to 20 tracks can be programmed in this way.
(Display example: The second programmed track is track No. 14.)
Flashes
PROGRAM
After having programmed all the desired tracks, press the
button.
STOP
The PROGRAM indicator status changes from flashing to continuously lit, indicating that the program is completed.
* When performing steps w to r, the program will be automatically
entered unless the next operation is performed within 10 seconds.
Light up continously
TRACK
t
w
Q&A
Flashes
r
If the program has already been entered, press the PROG button
to establish the program input mode.
Specify the first track to be programmed using the numeric buttons.
(Display example: The first programmed track is track number 6.)
e
q
PROGRAM
PLAY button, The programmed tracks will be played
Press the
in the programmed order.
13
ENGLISH
q
ABOUT BALANCED JACKS
ABOUT THE FILTER
q
The balanced output connector uses a XLR connector.
w
The XLR connector for professional use is internally wired in either
of the following two systems.
Super Audio CDs have a wide playback frequency band of about 100
kHz that is beyond the audible range: this means that their signals
contain ultra-high-range components that conventional CDs do not
have. A conventional amplifier is often not built to reproduce signals
containing these components, and when Super Audio CD signals are
output in their original state, noise may be generated, the amplifier's
protection circuits may be activated and/or the speakers may be
damaged.
To prevent this sort of trouble from occurring, the unit incorporates a filter
for attenuating the ultra-high-range components, and the filter can be set
STANDARD or CUSTOM using a switch on the rear panel. (This switch
is set to STANDARD when the unit is shipped from the manufacturing
plant.)
When the unit is to be connected with a next-generation amplifier that
supports Super Audio CDs, loosen the screws at the side of the switch,
release the protector, and set the switch to CUSTOM for use. This will
ensure play with a wider frequency range.
1. USA system (Pin 2 = COLD, Pin 3 = HOT)
COLD
ENGLISH
w q
e
GND
HOT
2. European system (Pin 2 = HOT, Pin 3 = COLD)
HOT
w q
e
* Use the switch at the STANDARD position if the unit is to be used with
a regular amplifier. Otherwise, the amplifier and/or speakers may be
damaged.
* Even when the unit has been connected with an amplifier that supports
Super Audio CDs, change the switch to the STANDARD position when
recording Super Audio CD sound on a tape deck, for instance.
GND
COLD
e
The SA-1 uses the USA system of 1.
When a preamp or main amplifier adopting the European system is
connected using a cable with XLR balanced connectors, the reproduced signal may be inverted of phase.
In this case, correct the wiring of the one of the XLR connectors on
the extremities of the cable to the USA system by exchanging the
connections of pins 2 and 3. This will make it possible to play the
signal with the correct phase.
14
TROUBLE SHOOTING
OPERATING PRECAUTIONS
If you think a malfunction has occurred, first check the points listed
below, The problem is likely to have been caused by a simple operational
error or a connection problem. If the problem cannot be corrected even
after carrying out the following checks, consult your dealer or nearest
Marantz sales office or service counter.
• In the winter you may notice that condensation forms on the window
of a well-heated room.
Condensation may also occur inside the SACD player in the following
situations:
– When the humidity in the room is high.
1. Is the mains lead plugged in properly?
– When the unit is moved from a cold environment to a warm room.
2. Is the POWER switch ON?
• If condensation occurs, the number of tracks cannot be read and the
SACD player may not function properly. If this happens, leave the
power ON and wait for about 30 minutes before operating the unit.
3. Is the disc placed in the correct position on the disc tray?
4. Is the disc placed properly with the label side facing up?
• The SACD player may interfere with the reception of your tuner or TV
set. If this occurs, place the SACD player farther away from the tuner
or TV.
5. Is the disc dirty?
6. Is the disc scratched?
7. Is the disc warped?
• The SACD player features very little noise compared to analog
records, and the noise before actual playback begins is almost
inaudible. Therefore, be careful not to set the volume control of the
amplifier too high, otherwise other audio components such as the
speakers may be damaged when actual playback starts.
• The disc is rotating but no sound is heard.
1. Are the amplifier and speakers connected properly?
2. Is the amplifier switch ON?
3. Is the amplifier’s volume control set at the minimum level?
4. Is the amplifier’s selector switch set to the correct input (“CD” or
“AUX”, whichever corresponds to the input jacks the SACD player is
connected to)?
CLEANING OF EXTERIOR SURFACES
• The sound drops out or noise is heard.
With proper care and cleaning, the exterior finish of your equipment will
last indefinitely. Never use scouring pads, steel wool, scouring powders
or harsh chemical agents (e.g. lye solution), alcohol, thinners,benzine,
insecticide or other volatile substances, as these will mar the finish of the
cabinet. Likewise, never use cloths containing chemical substances. If
the equipment becomes dirty, wipe the external surfaces with a soft, lintfree cloth.
1. Is the disc dirty?
If the cabinet becomes heavily soiled:
2. Is the disc scratched?
3. Is the disc warped?
– dilute some washing-up liquid in water, in a ratio of one part detergent
to six parts water;
• Remote control operation is not possible.
– dip a soft, lint-free cloth in the solution and wring the cloth out until it
is damp;
• The disc stops in mid-operation.
1. Is the disc dirty?
2. Is the disc scratched?
3. Is the disc warped?
1. Is the remote control unit’s transmitter pointed correctly at the remote
sensor on the front of the SACD player?
– wipe the equipment with the damp cloth;
– dry the equipment by wiping it with a dry cloth.
Or is there an obstruction between the transmitter and the remote
sensor?
2. Are the batteries in the remote control unit exhausted?
REPAIRS
3. Is there another strong light (from a window, etc.) striking the SACD
player’s remote sensor?
Only the most competent and qualified service technicians should be
allowed to service the equipment. The Marantz company and its factorytrained warranty station personnel have the knowledge and special
facilities needed for the repair and calibration of this precision equipment. After the warranty period has expired, repairs will be performed for
a charge if the equipment can be restored to normal operation.
In the event of difficulty, consult your dealer or write directly to the nearest
location to you that is listed on the Marantz Authorized Service Station
list. Please quote the model and serial number of the equipment and give
a full description of what you think is abnormal about the equipment’s
behaviour.
• A CD-R disc cannot be played.
1. Is the disc placed upside down?
2. Is the disc contains properly written TOC?
15
ENGLISH
– When the listening room is first heated.
• The disc fails to rotate.