1
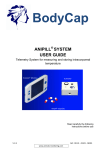
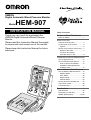
OMRON
Digital Automatic Blood Pressure Monitor
Model
HEM-907
INSTRUCTION MANUAL
Thank you very much for purchasing the
OMRON Digital Automatic Blood Pressure
Monitor.
Please read this Instruction Manual thoroughly
to ensure safe and correct use of the monitor.
Please keep this Instruction Manual for future
reference.
Table of Contents
Be Sure to Read This Section
Notes on Safety..................................1
Know Your Unit
Features of the Product......................4
Components of the Product ...............5
Options ...........................................6
Names and Functions of the Parts.....7
Names of the Parts.........................7
Functions and setting
while the unit is in use ....................9
Preparations before Measurement
How to Apply the Cuff ......................11
How to Use the Power Source .........13
How to Use the AC Adapter ............13
Installation and Replacement
of Battery Pack .............................14
How to Measure Blood Pressure
SYS
mmH
g
DIA
PUL
SE
mm
Hg
BPM
ON/O
FF
AC
HID
E
STA
RT
P-S
ET
140
100
180
220
AU
TO
260
280
AVG
.
MO
DE
S
ING
LE
MA
NU
.
CHE
CK
AV D E F
G. L AT
IO N
/1 s
t / 2n
d / 3rd
AR
T.
IN
DE
X
M
A
X
STO
P
How to Measure Blood Pressure .....15
SINGLE Mode ..............................16
AVG. Mode ...................................18
MANU. Mode ................................20
CHECK Mode ...............................22
How to Clean the Unit after Use ........23
List of Error Codes ...........................24
Troubleshooting ...............................25
Specifications
Specifications ...................................26
Exemptions on warranty...................27
MEMO (Blank pages)..................28-30
Notes on Safety
Warning
When a person other than the doctor or medical employee uses this monitor,
self-diagnosis of the measured results or treatment is dangerous. Please
consult and follow the instruction of the doctor.
• Self-diagnosis may worsen the disease.
If you encounter any problem during measurement such as inflation does not
stop, remove the cuff or pull out the air tube from the main unit.
• If inflation does not stop, there is danger of peripheral neuropathy.
If the fluid inside the battery gets in your eye, rinse the eye with lots of water
without rubbing, then seek medical treatment immediately.
• If left unattended, there is danger of loss of eyesight.
Do not wrap the cuff over the arm where intravenous injection or transfusion is
being conducted.
• Intravenous injection or transfusion will not be possible.
Do not erroneously connect the air tube or the cuff to the tube of other
equipment connected to intracorporeal organ.
• Air may get into the blood vessels.
Do not use this unit in places where inflammable gas, such as highly
inflammable anesthetic, may be generated or in a high-pressure oxygen room
or an oxygen tent.
• It may cause ignition and explosion.
Do not use the exclusive battery pack (option) for other equipment.
Do not throw the battery pack into fire, or heat, or disassemble it.
• It may cause heat, ignition, short-circuit or rupture.
Do not touch the AC adapter with wet hands.
• You may suffer electric shock.
If you are going to leave this unit unused for a long time, be sure to unplug the
AC adapter from the electric outlet.
• This is to avoid danger of electric shock, electric leak or fire due to
deteriorated insulation.
Be sure to unplug the AC adapter from the electric outlet when installing,
removing, or cleaning the part(s).
• This is to avoid danger of electric shock or injuries.
1
Notes on Safety
In the following cases, check the readings with the stethoscope.
(1) When an irregular pulse wave is displayed
• The reading may be erroneous due to external vibration or patient's body
movement.
(2) When erroneous reading takes place or the measured value is doubtful
• The reading may be erroneous due to external vibration or patient's body
movement.
• An error may have occurred or the blood pressure cannot be measured for
patient with peripheral circulatory disturbance or extreme hypotension.
• An error may occur if patient has extremely short variation of blood pressure
such as arrhythmia.
Be sure to use the AC adapter appropriate for your country.
• If not, it may cause fire or you may suffer electric shock.
Do not share an electric outlet with other unit or electric appliance.
• It may cause fire or you may suffer electric shock.
After cleaning this unit, dry it well, then plug the AC adapter in the electric
outlet.
• If not, you may suffer electric shock.
Insert the AC adapter to the electric outlet as far as it goes.
Do not use the AC adapter with dust accumulated on it.
• There is danger of electric shock, or there may be short circuit or fire
ignition.
If you encounter any trouble with the main unit, immediately stop using, turn
off the unit, unplug the AC adapter from the electric outlet, then contact the
repair department.
• There is danger of electric shock, or there may be short circuit or fire
ignition.
Be Sure to Read This Section
Caution
Do not disassemble or remodel this unit.
• There is danger of electric shock or injury, or there may be fire, or trouble.
Do not use any cuff other than the one exclusive for this unit.
• If not, result may be erroneous.
Do not use this unit on infants.
• Blood pressure may not be measured correctly.
Do not use this unit on patient using a pump oxygenator.
• The unit can not measure correctly.
Do not use AC adapter and battery pack that are not specified for this unit.
• It may cause fire or you may suffer electric shock.
Do not short-circuit the polarities of the optional battery pack with a metal
object such as wire.
If the fluid in the battery drip on your skin or clothes, immediately wash off the
fluid with water.
• You may suffer injury.
2
Notes on Safety
Caution
Do not use a cellular phone near this unit.
• This unit may malfunction.
Do not use this unit in a moving vehicle.
• This may result in erroneous measurement.
Do not install parts and/or instrument that are not specified for this unit.
• It may cause damage to the unit.
Do not use broken power cord or AC adapter, or loose electric outlet.
• There is danger of electric shock, or there may be short circuit or fire
ignition.
Do not pull the power cord when unplugging the AC adapter from the electric
outlet.
• The power cord will be disconnected or short-circuited, and may cause fire
or you may suffer electric shock.
Do not scratch, damage, modify, forcibly bend, pull, twist, bundle the cord of
AC adapter, or place heavy materials on it, or pinch it.
• You may suffer electric shock or there may be electric leak and fire because
of deteriorated insulation.
Do not install or store this unit where it may be sprayed with water or
medication.
• There is danger of electric shock.
General advice
Do not place or put anything on this unit.
Do not apply strong shock to or drop this unit.
Turn off power and unplug the AC adapter from the electric outlet before moving the unit.
Read the instruction manual of the other devices to be used at the same time with this unit, to
understand and be aware of the interaction between the devices.
Before using the unit
• Check if all cords and tubes are securely connected.
• Operate the Buttons to check that this unit operates normally before use.
When using the unit
• Do not inflate the cuff without being wrapped over the arm.
• Do not use torn cuff.
• Be sure that the patient do not touch the Buttons of this unit.
After using the unit
• Clean and store this monitor and accessories.
• Do not clean this unit with gasoline, paint thinner, or high concentration alcohol.
• Do not disinfect this unit by autoclave or gas sterilization (EOG, formaldehyde, or high
concentration ozone).
Do not install or store this unit in the following places.
• Under direct sunlight
• Dusty or salty environment
• At an inclined position, or subject to vibration and/ or shock
• Storage of chemicals or where gas may be generated
• At high temperature and high humidity
3
Features of the Product
• One-push operation
Just by wrapping the cuff and pushing the START Button (to start measurement), blood pressure
and pulse rate can be measured. Measurement is made by oscillometric method.
• Automatic pressure setting
When the P-SET (Pressure Setting) Knob is set to "AUTO," this unit will automatically inflate the
cuff to the optimal pressure according to each patient's blood pressure. Cumbersome pressure
value setting operation is not necessary.
With the use of an LCD display, display of figures is large and easy to read.
• Quiet operation
Because this unit is designed for quiet operation, it can be used in the hospital room at night.
Know Your Unit
• Large and easy to read display
Be Sure to Read This Section
OMRON Digital Automatic Blood Pressure Monitor, Model HEM-907 is developed to measure
blood pressure with accuracy and simple operation in the doctor's consultation room or at bedside.
• Average Mode (AVG. Mode)
Just by wrapping the cuff and pushing the START Button (to start measurement), this unit will
automatically start to measure for two or three times. After the measurements, the average values
of systolic and diastolic blood pressures and pulse rate of measurements are displayed. The
results of each measurement can also be called. By changing the setting, the number of
measurements and the interval can be changed.
• Auscultation Mode (MANU. Mode)
This unit can measure blood pressure by using a stethoscope. The unit inflates and deflates the
cuff automatically, then displays the pressure values. As the pressures during deflation are digitally
displayed and synchronized with the pulse rate, they can be read with accuracy. The deflation
speed after confirming the systolic pressure and immediately before the diastolic pressure can be
accelerated.
INTELLISENSE blood pressure monitor is a global brand name of blood pressure monitor
equipped with bio-information sensing and high performance fuzzy logic technology, which are
the key technologies of OMRON. With this excellent sensing technology, the monitor can
achieve "accurate measurement".
4
Components of the Product
Main unit
ON/O
HID
P-S
140
100
TO
E
STA
RT
ET
180
MO
D
220
AU
FF
E
AVG SINGL
E
.
MA
260
280
NU
.
CHE
CK
D
AV E F
G. L AT
ION
/1 s
t / 2n
d / 3rd
STO
P
Accessories
Cuff / bladder set M *
Model: HEM-970-CR19
Applicable arm circumference:
22 to 32 cm
MIN
IND
Air tube 1.0m (39 1/3") *
Model: HEM-TUBE-100
RANGE
MAX
EX
~13")
cm (9"
22~32
TUBE
REF
ART.
-CR19
HEM
AC adapter
Model: (Refer to OMRON dealer for the appropriate AC adapter).
Note: Actual AC adapter may look different from illustration.
5
Components of the Product
Options
Cuff / bladder set L
(with built-in bladder) *
Model: HEM-907-CL19
Applicable arm circumference:
32 to 42 cm
MIN
RANGE
Cuff / bladder set M
(with built-in bladder) *
Model: HEM-907-CR19
Applicable arm circumference:
22 to 32 cm
Cuff / bladder set S
(with built-in bladder) *
Model: HEM-907-CS19
Applicable arm circumference:
17 to 22 cm
MAX
MIN
RANGE
MAX
MIN
IND
RANGE
MAX
EX
IND
EX
INDE
X
17~22cm
"~17")
cm(13
32~42
2cm
22~3
(7"~ 9")
3")
(9"~1
REF HEM-CS1
ART.
9
ART.
-CL19
ART.
REF HEM
REF
-CR19
HEM
MIN
IND
RANGE
Bladder (three types) *
MAX
EX
32~42
cm(13
"~17")
-CL19
Cuff L (with no bladder)
Model:HEM-907-CUFFL
Bladder L
Model: HEM-907-BLDRL
Cuff M (with no bladder)
Model: HEM-907-CUFFM
Bladder M
Model: HEM-907-BLDRM
ART.
REF HEM
MIN
IND
RANGE
MAX
EX
2cm
22~3
3")
(9"~1
Know Your Unit
Cuff (three types) *
ART.
REF
-CR19
HEM
MIN
INDE
RANGE
MAX
X
17~22cm
(7"~ 9")
9
REF HEM-CS1
ART.
Air tube 1.3 m *
Model: HEM-TUBE-130
Stand exclusive for this unit *
Model: HEM-907-STAND
Cuff S (with no bladder)
Model: HEM-907-CUFFS
Air tube 1.0 m *
Model: HEM-TUBE-100
Wall-hanging kit *
Model: HEM-907-WKIT
Bladder S
Model: HEM-907-BLDRS
AC adapter
Model: (Refer to OMRON
dealer for the appropriate AC
adapter).
Battery pack (48H907N) *
Model: HEM-907-PBAT
Pole-mounting kit *
Model: HEM-907-PKIT
Items attached with
an asterisk (*) are
consumables and
not covered by the
guarantee.
Please understand
that the
specifications of
accessories and
options are subject
to change without
prior notice.
6
Names and Functions of the Parts
Names of the Parts
Main unit
1. Display
SYS
6. ON/OFF (power)
Button
2. HIDE (non-display) Button
mmH
DIA
PUL
DC
SE
mm
g
7. START Button (to
start measurement)
Hg
ON/O
BPM
AC
8V
FF
HID
E
P-S
3. DC jack
140
100
STA
RT
ET
180
MO
D
220
4. P-SET (pressure
setting) Knob
AU
TO
8. DEFLATION
(deflation control)
/Display Switch
Button
E
AVG SINGL
E
.
MA
260
280
AV D E F
G. L AT
ION
/1 s
t /2n
d /3rd
NU
.
CHE
C
9. Air Connector
K
STO
P
10. STOP Button
5. MODE Selector
1. Display: Displays blood pressure values, pulse rate, and pulse wave level.
2. HIDE Button: Switches between display and non-display of measured results.
3. DC jack: Connects the AC adapter.
4. P-SET (pressure setting) Knob: In the AUTO position, inflation pressure is automatically set.
Otherwise, inflation pressure can be set between 100 and 280 mmHg.
5. MODE Selector: Selects the mode of measurement.
• One-time Measurement Mode (SINGLE Mode): Measurement with automatic inflation
• Average Mode (AVG. Mode): Automatically measures two (or three) times consecutively.
• Auscultation Mode (MANU. Mode): Automatic inflation, automatic deflation, and pressure display (does not measure
blood pressure).
• Check Mode (CHECK Mode): Checks the accuracy of pressure display. Displays only pressure.
6. ON/OFF (power) Button: Turns on or off the power of the unit.
7. START Button : Starts the measurement.
8. DEFLATION (deflation control) /Display Switch Button:
• In the MANU. Mode; Deflates the cuff by approximately 5 to 10 mmHg with each push of the button.
• In the AVG. Mode; Switches the display of average values and the measurement results with each push.
9. Air Connector: Connects the air tube.
10. STOP Button: Stops the measurement and deflates air rapidly.
7
Names and Functions of the Parts
Display
Systolic blood pressure
When the measurement is finished: Displays systolic blood pressure.
When an error occurred: Displays error code.
In the CHECK Mode: Displays pressures.
Diastolic blood pressure
Ready to Measure /
Pulse rate synchronization
Pulse level /
Number of irregular pulse waves
Number of irregular pulse waves: The pulse
wave with a difference of more than 25%
from the average interval of pulse waves is
determined as irregular. Number of irregular
pulse waves is displayed up to three times.
SYS
mmHg
Know Your Unit
During measurement: Displays pressures.
When the measurement is finished: Displays
diastolic blood pressure.
In the CHECK Mode: Displays pressures.
Example of display
DIA
1
No. of arrhythmias
2
3
mmHg
PULSE
BPM
AC
Battery level
Displays
HIDE
Contents when the AVG.
Mode is selected
AVG. : Mean value
1st : First measurement
2nd : Second measurement
3rd : Third measurement
Blinks
Displays
for the operable level.
for a low charged
level
for the inoperable
level.
Pulse rate
When the measurement is
finished: Displays pulse rate.
Charging
Displays
when the battery
pack is being charged.
External power source
Displays AC when the unit is connected
to the external power source via the AC
adapter.
8
Names and Functions of the Parts
Functions and setting while the unit is in use
(1) Pressure setting function
P-SET
A function that can switch the pressure setting
Inflation can be set by AUTO (automatic setting) method or the pressure value setting method.
AUTO (Automatic setting): Can be used when the SINGLE, AVG., or MANU. Mode is selected.
The unit estimates the systolic blood pressure value during inflation and inflates to an appropriate
cuff pressure.
Pressure value setting method: Pressure value can be set between 100 and 280 mmHg. Set the
pressure value at about 30 to 40 mmHg higher than the expected systolic pressure.
• To set the P-SET to "AUTO," turn the P-SET Knob counterclockwise as far as it goes until you can hear a click sound.
• In the "AUTO" setting, proper inflation may not be possible when the systolic blood pressure is expected to be more than 220
mmHg. Use the unit in the pressure value setting method.
• If the cuff cannot be inflated to the pressure necessary for the measurement, it may be re-inflated automatically.
(2) Non-display function
HIDE
A function not to display measurement results. However, the cuff
pressure during measurement is displayed.
This function can be used in the SINGLE and AVG. Modes.
ON/OFF
START
HIDE
DEF
N
AVG L AT I O r d
. /1st / 2nd / 3
HIDE
By each push of the
Button, display or non-display of
the measurement results is switched.
P-SET
140
MODE
SINGLE
180
AVG.
220
100
MANU.
CHECK
STOP
260
280
AUTO
SYS
Display
mmHg
Non-display
DIA
mmHg
PULSE
BPM
AC
AC
(3) Manual deflation control function
A function to accelerate deflation by pushing the DEFLATION
(deflation control) / Display Switch Button during deflation.
This function can be used in the MANU. Mode.
ON/OFF
START
HIDE
DEF
N
AVG L AT I O r d
. /1st / 2nd / 3
P-SET
With each push of the
accelerated by 5 to 10 mmHg.
9
Button, deflation speed is
140
100
MODE
SINGLE
180
AVG.
220
MANU.
CHECK
STOP
260
AUTO
280
Names and Functions of the Parts
List of Functions for each Mode
Measurement
Mode
Function
Single
measurement
(SINGLE)
Average
(AVG.)
Auscultation
(MANU.)
Check
(CHECK)
Pressure setting
function
Non-display
function
Manual deflation
control function
You can set the number of measurements, the waiting time until the start of 1st measurement, and
the measurement interval for the AVG. Mode.
F1
F2
F3
Items to set
Set value
Number of measurements
Waiting time until the start of 1st measurement
Measurement interval
2 times, 3 times
0 sec, 3 min, 5 min, and 10 min.
5 sec, 30 sec, 1 min, and 2 min.
Note: The bold letters represent the factory-set values.
Know Your Unit
(4) Function setting
Procedure to change the set values
1) When the power is OFF, push the ON/OFF (power) Button for
more than three seconds while holding the START Button
and change the mode to the Setting Change Mode.
(F1 is displayed.)
ON/OFF
AC
START
HIDE
DEF
N
AVG L AT I O r d
. /1st / 2nd / 3
P-SET
140
MODE
SINGLE
180
MANU.
CHECK
AVG.
220
100
STOP
2) Push the START Button and select the items from F1 to F3.
Each time you push the START Button, the items change in
the order of
.
ON/OFF
AC
START
HIDE
DEF
N
AVG L AT I O r d
. /1st / 2nd / 3
P-SET
140
MODE
SINGLE
180
MANU.
CHECK
AVG.
220
100
STOP
3) Push the DEFLATION (deflation control)/
Display Switch Button to change the set values.
min
ON/OFF
sec
AC
START
4) When the setting is finished, push the ON/OFF (power)
Button to turn off the power. The setting is now changed.
HIDE
DEF
N
AVG L AT I O r d
. /1st / 2nd / 3
P-SET
140
100
MODE
SINGLE
180
AVG.
220
MANU.
CHECK
STOP
10
How to Apply the Cuff
The cuff of OMRON Digital Automatic Blood Pressure Monitor HEM-907 plays an important role of
collecting the information on blood vessels. Please wrap the cuff correctly according to the procedure.
Warning
Do not wrap the cuff over the arm to which
intravenous injection or transfusion is being
conducted.
• Intravenous injection or transfusion will be
impossible.
Do not erroneously connect the air tube or the
cuff to the tube of other equipment connected
to intracorporeal organ.
• Air may get into blood vessel.
General advice
• Do not inflate the cuff before it is wrapped over the
arm.
• Do not use torn cuff.
MIN
INDE
1. Select the cuff according to the arm
circumference of the patient.
Arm circumference
17 - 22 cm
22 - 32 cm
32 - 42 cm
RANGE
MAX
X
m(1
32~42c
)
3"~17"
-CL19
TUBE
REF HEM
Name of the cuff
Cuff / bladder set S (option)
Cuff / bladder set M
Cuff / bladder set L (option)
MIN
INDE
ART.
RANGE
MAX
X
~13")
cm (9"
22~32
TUBE
REF
• Use cuff that is suitable for the size of the patient's
arm.
• If a cuff not suitable for the arm size is used, blood
pressure may not be measured correctly.
• Check the following before wrapping the cuff.
1) The bladder is securely installed in the cuff.
2) The bladder is not twisted inside the cuff.
3) The bladder tube is protruding from the cuff as
shown in the Figure on the right.
ART.
-CR19
HEM
MIN
RANGE
MAX
X
INDE
"~ 9")
17~22cm(7
-CS19
REF HEM
TUBE ART.
Cuff
Extract the air tube from
TUBE
TUBE
ART.
Air tube
Enlarged figure of
the circled part
2. Connect the air tube securely.
• When connecting the air tube to the main unit,
securely connect the air plug to the base of the air
connector.
• Securely connect the air tube and the cuff/bladder
set by rotating them as shown in the Figure.
• If you connect the attached 1 m air tube, the air
tube can be used with the entire length of 1.2 m.
3. Prepare the patient to be ready to
wrap the cuff.
• Wrap the cuff directly on the arm as a rule.
• If the cuff is wrapped over a thick cloth or by
rolling up a jacket or a shirt, blood pressure may
not be measured correctly.
11
Cuff side
Air tube side
Air connector
Air plug
.
How to Apply the Cuff
4. Place the right hand of the patient
with the palm of hand facing upward.
5. Align the Artery Position Mark
with the brachial artery.
ART.
ART.
MIN
RANGE
MAX
X
INDE
m(9
22~32c
6. Wrap the cuff snugly using both
hands and securely fasten it with the
Velcro tape. At this time, the lower
edge of the cuff must be placed
1.2 cm to 2.5 cm above the inner
side of elbow joint.
"~13")
-CR19
REF HEM
TUBE
ART.
MIN
MIN
RANGE
RANGE
X
INDE
1.2-2.5 cm
)
m (9"~13"
22~32c
9
M-CR1
REF HE
TUBE
TUBE
ART.
RANGE
Preparations before Measurement
• If the INDEX is positioned outside the RANGE, select the cuff suitable for the patient's arm circumference and
wrap it again.
• If the cuff is not wrapped snugly, blood pressure may not be measured correctly.
• The cuff wrapped diagonally along the shape of the arm does not affect the measurement value.
ART.
RANGE
RANGE
INDEX
22~32cm (9"~13")
REF HEM-CR19
TUBE
ART.
TUBE
TUBE
ART.
ART.
7. Keep the level of the cuff at the same
level as the heart during the
measurement.
• For the correct measurement, keep the level of
the cuff to the same level as the heart.
AR
T.
12
How to Use the Power Source
How to use the AC adapter
Warning
Caution
Be sure to use the AC adapter appropriate for
your country.
• It may cause fire or you may suffer electric
shock.
Do not use this unit in places where
inflammable gas, such as highly inflammable
anesthetic, may be generated or in a high
pressure oxygen room or an oxygen tent.
• It may cause ignition and explosion.
Do not install or store this unit where it may
be sprayed with water or medication.
• You may suffer electric shock.
Do not touch the AC adapter with wet hands.
• You may suffer electric shock.
General advice
• Read the instruction manual of the other devices to
be used at the same time with this unit to
understand and be aware of the interaction between
the devices.
• Be sure to operate the Buttons to check this unit for
correct operation.
Connect the AC adapter to the DC jack of the main unit [1] and the electric outlet [2].
[2]
FF
ON/O
ST
DEFL A nd / 3
/2
AVG . / 1 s t
DE
MO E
GL
SIN
DC
ET
P-S
8V
140
G
AV
.
T
N
TIO rd
E
HID
[1]
AR
MA
NU
CH
.
ECK
P
STO
180
220
260
100
280
TO
AU
• When using the optional battery pack
48H907N (Model: HEM-907-PBAT), the unit
also function as the charger.
13
How to Use the Power Source
Installation and Replacement of Battery Pack (option)
Warning
If the fluid in the battery gets into your eye, wash
the eye with sufficient water without rubbing the
eye, then immediately consult the doctor for
treatment.
• There is danger in losing your eyesight.
Do not use the exclusive battery pack (option)
other than for this unit.
Do not throw the battery pack into fire, or heat,
or disassemble it.
• It may cause heat, ignition, short-circuit, or
rupture.
Caution
Do not short-circuit the polarities of the
optional battery pack with a metal object such
as wire.
If the fluid in the battery is stained on your
skin or clothes, immediately wash off the fluid
with water.
• You may suffer injury, or the battery may
leak, heat, ignite fire, or explode.
Preparations before Measurement
1. Remove the two screws on the upper portion of
the cover of this unit, then remove the battery
cover.
2. Installation: Connect the battery pack to the
connector in the battery cover to install it.
Replacement: Disconnect the battery pack
from the connector and replace with a new one.
3. Install the battery cover and fasten it with
screws. At this time, be careful not to pinch the
lead wire.
4. Connect the main unit and the AC adapter, then charge the battery pack. The
battery pack is not charged when you purchase the monitor. When you use the
battery pack for the first time, charge it for more than twelve hours before use.
Battery life
• You can use the unit for approximately three hundred measurements with one charge.
• Approximate life of battery pack is two years. However the battery pack life from each charging
may be shortened depending on the state of using. If the interval between charging becomes
short and a
mark appears frequently, replace it.
Charging time
• At approximately five seconds after connecting the AC adapter, the battery pack will start
charging automatically.
• While the battery is being charged, a
mark turns on.
• The battery can be charged in approximately twelve hours.
Battery low
• Even after a
mark starts to blink, you can use the battery for twenty to thirty
measurements. However if the Battery Low Mark starts to blink, charge
it soon.
• If a
mark is displayed, the battery is low (blood pressure cannot be measured.) Please
charge the battery.
Automatic Power Off
• If you use the unit with the battery pack, the unit will turn off automatically in approximately five
minutes even if you forget to turn off the power.
• While the AC adaptor is connected, the Auto Power Off function does not work.
14
How to Measure Blood Pressure
Warning
Caution
If any abnormal matter occurs during the
measurement such as inflation does not stop,
remove the cuff or pull out the air tube from
the main unit.
• You may suffer peripheral neuropathy.
General advice
• Be sure that the patient should not touch the unit.
In the following cases, check the readings
with the stethoscope.
(1) When an irregular pulse wave is displayed
• The reading may be erroneous due to
external vibration or patient's body
movement.
(2) When erroneous reading takes place or
the measured value is doubtful
• The reading may be erroneous due to
external vibration or patient's body
movement.
• An error may have occurred during
measurement or when measurement is not
possible for patient who has peripheral
circulatory disturbance or extreme
hypotension.
• An error may have occured due to extreme
short variation of blood pressure such as
arrhythmia.
Do not use cellular phone near the unit.
• The unit may malfunction.
Do not use this unit in a vehicle.
• It may result in erroneous measurement.
List of Measurement Modes
15
Refer to Page
To measure
only once
SINGLE Mode
To measure two
times (or three times)
automatically and
consecutively
AVG. Mode
To measure by
using a
stethoscope
MANU. Mode
To check the
accuracy of
pressure display
CHECK Mode
20.
Refer to Page
22.
Refer to Page
24.
Refer to Page
26.
How to Measure Blood Pressure (in SINGLE Mode)
1. Push the ON/OFF (power) Button to
turn on the power.
ON/OFF
START
HIDE
DEF
N
AVG L AT I O r d
. /1st / 2nd / 3
P-SET
140
MODE
SINGLE
180
AVG.
220
100
MANU.
CHECK
STOP
260
280
AUTO
2. Set the MODE Selector to "SINGLE".
mmHg
ON/OFF
AC
START
HIDE
DEF
N
AVG L AT I O r d
. /1st / 2nd / 3
P-SET
140
MODE
SINGLE
180
MANU.
CHECK
AVG.
220
100
STOP
260
280
AUTO
3. Set the P-SET (pressure setting)
Knob to "AUTO" or to the target
inflation-pressure value.
mmHg
ON/OFF
AC
DEF
N
AVG L AT I O r d
. /1st / 2nd / 3
P-SET
140
100
MODE
SINGLE
180
AVG.
220
MANU.
CHECK
STOP
260
AUTO
280
4. Wrap the cuff around the patient's
arm. (Refer to Pages 11 and 12.)
How to Measure Blood Pressure
START
HIDE
AR
T.
16
How to Measure Blood Pressure (in SINGLE Mode)
5. Push the START Button to start the
measurement.
mmHg
• Do not push the
START Button without
wrapping the cuff on
the arm.
AC
START
HIDE
START
HIDE
DEF
N
AVG L AT I O r d
. /1st / 2nd / 3
P-SET
140
100
• If you want to stop
measurement, push
the STOP Button. The
unit will deflate quickly.
ON/OFF
ON/OFF
MODE
SINGLE
180
AVG.
220
MANU.
CHECK
DEF
N
AVG L AT I O r d
. /1st / 2nd / 3
STOP
260
AUTO
280
P-SET
140
MODE
SINGLE
180
MANU.
CHECK
AVG.
220
100
STOP
260
280
AUTO
6. The measurement results are
displayed.
SYS
• While the battery pack is in use, the
monitor will turn off automatically in
approximately five minutes and the
display (measurement results) will
disappear. (Automatic Power Off)
mmHg
DIA
mmHg
PULSE
BPM
AC
HIDE
7. Push the ON/OFF (power) Button to
turn off the power.
ON/OFF
START
HIDE
DEF
N
AVG L AT I O r d
. /1st / 2nd / 3
P-SET
140
100
MODE
SINGLE
180
AVG.
220
MANU.
CHECK
STOP
260
AUTO
280
If the monitor detects a noise during the measurement or
determines that the pressure value is not correct, an error
display appears (Er1 to 9). In this case, refer to Page 24 for the
remedial actions and start the measurement again.
17
How to Measure Blood Pressure (in AVG. Mode)
1. Push the ON/OFF (power) Button to
turn on the power.
ON/OFF
START
HIDE
DEF
N
AVG L AT I O r d
. /1st / 2nd / 3
P-SET
140
MODE
SINGLE
180
AVG.
220
100
MANU.
CHECK
STOP
260
280
AUTO
2. Set the MODE Selector to "AVG.".
The factory-set values are set as follows:
mmHg
• Number of measurements: 2
• Waiting time until the 1st measurement:
0 sec.
• Interval: 1 min.
To change these factory-set values, refer to
Page 10.
ON/OFF
AC
START
HIDE
DEF
N
AVG L AT I O r d
. /1st / 2nd / 3
P-SET
140
MODE
SINGLE
180
MANU.
CHECK
AVG.
220
100
STOP
260
280
AUTO
3. Set the P-SET (pressure setting)
Knob to "AUTO" or the target
inflation-pressure value.
mmHg
ON/OFF
AC
DEF
N
AVG L AT I O r d
. /1st / 2nd / 3
P-SET
140
100
MODE
SINGLE
180
AVG.
220
MANU.
CHECK
STOP
260
AUTO
280
4. Wrap the cuff around the patient's
arm. (Refer to Pages 11 and 12.)
How to Measure Blood Pressure
START
HIDE
AR
T.
18
How to Measure Blood Pressure (in AVG. Mode)
5. Push the START Button to start the
measurement.
The unit automatically starts measurement according to
the waiting time until the start of 1st measurement.
After displaying the results of 1st measurement, the
monitor will measure blood pressure for the set number of
times automatically at the specified intervals.
• For the setting of the number of measurements, the
waiting time until the start of 1st measurement, and the
interval, refer to Page 10.
• If you want to stop measurement, push the STOP
Button. The unit will deflate quickly.
• If erroneous reading takes place during the
measurement, the monitor will automatically start
measurement again. If erroneous reading takes place
twice consecutively, measurement will be stopped
automatically.
• Do not push the START Button without wrapping the
cuff on the arm.
mmHg
ON/OFF
AC
START
HIDE
DEF
N
AVG L AT I O r d
. /1st / 2nd / 3
P-SET
140
MODE
SINGLE
180
MANU.
CHECK
AVG.
220
100
STOP
260
280
AUTO
6. The measurement results are
displayed.
SYS
After the measurement is finished, average values will be
displayed.
Each time the DEFLATION (deflation control)/
Display Switch Button is pushed, the results for each
measurement and the average value will be displayed.
• While the battery pack is in use, the monitor will turn off
automatically in approximately five minutes and the
display (measurement results) will disappear.
(Automatic Power Off)
mmHg
DIA
mmHg
PULSE
BPM
AC
HIDE
7. Push the ON/OFF (power) Button to
turn off the power.
ON/OFF
START
HIDE
DEF
N
AVG L AT I O r d
. /1st / 2nd / 3
P-SET
140
100
MODE
SINGLE
180
AVG.
220
MANU.
CHECK
STOP
260
AUTO
280
If the monitor detects a noise during the measurement or
determines that the pressure value is not correct, an error
display appears (Er1 to 9). In this case, refer to Page 24 for the
remedial actions and start the measurement again.
19
How to Measure Blood Pressure (in MANU. Mode)
1. Push the ON/OFF (power) Button to
turn on the power.
ON/OFF
START
HIDE
DEF
N
AVG L AT I O r d
. /1st / 2nd / 3
P-SET
140
MODE
SINGLE
180
MANU.
CHECK
AVG.
220
100
STOP
260
280
AUTO
2. Set the MODE Selector to "MANU.".
mmHg
ON/OFF
AC
START
HIDE
DEF
N
AVG L AT I O r d
. /1st / 2nd / 3
P-SET
140
MODE
SINGLE
180
AVG.
220
100
MANU.
CHECK
STOP
260
280
AUTO
3. Set the P-SET (pressure setting)
Knob to "AUTO" or the target
inflation-pressure value.
mmHg
ON/OFF
AC
DEF
N
AVG L AT I O r d
. /1st / 2nd / 3
P-SET
140
100
MODE
SINGLE
180
AVG.
220
MANU.
CHECK
STOP
260
AUTO
280
4. Wrap the cuff around the patient's
arm. (Refer to pages 11 and 12.)
How to Measure Blood Pressure
START
HIDE
AR
T.
20
How to Measure Blood Pressure (in MANU. Mode)
5. Place the stethoscope on the
patient's arm.
ON/OFF
START
HIDE
DEF
N
AVG L AT I O r d
. /1st / 2nd / 3
P-SET
140
MODE
SINGLE
180
AVG.
220
100
MANU.
CHECK
STOP
260
AUTO
280
6. Push the START Button to start the
measurement.
• Do not push the START Button without wrapping the
cuff on the arm.
If a pulse rate is detected during deflation, the pressure
display will be synchronized with the pulse rate and
renewed.
• If you want to inflate again after the start of deflation,
you can inflate the monitor again by pushing the START
Button only while you are pushing it.
• If you want to accelerate deflation after the start of
deflation, you can accelerate it by pushing the
DEFLATION (deflation control) / Measurement Results
Display Switch Button. Each time the Button is pushed,
the deflation speed can be accelerated by
approximately 5 to 10 mmHg.
mmHg
ON/OFF
AC
START
HIDE
DEF
N
AVG L AT I O r d
. /1st / 2nd / 3
P-SET
140
MODE
SINGLE
180
MANU.
CHECK
AVG.
220
100
STOP
260
280
AUTO
7. Push the STOP Button to finish the
measurement.
mmHg
• While the battery pack is in use, the monitor will turn off
automatically in approximately five minutes and the
display (measurement results) will disappear.
(Automatic Power Off)
ON/OFF
START
HIDE
DEF
N
AVG L AT I O r d
. /1st / 2nd / 3
P-SET
140
MODE
SINGLE
180
MANU.
CHECK
AVG.
220
100
STOP
260
280
AUTO
8. Push the ON/OFF (power) Button to
turn off the power.
ON/OFF
START
HIDE
If the monitor detects a noise during the
measurement or determines that the
pressure value is not correct, an error display
appears (Er1 to 9). In this case, refer to Page
24 for the remedial actions and start the
measurement again.
21
DEF
N
AVG L AT I O r d
. /1st / 2nd / 3
P-SET
140
100
MODE
SINGLE
180
AVG.
220
MANU.
CHECK
STOP
260
AUTO
280
How to Measure Blood Pressure (in CHECK Mode)
Accuracy of pressure display can be checked in the CHECK Mode.
What you need
(1) Calibrated mercury blood pressure monitor (including rubber ball), (2) T-shaped tube, (3) two
air tubes, and (4) a cylindrical object to wrap the cuff such as a tea container (a sturdy one that will
not break or deform under pressure)
* Measurement error may occur even with the mercury blood pressure monitor because of insufficient amount of mercury in the
mercury tank, dirty glass tube, or clogged glass tube cap.
How to use the blood pressure monitor
1. Connect the
mercury blood
pressure monitor,
rubber ball, and this
monitor with the Tshaped tube as
shown in the Figure.
mmHg
mmHg
ON/O
FF
AC
HIDE
STAR
T
2. Push the ON/OFF
(power) Button to
turn on the power.
P-SE
T
140
100
180
MODE
220
AU
TO
260
280
AVG.
SING
LE
MAN
U.
CHEC
K
D
AV E F L
G . / AT I O N
1st /
2nd / 3rd
STO
P
3. Set the MODE
Selector to
"CHECK".
Mercury blood
pressure monitor
4. Tightly wrap the cuff over a sturdy cylindrical object.
mmHg
6. Compare the values displayed on the monitor and those on
the mercury.
mmHg
7. Open the air release valve of rubber ball to deflate.
AC
How to Measure Blood Pressure
5. Close the air release valve of the rubber ball and inflate the
monitor to a certain value (pressure to be checked).
The systolic and diastolic pressure values are displayed.
HIDE
CHECK result
(1) Generally, the test tolerance of blood pressure monitor (accuracy of pressure when shipped
from the factory) should not exceed 4 mmHg.
(2) If the CHECK result shows a difference of +/- 5 mmHg or more, contact the store where you
purchased this unit or the nearest OMRON dealer.
22
How to Clean the Unit after Use
Caution
General advice
When cleaning this unit, please unplug the
AC adapter from the electric outlet.
• You may suffer electric shock.
After cleaning this unit, dry it well, then plug
the AC adapter in the electric outlet.
• You may suffer electric shock.
• Do not clean this unit with gasoline, paint thinner, or
high concentration alcohol.
• Do not disinfect this unit by autoclave or gas
sterilization (EOG, formaldehyde, or high
concentration ozone.)
1. Wipe the blood pressure monitor with a soft cloth squeezed well after moistened
with water, diluted disinfectant alcohol, or diluted detergent.
2. Then wipe the monitor with a soft dry cloth.
MAX
RA
NG
E
MIN
IN
DE
X
ART
ON/O
FF
~3
22
HIDE
STA
RT
P-SE
T
140
100
180
MOD
220
AUTO
260
280
E
AVG. SINGLE
MAN
U.
CHEC
K
D
AV E F
G . L AT I O N
/1 s
t / 2nd
/ 3rd
STO
23
P
2c
m
(9
1
"~
F
RE
)
3"
HE
-C
M
9
R1
.
List of Error Codes
Error code
Explanation
Inflation error
• When the pressure does not exceed 12
mmHg within the set time after the start of
inflation
• When the inflation does not reach the set
cuff pressure within the specified time
after the start of inflation
Deflation error
• When the deflation speed is too fast
during measurement
• When the deflation speed is too slow
during measurement
• When the measurement does not finish
within the specified time after starting the
measurement
How to correct
• Is the connector of the air tube connecting the
cuff and the main unit loose? Connect it
securely, then measure.
• Is the air tube connecting the cuff and the main
unit bent? Straighten it, then measure.
• If the cuff is wrapped loosely, it will take longer to
inflate. Wrap the cuff correctly and measure.
• Is the bladder of cuff leaking air? Replace the
bladder with new one (option).
• Is the air tube connecting the cuff and the main
unit bent? Straighten it and measure.
Insufficient inflation error
• Blood pressure could not be measured
due to insufficient inflation after the
measurement ends.
• If the measurement is made by setting the PSET to "AUTO", ask the patient not to move
his/her arm or body during the inflation. The
pressure value may be set lower during the
"AUTO" measurement because of the noise.
• Is the P-SET securely set to "AUTO"? Turn the
Knob counterclockwise as far as it goes until you
can hear a click sound.
• If the measurement is made by using the
pressure value setting method, set the value to
30 to 40 mmHg higher.
Indeterminable blood pressure error
• Blood pressure could not be measured
even when the cuff pressure reached the
specified pressure.
• If the cuff is wrapped loosely, correct
measurement is not possible. Wrap the cuff
correctly and measure.
Pulse wave small error
• Pulse wave was too small.
• If the cuff is wrapped loosely, correct
measurement is not possible. Wrap the cuff
correctly and measure.
• If the cuff is wrapped over a thick cloth or by
rolling up a jacket or a shirt, the pulse wave
cannot be measured. Do not wrap the cuff over
clothings.
Measurement error
• Relationship between systolic and
diastolic pressures was abnormal.
• Check the patient if he/she has arrhythmia.
• Ask the patient not to move his/her arm or body
during the measurement.
How to Measure Blood Pressure
Overpressure error
• The cuff pressure exceeded 299 mmHg.
Pulse rate error
• Pulse rate is not within the range of 30 to
199 beats/min.
Device error
• This is an indication of trouble of the main
unit.
• Contact the store where you purchased this
monitor or the nearest OMRON dealer.
24
Troubleshooting
If trouble occurs while using the unit, please check the following.
Trouble
The unit inflates to
abnormally high (or
low) pressure.
The monitor cannot
measure blood
pressure.
Measured values are
abnormally high (or
low).
25
What to inspect
How to correct
Is the cuff wrapped correctly?
Wrap the cuff correctly, and
measure again.
(Refer to Page 11 and 12.)
Did the patient moved his/her arm
or body during inflation?
Ask the patient not to move
his/her arm or body during
measurement, and measure
again.
Does this trouble occur to a
specific patient?
For some patients with
arrhythmia, this monitor may not
inflate properly.
Set the P-SET at 30 to 40 mmHg
higher than the systolic pressure
of the patient, then measure.
First of all, check the patient's
condition.
After checking the patient with the
stethoscope as needed, take
appropriate measure as in the
"List of error codes".
(Refer to Page 24.)
Did the patient moved his/ her
arm or body during
measurement?
Ask the patient not to move
his/her arm or body during
measurement, and measure
again.
Does the patient have
arrhythmia?
Check the patient with a
stethoscope.
Is the size of the cuff correct and
is it wrapped correctly?
Select the cuff according to the
patient's arm circumference, wrap
it correctly, then measure again.
(Refer to Pages 11 and 12.)
Is the level of the brachium to
which the cuff is wrapped at the
same level as the heart?
Keep the level of the brachium to
which the cuff is wrapped at the
same level as the heart, then
measure again.
(Refer to Page 12.)
Specifications
Name:
Model:
Display:
Measurement:
Measurement Range:
Accuracy:
Inflation:
Deflation:
Air Release:
Pressure Detection:
Power supply:
Electric Shock Protection Method:
Operating Temperature and Humidity:
Weight of Main Unit:
External Dimensions:
Accessories attached:
Options:
OMRON Digital Automatic Blood Pressure Monitor
HEM-907
Digital display
Oscillometric method
Pressure; 0 to 299 mmHg
Pulse rate; 30 to 199 beats/min
Pressure; Within ±4 mmHg
Pulse rate; Within ±5% of reading
Automatic inflation with pumping
Automatic deflation by electromagnetic control valve
Automatic rapid air release by electromagnetic control valve
Electrostatic capacity semi-conductor pressure sensor
AC adapter (230+
_10 VAC, 50/60 Hz or 110 VAC, 60 Hz or 240 V+
_10 VAC, 50Hz)* or
Battery pack (4.8 VDC, 6W)
Class II B type
10 to 40°C, 30 to 85% RH
Approx. 910 g
Approx.139 (W) x 203 (H) x 131 (D) mm
Cuff / bladder set M, AC adapter, air tube (1.0 m), Instruction Manual
Cuff / bladder set L, cuff / bladder set M, cuff / bladder set S,
Cuff L (with no bladder), cuff M (with no bladder), cuff S (with no bladder),
Bladder L, bladder M, bladder S,
Air tube 1.0 m, air tube 1.3 m,
Battery pack, AC adapter,
Stand exclusive for this unit, wall-hanging kit, pole-mounting kit
* AC adapter type to be specified at purchase.
[ Please note that specifications may be changed without prior notice.]
How to Measure Blood Pressure
Specifications
26
Exemptions
OMRON Will not bear any responsibilities on the following matters.
1. When a trouble and/or damage occurs caused by the maintenance and/or repair
conducted by a person other than OMRON or the dealer specified by OMRON
2. The trouble and/or damage of OMRON product caused by the product of other
manufacturer not delivered by OMRON
3. The trouble and/or damage caused by the maintenance and/or repair using the repair
parts not specified by OMRON
4. The trouble and/or damage caused by the results not observing the Notes on Safety or
the operational method mentioned in this Instruction Manual
5. Under the circumstances not within the operating conditions of this unit including the
power source or the setting environment mentioned in this Instruction Manual
6. The trouble and/or damage caused by the result(s) of remodeling or improper repair of
the product
7. The trouble and/or damage caused by act of god such as fire, earthquake, flood, or
thunders
1. The contents of this Instruction Manual may be changed without prior notice.
2. We have prepared the contents of this Instruction Manual with thoroughgoing measures.
However, if an inadequate description or error is found, please let us know.
3. It is prohibited to copy a part or an entire part of this Instruction Manual without getting
OMRON's permission. Unless this Instruction Manual is used by an individual
(company), it cannot be used without getting OMRON's permission from the standpoint
of the Copyright Law.
27
MEMO
28
MEMO
29
MEMO
30
OMRON Corporation
3-4-10, Toranomon, Minato-ku,
Tokyo 105-0001, Japan
OMRON HEALTHACARE SINGAPORE PTE LTD
83 Clemenceau Avenue, #11-01 UE Square
Singapore 239920