1
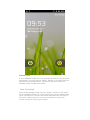
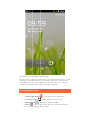
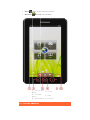
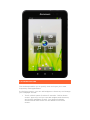
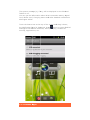
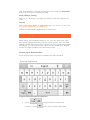
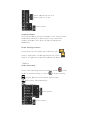
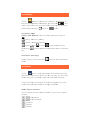
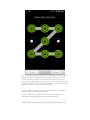
IdeaPad Tablet
A1-07
User Guide
V1.1
Please read the
safety precautions and important notes
in the supplied manual before use.
C
Contents
Chapter 01
Ov
verview of
o IdeaPa
ad Tablet A1-07
1
1-1
Ap
ppearance Description
D
1
1-2
Bu
uttons Desc
cription
1
1-3
Powering IdeaPad Table
et A1-07 On
n/Off
1
1-4
Turning Scree
en Backligh
ht On/Off
1
1-5
Screen Lock/Unlock
1
1-6
Na
avigation Tips
1
1-7
4-Pane Deskttop
1
1-8
Ho
ome Screen
n
1
1-9
Sw
witching Home Screen
1
1-10
Sta
atus Bar
1
1-11
Re
ecent Apps
1
1-12
Ap
pplications Manageme
M
nt
1
1-13
En
ntering Textt
Chapter 02
Co
onnecting
g to the Internet
2
2-1
Bro
owser
2
2-2
Lenovo App Shop
S
Chapter 03
Ap
pplication
ns
3
3-1
Ca
alculator
3
3-2
Ca
alendar
3
3-3
Ca
amera
3-4
Clock
3-5
Contacts
3-6
Email
3-7
ES File Explore
3-8
Gallery
3-9
Music
Chapter 04
Settings
4-1
Wireless & Networks
4-2
Sound Settings
4-3
Display Settings
4-4
Location & Security
4-5
Applications
4-6
Accounts & Sync
4-7
Privacy
4-8
Storage
4-9
Language & Keyboard
4-10
Backup
4-11
Date & Time
4-12
About Tablet
C
Chapter
01
O
Overview
w of IdeaP
Pad Tablet A1-07
7
*Speciffic models on
nly
1--1
Appearance De
escription
1--2
Butttons Description
1--3
Pow
wering IdeaP
Pad Tablet A1-07 On//Off
1--4
Turn
ning Screen
n Backlight On/Off
1--5
Scre
een Lock/Unlock
1--6
Nav
vigation Tips
s
1--7
4-Pa
ane Deskto
op
1--8
Hom
me Screen
1--9
Swittching Hom
me Screen
1--10
Stattus Bar
1--11
Rece
ent Apps
1--12
Applications Ma
anagementt
1--13
Ente
ering Text
1-1 Appearan
A
ce Descrription
The pic
cture is for reference purposes only, and may differ from the
actual item, which
h is the sta
andard.
1-2 Buttons
B
D
Descriptio
on
Powe
er Button
n
•
While in th
he shutdow
wn mode, prress and ho
old this buttton
•
•
•
(for about 2-3 sec) to power on your IdeaPad Tablet A1-07.
After your IdeaPad Tablet A1-07 is powered on, press this
button to turn off the illuminated screen display. While the
screen display is off, press this button again to reilluminate the screen.
After your IdeaPad Tablet A1-07 is powered on, press and
hold this button (for about 2-3 sec) to bring up IdeaPad
Tablet A1-07 "Tablet options" pop-up box; select "Power
off" and press "OK" to shut down IdeaPad Tablet A1-07.
After your IdeaPad Tablet A1-07 is powered on, press and
hold this button (for about 6 sec) to forced shutdown.
Volume Button
•
Adjusts the volume.
Screen Rotation Lock Button
•
•
Toggle the button DOWN to lock the screen orientation, not
allowing screen rotation.
Toggle the button UP to unlock the screen orientation,
allowing screen rotation.
*SIM card socket
•
The SIM card slot is located on the lower left of the device
frame. In the Power off mode, insert the end of a sharppointed object into the small hole above the socket until the
stopper pin pops out, and then insert the SIM card. To
remove the SIM card, in the Power off mode, push the SIM
card into the slot until it clicks, then pull it out.
1-3 Powering IdeaPad Tablet A1-07 On/Off
Powering IdeaPad Tablet A1-07 On
Press and hold the "Power" button on the upper right of IdeaPad
Tablet A1-07, and the Lenovo and startup screens display in
sequence, indicating that IdeaPad Tablet A1-07 has been powered
on.
Powering IdeaPad Tablet A1-07 Off
Press and hold the "Power" button on the upper right of IdeaPad
Tablet A1-07 until "Tablet options" displays on the screen, select
"Power off " and touch "OK" to power off your IdeaPad Tablet A107.
*For the 3G-enabled version, be sure to insert or remove the SIM
card in the Power off mode. Doing so when the device is on may
damage the SIM card.
1-4 Turning Screen Backlight On/Off
Turning Screen Backlight On
In the standby mode, you can tap the "Power" button on the upper
right of the IdeaPad Tablet A1-07 to "wake" the screen up. The
device's screen will then light up, indicating that the backlight has
been turned on.
Turning Screen Backlight Off
If your IdeaPad Tablet A1-07 is powered on and you do not use it
temporarily, you can tap the "Power" button on its upper right to
turn off the screen backlight. Your IdeaPad Tablet A1-07 will enter
the standby mode to save power.
1-5 Screen Lock/Unlock
Lock Screen
Auto Lock
You can set Screen timeout in <Display> under "
Settings". If
there is no operation within the preset standby time, then the
screen backlight will automatically turn off, and the device will be
locked.
Manual Lock
If your IdeaPad Tablet A1-07 is powered on and you do not use it
temporarily, you can tap the "Power" button on its upper right to
dim the screen display down. The device will then enter the
standby mode and become locked.
How to Unlock
Once in the standby mode, tap the "Power" button on the upper
right of IdeaPad Tablet A1-07 to brighten the screen display back
up to normal level. You can also touch and slide the lock icon to
the right, following the on-screen instructions to unlock the
screen, as shown in the figure below:
Screen Lock Pattern Settings
S
You can touch "Se
et up scree
en lock" in <Location
<
& security>
> under
"Settin
ngs" to set the
t
screen lock patterrn. After this function has
been enabled,
e
you need to draw
d
your unlock
u
pattern in orde
er to
unlock the screen
n before you
u can use your
y
device
e.
1-6 Navigatio
N
n Tips
•
Lenovo App
A
Shop
: Enter the
t
Lenovo App Shop.
•
Function menu
•
Applicatio
ons
•
Home
: Back to the
t
home screen
s
or prress the bu
utton
for 2 sec to display re
ecent apps.
: Display ap
pps function menu.
: Display
D
all tablet’s
t
app
ps.
•
Back
: Back to the previous screen.
•
Browser
: Brows
se the Interrnet.
1 - Lenovo App
4 - Home
S
Shop
2 - Function
n
5 - Back
m
menu
3 - Applicattions 6 - Browser
1-7 4-Pane
4
De
esktop
1-8 Home Screen
This desktop enables you to quickly view and open your most
frequently used applications.
In the home screen, you can add widgets or shortcuts, and change
your wallpaper as well.
•
Touch a blank space for about 2 seconds. "Add to Home
screen" pops out, and you can add widgets and shortcuts,
and change wallpaper as well. Your desired widgets,
shortcuts and other items can be added to the home
screen.
•
s
on the hom
me screen, touch and hold
To delete something
the desired
d gadget until a Trash
h Bin icon displays
d
at tthe
bottom of the screen, then drag
g and drop the gadgett icon
onto the
Trash Bin
n icon.
1-9 Switching
S
g Home Screen
S
I
Tablet A1-0
07 has mu
ultiple desktops.
Your IdeaPad
You can slide the screen with your finger to switch the displa
ay and
move icons amon
ng home screens.
1-10 Status Bar
B
The system mess
sage(s), if any,
a
will be displayed on the Idea
aPad
Tablet A1-07.
You can get the in
nformation about Wi-F
Fi connectio
on status, S
Signal
level, Power
P
level, Charging status and
d other deta
ailed notific
cations
about your
y
tablet.
Touch the Status bar at the top of the screen and
d drag it down,
the Notification Pa
anel is disp
played. Pres
ss
button to open d
detailed
setting
gs for Wirele
ess & networks, Sound, Display, Location &
securitty, Applications, etc.
1-11 Recent Apps
A
Your ta
ablet remem
mbers the apps
a
you used recentlly.
Touch
for about 2 second
ds to open a list of ap
pplications y
you
have used recently. Touch an
a applicatio
on to open it.
1-12 Applications Man
nagement
Tap
on the ho
ome screen to open th
he applications list.
anage applications in Applicattions under "
You can enter Ma
S
Settings".
Uninsttall
Tap "Downloaded", the app you desired, then press the Uninstall
button on the top to uninstall the app.
Stop/change setting
Tap "All" or "Running", the app you desired, then the option you
want.
Install
Tap "Lenovo App Shop" in applications list. For details, please refer
to "Lenovo App Shop" on "Chapter 2".
Select the appropriate applications to download.
1-13 Entering Text
When using your IdeaPad Tablet A1-07, you can enter text from
the virtual keyboard directly onto the touch screen, such as when
adding contact information into Contacts or typing and editing SMS
messages. You can also directly input Chinese characters, English
letters and digit symbols onto the touch screen.
Switch Input Method Editor
Press and hold the input box to display the soft keyboard.
System keyboard
Toggle between letters/numbers
•
Touch
/
numbers. Touch
to toggle between letters and
to see more special characters.
•
Touch
, the indicator displays, and you can enter
capital letters.
Input options
•
Touch
on the keyboard to open Input
languages menu. You can select Input languages or
Switch Layouts on this menu.
Voice input
•
Touch
on the keyboard to open voice input.
*Specific models only
C
Chapter
02
C
Connecti
ng to the
e Internet
*Specific models on
nly
2-1
B
Browser
2-2
L
Lenovo
App
p Shop
2-1
1 Browse
er
Network support is requ
uired for ac
ccessing the Internet
h the web browser. If there are
e any probllems with
with
your network support, please
p
cons
sult your network
erator or se
ervice prov
vider directtly.
ope
The
e web brow
wser in your IdeaPad Tablet A1--07 can acc
cess
the Internet via
v the Wi-Fi network
k for busine
ess and
pers
sonal use.
Touch "
wser.
brow
Bro
owser" in the
t
applications list to
o open the
e
e browser supports
s
th
he following functions
s:
The
In
nput web
b address
s
Touch the input text box
x, and inpu
ut the web address w
with
d. Then tou
uch
the popup sofft keyboard
keyboard to open
o
the web page.
on the sofft
Ex
xit
Touch "
" on
o the botto
om bar to quit the brrowser.
Bo
ookmark
ks
You can save bookmarks to your favorite
f
we
eb pages and
nav
vigate to th
hem in seco
onds. It co
ontains 3 ta
abs:
okmarks:
Boo
Disp
plays a listt of the web addresse
es that you
u have add
ded.
You can also add
a
a book
kmark. Press and hold web icon
ns
to open
o
the po
opup windo
ow for editting links. You
Y
can op
pen,
editt, copy, sha
are, delete
e the selectted website, create
shortcuts, set as home page
p
and do
d other op
perations.
st visited::
Mos
Disp
plays a listt of web ad
ddresses th
hat you hav
ve browsed
d
mos
st recently.
History:
plays a listt of the web addresse
es that you
u have
Disp
brow
wsed recen
ntly.
Ne
ew Wind
dow/Win
ndow
This
s function is
i mainly used
u
to ope
en a new web
w
page
window, or to toggle am
mong severral previous
sly opened
d
windows.
Ad
dditionall Functio
ons
Touch
to dis
splay more
e functions
s.
Reffresh: Touch
to manually refresh
r
the
e web page
e.
Forrward: Tou
uch
Boo
okmarks: Touch
Touch
to go to the next page.
ge your boo
okmarks.
to manag
to bookmark a current page.
to disp
play an opttion list. Th
hese options
Morre: Touch
include Add bo
ookmark, Find on page, Select text, Page
e
info
o, Share pa
age, Downlloads and Settings.
S
Zoo
om Pages In/Out: You
Y
can au
utomaticallly fit the pa
age
to the screen size, and zoom
z
the page
p
in/out by
enla
arging/redu
ucing the distance
d
be
etween you
ur two fing
gers
while touching
g the scree
en.
Bac
ck: Touch
to previous page.
2-2
2 Lenovo
o App Shop
Within the applications list, touch "
Lenovo App Shop"
to open the Lenovo App Shop interface. NOTE: Network
support is required before you can use this application. If
there is any problem with your network support, please
consult your network operator or service provider.
After entering the <New> page, you can toggle among
the upper tabs <All Categories>, <New>, <Bestsellers>,
<Recommended> and <All>, <Free>for various content.
If you want to download applications for your IdeaPad
Tablet A1-07, you must first register for a Lenovo
account. Once you have registered for a Lenovo account,
you can use it to log in and download the free applications
of your choice onto your IdeaPad Tablet A1-07.
All Categories
Click "All Categories" tab on top of the <Lenovo App
Shop> page to enter <Lenovo App Shop> category list.
New
Click to display the latest software applications.
Bestsellers
Click to display the most popular applications.
Recommended
Click to display the recommended applications.
All
Click to display all applications.
Free
Click to display the free applications.
*Specific models only
C
Chapter
03
A
Applicatio
ons
*Speciffic models on
nly
3-1
C
Calculator
3-2
C
Calendar
3-3
C
Camera
3-4
C
Clock
3-5
C
Contacts
3-6
Email
3-7
ore
ES File Explo
3-8
G
Gallery
3-9
M
Music
3-1
1 Calculator
Ca
alculator" in
n the applic
cations list to enter th
he
Touch "
calc
culator application.
3-2
2 Calenda
ar
Touch "
Ca
alendar" in the applica
ations list to open the
cale
endar page..
Ne
ew Calendar Item
m
You can create
e a new eve
ent by touc
ching and holding a tim
me.
Ma
anage Ca
alendar Events
E
You can switch
h among the Day view
w, Week vie
ew and Mon
nth
View
w by tappin
ng
function menu.
Day
y view: Tou
uch and ho
old an eventt in the day
y view to
crea
ate, view, edit
e
or delette that eve
ent.
Wee
ek view: Touch
T
and hold
h
an eve
ent in the week
w
view tto
crea
ate, view, edit
e
or delette that eve
ent.
Mon
nth view: Touch any date in the
e month vie
ew to enterr
Day
y view, then
n you can manage
m
eve
ents in day view.
TE: Within any "Calen
ndar" view, you can qu
uickly returrn to
NOT
the current day
y or the current week
k and month
h simply by
y
tapp
ping the
ct "
Tod
day" button
n on the
, and selec
func
ction menu from any other
o
day, week or month view.
3-3
3 Camera
a
Touch "
C
Camera"
in the applica
ations list to
o open the
photo taking and video re
ecording prreview interrface. The
foun
nd view will display on
n the screen. From thiis display, y
you
can perform th
he following
g operations:
Sw
witch Cam
meras
Your pad proviides you wiith two cam
meras. On cameras
c
, function
n menu appears, and select
interface, tap
ack.
swittch camera between front and ba
Ph
hotos
Tak
king Photo
os
In the photo ta
aking preview interfac
ce, touch
scre
een to take snapshots.
on the
Video Recorder: Sw
witches to th
he video re
ecording mo
ode.
ze, Picture quality, Color effect and
Exposure,, Picture siz
Cam
mera setting
gs.
Store loca
ation
White bala
ance
Zoom: Ad
djust the size of a
photo (fro
om 1x to 4x).
Select camera
wing Phottos
View
In the photo ta
aking preview interfac
ce, in the ve
ertical mod
de,
ch Photo Prreview on lo
ower right to open the
e photo
touc
prev
view interfa
ace. Here, you
y
can sett and play photo
p
slide
eshows.
oto Saving
g Location
Pho
Any
y photos you have take
en will be saved
s
in the
e"
Gallery" application. In th
he applications list, touch "
Gallery" to ope
en the list o
of all the ph
hotos you have
h
taken..
Vid
deos
Vide
eo Record
ding
In the video re
ecording pre
eview interrface, touch
h
scre
een to startt recording,, or touch
to stop
p recording.
Camera: Switches
S
to the photo taking mod
de.
Color effect, Camera
a settings
ance
White bala
Video quality
Select camera
on th
he
View
wing Vide
eos
In the vertical mode, a th
humbnail im
mage of the
e last
prev
viously reco
orded video
o will be dis
splayed in the
t
lower right
corn
ner of the video
v
record
ding previe
ew interface
e. Touch the
thum
mbnail to open
o
the vid
deo play intterface.
eo Saving Location
Vide
Any
y videos you
u have reco
orded will automatical
a
d in
ly be saved
the "
Gallery" application. Touc
ch "
Ga
allery" in th
he
applications lis
st to start the applicattion. You ca
an view the
e
reco
orded video
os in <Galle
ery>.
3-4
4 Clock
Touch "
view
w.
C
Clock"
in the
e applicatio
ons list to open the Clo
ock
To add
a
an alarrm, touch
then tou
uch "Add allarm".
Whe
en an alarm
m sounds, touch
t
Dism
miss to turn
n it off or
Sno
ooze to delay for ten minutes.
m
3-5
5 Contactts
Touch "
C
Contacts"
in
n the applic
cations list.
d contact
Add
With
hin the "Co
ontacts" ma
ain page, to
ouch
, se
elect the <N
New
conttact> on th
he function menu, and
d then inputt the releva
ant
information forr that conta
act. Tap the
e <Done> button whe
en
you have finish
hed.
Editt contact
With
hin the "Co
ontacts" dettails page, touch
, select
s
the
on the
t
function
n menu to enter
e
the editing
e
mode, then ediit
your contacts.
3-6
6 Email
work suppo
ort is requirred for usin
ng your Ide
eaPad Table
et
Netw
A1-0
07's mailbo
ox. If there are any prroblems witth your
netw
work suppo
ort, please consult
c
you
ur network operator or
serv
vice provide
er directly.
Touch "
E
Email"
in th
he applicatio
on list.
3-7
7 ES File Explore
Touch "
E File Explore " in the applicatio
ES
ons list to b
bring
up the
t
file man
nagement application,
a
, which ena
ables you to
o
brow
wse and ma
anage any and all of the
t
files sto
ored locally on
your Pad.
ot
Roo
Tap the
t
upper left corner of
o the page
e to
button in the
quic
ckly return to the roott directory for
f local sto
orage.
New
w
Tap
New" to create a new file or
o folder an
nd
, select "
searrch engine.. You can also edit the
e name of a folder or ffile.
Afte
er you touch "OK", the
e system sh
hould inform
m you that the
file has been created
c
succ
cessfully.
erations
Ope
Tap
, selectt "
dele
ete etc,.
Ope
eration" to paste,
p
cut, copy, rena
ame,
•
Copy/Pa
aste: Within the file list, tap
, select one
or more
e files, then
n touch "Co
opy" under "Operation
n".
Select the
t
location
n where you
u want to paste,
p
then
touch "Paste".
•
Delete: Within the
e file list, ta
ap
, select one or
more files, then to
ouch "Delette" under "O
Operation" to
delete the
t
file(s).
•
Rename
e: Within th
he file list, tap
, select one
file, the
en touch "R
Rename" un
nder "Opera
ation" to
rename
e the file.
For more detaiils, tap
help
p instruction.
, and refer to ES File Explore
3-8
8 Gallery
Touch "
G
Gallery"
to start
s
the <Gallery> ap
pplication. In
plication ho
omepage, you
y
can slid
de
in the
the picture app
upper right corrner of the screen afte
er touching
g the album
m to
ect display modes:
m
sele
album or
photto.
On Gallery Pa
age
Gallery and Camera:
C
Yo
ou can sele
ect Gallery or
o Camera..
Gallery: Sw
witch to Ga
allery.
Camera: Switch
S
to Ca
amera.
Details: To
ouch
then
n touch
file.
to select
on
o the func
ction menu,,
d
info
ormation ab
bout a selected
to show detailed
On Picture List Page
Sele
ect a photo, then touc
ch the
mod
de.
button
b
to en
nter slidesh
how
3-9
9 Music
Touch "
M
Music"
in the
e applicatio
on list to sta
art the mus
sic
application, the
en select what
w
you wa
ant to play.. You can c
copy
mus
sic from your compute
er using the
e USB cable
e supplied.
Touch the buttton on the top
t
of the music
m
page
e to sort your
mus
sic files by Artists,
A
Alb
bums, Song
gs or Playlis
sts.
Mus
sic Player Controls
You can press the side vo
olume butto
on of your Pad to adju
ust
volu
ume.
/
ay/Pause
: Pla
/
: Pre
evious/Nex
xt
: Playlists
: Shuffle
: Repeat
On music playe
er page, to
ouch
can
n back to home page,
then
n enter other applicatiions, but yo
our music continues
c
to
play
y. To turn off/change
o
music, touc
ch the statu
us bar at th
he
top of the scre
een, drag it down, then select
.
*Specific models only
C
Chapter
04
S
Settings
*Speciffic models on
nly
4-1
W
Wireless
& Networks
N
4-2
S
Sound
Settings
4-3
D
Display
Setttings
4-4
Location & Security
S
4-5
A
Applications
s
4-6
A
Accounts
& Sync
4-7
Privacy
4-8
S
Storage
4-9
Language & Keyboard
4-10
B
Backup
4-11
D
Date
& Time
e
4-12
A
About
Tablet
hin the app
plications lis
st, touch "
With
the Settings in
nterface.
Settin
ngs" to ente
er
4-1
1 Wireles
ss & Netw
works
This
s setting mo
odule includes: Airplane mode, Wi-Fi,
W
Wi-Fi
setttings, Bluettooth, Bluettooth settin
ngs, Tethering & porta
able
hots
spot, VPN settings
s
and
d 3G Mobile
e Networks
s (Specific
mod
dels only).
Airplane Mode
M
Onc
ce the Airpla
ane Mode has
h been en
nabled, all of the wire
eless
conn
nections on
n your Idea
aPad Tablett A1-07 will be disable
ed
imm
mediately.
Wi-Fi/Wi-F
Fi Setting
gs
You can enable
e/disable Wi-Fi
W
functio
on.
Onc
ce the Wi-Fi has been enabled, your IdeaPad Tablet A1
1-07
will automatica
ally scan fo
or available wireless ne
etworks,
disp
play them in
n the Wi-Fi network lis
st.
There is an ico
on indicating the network status following every
N, where
LAN
s that the network
n
req
quires no
indicates
pass
sword, and can be con
nnected dirrectly, and
indicattes
thatt the netwo
ork has bee
en encrypte
ed, and can be connec
cted
only
y after the required pa
assword is input.
Touch a desire
ed network from the list to conne
ect. Touch
,
then
n select "
Advance
e " to set sttatic IP settting. You ca
an
also
o select <Ad
dd Wi-Fi Ne
etwork> to manually add
a
a netw
work.
•
•
Wi-Fi: Wi-Fi functtion switch..
Network notifica
ation: After the switch
h is turned on,
the system will no
otify the use
ers if there are any op
pen
network
ks.
•
Wi-Fi sleep
s
polic
cy: Touch
and sele
ect "Wi-Fi sleep
Advance": sleep wh
policy" on the "
hen screen
n
turns off
o (uses more
m
mobile data), Never when
plugge
ed in or Ne
ever(uses more batttery power).
Blu
uetooth/
/Bluetootth Settin
ngs
You can establish a wirele
ess connecttion with an
ny other
Blue
etooth compatible dev
vices using Bluetooth technology
t
y.
Examples of su
uch Bluetoo
oth compattible devices may inclu
ude
sterreo earphon
nes, keyboa
ards, etc.
Sinc
ce a Bluetooth-enabled device co
ommunicate
es with oth
her
devices by radio waves, you
y
do not have to po
ose your
Idea
aPad Tablett A1-07 to be directly opposite th
he other
device. You sim
mply need to
t ensure that
t
the ma
aximum
distance betwe
een the two
o devices does not exc
ceed 10 m
(abo
out 32 feet). Howeverr, please no
ote that the
e Bluetooth
conn
nection can
n sometime
es be interfe
ered with by
b barriers
such
h as walls or
o other ele
ectronic dev
vices.
Your IdeaPad Tablet
T
A1-0
07 supports
s V2.0 Blue
etooth
spec
cification. To
T ensure the interacttive operation between
n
your IdeaPad Tablet A1-07 and another Bluetooth-enabled
device, please use only Lenovo-approved accessories
applicable to your IdeaPad Tablet A1-07 model. Or, check
with the manufacturer of the other device to determine
whether the device is compatible with your IdeaPad Tablet
A1-07.
In some cases, the use of Bluetooth may be restricted. For
the related information, please consult with your local
authorities or service provider.
Using functions requiring Bluetooth technology or running
these functions in the background will consume the battery
power of your IdeaPad Tablet A1-07 at a faster than average
rate, also reduce the service life of your battery. You can
perform the following operations in the Bluetooth Settings:
•
Bluetooth devices: After Bluetooth has been turned
on, your IdeaPad Tablet A1-07 will automatically
display a list of any Bluetooth-enabled devices which
can be found in the nearby area (i.e. scan devices).
Tethering & Portable Hotspot
You can share your tablet's mobile data connection via USB
or as a portable Wi-Fi hotspot.
VPN Settings
These settings allow you to add and set up various types of
VPN (Virtual Private Network).
3G Mobile Networks (Specific models only)
You can enable/disable 3G Mobile Networks function. If there
are any problems with your network support, please consult
your network operator or service provider.
4-2 Sound Settings
Touch this option to enter the "Sound Settings" interface.
The setting includes General (Silent mode, Vibrate,
Volume), Notifications (Notifications ringtone) and
Feedback (Audible touch tones, Audible selection,
Screen lock sounds and Haptic feedback ).
4-3 Display Settings
The display setting options include: Brightness, Auto-rotate
screen, Animation and Screen timeout.
Brightness
You can manually adjust the brightness, or select "Automatic
brightness", which allows your IdeaPad Tablet A1-07 to
adjust the screen brightness automatically according to the
current ambient light.
Auto-rotate screen
You can select whether to allow screen horizontal or vertical
auto-rotation.
Animation
Once the animation switch has been turned on, your IdeaPad
Tablet A1-07 will display animations whenever application
windows are opened or closed, thereby enhancing the
attractiveness of your experience.
Screen timeout
This option allows you to select how long your IdeaPad
Tablet A1-07's screen will remain lit without any activity
before it automatically locks the screen to save power. You
can set the time period to 15 seconds, 30 seconds, 1 minute,
2 minutes, 10 minutes, 30 minutes and never.
4-4 Location & Security
Within the settings, you will gain access to the following
functions:
My Location, Screen Unlock, SIM card lock (Specific
models only), Passwords, Device administration and
Credential storage.
My Location
You can select whether to use wireless networks or GPS
satellites.
Notice on using the GPS feature
•
Many factors can interfere with GPS satellite
reception. In places with strong interference (such as
indoors, in a car, or between buildings) or during bad
•
•
•
weather it is possible that you may either fail to get a
signal or find that a longer positioning time will be
necessary.
For your safety, please do not watch or operate the
monitor while driving.
Navdroyd is free navigation software that will enable
you to better experience this product’s GPS
functionality. Please esnure you connect to Wi-Fi
download the map by Navdroy before using the GPS.
Be aware that this version is function-limited to maps
of only one country or region. Before downloading the
maps of another country or region it will be necessary
to manually delete the previous set of maps.
Using a Wi-Fi connection, check for updates online at
least once a week to enhance your GPS experience.
Screen Unlock
Using the option, you will be able to unlock the screen in the
three ways: Pattern Unlock, PIN Unlock and Password
Unlock. You can cancel the screen lock here as well.
Touch <Pattern> and then draw the unlock pattern of your
choice (as demonstrated) on the screen with your finger.
Once you have set the unlock pattern, you will then be able
to turn <Use Visible Pattern> on/off.
Once you have set and activated the Pattern Unlock function,
then the Unlock keyboard will be displayed on the screen
whenever the screen is unlocked by the slide. Draw your
pre-selected pattern on the screen with your finger using the
Unlock keyboard. After the preset pattern has been correctly
drawn, the screen will become unlocked.
Touch <PIN>. You will need to input at least 4 numbers as
the PIN code to unlock the screen.
Touch <Password>. You will need to input at least 4
characters as the password to unlock the screen.
SIM Card Lock Setting (Specific models only)
Passwords
With the <Visible passwords> option, you can decide
whether or not your chosen password will be visible as you
input it. If the checkbox is checked, then the password will
be visible. If it is unchecked, then your password will only be
displayed as **** as you input it, thereby making your
password more secure.
Device administration
These functions are not available to ordinary users. Only
TsingMail users who have previously set up the appropriate
security policies within their companies can use these
functions.
These features work in conjunction with the Enterprise Policy
Center, (Lenovo Enterprise Policy Manager). The Enterprise
Policy Center is the executor of the security policy of the
Lenovo enterprise platform. Whenever the user enables the
Lenovo enterprise mail and service function, the Enterprise
policy center will then be enabled automatically. This will
allow your IdeaPad Tablet A1-07 to accept the security policy
as set forth by the IT department of your company, for
example, mandatory screen-savers with increased password
strength. Enabling these functions also allows your IdeaPad
Tablet A1-07 to accept management instructions from your
company’s IT department, for example, allowing them to
erase data remotely and reset your device.
Credential Storage
This function allows your IdeaPad Tablet A1-07 to access
web pages and LANs for which a specific security certificate
or other certificate is required. After having set the
credential storage password, you can access the web pages
or LANs with the appropriate security certificates and other
certificates you have stored.
•
•
•
•
Use secure credentials: This option will be
unavailable until the credential storage password has
been set.
Install from SD card : You can install certificates
from SD card.
Set password: Touch this option to set the
credential storage password. After it has been set
successfully, the "Use secure credentials " checkbox
will be checked, indicating that this option is now
available.
Clear storage: Select this option to delete all your
currently saved certificates and reset the credential
storage password.
4-5 Applications
With these settings include: Unknown sources, Manage
applications, Running services, Storage use, Battery use,
Development (NOTE: This last function is available for
developers only.)
Manage Applications
With this option, you can easily manage and delete
applications of your choice.
With the <All> menu, you can filter any running applications
or applications provided by the third-party software
developer in the applications list.
After selecting an application, you will then be able to see its
related information details, and also be able to perform
operations such as Uninstall , Clear cache and Clear defaults.
Running Services
With this option, you can end and set some running
applications.
Storage Use
With this option, you can view storage used by applications.
Battery Use
With this option, you can see how much the battery has
been used.
Unknown Sources
This option allows installation of non-Market applications.
Development
This option is only available for developers. With it, you can
set some of the development options available for that
application.
•
•
USB debugging: Uses the debugging mode after
connecting to USB. You can toggle between on and
off.
Stay awake: The screen will not sleep when the
battery is charged. You can toggle between on and
•
off.
Allow mock locations: You can toggle between on and
off.
4-6 Accounts & Sync
With the option, you will be able to do general sync settings
and manage accounts.
General sync settings enables you to select Background data
and Auto-sync.
Via account management settings, you can add accounts, or
use existing account. You can log in by using an existing
account to view relevant information under your account,
and to use some advanced functions and applications of this
device.
4-7 Privacy
This option enables you to reset to the factory data.
4-8 Storage
This option enables you to see SD card and internal storage.
4-9 Language & Keyboard
Language Settings
You can select the language you wish to use to operate your
IdeaPad Tablet A1-07.
Keyboard Settings
You can select input method and set Keyboard in this
setting.
4-10 Backup
This option enables you to back up and restore some data.
4-11 Date & Time
With these settings, you can set a series of time-related
options such as the system time.
Date & Time Settings
You can enable the auto time update via network, select the
time zone, set the specific date and time, and set the display
format of date and time.
4-12 About Tablet
Within this option, you can view System updates, Status,
Battery use, Legal information, Model number, Android
version, Kernel version and Build number.
*Specific models only