1
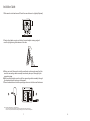
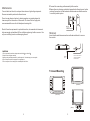
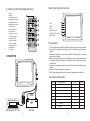
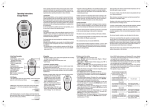
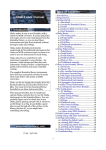
Lanzar
5.6 TFT LCD COLOR MONITOR
+
SEL
POWER
AV
PHONE
www.lanzar.com
WARNING:
DO NOT WATCH MONITOR WHILE
VEHICLE IN MOTION IT CAN BE
HAZARDOUS
SVHR56
Installation Guide:
1.Slide monitor into dash mount S2 and then use fastener to tighten(Optional)
2.Firmly attach dash mount on a flat surface and adjust viewing angle of
monitor by tightening the fastener at the side
A.When you install the monitor into the seat head cushion make sure that the
monitor connecting cable assembly has already been pull through by the
supporting pipe.
B.Before connecting the monitor, pull the connecting cable assembly through
the headrest shroud as shown in diagram2.
C.Place headrest shroud into the opening and secure it with correct fasteners.
A
B
Note: Installing Method of main cable assembly
1.Reeve the main cable assembly through (or beside) the head rest support tube.
2.Secure and protect the cable assembly from damage when the head rest is adjusted.
1
6
Maintenance
To avoid electrical shock ,do not open the enclosure. high voltage is present.
No user serviceable parts inside the enclosure
D.Connect the connecting cable assembly to the monitor.
E.Ensure there is no foreign material is trapped inside the enclosure, before
pushing the monitor into the headrest shroud make sure that the monitor
is securely locked in place.
C
E
Do not use any chemical solvent, cleaning agent or corrosive detergent to
clean away dirt on the surface of the screen. To clean off dirt or finger print,
we recommend the use of a soft damp lens cleaning cloth.
D
Monitor
Should there be requirement to replace blown fuse, do remember to disconnect
all power supply and switched off the unit before replacing it with a new one. Use
only correct rating fuse to avoid damaging the unit.
Headrest Shroud
Removal:
Insert durable card between monitor and headrest shroud to remove
the monitor.
CAUTION
1.Do not operate the monitor at temperatures below 0 or above 40
2.Keep the monitor clean and dry.
3.always seek pualified personnel to perform repairs . Never attempt you own repairs
4.Do not drop the monitor or expose to strong impacts.
5.Do not expose to direct sunlight for extended periods of time.
Focus on the concave of
monitor and headrest
shroud to insert
Durable
card
Trimount Mounting
+
SEL
POWER
AV
PHONE
+
SEL
(Headrest)
POWER
AV
PHONE
(Sun-Visor)
+
SEL
POWER
AV
PHONE
(Stand)
5
2
3)
Basic Operating instructions
Remote Control Operating Instruction:
1.mute
2.sleep
3. contrast control+
4. brightness control5. contrast control6. brightness control+
7.Hue control+
8. volume control+
9. Hue control10. volume control11. video1/video2
12. power on/off
13. color control+
14. color control15. mode:16:9/4:3
16.prference
17.system
1
2
3
4
5
6
7
8
9
10
SLEEP
11
AV
12
1
13
14
MODE
15
PP
16
SYS
17
1.SEL+
2. SELCT
3.SEL4. POWER ON/OFF
5. AUDIO/VIDEO SWITCH
6.EARPHONE
+
2
SEL
3
-
4
POWER
5
AV
6
PHONE
Precautions:
1.This unit should be install by qualified technicians or service personnel.
2.this product is designed to operate with a 12V, negative ground battery
system.
3.Disconnect the ground wire from the battery terminal before connecting
the electrical system.
4.Refer to the electrical connection diagram to avoid wrong connection of
the electrical system. Always use authorized service center for service
assistance.
5.Use proper insulation material to prevent short-circuiting of the supply
system.
6.Tighten all loose wires after installation.
7.Refer to is operating instruction for system upgrade and operation.
CONNECTOR
+
SEL
POWER
Accessories Supplied
AV
PHONE
Video1 input
Audio1 input
Item
CAR AUDIO(DVD OR VCD)
Description
Q ty
1
Monitor
1
2
Remote Control
1
3
Power Cable
1
4
AV Cable
1
5
Bracket
1
6
Earphone
1
7
ACC.Bag
1
8
Manual
1
BATTERY
3
4
Mark
W/Battery