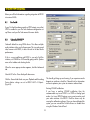
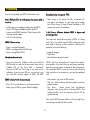
1
Contents
6. Using ERGO in several DAW Environments ................ 26
6.1 Scenario 1 ..................................................... 26
6.2 Scenario 2 ..................................................... 27
6.3 Scenario 3 ..................................................... 27
7. Generic DAW Configurations ................................... 28
7.1 Using ERGO in ASIO Mode ............................ 28
7.2 Using ERGO in WDM Mode ........................... 28
8. Specific DAW Configurations ................................... 29
8.1 Pro Tools® ..................................................... 29
8.2 Cakewalk/Sonar™ ......................................... 29
8.3 Ableton Live™ ................................................ 30
8.4 Nuendo® ...................................................... 30
9. Troubleshooting ...................................................... 31
10. Specifications ....................................................... 34
Appendix: Glossary of Terms ....................................... 35
1. Introduction ............................................................. 3
1.1 The idea behind ERGO .................................... 3
1.2 ERGO – A Complete System ............................. 3
1.3 How does ERGO work? .................................... 4
1.4 Input Modes .................................................... 4
1.4.1 FireWire Audio Input ............................... 4
1.4.2 Analog Input .......................................... 4
1.4.3 Digital Input ........................................... 4
1.5 System Requirements ......................................... 5
1.6 Acoustic Environments, Room Correction, and ERGO 5
1.6.1 It’s not your speakers, it’s your room ......... 5
1.6.2 Room Correction so far ............................ 5
1.6.3 So, why not flat and without reflections? ..... 6
2. ERGO Panels and Connections .................................. 7
2.1 Back Panel and Connections .............................. 7
2.2 Front Panel ....................................................... 8
2.3 Side Panel ........................................................ 9
3. Setting up ERGO and your Mixing Environment ......... 10
3.1 Installing your Monitors ................................... 10
3.2 Positioning your Monitors ................................ 11
3.3 Connecting your System – What goes where? ... 12
3.4 Test Signal and Measuring Techniques ............. 14
3.5 ERGO with RoomPerfect™ is the solution .......... 14
3.6 Software Installation ........................................ 15
4. ERGO Control Panel Description ............................... 16
5. ERGO Calibration Soft ware (ERGO Cal) ................... 17
5.1 Set up ............................................................ 17
5.2 Calibration ..................................................... 18
5.2.1 Enabling Calibration .............................. 19
5.2.2 Adjusting ERGO’s Volume ...................... 19
5.2.3 Focus Position Measurement .................... 20
5.2.4 Room Position Measurements .................. 22
5.2.5 Room Correction .................................... 23
5.2.6 Room Knowledge ................................... 24
2
1. Introduction
Thank you for purchasing the ERGO Room Correction System.
Enhanced Room
We appreciate your trust in us. ERGO (E
Geometry Optimization) is an exciting product that enhances
the performance on any loudspeaker/monitor system by
digitally correcting your room’s acoustic problems. A few of
ERGO’s bells and whistles are:
ERGO doesn’t color the sound or produce an artificially sterile
environment. So after using ERGO, you will hear the difference.
You will be able to “trust” the sound of your room, concentrate
on your music, mix faster and accurately, and create mixes that
will properly translate to other listening environments. That’s why
KRK developed ERGO. Because really, how good is a great track
that only sounds great in your room?
• High-performance, state-of-the-art Digital Signal Processor
for room correction and analysis
• Mastering grade Analog-to-Digital and Digital-to-Analog
converters
• Standalone correction - No computer is required for room
correction
• Analog or Digital Inputs/Interfaces
• Large Analog Volume Control
• Built-in speaker selector
• Top-notch RoomPerfect™ technology corrects phase and
frequency problems
• ERGO Cal Software compatible with Mac and PC platforms
• Professional calibrated measurement microphone
1.1
1.2
ERGO – A Complete System
ERGO is a complete room analysis and correction system. All
of the components have been carefully selected to work in
perfect harmony to provide the most accurate room analysis and
correction system on the market today. The ERGO system consists
of 3 main components:
• ERGO Mic – Calibrated Measurement Microphone
• The ERGO base unit – Room Correction System
• ERGO Cal Software – Room Analysis and Control
The idea behind ERGO
There are a lot of great sounds out there - whether they come
from professional musicians or a regular Joe trying to unwind
from the stresses of life. But, there aren’t always great rooms, or
studios, to back up that sound. ERGO was developed after years
of listening to the same comments - that mixes don’t sound the
same outside of the studio. And, true, there are several other
room correction products out there already. But, typically they’re
only analyzing and correcting 1-8 EQ points. ERGO uses
multiple measurements and thousands of EQ points to control
your audio environment. Our 3D model allows you to preserve
the “good” characteristics of the room, while correcting the bad.
To configure ERGO’s parameters and check system information,
just open ERGO’s Control Panel. (For more information about
ERGO’s Control Panel please read Chapter 4).
3
1. Introduction
1.3
How does ERGO work?
ERGO takes a stereo audio stream from the analog or digital
(SPDIF or FireWire) domain and processes it though a 96 kHz
room correction algorithm. All incoming analog audio is
sampled at 96 kHz, while incoming digital audio is sample rate
converted up to 96 kHz for processing. If incoming audio comes
in over FireWire, the processed audio is converted to reflect the
output frequency of the ASIO driver, up to 192 kHz. In Digital
Input mode, the output frequency and the audio going to your
monitors is going through digital to analog converters fixed at 96
kHz sample rates.
1.4.2
Analog Input
1.4.3
Digital Input
The Analog Input mode is the easiest way to implement ERGO
into your existing listening environment. If you already have your
DAW set up just the way you like it, and like your current audio
hardware, just plug the main Left/Right outputs of your DAW
hardware into the ¼” balanced inputs on ERGO. ERGO’s
high-quality converters will maintain the integrity of your mix
while correcting your room’s problems.
Visit www.krkergo.com/videos.php?vid=intro to watch ERGO’s
Video Introduction.
Input Modes
ERGO has 3 Input modes (Figure 1);
This is similar to the Analog Input mode, except that a digital
SPDIF Input is used. The SPDIF on ERGO accepts any input
signal from 44.1 kHz up to 96 kHz. The analog speaker
outputs in this mode will be fixed at a 96 kHz sample rate.
• FireWire Audio Input
• Analog Input
• Digital Input
Figure 1
FireWire Audio Input
In this mode, ERGO looks like an ASIO audio device under
Windows, or as a CoreAudio device on a Mac. To ensure your
monitor or mastering mixes will be correctly compensated for
your listening environment, it is recommended that you select
ERGO as your DAW main Left/Right outputs or output bus. At
the moment, Windows supports a single ASIO device, so you
must use ERGO as your only audio interface. To use your
existing multichannel audio interface with ERGO, just run ERGO
in Analog or SPDIF Input modes.
ERGO’s architecture provides the best audio quality while
maintaining compatibility with existing systems. In fact, the audio
converters used in ERGO are the same as those found in
multi-thousand dollar audio workstation hardware. Rest
assured...you can’t go wrong with ERGO.
1.4
1.4.1
4
1. Introduction
1.5
System Requirements
In addition, it is obvious that even if the greatest of care is taken
over tweaking the system with cables, interconnects, power
stabilizers, etc., none of that will never compensate for 10 to 20
dB peaks and dips in the frequency response. It’s clear that the
room is the weakest link in the chain. In principle, if you
strengthen the weakest link, then the entire chain is improved. In
other words, improve the overall quality of your artistic projects
using ERGO.
A computer is required for performing room measurement and
analysis. Minimum required computer specifications are:
Mac®
800 MHz (or faster) processor • 256 MB RAM • 6-pin FireWire
port (or 4-pin FireWire port using 4-6 pin adapter, not supplied)
• Mac OS X 10.5 or later.
1.6.2
PC®
1 GHz (or faster) processor • 256 MB RAM • 6-pin FireWire
port (or 4-pin FireWire port using 4-6 pin adapter, not supplied)
• VGA with 1024 x 768 resolution (or higher) • Windows XP or
Vista.
1.6
1.6.1
Room Correction so far
Today, most room correction is carried out based on a single
measurement at the listening position. This is problematic
because you are trying to solve problems in a 3 dimensional
sound field by taking a 1 dimensional measurement. To
accomplish this feat would require extraordinary acoustical skills
and luck to reach the right conclusions based on this single
measurement – so if this does work for you, you should head
out to your local store and buy a lottery ticket immediately! Even
taking a number of positions around the listening position and
averaging them is not a good solution, as tests have shown that
moving the microphone just 10 cm (4 in) relative to the listening
position easily results in 20 to 40 dB deviations. So, unless you
are a very skilled in acoustics, the chances of making a wrong
decision are huge.
Acoustic Environments, Room Correction, and ERGO
It’s not your speakers, it’s your room
Most studio monitors are created to be flat and precise, and to
be used in listening rooms with optimized dimensions and
acoustic treatment. However, most home or budget studios are
placed in less than ideal acoustic environments. This means that
the actual performance of your monitors is highly dependent on
the acoustics of your listening room. In fact, the perception of
your mix will change based on where you sit while monitoring
and the speaker’s placement.
Another crucial decision is how to define on the ideal target
response – logically, if you don’t know the target, it is
impossible to get there. Instead of making measurements at the
listening position, some systems measure the way the
loudspeaker couples to the room (the acoustic impedance). In
addition, such a power response measurement can correct the
issues you have “globally” through the room. However, it will
never perfectly solve the problems at the listening position.
To put this into perspective, extensive measurements in different
rooms show that even when a high-end system is placed in a
well-controlled room, peaks and dips between +10 to –20 dB in
the frequency response are more the rule than the exception!
Refining speaker design with the goal of creating a “linear”
sounding audio system by improving the linearity of each
component 0.2dB doesn’t actually help much.
5
1. Introduction
“The ideal response is flat and without reflections” is a statement
you’ll hear if you ask people what the perfect sound would be
for them. However, for various reasons, it is not ERGO’s goal to
do this. Instead, ERGO is focused on making the room sound
right, reflections and all.
1.6.3
Speaker designers obviously have an idea of how a loudspeaker
should sound. ERGO strives to preserve the speaker’s identity, no
matter what kind of room you’re in or how the speaker is placed.
You bought your great KRK monitors (or some other monitors)
because you liked the way they sounded and we understand
that. That’s why ERGO does not make every audio system sound
the same. The tonal balance of your speakers will be kept intact
– but ERGO will match them to your room by compensating for
the room’s influence. Generally, room influence can be defined
as peaks and dips in the frequency response. Some can and
should be compensated for, others cannot and should not.
So, why not flat and without reflections?
We are used to listening to music inside a room. Listening to
music outdoors is rarely satisfying as it is missing something:
bass and impact. In other words, what we define as the generic
in room bass enhancement sounds natural to us, which is
precisely why you shouldn’t compensate for this.
So now you see the challenge involved in creating a room
correction system that maintains the tonality of your system and
only compensates for problems that can be solved. ERGO can
correct for many of these issues and help your mixes to properly
translate to other listening environments.
Secondly, listening to a speaker with a flat in room power
response sounds very bright. Measuring the direct on-axis
response will look flat, but at the listening position the sound will
roll off towards the high frequencies – due to distance,
directivity, off-axis listening, general high frequency absorption,
and reflections in the room.
Last of all, reflections are a big part of how we determine
directionality and ambience. That is if there are no reflections, a
lot of the 3 dimensional information would be lost. If you are
trying to simulate how something will sound in a given position
in a room, you need to simulate a minimum of 100,000
reflections – otherwise, it just doesn’t reflect what happens in the
real world. Therefore, the challenge is not to remove the room
and the reflections – but to work with them.
6
2. ERGO Panels and Connections
2.1
Back Panel and Connections
While ERGO can use a 6-pin FireWire port’s power for itself,
many times this will be a bit “noisy.” If you find this to be true in
your case and you think ERGO is not providing the best sonic
quality that it can, go back to using the external power supply.
Keep in mind, that you will always need to plug ERGO into the
external power supply when using a mini 4-pin FireWire cable
since it does not provide power like its 6-pin counterpart.
In the Back panel (Figure 2), ERGO includes:
•
•
•
•
•
•
•
•
•
On/Off Switch
Power Input
FireWire Ports
SPDIF IN
Cal Mic Input
Line Inputs (L & R)
Calibrate button
Speaker A and B/Sub Outputs
Headphone Output
FireWire ports
These 2 ports allow input and daisy chaining of FireWire signals.
One of these ports must be used while ERGO is measuring and
calibrating your room.
Note Usually, the FireWire port is only used when ERGO is
running its room analysis. After the analysis is complete, you
can unplug the FireWire interface and still use ERGO in
Standalone mode using the Line or SPDIF Inputs.
SPDIF IN
It receives digital audio data.
Cal Mic Input
This jack is used to connect the ERGO measurement microphone.
It is only used during the calibration process.
Figure 2
On/Off Switch
It switches the unit On or Off…
Note It is recommended that you use the mic supplied with
ERGO for room calibration. ERGO supplies a 15V phantom
power source to its microphone, and using other mics for
calibration may result in poor room analysis and improper
correction filters.
Power Input
ERGO’s power input accepts a 12VDC power supply capable of
delivering a minimum of 1 amp. If you intend to keep ERGO
hooked up to the FireWire port on your computer (6-pin), you do
not need to use the external power supply, as ERGO is designed
to use the power coming in via the 6-pin FireWire port.
Line Inputs (L & R)
These balanced/unbalanced audio inputs are used either as
inputs from your existing audio interface or as recording inputs
from a mixer. You may want to use the Analog Inputs for one of
the following reasons:
7
2. ERGO Panels and Connections
Status LEDs
• You have a complex or well-established FireWire
configuration on your computer and don’t want to
interfere with it.
• You are using an analog console and mix “outside of the box.”
Clip
This LED illuminates when the incoming audio signal is 3dB from
full-scale input, indicating a likely clip condition. This is used
during the calibration process and when the incoming main
output signal is inserted into the Input (Line In) jacks on the back
of ERGO. This is also used when using ERGO as a FireWire
recording interface to indicate excessive signal coming in from
the line-level device (mixer, keyboard, etc).
Calibrate button
You need to press this button to proceed with the Calibration
process.
Speaker A and B/Sub Outputs
These balanced/unbalanced outputs are connected to your
powered speakers, or to an amplifier and speaker combination.
These are line level outputs. It is recommended that balanced
cables and connections be used to ensure the best audio
quality.
IO / FireWire
This bi-color LED illuminates red when power is applied, and
green when a valid FireWire connection is detected.
Calibrate
The Calibrate LED illuminates when the Calibrate button is
pressed on the back of the ERGO unit. While in Calibrate mode,
the Line In signals are no longer active and the MIC input is
active.
Headphone Output
Connect your 1/4 inch headphone here.
2.2
Front Panel
Buttons
In the Front Panel (Figure 2.1), ERGO features:
A
When applying one input, use the A input and press the button
to enable. When the button is unlit, there is no audio passing
through.
• 3 Status LEDs (Clip, IO/FireWire and Calibrate)
• 3 Buttons (A, B/Sub and Focus/Global)
• 1 Volume knob
B/Sub
When connecting a second input, and you want to hear both A
and B speakers, press B/Sub to enable this function.
Note The software control panel selects the speaker mode. In default
(non-Subwoofer) mode, only the A or B speaker can be selected. ERGO
is smart enough to make the A/B buttons mutually exclusive. Using
ERGO, it is possible to set ERGO up in Subwoofer mode. In
Subwoofer mode, ERGO makes the A/B buttons independent, so that
you can mute or enable the sub in conjunction with the A speakers.
Figure 2.1
So lets read their description;
8
2. ERGO Panels and Connections
Focus/Global
ERGO has two modes of operation; Focus and Global.
Headphone control
On the right-hand side of ERGO, is a rotary knob that controls
the headphone volume. Why the right-hand side you may ask?
Because 90% of the world is right-handed, and because most
mastering/control-room sections in the studio are located on the
right-hand side, and because the main Volume knob for ERGO
is on the right-hand side of the unit, making your hand
naturally rest on the headphone volume knob, yadda, yadda,
yadda…Basically, it just belongs there.
In Focus mode all of ERGO's processing power is correcting the
focus (sweet spot or mixing) position, correcting time and
frequency domain problems. Use this mode when mixing your
tracks.
In Global mode, ERGO's processing power is correcting a much
larger area, so it is only fixing frequency related problems. Use
this when you want an audience to hear the corrected room.
If ERGO is used in FireWire Audio Input mode, the headphone
output is a separate audio stream. So, your DAW can send a
monitor or custom headphone mix to this stream, and it can be
controlled independently using this little knob on the side of
ERGO. That’s really nice, isn’t it?
When the Focus/Global button is depressed for two seconds,
ERGO enters Bypass mode (indicated by the LED flashing). In
Bypass mode, audio is passing straight through with no
correction being performed.
Caution ERGO’s headphone amplifier is l-o-u-d, loud.
We are not talking about “Oooh, that’s a bit loud” kind of
loud, we are talking “Oh my freaking head just exploded
due to the insane loudness coming through the cans!” kind
of loud. Be very careful with this volume control. Start low
and slowly raise the volume level. Also, ensure that your
system sounds are balanced with your DAW mix, or your
next wrong mouse click/error ping could implode your
melon. That would seriously be not cool.
Volume knob
This big Volume knob adjust ERGO’s volume. Also, it will allow
you to adjust ERGO’s volume to a proper level, so it is adequate
for the calibration process.
2.3
Side Panel (Figure 2.2)
Figure 2.2
9
3. Setting up ERGO and your Mixing Environment
It’s time to get ready to set up your mixing environment. This
consists of 3 easy steps:
Typically, back wall reflections are annoying because they
arrive from the same direction as the direct sound from the
loudspeaker. Side wall reflections are easier for the brain to cope
with simply because they arrive from another direction and
because of this, they are often regarded as adding ambience
and localization clues. If you place the loudspeaker close to the
back wall, the bass reflections from the wall and the direct sound
will arrive simultaneously at your listening position.
1) Set up your monitors - you may have already put them exactly
where you want them, but please read the next section as you
may learn something about monitor positioning that will ensure
you get maximum enjoyment out of ERGO.
2) Hook up cables - this is always fun as you will get to plug
things into and out of your ERGO. Follow the directions and you
will be rewarded.
Impulse response in the bass region can be improved
considerably since ERGO can easily compensate for the uneven
frequency response as a consequence of the placement. With
ERGO, it can actually be to your advantage to place your
loudspeaker in a less than ideal “close wall” spot as this will
improve the impulse response while ERGO corrects it. In
addition, when compensating for the increased efficiency, the
load on both amplifier and loudspeaker is decreased meaning
that less distortion and better headroom are achieved. Taking
energy out of the system also has another advantage since
pumping less energy into the room means that room modes are
less excited. So, you achieve a much more even power response
across the room – That is the differences between peaks and
dips in the response are reduced dramatically.
3) Run the software - this is always not fun, as software is
typically horrible and causes all kinds of headaches. Thankfully,
ERGO’s software is simple to install and use, but it does require
that you pay attention to the instructions in this manual and on
your computer screen.
OK, let’s make sure your monitors are properly set up!
3.1
Installing Your Monitors
Before to install your monitors, it is a good idea to understand
what happens in your room depending on speaker placement
and other tidbits like that. You see, with ERGO, there’s a change
up in traditional loudspeaker placement rules – you can break
away from conventional “free space” placement. In general,
loudspeakers are placed well away from rear and side walls to
secure the best possible frequency response. Considering that a
traditional box loudspeaker has omnipolar dispersion in the
bass region, this “free space” placement has a big
disadvantage since it is possible to destroy the impulse response.
The reason for this is that you hear both the direct sound from
the speaker and later all the reflections from the walls. The
reflections are delayed as a consequence of the distance to the
walls and will end up arriving later...think the smeared “attack”
of a snare drum that you may have heard in the past, for
example.
In a case like this, the room correction index will also be quite
high since correction in the bass region is needed. However, the
index number is not high because you have a “poor system” it’s
high just because you have chosen a loudspeaker position that
improves the impulse response but then requires
compensation for the increased efficiency in the bass region. Try
it out and see what works for you – near wall or “free space”
placement – ERGO works in both cases.
The close-field monitor, by definition, reduces room interaction.
This can be compared to the conventional stereo configuration
or the large monitor arrangement in a recording studio where
sounds emanating from the monitor or reflecting off ceilings,
walls, and floors greatly affect the sound quality.
10
3. Setting up ERGO and your Mixing Environment
Two-Channel Set Up
By shortening the path to the ear, the close-field monitor offers
a tremendous amount of flexibility, allowing the sound to
become less susceptible to differing room conditions. The
ability to adjust the high characteristics is equally important to
help compensate for room irregularities and achieve the highest
sound accuracy.
• Near-Field Configuration – In a control room situation, the
monitors are often times placed on the meter bridge or in a
close-field listening position. Initial placement starts by
measuring out a simple equilateral triangle (all three sides equal
in length) with the apex at the center of the listening position as
an “overlay” for the stereo installation. In this configuration, the
Left and Right monitors are each placed at a 60° angle,
equidistant from the listening position. (Figure 3)
A room that is heavily dampened would typically require a slight
high frequency boost. Likewise, reducing the high frequencies
can alter a reverberant room.
Placing the monitor close to a rear wall, side wall, or a corner
will reinforce the low frequencies. Generally speaking, if you
move them two to three feet away from walls and corners, you'll
hear less low frequency interaction (excluding any interaction
with the mixing console).
60°
60°
There. That wasn’t so bad, was it? You did good.
3.2
Figure 3
Positioning Your Monitors
Focus / Listening Position
• Mid-Field Configuration – This configuration is similar to the
close-field configuration. It is normally used with larger monitors
or when the monitors are too large or heavy for the meter
bridge. This set up has the potential for a larger sweet spot and
better spatial imaging. Make sure that the height of the woofer
is above the height of the console. (Figure 3.1)
Positioning your monitors correctly in the studio is critical to their
performance. Typically, they should be placed so that that the
listening position is fully “covered” with all monitors resting on
the same horizontal plane. To test a monitor for its imaging
capability, playback a song that includes acoustic instruments, to
fully represent the entire sound spectrum.
You can adjust the angle of each monitor by listening for dead
spots. Keep in mind, changing the angle or position of a
monitor will change the way that you perceive your music. So lets
analyze a few examples;
60°
60°
Figure 3.1
Focus / Listening Position
11
3. Setting up ERGO and your Mixing Environment
Adding a Subwoofer
Begin by determining the best location for your subwoofer. If
possible, the optimum set up would reflect that shown in Figure
3.2; however, this set up may not be practical, or possible, in
your room. Once you have set up your monitors, listen to
program material that you know contains low frequency
information. If your subwoofer has a phase switch, adjust the
subwoofer to provide the highest frequency setting possible. Flip
the switch back and forth to find the loudest setting. Then adjust
the sub’s low pass filter so that it works in conjunction with the
satellite’s high pass frequencies. When you have finished,
readjust the level of the sub. (Figure 3.2)
1) Plug ERGO into your computer by connecting it to the
FireWire port. ERGO ships with a 6-pin FireWire cable that
supplies both power and data. If you are using a laptop that has
a 4-pin FireWire cable, you’ll need to dig up an adapter cable
to use ERGO.
2) Plug in ERGO’s Microphone adapter cable. This is the little
XLR to 1/4” TRS cable that shipped with ERGO.
3) Go into that box in the corner of your room and dig up your
best XLR mic cable. Make sure it is about the length of the longest
dimension of your room. Also make sure it is your BEST cable
and it is in working order. Plug this into the ERGO’s XLR-1/4”
adapter.
Subwoofer
4) Plug in ERGO’s microphone into your best cable that you
installed in the previous step. Place the microphone in your best
microphone stand, you know, the one in the other corner of your
studio. Put this aside for the time being.
Rig
t
Lef
ht
Setting Up a System with Two Monitors and One Sub (Figure
3.3)
Focus / Listening Position
Figure 3.2
3.3
Connecting Your System—What Goes Where?
Now you get to plug things into ERGO. Plugging in audio
cables is always a rewarding experience, as the gratuitous
“thunk” of a cable seating into a jack provides a sense of
accomplishment, both aurally and tactically. So here are the
steps for hooking things up:
Make sure power is Off at your monitors/amplifier, computer,
and ERGO’s power switch is Off. This is an important step.
Please follow it to ensure things go smoothly.
Figure 3.3
12
3. Setting up ERGO and your Mixing Environment
Set ting Up a 2.1 System with Two Full Range Monitors
(Figure 3.4)
Setting Up a System with Two 2.1 Configurations (Figure 3.5)
Figure 3.4
Figure 3.5
Setting Up a 2.2 System (Figure 3.6)
Configurations
There are several possible ERGO configurations. These all
depend on how you want to use ERGO in the studio. What’s the
same between all of these is that all of the configurations end
with a pair of powered speakers (or an amp and speakers)
connected to the “A” outputs on ERGO. What’s different are the
various input options. These depend on your studio set up, for
example;
• 1 set of speakers, FireWire Audio Input
• 2 sets of speakers, SPDIF, or Analog Input
• 2 sets of full range speakers, FireWire Input
• 2 sets of full ranges speakers, SPDIF, or Analog Input
• 2.1 system, FireWire Audio Input
• 2.1 system, SPDIF, or Analog Input
Figure 3.6
13
3. Setting up ERGO and your Mixing Environment
Using Analog (L & R) and Digital (SPDIF) Inputs
Here are a few tips to keep in mind when dealing with Analog
and Digital Inputs with ERGO. When using ERGO as a
soundcard connected via FireWire to your computer, the
FireWire audio stream is automatically selected as the input
source.
in the frequency domain, something which is almost insensitive
to normal broadband background noise.
ERGO generates energy at the very same frequencies where the
analysis takes place, that is energy and processing is not wasted
by measuring the spaces in between the analysis frequencies.
Why go to all of this trouble? Because traditional 1/3 octave
measurement and correction (three frequencies for each
doubling of frequency) is not sufficient for room correction. Room
correction needs great analysis and powerful processing, both of
which ERGO delivers.
If you are in Standalone mode (no FireWire connected) and
using either the SPDIF Input or the Analog Inputs, ERGO selects
the audio source as follows:
1. If ERGO detects a SPDIF clock, it automatically selects
the SPDIF Input as its source.
3.5
• If ERGO has detected a SPDIF clock, but you want to use the
Analog Inputs, then you must use ERGO’s control panel to
select the Analog Inputs.
• If ERGO has detected a SPDIF clock, but the SPDIF Input
is not working, then ERGO was started in Analog mode.
Use the ERGO Control Panel to select the SPDIF Input.
• If the SPDIF Input is not working, ERGO is probably not
locking its clock to a SPDIF clock. Check your cables and the
audio output selection in your DAW application.
In our quest for the best possible components to power ERGO’s
Room Correction technology, KRK licensed RoomPerfect™ from
Lyngdorf Audio. Why Lyngdorf? Because they are the best, and
they solved the problem with getting 3 dimensional Room
Knowledge in a very unique way. By combining global
measurements (room positions) with measurements at the
listening position, up to 8 corrected listening positions can be
calculated.
The RoomPerfect™ system combines information about the
listening position with information about the energy transport
into the sound-field in a completely new and innovative way. The
measurement at the listening position holds information about
the listener’s access to the sound-field while the room positions
hold information about the 3 dimensional sound-field in the
entire listening room. And so, perfect sound is rendered,
regardless of your listening room, speaker position and listening
position. In fact, the vast amount of information gathered about
the sound-field allows you to enjoy the benefits of room
correction in any spot in the room.
2. If ERGO does not detect a SPDIF clock, it automatically selects
the Analog Inputs as its source.
3.4
ERGO with RoomPerfect™ is the Solution
Test Signal and Measuring Techniques
To get the necessary Room Knowledge, ERGO relies on a new
way of measuring the room. Using traditional test signals such
as pink noise, normally means a trade-off between signal-tonoise ratio (SNR) and frequency resolution. Long analysis
windows lead to high frequency resolution but poor SNR due to
the low number of averages. But using multiple pure tones
means long analysis windows (5.5 seconds for low frequency
test signal) leading to both high frequency resolution (0.2 Hz)
AND an excellent SNR due to very narrow analysis bandwidth
You will see, and hear, a system with all required knowledge
and operation already embedded in it, a “smart” system.
14
3. Setting up ERGO and your Mixing Environment
Mac
RoomPerfect™ can derive information about:
1. Insert the KRK ERGO Installation CD and double click the
ERGO software installer.
• Room acoustic properties and modes (peaks and dips in
the room)
• Power response throughout the room
• Loudspeaker directivity
• High frequency roll-off
• Characteristics of low frequency roll-off
2. After the installation process is finished, the ERGO
Calibration Wizard will start automatically. Follow its
instructions.
From the acquired measurements, RoomPerfect™ processes the
information and sets up amplitude targets and limiters for the
different filters in an automated process. The most challenging
task for a room correction system is the automated correction of
an already near ideal system – but RoomPerfect™ is capable of
solving even this challenge and compensates using minor
corrections.
In Mac systems, ERGO uses Apple’s Core Audio FireWire
functionality to provide plug and play operation. Once
connected to a Mac’s FireWire port, ERGO is recognized and
automatically added as an option in the Sound Preference panel
and to any Core Audio compliant software.
PC
If the KRK ERGO Installation CD does not automatically Autorun,
double click My Computer, right-click the KRK ERGO icon, and
click Open.
In the ERGO system, RoomPerfect™ automatically identifies the
optimal target curve from the information in the measurements
and everything after that is controlled by the calibration
software (ERGO Cal). In a new ERGO installation, the software
guides you through the set up sequence, indicates when to move
the microphone, monitors the quality of the measurements, and
continues the process until the necessary information is retrieved
and the filters for “global” and “focused” correction can be
calculated.
1. Double click the ERGO Software v1.0.0.exe. The KRK ERGO
Installation Wizard will guide you through the installation
process.
2. After the installation process is finished, the ERGO
Calibration Wizard will start automatically. Follow its
instructions.
Visit www.lyngdorf.com/index.php?option=com_content&task
=view&id=91&Itemid=35 to find information about
RoomPerfect™.
3.6
To open the ERGO Control Panel go to Start > Programs > KRK
ERGO and click ERGO Control Panel.
Once installed correctly, you should have the following items on
your computer:
Soft ware Installation
To install ERGO Cal software, insert the KRK ERGO Installation
CD and follow the next instructions;
• PDF of the ERGO User’s Manual
• ERGO Cal Room Correction Software
• ERGO Control Panel
• ASIO and WDM Drivers (installs on PC only)
15
4. ERGO Control Panel Description
ERGO Info
This is a read-only display that indicates the current system
firmware revision, DSP firmware revision, and your FireWire ID.
This section describes ERGO’s Control Panel including
configurable parameters and system information. (Figure 4)
SPDIF Status
This display lights to indicate ERGO’s sample rate.
Audio Settings
Use the associated pull down boxes to select ERGO’s sample
rate (Figure 4.1) and ASIO buffer size (Figure 4.2).
Figure 4
Note Remember that ERGO Control Panel is available for
Windows only. Go to Start > Programs > KRK ERGO and
click ERGO Control Panel to open it.
Figure 4.1
Speaker Mode
Allows you to select to use only your A speakers, A and B, or A
and Sub(s) (referred to as Subwoofer mode).
Note Reducing the buffer size can decrease the amount of
latency while monitoring and recording audio. Increasing
the buffer size can reduce and /or eliminate some audio
artifacts such as pops and clicks while recording.
Subwoofer Settings
If selecting Subwoofer mode, use this section to adjust your
crossover settings.
Tip Remember that in a speaker crossover network, the
crossover frequency is the frequency point that represents the
upper or lower range limits of a given speaker driver. In a
two-way speaker system, the crossover frequency would be
the point where the low frequency driver begins to roll off
and the high frequency driver starts to cut in.
Figure 4.2
16
5. ERGO Calibration Software (ERGO Cal)
5.1
ERGO Cal is your friend. Get to know, and love it.
Set Up
Are you plugged in?
After you’ve plugged in your speakers and calibration mic, click
Enter. (Figure 5.2)
Double click ERGO Cal icon (located as shortcut in your
desktop or within the Applications folder). Once you initialize
ERGO Cal, the following screen appears (Figure 5).
Figure 5
Figure 5.2
Are you using ERGO in Speaker or Subwoofer Mode?
This screen asks if you’re going to use ERGO in Subwoofer mode
(where you have a sub connected directly to ERGO). Well, are
you? Choose YES or NO. If NO, go to Speaker mode. If YES, go
to Subwoofer mode. (Figure 5.3)
Then, ERGO is ready to measure your room (Figure 5.1)
Figure 5.1
All of the magic starts from here. ERGO is pretty good about
letting you know what it needs. It’ll tell you when to click Enter
and when it needs something that it isn’t being given. All you
have to do is pretty much follow the prompts that appear as you
step through the program. So, now do what it says and click
Enter.
Figure 5.3
17
5. ERGO Calibration Software (ERGO Cal)
5.2
Calibration
Don’t be scared. Overwriting measurements helps ERGO clear
its thoughts and prepares it to take new measurements.
Selecting CANCEL sends you to the initial window. If there is
something you want to reconfigure at this point, then select
CANCEL. If not, click Enter to continue. (Figure 5.6)
Speaker Mode
This window will inform you of which, if any, buttons are selected
on ERGO—A, B/Sub, both, or neither and will instruct you to
select the appropriate button. Click Enter to proceed. (Figure 5.4)
Figure 5.4
Figure 5.6
Subwoofer Mode
If you chose to use ERGO in Subwoofer mode, the next window
gives you a thumbs up to proceed, or tells you to press any
required buttons. When given the prompt, click Enter. (Figure
5.5)
This pretty much speaks for itself. (Figure 5.7)
Figure 5.5
Figure 5.7
Tip To enable the Subwoofer mode, remember to open the
ERGO Control Panel and click A + SUB from the Speaker
Mode area.
18
5. ERGO Calibration Software (ERGO Cal)
5.2.1
Enabling Calibration
5.2.2
Adjusting ERGO’s Volume
The next step is to adjust ERGO’s volume to a proper level, so it
is adequate for the calibration process.
If the Calibrate button is Off, check ERGO’s Back panel and
press it (Figure 5.8). The Calibrate LED located on the Front
panel will lit (green).
There are two volume adjustments. The first ensures that you
have the volume set so that ERGO can hear audio. This is
typically at the 10 o’clock volume position. During the second
volume adjustment, ERGO measures the sound pressure from
your speakers. The level is moderately loud. If you feel that the
volume is too high or that your speakers may be at risk and
ERGO is telling you that the volume is too low, accept the
current level by following the instructions provided in the screen.
ERGO will use this volume level and attempt to perform a
measurement.
Figure 5.8
In the first volume adjustment the following screen will inform
you whether the volume level is acceptable or requires
adjustment. (Figure 5.10).
If the Calibrate button is already On, just click Enter. (Figure 5.9)
Figure 5.9
Figure 5.10
If the message displayed indicates that the volume is too low or
too high, adjust the big Volume knob until you get the “Volume
Ok message”, typically at 10 o’clock (Figure 5.11).
19
5. ERGO Calibration Software (ERGO Cal)
• The length of each measurement depends on a combination
of the measurement volume, and the background noise in
your local environment. Typical measuring times for the
low and high frequency measuring signals are 25 and 5
seconds, respectively.
• If ERGO is unhappy with the measurement, an error
message is displayed. Make any required corrections to your
set up and follow the prompt to retry the measurement.
Figure 5.11
• Focus Position Measurements must be performed more than
1 m (3 ft) away from the loudspeakers, in a X/Y orientation,
and must not performed behind the loudspeaker. Also, do
not sit in the listening position while Focus measurements
are being taken.
In the second adjustment, the volume is system dependent.
5.2.3
Focus Position Measurement
The following window prepares you to take your Focus Position
Measurement. Before to click Enter, read the instructions below;
Now, that you’ve read and memorized the information above,
click Enter and follow the prompts to calibrate the volume level
at your focus position. (Figure 5.13)
• Make sure that the height and orientation of the microphone
correspond to your typical listening height and direction as
illustrated below. Do not block the line of sight between the
microphone and the loudspeakers. Each measurement is
comprised of a low and a high frequency measuring
signal first in the left and then in the right channel.
(Figure 5.12)
Figure 5.13
Figure 5.12
20
5. ERGO Calibration Software (ERGO Cal)
One Mississippi, two Mississippi... (Figure 5.14)
Tip If you see the Clip LED light up during this step, your
volume level is probably just fine, and you should use this
volume level regardless of what ERGO displays
(Figure 5.16). Press Enter to continue.
Figure 5.14
Well, how did things go? If the level did not fall within an
acceptable parameter, ERGO will notify you. This doesn’t
necessarily mean that something is wrong. A possibility is that
your speakers do not produce a high enough SPL to register, but
the calibration can still be performed. (Figure 5.15)
Figure 5.16
Tick tock, tick tock... (Figure 5.17)
Figure 5.15
Figure 5.17
In this instance, select NO at the ERGO Cal screen to accept the
level that was originally measured and then click Enter.
21
5. ERGO Calibration Software (ERGO Cal)
If the Focus measurement was Ok, ERGO will instruct you to
place your measurement mic in Room Position 1, then click Enter.
(Figure 5.18)
For optimal room correction, make sure that the measurements
are:
1. Performed more than 1 m (3 ft) away from the loudspeakers
2. Not performed behind the loudspeaker
3. Taken at a minimum of 50 cm (1.5 ft) between each
measurement
The following illustration shows the steps listed above. (Figure
5.19)
Figure 5.18
If there was a problem with the measurement, ERGO will display the information and instructions for the next step.
5.2.4
Room Position Measurements
The number of room positions needed depends on the value of
Room Knowledge. If it is below 90% after the third measurement,
ERGO Cal automatically includes extra room measurements until
a Room Knowledge of 90% or better has been achieved.
The remaining measurements should be taken from random
positions in the room with random orientations of the
microphone. Choosing these positions and orientations is a
breeze. All you have to do is place the microphone at different
positions in the room and in different orientations. It is important
to perform well-spaced measurements to get a covering image
of the acoustical properties in the room that is varying positions,
heights, and orientations of the microphone.
Figure 5.19
Once you’ve placed your mic in an acceptable location, you
may begin.
This process is repeated at least three times and until the Room
Knowledge reaches 90%.
22
5. ERGO Calibration Software (ERGO Cal)
5.2.5
Room Correction
Keep in mind that as long as Room Knowledge is 90% or
greater, you are doing great! And, it can take you between 3 to
9 measurements before you get to 90%, so don’t be alarmed if
it seems ERGO is asking for “too many” measurements. (Figure
5.21)
The room correction score is a measure of how much processing
is being performed in the room correction filters. To some
extent, this reflects how audible the correction is. However, the
same amount of processing can sound very different due to
placement in frequency of the processing. For low values (below
10%) of the room correction index, only subtle correction is
needed to the original sound in the room. With high room
correction index values, more extensive processing is employed.
The room correction score for a specific RoomPerfect™ filter can
be viewed by pressing the Info button from the initial (ERGO is
ready to measure your room) screen.
Figure 5.21
As ERGO begins taking measurements to acquire Room
Knowledge, you will be notified of the percentage of information
gathered after each measurement, and instructed to continue on
to the next Room position measurement. (Figure 5.20)
Once ERGO reaches 90% Room Knowledge, it will ask if you
want to add more room measurements (Figure 5.22)—no more
are required at this point so you can select NO.
Figure 5.20
Figure 5.22
23
5. ERGO Calibration Software (ERGO Cal)
Then, click YES to store your measurements (Figure 5.23).
Knowledge about the room is calculated and if the measurement
positions have not gathered enough information, you can take
further measurements until there is enough information present
for a proper analysis. (Figure 5.24)
Figure 5.23
Figure 5.24
If you choose to continue with more measurements, select YES
and follow ERGO’s prompts. Some rooms take many
measurements; some can reach this level with only 3
measurements. ERGO will not let you store a room correction
until Room Knowledge is at least 90%. You may continue taking
additional measurements to increase Room Knowledge, which
will result in a more accurate correction filter.
When sufficient Room Knowledge has been obtained, target
curves, focus filters (listening position) and global filters (general
room filter) are generated automatically and stored in ERGO.
...and you’re done with room calibration.
So, what did ERGO just measure?
5.2.6
The following screen will appear and prompt you to release the
Calibrate button – go ahead and do it. (Figure 5.25)
Room Knowledge
Room Knowledge indicates how much information has been
gathered about the room. In normal rooms, a listening position
measurement and a minimum of 34 additional measurements
are adequate to get a Room Knowledge of 90% or better
regarding the room’s acoustic properties. Once Room
Knowledge reaches this range, ERGO can begin processing the
room. Additional measurements can improve Room Knowledge,
up to 100%. With ERGO Cal, measurements are analyzed in
real-time.
Figure 5.25
24
5. ERGO Calibration Software (ERGO Cal)
This will take you to ERGO Cal’s initial screen...and you’re done.
(Figure 5.26)
Figure 5.26
25
6. Using ERGO in several DAW Environments
• Reboot and power cycle your system
If after configuring your system you find something is not
working correctly, reboot your computer, and turn the power
off then on to ensure that all changes take effect.
The following are tips that you probably already know, but it
would be a good idea to read them as a refresher. You know the
old adage...better safe than sorry.
• Turn Off your speakers before turning Off ERGO
Otherwise, you may experience a pop as ERGO’s power
rails come crashing down to zero volts!
Now, Let’s Begin
ERGO has been designed to provide maximum flexibility when
used in a DAW environment. Due to driver limitations on both
Mac and PC platforms, we provide the following guidelines to
ensure that your DAW experience is transparent and
trouble-free.
• Always turn Off your computer when unplugging ERGO
You must shut down your computer any time you wish to
connect or disconnect ERGO. Failure to do so may cause
damage to your computer or ERGO’s FireWire ports.
• If you are using PC ASIO hardware now
If you are currently using an ASIO driver on a PC, use ERGO
in SPDIF Digital mode or Analog mode unless you are
sure your system can function properly with multiple
ASIO drivers.
6.1
Scenario 1: I have a rockin’ DAW
If your DAW is currently set up so that your recording hardware
works great, everything is routed just so, and life is bliss, then we
recommend using ERGO in any mode but FireWire mode. Why?
Because if you are using a PC, there is a good chance that your
DAW is using an ASIO driver with your recording hardware. In
most cases, only a single ASIO driver can be enabled in PC
systems. Using ERGO’s ASIO driver will effectively disable your
rockin’ DAWs recording hardware and change your DAW from
bliss to bust. So do one of the following:
• If you want to add ERGO to your current PC DAW hardware
setup.
Use WDM mode, which supports multiple hardware devices.
Please remember this set up is the least desirable it terms
of system performance versus ASIO mode.
• If your current hardware has SPDIF Out, take this SPDIF
Out and connect it to ERGO’s SPDIF In. Set your main
mix bus in your DAW to use the SPDIF outputs (that is
your main L/R Outs). This allows you to use ERGO’s
awesome D/A converters, eliminates any driver hassles
and provides the ultimate in compatibility. ERGO’s SPDIF
Input can handle incoming sample rates from 32-96
kHz. There are no settings to change on ERGO. ERGO
will automatically figure out that SPDIF is connected and
begin processing signals from that port. By the way, if
you have Pro Tools, this is the preferred connection route.
• Foolproof set up
The easiest set up is already having a working DAW,
FireWire and/or USB interfaces. But, if you’re not so
lucky, then the next easiest set up is either Analog mode
where you provide your left and right mix outputs to ERGO’s
Analog Inputs and extremely high performance digital
converters, or Digital mode where you use the SPDIF output
of your DAW hardware and connect to the SPDIF Input of
your ERGO system.
• Multiple FireWire interfaces on Apple machines
ForMac OS 10.5 or greater, you can use FireWire with
ERGO even if you have other FireWire audio devices.
26
6. Using ERGO in several DAW Environments
• What if you don’t have SPDIF Out? No problema, amigo.
Just plug the outputs that are currently connected to your
monitors into ERGO’s LINE Ins, then plug your monitors
into the “A” speakers. Voila! That’s it! ERGO’s
high-performance A/D converters will meticulously transform
your signal into beautifully pure digital data, ERGO will work
its magic and its amazing D/A converters will deliver the
sonic goods in all their room-corrected glory.
Whatever is playing through your mixer gets recorded to your
DAW. That’s pretty simple.
• If you are using a digital mixer with SPDIF outputs, or a
keyboard/preamp/toaster oven with SPDIF output, just
plug this SPDIF Output into ERGO’s SPDIF Input, and set your
keyboard/preamp/toaster oven to a SPDIF output sample
rate between 32 kHz and 96 kHz. ERGO will figure out
the sample rate coming in and set its hardware to work
with your device. That too, is pretty simple.
Mac users – Mac OS versions greater than 10.4 allow for
“device aggregation”, that is you can make lots of different audio
devices look like one big audio device. If you have a rockin’
DAW, you may want to abide by the adage, “If it ain’t broke,
don’t fix it,” and use one of the hook ups mentioned above.
However, when using a Mac, you can run ERGO in FireWire
mode and it can live with your current DAW hardware. In this
case, simply set the ERGO driver to be your main bus outputs (in
your DAW) and plug your monitors into ERGO.
6.2
6.3
Scenario 3 – I have a pretty cool DAW setup, but I am
not sure which approach is best for me. Which
route should I take?
If your current audio hardware has SPDIF Out, use this. No new
drivers, no compatibility issues, just pure clean room correction
goodness. You’ll get the benefit of ERGO’s pristine audio
performance with no degradation.
Scenario 2: I have a prett y simple recording set up
and want to use ERGO as my main audio interface.
If your current audio hardware leaves a bit to be desired, use
ERGO (Mac users, stop reading here) in ASIO (preferred) or
WDM mode. In ASIO mode, you’ll benefit from ERGO’s low
latency. In WDM mode, however, you will be able to use
multiple recording interfaces under Windows.
If you are a 1 person operation and can live with recording 24
tracks at a time, this works quite nicely. Here’s what you do:
Make sure ERGO’s audio drivers are installed and set up. If you
are able to do a room measurement, then this is complete. If you
are not able to do a room measurement, then see the
Troubleshooting section of this manual.
PC Users: Uninstall any other ASIO driver/audio device. If it
doesn’t say ERGO ASIO, but says XXXXX ASIO, get it out of
your system or conflicts may arise. To do this:
• If you are using an analog mixer to route your signals, take
the main Left/Right outputs of this mixer into ERGO’s LINE
Ins. Tell your DAW to use ERGO Analog Inputs as your
recording interface.
27
7. Generic DAW Configurations
Configuring ERGO Inputs and Outputs in Your DAW System
7. Open the Control Panel for ERGO and adjust the settings
accordingly (this is found in System Preferences on Apple
computers).
ERGO inputs and outputs will appear as inputs and outputs in
your DAW system. Set up is described later in this manual.
Depending on your chosen application, these ERGO inputs and
outputs maybe labeled as ASIO, WDM, (PC’s) or Core Audio
inputs and outputs (Mac’s). In ASIO mode, ERGO’s “A” outputs
will be labeled: “ERGO ASIO A Outputs.”
7.1
8. Some programs provide an option called “Release Driver
when Application is in the Background.” Choosing this option
allows other applications to play back through ERGO even when
your main DAW software is running in the background.
7.2
Using ERGO in ASIO Mode
Using ERGO in WDM Mode
1. PC users: In your DAW software, review the documentation
that describes selecting your audio hardware.
Please read the following instructions;
1. PC users: Uninstall all other ASIO drivers for audio devices
before installing the ERGO driver software.
2. For your driver/hardware set up, make sure you choose
“WDM” mode. This can be called “Driver Type” or “Drive
Mode” depending on the brand of software you are using.
2. In your DAW software, review the documentation that
describes selecting your audio hardware.
3. From the device set up menus, make sure you select ERGO
from the audio output choices.
3. For your driver/hardware set up make sure you choose
“ASIO” mode. This can be called “Driver Type” or “Drive Mode”
depending on the brand of software you are using.
4. If you want to use an input on ERGO to send audio to your
DAW software, you must choose ERGO under your Input
options.
4. From the device set up menus, make sure you select ERGO
from the audio output choices.
5. Set your Playback and Recording Timing Master settings to
use “ERGO WDM A Outputs.” Open the Control Panel for
ERGO and adjust the settings accordingly.
5. If you want to use an input on ERGO to send audio to your
DAW software, you must choose ERGO under your Input
options.
6. Some programs provide an option called “Release Driver
when Application is in the Background.” Choosing this option
allows other applications to play back through ERGO even when
your main DAW software is running in the background.
6. Playback and recording main outputs and timing master
(if applicable) should be set to ERGO ASIO A outputs.
28
8. Specific DAW Configurations
Below you will find information regarding integration of ERGO
into various DAWs.
8.1
Pro Tools®
8.2
Cakewalk/SONAR™
If your Pro Tools hardware provides a SPDIF output, ensure that
SPDIF is enabled in your Pro Tools hardware configuration set
up. Please read your Pro Tools manual for more details.
Cakewalk defaults to using WDM drivers. This allows multiple
audio interfaces to be used in the program. This is a pretty good
idea, however with ERGO, it does not result in the best audio
performance.
If this is a new installation and ERGO is your only FireWire
interface, set SONAR for ASIO mode by going into the Options
menu in the toolbar and selecting Audio.
When the screen pop-up window appears, click the Advanced
tab.
Figure 8
Select ASIO in the Driver Mode pull down menu.
This should get things up and running. If you experience audio
dropouts or weirdness, check the Cakewalk site for information
on how to optimize your system to minimize audio artifacts.
Click the General tab. Make sure your Playback and Recording
Timing Master settings are set to ERGO ASIO A Outputs.
(Figure 8)
Existing SONAR Installations
If you have a working SONAR installation, then the
recommended way to use ERGO is in SPDIF or Analog Input
modes. Just insert ERGO between your current monitors and
your audio interface. Use ERGO’s FireWire drivers only for
running the calibration software. Once you have calibrated the
system, you can uninstall the FireWire drivers or disable them
using the Windows Control Panel.
29
8. Specific DAW Configurations
8.3
Ableton Live™
8.4
Nuendo®
Access the Device Setup window and select VST Audio System
in the Devices list in the left pane of the screen. (Figure 8.2)
If this is a new installation and ERGO is your only FireWire
interface, set Ableton for ASIO mode by going into the Options
menu in the toolbar and selecting Preferences.
When the screen pop-up window appears, select the Driver Type
pull-down and choose ASIO. (Figure 8.1)
Figure 8.2
Select ERGO from the ASIO Driver menu. Then, select the ERGO
driver from the Devices pane.
To open the control panel in Windows, click the Control
Panel button. Using Mac OS X, access System Preferences from
the Apple menu or from the Dock. If you’re using the Mac’s
built-in audio hardware, you can use the Sound Control Panel in
System Preferences for your settings. However, if you’re using
ASIO audio hardware, click the Control Panel button. Click
Apply and then OK to close the dialog box.
Figure 8.1
In Audio Device, select ERGO ASIO.
If you do not see your specific DAW described, please refer to
your DAW’s User’s Manual (especially the chapters related to
Hardware/Software configuration, Audio Drivers’ selection, etc).
You may also check www.krkergo.com for updates.
From here, you can choose sample rates, set the buffer sizes
using the Hardware Setup button, and set the Input and Output
Configs to your preference (stereo or mono channels).
30
9. Troubleshooting
Room Knowledge never gets to 100%.
If you’re having trouble with ERGO, check out these tips.
Power LED/knob LEDs do not illuminate when power switch is
turned on.
• Some things in life cannot be fully understood—like
your spouse, for example. So, your room may be another
one of these things. As long as Room Knowledge is 90%
greater, your mixes will sound better.
• FireWire port is not supplying enough power for ERGO.
Use the 12VDC power adapter to power up ERGO.
• Is power switch REALLY turned on? Check it again while
using the external adapter.
• Is the AC outlet working?
I don’t hear a difference bet ween ERGO in bypass and
processing modes.
Your room may already be very good, so ERGO isn't doing
much. This is very unlikely, however. ERGO's effects can range
from subtle to extreme, so there should be a difference. In
particular, listen for the following:
ERGO Cal does not run.
• Driver is not installed properly.
• ERGO is not plugged into a FireWire port.
• Power is not applied to ERGO.
• Improved imaging
• Tighter bass
• More definition among instruments
Microphone does not work.
• You need to have the Calibrate switch on the back of
ERGO pushed in in order for the mic to work. Make sure the
Calibrate LED on the Front Panel is illuminated.
• Use only the KRK mic! Don't plug in any other mic for
calibration. If you lose your KRK mic, you can buy a new
one from KRK customer support at (954) 316-1580.
ERGO's goal is not to make the mix “sweeter” but to make it
more accurate. If you don't think you are hearing something,
finish the mix, and see how it translates to other environments.
This is proof that ERGO is working. If you are still not hearing
what you believe is an accurate mix, you may have problems
with:
ERGO Cal asks for lots of measurements.
• Your monitors - get a pair of KRK monitors!
• Your ears - Cotton swabs are relatively inexpensive, and can
perform wonders.
• Your brain - please refrain from mind-altering
substances when using and/or evaluating ERGO. Your
auditory faculties and the processing thereof will be
greatly enhanced.
• That's OK. It can take between 3 and 9 measurements
before you get to 90% or greater Room Knowledge.
Also, visit the ERGO forum and talk to us! We can help! Go to
www.krkergo.com and click the Forum link.
31
9. Troubleshooting
The Calibration Mic level is not loud enough.
Using a Mac, I cannot see ERGO as a FireWire device.
• Turn up the volume on your speakers. The speakers need to
excite your room in order for ERGO to measure it accurately.
• Turn up the volume on ERGO. The volume control should
point to the word “Volume.” This is the 0 dB point for the
volume control.
• ERGO needs Leopard (10.5.x) or later.
Check www.krkergo.com for detailed instructions on how
to enable workarounds for other OS versions.
ERGO Rocks! But, I want to mix in surround. Can I use 2 or more
ERGOs for this?
I installed ERGO as a FireWire device, and now my other XYZ
FireWire interface is gone.
• No. Surround has other issues. Keep checking
www.krkergo.com for exciting ERGO developments.
This should not happen on Macs, since the Mac OS can
aggregate, or combine, multiple devices into a single interface.
Windows users have a couple of options:
I know I’m only supposed to hear out of my right speaker, but
that’s not happening.
If you’re getting no sound:
• Make sure that your speakers are plugged into the
speaker jacks (oops).
• Windows systems can only have a single ASIO device.
Use your main ASIO device when tracking, and switch
to ERGO ASIO when mixing down.
If you’re getting sound out of your left speaker:
• Check to see that your connectors aren’t crossed and
plugged in the wrong jacks.
• Take a SPDIF or analog out from your existing FireWire
interface and plug it into ERGO. In this mode, you can
unplug ERGO from its FireWire port and power up using the
external power adapter. ERGO's SPDIF Inputs and converters
are of the highest quality, so there will be no
degradation when using this approach. In fact, if your DAW
is “dialed in”, we suggest that you use this approach.
Also, this is the only approach to use for Pro Tools rigs.
While listening my mix in Global Mode, I do not perceive it in
the same way than when I monitoring it in Focus Mode. Is there
any technical reason?
• In Focus mode, ERGO is correcting for time and frequency
domain problems. However, in Global mode, ERGO is
only fixing frequency domain problems. This makes sense,
considering that in Global mode ERGO’s processing
power is correcting a much larger area so is almost
impossible to correct both time and frequency issues in
this scenario.
• Use the WDM drivers. Windows can aggregate WDM
devices. Latency may increase when using WDM instead
of ASIO jacks (oops).
32
9. Troubleshooting
While using ERGO in WDM Mode, I’m not able to select a
buffer size value from the Control Panel.
To contact KRK Service & Support, send an e-mail to
[email protected] or call us at (954) 316.1580.
• That is the expected behavior. To manually select a buffer
size, select ASIO from the Control Panel.
I’m having problems loading the necessary ERGO drivers. I’m
using a Mac OS X running AppleFWAudio2.1. What should I
do?
• Until a permanent fix is released, follow these instructions to
install AppleFWAudio2.0.1:
• Log onto http://developer.apple.com/sdk/ and download
the FireWire SDK 24 for Mac OS X. A file will
download called FireWireSDK24.dmg. Double click this
file. From here, double click the FireWireSDK23.pkg file. This
will launch the installer. Follow the instructions and
prompts that appear.
• Once installed, select Macintosh HD/Developer/
FireWireSDK23/FireWireComponents/FireWire Audio 2.0.1
and
launch
the
installer
by
double
clicking
AppleFWAudio-2.0.1fc1-e8.pkg. Follow the instructions and
prompts that appear. You will be prompted to reboot
your computer.
• Once your computer has rebooted, you may verify that
the update has been performed from System Profiler by
viewing the AppleFWAudio extension. Select the Apple
icon and then About this Mac. From here, select the More
Info button.
• In the left hand pane under Software, select Extensions. After
the Extensions list populates, read the version of
AppleFWAudio that installed–which should be 2.0.1. ERGO
drivers should now install properly.
33
10. Specifications
Processing
- Processing 400 MHz Blackfin DSP
- RoomPerfect™ Algorithm Sample Rate 96 kHz
- Room Correction Frequencies 20-500 Hz
Audio Spec
- Audio Spec A/B Speaker Select and Control
Stereo Audio-In
- SPDIF In (32 kHz-96 kHz)
- 118 dB SNR and Dynamic Range
- THD+N 0.003%
FireWire Spec
- Mac, WDM, and ASIO Driver support
- FireWire Recording Interface Capable
(Simultaneous 4 in, 6 out)
Mechanicals
- Illuminated Controls
- Measurement Microphone
- Headphone Output
34
Appendix: Glossary of Terms
A/D - short for Analog to Digital Conversion. The conversion of
analog data or information into digital or binary form (See
binary).
Filter - A circuit that removes or acts on certain frequency signals
above or below a predetermined point called a cut-off
frequency.
ASIO – Audio Stream Input Output. ASIO, developed by
Steinberg, is a cross-platform, multi-channel audio transfer
protocol. It allows software to have access to the multi-channel
capabilities of a wide range of powerful sound cards.
Frequency - The rate or speed at which an audio source
generates complete cycles in one second. The number of cycles
that occur in one second is call hertz (Hz).
Frequency Range - The range of frequencies over which an
electronic device delivers its best performance or over which a
sound source will produce substantial energy.
Binary - A digital numbering system based on two where data
is expressed as combinations of "0"s and "1"s). Bit - A single
unit of digital information expressed as a "0" or "1.”
Frequency Response - A plot or graph of frequencies that an
audio device, such as a mic, amplifier or speaker, can accurately
reproduce within stated parameters or conditions.
Core Audio - This is an ultra-low latency, high quality
MAC-compatible audio driver that is built directly in to the OS
X operating system.
Harmonics - A tone along with whole-number multiples of the
fundamental tone that distinguish the pitch of a particular
instrument or sound.
Decibel (DB) - A unit of measurement for expressing sound
pressure level (SPL), signal level and variation or differences in
signal level.
Harmonic Distortion - The occurrence of harmonics in the output
signal of a playback device or amplifier which were not present
in the original input signal.
Digital To Analog Converter - A circuit used to change binary
data that make up the digital audio signal into discrete voltage
levels that approximate the original analog audio waveform.
Abbreviated as D/A converter.
Hertz (Hz.) - A unit of frequency measurement used to express
the number of complete cycles occurring in a one-second
interval. Abbreviated as Hz.
DSP - An abbreviation for Digital Signal Processing (Any signal
processing done after an analog audio signal has been
converted into digital audio.
I/O - Short for "Input/Output." A port or in-line control for
channeling the flow of signal data to and from a device.
Dynamic Processing (Dynamic Signal Processing) - An signal
processing system which automatically changes the gain to
maintain a preset level ratio or relationship between the loudest
and quietest passages of music.
kHz - The Abbreviation for kilohertz (1,000 Hz).
LED - See light emitting diode.
Dynamic Range - The level difference, expressed in dB, between
the loudest level and quietest level of a recording or live audio
source.
35
Appendix: Glossary of Terms
Sampling Frequency - The number of digital snapshots or
samples taken of an analog audio signal in one second
necessary to produce a digital interpretation of the original
signal. The industry standard sampling frequency for
CD-quality audio is 44.1 kHz. Also referred to as Sample Rate.
Signal-to -Noise Ratio - A measure of how quiet an audio device
is when no signal is present. Also referred to as Hum and Noise
or Residual Noise.
SPD IF – Sony/Philips Digital Interface. An interface
(input/output) that allows you to connect two digital audio
devices using an RCA connector (Coaxial) or a TOSLINK
(Optical).
THD - The abbreviation for Total Harmonic Distortion.
WDM – Windows Driver Model. A driver model based on the
Windows NT driver model that is designed to provide a common
architecture of I/O services for Windows operating systems for
specific classes of drivers. This driver model is currently
supported under Windows 98 Second Edition, Windows
Millenium Edition, Windows 2000, and Windows XP. WDM
drivers provide multichannel I/O.
36
Copyright © 2008 by KRK Systems, LLC
ERGO is a trademark of the Stanton Group. RoomPerfect is a trademark of Lyngdorf Audio
All other trademarks are property of their respective owners, who are in no way affiliated with KRK Systems or KRK products.
All information included in this User Manual is subject to change without notice.
http://www.krksys.com
+1 954-316-1580
LITK00027 REV-A 8/22/2008