1
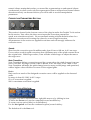
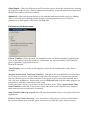
Waves Tune
Tuning Correction Plug-in for Vocals and Monophonic
Sound Sources.
Software Users Guide
Introduction and Overview
Waves Tune is a software audio processor which allows for correction and manipulation
of pitch in vocals and monophonic instruments. When Tune is inserted into a track of
your audio sequencer or editor , it detects the signal’s pitch and corrects to the nearest
“clean” (in-tune) note. You can perform straightforward pitch clean-ups of a track,
meticulous, nuanced touch-ups or complete manipulation of the melody, depending your
settings choices. Tune delivers excellent results in any form of music, even non-Western.
Vocalists, producers and engineers facing complicated pitch-correction problems will
benefit from the extraordinary quality and flexibility which Waves Tune offers.
Tune operates in perfect sync with the host timeline. It even takes charge of transport
functions and region playback in host applications using ReWire technology by
Propellerhead Software.
Tune offers natural sounding results while maintaining tight pitch correction by using
formant corrected pitch shifting, combined with smoothing of note transitions as well as
detection and editing of natural vibrato. Now, pitch shift with a synthetic sounding
quantized effect is a choice rather than artifact.
A piano roll interface makes pitch curve editing familiar and comfortable, much like
editing MIDI notes on a sequencer track. The pitch correction curve is a WYSIWYG (What
You See Is what You Get) display. Changes to a selection’s correction parameters can be
viewed and auditioned in real time.
The process is streamlined and scalable, so that you can start from a purely default tuning
scheme, then intervene after an initial scan to fine-tune sections needing further attention
using the graphical and parametric correction tools. The controls are laid out in a way
that makes the workflow clear, intuitive and efficient.
Please note!
• Tune must scan the audio before any correction will take place.
• Tune will display the intended correction during the scan but the sound correction
will be bypassed until the scan is complete.
• When using ProTools, a Waves ReWire plug-in must be inserted in order to work
in sync with the host transport and timeline.
Quick Start
INSERTING THE PLUG-IN
To get started, insert Tune onto your vocal track (or monophonic instrument track.) It is
important that Tune precedes any effects processing on the source. We recommend that
Tune is your first insert on the track.
Important note to ProTools users!
For proper operation of Tune you need to first insert the Waves ReWire plug-in into your
session. Since the Waves ReWire plug-in has no audio output you should insert it into an
auxiliary track so that it doesn’t use a valuable voice.
Other host applications automatically launch the Waves ReWire device.
ReWire technology is made by Propellerhead software.
Once inserted on a track, Tune is ready to scan an incoming signal. To keep memory
usage reasonable and to offer you an extremely stable work environment, Tune can track
pitches for a duration of ten consecutive minutes. If you need to scan more than ten
minutes, you can clear the memory and use the Session Start Time dialogue to start a new
scan at a later specific location.
Tune fully syncs with the host editor’s time line, so that you will not have to leave the
plug-in during your session. The following transport functions can be performed from
within Tune:
1. Play start time.
2. Mark and playback loop regions.
3. Stop playback.
4. Start playback.
5. Set session start time.
6. Snap marker to host’s grid option.
All this is done using ReWire technology licensed from Propellerhead Software.
Before you begin scanning your track, you can set global parameters and segmentation
parameters such as Scale and Root. These can be modified later, but the modifications will
affect only the selected notes. Reference Pitch should be adjusted before the scan, as any
changes made after the scan will require clearing the graph and re-scanning.
SCANNING AND PITCH TRACKING
When you send audio through the plug-in, Tune will perform a scan and create the
following displays:
• Waveform overview - displayed at the top.
• Detected pitch curve - displayed in orange on the piano roll pitch editing graph.
• Correction pitch curve - displayed in green on the piano roll pitch editing graph.
• Note segments – displayed as light white blocks around segments of the pitch
correction curve.
An orange highlight on the top waveform overview indicates that Tune is scanning audio.
During the scan, you will not hear any changes in the original audio.
There’s no need to scan the entire track at once. Whenever Tune detects signal in a
section where it hasn’t yet established a pitch curve or where the pitch curve has been
cleared, it will automatically begin scanning. The sound output will remain uncorrected
during the scan, but an orange highlight will appear to indicate that scanning in progress.
PITCH CORRECTION AND PITCH CURVE EDITING
After a section is scanned and its correction curve and note segmentation are created, you
can play back the section to apply and hear the correction. Audition through the track’s
assigned output. You can now select notes, sections or the entire piece and begin
adjusting the correction curves.
Use the default Note tool to make a selection in the Tune graph. Select a single note by
clicking on it or select multiple notes by clicking outside and dragging over the area you
would like to select. The Select All button allows you to quickly select the entire curve
with all its notes.
During the scan, Tune scans the track and applies default correction parameters for the
construction of the correction graph. Choosing Select All is a convenient way to choose
your own custom parameters rather than the automatic defaults. Once all segments are
selected you can change the Segmentation and Correction Parameters. Increasing Note
Tolerance in the Segmentation section, for example, will reduce the amount of false note
transitions in places where the singer went off key momentarily.
When you are satisfied with the segmentation settings, you can increase or decrease any
of the Correction Parameters for tighter or more relaxed correction. The results are
animated and auditioned in real time. Once you are happy with the overall correction,
you can make local adjustments to sections or individual notes using the Correction
Parameters and Graphic Tools.
SO MUCH FOR THE QUICK START
The Tune interface is logical and intuitive, so with a bit of trial and error and a good pair
of ears you should quickly be able to achieve quality results. But to get the most from the
product, please read the rest of this manual.
The next chapter will take you through Tune’s interface and describe each control. After
that, in the chapter “Working with Tune,” you’ll find comprehensive instructions
describing how to control Tune in greater detail.
Tune Interface Reference
The Tune Interface is divided into the following sections –
• Global Correction section
• Segmentation section
• Correction Parameters section
• Graphic Editing Tools section
• Vibrato section
• Main Pitch Editing Graph
GLOBAL CORRECTION SECTION:
The Global Correction section , the first section of the Tune work flow, offers four global
tune parameters which are critical for pitch detection:
Reference Pitch –This is similar to the calibration adjustment on a standard
guitar/instrument tuner. It allows adjusting the overall tuning offset for any scale.
Reference Pitch should be adjusted before the scan. Changing Reference Pitch later will
require clearing the graph and re-scanning.
Default: A = 440hz; Range: +/- 2 octaves (220hz-880hz.)
Global Pitch Shift - Here you will define the global pitch shift which you want to
perform on all scanned material. Global shift defines a constant shift in equal tempered
semitones (half steps.)
Default = 0 ; +/- 12 half-steps (semitones.)
Formant Correction - The correction type can be set to Formant corrected or Non
Formant corrected. For vocals we recommend formant correction to avoid unnatural
pitch shifts. You may change this setting at any time and the note shift method will adjust
accordingly.
Range- This parameter will narrow Tune’s detection area to a certain range (bass,
baritone, tenor, soprano etc.,) making detection in that range more precise. You can
change the range of detection simply by narrowing or enlarging the grayed out area on
the Piano Roll. This is done by placing the mouse over the current range border until the
pointer changes into a resize tool. Click-dragging will adjust the detection range
boundary.
SEGMENTATION SECTION:
The Segmentation section allows you to select conditions by which Tune will segment the
correction curve into notes. These conditions set the “rules” of the Correction Grid in
determining whether or not a note is “legal.” This section has two main parts: Scale
Selection and Tolerance Parameters.
Root and Scale (pop up menu items):
The Root pop-up defines the root note for the selected scale. The default scale is a 12
semitone (half-step) equal tempered chromatic scale. Since the notes in a scale will define
the correction grid, a selected scale preset will adjust the number of notes, as well as the
Note Status (legal vs. illegal.) The grid serves as a table of possible “correct to” pitch
values which are designated according to the detected input pitch.
Default Scale: Chromatic.
Default Root: Grayed out - will become available when scale is changed.
Clicking on the Edit Scale button allows you to further change and manipulate the scale.
Tolerance:
The Tolerance control works between the detection and the assignment of target notes
(segments.) It sets a couple of rules, making the target note hold to the current target
unless the change lasts for more then the Tolerance time, or is steeper then a defined
Slope. This allows marginal detunes and small “getaways” to maintain the same target
and move to a new note only when the change is more significant than the Tolerance
value.
Vibrato Segmentation Button:
The Vibrato button enables detection of natural vibrato in the track. Tune will segment a
section with detected vibrato so that the target note of the selection is the average pitch of
the vibrato. A red highlight will appear over segments in which natural vibrato was
detected.
On/Off, default off.
The detection of natural vibrato is not always perfect and some false detection might
occur. If you apply vibrato re-segmentation onto a section that does not have natural
vibrato, it might cause artifacts or clicks. Try using Natural Vibrato for selections in which
you think there is vibrato to detect and see whether Tune’s vibrato segmentation is
helpful. Working with vibrato is as much an art as a science.
Natural Vibrato has separate controls for segmentation in the Segmentation section and
manipulation control in the Vibrato section. Although these two applications both rely on
the same type of vibrato detection processes, You will only have the option to use the
natural vibrato manipulation after you turned the segmentation on and natural vibrato
was detected, in other words only the segmentation button will perform Natural vibrato
detection and only on detected section you will be able to use the manipulation
parameters.
CORRECTION PARAMETERS SECTION:
This section is located in the bottom center of the plug-in under the Graphic Tools section.
In this section, Tune offers the three most important correction parameters:
speed, note transition and ratio. We recommend starting with the default values for a
moderate correction and lowering the values for a more rapid correction.
All parameters in the section are applied in real time and will strongly influence the
correction curve.
Speed:
Speed sets the correction speed in milliseconds, from 0.1ms to 800 ms, in 0.1 ms steps.
Lower values result in rapid corrections that will flatten most of the pitch contours from
the original take. With longer values, Tune will take a little longer to adjust the tune to
the target note.
Note Transition:
Note Transition defines a correction speed for events where the pitch changes from one
note to another. Its range is from 0.1ms to 800ms, in 0.1 ms steps. A low value or fast
Note Transition will make the pitch change between notes sound jumpy and quantized,
while a higher value will allow for more of the original glide.
Ratio:
Ratio sets how much of the designed correction curve will be applied on the detected
audio.
Its range is from 0%-100% in 0.1% steps.
0%= no correction is applied.
100%= maximum correction is applied.
GRAPHIC TOOLS SECTION:
A graphic tool can be selected from a right click menu or by clicking its icon.
To select the Zoom tool, use the command/control modifier key.
To zoom out use option (Mac) or alt (Windows).
For the Navigation tool use the command+option/control+alt key.
The default tool is the Note tool.
The Note tool allows you to select a note or multiple notes in the Edit Window and
perform various actions on anything within the selection. Select single notes by clicking
them or select multiple notes by click-dragging in the Edit Window. Now you can edit
the selected notes in the pitch correction curve using any of the correction parameters. In
addition to these selection functions, each of the tools offer specialized graphical editing
functions.
The Graphic Tools are:
Note Tool – With the Note tool you can select a single note by clicking on it, or a region of
notes by click-dragging over the area. Selected notes can be moved to different targets
within the correction grid. Point the mouse at the borders of a note and the cursor will
change to a Trim tool icon, allowing you to extend or trim the length of a note. This tool
is useful for fixing note transition points or fine-tuning segmentation and will be available
only if there is no unvoiced section between the trimmed notes.
Zoom Tool – Select the Zoom tool and your cursor will become a magnifying glass with a
“+” inside. When using the Zoom tool, click-drag to a desired area of the Edit to zoom in
accordingly. The number of zoom-in stages that you make will be equal the amount of
zoom-out stages needed to go back to full zoom.
Slice Tool – This tool allows you to separate a note into two or more notes, thus allowing
you to drag a part of the note to a different pitch.
Glue Tool – Click on a note with the Glue tool it will connect to the next note. Both notes
will become one selected note. If the next note is different, the clicked note will tune to its
new mate. When there are no notes near the one clicked, no action will occur. If you
have selected a range of notes, clicking with the Glue tool on any of the note segments
will bring all notes within the selection to that target.
Pencil Tool – This tool allows you to draw your own pitch curve, overriding existing
smoothing parameters.
Curve Tool – Click-dragging on the Curve tool allows you to move the selected pitch
correction curve up or down in a continuous motion. If you want to create or correct a
“slide” between notes while preserving all detail within the notes, you can click near the
edge of the selection, enabling you to move the curve in diagonal manner. The corrected
tune graph will interpolate with a smoothing factor related to the speed value.
Line Tool – This tool is similar to the Draw tool, but allows drawing straight lines by
defining dots using a single click and ending the line with double click. This process
overrides any smoothing parameters.
Navigation Tool – With this tool you can easily navigate through the entire Edit Window
(up, down, left, right, diagonal, etc.)
The corrected tune graph is a “What You See Is What You Get” graph containing the
smoothing derived from the specified Speed and/or Note Transition parameters (or the
equivalent smoothing faders.) When the graph is constructed, the default correction
parameters are always initially used.
PITCH EDIT GRAPH:
The Pitch Edit Graph fills the largest part of the Tune interface. There are four main parts
to the Pitch Edit Graph:
•
•
•
•
Waveform Overview
Timeline Ruler
Piano Roll
Pitch Editor
Waveform Overview
At the top of Tune Editor is the Waveform Overview.
It shows an overview of the waveform in two possible modes:
• Global Overview (currently called track overview) - shows the overall waveform,
highlighting the current view of the Edit Window. The Global Overview allows for
fast navigation to anywhere in the song.
• Edit Window Overview (currently called field of view) - shows the waveform
corresponding to the horizontal zoom set in the Edit Window.
You can change between the two modes using the preferences pull down menu located
on the upper right corner of the Tune interface, next to the time display,
or by right clicking inside the Waveform Overview.
Clicking in the Waveform Overview area will center the view in the Edit Window to a
clicked location on the timeline. Click-dragging in the Waveform Overview area will set
the view of the Edit Window.
The Timeline Ruler
The Timeline Ruler is located between the Waveform Overview and the Edit Window.
The Timeline Ruler is always tied to the Edit Window zoom.
Whereas selections in the Edit area allow curve editing, selection in the Timeline ruler
create looped playback sections. When you click-drag on the timeline, two playback
locators will appear on the Timeline Ruler to mark the beginning and end of the selection.
The Timeline Ruler has three modes:
Bars/Beats - In this mode the timeline is displayed in Bars/Beats. Use this option to snap
to the host’s timeline from the “time bar” pull-down menu. This will lock Tune’s grid to
the host’s grid resolution.
Please note that Tune does not support tempo changes. You may encounter unexpected
results if used within a tempo changed timeline. Remember, the timeline will be limited to
ten minutes, after which pitch detection will stop.
Minutes/Sec – Here, the timeline is displayed display in Minutes/Seconds. The timeline
will be limited to ten minutes, after which pitch detection will stop.
Samples – This mode shows the timeline in samples. Again, the maximum length is ten
minutes, after which pitch detection will stop.
When Tune reaches the ten minute limit, you will see a message in the Waveform Display
Window, “Outside Session Limits.”
Pitch Editor
Piano Roll
The Piano Roll allows the user to establish his own rules concerning
scales, “legal and Illegal” notes, and the status of each note in a desired
scale. You can play reference notes by pressing the appropriate piano
key or set range boundaries by dragging the edges of the scale to a
desired key.
Tune offers a variety of musical scales as well as the option to create
custom scales, bypass correction for certain notes and exclude certain
notes so that the correction will not tune to those marked noted but to
the next closest note above or below within the scale. All of this is done
in the Piano Roll section.
By default, Tune has a 12 semitone grid. Each semitone quantization is
subject to a tune adjuster (in cents) and a global tune value which
defaults to 440Hz, but can be adjusted to any desired reference pitch.
Tune allows you to select scales with different numbers of notes within
each octave, plus microtonal tunings to accommodate microtonal and
non-Western scales.
The Notes Grid:
The Notes Grid allows dividing octave intervals into a certain number (n) of notes. Scale
Selection choice determines how many notes are available within an octave. By default,
the grid consists of 12 semitones, but many more options are available within the Scale
pop-up menu. Tuning of each scale note is defined in cents, and the user can offset the
tune or temper use the Edit Scale feature of the Piano Roll.
Edit Scale:
The Edit Scale button provides an easy way to view and manipulate notes on the grid.
When Edit Scale is not selected, the view may become too congested to accurately adjust
note-specific parameters. When Edit Scale is selected, the Tune Notes Graph will become
a single octave zoom and allow faster and clearer adjustment of per-note correction
properties.
Note Tune:
When the Edit Scale button is on, each of the 12 notes will show its temperament, in
cents. Tune can be adjusted to perfect the notes’ intonation. The adjustment is in cents
but allows inserting sub-decimal fractions, for maximum resolution.
Note Status:
The Note Grid assigns a status to each note in the selected grid. For instance, a major
scale in a 12-note grid will have eight “legal” notes. Special status options help the
automatic process to better aim to the desired target note while keeping the user
informed as to what is happening.
There are five status possibilities:
Legal Note – Correct to this note.
= Illegal Note - Corrects to nearest grid note. This means that the note is illegal and
the output should be tuned to the nearest legal note.
= Illegal Note - Corrects to nearest grid note above this note.
= Illegal Note - Corrects to nearest grid note below this note.
Bypass Note = Legal Note – Bypasses the fix (doesn’t fix the tuning.) Here, when the
input note is detected to be closest to this note, no pitch correction will take place.
However, if the input note is illegal and the legal note is the nearest grid note, then
correction will be applied to that note according to the other correction parameters.
(For instance, if D natural is bypassed and the singer sings a few cents above an illegal
C#, then the C# will be corrected to a D, even though D is bypassed.)
Just to the right of the Piano Roll is the Edit Window area.
Pitch Edit Area
This area offers continuous horizontal and vertical zoom. When Tune processes a
selection for the first time, three graphs appear in the Edit Window:
The Detection Graph (light orange) – The original pitch detection of the input audio.
The Correction Graph (green) – This is a display of the automatic pitch correction as
determined by the current parameters settings in the Segmentation and Correction
sections.
The Note Segments – Portions of the pitch graph will be outlined by note segment
blocks which resemble MIDI notes. Selected notes are highlighted in light orange for
clarity. Anytime you edit the correction curve, Tune will automatically re-segment the
notes to accommodate your changes.
The corrected pitch graph may be further edited using a few simple tools that change the
appearance of the mouse pointer in context with its current function.
Undo/Redo
Next to the Graphic Tools section are the Undo/Redo buttons. These pull-down menus
allow you to view and access any point of the Undo/Redo history, up to 32 levels deep.
Position window
The Position Window, located at the bottom-right of the Pitch Graph, shows you the note
and cents of the note at the current cursor location.
VIBRATO SECTION
On the lower-right corner of the Tune interface is the Vibrato Section. Two vibrato types
are available: Synthetic and Natural.
The Natural Vibrato section has the following controls:
On/Off - Turns Natural Vibrato manipulation on/off (Please note that in order to
manioulate natural vibrato you first need to detect it by turning vibrato segmentation to
on in places where you suspect there is a natural vib.
When selected, you will be able to manipulate the Natural vibrato in places where it was
detected. The Natural Vibrato will perform a new segmentation only when the Vibrato
button in the segmentation section is turned on.
Amount: 0% to 200%; Default: 100%
This is a ratio multiplier for the detected natural vibrato. At 0, the Tune will
flatten the Natural Vibrato and at 200% it will double the amount of the natural vibrato.
Attack: This is the time it will take the natural vibrato modulation to build to its full
assigned amount.
The Synthetic Vibrato section has the following controls:
On/Off button (in the Vibrato section) – Turns Synthetic Vibrato on/off.
Waveform: Waveform defines the shape of the synthetic vibrato which will be applied to
a selection. Choices are: sine, triangle, square, saw up, saw down.
Default: Sine.
Pre-delay: 0 to 2000 ms; Default 0ms
This is the time it will take from the start of a new note until the synthetic vibrato
commences.
Rate: 1 to 20Hz, Default: 5.0Hz
This defines the rate of the synthetic vibrato waveform modulation.
Depth: +/-0 to 400 cents; Default: 0
This value sets the amount of vibrato (or pitch deviation from the original note.) At the
full synthetic vibrato setting of 400 cents, pitch will deviate by a whole step above and
below the original note.
Attack: 0 to 1000ms; Default: 0ms.
This is the time it will take the synthetic vibrato modulation to build from no vibrato to its
full depth.
MIDI
Each Tune instance creates a MIDI port through which it receives and sends MIDI
information. The configuration varies depending on the host application. Operation of
Waves Tune is possible without MIDI, but a few features are lost.
There are two applications specifically for MIDI note I/O:
Receive MIDI – Tune to MIDI Notes: On/Off button
This allows designating the current pitch according to a MIDI note, so you can actually
retune to a designated note by playing it on a keyboard. This mode overrides the Notes
grid (and all other modes) while MIDI notes are being played. Normal functioning
resumes when no MIDI note input is sensed. MIDI note targeting overrides the speed and
note transition, which can be adjusted later.
Export MIDI – Exports Correction Curve to MIDI.
You can export your completed corrections to a MIDI file which can be played by any
MIDI instrument. Designated notes in the Edit Window can be translated to MIDI notes
and delivered as MIDI output. Create a MIDI file simply by pressing the Export MIDI
button located on the Waves Menu Bar. The exported MIDI file will contain the pitch
contours as pitch bend control, calibrated to +/- two semitones. 127=+200 cents; 0=-200
cents. Don’t forget to correctly set the pitch bend range on your synth.
General Purpose Buttons:
If you wish to redo the automatic tuning of a selection or of an entire song after the
detected and corrected Pitch Curve is established, use one of the following buttons located
beneath the Edit Window, between the Piano Roll and the Re-Segment section:
Clear Graph – Clears the Detection and Correction curves from the selected area, clearing
all analysis for that region. During subsequent playback, Tune will scan cleared regions as
though they had never been scanned.
Select All – Selects all detected notes on the timeline and makes them ready for editing.
This is convenient for making global changes to the Segmentation or Correction
parameters which apply to the entire scanned take.
Preferences pull down menu
Follow Timeline- When checked, the timeline curser will follow playback, updating the
view as the cursor leaves the window. Unchecked, the current window will remain in
place, regardless of playback location.
Default is checked.
Time Display- Lets you choose the display format in the timeline ruler: time, bars or
samples.
Acquire Session Start Time from Timeline- Tune limits the scan duration to ten minutes.
If you need to correct a track which is longer than ten minutes, you must first scan the
first ten minutes, perform all corrections to the graph, and re-record the finished track
onto the host application. Afterwards, you can Select All and clear the entire graph to be
prepared to scan the continuation of the song.
Locate the cursor where you want to begin your new scan. When Acquire Start Time
from Timeline is selected, Tune creates a new start time at the current cursor location,
then scans the next ten minutes of material.
Snap Timeline and Loop to grid- this will snap the timeline curser to the grid of the host
application.
Field of View/ Track Overview – You can choose a Waveform overview which shows
the current field in sync with the piano roll area or reveals the entire track overview.
WAVESYSTEM
The WaveSystem Toolbar provides standard functions such as preset Save/Load handling,
Help button etc. This is common to all Waves Plug-ins. However, with Tune there are
some special considerations which require a few unique implementations as follows:
Setup A/B – The Tune plug-in does not have Setup A/B.
Presets – Tune presets will have two separate pre-set parameters blocks: Scale and
Global.
Load/Save:
Tune will load and save presets normally. When saving presets, all parameters will be
saved. When loading a preset, you will be able to load the entire preset or just the scale
saved in a preset so that the rest of the parameters remain unaffected.
Export MIDI - This button enables the user to export the corrected notes as a MIDI file so
you can assign it to any instrument that will receive MIDI.
Using Tune
Waves Tune is designed for an intuitive and smooth workflow. Tune offers a very simple
assortment of pre-sets for beginners, but allows advanced users to tailor their work with
a rich collection of controls.
You’ll find the Tune plug-in to be most effective if you “guide” it to the correct key and
scale, based on the musical passage you are working on. With that in mind, we
recommend the following workflow for ease and efficiency.
Part 1: Global parameters and preparation for scanning
We first set global parameters for optimizing the pitch detection process. The default
parameters of Tune are generalized, so specifying some pre-scan preferences may make
the initial auto-generated correction more useful, saving you work down the line.
1) Session Start Time – In most cases when working on songs, the default session
start time is the 00:00.000. However Tune’s memory management allocates
memory for 10 minutes of pitch analysis. It’s best you study the song before you
begin the pitch analysis, to get the most out of those ten minutes. If , for example,
you are working on a long session which begins at zero and there is a vocal take
starting at 14:24.122, Tune’s memory will be full before this vocal begins, so Tune
will not track its pitch. If the vocals do not start at the beginning of a song, but
instead after a lengthy introduction, begin pitch analysis at that point. Place your
cursor at the start of the vocal take and select Acquire Session Start Time from
Timeline from the preferences pull down menu.
2) Reference pitch -The first step is to define the reference pitch of your material or
the music to which the vocalist sings. You’ll see this control in the upper left corner
of the Tune interface. The default pitch for modern Western music is middle
A=440Hz. Some special Asian and European orchestras use alternate reference
3)
4)
5)
6)
tunes such as 443. Music transferred from analogue tape can exhibit pitch variances
due to playback speed inconsistencies. However you determine the reference pitch,
it is very important to get this right for correct targeting of the pitch correction
operation.
Global Pitch Shift- Here you define any global pitch shift you want to perform on
all scanned signal. You would use this, for example, if you have an existing vocal
take that was recorded before the song was transposed.
Formant Correction- Choose whether or not you want formant correction.
Normally you will choose formant correction for human vocals, as well as
instruments with a similar resonance (woodwinds, some brass, etc.,) as this will
give you much more natural pitch shift results than without formant correction.
There may be times you will want to work without formant correction, but you
run the risk of the familiar “Chipmunk” sound often associated with pitch shifters.
Range- Setting Tune’s detection range according to the singer’s range will help
detection process by narrowing frequency range scanned. While Tune’s pitch
detector is designed to detect the exact pitch of the fundamental frequency of the
input, some cases are challenging. Since we can’t foresee the range in which your
talent sings, we assign a wide, inhuman range as default. However, narrowing the
Range to the singer’s expected vocal range can reduce the risk of false detection.
Scale and Root - While these can be changed at a later point, setting them before
the initial scan will provide results that are more immediately usable.
Part 2: Scanning – pitch detecting and initial correction curve creation.
Press Play to scan the audio from the track where Tune plug-in is inserted. Tune will
automatically scan previously un-scanned segments within the ten minute limit. During
the scan, the waveform display area will highlight in orange and display a “Scanning…”
message. Tune is scanning the audio and preparing the initial correction curve, however
the sound output is not yet corrected, so you will hear the track in its original form.
We strongly suggest that you scan an entire song or logical segment of music before you
begin correcting the track. Whereas it’s possible to scan a section of a song, work on that
section’s corrections, and then scan new sections, the fact that Tune will automatically
switch into Scan mode when playing un-scanned regions may prove confusing. With
study and experience you will develop your own way of working with Tune, but for
starters we suggest you work in a methodical manner, beginning with a complete scan of
the song, followed by corrections and fine-tuning.
While scanning, Tune creates the initial suggested correction curve using a set of default
correction values. Speed-15ms, Note Transition-120ms and Ratio-100% are hard coded
into the initial correction graph creation but can be easily edited after the scan, even
before auditioning the initial correction curve.
Once you have scanned a segment of music and made your corrections, changing the
underlying audio will not automatically update the graph. If you make editorial changes
to a piece or re-record a segment and drop it into your audio, you will likely need to rescan and re-adjust the graph for that section. Select and clear graph segments to refresh
them. After clearing segments, Tune will relate to them as un-scanned and will scan them
on the next pass.
Part 3: Post Scan – General corrections
After performing the scan, Tune constructs the detected pitch curve and correction curve.
From this point on, any audio you play on this track will be affected by the correction
curve pitch adjustment, with all changes happening in real time. Remember, to modify
the curves you must select something – whether an individual note or a wider selection.
Changes will not affect unselected areas.
Since the correction curve is constructed by a set of defaults, now is the time to set your
own general correction parameters. If you locate a small section of a track whose
problems are representative of the entire scanned passage, you can experiment with the
small section and then apply those parameters to the entire passage.
Segmentation Tolerance and Scale Settings
Increasing Tolerance will generally make smoother segmentation where short note
glitches and slight marginal detunes will stick to the longer and more solid note in that
area. Some find it convenient to use the Select All button to select all notes in the scanned
passage and then manipulate the Tolerance parameter to see how it affects the note
segmentation of the correction curve.
Vibrato segments have a tendency to create over-segmentation, in which one vibrato
note may be segmented into two or three different note segments. The Tolerance
parameter can reduce this over-segmentation, but it may result in an over-tolerant setting
for other parts of the performance.
Tune offers a Vibrato segmentation control which will detect natural vibrato segments,
then target the note closest to the average pitch of the vibrato segment while maintaining
the natural vibrato. Vibrato detection is not perfect for all applications, so it is
recommended to reserve the vibrato segmentation for those specific selections where
your intuition tells you it should apply.
Oftentimes you will begin a project without knowing the scale or other general trends of
the music. It’s often easier to identify the scale after the first scan creates a suggested
segmentation. Now, too, you can more easily spot a general bias in the singer’s
performance, such as a tendency to be flat or sharp on a certain note, and make global
corrections. You can additionally “second guess” the notes grid and force the correction to
the legal note above or below or even experiment with scales to see if you achieve better
results.
General Correction Parameters settings
When you are satisfied with the segmentation, you can begin to adjust the general
correction parameters. The three controls, located below the graphic tools, default to the
settings embedded in the initial correction curve. Here’s how to adjust these settings for a
more personalized general correction:
Speed: Determines the speed of the correction within a note. Lower values will flatten
the pitch contours into a straight line, forcing the note’s pitch to the target note pitch.
Higher values will make a more relaxed correction, preserving more of the original pitch
contours while still correcting towards the target note.
Note Transition: This control sets how quickly or steeply a note “slides” into the next
note. Very low values tend to make a note jump to the next note in an unnatural way.
This can cause an artifact which has become a creative effect occasionally (incorrectly)
referred to as the “Cher Effect.”
Ratio: Here, you determine how strongly to apply the correction. Ratio defines how tight
the correction should be, over then entire timeline of the correction. The default of 100%
will maintain the speed and note transition values as they are in the original track. Lower
values will morph the correction curve towards the detected pitch curve and a ratio of 0%
will effectively bypass the correction. Think of it as a “More Correction/Less Correction”
control.
Once you have manipulated all of the above controls to your liking, your song should be
in good shape. In fact, you may be finished with the job. However, there likely remain
some problem areas of the track which need more attention. For surgical fine-tuning and
detailed vibrato corrections, Tune offers a complete set of tools to control each nuance of
the pitch curve.
Part 4: Surgical Graphic Curve Editing
One size doesn’t always fit all, so Tune allows you to make meticulous local modifications
to all parameters. Select a note or a segment and modify the curve to meet your needs.
Tune remembers the parameters applied to each segment.
The best tools for perfecting your track are your ears and your experience with sound.
Since Tune synchronizes perfectly with the host timeline, you can play all the elements of
your mix while making adjustments to the pitch correction. You can play or loop the
smallest of sections and make adjustments in real time. It’s no harder than adjusting an
EQ.
First, identify a section which requires further work and define a loop around that area.
You can create the loop in the host application, or you can define a loop within the Tune
plug-in. Most will find it easier to set-up the loop within Tune, thus avoiding leaving and
re-entering the plug-in. Dragging the cursor over Tune’s Timeline ruler will define a loop
playback section. Pressing Play will start a looped playback. While your loop is playing,
the default Note tool allows you to select specific notes which require further correction.
Zoom in on the suspect notes by holding the Command (Apple Mac) or Control
(Windows PC) while dragging around the suspect area.
By zooming in closely, you should be able to locate the offensive event and start
correcting it. Only selected segments will be affected by your adjustments, leaving the
rest of the curve unaltered. This includes Segmentation as well as Correction parameters.
Certain manipulations with the graphic editing tools (such as the Glue or Slice tools) will
alter your selection in a logical manner. Until you get used to this, pay attention to the
resulting selections.
Let’s say that you identify an incorrect note. The singer got out of key enough so that
Tune assumed the singer sang the next semitone, but actually should have gone to the full
tone. Here, the first step would be to grab the note and drag it to the correct target note.
Similarly, imagine the singer tried, unsuccessfully, to sing the same note twice. If Tune
interpreted the second of the notes to be a different pitch, you can click on the note before
the “stray “ with the Glue tool to merge them into one note segment, thus eliminating
the note transition between them.
In the opposite case, Tune might remain at the same note, although the singer was
supposed to go to the next one. Here the Slice tool allows segmenting the single note into
separate ones by clicking on the point at which you want to slice. Click-drag to splice a
whole segment. Use the Note tool to drag the note or segment to its correct place. By
selecting specific segments, you can adjust the Correction parameters of everything
within the selection, yet protect the rest of the track.
If this isn’t giving you the results you desire, you can use Line or Pencil tools to draw a
correction line which forces the pitch of an event to anything you desire. The Line and
Pencil tools will override any correction parameters and draw the curve as you design it.
After this you can still select and smooth your edit using the correction parameters.
Part 5: Vibrato Editing
Vibrato is an important part of many vocal performances. Vibrant pitch and amplitude
modulations add “feel” to a vocal take but ultimately conflict with a brute force pitch
correcting process. Tune allows you to achieve the kind of vibrato results you want by
offering two types of vibrato editing, Natural and Synthetic.
Natural Vibrato editing relies on the detection of natural vibrato in the singer’s original
take. The detection can serve two different applications:
Segmentation – In the Segmentation section at the bottom left part of the plug-in is
the Vibrato segmentation button. Turning it on will highlight the detected natural
vibrato with a red highlight. It will eliminate over-segmentation often caused by
detecting the vibrato as separate target notes. The vibrato will target it to the note
closest to the average pitch of the vibrato segment.
Manipulation (depends on previously detected vibrato) – If you have a passage
which is well sung, but you want to increase or decrease the amount of vibrato, use
the Amount control. You can adjust up to twice the original, or down to none. If you
feel the natural vibrato is not good and you want to replace it with synthetic vibrato,
you can use the Amount control to flatten the natural vibrato, making way for
synthetic vibrato in its place.
The natural vibrato attack control will define how quickly the manipulation attacks.
Synthetic Vibrato editing requires no detection other then the normal pitch detection and
can be applied over any selection using the controls at the bottom part of the vibrato
section.
The manipulations will be applied across selected segments only, so it’s important to
identify and select the part of the correction curve where you want to detect and
manipulate the vibrato.
Part 6: Additional useful features
If you’ve followed the steps in parts 1-5 of this chapter, you should have a very well tuned
track. Some of the processes may need to be repeated, either over previously
unprocessed sections, or “on top” of existing processing, to achieve perfect results.
Undo/Redo
Tune offers a multi-level Undo/Redo. Undo allows you to back-up through 32 steps of
history. You can jump to a specific point in history by clicking the Undo History pop-up
menu, next to the Undo button. Each undo will create a Redo History that will allow
stepping forward until you make a change and the Undo History is broken. In this case
the Redo button becomes grayed out and isn’t available.
Remember, in worst case you can always select the troublesome or overworked segment,
clear it then scan it again to start from the beginning.
MIDI Receive/Export
Tune allows easy use of MIDI functions such as correcting to notes that come in real time
through MIDI, or exporting a pitch curve to a MIDI file.
Receive MIDI – In this mode, Tune will “listen” for MIDI input. When Tune receives a
MIDI note, it will set that note as the target note, overriding the scale and root logic
parameters. This is useful if you prefer to “teach” Tune the correct note by playing it on a
MIDI keyboard.
Consult the user’s manual of your host application to learn how to send MIDI to a plug-in.
Export MIDI – Is located on the top left toolbar. Clicking this will prompt you for a
location and filename and will generate a standard MIDI file which you can import back
into your favorite MIDI sequencer. This will allow playing a MIDI instrument in unison
with your vocal track, for example. You can also use Export MIDI to tune the pitch of
another track against the newly exported, pitch-corrected vocal which you exported as a
MIDI file. Tune can be used as a straightforward pitch to MIDI converter.