1
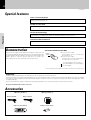
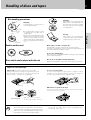
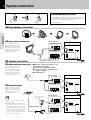
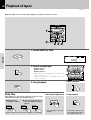
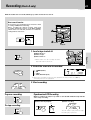
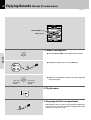
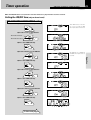
COMPACT HIFI SYSTEM
XD SERIES
XD-A3
XD-251
XD-301/XD-351
XD-371S
INSTRUCTION MANUAL
KENWOOD CORPORATION
This instruction manual is used to describe multiple models listed above.
Model availability and features (functions) may differ depending on the country and
sales area.
B60-3879-08 00 MA (K,M,T,X,Y) OC
99/12 11 10 9 8 7 6 5 4 3 2 1 98/12 11 10 9 8 7 6 5
2
Before applying power
Caution : Read this page carefully to ensure safe operation.
XD SERIES (En)
Units are designed for operation as follows.
U.S.A. and Canada ................................................. AC 120 V only
Austraria ................................................................... AC 240 V only
Europe and U.K. ...................................................... AC 230 V only
*Other countries ............... AC 110-120 /220-240 V switchable
Preparation
CH01
Safety precautions
WARNING :
TO PREVENT FIRE OR ELECTRIC SHOCK, DO NOT EXPOSE THIS APPLIANCE TO RAIN
OR MOISTURE.
CAUTION
RISK OF ELECTRIC SHOCK
DO NOT OPEN
CAUTION: TO REDUCE THE RISK OF ELECTRIC SHOCK, DO NOT REMOVE COVER
(OR BACK). NO USER-SERVICEABLE PARTS INSIDE, REFER SERVICING TO
QUALIFIED SERVICE PERSONNEL.
THE LIGHTNING FLASH WITH ARROWHEAD SYMBOL, WITHIN AN EQUILATERAL TRIANGLE, IS
INTENDED TO ALERT THE USER TO THE PRESENCE OF UNINSULATED “DANGEROUS VOLTAGE”
WITHIN THE PRODUCT’S ENCLOSURE THAT MAY BE OF SUFFICIENT MAGNITUDE TO CONSTITUTE
A RISK OF ELECTRIC SHOCK TO PERSONS.
THE EXCLAMATION POINT WITHIN AN EQUILATERAL TRIANGLE IS INTENDED TO ALERT THE USER
TO THE PRESENCE OF IMPORTANT OPERATING AND MAINTENANCE (SERVICING) INSTRUCTIONS
IN THE LITERATURE ACCOMPANYING THE APPLIANCE.
The marking of products using lasers
(Except for some areas)
CLASS 1
LASER PRODUCT
The marking is located on the rear panel and says that the component uses laser beams that have been classified as Class 1. It means
that the unit is utilizing laser beams that are of a weaker class. There
is no danger of hazardous radiation outside the unit.
3
XD SERIES (En)
Contents
Preparation
Operation
Before applying power ............................................................... 2
Let's put out some sound .......................................................... 14
Safety precautions .......................................................................................... 2
Basic use method ......................................................................................... 14
Contents ............................................................................................................ 3
Muting the sound temporarily .................................................................... 15
Special features .............................................................................................. 4
Listening through headphones ................................................................... 15
Demonstration ................................................................................................. 4
Changing the Tone ........................................................................................ 15
Playback of CDs ......................................................................... 16
Sequential playback from the first track .................................................. 16
AM loop antenna connection ....................................................................... 8
Introduction Scanning and Random Playback ........................................ 17
FM antenna connection ................................................................................. 8
Listening in the desired sequence (program playback) ........................ 18
Playback from the desired track ................................................................ 17
Repeat Playback ........................................................................................... 17
Connection of the speaker systen .............................................................. 9
To add a track to the program ..................................................................... 19
Connection of options (Optional parts) ....................................................... 9
To check the programmed tracks .............................................................. 19
Controls and indicators ............................................................. 10
To clear tracks from the program .............................................................. 19
CD unit ............................................................................................................. 10
Receiving broadcast station .................................................... 20
Receiver unit .................................................................................................. 10
Collective presetting of stations (auto preset) ........................................ 21
Cassette deck unit ........................................................................................ 11
One-by-one presetting (manual preset) .................................................... 21
Display ............................................................................................................ 11
CHANNEL SPACE setting ............................................................................. 13
Playback of tapes....................................................................... 22
Recording (Deck A only) ........................................................... 23
Enjoying Karaoke ....................................................................... 24
Timer operation .......................................................................... 25
Setting the Present Time ............................................................................. 13
Setting the ON/OFF time .............................................................................. 25
Operation of remote control unit ............................................. 12
Preparation .................................................................................. 13
Playback start by timer/timer setting confirmation ............................... 26
Use of the Sleep Timer ................................................................................. 26
Knowledge
Important Items........................................................................... 27
In case of difficulty .................................................................... 28
Specifications............................................................................. 31
Preparation
Accessories ..................................................................................................... 4
IMPORTANT SAFEGUARDS ........................................................ 5
Handling of discs and tapes ...................................................... 7
system connection ....................................................................... 8
4
XD SERIES (En)
Special features
3-Disc carousel CD player
Tree discs can be set. There are various ways for enjoyment at the time of program play back, repeat
playback, random playback, etc.
Double cassette deck
Two tape decks are installed, permitting dubbing from tape to tape and relay playback.
Various Sound Settings
Preparation
The desired sound type can be selected according to the music being played.
Popular (POP), rock (ROCK), jazz (JAZZ), and extra bass (EX.BASS) can be selected.
Convenient Timer Functions
An ON/OFF timer for listening at the same time each day and a sleep timer are provided.
Demonstration
Cancellation of Demonstration Mode
When the power supply is restored after a power failure or the power cord
is unplugged and plugged in again during use, this unit automatically starts
the demonstration function (display only), During the demonstration, the
display changes in sequence but the audio does not change. The
demonstration can be canceled with the following procedure.
DISPLAY
/DEMO
When the power is OFF:
Demonstration mode is cancelled by
pressing this key.
When the power is ON:
Switching as shown below takes place
each time this key is pressed.
1 Demonstration mode (execution)
2 Normal display (CD or tuner display)
3 Time display
÷ The setting is remembered even when the power is switched off.
Unpacking
Unpack the unit carefully and make sure that all accessories are put aside so they will not be lost.
Examine the unit for any possibility of shipping damage. If your unit is damaged or fails to operate, notify your dealer immediately. If your unit was shipped
to you directly, notify the shipping company without delay. Only the consignee (the person or company receiving the unit) can file a claim against the carrier
for shipping damage.
We recommend that you retain the original carton and packing materials for use should you transport or ship the unit in the future.
Keep this manual handy for future reference.
Accessories
FM indoor antenna (1)
Europe and U.K.
AM loop antenna (1)
Other countries
CD/TUNER
Remote control unit (1)
Remote control unit (1)
IMPORTANT SAFEGUARDS
Caution : Read this page carefully
to ensure safe operation.
5
XD SERIES (En)
Preparation
6
Preparation
XD SERIES (En)
,,,,,,,
,, ,,,,
,,,,
,,,,
,,
,,,,,
,,
,,,,
,,,,
,,,,,
,,,,
,,
,,
,,,,
,,,,,
,,,,
,,
,
,,
,
,,,,
,,,,,
,,,,
,,
,,,,,,,,,,
,,
,,,,
,
,,,,
,
,,,,,,,,,
,,,,,,,,,
,,,,,,,,,
,,,,,,,,,
,,,
,,,,,,,,,
,,,
,,,,,,,,,
,,,
,,,,,,,,,
,,,
Handling of discs and tapes
7
XD SERIES (En)
Disc handling precautions
Cleaning
If fingerprints or foreign matter become
attached to the disc, lightly wipe the
disc with a soft cotton cloth (or similar)
from the center of the disc outwards,
in a radial manner.
Handling
Hold compact discs so that you do not
touch the playing surface.
Label side
Sticker
Playing
side
Caution on disc used
Storage
When a disc is not to be played for a
long period of time, remove it from the
CD player and store it in its case.
Never play a cracked or warped disc.
During playback, the disc rotates at high speed in the player.
Therefore, to avoid danger, never use a cracked or deformed disc or a
disc repaired with tape or adhesive agent.
Do not use cleaning discs.
Please do not use commercially available cleaning discs, they may damage the internal mechanism.
Discs which can be played with this unit
CD (12 cm, 8 cm), CDV (only the audio part)
÷ With CD-G (CD Graphics) discs, this unit can play only the audio.
Notes on cassette tape
Safety tab (accidental erasure prevention tab)
After an important recording has been finished, break
the safety tab, to prevent the recorded contents from
being erased or recorded on accidentally.
To store cassette tapes
Do not store the tapes in a place which is subject to direct
sunlight, or near equipment that generates heat. Keep the
cassette tapes away from any magnetic field.
N
S
For A side
For B side
When there is slack in the tape
In such a case, insert a pencil into the reel hole and wind the
reel hub to remove the slack.
To re-record
Note
Apply tape only to the position
where the tab has been removed.
1. Longer tape than 110 minutes cassette tape
Since longer tape than 110 minutes cassette tape is
very thin, the tape could adhere to the pinch roller or be
easily cut. It is recommended that these tapes not be
used with this unit to prevent possible damage.
2. Endless tapes
Do not use an endless tape, as this could damage the
mechanism of the unit.
Preparation
Sticky paste
÷ Do not attach paper or tape to either
the playing side or the label side of
compact discs.
÷ The paste left on the label surface after
a sticker has been peeled off is a factor
which may cause malfunction. If the
surface is sticky due to remaining paste,
be sure to clean it with alcohole before
use.
System connection
8
XD SERIES (En)
1
2
3
Caution regarding placement
To maintain proper ventilation, be sure to leave a space around
the unit (from the largest outer dimensions including projections) equal to, or greater than, shown below.
Rear panel: 10 cm
Preparation
AM loop antenna connection
AM loop antenna connection
Europe and U.K.
ANTENNA
The supplied antenna is for
indoor use. Place it as far as
possible from the main system, TV set, speaker cords
and power cord, and set it to
a direction which provides
the best reception.
FM 75 Ω
AM
SUPER
WOOFER
PRE OUT
ANTENNA
FM 75 Ω
GND
AM
AUX INPUT
R
L
GND
AC 110 –120V
AC 220 –240V
AC 110 –120V
AC 220 –240V
AC 110 –120V
AC 220 –240V
Other countries
1
ANTENNA
2
BEAT
CANCEL
SPEAKERS
(6–16 Ω)
FM 75 Ω
AM
+
L
–
–
R
+
GND
FM antenna connection
FM indoor antenna connection
The accessory antenna is for
temporary indoor use only.
For stable signal reception
we recommend using an
outdoor antenna. Remove
the indoor antenna if you
connect one outdoors.
1 Strip the coating from the tip of cord
and twist the conductor.
2 Connect to the antenna terminal.
3 Locate the position providing good
reception condition.
4 Fix the antenna.
Europe and U.K.
ANTENNA
FM 75 Ω
AM
ANTENNA
GND
FM 75 Ω
AM
GND
Other countries
FM outdoor antenna
ANTENNA
Note
•
•
Never short-circuit the + and –
speaker cords.
If the left and right speakers are
connected inversely or if the
speaker cords are connected with
reversed polarity, the sound becomes unnatural with ambiguous
acoustic image positioning. Be
sure to connect the speakers and
speaker cords correctly.
R
1
2
L
BEAT
CANCEL
SPEAKERS
(6–16 Ω)
FM 75 Ω
Lead the 75W coaxial
cable connected to the FM
outdoor antenna into the
room and connect it to the
FM 75W termimal.
AUX
INPUT
AM
+
L
–
–
R
+
GND
Antenna adapter
(optional)
Europe and U.K.
ANTENNA
FM 75 Ω
AM
ANTENNA
FM 75 Ω
GND
AM
GND
Other countries
AUX
INPUT
R
1
ANTENNA
2
SPEAKERS
(6–16 Ω)
FM 75 Ω
AM
+
L
–
10mm 10mm
–
R
+
GND
L
BEAT
CANCEL
System connection
9
XD SERIES (En)
Do not plug the power cord into the power outlet until all of the
required connections have been made.
Connection of the speaker systen
ANTENNA
FM 75 Ω
AM
GND
AC 110 –120V
AC 220 –240V
AUX
INPUT
R
1
2
L
BEAT
CANCEL
SPEAKERS
(6–16 Ω)
Speaker front view (the front
net can not be removed)
+
L
–
Connect only provided main unit.
–
R
+
Connection of options (Optional parts)
Connect separately sold parts as shown in the figure.
Do not plug the power cord into the power outlet until all of the
required connections have been made.
SUPER WOOFER
Only XD-A3
SUPER
WOOFER
PRE OUT
ANTENNA
AUX INPUT
SUPER
WOOFER
PRE OUT
FM 75 Ω
AM
AUX INPUT
R
R
L
1
2
MD PLAYER
BEAT
CANCEL
SPEAKERS
(6–16 Ω)
Audio output
+
L
–
–
R
+
L
GND
Preparation
+
L
–
–
R
+
10
Controls and indicators
XD SERIES (En)
CD unit
1
4
2
¢
3
DISC 1
DISC
SKIP
DISC 2
4 5 6
0
DISC 3
7
6
Preparation
7
1 Skip (4, ¢) keys
&
2 DISC SKIP key
&
Used to skip discs.
3 Disc selection keys
&
The disc number is selected directly and playback starts.
4 OPEN/CLOSE (0) key
The disc tray is opened and closed.
5 Stop (7) key
6 Play/pause (6) key
7 Disc tray
Three discs can be stored.
^
^
^
^
Receiver unit
∞
¢ £
UP
8
9
0
ON/STANDBY
STANDBY
DOWN
TIMER
MANUAL
PRESET
AUTO/MONO
TIMER SET
!
AUTO
PRESET
T
TUNING
DISPLAY
/DEMO
BAND
EX.BASS
MIC VOLUME
MIN.
¡
FLA
CK
RO
MIC 1
@
™
INPUT
PHONES
CLOCK
PO
MAX.
P
ZZ
JA
MIC 2
^
#$ %
8 ON/STANDBY (
) key
$
9 INPUT key
$
Key for input switching.
0 TIMER key
§
Key for timer START/STOP switching.
! MIC 1/MIC 2 jack (except for some areas)
¢
@ MIC VOLUME knob (except for some areas)
¢
# TIMER SET key
∞
Used for setting the timer ON/OFF time.
$ CLOCK key
#
Used to set the present time.
% DISPLAY/DEMO key
4%
Switches the display contents.
*Used for demonstration (DEMO) ON/OFF.
^ AUTO/MONO key
)
Switches the tuning mode.
& MANUAL PRESET key
¡
Used to memorize broadcasting stations in the desired order.
* BAND key
)
Press to switch the receiving band.
&
* (
)
( TUNING/
keys
#)∞
Used for tuning to broadcasting stations and for time settings.
) PHONES terminal
%
For connection of a headphone (optional).
¡ AUTO PRESET key
¡
Used for automatic presetting of broadcasting stations.0
™ VOLUME CONTROL knob
$
This is used for volume adjustment.
£ Sound selection keys
%
Used to select the desired sound type.
FLAT
: For listening without changing the sound.
JAZZ
: A sound quality curve suitable for jazz.
POP
: A sound quality curve suitable for popular
music.
ROCK
: A sound quality curve suitable for rock-and-roll.
EX.BASS : For listening with abundant bass. (Can be used
together with other sound selection keys.)
¢ Display
!%
∞ STANDBY indicator (Except for some areas)
Controls and indicators
11
XD SERIES (En)
Cassette deck unit
1
A
!
RECORDING/ PLAYBACK
¶
3
1
¡
7/0
4
8
3
5 6
1
7
¡
8
7/0
B
8
Preparation
2 3
PLAY BACK
9 0
B deck
A deck
1 Cassette holder
Press the § key to remove and insert the tape.
2 REC (¶)key
3 Play (3) key
4 Fast forward and rewind (1, ¡) keys
5 Stop/Eject (§) key
6 Pause (8) key
7 Play (3) key
8 Fast forward and rewind (1, ¡) keys
9 Stop/Eject (§) key
0 Pause (8) key
! Cassette holder
Press the § key to remove and insert the tape.
™
£
™
™
™
™
Display
#
!
@
1
9
8
7
5
0
MEMORY PROGRAM STEREO
PRESET REPEAT 1 AUTO
AUTO PAUSE
ALL DISC
RANDOM
FLAT
MEMORY STOP P.B.C
AUTO
DISC
6
TIMER
SLEEP
EX.BASS
PRESET EQ
ROCK
POP
JAZZ
PAL
NTSC
L
4
R
kHz
MHz
3
2
1 Disc display
When CD is selected, the numbers for which a disc has been
set light.
2 Letter and number display
Title number, playback time, present time, etc. are displayed.
3 Reception frequency unit indication (kHz/MHz)
4 Sound selection indication
5 Extra bass (EX.BASS) indication
6 Sleep timer (SLEEP) indication
7 Timer (TIMER) indication
8 STEREO/AUTO indication
Indication of the reception mode for stereo broadcasts
9 PROGRAM indication
Lights at the time of program mode.
0 Repeat/Random mode indication
! MEMORY indication
Shows when a broadcasting station is memorized.
@ PRESET indication
# Playback (£), Pause (8) indication
™
™
™
™
™
12
Operation of remote control unit
XD SERIES (En)
The keys on the remote control unit with the same names as on the main
unit have the same function as the keys on the main unit.
POWER
1
SLEEP/
OPEN/CLOSE CLOCK LIGHT
2
0
DISPLAY
EQ
EX.BASS
CLEAR
CHECK
P.MODE
RANDOM
REPEAT
DISC SKIP
3
!
4
Preparation
5
1 TUNING ¡
6
CD/TUNER
BAND
4 P.CALL ¢
7
6
@
#
$
%
7
INPUT
8
VOLUME
^
MUTE
9
0 SLEEP/CLOCK LIGHT key
When the power is ON :
key for setting the sleep timer
§
When the power is OFF :
The display light lights %
! EQ key
%
Switching between FLAT/JAZZ/
POP/ROCK
EX.BASS key
%
@ DISC SKIP key
&
# TUNING (1, ¡) keys
&)
Used for reception frequency tuning and as CD skip and search keys.
$ P.CALL (4, ¢) keys
*)
Used to call preset broadcasting
stations and as CD skip keys.
% (CD) Play/pause (6) key^
^ (CD) Stop (7) key
^
& VOLUME key
$
) key
$
1 POWER (
Power ON/OFF switching is executed.
2 OPEN/CLOSE (0) key
^
The disc tray is opened and closed.
3 DISPLAY (DEMO) key
4%
4 CD program-related keys
*(
CLEAR key/CHECK key/Program
mode (P.MODE) key
5 RANDOM key
&
Used for CD random playback.
6 REPEAT key
&
Used for CD repeat playback.
7 BAND key
)
8 INPUT key
$
9 MUTE key
%
Used for temporary muting.
&
Loading batteries
1 Remove the cover.
2 Insert batteries.
3 Close the cover.
1
2
÷ Insert two R6 (“AA”-size) batteries
following the polarity indications.
Operation
Plug the power cord into the mains power outlet and press the
on/standby (
POWER) key of the remote control unit to
turn power ON. After the power has been turned ON, press the
desired key.
To turn power off, press the on/standby (
POWER) key
again. The system enters the standby mode in which only the
time display is lit.
÷ When pressing more than one remote control keys successively,
press the keys securely by leaving an interval of 1 second or more
between keys.
Notes
Remote sensor
6m
30°
30°
Operating range (approx.)
1. The provided batteries are intended for use in operation checking, and their service life may be short.
2. When the remote controllable distance becomes short, replace both of the batteries with new ones.
3. If direct sunlight or the light of a high- frequency fluorescent lamp (inverter type, etc.) is incident to the remote sensor, malfunction
may occur. In such a case, change the installation position to avoid malfunction.
Preparation
13
XD SERIES (En)
CHANNEL SPACE setting
(Except for the U.S.A., Canada, U.K. Europe and Australia)
The space between radio channels has been set to the one that
prevails in the area to which the system is shipped. However, if the
current channel space setting does not match the setting in the
area where the system is to be used, for instance when you move
from area 1 or area 2 shown in the following table or vice versa,
proper reception of AM/FM (SW/MW/FM) broadcasts cannot be
expected. In this case, change the channel space setting in
accordance with your area by referring to the following table.
CHANNEL
SPACE freq.
Area
USA, Canada and South
American countries
FM : 100 kHz
AM : 10 kHz
2
Other countries
FM : 50 kHz
AM : 9 kHz
ON/STANDBY
2 Press the TUNING (%) key.
TUNING
Each press switches the space frequency alternately.
1 “50/9 ” .......... FM 50 MHz/AM 9 kHz STEP
2 “ 100/10 ” ..... FM 100 MHz/AM 10 kHz STEP
Preparation
1
1 Turn power off.
3 Establish the selection. (Press the BAND key.)
Setting the Present Time
Set the present time after the AC cable has been connected to a receptacle. (In case of demonstration mode, first cancel the
demonstration mode. )
The timer will not operate correctly when the present
time is not correct.
1. Press the CLOCK key.
÷ When the power is OFF,
it is switched ON when
the CLOCK key is pressed.
TIMER SET
MEMORY PROGRAM STEREO
PRESET REPEAT 1 AUTO
AUTO PAUSE
ALL DISC
RANDOM
FLAT
MEMORY STOP P.B.C
AUTO
DISC
TIMER
SLEEP
EX.BASS
PRESET EQ
ROCK
POP
JAZZ
PAL
NTSC
R
kHz
MHz
CLOCK
2. Use the TUNING keys to set the hours.
TUNING
The "hour" unit increases.
L
The "hour" unit decreases.
÷ When the key is kept
pressed, the numbers
will start to change faster
after a little time.
÷ After AM, the indication
switches to PM.
MEMORY PROGRAM STEREO
PRESET REPEAT 1 AUTO
AUTO PAUSE
ALL DISC
RANDOM
FLAT
MEMORY STOP P.B.C
AUTO
DISC
TIMER
SLEEP
EX.BASS
PRESET EQ
ROCK
POP
JAZZ
PAL
NTSC
L
R
kHz
MHz
3. Press the CLOCK key.
TIMER SET
MEMORY PROGRAM STEREO
PRESET REPEAT 1 AUTO
AUTO PAUSE
ALL DISC
RANDOM
FLAT
MEMORY STOP P.B.C
AUTO
DISC
TIMER
SLEEP
EX.BASS
PRESET EQ
ROCK
POP
JAZZ
PAL
NTSC
L
R
kHz
MHz
CLOCK
4. Use the TUNING keys to set the minutes.
TUNING
The "minute" unit increases.
MEMORY PROGRAM STEREO
PRESET REPEAT 1 AUTO
AUTO PAUSE
ALL DISC
RANDOM
FLAT
MEMORY STOP P.B.C
AUTO
DISC
TIMER
SLEEP
EX.BASS
PRESET EQ
ROCK
POP
JAZZ
PAL
NTSC
L
R
kHz
MHz
The "minute" unit decreases.
5. Press the CLOCK key.
TIMER SET
÷ The normal display (CD
or tuner display) appears.
MEMORY PROGRAM STEREO
PRESET REPEAT 1 AUTO
AUTO PAUSE
ALL DISC
RANDOM
DISC
CLOCK
MEMORY STOP P.B.C
TIMER
FLAT
SLEEP
EX.BASS
PRESET EQ
ROCK
POP
JAZZ
L
R
14
Let's put out some sound
XD SERIES (En)
Basic use method
4
1
7
6
1
2
CD/TUNER
2
0
¢
3
3
¶
3
1
¡
7/0
8
3
1
¡
7/0
8
1. Switching the power ON (OFF)
Operation
ON/STANDBY
The power can also be turned ON by pressing the play key of the CD player, or the
BAND key of the tuner.
When the ON/STANDBY key is pressed while the power is ON, the power will be
switched OFF.
2. Selecting the desired output
1
2
3
4
TUNER (Radio)
CD
TAPE
AUX (External input)
When CD has been selected.
MEMORY PROGRAM STEREO
PRESET REPEAT 1 AUTO
AUTO PAUSE
ALL DISC
RANDOM
DISC
MEMORY STOP P.B.C
TIMER
FLAT
AUTO
SLEEP
EX.BASS
PRESET EQ
ROCK
POP
JAZZ
PAL
NTSC
L
R
kHz
MHz
INPUT
÷ When CD is selected, playback will start when a
disc already has been inserted into deck B.
3. Volume adjustment
UP
To increase
volume
Volume display
MEMORY PROGRAM STEREO
PRESET REPEAT 1 AUTO
AUTO PAUSE
ALL DISC
RANDOM
FLAT
MEMORY STOP P.B.C
AUTO
DISC
DOWN
To decrease
volume
TIMER
SLEEP
EX.BASS
PRESET EQ
ROCK
POP
JAZZ
PAL
NTSC
L
R
kHz
MHz
15
XD SERIES (En)
Muting the sound temporarily (Remote control unit only)
MUTE
MORY PROGRAM STEREO
ESET REPEAT 1 AUTO
AUSE
ALL DISC
RANDOM
FLAT
TIMER
MEMORY STOP P.B.C
AUTO
SLEEP
EX.BASS
PRESET EQ
ROCK
POP
JAZZ
PAL
NTSC
L
STANDBY mode of ON/STANDBY (
) switch
R
kHz
MHz
Blinks
÷ Press again to resume the original volume.
÷ The sound muting is also canceled when the volume is controlled.
When the power cable plug of this unit is inserted into a
receptacle, a minute current flows for memory
protection.This status is referred to as the STANDBY mode,
and the unit in the STANDBY mode can be turned ON from
the remote control unit.
Listening through headphones
Insert the headphone plug into the PHONES jack.
For better visibility of the time display during
power OFF
SLEEP/
CLOCK LIGHT
[Remote control]
PHONES
When the SLEEP/CLOCK LIGHT key is pressed while the power is
OFF, the backlight lights for about 10 seconds.
÷ The sounds from all speakers are cut off.
Changing the Tone
Display Switching
The factory setting is ON.
When the power is ON, the display indication can be
switched.
FLA
CK
EX.BASS
PO
DISPLAY
/DEMO
Lit
T
RO
REO
O
DOM
TIMER
FLAT
B.C
AUTO
SLEEP
EX.BASS
PRESET EQ
ROCK
POP
JAZZ
PAL
NTSC
L
R
Z
Z
JA
P
÷ Switching between ON and OFF
each time the key is pressed.
During CD Playback
Each time the DISPLAY/DEMO key (the DISPLAY key in case of
remote control) is pressed, the indication changes as shown below.
Selecting the Desired Tone
Operation on the unit
Remote control operation
FLA
CK
T
RO
EQ
EX.BASS
PO
P
1 Number of the disc being played/title No./elapsed
time
2 Number of the disc being played/title No./remaining
time of the title
3 Number of the disc being played/title No./*remaining
time of the disc
4 Present time (return to 1 after several seconds)
ZZ
JA
*During REPEAT playback and RANDOM playback, the
remaining disc time is not displayed.
÷ The sound of the pressed
key is selected.
÷ Press FLAT to cancel the
selection.
The sound is switched as
shown below each time
the key is pressed.
1
2
3
4
O
TIMER
M
FLAT
C
AUTO
SLEEP
EX.BASS
PRESET EQ
ROCK
POP
JAZZ
PAL
NTSC
L
ROCK
POP
JAZZ
FLAT (cancelled)
Simultaneous use with
EX.BASS is possible.
R
A frame is shown for the
selected sound.
Other than During CD Playback
Each time the DISPLAY/DEMO key (the DISPLAY key in case of
remote control) is pressed, the indication changes as shown
below.
1 Normal display (TAPE/AUX/TUNER indication etc.)
2 Present time (return to 1 after several seconds)
Operation
Extra Bass
16
Playback of CDs
Sequential playback
from the first track
XD SERIES (En)
If a disc has already been loaded in the CD player and the
power is OFF, simply pressing the CD play key turns power
automatically ON and starts playback.
1
1 2
4
CD/TUNER
0
¢
7
6
2
¶
3
1
¡
7/0
8
3
1
¡
7/0
8
1. Load a disc.
Operation
0
The label must be on top.
1 Open the tray.
2 Place a disc.
3 Close the tray.
The tray opens when the key is pressed
and closes when the key is pressed again.
Disc number
1
2
÷ Do not touch the played side of disc.
÷ Set the disc correctly according to the tray groove.
(Diagonal setting of a disc can cause trouble.)
2. Start playback.
6
Track number
MEMORY PROGRAM STEREO
PRESET REPEAT 1 AUTO
AUTO PAUSE
ALL DISC
RANDOM
Lights when a disc is inserted at
the time of playback.
DISC
MEMORY STOP P.B.C
SLEEP
EX.BASS
PRESET EQ
ROCK
POP
JAZZ
PAL
7
÷ Each press pauses and plays the CD alternately.
Caution for Disc Handling
Do not use a disc with exposed adhesive from attached
cellophane or a rental CD seal, or from which such a seal etc.
has been removed. When such a disc is played, removal may
become impossible, and trouble can be caused.
L
Playback
elapsed time
To stop playback
6
NTSC
R
kHz
MHz
The selected disc
is indicated.
To pause playback
TIMER
FLAT
AUTO
CAUTION
Do not look into the laser light.
Laser light getting into your eyes can impair your vision.
Playback of CDs (Application)
XD SERIES (En)
Playback from the desired track
Skipping tracks
17
Skipping to a Different Disc
4
To skip backward
(Only at the main unit)
¢
To skip forward
DISC 1
DISC
SKIP
DISC 2
DISC 3
Pressing the 4 key once returns to the begining of the track being
played.
High-speed search in forward and reverse directions
(Remote control unit only)
1 TUNING ¡
Backward search
Forward search
÷ Each time this key is
pressed, the unit skips
to the next disc and
playback starts.
÷ When no disc is set in a
tray, the unit skips to
the next tray.
÷ Playback starts from the
selected disc.
÷ When no disc is set in a tray,
the unit skips to the next
tray.
÷ Playback starts from the position where the key is released.
Repeat Playback (only from the remote control)
Introduction Scanning and Random Playback
Any title or disc can be played repeatedly.
Introduction Scanning:
Press the REPEAT key on the remote control.
Random Playback:
As the titles each time are selected at random,
the enjoyment is always new.
REPEAT
Set the input selection to "CD".
The mode is switched as shown below each time the key is
pressed.
1 REPEAT
(Only the selected title will be repeated.)
2 DISC REPEAT
(The entire selected disc will be repeated.)
3 ALL REPEAT
(All discs will be repeated.)
4 Cancel (REPEAT goes out.)
MORY PROGRAM STE
ESET REPEAT 1 AU
AUSE
ALL DISC RAN
MEMORY STOP
1 REPEAT
lights.
ORY PROGRAM STER
SET REPEAT 1 AUT
USE
ALL DISC RAND
EMORY PROGRAM STE
RESET REPEAT 1 AUT
AUSE
ALL DISC RAN
MEMORY STOP P
MEMORY STOP P
2 DISC REPEAT
lights.
Press the RANDOM key on the remote control.
The mode is switched as shown below each time
the key is pressed.
1 Introduction scanning
(The beginning of each title will be
played for about 10 seconds.)
2 DISC RANDOM
(All titles of the selected disc will be
played in random sequence.)
3 ALL RANDOM
(The titles of all discs will be played in
random sequence.)
4 Cancel (RANDOM goes out)
RANDOM
RY PROGRAM STE
ET REPEAT 1 AU
E
ALL DISC RAN
MEMORY STOP
3 ALL REPEAT 4 The indication
lights.
goes out.
Program repeat playback
÷ When "PROGRAM" is lit, the programmed titles will be
repeated.
Random repeat playback
÷ During DISC RANDOM playback, random playback of that disc
will be repeated.
÷ During ALL RANDOM playback, random playback of all discs
will be repeated.
MEMORY PROGRAM STEREO
PRESET REPEAT 1 AUTO
AUTO PAUSE
ALL DISC RANDOM
FLAT
MEMORY STOP P.B.C
AUTO
DISC
TIMER
1 During introduction
scanning, the
respective title
number flashes.
PROGRAM STEREO
REPEAT 1 AUTO
ALL DISC RANDOM
FLAT
TIME
MEMORY STOP P.B.C
AUTO
2 “DISC RANDOM”
is lit.
RY PROGRAM STEREO
ET REPEAT 1 AUTO
SE
ALL DISC RANDOM
MEMORY STOP P.B.C
A
3 “ALL RANDOM”
is lit.
During introduction scanning
÷ The RANDOM key does not function when "PROGRAM" is lit.
Press the P.MODE key on the remote control to extinguish
"PROGRAM".
÷ During introduction scanning, repeat playback is possible for
all discs.
Cancellation of introduction scanning/random playback
Cancellation of Repeat Playback
÷ Press the RANDOM key repeatedly until the "RANDOM"
indication goes out.
÷ Press the REPEAT key repeatedly, until the "REPEAT" indication
goes out.
Operation
The beginning of each title on the CD will be played
one after another for about 10 seconds each.
This is convenient to find a title by listening to the
introductions.
Set the input selection to "CD".
18
XD SERIES (En)
Listening in the desired sequence (program playback)
Any titles on the discs in the tray can be listened to in the desired sequence. (Max. 32 titles)
1
4
CD/TUNER
2
3
Preparation
÷ Insert a CD.
÷ Set to stop mode.
1. Press the P.MODE key
÷ Program mode is reached.
Lit
Operation
P.MODE
MEMORY PROGRAM STEREO
PRESET REPEAT 1 AUTO
AUTO PAUSE
ALL DISC
RANDOM
FLAT
MEMORY STOP P.B.C
AUTO
DISC
TIMER
SLEEP
EX.BASS
PRESET EQ
ROCK
POP
JAZZ
PAL
NTSC
L
R
kHz
MHz
2. Select the disc.
DISC SKIP
MEMORY PROGRAM STEREO
PRESET REPEAT 1 AUTO
AUTO PAUSE
ALL DISC
RANDOM
FLAT
MEMORY STOP P.B.C
AUTO
DISC
TIMER
SLEEP
EX.BASS
PRESET EQ
ROCK
POP
JAZZ
PAL
NTSC
L
R
kHz
MHz
Select the disc
Track No.
Program No,
3. Select the track.
4 P.CALL ¢
MEMORY PROGRAM STEREO
PRESET REPEAT 1 AUTO
AUTO PAUSE
ALL DISC
RANDOM
FLAT
MEMORY STOP P.B.C
AUTO
DISC
TIMER
SLEEP
EX.BASS
PRESET EQ
ROCK
POP
JAZZ
PAL
NTSC
L
R
kHz
MHz
Select the track
4. Press the P.MODE key
÷ The program No. and the title number
are memorized.
P.MODE
MEMORY PROGRAM STEREO
PRESET REPEAT 1 AUTO
AUTO PAUSE
ALL DISC
RANDOM
DISC
MEMORY STOP P.B.C
TIMER
FLAT
AUTO
SLEEP
EX.BASS
PRESET EQ
ROCK
POP
JAZZ
PAL
NTSC
L
R
kHz
MHz
To select other tracks, repeat steps 2
to 4 for each of the additional tracks.
÷ The program No. automatically is incremented by one.
÷ When the same disc No. is to be entered, step 2 can be skipped.
÷ Up to 32 tracks can be programmed. When “FULL” is displayed, no more tracks can be
programmed.
19
XD SERIES (En)
Start playback
6
÷ When the 4 or the ¢ key is pressed during playback, the unit
skips to the preceding or the next program title.
÷ When the 4 key is pressed once during playback, return is made to
the beginning of the title being played.
CD/TUNER
To stop playback
7
CD/TUNER
To add a track to the program
(Operation in stopped condition)
To clear tracks from the program
(Operation in stopped condition)
Press to clear tracks from the end.
CLEAR
DISC SKIP
CD/TUNER
CD/TUNER
÷ Each time the key is pressed, the
last track in the program is cleared.
2 Select the track.
4 P.CALL ¢
To clear all tracks.
CD/TUNER
P.MODE
3 Press the P.MODE key
P.MODE
CD/TUNER
÷ The added track number is added to
the end of the existing program.
To check the programmed tracks
(Operation in stopped condition)
CHECK
CD/TUNER
÷ The program contents are shown
each time the key is pressed.
CD/TUNER
÷ The "PROGRAM" indication
goes out.
Operation
1 Select the disc.
20
Receiving broadcast station
XD SERIES (En)
It is also possible to receive them by one-touch operations by
storing up to 30 stations in the preset memory.
When the BAND key is pressed, this unit will be
switched on automatically.
Select the tuning
mode
4
2
1
0
¢
7
6
1
2
2
CD/TUNER
¶
3
1
¡
7/0
8
3
1
¡
7/0
8
1. Select the broadcast band.
Operation
BAND
Each press changes the band.
1 FM
1 FM
or
2 MW (AM)
2 AM
3 LW
Example when an FM station is received
MEMORY PROGRAM STEREO
PRESET REPEAT 1 AUTO
AUTO PAUSE
ALL DISC
RANDOM
DISC
or
MEMORY STOP P.B.C
1 FM
2 MW (AM)
3 SW
TIMER
FLAT
AUTO
SLEEP
EX.BASS
PRESET EQ
ROCK
POP
JAZZ
PAL
L
NTSC
R
kHz
MHz
Frequency display
2. Select a station.
To increase
frequency
When no stations have been memorized
TUNING
To decrease
frequency
Auto tuning
: Each press receives the next station.
Manual tuning : Press the key repeatedly or hold it depressed until a station is
received.
Lights during stereo reception
PRESET indicator
MEMORY PROGRAM STEREO
PRESET REPEAT 1 AUTO
AUTO PAUSE
ALL DISC
RANDOM
DISC
MEMORY STOP P.B.C
TIMER
FLAT
AUTO
SLEEP
EX.BASS
PRESET EQ
ROCK
POP
JAZZ
PAL
NTSC
L
R
kHz
MHz
Lights during auto tuning.
Remote control only
4 P.CALL ¢
When stations have been memorized (preset call)
Every time the key is pressed, the preset stations are switched over as follows.
Press ¢
Press 4
for the order of 1=2=3 ... 29=30=1...
for the order of 30=29=28 ... 2=1=30...
Select the tuning mode.
AUTO/MONO
Each press alternates the mode.
1 “AUTO” lit (Auto tuning)
2 “AUTO” not lit (Manual tuning)
Use the manual tuning mode when reception is noisy due to weak reception.
(In the manual mode, stereo broadcasts are received in monaural.)
÷ Normally, use the AUTO (Auto tuning) mode.
Receiving broadcast station
Collective presetting of stations (auto preset)
21
XD SERIES (En)
You can store up to 30 stations in the memory and recall them
with a single touch of the key.
"MEMORY" flashes during operation.
Press the AUTO PRESET key
Main unit only
MEMORY PROGRAM STEREO
PRESET REPEAT 1 AUTO
AUTO PAUSE
ALL DISC
RANDOM
FLAT
MEMORY STOP P.B.C
AUTO
DISC
TIMER
SLEEP
EX.BASS
PRESET EQ
ROCK
POP
JAZZ
PAL
L
NTSC
AUTO
PRESET
R
kHz
MHz
÷ After memorizing of the FM band, the band is switched and up to
30 stations can be memorized.
For memorizing after already stored numbers
Remote control only
Main unit only
4 P.CALL ¢
÷ On the remote control, press the P.CALL key, display the preset
number, and then press the AUTO PRESET key.
÷ Memorizing starts with the number following the one being
displayed.
AUTO
PRESET
MEMORY PROGRAM STEREO
PRESET REPEAT 1 AUTO
AUTO PAUSE
ALL DISC
RANDOM
DISC
MEMORY STOP P.B.C
TIMER
SLEEP
EX.BASS
PRESET EQ
ROCK
POP
JAZZ
FLAT
AUTO
PAL
L
NTSC
R
kHz
MHz
Preset No.
One-by-one presetting (manual preset)
Desired stations can be selected and memorized one by one.
Main unit only
Operation
1 Select a station
To increase
frequency
TUNING
MEMORY PROGRAM STEREO
PRESET REPEAT 1 AUTO
AUTO PAUSE
ALL DISC
RANDOM
FLAT
MEMORY STOP P.B.C
AUTO
DISC
TIMER
SLEEP
EX.BASS
PRESET EQ
ROCK
POP
JAZZ
PAL
NTSC
L
R
kHz
MHz
To decrease
frequency
2 Press the MANUAL PRESET key
Lit
MEMORY PROGRAM STEREO
PRESET REPEAT 1 AUTO
AUTO PAUSE
ALL DISC
RANDOM
FLAT
MEMORY STOP P.B.C
AUTO
DISC
TIMER
SLEEP
EX.BASS
PRESET EQ
ROCK
POP
JAZZ
PAL
NTSC
MANUAL
PRESET
L
R
kHz
MHz
Blinks
3 Select one of the preset numbers from 1 to 30.
The preset number
increases.
TUNING
MEMORY PROGRAM STEREO
PRESET REPEAT 1 AUTO
AUTO PAUSE
ALL DISC
RANDOM
FLAT
MEMORY STOP P.B.C
AUTO
DISC
TIMER
SLEEP
EX.BASS
PRESET EQ
ROCK
POP
JAZZ
PAL
NTSC
L
R
kHz
MHz
The preset number
decreases.
Blinks
4 Press the MANUAL PRESET key
MEMORY PROGRAM STEREO
PRESET REPEAT 1 AUTO
AUTO PAUSE
ALL DISC
RANDOM
DISC
MANUAL
PRESET
MEMORY STOP P.B.C
TIMER
FLAT
AUTO
SLEEP
EX.BASS
PRESET EQ
ROCK
POP
JAZZ
PAL
NTSC
L
R
kHz
MHz
÷ The memorization is finalized.
Repeat steps 1 to 4 to preset other stations.
22
Playback of tapes
XD SERIES (En)
With the double deck of A and B, relay playback is possible from deck B to deck A.
4
0
¢
7
6
1
¶
3
1
3
¡
7/0
8
3
1
¡
7/0
8
23 2
1. Switch INPUT to TAPE.
Operation
INPUT
MEMORY PROGRAM STEREO
PRESET REPEAT 1 AUTO
AUTO PAUSE
ALL DISC
RANDOM
FLAT
MEMORY STOP P.B.C
AUTO
DISC
TIMER
SLEEP
EX.BASS
PRESET EQ
ROCK
POP
JAZZ
PAL
NTSC
L
R
kHz
MHz
2. Load a cassette tape.
1 Open the door.
2 Insert a tape.
3 Close the door.
7/0
A
A
FLA
T
CK
RO
EX.BASS
PO
ZZ
P
÷ When side A is to be played, insert the tape with
side A to the front.
÷ When only one tape is to be played, insert it into
deck A or deck B.
JA
A
B
¶
3
1
¡
7/0
8
3
1
¡
7/0
8
To pause playback
3. Start playback.
3
8
Relay Play
To wind tape at high speed
To stop playback
After playback of deck B ends, playback of deck A can be
started automatically. (only deck B to deck A)
1 Bring deck B to
playback condition.
Deck B
3
2 Press the Play (£) key of
deck A and then the Pause
(8) key.
Deck A
¶
1
¡
7/0
Deck A
3
8
Playback of deck A starts when the playback of deck B ends.
÷ Press the 7 key to stop fast
winding.
÷ Do not take out the cassette
tape until the tape transport
has stopped completely.
Recording (Deck A only)
23
XD SERIES (En)
With the double deck of A and B, dubbing is possible from deck B to deck A.
Beat cancel function
There may be cases in which beat noise interferes with
recording of MW/LW broadcasting.
Before recording the desired program, make trial
recordings with both positions of the BEAT CANCEL
switch on the rear of the unit, and then record with the
setting with less beat noise.
FM 75 Ω
1
BEAT
CANCEL
2
4
0
¢
7
6
2
AM
GND
¶
3
1
¡
7/0
8
3
1
¡
7/0
8
1
2
3
+
–
–
+
PAUSE
1 STOP
1. Load a tape in deck A.
A
1 Open the door.
2 Insert a tape.
3 Close the door.
7/0
FLA
CK
T
RO
EX.BASS
PO
P
Operation
÷ When side A is to be recorded, insert the
tape with side A to the front.
ZZ
JA
B
A
¶
1
3
¡
7/0
8
3
1
¡
7/0
8
2. Select the source to be recorded.
1
2
3
4
INPUT
MEMORY PROGRAM STEREO
PRESET REPEAT 1 AUTO
AUTO PAUSE
ALL DISC
RANDOM
TUNER (Radio)
CD
TAPE
AUX (External input)
DISC
MEMORY STOP P.B.C
TIMER
FLAT
AUTO
SLEEP
EX.BASS
PRESET EQ
ROCK
POP
JAZZ
PAL
NTSC
L
R
kHz
MHz
When CD has been selected.
÷ When there is already a CD in the tray, playback will start, and the stop (7) key
should be pressed to stop playback.
3. Start recording.
¶
3
To pause recording
8
Synchronized CD Recording
When recording from a CD, it is possible to start the CD simultaneously with the
start of tape recording.
1 Pause the CD playback.
2 Start recording.
Lit
To stop recording
6
¶
3
MEMO
PRES
AUTO PAU
DISC
7/0
The CD starts to play when the tape
Recording key is pressed.
24
Enjoying Karaoke (Except for some areas)
XD SERIES (En)
MIC VOLUME knob
MIC 1/2 jacks
1. Connect a microphone.
MIC VOLUME
Operation
MIN.
1 Turn the MIC VOLUME control fully counterclockwise.
MAX.
2 Plug the microphone into one of the MIC jacks.
MIC 1
MIC VOLUME
MIN.
MAX.
MIC 2
3 Adjust the volume balance between the music input and
microphone input.
MIC VOLUME
To decrease
microphone
volume
MIN.
MAX.
To increase
microphone
volume
2. Play the music.
3. Sing along with the accompaniment.
After the above steps, you can record your karaoke singing onto
a tape. However, note that the karaoke singing using a tape
cannot be recorded onto a tape.
Timer operation
Adjust the clock before setting the timer.
25
XD SERIES (En)
When the ON/OFF timer is used, the CD or the tuner will start to play when the set time is reached.
Setting the ON/OFF time (only on the main unit)
First, set the volume for the timer playback. $
1 Press the TIMER SET key.
TIMER SET
MEMORY PROGRAM STEREO
PRESET REPEAT 1 AUTO
AUTO PAUSE
ALL DISC
RANDOM
FLAT
MEMORY STOP P.B.C
AUTO
DISC
TIMER
SLEEP
EX.BASS
PRESET EQ
ROCK
POP
JAZZ
PAL
NTSC
L
R
After ON has been shown
for 2 or 3 seconds, the ON
time input status is reached.
kHz
MHz
CLOCK
2 Set the "hour" for the ON time.
TUNING
The hours increase.
MEMORY PROGRAM STEREO
PRESET REPEAT 1 AUTO
AUTO PAUSE
ALL DISC
RANDOM
FLAT
MEMORY STOP P.B.C
AUTO
DISC
TIMER
SLEEP
EX.BASS
PRESET EQ
ROCK
POP
JAZZ
PAL
NTSC
The hours decrease.
L
R
kHz
MHz
3 Press the TIMER SET key.
TIMER SET
MEMORY PROGRAM STEREO
PRESET REPEAT 1 AUTO
AUTO PAUSE
ALL DISC
RANDOM
FLAT
MEMORY STOP P.B.C
AUTO
DISC
TIMER
SLEEP
EX.BASS
PRESET EQ
ROCK
POP
JAZZ
PAL
NTSC
L
R
kHz
MHz
CLOCK
4 Set the "minutes" for the ON time.
TUNING
MEMORY PROGRAM STEREO
PRESET REPEAT 1 AUTO
AUTO PAUSE
ALL DISC
RANDOM
FLAT
MEMORY STOP P.B.C
AUTO
DISC
TIMER
SLEEP
EX.BASS
PRESET EQ
ROCK
POP
JAZZ
PAL
NTSC
L
R
5 Press the TIMER SET key.
MEMORY PROGRAM STEREO
PRESET REPEAT 1 AUTO
AUTO PAUSE
ALL DISC
RANDOM
TIMER SET
DISC
MEMORY STOP P.B.C
TIMER
FLAT
AUTO
SLEEP
EX.BASS
PRESET EQ
ROCK
POP
JAZZ
PAL
NTSC
L
R
kHz
MHz
CLOCK
6 Set the "hour" for the OFF time.
TUNING
MEMORY PROGRAM STEREO
PRESET REPEAT 1 AUTO
AUTO PAUSE
ALL DISC
RANDOM
FLAT
MEMORY STOP P.B.C
AUTO
DISC
TIMER
SLEEP
EX.BASS
PRESET EQ
ROCK
POP
JAZZ
PAL
NTSC
L
R
kHz
MHz
7 Press the TIMER SET key.
TIMER SET
MEMORY PROGRAM STEREO
PRESET REPEAT 1 AUTO
AUTO PAUSE
ALL DISC
RANDOM
FLAT
MEMORY STOP P.B.C
AUTO
DISC
TIMER
SLEEP
EX.BASS
PRESET EQ
ROCK
POP
JAZZ
PAL
NTSC
CLOCK
L
R
kHz
MHz
8 Set the "minutes" for the OFF time.
TUNING
MEMORY PROGRAM STEREO
PRESET REPEAT 1 AUTO
AUTO PAUSE
ALL DISC
RANDOM
FLAT
MEMORY STOP P.B.C
AUTO
DISC
TIMER
SLEEP
EX.BASS
PRESET EQ
ROCK
POP
JAZZ
PAL
NTSC
L
R
kHz
MHz
9 Press the TIMER SET key.
TIMER SET
MEMORY PROGRAM STEREO
PRESET REPEAT 1 AUTO
AUTO PAUSE
ALL DISC
RANDOM
FLAT
MEMORY STOP P.B.C
AUTO
DISC
CLOCK
To the next page.
TIMER
SLEEP
EX.BASS
PRESET EQ
ROCK
POP
JAZZ
PAL
NTSC
L
R
kHz
MHz
Operation
kHz
MHz
The ON time is established
and OFF time input mode is
reached.
26
Adjust the clock before setting the timer.
XD SERIES (En)
Select the input for the ON playback.
Perform this operation after the ON/OFF time has
been set.
1 Select the input with the TUNING
TUNING
keys.
MEMORY PROGRAM STEREO
PRESET REPEAT 1 AUTO
AUTO PAUSE
ALL DISC
RANDOM
FLAT
MEMORY STOP P.B.C
AUTO
DISC
TIMER
SLEEP
EX.BASS
PRESET EQ
ROCK
POP
JAZZ
PAL
NTSC
L
R
kHz
MHz
2 Press the TIMER SET key.
TIMER SET
MEMORY PROGRAM STEREO
PRESET REPEAT 1 AUTO
AUTO PAUSE
ALL DISC
RANDOM
FLAT
MEMORY STOP P.B.C
AUTO
DISC
TIMER
SLEEP
EX.BASS
PRESET EQ
ROCK
POP
JAZZ
PAL
NTSC
Switching is done each time
the key is pressed.
L
R
kHz
MHz
1 Tuner
2 CD
When CD has been selected,
the timer setting has been
completed and the setting
contents are displayed.
CLOCK
Only when the tuner has been selected
1 Select the preset number.
When TUNER has been selected, select the preset number of
the preset broadcasting station.
TUNING
MEMORY PROGRAM STEREO
PRESET REPEAT 1 AUTO
AUTO PAUSE
ALL DISC
RANDOM
FLAT
MEMORY STOP P.B.C
AUTO
DISC
TIMER
SLEEP
EX.BASS
PRESET EQ
ROCK
POP
JAZZ
PAL
NTSC
L
R
kHz
MHz
2 Press the TIMER SET key.
MEMORY PROGRAM STEREO
PRESET REPEAT 1 AUTO
AUTO PAUSE
ALL DISC
RANDOM
Operation
TIMER SET
DISC
MEMORY STOP P.B.C
TIMER
FLAT
AUTO
SLEEP
EX.BASS
PRESET EQ
ROCK
POP
JAZZ
PAL
NTSC
R
kHz
MHz
CLOCK
Timer setting has been completed and the setting
contents are displayed.
L
When the setting has been completed, the ON time, the OFF
time, and the setting contents (CD or tuner setting contents)
are displayed once, and then return is made to the normal
display.
Playback start by timer/timer setting confirmation (only on the main unit)
Switching is done each time the key is pressed.
1 TIMER indication
2 Not lit (cancelled)
TIMER
Lit
REO
O
DOM
FLAT
TIMER
B.C
AUTO
SLEEP
PRESET EQ
ROCK
POP
PAL
NTSC
When the timer is set, the ON time, the OFF time, and the setting
contents are displayed sequentially, and then return is made to the
normal display.
For Timer Playback Start
Switch off the power after the timer has been set.
Press the TIMER key to display "TIMER", and then switch off
the power.
÷ When the set ON time is reached, the power is switched ON and
the tuner or the CD starts to play.
Use of the Sleep Timer (only from the remote control)
When the set time has passed, the power is switched off
automatically.
Switching is done each time the key is pressed.
(90 minutes sleep timer)
SLEEP/
CLOCK LIGHT
SLEEP90 = SLEEP80
(Sleep timer cancelled)
SLEEP10 = SLEEPOF
When the set time has passed, the power is switched off
automatically.
Cancellation
Press the SLEEP/CLOCK LIGHT key repeatedly or switch
off the power.
Important Items
27
XD SERIES (En)
Maintenance
Cleaning the head section
Cleaning the heads and peripheral components
Cotton swab
Capstan
Head
For maintaining the best condition of the deck and
for longer service life, always keep the heads (recording / playback / erase), capstan and pinch roller
clean. To clean them, perform the following:
1. Open the cassette holder.
2. Using a cotton swab dipped in alcohol, clean the
head (recording / playback / erase), capstan and
pinch roller carefully.
Demagnetizing the head
When the recording / playback head is magnetized,
the sound quality will deteriorate. In such a case,
demagnetize the head using a commercially available demagnetizer (head eraser).
Pinch roller
Note
There are precisely aligned parts around the heads, including the tape guides.
When cleaning, pay special attention so as not to apply shock to them.
Maintenance of the set
In regardto contact cleaner
When the front panel or case becomes dirty, wipe with a soft, dry
cloth. Do not use thinner, benzine, alcohol, etc. for these agents may
cause discoloration.
Do not use contact cleaners because it could cause a malfunction.
Be specially careful not to use contact cleaners containing oil, for
they may deform the plastic component.
Caution on condensation
Note related to transportation and movement
(CD player)
Condensation (of dew) may occur inside the unit when there is a
great difference in temperature between this unit and the outside.
This unit may not function properly if condensation occurs. In this
case, leave the unit for a few hours with the power left ON, and
restart the poeration after the condensation has dride up.
Be specially cautious against condensatin in a following
circumsatance:
When this unit is carried from a place to another across a large
difference in temperature, when the humidity in the room where
this unit is installed increases, etc.
Before transporting or moving this unit, carry out the following
operations.
1. Turn the power ON.
2. Unload the discs
3. Close the disc tray.
4. Turn power off.
When your unit needs to be repaired, bring the entire set (Speakers
excluded) to your dealer.
Knowledge
Tape guides
28
In case of difficulty
XD SERIES (En)
What seems to be a malfunction is not always so. Before calling for service, check the following table according to the symptom
of your trouble.
Operation to reset
The microcomputer may fall into malfunction (impossibility to
operate, erroneous display, etc.) when the power cord is
unplugged while power is ON or due to an external factor. In
this case, execute the following procedure to reset the
microcomputer and return it to normal condition.
Press the "POWER" key while holding the Stop (7)
key of the CD section pressed, to switch off the
power, and then switch the power on again after a
few seconds.
÷ Please note that resetting the microcomputer clears the contents
stored in and returns and to condition when it left the factory.
Receiver, speakers
Symptom
Cause
÷ Connect properly referring to “System connection”.
÷ Switch MUTE OFF.
9
%
÷ Unplug the headphone plug.
%
÷ The speaker cords are disconnected.
÷ Connect properly referring to “System connection”.
9
Demonstration starts suddenly.
÷ The power plug was unplugged from the
outlet while the power switch was ON, or
there was a power failure.
÷ This is not malfunction. Press the DISPLAY/
DEMO key to cancel the demontration.
4
The clock display blinks
÷ There was a power failure.
÷ The power cord was unplugged from the
outlet.
÷ Adjust the present time again.
÷ Adjust the present time again.
#
#
÷ The present time has not been adjusted or
there was a power failure.
÷ The timer ON time and OFF time have not
been set.
÷ The timer execution was not set up.
÷ Adjust the present time referring to “Clock
adjustment”.
÷ Set the timer ON time and OFF time.
#
∞
÷ Execute the timer program.
§
÷ The antennas have not been connected.
÷ A proper broadcasting band has not been
selected.
÷ The frequency of the station to be received
is not tuned.
÷ Connect antennas.
÷ Select a band.
8
)
÷ Tune to the frequency of the desired station.
)
÷ Car ignition noise.
÷ Install the outdoor antenna in an apart position from the road.
÷ Switch the suspected electric appliance OFF.
÷ Install the TV or the system at an increased
distance between them.
Sound is not produced.
÷ The speaker cords are disconnected.
÷ The MUTE switch of remote control unit is
switched ON.
÷ The headphone plug is inserted into the
jack.
Sound is not produced from the left or
right speakers.
Timer operation is not possible.
Knowledge
Remedy
Radio stations cannot be received.
Noise interferes.
÷ Influence of an electric appliance.
÷ A TV set is installed near the system.
A station has been preset but it cannot
be received by pressing the P.CALL key.
÷ The frequency of the preset station is not
tunable.
÷ The preset memory has been cleared because the power cord has been unplugged
for a long period.
8
÷ Preset stations with tunable frequencies.
¡
÷ Preset stations again.
¡
In case of difficulty
29
XD SERIES (En)
Remote control unit
Symptom
Cause
Remote control operation is not possible.
÷ Batteries are exhausted.
÷ The remote control is too far away from the
system, the controlling angle is deviated or
there is an obstacle in between.
÷ There is no tape or CD set in the component
to be played.
Remedy
÷ Replace with new batteries.
÷ Operate the unit inside the remote controllable range.
÷ Set a tape or CD in the component to be
played.
@
@
^
Cassette deck
Cause
Sound cannot be produced by pressing
the play key or no operation occurs even
when an operation key is pressed.
÷ The head is dirty.
÷ The tape is wound too tight due to irregular
winding.
÷ A nonrecorded tape is played.
÷ Clean the head referring to “Maintenance”.
÷ Try another tape.
÷ The cassette holder is not closed completely.
÷ A tape is not inserted in the unit.
÷ The tape is wound too tight due to irregular
winding.
÷ The tape is fully wound to one of the reels.
÷ Close the holder completely.
™
÷ Insert a tape.
÷ Try another tape.
™
Sound is harsh or high frequencies are not
reproduced.
÷ The head is dirty.
÷ The tape is stretched or shrunk.
÷ Clean the head referring to “Maintenance”.
÷ Try another tape.
Noise is noticeable.
÷ The tape head is magnetized.
÷ Demagnetize the head referring to “Maintenance”.
÷ Install the system at a distance from other
electric appliances and TV.
÷ This unit can not play tapes recorded with
Dolby NR ON with the correct sound quality
No operation occurs even when an operation key is pressed.
÷ External noise is induced.
÷ A tape recorded with Dolby NR ON is being
played on this unit.
Sound vibrates.
Recording cannot be started by pressing
the record key.
Notes
÷ The capstans or pinch rollers are dirty.
÷ The tape is wound irregularly.
÷ The recording protect tab of the cassette
has been broken.
÷ The cassette holder is not closed completely.
÷ The tape is fully wound to one of the reels.
Remedy
¶
™
÷ Play a recorded tape.
÷ Reverse the tape insertion orientation.
÷ Clean the head referring to “Maintenance”.
÷ Wind the tape again by fast forwarding,
rewinding or playing from an end to the
other.
¶
¶
¶
™
÷ Use a cassette with an unbroken recording
protect tab or block the hole.
÷ Close the holder completely.
7
™
÷ Reverse the tape insertion orientation.
™
1. With some tapes, a squeaky noise is produced when the tape is stopped automatically. This is due to the tape protection function,
and not a malfunction.
2. Do not use longer tape than 110 minutes tapes, for the tape is too thin and gets easily tangled.
Knowledge
Symptom
30
In case of difficulty
XD SERIES (En)
CD player
Symptom
A CD is placed in the player but it cannot
be played.
Cause
÷ The disc is placed upside down.
÷ The disc position is displaced.
÷ The disc is extremely dirty.
÷ The disc is scratched.
÷ Dew is condensed on the optics lens.
Sound is not produced.
÷ The disc has not been placed.
÷ The player is not put to the play mode.
÷ The disc is extremely dirty.
÷ The disc is scratched.
Sound skips.
÷ The disc is dirty.
÷ The disc is scratched.
÷ The player is subject to vibration.
WARNING NOTICE:
Knowledge
IN MOST CASES IT IS AN INFRINGEMENT OF COPYRIGHT TO
MAKE COPIES OF TAPES OR DISCS WITHOUT THE PERMISSION
OF THE COPYRIGHT OWNERS. ANYONE WISHING TO COPY COMMERCIALLY AVAILABLE TAPES OR DISC SHOULD CONTACT THE
MECHANICAL COPYRIGHT PROTECTION SOCIETY LIMITED OR
THE PERFORMING RIGHTS SOCIETY LIMITED.
Remedy
÷ Place the disc properly, with the label side
facing upward.
÷ Place the disc properly.
÷ Clean the disc referring to “Disc handling
precautions”.
÷ Try another disc.
÷ Refer to “Caution on condensation” and
remove the condensation by evaporation.
÷ Place a disc in the CD player.
÷ Press the play key.
÷ Clean the disc referring to “Disc handling
precautions”.
÷ Try another disc.
÷ Clean the disc referring to “Disc handling
precautions”.
÷ Try another disc.
÷ Install the unit in a place not subject to
vibrations.
^
^
7
^
¶
^
^
7
^
7
Specifications
31
XD SERIES (En)
Main unit
[ Amplifier section ]
[ Cassette deck section ]
(XD-A3)
Rated power output (U.S.A. and Canada)
Track ............................................................. 4-track, 2-channel stereo
Recording system ....................................................... AC bias system
(Frequency: 105 kHz)
Heads
A deck Playback / recording head .............................................. 1
Erasing head ..................................................................... 1
B deck Playback head .................................................................. 1
Motor ................................................................................................... 1
Fast winding time ............................................. Approx. 100 seconds
(C-60 tape)
30 watts per channel minimum RMS, both channels driven, at
6 Ω form 60 Hz to 14 kHz with no more than 0.9 % total harmonic distortion.
Effective output power during STEREO operation
U.S.A. and Canada
1 kHz, 10 % T.H.D., 6 Ω ................................................... 40 W + 40 W
(XD-251/XD-301)
Effective output power during STEREO operation
1 kHz, 10 % T.H.D., 6 Ω ................................................... 40 W + 40 W
(XD-351/XD-371S)
Effective output power during STEREO operation
Europe, U.K. and Russia.
1 kHz, 10 % T.H.D., 6 Ω .................................................... 40 W + 40 W
Other countries
1 kHz, 10 % T.H.D., 6 Ω .................................................... 60 W + 60 W
Rated output power during STEREO operation
Europe, U.K. and Russia
(DIN) 1 kHz, 0.7 % T.H.D., 6 Ω ........................................ 30 W + 30 W
Other countries
1 kHz, 1.0 % T.H.D., 6 Ω ................................................... 40 W + 40 W
Input sensitivity / inpedance
AUX ........................................................................ 300 mV / 40 kΩ
(XD-351/XD-371S)
MIC 1, 2 (Except for some arears) ....................... 2.5 mV / 2.2 kΩ
Output level / impedance
(XD-A3)
SUPER WOOFER PREOUT ...................................... 1.8 V / 0.6 kΩ
[ Tuner section ]
FM tuner section
Tuning frequency range ...................................... 87.5 MHz ~ 108 MHz
(For Russia) ....................................................
87.5 MHz ~ 108 MHz
( 65.0 MHz ~ 74.0 MHz
AM (MW) Tuner section
Tuning frequency range
Europe, U.K. and Russia ...................................
U.S.A. and Canada ............................................
Other countries
9 kHz step .......................................................
10 kHz step .....................................................
531 kHz ~ 1,602 kHz
530 kHz ~ 1,700 kHz
531 kHz ~ 1,602 kHz
530 kHz ~ 1,610 kHz
LW Tuner section (For U. K.)
Tuning frequency range ......................................... 153 kHz ~ 279 kHz
SW Tuner section (XD-371S)
Tuning frequency range ..................................... 5.95 MHz ~ 17.9 MHz
Laser .................................................................... Semiconductor laser
Wow & Flutter ................................... Less than unmeasurable Limit
[ General ]
Power consumption ....................................... (XD-A3/XD-301) 150 W
(XD-351 for Europe and U.K.) 150 W
(XD-351 for other countories) 180 W
(XD-371S) 180 W
Dimensions .................................................... W: 280 mm
(11”)
H: 320 mm
(12-5/8”)
D: 405 mm (15-15/16”)
Weight (net) ........................................ (XD-A3/XD-301) 6.9kg (15.2 lb)
(XD-351 for Europe and U.K.) 6.9kg (15.2 lb)
(XD-351 for other countories) 9.1kg (20.1 lb)
(XD-371S) 9.1kg (20.1 lb)
Speakers (LS-N301/LS-N351) XD-A3/XD-251/XD-351 (Europe,
U.K. and Russia)
Enclosure .................................................................... Bass-reflex type
Speaker configuration
Woofer ............................................................ 130 mm, cone type
Tweeter .............................................................. 50 mm, cone type
Impedance ....................................................................................... 6 Ω
Maximum input level ................................................................... 40 W
Dimensions ....................................................... W: 220 mm (8-11/16”)
H: 320 mm (12-5/8”)
D: 295 mm (11-5/8”)
Weight (net) ..................................................... 3.3 kg (7.3 lb) (1 piece)
Speakers (LS-N371)
XD-351 (other countries)/XD-371S
Enclosure .................................................................... Bass-reflex type
Speaker configuration
Woofer ............................................................ 160 mm, cone type
Tweeter .............................................................. 50 mm, cone type
Impedance ....................................................................................... 6 Ω
Maximum input level ................................................................... 60 W
Dimensions ....................................................... W: 220 mm (8-11/16”)
H: 320 mm (12-5/8”)
D: 295 mm (11-5/8”)
Weight (net) ..................................................... 3.7 kg (8.2 lb) (1 piece)
Knowledge
Rated output power during STEREO operation
Europe, U.K. and Russia
(DIN) 1 kHz, 0.7 % T.H.D., 6 Ω ........................................ 30 W + 30 W
Other countries
1 kHz, 1.0 % T.H.D., 6 Ω ................................................... 30 W + 30 W
[ CD player section ]
For your records
Record the serial number, found on the back of the unit, in the spaces
designated on the warranty card, and in the space provided below. Refer to the model and serial numbers whenever you call upon your dealer
for information or service on this product.
Model
Serial Number