1
FRANÇAIS
M2GD55
M1GD50
INSTRUCTION MANUAL
ENGLISH
DIGITAL AUDIO PLAYER
DEUTSCH
NEDERLANDS
ITALIANO
ESPAÑOL
© B60-5704-08 /01 (E)
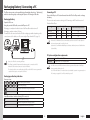
Contents
Playing music tracks
Appendix
Names and functions of parts.......................6
Screen display items.........................................7
Selecting music for playback...................... 17
Display during playback............................... 18
Number of tag information display
characters............................................................. 18
Operations available during playback.... 18
Various play modes........................................ 19
For first use
Adjusting the audio
Connecting stereo headphones...................8
Selecting the ear tips............................................8
Switching Power ON/OFF...............................8
HOLD function....................................................8
Recharging Battery/ Connecting a PC.......9
Recharging Battery.................................................9
Recharging and battery indication..............9
Connecting a PC......................................................9
PC system configuration requirements....9
Disconnecting the Player from the PC.... 10
When the connection mode is MTP
mode ..................................................................... 10
When the connection mode is MSC
mode ..................................................................... 10
Capturing Music in PC................................... 11
The Player can play the following 2 types
of music files....................................................... 11
Using Windows Media Player 11/10/9.... 11
Transferring Music from PC......................... 13
Using Windows Media Player 11/10/9.... 13
Data transfer by drag & drop........................ 14
Deleting tracks................................................. 15
Using Windows Media Player 11/10/9.... 15
Formatting......................................................... 16
When the connection mode is MTP
mode ..................................................................... 16
When the connection mode is MSC
mode ..................................................................... 16
Adjusting the audio....................................... 21
Adjusting the volume........................................ 21
Selecting the sound effects........................... 21
Connection of external components...... 26
Connecting to the headphones jack....... 26
Connecting to the USB connector............ 26
Digital Audio Player Link.............................. 27
Glossary.............................................................. 28
Error messages................................................. 28
Troubleshooting.............................................. 29
Specifications................................................... 30
Notes on Disposal........................................... 31
Recycling the Built-in Battery....................... 31
Removing the Rechargeable Battery
(Built-in Battery) Before Disposal:
M2GD55................................................................ 31
Removing the Rechargeable Battery
(Built-in Battery) Before Disposal:
M1GD50................................................................ 32
Safety precautions.............................................3
Unpacking............................................................5
Flow for music playback..................................5
Read Before Use
Setting and adjusting the Player
Sleep timer........................................................ 22
Various setups.................................................. 23
Function items that can be set.................. 23
Setting the menu language........................ 24
Initialization....................................................... 25
English
Safety precautions
Do not use or place the product in the following locations:
IMPORTANT SAFETY INSTRUCTIONS
• A place with high humidity, such as in a bathroom or shower room. Also do not use the
Player in a place subject to water splashes. Otherwise, a fire hazard or battery leak may
result.
• Do not approach the Player to heating equipment (a stove, iron, etc.). Otherwise, a fire
hazard or battery leak may result.
• Do not place the Player in a place subject to soot or vapor, for example in a kitchen or
near an air humidifier, or in a place subject to excessive humidity or dust. Otherwise, a fire
hazard or battery leak may result.
• Do not leave the Player in a place where the temperature may rise abnormally high, for
example in a closed automobile or under direct sunlight. Otherwise, the Player or its parts
may deteriorate or a fire hazard or battery leak may result.
¤ Caution:
Read this page carefully to ensure safe operation.
Read Instructions – All the safety and operating instructions should be read before the
product is operated.
Retain Instructions – The safety and operating instructions should be retained for future
reference.
Heed Warnings – All warnings on the product and in the operating instructions should be
adhered to.
Follow Instructions – All operating and use instructions should be followed.
WARNING :
Notes on using through headphones:
• Do not use headphones during riding/driving a vehicle or walking.
Otherwise, a traffic accident may result. Never use headphones when you ride a bicycle
or driving an automobile or motorbike. If the Player is used during walking, the ambient
sounds will be cut and you may have difficulties in hearing various warning sounds.
• Do not operate the Player during riding or driving a vehicle.
Do not operate the Player when you drive or ride an automobile, motorbike or bicycle.
Otherwise, a traffic accident may result. Be sure to stop the vehicle in a safe place before
operating the Player.
• Do not stare at the display screen during riding or driving a vehicle.
Otherwise, a traffic accident may result.
• Do not leave the ear tips provided with the Player in the reach of children.
There has been a case in which a child swallowing a small item was suffocated to death.
If a child swallows an ear tip by accident, immediately take the emergency measure to let
the child vomit it out and see a doctor.
• Do not start listening with too high a volume. Otherwise, sudden output of a highvolume sound may cause hearing failure, etc.
• Do not listen to the audio with an extremely high volume for long hours. Otherwise, your
hearing ability may be damaged.
• Do not use headphones if an abnormality is felt on the skin. Otherwise, skin
inflammations may result. Should any abnormality be felt on the skin or ears during use
of headphones, immediately stop using them and see a doctor.
• A person with an ear disease is discommended to use headphones. Otherwise, the
disease may worsen. Should any abnormality be felt on the skin or ears during use of
headphones, immediately stop using them and see a doctor.
• Be sure to attach the ear tips firmly. If the ear tips are attached insufficiently to the
headphones, an ear tip may drop out, enter the deep of the ear and injure it. Should an
ear tip drop out inside an ear, see a doctor.
• Attach and detach headphones around the ears gently and slowly. Violent attaching or
detaching may injure the ear.
Precautions :
• Do not insert or drop a metallic object or an easily flammable object inside the Player
through an opening. Otherwise, a fire hazard or battery leak may result.
• When connecting ancillary equipment to the Player, read the instruction for the
equipment, switch the Player off and connect the equipment as instructed. Also be sure
to use the specified cord for the connection. Inappropriate connection, use of a nonspecified cord or extension of the cord may cause heat generation and a burn or other
injuries.
Notes on using through car stereo :
• Do not leave the products or batteries in the car, particularly above the dashboard, for
this may lead to malfunction or damage due to solar heat.
• If the unit is connected to a car stereo using an audio cord, noise may sometimes
interfere.
English
Safety precautions
Handling
Note on the built-in battery
• Do not apply an excessive force to the display part. Otherwise, it may be damaged.
• Avoid storing the player in a bag together with a hard object. Otherwise, the player may
be damaged when the bag is pushed.
• Do not expose the player to an insecticide or other volatile substance or bring the player
in extended contact with a rubber or vinyl material. Otherwise, discoloration or peeling of
the surface finish may result.
• Do not put the player in a pocket of trousers. Otherwise, it may be damaged due to a
strong impact when you sit down, etc.
• Protect the player against sweat and moisture.
Do not use the player by putting it in a breast pocket for long hours in the summer or
during exercise. Otherwise, penetration of moisture or sweat may cause malfunction or
failure.
• For the replacement of the built-in battery, contact your dealer.
• The battery built into the player discharges spontaneously even when the player is not
used. This means that the built-in battery may be exhausted completely when the player
is left unused for a long period. If this happens, recharge the battery before using the
player.
• The battery recharging time is variable depending on the condition of the battery and
ambient temperature.
• The available playback time reduces when the player is used under low temperatures.
• The built-in battery can be recharged for about 500 times. (This is a reference value and is
not guaranteed.)
• The built-in battery is a consumable part, and the available playback time reduces
gradually after repeated use. If the available playback time becomes very short even after
the battery has been recharged fully, the battery may be degraded; replace it with new
one.
• Kenwood will not assume any liabilities for the alteration or loss of data caused due to
complete discharging of the built-in battery.
• The built-in battery is a lithium ion battery.
It is free from the memory effect of Ni-Cad and nickel-hydrogen batteries, with which the
capacity decreases if the battery is charged or discharged incompletely for several times.
The built-in battery therefore accepts additional charging before it has exhausted
completely.
Operating conditions
Temperature: 5 to 35°C. (without condensation)
Caution on condensation
Condensation (of dew) may occur inside the unit when there is a great difference in
temperature between this unit and the outside. This unit may not function properly if
condensation occurs. In this case, leave the unit for a few hours and restart the operation
after the condensation has dried up.
Be specially cautious against condensation in the following circumstances:
When this unit is carried from one place to another across a large difference in temperature,
when the humidity in the room where this unit is installed increases, etc.
Maintenance of the unit
When the front panel or case becomes dirty, wipe with a soft, dry cloth.
Do not use thinner, benzine, alcohol, etc. for these agents may cause discoloration.
In regard to contact cleaner
Do not use contact cleaners because it could cause a malfunction. Be specially careful not
to use contact cleaners containing oil, for they may deform the plastic component.
English
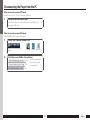
Unpacking
Flow for music playback
Preparation
Preparation of
music files
Player (M1GD50)
DIGITAL AUDIO
Connecting stereo headphones (page 8)
Cancelling the HOLD function (page 8)
Switching Power ON (page 8)
Recharging Battery/ Connecting a PC (page 9)
Capturing Music in PC (page 11)
Transferring Music from PC (page 13)
Player (M2GD55)
Playback of music
Playing music tracks
Selecting music for playback (page 17)
Operations available during playback (page 18-19)
Volume and tone
adjustments
Adjusting the audio
Adjusting the volume (page 21)
Selecting the sound effects (page 21)
PLAYER
M2GD55
M1GD50
QUICK STAR
T MANUAL
USB cable
Quick start manual
Headphones
(Ear tip: M size)
Ear tip (L size, S size)
English
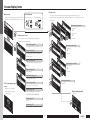
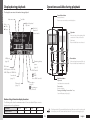
Names and functions of parts
Read Before Use
M1GD50
Display
/ Power/Menu button
• Press and hold to switch the power
ON/OFF.
• Press shortly to open the menu.
• Press shortly while the menu is open
to return to the previous display page.
• Press when the display is turned off
(screen saver mode) to turn on the
display.
• Status indicated by the indicator
During play
During USB
connection
Steady lighting Power is ON.
Recharging…
One blink per Screen saver mode.
–
3 sec.
Two blinks per Screen saver
3 sec.
mode under Hold –
function activated.
Blink
Transferring
–
data…
Extinguished Power is OFF.
Recharging
completed.
D
L
O
H
Power/Menu button
Strap eyelet
D
L
Up button
O
H
HOLD switch
Down button
T
E
S
E
Play/Pause button
VOLUME button
R
Reset button
T
E
S
E
R
Phones jack
USB jack
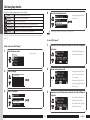
M2GD55
Display
5 Up button
Power/Menu button
• Press to move the cursor upward.
• Press during playback to skip to
the beginning of the current track.
Pressing the button at the beginning
of a track skips to the beginning of the
previous track.
• Press and hold to fast reverse the track.
Strap eyelet
D
L
O
H
Up button
HOLD switch
Down button
D
L
O
H
Play/Pause button
D
L
VOLUME button
O
H
∞ Down button
T
E
S
Reset button
E
R
Phones jack
T
• Press to move the cursor downward.
• Press during playback to skip to the
beginning of the next track.
• Press and hold to fast forward the
track.
USB jack
E
S
T
E
E
R
S
E
R
6 Play/Pause button
• Press to play a track or let it pause.
• During playback, press and hold for
more than 1 second to set the A-B
Repeat points.
• Press while the menu is displayed to
enter a selected item.
VOLUME button
• Press to increase (+) or decrease (-) the
volume. Pressing and holding a button
segment varies the volume gradually.
HOLD switch
• Press to defeat all other buttons. This
helps prevent erroneous operation of
the Player when it is carried in a bag,
etc.
Phones jack
• Connect the provided stereo
headphones.
USB jack
• Connect to a PC using the provided
USB cable to transfer music files or
recharge the battery.
Strap eyelet
• Pass the strap through this hole.
Reset button
• In case of irregularity, first consult
<Troubleshooting> (page 29). If an
optimum remedy is not found, try
pressing the reset button with the tip
of a clip or ballpoint pen.
D
D
L
L
O
O
H
H
T
E
S
T
E
S
E
E
E
T
R
S
E
R
R
•Do not pass a metallic hook or like (a key holder, etc.) through the strap eyelet. Otherwise, the
player may be damaged.
English
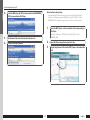
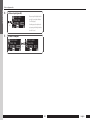
Screen display items
Read Before Use
This is the initial display page for use in selection of
the music selection method and in various setups.
Ar t
is
A lb t
um
G en
r
Tra e
ck
Library screen
Control buttons
Home screen
Cursor movement
Ar t
is
A lb t
um
G en
r
Tra e
ck
Settings menu screen
S et
t ing
Menu screen for use in various settings including the tone
ting and playback modes.
adjustment
S et
s
s
S et
t ing
S ou
s
n
P la d m o d
ym
e
Sle o d e
ep
t im
er
USB connecting message
screen
Message screen indicating
that the Player is connected
to a PC (page 9).
S et
t
B r ig i n gs
h
A u t t n e ss
o
S cr p o we
een r o ff
s av
ers
S et
t
L a n i n gs
g ua
g
I ni t
ia e
Sys lize
te m
This is the music selection display page with 4 types of selecting method. (page 17)
Selecting "Play all" during playback starts playback of all the music tracks belonging to the last
selected item.
Screen switching
Ar t
is
P la t
y al
Ar t l
is
A r t t na m
ist
e
na m
e
Ar t
is
P la t
y
Alb all
um
A lb t i t le
um
t i t le
G en
P la r e
y
Tra all
G en
ck
t
re n
Gen am Track itle
t i t le
re n e
am
e
G en
G en
P la r e
P la r e
y
y
Tra all
Gen all
ck
t
re n
Gen am Track itle
t i t le
re n e
am
e
Tra
c
P la k
y al
Tra l
ck
Tra title
ck
t i t le
Tra
c
P la k
y al
Tra l
ck
Tra title
ck
t i t le
Sleep timerS(page
et 22)
ti
Ge
n s
n
Off, 10Min,B20Min,
40Min, 50Min,
righ g30Min,
P la r e
y al
60Min
A u t n e ss
l
to
S cr p o we
Brightness (page
een 23) r off
s av
High, Mid, Low
ers
Auto powerSoff
ett (page 23)
in
Init uage
ia
Screen savers (page
Sys lize 23)
tem30Sec, 60Sec
3Sec, 5Sec, 10Sec,
gs
La5Min,
1Min, 3Min,
ng 10Min
Language (page 24)
ENGLISH, 日本語, DEUTSCH, FRANCAIS,
ESPAÑOL, ITALIANO, NEDERLANDS
Ar t
is
P la t
y
Tra all
ck
Tra title
ck
t i t le
Selecting by artist name
Artist name
∞
Album title
∞
Track title
A lb
A lb
u
u
P la m
P la m
y al
y al
Tra l
A lb l
ck
um
Alb title Track title
um
t i t le
t i t le
Selecting by album title
Album title
∞
Track title
Selecting by genre name
Genre name
∞
Track title
Selecting by track title
Track title
Display during playback
(page 18)
Ar t
is
Tra t name
ck
t i t le
No, Yes
ing
Ar t
is
Pla tAr tis
y
t
Tra aPlllay a
ck A
ll
t
r
i
Tra
t
ckA tliest na
tirttlie
st n m e
am
e
A lb
A lb
u
u
P la m
P la m
t t in
y al
y
Normal, Bass,
Jazz,
Dance,
Voice
SouPops,gRock,
a
s
Tra l
Alb ll
n
ck
um
P la d m o d
Alb title Track title
Play mode (page
y m 19) e
u
o
m
t i t le
S
d
lee all, Repeat
Normal, Repeat
p ti e one, Random, title
Repeat random mer
Sound mode
Se(page 21)
Initialize (page 25)
conUSB
ne c
t
Ar t
is
P la t
y
Alb all
um
A lb t i t le
um
t i t le
System (page 23)
MP
3
Ar t
is
Tra t name
ck
t i t le
MP
3
English
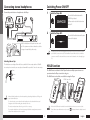
For first use
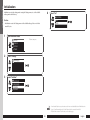
Connecting stereo headphones
Switching Power ON/OFF
Connect the provided stereo headphones to the Player.
1
Switch the Player ON.
2
Switch the Player OFF.
Press and hold the Power/Menu button until the
KENWOOD logo is displayed.
The Player enters the mode before the last time it was
switched OFF.
Press and hold the Power/Menu button until the pattern
shown on the left is displayed.
Entanglement-prevention slider
.
Hold the headphone body and insert into each
ear. The optimum condition is when the ear hole
is stopped completely by the ear tip.
(
•The display is turned off automatically when the Player has not been operated for a certain
period of time (screen saver mode). The Power/Menu button blinks every 3 seconds in the
screen saver mode. The time until the screen saver mode is activated can be changed (page
23).
Selecting the ear tips
The headphones are shipped from the factory with the M-size ear tips attached. If the Msize ear tips do not match your ears, replace them with the provided S-size or L-size ear tips.
HOLD function
The HOLD function defeats all of the Player’s buttons and helps prevent erroneous
operation when the Player is carried in a bag, etc.
The HOLD function should be canceled before using the Player.
S-size
M-size
L-size
HOLD canceled
D
L
D
O
L
H
O
D
H
D
L
L
O
H
O
H
•Always hold the headphone bodies when attaching or detaching headphones. Pulling a cord
may result in malfunction.
•To clean the ear tips, remove them from the headphone bodies and wash with a neutral
detergent solution. After washing, wipe them dry before use.
•The ear tips may deteriorate after a long period of use or storage.
•To prevent the headphone cord from being entangled, slide the entanglement-prevention
slider to fix the headphone bodies in position.
T
E
S
E
T
R
E
S
E
R
HOLD
•When the HOLD function is switched on and the display is in the screen saver mode, the
Power/Menu button blinks twice every 3 seconds. " " is displayed when the display is turned
on.
English
Recharging Battery/ Connecting a PC
For first use
Connecting a PC
The Player incorporates a rechargeable battery (hereinafter referred to as "the battery"),
which can be recharged by connecting the Player to a PC through a USB cable.
Connect the Player to a PC to transfer music from the PC to the Player and to recharge
its battery.
The connection mode varies according to the OS running on the PC and the version of
Windows Media Player.
Windows Media Player
OS
Windows Media Player not installed
11
10
9
Windows Vista
MTP
—
—
MSC
Windows XP (SP1/SP2)
MTP
MTP
MSC
MSC
Windows 2000
—
—
MSC
MSC
Recharging Battery
Open the USB cover.
Using the provided USB cable, connect the Player to a PC.
Recharging is complete when the indicator of the Power/Menu button turns off.
Recharging completes in about 3.5 hours.
The method for disconnection from the PC after recharging is variable depending on the
connection mode. For details, see <Disconnecting the Player from the PC> (page 10).
•When the OS is Windows XP, it is recommended to patch Service Pack 2. The descriptions in
this manual assume that Service Pack 2 is used.
•Update the OS and Windows Media Player to the latest conditions by means of the Windows
Update facility.
PC system configuration requirements
OS
USB connector
•Start up the PC before connecting the Player.
•The Player is switched ON automatically at the moment it is connected to the PC.
•When the USB connection, always use a supplied USB cable.
•The player should be connected directly to the USB port of the PC. We cannot guarantee the
operation if the player is connected via a USB hub.
Microsoft® Windows® Vista/XP/2000
Compliant to USB 1.1/2.0 (Full Speed) standard
•All of the above specified PC environment does not guarantee full operation of the Player.
•Not supported by 64 bit version OS.
•Use a PC in which either OS mentioned above is preinstalled. Operation is not guaranteed on a
PC running an upgraded OS or a PC assembled by yourself.
Recharging and battery indication
On-screen icons
➞
➞
➞
Shows the remaining power of the battery.
➞
➞
➞
Indications during recharging.
The battery is nearly exhausted. Recharge it if it is rechargeable.
The battery is not inserted or not rechargeable.
Power/Menu button’s indicator (during USB connection)
ON
The indicator lights during recharging.
OFF
Blink
The indicator is extinguished when recharging completes.
Data is being transferred between the player and the PC.
English
Disconnecting the Player from the PC
For first use
When the connection mode is MTP mode
(When "Kenwood M_D5*" or "M_D5*" is displayed on Windows)
1
Unplug the USB cable from the Player.
Ensure that the indicator of the Power/Menu button is not blinking before
unplugging the USB cable.
When the connection mode is MSC mode
(When "KENWOOD_DAP" is displayed on Windows)
1
Click the [Safe To Remove Hardware] icon.
Display the indicator on the task tray if it is not
displayed.
Windows Vista
Windows XP Windows 2000
2Click [Safely remove USB Mass Storage Device].
(Vista)
(XP)
When the message showing that the
Player can be disconnected safely,
disconnect it from the PC.
(2000)
10
English
Capturing Music in PC
For first use
5
To play music files as tracks of this Player, first rip music files in the PC.
Click the [Start Rip] button.
The Player can play the following 2 types of music files.
• MP3 (*.mp3) : MPEG-1 Audio Layer-3
Sampling frequency
Transfer bit rate
Variable Bit Rate (VBR)
ID3 tag
32/ 44.1/ 48 KHz
16k – 320 kbps
16k – 320 kbps
Ver. 2.2/ 2.3/ 2.4
When the [Rip Option] dialog box is displayed:
Select "Do not add copy protection to your music", check "I understand that
music… I have copied." and then click [OK].
• WMA (*.wma) : Windows Media Audio
Sampling frequency
32/ 44.1/ 48 KHz
Transfer bit rate
32k – 320 kbps
Variable Bit Rate (VBR)
32k – 355 kbps
Using Windows Media Player 11/10/9
A music CD can be ripped into the PC using the Windows Media Player 11/10/9.
(The following steps describes the operation with the Windows Media Player 11/10.)
Using Windows Media Player 11
1
2
Launch the Windows Media Player.
Click the [Rip] button on the top.
3
4
Place a music CD in the CD-ROM driver of the PC.
Check the checkboxes of the CD tracks to be ripped.
•For the operating procedures of software including the Windows Media Player, refer to the
manuals and help information for the software.
•If copy protection is set, when capturing tracks of a music CD into the PC using the Windows
Media Player, transferring the music file to the Player is limited only to the Windows Media
Player. The music files which are transferred using drag & drop or copy & paste cannot be
played.
•Before transferring a music file, view it with the Windows Media Player to confirm that the
genre, artist name, album title and track title are set correctly.
•For selecting a destination folder or a file format, go to [Tools] menu > [Options] > [Rip Music]
tab.
Checking the checkbox at the top of the list checks or unchecks all the track
names listed below it.
11
English
Capturing Music in PC
For first use
Using Windows Media Player 10
1
2
Launch the Windows Media Player.
3
4
Place a music CD in the CD-ROM driver of the PC.
5
Click the [Rip Music] button.
Click the [Rip] button on the top.
Check the checkboxes of the CD tracks to be ripped.
•For selecting a destination folder or a file format, go to [Tools] menu > [Options] > [Rip music]
tab.
12
English
Transferring Music from PC
For first use
5
The obtained music files can then be transferred to the Player.
(The following steps describes the operation with the Windows Media Player 11/10.)
Using Windows Media Player 11
1
2
3
Add the music files to be transferred in the Sync List.
Drag & drop the music file selected from the library into the sync list on the right.
Alternatively, right-click to open a pop-up menu and select [Add to ‘Sync List’]
from it.
Using Windows Media Player 11/10/9
Connect the Player to a PC.
Launch the Windows Media Player.
Set up the device.
When MTP: [Kenwood M_D5*] or MSC: [KENWOOD_DAP] device name is
displayed, click [Finish].
6
Click the [Start Sync] button.
When the [Device Setup Manage Existing Files on Device] dialog box is
displayed:
Search for the music files to be added to the library.
3
4
Click the [Sync] button on the top.
Using Windows Media Player 10
1
2
3
Select the MTP player (Kenwood M_D5*) or the removable disk
(KENWOOD_DAP) corresponding to this Player.
13
Connect the Player to a PC.
Launch the Windows Media Player.
Click the [Sync] button on the top.
English
Transferring Music from PC
For first use
4
Data transfer by drag & drop
Select the MTP player (M_D5*) or the removable disk (KENWOOD_
DAP) corresponding to this Player.
Open the Windows Explorer and drag & drop the desired file from the PC’s hard
disk drive to this Player (expressed as MTP: [Kenwood M_D5* ], [M_D5* ] or MSC:
[KENWOOD_DAP] on Windows). Copy & paste can also be used for data transfer.
1
5
6
Open the MTP player or the removable disk corresponding to
this Player.
Click [Start] – [Computer] – MTP: [Kenwood M_D5*], [M_D5*] or MSC:
[KENWOOD_DAP].
Add the music files to be transferred in the Sync List.
2
3
Click the [Start Sync] button.
14
Open the folder storing the desired music file.
Drag & drop the music file into the MTP player or the removable
disk.
English
Deleting tracks
For first use
The music files transferred from the PC to the Player can be deleted from the Player.
Using Windows Media Player 10
Using Windows Media Player 11/10/9
(The following steps describes the operation with the Windows Media Player 11/10.)
Using Windows Media Player 11
1
2
3
4
Connect the Player to a PC.
5
Select the music file to be deleted, right-click to open a pop-up
menu, and select [Delete] from it.
Launch the Windows Media Player.
Click the [Sync] button on the top.
Select the MTP player (Kenwood M_D5*) or the removable disk
(KENWOOD_DAP) corresponding to this Player.
15
1
2
3
4
Connect the Player to a PC.
5
Click the [Delete] icon.
Launch the Windows Media Player.
Click the [Sync] button on the top.
Select the MTP player (M_D5*) or the removable disk (KENWOOD_
DAP) corresponding to this Player.
English
Formatting
For first use
Formatting can be used to delete all of the music and other files stored in the Player.
Using Windows Media Player 10
1
2
3
4
5
Caution
• Formatting deletes all of the files in the Player. It also deletes demonstration music,
which cannot be restored later. It does not alter the settings made with the Settings
menu.
• Once formatted, the memory cannot be restored to the previous condition. Be
cautious when performing formatting.
Connect the Player to a PC.
Launch the Windows Media Player.
Click the [Sync] button on the top.
Select the MTP player (M_D5*) corresponding to this Player.
Click the [Format] icon.
When the connection mode is MTP mode
(When "Kenwood M_D5*" or "M_D5*" is displayed on Windows)
Using Windows Media Player 11
1
2
3
4
Connect the Player to a PC.
5
Click the arrow below the [Sync] tab to open a menu, and select
[Kenwood M_D5*] – [Format].
Launch the Windows Media Player.
When the connection mode is MSC mode
Click the [Sync] button on the top.
(When "KENWOOD_DAP" is displayed on Windows)
Select the MTP player (Kenwood M_D5*) corresponding to this
Player.
1
2
Connect the Player to a PC.
Open the removable disk corresponding to this Player.
Click [Start] – [Computer] – [KENWOOD_DAP].
3
Format the Player.
Right-click to open a pop-up menu, and select [Format] from it.
File system
: FAT32
Allocation unit size
: Default allocation size
16
English
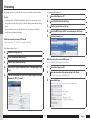
Selecting music for playback
Playing music tracks
4Select an intermediate item ("Artist name", for example).
Select and play the desired track.
Artist
Select Artist name = Album title = Track title.
Album
Select Album title = Track title.
Genre
Select Genre name = Track title.
Track
Select Track title directly.
Artist
Play all
Artist name
Artist name
5Select an intermediate item ("Album title", for example).
When a major item is selected, the list of intermediate items located below it is displayed.
Selecting "Play all" plays all of the currently selected music tracks.
When a track is selected from "Artist" or "Album", the tracks are played in order of track
numbers. When a track is selected from "Genre" or "Track", the tracks are played in order of
track titles.
1
Connect headphones and switch the Player ON.
2
Open the home screen.
3
Artist
Play all
Album title
Album title
6
See page 8.
Artist
Album
Genre
Track
The list for the intermediate item is
displayed.
Select a track ("Track title", for example).
Artist
Play all
Track title
Track title
The home screen opens.
The list for the intermediate item is
displayed.
Artist name
Track title
MP3
Select a major item ("Artist", for example).
Artist
Album
Genre
Track
The list for the major item (intermediate
items) is displayed.
17
•A track that does not contain tag information is classified as "Unknown".
•The music tracks are played back in either order described below.
Track number: Order of track numbers in the tag information. When there is no track number,
the tracks are played in order of track titles or file names.
Track title: Order of track titles or file names in the tag information.
•Press the Menu button to return to the previous display page.
English
Display during playback
Operations available during playback
Playing music tracks
The display shows various information during playback.
Power/Menu button
Artist name
Displays the menu.
Press in screen saver mode to turn the display on.
Track title
Elapsed play time/
Play time
Track No./
Number of
selected tracks
Mode
3 : Play
8 : Pause
Up button
Artist name
Track title
Each press skips to the beginning of the
current track or of the previous track
(Skip-down).
Press and hold to fast reverse the track.
MP3
A-B Repeat
(page 19)
Down button
Each press plays the next track (Skip-up).
Press and hold to fast forward the track.
Remaining battery
power
(page 9)
File format
MP3: Playback of MP3 files.
WMA: Playback of WMA files.
HOLD switch
(page 8)
: HOLD
None: HOLD canceled
Sound mode
(page 21)
Play/Pause button
Play mode:
Sleep timer
(page 22)
: Sleep timer on
None: Timer off
Play mode
(page 19)
Lets playback pause temporarily.
Pause mode:
Resumes playback.
Pressing and holding for more than 1 sec.:
Sets an A-B repeat point (page 19).
Number of tag information display characters
The following table shows the maximum number of characters that the Player can use to
display each item of tag information.
Tag information
Number of characters
Artist name
46
Album title
44
Track title
78
Genre
18
•The Player switches OFF automatically after it has been left in pause mode for a certain period
of time (Auto power-off ). The time until Auto Power-OFF occurs can be changed (page 23).
18
English
Various play modes
Playing music tracks
4
One of the following six play modes can be selected.
Normal
Repeat all
Playback stops after having played the tracks in the list.
Playback of all of the tracks in the list repeatedly.
Repeat one
Playback of the same track repeatedly.
Random
Playback of all of the tracks in the list in a random order, playing every track once.
Repeat random
Repeated playback of all of the tracks in the list in a random order.
A-B Repeat
Repeat playback of the section between points A-B set within a track.
Play mode
Normal
Repeat all
Repeat one
To select "A-B repeat"
1
Modes other than "A-B Repeat"
Open the home screen.
Artist
Album
Genre
Track
2
Advance music until the point you want to set as the A-B Repeat
start point.
Artist name
Track title
The home screen opens.
Press and hold the Up or Down button to
fast forward or fast reverse the music.
MP3
2
Select "Settings".
Set the start point (point A).
Artist name
Track title
Settings
1sec.
3
The display during playback resumes in
about 30 seconds.
•Press the Menu button to return to the previous display page.
The tracks in the list vary depending on the item used for selecting the track being played.
(page 17)
1
Select the desired play mode.
3
Select "Play mode".
Settings
Sound mode
Play mode
Sleep timer
MP3
Advance music until the point you want to set as the A-B Repeat
end point.
Artist name
Track title
MP3
19
After pressing and holding the button for
more than 1 second, release the button.
"A↔" is displayed.
Even during pause, the start point can be
set by pressing and holding the button for
more than 1 second.
Press and hold the Up or Down button to
fast forward or fast reverse the music.
If the blank between tracks is reached, the
A-B Repeat setting is canceled.
English
Various play modes
Playing music tracks
4
Set the end point (point B).
After pressing and holding the button for
more than 1 second, release the button.
"A↔B" is displayed.
Even during pause, the end point can be
set by pressing and holding the button for
more than 1 second.
Artist name
Track title
1sec.
5
MP3
To cancel A-B Repeat.
Artist name
Track title
Artist name
Track title
1sec.
MP3
MP3
20
English
Adjusting the audio
Adjusting the audio
2
Adjusting the volume
Adjust the listening volume as follows.
1
Settings
Select the volume level.
Artist name
Track title
Artist name
Track title
3
10
MP3
(side)
4
Select one of the 7 modes.
Normal
Bass/ Pops/
Select "Sound mode".
Settings
Sound mode
Play mode
Sleep timer
Pressing and holding a button segment varies the
volume gradually.
Selecting the sound effects
Select the desired sound mode.
Sound mode
Normal
Bass
Pops
Playback in normal tone.
Playback in a tone matching the genre of music.
Rock/ Jazz/
Dance/ Voice
1
Select "Settings".
The display during playback resumes in
about 30 seconds.
Open the home screen.
Artist
Album
Genre
Track
The home screen opens.
21
•If the headphone volume is increased too much, you will be unable to hear the sounds from
outside. Be careful not to increase the volume too much.
•With the default condition set at the factory, Sound mode is set to "Normal".
•Press the Menu button to return to the previous display page.
English
Setting and adjusting the Player
Sleep timer
The sleep timer makes it possible to switch the Player OFF after the set period of time.
1
Open the home screen.
Artist
Album
Genre
Track
2
The home screen opens.
Select "Settings".
Settings
3
Select "Sleep timer".
Settings
Sound mode
Play mode
Sleep timer
4
Select the timer to be set.
Sleep timer
Off
10Min
20Min
The sleep timer period can be set in 10minute steps between 10 and 60 minutes.
The display during playback resumes in
about 30 seconds.
22
•To deactivate the timer, select "Off" in step 4.
•The timer setting is canceled when the Player is switched OFF.
•Press the Menu button to return to the previous display page.
English
Setting and adjusting the Player
Various setups
Function items that can be set
The functions such as the button illuminations, display resume function and Auto
Power OFF function can be set up as required.
• Sound mode
Playback in a tone matching the genre of
music.
Refer to <Selecting the sound effects>
(page 21).
1
Open the home screen.
Artist
Album
Genre
Track
2
The home screen opens.
• Play mode
One of the following six play modes can
be selected.
Refer to <Various play modes> (page 19).
Select "Settings".
• Sleep timer
The sleep timer makes it possible to switch
the Player OFF after the set period of time.
Refer to <Sleep timer> (page 22).
Settings
3
Select the item to be set.
Settings
Brightness
Auto power off
Screen savers
4
• Display brightness (Brightness)
Select the brightness level of the display
panel.
To decrease the display brightness, for
example, select "Brightness" to view
its options.
High
Mid*
Low
(* indicates the factory setting.)
• Auto power off
Select the time until the Player is switched
OFF when no operation including playback
is performed.
Select the desired option.
Brightness
High
Mid
Low
High
Medium
Low
After the desired option is set, the Settings
menu appears again.
• Display power-save setting (Screen
savers)
Select the time until the display is turned
off when no operation is performed.
3 sec/ 5 sec/ 10 sec*/ 30 sec/ 60 sec
(* indicates the factory setting.)
• Language
Select the language used for the displayed
menus, etc.
ENGLISH*/ 日本語/ DEUTSCH/ FRANCAIS/
ESPAÑOL/ ITALIANO/ NEDERLANDS
(* indicates the factory setting.)
• Initialize
Initialization resets the settings made using
the Settings menu, etc. to the default
settings made at the factory.
Refer to <Initialization> (page 25).
• System information (System)
The system information of the Player
(total memory capacity, available memory
capacity and version No.) is displayed.
Press the Play/Pause button to hide the
system information display.
1 min/ 3 min/ 5 min*/ 10 min
The display during playback resumes in
about 30 seconds.
(* indicates the factory setting.)
•Press the Menu button to return to the previous display page.
23
English
Setting and adjusting the Player
Setting the menu language
Select the language used for the display.
1
Open the home screen.
Artist
Album
Genre
Track
2
The home screen opens.
Select "Settings".
Settings
3
Select "Language".
Settings
Language
Initialize
System
4
Select the desired language.
Language
ENGLISH
日本語
DEUTSCH
The display during playback resumes in
about 30 seconds.
•Press the Menu button to return to the previous display page.
24
English
Setting and adjusting the Player
Initialization
Initialization resets the settings made using the Settings menu, etc. to the default
settings made at the factory.
4
Initialize
No
Yes
Caution
• Initialization resets the Settings menu to the default settings. It does not delete
music files, etc.
1
Open the home screen.
Artist
Album
Genre
Track
2
Select "Yes".
The home screen opens.
Select "Settings".
Settings
3
Select "Initialize".
Settings
Language
Initialize
System
25
•Even after the Player is reset, the tracks stored in it are not deleted. Deletion of individual tracks
(page 15) and formatting (page 16) of the Player should be executed from the PC.
•Press the Menu button to return to the previous display page.
English
Connection of external components
Appendix
The headphone jacks can be used to connect an external component such as a speaker
with built-in amplifier.
The USB connector can be used to connect an external component such as a stereo set
with USB capability.
Connecting to the USB connector
USB-compatible stereo
Connecting to the headphones jack
USB-compatible car stereo
Speaker with built-in amplifier
USB cable
Stereo amplifier
Cable with stereo miniplugs
FM transmitter
Car stereo
•Prepare an optimum audio cable (commercially available) according to the input terminal of
the connected external component.
•Noise may be interfered depending the installation environment, including the vehicle model,
devices in the surroundings and the antenna positioning.
•Do not use or leave the Player or connected component in an automobile compartment with
high temperatures. Otherwise, equipment failure may result.
26
•For the operating procedure and the playable files, read the instruction manual for the
connected stereo set.
•Do not use or leave the Player or connected component in an automobile compartment with
high temperatures. Otherwise, equipment failure may result.
English
Digital Audio Player Link
Appendix
When the Player is connected to a Kenwood audio component with the Digital Audio
Player Link compatibility, playback of the Player can be controlled from the external
audio component.
Digital Audio Player Linkcompatible stereo
Digital audio input
Special cable
1 Switch the Player ON.
2 Set the input selector of the connected stereo set to "Digital Audio".
• The Player operations including "Play/Pause" and "Skip Up/Down" can be controlled from the
main and remote control unit keys of the connected stereo.
* Examples of Digital Audio Player Link-compatible stereo models
: AX-7, K-501USB, R-K1 (as of October 2007)
•For details and operating method of the Digital Audio Player Link, refer to the instruction
manual for a Digital Audio Player Link-compatible audio component. This Player is not
compatible with the "folder skip" function.
27
English
Glossary
Appendix
DRM 10 (Digital Rights Management 10):
A copyright protection technology of
Microsoft Corp., that was incorporated
since Windows Media Player 10. It is
compatible with fixed-rate distribution as
well as traditional copy protection.
MP3:
An international data compression
standard of MPEG, which is a working
group in ISO (International Standardization
Organization). It offers compression rates
between about 1/10 and 1/12.
Error messages
Tag data:
Information on each audio file, including
the music title, artist name, album name
and genre name.
WMA (Windows Media Audio):
An audio compressed encoding format
developed by Microsoft Corporation. Also
the extension used with audio files created
using WMA.
MSC (Mass Storage Class):
USB device type that is classified as a largecapacity storage device, the examples of
which include a hard disk drive and CD
drive.
When an MSC device is connected to a
PC, the PC recognizes the device just like
a removable disk, with which files can be
exchanged easily using the standard drag
& drop operation.
Message
Remedy
Not enough memory, Need 4MB free space
The memory capacity is low.
An idle space of 4 MB is required to store the system information of the Player.
Delete some files to increase the idle space.
File system error
An error occurred in the file system of the Player.
Format the Player (page 16).
Unsupported file
An attempt is made to play a file that is not supported by the Player.
For the file formats supported by the Player, see <Specifications> (page 30).
No playback license
A music track with DRM cannot be played because the license is expired or a
music track with DRM has been transferred using an application other than
Windows Media Player.
No contents
The Player does not store a playable music file such as the ones transferred
from the PC.
Please wait
The music information in the memory is being updated. Wait until the
updating completes.
Low battery
The remaining battery capacity is low. Recharge the battery.
MTP (Media Transfer Protocol):
Data transfer protocol developed by
Microsoft Corp. The data protected with
DRM10 can be transferred using the MTP.
Music files downloaded from a fixedrate music distribution service can be
transferred to the Player using this mode.
28
English
Troubleshooting
Appendix
The Player can often be recovered using the PC.
Try recovery from the PC in case of a trouble, for example, when the Player cannot be
switched ON, it switches OFF spontaneously or the display is erroneous.
For details, refer to the support information in our website by visiting:
http://www.kenwood.com/
Symptom
Power cannot be switched ON or pressing a
button does not start an operation.
PC does not recognize the Player.
USB cable is defective.
Purchase and use another USB cable.
The Player is connected to the PC improperly.
Check the connection between the Player and PC.
The player is connected to a USB hub.
The player does not function if connected to a bus power type USB hub.
Connect the player directly to the PC or to a self-powered USB hub.
Remedy
The HOLD function is ON.
Cancel the HOLD function with the HOLD switch on the Player (page 8).
The battery is nearly exhausted.
Recharge it if it is rechargeable or replace it if it is an alkaline battery.
The Player is being connected to the PC.
The Player is inoperable when it is connected to the PC in the storage mode.
The KENWOOD logo appears but
immediately disappears.
The HOLD function is ON.
Cancel the HOLD function with the HOLD switch on the Player (page 8).
The remaining battery power drops soon
after recharging.
The rechargeable battery is degraded.
Replace it with a brand-new rechargeable battery.
For the battery replacement, contact your nearest Kenwood service agent.
Audio is not heard.
Headphones are connected improperly.
Connect headphones correctly to the Player.
Battery cannot be recharged.
USB cable is connected improperly.
Check the connections on both the Player and PC sides.
The ambient temperature is outside the operating temperature range.
The battery should be recharged within the operating temperature range.
(page 30)
The player is connected to a USB hub.
The player does not function if connected to a bus power type USB hub.
Connect the player directly to the PC or to a self-powered USB hub.
29
English
Specifications
Appendix
Built-in flash memory
M2GD55: 2 GB *1
M1GD50: 1 GB *1
Headphone output
: 3.5 mm stereo mini jack
: 3.5 + 3.5 mW/ 16 Ω
Interface
: USB 2.0 Full Speed
(USB 1.1 compatible)
Display
: 1 inch OLED *2
Main unit dimensions (W × H × D)
M2GD55:
38.0 mm × 92.5 mm × 11.5 mm
(1-1/2 × 3-5/8 × 7/16 inch)
M1GD50:
38.0 mm × 92.5 mm × 12.5 mm
(1-1/2 × 3-5/8 × 1/2 inch)
Weight (Net)
:A
pprox. 38 g (Approx. 0.08 lbs)
Operational Temperature Range
: 5 °C – +35 °C
(without condensation)
Battery type
: Built-in Li-ion rechargeable battery
Battery operation time *3
MP3 (128 kbps) : Approx. 21 hours
WMA (128 kbps) : Approx. 16 hours
Maximum number of files
: 1,000
Max. recording time/ tracks *4
M2GD55: Approx. 32 hours/
Approx. 480 tracks
M1GD50: Approx. 16 hours/
Approx. 240 tracks
Playback format
MP3
Sampling rate: 32/ 44.1/ 48 kHz
Bit rate: 16 - 320 kbps
Variable bit rate *5: 16 - 320 kbps
ID3 tag: ver. 2.2/ 2.3/ 2.4
WMA (DRM 10 compatible)
Sampling rate: 32/ 44.1/ 48 kHz
Bit rate: 32 - 320 kbps
Variable bit rate *5: 32 - 355 kbps
(Not supported by Professional,
Lossless, or Voice.)
PC system configuration
requirements *6
OS
: Microsoft® Windows® Vista/
XP/2000 (Not supported by 64 bit
version OS.)
USB connector
: Compliant to USB 1.1/2.0 standard
30
• Kenwood follows a policy of continuous
advancements in development. For this
reason specifications may be changed
without notice.
*1 The actual available space may be
smaller than specified due to the
presence of the system file area.
*2 The organic EL display is fabricated with
high-precision technology. However,
there may be some pixels that are
permanently lit or extinguished. (This is
not a failure.)
*3 Typical value when the provided
headphones are used in the
"Normal" sound mode. This value is
not a guaranteed value. It may be
shorter depending on the ambient
temperatures and operating conditions.
*4 A
ssuming that each tracks is in the 128
kbps MP3/ WMA format with playback
time of about 4 min.
*5 A
udio data with variable bit rate (VBR)
may sometimes go beyond the bit rate
range of the Player. In this case, the
Player cannot play the audio data.
*6 A
ll of the above specified PC
environment does not guarantee full
operation of the Player.
*6 U
se a PC in which either OS mentioned
above is preinstalled. Operation is
not guaranteed on a PC running an
upgraded OS or a PC assembled by
yourself.
English
Notes on Disposal
Removing the Rechargeable Battery (Built-in Battery) Before Disposal:
M2GD55
Recycling the Built-in Battery
Appendix
The Transmitter uses a lithium ion rechargeable battery cell as the built-in battery. The
lithium ion rechargeable battery is a recyclable resource. When disposing of the Transmitter,
take out the built-in battery and bring it to your local recycling business.
IMPORTANT:
Never attempt to open the Player besides when disposing of it.
For replacement of the built-in battery, contact your nearest Kenwood service agent.
WARNING
• Do not heat excessively the built-in battery, open it, modify it or throw it in fire or
water.
Excessive heat generation, explosion or fire ignition may cause a fire.
• Do not leave the built-in battery near fire or under direct sunlight.
A fire, explosion or excessive heat generation may result.
• Attach insulating tape on the connectors of the built-in battery.
A fire or explosion may result if the battery electrodes are short-circuited.
• Do not leave the built-in battery within the reach of children.
Injury or other accidents may result.
• If the built-in battery fluid leaks and enters your eyes, immediately rinse your eyes
with fresh water and call a doctor.
If the fluid is left in your eyes, an eye injury may result.
1 Open the USB cover.
2 Remove the 2 screws from the panel
using a precision Phillips screwdriver
(+).
3 Remove the back panel (by releasing
7 latches).
4 Disconnect the built-in battery from the
connector. Be careful not to apply an
excessive force on the connector.
5 Take out the built-in battery. Be careful
not to injure your nail or finger during
removal.
6 Attach a piece of insulating tape on
the connector at the end of the cable
from the built-in battery, and put it in a
plastic bag, etc.
31
• Remove the built-in battery after having confirmed that it is completely discharged.
• Once the built-in battery is disconnected, do not attempt to reconnect it to the connector on
the circuit board.
• Bring the removed built-in battery to a rechargeable battery recycling business as early as
possible.
English
Notes on Disposal
Appendix
Removing the Rechargeable Battery (Built-in Battery) Before Disposal:
M1GD50
IMPORTANT:
Never attempt to open the Player besides when disposing of it.
For replacement of the built-in battery, contact your nearest Kenwood service agent.
1 Remove the rubber of back panel.
2 Remove the 1 screw from the panel
using a precision Phillips screwdriver
(+).
3 Remove the front panel (by releasing
8 latches).
4 Remove the 4 screws from the circuit
board using a precision Phillips
screwdriver (+).
5 Take out the circuit board.
6 Disconnect the built-in battery from the
connector. Be careful not to apply an
excessive force on the connector.
7 Take out the built-in battery. Be careful
not to injure your nail or finger during
removal.
8 Attach a piece of insulating tape on
the connector at the end of the cable
from the built-in battery, and put it in a
plastic bag, etc.
32
• Remove the built-in battery after having confirmed that it is completely discharged.
• Once the built-in battery is disconnected, do not attempt to reconnect it to the connector on
the circuit board.
• Bring the removed built-in battery to a rechargeable battery recycling business as early as
possible.
English
Declaration of Conformity with regard to the EMC
Directive 2004/108/EC
Manufacturer:
Kenwood Corporation
2967-3 Ishikawa-machi, Hachioji-shi, Tokyo, 192-8525 Japan
EU Representative's:
Kenwood Electronics Europe BV
Amsterdamseweg 37, 1422 AC UITHOORN, The Netherlands
Information on Disposal of Old Electrical and Electronic
Equipment (applicable for EU countries that have adopted
separate waste collection systems)
Products with the symbol (crossed-out wheeled bin) cannot be
disposed as household waste.
Old electrical and electronic equipment should be recycled at a
facility capable of handling these items and their waste byproducts.
Contact your local authority for details in locating a recycle facility
nearest to you. Proper recycling and waste disposal will help
conserve resources whilst preventing detrimental effects on our
health and the environment.
Trademark Information
÷ "Microsoft" and "Windows Media" are trademarks or registered trademarks of Microsoft
Corporation in the USA and other countries.
÷ "Adobe Reader" is a trademark of Adobe Systems Incorporated.
Other system names and product names are also trademarks or registered trademarks of
their respective developers. Note that the "™" and "®" markings are omitted in the text of
this manual.